


MANUAL
i3TOUCH V8610 T10

2
Note: Please read this Manual carefully before using the product!
Do not attempt to disassemble the product. If the product does not work, please contact us or our dealer in your area.

3
CONTENTS
1. Special Functions 4
2. Safety Warning and Precautions 5
3. Installation and Connection 9
3.1 Packing List 9
3.2 Interfaces 11
3.3 Connection Diagram 15
3.4 Keys on the Control Panel 16
4. Remote Control 17
5. Basic Operations 19
5.1 Power On/Standby 19
5.2 Signal Source Selection 19
5.3 Menu Operations 20
5.4 Setting List 21
6. Instructions for Intelligent Platform 22
6.1 Basic Operations 22
6.2 QuickStart 22
6.3 Intelligent Application 23
6.4 Settings 29
7. Important Statement about Web Service 30
8. Troubleshooting 31
9. Technical Specications 32
10. ROHS Compliance 44

4
i3TOUCH V-SERIES USER MANUAL
1. Special functions
1. Android 4.0 intelligent operating system and unique UI design for easier operation
and better visual experience.
2. Huge amounts of online applications to be downloaded for chatting, inquiring, learning,
shopping and reading. Supporting synchronized receiving and sending of e-mails.
3. Supporting mouse and keyboard with USB interfaces for easy operation like PC.
4. Embedded Wi-Fi module, mass memory and high-capacity cache to watch 1080P HD movies
and play games without any difficulty.
5. High-grade LCD screen, flicker-free and low-radiation, relieving asthenopia and protecting eyes;
featured with high brightness, high contrast and wide viewing angle; quick response,
greatly reducing the ghosting of moving images.
6. Progressive image processing with advanced motion compensation technology, eliminating
jaggies and blurring on the edge of moving images completely.
7. Dynamic contrast, improving definition and contrast of various images obviously.
8. Multiple USB interfaces, supporting HD streaming.
9. The ultrathin and narrow-bezel design.
2. Safety Warning and Precautions
Thanks for purchasing our high-performance multi-functional LED electronic whiteboard. As a very valuable product,
it could bring you better visual enjoyment. All factors ensuring personal safety have been considered when designing the product, and it has passed our rigid tests before delivery. However, improper installation or use may cause
electric shock or fire, etc. To ensure your safety, prolong the service life of the product and give full play to optimum
performance, please read and understand these instructions and nameplates carefully before use and follow them
strictly in use. Also, keep this Manual carefully for future reference.
May cause personal injuries
Prohibited behavior
May cause injuries or property losses
Required operation
warning
Attention

5
i3TOUCH V-SERIES USER MANUAL
2. Safety Warning and Precautions
In case of the followings:
• Power outage or unstable voltage.
• The product emits abnormal sounds or smell.
• AC power cord is damaged
• The LCD electronic whiteboard is damaged due to fall, strike or impact.
• Any liquid or external object enters the housing.
Required operation
Power off the LCD electronic whiteboard immediately, remove the power plug
from the socket and timely contact the authorized professional technician for
repair.
When coal gas or other inflammable gases leak, do not insert or remove the power plug of LCD electronic whiteboard and other electrical appliances, but close the valve with gas leakage immediately and open the doors and
windows quickly.
Power off the LCD electronic whiteboard immediately, remove the power plug
from the socket and timely contact the authorized professional technician for
repair.

6
i3TOUCH V-SERIES USER MANUAL
2. Safety Warning and Precautions
WARNING
• Do not use the power source other than AC 220V, 50Hz.
• All connecting cables shall be connected to and disconnected from the interfaces when power is cut off.
• Do not install the LCD electronic whiteboard on an unstable place, or it may fall down to cause damage or even fire.
• Do not expose the LCD electronic whiteboard to:
1. Direct light, and humid, very hot, cold or dusty environment;
2. Environment where explosive and inflammable substances are stored or used;
3. Environment filled with combustible or corrosive gases;
4. Bath rooms and kitchens, etc.
• Do not use any damaged or unsuitable socket and ensure reliable contact between the plug and socket.
• Ensure the power plug and socket is not attached with dust and metal impurities.
• Do not damage the power cord:
1. Do not refit the power cord;
2. Do not place any heavy object on the power cord;
3. Keep the power cord away from the heat source;
4. Do not pull the power cord when removing the power plug.
• Do not connect too many plugs in parallel to the same socket, or excessive power may cause fire.
• Keep LCD electronic whiteboard away from open fire (e.g. a lit candle), or it may cause electric shock or fire.
• Keep the product away from water drops or splashes. Do not put any container filled with water on the product,
or there could be a risk of fire or electric shock.
• Do not insert any sharp or metal object or pour any liquid into the signal connector or ventilation holes, or there
could be a risk of short circuit, product damage or electric shock.
• The ventilation holes in the housing are designed to protect the product against overheating and ensure the inside
components are durable and reliable. Be careful not to block the holes.
• Do not touch the plug with a wet hand, or it may cause electric shock.
• Do not use the product in case of rainstorm and especially thunder and lightning; please disconnect the power
supply and antenna plug timely to prevent from thunderstrike.
• For your safety, you are not allowed to disassemble the product in any manner, or it may cause electric shock or
fire. Please contact professional technicians for repair.
WARNING

7
i3TOUCH V-SERIES USER MANUAL
2. Safety Warning and Precautions
• Do not allow the children to climb on the product.
• Keep small attachments out of reach of children to avoid accidental swallowing.
• If the product will not be used in a long time, please power it off and remove the power plug.
• When the position or angle of the product needs to be adjusted, please disconnect all cable connections and move
it slowly to prevent it from falling.
• Do not use any other hard object to rub, knock on, warp or press the screen.
• If you move the product from a low-temperature place to a high-temperature place, please wait a while before use.
Otherwise, it could have a fault due to condensation.
• Before cleaning the product, please disconnect the power plug; wipe it with soft cloth. Note to use no industrial
chemical agent for cleaning and prevent any external object from entering the product. Improper cleaning (e.g. detergent and water, etc.) may damage the product appearance, remove the information printed on the product and
even enter the internal components to cause damage and display failure.
• If the screen displays the same image for long or stable letters and icons exist in the moving image for long, “ghost”
may reside on the screen and will not disappear in a long time after power off, which is beyond the warranty coverage.
• When the power plug is removed from the socket, the power supply for the product will be disconnected.
• If the LCD screen is broken to cause splashes on skin, please wash with clean water for 15min and seek medical
advice.
• When handling the product with hands, please hold four corners tightly and prop the bottom, but do not exert force
on the panel.
• Healthy use of the product: Please use it under suitable light; insufficient light or long watching time may damage
your eyesight.
• If you use any power plug or appliance coupler as the disconnection device, please ensure they are easy to operate.
• Insert the power plug into the power socket reliably. Unreliable connection could cause sparkles or fire.
• The technical parameters provided both in this Manual and on the outer package are subject to change without fur-
ther notice; in case of any difference between actual operation and the descriptions herein, the former shall prevail.
8
i3TOUCH V-SERIES USER MANUAL
2. Safety Warning and Precautions
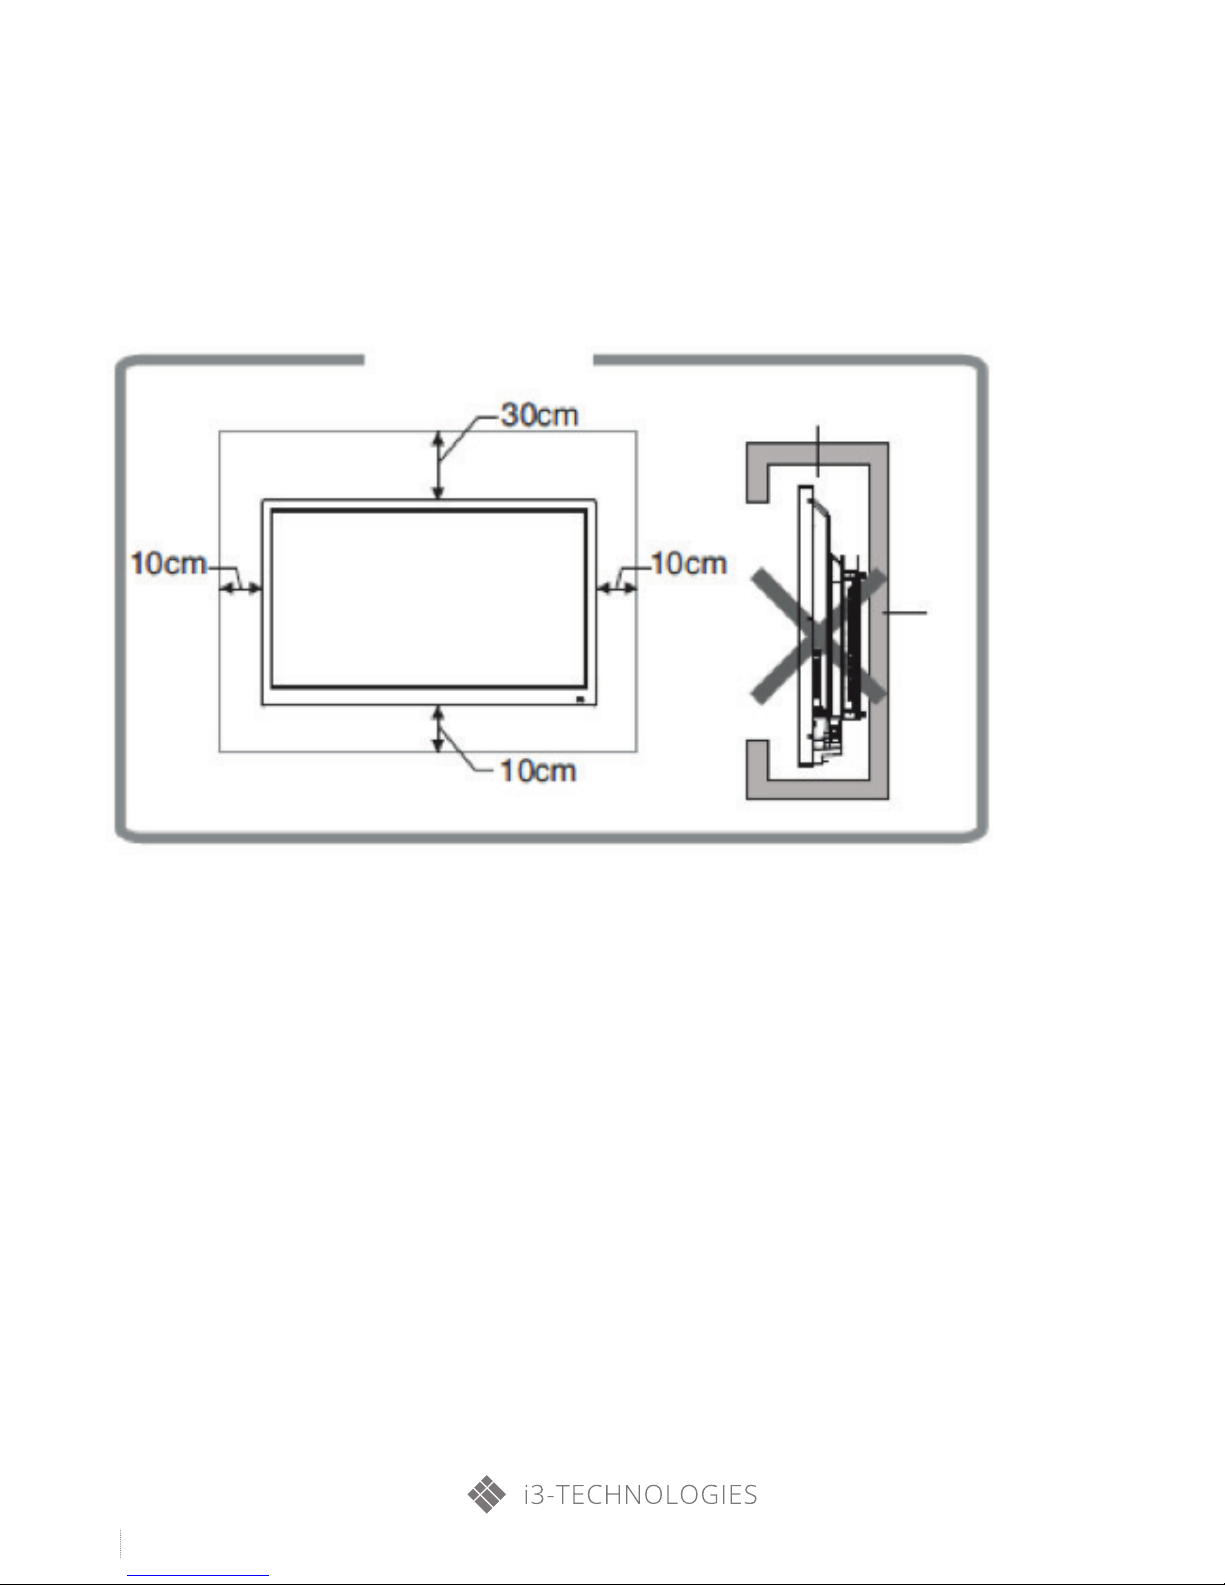
Ventilation
• Please reserve some spaces around the product as indicated in the figure.
• Do not cover the ventilation holes or insert any object into the housing.
• Do not place the product in the confined space, such as a bookcase or embedded cabinet, unless suitable venti-
lation conditions are provided. Sufficient space shall be reserved around the product for ventilation.
Mounted on the wall
Hinder ventilation
Wall

9
i3TOUCH V-SERIES USER MANUAL
3. Installation and Connection
Packing List
Part Name
1 LCD electronic whiteboard ü
1 remote control ü
1 User’s Manual ü
1 power cord ü
2 styluses ü
Please note that:
If you have any questions on operation, debugging and connection of the touch screen, please contact the dealer
in your area; if the product does not work normally, disconnect the power immediately and consult the dealer in
your area. The product is a Grade A product, so it could cause radio interference in the living environment. In this
case, the user needs to take feasible measures against interference, and also add the power plug as a disconnection
device.
Part name
1 disk (optional) ü
1 warranty card ü
1 certificate of quality ü
1 Instruction for Wall Mounting (optional) ü
2 batteries (optional) ü

10
i3TOUCH V-SERIES USER MANUAL
3. Installation and Connection
Tips
• Place the LCD electronic whiteboard nearby an AC power socket which is easy to plug and unplug.
• For your safety, you are recommended to use a suitable wall bracket or base.
• To prevent injuries, please place the product on a stable and even plane or fasten it on a firm wall.
• If the product needs to be mounted on the wall, ask the professional technicians for help. Improper installation
may cause unreliable fixture of the product.
• Do not put the product in a place with the possibility of mechanical vibration.
• Do not put the product in a place where bugs may enter easily.
• Do not install the product facing an air conditioner, or it may cause some fault due to condensation of internal
panel.
• Do not put the product in a place with strong electromagnetic field, or it may suffer from interference of electro-
magnetic wave and damages.
11
i3TOUCH V-SERIES USER MANUAL
3. Installation and Connection
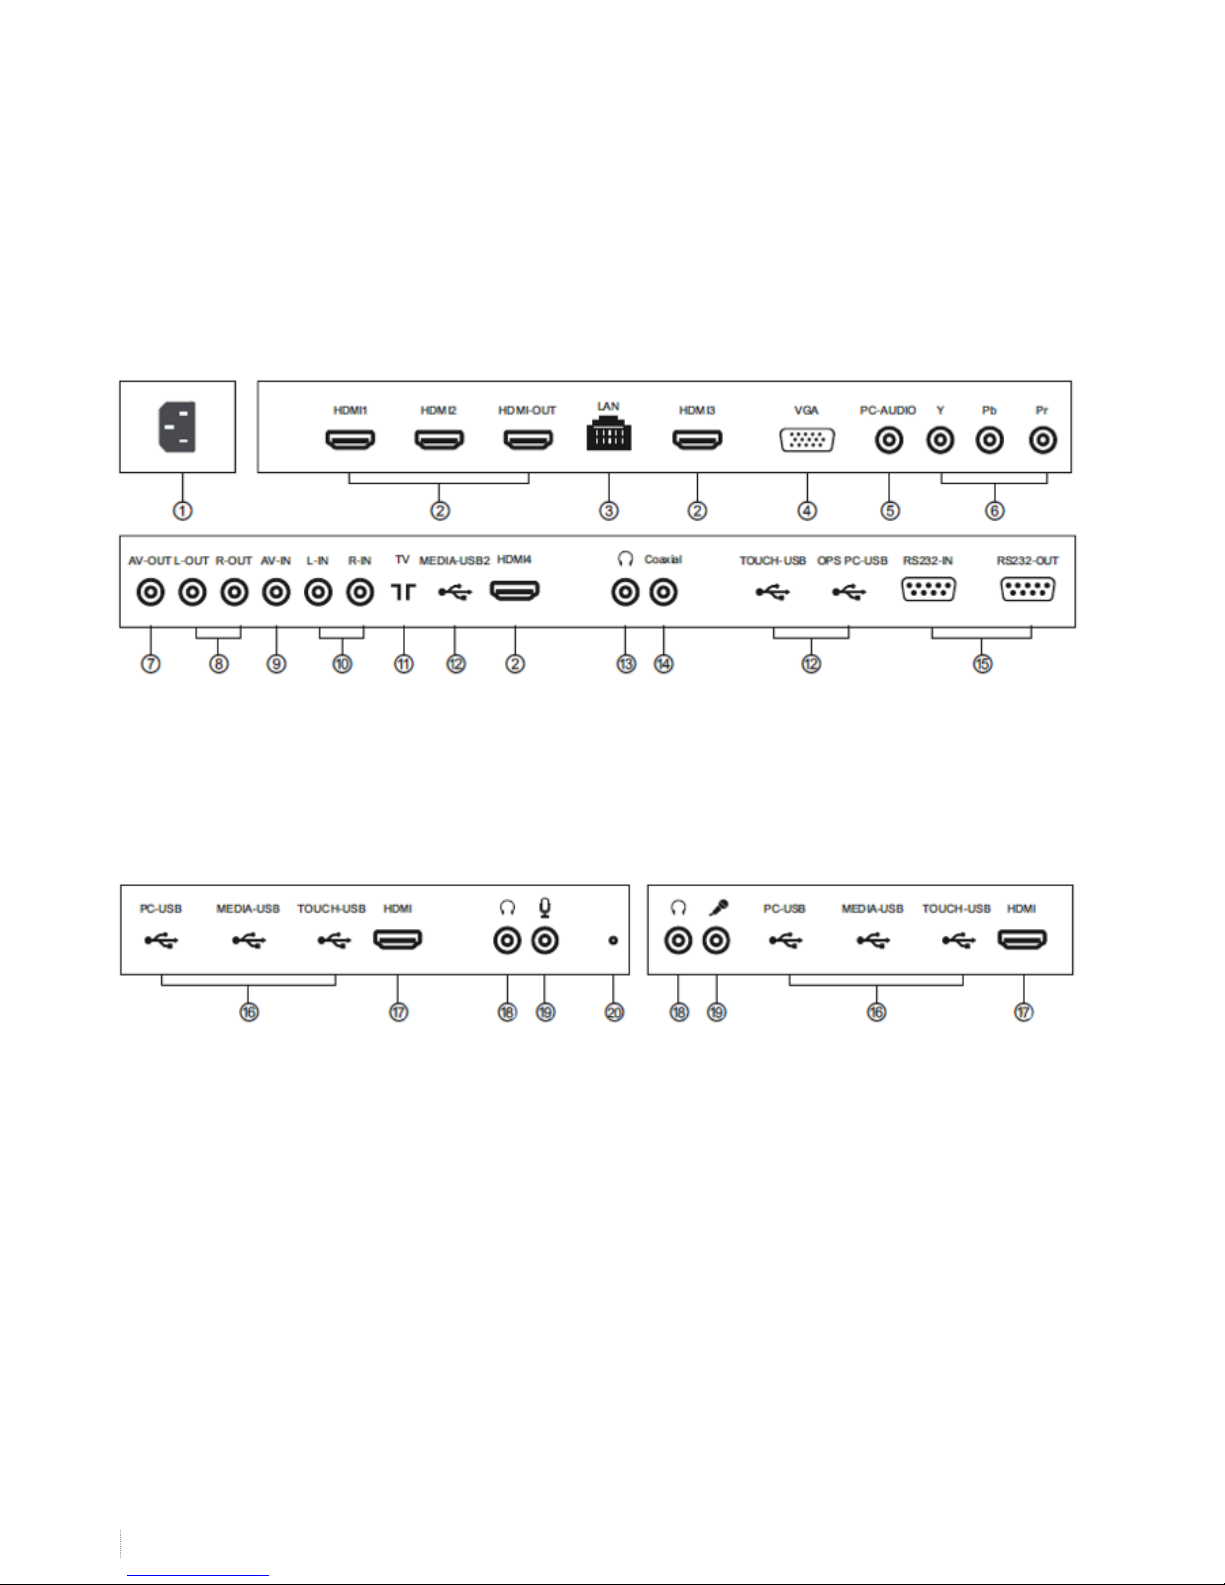
Interfaces
Below 79” (001/002/004/005) interfaces
Front frame interfaces for Series 001/002 Front frame interfaces for Series 004/005
Remark:
Different models in the same series may have varied interfaces; Please refer to the actual product.
1.Power interface;
2. HDMI;
3. Network interface;
4. VGA interface;
5. PC audio interface;
6. YPbPr/YCbCr input interfaces;
7. Video output interface;
8. Audio output interfaces;
9. Video input interface;
10. Audio input interfaces;
11. TV antenna interface;
12. USB interface;
13. Earphone interface;
14. Coaxial interface;
15. RS232 input and output interfaces;
16. USB interface on front frame;
17. HDMI on front frame;
18. Audio interface on front frame;
19. Microphone interface on front frame;
20. LED light sensor.
Note: Please firstly disconnect the power plug when you install or
assemble & disassemble the product!

12
i3TOUCH V-SERIES USER MANUAL
3. Installation and Connection
Interfaces
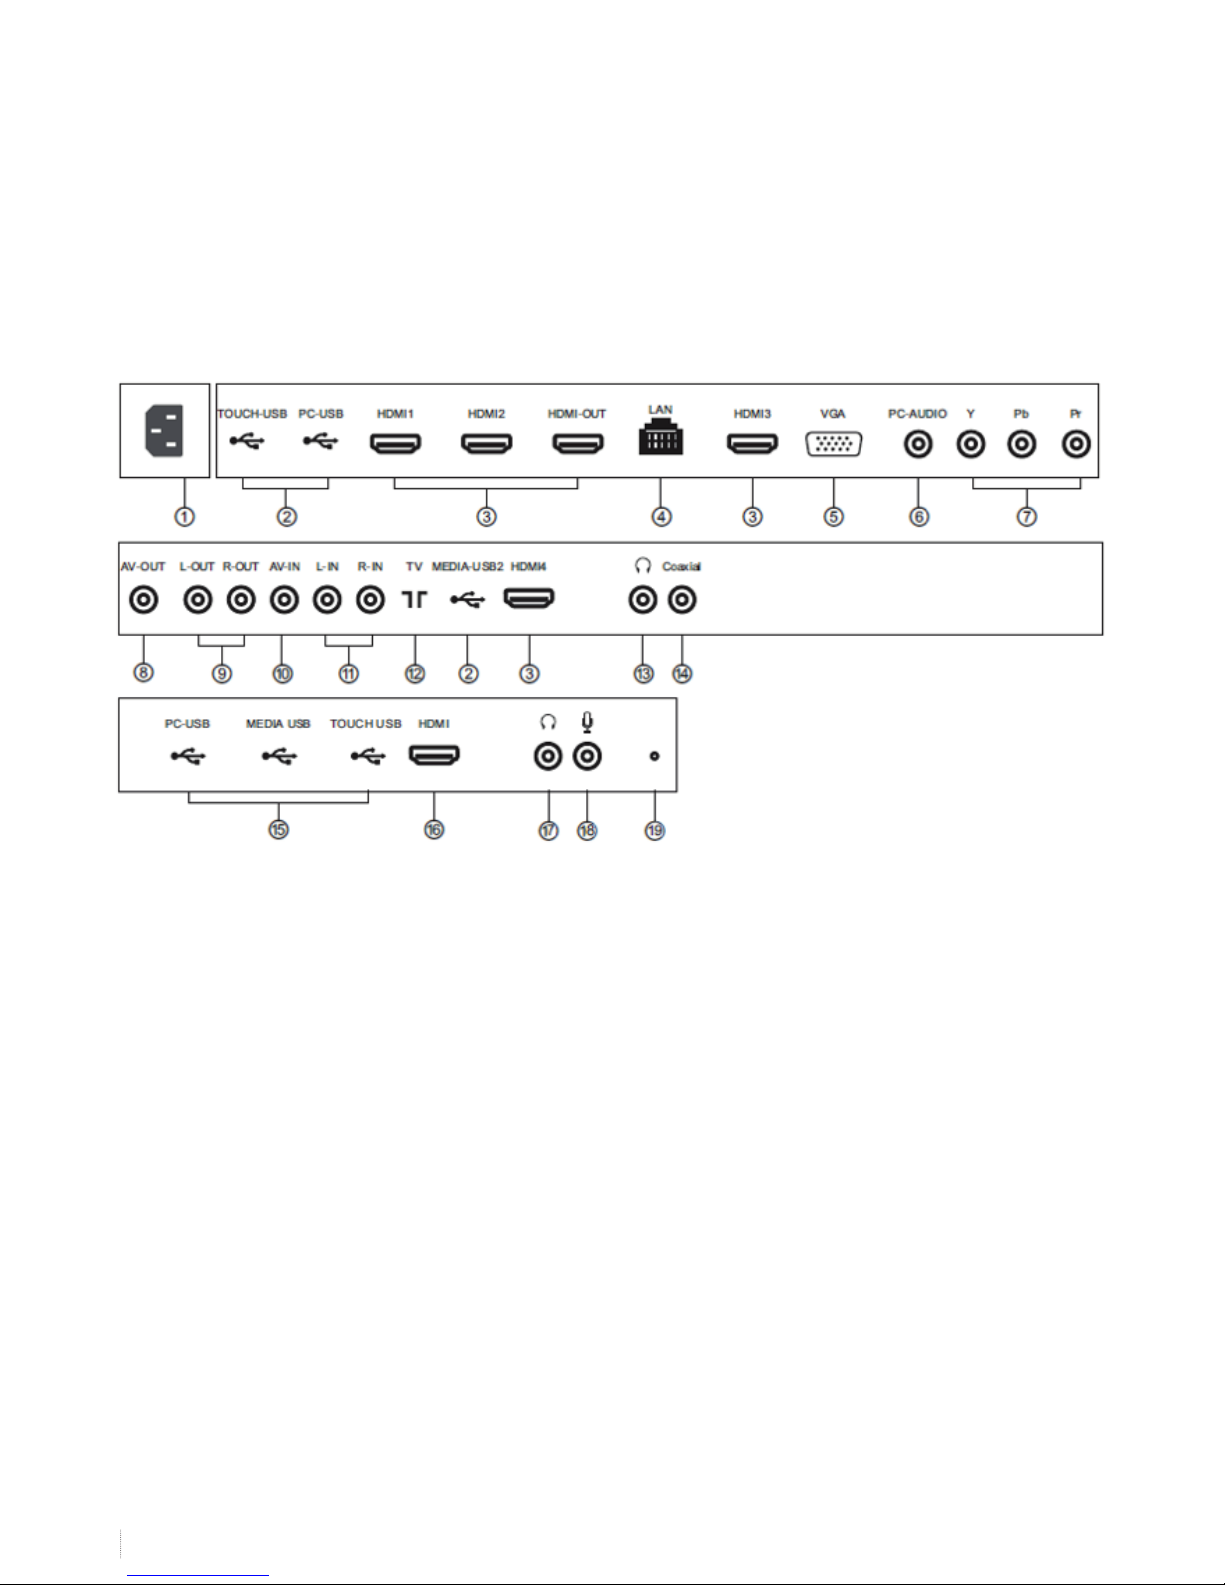
79’’ and above (001/002) interfaces
Remark:
Different models in the same series may have varied interfaces; Please refer to the actual product.
1. Power interface;
2. HDMI;
3. Network interface;
4. UHD interface;
5. VGA interface;
6. PC audio interface;
7. YPbPr/YCbCr input interfaces;
8. Video output interface;
9. Audio output interfaces;
10. Video input interface;
11. Audio input interface;
12. TV antenna interface;
13. USB interface;
14. Earphone interface;
15. Coaxial interface;
16. RS232 input and output interfaces;
17. USB interface on front frame;
18. HDMI on front frame;
19. Audio interface on front frame;
20. Microphone interface on front frame;
21. LED light sensor.
Note: Please firstly disconnect the power plug when you install
or assemble & disassemble the product!

13
i3TOUCH V-SERIES USER MANUAL
3. Installation and Connection
Interfaces
79’’ and above (004/005) interfaces
Remark:
Different models in the same series may have varied interfaces; Please refer to the actual product.
1. Power interface;
2. HDMI;
3. Network interface;
4. UHD interface;
5. VGA interface;
6. PC audio interface;
7. YPbPr/YCbCr input interfaces;
8. Video output interface;
9. Audio output interface;
10. Video input interface;
11. Audio input interfaces;
12. TV antenna interface;
13. USB interface;
14. Earphone interface;
15. Coaxial interface;
16. RS232 input and output interface;
17. USB interface on front frame;
18. HDMI on front frame;
19. Audio interface on front frame;
20. Microphone interface on front frame.
Note: Please firstly disconnect the power plug when you install
or assemble & disassemble the product!
14
i3TOUCH V-SERIES USER MANUAL
3. Installation and Connection
Interfaces
Connection of external equipment to 65’’ Series 003
Remark:
Different models in the same series may have varied interfaces; Please refer to the actual product.
1. Power interface;
2. USB interface;
3. HDMI;
4. Network interface;
5. VGA interface;
6. PC audio interface;
7. YPbPr/YCbCr input interface;
8. Video output interface;
9. Audio output interface;
10. Video input interface;
11. Audio input interfaces;
12. TV antenna interface;
13. Earphone interface;
14 Coaxial interface;
15. USB interface on front frame;
16. HDMI on front frame;
17. Audio interface on front frame;
18. Microphone interface on front frame;
19. LED light sensor.
Note: Please firstly disconnect the power plug when you install
or assemble & disassemble the product!

15
i3TOUCH V-SERIES USER MANUAL
3. Installation and Connection
Connection diagram
Connection diagram for PC and i3TOUCH.
(Note: Please firstly disconnect the power plug when you install or assemble & disassemble the product!)
Interfaces on the i3TOUCH.
Interfaces on the PC.
Remark: The connection diagram described herein is only for reference in PC connection; the actual operation shall
prevail.

16
i3TOUCH V-SERIES USER MANUAL
3. Installation and Connection
Keys on the panel
1. Power/Standby key (long press for standby/press for BLANK- black screen);
2. MENU: Press it to display the setup menu;
3. : VOL +/- keys; in OSD menu operations, press them to adjust the analog value of the selected item; their functions
are the same as keys on the remote control;
4. : Channel number +/- keys; in OSD menu operations, press them to select the item to be adjusted; their functions
are the same as keys on the remote control;
5. SOURCE: Press it to enter the signal source selection menu to select a signal source; in OSD menu operations,
press it to confirm the operation; its function is the same as “OK” key on the control panel;
6. Indicator and remote control reception window;
7. On/Off key (“I” end is for power on, and “O” end is for power off. The key is optional; please refer to the actual
product.); 8. OPS.
Remark: O,1 Different models may have varied appearances; Please refer to the actual product.
O,2 “SOURCE” (on ANDROID operating system) – BACK: Return key;
O,3 “
” (on ANDROID operating system) – HOME: Homepage key.

17
i3TOUCH V-SERIES USER MANUAL
4. Remote control
Installation of the batteries:
Remove the battery compartment cover and install two AAA batteries (1.5V) into the battery compartment as per the
polarity symbols “+” and “-”.
Precautions:
• The remote control should aim at the reception window. Do not leave any obstacle between the remote control
and the reception window, or normal operation may be interfered.
• Protect the remote control against violent vibration. Do not put or use the remote control in direct sunlight, or
the heat could cause it to deform.
• The remote control may not work if the reception window is exposed to direct sunlight or strong light. Please
change the direction of the light or product, or get closer to the reception window to operate the remote control.
• Low battery voltage could lead to a shorter remote control distance, please replace the battery. If the remote
control is to be kept idle for a long time, please remove the battery to avoid the corrosion to the remote control
caused by battery leakage.
• Do not use batteries of different types or mix new batteries with old ones. Always replace the batteries in pairs.
• Do not put the batteries in fire, or charge or disassemble them, or charge, short circuit, disassemble, heat or
burn used batteries. Please dispose of waste batteries in accordance with local environmental regulations. Do
not expose the batteries to the overheated environment like sunlight or baking.

18
i3TOUCH V-SERIES USER MANUAL
4. Remote control
Standby
Snapshot
Mute key
Letter/numeric keys
F1 (still image)
Program list
Homepage
Menu
Cursor keys
VOL +/Return
Source
Channel +/Sound mode
Sleep
OSD
Zoom
Image mode
Favorite list
SYS
NICAM (optional)
OK (OK)
Play
Pause
Stop
Rotate
Previous
Next
Fast rewind
Fast forward
Switch between working mode and standby mode
Take screenshot
Turn on or off the sound
Input any letter and number
Turn on or off still image in LCD electronic whiteboard
Character input backspace key/view TV program list
Display the homepage
Display the main menu
Select or adjust the menu item
Increase/decrease the volume
Return to the previous page
Display the signal source selection menu (only for TV system)
Increase/decrease the channel
Switch sound modes
Set a time for auto power-off
Display the program information
Switch the display scale
Switch image modes
Display the list of favorite channels
Switch TV systems
Select NICAM mode
Con rm the current operation
Used for multimedia operations on the intelligent platform

19
i3TOUCH V-SERIES USER MANUAL
5. Basic Operations
Power On/Standby
Insert the power plug into the power socket, press the on/off key “ ” (if applicable) on the LCD electronic whiteboard to turn on it; and then press the “ ” key on the remote control or control panel to turn on the
LCD electronic whiteboard; if there is no on/off key “ ”, just press the “ ” key.
In on state, press the “ ” key to enter the standby state
Signal Source Selection
Press the “SOURCE” key on the remote control or control panel to enter the input signal source menu,
press the “
/ ” keys on the remote control or the “Channel +/-” keys on the control panel to select a signal
source. Then press the “OK” key on the remote control or the “SOURCE” key on the control panel to switch to the
selected input signal source.
001-T/002-T/004-T/
005-T (above 79’’)
001/002/004/
005 (above 79’’)
001-T/002-T/004-T/
005-T (below 79’’)
001/002/004/005
(below 79’’) 003

20
i3TOUCH V-SERIES USER MANUAL
5. Basic Operations
Menu operations
In this Chapter, we take the menu operations of LCD electronic whiteboard as an example, and menu operations in
other modes are similar to those of LCD electronic whiteboard. As for the operations in intelligent mode, please refer
to the Instructions for Intelligent Platform hereinafter.
Press the “MENU” key on the remote control or control panel to display the main menu:
1.Press the “ ” keys on the remote control or the “VOL +/-” keys on the control panel to select an adjustable menu,
like [Image], [Sound], [Channel] or [Settings].
2.Press the “ / ” keys on the remote control or the “Channel +/-” keys on the control panel to select an item to be
adjusted.
3.Press the “OK” key on the remote control to enter the selected item.
4.Press the “ / ” keys on the remote control or the “VOL +/-” keys on the control panel to change or set the
analog value of the selected item.
5.When the main menu appears on the screen, you can press the “MENU” key to exit from the main menu;
6.In menu operations, the currently inoperable items will turn grey.

21
i3TOUCH V-SERIES USER MANUAL
5. Basic Operations
Basic operations
Settings list
Image
Image mode Adjust the overall image eff ect: “[Standard], [Soft], [User] or [Bright]”.
Contrast Adjust the overall image layering: The bigger the analog value (0-100), the higher the layering.
Brightness Adjust the overall image brightness: The bigger the analog value (0-100), the higher the brightness.
Color tone Adjust the color tone: The bigger/smaller the analog value (0-100), the greener/more purple the tone.
De nition Adjust the image de nition: The bigger the analog value (0-100), the higher the de nition.
Color saturation Adjust the color depth: The bigger the analog value (0-100), the darker the color.
Color temperature Adjust the overall color temperature: [Standard], [Warm] or [Cold].
Aspect ratio Adjust the image display scale: [Full Screen], [4:3], [Movie] or [Subtitle].
Image
Noise reduction Set the noise reduction level: [Medium], [High], [Off ] or [Low].
PC image adjustment Adjust the image display range in PC mode (available under PC signal source).
Remark: The analog values of contract, brightness, color tone, de nition and color saturation are adjustable only in the user mode.
Sound
Sound mode Select a sound eff ect: [Standard], [Music], [Movie] or [User].
Bass Adjust the bass: The bigger the analog value (0-100), the higher the bass.
Treble Adjust the treble: The bigger the analog value (0-100), the higher the treble.
Balance
Adjust the balance between left and right tracks: Slide to the left/right to increase the left-track/right-track
volume (L50-R50). Generally, set it to 0.
Surround Turn on/off the surround eff ect.
Coaxial output Select the digital audio output mode: PCM or RAW.
Remark: The analog values of bass and treble are adjustable only in the user mode.
Settings
Menu display time Set the menu display time: [5s], [10s], [15s], [20s], [30s] or [Constant display].
Reset Restore the factory default settings

22
i3TOUCH V-SERIES USER MANUAL
6. Instructions for Intelligent Platform
Basic operations
Press the “ ” key on the remote control to display the intelligent homepage (as shown in the figure).
1. Press the “ ” keys to select the application;
2. Press the “OK” key to run the application;
3. Press the “Return” key to return to the previous page
Tips
The operations under intelligent mode are complicated; the user may have the discretion to install and download the
applications; different applications have varied operations. The operations of applications described in this Manual
are only for reference. Please operate the product as the case may be. Some functions cannot be realized via remote
control, so you are recommended to use the mouse and keyboard with USB interfaces for easier operation. The
mouse and keyboard need to connect to USB interfaces on the product.
QuickStart
Please get familiar with the following operations before using the product for better user experience.
Mouse Operation
1. Click: Click the mouse button and then release it at once;
2. Long press: Press the mouse button for over 3s and then release it;
3. Click the left mouse button to confirm just as the “OK” key on the remote control;
4. Click the right mouse button to return just as the “Return” key on the remote control.
Language and keyboard settings
Language: In intelligent mode, select Settings > Language and Keyboard Settings > Language Settings and press the
“OK” key; press the “ ” keys to select the target language and press the “OK” key.
Input method selection: In intelligent mode, select Settings > Language and Keyboard Settings > Change Default
Input Method and press the “OK” key; select the target input method in option menu and press the “OK” key to select
it; the system is provided with “Android keyboard” and “Google Pinyin IME”, and the user may download the thirdparty input methods.

23
i3TOUCH V-SERIES USER MANUAL
6. Instructions for Intelligent Platform
Basic operations
System time setting: In intelligent mode, select Settings > Time and Date Settings > Auto Acquisition of Time and Date
via the Internet and press the “OK” key; the system will acquire time from the Internet and update automatically; if
your LCD electronic whiteboard is not connected with the Internet, you can only set the system time manually in
Time and Date Settings.
Screenshot: Insert USB storage device into the USB interface on the product prior to taking screenshots and press
the “Snapshot” key. After screenshot, the picture will be saved in the folder “:\Pictures\Screenshots” of USB storage
device.
Intelligent Application
Browser: You can display the texts, images, sounds and other information on the Internet by using the browser.
Before the Internet access, you must connect the LCD electronic whiteboard to the Internet firstly;
please refer to “Settings > Internet and Location Settings” for detailed setting methods.
1. Return to the previous page
2. Go to the next page
3. Refresh
4. Browser page
5. Close the current page
6. Add a new page
7. Website input box
8. Add a bookmark
9. Search the input content
10. Browser menu
11. OK

24
i3TOUCH V-SERIES USER MANUAL
6. Instructions for Intelligent Platform
Basic operations
How to access a website? Firstly press “ ” keys to select the website input box and then input the network
address to be accessed in the website box; at last, select the Go icon on the virtual keyboard and press the “OK” key
to access the website.
How to save a website as a bookmark? Firstly select icon in main interface of the browser and press the “OK” key;
and then input the browser label and website. Select an account and press the “OK” key; and then press the
“ / ” keys to select the storage account, and press the “OK” key. Press the “OK” key to add the bookmark.
How to copy and paste the text in a webpage? Move the cursor over the text to be copied; long press the left mouse
button, and then a pair of selecting cursors will appear on the screen. Drag the selecting cursors to select the text;
select COPY on the top of screen and click the left mouse button to select the position to paste; long press the left
mouse button and click PASTE in the popped up dialog box.
E-mail: The e-mail sending option helps the user to log in the individual or corporate email account; and then the
user can receive and send e-mails.
Music: Before using the function, please insert USB storage device into the USB interface on the product.
1. In intelligent mode, select All Applications > Music, and press the “OK” key to operate;
2. The submenu provides [Music], [Artist] and [Special] for selection, and press the “OK” key to confirm.
1. Display the playlist
2. Shuffle play
3. Repeat play mode setting
4. The artist of current song
5. The album of current song
6. Current song name
7. Progress bar; drag the cursor to adjust the playing progress by using the mouse
8. Fast rewind/previous song; click the left mouse button to play previous song and long press the left mouse
button for fast rewind.
9. Play/pause
10. Fast forward/next song; click the left mouse button to play next song and long press the left mouse button
for fast forward.

25
i3TOUCH V-SERIES USER MANUAL
6. Instructions for Intelligent Platform
Basic operations
APK installer: APK installer option helps the user to manage the applications. The user can install any installation file
saved in a local disk or remove any application installed locally.
Tip: You can select Settings > Application Management to set whether it is allowed to install non Appstore applications and set the preferred installation location or manage all applications.
• How to install an application? Enter APK installation to select Install and press the “OK” key to enter. Select a tar-
get file in a local disk as the installation route and find the installation package to be installed in the right box and
press the “OK” key.
• How to delete an application? Firstly select Manage and press the “OK” key to enter; and then select the applica-
tion to be removed and press the “OK” key; at last, select Uninstall and click the “OK” key to remove the application automatically.

26
i3TOUCH V-SERIES USER MANUAL
6. Instructions for Intelligent Platform
Basic operations
Multimedia player: Connect to the USB storage device via USB interface; in intelligent mode, select Local Play and
press the “OK” key to run. Select the file category from [All], [Picture], [Music] and [Video] on the left.
Play the file saved in a local disk device: Firstly insert the USB storage device into the USB interface of the product
before playing the file saved in a local disk device.
Select the Local Disk Device from the file list in the middle and press the “OK” key to enter. Select “Return” and press
the “OK” key to return to the previous folder; select a folder and press the “OK” key to enter this folder, and then
press the “Return” key to return to the desktop.
Note:
O,1 Some nonstandard USB devices may not be identified; please replace with standard USB devices;
O,2 The streaming system has a certain limitation on the format of each playing file; if the system limitation is exceeded, an error will occur in playing;
O,3 Do not insert and remove a USB device in playing, or it may bring some problem to the system or device.
O,4 The system supports the USB devices and mobile HDDs, etc. with standard USB1.1 and USB2.0 interface and
transmission protocols;
O,5 Maximum output current of USB interfaces in the product is 500mA; the product will activate self-protection in
case of excessive current; if the user connects an external device with larger current, it is recommended to use an
external power supply.
O,6 The system is very complicated and equivalent to a PC system, so freeze or no response may occur in file reading or playing due to compatibility and stability, etc. of USB devices; in such case, please attempt to power off and
reinitialize the system.
Introduction to the option icon of playing interface

27
i3TOUCH V-SERIES USER MANUAL
6. Instructions for Intelligent Platform
Introduction to the option icon of playing interface
Menu option of picture player
Play the previous picture.
Pause/start slide playing.
Play the next picture.
Zoom in the picture.
Zoom out the picture.
Rotate 90°left.
Rotate 90°right.
Display detailed picture information.
Picture playing settings.
Menu option of music player
Play the previous music.
Pause/start music playing
Play the next music.
Set loop playback: All loop, single loop and shuffle play.
View the playlist.
Display detailed music information

28
i3TOUCH V-SERIES USER MANUAL
6. Instructions for Intelligent Platform
Introduction to the option icon of playing interface
Menu option of video player
Play the previous video.
Select the speed of fast rewind.
Pause/start video playing.
Select the speed of fast forward.
Play the next video.
Select a time point to start watching.
View the playlist.
Display detailed video information.
Playback settings. Activate subtitle display and adjust the track progress in this option.
Set repeat playing between A and B; after setting, the video will be played repeatedly between A and B.
During playing, press the “OK” key to display the menu options as shown in the above figure, select the corresponding icon and press the “OK” key to confirm the operation; the user may press the “Return” key to exit from playing, or
press the “ ” keys on the remote control as shortcut keys.

29
i3TOUCH V-SERIES USER MANUAL
6. Instructions for Intelligent Platform
Settings
Visible passwords: Display the password information when input passwords in PPPOE dialing and wireless network
connection. Select Visible Passwords and press the “OK” key to enable and disable the function.
Network settings: Select Network Settings in Settings of intelligent mode and press the “OK” key to enter.
Wired settings: Before using a wired network, firstly connect one end of the network cable to
the interface of LCD electronic whiteboard and then connect the other end to the router.
1. Select Wired Settings and press the “ ” key to enter settings;
2. When your router is set to allow automatic acquisition of IP address, select Automatic Acquisition
of IP Address and press the “OK” key, and then your LCD electronic whiteboard will acquire IP address
automatically. When your router is not set to allow automatic acquisition of IP address, you must finish
network connection as follows;
3. Select IP Address and configure an available IP address for the product;
4. Select Default Gateway and configure an available gateway for the product;
5. Select Primary DNS and Secondary DNS, and configure an available DNS server address for the product;
6. Select Save and press the “OK” key; and then the system will prompt that settings are completed.
Wireless settings
1. Select Wireless Settings and press the “OK” key;
2. Select Wi-Fi and press the “OK” key to activate the wireless network.
3. Select SSID and press the “OK” key to view the nearby wireless networks signal searched by the product;
when icon is shown among the searched networks, it indicates this network is available without
passwords; when icon is shown among the searched networks, this network has been secured
with passwords and you must input passwords for connection;
4. Select the network to be connected in the network list and press the “OK” key;
5. Select Establish Connection and input the passwords in the password box; select Connect and
then press the “OK” key;
6. When your router is set to allow automatic acquisition of IP address, select Automatic Acquisition of IP Address and press the “OK” key, and then your LCD electronic whiteboard will acquire IP address
automatically. When your router is not set to allow automatic acquisition of IP address,
you must finish network connection as follows.
7. Select IP Address and configure an available IP address for the product;
8. Select Subnet Mask and configure an available subnet mask for the product;
9. Select Default Gateway and configure an available gateway for the product;
10. Select Primary DNS and Secondary DNS, and configure an available DNS server address for the product;
11. Select Save and press the “OK” key; and then the system will prompt that the settings are completed.

30
i3TOUCH V-SERIES USER MANUAL
6. Instructions for Intelligent Platform
Settings
Visible passwords: Display the password information when input passwords in PPPOE dialing and wireless network
connection. Select Visible Passwords and press the “OK” key to enable and disable the function.
Network settings: Select Network Settings in Settings of intelligent mode and press the “OK” key to enter.
WiFi Hotspot:
This setting is intended to use the LCD electronic whiteboard as a wireless hotspot;
1. Select WiFi Hotspot and press the “OK” key to activate WiFi hotspot;
2. Select Configure WiFi Hotspot and press the “OK” key;
3. Input the network name (SSID) in the textbox; the default name is “AndroidAP”, and you can change
it into other names;
4. Select Security and press the “ ” keys to select the security type; if it is used as an open network,
there is no need to set passwords; in this case, any device finding your network can connect to your
open Wi-Fi network; if WPA PSK/WPA2 PSK is selected for encryption, you need to input 8 digits or
more as the password; when other devices find your Wi-Fi network, they need to input correct
passwords to connect to your network;
5. Select Encryption and the system will configure the passwords automatically for you, or you can
also input your own passwords in the password box;
6. Select Save and press the “OK” key to save settings; and then your network will display on other
Wi-Fi devices within the range when they search for the network.
Note: Please try not to set a too simple network password.
7. Important Statement about Web Service
All contents and services acquired from the product are in the possession of the third party and protected by the
laws related to copyright, patent right, trademark right and/or other intellectual property right. Such contents and
services are only for your own non-commercial purposes; any content or service shall not be used in any manner
unauthorized by the content owner or service provider.
In any case, our company is not liable for any direct, indirect and accidental losses or damages arising from access to
any content or service or any information or any third-party software via the product by you or any third party.
The third-party services may change, delete and stop without prior notice; our company does not make any representation or warranty about whether the service or content is available within any time limit.
Our company is not responsible for any service related to the said services and contents and is not liable for clients’
services; if you have any question related to services or contents and service request, please contact the relevant
content and service provider directly.

31
i3TOUCH V-SERIES USER MANUAL
8. Troubleshooting
Troubleshooting
Fault Possible Cause Solution
Snowake-like spots on the image
accompanied with noises
The antenna connector is loose and the cable is damaged
The antenna type is not suitable
The antenna orientation or location is not proper
The signal is poor
Check whether the antenna connector is loose or not and
whether the cable is undamaged or not
Check the antenna type (VHF/UHF)
Adjust the antenna orientation or location
Attempt to use a signal enhancer
No image display on the screen; no
sounds; and dim indicator
The power plug is loose and power supply is not connected Check whether the power cord is in proper connection or not
Dot line or stripe interference on the
image
The signal is interfered, such as cars, neon lights and electric hair dryers
Do not use the electric hair dryer nearby the product and
adjust the antenna orientation to reduce interference
Ghost
The signal is reected by the surrounding mountains or buildings
The antenna orientation is not proper
Use a high-orientation antenna
Adjust the antenna orientation
No colors Color saturation is too low Enter “Image” submenu to increase color saturation
No accompanying sound
The volume is too low
Mute is activated
Adjust to the suitable volume
Press the “Mute” key on the remote control to disable the
mute mode
No display on PC; Prompt of no signal
input; Flickering of red indicator
The signal cable is loose or disconnected
Check whether the signal cable is loose or disconnected or
not; connect it again if so
Image shift; image cannot ll the full
screen or exceed the screen; vague
display on PC
Improper adjustment
Improper display mode
Use the function of automatic adjustment
Enter “PC Image Adjustment” to adjust the horizontal or vertical position. Use the recommended mode
Short remote control distance; remote
control failure
The remote control reception window is obstructed
Low battery of remote control unit
Move away the articles to avoid obstruction
Replace with new batteries
Failure in network access
Wrong conguration of network parameters
Improper network connection
Network service is not available
Inquire the network administrator to acquire available network IP address and other parameters
Check whether the network is connected normally or not
Consult the network service provider
Unsmooth online video playing
The network bandwidth is low
Many PCs share the same network
Several movies or other contents are downloaded at the same time
Update your network bandwidth to a higher level
Please attempt to replace with another websites for better
resources
System is stuck, crashed and unable
to operate
External environment (such as lightning and static) disturbs the normal operation
Disconnect the power supply for the product; wait for 1-2min
and then connect to power supply again; and then start it up

32
i3TOUCH V-SERIES USER MANUAL
9. Technical specications
Overal specification
Model 65’’ (001)/65’’ (001-T) 65’’ (001 N)
Physical resolution FHD 1920 × 1080 (pixels) 1920 × 1080 (pixels)
Pixel pitch 0.744mm × 0.744mm
Response time 6.5ms
Brightness 350 cd/m2
Contrast 4000:1
Viewing angle 178°/178°
Chroma 16.7M
System functions
Contrast, brightness, denition, color saturation, color tone, signal switching, color temperature adjustment
and refresh rate switching
Control mode Key control/infrared remote control/RS232 control
Input voltage AC 100-240V
Power consumption 200 W
Dimension (without packing) 1536mm×931mm×82mm (thickness) 1536mm×931mm×85.2mm (thickness)
Net weight/gross weight 72Kg/92Kg (heavy carton) 60.6Kg/82.8Kg (heavy carton)
Wall mounting holes 400 mm (H) × 400 mm (W)
Installation method Through the wall mounting holes (screw size: M8) Through the wall mounting holes (screw size: M6)
Housing material Metal (NCT) Metal + plastic
Environmental protection standard All components and packing materials comply with the international environmental protection standards

33
i3TOUCH V-SERIES USER MANUAL
9. Technical specications
Overal specification
Model 70’’ (001)/70’’ (001-T) 70’’ (001 N)
Physical resolution FHD 1920 × 1080 (pixels) 1920 × 1080 (pixels)
Pixel pitch 0.807mm × 0.807mm
Response time 8ms
Brightness 400 cd/m2
Contrast 4000:1
Viewing angle 178°/178°
Chroma 16.7M
System functions
Contrast, brightness, denition, color saturation, color tone, signal switching, color temperature adjustment, refresh rate switch-
ing and running state display
Control mode Key control/infrared remote control/RS232 control
Input voltage AC 100-240V
Power consumption 310 W
Dimension (without packing) 1636.9mm×981.45mm×92.5mm (thickness) 1636.9mm×981.45mm×96.3mm (thickness)
Net weight/gross weight 76Kg/94.5Kg (heavy carton) 72Kg/91.5Kg (heavy carton)
Wall mounting holes 600 mm (H) × 400 mm (W)
Installation method Through the wall mounting holes (screw size: M8)
Housing material Metal (NCT) Metal + plastic
Environmental protection standard All components and packing materials comply with the international environmental protection standards

34
i3TOUCH V-SERIES USER MANUAL
9. Technical specications
Overal specification
Model 79’’ (001)/79’’ (001-T)
Physical resolution 3840 × 2160 (pixels)
Pixel pitch 0.453mm × 0.453mm
Response time 5ms
Brightness 430 cd/m2
Contrast 1400:1
Viewing angle 178°/178°
Chroma 1.06B
System functions
Contrast, brightness, denition, color saturation, color tone, signal switching, color temperature adjustment, refresh rate switch-
ing and running state display
Control mode Key control/infrared remote control/RS232 control
Input voltage AC 100-240V
Power consumption 250 W
Dimension (without packing) 1857.4mm×1104.5mm×75.7mm (thickness)
Net weight/gross weight 91.4Kg/116.4Kg (heavy carton)
Wall mounting holes 600 mm (H) × 400 mm (W)
Installation method Through the wall mounting holes (screw size: M8)
Housing material Metal (NCT)
Environmental protection standard All components and packing materials comply with the international environmental protection standards

35
i3TOUCH V-SERIES USER MANUAL
9. Technical specications
Overal specification
Model 84.04’’ (001)/84.04’’ (001-T)
Physical resolution 3840 × 2160 (pixels)
Pixel pitch 0.4845mm × 0.4845mm
Response time 5ms
Brightness 350 cd/m2 / 420 cd/m2
Contrast 1600:1
Viewing angle 178°/178°
Chroma 1.06B
System functions
Contrast, brightness, denition, color saturation, color tone, signal switching, color temperature adjustment,
refresh rate switching and running state display
Control mode Key control/infrared remote control/RS232 control
Input voltage AC 100-240V
Power consumption 500 W
Dimension (without packing) 1965.2mm×1164.2mm×87.6mm (thickness)
Net weight/gross weight 142Kg/173Kg (heavy carton)
Wall mounting holes 600 mm (H) × 400 mm (W)
Installation method Through the wall mounting holes (screw size: M8)
Housing material Metal (NCT)
Environmental protection standard All components and packing materials comply with the international environmental protection standards

36
i3TOUCH V-SERIES USER MANUAL
9. Technical specications
Overal specification
Model 97.52’’ (001)/ 97.52’’ (001-T)
Physical resolution UHD 3840 × 2160 (pixels)
Pixel pitch 0.5622mm × 0.5622mm
Response time 5ms/8ms
Brightness 500 cd/m2
Contrast 1300:1
Viewing angle 178°/178°
Chroma 1.06B
System functions
Contrast, brightness, denition, color saturation, color tone, signal switching, color temperature adjustment,
refresh rate switching and running state display
Control mode Key control/infrared remote control/RS232 control
Input voltage AC 100-240V
Power consumption 540 W
Dimension (without packing) 2245.4mm×1321.8mm×114.5mm (thickness)
Net weight/gross weight 162Kg/214Kg (heavy carton/with wooden pallet)
Wall mounting holes 800 mm (H) × (400 + 300) mm (W)
Installation method Through the wall mounting holes (screw size: M8)
Housing material Metal (NCT)
Environmental protection standard All components and packing materials comply with the international environmental protection standards

37
i3TOUCH V-SERIES USER MANUAL
9. Technical specications
Overal specification
Model 64.5’’ (002)/64.5’’ (002-T)
Physical resolution FHD 1920 × 1080 (pixels)
Pixel pitch 0.744mm × 0.744mm
Response time 8ms
Brightness 360cd/m2
Contrast 4000:1
Viewing angle 178°/178°
Chroma 1.07B
System functions
Contrast, brightness, denition, color saturation, color tone, signal switching, color temperature adjustment,
refresh rate switching and running state display
Control mode Key control/infrared remote control/RS232 control
Input voltage AC 100-240V
Power consumption 240 W
Dimension (without packing) 1520.89mm×915.89mm×91.6mm (thickness)
Net weight/gross weight 66.5Kg/86Kg (heavy carton)
Wall mounting holes 600 mm (H) × 400 mm (W)
Installation method Through the wall mounting holes (screw size: M8)
Housing material Metal (NCT)
Environmental protection standard All components and packing materials comply with the international environmental protection standards

38
i3TOUCH V-SERIES USER MANUAL
9. Technical specications
Overal specification
Model 70’’ (002)/70’’ (002-T)
Physical resolution FHD 1920 × 1080 (pixels)
Pixel pitch 0.807mm × 0.807mm
Response time 8ms
Brightness 400cd/m2
Contrast 4000:1
Viewing angle 178°/178°
Chroma 16.7M
System functions
Contrast, brightness, denition, color saturation, color tone, signal switching, color temperature adjustment,
refresh rate switching and running state display
Control mode Key control/infrared remote control/RS232 control
Input voltage AC 100-240V
Power consumption 310 W
Dimension (without packing) 1631.69mm×974.09mm×97mm (thickness)
Net weight/gross weight 74.4Kg/92.2Kg (heavy carton)
Wall mounting holes 600 mm (H) × 400 mm (W)
Installation method Through the wall mounting holes (screw size: M8)
Housing material Metal (NCT)
Environmental protection standard All components and packing materials comply with the international environmental protection standards

39
i3TOUCH V-SERIES USER MANUAL
9. Technical specications
Overal specification
Model 64.5’ (003)/64.5’’ (003-T)
Physical resolution FHD 1920 × 1080 (pixels)
Pixel pitch 0.248mm × 0.744mm
Response time 6.5ms
Brightness 350 cd/m2
Contrast 5000:1
Viewing angle 178°/178°
Chroma 1.07G
System functions
Contrast, brightness, denition, color saturation, color tone, signal switching, color temperature adjustment,
refresh rate switching and running state display
Control mode Key control/infrared remote control/RS232 control
Input voltage AC 100-240V
Power consumption 120 W
Dimension (without packing) 1490mm×902mm×73.7mm (thickness)
Net weight/gross weight 58.8Kg/77.8Kg (heavy carton)
Wall mounting holes 400 mm (H) × 300 mm (W)/ 400 mm (H) × 350 mm (W)
Installation method Through the wall mounting holes (screw size: M6)
Housing material Metal (NCT)
Environmental protection standard All components and packing materials comply with the international environmental protection standards

40
i3TOUCH V-SERIES USER MANUAL
9. Technical specications
Overal specification
Model 64.5’’ (004/005)/ 64.5’’ (004/005-T)
Physical resolution 1920 × 1080 (pixels)
Pixel pitch 0.248mm × 0.744mm
Response time 6.5ms
Brightness 350 cd/m2
Contrast 5000:1
Viewing angle 178°/178°
Chroma 1.07G
System functions
Contrast, brightness, denition, color saturation, color tone, signal switching, color temperature adjustment,
refresh rate switching and running state display
Control mode Key control/infrared remote control/RS232 control
Input voltage AC 100-240V
Power consumption 120 W
Dimension (without packing) 1521.16mm×934.86mm×88.65mm (thickness)
Net weight/gross weight 54.5Kg/71.95Kg (heavy carton)
Wall mounting holes 400 mm (H) × 400 mm (W)
Installation method Through the wall mounting holes (screw size: M8)
Housing material Metal (NCT)
Environmental protection standard All components and packing materials comply with the international environmental protection standards

41
i3TOUCH V-SERIES USER MANUAL
9. Technical specications
Overal specification
Model 70’’ (004/005)/ 70’’ (004/005-T)
Physical resolution 1920 × 1080 (pixels)
Pixel pitch 0.807mm × 0.807mm
Response time 8ms
Brightness 400 cd/m2
Contrast 4000:1
Viewing angle 178°/178°
Chroma 16.7M
System functions
Contrast, brightness, denition, color saturation, color tone, signal switching, color temperature adjustment,
refresh rate switching and running state display
Control mode Key control/infrared remote control/RS232 control
Input voltage AC 100-240V
Power consumption 310 W
Dimension (without packing) 1637.6mm×1002.3mm×88mm (thickness)
Net weight/gross weight 77Kg/96.3Kg
Wall mounting holes 600 mm (H) × 400 mm (W)
Installation method Through the wall mounting holes (screw size: M8)
Housing material Metal (NCT)
Environmental protection standard All components and packing materials comply with the international environmental protection standards

42
i3TOUCH V-SERIES USER MANUAL
9. Technical specications
Overal specification
Model 8610 T10
Physical resolution 3840 × 2160 (pixels)
Pixel pitch 0.4845mm × 0.4845mm
Response time 5ms
Brightness 350 cd/m2
Contrast 1600:1
Viewing angle 178°/178°
Chroma 10bit
System functions
Contrast, brightness, denition, color saturation, color tone, signal switching, color temperature adjustment,
refresh rate switching and running state display
Control mode Key control/infrared remote control/RS232 control
Input voltage AC 100-240V
Power consumption 500 W
Dimension (without packing) 1966.06mm×1190.06mm×89.7mm (thickness)
Net weight/gross weight 102.85Kg/133.85Kg
Wall mounting holes 600 mm (H) × 400 mm (W)
Installation method Through the wall mounting holes (screw size: M8)
Housing material Metal (NCT)
Environmental protection standard All components and packing materials comply with the international environmental protection standards

43
i3TOUCH V-SERIES USER MANUAL
9. Technical specications
Overal specification
Requirements for working environment:
Temperature: 0°C-40°C Humidity: 20%-80% Barometric pressure: 86kPa-104kPa
Requirements for storage environment:
Temperature: -10°C-60°CHumidity: 10%-60% Barometric pressure: 86kPa-104kPa
1.Supported SYS: PAL+NTSC+SECAM;
2. Antenna input: 75Ω coaxial (asymmetric);
3. AV video input: 75Ω, 1Vp-p, RCA terminal;
4. AV audio input: 20KΩ, 500mV RMS;
5. YPbPr/HDMI video input: 480i, 480P, 576i, 576P, 720P, 1080i, 1080P, 4K (supporting HDMI for 79’’, 84’’and 98’’);
6. The capacity of embedded memory is subject to the actual configuration;
7. The capacity of cache is subject to the actual configuration;
8. Wireless connection: Wi-Fi (IEEE 802.11 b/g/n);
9. Intelligent operating system: Android 4.0;
10. Browser: Google browser.
No. Mode Resolution Refresh Rate
1
VGA
720×400 70 Hz
2 640×480 60 Hz
3 SVGA 800×600 60 Hz
4
XGA
1024×768 60 Hz
5 1280×720 60 Hz
6
WXGA
1360×768 60 Hz
7 1600×900 60 Hz
8 WUXGA 1920×1080 60 Hz
Recommended operating mode: 1920×1080@60 Hz

44
i3TOUCH V-SERIES USER MANUAL
10. ROHS Compliance
Names and contents of toxic and hazardous substances or elements contained in the product
Component
Toxic and Hazardous Substance or Element
Pb Hg Cd Cr6+ PBB PBDE
Display screen × O O O O O
Housing O O O O O O
PCB assembly* × O O O O O
Power cord and connecting wires × O O O O O
Metal parts O O O O O O
Packing materials* O O O O O O
Remote control × O O O O O
Loudspeaker × O O O O O
Accessories* O O O O O O
*: PCB assembly includes the PCB and its electronic components;
Packing materials include the carton and Styrofoam, etc.;
Other accessories include the User’s Manual and so on;
O: The toxic and hazardous substance contained in all homogeneous materials of that component does not exceed the limit requirement prescribed in the GB/T 26572-2011 standards.
×: That toxic and hazardous substance contained in one or more homogeneous materials of that component exceeds the limit requirement prescribed in the GB/T 26572-2011 standards.
Provided by our material suppliers and veri ed by us, the data in the table above indicates that the product contains hazardous substances. Due to the limitation of the existing technology, the
hazardous substances in some materials cannot be replaced, although we have been striving to improve this situation.
The product has an Environmental Friendly Use Period of 10 years. The pollution control symbol is shown on the right.
The EFUP is valid only when the user operates in normal conditions speci ed in the User’s Manual.
Indicative Description of Regulations on Recycling and Disposal of Waste Electrical and Electronic Products
When you no longer need this product or its service life expires, please send it to a quali ed recycling station in your area for recycling according to the Regulations on Recycling and Disposal of
Waste Electrical and Electronic Products, in order to protect the Earth.
This manual is only for reference; in case of any diff erence between the product and the descriptions herein, the actual product shall prevail without further notice. V1.2

45
i3TOUCH V-SERIES USER MANUAL
NOTES
 Loading...