

Hulsta Teufel User Manual

Sound System
We hope you have lots of fun with your new Teufel sound unit!
Now all you have to do is connect your TV and peripheral units and off you go!
Further information – for example how to upgrade to 5.1 surround sound –
can be found at www.Teufel.de/huelsta
SERVICE
Stand: 09/2015
hülsta-werke · Karl-Hüls-Straße 1 · D- 48703 Stadtlohn
TEL +49 2563 86-1500 · FAX +49 2563 86-1417
www.huelsta.com
1568309

Inside
General notes and information ................................ 3
Trademarks ...........................................................3
Proper use ............................................................. 3
For your safety ........................................................... 4
Sign symbols ......................................................... 4
Safety notes .......................................................... 4
Symbol explanations .............................................5
Control unit – operating elements and connections
Control unit rear view ............................................ 6
Control unit front view...........................................7
Remote control RC 1 .............................................7
Connecting control unit ............................................ 8
FM (VHF) antenna ................................................. 8
Input jacks for source devices ............................. 8
HDMI 1, 2, 3 and 4........................................8
OPTICAL 1 and 2 ........................................... 8
COAXIAL ......................................................... 9
AUX 1, 2 and 3 ............................................... 9
Output jacks ..........................................................9
Loudspeaker output jacks ............................ 9
Subwoofer ....................................................10
Pre Out .........................................................10
TV set ...........................................................10
Headphones ................................................11
Mains connections ......................................11
Remote control ........................................................ 12
Insert/change battery .........................................12
Functioning ..........................................................13
Pairing remote control ........................................13
Control unit – Basic functions ............................... 14
Switch on and off ................................................14
Select source ....................................................... 14
Adjust volume ......................................................15
Mute .....................................................................15
Adjust tone...........................................................15
Select surround mode ........................................15
Dolby digital and DTS ..................................15
Control unit – menu functions ............................... 16
“Tuner” menu ......................................................16
Station memory (preset) .............................16
Frequency ....................................................17
Mode ............................................................ 17
Station memory ........................................... 17
Erase memory .............................................17
“Surround” menu ................................................ 17
Dolby digital and DTS .................................. 17
“Tone Control” menu ..........................................18
Ton e ..............................................................18
Mode ............................................................18
Equalizer ......................................................18
6
“Speaker levels” menu .......................................18
“Source levels” menu .........................................18
“Audio mapping” menu .......................................18
“Speaker Setup” menu .......................................19
Speaker size ................................................19
Crossover .....................................................19
Phase Sub ....................................................19
Lip Sync ........................................................19
Distance .......................................................19
“System Setup” menu ........................................20
Special keys ................................................. 20
HDMI ............................................................20
Auto-off ........................................................20
Power On level .............................................20
Wireless .......................................................21
3.1/5.1 .........................................................21
D/E ...............................................................21
System reset................................................21
Control unit – Bluetooth playback......................... 22
Pairing ..........................................................22
Playback .......................................................22
Control unit – radio playback ................................. 23
Select radio stations ...........................................23
Stereo/Mono ...............................................23
Station memory ...................................................23
Save station .................................................23
Select saved station ...................................23
Delete station memory ...............................23
Control unit – Software update ............................. 24
Install new software ............................................24
Subwoofer – Operating elements and connections
Connect subwoofer ................................................. 26
Mains connections ..............................................26
Audio connections...............................................26
Connecting via SUB IN ................................26
Subwoofer – Operating and adjusting ................... 27
Switching on and off ...........................................27
Automatic switch on/off .............................27
Adjusting amplier and subwoofer.....................27
Amplier settings ........................................27
Subwoofer settings .....................................28
Care and maintenance ............................................ 28
Troubleshooting ....................................................... 29
Control unit ..........................................................29
Subwoofer ............................................................30
Technical data ......................................................... 31
Control unit ..........................................................31
Subwoofer ............................................................ 31
Satellite loudspeakers ........................................ 31
25
PAGE 2

General notes and information
Trademarks
® All trademarks are the property of the
corresponding owner.
Manufactured under licence of
Dolby Laboratories. Dolby and the
Double-D symbol are trademarks of
Dolby Laboratories.
The DTS patents can be found
at http://patents.dls.com.
Manufactured under licence
of DTS Licensing Ltd. DTS, the symbol and DTS and
the symbol together are registered trademarks and
DTS Digital Surround is a trademark of DTS Inc. ©
DTS, Inc. All rights reserved.
Bluetooth® and the Bluetooth
symbol are trademarks of
Bluetooth SIG, Inc.
aptX® and the aptX symbol are
trademarks of CSR plc or related
companies and may be under
protection in several countries.
Proper use
The units are only to be used as an audio system.
Only use the components as described in these
Operating Instructions. Any other use is deemed to
be improper and can cause damage to property or
even harm persons.
The manufacturer accepts no liability for damage
caused by improper use.
The units are meant for use in private homes.
Before using the subwoofer, please first
read the safety notes and the operating
instructions carefully. This is the only way to
ensure safe and reliable use of all functions. Please
keep the Operating Instructions in a safe place and
forward them to any later owner.
The HDMI and High Definition
Multimedia Interface sign,
and the HDMI logo are trademarks or registered
trademarks of HDMI Licensing LLC in the USA and
other countries.
PAGE 3

For your safety
Sign symbols
The following sign symbols are to be found in these
instructions:
WARNING
This sign symbol denotes danger of a medium risk,
which, if not avoided, can lead to death or severe
injury.
CAUTION
This sign symbol denotes danger of a low risk,
which, if not avoided, can lead to slight injury.
NOTE
This sign symbol warns about possible damage.
Safety notes
WARNING
Incorrect electrical installation or excessive
voltage can cause an electrical shock.
• The units are suitable for mains voltage of 230 V ~
/ 50 Hz. When connecting, please ensure that the
voltage is correct. You will find more information
on this subject on the identification plate.
• If damage has been caused to the housing
or the mains lead, disconnect the mains plug
immediately and do not continue using the unit.
Check all components regularly for damage.
• Disconnecting from the mains is done by
disconnecting the mains plug of the units.
Therefore please ensure that the mains plug
is easily accessible at all times.
• If the unit emits smoke, smells of burning or makes
unusual noises, immediately disconnect the mains
plug and do not continue using the unit.
• Never open the housing of the units. Repairs
may only be done by an authorised dealer. Only
components may be used which meet the original
unit data requirements.
• Only use accessories specifically recommended
by the manufacturer.
• Only use the unit indoors.
• Do not use the unit in moist rooms, and protect
it against drops of water or spraying. Ensure that
no vases or other containers with liquid stand
on the unit or in its vicinity so that no liquids
can penetrate the housing. If water or any other
foreign body should penetrate the housing,
immediately disconnect the mains plug and
remove any existing batteries if need be. Then
send the unit to our service address.
• Never touch the mains plug with moist hands.
Children can get caught up in the packaging and
suffocate during play.
• Do not allow children to play with the unit or the
packaging. There is a danger of suffocation.
• Ensure that children do not remove any small
components from the unit (e.g. operating or plug
adapters). They could swallow these components
and suffocate.
• Never allow children to use electrical units
unsupervised.
If any components belonging to the remote
control are swallowed, this can cause serious
internal injury and even death.
• Store any new or used batteries in place
inaccessible for children.
• If the battery compartment can no longer be
closed securely, do not use the article any longer
and store it in a place inaccessible for children.
• If you suspect that a battery has been swallowed or
entered a person’s body in any other way contact a
doctor immediately.
Battery acids which have leaked can cause burns.
• Avoid contact of battery acid with the skin, eyes or
mucous membranes. If there is contact with acid,
rinse the affected parts immediately with sufficient
clear water and, if necessary, contact a doctor.
Batteries (particularly lithium batteries) can
explode due to improper use.
• Never try to charge standard batteries.
• Only insert batteries of the same or similar type.
• Batteries and rechargeable batteries must not
be heated up, short-circuited or disposed of by
burning.
• Do not subject batteries or rechargeable batteries
to direct sunlight.
PAGE 4
Listening to high volumes for long periods
can cause damage to the hearing.
• Prevent injury by avoiding listening to high volume
levels for long periods.
• Always keep a suitable distance away from the
unit when it is used at high volume levels and
never place your ears in the direct vicinity of the
loud speakers.
• If the loudspeaker is set to full volume, strong
sound waves can occur. Apart from organic injury,
psychological injury can also result. Children and
domestic animals are particularly at risk. Set the
volume level of your source device to a low setting
before switching it on.
CAUTION
An incorrect location can cause damage.
• Do not use the unit in extreme temperatures or in
environments involving a risk of fire or explosion.
• Do not use the units or the loudspeakers in
vehicles where they are not firmly fixed in position,
on unlevel surfaces, on instable substructures or
on furniture, or on holding apparatus that is too
small. The units or the loudspeakers could fall
over and cause injury to persons or be damaged
themselves.
PLEASE NOTE
Other factors could damage the unit or even
destroy it.
• If the unit is left unsupervised for a longer
period (e.g. during a holiday), or if a thunderstorm
is threatening, disconnect the mains plug. Any
unexpected excessive voltage could otherwise
cause a defect.
• If you are absent for a longer period, remove the
batteries from the remote control. Leaky batteries
could damage the remote control.
• If the unit comes out of a cold into a warm
environment – e.g. after transport – condensation
can build up inside the unit. In such a case
leave the unit alone for at least 2 hours before
connecting and using it.
Improper use of the unit can cause damage or fire.
• Do not place any open sources of fire such as
burning candles or similar articles on top of the
unit.
• Ensure there is sufficient ventilation.
• Do not subject the unit to direct sunlight.
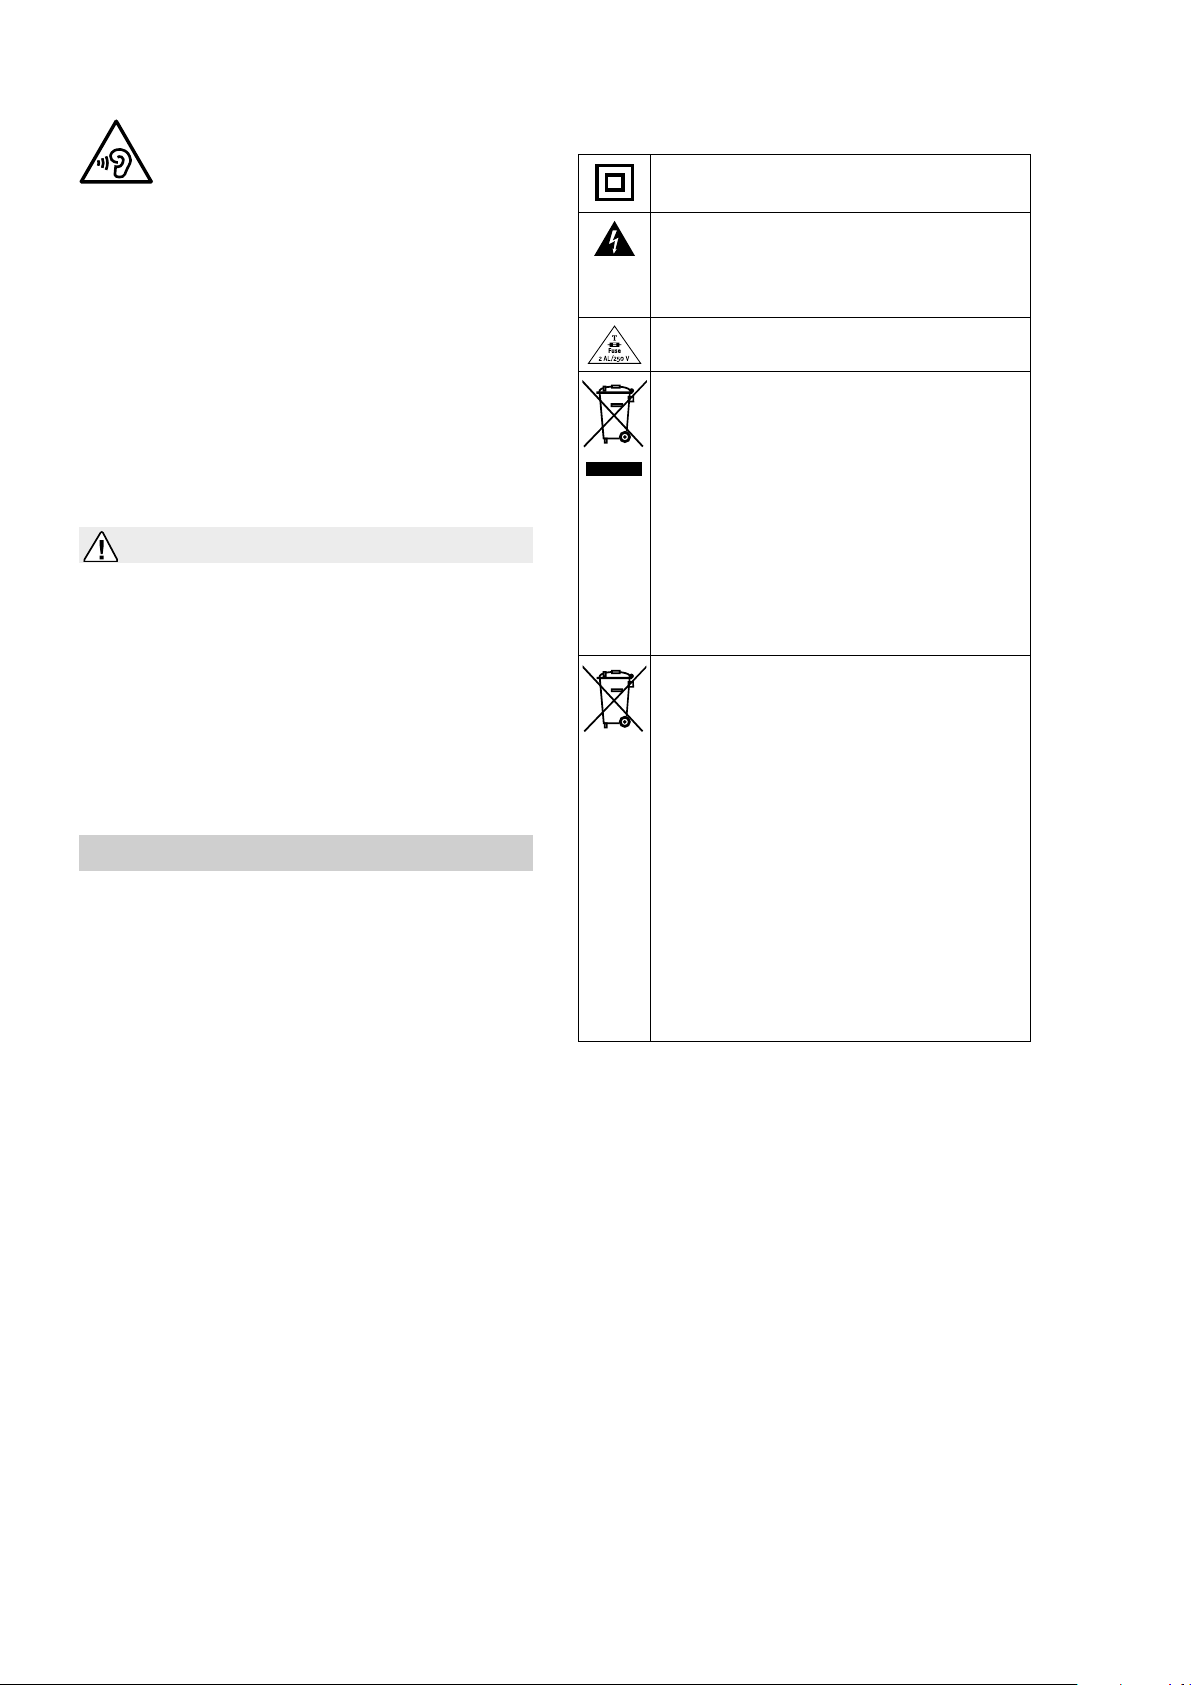
Explanation of symbols
Protection class II
Double insulation
Danger of electric shock – do not open
housing.
Disconnect from mains before exchanging
fuses.
Safety fuse T2 / 250 V
Old units must not be disposed of
with household waste!
If the unit is no longer suitable for use,
every consumer is legally obliged to
dispose of it separately from household
waste, e.g. at a specified local collection
point. This guarantees that all units are
recycled properly and any negative effects
on the environment are avoided.
That is why electrical apparatus is marked
with the symbol shown here.
Batteries and rechargeable batteries must
not be disposed of with household waste!
Every consumer is legally obliged to
dispose of all batteries and rechargeable
batteries, whether they contain damaging
substances*) or not, at a local collection
point or at a local dealer, so that
environmentally friendly disposal is
ensured.
Batteries and rechargeable batteries
should only be disposed of when they are
not charged!
*) marked with: Cd = Cadmium, Hg =
Mercury, Pb = Lead
PAGE 5
Control unit – Operating elements and connections
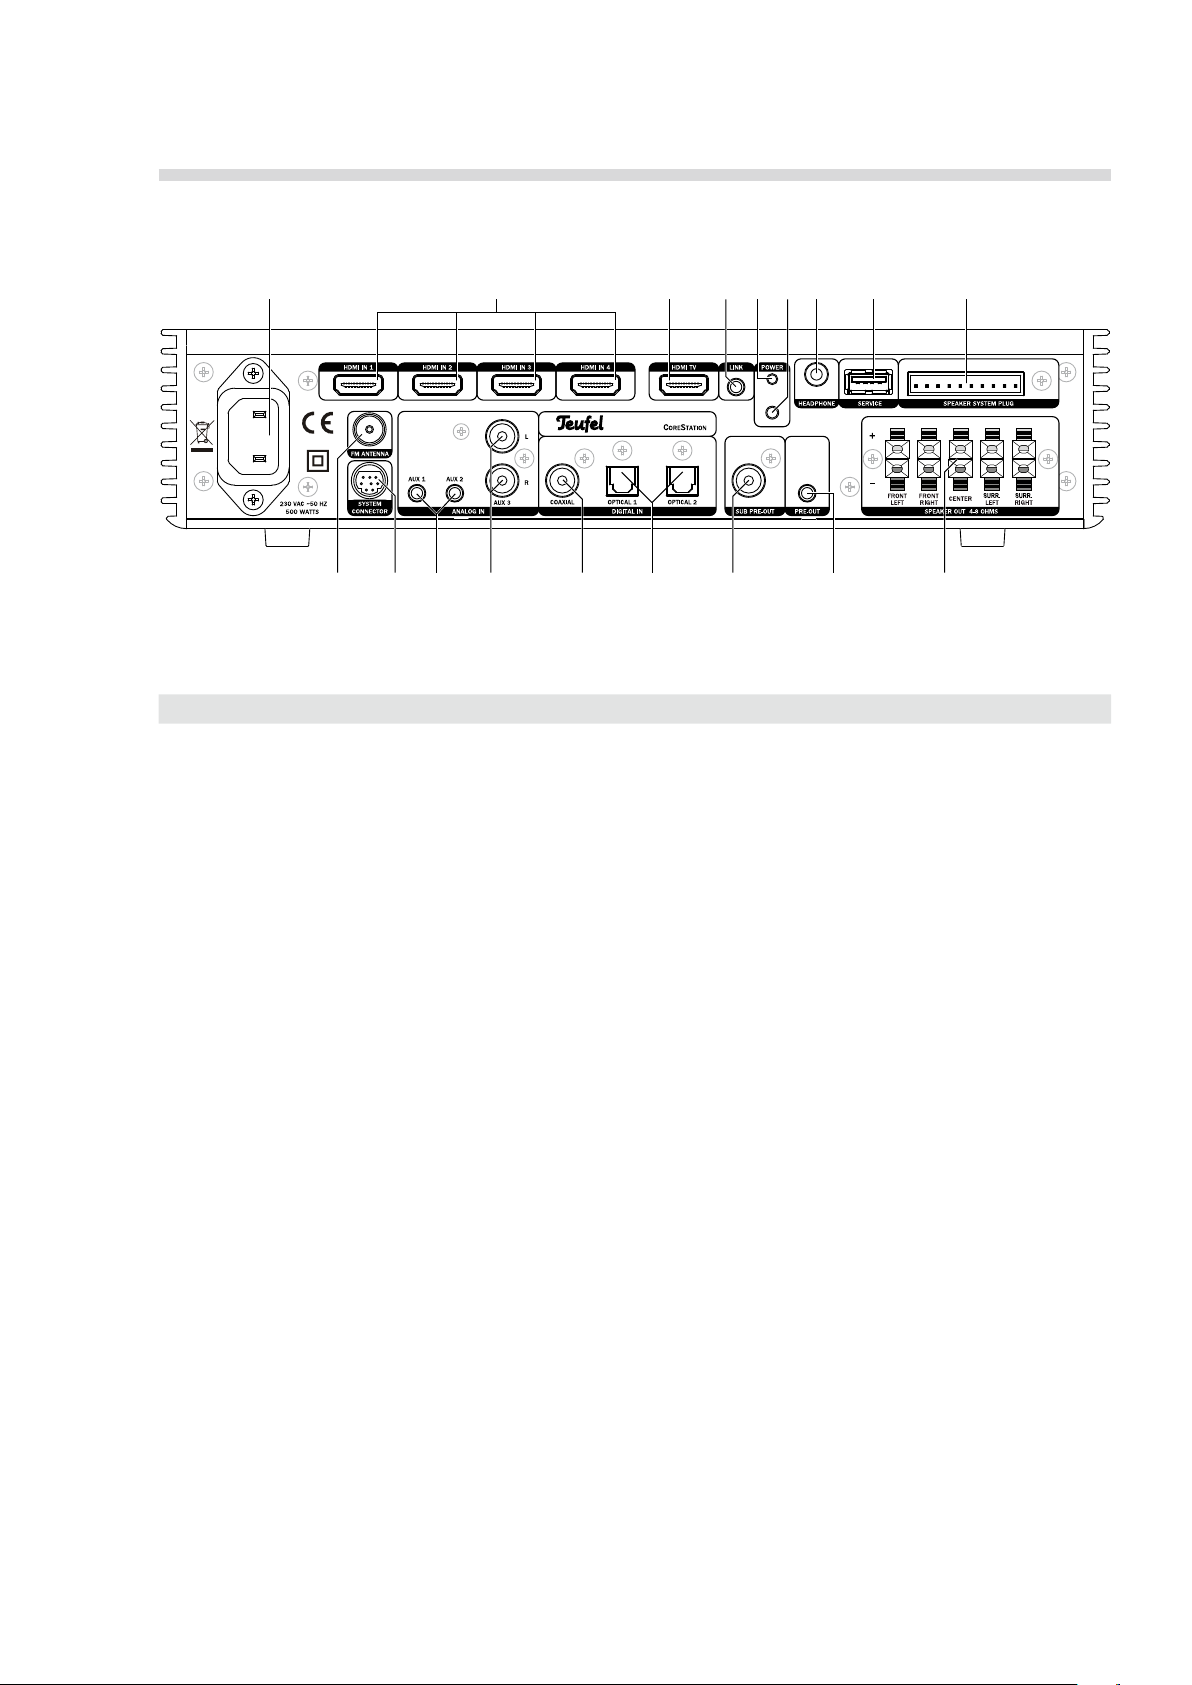
Control unit rear view
51 643 7 8 92
101112131416 151718
Pos. Name Description
1 —
2 HDMI IN 1–4
3 HDMI TV
4 LINK
5 POWER
6 —
7 HEADPHONE
8 SERVICE
9 SPEAKER
SYSTEM PLUG
10 SPEAKER OUT
4-8 OHM
11 PRE OUT
12 SUB PRE OUT
13 OPTICAL 1–2
14 COAXIAL
15 AUX 3
16 AUX 1–2
17 SYSTEM
CONNECTOR
18 FM ANTENNA
Connection jack for mains cable
Input jacks for external HDMI source devices
HDMI output jack to TV set
Connection jack for future extensions
Operation mode LED display
Key to switch unit on / to standby
Connection jack for headphones
USB connection (only for service)
Connection for loudspeaker system plug
Connection clips for loudspeakers
Analogue audio output jack
3.1 mode: stereo downmix
5.1 mode: surround channels
Line output jack for subwoofer
Digital audio input jacks for optical cables
Digital audio input jacks for coaxial cables
Analogue audio input jacks (cinch)
Analogue audio input jacks (3.5 mm jack plug)
Connection jack for future extensions
Connection for FM (VHF) antenna
PAGE 6
Control unit front view
19
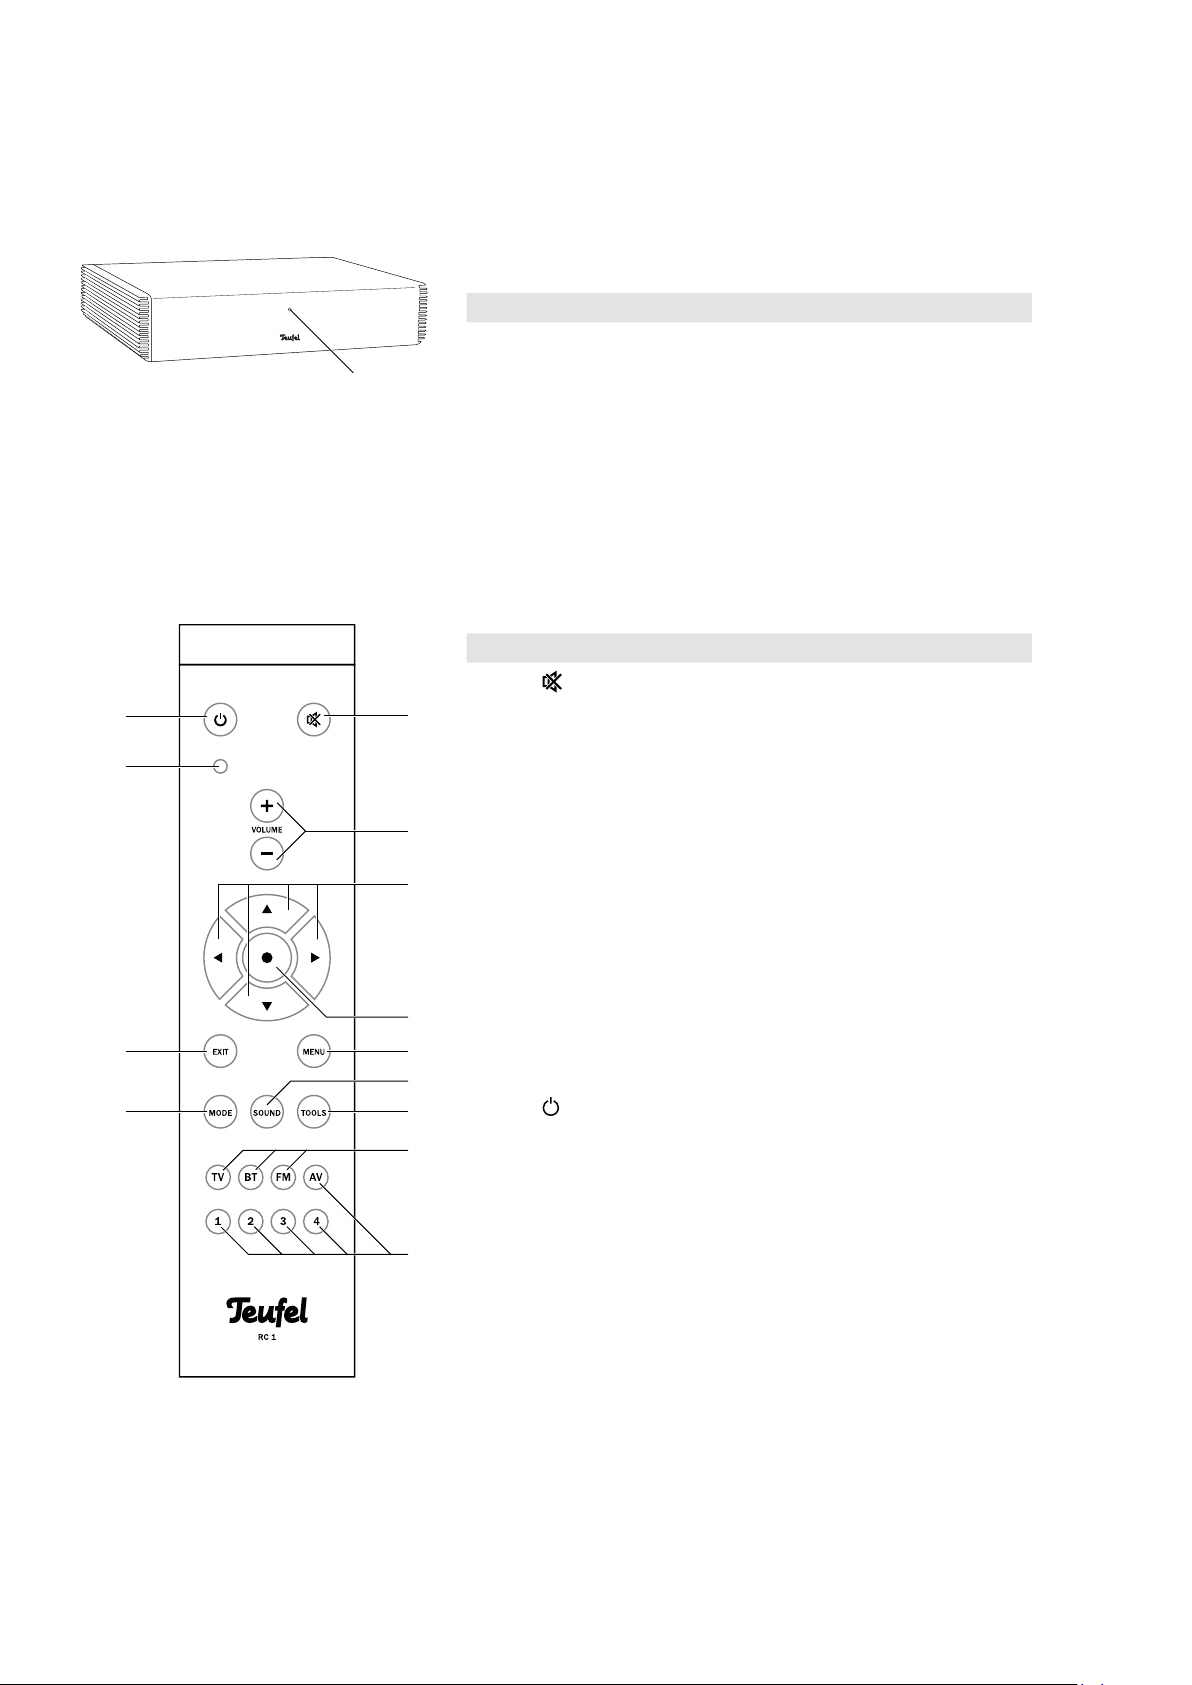
Remote control RC 1
32
31
30
29
Pos. Name Description
19 —
Pos. Name Description
20
20
21
22
23
24
25
26
21 VOLU M E +/–
22
◄ ►▲▼
23 •
24 MENU
25 SOUND
26 TOOLS
27 TV, BT, FM
28 AV, 1, 2, 3, 4
29 MODE
30 EXIT
31 —
32
Function LED
Mute (switch sound on and off)
Lower (-) / increase (+) volume
Setting buttons
Enter button
Access main menu
Access tone setting
Access “System Setup” menu
Select source device TV, Bluetooth or
radio directly
Programmable source device buttons
Switching over surround mode
Leave menu
LED signal (blinks every time a command
is successfully transmitted by the remote
control)
Switch unit on / to Standby
27
28
PAGE 7

Connecting control unit
WARNING
Danger of injury / damage!!
Lay out cables so that they cannot be tripped over.
FM (VHF) antenna
WARNING
Danger of electrical shock!
If you use an outside or roof antenna, be sure that
the antenna is correctly protected against lightning.
Connect the antenna for receiving FM/VHF stations
to the FM ANTENNA jack (18).
This can be a roof/outside antenna or a cable TV
connection. To do so you require a coax connection
cable.
If no antenna connection is available at the site, you
can use the loose antenna supplied d. Push the plug
of the antenna into the FM ANTENNA jack (18) and
alter the position of the loose antenna until you get
the best reception. Then fix the antenna in position.
18
d
Input jacks for source devices
The control unit provides you with 4 HDMI input jacks
for digital audio/video signals (HDMI 1, 2, 3 and 4),
three analogue sound input jacks (AUX 1, 2 and 3) as
well as one coaxial and two optical digital sound input
jacks.
HDMI 1, 2, 3 and 4
You can connect one HDMI source device with digital
picture and sound signals (e.g. PC, Blu-ray player or
games console) to each of the jacks (2). To do so you
require an HDMI cable for each device.
If the device does not transmit sound via HDMI, you
can allocate this device to one of the sound input
jacks of the control unit in the “Audio mapping”
menu (see page 18).
OPTICAL 1 AND 2
You can connect the optical digital sound output
jacks of two source devices to the OPTICAL jacks
(13). To do so you require an optical cable with a
TOSLINK plug for each device.
2
13
PAGE 8
COAXIAL
You can connect the coaxial digital sound output jack
of a source device to the COAXIAL jack (14). To do so
you require a coaxial cable with cinch plugs.
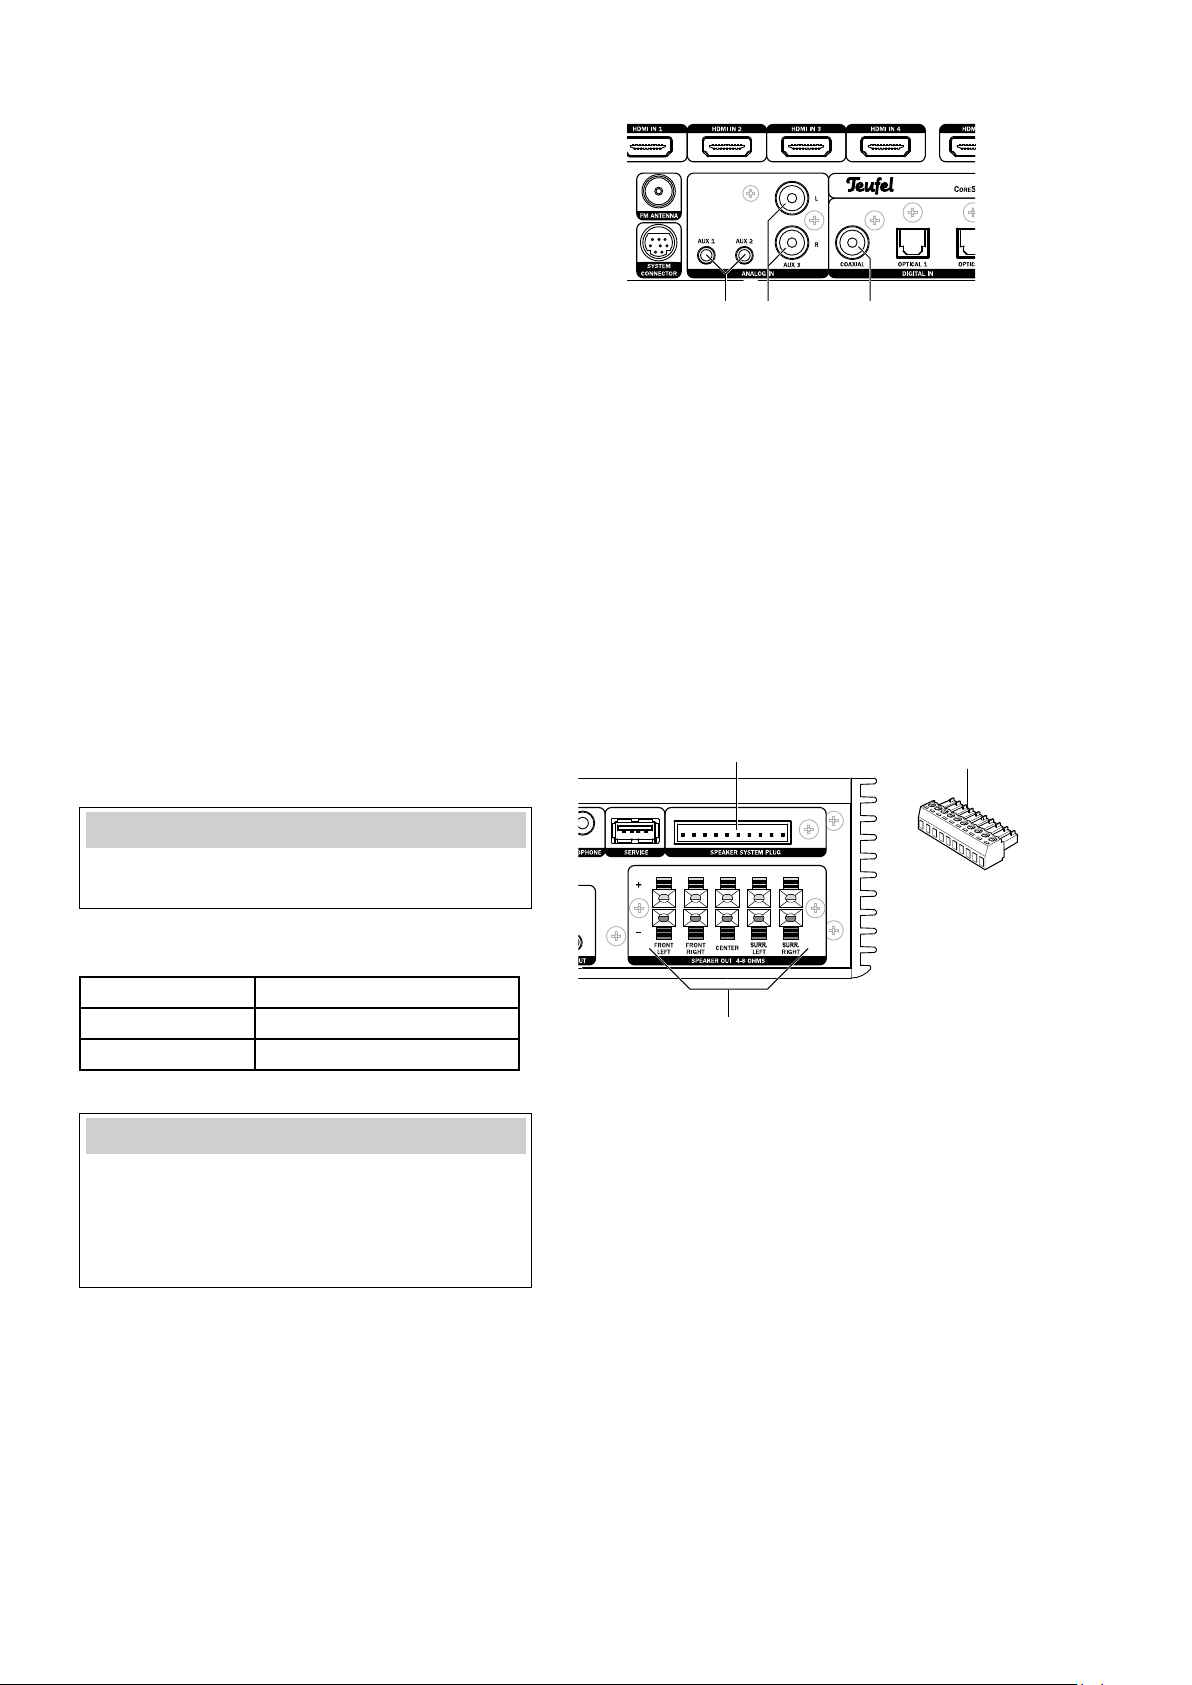
AUX 1, 2 and 3
You can connect source devices with analogue sound
to the jacks (15) and (16). The AUX 3 jacks (15) are
cinch jacks for connecting e.g. a cassette or tape
recorder. The AUX 1 and AUX 2 jacks are both 3.5 mm
jack plugs for connecting e.g. an MP3 player.
Output jacks
Loudspeaker output jacks
The control unit has output stages for 5 loudspeakers
– only the active subwoofer is connected by a cinch
cable or remote control.
To connect loudspeakers, use high-quality twin-lead
loudspeaker wires with at least 1 mm² diameter
if possible. Corresponding cables can be ordered
from our webshop (www.teufelaudio.com) in the
“Accessories” section.
To connect the loudspeakers you can use the
connection terminal SPEAKER OUT (10) or the
SPEAKER SYSTEM PLUG (9) connection and the
system plug supplied .
141516
9
NOTE
Use either the connection terminal or the system plug
– never use both at the same time.
Connect the loudspeakers to the connection terminal
SPEAKER OUT (10) as follows:
FRONT LEFT/RIGHT front channels left/right
CENTER centre channel
SURR. LEFT/RIGHT rear channels left/right
The clips are each marked red (+) and black (-).
NOTE
Ensure the polarity is correct!
Connect the clips to the same colours. Otherwise
the sound quality will suffer. The leads of the
loudspeaker cables are marked by different colours
or shapes.
• Connect the clips to the same colours. Otherwise
the sound quality will suffer. The leads of the
loud speaker cables are marked by different colours
or
shapes.
10
PAGE 9
• Separate the wires to about 30 mm and remove
about 10 mm of the insulation in each case. Twist
the wire so that no threads are protruding.
Soldering is not necessary.
• Press the levers of the connection clip and feed
the cable end into the corresponding aperture.
When the levers are released, the cable is fixed in
position.
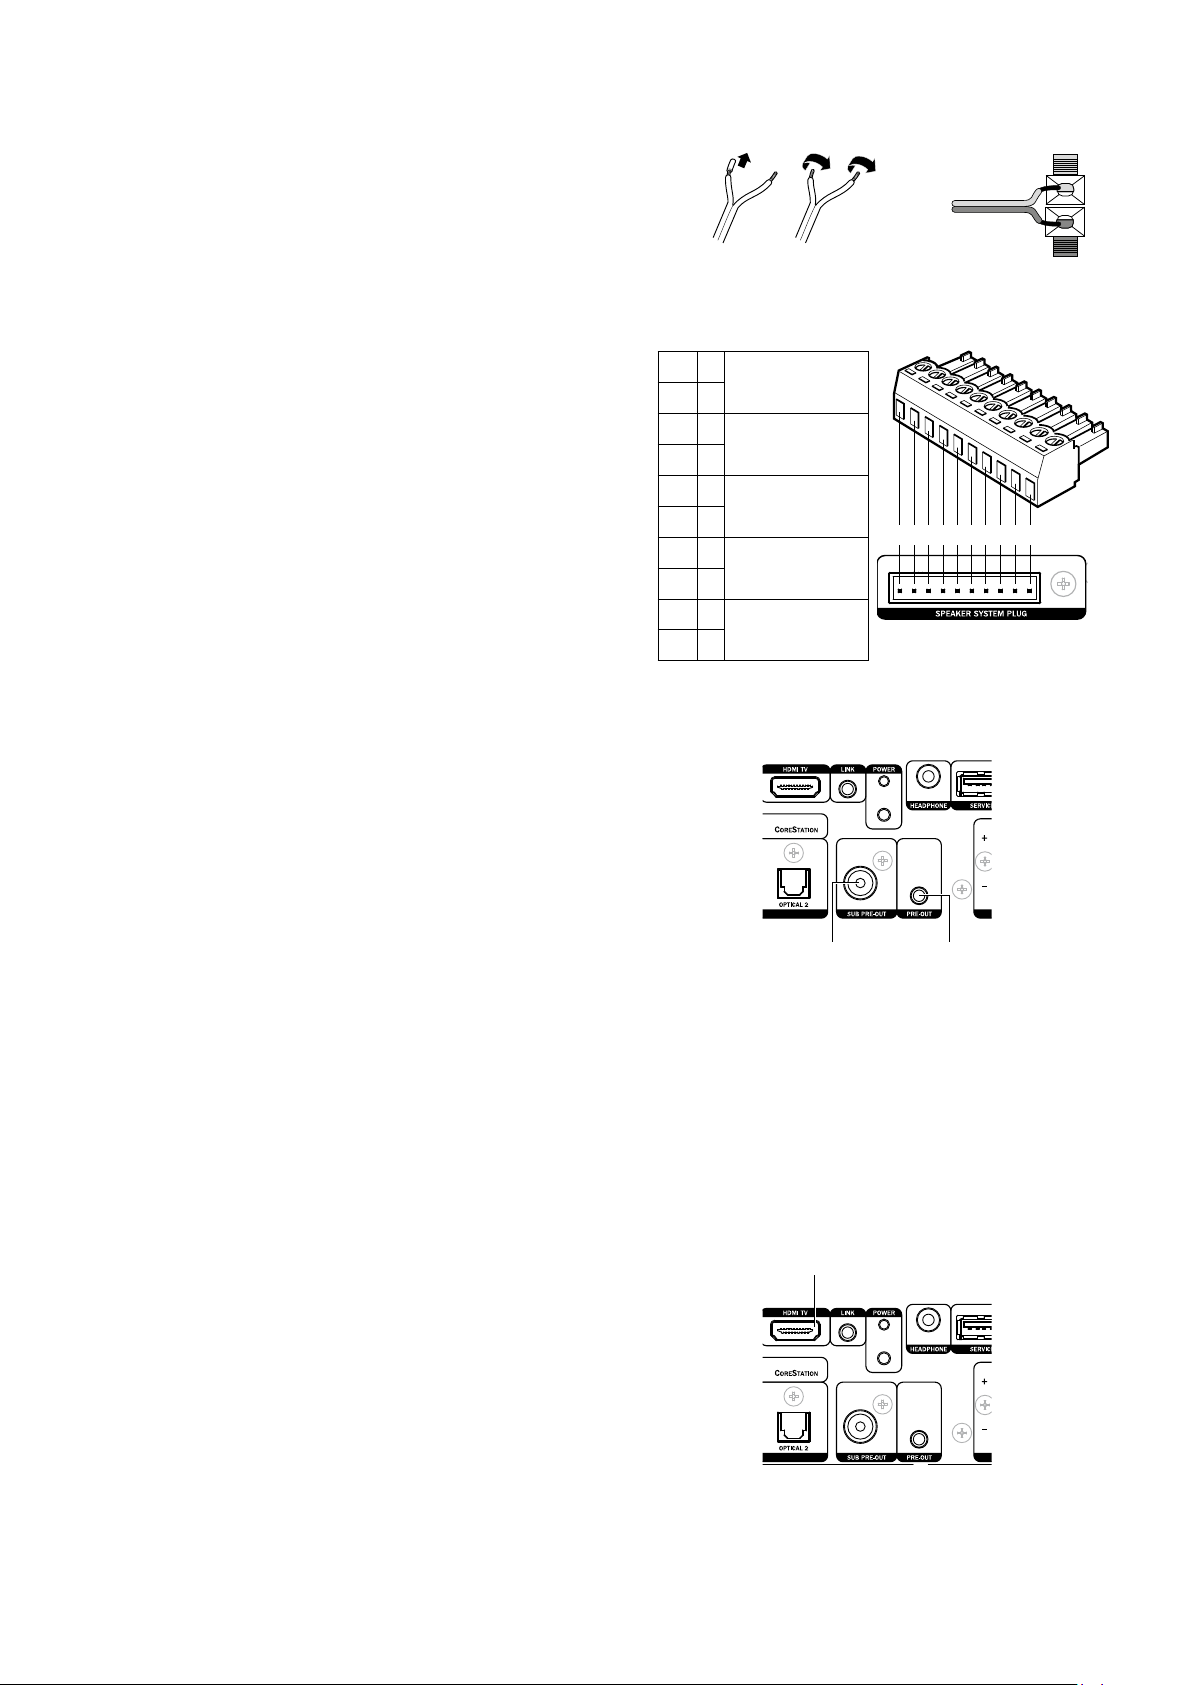
Connect the loudspeakers with a system plug in
accordance with the adjacent table:
• Separate the wires to about 20 mm and remove
about 6-7 mm of the insulation in each case. Twist
the wire so that no threads are protruding.
Soldering is not necessary.
• Feed the cable end into the corresponding
aperture and screw it tight.
• After connecting all the cables, push the system
plug into the SPEAKER SYSTEM PLUG (9) jack as
far as it goes.
Subwoofer
You can connect an active subwoofer to the SUB PRE
OUT jack (12) with a cinch cable.
If you are using an active subwoofer with a remote
control, activate the connection in the “System
Setup” menu (see “Wireless” on page 21).
Pre Out
The functions of the PRE OUT analogue output jack
(11) can be determined in the “System configuration”
menu (see “3.1/5.1” on page 21):
3.1-mode Convert the 5.1 sound signal to the 2
stereo channels (2.0) (downmix), for
example to transmit sound to a second
room.
5.1-mode Output from the rear channels
(surround).
1 +
2 –
3 +
4 –
5 +
6 –
7 +
8 –
9 +
10 –
Front channel
left
Front channel
right
Centre channel
1 2 3 4 5 6 7 8 9 10
Rear channel
left
Rear channel
right
1112
You can connect your end amplifiers or active
loudspeakers or even a remote control transmission
system (for example the Teufel RearStation 4) to
these jacks. To do so you require a stereo cable with
3.5 mm stereo jacks.
TV set
Connect your TV set or your projector to the HDMI TV
jack (3) . To do so you require an HDMI cable.
If your TV set does not transmit sound via HDMI ARC,
you can allocate your TV set to one of the sound input
jacks of the control unit in the “Audio mapping” menu
(see page 18).
PAGE 10
3
 Loading...