

Page 1

TFT LCD MONITOR
User's Manual
Page 2
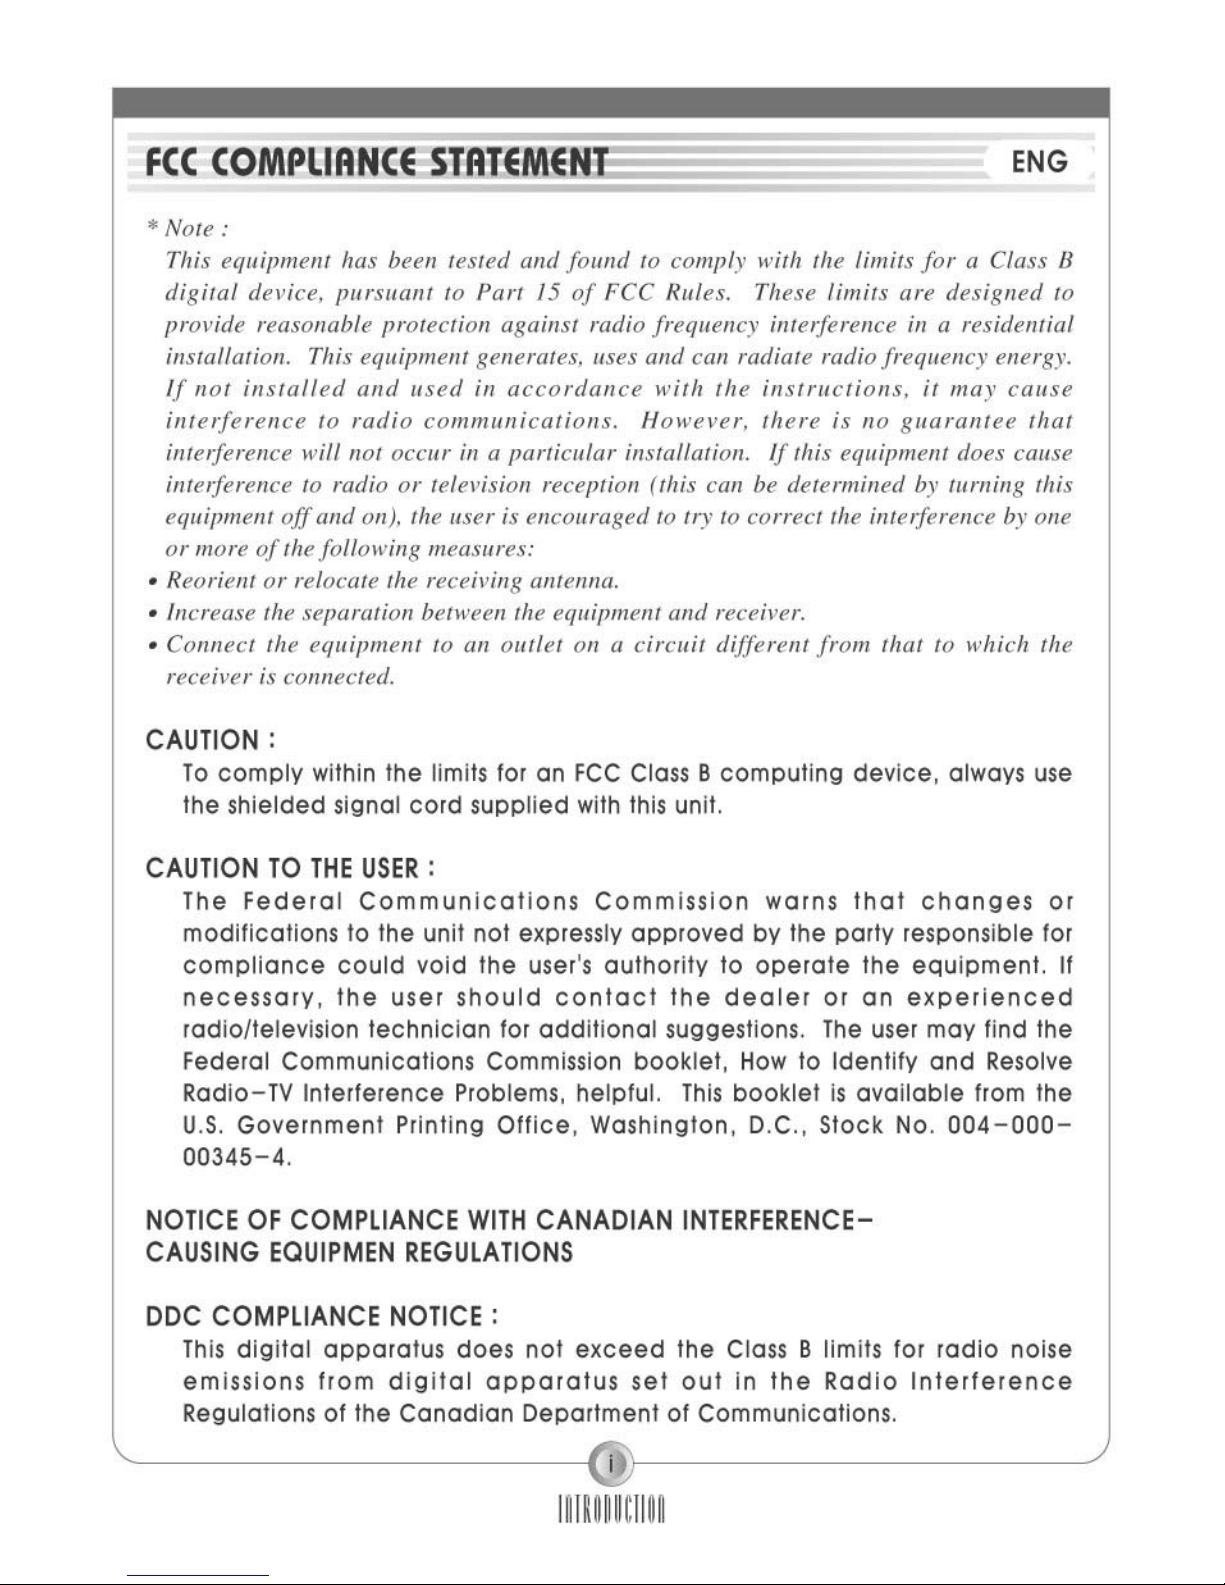
Page 3
2
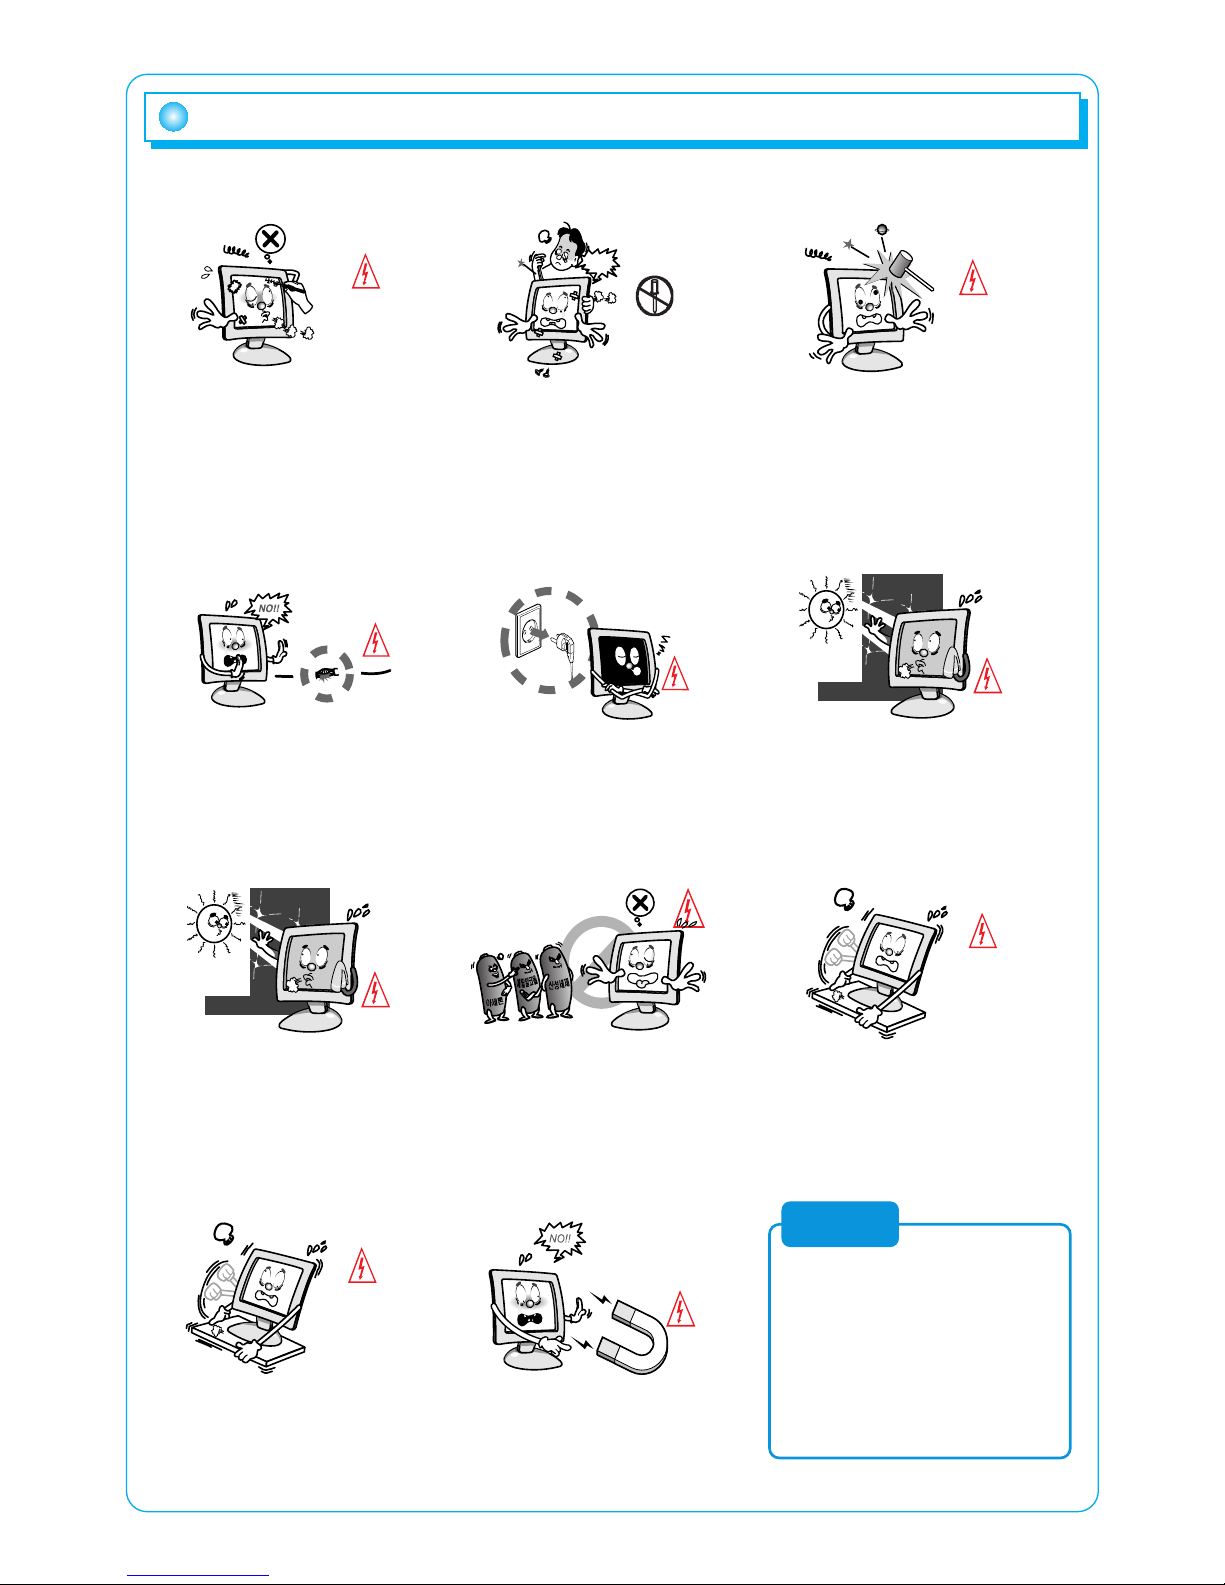
Please read the cautions carefully before using this product
Do not scratch the screen of the
LCD monitor with sharp
materials such as nails and
pens.
The interior part of the monitor is
composed of electric elements. If
the monitor is broken, do not try
to disassemble it, because it is
necessary to contact appropriate
technical services in order to
have the product repaired.
Take care of the LCD monitor so
that it is not damaged by the
external impact.
Take care not to use damaged
cords and keep this product out
of reach of children and persons
who are not involved in using the
product.
Disconnect the power cable
when the monitor is not used
during a long period of time while
you are away from home.
Do not use this product near the
windows receiving direct sunlight
or direct natural light.
Choose a fresh and dry area and
protect the monitor from extreme
conditions of temperature and
humidity, dust and smoke.
Adequate temperature = 0-40°∆C.
Adequate humidity = 30-80 RH
The LCD monitor screen can be
damaged in the case that you
clean the surface by using
acetone, ethyl alcohol or acid
detergent.
Do not install the monitor in a
sloping place that is not safe due
to the fact that the product can fall
down and be broken, thus doing
harm to other persons.
Check the power voltage before
connecting to the AC power
cable.
Take care so that the monitor is
not in contact with magnetic
materials, metals and inflammable
substances.
Note
This product uses the TFT LCD panel
produced using state-of-the-art technology.
The TFT LCD panel consists of millions of
pixels and there is much probability of
occurrence of bad pixels. Due to this
reason, red, blue and green pixels may
seem to shine and some black pixels may
be visible. But this does not mean that the
quality of this product is bad. You can use
this product without worrying about the
worsening of product performance.
Page 4
3
Introduction
Thank you for buying our TFT LCD monitor.
Our monitor is a high-resolution monitor that has features of electromagnetic
wave blocking, reduction in electricity consumption, and efficient use of space.
In view of the fact that this user's manual is prepared for helping you to
adequately use the product, it is recommendable to read the user's manual
before using the product.
Product features
1) This product has a 15-inch flat surface (Color Active Matrix TFT LCD) with
a pixel size of 0.297 mm (H) x 0.297 mm (V) for displaying an ultraprecision, high-resolution image.
2) This product uses TFT (Thin Film Transistor) LCD panel and supports a
maximum of 1024 x 768.
3) This product is a monitor whose deflection frequency is automatically
transformed up to 30 - 80 kHz horizontally and up to 56 - 75 Hz vertically.
4) This product is compatible with IBM PC and Apple Macintosh
(a different adapter is necessary for Apple Macintosh).
5) This product has a power-saving function less than 40 W in ON mode,
less than 3 W in stand-by mode, less than 3 W in pause mode and less than
3 W in OFF mode in comparison with other monitors.
6) This product weighs just 1.7 kg.
7) This product supports DDC and allows you to use 'Plug and Play'.
Product features
In the case of some system requirements, it may not be compatible with
Plug and Play.
Registered as a device whose electromagnetic wave-blocking capacity is
adequate (B Class).
This product is registered as a device whose electromagnetic wave-blocking
capacity is adequate and can be used in all places (including homes).
Note
Page 5
Checking the product
Please check if the product contains the following items. If there are some
items missing, please contact the technical services.
1. TFT LCD monitor
2. User's manual (including product warranty).
3. AC to DC adapter.
4. Power cable
(the power cable can be different according to use environment).
5. Floppy diskette.
Cautions when installing the product
1. Install the product in a safe place.
2. Install the product in a place without either moisture or dust.
3. Do not install the product near direct sunlight or heating devices.
Installation
1. Turn off the power connected to the monitor before connecting to an
external device.
2. Power connection
Connect the adapter to the DC jack connected to the signal cable of the
monitor and connect the power cable.
3. Signal connection
This signal input terminal is a D-SUB connector. Connect the signal cable
to the signal input of the computer.
4. Turn on the power of the monitor.
5. Turn on the power of the system that you want to use.
6. Continue with the operation when the screen appears. You can adjust the
desired status of the screen using control buttons at
the bottom of the monitor.
7. If you wan to finish the operation, turn off the system power and then turn
off the power of the monitor.
4
Installation of the product
Page 6
5
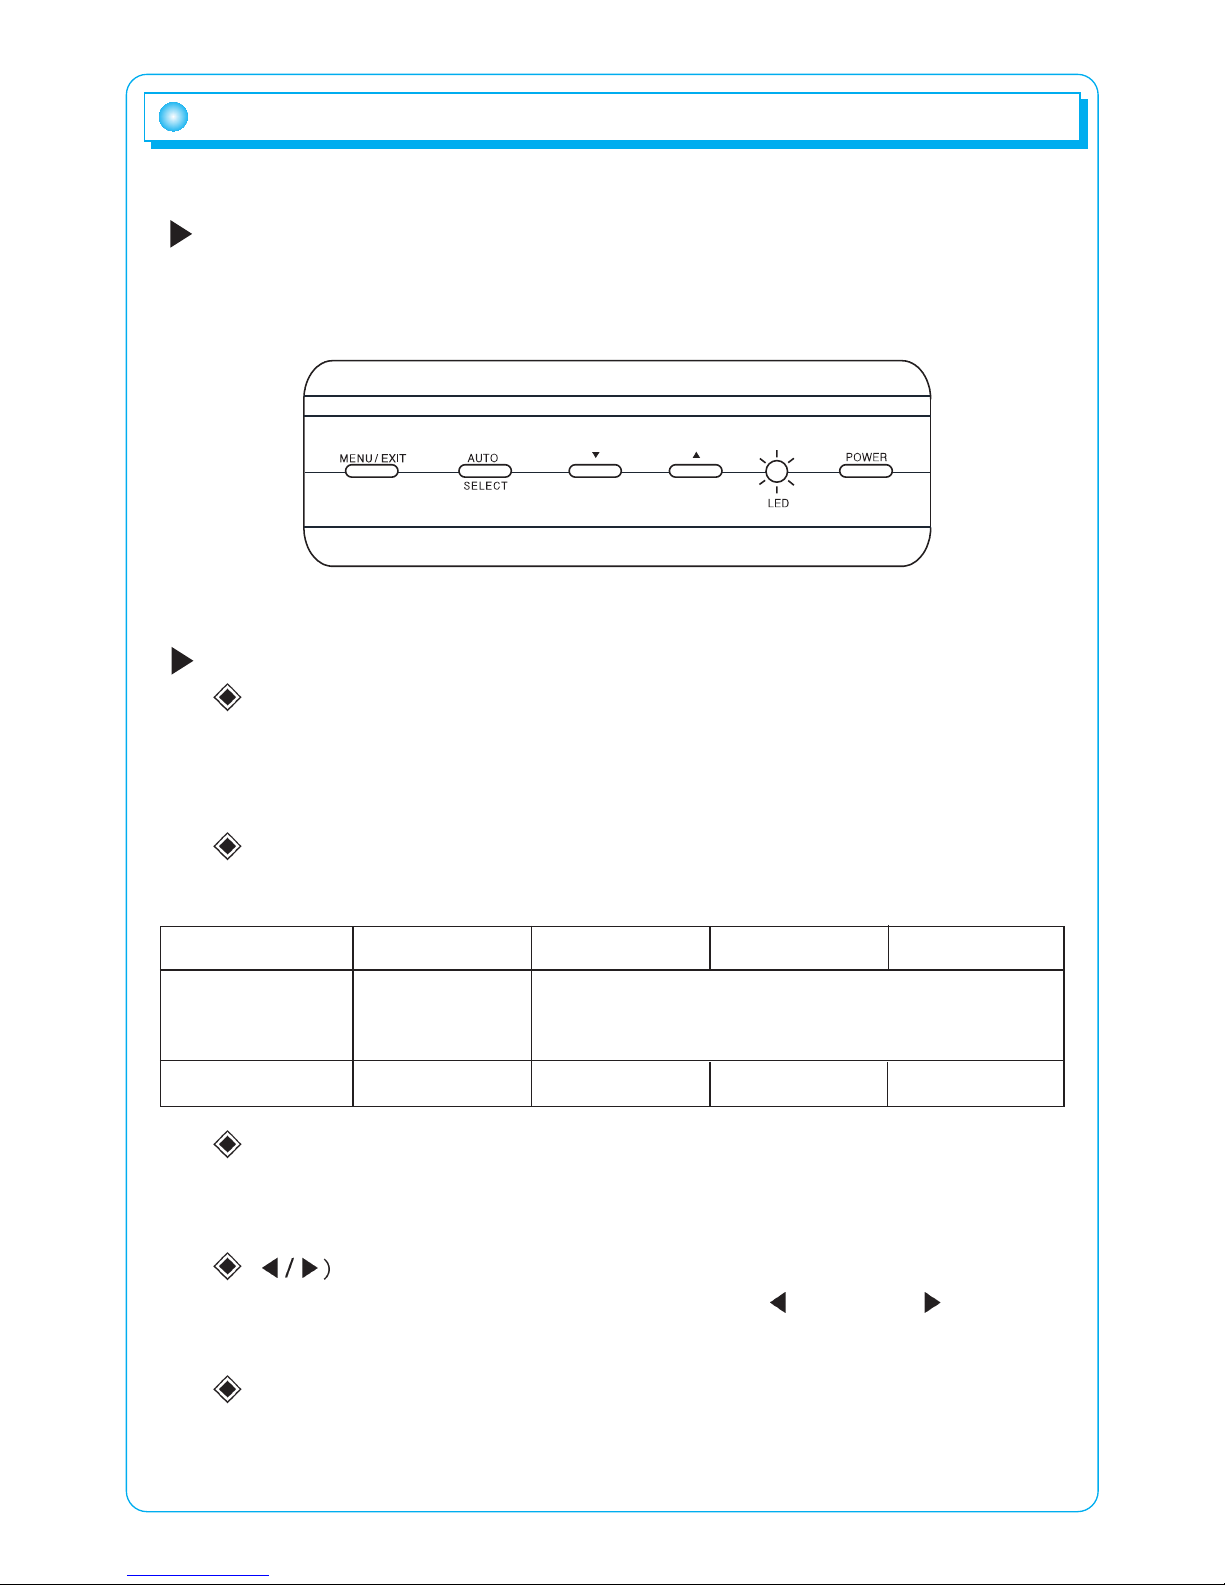
Names and operation of control buttons
Names and operation of control buttons
This monitor has several control buttons. They can be used according to
the user preference.
Function of the buttons
Power button (POWER)
If you press the power button, the indicator lamp is turned on, and the
operation of the monitor is initiated. If you do not want to start the
operation of the monitor, press the power button again.
Power indicator lamp (green)
Considering that this product has a power-saving function, if the power
cable is connected, the power indicator lamp is shown as follows.
MENU
If you press the menu button, the OSD (On-Screen Display) menu window
appears.
(
You can choose the desired item using the button (decrease)/ (increase)
in the OSD menu, or you can modify the selected values.
AUTO/SELECT button
If you press AUTO/SELECT button in the screen status, it is automatically
adjusted for the optimal size and optimal position, and if you press the
button, it functions as a selection button.
MODE ON STAND BY SUSPEND OFF
Screen Active Blanked Blanked Blanked
Green
Green
(blinks every second)
Power indicator
lamp
Page 7
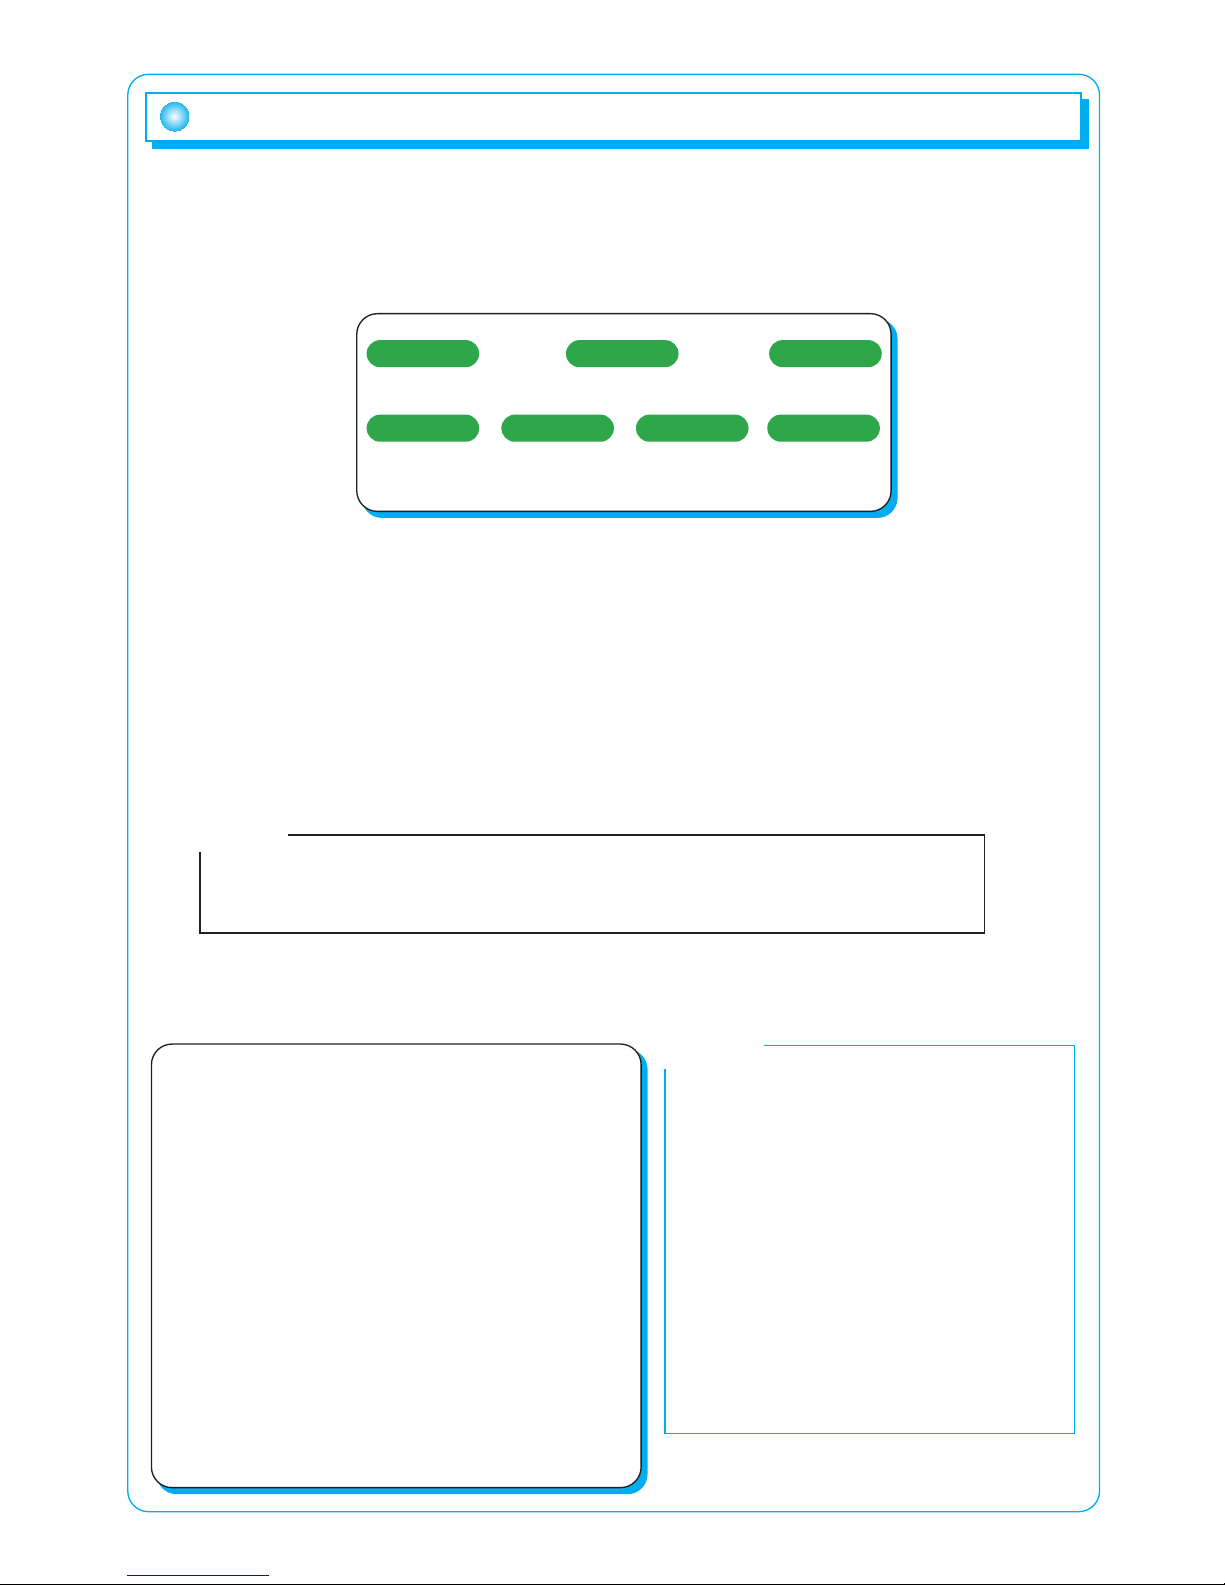
You can select the OSD menu in the OSD window using all the control buttons at
the bottom of the screen. To change the current settings or adjust them for the
desired settings, follow the following steps.
1. Press the Menu button to open the OSD menu window.
2. Press the ◀/▶button to move the item of desired main menu.
3. If you highlight the desired menu item, press the Select button.
4. Press the ◀/▶button to move the desired sub-menu item.
5. If you highlight the sub-menu item, press the Select button.
6. Press the ◀/▶button to modify the current value.
7. Press the Select button to save the modified value.
8. To close the OSD menu window, press the Menu button or choose 'Exit (Salir)
in the sub-menu window.
The menu that can be configured by the user in this product uses the pulldown menu. The main menus are as follows.
6
Selection and operation of the OSD menu
MENU
SELECT
MENU
SELECT SELECT
(Select the menu item)
(Select the
main item)
(Select the
main item)
(Exit the OSD
menu window)
The OSD window will disappear within a few seconds if there is no input in the
OSD window. It does not appear when there is no input signal.
Note
1. Color
Adjusts brightness, contrast, sharpness and
saturation.
2. Image
Adjusts the position and sharpness of the
screen.
3. Function
Adjusts the position, sharpness and
saturation of the screen.
4. OSD menu
Adjusts the language used, the position of the
menu screen, the display time of the menu
screen and the saturation of the menu screen.
5. Miscellaneous
Configures a certain screen status and
initializes the menu value.
Each menu has its corresponding
items.
You can modify the value after
selecting the desired item according
to the selection method and OSD
menu operation in the previous
chapter.
If you choose the menu, the icon
corresponding to the chosen menu
blinks, and the selected menu
appears in the menu selection
screen.
Note
/
/
Page 8
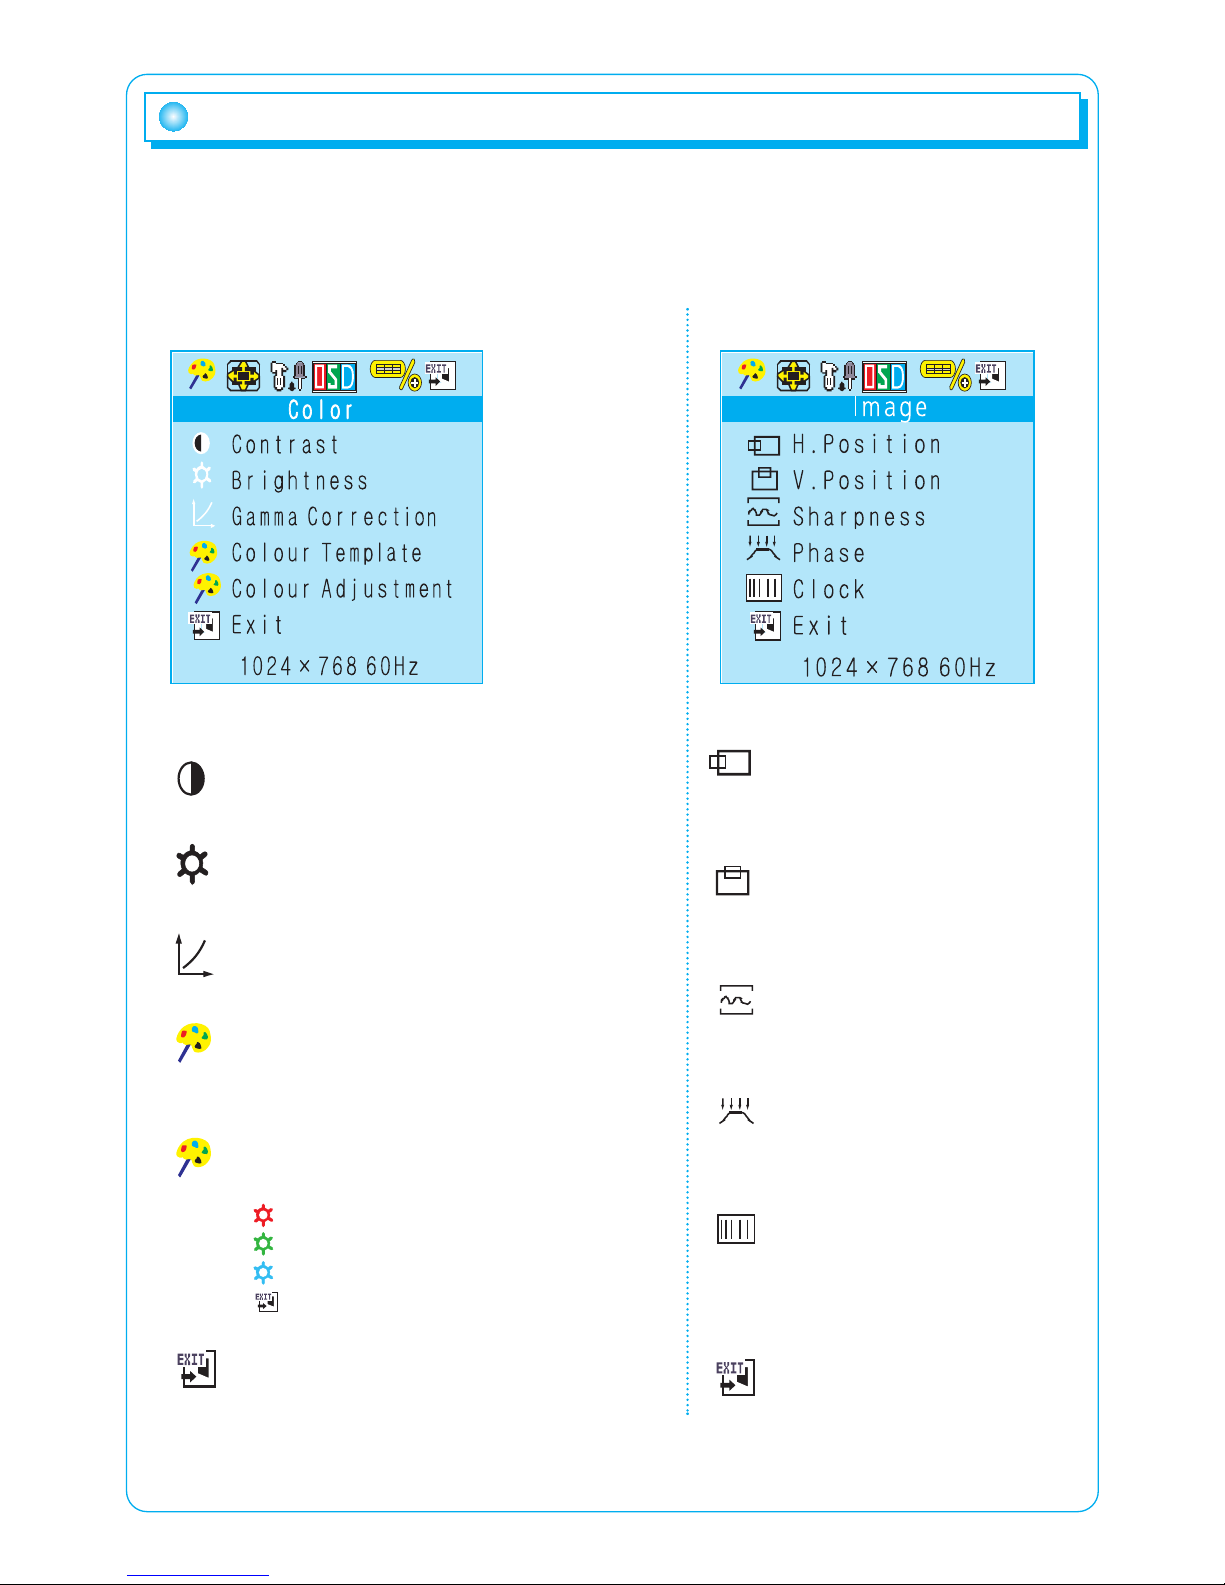
1. Color menu
If you press the menu button, the following
screen appears.
ï\é¶Window
Contrast
Adjusts contrast. 0 ~ 100
Brightness
Adjusts brightness. 0 ~ 100
Gamma correction
Adjusts the clarity of color. 0 ~ 31
Color template
Adjusts the color desired by the user.
19300. 6500. 5000. User.
Color adjustment
Adjusts colors (red, green and blue).
- Red: Adjusts color saturation. 0 ~ 100
- Green: Adjusts color saturation. 0 ~ 100
- Blue: Adjusts color saturation. 0 ~ 100
- Exit: Exits the current setting.
Exit
Exits the current menu.
7
Menu
2. Image menu
Horizontal position
Adjusts the horizontal position
of the current screen. 0 ~ 100
Vertical position
Adjusts the vertical position
of the current screen. 0 ~ 100
Sharpness
Modifies sharpness of the
screen. 0 ~ 50 0 ~ 31
Phase
Adjusts the center of the
current screen. 0 ~ 30
Clock
Increases or decreases the
number of pixel to adjust the
horizontal size.
Exit
Exits the current menu.
Main menu screen
Menu selection
screen
Submenu screen
Current screen
status
Page 9
8
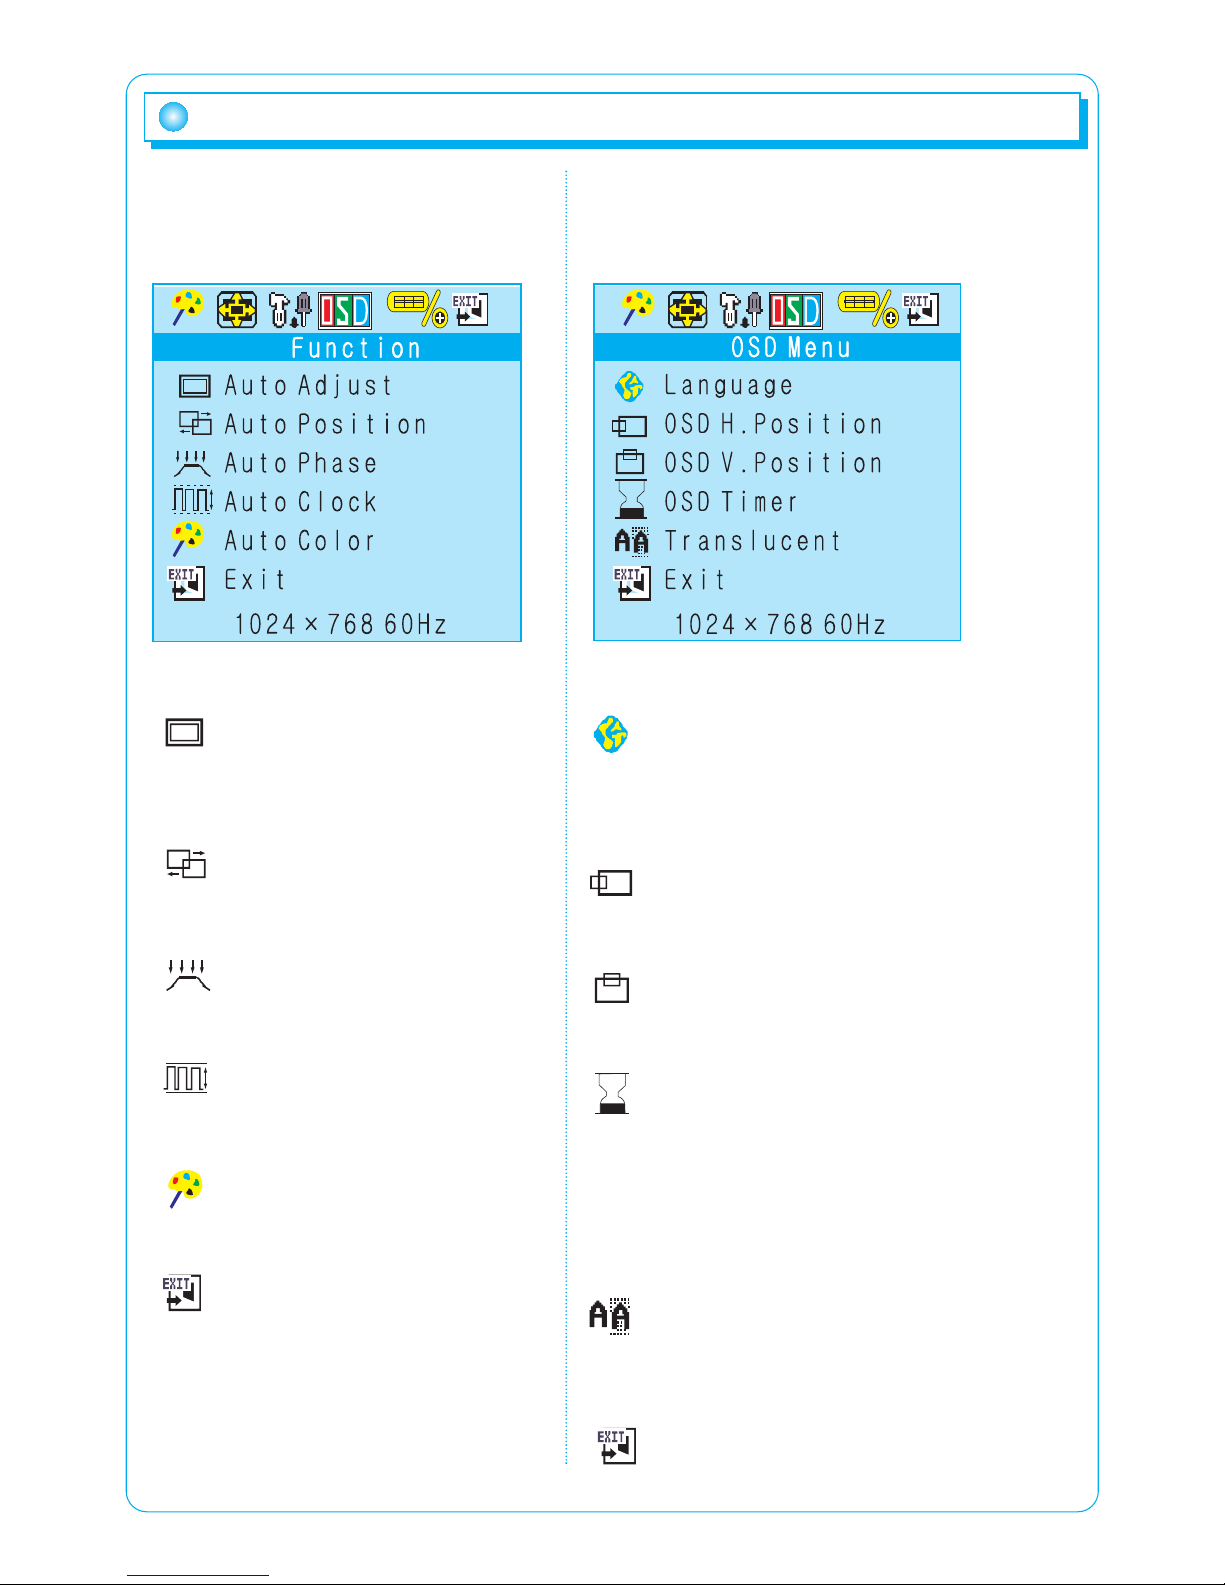
3. Function menu 4. OSD menu
Auto-Adjust
Configures Auto-Position, AutoPhase, Auto-Clock and AutoColor at the same time.
Auto-Position
Adjusts the position of the
screen automatically.
Auto-Phase
Adjusts the center of the screen
automatically.
Auto-Clock
Adjusts the pixel size of the
screen automatically.
Auto-Color
Adjusts the colors of the screen
automatically.
Exit
Exits the current menu.
Menu
Language
Configures the language used in the OSD
menu. The languages are as follows: English,
German, French, Italian, Spanish, Chinese
Simplified, Chinese Traditional and Japanese.
OSD horizontal position
Adjusts the horizontal position of the OSD
menu screen. 00 ~ 110
OSD vertical position
Adjusts the vertical position of the OSD menu
screen. 00 ~ 110
OSD timer
- On:
The OSD menu screen disappears
after a certain time period.
- Off: The OSD menu screen does not
disappear even after a certain time
period.Press the Menu button in
order for the OSD menu screen to
disappear.
Translucent
- On:
Switches the OSD menu screen to
the translucent mode.
- Off:
Disables the translucent mode.
Exit
Exits the current menu.
Page 10
9
Menu
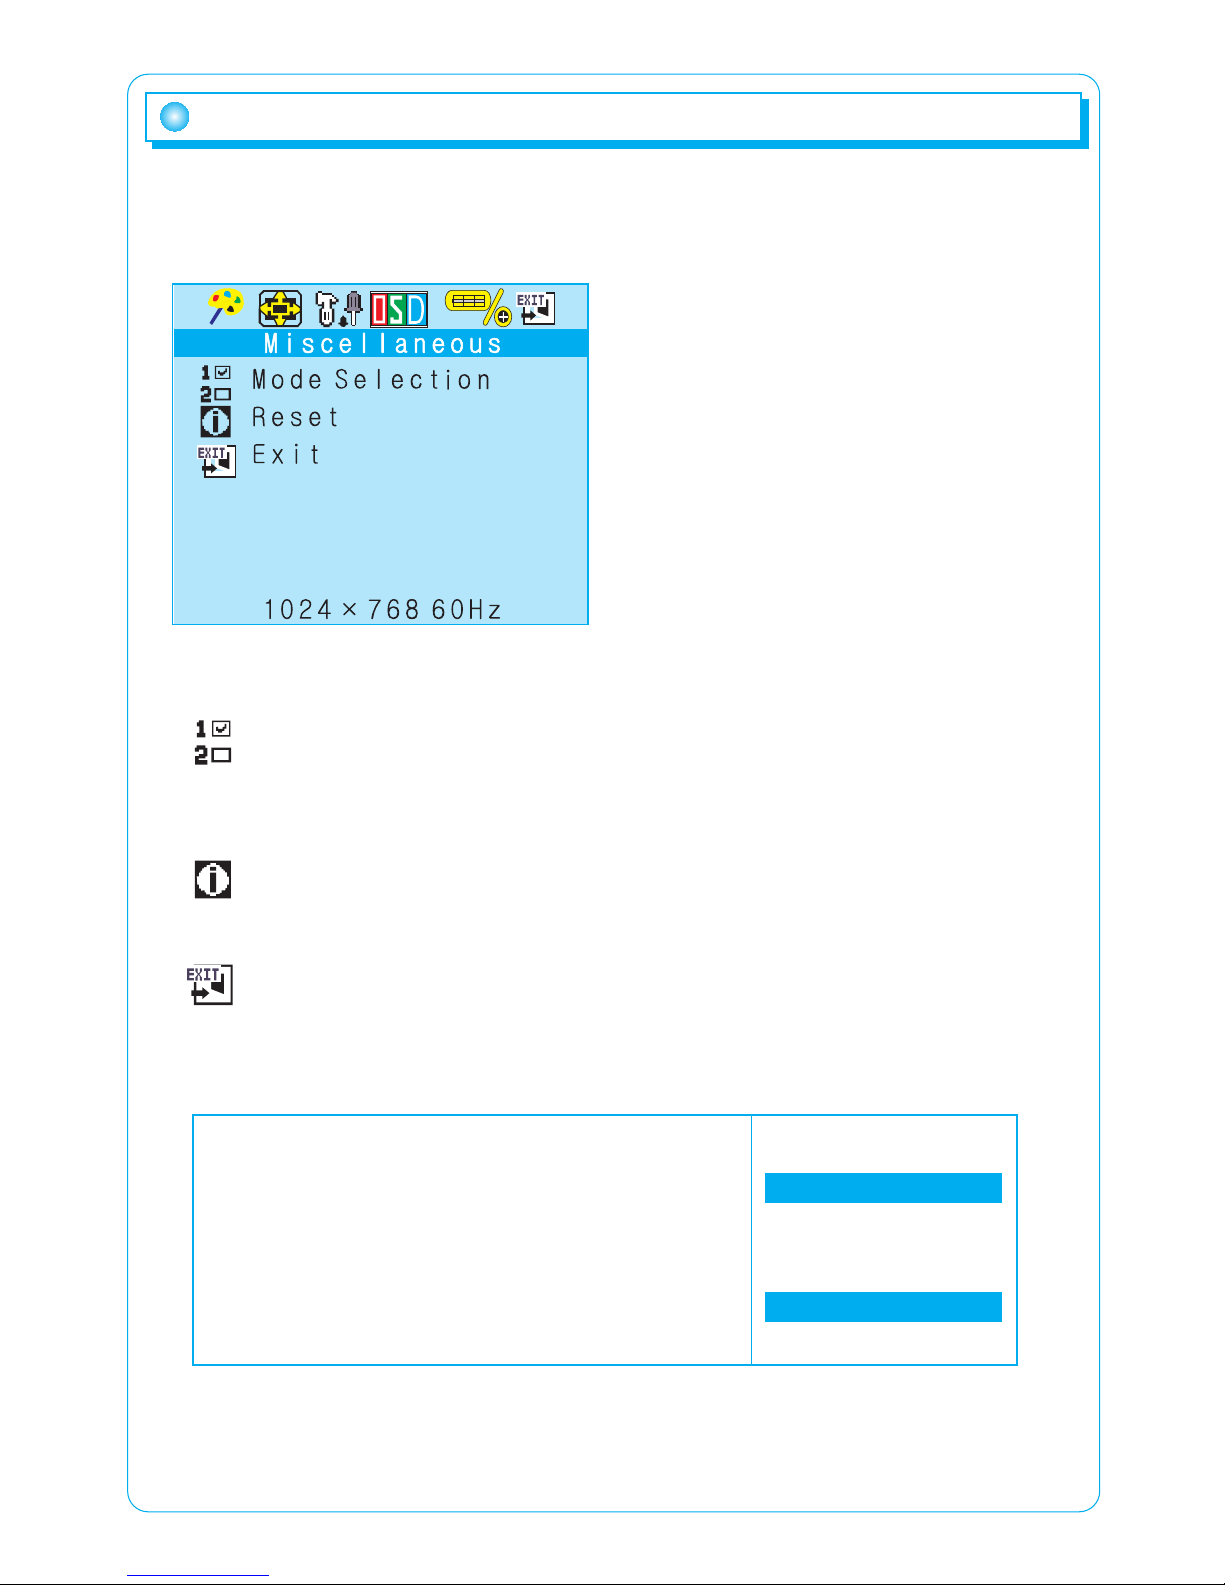
5. Miscellaneous
Mode selection
- 640 x 400: Optimizes the screen status for the status of 640 x 240.
- 720 x 400: Optimizes the screen status for the status of 720 x 400.
Reset
Resets all the functions.
Exit
Exits the current menu.
Description of operation messages
Cable not connected
It appears when there is no input signal from the
computer.
If the message disappears, the monitor status is
changed to energy-saving mode.
Signal out of range
It appears when the input signal is out of range.
Cable Not Connected
Signal Out of Range
Page 11
Timing guide
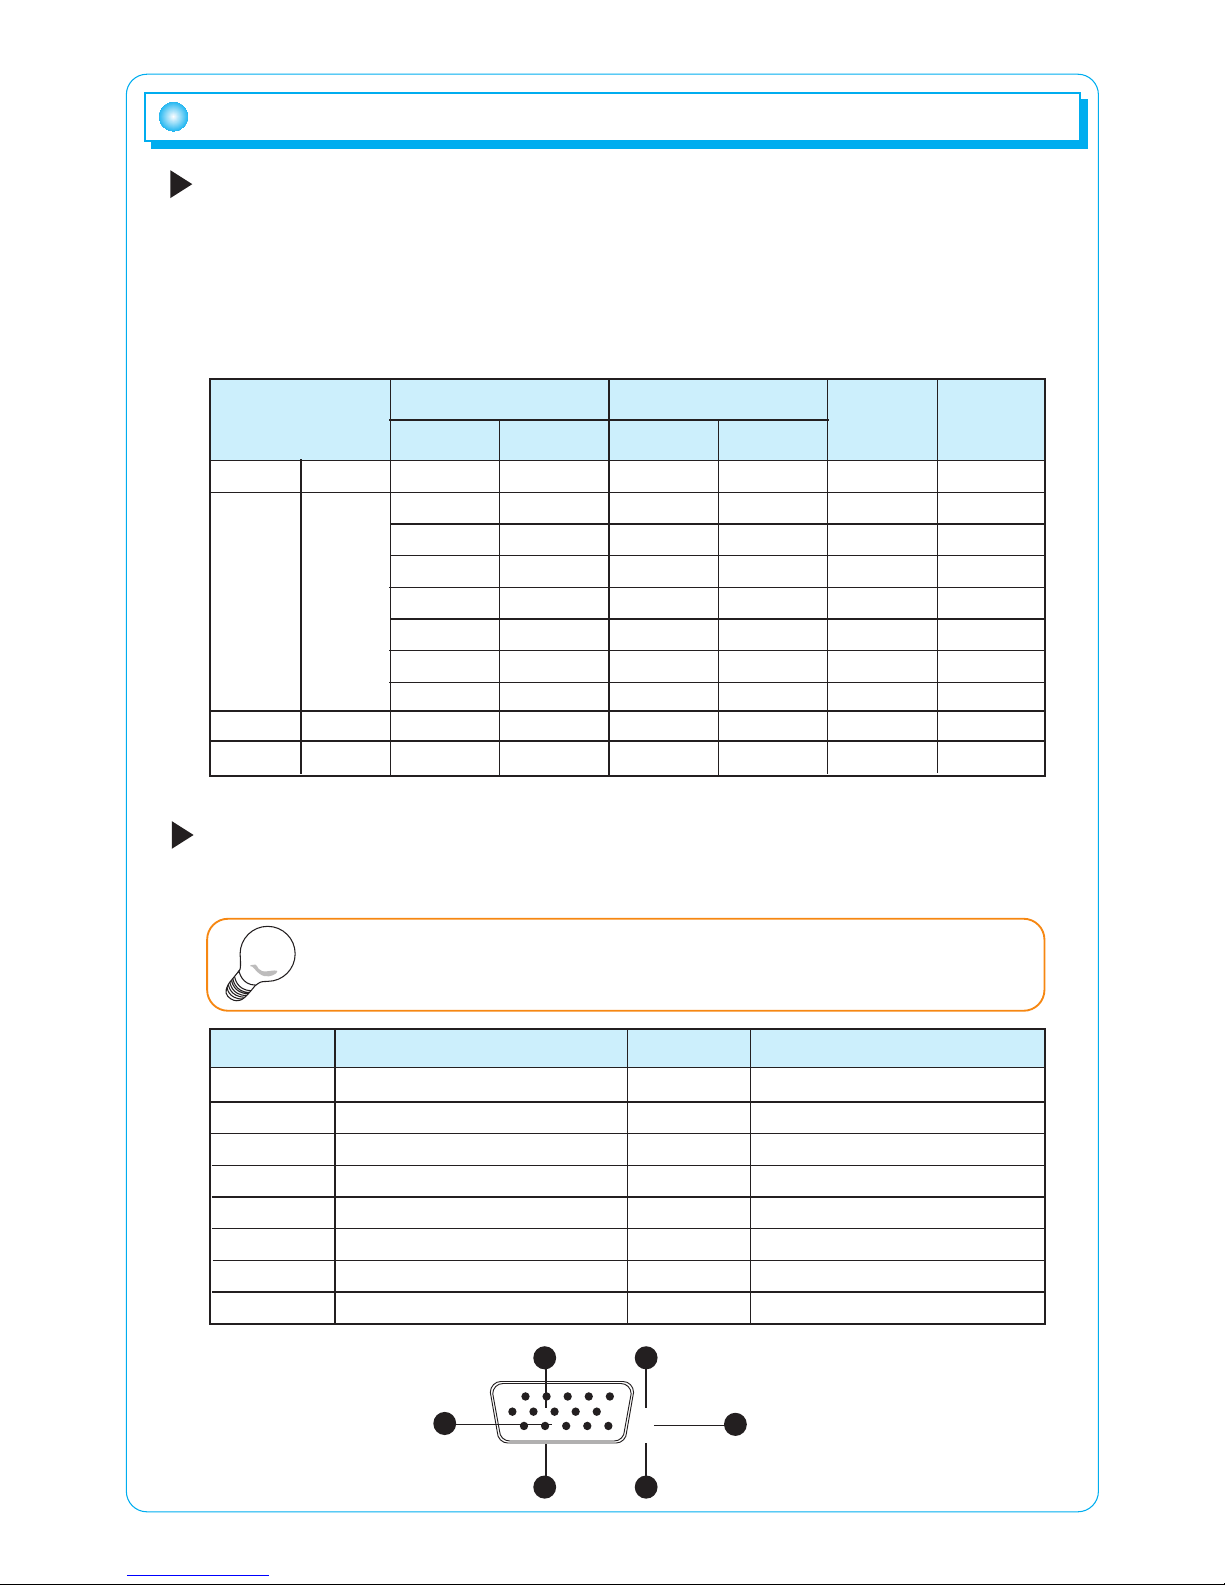
This product is a multi-frequency monitor.
It functions in horizontal frequencies from 30 kHz to 80 kHz and vertical
frequencies from 56 Hz to 75 Hz. Due to its design based on
microprocessor, it offers the functions of automatic synchronization and
automatic size. This monitor is equipped with 10 programmed configurations
that are shown in the timing table. The followings are the ten configurations.
Signal connection
This signal input terminal is a D-SUB connector. Connect the signal cable to
the signal input of the computer.
Preset
Resolution
Horizontal
VESA
MAC
Vertical Horizontal Vertical
Frequency
Clock [MHz]
Polarity
(H/V)
M1
M2
M3
M4
M5
M6
M7
M8
M9
M10
720
640
640
800
800
1024
1024
1280
1280
832
400
480
480
600
600
768
768
1024
1024
624
31.5KHz
31.5KHz
37.5KHz
37.9KHz
46.9KHz
48.4KHz
60.0KHz
64.0KHz
80.0KHz
49.7KHz
70Hz
60Hz
75Hz
60Hz
75Hz
60Hz
75Hz
60Hz
75Hz
75Hz
28.322
25.175
31.500
40.000
49.500
65.000
78.750
108.000
135.000
57.284
- / +
- / -
- / -
+ / +
+ / +
- / -
+ / +
+ / +
+ / +
- / -
VGA
10
Timing guide
Disconnect the power connected to the monitor before connecting the
signal output of the system.
PIN NO
1
2
3
4
5
6
7
8
9
10
11
12
13
14
15
Red
Green
Blue
No Connection
Ground
Red Ground
Green Ground
Blue Ground
No Connection
Ground
Ground
SDA
Houizontal-Sync
Vertical-Sync
CSL
DESCRIPTION DESCRIPTIONPIN NO
10
5 1
5 1
6
Note
Page 12
11
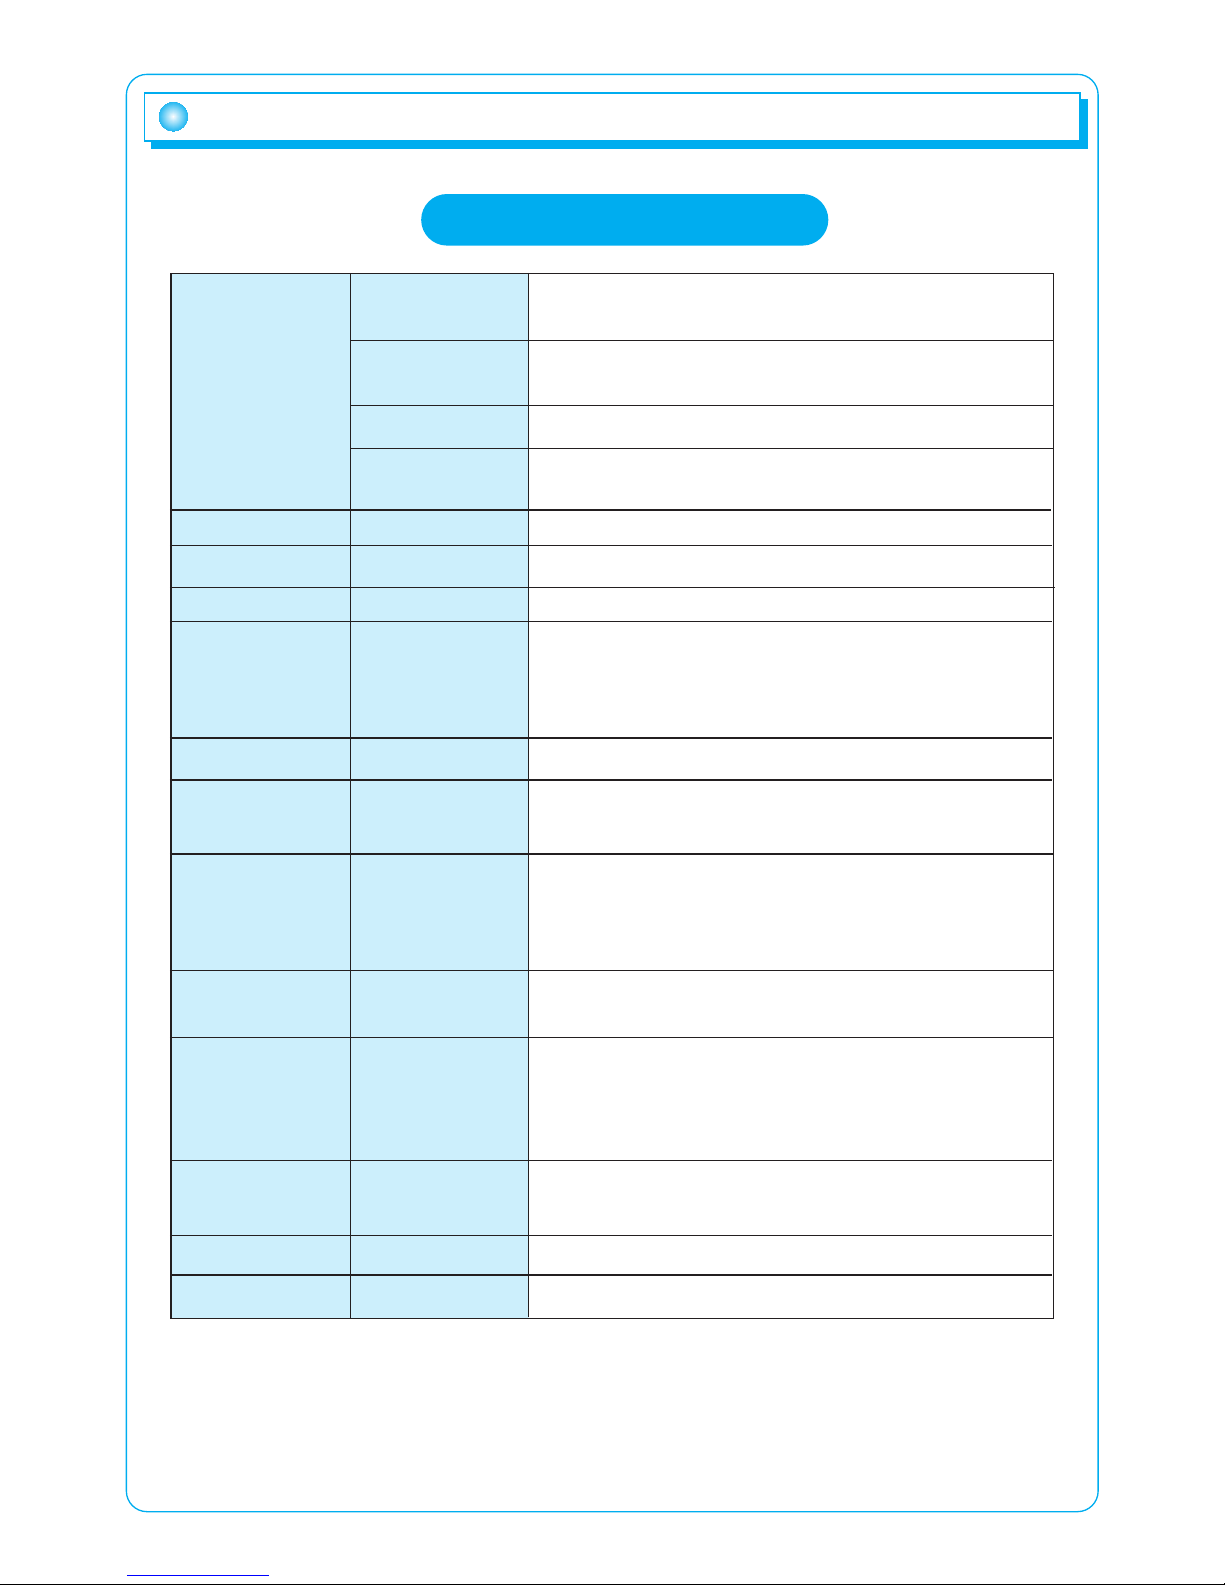
Product specifications
Product specifications
LCD
Angle of view
Contrast ratio
Brightness
Refresh rate
Dimension
Weight
Left/Right
Typ.
Typ.
PC
Maximum
Input
Output
Consumption
Temperature
Humidity
Altitude
Temperature
Humidity
Set / Packing
Input Signal
Power
15-pin D-SUB Jack type DC+12 V In
Storage
conditions
Features
285.696 mm(H) x 214.262 mm(V)
Maximum
Compatibility
Connectors
Voltage/Power
Screen size
Type
★ The design and specifications of the product are subject to change
without previous notice to improve the quality of the product.
2
Glass surface
Screen status
Anti-glare coating
14" diagonal view able screen TFT Thin Film
Transistor Active Matrix Panel
0.279mm(H)×0.279mm(V) pixel pitch RGB
vertical stripe
262, 144 colors
Color filter
Colors
90° / 60°
200 : 1
150 cd/m
IBM XT, AT, 386, 486, Pentium or PS/2 and
compatibles (from VGA up to 1024x768 @
75Hz Nl).
1024x768 @ 75 Hz Nl (60 Hz for optimal display)
AC 100-240 V, 50-60 Hz
DC 12 V
40 watts
33°F ~ 104°F (0°C ~ 40°C) 20%RH-90%RH
(no condensation) Up
To 10,000 feet
-14°F ~ 104°F (-20°C ~ 40°C) 5%RH-
90%RH(no condensation)
319.4mm(W)×272.7mm(H)×140mm(D)
1.7 kg / 2.5 kg
Page 13
Before asking for repair service
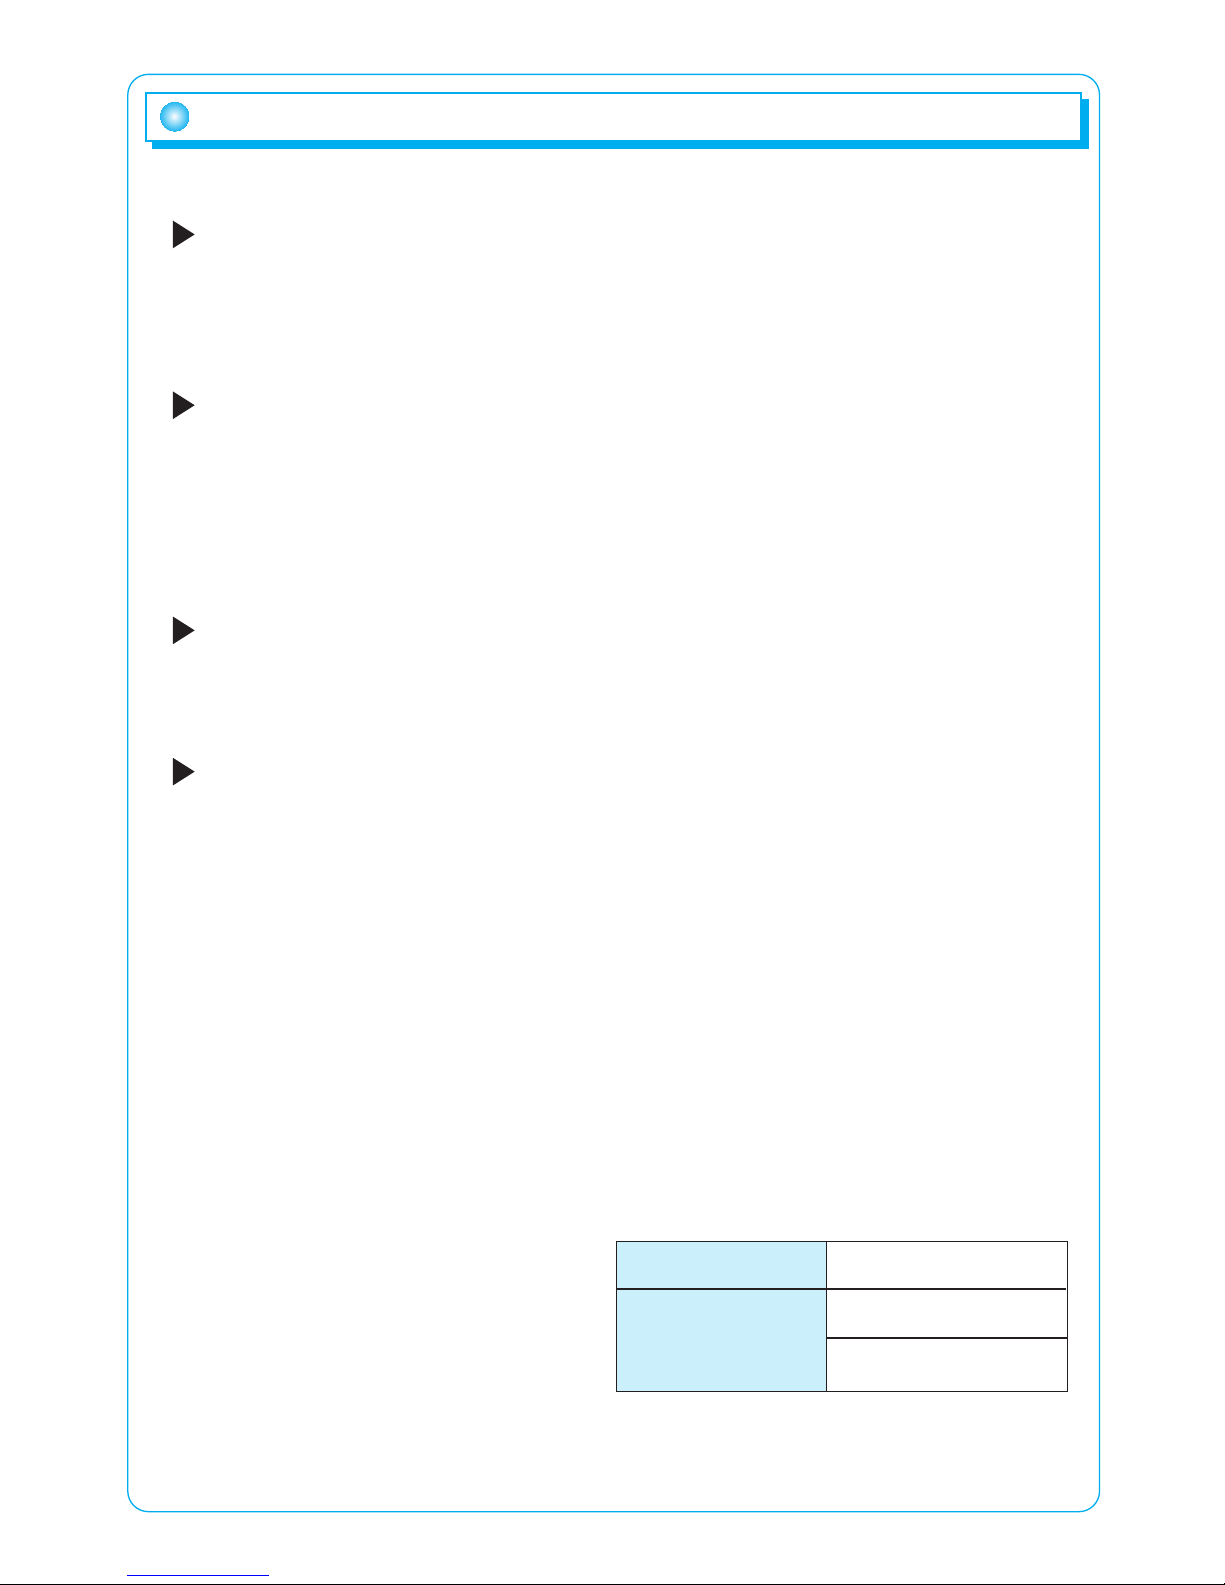
You can contact our technical services or selling agency if you want to ask
for repair service. Check the following before you ask for repair service.
Screen shows no image.
- Check if the power cable is correctly connected.
- Check if the power of the monitor is turned off.
- Check if the system power is turned off.
- Check if the signal cable of the monitor is connected.
Screen is too dark or bright.
- See color menu (see page 7).
Screen is tilted left / right or upward/downward.
- See position menu.
- Run Auto-Tune function.
Date of purchase
Purchased from
Telephone:
12
Before asking for repair service
 Loading...