

HYVE Pryme 01 User Manual

1
Pryme 01 - User Manual
Android™ 6.0 Operating System

2
Preface
Please read the following guidelines before using your new
Smartphone. Utmost compliance with the following is
highly recommended for your safety. Non-compliance may
pose danger to you and your mobile phone, and may be
illegal.
The Pryme 01 is packed with features to satisfy your needs
such as Phonebook, Music Player, Video Player, Digital
Camera, among others. It is Wi-Fi and Bluetooth capable
and also meets the LTE/WCDMA/GSM/GPRS/EDGE
technical criteria. It is certified by both local and
international authorities.
Pryme 01 reserves the right to modify technical
specifications without prior notice. Some content in this
manual, i.e. software, images, accessories and more, may
vary from that in the actual device. Please refer to your
unit for accuracy.
This guide aims to help you get started on your new Pryme
01 phone. Aside from the last two parts of this guide i.e.
Section 6 - Important Safety Precautions and Section 7 Troubleshooting, you will find the following icons
periodically present to help you make better use of your
device.
Indicates sequence of processes
Presents additional notes on a topic or
alternative options for a feature
Shows further cautionary measures to prevent
damage to your mobile phone

3
1. Getting Started
Switch your Mobile Phone ON / OFF
To switch your mobile phone ON, press and hold the
Power Key until an
animation appears
on the screen. Make
sure the battery is
charged and
inserted properly.
To switch OFF, press
and hold the Power
Key until a window
pops up.
Tap Power off OK and the phone will shut down.
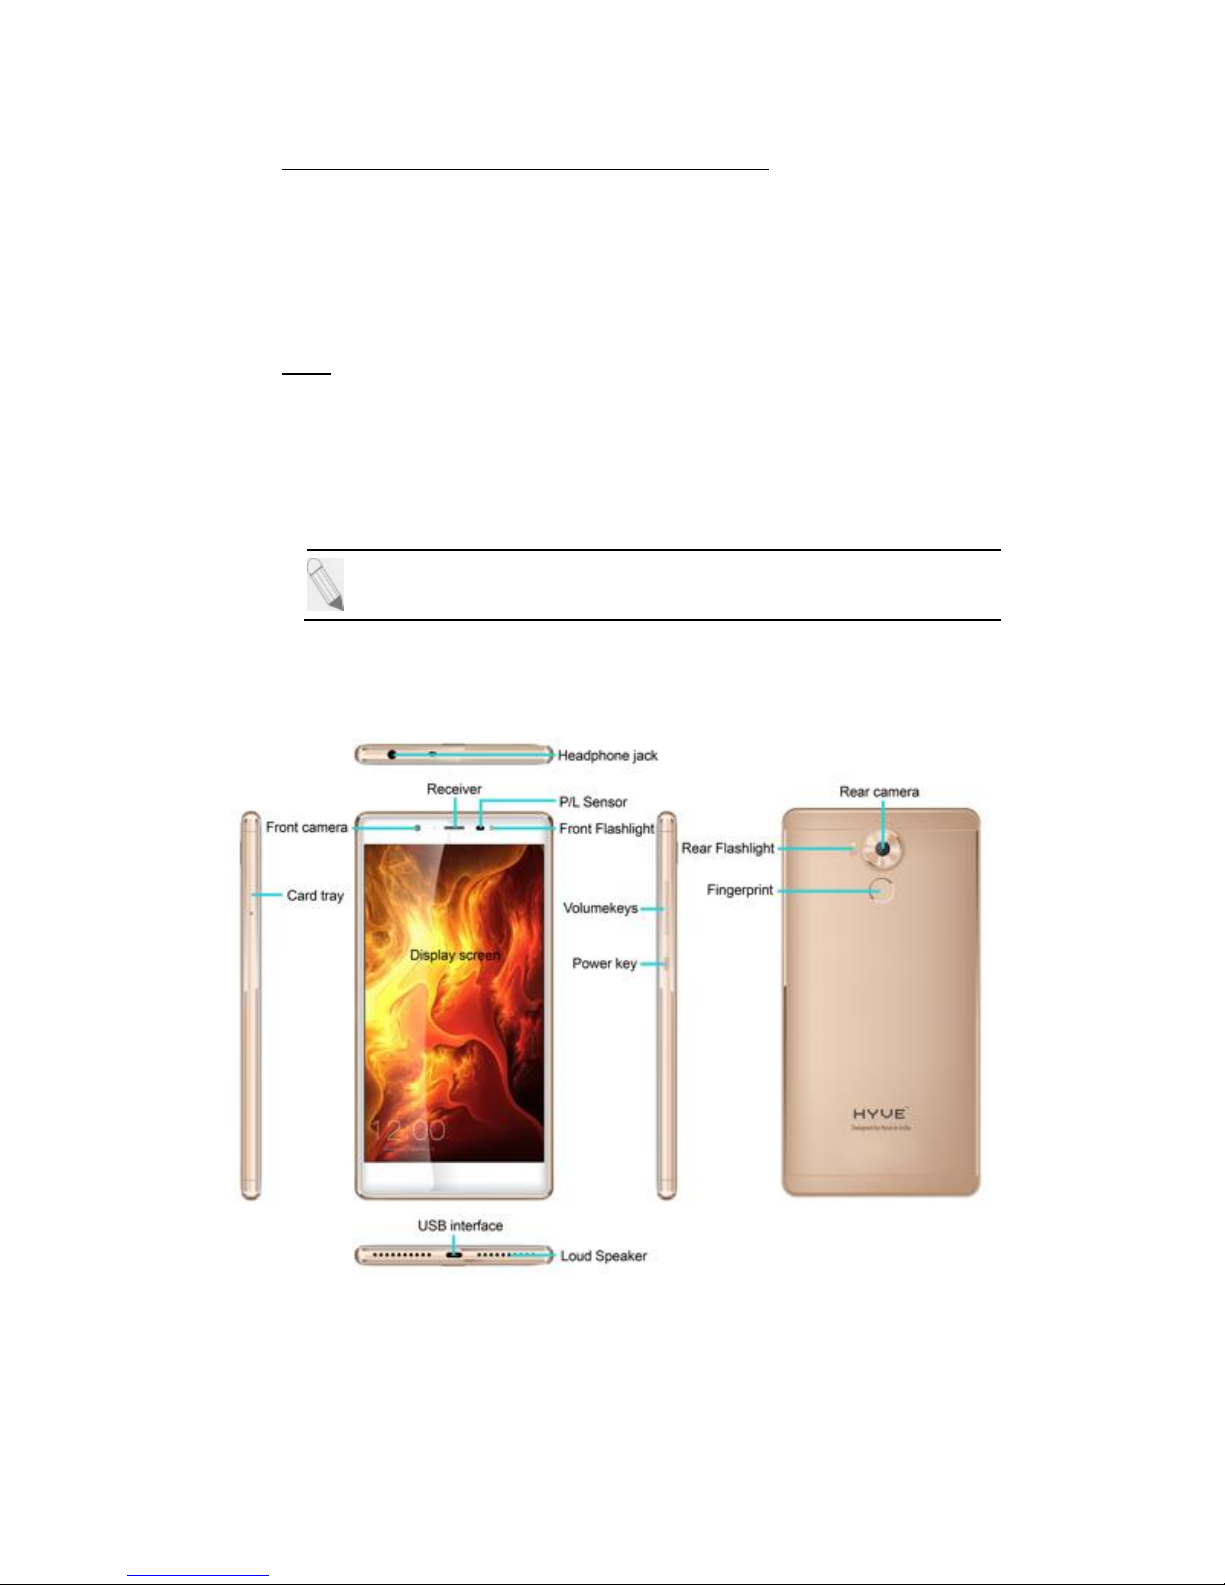
Install / Remove the SIM Card
If you were given the SIM card to install, install it before
setting up your phone. To install / remove the SIM card,
perform the following:
1. Take the use of the BisonFone (SIM ejector tool) to
install the SIM card.
2. Take the BisonFone for phone on the right side of
the hole, push hard until the card tray out.
3. Carefully insert the SIM card into the SIM card slot,
making sure that the card’s gold plate is facing
down.
4. Put away after, push in the card tray with the hand.
5. To remove, take out the card tray and SIM card.
If the screen displays that the SIM card is locked
permanently, please consult your network operator.
Charge the Battery
1. Plug the charger into the electrical outlet.
2. Connect the small end of the charger connector into
the mobile phone’s charging slot.
The battery indicator icon will flash until charging is
finished. When charging is complete, i.e. the battery
charging icon stops flashing, disconnect the phone from
the charger.
4
Do not forget to unplug the charger from the
electrical outlet after charging.
Only use Pryme 01 approved charger and other
accessories.
You can use the phone while charging, but charging
time may increase. When charging the handset in its
Power Off state, a charging indicator will appear on
the screen.
Switch to Sleep Mode / Wake Up
The Sleep Mode suspends your device to a low power
consumption state in order to prolong battery life. Your
device also goes into Sleep Mode by itself when the
display automatically turns off after a certain period of
time, depending on display settings.
Lightly press Power Key to switch to Sleep Mode.
Press the Power Key to Wake Up / activate your screen
display.
To configure sleep settings,
Go to Settings Display Sleep choose time
Switching the Phone to Sleep Mode is a way to lock
your phone.
Screen Lock
You can lock your screen for additional security. After you
set a lock, the screen is locked after the display goes to
sleep.
1. Go to Settings Personal Security Screen
lock.
2. Touch the type of lock you want and follow the
onscreen instructions.
You can choose among these lock options:
Swipe
Provides no protection, but lets you get
to the Home screen quickly.
Voice
Unlock
Lets you unlock your Smartphone using
voice recognition system.
5
Pattern
Lets you draw a simple pattern with your
finger to unlock the tablet. This is slightly
more secured than face unlock.
PIN
Requires four or more numbers. Longer
pins tend to be more secure.
Password
Requires four or more letters or
numbers. This is the most secure option,
as long as you create a strong password.
Fingerprint To use your fingerprint to unlock your screen
or confirm purchases you'll need to set up
your backup screen lock method
Unlock Your Phone
Drag the icon to the up, depending on your screen lock
pattern.
To set Screen Lock pattern, go to Menu Settings
Security Screen Lock choose from options.
Security Codes
The mobile phone and the SIM card support several
passwords in order to prevent misuse. When prompted
to enter any of the codes mentioned below, type in the
correct code and then confirm by tapping the OK key.
To access the phone’s settings for these codes,
Go to Menu [ ] Settings [ ] Security Set up
SIM card lock Choose which card to lock Lock SIM
Card enter SIM PIN OK
Personal Identification Number (PIN)
Local network service providers furnish each SIM card
with a unique set of codes including the PIN, PIN2 and
PUK. If the PIN is incorrectly entered for three successive
times, the SIM card will be locked.
To unlock the SIM card, you need to enter the PUK or the
Personal Unlocking Key.
6
For further information regarding PIN, PUK and SIM Lock,
contact your network service provider.
Basic Troubleshooting for locked SIM card
Enter the correct PUK. You will then be prompted
to enter a new PIN.
Type in the new PIN OK.
Re-type the new PIN OK.
PUK
The PUK (Personal Unlocking Key) code is required in
order to modify a blocked PIN. This code usually comes
with the SIM card upon purchase. Otherwise, contact
your local service provider.
If you enter the wrong PUK code for 10 consecutive
times, the SIM card will become invalid.
2. Overview
Touch Control
Your phone is receptive to the following finger gestures:
TAP
Selects or launches an item or an app
i.e. Selecting from the menu, entering
characters or text in a field
7
TAP &
HOLD
Activates widgets and offers further
options to an application. Tap & hold
an item on the screen by touching it
and not lifting your finger until an
action occurs
DRAG
Tap & hold an item and then, without
lifting your finger, move your finger
on the screen to reposition it on the
screen.
SWIPE /
SLIDE
Lets you scroll the screen up, down,
left or right. It is also used when
unlocking the screen. Lightly and
quickly touch and slide your finger
across the screen without pausing to
avoid dragging an item instead
DOUBLETAP
Lets you zoom in or out a screen tap
quickly twice on a webpage, map, or
other screen to zoom.
The Home Screen
To move between Home screens, swipe left or right.
Change the Wallpaper
Tap and hold any clear part of the Screen Choose a
wallpaper from Gallery, Live Wallpapers and Wallpapers.
Add Apps and Widgets to Your Home Screen
Tap Home Key
Tap and hold chosen application/widget to add to the
Home Screen.
Drag towards desired position.
Release hold when the Main Screen appears in the
background.
Remove Items from Your Home Screen
Tap Home Key to return to the Home Screen.
Tap and hold the item to be
removed and drag it towards
the [X] Remove icon at the top
of the screen.
Auto-Rotate Screen

8
With the Auto-Rotate Screen turned on, you will be able to
view items on the screen vertically or horizontally,
depending on how you hold your phone.
Please note that not all screens are covered by the AutoRotate Screen feature.
To turn the Auto-Rotate Screen feature on/off,
Go to Menu Settings Display When device is
rotated (uncheck)
You may also drag down the Notifications panel,
Tap Auto-rotation to activate or deactivate autorotate function.
Folders
This allows you to organize your applications in folders on
the Home Screen. To make a new folder on your Home
screen, tap and hold and drag apps to the Home Screen,
and stack them on top of another. They will automatically
be grouped into a folder.
To name folder on Home screen
1. Touch the folder icon on Home screen to open
2. Touch the folder’s title bar to show the name field.
3. Edit the folder’s name and tap Done after
renaming.
To remove move applications out of a folder back to the
Home Screen
Touch and hold the item in a folder, and then drag it out
of the folder.
Voice Command
Your phone also operates via voice command. Search
items in your phone or on the Internet simply by
speaking. Tap on any screen that it is visible and
follow prompt before speaking.
For texting/typing using speech, go to Messaging on page
11.

9
Status and Notification Icons
To view your phone’s notifications, simply swipe the
notifications bar downwards. Below are the possible
status icons you will encounter and their meanings:
- Airplane mode
- Signal strength
- Battery charge
- New message
- Bluetooth icon
- Wi-Fi network
- Meeting mode
- Earphone insert
- Alarm set
- Signal searching
- Silent mode
- Missed call
- USB debugging
connected
- New Wi-Fi network
detected
Notifications
The Notifications panel let you
view notices, warnings and any
new updates in your phone.
To open the Notifications panel
Found on the top part of the
screen, swipe the notifications
panel (also known as the status
bar) downwards.
Swipe it upwards to close.
To open a running application
from the Notifications panel
From the Notifications panel, touch the icon for the
running application to open it. To dismiss notifications,
tap
10
Toolkits
Toolkits quickly start applications such as Bluetooth,
WLAN and so on.
Using one finger, swipe the Notifications panel
downwards.
Tap a Toolkit to enable or disable.
Magnification Gestures
With this feature turned on, you can zoom in/out by
quickly tapping the screen three times (triple-tapping)
While zoomed in, you can:
Pan – drag two or more fingers across the screen
Adjust zoom level – pinch two or more fingers together or
spread them apart
You can also temporarily magnify what’s under your finger
by triple-tapping and holding. In this magnified state, you
can drag your finger to explore different parts of the
screen. Lift your finger to return to previous size.
The triple-tap magnification gesture works on any
screen except the keyboard and navigation bar.
To activate, go to Accessibility
Magnification Gestures ON.
3. Basic Functions
Make and Answer Calls
11
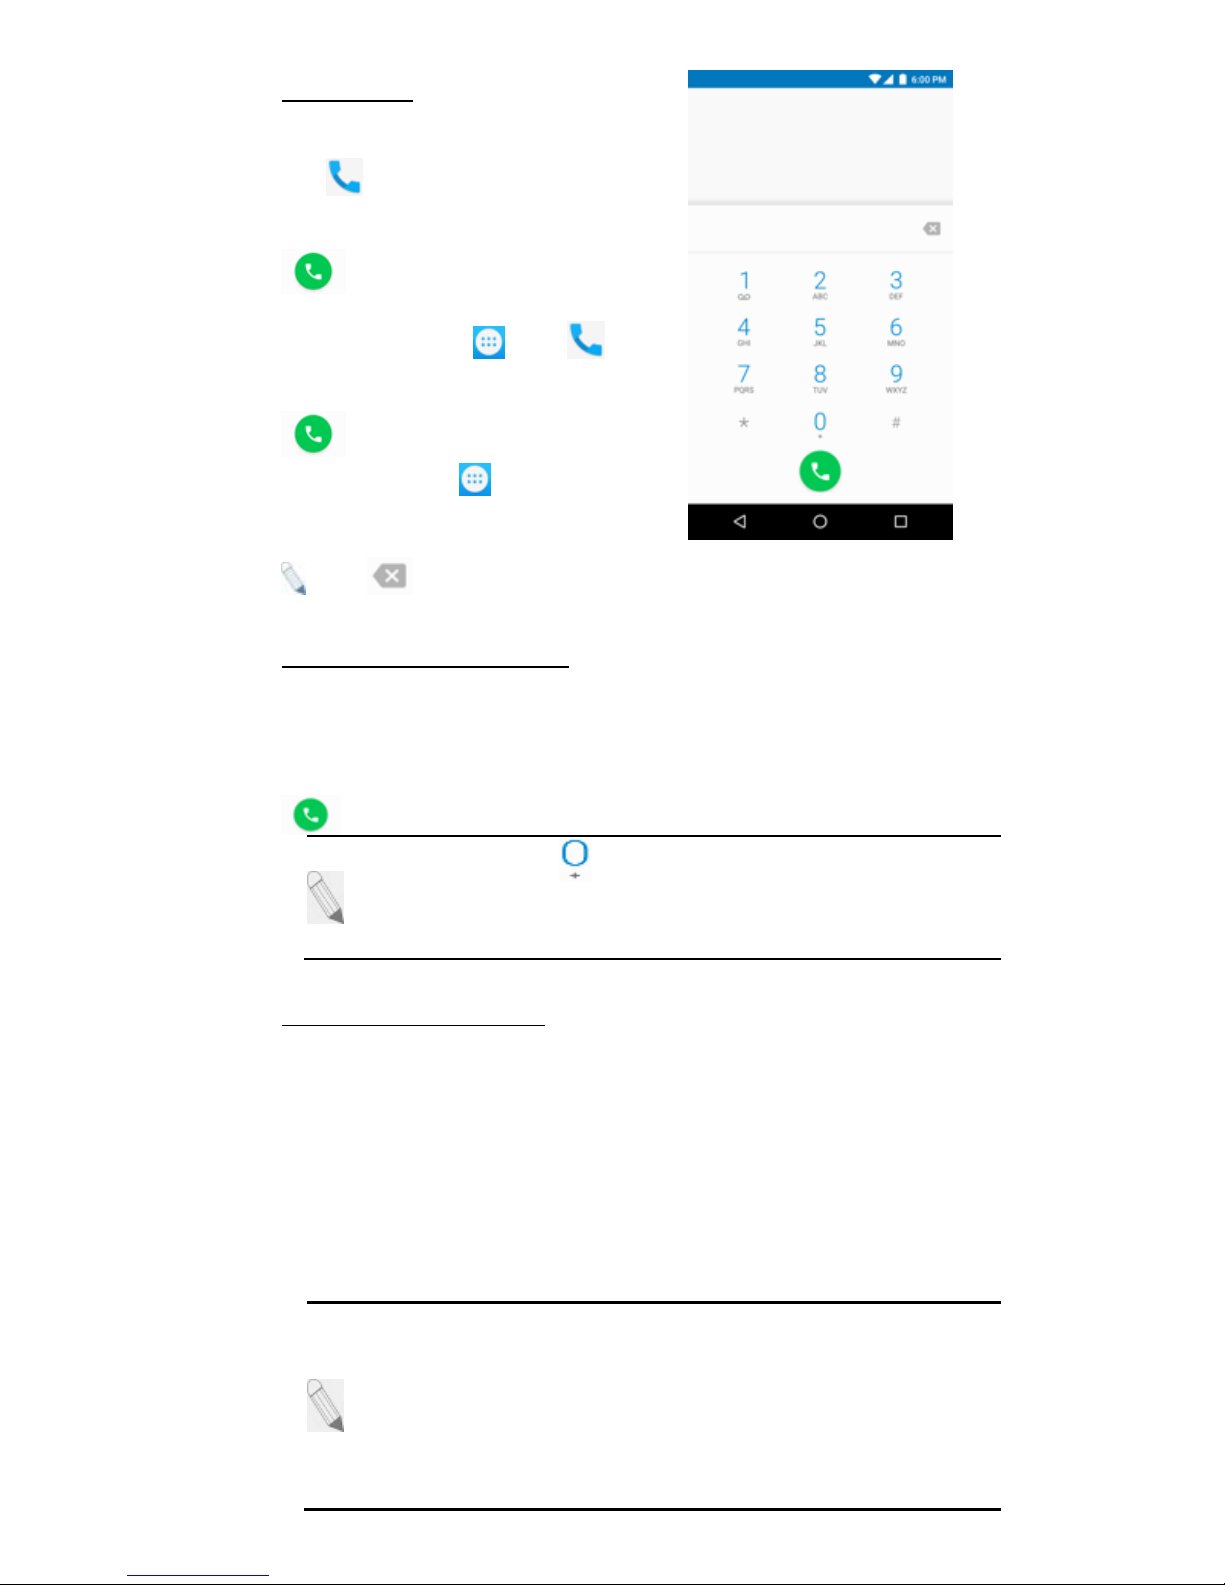
Make a Call
Option 1: On the Home Screen
tap choose the Phone tab
enter phone number tap
.
Option 2: Tap
enter phone number tap
.
Option 3: Tap Contacts
tap name of selected contact
: Tap to erase incorrect digits.
Dial an International Call
For international calls, type (+) followed by the country
code and then the complete number.
(+) (Country Code) (Complete phone number) then tap
Tap and hold to type "+" and then type the
country code, the area code and the telephone
number. Then tap the telephone icon to connect.
Dial an Emergency Call
This phone operates using radio signals, wireless and
landline networks, but cannot guarantee connection in all
locations at all conditions. It is not advisable to rely solely
on wireless phones to make emergency calls. To make an
emergency call:
1. Switch your phone on.
2. Dial emergency number and tap Call.
Some networks may require that a valid SIM card is
properly inserted in the phone before making an
emergency call. Emergency numbers vary in every
country. Emergency calls may not work in all
locations due to network and interference issues.
Emergency numbers vary in every country.
12
Emergency calls may not work in all locations due to
network and interference issues.
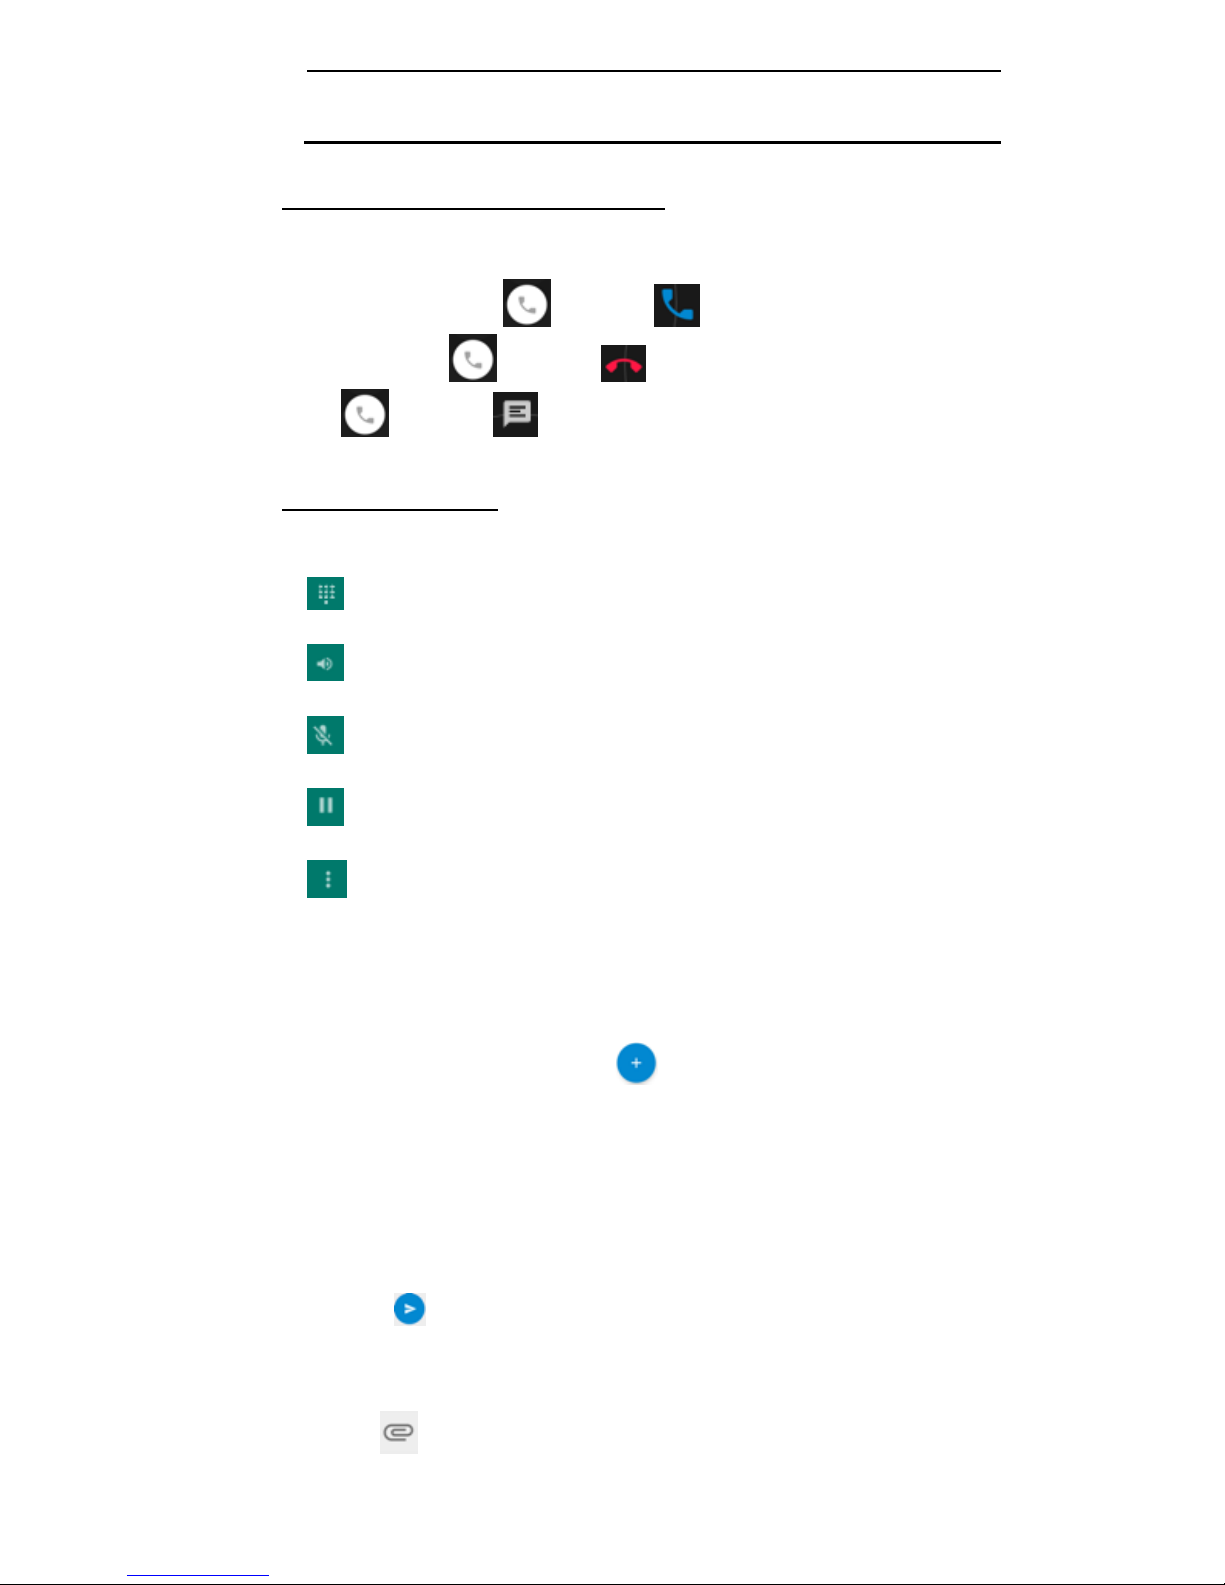
Answer / Reject an Incoming Call
When you receive an incoming call, a notification message
appears on the screen.
To accept call, drag towards
To reject, drag towards
Drag towards to send a message instead.
Adjust the Volume
During a call, press the Side Keys to adjust the volume.
Messaging
To create and send message from home screen, tap
Tap the new message icon at the bottom left
part of the screen.
In TO field, type the recipient’s phone number OR
select contacts.
Type message in the Send message field using the on
screen keyboard
Tap to send.
To send MMS, add an attachment to the text message by
tapping and the SMS will automatically be sent as an
 Loading...