

HYUNDAI MOBIS PA760VGXB MY, PA710VGXMB MY User Manual
31
Knowing your vehicle
D300800AHM
How vehicle audio works
AM and FM radio signals are broadcast
from transmitter towers located around
your city. They are intercepted by the
radio antenna on your vehicle.This signal
is then received by the radio and sent to
your vehicle speakers.
When a strong radio signal has reached
your vehicle, the precise engineering of
your audio system ensures the best possible quality reproduction. However, in
some cases the signal coming to your
vehicle may not be strong and clear. This
can be due to factors such as the distance from the radio station, closeness of
other strong radio stations or the presence of buildings, bridges or other large
obstructions in the area.
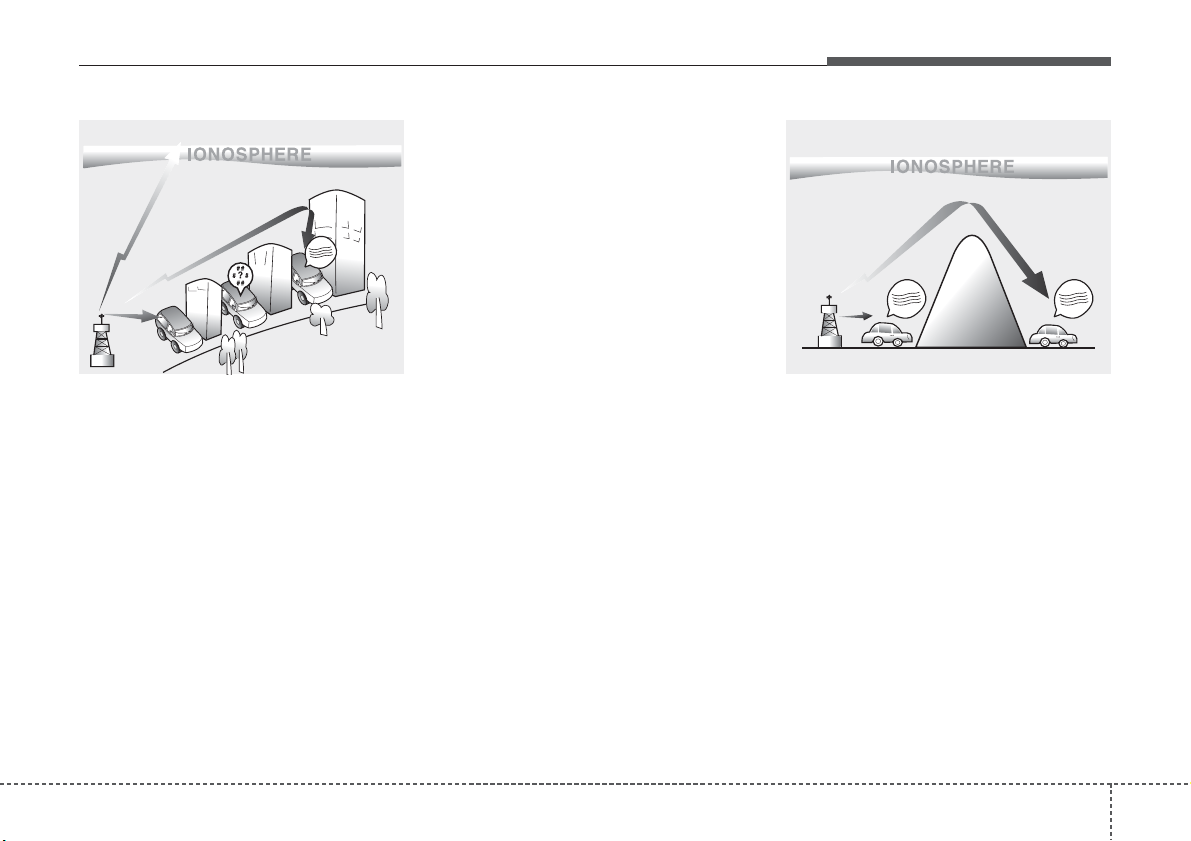
AM broadcasts can be received at
greater distances than FM broadcasts.
This is because AM radio waves are
transmitted at low frequencies. These
long, low frequency radio waves can follow the curvature of the earth rather than
travelling straight out into the atmosphere. In addition, they curve around
obstructions so that they can provide better signal coverage.
JBM002
AM reception
JBM001
FM reception
¢¢¢
¢¢¢
¢¢¢
Knowing your vehicle
23
FM broadcasts are transmitted at high
frequencies and do not bend to follow the
earth's surface. Because of this, FM
broadcasts generally begin to fade at
short distances from the station.
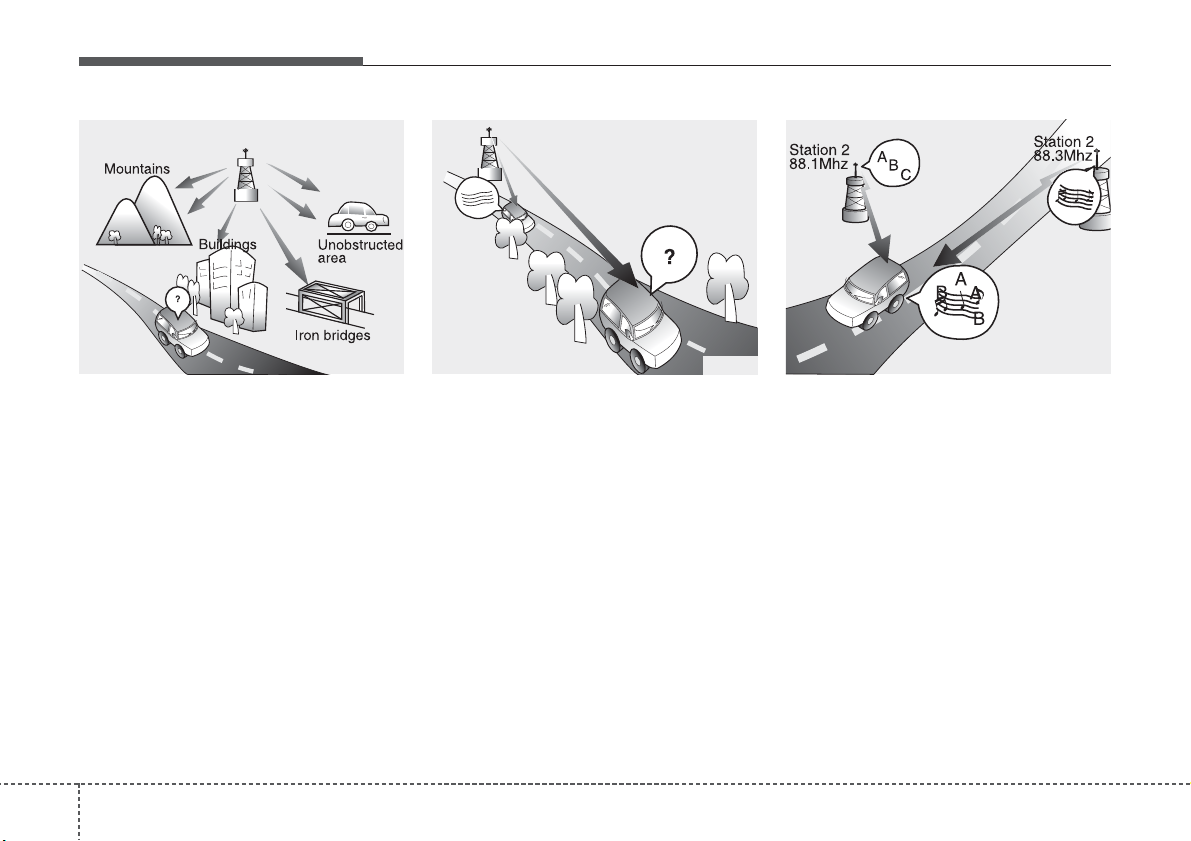
Also, FM signals are easily affected by
buildings, mountains, or other obstructions. These can result in certain listening
conditions which might lead you to
believe a problem exists with your radio.
The following conditions are normal and
do not indicate radio trouble:
• Fading - As your vehicle moves away
from the radio station, the signal will
weaken and sound will begin to fade.
When this occurs, we suggest that you
select another stronger station.
• Flutter/Static - Weak FM signals or
large obstructions between the transmitter and your radio can disturb the
signal causing static or fluttering noises to occur. Reducing the treble level
may lessen this effect until the disturbance clears.
• Station Swapping - As a FM signal
weakens, another more powerful signal near the same frequency may
begin to play. This is because your
radio is designed to lock onto the clearest signal. If this occurs, select another
station with a stronger signal.
• Multi-Path Cancellation - Radio signals
being received from several directions
can cause distortion or fluttering. This
can be caused by a direct and reflected signal from the same station, or by
signals from two stations with close
frequencies. If this occurs, select
another station until the condition has
passed.
JBM005
JBM004JBM003
FM radio station
¢¢¢
33
Knowing your vehicle
Using a cellular phone or a two-way
radio
When a cellular phone is used inside the
vehicle, noise may be produced from the
audio equipment. This does not mean
that something is wrong with the audio
equipment. In such a case, use the cellular phone at a place as far as possible
from the audio equipment.
Care of discs
• If the temperature inside the vehicle is
too high, open the vehicle windows for
ventilation before using your vehicle
audio.
• It is illegal to copy and use MP3/WMA
files without permission. Use CDs that
are created only by lawful means.
• Do not apply volatile agents such as
benzene and thinner, normal cleaners
and magnetic sprays made for analogue disc onto CDs.
• To prevent the disc surface from getting damaged. Hold and carry CDs by
the edges or the edges of the center
hole only.
• Clean the disc surface with a piece of
soft cloth before playback (wipe it from
the center to the outside edge).
• Do not damage the disc surface or
attach pieces of sticky tape or paper
onto it.
• Make sure objects other than CDs are
not inserted into the CD player (Do not
insert more than one CD at a time).
• Keep CDs in their cases after use to
protect them from scratches or dirt.
• Depending on the type of CD-R/CDRW CDs, certain CDs may not operate
normally according to manufacturing
companies or making and recording
methods. In such circumstances, if you
still continue to use those CDs, they
may cause the malfunction of your
vehicle audio system.
✽✽
NOTICE - Playing an
Incompatible Copy
Protected Audio CD
Some copy protected CDs, which do not
comply with the international audio CD
standards (Red Book), may not play on
your vehicle audio. Please note that if
you try to play copy pr otected CDs and
the CD player does not perform correctly the CDs maybe defective, not the CD
player.
WARNING
Do not use a cellular phone while
driving. Stop at a safe location to
use a cellular phone.
Knowing your vehicle
43
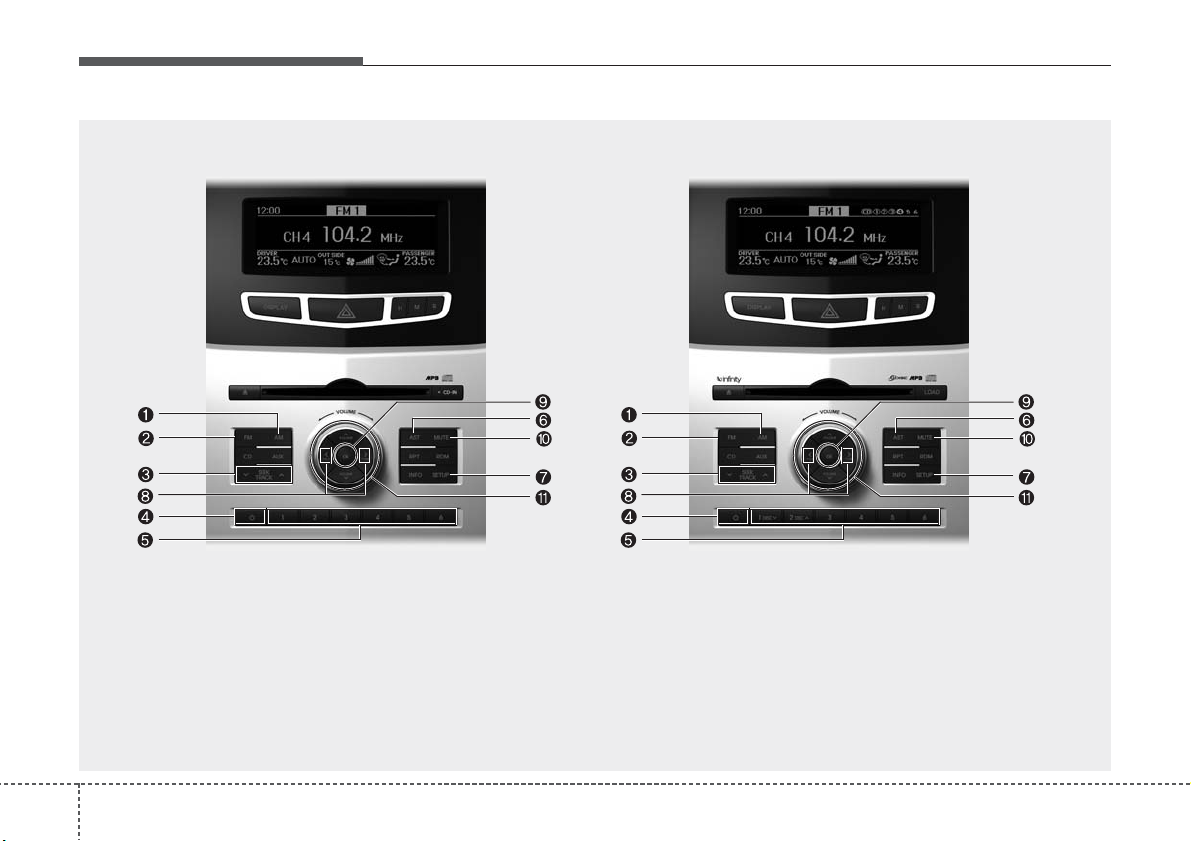
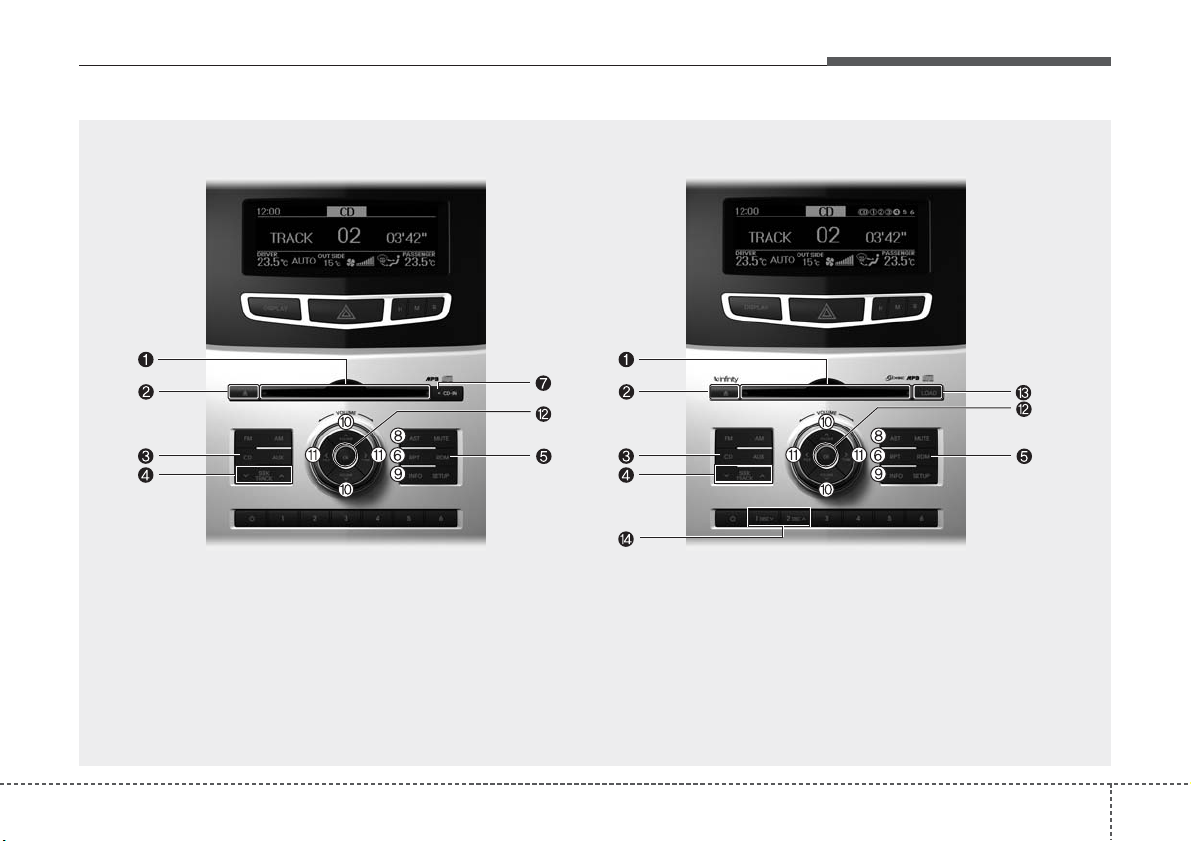
1. AM Button
2. FM Button
3. SEEK Button
4. Power ON/OFF Button
5. Preset Buttons
6. AST(AUTO STORE) Button
7. SETUP Button
8. TUNE Button
9. OK Button
10. MUTE Button
11. VOLUME Knob
Using RADIO, SETUP, VOLUME and AUDIO CONTROL (CDP: PA710VG, CDC: PA760VG)
VG_PA710VG_RADIO / VG_760VG_RADIO
Using RADIO, SETUP, VOLUME
and AUDIO CONTROL
1. AM Button
Pressing the [AM] button selects the AM
band. AM Mode is displayed on the LCD.
2. FM Button
Turns to FM mode and toggles FM1and
FM2 when the button is pressed each time.
3. SEEK Button
• When the [SEEK ] button is pressed,
it increases the band frequency to automatically select channel. Stops at the
previous frequency if no channel is
found.
• When the [TRACK ] button is pressed, it reduces the band frequency to
automatically select channel. Stops at
the previous frequency if no channel is
found.
4. Power ON/OFF Button
• Turns on/off the set when the IGNITION SWITCH is on ACC or ON.
5. Preset Buttons
Push [1]~[6] buttons less than 0.8 second to play the channel saved in each
button. Push Preset button for 0.8 second or longer to save current channel to
the respective button with a beep.
6. AST(AUTO STORE Button)
When the button is pressed, it automatically selects and saves channels with
high reception rate to PRESET buttons
[1]~[6] and plays the channel saved in
PRESET1. If no channel is saved after
AST, it will play the previous channel.
7. SETUP Button
■ PA710VG
Press this button to turn to the SCROLL
option and the other adjustment mode. If
no action is taken for 5 seconds after
pressing the button, it will return to the
play mode. (After entering SETUP mode,
select Manual tune Button and push OK
Button. )
The setup change in the order of
SOUND
➟ SDVC➟ CLOCK➟ TEMP➟
SCROLL➟RETURN
■ PA760VG
The setup change in the order of
SOUND
➟ V-EQ➟ SDVC➟ CLOCK➟
TEMP➟SCROLL
In the case of JBL AMP
SOUND
➟ SDVC➟ CLOCK➟ TEMP➟
SCROLL
• SDVC
This function automatically adjusts the
volume level according to the speed of
the vehicle and can be turned ON/OFF
through the sound quality control knob.
• SOUND
Select this menu to adjust the sound in
following order: BASS, MIDDLE, TREBLE and FADER /BALANCE. To move
between items, press [OK] button.
BASS/MIDDLE/TREBLE: Use [ FILE
], [ TUNE ] buttons to adjust the menu.
FADER/BALANCE: Use [ FILE ],
[ TUNE ] buttons to adjust BALANCE
and [ FOLDER ] buttons to adjust
FADER.
35
Knowing your vehicle
Knowing your vehicle
63
• V-EQ
Press [ FILE ], [ TUNE ] button
changes the Innocente, Forza,
Concertro mode, and push [OK] Button.
• CLOCK <PA760VG>
Pressing the [ FILE ], [ TUNE ] but-
ton select the time mode(12, 24mode),
and push the [OK] button.
8. TUNE Button
Push this button to manually adjust frequency, While listening to the radio channel.
9. OK Button
Push this button to select each mode.
10. MUTE Button
When the button is pressed, stops sound
and “Audio Mute” is displayed on LCD.
11. VOLUME Knob
If the knob is turned clockwise/counterclockwise, the volume will increase
/decrease.
37
Knowing your vehicle
1. CD Slot
2. CD Eject Button
3. CD Button
4. TRACK Button
5. RANDOM Button
6. REPEAT Button
7. CD Indicator icon
8. SCAN Button
9. INFO Button
10. FOLDER Button
11. FILE Button
12. OK Button
13. CD LOAD Button
14. DISC Button
Using CD Player (CDP: PA710VG, CDC: PA760VG)
VG_PA710VG_CDP / VG_760VG_CDC
 Loading...