

Page 1

FCC ID: TQ8-PA710PAGEBT
ATTACHMENT E.
- User Manual -
HCT CO., LTD.
SAN 136-1, AMI-RI, BUBAL-EUP, ICHEON-SI, KYOUNGKI-DO, 467-701, KOREA
TEL:+82 31 639 8517 F AX:+82 31 639 8525 www .hct.co.kr
Report No. : HCTR1005FR15 1/1
Page 2
469
Features of your vehicle
Antenna
D300102APA
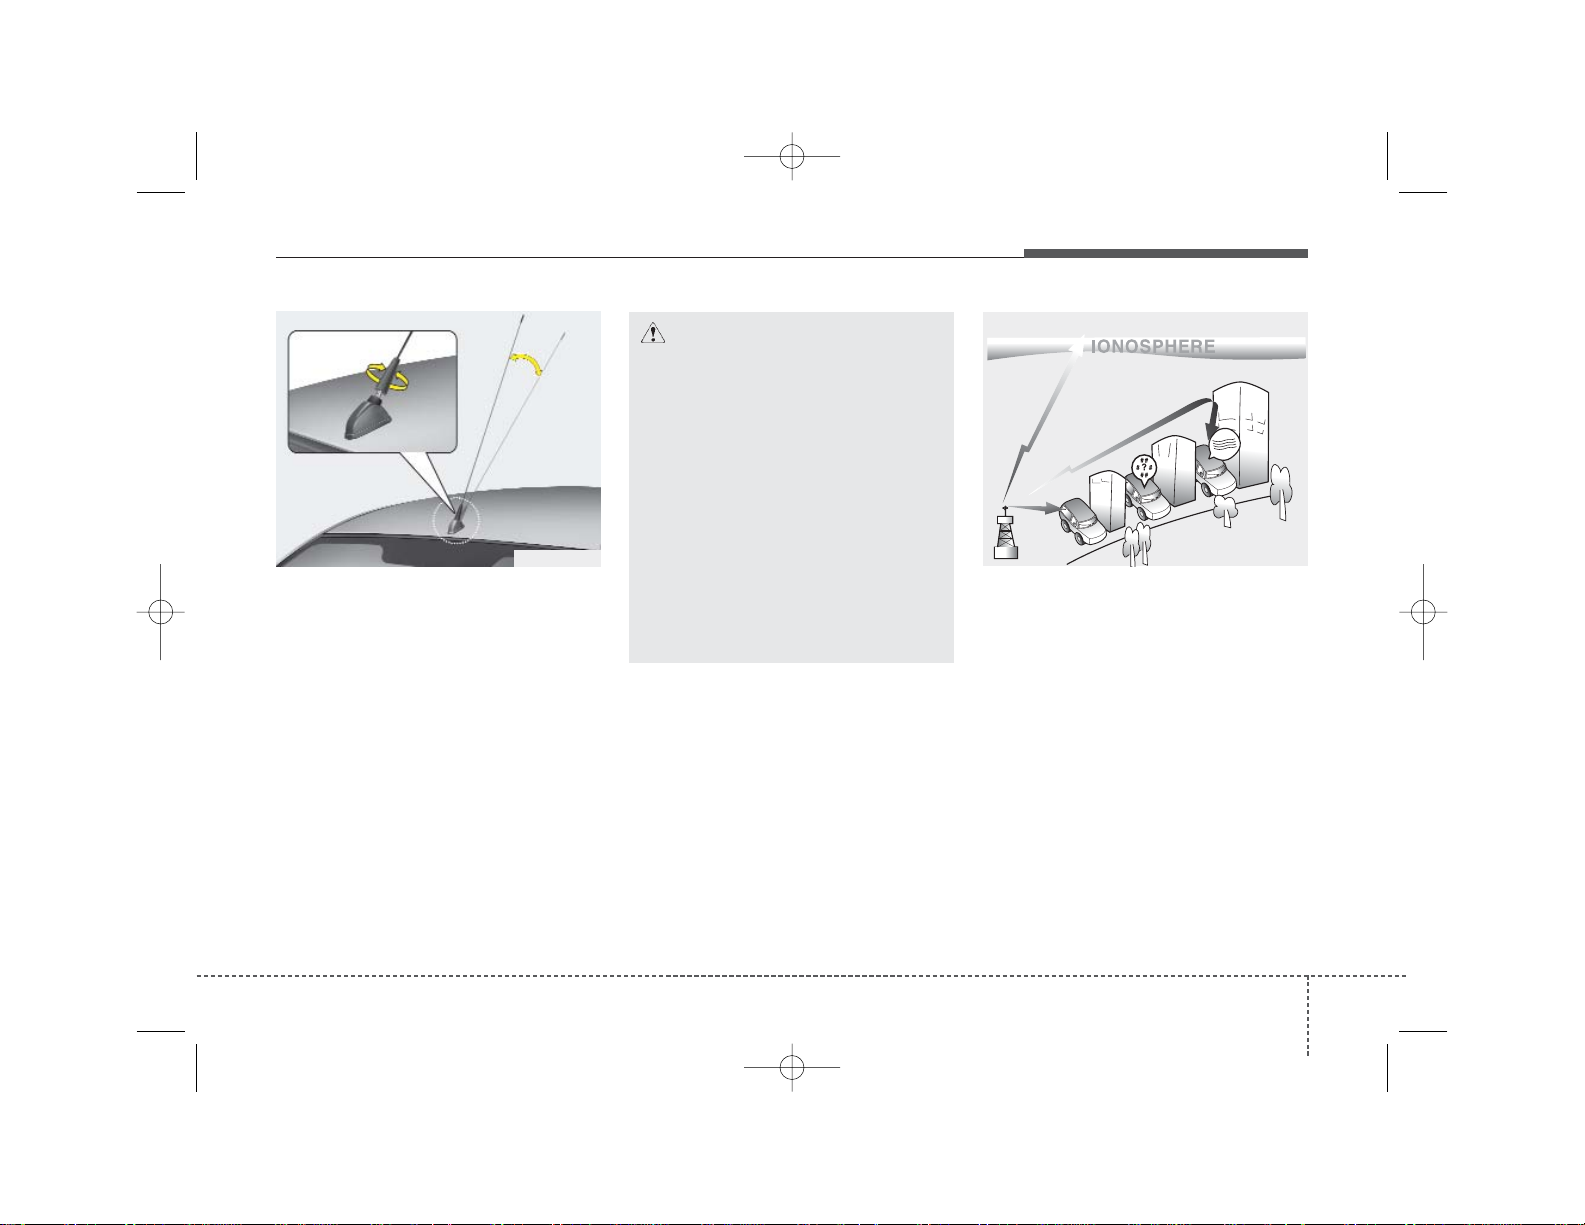
Roof antenna (if equipped)
Your car uses a roof antenna to receive
both AM and FM broadcast signals. This
antenna is a removable type. To remove
the antenna, turn it counterclockwise. To
install the antenna, turn it clockwise.
D300800AEN
How car audio works
AM(MW, LW) and FM radio signals are
broadcast from transmitter towers located around your city. They are intercepted by the radio antenna on your car. This
signal is then received by the radio and
sent to your car speakers.
When a strong radio signal has reached
your vehicle, the precise engineering of
your audio system ensures the best possible quality reproduction. However, in
some cases the signal coming to your
vehicle may not be strong and clear. This
can be due to factors such as the distance from the radio station, closeness of
other strong radio stations or the presence of buildings, bridges or other large
obstructions in the area.
AUDIO SYSTEM
OPA047097
CAUTION
• Before entering a place with a low
height clearance, be sure that the
antenna is fully folded down or
removed.
• Be sure to remove the antenna
before washing the car in an automatic car wash or it may be damaged.
• When reinstalling your antenna, it
is important that it is fully tightened and adjusted to the upright
position to ensure proper reception. But it could be folded or
removed when parking the vehicle.
JBM001
FM reception
PA eng 4-69~(Audio).qxd 1/15/2010 10:52 AM Page 69
¢¢¢
Page 3

Features of your vehicle
704
AM(MW, LW) broadcasts can be
received at greater distances than FM
broadcasts. This is because AM(MW,
LW) radio waves are transmitted at low
frequencies. These long, low frequency
radio waves can follow the curvature of
the earth rather than travelling straight
out into the atmosphere. In addition, they
curve around obstructions so that they
can provide better signal coverage.
FM broadcasts are transmitted at high
frequencies and do not bend to follow the
earth's surface. Because of this, FM
broadcasts generally begin to fade at
short distances from the station. Also,
FM signals are easily affected by buildings, mountains, or other obstructions.
These can result in certain listening conditions which might lead you to believe a
problem exists with your radio. The following conditions are normal and do not
indicate radio trouble:
• Fading - As your car moves away from
the radio station, the signal will weaken
and sound will begin to fade.When this
occurs, we suggest that you select
another stronger station.
• Flutter/Static - Weak FM signals or
large obstructions between the transmitter and your radio can disturb the
signal causing static or fluttering noises to occur. Reducing the treble level
may lessen this effect until the disturbance clears.
JBM002 JBM003
AM(MW, LW) reception FM radio station
JBM004
PA eng 4-69~(Audio).qxd 1/15/2010 10:52 AM Page 70
¢¢¢
¢¢¢
¢¢¢
Page 4
471
Features of your vehicle
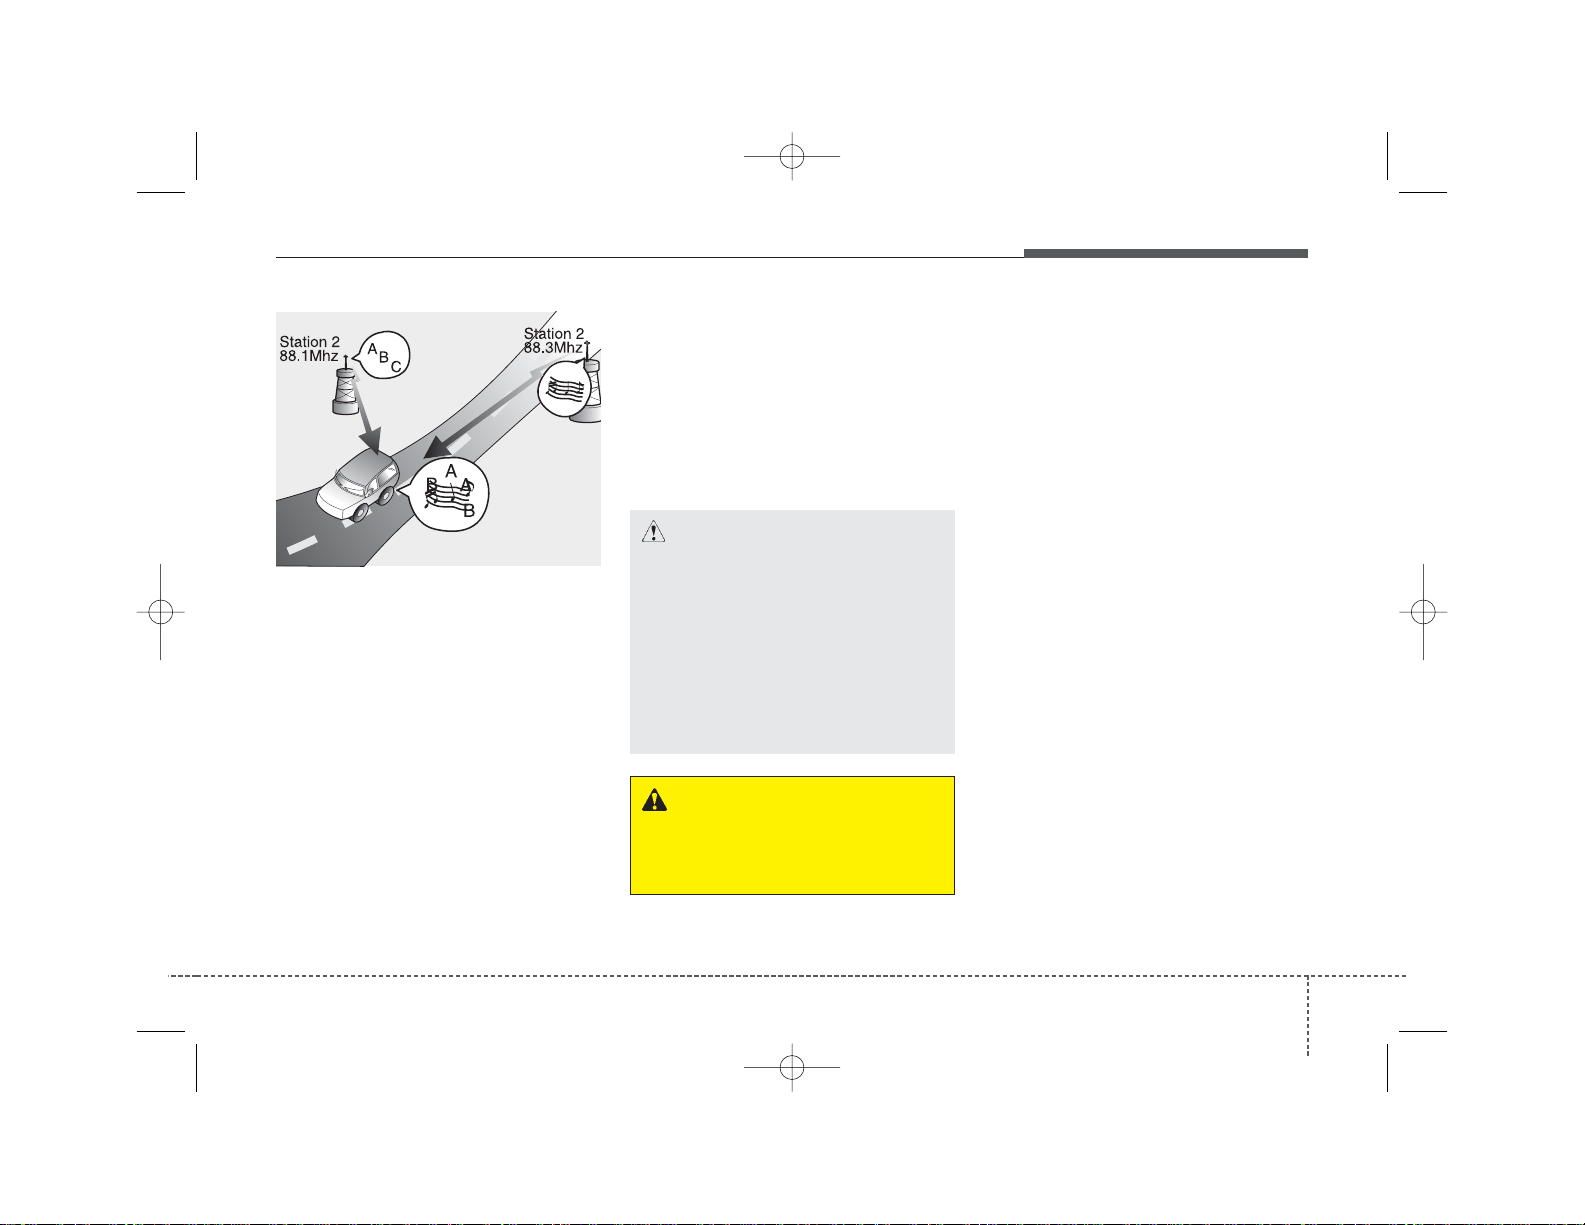
• Station Swapping - As a FM signal
weakens, another more powerful signal near the same frequency may
begin to play. This is because your
radio is designed to lock onto the clearest signal. If this occurs, select another station with a stronger signal.
• Multi-Path Cancellation - Radio signals
being received from several directions
can cause distortion or fluttering. This
can be caused by a direct and reflected signal from the same station, or by
signals from two stations with close
frequencies. If this occurs, select
another station until the condition has
passed.
Using a cellular phone or a two-way
radio
When a cellular phone is used inside the
vehicle, noise may be produced from the
audio equipment. This does not mean
that something is wrong with the audio
equipment. In such a case, use the cellular phone at a place as far as possible
from the audio equipment.
Care of discs
• If the temperature inside the car is too
high, open the car windows for ventilation before using your car audio.
• It is illegal to copy and use MP3/WMA
files without permission(If equipped
with SA710, use only CD-DA). Use
CDs that are created only by lawful
means.
• Do not apply volatile agents such as
benzene and thinner, normal cleaners
and magnetic sprays made for analogue disc onto CDs.
• To prevent the disc surface from getting damaged. Hold and carry CDs by
the edges or the edges of the center
hole only.
• Clean the disc surface with a piece of
soft cloth before playback (wipe it from
the center to the outside edge).
• Do not damage the disc surface or
attach pieces of sticky tape or paper
onto it.
• Make sure on undesirable matter other
than CDs are inserted into the CD
player (Do not insert more than one
CD at a time).
JBM005
CAUTION
When using a communication system such a cellular phone or a radio
set inside the vehicle, a separate
external antenna must be fitted.
When a cellular phone or a radio set
is used with an internal antenna
alone, it may interfere with the vehicle's electrical system and adversely affect safe operation of the vehicle.
WARNING
Don't use a cellular phone when
you are driving. You should stop at
a safe place to use a cellular phone.
PA eng 4-69~(Audio).qxd 1/15/2010 10:52 AM Page 71
Page 5

Features of your vehicle
724
• Keep CDs in their cases after use to
protect them from scratches or dirt.
• Depending on the type of CD-R/CDRW CDs, certain CDs may not operate
normally according to manufacturing
companies or making and recording
methods. In such circumstances, if you
still continue to use those CDs, they
may cause the malfunction of your car
audio system.
✽✽
NOTICE - Playing an
Incompatible Copy
Protected Audio CD
Some copy protected CDs, which do not
comply with the international audio CD
standards (Red Book), may not play on
your car audio. Please note that if you
try to play copy protected CDs and the
CD player does not perform correctly
the CDs maybe defective, not the CD
player.
PA eng 4-69~(Audio).qxd 1/15/2010 10:52 AM Page 72
Page 6
473
Features of your vehicle
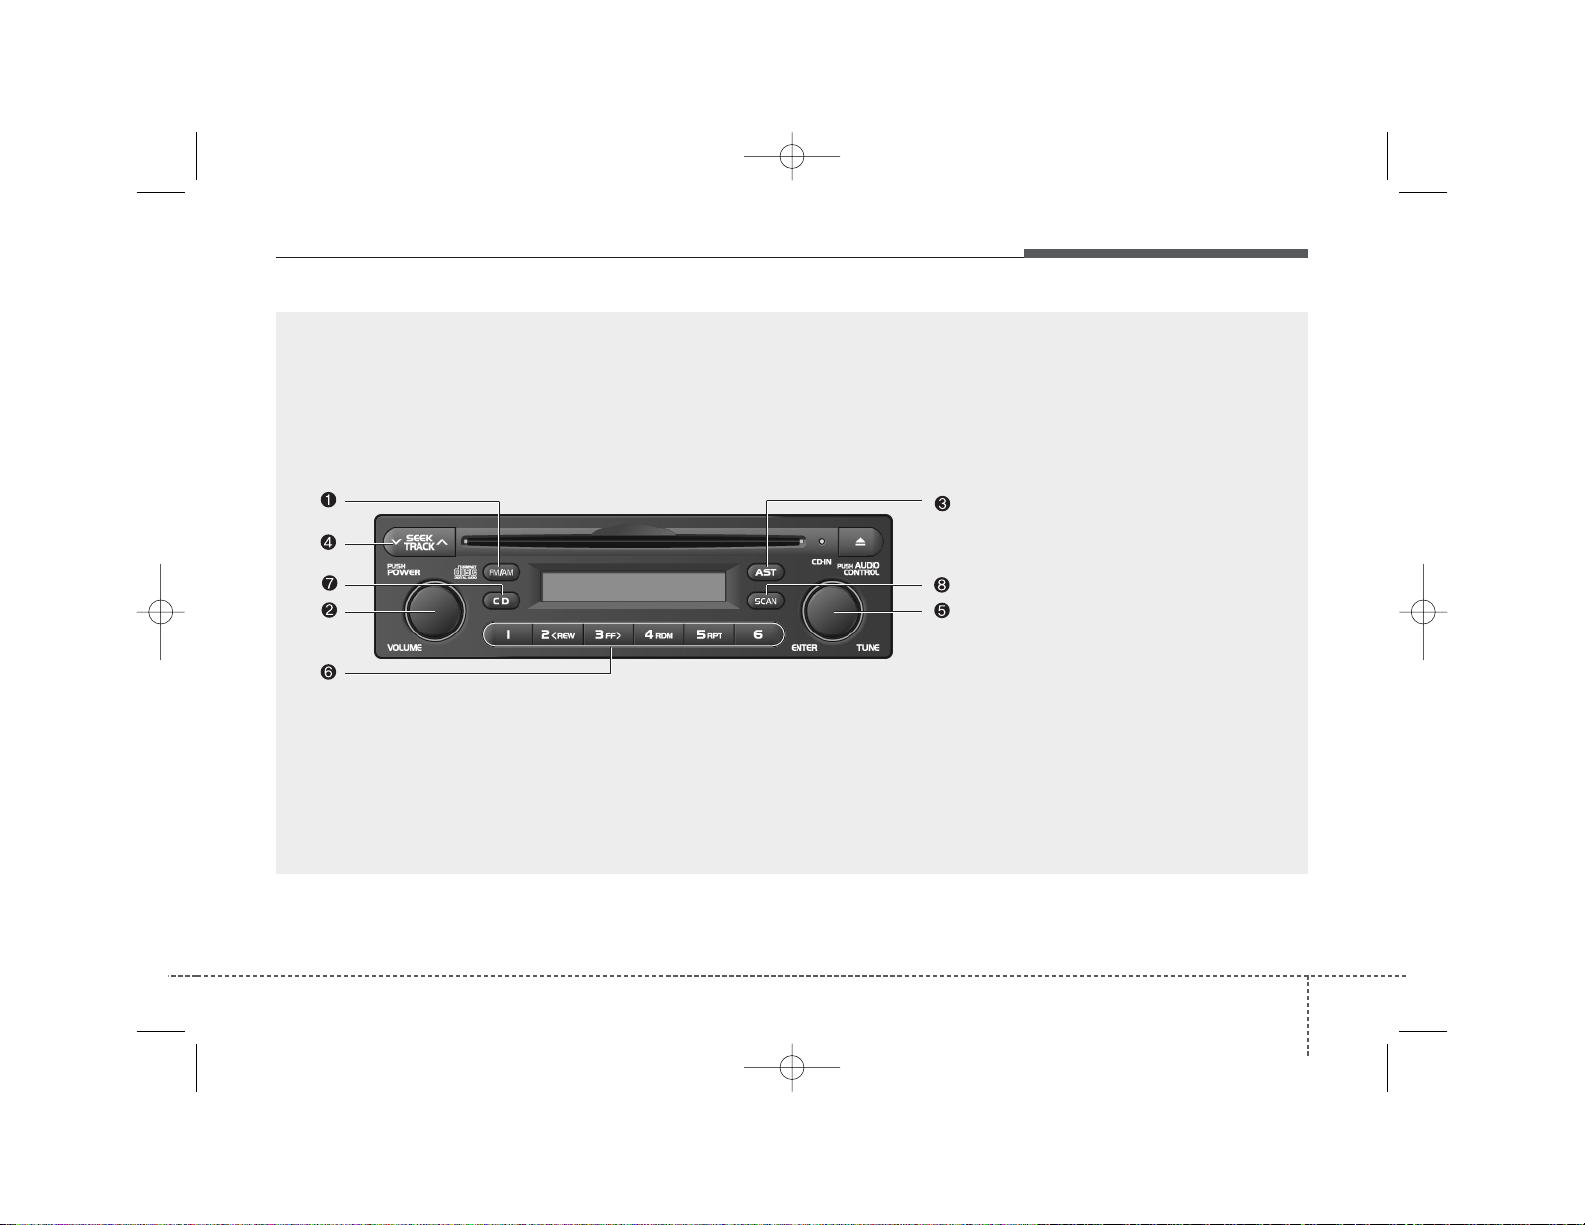
SA710PA
1. FM/AM Selection Button
2. Power ON/OFF
3. AUTO STORE Button
4. Automatic Channel Selection Button
5. TUNE/AUDIO Control Button
6. PRESET Button
7. CD Selection Button
8. SCAN Button
RADIO, VOLUME CONTROL (SA710, if equipped)
PA eng 4-69~(Audio).qxd 1/15/2010 10:52 AM Page 73
Page 7
Features of your vehicle
744
1. FM/AM Selection Button
Turns to FM/AM mode and toggles FM1
and FM2
➟AM➟FM1··· when the button is
pressed each time.
2. Power ON/OFF & Vloume
Control Button
Turns ON/OFF the set when the IGNITION SWITCH is on ACC or ON.
If the button is turned to the right, it
increases the volume and left, decreases
the volume.
3. AUTO STORE Button
When the button is pressed, it automatically selects and saves channels with
high reception rate to PRESET buttons(1~6) and plays the channel saved in
PRESET1.
If no channel is saved after AST, it will
play the previous channel.
4. Automatic Channel Selection
Button
When the [SEEK ] button is pressed, it
reduces the band frequency by 50kHz to
automatically select channel.
Stops at the previous frequency if no
channel is found.
When the [SEEK ] button is pressed, it
increases the band frequency by 50kHz
to automatically select channel.
Stops at the previous frequency if no
channel is found.
5. TUNE/AUDIO Control Button
Turn this button clockwise by one notch
to increase frequency by 50kHz from current frequency.
Turn this button counterclockwise by one
notch to decrease frequency by 50kHz
from current frequency.
Turns to AUDIO CONTROL mode, and
toggles in the order of BASS
➟MIDDLE
➟TREBLE➟FADER➟BALANCE➟BASS·
·· when the button is pressed each time.
GENERAL FM 100kHz
AM 9kHz
EUROPE FM 50kHz
MW 9kHz
LW 1kHz, 3kHz(AUTO)
USA FM 200kHz
AM 10kHz
6. PRESET Button
Push [1]~[6]button less than 0.8 sec to
play the channel saved in each button.
Push preset button for 0.8 sec or longer
to save current channel to the respective
button with a beep.
7. CD Selection Button
If there is a cd in the CDP DECK it turns
to CD mode.
8. SCAN Button
When the button is pressed, it scan up
from the current broadcast that received.
In case of the broadcast having more
than the certain electric field, receive the
appropriate broadcast for 5 sec.
The frequency received is flickering for 5
sec .
When inputting SCAN KEY during
receiving the broadcast for 5 sec, cancel
the operation of SCAN and receive the
broadcast flickering at that time.
In case of no input for cancel after
inputting SCAN KEY, operate SCAN only
1CYCLE.
PA eng 4-69~(Audio).qxd 1/15/2010 10:52 AM Page 74
Page 8

475
Features of your vehicle
SA710PA
1. CD loading slot
2. CD Eject Button
3. SCAN Play Button
4. Automatic Track Selection Button
5. CD-IN Indicator
6. REPEAT Button
7. RANDOM Play Button
8. TUNE/ENTER Button
9. Fast Rewind Button
10. Fast Forward Button
CD (SA710, if equipped)
PA eng 4-69~(Audio).qxd 1/15/2010 10:52 AM Page 75
Page 9

Features of your vehicle
764
1. CD loading slot
Please face printed side upward and
gently push in.
When the ignition switch is on ACC or
ON and power is OFF, power is automatically turned on if the CD is loaded.
This CDP support only 12cm CD. But if
VCD. Data CD are loaded, "Disc-Err"
message will appear and CD will be
ejected.
2. CD Eject Button
Push button to eject the CD.
This button is enabled when ignition
switch is off.
3. SCAN Play Button
Play first 10 sec of each song in the
DISC.
To cancel the mode, press the key once
again.
4. Automatic Track Selection
Button
• Push [TRACK ] button for less than
1 sec to play from the beginning of current song.
• Push [TRACK ] button for less than
1 sec and press again within 1 sec to
play the previous song.
• In case of pushing, TRACK DOWN
continually.
• Push [TRACK ] button for less than
1 sec to play the next song.
• In case of pushing, TRACK UP contin-
ually.
5. CD-IN Indicator
When car ignition switch is ACC or ON
and if the CD is loaded, this indicator is
lighted.
If the CD is ejected the light is turned off.
6. REPEAT Button
Repeats current song when the button is
pressed for less than 0.8 sec.
Repeats the entire DISC when the button
is pressed for 0.8 sec or longer.
7. RANDOM Play Button
Turns ON/OFF the randomization of the
play list of files in the currently played
DISC.
To cancel the mode, press the key once
again.
8. TUNE/ENTER Button
Turn this button clockwise to display
songs after current song.
Also, turn this button counterclockwise to
display songs before current song.
To listen to the displayed song, press the
button to skip to the song and play.
9. Fast Rewind Button
Push and hold the “2 REW” Key, more
than 0.8sec : play the operation of FF on
the current TRACK.
10. Fast Forward Button
Push and hold the “3 FF” Key, more than
0.8sec : play the operation of REW on
the current TRACK.
PA eng 4-69~(Audio).qxd 1/15/2010 10:52 AM Page 76
Page 10

477
Features of your vehicle
PA710RDSPA
1. FM Selection Button
2. AM Selection Button
3. TA Selection Button
4. CD Selection Button
5. AUX Selection Button
6. Automatic Channel Selection Button
7. Power ON/OFF & Volume Control Knob
8. AUTO STORE Button
9. Screen ON/ OFF Button
10. SETUP Button
11. TUNE/ENTER Knob
12. PTY(FLDR) Button
13. PRESET Button
14. SCAN Button
RADIO, SETUP, VOLUME CONTROL (PA710RDS, if equipped)
PA eng 4-69~(Audio).qxd 1/15/2010 10:52 AM Page 77
Page 11

Features of your vehicle
784
1. FM Selection Button
Turns to FM mode and toggles FM1 and
FM2 when the button is pressed each
time.
2. AM Selection Button
Turns to AM mode, and toggles in the
order of MW
➟LW➟···➟MW···when the
button is pressed each time.
3. TA Selection Button
In FM, CD, AUX mode, turns on/off the
reception of TA channels of RDS.
4. CD Selection Button
If there is a cd in the CDP DECK it plays
the CD.
Press CD button to automatically insert
CD when the disc is ejected from the
deck by pressing CD EJECT.
5. AUX Selection Button
If the auxiliary device is connected, it
turns to AUX MODE to play the sound
from the auxiliary player.
If the auxiliary device is not connected, it
displays “No AUX Input” for 5 sec and
returns to the previous mode.
6. Automatic Channel Selection
Button
• When the [SEEK ]button is pressed,
it reduces the band frequency by
50kHz to automatically select channel.
Stops at the previous frequency if no
channel is found.
• When the [SEEK ]button is pressed,
it increases the band frequency by
50kHz to automatically select channel.
Stops at the previous frequency if no
channel is found.
7. Power ON/OFF & Volume
Control Knob
Turns on/off the set when the IGNITION
SWITCH is on ACC or ON. If the knob is
turned to the right, it increases the volume and left, decreases the volume.
8. AUTO STORE Button
When the button is pressed, it automatically selects and saves channels with
high reception rate to PRESET buttons
(1~6) and plays the channel saved in
PRESET1.
If no channel is saved after AST, it will
play the previous channel.
9. Screen ON/ OFF Button
Turns on/off the displayed data and light
on LCD.
When LCD display is turned OFF, press
any button to turn ON diplay.
10. SETUP Button
Press this button to turn to the Audio,
RDS option, Clock setting, Scroll,
Display and Adjustment mode.
If no action is taken for 5 sec after pressing the button, it will return to the play
mode.(After entering SETUP mode,
move between items using the left, right
and PUSH functions of the TUNE button.)
The SETUP menu changes as below
table
Bass > 00
Middle > 00
AUDIO
Treble > 00
Fader > F=R
Balance > L=R
Return
RDS
AF > On
REG > Off
PA eng 4-69~(Audio).qxd 1/15/2010 10:52 AM Page 78
Page 12

479
Features of your vehicle
❈ TO SETUP CLOCK
If Audio is ON
1. Press SETUP button.
2. Select CLOCK menu by rotating/pressing
TUNE knob.
3. Select ADJUST and current hour will
flash.
4. Adjust hour by rotating TUNE knob.
5. Press TUNE knob and now current
minute will flash.
6. Adjust minute and push TUNE knob
when finished.
7. Press SETUP button or select RETURN
to exit SETUP mode.
If Audio is OFF
1. Press SETUP button and current hour
will flash.
2. Adjust hour and press TUNE knob.
3. Rotate TUNE knob to adjust minute
when the current minute is flashing.
4. Push TUNE knob, and press SETUP
button or select RETURN to exit
SETUP mode.
11. TUNE/ENTER Knob
Turn this knob clockwise by one notch to
increase frequency by 0.05Mhz from current frequency.
Turn this knob counterclockwise by one
notch to decrease frequency by 0.05Mhz
from current frequency.
Press this knob while holding SETUP
button to activate / inactivate the
item.Select SETUP item using left and
right function of the Tune knob.
GENERAL FM 100kHz
AM 9kHz
EUROPE FM 50kHz
MW 9kHz
LW 1kHz, 3kHz(AUTO)
USA FM 200kHz
AM 10kHz
12. PTY(FLDR) Button
• Press this button to enter Program Type
select mode.
• Press Move[PTY . ] button or
rotate TUNE knob when to search
Program Type in RDS.
• Press TUNE/ENTER knob to select
Program Type, and program search will
be started from the current frequency.
13. PRESET Button
Push [1]~[6] buttons less than 0.8 sec to
play the channel saved in each button.
Push PRESET button for 0.8 sec or longer
to save current channel to the respective
button with a beep.
14. SCAN Button
If the SCAN button is pressed during
receiving the broadcast for 5 sec, if cancels SCAN operation and receives the
broadcast flickering at that time.
When inputting SCAN KEY during
receiving the broadcast for 5 sec cancel
the operation of SCAN and receive the
broadcast flickering at that time.
In case of no input for cancel after
inputting SCAN KEY, operate SCAN only
1CYCLE.
NEWS > Off
RDS TA Vol > +05
Return
Adjust >
Clock
Display > 24Hour
Update > Auto
Return
Scroll > On
Return
PA eng 4-69~(Audio).qxd 1/15/2010 10:52 AM Page 79
Page 13

Features of your vehicle
804
1. CD loading slot
2. CD-IN indicator
3. CD Eject Button
4. AUX Selection Button
5. Automatic Track Selection Button
6. INFO Button
7. TUNE/ENTER Knob
8. REPEAT Button
9. RANDOM Play Button
10. SCAN Play Button
11. MARK Play Button
12. AUX IN
13. Folder moving Button
14. Fast Rewind Button
15. Fast Forward Button
PA710RDSPA
CD (PA710RDS, if equipped)
PA eng 4-69~(Audio).qxd 1/15/2010 10:52 AM Page 80
Page 14

481
Features of your vehicle
1. CD loading slot
Please face printed side upward and
gently push in. When the ignition switch
is on ACC or ON and power is off, power
is automatically turned on if the CD is
loaded. This CDP support only 12 cm
CD. But if VCD, Data CD loaded, "Er-6"
message will appear and CD will be
ejected.
2. CD-IN Indicator
When car ignition switch is ACC or ON
and if the CD is loaded, this indicator is
lighted. If the CD is ejected the light is
turned off.
3. CD eject Button
Push button to eject the CD. This button is enabled when ignition switch is off.
4. AUX Selection Button
If the auxiliary device is connected, it
turns to AUX MODE to play the sound
from the auxiliary player.
If the auxiliary device is no connected, it displays "No AUX Input" for 5 sec and returns
to the previous mode."
5. Automatic Track Selection
Button
• Push [TRACK ] button to play from
the beginning of current song.
• Push [TRACK ] button and press
again within 1 sec to play the previous
song.
• In case of keep pressing, track goes
down continually.
• Push [TRACK ] button to play the
next song.
• In case of keep pressing, track gose up
continually.
6. INFO Button
Displays the information of the current
CD TRACK in the order of DISC
TITLE
➟DISC ARTIST➟TRACK TITLE➟
TRACK ARTIST➟TOTAL TRACK➟ Play
Screen
➟DISC TITLE➟···.(not displayed if
the information is not available on the
DISC.)
7. TUNE/ENTER Knob
Turn this knob clockwise to display songs
after current song.
Also, turn this knob counterclockwise to
display songs before current song.
To listen to the displayed song, press the
knob to skip to the song and play.
8.REPEAT Button
Repeats current song when the button is
pressed for less than 0.8 sec.
Repeats the entire DISC when the button
is pressed for 0.8 sec or longer.
If CD has folders in it, repeat current folder instead of entire DISC when the button
is pressed for more than 0.8 sec.
PA eng 4-69~(Audio).qxd 1/15/2010 10:52 AM Page 81
Page 15

Features of your vehicle
824
9. RANDOM Play Button
Turns on/off the randomization of the
play list of files in the currently played
DISC.
To cancel the mode, press the key once
again.
10. SCAN Play Button
Plays first 10 sec of each song in the
DISC.
To cancel the mode, press the key once
again.
11. MARK Play Button
Press the button for 0.8 sec or longer to
mark or unmark the current song.
Press the button for less than 0.8 to play
currently marked song.
12. AUX-IN
Connect auxiliary device and it will automatically turn to AUX mode.
13. Folder moving Button
• Moves [FLDR ] button child folder of
the current folder and displays the first
song in the folder. Press TUNE/ENTER
knob to move to the folder displayed.
It will play the first song in the folder.
• Moves [FLDR ] button Parent folder
and displays the first song in the folder.
Press TUNE/ENTER knob to move to
the folder displayed. It will play the first
song in the folder.
14. Fast Rewind Button
Push and hold the “4 REW” key, more
than 0.8sec : play the operation of FF on
the current TRACK.
15. Fast Forward Button
Push and hold the “1 FF” key, more than
0.8sec : play the operation of REW on
the current TRACK.
PA eng 4-69~(Audio).qxd 1/15/2010 10:52 AM Page 82
Page 16

483
Features of your vehicle
PA710PA
1. FM Selection Button
2. AM Selection Button
3. CD Selection Button
4. AUX Selection Button
5. Automatic Channel Selection Button
6. Power ON/OFF & Volume Control Knob
7. AUTO STORE Button
8. Screen ON/ OFF Button
9. SETUP Button
10. TUNE/ENTER Knob
11. PRESET Button
12. SCAN Button
RADIO, SETUP, VOLUME CONTROL (PA710, if equipped)
PA eng 4-69~(Audio).qxd 1/15/2010 10:52 AM Page 83
Page 17

Features of your vehicle
844
1. FM Selection Button
Turns to FM mode and toggles FM1 and
FM2 when the button is pressed each
time.
2. AM Selection Button
Turns to AM mode, and toggles in the
order of AM1
➟AM2➟ AM1···when the
button is pressed each time.
3. CD Selection Button
If there is a cd in the CDP DECK it plays
the CD.
Press CD button to automatically insert
CD when the disc is ejected from the
deck by pressing CD EJECT.
4. AUX Selection Button
If the auxiliary device is connected, it
turns to AUX MODE to play the sound
from the auxiliary player.
If the auxiliary device is not connected, it
displays “No AUX Input” for 5 sec and
returns to the previous mode.
5. Automatic Channel Selection
Button
• When the [SEEK ]button is pressed,
it reduces the band frequency by
50kHz to automatically select channel.
Stops at the previous frequency if no
channel is found.
• When the [SEEK ]button is pressed,
it increases the band frequency by
50kHz to automatically select channel.
Stops at the previous frequency if no
channel is found.
6. Power ON/OFF & Volume
Control Knob
Turns on/off the set when the IGNITION
SWITCH is on ACC or ON. If the knob is
turned to the right, it increases the volume and left, decreases the volume.
7. AUTO STORE Button
When the button is pressed, it automatically selects and saves channels with
high reception rate to PRESET buttons
(1~6) and plays the channel saved in
PRESET1.
If no channel is saved after AST, it will
play the previous channel.
8. Screen ON/ OFF Button
Turns on/off the displayed data and light
on LCD.
The screen and light will be turned on by
pressing any button except Screen
ON/OFF button when the screen is
turned off.
9. SETUP Button
Press this button to turn to the Audio,
Clock setting, Scroll, Display and
Adjustment mode.
If no action is taken for 5 sec after pressing the button, it will return to the play
mode.(After entering SETUP mode,
move between items using the left, right
and PUSH functions of the TUNE button.)
The SETUP menu changes as below
table
Bass > 00
Middle > 00
AUDIO
Treble > 00
Fader > F=R
Balance > L=R
Return
PA eng 4-69~(Audio).qxd 1/15/2010 10:52 AM Page 84
Page 18

485
Features of your vehicle
❈ TO SETUP CLOCK
If Audio is ON
1. Press SETUP button.
2. Select CLOCK menu by rotating/pressing
TUNE knob.
3. Select ADJUST and current hour will
flash.
4. Adjust hour by rotating TUNE knob.
5. Press TUNE knob and now current
minute will flash.
6. Adjust minute and push TUNE knob
when finished.
7. Press SETUP button or select RETURN
to exit SETUP mode.
If Audio is OFF
1. Press SETUP button and current hour
will flash.
2. Adjust hour and press TUNE knob.
3. Rotate TUNE knob to adjust minute
when the current minute is flashing.
4. Push TUNE knob, and press SETUP
button or select RETURN to exit
SETUP mode.
10. TUNE/ENTER Knob
Turn this knob clockwise by one notch to
increase frequency by 0.05Mhz from current frequency.
Turn this knob counterclockwise by one
notch to decrease frequency by
100kHz(0.05Mhz) from current frequency.
Press this knob while holding SETUP
button to activate / inactivate the item.
Select SETUP item using left and right
function of the Tune knob.
(0.05Mhz) is A-200PAS only.
GENERAL FM 100kHz
AM 9kHz
EUROPE FM 50kHz
MW 9kHz
LW 1kHz, 3kHz(AUTO)
USA FM 200kHz
AM 10kHz
11. PRESET Button
Push [1]~[6] buttons less than 0.8 sec to
play the channel saved in each button.
Push PRESET button for 0.8 sec or longer
to save current channel to the respective
button with a beep.
12. SCAN Button
If the SCAN button is pressed during
receiving the broadcast for 5 sec, if cancels SCAN operation and receives the
broadcast flickering at that time.
When inputting SCAN KEY during
receiving the broadcast for 5 sec cancel
the operation of SCAN and receive the
broadcast flickering at that time.
In case of no input for cancel after
inputting SCAN KEY, operate SCAN only
1CYCLE.
Adjust >
Clock Display > 24Hour
Return
Scroll > On
Return
PA eng 4-69~(Audio).qxd 1/15/2010 10:52 AM Page 85
Page 19

Features of your vehicle
864
1. CD loading slot
2. CD-IN indicator
3. CD Eject Button
4. AUX Selection Button
5. Automatic Track Selection Button
6. INFO Button
7. TUNE/ENTER Knob
8. REPEAT Button
9. RANDOM Play Button
10. SCAN Play Button
11. MARK Play Button
12. AUX IN
13. Folder moving Button
14. Fast Rewind Button
15. Fast Forward Button
PA710PA
CD (PA710, if equipped)
PA eng 4-69~(Audio).qxd 1/15/2010 10:52 AM Page 86
Page 20

487
Features of your vehicle
1. CD loading slot
Please face printed side upward and
gently push in. When the ignition switch
is on ACC or ON and power is off, power
is automatically turned on if the CD is
loaded. This CDP support only 12 cm
CD. But if VCD, Data CD are loaded, "Er6" message will appear and CD will be
ejected.
2. CD-IN Indicator
When car ignition switch is ACC or ON
and if the CD is loaded, this indicator is
lighted. If the CD is ejected the light is
turned off.
3. CD eject Button
Push button to eject the CD. This button is enabled when ignition switch is off.
4. AUX Selection Button
If the auxiliary device is connected, it
turns to AUX MODE to play the sound
from the auxiliary player.
If the auxiliary device is no connected, it displays "No AUX Input" for 5 sec and returns
to the previous mode."
5. Automatic Track Selection
Button
• Push [SEEK ] button to play from
the beginning of current song.
• Push [SEEK ] button and press
again within 1 sec to play the previous
song.
• In case of keep pressing, track goes
down continually.
• Push [SEEK ] button to play the next
song.
• In case of keep pressing, track goes up
continually.
6. INFO Button
Displays the information of the current
CD TRACK in the order of DISC
TITLE
➟DISC ARTIST➟TRACK TITLE➟
TRACK ARTIST➟TOTAL TRACK➟ Play
Screen
➟DISC TITLE➟···.(not displayed if
the information is not available on the
DISC.)
7. TUNE/ENTER Knob
Turn this knob clockwise to display songs
after current song.
Also, turn this knob counterclockwise to
display songs before current song.
To listen to the displayed song, press the
knob to skip to the song and play.
8. REPEAT Button
Repeats current song when the button is
pressed for less than 0.8 sec.
Repeats the entire DISC when the button
is pressed for 0.8 sec or longer.
9. RANDOM Play Button
Turns on/off the randomization of the play
list of files in the currently played DISC.
To cancel the mode, press the key once
again.
PA eng 4-69~(Audio).qxd 1/15/2010 10:52 AM Page 87
Page 21

Features of your vehicle
884
10. SCAN Play Button
Plays first 10 sec of each song in the
DISC.
To cancel the mode, press the key once
again.
11. MARK Play Button
Press the button for 0.8 sec or longer to
mark or unmark the current song.
Press the button for less than 0.8 to play
currently marked song.
12. AUX-IN
Connect auxiliary device and it will automatically turn to AUX mode.
13. Folder moving Button
• Moves [FLDR ] button child folder of
the current folder and displays the first
song in the folder. Press TUNE/ENTER
knob to move to the folder displayed.
It will play the first song in the folder.
• Moves [FLDR ] button Parent folder
and displays the first song in the folder.
Press TUNE/ENTER knob to move to
the folder displayed. It will play the first
song in the folder.
14. Fast Rewind Button
Push and hold the “4 REW” key, more
than 0.8sec : play the operation of FF on
the current TRACK.
15. Fast Forward Button
Push and hold the “1 FF” key, more than
0.8sec : play the operation of REW on
the current TRACK.
PA eng 4-69~(Audio).qxd 1/15/2010 10:52 AM Page 88
Page 22

This equipment has been tested and found to comply with the limits for a Class A digital device, pursuant to part 15 of the FCC Rules.
These limits are designed to provide reasonable protection against harmful interference in a residential installation. This equipment
generates, uses and can radiate radio frequency energy and, if not installed and used in accordance with the instructions, may cause
harmful interference to radio communications. However, there is no guarantee that interference will not occur in a particular
installation. If this equipment does cause harmful interference to radio or television reception, which can be determined by turning the
equipment off and on, the user is encouraged to try to correct the interference by one or more of the following measures:
ˍ Reorient or relocate the receiving antenna.
ˍ Increase the separation between the equipment and receiver.
ˍ Connect the equipment into an outlet on a circuit different from that to which the receiver is connected.
ˍ Consult the dealer or an experienced radio/TV technician for help.
Caution: Any changes or modifications to this device not explicitly approved by manufacturer could void your authority to operate this
equipment.
This device complies with part 15 of the FCC Rules. Operation is subject to the following two conditions: (1) This device may not
cause harmful interference, and (2) this device must accept any interference received, including interference that may cause undesired
operation.
This equipment complies with FCC radiation exposure limits set forth for an uncontrolled environment. This equipment should be
installed and operated with minimum 20 cm between the radiator and your body. This transmitter must not be collocated or operating
in conjunction with any other antenna or transmitter unless authorized to do so by the FCC.
IC Warning
Operation of this device is subject to the following two conditions: (1) this device may not cause interference, and (2) this device must
accept any interference, including interference that may cause undesired operation of the device.
 Loading...