

HYUNDAI MOBIS AVN-700MDA User Manual

FCC ID: TQ8-AVN-700MDA / IC: 5074A-AVN700MDCA
ATTACHMENT E.
- User Manual -
HCT CO., LTD.
SAN 136-1, AMI-RI, BUBAL-EUP, ICHEON-SI, KYOUNGKI-DO, 467-701, KOREA
TEL:+82 31 639 8517 FAX:+82 31 639 8525 www.hct.co.kr
Report No. : HCTR1005FR16 1/1

DIGITAL NAVIGATION SYSTEM
User's Manual
DIGITAL NAVIGATION SYSTEM
User's Manual

Table of contents
PART 1
PRE-OVERVIEW
Introduction ……………………… 1-2
Controller and functions ………… 1-3
Basic operation and setting ……… 1-6
PART 2
AUDIO SYSTEM
Operating the radio ……………… 2-2
Operating the CD Player ………… 2-10
Operating external devices ……… 2-22
PART 3
NAVIGATION SYSTEM
Limitations of the navigation
system …………………………… 3-2
Map Functions …………………… 3-5
Setting a destination …………… 3-12
Operating after setting
a destination ……………………… 3-28
Route guidance …………………… 3-30
Setup and Information …………… 3-36
PART 4
XM DATA
Entering XM Data mode ………… 4-2
PART 5
VOICE COMMAND SYSTEM
Operating voice command ……… 5-2
Setting up the voice command
system …………………………… 5-4
Voice command list ……………… 5-6

Table of contents
PART 6
BLUETOOTH HANDS FREE
Before using the Bluetooth
Handsfree ………………………… 6-2
Converting Bluetooth Handsfree
mode ……………………………… 6-2
Pairing and connecting a Bluetooth
phone ……………………………… 6-4
Bluetooth Handsfree screen
layout ……………………………… 6-9
Making a call ……………………… 6-11
Answering a call ………………… 6-13
Operating menus during a call …… 6-14
Phone Book ……………………… 6-16
Call History List …………………… 6-19
Phone Music ……………………… 6-21
Bluetooth settings ………………… 6-24
PART 7
PGS (Parking Guide System)
About PGS (Parking Guide System)
… 7-2
PART 8
APPENDIX
Troubleshooting guide …………… 8-2
Map legend ……………………… 8-5
INDEX ……………………………… 8-8
Important information …………… 6-30

PART 1 PRE-OVERVIEW
PART 1
PRE-OVERVIEW
Introduction ……………………… 1-2
Important information about this
manual …………………………………1-2
Precaution for safe usage ………………1-2
Controller and functions ………… 1-3
Control panel ……………………………1-3
Steering wheel remote controller ………1-5
Basic operation and setting ……… 1-6
Turning the Power ON …………………1-6
System Power ON …………………… 1-6
Turning the Power OFF …………………1-6
Turning the Audio ON/OFF ……………1-6
Adjusting audio volume …………………1-7
How to operate the screen menu ………1-7
Operating typical screen menu ……… 1-7
Inputting letter by using screen
keyboard ……………………………… 1-7
Displaying the list …………………… 1-7
Selecting an item in a list …………… 1-8
Sorting items from list ……………… 1-8
How to operate menu by voice
command ………………………………1-8
Conditions for voice recognition
system ………………………………… 1-8
Giving voice command ……………… 1-9
Sound setting ……………………………1-9
FAD/BAL ……………………………… 1-9
BASS/MID/TREB ……………………… 1-10
Auto volume control ON/OFF ……… 1-10
Touch screen beep ON/OFF ………… 1-10
Variable EQ Setup (Optional) ………… 1-10
Operating Variable EQ ……………… 1-10
Display setting ……………………… 1-11
Display mode ………………………… 1-11
Brightness …………………………… 1-11
Display OFF ………………………… 1-11
Display ON …………………………… 1-11
Viewing Current Time ………………… 1-12
Setting the Clock …………………… 1-12
Setting Display OFF ………………… 1-13
Display Photo Frame ………………… 1-13
PRE-OVERVIEW
PRE-OVERVIEW 1-1

Preface
Thank you for purchasing this Audio
Navigation System.
This user's manual explains how to use
the Hyundai Motor Audio Navigation
System.
Before using the p roduct, read the
contents of this user's manual carefully
and use this product safely.
●
The screens shown in this manual
may differ with the actual screens of
the product.
●
The design and specification of this
product may change without prior
notification for product improvement.
●
When transferring the vehicle to
another individual, include this user's
manual so that the next driver can
continue its use.
iPod®
iPod® is a registered trademark of Apple
Inc.
Bluetooth®
The Bluetooth® word mark and logos
are registered trademarks owned by
Bluetooth SIG, Inc. and any use of such
marks by Hyundai is under license.
A Bluetooth® e nabled cell phone is
required to use Bluetooth® wireless
technology.
Copyright(c) 2009 by NAVTEQ. All Map Database cannot be copied without permission.
This is protected by U.S. copyright laws. All rights not expressly granted are reserved.
You may not otherwise reproduce, modify, and distribute the content without M&Soft, Inc's prior written consent.
PART 1 PRE-OVERVIEW
Introduction
Important information about this
manual
This user manual contains instructions related
to safety. Closely observe and comply with all
of the safety instructions found within this
manual.
WARNING !
Disobeying the warnings listed within this
user's manual may cause fatal or serious inju-
ries. Warnings indicate matters which may
directly lead to accidents.
CAUTION!
Disobeying the cautions listed within this user
manual may lead to accidents or cause injury.
Cautions indicate matters which may lead to
vehicle damage or malfunction.
INFORMATION
Information which the user must be aware or
allows for more convenient use of the device.
Precaution for safe usage
WARNING !
●
Do not operate the Audio Navigation system
while driving.
●
Do not disassemble, assemble, or modify the
Audio Navigation system.
●
Do not watch the screen for prolonged peri-
ods of time while driving.
●
Set the volume to a level which allows the
driver to be aware of external conditions.
CAUTION!
●
Do not operate the Audio Navigation sys-
tem for prolonged periods of time with the
vehicle ignition in ACC. Such operations
may lead to battery discharge.
●
Be cautious not to spill water or introduce
foreign objects into the device.
●
Do not cause severe shock to the device.
Direct pressure onto the front side of the
monitor may cause damage to the LCD or
touch panel.
●
In case of product malfunction, please con-
tact your place of purchase or service cen-
ter.
●
When cleaning the touch screen, make sure
to turn off the device and use a dry and
smooth cloth. Never use tough materials,
chemical cloths, or solvents (alcohol, ammo-
nia, benzene, thinners, etc.) as such materials
may damage the device panel or cause color
and quality deterioration.
Reference Page
This indicates the title and page that you
should refer to.
This indicates a key on the control panel.
Voice Command
This indicates an operation by voice com-
mand.
1-2 PRE-OVERVIEW
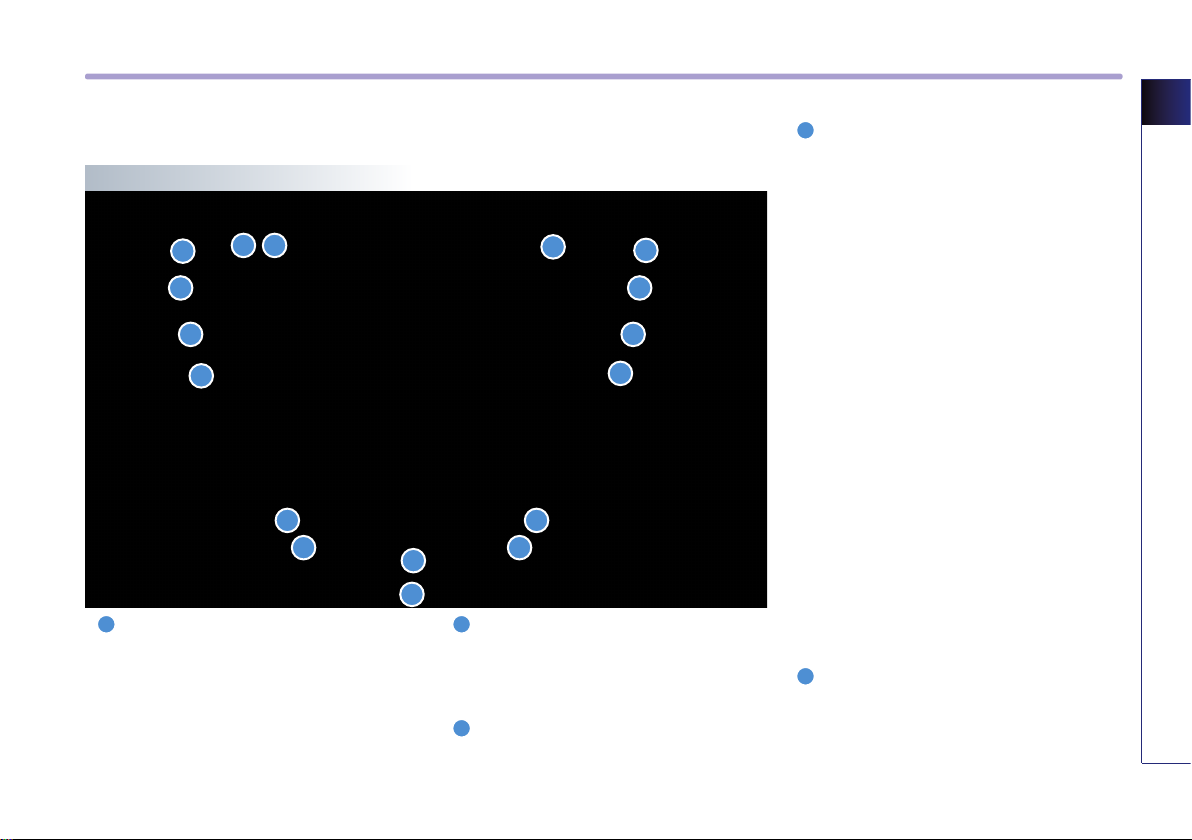
Controller and functions
Control panel
16
1 4
1
Power / Volume control knob
●
Push knob (over 0.8 second) : turns the
power off.
●
Push knob (under 0.8 second) : each time the
knob is pressed, the Audio is turned on and off.
●
Tune knob : the range of volume adjustment
is between 0 ~ 35.
7 8
2 5
3
12 14
13 15
9
17
6
10
11
2
FM/AM
Each press will change the bands in the fol-
→
→
lowing order: FM1
3
XM
Each press will change the bands in the fol-
lowing order: XM1
→
FM2
XM2
AM → FM1 ...
→
XM3
→
XM1 ...
4
SEEK/TRACK Up/Down
●
SHORT KEY(less than 0.8 second)
• FM/AM Mode : automatically searches for
the previous or next broadcast frequency
and starts playing.
• XM Mode : receives the previous or next
channel.
• CD Mode : plays the previous or next track.
• MP3, USB Mode : Plays the previous or
next file.
• iPod Mode : plays the previous or next song.
●
LONG KEY(over 0.8 second)
• FM/AM Mode : quickly moves through the
frequencies while the button is pressed.
Once released, automatically searches for
broadcasts which can be received.
• XM Mode : quickly moves to the previous
or next channel.
• CD Mode : REW/FF the cur rent playing
track.
5
MEDIA
Each press will change the bands in the fol-
→
lowing order: DISC(CD, MP3)
→
(AUX) → (Phone Music)
(USB or iPod)
→
DISC(CD, MP3)...
PRE-OVERVIEW 1-3
PRE-OVERVIEW
PART 1 PRE-OVERVIEW
• MP3, USB Mode : REW/FF the current play-
ing file.
• iPod Mode : REW/FF the current playing
song.
6
PHONE
Displays the Bluetooth handsfree screen.
7
DISP
DISP displays the displays setting screen.
8
MAPVOICE
Displays the map screen for the current posi-
tion.
9
ROUTE
Displays the Route menu screen.
10
DEST
Displays the displays setting screen.
11
TUNE
●
FM/AM Mode : push the key to search for
the desired frequency. Press the key to
receive the selected frequency.
●
XM Mode : push the key to search for the
desired channel. After a brief moment, the
selected channel will be displayed.
●
CD Mode : push the key to search for the
desired track. Press the key to play the
selected track.
●
MP3, USB Mode : push the key to search
for the desired file. Press the key to play
the selected file.
●
iPod Mode : push the key to search for the
desired song. Press the key to play the
selected song.
12
SETUP
Displays the Setup menu screen.
13
ENTER
Completes the command.
14
RESET
Resets the system - if software locks-up.
INFORMATION
If pressing the power off knob for over 0.8 sec-
ond and the system does not shut down, and
carefully use and insert a straightened paper
clip at the access hole shown next to the right
DISC indicator LED to reset the software.
The system power will shut-off and restart.
15
Clock
●
Short Key (under 0.8 second)
• When the screen is turned on : displays
th e cur ren t tim e in the ce nte r of the
screen.
• When the screen is turned off : turns the
full clock screen on and off.
●
Long Key (over 0.8 second)
• Displays the clock setting screen.
16
DISC eject
Ejects the inserted disc.
17
DISC insert indicator LED
Displays whether a DISC has been inserted.
1-4 PRE-OVERVIEW

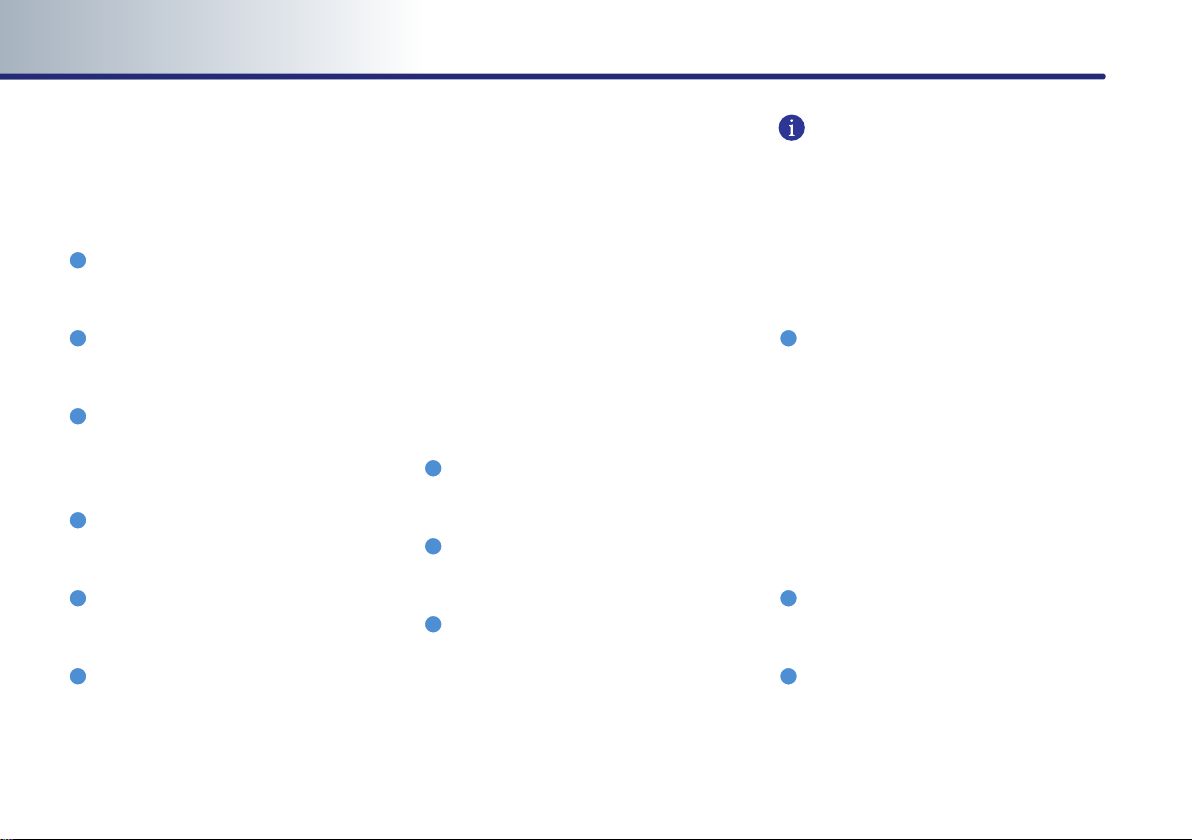
Steering wheel remote controller
1
2
3
4
5
6
1
MODE
Each time the Mode key is pressed, the mode
changes in the following order: FM1
→
AM → XM1 → XM2 → XM3 → (DISC) →
(USB or iPod)
FM1 ...
If an unsupported DISC is inserted, if there is
no disc, or if an external device (e.g. iPod, USB
memory stick, etc.) has not been connected,
the mode will not be recognized and auto-
matically switch to the next mode.
→
(AUX) → (Phone Music) →
→
FM2
●
Press this key for over 0.8 second to turn the
Audio ON and OFF.
●
Press this key when the Power is turned off
to turn the power on.
2
Volume Up/Down
Increases or decreases the volume within a
range between 0 ~ 35. Volume for navigation
and voice guidance can be adjusted in the
setup mode.
3
Seek Up/Down
●
SHORT KEY(less than 0.8 second)
• FM/AM : receives the previous or next pre-
set frequency.
• XM Mode : receives the previous or next
preset channel.
• CD Mode : plays the previ ous or nex t
track.
• MP3, USB Mode : plays the previous or
next file.
• iPod Mode : plays the previous or next
song.
●
LONG KEY(Over 0.8 second)
• FM/AM Mode : quickly moves through the
frequencies while the key is pressed.
Once released, automatically searches for
broadcasts which can be received.
• XM Mode : quickly moves to the previous
or next channel.
• CD Mode : REW/FF the current playing track.
• MP3, USB Mode : REW/FF the current play-
ing file.
• iPod Mode : REW/FF the current playing
song.
4
Voice Recognition
Starts Voice Recognition.
5
CALL
Press this key to receive an incoming call. If
pressed while in Audio/Navigation mode, the
bluetooth handsfree screen will be displayed.
6
END
Press this key to reject an incoming call.
If pressed while on a call, then the call will be
terminated.
PRE-OVERVIEW
PRE-OVERVIEW 1-5

PART 1 PRE-OVERVIEW
Basic operation and setting
Turning the Power ON
1. Turn the ignition key onto ACC or ON. If the
system power had been on when the igni-
tion was turned off, the system will turn
back on automatically.
2. If the system power had been off when the
ignition wa s turned off, the system will
remain off. In this case, press the
knob to turn on the system power.
PWR/VOL
System Power ON
INFORMATION
As system booting starts from the point the
door lock is unlocked, the device may com-
plete booting before the ACC is turned on or
PWR/VOL
the
Consequently, the booting screen may not be
displayed upon initially turning on the system
power.
3. Once system booting is complete, the most
recent operated mode will be displayed. For
example, turning on the system will display
FM1 radio mode if the last operated mode
prior to turning off the system had been
FM1 radio mode.
knob is pressed.
Turning the Power OFF
PWR/VOL
If the
second, a beep will sound and the system
power will be turned off.
knob is pressed for over 0.8
Turning the Audio ON/OFF
Press the
ond with the system power on to turn the
Audio on and off.
PWR/VOL
knob for under 0.8 sec-
Voice Command
1. Press the key on the steering wheel
remote controller.
2. After the beep sound, say a command.
"Audio On"
"Audio Off"
INFORMATION
Conducting the following operations while
the AUDIO is off will automatically turn on the
Audio system.
●
Pressing the Audio related keys (
XM, MEDIA
●
Inserting a DISC or connecting an external
device.
).
FM/AM
,
1-6 PRE-OVERVIEW

Adjusting audio volume
Turn the
tion to increase the volu me and cou nter-
clockwise to decrease the volume.
PWR/VOL
knob in clockwise direc-
INFORMATION
●
The range of volume adjustment is between
0 ~ 35.
●
Adjustments to the volume cannot be made
while the AUDIO is turned off.
How to operate the screen menu
Operating typical screen menu
●
If a menu button on the screen is pressed,
the corresponding function will begin oper-
ation.
●
The same menu button may perform differ-
ent functions depending on the length of
time the button is pressed (under 0.8 sec-
onds or over 0.8 second). For more informa-
tion, refer to the specific function within this
user manual.
●
The current operated button will be high-
lighted upon display.
●
Buttons which cannot be operated under
the current conditions will be displayed in
disabled state. Pressing a disabled button
will not perform any operation.
Inputting letter by using screen
keyboard
ABC
: Displays the English alphabet keypad.
: Displays the French alphabet keypad.
(if available)
0 - 9
: Displays the number and symbol key-
pad.
Delete
: Deletes the previously inputted letter.
Pressing for over 0.8 second will delete
all content.
Done
: The input is completed.
: Re sto res to previo us screen. The
inputted text will not be saved.
Displaying the list
List
: Even if input is not complete, the cur-
rent matching items from the data-
base will be displayed.
INFORMATION
The number at the upper-right side of the
screen displays the number of current matches.
PRE-OVERVIEW
PRE-OVERVIEW 1-7

PART 1 PRE-OVERVIEW
Selecting an item in a list
▲
▼
: Moves to the next page or previous
page.
▶ ◀
:
The
▶
button will be displayed if
the text is too long to be displayed in
one button.
Press the
the end of the text. Press the
▶
button to move the cursor to
◀
button to
move the cursor to the front of the text.
Sorting items from list
Select the desired sorting method to reorga-
nize the list in accordance to the selected
method.
How to operate menu by voice
command
Conditions for voice recognition system
Most of the functions within the Audio and
Navigation system can be operated by voice.
Please follow the instructions below for opti-
mal voice recognition performance.
●
Close all windows and the sunroof. The
voice recognition can be improved when in
a quiet environment.
●
Press the voice recognition button and say
the desired voice command after the sound
of the beep.
●
The microphone is positioned above the
driver so that voice commands can be said
while maintaining a proper posture.
●
Pronounce the voice commands naturally
and clearly as if in normal conversation.
1-8 PRE-OVERVIEW
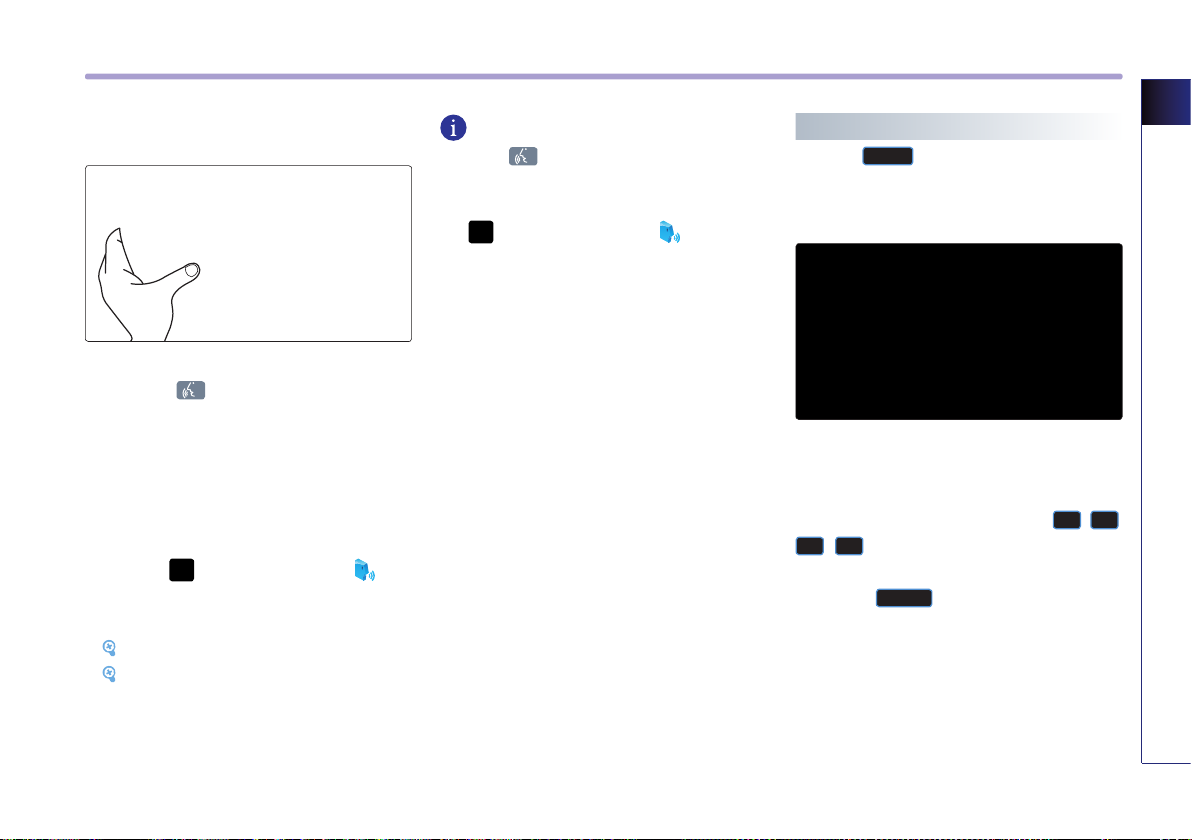
Giving voice command
1. Press the key on the steering wheel
remote controller.
A voice command window will be displayed
on the lower side of the screen followed by
a "Command please" system voice com-
ment.
2. Once the icon changes into the icon
on the pop-up screen with a beep sound,
say the desired voice command.
[Voice command list], page 5-6.
[ Searching a destination by voice com-
mand], page 5-19.
INFORMATION
Press the key shortly to input the desired
voice command. The system voice instruction
comment will immediately terminate. When
the
icon changes into the icon with a
beep sound, it is possible to input voice com-
mands.
Sound setting
Press the
each Audio mode (FM/AM, XM, CD, MP3, USB,
iPod) to display the Sound setting screen.
FAD/BAL
The position of the sound can be adjusted by
using the up-down and left-right (
▶, ◀
screen.
Press the
sound in the center of the vehicle.
Sound
button on the main screen of
▲, ▼
) buttons on the left sid e of the
Center
but ton to posit ion the
PRE-OVERVIEW
,
PRE-OVERVIEW 1-9

PART 1 PRE-OVERVIEW
BASS/MID/TREB
The BASS/MID/TREB can be adjusted by using
the left/right buttons (
trol.
◀, ▶
) of each con-
Auto volume control ON/OFF
Each time the
pressed, the Auto volume control function is
turned on or off.
Auto volume control
button is
INFORMATION
The Auto Volume Control is a function which
automati cally adjusts the volume level in
accordance to changes in vehicle speed.
Touch screen beep ON/OFF
Ea ch time the
pressed, the beeping sound that follows each
press on the screen will turn on or off.
Touch screen beep
butto n is
Variable EQ Setup (Optional)
Operating Variable EQ
Sound
Variable EQ
screen.
1. Press the
the
2. Within the <Vari able EQ> sc reen, th ree
ty p es of EQ s et up s such as N or ma l,
Dynamic, Concert can be selected.
button at the top of
3. Press the
information on the three EQ settings.
Detail
button to view specific
INFORMATION
The Variable EQ feature may not be supported
in some vehicle models and tuner mode.
1-10 PRE-OVERVIEW

Display setting
Press the
display the Setup menu screen.
DISP
key on the control panel to
Night
●
Th e dark scree n is al ways maint aine d
regardless of the on/off state of the vehicle
taillights.
Brightness
Use the left/right buttons (◀, ▶) for con-
trol to make adjustments.
Display OFF
Press the
Display Off
button.
PRE-OVERVIEW
Display mode
Press the button for the desired display mode
fr om
Automatic
Day
,
, an d
Night
modes. The current selected mode is high-
lighted.
Automatic
●
The displa y is automatic ally conve rte d
be twe en Daylight and Night modes in
accordance to the on/off state of the vehi-
cle taillights.
Day
●
The bright screen is always main tained
regardless of the on/off state of the vehicle
taillights.
Display ON
Press anywhere on the black screen.
The screen prior to display setting will be dis-
played.
PRE-OVERVIEW 1-11
PART 1 PRE-OVERVIEW
Viewing Current Time
Press the on the front panel shor tly
(under 0.8 second) to display the current time
at the center of the screen.
INFORMATION
If the screen is turned off, selecting the
will display the current time on the entire
screen.
Setting the Clock
Press and hold the on the front panel
(over 0.8 second) to display the Clock setting
screen.
●
GPS Time
The time received from the GPS will be dis-
played automatically.
●
Clock Type
Selec ts the clock type shown as the entire
screen when the system power is turned off.
●
Time Format
When the clock type is digital, this button is
used to convert the time between 12 hour/ 24
hour systems.
●
Daylight Saving Time
Turns the Daylight Saving Time function on or
off.
INFORMATION
Clock setting mode can be displayed while
the clock is displ ayed on the screen even
when the system is turned off.
1-12 PRE-OVERVIEW

Setting Display OFF
Display Photo Frame
1. P res s the
DISPLAY setup screen.
Power Off Set
bu tt on in th e
4. To delete an image registered as a frame,
press the
Delete Image
button.
PRE-OVERVIEW
2. P re s s th e
Photo Frame
bu tt on in t h e
<Setting Display Off> setup screen.
3. The registered image will be displayed once
power is turned off.
INFORMATION
For Photo Frame setup, the frame must be set
in USB Image mode. (For details on setting the
Photo Frame, refer to the USB IMAGE page.)
PRE-OVERVIEW 1-13

PART 2 AUDIO SYSTEMPART 2 AUDIO SYSTEM
PART 2
AUDIO SYSTEM
Operating the radio ………………… 2-2
FM/AM Radio …………………………… 2-2
Listening to the FM/AM radio ………2-2
FM/AM screen and functions
Selecting FM/AM broadcast
frequency
Storing FM/AM preset
Scanning FM/AM broadcast
frequency
XM radio ………………………………… 2-6
Listening to the XM radio ……………2-6
XM screen and functions
Switching the XM mode
(Channel / Category)
Selecting XM broadcast channel
Storing XM preset
Scanning XM broadcast channel
……………………………2-3
……………………………2-5
……………………2-9
…………2-2
………………2-4
……………2-6
…………………2-7
……2-7
……2-9
Operating the CD Player …………… 2-10
About CD Player ………………………… 2-10
Precautions upon handling discs … 2-10
For safe and efficient operation
Supported disc formats
Disc/Content format compatibility
Inserting/Ejecting Disc ………………… 2-13
Inserting a Disc …………………… 2-13
Ejecting a Disc
CD ……………………………………… 2-14
Listening to CD music …………… 2-14
CD screen and functions
Selecting the CD track
REW/FF CD track
Setting Repeat function for
CD music
Setting Random function for
CD music
Scanning CD track ………………… 2-16
…………………… 2-13
…………… 2-14
…………………… 2-15
…………………………… 2-15
…………………………… 2-15
…… 2-10
…………… 2-11
… 2-12
………… 2-14
MP3 …………………………………… 2-17
MP3 disc related information and
precaution ………………………… 2-17
Listening to MP3 music
MP3 screen and functions
Selecting to MP3 music
REW/FF MP3 file
Viewing detail information for
MP3 file …………………………… 2-20
Setting Repeat function for
MP3 file
…………………………2-20
Setting Random function for
MP3 file
…………………………… 2-20
Scanning MP3 file
…………… 2-18
………… 2-18
…………… 2-19
…………………… 2-20
………………… 2-21

PART 2
AUDIO SYSTEM
Operating external devices ……… 2-22
iPod® …………………………………… 2-22
Connecting iPod device …………… 2-22
Listening to iPod music ……… 2-22
iPod screen and functions ………… 2-23
Selecting an iPod song
REW/FF iPod song
Setting Repeat function for
iPod song
Setting Random function for
iPod song
USB MP3 ………………………………… 2-26
USB MP3 related information and
precaution
Precautions upon handling USB
Connecting the USB
Listening to USB music
USB IMAGE Mode ……………………… 2-29
Starting USB IMAGE Mode ………… 2-29
USB IMAGE mode menu screen
configuration
………………………… 2-25
……………………… 2-25
………………………… 2-26
……………………… 2-29
…………… 2-23
………………… 2-24
… 2-26
……………… 2-28
…………… 2-28
Operating USB IMAGE Mode
AUX ……………………………………… 2-31
Connecting AUX …………………… 2-31
Playing AUX
AUX screen
……………………… 2-31
………………………… 2-31
……… 2-30
AUDIO SYSTEM
AUDIO SYSTEM 2-1
PART 2 AUDIO SYSTEM
Operating the radio
FM/AM Radio
Listening to the FM/AM radio
1. Press the
The FM/AM radio band of the most recent
listened station will be displayed.
2. Pres s the
desired radio band. Each press will change
the bands in the following order: FM1
FM2
3. Select the desired broadcast frequency.
[Selecting FM/AM broadcast frequency],
page 2-3.
FM/AM
→ AM →
key on the control panel.
FM/AM
ke y to chang e th e
FM1 ...
Voice Command
1. Press the key on the steering wheel
remote controller.
2. After the beep sound, say a command.
" Radio"
"(Radio) AM"
"(Radio) FM"
"(Radio) FM <1 or 2>"
"AM Frequency <530 to 1710>"
"FM Frequency <87.5 to 107.9>"
"AM Preset <1 to 6>"
"FM <1 or 2> Preset <1 to 6>"
→
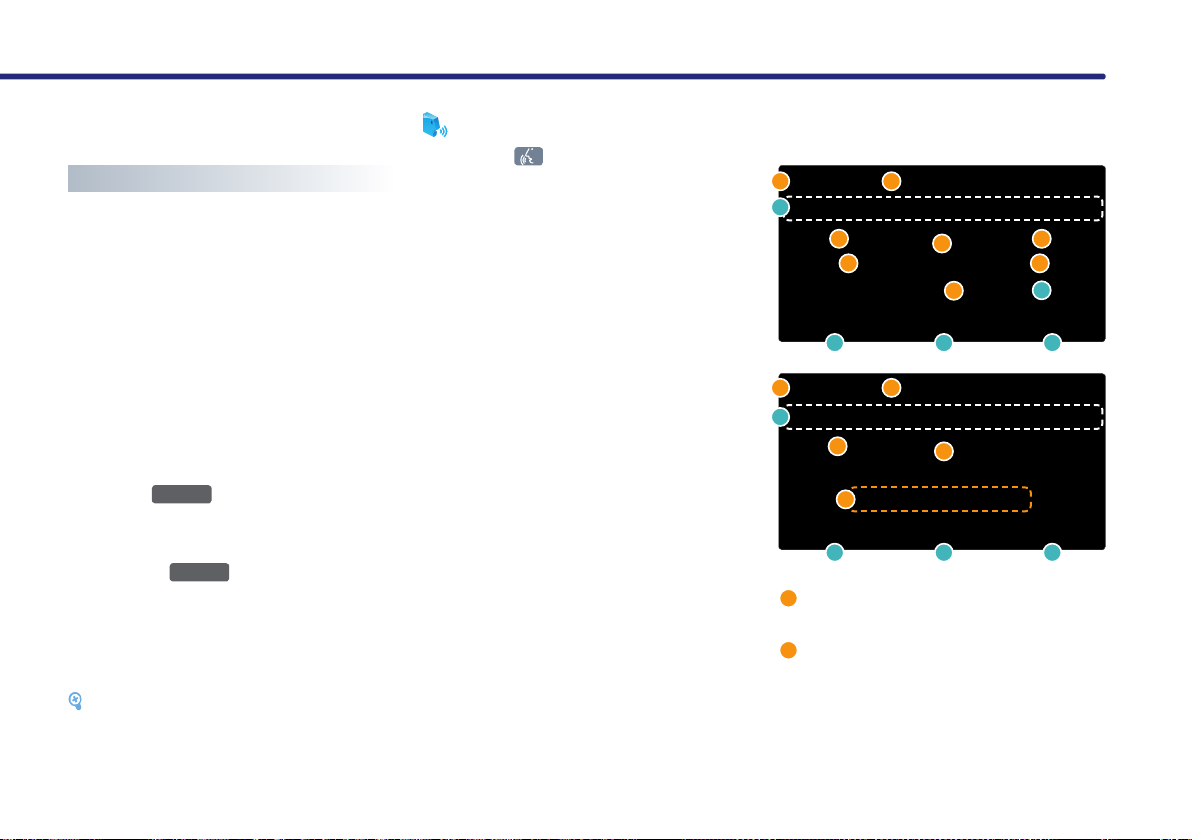
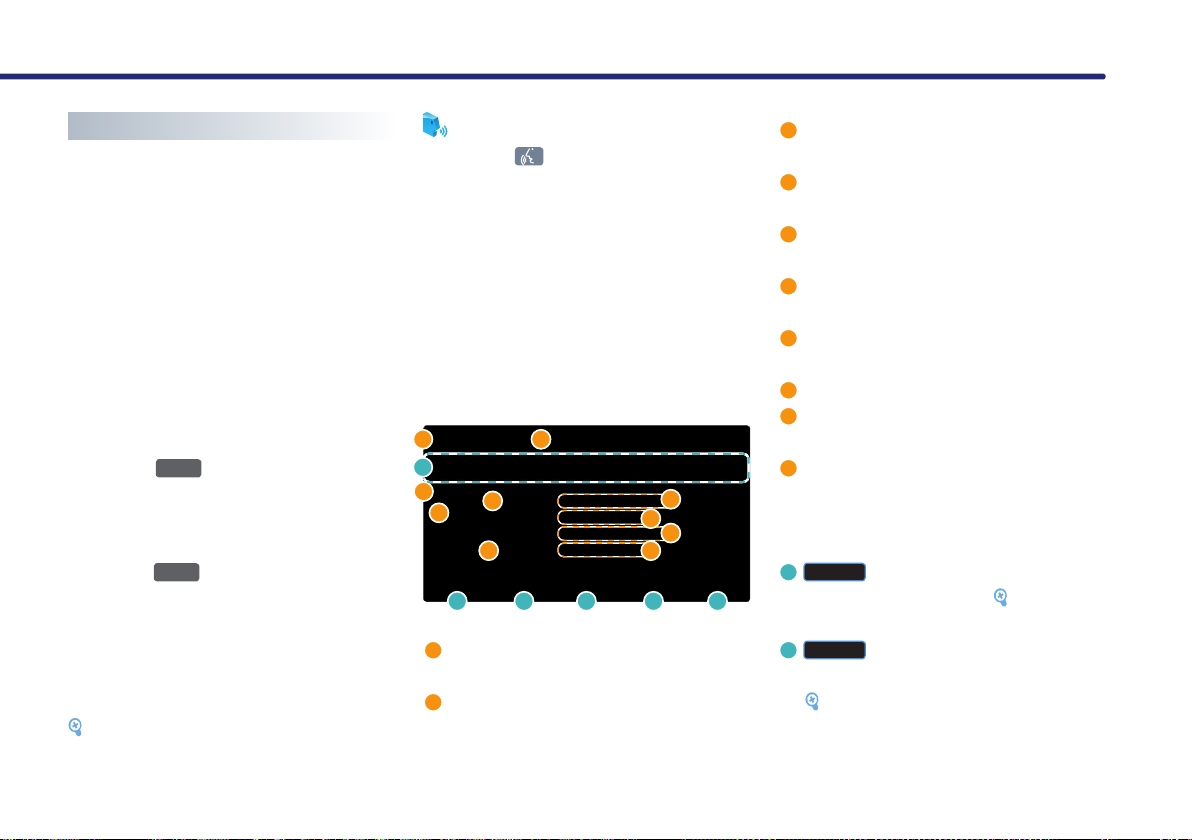
FM/AM screen and functions
1
a
1
a
1
Mode display : displays the FM1/FM2/ AM
9
2 3
4
c
2
8
c
5
7
d
9
5
d
6
b
modes.
2
SEEK/SCAN/PRESET SCAN/AUTO PRESET
indicator : if SEEK/SCAN/PRESET SCAN /
AUTO PRESET is operating, the switch is
displayed.
e
e
2-2 AUDIO SYSTEM
3
STEREO indicator : if the current frequency
is a stereo broadcast, the indicator is dis-
played.
4
Program Service name : displays the pro-
gram service name if data is being broad-
cast.
5
Frequency : displays the current playing
frequency.
6
Program type name : displays the program
type name if data is being broadcast.
7
Radio Text : displays the radio text infor-
mation if data is being broadcast.
8
Frequency Bar : displays the position of
the current frequency within the total fre-
quency range.
9
Current time : displays the current time
manually automatically according to the
GPS time.
a
Preset
buttons : the desired frequency
can be preset and selected.
[Storing FM/AM preset], page 2-4.
R-Text
b
ON/OFF button : turns the Radio
Text information on and off.
INFORMATION
R-Text
If the
displayed even if there is text being transmit-
ted from the broadcast station.
If the
bar will not be displayed. Even if the
in on ON state, text may not be displayed if
text is not being received from the broadcast
station.
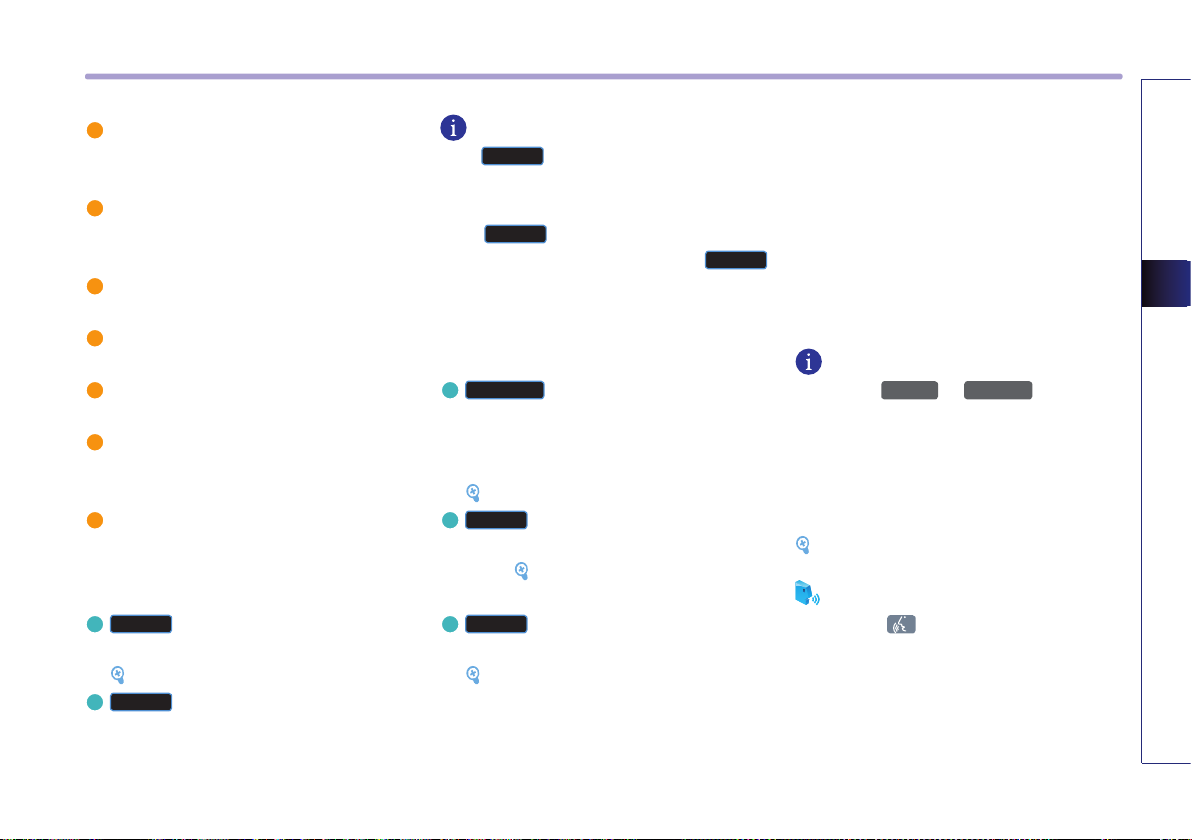
c
Auto Store
quencies with the most superior reception
and automatically stores as preset buttons
in corresponding order.
Scan
d
just the preset frequencies for 5 seconds
ea ch.
frequency], page 2-5.
e
Sound
BASS/MID/TREB controls.
is on OFF state, text will not be
R-Text
is on ON state, the frequency
button : search es the 6 fre-
[Storing FM/AM preset], page 2-4.
button : scans all frequencies or
[S cann ing FM/AM broa dca st
button : a djusts the FAD/BAL,
[Sound setting], page 1-10.
R-Text
Selecting FM/AM broadcast frequency
There are 3 ways to select the broadcast fre-
quency - (a) selecti ng throug h preset, (b)
selecting through SEEK, (c) selecting through
manual search.
(a) Selecting a frequency through preset
Press the preset button of the desired broad-
cast frequency.
INFORMATION
●
Press the
steering wheel remote controller shortly. The
preset frequencies of the current band will be
selected in order.
●
There are 6 preset frequencies each for FM1,
FM2, and AM modes.
[Storing FM/AM preset], page 2-4.
∨SEEK
or
TRACK∧
keys on the
Voice Command
1. Press the key on the steering wheel
remote controller.
2. After the beep sound, say a command.
"Preset <1 to 6>"
"Preset Up"
"Preset Down"
AUDIO SYSTEM
AUDIO SYSTEM 2-3
PART 2 AUDIO SYSTEM
(b) S el ec ti ng a B r oa dca st f re qu en cy
through SEEK
Pre ss the
∨SEEK
or
TRACK∧
keys on the
control panel for less than 0.8 second.
Once the SEEK function is operating (SEEK
in dic ator blink ing), the next or pre vious
broadcast frequency with superior reception
will be searched automatically.
INFORMATION
●
Press the
control panel or steering wheel remote con-
troller for more than 0.8 second to quickly
move to the nearest desired fre quenc y.
Once the button is released, the next fre-
quency with superior reception wil l be
searched automatically.
●
If the SEEK function is operating, pressing
the
trol panel again will terminate SEEK opera-
tion and select the current frequency.
∨SEEK
∨SEEK
or
TRACK∧
or
TRACK∧
keys on the
keys on the con-
Voice Command
1. Press the key on the steering wheel
remote controller.
2. After the beep sound, say a command.
"Seek Up"
"Seek Down"
(c
) Selecting a broadcast frequency through
manual search
Press the
frequency.
Each click on the
or decrease the frequency by 1 step (FM: 0.2
MHz, AM: 10 kHz).
Storing FM/AM preset
There are 2 ways to store preset frequencies -
(a) storing manually and (b) auto store.
(a) Storing manually
1. Select the desired frequency.
∨TUNE∧
key to search for desired
∨TUNE∧
key will increase
[Selecting FM/AM broadcast frequenc y],
page 2-3.
2. Press the preset button to store for over 0.8
second. The frequency will become stored
along with a beep sound.
INFORMATION
Six preset frequencies each for FM1/ FM2/AM
modes can be stored using the above instruc-
tions.
(b) Auto store
After selecting the desired band, press the
Auto store
button. The 6 frequencies with the
most superior reception will be stored as pre-
set buttons in corresponding order.
INFORMATION
Auto store
I f th e
while operating Auto Store, then the Auto
Store operation will be terminated and the
previously played frequency will be restored.
but ton is pressed aga in
2-4 AUDIO SYSTEM
Voice Command
1. Press the key on the steering wheel
remote controller.
2. After the beep sound, say a command.
"Auto preset"
Voice Command
1. Press the key on the steering wheel
remote controller.
2.
After the beep sound, say a command.
"Preset Scan"
Scanning FM/AM broadcast frequency
1. Press the
●
SCAN (less than 0.8 second) : scans all fre-
quencies and plays only frequencies with
superior reception for 5 seconds each.
Scan
button.
Voice Command
1. Press the key on the steering wheel
remote controller.
2. After the beep sound, say a command.
"Scan"
●
PRESET SCAN (over 0.8 second): scans the
6 frequencies stored as delete this part in
the current band for 5 seconds each.
2. Press the
listening to a frequency. The scan will be ter-
minated and the current frequency will con-
tinue to be played.
Scan
button again to continue
INFORMATION
When scanning has completed an entire revo-
lution, the scan function will terminate auto-
matically and the previous played frequency
will be restored.
AUDIO SYSTEM
AUDIO SYSTEM 2-5
PART 2 AUDIO SYSTEM
XM radio
Listening to the XM radio
→
XM1 ...
XM
key on the control panel.
XM
key to change the desired
→
XM2 →
1. Press the
Th e XM radi o ban d screen of th e mo st
recent listened station will be displayed.
2. Press the
ra dio ban d. Each press will cha nge the
bands in the following order: XM1
XM3
3. Select the desired broadcast channel.
[Selecting XM broadcast channel], page
2-7.
Voice Command
1. Press the key on the steering wheel
remote controller.
2. After the beep sound, say a command.
"XM"
"XM <1 or 2 or 3>"
"XM Channel <0 to 255>"
"XM <1 or 2 or 3> Preset <1 to 6>"
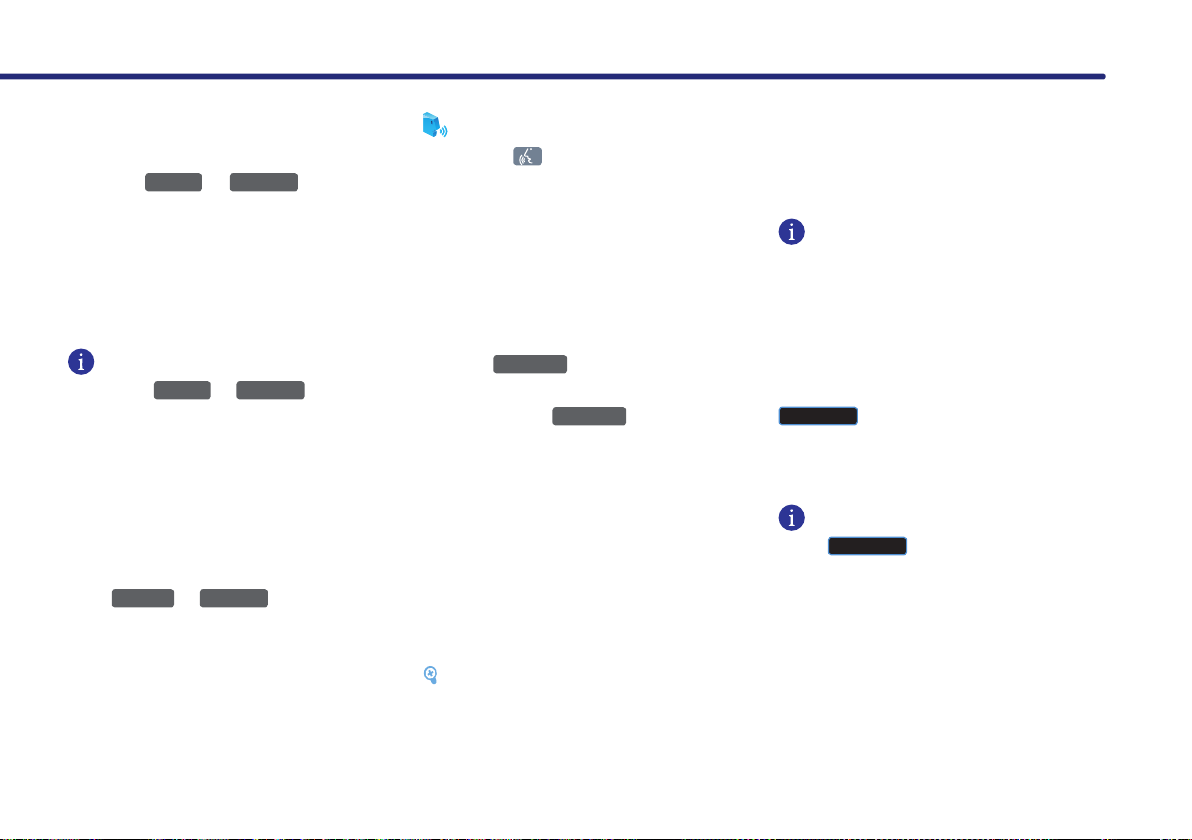
XM screen and functions
101
a
2
4
3
5
b c d e f
1
Mode disp lay : displays the XM1/XM2/
XM3 modes.
2
SCAN/PRESET SCAN indicator : if SCAN/
PRESET SCAN is operating, the switch is
displayed.
6
7
8
9
3
Channel number : displays the current
playing channel.
4
Channel mode indicato r : displays the
channel mode in orange.
5
Category mode indicator : displays the cat-
egory mode in orange.
6
Ch ann el name : disp lays th e cha nne l
name.
7
NAME : displays the artist and other relat-
ed information.
8
Title name : displays the title name.
9
Category name : displays the categor y
name.
10
Current time : displays the current time
manually automatically according to the
GPS time.
a
Preset
buttons : the desired channel can
be preset and selected. [Storing XM
preset], page 2-9.
Mode
b
buttons : swi tches betwe en
channel mode and category mode.
[Switching the XM mode], page 2-7.
2-6 AUDIO SYSTEM
c
List
button : displays the channel or
category list. [Selecting XM broadcast
channel], page 2-7.
Search
d
button : selects the channel by
directly inputting the channel number.
[Selecting XM broadcast channel], page
2-7.
e
Scan
button : scans all frequencies or
just th e preset channels for 5 secon ds
each.
[Scanning XM broadcast channel], page
2-9.
Sound
f
button : a djusts the FAD/BAL,
BASS/MID/TREB controls.
[Sound setting], page 1-10.
Switching the XM mode (Channel /
Category)
Each time the
Mode
button is pressed, the
mode will switch between channel mode and
category mode.
Use the tune knob to change categories and
press the tune knob change to selected cate-
gory.
Selecting XM broadcast channel
There are 5 ways to select a broadcast channel
- (a) selecting through preset, (b) selecting
with channel Up/Down, (c) Selecting a chan-
nel throug h manu al sea rch, (d) selec ting
through channel/ category list, (e) selecting
by directly inputting the channel number.
(a) Selecting a channel through preset
Press the preset button of the desired chan-
nel.
INFORMATION
●
Press the
steering wheel remote controller for less
than 0.8 second. The preset channels of the
current band will be selected in order.
●
There are 6 preset channels each for XM1,
XM2, and XM3.
[Storing XM preset], page 2-9.
∨SEEK
or
TRACK∧
keys on the
Voice Command
1. Press the key on the steering wheel
remote controller.
2. After the beep sound, say a command.
"Preset <1 to 6>"
"Preset Up"
"Preset Down"
(b) Selecting with Channel Up/Down
Pre ss the
∨SEEK
or
TRACK∧
keys on the
control panel for less than 0.8 second.
The previous or next channel will be selected.
INFORMATION
●
If in Channel mode, the channel is selected
from all channels. If in Category mode, the
first channel of each category is selected.
●
Press the
control panel or steering wheel remote con-
troller for more than 0.8 second to quickly
move to the nearest desired channel. Once
the button is released, the current channel
will be selected.
∨SEEK
or
TRACK∧
keys on the
AUDIO SYSTEM
AUDIO SYSTEM 2-7
PART 2 AUDIO SYSTEM
Voice Command
1. Press the key on the steering wheel
remote controller.
2. After the beep sound, say a command.
"Channel Up"
"Channel Down"
(c
) Selecti ng a chann el th roug h man ual
search
Press the
ous or next channel information. After a brief
moment, the selected channel will be displayed.
∨TUNE∧
key to display the previ-
INFORMATION
If in channel mode, the channel is selected
from all channels. If in category mode, the first
channel of each category is selected.
(Category search)
(d
) Selec ting channel throu gh channel /
category list
1. Press the
●
If in category mode, the all category list
screen will be displayed.
Select the desired category button to dis-
play the channel list screen for the corre-
sponding category.
●
If in channel mode, the all channels list
screen will be displayed.
List
button.
2. Select the desired channel button. The pre-
vious screen will be restored and the select-
ed channel will begin playing.
(e
) Selecting channel by directly inputting
the channel number
1. Press the
input screen will be displayed.
Search
button . The channel
2-8 AUDIO SYSTEM
2. Input desired channel number, and press
OK
the
button.
The previous screen will be restored and the
selected channel will begin playing.
INFORMATION
To prevent inputting a channel which exceeds
the channel range, numbers which cannot be
inputted are set to disabled state.
Voice Command
1. Press the key on the steering wheel
remote controller.
2. After the beep sound, say a command.
"Channel<0 to 255>"
Storing XM preset
1. Select the desired channel. [Selecting XM
broadcast channel], page 2-7.
2. Press the preset button for over 0.8 second.
The frequ enc y will be saved along with
beep sound.
INFORMATION
Six preset frequencies each for XM1/ XM2/
XM3 modes can be stored using the above
instructions.
Scanning XM broadcast channel
1. Press the
●
SCAN (under 0.8 second): scans all channels
for 5 seconds each if in channel mode. If in
category mode, scans all channels within
the current category for 5 seconds each.
Scan
button.
Voice Command
1. Press the key on the steering wheel
remote controller.
2. After the beep sound, say a command.
"Scan"
●
PRESET SCAN (over 0.8 second): scans the 6
preset channels within the current band for
5 seconds each.
Voice Command
1. Press the key on the steering wheel
remote controller.
2. After the beep sound, say a command.
"Preset Scan"
1. Press the
playing the channel. The scan will be termi-
nated and the current channel will continue
to be played.
Scan
button again to continue
INFORMATION
●
When scanning has completed an entire
revolution, the scan function is automatical-
ly terminated and the previous played chan-
nel will be restored.
●
Channel 0 is the radio ID and contains infor-
mation required for XM Activation.
AUDIO SYSTEM
AUDIO SYSTEM 2-9

PART 2 AUDIO SYSTEM
Operating the CD Player
About CD Player
Precautions upon handling discs
●
After using a disc, keep it in the original case
to prevent it from becoming scratch ed,
which may cause the CD to make popping
sounds.
●
Do not use heart-shaped discs, octagon-
sh aped di scs , or any oth er abnor mal ly
shaped disc. Such discs may be the cause of
malfunctions.
●
Do not clean discs with chemical solutions
such as record sprays, antistatic sprays, anti-
static liquids, benzene, or thinners. Such
materials may cause the surface of DISC to
be unrecoverable.
●
Do not expose the disc to direct sunlight for
prolonged periods of time. Such exposure
may lead to disc deformation.
●
Dust, scratch, and other substances may
cause popping sound while playing as well
as sound deterioration.
●
Never place paper on either side of the disc
or write on disc sur faces. Sharp wr iting
utensils and inks used in felt-tip pens may
cause damage to disc surfaces
●
Clean fingerprints and dust off the signal
surface (coated side) of the disc with a soft
cloth.
Only soft cloths should be used as there are
no grooves for dust to get in as is the case
with LPs.
●
Copy-protected CDs such as S-type CDs
may not function in the device.
●
DATA CDs are not supported by the device.
(However, such discs may operate abnor-
mally.)
For safe and efficient operation
●
Do not disassemble the CD Player for repair
purposes. Contact your place of purchase in
the case of malfunction. (Complete service
assistance will not be provided if the user
disassembles the device.)
●
Do not use water to clean the device.
Exposure to water may cause damage to
the device.
●
Be cautious not to introduce foreign sub-
stances into the disc insert slot.
Foreign substances may cause damage to
the interior of the device.
●
The device may fail to operate properly in
extremely hot or cold temperatures.
Discontinue the use of the device unless
normal temperature is maintained.
( Th e operation al tempe rature range is:
-10℃ ~ 65℃).
●
Steam can be condensed on the fiberoptic
lens due to rain, wet conditions, or upon
operating the heating system.
●
Skipping may occur to the audio when driv-
ing on bumpy roads for prolonged periods
of time or upon severe shock to the vehicle.
●
Do not use chemical solvent to clean the
device. Such solvents may cause damage to
the surfaces of the device.
Always use a clean and dry cloth.
2-10 AUDIO SYSTEM
WARNING !
Always pay full attention to driving.
Avoid operating your system in such a way
that you are distracted from driving your vehi-
cle.
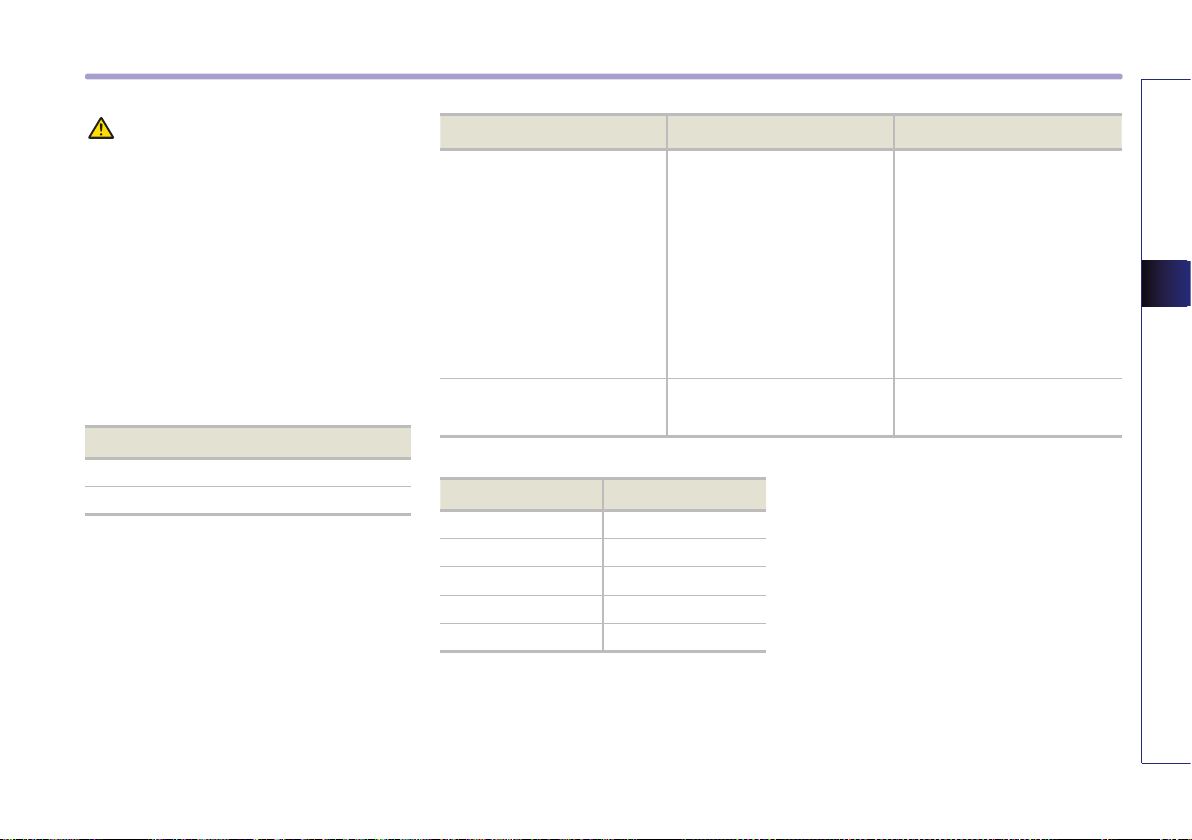
Supported disc formats
●
The disc types supported by this device are
as shown below.
Disc Size
3-inch (7.6 cm)
5-inch (12.7cm)
Disc Type Disc Media DIsc Format
CD CD-DA
CD-R MP3
CD-RW WMA
Multisession-CD DTS-CD
CD
SACD
Disc format Audio format
CD LPCM
MP3 MPEG1, Layer3
SACD
SACD(Hybrid)
●
CD-R or CD-RW DISC burned with a bulk CD
without quality guarantees may not be rec-
ognized by the device.
MPEG2, Layer3
●
MPEG2.5
WMA Ver9
Inserting an abnormal disc may result in
faulty operation or recognition.
CD-ROM
CD-G
CD-EXTRA
CD-TEXT
AUDIO SYSTEM
AUDIO SYSTEM 2-11
 Loading...