


DISPLAY CAR SYSTEM
ADB10F6AN, ADB11F6GG, ADB11F6GN,
ADB11F6GL, ADB10F6GB, ADB10F6GP,
ADB11F6MG, ADB10F6GU

Car Infotainment System
User's Manual
[ Your system's functions and
specifications are subject to change
without prior notice for performance
improvement.
[ The functions and services described
in this guide are subject to change
without prior notice for performance
improvement. If the system software is
updated, the screenshots in this guide
may appear different than the actual
images on the system.
[ You can view the up-to-date information
about changed functions and services
from the web manual.
[ The functions and services described
in this guide may differ from those
provided in your vehicle. For precise
information related to your vehicle,
refer to the owner's manual or catalog
of your vehicle.
[ Open Source Information
This system contains open source
software. To download the open
source codes installed on this product
developed under GPL, LGPL, Apache,
and other open source licenses,
please visit http://www.mobis.co.kr/
opensource/list.do. All notified license
content, including the source code, is
available for download. If you request
the open source code of a software
mounted on this product by sending an
email to MOBIS_OSSrequest@mobis.
co.kr within 3 years of purchasing this
product, you will receive it on a CD-ROM
or another storage media at a minimal
cost, such as the costs of the medium
and delivery.
1
Available
Symbols used in
information for
users
Car Infotainment
System Quick
Reference Guide
(Leaflet)
This guide contains basic information to
use your system including component
names and functions. To use your
system correctly and safely, read this
guide before use.
Car Infotainment
System User's Manual
(Web)
This guide is a web manual you can
access by scanning a QR code in the
Quick Reference Guide or on your
system′s screen. This guide introduces
your system's functions and explains
how to use them.
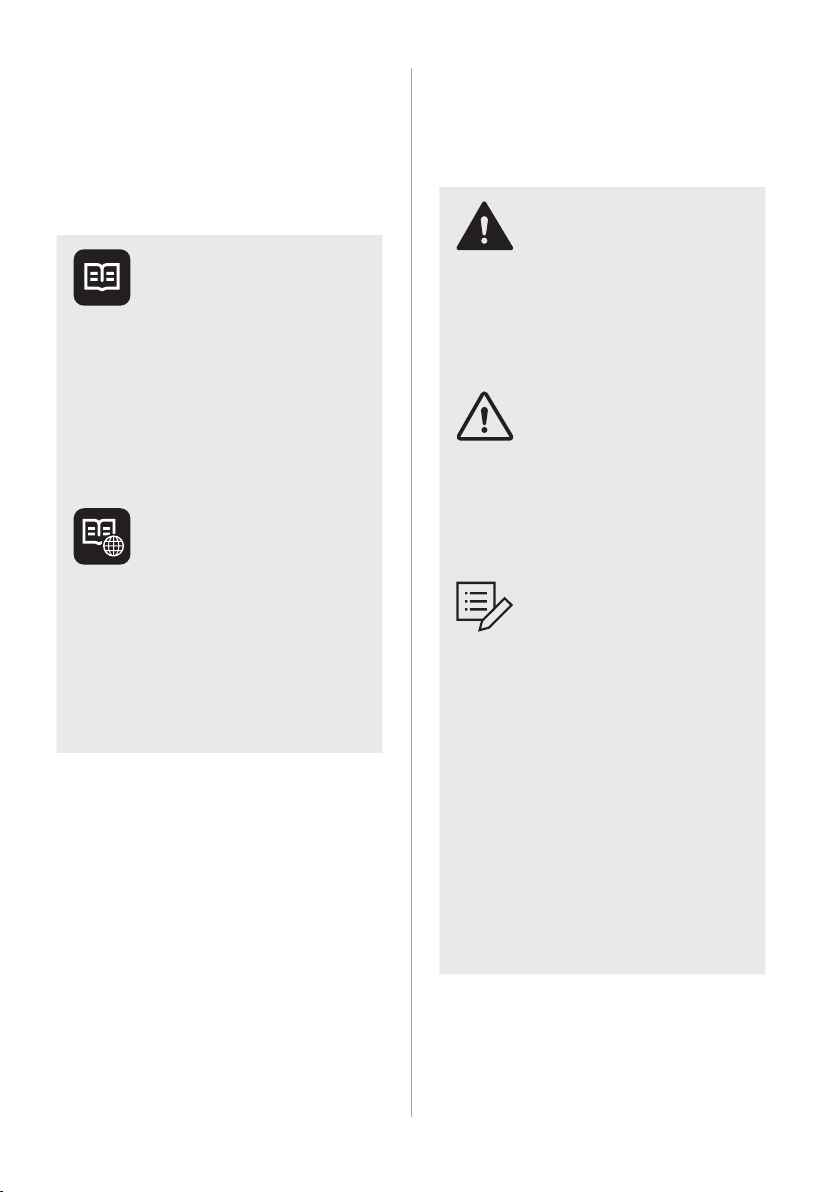
this guide
Warning
Indicates important information
related to user safety. Failure to follow
warnings may result in death or serious
personal injury.
Caution
Indicates important information related
to user safety. Failure to follow cautions
may result in personal injury, or
damage or malfunction your vehicle.
Note
Indicates helpful information for
convenient use.
(if equipped)
Indicates descriptions for optional
features.
This guide covers all specifications,
including all trim models and
optional specifications. It may include
descriptions for features that are not
equipped in your vehicle.
2

Safety warnings
For safety, follow the instructions below.
Failure to do so may increase the risk of a
traffic accident, which may result in death
or personal injury.
Ü About driving
Avoid watching the screen while driving.
• Driving while distracted may lead to a traffic
accident.
• Stop your vehicle in a safe location before using
functions that require multiple operations.
Stop your vehicle first before using your
mobile phone.
• Using a mobile phone while driving may lead to
a traffic accident.
• If necessary, use the Bluetooth Handsfree
feature to make calls and keep the call as short
as possible.
Keep the volume low enough to hear
external sounds.
• Driving without the ability to hear external
sounds may lead to a traffic accident.
• Listening to a loud volume for a long time may
cause hearing damage.
Ü About handling the system
Do not disassemble or modify the
system.
• Doing so may result in an accident, fire, or
electric shock.
Do not allow liquids or foreign
substances to enter the system.
• Liquids or foreign substances may cause
noxious fumes, a fire, or a system malfunction.
Stop using the system if it malfunctions,
such as no audio output or display.
• If you continue using the system when it is
malfunctioning, it may lead to a fire, electric
shock, or system failure.
Û Note
If you experience any problems with the
system, contact your place of purchase or
dealer.
3

Safety cautions
For safety, follow the instructions below.
Failure to do so may result in personal
injury or damage to the system.
Ý About operating the system
Use the system with the engine
running.
• Using the system for a long time when the
engine is stopped may discharge the battery.
Do not install unapproved products.
• Using unapproved products may cause an error
while using the system.
• System errors caused by installing unapproved
products are not covered under the warranty.
Ý About handling the system
Do not apply excessive force to the
system.
• Excessive pressure on the screen may damage
the LCD panel or the touch panel.
When cleaning the screen or button
panel, make sure to stop the engine
and use a soft, dry cloth.
• Wiping the screen or buttons with a rough
cloth or using solvents (alcohol, benzene, paint
thinner, etc.) may scratch or chemically damage
the surface.
If you attach an air freshener to the fan
louver, the surface of the louver may
become deformed due to the flowing
air.
Û Note
If you experience any problems with the
system, contact your place of purchase or
dealer.
4

1
System overview
Component names and functions
Turning the system on or off
Using the touch screen
Getting to know the Home screen
Getting to know the All Menus screen
Using Favorites
Component names and functions
The following explains the names and functions of the components on your system's control
panel and steering wheel remote control.
Control panel
Û Note
Depending on vehicle models or specifications, the system components' appearance and
layout may differ from the actual product. Refer to the Quick Reference Guide.
Radio button • Turn on the radio. While listening to the radio, press to
change the radio mode.
Media button
Custom button (
Power button (POWER)/
Volume knob (VOL)
Reset button
) • Use a custom function.
• Play content from a media storage device. If you have
multiple media storage devices, select one from the
media selection window.
• Press and hold to display the media selection window.
• Press and hold to access the settings screen for the
Custom button.
• Turn the radio/media function on or off.
• Press and hold to turn off the screen and the sound.
• Turn to the left or right to adjust the system sound
volume.
• Restart the system.
1-2

Search backward/forward
button (SEEK/TRACK)
• While using the radio/media function, change the
station/track/file.
• While listening to the radio, press and hold to search
for a station.
• While playing media, press and hold to rewind or fast
forward (except for the Bluetooth audio mode).
Setup button
Search knob (TUNE FILE)
• Access the settings screen.
• Press and hold to access the system information
screen.
• While listening to the radio, adjust the frequency or
change the station.
• While playing media, search for a track/file (except for
the Bluetooth audio mode).
• During a search, press to select the current track/file.
1-3
Steering wheel remote control
Û Note
Depending on vehicle models or specifications, the system components' appearance and
layout may differ from the actual product. Refer to the Quick Reference Guide.
Voice recognition button ( ) • Start or end voice recognition of a connected
smartphone via phone projection. (The button′s
operation may vary depending on smartphone
specifications.)
Mode button
Volume lever/button (+/-)
Mute button (
Search lever/button (
Call/Answer button (
Call end button (
) • Mute or unmute the system.
) • When a call comes in, reject the call.
• Change the mode (radio, media, etc.).
• Press and hold to access the settings screen for the
Mode button.
• Adjust the sound volume.
• While playing media, press to pause or resume
playback.
) • While using the radio/media function, change the
station/track/file.
• While listening to the radio, press and hold to search
for a station.
• While playing media, press and hold to rewind or fast
forward (except for the Bluetooth audio mode).
) • Start connecting a mobile phone via Bluetooth.
• After a Bluetooth phone connection is made, access
your call history. Press and hold to dial the most recent
phone number. When a call comes in, answer the call.
• During a call, switch between the active call and the
held call. Press and hold to switch the call between the
system and the mobile phone.
• During a call, end the call.
1-4
Turning the system on
or off
The following explains how to turn the
system on or off.
Turning on the system
To turn on the system, start the
1
engine.
When the safety warning
2
appears, read it and press
Confirm.
• To change the system language,
press Language.
Ü Warning
• Some functions may be disabled for
safety reasons while the vehicle is
moving. They work only when the
vehicle stops. Park your vehicle in a safe
location before using any of them. In a
manual transmission vehicle, apply the
parking brake to use the functions. In an
automatic transmission vehicle, shift to
"P" (Park) or apply the parking brake.
• Stop using the system if it malfunctions,
such as no audio output or display. If
you continue using the system when it
is malfunctioning, it may lead to a fire,
electric shock, or system failure.
Ý Caution
• You can turn on the system when the
key ignition switch is placed in the "ACC"
or "ON" position. Using the system for
an extended period without the engine
running drains the battery. If you plan
on using the system for a long time,
start the engine.
• If you turn on your system without
starting the engine, a battery warning
will appear. Once the engine starts, the
battery warning will disappear.
Û Note
To avoid having audio play at an excessive
volume when you start the engine,
adjust the volume level before stopping
the engine. On the Home screen, press
All Menus > Setup > Sound > Priority
and activate the Start-up Volume Limit
option.
1-5
Turning off the system
Using the touch
If you do not want to use the
system while driving, press and
hold the Power button on the
control panel.
• The screen and the sound will turn off.
• To use the system again, press the
Power button.
After you have turned off
the engine, the system will
automatically turn off after a
while or as soon as you open the
driver's door.
screen
Your system is equipped with a touch
screen. You can perform various functions
via touch inputs.
Ý Caution
• Do not apply excessive pressure to the
touch screen or press it with a pointed
object. Doing so may damage the touch
screen.
• Do not let any electrically conductive
material contact the touch screen. A
shock from static electricity may cause
the system or the touch screen to
malfunction.
Û Note
If you wear regular gloves, you will not be
able to control the touch screen. Remove
your gloves or wear gloves designed for
use with a touch screen.
1-6
Press
Press an object lightly and lift your
finger. You can perform a function or
select an option.
Press and hold
Slide
Press an object and hold it for at least
one second without lifting your finger.
You can rewind or fast forward media
by pressing and holding an appropriate
button.
Drag
Press an object, drag it, and then drop it
on a new location.
You can change the playback position
during media playback. On a playback
screen, press and hold the progress bar,
slide your finger along the progress bar,
and then lift it at a desired location.
Swipe
Swipe the screen lightly in an
appropriate direction. This is an easy
way to scroll through a menu or list
quickly.
1-7
Getting to know the
Home screen
From the Home screen, you can access
various functions.
Getting familiar with the
Home screen layout
ba
d
f
a Display the options list.
• Edit Left Widget: Change the
functions of the left widget.
• Edit Right Widget: Change the
functions of the right widget.
• Edit Home Icons: Change the
shortcuts for menus you use
frequently on the Home screen.
• User′s Manual on Web (QR Code):
Access the web manual via the QR
code.
b Current time and date. Press to access
the time and date settings screen.
> See ″Date/Time.″
c System status icons. > See ″System
status icons.″
c
e
d Left widget. Press to activate the
corresponding function in full screen.
Press and hold to change the widget
to another one.
Home screen widgets.″
e Right widget. Press to activate the
corresponding function in full screen.
Press and hold to change the widget
to another one.
Home screen widgets.″
f Menu icons. Press to access a selected
function. Press and hold to change
the menu′s type and location.
″Changing the Home screen menu icons.″
> See ″Changing the
> See ″Changing the
> See
Û Note
• To move to the Home screen from
another screen, press
• Depending on vehicle models or
specifications, the Home screen layout
may vary.
.
Changing the Home screen
widgets
You can change the types of widgets
displayed on the Home screen.
On the Home screen, press
1
Menu > Edit Left Widget or
Edit Right Widget.
• Alternatively, press and hold the
widget you want to change.
1-8
Swipe the screen to the left or
2
right, and check the available
functions.
Select a desired function.
3
Û Note
• You cannot set the same function for the
left and right widgets.
• Press Reset to restore the default
settings for the widget.
Changing the Home screen
menu icons
You can change the types and locations of
menus on the Home screen.
On the Home screen, press
1
Menu > Edit Home Icons.
• Alternatively, press and hold a menu
icon.
Press an icon on the menu list,
2
and drag it to the icon field at
the bottom of the screen.
• To change an icon′s location, press
the icon in the icon field, and drag it
to a desired location.
Û Note
• The All Menus icon cannot be changed
to another menu. You can only change
its location.
• Press Reset to restore the default
settings for menus.
• Once you change the menus displayed
on the Home screen, it may affect how
to access or perform some functions.
If you cannot find a function you want
from the Home screen, press All Menus
to access or perform it.
1-9

Getting to know the
All Menus screen
Rearranging the All Menus
screen
You can view the all menus and access a
desired function in the system.
Getting familiar with the
All Menus screen layout
On the Home screen, press All
Menus.
a b
c
a Display the options list.
• Reorder Icons: Rearrange the
menus on the All Menus screen.
> See ″Rearranging the All Menus
screen.″
• User′s Manual on Web (QR Code):
Access the web manual via the QR
code.
b Return to the previous level.
c All menus available on your system
Rearrange the menus on the All Menus
screen.
On the Home screen, press All
1
Menus.
Press Menu > Reorder Icons.
2
• Alternatively, press and hold
anywhere on the All Menus screen.
Drag a menu to the desired
3
location.
Û Note
Press Reset to restore the default settings
for the menu order.
1-10
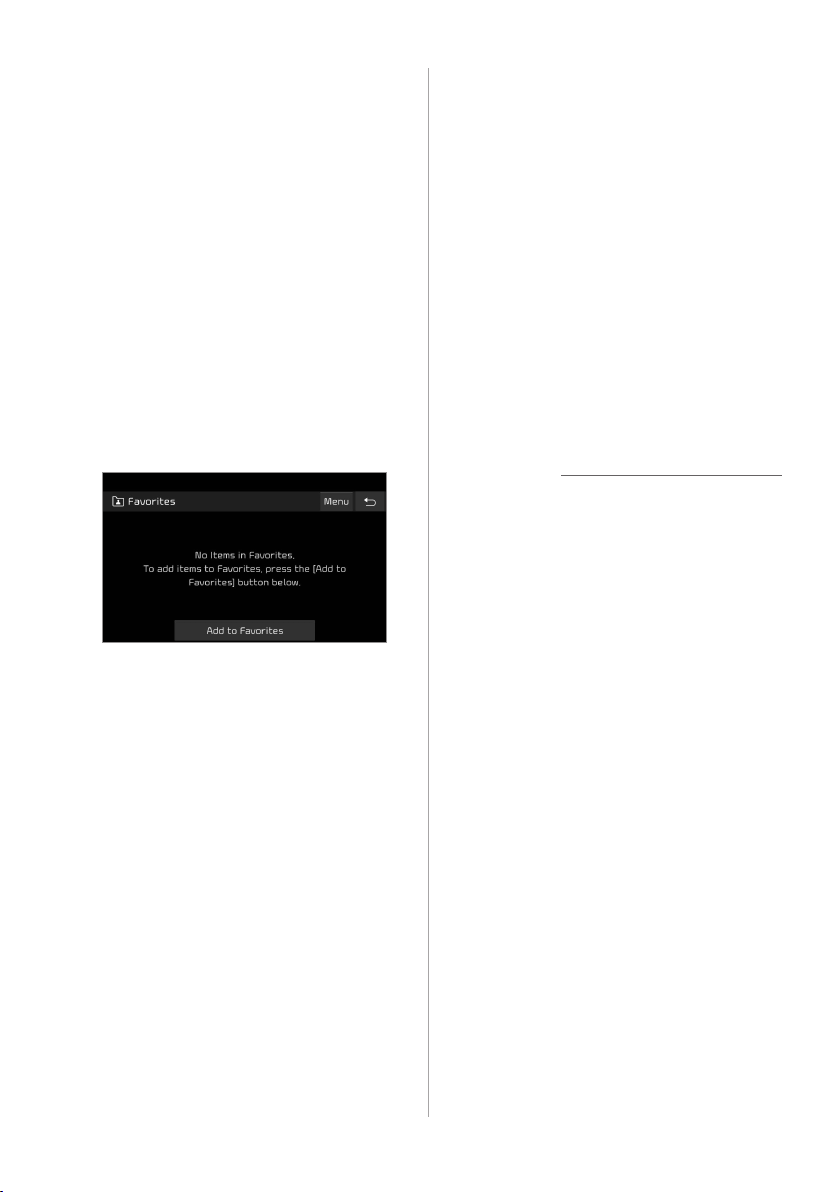
Using Favorites
Add your frequently used functions to
Favorites to access them quickly. You can
add up to 24 items.
Adding favorite items
On the Home screen, press All
1
Menus > Favorites > Add to
Favorites.
• If you have already added items, on
the Favorites screen, press Menu >
Add.
Rearranging the items in
Favorites
You can rearrange the items added to
Favorites.
On the Home screen, press All
1
Menus > Favorites > Menu >
Reorder.
• Alternatively, press and hold an
added item.
Drag an item to a desired
2
location.
Û Note
You can only rearrange the items, and
cannot move an item to an empty slot.
Deleting favorite items
Select items to add and press
2
Add > Yes.
You can delete the items added to
Favorites.
On the Home screen, press All
1
Menus > Favorites > Menu >
Delete.
Select items to delete and
2
press Delete > Yes.
1-11

2
Useful functions
Using phone projection
Getting to know the driving assistance screen
Viewing driving information

Using phone
projection
Phone projection enables you to connect
your Android smartphone or iPhone to
your system and use their functions via
the system. You can perform and control
your smartphone applications by using
the larger screen and enhance your use of
the system.
Connecting your Android
smartphone via Android
Auto
You can connect your Android
smartphone and system via Android Auto
and control your smartphone applications
on the system′s screen.
Before using Android Auto, be sure to
check the following:
Ý Caution
• Use only applications that are
compatible with phone projection.
Using incompatible applications may
cause problems for your system or
smartphone.
• Only compatible applications will be
displayed on the phone projection
screen. You can also check compatible
applications by visiting the following
websites:
- Apple CarPlay: https://www.apple.
com/kr/ios/carplay
- Android Auto: https://www.android.
com/auto
Android Auto support on your
smartphone
Visit the Google homepage (https://
www.android.com/auto) and check the
regions, device types, and models that
support Android Auto.
Android Auto installed on your
smartphone
Download and install the Android Auto
application from Google Play.
2-2
Start Android Auto by following the steps
below:
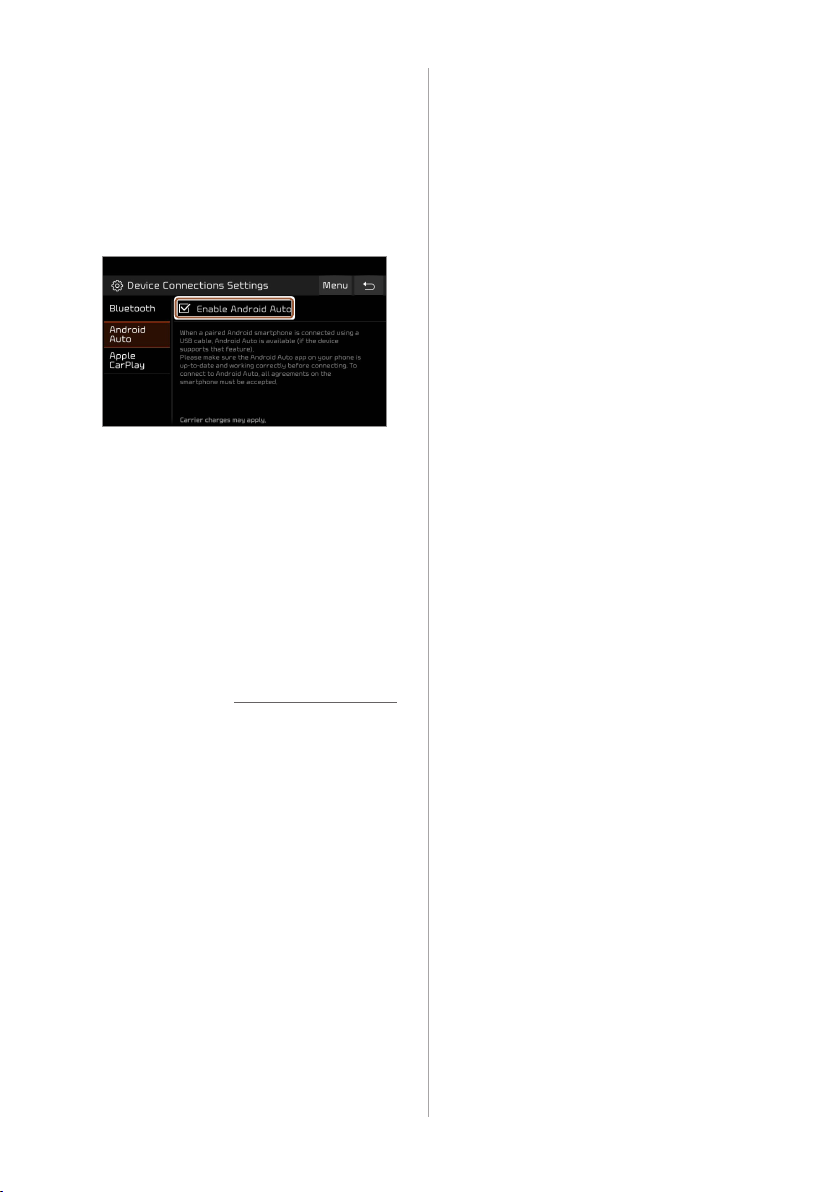
On the Home screen, press
1
All Menus > Setup > Device
Connections > Android Auto
> Enable Android Auto.
Connect your smartphone to
2
the USB port in your vehicle
via the cable supplied with the
smartphone.
• If you are connecting the device for
phone projection for the first time,
read the message on the notification
pop-up window and press OK.
Ý Caution
Do not connect and disconnect a USB
connector repeatedly in a short time.
Doing so may cause an error in the
device or a system malfunction.
If your smartphone is locked,
3
unlock it and agree to use
phone projection.
• When the smartphone is recognized
successfully, Android Auto appears
on the Home screen.
On the Home screen, press
4
Android Auto.
Use your smartphone's
5
functions, such as calling and
messaging, on your system.
• Press an icon on the screen to run an
application or perform a function.
• Press the Voice recognition button
on the steering wheel to start
Google voice recognition.
• Press the Mode button on the
steering wheel to select and start
a media player installed on your
smartphone, in addition to the
system's radio and media functions.
• Press the Call/Answer button on
the steering wheel to start using
Bluetooth call functions.
To end Android Auto, remove
6
the USB cable from your
system.
2-3

Û Note
• When phone projection is active, you
cannot change the phone projection
settings.
• Depending on Google's policies, the
icons on the main screen of Android
Auto may change.
• Depending on Google's policies,
applications or functions that are
compatible with Android Auto
may change. To check compatible
applications, visit the Android
homepage (https://www.android.com/
auto).
• To use phone projection in optimized
environments, update your
smartphone's operating system to the
latest version.
• Depending on the connected device's
hardware, firmware, and operating
system versions, the recognition time
may vary.
• Using phone projection may result in
mobile communication charges.
• Depending on the network signal status,
some functions may not work correctly.
• Avoid controlling your smartphone
while phone projection is in use.
• While you are using Android Auto, the
following functions are unavailable:
- USB mode
- Searches using the Search knob
(TUNE FILE)
- Apple CarPlay
Connecting your iPhone
via Apple CarPlay
You can connect your iPhone and system
via Apple CarPlay and control your
smartphone applications on the system′s
screen.
Before using Apple CarPlay, be sure to
check the following:
Apple CarPlay support on your
iPhone
Visit the Apple homepage (https://www.
apple.com/kr/ios/carplay) and check
the iPhone models that support Apple
CarPlay.
Apple CarPlay activated or updated
on your iPhone
On your iPhone, ensure that Apple
CarPlay is activated. If your iPhone
does not have the function, update the
iPhone's operating system to the latest
version.
2-4

Start Apple CarPlay by following the steps
below:
On the Home screen, press
1
All Menus > Setup > Device
Connections > Apple CarPlay
> Enable Apple CarPlay.
Connect your iPhone to the
2
USB port in your vehicle via the
cable supplied with the iPhone.
• If you are connecting the device for
phone projection for the first time,
read the message on the notification
pop-up window and press OK.
Ý Caution
Do not connect and disconnect a USB
connector repeatedly in a short time.
Doing so may cause an error in the
device or a system malfunction.
If your iPhone is locked, unlock
3
it and agree to use phone
projection.
• When the iPhone is recognized
successfully, Apple CarPlay appears
on the Home screen.
On the Home screen, press
4
Apple CarPlay.
Use your iPhone's functions,
5
such as calling and messaging,
on your system.
• Press an icon on the screen to run an
application or perform a function.
Press the KIA icon to move to the
Home screen of your system.
• Press the Voice recognition button
on the steering wheel to start Siri.
• Press the Mode button on the
steering wheel to select and start
a media player installed on your
smartphone, in addition to the
system's radio and media functions.
• Press the Call/Answer button on the
steering wheel to answer an
incoming call.
To end Apple CarPlay, remove
6
the USB cable from your
system.
2-5
Û Note
• When phone projection is active, you
cannot change the phone projection
settings.
• Depending on Apple's policies,
applications or functions that are
compatible with Apple CarPlay
may change. To check compatible
applications, visit the Apple homepage
(https://www.apple.com/kr/ios/carplay).
• To use phone projection in optimized
environments, update your
smartphone's operating system to the
latest version.
• Depending on the connected device's
hardware, firmware, and operating
system versions, the recognition time
may vary.
• Using phone projection may result in
mobile communication charges.
• Depending on the network signal status,
some functions may not work correctly.
• Avoid controlling your smartphone
while phone projection is in use.
• While you are using Apple CarPlay, the
following functions are unavailable:
- Bluetooth
- USB mode
- Searches using the Search knob
(TUNE FILE)
- Android Auto
Getting to know the
driving assistance
screen
You can view the outside of your vehicle
on the system screen. Depending on
vehicle models, the displayed screens and
available functions may vary.
Ý Caution
The distance shown in the rear view
screen may differ from the actual
distance. For safety, be sure to visually
check the rear, left, and right sides of your
vehicle.
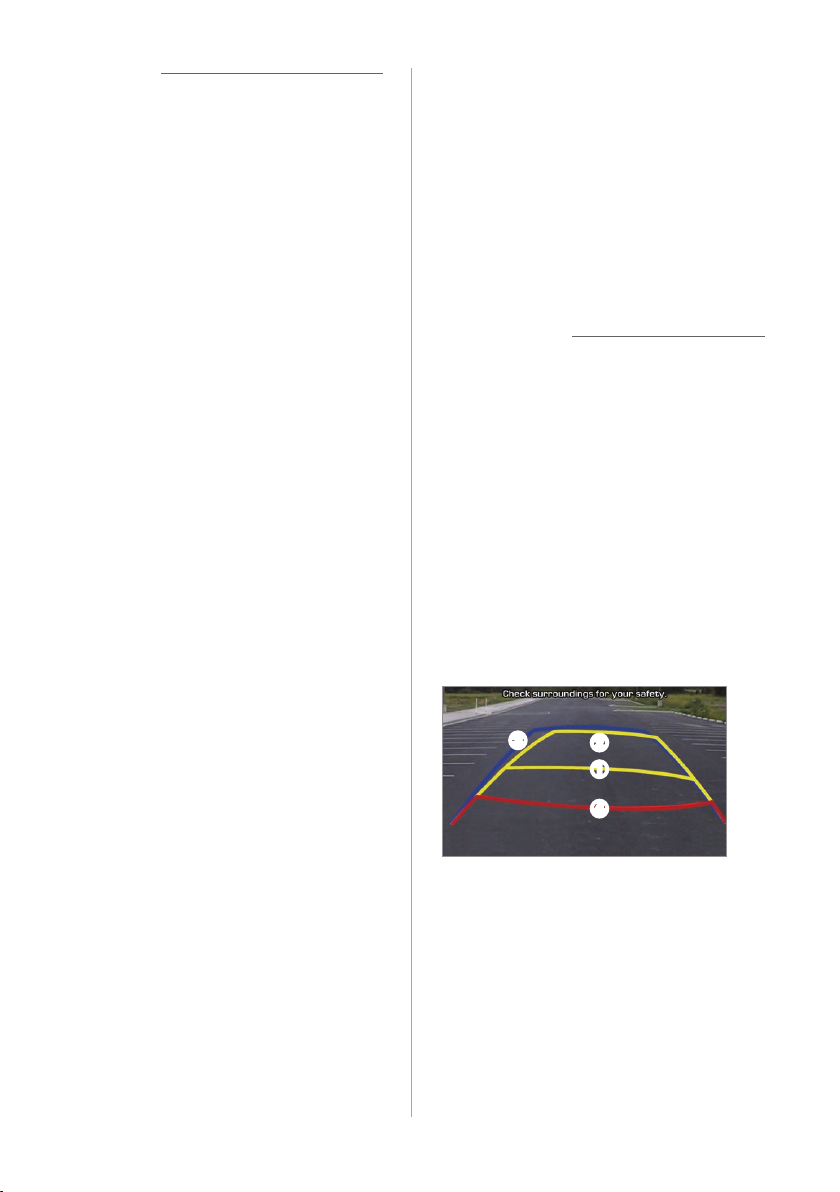
Rear view screen
When you shift to "R" (Reverse) while the
engine is running, the system screen will
automatically display the rear view and
the parking guides.
c
b
a
d
2-6
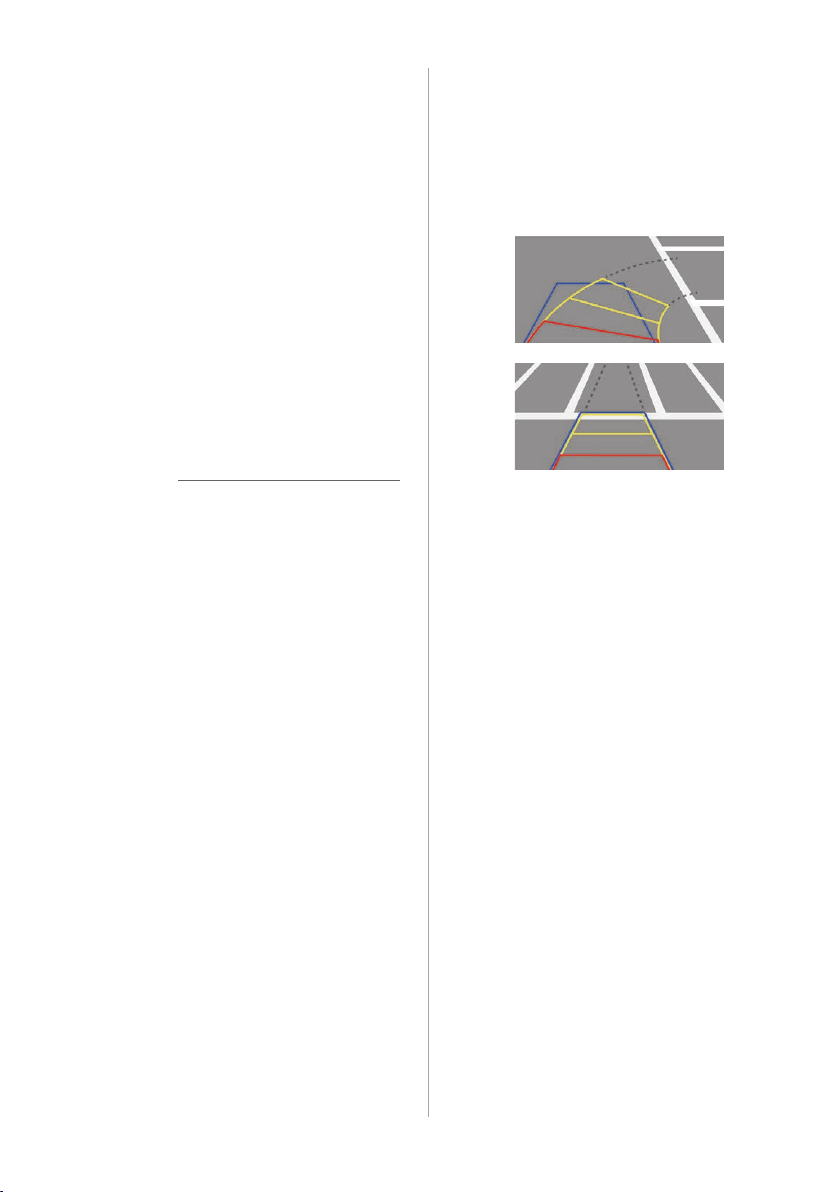
• Driving direction lines (yellow) ab
These lines show the directions of the
vehicle according to the steering angle.
• Neutral direction lines (blue) c
These lines indicate your vehicle's
expected path with the steering wheel
in the neutral position. It can help you
determine whether the vehicle is in the
correct position in a parking space and
prevent you from parking too close to
the next vehicle.
• Crash warning lines (red) d
These lines are to help prevent a
collision.
• You can change the operation setting
for the rear view camera. On the Home
screen, press All Menus > Setup >
Advanced > Extend Rear Camera Use
(if equipped).
• The parking guides show your vehicle′s
path according to the steering angle.
Û Note
• If your vehicle's camera supports the
rear view function while driving at low
speeds, the rear view screen remains
active even if you shift to any position
other than ″P″ (Park) or ″R″ (Reverse)
after backing up. However, the parking
guides do not appear on the screen.
When you shift to ″P″ (Park) or drive at a
predetermined speed or faster, the rear
view screen will be deactivated and the
system will display the previous screen
automatically.
• If an object comes too close to your
vehicle as you are parking the vehicle, a
warning beep will sound. To prevent an
accident that might result if you do not
hear the beep, you can set the system
to decrease the volume level of any
media playing automatically when you
are parking the vehicle. On the Home
screen, press All Menus > Setup >
Sound > Priority > Proximity Warning.
2-7

Steering-interactive
camera
[ Checking the rear top view
equipped)
With the rear top view feature, you can
look down at what is behind you.
On the rear view screen, press .
• The parking guides are displayed on the
rear top view screen.
- The parking guides indicate the space
necessary to open the tailgate of your
vehicle. It can help you see if there
is enough space to open the tailgate
after parking and if there is any
obstacle to opening it.
- An extension of your vehicle's center
appears. It shows the path of your
vehicle′s center according to the
steering angle.
[ Checking the rear view while
driving
You can check the rear view via the system
screen while driving.
(if
Press the [ ] button while
driving.
• The rear view is displayed on the screen.
appears on the screen to indicate that
the rear view is active.
To deactivate the rear view screen,
press the [
] button again.
2-8
Surround view monitor
equipped)
The surround view monitor feature
enables you to view the surroundings of
your vehicle by using multiple cameras
installed in the vehicle.
(if
[ Checking your surroundings
while driving
Press the [ ] button.
• The front view with the surround view is
displayed on the screen.
• The feature is activated only in the
following conditions:
- When you are driving at 15 km/h or
slower in "D" (Drive)
- When you stop in "D" (Drive) or "N"
(Neutral)
Press one of the icons at the bottom of
the screen to check the corresponding
direction.
Icon Description
Check the rear view while
driving. appears on the
screen to indicate that the rear
view is active.
Change the surround view
screen settings.
To deactivate the surround view
screen, press the [
] button.
Û Note
If an open door or tailgate or a folded
outside rearview mirror is detected while
the surround view monitor is active, an
alert icon will appear on the left side of
the screen.
Icon Description
Check the front view and the
surround view.
Check the front view in full
screen.
Check the front view and frontleft view.
Check the front view and frontright view.
2-9
[ Checking your surroundings
while backing up
When you shift to "R" (Reverse),
the rear view will appear on the
screen automatically.
Press one of the icons at the bottom of
the screen to check the corresponding
direction.
Icon Description
Check the rear view and the
surround view.
Check the rear view in full
screen.
Check the rear view and rearleft view.
Check the rear view and rearright view.
Check the rear top view. > See
″Checking the rear top view.″
Change the surround view
screen settings.
Û Note
If you shift to "P" (Park), the surround view
monitor will not work.
[ Checking the rear top view
On the surround view screen,
press
to look down at what is
behind you.
• The parking guides are displayed on the
rear top view screen.
- The parking guides indicate the space
necessary to open the tailgate of your
vehicle. It can help you see if there
is enough space to open the tailgate
after parking and if there is any
obstacle to opening it.
- An extension of your vehicle's center
appears. It shows the path of your
vehicle′s center according to the
steering angle.
[ Setting the surround view
screen
To change the screen settings,
press
on the surround view
screen.
• Display Contents: Select what to display
on the rear view screen.
• Front View Default Mode: Select a
default view to be displayed when you
activate the surround view monitor
while driving.
• Rear View Default Mode: Select a
default view to be displayed when the
surround view monitor is activated while
you are backing up.
2-10

Viewing driving
information
You can see your driving patterns by
checking information such as driving time,
distance, idling time ratio, and speed
distribution. Use driving information for
safe and economical vehicle operation.
On the Home screen, press All
1
Menus > Driving Info.
View your vehicle's driving
2
information.
• To view the latest information, press
Update.
Û Note
You can use this function only when your
vehicle is stationary with the engine is
running.
2-11


3
Radio
Listening to the radio

Listening to the radio
You can search for radio stations through
various search methods and listen to
them. You can also save your favorite
radio stations to the preset list.
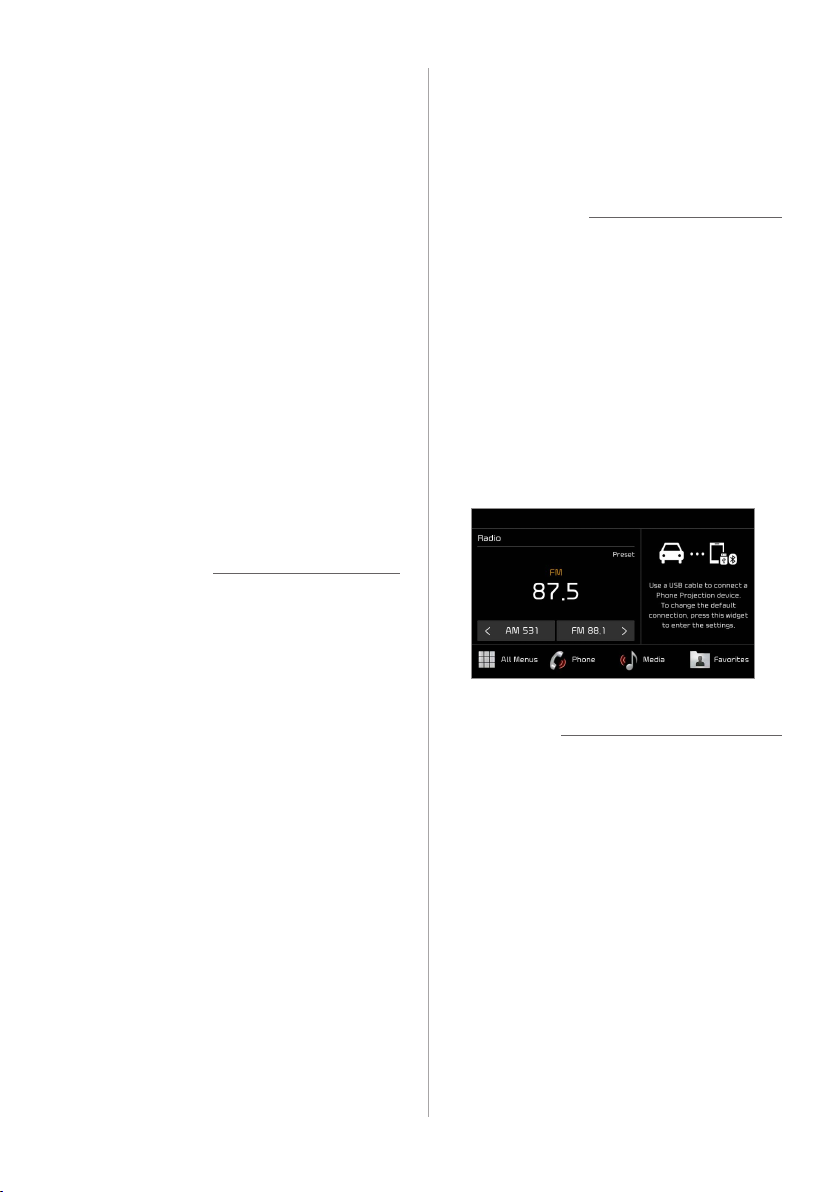
Turning on the radio
Press All Menus > Radio on the
Home screen, or press the Radio
button on the control panel.
c
b
a
e
d
f g
a Select a radio mode.
b Display the options list.
• Station List: Access the list of
available radio stations.
• Auto-sort Presets: Sort the preset
list in frequency order.
• Reorder Presets: Rearrange saved
radio stations on the preset list.
> See ″Rearranging the preset list.″
• Delete Presets: Delete saved radio
stations from the preset list.
″Deleting saved radio stations.″
• Set Number of Presets: Set the
number of radio stations to display
on the preset list.
number of radio stations on the preset
list.″
• Sound Settings: Customize the
system sound settings.
″Configuring the sound settings.″
• User′s Manual on Web (QR Code):
Access the web manual via the QR
code.
c Return to the previous level.
d Radio station information
e Save the current radio station to the
preset list, or delete it from the list.
f Preset list
g Preview each radio station for a few
seconds and select the one you want.
> See ″Changing the
> See
> See
3-2

Changing the radio mode
On the radio screen, press FM/
AM to switch between the radio
modes.
• Alternatively, press the Radio button on
the control panel or the Mode button on
the steering wheel.
Scanning for available
radio stations
You can listen to each radio station for a
few seconds and select the one you want.
Searching for radio
stations
You can search for radio stations by
changing frequencies.
To change frequencies, press the
Search backward button (SEEK)
or the Search forward button
(TRACK) on the control panel.
• Alternatively, turn the Search knob
(TUNE FILE) on the control panel.
To change frequencies quickly,
press and hold the Search
backward button (SEEK) or the
Search forward button (TRACK) on
the control panel.
• When you release the button, the
current radio station will be selected.
• Alternatively, use the Search lever/
button on the steering wheel.
On the radio screen, press .
1
• The system provides a preview of
each radio station on the available
stations list for five seconds.
When you find the radio
2
station you want to listen to,
press
• You can continue listening to the
current radio station.
to stop the scan.
3-3

Saving radio stations
You can save your favorite radio stations
and listen to them by selecting them from
the preset list.
Press the star icon ( ) next to the
current radio station information.
• The current radio station will be added
to the first available slot on the preset
list.
• Alternatively, press and hold an empty
slot on the preset list.
Û Note
• You can save up to 40 radio stations.
• If you select a slot that is already filled,
the station will be replaced by the
station you are listening to.
Listening to saved radio
stations
On the radio screen, select one of
the radio stations from the preset
list.
• Alternatively, use the Search lever/
button on the steering wheel to scroll
through the radio stations on the preset
list.
Rearranging the preset list
On the radio screen, press
1
Menu > Reorder Presets.
Press next to the radio
2
station you want to move and
drag it to a desired location.
• Your changes will be applied to the
preset list immediately.
Û Note
To sort the preset list in frequency order,
press Menu > Auto-sort Presets.
3-4

Deleting saved radio
stations
On the radio screen, press
1
Menu > Delete Presets.
Select the radio station you
2
want to delete and press
Delete > Yes.
• The selected radio station will be
deleted from the preset list.
Û Note
If you are listening to one of the saved
radio stations, press the blue star
icon next to the current radio station
information to delete the radio station.
Changing the number
of radio stations on the
preset list
On the radio screen, press
1
Menu > Set Number of
Presets.
Select the number of radio
2
stations and press Yes.
• The selected number of the radio
stations will be displayed on the
preset list.
Û Note
If you set a number lower than the
previously set number, only the selected
number of radio stations will be displayed
and the rest will be deleted.
3-5


4
Media
Using the media

Using the media
Listening to music from a
USB device
You can play media files stored in portable
devices, such as USB storage devices
and MP3 players. Check compatible USB
storage devices and file specifications
before using the USB mode.
mode.″
Û Note
Depending on vehicle models and
specifications, available buttons or the
appearance and layout of the USB port in
your vehicle may vary.
> See ″USB
[ Starting the USB player
Connect your USB device to the
1
USB port in the vehicle.
• Playback may start immediately
depending on the device that you
connect to the system.
Press All Menus > Media on
2
the Home screen, or press the
Media button on the control
panel.
• The media player is displayed in full
screen.
• If you have multiple media storage
devices, press the Media button on
the control panel again and press
USB Music on the media selection
window.
4-2
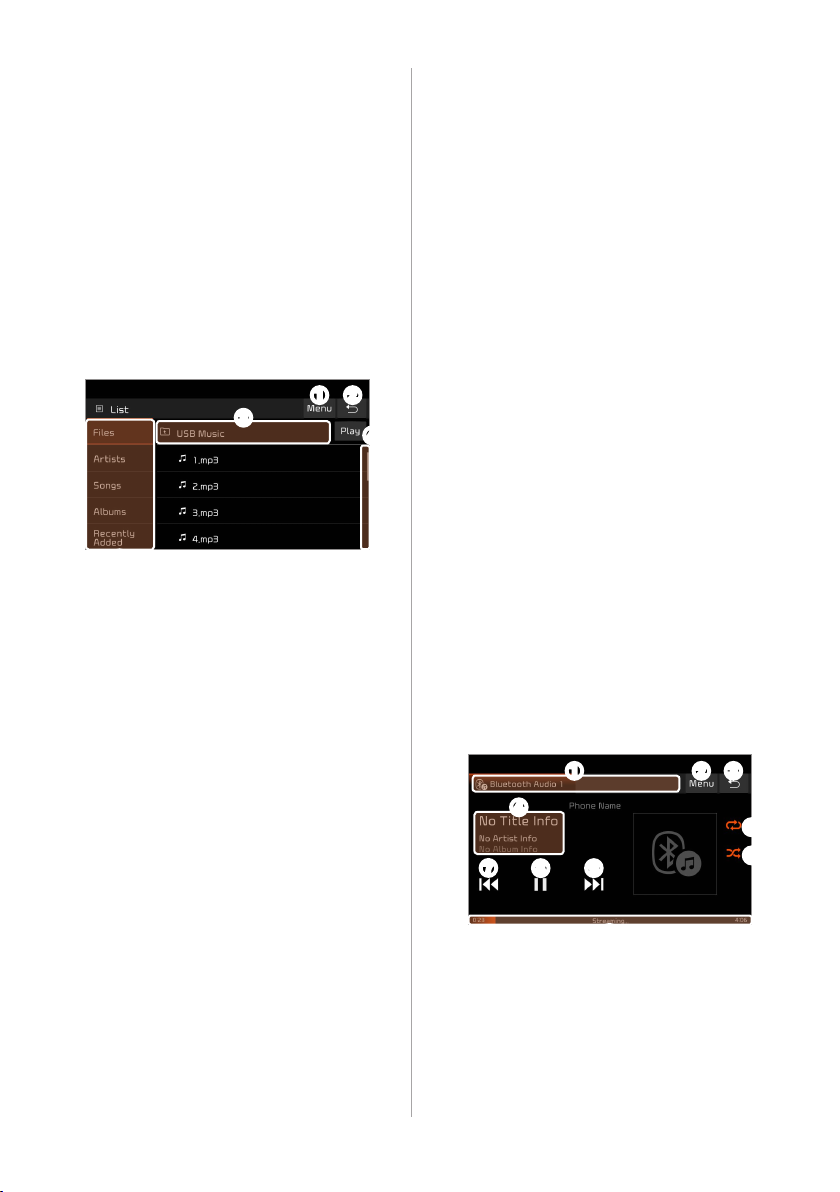
i j k
adb c
e
f
g
h
l

a Access the files list.
b Display the options list.
• Media Sources: Select a media
storage device you want to use.
• Songs by this Artist: Move to
the list of songs by the artist
currently playing.
• Songs from this Album: Move to
the list of songs from the album
currently playing.
• Sound Settings: Customize the
system sound settings.
″Configuring the sound settings.″
• User′s Manual on Web (QR
Code): Access the web manual
via the QR code.
c Return to the previous level.
d Information about the song
currently playing
e Current file number and total
number of files
f Change the repeat play mode.
g Activate or deactivate the shuffle
play mode.
h Hide the current file.
i Restart the current playback or
play the previous file. Press and
hold to rewind.
j Pause or resume playback.
k Play the next file. Press and hold to
fast forward.
l Playback time and playback
position
> See
Û Note
Only USB storage devices formatted in
FAT16/32 formats support hiding files. You
can find the hidden files in the "Hidden_"
folder.
Ý Caution
• Start the engine of your vehicle before
connecting a USB device to your system.
Starting the engine with a USB device
connected to the system may damage
the USB device.
• Be careful of static electricity when
connecting or disconnecting a USB
device. A static discharge may cause a
system malfunction.
• Be careful not to let your body or
external objects contact the USB port.
Doing so may cause an accident or a
system malfunction.
• Do not connect and disconnect a USB
connector repeatedly in a short time.
Doing so may cause an error in the
device or a system malfunction.
• Do not use a USB device for purposes
other than playing files. Using USB
accessories for charging or heating may
cause poor performance or a system
malfunction.
4-3

Û Note
• When connecting a USB storage device,
do not use an extension cable. If you use
a USB hub or an extension cable, the
device may not be recognized.
• Fully insert a USB connector into the
USB port. Failure to do so may cause a
communication error.
• When you disconnect a USB device, a
distorted noise may occur.
• The system can play only files encoded
in a standard format.
• The following types of USB devices may
not be recognized or work correctly:
- Encrypted MP3 players
- USB devices not recognized as
removable disks
• A USB device may not be recognized
depending on its condition.
• Some USB devices may be incompatible
with your system.
• Depending on the USB device's type,
capacity, or the format of files, USB
recognition time may be longer.
• Depending on the specification, some
USB devices may not support charging
via a USB connection.
[ Controlling the USB player
Use the buttons on the media player
screen to control the music playback.
Pausing/Resuming playback
Press to pause playback. Press to
resume playback.
Rewinding/Fast forwarding
Press and hold or to rewind or
fast forward.
• Alternatively, use the Search backward
button (SEEK) or the Search forward
button (TRACK) on the control panel.
• You can also use the Search lever/
button on the steering wheel.
• You can change the playback position
by pressing the progress bar on the
screen. Music will begin playing from
the selected location.
4-4

Restarting the current playback
Playing repeatedly
After three seconds of playback have
elapsed, press
song.
• Alternatively, use the Search backward
button (SEEK) on the control panel.
• You can also use the Search lever/
button on the steering wheel.
to restart the current
Playing the previous or next song
Press within the first three seconds
of the current song to play the previous
song. After three seconds of playback
have elapsed, press
to play the next song.
• Alternatively, use the Search backward
button (SEEK) or the Search forward
button (TRACK) on the control panel.
• You can also use the Search lever/
button on the steering wheel.
• On the control panel, turn the Search
knob (TUNE FILE) to find the desired
song and press the knob within five
seconds to play the file. If no control
is detected within five seconds, the
search is canceled and the screen
displays information about the song
currently playing.
twice. Press
Press to play a file on repeat.
• Each time you press the button, the
corresponding mode icon appears on
the button.
Û Note
Depending on the current playlist,
available repeat play modes may vary.
Playing in random order
Press to shuffle an album or playlist.
• When you activate the shuffle play
mode, the icon on the button turns
blue.
4-5
[ Searching for music files on
a files list
Access a files list to search for and select
a song.
On the music playback screen,
1
press List.
Press the screen to open
2
a folder, move to another
category, or play a music file.
a
b
c
e
a Display the options list.
• Media Sources: Select a media
storage device you want to use.
• Now Playing: Return to the
currently playing file if it is not
visible on the current screen.
b Return to the previous level.
c Move up to another folder/
category.
d Play all files in the selected folder
or category.
e Search for a song based on
categories.
f Scroll bar
f
d
Listening to music via
Bluetooth
You can listen to music stored in the
connected Bluetooth audio device via your
vehicle's speakers.
[ Starting the Bluetooth audio
player
Connect a Bluetooth-enabled
1
device to your system, such
as a mobile phone or an MP3
player.
devices.″
Press All Menus > Media on
2
the Home screen, or press the
Media button on the control
panel.
• If you have multiple media storage
> See ″Connecting Bluetooth
devices, press the Media button on
the control panel again and press
Bluetooth Audio from the media
selection window.
b c
g
a
d
h i
j
e
f
4-6

a If two Bluetooth audio devices are
connected to your system, select a
device to play music from.
b Display the options list.
• Media Sources: Select a media
storage device you want to use.
• Connections: Customize the
Bluetooth connection settings.
• Sound Settings: Customize the
system sound settings.
″Configuring the sound settings.″
• User′s Manual on Web (QR
Code): Access the web manual
via the QR code.
c Return to the previous level.
d Information about the song
currently playing
e Change the repeat play mode.
f Activate or deactivate the shuffle
play mode.
g Restart the current playback. Press
twice to play the previous file.
h Pause or resume playback.
i Play the next file.
j Playback time and playback
position
> See
Û Note
• Depending on the connected Bluetooth
device, mobile phone, or the music
player you are using, playback controls
may differ.
• Depending on the music player you are
using, streaming may not be supported.
• Depending on the connected Bluetooth
device or mobile phone, some functions
may not be supported.
• If you connect a media device or
mobile phone to your system via both
Bluetooth and a USB cable, your system
or device may not operate correctly. To
use a Bluetooth connection, disconnect
any cable connection to the device.
[ Controlling the Bluetooth
audio player
Use the buttons on the media player
screen to control the music playback.
Û Note
Depending on the connected Bluetooth
device, mobile phone, or the music player
you are using, playback controls may
differ.
4-7

Pausing/Resuming playback
Press to pause playback. Press to
resume playback.
Restarting the current playback
Press to restart the current song.
• Alternatively, use the Search backward
button (SEEK) on the control panel.
• You can also use the Search lever/
button on the steering wheel.
Playing the previous or next song
Press twice to play the previous
song. Press
• Alternatively, use the Search backward
button (SEEK) or the Search forward
button (TRACK) on the control panel.
• You can also use the Search lever/
button on the steering wheel.
to play the next song.
Playing repeatedly
Press to play a file on repeat.
• Each time you press the button, the
corresponding mode icon appears on
the button.
Playing in random order
Press to shuffle an album or playlist.
• When you activate the shuffle play
mode, the icon on the button turns
blue.
4-8

5
Phone
Connecting Bluetooth devices
Making a call via Bluetooth
Answering a call via Bluetooth

Connecting Bluetooth
devices
Pairing devices with your
system
Bluetooth is a short-range wireless
networking technology. Via Bluetooth,
you can connect nearby mobile devices
wirelessly to send and receive data
between connected devices. This enables
you to use your devices effectively.
On your system, you can use only the
Bluetooth Handsfree and Audio features.
Connect a mobile device that supports the
Bluetooth Handsfree or Audio feature.
Ü Warning
Park your vehicle in a safe location before
connecting Bluetooth devices. Distracted
driving can cause a traffic accident and
lead to personal injury or death.
Û Note
For more information on Bluetoothenabled devices and their functional
compatibility, visit the Hyundai website
(http://www.hyundai.com).
For Bluetooth connections, first pair your
device with your system to add it to the
Bluetooth devices list. You can register up
to six devices.
On the Home screen, press
1
All Menus > Setup > Device
Connections > Bluetooth >
Bluetooth Connections > Add
New.
• If you are pairing a device with your
system for the first time, you can
also press the Call/Answer button on
the steering wheel. Alternatively, on
the Home screen, press All Menus
> Phone.
Select a function you want to
2
use and press OK.
5-2
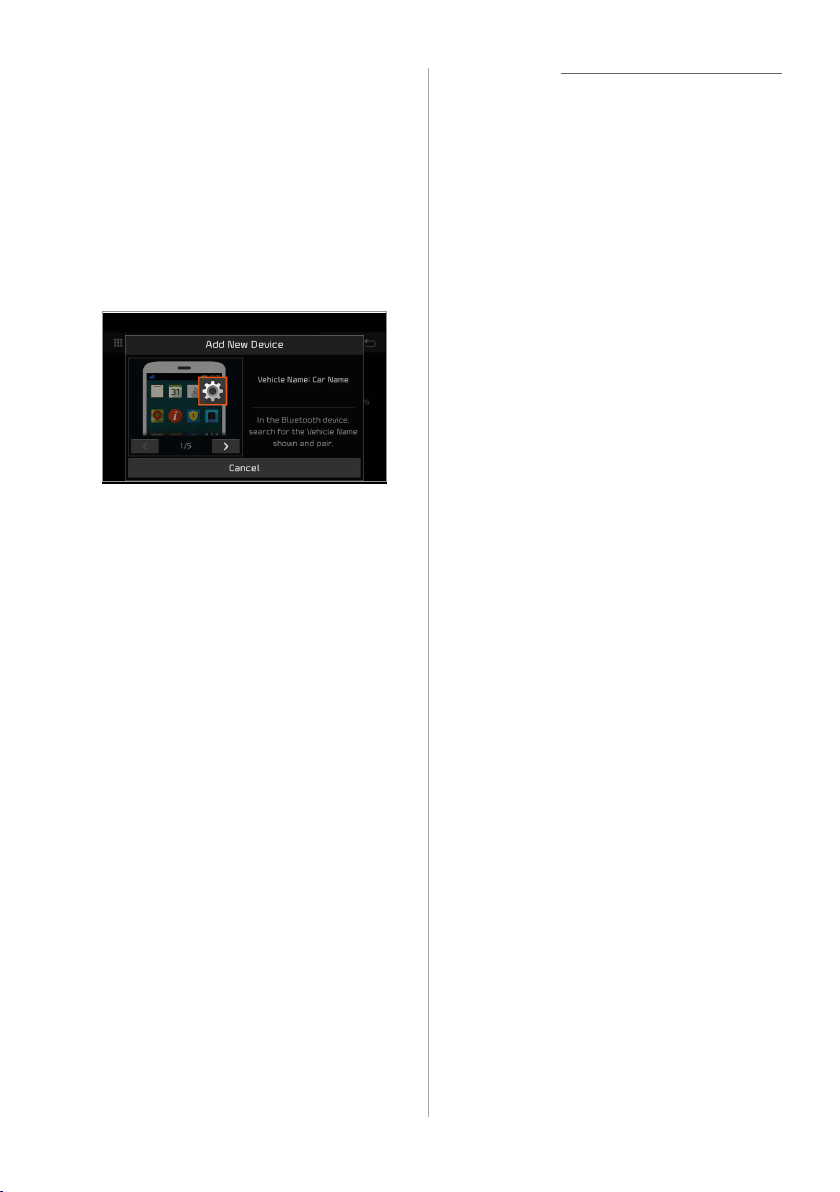
On the Bluetooth device you
3
want to connect, activate
Bluetooth, search for your
vehicle's system, and then
select it.
• Check the system's Bluetooth
name, which is displayed in the new
registration pop-up window on the
system screen.
Û Note
• It may take a while for the system to
connect with the device after you permit
the system to access the device. When
a connection is made, the Bluetooth
status icon appears at the top of the
screen.
• You can change the permission settings
via the mobile phone's Bluetooth
settings menu. For more information,
refer to your mobile phone's user guide.
• When a device is connected to the
system via Bluetooth, you cannot pair
another device.
• If you do not want the system to
connect with the device automatically,
deactivate Bluetooth on your device.
Ensure that the Bluetooth
4
passkeys displayed on the
Bluetooth device screen
and the system screen are
the same and confirm the
connection from the device.
If you are connecting a mobile
5
phone, permit the system to
access and download your
data from the device.
• Downloading data is only for
Bluetooth call functions. Permission
is not required if you are connecting
an audio device.
Connecting a paired device
To use a Bluetooth device on your system,
connect the paired device to the system.
You can connect your system with one
device for Bluetooth Handsfree or two
devices at a time for Bluetooth Audio.
On the Home screen, press
1
All Menus > Setup > Device
Connections > Bluetooth >
Bluetooth Connections.
5-3

Press a device name or
2
Connect.
• If another device is already
connected to your system,
disconnect it. Press Disconnect next
to the device.
a
d
g h
a Display the options list.
• User′s Manual on Web (QR
Code): Access the web manual
via the QR code.
b Return to the previous level.
c Connect the device.
d List of Bluetooth devices paired
with the system. Press a device
name to connect or disconnect the
device.
e Disconnect the device.
f Select a function you want to use
on the Bluetooth device.
g Pair a new device with your system.
h Delete paired devices. Downloaded
data from devices will also be
deleted.
e f
c
b
Û Note
• If you cannot connect a Bluetooth
device, check if Bluetooth is activated on
the device.
• If a connection ends because a device is
out of the connection range or a device
error occurs, the connection will be
restored automatically when the device
enters the connection range or when
the error is cleared.
• If a connection is unstable due to a
communication error, reset Bluetooth
by pressing All Menus > Setup >
Device Connections > Bluetooth >
Reset, and then reconnect the device.
Disconnecting a device
If you want to stop using a Bluetooth
device or connect another device,
disconnect your currently connected
device.
On the Home screen, press
1
All Menus > Setup > Device
Connections > Bluetooth >
Bluetooth Connections.
Press a device name or
2
Disconnect.
Press Yes.
3
5-4

Deleting paired devices
Making a call via
If you no longer want a Bluetooth device
paired or if you want to connect a new
device when the Bluetooth devices list is
full, delete paired devices.
On the Home screen, press
1
All Menus > Setup > Device
Connections > Bluetooth
> Bluetooth Connections >
Delete Devices.
Select the devices you want to
2
delete and press Delete.
• To delete all paired devices, press
Mark All > Delete.
Press Yes.
3
• Downloaded data from devices will
also be deleted.
Bluetooth
By connecting a device that supports
Bluetooth Handsfree, you can use the
Bluetooth phone feature on your system.
This feature enables you to talk on the
phone hands free via Bluetooth. View
call information on the system screen,
and make or receive calls safely and
conveniently via the vehicle's built-in
microphone and speakers.
Ü Warning
• Park your vehicle in a safe location
before connecting any Bluetooth
devices. Distracted driving can cause
a traffic accident and lead to personal
injury or death.
• Never dial a phone number by entering
it manually or pick up your mobile
phone while driving. Use of a mobile
phone may distract your attention,
making it difficult to recognize external
conditions and reducing the ability to
cope with unexpected situations, which
may lead to an accident. If necessary,
use the Bluetooth Handsfree feature to
make a call and keep the call as short as
possible.
5-5

Dialing from your call
history
You can make a call by selecting one of
your call records downloaded from the
connected mobile phone.
On the Home screen, press All
1
Menus > Phone.
• Alternatively, press the Call/Answer
button on the steering wheel.
• If the Bluetooth Handsfree feature
is deactivated, the device selection
pop-up window appears. Connect
a mobile phone by selecting one
from your list of paired devices or by
pairing a new one.
On the Bluetooth phone
2
screen, press
Select a phone number from
3
your call history to make a call.
• You can find the call record you want
by using the Search lever/button on
the steering wheel.
.
a Display the options list.
• Download: Download your call
history.
• Privacy Mode: Activate the
privacy mode to protect your
personal information. In the
privacy mode, personal data will
not be displayed.
• Bluetooth Settings: Search for
and connect another Bluetooth
device.
• User′s Manual on Web (QR
Code): Access the web manual
via the QR code.
b Return to the previous level.
c Call records downloaded from your
mobile phone
d View all call records.
e View only dialed calls.
f View only received calls.
g View only missed calls.
To end the call, press the Call
4
end button on the steering
wheel or press End on the call
screen.
5-6
a b
c
d e f g

Û Note
• Some mobile phones may not support
the download function. For more
information on feature compatibility,
visit the Hyundai website (http://www.
hyundai.com).
• Up to 50 call records will be downloaded
per individual list.
• Call durations do not appear on the
system screen.
• Permission is required to download
your call history from the mobile phone.
When you attempt to download data,
you may need to permit the download
on the mobile phone. If the download
fails, check the mobile phone screen for
any notification or the mobile phone's
permission setting.
• When you download your call history,
any old data will be deleted.
Dialing from your favorites
list
If you register frequently used phone
numbers as your favorites, you can find
them and dial them quickly.
[ Setting up your favorites list
On the Home screen, press All
1
Menus > Phone.
• Alternatively, press the Call/Answer
button on the steering wheel.
• If the Bluetooth Handsfree feature
is deactivated, the device selection
pop-up window appears. Connect
a mobile phone by selecting one
from your list of paired devices or by
pairing a new one.
On the Bluetooth phone
2
screen, press
.
Press Add New and select a
3
contact from your contacts list.
• If you have already added your
favorites, on the favorites screen,
press Menu > Edit.
Press the start icon ( ) next to
4
the phone number you want.
• The phone number is added to your
favorites list.
5-7

Û Note
• You can register up to 10 favorites for
each device.
• Emergency service numbers are
stored by default on the favorites list
for immediate use in an emergency
situation.
• To delete one of your favorites, on the
favorites screen, press Menu > Delete.
• When you connect a new mobile phone,
your favorites set for the previous
mobile phone will not be displayed, but
they will remain in your system until
you delete the previous phone from the
devices list.
[ Making a call through the
favorites list
On the Home screen, press All
1
Menus > Phone.
• Alternatively, press the Call/Answer
button on the steering wheel.
• If the Bluetooth Handsfree feature
is deactivated, the device selection
pop-up window appears. Connect
a mobile phone by selecting one
from your list of paired devices or by
pairing a new one.
On the Bluetooth phone
2
screen, press
.
Select a contact from your
3
favorites list to make a call.
• You can find the contact you want by
using the Search lever/button on the
steering wheel.
a Display the options list.
• Edit: Register phone numbers
from the downloaded contacts
as your favorites or change your
favorites.
• Delete: Delete phone numbers
from your favorites list.
• Privacy Mode: Activate the
privacy mode to protect your
personal information. In the
privacy mode, personal data will
not be displayed.
• Bluetooth Settings: Search for
and connect another Bluetooth
device.
• User′s Manual on Web (QR
Code): Access the web manual
via the QR code.
b Return to the previous level.
c Make a call to an emergency
service number, such as the
National Police or National
Intelligence Service.
d Contacts registered as your
favorites
a b
c
d
5-8

Dialing from your contacts
list
You can make a call by selecting one
of your contacts downloaded from the
connected mobile phone.
On the Home screen, press All
1
Menus > Phone.
• Alternatively, press the Call/Answer
button on the steering wheel.
• If the Bluetooth Handsfree feature
is deactivated, the device selection
pop-up window appears. Connect
a mobile phone by selecting one
from your list of paired devices or by
pairing a new one.
On the Bluetooth phone
2
c
.
a b
d
screen, press
Select a contact from the
3
contacts list to make a call.
• You can find the contact you want by
using the Search lever/button on the
steering wheel.
a Display the options list.
• Download: Download your
mobile phone contacts.
• Search: Enter a contact's name
or phone number to search the
list.
• Privacy Mode: Activate the
privacy mode to protect your
personal information. In the
privacy mode, personal data will
not be displayed.
• Bluetooth Settings: Search for
and connect another Bluetooth
device.
• User′s Manual on Web (QR
Code): Access the web manual
via the QR code.
b Return to the previous level.
c Contacts downloaded from your
mobile phone
d Select an initial letter to find
contacts quickly.
Û Note
• Only contacts in the supported format
can be downloaded and displayed from
the Bluetooth device. Contacts from
some applications will not be included.
• Up to 5,000 contacts can be downloaded
from your device.
• Some mobile phones may not support
the download function. For more
information on feature compatibility,
visit the Hyundai website (http://www.
hyundai.com).
5-9

• Contacts stored both in the phone and
in the SIM card are downloaded. With
some mobile phones, contacts in the
SIM card may not be downloaded.
• If you have set up speed dial numbers
on the mobile phone, you can make a
call by pressing and holding a speed
dial number on the keypad. Depending
on the mobile phone type, the speed
dialing function may not be supported.
• Permission is required to download
contacts from the mobile phone. When
you attempt to download data, you
may need to permit the download on
the mobile phone. If the download
fails, check the mobile phone screen for
any notification or the mobile phone's
permission setting.
• Depending on the mobile phone type or
status, downloading may take longer.
• When you download your contacts, any
old data will be deleted.
• You cannot edit or delete your contacts
on the system.
• When you connect a new mobile phone,
your contacts downloaded from the
previous mobile phone will not be
displayed, but they will remain in your
system until you delete the previous
phone from the devices list.
Dialing from the keypad
You can make a call by entering a phone
number manually on the keypad.
Ü Warning
Never dial a phone number by entering
it manually while driving. Use of a mobile
phone may distract your attention,
making it difficult to recognize external
conditions and reducing the ability to
cope with unexpected situations, which
may lead to an accident.
On the Home screen, press All
1
Menus > Phone.
• Alternatively, press the Call/Answer
button on the steering wheel.
• If the Bluetooth Handsfree feature
is deactivated, the device selection
pop-up window appears. Connect
a mobile phone by selecting one
from your list of paired devices or by
pairing a new one.
On the Bluetooth phone
2
screen, press
Enter a phone number on the
3
keypad and press
call.
• You can also search for contacts by
using initials or digits labeled on the
keypad. For example, enter "JS" for
"John Smith.″
.
to make a
5-10

a b
Answering a call via
Bluetooth
c
e fd
a Display the options list.
• Privacy Mode: Activate the
privacy mode to protect your
personal information. In the
privacy mode, personal data will
not be displayed.
• Bluetooth Settings: Search for
and connect another Bluetooth
device.
• User′s Manual on Web (QR
Code): Access the web manual
via the QR code.
b Return to the previous level.
c Enter a phone number or name by
using the keypad.
d Dial the phone number you
entered. If you did not enter any
phone number, this button will
perform the following functions:
• Pressing this button enters the
most recently dialed phone
number into the input field.
• Pressing and holding this button
redials the most recently dialed
phone number.
e Change the settings for Bluetooth
connections.
f Delete the phone number you
entered.
You can accept or reject calls and use
convenient functions during a call.
Accepting or rejecting a
call
When a call comes in, a notification popup window of the incoming call appears
on the system screen.
To answer the call, press Accept.
• Alternatively, press the Call/Answer
button on the steering wheel.
To reject the call, press Reject.
• Alternatively, press the Call end button
on the steering wheel.
5-11

To close the incoming call pop-up
window and hold the call, press
Hold.
• To return to the incoming call screen,
press the Call/Answer button on the
steering wheel.
Using functions during a
call
During a call, you will see the call screen
shown below. Press a button to perform
the function you want.
Ü Warning
• Park your vehicle in a safe location
before connecting any Bluetooth
devices. Distracted driving can cause
a traffic accident and lead to personal
injury or death.
• Never pick up your mobile phone
while driving. Use of a mobile phone
may distract your attention, making it
difficult to recognize external conditions
and reducing the ability to cope with
unexpected situations, which may lead
to an accident. If necessary, use the
Bluetooth Handsfree feature to make
a call and keep the call as short as
possible.
Û Note
• Depending on the mobile phone type,
call rejection may not be supported.
• Once your mobile phone is connected
to the system, the call sound may be
output through the vehicle′s speakers
even after you exit the vehicle if the
phone is within the connection range.
To end the connection, disconnect the
device from the system or deactivate
Bluetooth on the device.
a
b
c
d e f
a Return to the previous level.
b Turn off the microphone so the other
party cannot hear you.
c Adjust the microphone volume.
d Display the keypad.
e Switch the call to your mobile phone.
Depending on the mobile phone type,
this function may not be supported.
f End the call.
Û Note
• If the caller information is saved in
your contacts list, the caller's name and
phone number will be displayed. If the
caller information is not saved in your
contacts list, only the caller's phone
number will be displayed.
• You cannot switch to any other screen,
such as the radio, media, or settings
screen, during a Bluetooth call.
• Depending on the mobile phone type,
call quality may vary.
• Depending on the mobile phone
type, the phone number may not be
displayed.
5-12

Switching between calls
If your mobile phone supports call
waiting, you can accept a second call. The
first call is put on hold.
To switch between the active call
and the held call, press Switch
or press the phone number
displayed on the call screen.
Û Note
Depending on the mobile phone type, this
function may not be supported.
5-13


6
Voice functions
Using Voice Memo

Using Voice Memo
Recording voice memos
You can record voice memos using the
microphone installed in your vehicle and
play voice memos on your system.
Starting Voice Memo
On the Home screen, press All
Menus > Voice Memo.
a b
c
a Display the options list.
• Delete: Delete voice memos.
• Save to USB Device: Save voice
memos to a USB storage device.
This option is available only for
USB storage devices formatted in
FAT16/32 formats.
• Storage Information: View
information on the storage space
used for your voice memos.
• User′s Manual on Web (QR Code):
Access the web manual via the QR
code.
b Return to the previous level.
c List of your voice memos. Press a voice
memo to play it.
d Start or pause recording.
e Stop recording.
d e
On the Home screen, press All
1
Menus > Voice Memo.
On the voice memo screen,
2
press
• Press to pause recording. Press
Press to stop recording.
3
• Alternatively, press the Call end
button on the steering wheel.
• The voice memo is saved and added
to the voice memos list on the left of
the screen.
.
to resume recording.
Û Note
• Voice memo recording mutes the
function in operation or pauses media
playback.
• If you make or answer a call while
recording a voice memo, the recording
pauses.
6-2

Playing voice memos
On the Home screen, press All
1
Menus > Voice Memo.
Select a voice memo from the
2
voice memos list.
• The voice memo will begin playing.
Pausing/Resuming playback
Press to pause playback. Press to
resume playback.
Rewinding/Fast forwarding
Press and hold or to rewind or
fast forward.
• Alternatively, use the Search backward
button (SEEK) or the Search forward
button (TRACK) on the control panel.
• You can also use the Search lever/
button on the steering wheel.
• You can change the playback position
by pressing the progress bar on the
screen. The voice memo will begin
playing from the selected location.
Restarting the current playback
After three seconds of playback have
elapsed, press
• Alternatively, use the Search forward
button (TRACK) on the control panel.
• You can also use the Search lever/
button on the steering wheel.
.
Playing the previous or next voice
memo
Press within the first three seconds
of the current voice memo to play the
previous file. After three seconds of
playback have elapsed, press
Press to play the next voice memo.
• Alternatively, use the Search backward
button (SEEK) or the Search forward
button (TRACK) on the control panel.
• You can also use the Search lever/
button on the steering wheel.
• On the control panel, turn the Search
knob (TUNE FILE) to find the desired
voice memo and press the knob within
five seconds to play the file. If no
control is detected within five seconds,
the search is canceled and the screen
displays information about the voice
memo currently playing.
twice.
6-3


7
Settings
Configuring the vehicle settings (if equipped)
Configuring the device connection settings
Configuring the advanced system settings
Configuring the general system settings
Configuring the sound settings
Configuring the display settings

Configuring the
vehicle settings
equipped)
You can change the settings related
to driving or the interior and exterior
environment of your vehicle.
On the Home screen, press All
Menus > Setup > Vehicle and
select an option to change.
(if
[ CUSTOM
You can set the drive modes by individual
parts, such as the engine or suspension.
• ECO: This is a drive mode for increasing
the vehicle′s fuel efficiency. This mode
is available for the AWD, engine, and
transmission of your vehicle.
• COMFORT: This is a drive mode focused
on the driver and passenger′s comfort.
• SPORT: This drive mode enables a more
dynamic driving performance.
Û Note
• You can change the vehicle environment
settings only when the engine is
running.
• Depending on vehicle models or
specifications, available options may
vary.
Drive Mode
You can change the settings related to
driving environment of your vehicle.
[ Drive Mode Change Alert
You can set to display a notification when
you change your vehicle's drive mode.
• Detailed Alert: When you change the
drive mode, a detailed notification will
be displayed with the vehicle image.
• Simple Alert: When you change the
drive mode, a brief notification will be
displayed at the top of the screen.
• None: When you change the drive
mode, no notification will be displayed.
Û Note
Depending on vehicle models and
specifications, this function may not be
supported.
7-2

Active Sound Design
Coasting
You can select an engine sound mode.
The set engine sound is a virtual sound
that is output through the system
speaker. It does not affect the engine's
actual operation and performance.
Ý Caution
For your safety, park your vehicle at a
safe location and shift to "P" (Park) before
setting the engine sound effect.
Û Note
If you replace the vehicle's amplifier or
speaker arbitrarily, this function may not
work correctly.
You can set the vehicle to disengage
the engine from the transmission while
coasting in ECO mode to save fuel.
Smart Posture Care
You can enter your body measurements
to analyze your posture and adjust the
driver′s seat to change to the optimal
posture.
Û Note
This function is unavailable when you
drive at 3 km/h or faster in "D" (Drive), "N"
(Neutral), or "R" (Reverse).
7-3

Seat Position Change Alert
Climate
You can set the system to display a
notification when you change the position,
height, or angle of the driver′s seat.
Heated/Ventilated
Features
You can set the steering wheel heater and
the driver seat heater or ventilation to be
controlled automatically.
The auto control mode will be deactivated
if you operate the heater or ventilation
controls manually. Selecting this option
again or restarting the vehicle will
reactivate the auto control mode.
You can change the vehicle's climate
control settings.
Û Note
Depending on the climate control
specifications, some functions may not be
supported.
[ Auto Defog
You can set to operate the climate control
system automatically to prevent fog from
forming on the front windshield.
[ Smart Ventilation
You can set to expel air from the vehicle
automatically as needed, such as when
the air becomes too humid, when the
climate control system is turned off.
7-4

[ Carbon Dioxide Auto Vent
You can set to expel air from the vehicle
automatically when the carbon dioxide
density in the vehicle increases.
[ Lock Rear Climate Controls
You can set to prevent operation of the
climate control system from the rear
seats.
[ Rear Climate Controls
You can set to check the current status
and control the rear seat climate control
system via the system screen.
Configuring the device
connection settings
You can manage Bluetooth devices or
customize your Bluetooth settings. You
can also enable phone projection to
control your smartphone applications via
the system screen.
On the Home screen, press
All Menus > Setup > Device
Connections and select an option
to change.
Bluetooth
You can change the settings for Bluetooth
connections.
Û Note
Some options will be displayed only
when a mobile phone is connected to the
system.
7-5

[ Bluetooth Connections
Android Auto
You can pair new Bluetooth devices with
your system, or connect or disconnect a
paired device. You can also delete paired
devices.
[ Bluetooth System Info
You can view or edit your system's
Bluetooth information.
[ Privacy Mode
You can activate the privacy mode to
protect your personal information. In the
privacy mode, personal data will not be
displayed.
[ Reset
You can delete all paired Bluetooth
devices and reset your Bluetooth settings
to default values. All data related to
Bluetooth devices will also be deleted.
You can enable Android Auto to connect
your Android smartphone to your system.
Apple CarPlay
You can enable Apple CarPlay to connect
your iPhone to your system.
7-6

Configuring the
advanced system
Steering Wheel Mode
Button
settings
You can customize the advanced system
settings, such as notifications or button
functions.
On the Home screen, press All
Menus > Setup > Advanced and
select an option to change.
Custom Button
You can select a function to access when
you press the Custom button on the
control panel.
You can select functions, such as AM radio
and phone projection, to access when you
press the Mode button on the steering
wheel.
Home Screen
You can change the widgets and
menus displayed on the Home screen.
Personalize the Home screen by adding
your favorite menus.
Home screen widgets" or "Changing the Home
screen menu icons."
> See "Changing the
7-7

Media Change
Notifications
Configuring the
general system
You can set to briefly display media
information at the top of the screen when
the next item starts playing if you move
from the media player to another function
screen.
Extend Rear Camera Use
equipped)
You can set the rear view screen to remain
active even if you shift to any position
other than "R" (Reverse) after backing up.
When you shift to "P" (Park) or drive at a
predetermined speed or faster, the rear
view screen will be deactivated and the
system will display the previous screen
automatically.
(if
settings
You can customize your system
environment settings, such as the time
and date, the system language, and more.
On the Home screen, press All
Menus > Setup > General and
select an option to change.
Date/Time
You can set the current time and date or
change the time display format.
[ GPS Time
7-8
You can set the system to receive time
information from the GPS. When you
deactivate this option, you can set the
time and date manually.

[ 24 Hours
Keyboard
You can set the time in the 24 hour
format.
Language
You can change the system language.
Û Note
• It may take a while for the system to
apply the selected language. When the
change is completed, a pop-up window
will appear telling you the system
language has changed. Press outside
the pop-up window area on the screen
to close the window, or wait for a few
seconds.
• This setting will not affect user data,
such as MP3 file names.
You can select a keyboard type for each
language.
Û Note
This setting will be applied to all text input
on your system.
[ Korean Keyboard
You can select a Korean keyboard.
[ English Keyboard
You can select an English keyboard.
7-9

Screen Saver
[ SW Info/Update
You can select a screen saver option to be
displayed when you turn off the screen by
pressing and holding the Power button on
the control panel.
• Digital Clock: The digital clock is
displayed.
• Analog Clock: The analog clock is
displayed.
• None: No screen saver is displayed.
System Info
You can view your system information or
reset your system settings to the default
values.
You can view your system's version
information or update it to the latest
version. To update your system, download
the latest update file to a USB storage
device and connect it to the system.
Ý Caution
• Depending on the total data amount, an
update may take several minutes.
• Do not turn off the system or remove
the storage device while the update is in
progress. If the power supply is cut off
or the storage device is removed from
the system, it may damage the data or
cause a system malfunction.
Û Note
System software updates can be used
limitedly as an engineering service for
customer support.
[ Storage
You can view storage information of your
system's memory.
7-10
[ Reset
You can reset your system settings to the
default values. All user data stored in the
system will also be deleted.

Configuring the sound
Volume
settings
You can change the settings related to
sounds, such as the speaker volume and
sound effects.
On the Home screen, press All
Menus > Setup > Sound and
select an option to change.
Û Note
• Depending on vehicle models or
specifications, available options may
vary.
• Depending on the system or amplifier
specifications applied to your vehicle,
some functions may not be supported.
Position
You can select a location where sound
will be concentrated in the vehicle. Press
a desired location on the seat image or
press the arrow buttons to move the
focus. To set sound to be centered in the
vehicle, press
.
You can adjust the volume levels for
various system features, including phone
projection.
[ System Sound
You can adjust the volume levels for
individual system features.
Û Note
To restore the default volume settings for
system features, press Reset.
[ Phone Projection
You can adjust the volume levels for
phone projection features individually.
Û Note
To restore the default volume settings for
phone projection, press Reset.
7-11

Tone
[ Proximity Warning
You can adjust the output level for each
sound tone mode.
Û Note
To restore the default settings for all
sound tone modes, press Center.
Priority
You can set specific sounds to take priority
over other sounds when they play at the
same time.
You can set the system to decrease the
audio volume to hear a proximity warning
prior to other sounds while parking your
vehicle.
[ Start-up Volume Limit
You can set the system to automatically
decrease the volume when turned on, if
the volume has been set to too high of a
level.
Advanced
You can set the advanced sound options
or apply various sound effects.
7-12
Û Note
Depending on the amplifier specifications,
available sound options and effects may
vary.

[ Speed Dependent Volume
Control
You can set the volume to be adjusted
automatically according to your driving
speed.
[ Live Dynamic
(if equipped)
[ BOSE Centerpoint
You can enjoy rich surround sound via the
stereo sound source, such as digital audio
files or satellite radio.
(if equipped)
[ BOSE Dynamic Speed
Compensation
(if equipped)
You can enjoy natural, dynamic sound like
sound from a live performance.
[ Bass Boost
You can enjoy grand, dynamic sound with
amplified bass frequencies.
[ Clari-Fi
You can enjoy sound restored to
compensate for frequencies lost during
audio compression.
[ Quantum Logic Surround
equipped)
You can enjoy spacious, surround sound,
like the actual sound on a live stage.
[ Arkamys Sound Mood
equipped)
You can enjoy live sound with rich
stereophonic sound.
(if equipped)
(if equipped)
(if
(if
You can enjoy a stable listening
environment by automatically calibrating
the sound according to your driving
speed.
Reset
You can reset your sound settings to the
default values.
Touch sound (Beep)
You can turn the touch sound on or off
by pressing Beep on the sound settings
screen.
7-13

Configuring the
display settings
You can change the settings for the screen
display.
[ Daylight
This option is available when you
deactivate the Automatic option. The
screen brightness stays bright regardless
of the ambient lighting conditions.
On the Home screen, press All
Menus > Setup > Display and
select an option to change.
Mode
You can set the screen brightness to be
adjusted automatically according to the
ambient lighting conditions or set the
screen to stay bright or dark continuously.
[ Automatic
The screen brightness is adjusted
automatically based on the ambient
lighting conditions.
[ Night
This option is available when you
deactivate the Automatic option. The
screen brightness stays dark regardless of
the ambient lighting conditions.
Illumination
You can adjust the screen brightness for
each brightness mode.
7-14

[ Link to Cluster Illumination
Control
You can set the system brightness to be
adjusted according to the instrument
cluster′s brightness. If this feature is
deactivated, you can adjust the brightness
for the day or night mode according to
your setting in the Mode option.
[ Daylight
You can adjust the screen brightness for
the day mode when you select Daylight in
the Mode option.
Blue Light Filter
The blue light filter reduces eye fatigue by
adjusting the levels of blue light displayed
by the screen.
[ Use Blue Light Filter
[ Night
You can adjust the screen brightness for
the night mode when you select Night in
the Mode option.
Û Note
To restore the default settings for the
brightness modes, press Reset.
You can set to use the blue light filter.
[ Blue Light Filter Settings
You can set the system to activate the blue
light filter automatically according to the
ambient lighting conditions or manually
enter a period for when to use the blue
light filter.
• Automatic: The blue light filter will
function automatically according to the
ambient lighting conditions.
• Scheduled Time: The blue light filter will
function during the set period.
7-15

Reset
You can reset your display settings to the
default values.
7-16

8
Appendix
Troubleshooting
System status icons
FAQ
Product specifications
Index

Troubleshooting
Before reporting a malfunctioning system, refer to the following table and see if you can
identify and fix the problem. If the problem persists or you are unable to locate your specific
need, contact your place of purchase or dealer.
Sound and display
Symptom Possible cause Solution
No sound System turned off
Low volume level Turn the Volume knob on the control panel
System muted Press the Mute button on the steering
Sound is heard from
only one speaker.
Sound is cut off or
a distorted noise is
heard.
The image quality is
deteriorated.
Unbalanced sound
output
System vibration It is not a malfunction. If the system
System vibration It is not a malfunction. If the system
Aged or
deteriorated
screen
• Ensure that the engine start/stop button
is set to "ACC" or "ON.″
• Press the Power button to turn on the
system.
to adjust the volume.
wheel to unmute the system.
On the Home screen, press All Menus >
Setup > Sound > Position and change the
settings to adjust the sound balance.
vibrates, the sound may be cut off or
a distorted noise may occur. When the
vibration stops, the system will operate
normally.
vibrates, the image may be distorted. When
the vibration stops, the system will operate
normally.
If the problem persists, contact your place
of purchase or dealer.
Small red, blue, or
green dots appear on
the screen.
8-2
Because the LCD is manufactured with
technology requiring extremely high pixel
density, pixel deficiency or constant lighting
may occur within the permitted range of
less than 0.01 % of the total pixels.
USB playback
Symptom Possible cause Solution
The files on the USB
storage device are
not recognized.
File format not compatible Copy compatible media files to
the USB device and reconnect the
> See ″USB mode.″
device.
Poor connection Disconnect the USB storage device
from the USB port and reconnect
it correctly.
Contaminated USB
connectors
USB hub or extension cable
used
Non-standard USB storage
device used
Corrupt USB storage device Format the USB storage device on
Remove foreign substances from
the USB connector of the storage
device and the contact surface of
the USB port.
Connect the USB storage device
directly to the USB port.
Use a USB storage device that is
compatible with the system. > See
″USB mode.″
a PC and reconnect it. Format the
device in FAT16/32 format.
8-3

Bluetooth connection
Symptom Possible cause Solution
The system is not
detected on the
Bluetooth device.
The Bluetooth device
is not connected to
the system.
Pairing mode not
activated
Bluetooth deactivated Activate Bluetooth on the device.
Bluetooth error
On the Home screen, press All Menus
> Setup > Device Connections >
Bluetooth > Bluetooth Connections
> Add New to switch the system to the
pairing mode. Then, try searching for the
system again on the device.
• Deactivate Bluetooth and reactivate
it on the device. Then, reconnect the
device.
• Turn the device off and on. Then,
reconnect it.
• Remove the battery from the device
and reinstall it. Then, turn the device
on and reconnect it.
• Unregister the Bluetooth pairing on
both the system and the device and
then re-register and connect them.
8-4

Phone projection
Symptom Possible cause Solution
Phone projection
does not start when
a smartphone is
connected via a USB
cable.
When phone
projection starts or is
in use, a black screen
is displayed.
Phone projection not
supported by the
phone
Phone projection
disabled
Smartphone
not ready or
malfunctioning
Smartphone
malfunctioning
Visit the following websites and ensure
that the smartphone supports the
corresponding function.
• Android Auto: https://support.google.
com/androidauto
• Apple CarPlay: https://www.apple.com/
kr/ios/carplay
• On the Home screen, press All Menus
> Setup > Device Connections,
select a function you want to use, and
activate it.
• Check if the function is disabled in
the application settings or restriction
settings on the smartphone.
• Check if the smartphone′s battery
is low. If the battery is low, the
smartphone may not be recognized.
• If the network signal is weak, phone
projection may not work correctly.
• If the smartphone is locked, unlock it.
• Reset the smartphone and reconnect it.
• Disconnect the USB cable from the
smartphone and reconnect the cable.
• Reset the smartphone and reconnect it.
8-5

System operation
Symptom Possible cause Solution
The previously used
media mode is not
activated after the
system turns off and
back on.
The system is slow or
it does not respond.
The system does not
turn on.
Poor connection or
playback error
Internal system error
Fuse shorted
If the corresponding media storage
device is not connected or has a problem
in playback when you turn on the
system, the mode you previously used
will be activated. Reconnect the media
storage device or restart playback.
• Press and hold the Reset button with
a suitable tool, such as a pen or a
paperclip.
• Update the system software to the
latest version.
• If the problem persists, contact your
place of purchase or dealer.
• Visit a repair shop and replace with a
suitable fuse.
• If the problem persists, contact your
place of purchase or dealer.
8-6

System status icons
Status icons appear at the top right of
the screen to display the current system
status.
Familiarize yourself with the status icons
that appear when you perform certain
actions or functions and their meanings.
[ Mute and voice
recording
Downloading call history from
a mobile phone connected via
Bluetooth to the system
Downloading contacts from a
mobile phone connected via
Bluetooth to the system
Signal strength of the mobile
phone connected via Bluetooth
[ Wireless charging
Radio and media muted
Voice memo recording
[ Bluetooth
Battery level of connected
Bluetooth device
Mobile phone connected via
Bluetooth
Audio device connected via
Bluetooth
Mobile phone and audio device
connected via Bluetooth
Bluetooth call in progress
Microphone turned off during
Bluetooth call
Wireless charging in progress
Wireless charging completed
Wireless charging error
Û Note
• The battery level displayed on the
screen may differ from the battery level
displayed on the connected device.
• The signal strength displayed on the
screen may differ from the signal
strength displayed on the connected
mobile phone.
• Depending on vehicle models and
specifications, some status icons may
not be displayed.
8-7

FAQ
Bluetooth
What kinds of functions can I use
Q
with Bluetooth?
You can connect your mobile phone
A
to make or answer calls hands
free. You can also connect audio
devices, such as MP3 players and
mobile phones, to listen to music
in your vehicle.
via Bluetooth" or "Listening to music via
Bluetooth."
How do I pair a Bluetooth device
Q
with the system?
On the Home screen, press
A
All Menus > Setup > Device
Connections > Bluetooth >
Bluetooth Connections > Add
New. From the Bluetooth device
you want to connect, search for
and pair with your system. When
you enter or confirm a Bluetooth
passkey displayed on the system
screen, the device is registered
to the system's Bluetooth devices
list and connected to the system
automatically.
Bluetooth devices.″
> See "Making a call
> See ″Connecting
I changed my mobile phone that
Q
was registered to the system via
Bluetooth. How can I register my
new mobile phone?
You can register additional devices
A
to your system by following the
instructions to pair a device. Up to
six devices can be added to your
system's Bluetooth devices list.
To delete a registered device, on
the Bluetooth devices list, press
Delete Devices, select the devices
to delete, and press Delete.
″Connecting Bluetooth devices.″
How do I access the contacts in my
Q
mobile phone from the system?
When connecting your mobile
A
phone to your system, permit the
system to access the contacts saved
in the mobile phone. The contacts
will be downloaded to the system.
To open the downloaded contacts
list, press the Call/Answer button
on the steering wheel and press
on the phone screen. You can
search for a contact to make a call
or add it to favorites.
a call via Bluetooth.″
> See ″Making
> See
8-8

Audio function
What kinds of audio functions does
Q
my system have?
Your system provides you with
A
the radio and media player (USB,
etc.). For more information, see the
corresponding chapters.
How to self-check a system
faults
My system does not operate
Q
normally. What should I do?
Check your system by referring
A
to the solutions explained in the
troubleshooting sections.
″Troubleshooting.″
> See
I want to move to the previous or
Q
next song without controlling the
screen while driving.
Use the Search lever/button on
A
the steering wheel to move to the
previous or next song.
Broadcast reception
No sound is heard or a distorted
Q
noise is heard when listening to the
radio while driving.
Depending on the location, the
A
reception may deteriorate due to
obstacles.
Attaching a window film including
metal components to the rear
window equipped with a glass
antenna may lower radio reception.
If the system still does not operate
normally after following the
relevant instructions, press and
hold the Reset button.
If the problem persists, contact
your place of purchase or dealer.
8-9

Product specifications
Media player
[ USB mode
# Music
Item Specifications
Audio file
specification
Bit rates/Sampling
frequency
Detailed
specifications
MPEG-1/2 Layer3, OGG (Vorbis), FLAC, WMA (Standard/
Professional), WAV
MP3 8 to 320 kbps (CBR/VBR), to 48 kHz (ID3 tag version:
Ver. 1.0, Ver. 1.1, Ver. 2.2, Ver. 2.3, Ver. 2.4)
OGG Q1 to Q10, to 48 kHz
FLAC 8/16/24 bit, to 48 kHz
WMA
WAV 8/16 bit, to 48 kHz
• Maximum number of directory layers: 20
• Maximum length of folder/file names: 255 byte
• Supported characters for folder/file names: Alphanumeric
• Maximum number of folders: 2,000 (including ROOT)
• Maximum number of files: 8,000
• Standard (0x161): to L3 Profile, to 385 kbps, to 48 kHz
• Professional (0x162): to M0b, to 192 kbps, to 48 kHz
characters, Korean standard character set 2,350 characters,
Simplified Chinese 4,888 characters
8-10

Û Note
• You cannot play the following types of files:
- Modified files (files whose file format has changed)
- Variant files (for example, MP3 files encoded with WMA audio codec)
• Sound quality of music files using a bit rate in more than 192 kbps is not guaranteed.
• For files that do not use a fixed bit rate, some functions may not work or the playback time
may be incorrect.
• If an error occurs when you play a file or the file is not in supported format, change the file
format by using the latest encoding software.
# USB storage devices
Item Specifications
Byte/Sector 64 kbyte or less
Format system FAT16/32 (recommended), exFAT, NTFS
Û Note
• Operation is guaranteed only for a metal cover type USB storage device with a plug type
connector.
- USB storage devices with a plastic plug may not be recognized.
- USB storage devices in memory card types, such as CF card or SD cards, may not be
recognized.
• Any problem caused by the use of USB storage devices not listed in the following table are
not covered by the warranty.
Product name Manufacturer
XTICK LG Electronics Inc.
BMK BMK Technology Co., Ltd.
SKY-DRV Sky Digital Co., Ltd.
TRANSCEND JetFlash Transcend Information, Inc.
Sandisk Cruzer SanDisk
Micro ZyRUS ZyRUS
NEXTIK Digiworks Co., Ltd.
8-11

• USB hard disk drives may not be recognized.
• When you use a large capacity USB storage device with multiple logical drives, only files
stored on the first drive will be recognized.
• If an application program is loaded on a USB storage device, the corresponding media
files may not play.
Common specifications
Item Specifications
Power supply DC 14.4 V
Operating power DC 9 to 16 V
Sleep current 1 mA or less
Operating temperature -20 to +70 °C
Storage temperature -40 to +85 °C
Current consumption 2.5 A
Radio
Item Specifications
Channels
Sensitivity
Distortion factor 2 % or less
8-12
• FM: 87.5 to 108.0 MHz (Step: 100 kHz)
• AM: 531 to 1602 kHz (Step: 9 kHz)
• FM: 10 dBuV or lower
• AM: 35 dBu EMF or lower

Bluetooth
Item Specifications
Frequency range
Supported Bluetooth
specification
Supported profile Handsfree (1.7), A2DP (1.3), AVRCP (1.6), PBAP (1.2)
Bluetooth Power Class 2 -6 to 4 dBm
2402 to 2480 MHz
3.0
Antenna power
Number of channels 79
4dBm (maximum)
8-13

Trademarks
• The Bluetooth® word mark and logos
are registered trademarks owned by
Bluetooth SIG, Inc. and any use of such
marks by HYUNDAI is under license.
®
A Bluetooth
enabled cell phone is required to use
Bluetooth
• Google, Android, Android Auto, and
Google Play are registered trademarks
of Google LLC.
Wireless Technology
®
Wireless Technology.
• Apple®, Apple CarPlay™, iPad®, iPad
mini™, iPhone
iPod nano
®
are trademarks of Apple Inc.
Siri
• Other trademarks and trade names are
those of their respective owners.
®
, iPod®, iPod classic®,
®
, iPod touch®, iTunes®, and
FCC Notice
Caution: Any changes or modifications to this
device not explicitly approved by manufacturer
could avoid your authority to operate this
equipment.
This equipment complies with FCC radiation
exposure limits set forth for an uncontrolled
environment.
This equipment should be installed and
operated with minimum 20cm between the
radiator and your body.
This transmitter must not be collocated or
operating in conjunction with any other
antenna or transmitter unless authorized to do
so by the FCC.

 Loading...