

Hyundai MIB SB-2000 User Manual

1
Important Safety Information
Always be careful when using the machine. To reduce the risk of fire, electrical shocks, and
other injuries, keep these safety considerations in mind when installing, using, and maintaining
your machine:
Stability: Place the machine on a secure, stable surface. The machine can be seriously
damaged if it falls.
Power Supply: Provide correct power to the machine, as listed on the back of the machine. If
you are not sure of the type of power that is supplied to your office, call your electric company.
Grounding: If the plug has three prongs, it must be plugged into a grounded (three hole)
outlet. Grounded plugs and outlets are designed for your safety - do not try to make a three-
prong plug fit into a two-prong outlet by modifying the plug or outlet in any way. If you cannot
insert the plug into your wall outlet easily, then a qualified electrician should inspect the outlet.
Overload: Do not plug too many electrical devices into a wall outlet or an extension cord. An
overloaded outlet could be a reason of a fire and electrical shock hazard.
Cleaning: Before cleaning the machine, unplug it from the power outlet. Clean exposed parts
with a soft cloth slightly dampened with water. Do not use aerosol cleaners.
Gas Leaks: Never use any machine close to a gas leak. If you think gas is leaking, call the
gas company immediately. A small electrical spark in the machine could cause a fire or
explosion.
Precaution
When using the machine, these precautions should always be followed:
1. Never push objects of any kind into your machine through the case or cabinet openings.
2. Do not use your machine near water, in wet locations, or outdoors.
3. Do not allow anything to rest on the power cord, line cord, or PC interface cable. Do not
locate your machine where the cords can be damaged by persons’ walking on them.
4. Do not allow pets to chew on the power cord or PC interface cable.
5. Use supplies or cleaning materials only as directed. Keep all supplies and materials out of
the way of children.
6. The power supply turns this machine on and off. Make sure that your machine is installed
near an outlet and is easily accessible.
7. Never remove covers or guards that require a tool for removal. There are no operator
serviceable areas inside your machine. Refer servicing to authorized service personnel.
8. Never defeats interlock switches. This machine is designed to restrict operator access to
unsafe areas. Covers, guards and interlock switches are provided to ensure that the

2
machine will not operate with covers opened.
9. Risk of explosion if battery is replaced by an incorrect type. Dispose of used batteries
according to the instruction.
Managing the performance of the machine
This unit has many sophisticated sensors. Without proper maintenance, it cannot last its good
performance. Please read the ‘Daily Maintenance’ section of this manual carefully, and do it
everyday. When the performance is deteriorated on a sudden, please clean all the sensors first
before calling a service.
Safety Notes
Your machine and the supplies are designed and tested to meet strict safety requirements.
Included are safety agency examination and approval and compliance to established
environmental standards. Please read the following instructions carefully before operating your
machine, and refer to them as needed to ensure the continued safe operation of your machine.
WARNING
Hazardous moving parts!
Keep fingers and other body parts away
Battery is used for ‘PBA POWERIO’ in this machine. If wrong date and time are displayed on
LCD after correct setting, it is necessary to change the battery of ‘PBA POWERIO’. Please read
the following instructions carefully before changing the battery.
CAUTION
Risk of explosion: if battery is replaced by an incorrect type.
Dispose of used batteries according to the instructions.
FCC Compliance Statement
THIS DEVICE COMPLIES WITH PART 15 OF FCC RULES. OPERATION IS SUBJECT
TO THE FOLLOWING CONDITIONS:
1. THIS DEVICE MAY NOT CAUSE HARMFUL INTERFERENCE, AND
2.
THIS DEVICE MUST ACCEPT ANY INTERFERENCE RECEIVED, INCLUDING
INTERFERENCE THAT MAY CAUSE UNDESIRED OPERATION.

Table of Contents
Chapter 1 Installation 4
Chapter 2 Description of the Parts 6
Chapter 3 Overview of Control Panel 7
Chapter 4 Overview of Display (LCD) 8
Chapter 5 Getting Started 9
Placing Bills into the Hopper 9
Counting 9
Chapter 6 Basic Operation 11
Selecting Count Mode 11
Selecting Counterfeit (CF) Function 15
Selecting Add Function 15
Selecting Batch Function 16
Changing Display Contents 17
Grand Total 19
Selecting Currency 20
Chapter 7 Set Function and its Parameters 21
USER Menu 21
Set Speed of the Machine 22
Set Contrast of Banknotes 22
Set Start Mode, Mode Lock & Counterfeit Detection Function 23
Set Beep Function 25
Set Pocket Capacity 25
Printer Type 25
Set CF Level 26
Set Fitness Level 26
Set Parameters 27
Chapter 8 Troubleshooting 31
LCD Error Messages 31
Fixing Problems 31
Chapter 9 Daily Maintenance 32
Cleaning the Banknote Scanner 33
Chapter 10 Specification 34
3
4
Installation
Unpacking List
1. SB-2000 1 Unit
2. AC Power Code 1 pc.
3. User's Guide 1 pc.
4. Cleaning Brush 1 pc.
5. Sensor Cleaning Cloth 1 pc.
6. Serial Cable (Connection between SB-2000 & PC) (option) 1 pc.
7. Printer Cable (used in connecting a printer) (option) 1 pc.
Choosing a Location
To help guarantee trouble-free operation of your machine, place it on a flat, stable surface near
your workstation.
Do not place your machine:
In direct sunlight.
Near heat sources or air conditioners.
In dusty or dirty environments.
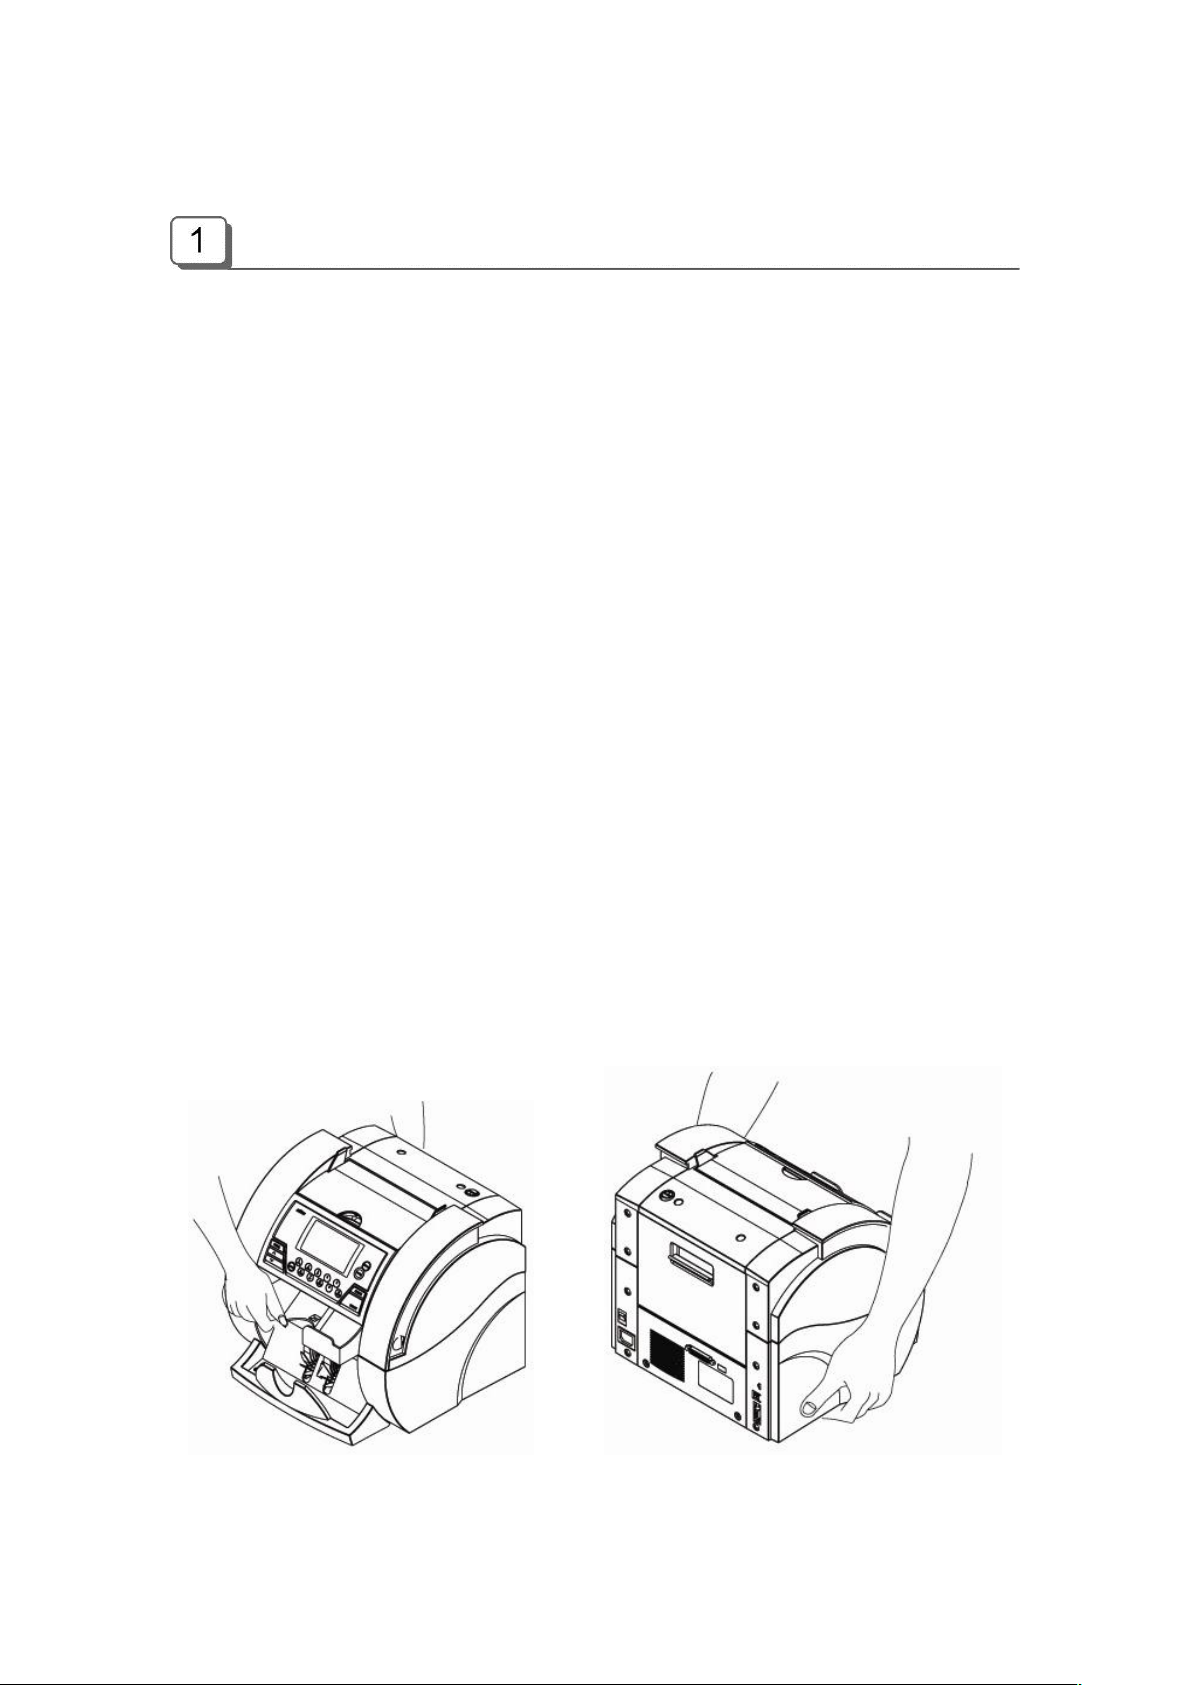
Handling the Machine
When handling or moving the machine, do not lift with grasping the Reject Pocket. The picture
shows how to lift the machine correctly. Please refer to the pictures on the next page.
(X) (X)
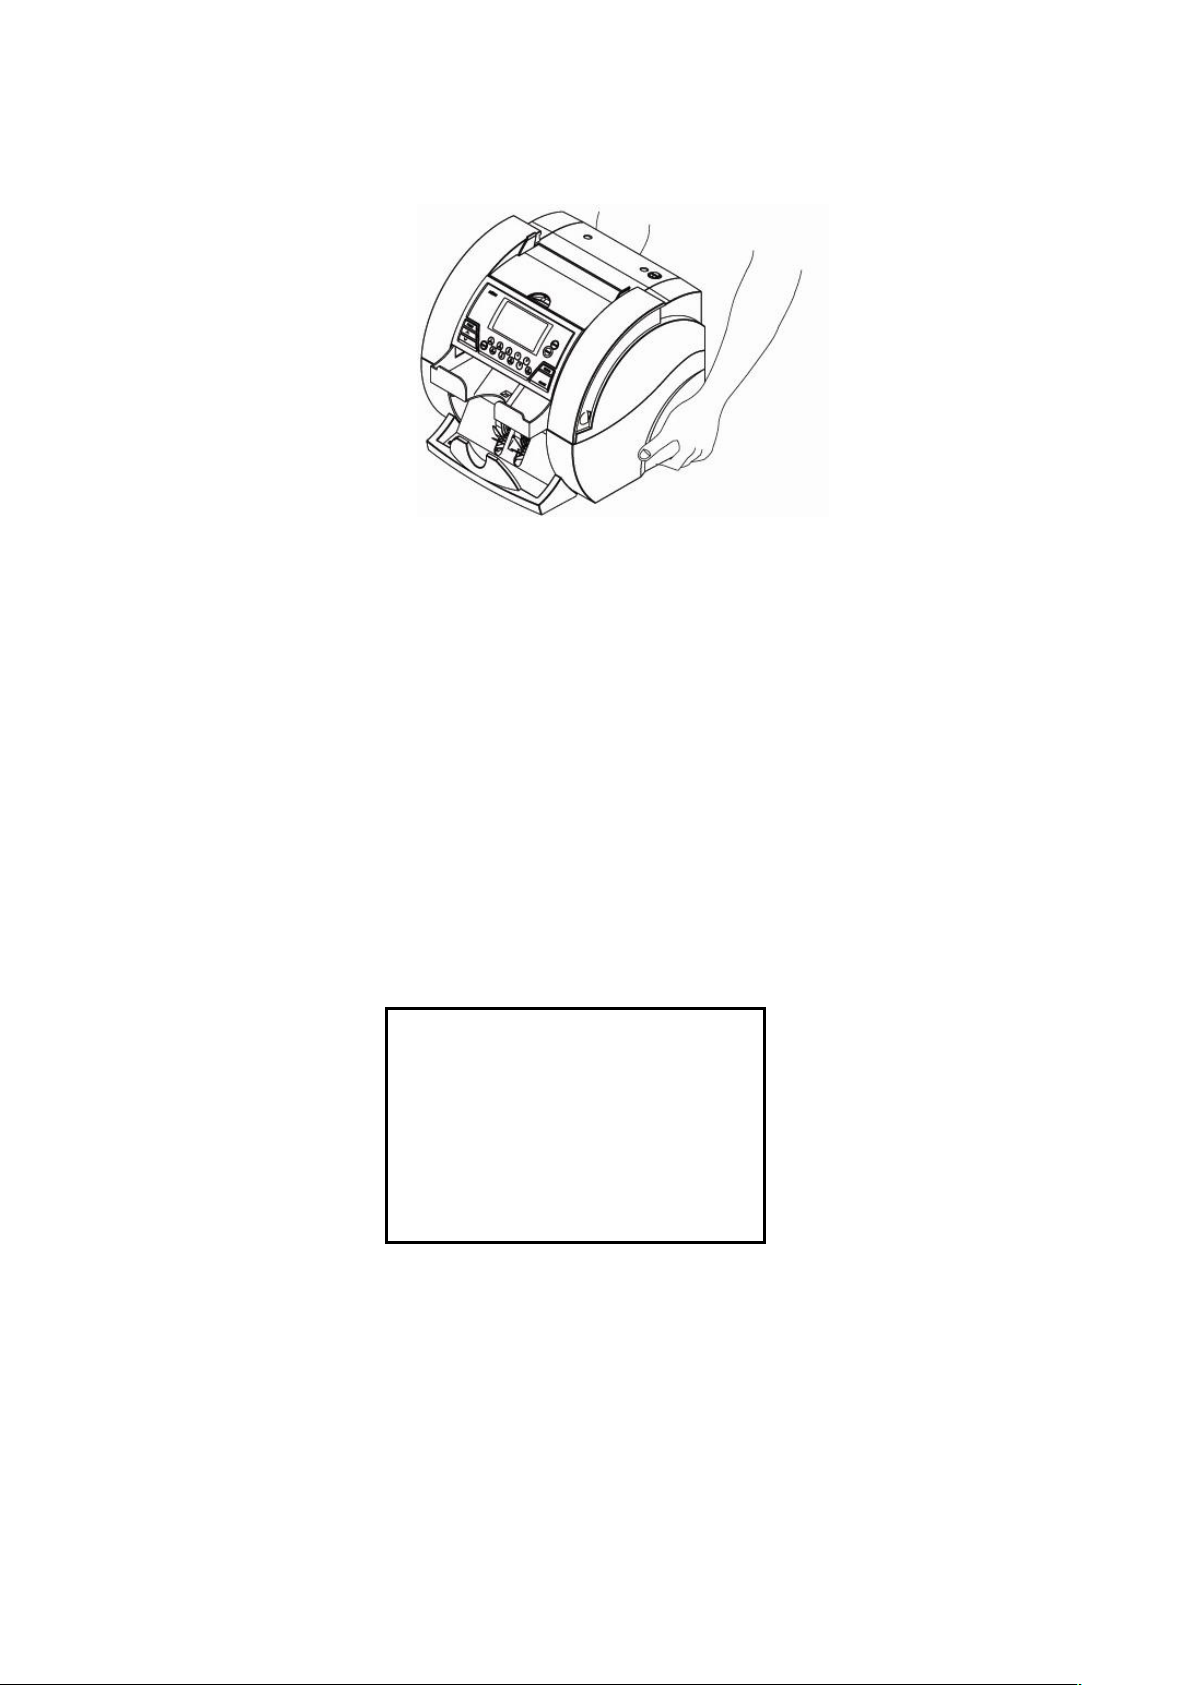
(O)
Correct way to lift the machine
Setting Up Your Machine
Power Cord
Plug one end of the cord into the back of the machine and the other end into a standard AC
power outlet.
If you turn on the power switch, the machine will display initializing process. If there is Service
Call number saved by a service provider, the Call number will be displayed as below:
And the machine will display version of software and its checksum also.
INITIALIZING SYSTEM
▶ ▶ ▶
A/S CALL
123-456-789
Printer
Your SB-2000 has a serial interface port, which allows you to connect your printer to print out
counting result. To connect your printer to the machine, follow the steps as below:
1. Make sure that both the SB-2000 and the printer are turned off.
2. Plug the cable of printer into the serial port of SB-2000.
3. Turn on the SB-2000 and set parameters referring to the Chapter 7 of this manual.
‘Set Function and its Parameters’ -> ‘Interface’.
5
6
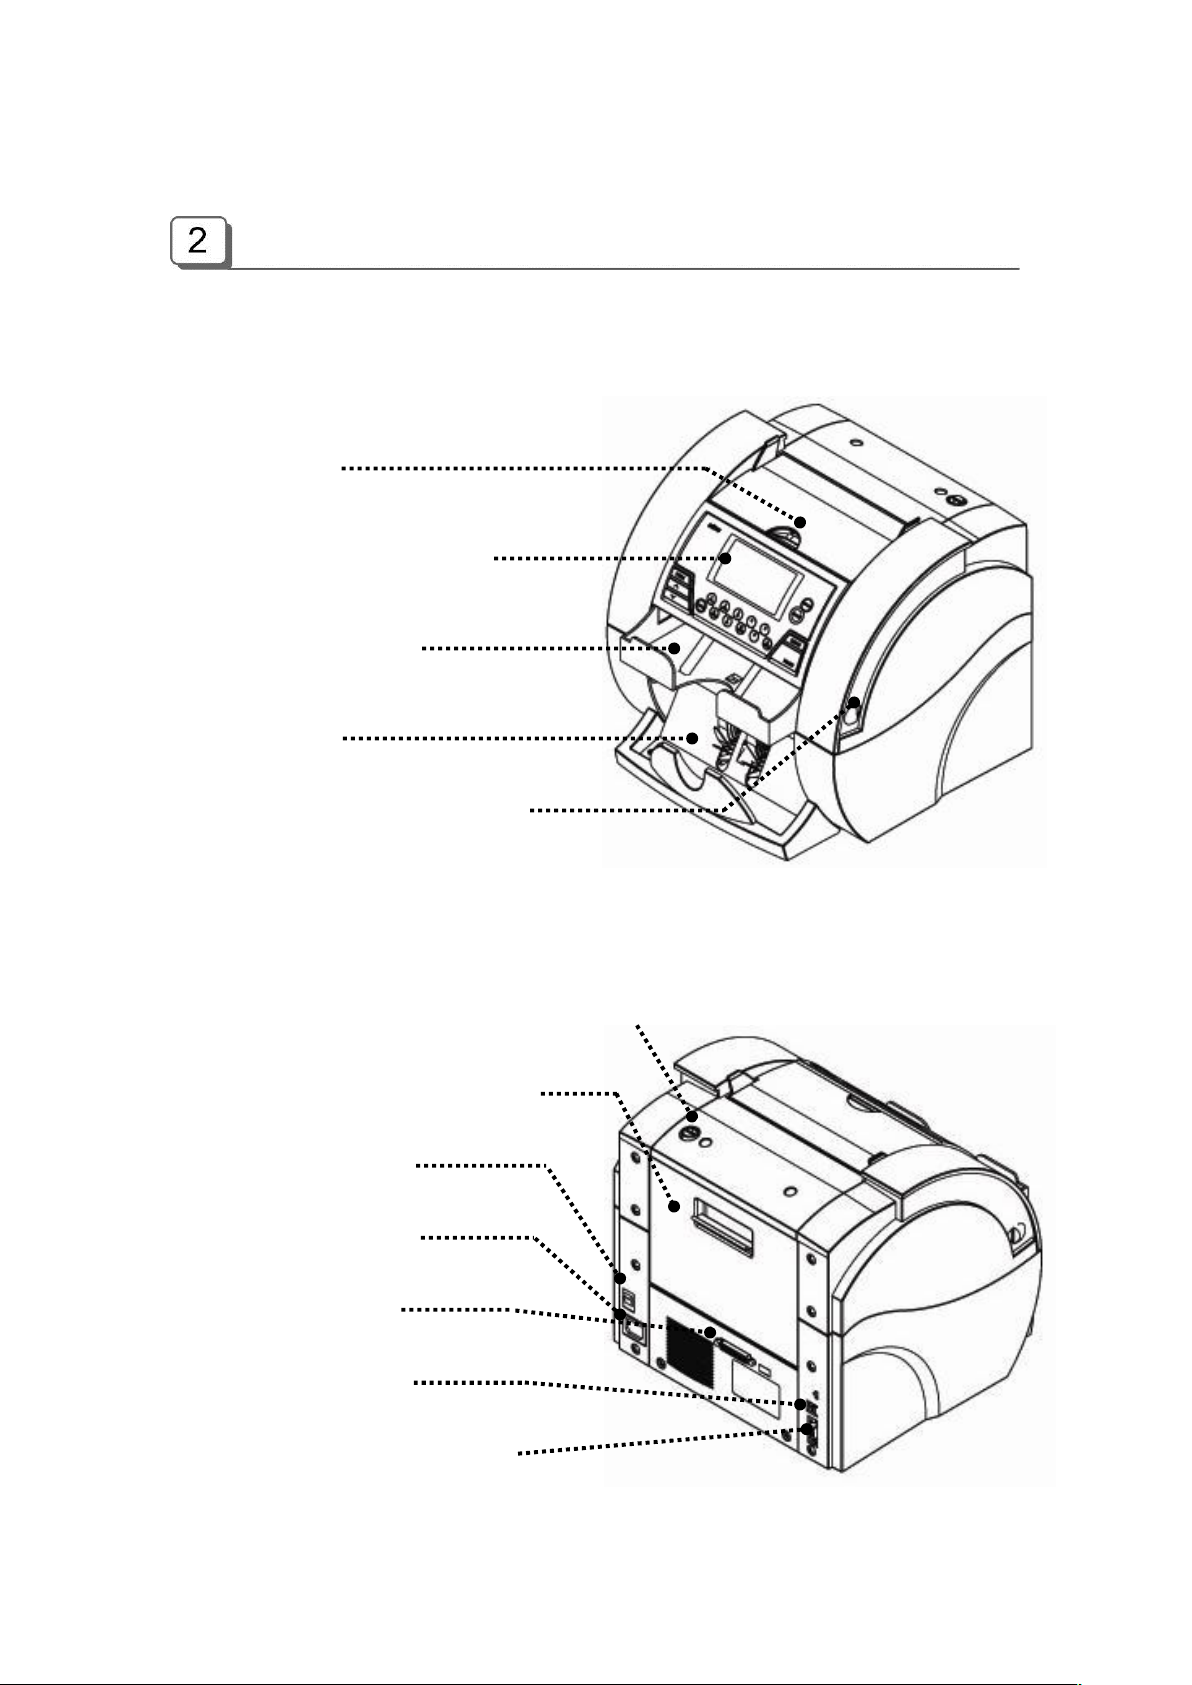
Description of the Parts
Front View
Hopper①
LCD & Control Panel②
③ Reject Pocket
Stacker④
Front Cover Open Knob⑤
Rear View
Currency Gate Adjustment Screw⑥
Rear Cover Open Handle⑦
Power Switch⑧
AC Connector⑨
Parallel Port⑩
I/F Connector⑪
Printer / PC Connector⑫
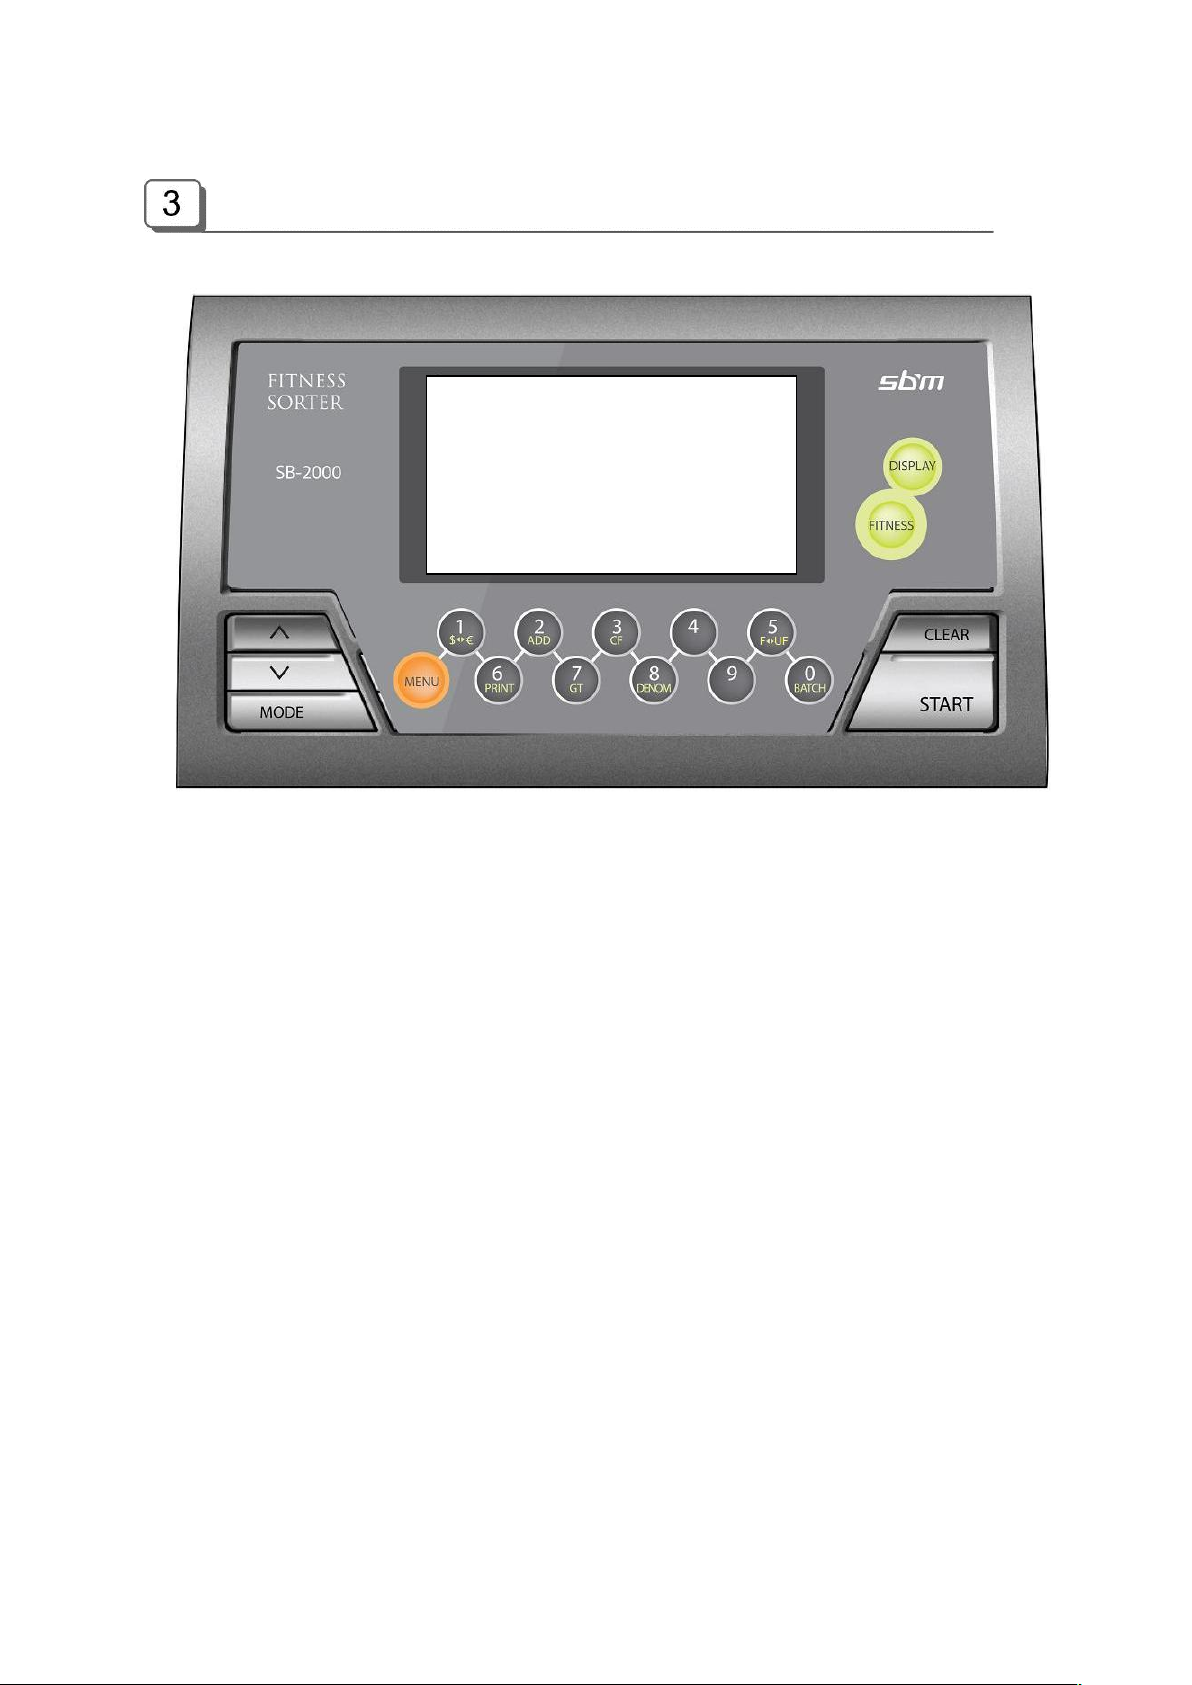
Overview of Control Panel
AUTO CF EUR
R : 22 S: 55
T: 55
S $ 3,170
DISPLAY For changing Display Mode
Large View Reject Reason Detail View
FITNESS FITNESS Mode
CLEAR Clear Errors (For clearing jammed notes) / Escaping from MODE Menu / Returning to
Initial Display
START Counting Start (in manual start Mode) / Entering a selected parameter / User Stop key
∧ Up
T $ 3,170
FIT 1 ◐ ▶
∨ Down
MODE MIXED SINGLE FACE ORIENT COUNT (MIXED)
MENU Change Values of various Parameters
$ € Selecting Currency
ADD Add function On/Off
CF Counterfeit (CF) Detection On/Off
FITUF Toggling ‘Stacker Fit’ or ‘Stacker Unfit’
PRINT Printing
GT For displaying Grand Total
DENOM. For selecting a denomination under Single Mode
BATCH Batch function On/Off
7
8
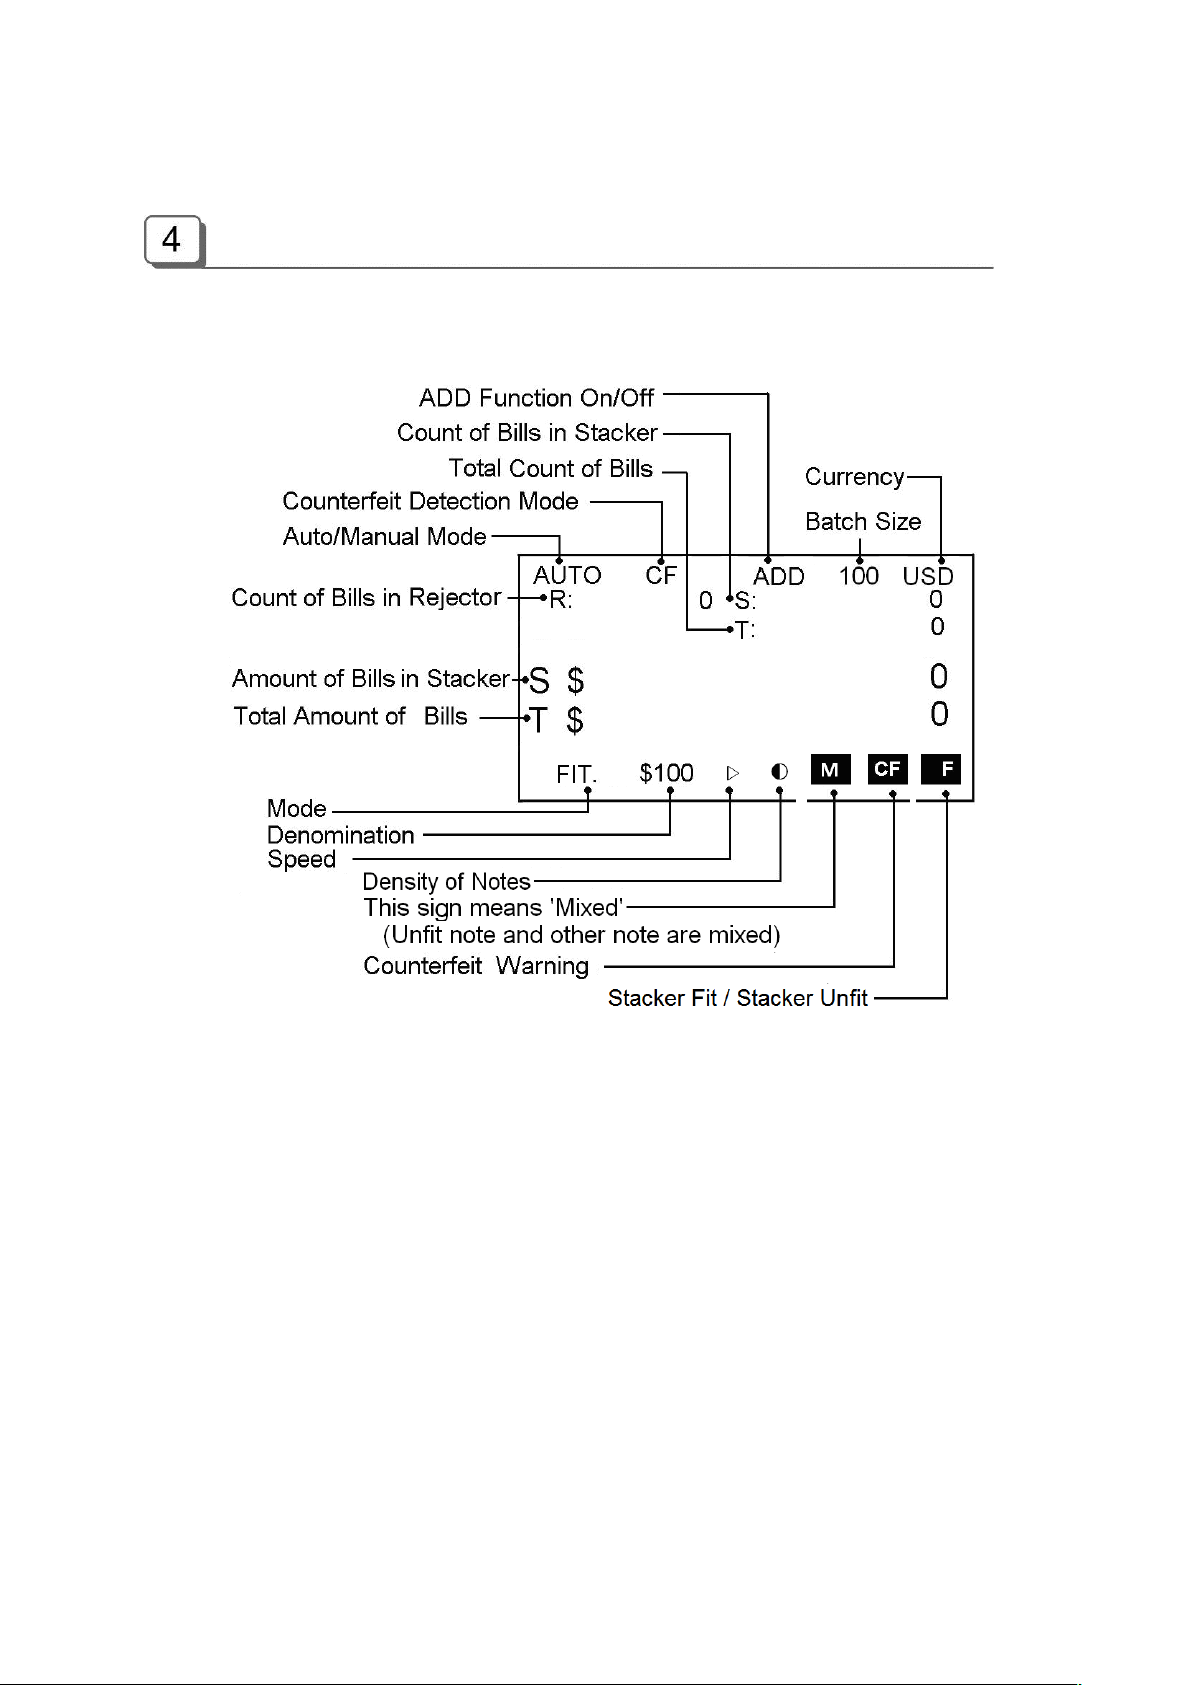
Overview of Display (LCD)
Getting Started … (Simple Counting)
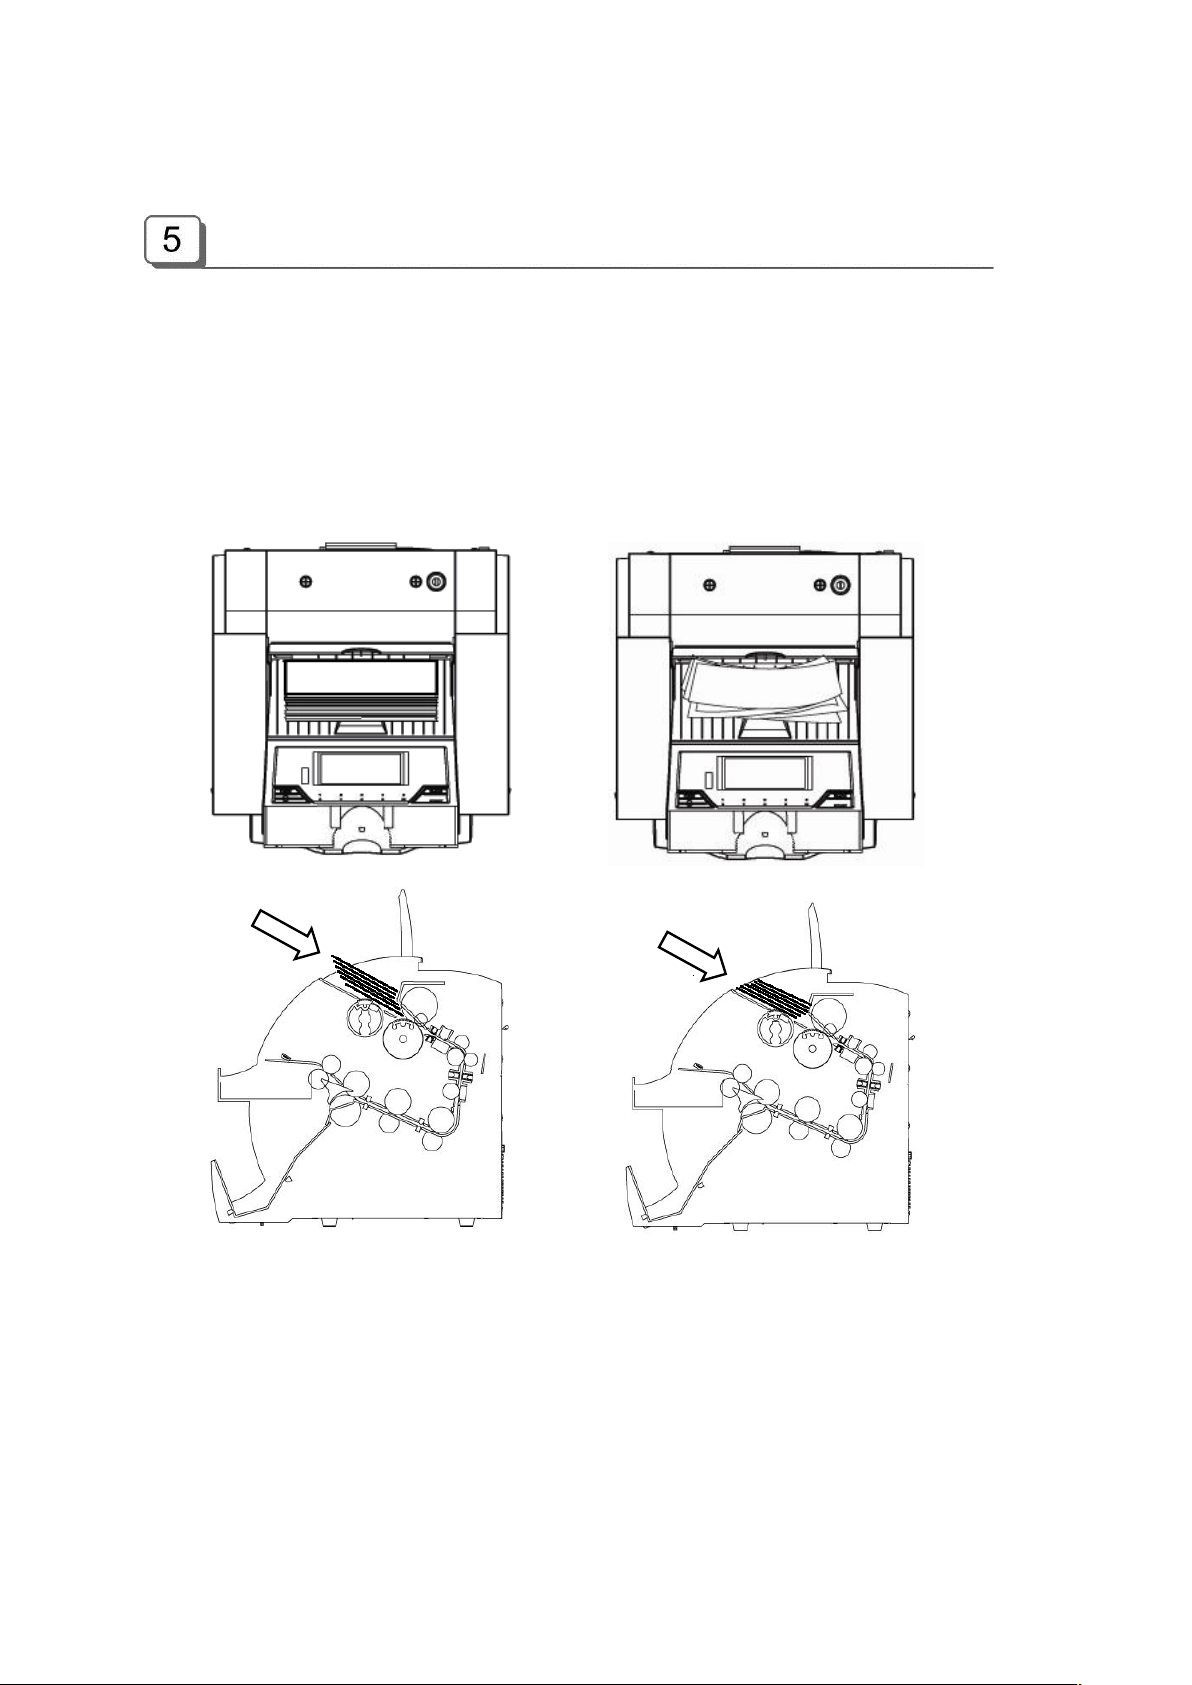
Placing Bills into the Hopper
It is very important to place the bills on the hopper correctly because recognition performance of the
bills is highly affected by the arrangement of the bills. And the number of the rejected bills can be
increased when they are not arranged and placed properly. Refer to the pictures for the correct
placement of the bills.
Good Bad
Good Bad
Please avoid counting bills like wet, excessively dirty, spoiled, severely folded, curled notes and with
foreign material like clips, bands, etc. Sometimes it causes malfunction of the machine.
Counting
In AUTO mode, the machine starts to count the bill automatically as it detects the existence of the bill in
9

10
the hopper. In MANUAL mode, the machine will start to count the bill only if the bills are placed into the
hopper and START key is pressed. While counting, the machine will display the number of the bills on
LCD display and it stops working when it meets the conditions described as below;
- No bills in the hopper
- Stacker is full.
- Rejecter is full.
- The number of the bills counted is the same as the batch number to be set in BATCH
mode.
- Errors have occurred.
If an error is occurred during operation and the machine stops, then an error message will be displayed.
To clear the error, press CLEAR key. The machine will try to solve the problem automatically, but if it
fails to clear a jam or there are some other mechanical errors, open the front or rear cover and get rid of
jammed bills and close the cover correctly. Then press the CLEAR key again to clear error message.
Press START button to stop operation while the machine is counting.
To restart, press CLEAR button.
Stop in operation
Basic Operation
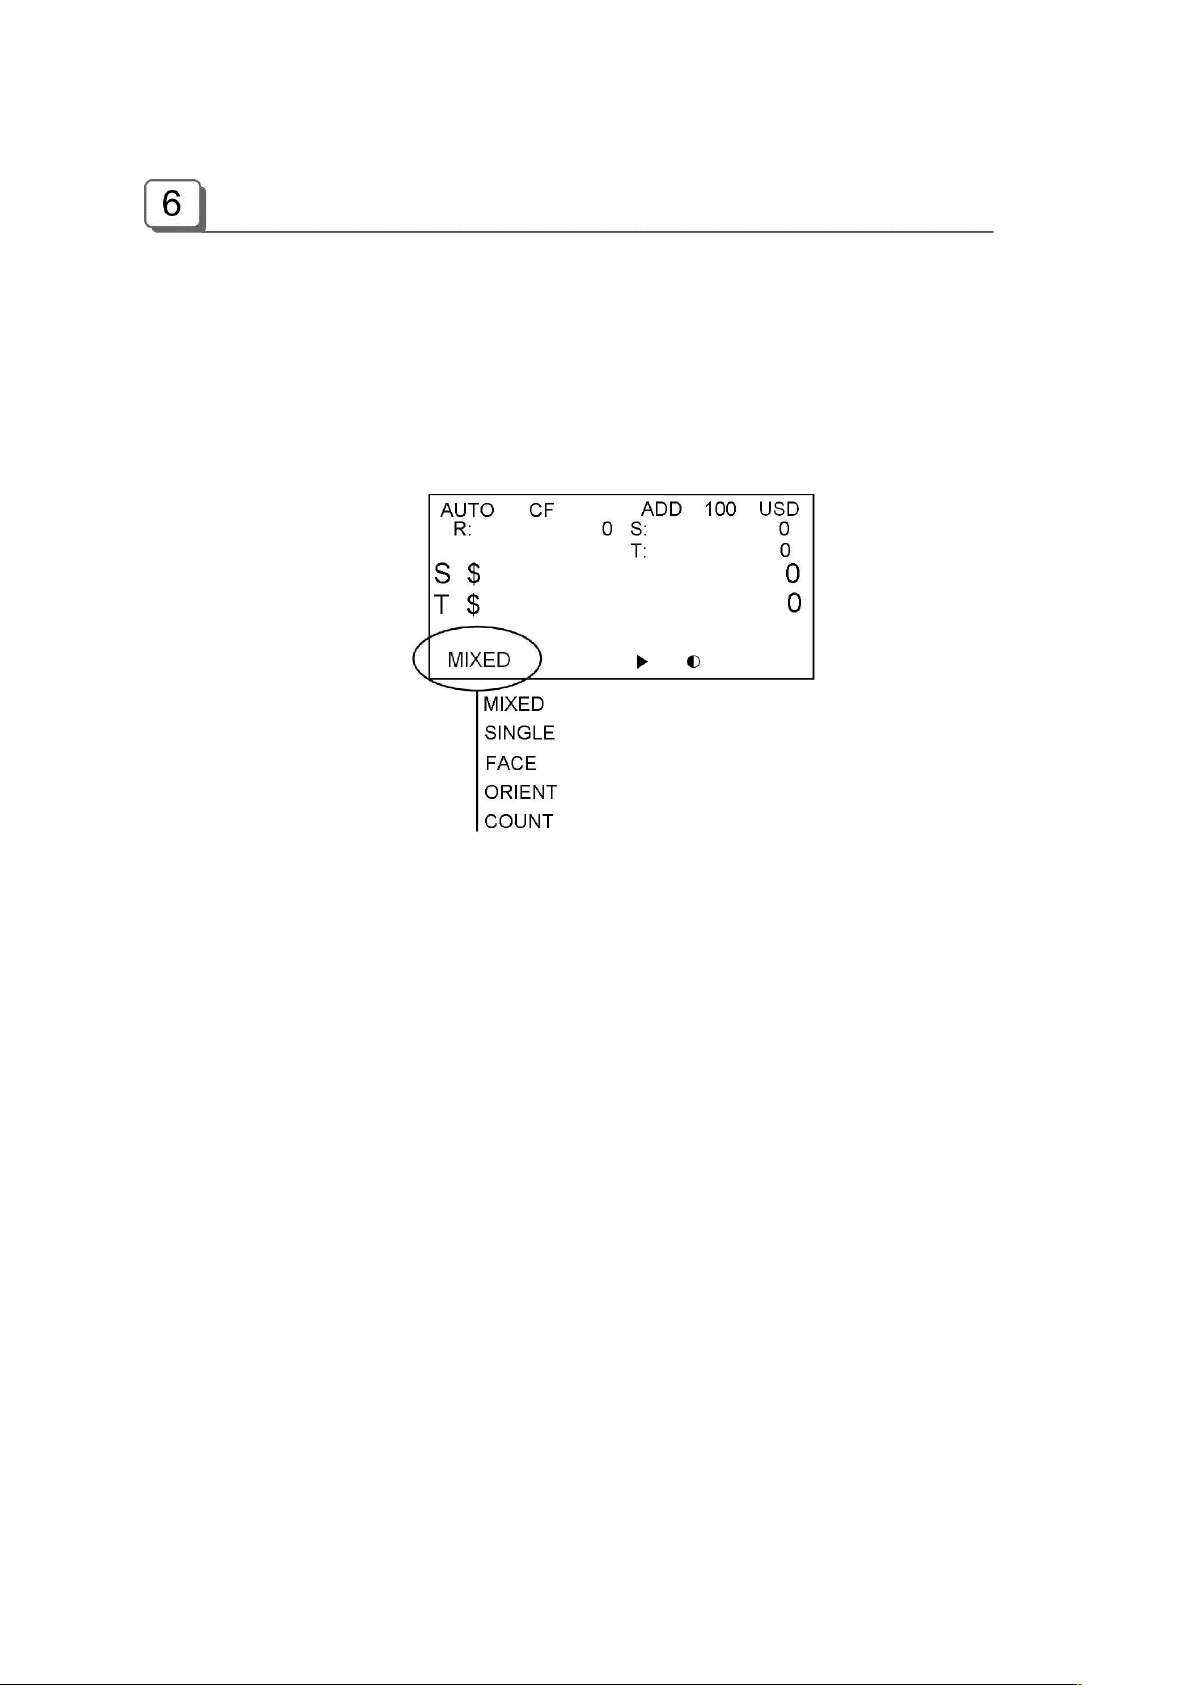
Selecting Count Mode
There are six counting modes; MIXED, SINGLE, FACE, ORIENT, COUNT and FITNESS modes.
The modes are changed in sequence as shown below by pressing the MODE key in a row;
MIXED -> SINGL (SINGLE) -> FACE -> ORENT (ORIENT) -> COUNT
Only FIT. (FITNESS) mode is selected by pressing FITNESS key.
■ MIXED Mode
‘MIXED’ means that more than 1 denomination is mixed in a bundle of bank notes not means mixed
currency.
Under this Mode, the machine counts and discriminates the denominations of the bank notes. If the
denomination of a bank note is successfully discriminated, then the note will be sent to the stacker
pocket. If a note fails to be detected or it is a suspected note (if CF is ON), the note will be sent to the
reject pocket.
To change into the MIXED mode, press MODE key until ‘MIXED’ is displayed on LCD.
■ SINGL (SINGLE) Mode
‘Single’ means what you want to count only one denomination of a bank note bundle.
Under this mode, the machine sorts out notes whose denomination is same to a selected
denomination. The other notes whose denomination is not matched will be sent to the reject pocket.
To select a denomination, press DENOM key. The denomination will be displayed in LCD.
For example in case of US dollar, every time DENOM key is pressed, the denomination will be
changed sequentially:
11
 Loading...