

Page 1
Page 2

NOTE :
This equipment has been tested and found to comply with the limits for a Class B digital
device, pursuant to part 15 of the FCC Rules. These limits are designed to provide
reasonable protection against harmful interference in a residential installation. This
equipment generates, uses and can radiate radio frequency energy and, if not installed
and used in accordance with the instructions, may cause harmful interference to radio
communications. However, there is no guarantee that interference will not occur in a
particular installation. If this equipment does cause harmful interference to radio or
television reception, which can be determined by turning the equipment off and on, the
user is encouragedto try to correct the interference by one or more of the following
measures :
- Reorient or relocate the receiving antenna.
- Increase the separation between the equipment and receiver.
- Connect the equipment into an outlet on a circuit different from that to which the
receiver is connected.
- Consult the dealer or an experienced radio / TV technician for help.
Modifications not expressly approved by the manufacturer could void the user's
authority to operated the equipment under FCC rules.
Page 3

1
Contents
Contents
11. Introduction 2
1.1. Overview
1.2. Main Features
12. Safety/Precautions 3
2.1. Safety
2.2. Precautions
13. Check Point before Use 5
3.1. Accessories
14. Controls/Functions 6
4.1. Front Panel
4.2. Rear Panel
4.3. Remote Control
15. How to Connect 10
16. Operation 13
6.1. Getting Started
6.2. Channel Editing
6.3. System Parameters
6.4. Transponder
6.5. Factory Set
6.6. On Air Download
6.7. Other Function on Remote Control
6.8. Picture in Picture
6.9. Zoom Function
17. Hard Disk Operation 44
7.1. Recording
7.2. Playing
7.3. Delete Programs
7.4. Descrambling Service
7.5. Lock Programs
7.6. Skip Play
7.7. Bookmark
7.8. Repeat
7.9. Split Operation
1
7.10. Trick Play Controls without OSD
19. Trouble Shooting 53
10. Specifications 54
Page 4

Introduction
1.1
Overview
1.2
Main Features
This Dual tuner PVR(Personal Video Recorder) with Common Interface is your “Window to the World”
giving you the opportunity to enjoy scrambled programs. Enjoy the rich choice of more than 4,000
different channels, broadcasting a large range of culture, sports, cinema, news, events, etc. This
receiver is a technical masterpiece, assembled with the highest qualified electronic parts.
Fully compliant with MPEG-2 and DVB standards
Dual Tuners for watch and record
User friendly operating Menu and On-Screen Graphic Menu
Easy to use EPG(Electronic Program Guide) on screen
Age protection lock function
Tele-text supported by VBI insertion and OSD
Manual PID control
Hard Disk extensible upto 160GB
Picture in Picture(Dual Decoding)
S/PDIF for digital audio and Dolby AC-3 bitstream output
Dual Recording and Playback simultaneously
Recording and Time Shifting simultaneously
Playback of the selected region repeatedly
Powerful trick mode supported
Zoom function
2
Page 5
Safety/Precaution
Safety/Precaution
Be sure to read the user's manual before
starting the operation of the unit.
Do not touch the power cord with wet hands
as it may cause electric shock.
Never open the cover. It is very dangerous to
touch the inside of the unit due to possible
electric shock.
Place the unit in a well ventilated and noheat environment.
When you do not use this unit for a long time,
make sure that power cord is pulled out from
the outlet. Also do not use a damaged
power cord as it may cause fire or electric
shock.
A professional installation is required.
If reception is interrupted, contact your local
service centre.
2.1
Safety
3
Page 6
4
Safety/Precaution
Safety Precautions
When installing the unit
Install the unit horizontally. An uneven
installation may cause the unit to be
damaged.
Do not put heavy items such as a TV on the
unit. That may cause the unit to be
damaged.
Do not leave the unit where the water drops
or splashs.
Do not put water holding items such as vase
on the unit.
Do not install the unit:
Where it is subject to vibrations
Where it is exposed to direct sunlight
Where there is humidity
Where the temperature is too high or too low.
Where there is no ventilation
Moving the unit to a hot area from a cold
one will cause condensation.
Do not operate the unit for one or two hours
or until it has dried completely.
2.2
Precautions
Page 7
5
Check Point before Use
Check Point before Use
User's manual : 1
U
s
er's m
an
u
al
Batteries (AAA type) : 2
QZ-
ABC
DEF
GHI JKL MNO
PRS
TUV
WXY
INFO
AUDIO
GUIDE
CH.LIST
AUX IN
RECALL
TV/RADIO
TV/SAT
MENU
EXIT
CH
VOLVOL
CH
SLEEP
LIST
3.1
Accessories
Accessories of the Unit
Remote control : 1
If any accessories listed above are
missing, contact the sales
representative where you purchased
this unit.
Page 8
6
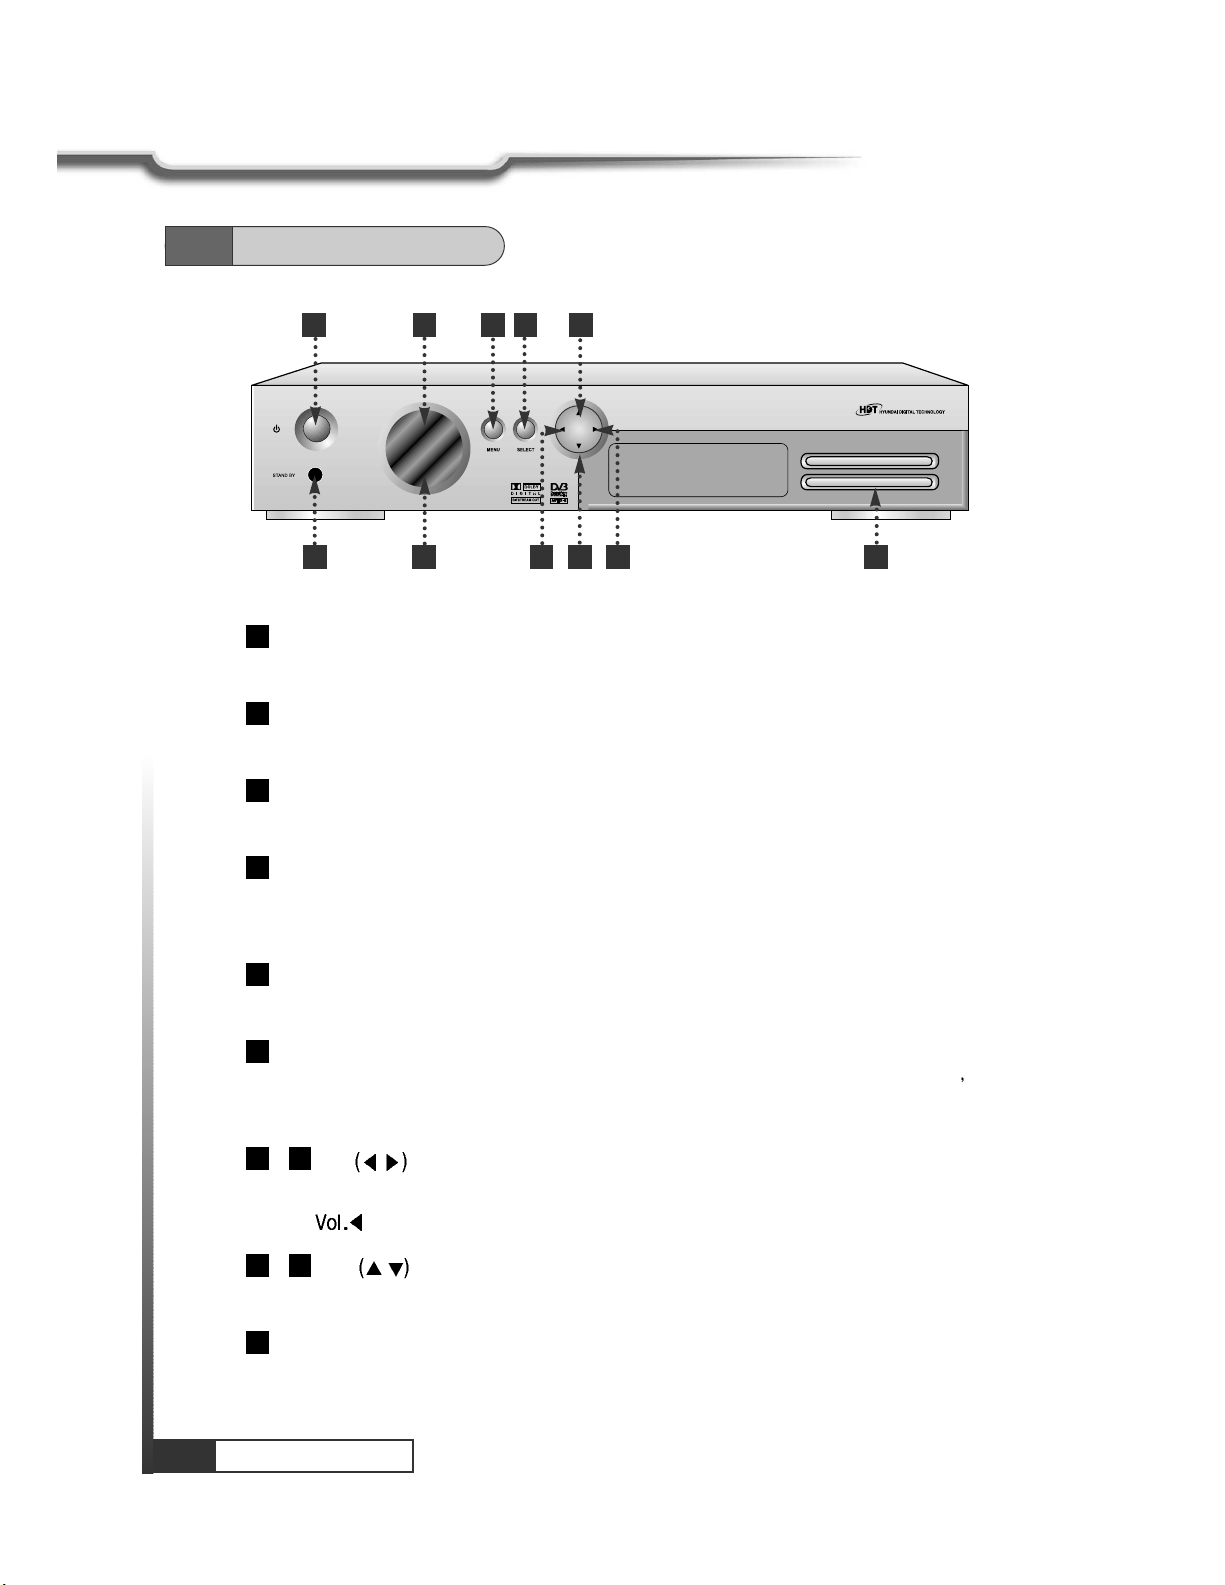
Controls/Functions
Controls/Functions
Power
To switch the receiver in “standby” mode or in power on mode.
Standby/Power on Indication light
Flashing red in “standby” and no light in power on mode.
Remote Sensor
Receives the infrared signal from remote control.
Channel Display(4 Digit)
- When you connect the power line of the receiver, the current time is displayed.
- After programming, the program number or name is displayed.
Menu
To launch or terminate the menu application.
Select
To activate a highlighted item or go to next level on hypertext menu or confirm the user
s
action.
- Vol. /
To adjust the volume level or change the value of an item with preprogrammed values. The
Key
can be used as a backspace to cancel the numerical input.
- CH.
/
11
10
9
87
6
5
4
3
2
1
1 3 5 6
2 4
11
7
10
8
9
4.1
Front Panel
To change channel or cursor position on the application screen.
Smart Card
Page 9
7
Controls/Functions
Controls/Functions
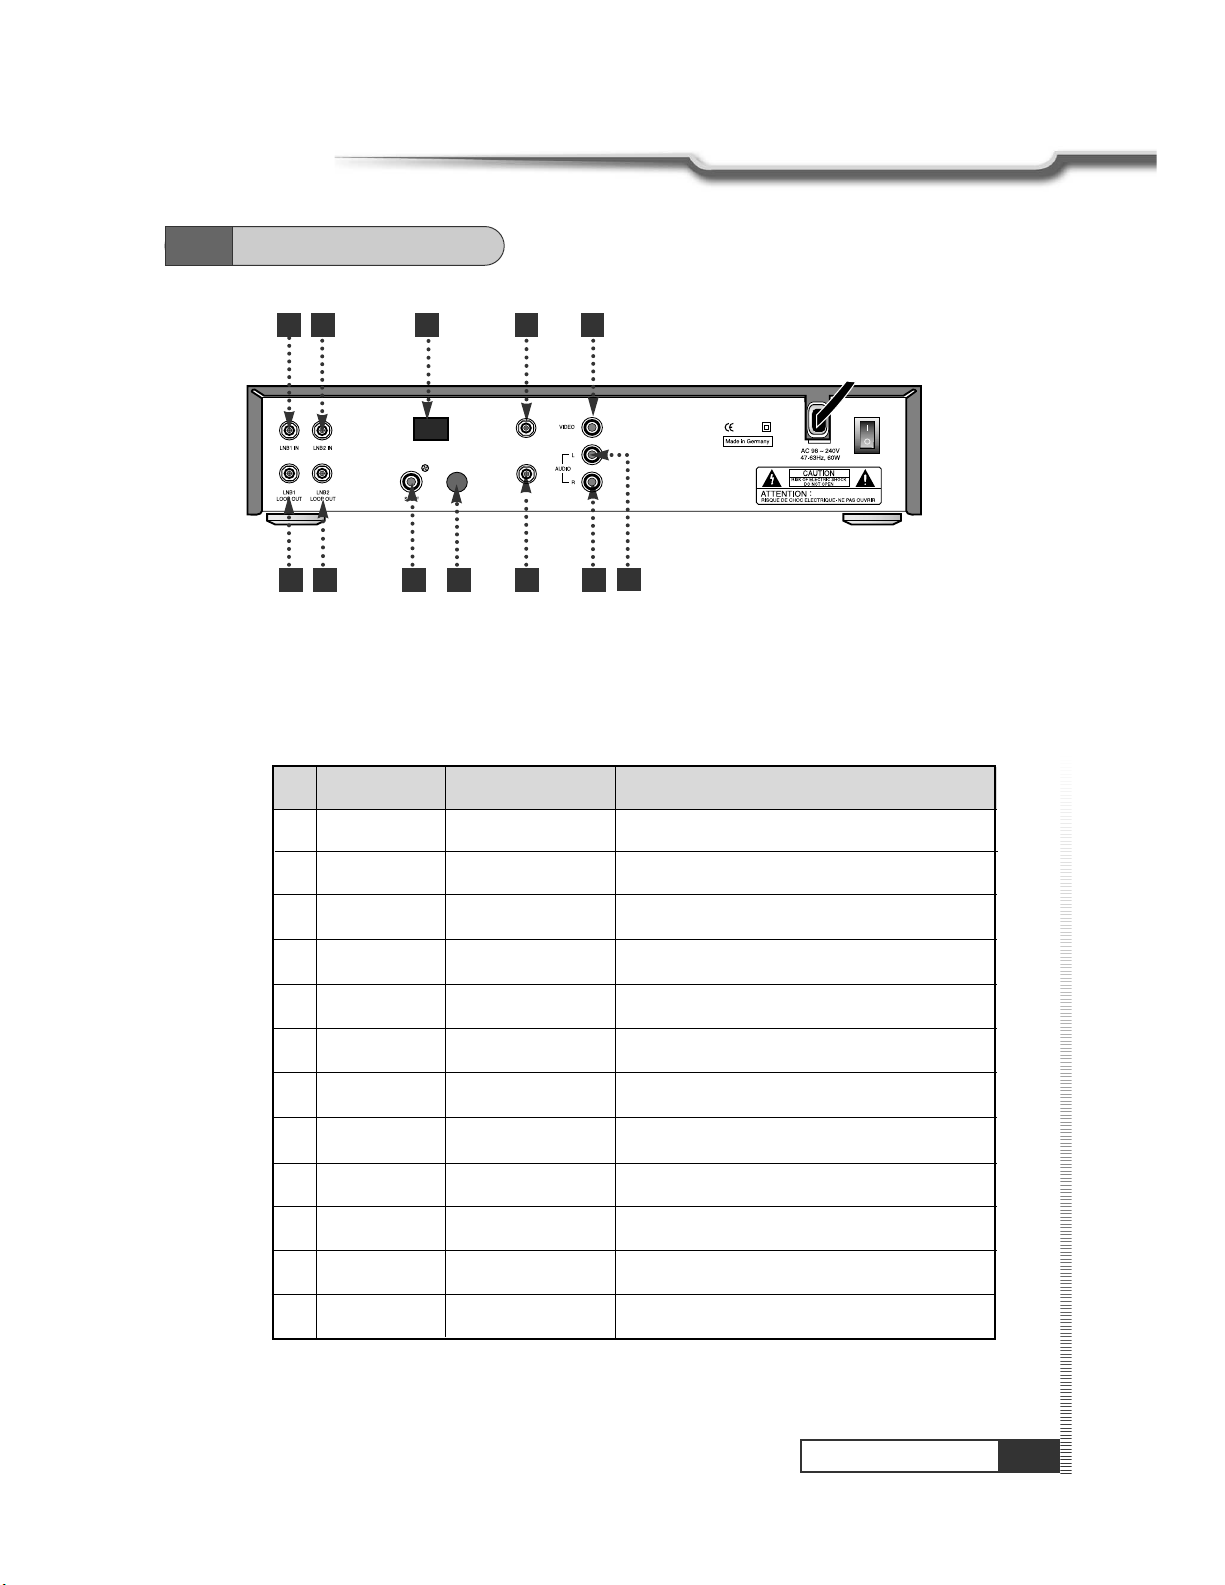
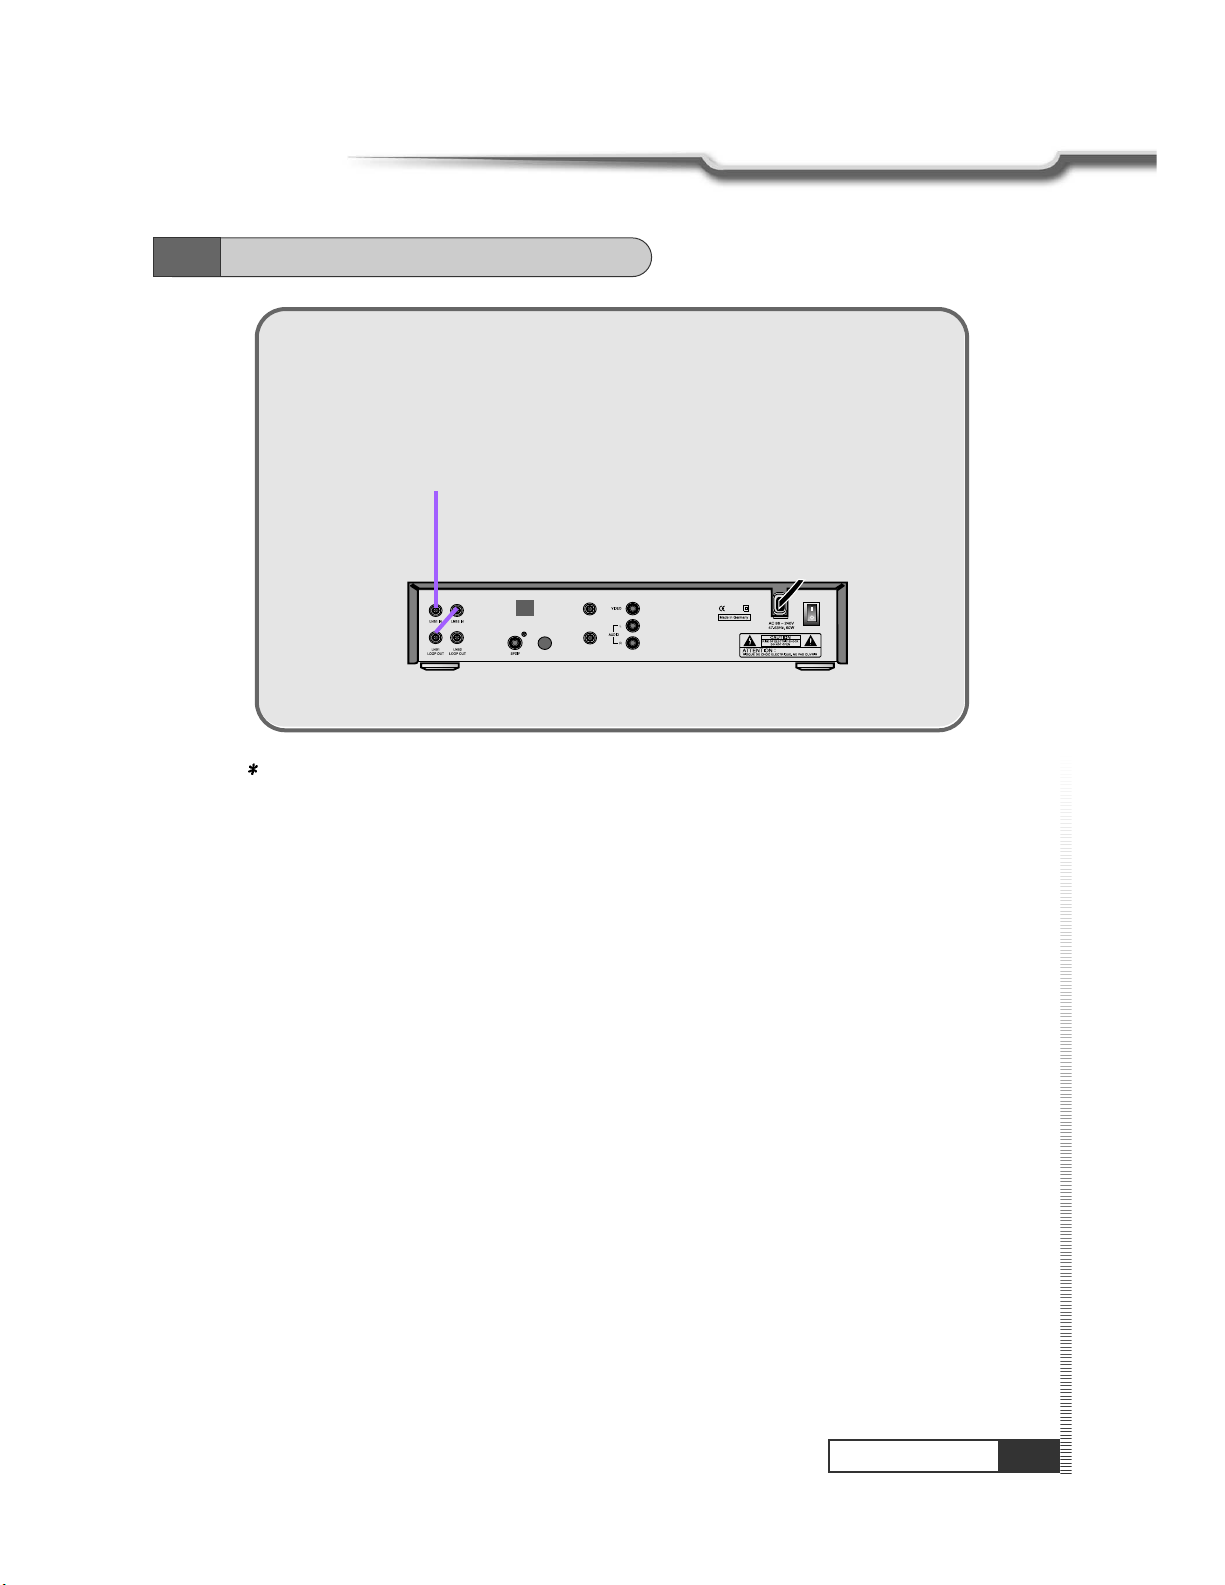
4.2
Rear Panel
No. Name Connector Function
1 LNB1 INPUT IEC 169-23 Female IF input from LNB to Digital Tuner 1
2 LOOP1 OUT IEC 169-23 Female IF Loop-through output from Digital Tuner 1
3 LNB2 INPUT IEC 169-23 Female IF input from LNB to Digital Tuner 2
4 LOOP2 OUT IEC 169-23 Female IF Loop-through output from Digital Tuner 2
5 Digital Audio RCA Cinch Digital Audio Output (S/PDIF)
6 S-VHS S-VHS Super Video Output
7 RF IN IEC 169-23 Female Input from Terrestrial Antennal
8 RF OUT IEC 169-23 Female Output to TV
9 VIDEO RCA Cinch Composite Video Output
10 AUDIO L RCA Cinch Left Audio Output
11 AUDIO R RCA Cinch Right Audio Output
1
9
2 4
5
6
7
10
12
MODEM
RJ11
Line In (Telephome)
10
3
12
8
11
Page 10

8
Controls/Functions
Controls/Functions
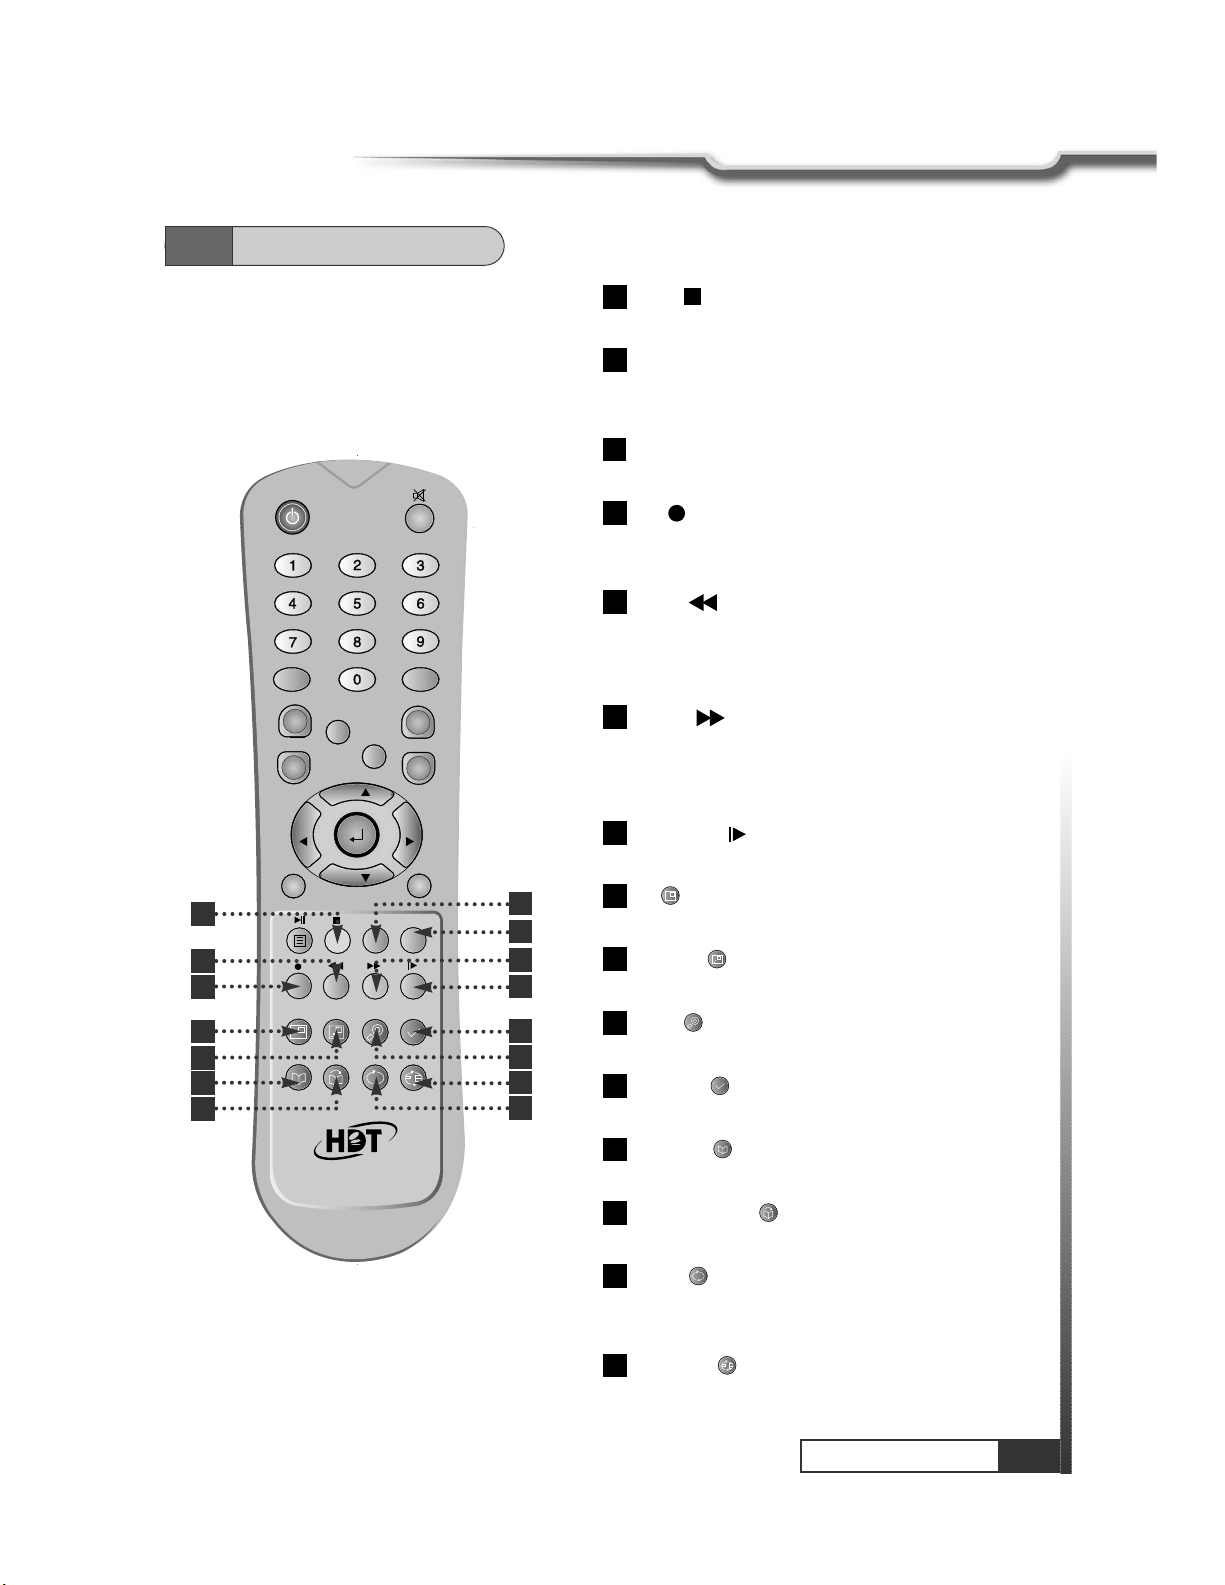
POWER :To switch into ‘standby’ or ‘power on’ mode.
MUTE: To turn the sound on/off.
Numeric Keys(0-9): To input numeric value, channel
number or characters.
INFO.:To display the information of the current
channel.
AUDIO:To change the audio track, stereo-mono
mode.
GUIDE
:
(EPG : Electronic Program Guide)
To watch program information. Press once more to
return to normal mode.
CH LIST:To watch the channel list. Press to
confirm or press EXIT to return to previous
chosen channel.
MENU: To enter/exit the main menu.
EXIT :To return to previous status or menu.
AUX IN : To select in/out mode of scart connector. SAT,
AUX, AUX2 and TV mode are toggled in turn.
RECALL :To return to the previous chosen channel.
- Left & Right : To change the value of a
selected item with preprogrammed value in menu.
can be used as a backspace to cancel the
numerical input.
(
ENTER
)
:
To select an item or to confirm a menu.
- Up & Down : To move the cursor up
and down in menu.
TV/RADIO :To switch between the TV and radio
channels.
TV/SAT :To toggle the TV output source between the
satellite input and UHF/VHF antenna input.(Option)
BLUE : To delete a channel from the Channel List
menu. To show extended program information in the
EPG menu. To see Teletext Service Data. To play or
pause the stored programs on HD.
19
18
17
CH
CH
1615
14
VOL
VOL
VOL
1312
11
10
9
8
7
6
5
4
3
2
1
QZ-
ABC
DEF
GHI JKL MNO
PRS
TUV
WXY
INFO
AUDIO
GUIDE
CH.LIST
AUX IN
RECALL
TV/RADIO
TV/SAT
MENU
EXIT
CH
VOLVOL
CH
SLEEP
LIST
1
3
4
6
8
10
12
16
17
2
5
7
9
11
13
18
14
4.3
Remote Control
15
19
Page 11
9
Controls/Functions
Controls/Functions
4.3
Remote Control
IVORY: To add a new channel to the Channel List
menu. To stop the played programs on HD.
ORANGE(LIST
)
:
To see variant channel lists for user's
convenience in the Channel List menu. To watch the list of
stored programs on HD.
SLEEP : To switch off the receiver automatically after 30
upto 150 minutes.
RED:To setup favorite channel lists in the Channel
List menu. To record the program on to HD. To delete
the stored programs on HD or set skip points.
GREEN : To lock channel in the Channel List
menu. To show current/next program information in the
EPG menu. To play the stored programs on HD with fast
reverse mode.
YELLOW : To move a channel to other position in
the Channel List menu. To show program schedule
information in the EPG menu. To play the stored
programs on HD with fast forward mode.
Slow Motion:To play the stored program on HD with
slow motion mode.
PIP:To Set PIP Window. Live, HDD and Diasble the
Sub-picture.
PIP SWAP : To Switch between Main-Picture and
Sub-Picture.
ZOOM : To set zoom function. Control zoom
function beginning and magnification.
Time-Shift : To start the time-shift function for the
current channel.
Bookmark : To set the bookmark position while
playback.
Go to Bookmark : To jump to the bookmark
position while playing.
REPEAT : To repeat playback of the stored program
on HD. Repeat 1, Repeat All and Normal are toggled
in turn.
PEPEAT A-B : To repeat playback of the selected
section of the stored program on HD.
34
33
32
31
30
29
28
27
26
25
24
23
22
21
20
QZ-
ABC
DEF
GHI JKL MNO
PRS
TUV
WXY
INFO
AUDIO
GUIDE
CH.LIST
AUX IN
RECALL
TV/RADIO
TV/SAT
MENU
EXIT
CH
VOLVOL
CH
SLEEP
LIST
20
21
22
23
24
25
26
27
28
29
30
31
32
33
34
Page 12
10
How to Connect
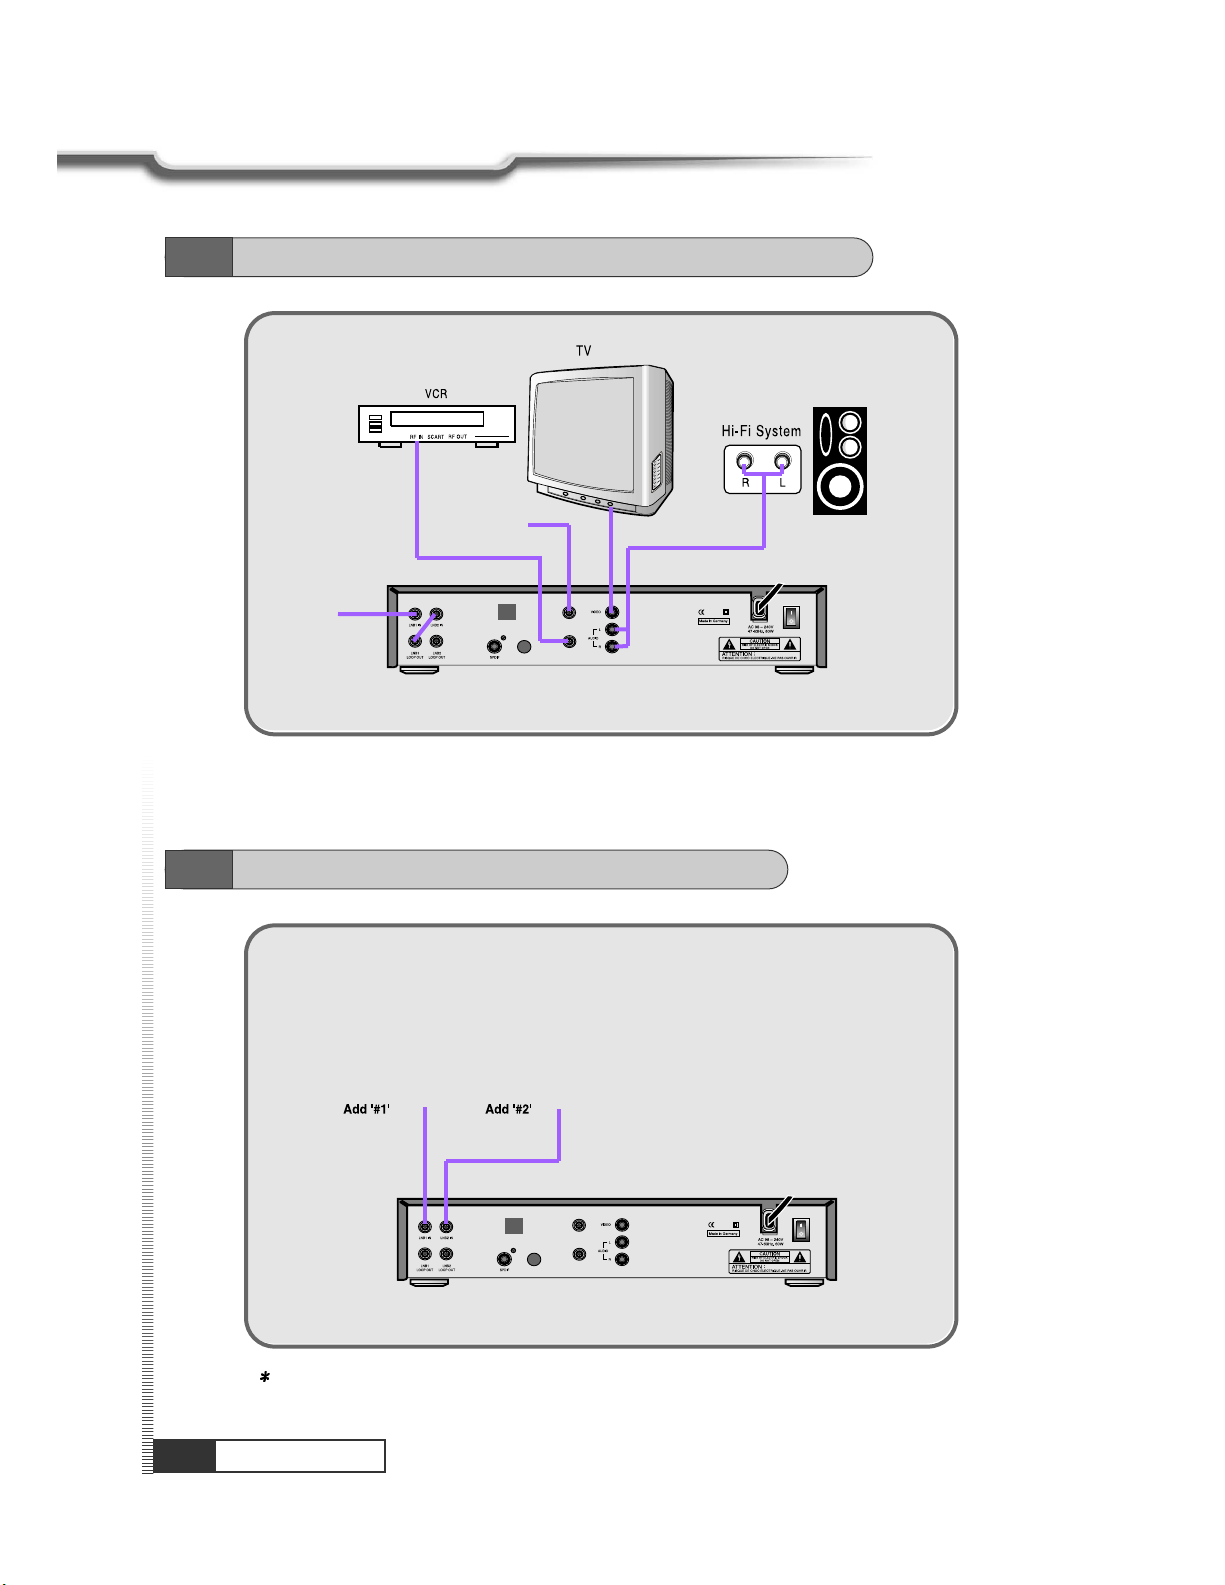
How to Connect
5.1
Connecting IRD to Hi-Fi system and TV, VCR
TV ANT
Cable
5.2
Connecting Tuner to two separated Cable
Cable
Note : At tuner select in LNB Configuration menu, #1 or #2 mode should be selected
Cable
Page 13
11
How to Connect
How to Connect
5.3
Connecting Tuner to one Cable
Cable
Note : Tuner select in LNB Configuration menu, Loop mode should be selected.
Page 14

MEMO
12
MEMO
Page 15
13
Operation
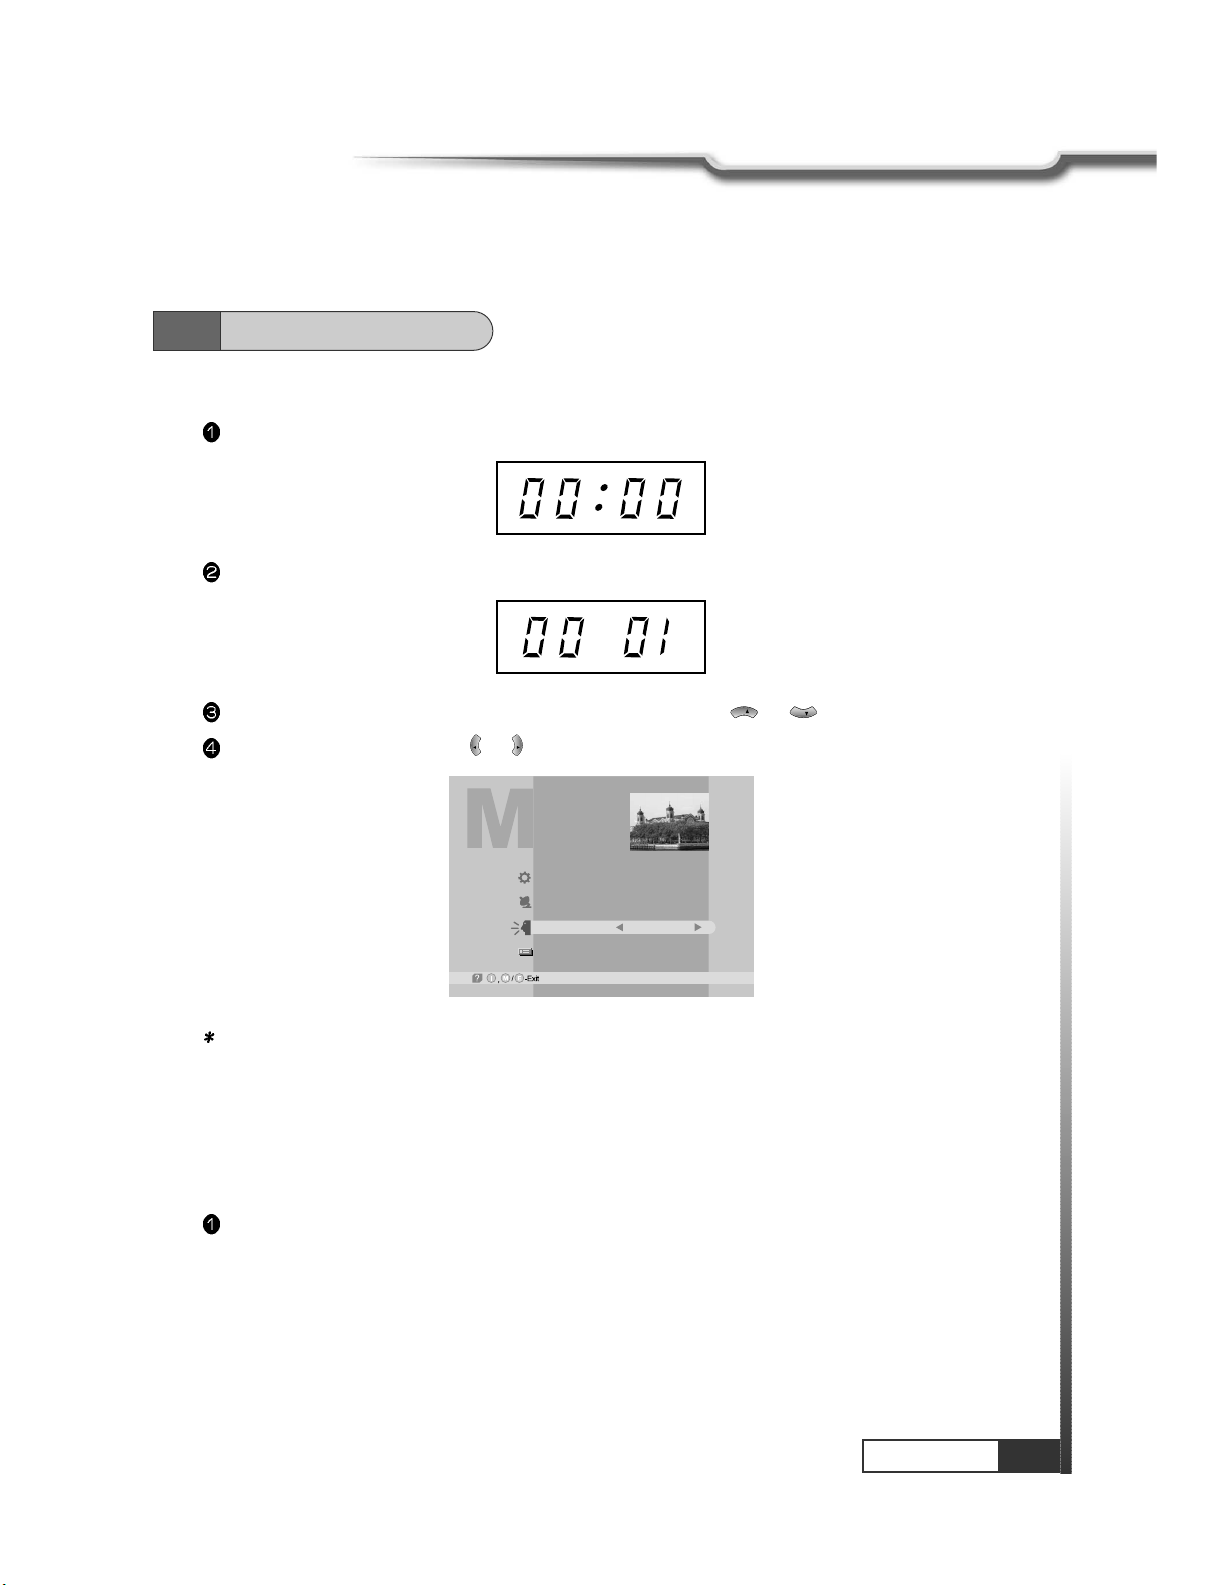
1. Menu Language Setting
When you plug in AC power, the following will be displayed on the front.
Press POWER on remocon, the LED number will be displayed as follows;
Press MENU key and position cursor on ‘Language' column with or .
Select language you want with or .
VOL
VOL
CH
CH
Note : Languages displayed in 'Language' column are supported by your receiver.
After your receiver is powered up, proceed with installation as follows:
Main Menu
System Parameters
Installation
Language
Common Interface
English
6.1
Getting Started
2. Help
If you want to know how to use current part in the menu, use ‘help' function.
Select a content in the menu.
For example, if you want to know about the installation menu, select installation.
Operation
Page 16
14
Operation
Operation
Press MENU key and position the cursor on Installation column with or and press .
CH
CH
By using or , select ‘LNB Configuration’ and press .
Note : Enter 4-Digit password if need arise. The default password is ‘0000’.
CH
CH
LNB Configuration
Antenna Setup
Satellite Scan
TP Edit/Scan
Factory Set
On Air Download
Installation
-Next, -Prev.
Position
High L.O.
Low L.O.
Power
0/22KHz
DiSEqC
Tuner Select
LNB Configuration
USER1
-Page Up/Down, -Edit
G L
USER7
USER8
USER9
USER10
USER11
USER12
USER13
USER14
o
000.0
5,150 GHz
0 GHz
ON
0 KHz
----
#1 & #2
Select the Satellite you want to add with or and press or .
VOL
VOL
CH
CH
6.1
Getting Started
Press INFO. Then you can see the help window of the selected content.
3. Cable Setting
Since your receiver has the basic data of most satellites and channels, you can receive programs just by
plugging in. But, according to the status of your antenna setup, you may have to modify the basic data
of satellites and / or channels.
When you need to modify the data, proceed as follows ;
Page 17
15
Operation
Operation
6.1
Getting Started
Select item you want to edit with or and change each parameter.
- Position : You can input the longitude of the satellite with numeric keys.
- High L.O. / Low L.O. : Enter LNB oscillator frequency with numeric keys.
- Power : Set LNB power ON or OFF with or .
- 0/22KHz : Set the path of 0/22KHz switch box with or .
- DiseqC : Set the path of DiSEqC box with or .
- Tuner Select : Set the tuner #1, #2, #1 & #2 and Loop with or .
If you do not use the switch box, set as “---”.
Note : When you change each parameter, you need to know exact parameter of LNB to modify
L.O.(local oscillator) frequency.
Note : When you change each parameter, you need to understand environment of connecting the
receiver and antenna in order for you to set 22KHz and DiSEqC properly.
Note : For more information, refer to Chapter.6 How to Connect
When necessary, you can change a satellite name as you wish.
You can enter alphabetic characters with the numeric keys.
For example, if you want to enter ‘SAT-1',
Press .
Note : Press for space.
After the installation procedure, press EXIT key or MENU key to store your entered data.
VOL
VOL
VOL
VOL
VOL
VOL
VOL
VOL
VOL
VOL
VOL
VOL
CH
CH
If you press , the selected Satellite will be added and the cursor will move to right window for
detailed installation.
Note : If you just want to edit the data of the satellite which is already contained in the receiver, press
after you select the satellite.
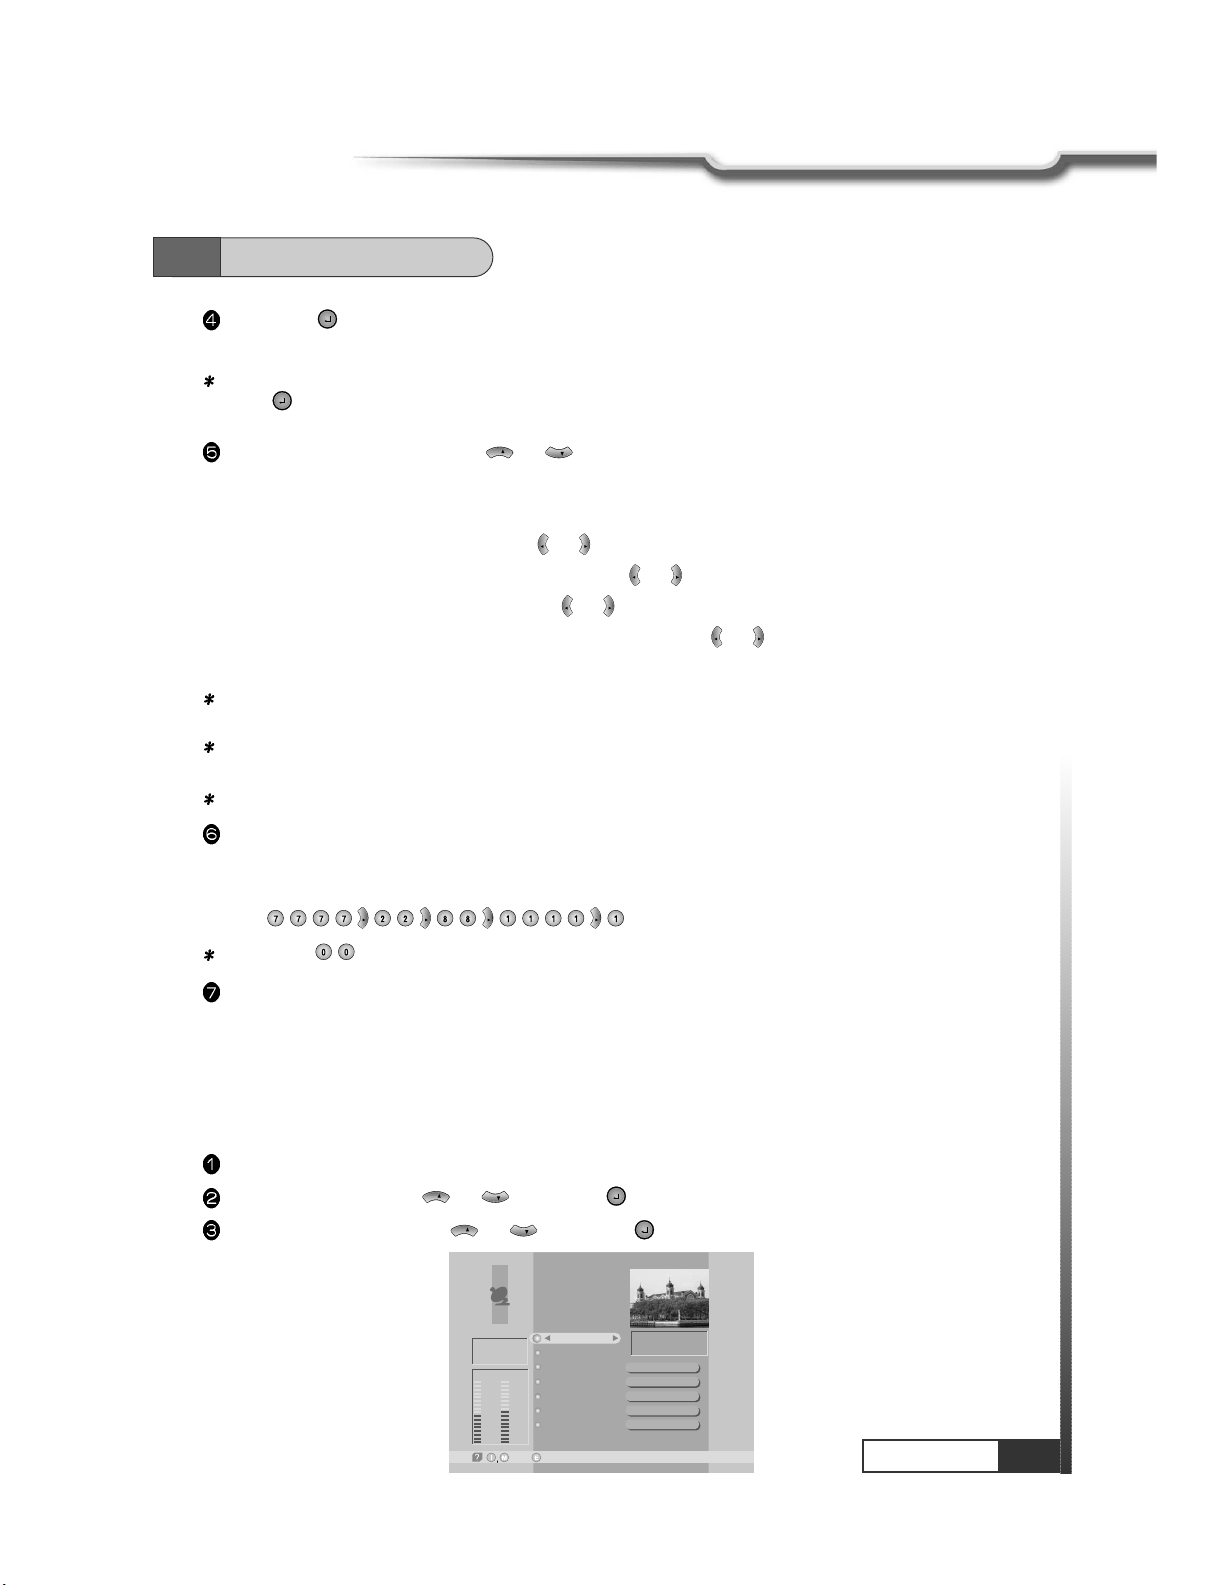
4. Antenna Setup
You need to position your antenna correctly for reception of the best signal.
Press MENU key.
Select ‘Installation’ with or , and press .
Select ‘Antenna Setup’ with or and press .
CH
CH
CH
CH
Antenna Setup
-Prev.-Main,
Motor / Goto 0
Move / Save
Set Limit
My longitudo
My latitudo
Off
Stop
Disable
000.0
00.0
O
O
O
ASIA3
[7] 3,710 GHz
Vertical - 14V
3,300 MSPS
Tuner Lock
FEC
Level
47% 51%
Qual.
3/4
Page 18
16
Operation
Operation
6.1
Getting Started
Level Indicating selected satellite signal strength level
Quality Indicating signal to noise ratio
Select the satellite you want with or .
Press to move to TP section and select the TP you want with or .
When the satellite and the TP are selected, you can check the reception status of the satellite signal.
If the reception signal status is bad, adjust antenna to get the following result.
VOL
VOL
CH
VOL
VOL
Tuner Lock FEC 1/2, 2/3, 3/4, 5/6 or 7/8
Level over 30% Quality over 10%
If you press , DiSEqc Motor will move toward Zero Equator.
- Move/Save
Motor moves to West & East direction.
- Set Limit
Determine the value of Limit of Motor.
If you select , the value of Limit will be changed.
- My longitude/My latitude
You can use this item when STAB is setted on ‘Motor/Goto 0'.
Determine your longitude & latitude at present.
‘East/West' is changed by using or .
VOL
VOL
DiSEqC 1.2 Positioner Setting
- Motor/Goto 0
Determine the kind of Motor & whether or not controlling it by using or .
VOL
VOL
On Using DiSEqC Motor.
Off Not using DiSEqC Motor.
STAB
Using the specific Motor supplied by Stab company. Determine the longitude of the
satellite on LNB Configuration Menu. If the longitude of the satellite on LNB Configuration
Menu is setted, user must input the longitude about your position at present.
Page 19

17
Operation
Operation
6.1
Getting Started
5. Satellite Scan
After finishing ‘Antenna Setup’, execute a ‘Satellite Scan’.
Then you can get all channels in the pre-programmed TPs. This function can also be used to get the
latest channel data while receiver is in use. Through this function, the receiver searches for all the
available channels and saves them in the memory.
Press MENU key.
Select ‘Installation’ with or , and press .
Select ‘Satellite Scan’ with or , and press .
Select ‘Scan Mode’ with or .
Select the scan mode you want with or .
Select the satellite name you want with or .
VOL
VOL
VOL
VOL
CH
CH
CH
CH
CH
CH
Satellite Scan
-Select, -Prev.-Main,
Free+Scrambled
AsiaSat 2
Scan Mode
Satellite Name
If you press
, the selected satellites will be scanned.
While scanning, you can see the following menu on the screen.
Satellite Scan
-Select, -Main,M-Prev.
E
Good
84%
TV: 2 Scanning:10% Radio: 0
33
34
35
36
37
38
39
17
18
19
20
21
22
SATLINK 972 2
APTN1 + 442074
NMTV
Guangdong 2
Hunan 2
Hubei 1
Hubei 2
DW 9
RDP ANTENA 1
RDP ESPECIAL
NN
¥xÆWaN¥<< TWN
¥@uØ
1/2
Auø USA
AsiaSat 2 [4] 3,720 GHz Hor. 4,420
~
~
Satellite Scan
-Watch, /M-Prev.
E
Bad
1%
-Page Up/Down,
TV: 39 Scanning:10% Radio: 22
17
18
19
20
21
22
DW 9
RDP ANTENA 1
RDP ESPECIAL
NN
¥xÆW
a
N¥<< TWN
¥@uØ
1/2
Auø USA
AsiaSat 2 [28] 3,960 GHz Hor. 30,000
~
~
33
34
35
36
37
38
39
SATLINK 972 2
APTN1 + 442074
NMTV
Guangdong 2
Hunan 2
Hubei 1
Hubei 2
Satellite scan is done.
Press Key.
Q
Page 20

18
Operation
Operation
6. Select Channel
You can change the current channel to any other channel you want.
If you do not know the channel name, or you want to select a channel at random, you can
navigate between channels with or
(
CH. Up/Down)till you find the channel you want.
If you know the channel number, enter the number and wait 5 seconds for the channel to change.
If you know the channel name, press CH LIST key then channel list will pop-up.
CH
CH
In the right section, detailed information of the selected channel will be displayed.(Name of satellite,
frequency, symbol rate, etc.)
Select the channel you want with / (scroll up/down) or / (page up/down).
When the scroll bar is positioned on the channel you want to see, press .
VOL
VOL
CH
CH
TV Channel List
-Watch, -EXIT, ~ -Move
09
-Main,-Page Up/Down,
1
2
3
4
5
6
7
8
Fujian 1
DIGITL VID
ANHUI TV
NMCHTV
Guangdong 1
Hunan 1
DWtv
MCM
AsiaSat 2
[24] 4,000 GHz
Horizontal-18V
28,123 MSPS
Deutsche Well
FAV.
LOCK
MOVE
DEL
ADD
MODE
All List
6.1
Getting Started
After the scanning process, the first channel of the last scanned TP will be displayed on the back
screen.
Press to finish the process. Then select a channel and press to watch a program or press
MENU key or EXIT key.
Note : Now you have completed all steps needed for watching programs. If you could not see the
program after finishing these procedures, please contact your engineer or representative.
Page 21

19
Operation
Operation
1. Favorite Channel
You can set up favorite channel lists as you want.
For example, if you want to set favorite channel lists as following.
Favorite1 : 7 DWtv, 6 Hunan1
Favorite2 : 1 Fujian1
Favorite3 : 3 ANHUI TV, 5 Guangdong1
Firstly, set favorite1 channels.
Press CH.LIST.
Select ‘DWtv' channel with / or / .
VOL
VOL
CH
CH
TV Channel List
-Watch, -EXIT, ~ -Move
09
-Main,-Page Up/Down,
1
2
3
4
5
6
7
8
Fujian 1
DIGITL VID
ANHUI TV
NMCHTV
Guangdong 1
Hunan 1
DWtv
MCM
AsiaSat 2
[24] 4,000 GHz
Horizontal-18V
28,123 MSPS
Deutsche Well
FAV.
LOCK
MOVE
DEL
ADD
MODE
All List
TV Channel List
-Select, -Exit/
1
2
3
4
5
6
7
8
Fujian 1
DIGITL VID
ANHUI TV
NMCHTV
Guangdong 1
Hunan 1
DWtv
MCM
AsiaSat 2
[24] 4,847 GHz
Horizontal-18V
28,123 MSPS
Dban
FAV.
LOCK
MOVE
DEL
ADD
MODE
All List
Favorite State
Favorite 1
Favorite 2
Favorite 3
Favorite 4
Favorite 5
Rename.
TV Channel List
1
2
3
4
5
6
7
8
Fujian 1
DIGITL VID
ANHUI TV
NMCHTV
Guangdong 1
Hunan 1
DWtv
MCM
AsiaSat 2
[24] 4,000 GHz
Horizontal-18V
28,123 MSPS
Deutsche Well
FAV.
LOCK
MOVE
DEL
ADD
MODE
All List
-Watch, -Exit, ~ -Move
09
-Main,-Page Up/Down,
6.2
Channel Editing
Press RED.
Select favorite1 with or and Press .
CH
CH
Favorite1 ~Favorite5 are default name. Users can rename them for their convenience.
If you want to rename ‘Favorite1' (for example ‘Drama').
Press RED.
TV Channel List
-Select, -Exit/
1
2
3
4
5
6
7
8
Fujian 1
DIGITL VID
ANHUI TV
NMCHTV
Guangdong 1
Hunan 1
DWtv
MCM
AsiaSat 2
[24] 4,000 GHz
Horizontal-18V
28,123 MSPS
Deutsche Well
FAV.
LOCK
MOVE
DEL
ADD
MODE
All List
Favorite State
Favorite 1
Favorite 2
Favorite 3
Favorite 4
Favorite 5
Rename.
Page 22

20
Operation
Operation
Select ‘Favorite 1’ with or .
CH
CH
Press IVORY.
TV Channel List
-Select, -Exit/
1
2
3
4
5
6
7
8
Fujian 1
DIGITL VID
ANHUI TV
NMCHTV
Guangdong 1
Hunan 1
DWtv
MCM
AsiaSat 2
[24] 4,847 GHz
Horizontal-18V
28,123 MSPS
Dban
FAV.
LOCK
MOVE
DEL
ADD
MODE
All List
Favorite State
Favorite 1
Favorite 2
Favorite 3
Favorite 4
Favorite 5
Rename.
TV Channel List
-Select, -Exit/
1
2
3
4
5
6
7
8
Fujian 1
DIGITL VID
ANHUI TV
NMCHTV
Guangdong 1
Hunan 1
DWtv
MCM
AsiaSat 2
[24] 4,830 GHz
Horizontal-18V
28,123 MSPS
HTV1
FAV.
LOCK
MOVE
DEL
ADD
MODE
All List
Favorite State
Rename.
Favorite 1
Favorite 2
Favorite 3
Favorite 4
Favorite 5
VOL
VOL
VOL
VOL
VOL
VOL
VOL
VOL
VOL
TV Channel List
-Select, -Exit//
1
2
3
4
5
6
7
8
Fujian 1
DIGITL VID
ANHUI TV
NMCHTV
Guangdong 1
Hunan 1
DWtv
MCM
AsiaSat 2
[24] 4,000 GHz
Horizontal-18V
28,123 MSPS
he Well
FAV.
LOCK
MOVE
DEL
ADD
MODE
All List
Favorite State
Rename.
DRAMA
Favorite 2
Favorite 3
Favorite 4
Favorite 5
6.2
Channel Editing
2. Channel List Mode
Using this function, you can see variant channel lists which may enable you to edit and select channels
more conveniently.
Favorite Mode
If you have set up favorite channel lists as the previous section, you can use them as following.
Press CH.LIST.
Press ORANGE.
Page 23

21
Operation
Operation
6.2
Channel Editing
You can see ‘Channel List Mode' window. Select ‘Favorite' with or and select ‘Favorite1'
with or .
VOL
VOL
CH
CH
TV Channel List
-Exit/
1
2
3
4
5
6
7
8
Fujian 1
DIGITL VID
ANHUI TV
NMCHTV
Guangdong 1
Hunan 1
DWtv
MCM
AsiaSat 2
[20] 3,847 GHz
Horizontal-18V
4,420 MSPS
Hunan
FAV.
LOCK
MOVE
DEL
ADD
MODE
All List
A
B
Channel List Mode
Favorite
Satellite
Alphabet
Favorite 1
AsiaSat 2
A
Free+Scrambled
Press .
You can see only favorite1 channels are listed. With similar way, you can see favorite2
~
favorite5
channel list.
If you want to return to all channel list (all channels of the selected satellite), press ORANGE and select
‘Satellite' with or and press .
CH
CH
TV Channel List
-Watch, -Exit, ~ -Move
09
-Main,-Page Up/Down,
AsiaSat 2
[20] 3,847 GHz
Horizontal-18V
4,420 MSPS
Hunan
FAV.
LOCK
MOVE
DEL
ADD
MODE
67Hunan 1
DWtv
Favorite 1
1
TV Channel List
-Exit/
AsiaSat 2
[24] 4,000 GHz
Horizontal-18V
28,123 MSPS
Deutsche Well
FAV.
LOCK
MOVE
DEL
ADD
MODE
27DIGITL VID
DWtv
D
A
B
A
B
Channel List Mode
Favorite
Satellite
Alphabet
Favorite 1
AsiaSat 2
D
Free+Scrambled
Alphabet Mode
Using this function, you can see the channel list which have same initial. This function is useful when you
search specific channel among the list of thousands channels.
For example, if you want to see the channel lists which start with ‘D'.
Press ORANGE in the channel list and select ‘Alphabet' with or .
CH
CH
Page 24

22
Operation
Operation
TV Channel List
-Exit/
1
2
3
4
5
6
7
8
Fujian 1
DIGITL VID
ANHUI TV
NMCHTV
Guangdong 1
Hunan 1
DWtv
MCM
AsiaSat 2
[20] 3,000 GHz
Horizontal-18V
4,420 MSPS
Deutsche Well
FAV.
LOCK
MOVE
DEL
ADD
MODE
All List
A
B
Channel List Mode
Favorite
Satellite
Alphabet
Favorite 1
AsiaSat 2
D
Free+Scrambled
Select ‘D' with or .
VOL
VOL
Press .
You can see the channel list where all channels have initial ‘D'.
TV Channel List
-Watch, -Exit, ~ -Move
09
-Main,-Page Up/Down,
AsiaSat 2
[24] 4,000 GHz
Horizontal-18V
28,123 MSPS
Deutsche Well
FAV.
LOCK
MOVE
DEL
ADD
MODE
27DIGITL VID
DWtv
D
A
B
Free only Mode
Press ORANGE in the channel list and select first line with or .
Select ‘Free only' with or .
Select ‘Favorite' or ‘Satellite' or ‘Alphabet' and press . You can see only the selected ‘free'
channel list.
VOL
VOL
CH
CH
TV Channel List
-Exit/
1
2
3
4
5
6
7
8
Fujian 1
DIGITL VID
ANHUI TV
NMCHTV
Guangdong 1
Hunan 1
DWtv
MCM
AsiaSat 2
[20] 3,000 GHz
Horizontal-18V
4,420 MSPS
Hunan
FAV.
LOCK
MOVE
DEL
ADD
MODE
All List
A
B
Channel List Mode
Favorite
Satellite
Alphabet
Favorite 1
AsiaSat 2
A
Free+Scrambled
6.2
Channel Editing
Page 25

23
Operation
Operation
6.2
Channel Editing
Free + Scrambled Mode
Press ORANGE in the channel list and select first line with or .
Select ‘Free+ Scrambled' with or .
VOL
VOL
CH
CH
TV Channel List
-Exit/
1
2
3
4
5
6
7
8
Fujian 1
DIGITL VID
ANHUI TV
NMCHTV
Guangdong 1
Hunan 1
DWtv
MCM
AsiaSat 2
[20] 3,20 GHz
Horizontal-18V
4,420 MSPS
Dian
FAV.
LOCK
MOVE
DEL
ADD
MODE
All List
A
B
Channel List Mode
Favorite
Satellite
Alphabet
DRAMA
AsiaSat 2
A
Free+Scrambled
Satellite Mode
By using this function, you can see all channel list of the selected satellite.
Press ORANGE and select ‘Satellite’ item with or .
CH
CH
TV Channel List
-Exit/
AsiaSat 2
[24] 4,000 GHz
Horizontal-18V
28,123 MSPS
Deutsche Well
FAV.
LOCK
MOVE
DEL
ADD
MODE
27DIGITL VID
DWtv
D
A
B
A
B
Channel List Mode
Favorite
Satellite
Alphabet
Favorite 1
AsiaSat 2
D
Free+Scrambled
Select ‘Favorite' or ‘Satellite' or ‘Alphabet' and press . You can see the selected free and
scrambled channel list.
Note : ‘Scrambled’ channel can be shown only with CI (Common Interface) model and CAS
(Conditional Access System) model. ‘Free’ channel can be shown with all (FTA(Free To Air) and CI
and CAS) models.
Press or to select a satellite and press .
VOL
VOL
Page 26

24
Operation
Operation
3. Lock Channel
This menu enables you to prevent children from viewing programs unsuitable for their age.
Press CH.LIST and select the channel you want to lock with /
or
/ and press GREEN.
Then the selected channel is locked.
Note : If ‘password’ window is risen as following picture, enter password with numeric keys (default
password is ‘0000’). Then you can lock the channel. If you don't want this window, change
‘Parental Control' set up in the ‘System Parameters’ menu. Refer to the ‘Parental control' in
‘System parameters’ in this manual for detail.
VOL
VOL
CH
CH
TV Channel List
-Watch, / -EXIT, ~-Move
09
-Main,-Page Up/Down,
1
2
3
4
5
6
7
8
Fujian 1
NMCHTV
RAI
Guangdong 1
Hunan 1
MCM
DWtv
TVE
AsiaSat 2
[24] 4,000 GHz
Horizontal-18V
28,123 MSPS
Deutsche Well
FAV.
LOCK
MOVE
DEL
ADD
MODE
All List
TV Channel List
-Watch, / -EXIT, ~-Move
09
-Main,-Page Up/Down,
1
2
3
4
5
6
7
8
Fujian 1
NMCHTV
RAI
Guangdong 1
Hunan 1
MCM
DWtv
TVE
AsiaSat 2
[24] 4,000 GHz
Horizontal-18V
28,123 MSPS
Deutsche Well
FAV.
LOCK
MOVE
DEL
ADD
MODE
All List
<< Authorized! >>
6.2
Channel Editing
Press MENU, EXIT or to finish the process.
Without entering your password, you cannot watch a locked channel's program.
If you want to cancel the channel lock, go to the channel list and select the channel and press
GREEN.
4. Channel Order Setting
You can organize the number or sequence of the channels.
Press CH.LIST.
Select the channel you want to move with / or / and press YELLOW.
VOL
VOL
CH
CH
TV Channel List
-Watch, -EXIT, ~ -Move
09
-Main,-Page Up/Down,
9
10
11
12
13
14
15
16
RAI Internati
TVE
TV5-Asia
RTPi
uØoH-u1/4Ö¥x CS
ªFËê>>Ú¥x ET
«DoZ¥x USTV-I
oé¥>>¥x JET
AsiaSat 2
[24] 4,000 GHz
Horizontal-18V
28,123 MSPS
Deutsche Well
FAV.
LOCK
MOVE
DEL
ADD
MODE
All List
S
S
S
S
Move the selected channel with / or / to the position you want.
VOL
VOL
CH
CH
Page 27

25
Operation
Operation
6.2
Channel Editing
Press YELLOW.
Press MENU, EXIT or to finish the process.
TV Channel List
-Watch, -EXIT, ~ -Move
09
-Main,-Page Up/Down,
9
10
11
12
13
14
15
16
RAI Internati
RTPi
TVE
TV5-Asia
uØoH-u1/4Ö¥x CS
ªFËê>>Ú¥x ET
«DoZ¥x USTV-I
oé¥>>¥x JET
AsiaSat 2
[24] 4,000 GHz
Horizontal-18V
28,123 MSPS
Deutsche Well
FAV.
LOCK
MOVE
DEL
ADD
MODE
All List
S
S
S
S
5. Delete Channel
You can delete channels from the channel list.
Press CH.LIST and select the channel you want to remove with / or / .
Press BLUE.
Note : If ‘password' window is risen as following picture, enter password with numeric keys (default
password is' 0000'). Then you can delete the channel. If you don't want this window, change
‘Parental Control' set up in the ‘System Parameters' menu. Refer to the 'Parental control' in System
parameters' in this manual for detail.
VOL
VOL
CH
CH
Then, you need to confirm the deletion. If you definitely want to delete, press . If not, press EXIT.
Note : Please be careful when you delete channel(s).
Press MENU, EXIT or to finish the process.
TV Channel List
-Watch, -Exit,/ ~ -Move
0L9
-Main,-Page Up/Down,
9
10
11
12
13
14
15
16
TVE
TV5 - Asia
Hubei 1
Hubei 2
RAI Internati
Fujian 2
Jiangxi 1
Jiangxi 2
AsiaSat 2
[3] 3,713 GHz
Horizontal-18V
4,420 MSPS
Hubei
FAV.
LOCK
MOVE
DEL
ADD
MODE
PASSWORD
????
TV Channel List
-Watch, -Exit,/ ~ -Move
0L9
-Main,-Page Up/Down,
9
10
11
12
13
14
15
16
TVE
TV5 - Asia
Hubei 1
Hubei 2
RAI Internati
Fujian 2
Jiangxi 1
Jiangxi 2
AsiaSat 2
[3] 3,713 GHz
Horizontal-18V
4,420 MSPS
Hubei
FAV.
LOCK
MOVE
DEL
ADD
MODE
All List
Do you want to delete this channel?
Yes / No
Q
Page 28

26
Operation
Operation
6. Add Channel
Press CH.LIST.
Press Ivory.
Select a satellite into which you want to add your new channel.
Note : You can only select satellites which you set in ‘Installation’ menu.
Move to ‘TP Frequency' section (column)by pressing and change frequency with / or enter
frequency with numeric keys.
Note : TP frequency consists of 5 digits ending with GHz.
For example : TP Frequency 4.000GHz is
Move to ‘Polarization' by pressing and select Horizontal or Vertical with or .
Note : Please check whether LNB Power is ON in ‘Installation’ menu.
Move to ‘Symbol Rate' by pressing and enter the Symbol Rate value with numeric keys.
Move to ‘CH. Name' by pressing and enter the alphabetic characters with numeric keys.
For example : if you want to enter SAT-1,
Note : Press for space.
Move to ‘VIDEO PID' by pressing key and enter the proper value with numeric keys.
Move to ‘AUDIO PID' by pressing key and enter the proper value with numeric keys.
Move to ‘PCR PID' by pressing key and enter the value between 0000
~
8192 with numeric keys.
Note : The above mentioned TP Frequency, Symbol Rate, VIDEO PID, AUDIO PID, PCR PID are very
important for optimal satellite signal reception. We recommend you get professional advice
where available. You cannot setup ‘VIDEO PID’ for RADIO channels.
CH
CH
CH
VOL
VOL
VOL
VOL
CH
CH
VOL
VOL
CH
VOL
VOL
CH
Add Digital Channel
AsiaSat 2
[24] 4,000 GHz
Horizontal-18V
28,123 MSPS
DWtv
2305
2306
2304
Satellite Name
TP Frequency
Polarization
Symbol Rate
CH. Name
Video PID
Audio PID
PCR PID
6.2
Channel Editing
Page 29

27
Operation
Operation
DL Saving
TV Type
Aspect Ratio
Screen
A/V Mode
System Parameters
-Next, -Prev./
Y/CNo
PAL
4X3
P/S
Parental Control
System Information
Local time/Timer
19/06/2001 11:57
PASSWORD
????
1. Setting Age Restrictions
This sub-menu allows you to set the age for parental locking and protect children from viewing programs
unsuitable for their age.
Press MENU key.
Press or to select ‘System Parameters' and press .
Press or to select ‘Parental Control' and press .
CH
CH
CH
CH
6.3
System Parameters
Enter 4-digit password.
Note : The default password is '0000'.
Press or to select ‘Age Limit’.
CH
CH
Press or to select age you want.
VOL
VOL
None No age limit
8 Without entering password, programs are restricted to those who are over 8 years old.
12 over 12 years old.
15 over 15 years old.
18 over 18 years old.
Note : ‘Age limit’ can be applicable only for the signal which carries age limit information.
Parental Control
Age Limit
Lock Channel Editing
Lock Installation
New Password
Verify Password
Personal
-Prev.-Main,
*****
None
????
????
No
No
Page 30

28
Operation
Operation
2. Security Check
You can set SECURITY CHECK to protect your current installation from being changed (location shift,
deletion, adding etc.) or modifying of installed data.
Press MENU key.
Press or to select ‘System Parameters' and press .
Press or to select ‘Parental Control' and press .
Enter 4-digit password.
Note : The default password is '0000'.
Press or to select ‘Lock channel Editing’, or ‘Lock Installation’.
Press or to select ‘Yes’, or ‘No’.
Note : Your receiver is pre-set as ‘No’.
VOL
VOL
CH
CH
CH
CH
CH
CH
3. Password Changing
You can change your password.
Press MENU key.
Press or to select ‘System Parameters' and press .
Press or to select ‘Parental Control' and press .
Enter 4-digit password.
Note : The default password is '0000'.
Press or to select ‘New Password’.
Press
~
numeric numbers to enter new password.
Press
~
numeric numbers again to verify the new password.
Note : When you forget your new password, please consult the shop where you bought the receiver or
the nearest dealer.
CH
CH
CH
CH
CH
CH
Yes
When you process with ‘Channel Editing’ or ‘Installation’ of Main Menu, your receiver will
ask for password. If you enter wrong password, you cannot proceed further.
No You do not enter password during your processing.
6.3
System Parameters
Page 31

29
Operation
Operation
6.3
System Parameters
4. Personal Information Setting
You can enter your personal information, such as your name and address, etc.
Press MENU key.
Press or to select ‘System Parameters' and press .
Press or to select ‘Parental Control' and press .
Enter 4-digit password.
Note : The default password is '0000'.
Press or to select ‘Personal’.
Press
~
numeric numbers to enter new personal information.
For example : If you want to enter ‘WELCOME',
Note : 1. Maximum 32 letters can be entered.
2. Your entered personal information will be displayed on the TV screen as Welcome Window
when you power on your receiver.
3. Initial information is ‘ ’.
4. After purchasing the receiver, if information other than that which you entered is displayed,
please consult the shop where you bought it.
5. Personal Information does not affect your viewing in any way.
VOL
VOL
VOL
VOL
VOL
VOL
CH
CH
CH
CH
CH
CH
5. System Information
You can check the current information about your receiver such as receiver’s software and hardware
version or manufacturing date.
Press MENU key.
Press or to select ‘System Parameters' and press .
Press or to select ‘System Information' and press .
CH
CH
CH
CH
Note : This information is necessary when you download new software or you need to repair the
receiver.
System Information
-Prev.-Main,
Product Name
Hardware Version
Software Version
Channel List
Last Update
HSS880
HSS880-100
HSS880 0000b
HSS880-001
Nov 03 2003
Page 32

30
Operation
Operation
6. Setting Timer (Automatic power On/Off)
You can pre-set the on/off time of your receiver.
During your absence, you can record programs on your VCR.
Press MENU key.
Press or to select ‘System Parameters’, and press .
Press or to select ‘Local Time/Timer’, and press .
Note : Without the local time setting, this ‘TIMER’ function does not work.
CH
CH
CH
CH
Press or to select ‘Timer #(number)’ you want to set and press .
determine ‘CH. Type' by selecting ‘TV' or ‘RADIO' with or .
Select ‘CH. Number' with or and enter channel number with numeric keys or with or .
Select ‘Start Time’ for your receiver power-on.
For example : For 1st of February in the year of 2000, 7:30 P.M.,
Enter in sequence
Select ‘Stop Time’ by pressing .
Enter power off time in the same way as you entered ‘Start Time’.
Select ‘Status’ and set ‘Once/Daily/Weekly/No’ with or .
Select ‘HD record’ and set ‘ON’ with or if you want to record auto matically.
Note : 1. Without ‘STATUS’ being activated (ON), Timer does not work.
2. If Prior time than current is entered, Timer does not work.
3. You can pre-set 14 TIMERs simultaneously. Regardless of number of TIMER, Timer will work in
sequence of time sequence.
4. Remocon Key doesn’t work while VCR recording.(While HDD recording, remocon key works)
VOL
VOL
VOL
VOL
CH
VOL
VOL
CH
CH
VOL
VOL
CH
CH
CH. Type
CH. Number
CH. Name
Start Time
Stop Time
Status
HD record
TV
1
Fujian 1
18/07/2001 16:42
18/07/2001 17:42
No
ON
18/07/2001 16:40
Timer
-Edit, -Prev.-Main,
Timer #1
Timer #2
Timer #3
Timer #4
Timer #5
Timer #6
Timer #7
6.3
System Parameters
Page 33

31
Operation
Operation
7. Setting Day Light Saving Time (Summer Time)
You can adjust current local time when summer time is applicable.
Press MENU key.
Press or to select ‘System Parameters’, and press .
Press or to select ‘DL Saving’.
Press or to select ‘Yes’ or ‘No’.
CH
CH
CH
CH
CH
CH
Note : Without current local time setting, this menu cannot be processed.
Yes
Set for daylight saving function activated. The current time automatically moves
one hour ahead.
No
Set for daylight saving function deactivated. The current time automatically moves
on hour behind.
6.3
System Parameters
8. Setting TV Type
You can set your TV display mode with this sub-menu.
Press MENU key.
Press or to select ‘System Parameters’, and press .
Press or to select ‘TV Type’.
Press or to select ‘Multi’, ‘PAL’, or ‘NTSC’.
VOL
VOL
CH
CH
CH
CH
Note : If the satellite signal and your TV type are mismatched, the TV picture may be distorted. Even in
this case, MENU will be displayed as normal. (e.g. When you receive PAL satellite signal with NTSC
TV type setting or vice versa)
Multi When your TV is compatible with NTSC/PAL dual mode.
PAL
When your TV is only for PAL reception. Regardless of satellite signal, the display will be
done in PAL format.
NTSC
When your TV is only for NTSC reception. Regardless of satellite signal, the display will be
done in NTSC format.
9. Setting Aspect Ratio
This sub-menu allows you to select your TV aspect ratio to 4:3 or 16:9 according to your wishes.
Press MENU key.
Press or to select ‘System Parameters’, and press .
Press or to select ‘Aspect Ratio’.
Press or to select ‘4x3’ or ‘16x9’ or ‘Auto’.
CH
CH
CH
CH
CH
CH
Page 34

32
Operation
Operation
Note : If you set 4 x 3 when the Satellite input signal is 16 x 9, the right and the left parts of the original
picture may not be seen.
4x3 When your TV is 4:3.
16x9 When your TV is 16:9.
Auto When setting suitable aspect ratio automatically.
10. Setting Screen
You can select the satellite input signal display mode.
Press MENU key.
Press or to select ‘System Parameters’ , and press .
Press or to select ‘Screen’.
Press or to select ‘P/S’ or ‘L. Box’.
VOL
VOL
CH
CHCHCH
P/S
When you set screen display boundary from Pan/Scan data of Satellite input signal.
(
For
signal for 16x9 program
)
L.Box You can watch 16 x 9 ratio screen by reducing original size vertically and horizontally.
6.3
System Parameters
Note : 1. If you select ‘L.Box’, t he screen might be distorted. Upper and lower part of the screen will be
blocked with black stripes.
2. ‘Screen’ function is helpful when receiving 16x9 signal with TV of 4x3 format.
Page 35

33
Operation
Operation
1. TP Edit / Scan
After ‘LNB Configuration’ and ‘Antenna Setup’ procedure, when necessary, you can edit and/or add
certain TPs (transponders
)
Press MENU key.
Select ‘Installation’ with or , and press .
Select ‘TP Edit/Scan’ with or , and press .
CH
CH
CH
CH
Select the ‘Satellite Name’ which includes the TP you want to add/edit with or .
Move to ‘TP Frequency’ with and select the TP you want to edit with or .
If you want to add the new TP, enter the TP frequency with numeric keys.
Select ‘Polarization’ by pressing and the set the proper value for selected TP with or .
Select ‘Symbol rate’ by pressing and enter the symbol rate value for the selected TP with
numeric keys .
After entering all values of the TP parameters, move to ‘SCAN’ section (column) with and press
for storing all the entered TP data.
As a result, you can get the following menu showing the scanning process.
CH
CH
VOL
VOL
CH
VOL
VOL
CH
VOL
VOL
TP Edit/Scan
-Select, -Prev.-Main,
AsiaSat 2
[24] 4,000 GHz
Horizontal-18V
28,123 MSPS
Free+Scrambled
Good
81%
Satellite Name
TP Frequency
Polarization
Symbol Rate
Scan
TP Delete
6.4
Transponder
TP Edit/Scan
-Select, -Prev.-Main,
USER
[15] 3,820 GHz
Vertical-14V
28,123 MSPS
Free+Scrambled
Good
81%
Satellite Name
TP Frequency
Polarization
Symbol Rate
Scan
TP Delete
Scanning
Press to stop scanning
Q
Page 36

34
Operation
6.4
Transponder
After scanning process, the first channel of scanned TP will be displayed.
Note : If the scan fails, please check whether your entered values are correct or not and the signal
reception sensitivity is good or bad.
TP Edit/Scan
Good
82%
-Watch, -Prev./-Page Up/Down,
TV: 6 Success Radio: 20
17
18
19
20
21
22
DW 9
RDP ANTENA 1
RDP ESPECIAL
NN
¥xÆW
a
N¥<< TWN
¥@uØ
1/2
Auø USA-
AsiaSat 2 [24] 4,000 GHz Hor. 28,123
~
~
9
10
11
12
13
14
15
16
RAI Internati
TVE
TV5-Asia
RTPi
uØoH-u1/4Ö¥x CS
ªFËê>>Ú¥x ET
«DoZ¥x USTV-I
oé¥>>¥x JET
2. TP Delete
Press MENU key.
Select ‘Installation’ with or , and press .
Select ‘TP Edit/Scan’ with or , and press .
CH
CH
CH
CH
TP Edit/Scan
-Select, -Prev.-Main,
AsiaSat 2
[24] 4,000 GHz
Horizontal - 18V
28,123 MSPS
Free+Scrambled
Good
80%
Satellite Name
TP Frequency
Polarization
Symbol Rate
Scan
TP Delete
Move to TP section (column) with and select the TP you want to delete with or .
Move to ‘TP Delete’ section (column) by pressing and press .
When the menu asks you to confirm the deletion, press if you want to delete it or press EXIT key if
you want to void the deletion.
CH
VOL
VOL
CH
Operation
Page 37

35
Operation
Operation
6.6
On Air Download
The status of the receiver will return to factory default parameters by using this function.
Press MENU key.
Select ‘Installation’ with or , and press .
Select ‘Factory Set’ with or , and press .
When the menu asks you to confirm the reset, press if you want to reset or press EXIT key if you
want to void the reset.
CH
CH
CH
CH
6.5
Factory Set
LNB Configuration
Antenna Setup
Satellite Scan
TP Edit/Scan
Factory Set
On Air Download
Installation
-Next, -Prev.
Do you want to reset all data?
Yes / No
Q
To upgrade firmware of the receiver via satellite.
Press Menu Key, and select Select ‘Installation'.
Press at ‘On Air Download'.
Set Satellite, TP frequency, Symbol rate and data PID like as picture.
Note : Don't edit each section carelessly.
On Air Download
-Prev./
Astra
12,600 GHz
Horizontal - 18V
22,000 MSPS
1211
Satellite Name
TP Frequency
Polarization
Symbol Rate
Data PID
Start
On Air Download
-Edit,09~ -Prev./
HotBird
12,475 GHz
Horizontal - 18V
27,500 MSPS
1997
Satellite Name
TP Frequency
Polarization
Symbol Rate
Data PID
Start
Page 38

36
Operation
Operation
Press at ‘Start'.
It takes a few minutes to search the group of program & download channel. If there is problem in
searching the necessary information, then other window is open.
If you select ‘Start' again, upgrade will start. On finishing upgrade, if necessary, Receiver is restarted.
Note : Do not turn off the power, while upgrading Receiver.
-Select, -Prev.-Main,
Astra
Horizontal-18V
[1] 12,603 GHz
22,000 MSPS
On Air Download
Good
98%
Select
Yes
No
Yes
Start
Display Info
Main SW
Ch List
Info Text
-Select, -Prev.-Main,
HotBird
Horizontal-18V
[1] 11,750 GHz
27,500 MSPS
On Air Download
Good
98%
Select
Yes
No
Yes
Start
Display Info
Main SW
Ch List
Info Text
1. TV / RADIO switching
You can use this menu when you change a TV channel to a Radio channel or vice versa.
Press ‘TV/RADIO’.
When listening a radio channel, ‘r001’ will be displayed on the front panel.
6.7
Other Function on Remote Control
2. GUIDE(EPG:Electronic Program Guide)
You can check the channel information on the channels of the transponder you are watching.
Press GUIDE key, then the following menu will be displayed.
Note : 1. You can check local time, channel name, and other brief information on the current program.
2. If you didn't set local time under ‘System Parameters’ section, the GUIDE function may not work
properly.
3. EPG information is delivered by satellite from service providers. If the channel does not carry
any signal on the guide data, this function may not work properly.
6.6
On Air Download
Page 39

37
Operation
Operation
6.7
Other Function on Remote Control
Select Channel with or .
Then you can see current or next program information of the selected channel.
If you press GREEN, current or next program information would be converted to next or current
program information respectively.
CH
CH
Program Guide
-Schedule, -Extended-Current/Next,
19:33
19:23 19:53
Current
JOURNAL News - Sports Weather - Interview
1
2
3
4
5
6
7
8
Fujian 1
DIGITL VID
ANHUI TV
NMCHTV
Guangdong 1
Hunan 1
DWtv
MCM
JOURNAL Ne..
Program Guide
-Schedule, -Extended-Current/Next,
19:34
19:53 20:23
Next
In Focus
1
2
3
4
5
6
7
8
Fujian 1
DIGITL VID
ANHUI TV
NMCHTV
Guangdong 1
Hunan 1
DWtv
MCM
In Focus
If you press YELLOW, you can see program schedule list of the selected channel.
If you want to see program information of a program in the program schedule list, select the program
with or .
Then you can see the program information in the right window.
CH
CH
If you press BLUE, you can see extended program information of the selected program.
Program Guide
-Schedule, -Extended-Current/Next,
19:39
Guest: Marianne Birthler Commissioner
for Stasi Files
[7] DWtv
11/03/1998 19:27~19:57
JOURNAL News-SportsWeather - Interview
Program Guide
-Schedule, -Extended-Current/Next,
19:42
19:27~19:57
19:57~20:27
20:27~20:57
20:57~21:27
21:27~21:57
21:57~22:27
22:27~22:57
22:57~23:27
JOURNAL News - Sports..
In Focus
JOURNAL Nachrichten - ..
Thema
JOURNAL News - Busines..
Germany Live
JOURNAL Nachrichten - ..
Im Focus
[7] DWtv
11/03/1998 20:27~20:57
JOURNAL Nachrichten Wirtsohaft - Wetter Tagesthema
Page 40

38
Operation
Operation
6.7
Other Function on Remote Control
You can set up automatic power on-off
(
Timer)or automatic recording on the program schedule list.
After pressing YELLOW in the Guide(EPG)menu, select a program with / or / and press
.
Select ‘Once/Daily/Weekly/No' of ‘Status' with or .
Select ‘HD record’ and set ‘ON’ with if you want to record automatically.
VOL
VOL
VOL
VOL
CH
CH
Press to save the new ‘Timer' setting.
Press MENU, EXIT or to finish GUIDE menu.
Note : 1. Without 'STATUS' being actuated (Yes), 'Timer' does not work.
2. If a program of prior time than current time ('Local Time' in 'System Parameters' menu) is
selected, Timer does not work.
3. Refer to 'Setting Timer' in 'System Parameters' in this manual.
Program Guide
-Schedule, -Extended-Current/Next,
19:42
19:27~19:57
19:57~20:27
20:27~20:57
20:57~21:27
21:27~21:57
21:57~22:27
22:27~22:57
22:57~23:27
JOURNAL News - Sports..
In Focus
JOURNAL Nachrichten - ..
Thema
JOURNAL News - Busines..
Germany Live
JOURNAL Nachrichten - ..
Im Focus
[7] DWtv
11/03/1998 20:27~20:57
JOURNA chrichten Weather -- Wetter -
11/03/1998 20:26
Timer
Status
HD record
11/03/1998 21:02
-Reserve, -Cancel
E
Once
ON
Program Guide
-Schedule, -Extended-Current/Next,
19:42
19:27~19:57
19:57~20:27
20:27~20:57
20:57~21:27
21:27~21:57
21:57~22:27
22:27~22:57
22:57~23:27
JOURNAL News - Sports..
In Focus
JOURNAL Nachrichten - ..
Thema
JOURNAL News - Busines..
Germany Live
JOURNAL Nachrichten - ..
Im Focus
[7] DWtv
11/03/1998 20:27~20:57
JOURNA chrichten Weather -- Wetter -
11/03/1998 20:26
Timer
Status
HD record
11/03/1998 21:02
-Reserve, -Cancel
E
No
ON
Program Guide
-Schedule, -Extended-Current/Next,
19:42
19:27~19:57
19:57~20:27
20:27~20:57
20:57~21:27
21:27~21:57
21:57~22:27
22:27~22:57
22:57~23:27
JOURNAL News - Sports..
In Focus
JOURNAL Nachrichten - ..
Thema
JOURNAL News - Busines..
Germany Live
JOURNAL Nachrichten - ..
Im Focus
[7] DWtv
11/03/1998 20:27~20:57
Wirtsohaft - Wetter Tagesthema
Reserved at Timer #1
!
Page 41

39
Operation
Operation
3. Subtitle/Audio
You can adjust the subtitle and audio condition/status of the current channel.
Press ‘AUDIO’ and subtitle and audio related window will be displayed on the screen.
In this example, program spoken language is ‘English' and user's selected subtitle language is
‘Swedish'.
The contents of each parameter are as follows ;
Note : These subtitle and audio parameters are workable only when the receiving channel supports
these functions.
-Subtitle On/Off
Subtitle Track
Audio Track
Audio Mode
Dig.Output
2 of 10 [Swedish]
1 of 8 [English]
Stereo
Non-compressed
Subtitle/Audio
Subtitle Track
(
Subtitle language #)of (all subtitle language available in this program
)
[
Current selected subtitle language
]
Audio Track
(
Audio track #)of (all tracks available in this program
)
[spoken language in this
program
]
Audio Mode Stereo -> Mono-Left -> Mono-Right
Dig.Output Non-compressed / Compressed
6.7
Other Function on Remote Control
Page 42

40
Operation
Operation
6.7
Other Function on Remote Control
4. Teletext
Teletext Service is text data service from Service Provider.
It is available only when the satellite signal carries teletext service data.
Press BLUE key and wait.
If ‘*’ sign is pops up in the left upside of the screen as the following picture, wait until teletext service
menu is displayed because ‘*’ means ‘This program provides teletext service. So wait a moment'.
Teletext Service Data is displayed as following picture.
Select your interesting item with numeric keys. For example, if you want to see about ‘CITY GUIDE',
press .
Page 43

41
Operation
Operation
5. Sleep Timer
Your receiver will automatically power-off when the time you set is passed.
Press ‘SLEEP’ key until the right time you want appears.
Note : 1. You can set SLEEP TIMER in 30 minute steps up to 150 minutes.
2. The SLEEP TIMER does not work while you are in ‘MENU’, ‘GUIDE’ or ‘CHANNEL LIST’.
6. Aux in
You can set in/out mode of the two scart connectors (TV, AUX) on the rear panel. Press ‘Aux in’ key until
the scart mode you want is displayed.
6.7
Other Function on Remote Control
Note : You cannot see picture when set to AUX2 mode if there is no input signal from AUX scart.
SAT
Input satellite signal will be output to TV Scart and AUX
(
VCR)Scart. (VCR is connected to
AUX to connector for recording
)
AUX
Input signal from AUX scart connector will be output to TV scart. If there is no input from
AUX scart, your receiver will operate as if you chose SAT mode.
AUX 2 Input signal from AUX scart connector will be output to TV scart by force.
TV This is special mode for hiding TV scart video output. AUX scart video out is not affected.
Page 44

42
Operation
Operation
6.7
Other Function on Remote Control
7. Channel / Information
Brief information is displayed, such as current channel type, name, local start/end time, guide
information, current time, fav/normal mode, Audio mode and Audio ID.
Press INFO, then the information bar will pop-up.
Note : If you have no information :
- Check your local time setting is correct.
- Information is not sent by the channel provider.
5 DWtv
JOURNAL News-Busin...
13:41
13:26 ~ 13:56
(
(
(
(
(
(
1/8
AsiaSat 2
6.8
Picture in Picture
1. Start PIP
You can use PIP function by pressing PIP
()
key.
Press PIP
()
key to display sub-picture window.
Whenever press PIP
()
, the sub-picture window changes like as Live, HDD and Disable.
If sub-picture window pops up, you can select main-picture window or sub-picture window by pressing
volume up/down key.
Press or to change channel (or HDD program)of selection window.
CH
CH
Page 45

43
Operation
Operation
2. PIP swaping
You can swap main-picture window and sub-picture window by pressing PIP swap
()
key.
If PIP function is running, press PIP swap
()
key. Main-picture and sub-picture will be swapped
6.8
Picture in Picture
If you want to magnify other position, press / or / key.
Zoom window will move to the selected position.
You can adjust zoom ratio by pressing ZOOM
()
key.
CH
CH
VOL
VOL
1. Start ZOOM Function
You can magnify selected part of screen by pressing ZOOM
()
key.
Press ZOOM
()
key to magnify selected part of screen by pressing.
And zoom position window is displayed.
2. Stop ZOOM Function
To Stop zoom function, press EXIT key.
Note : Maximum magnification is by four.
6.9
Zoom Function
Page 46

7.1
Recording
1. Start Recording
You can record the current channel by pressing RED
()
key.
If program Guide menu pops up, you can record any channel you want.
Press RED
()
key to record current channel.
In Program Guide menu, press RED
()
key to record after selecting a program you want.
Then Record dialog menu will be displayed.
Some items can be edited in Record dialog menu.
Note : Direct recording is stopped only when user stops it or there is no HDD space.
Press to start recording.
Program Guide
-Record, -Exit,E~
11:1 9
Current
nt
00:36 00:35
0
-Edit
9
17
18
19
CH 22 - Indue
CH
Sa
Name
Information
start
Stop
REC
SABo TV Notwo
Default Event
11:1 9
00:40
HD-Program Guide
-Delete, -Satellite Mode
11:2 0
REC
Title
Play time REC
28/08/2001 11:20
Free 38.8 GB (99.4%)
Default Event
Play Type
1 Default Event
/ -Wotoh,
R
Note : When a program is recorded, red R-icon is flickered on the upper-left conner. If you want to play
during recording press ORANGE(LIST) key to enter HD-Program Guide Menu.
Note : If you insert or take out CAM module during recording or replaying scrambled contents, it may
not work properly.
2. Stop Recording
To stop recording maunally, you must enter into HD-Program Guide menu by pressing ORANGE(LIST)key.
If any program has been played, press ORANGE(LIST) key to enter HD-Program Guide menu.
Press ORANGE(LIST)or EXIT key to display message of stop recording.
44
Hard Disk Operation
Hard Disk Operation
Page 47

45
Hard Disk Operation
Hard Disk Operation
Note : If there is no HDD access for 5-minutes, the receiver will go into sleep mode.
If one channel is recorded, press key to stop recording.
If two channels are recorded, press key to stop First recording and press YELLOW
()
Key to
stop Second recording.
HD-Program Guide
-Delete, -Satellite Mode
11:2 0
REC
Title
Play time REC
28/08/2001 11:20
Free 38.8 GB (99.4%)
Default Event
Play Type
1 Default Event
/ -Wotoh,
R
Do you want to stop recording?
Yes /
Q
No
E
7.1
Recording
3. Time Shifting
You can use time-shift function for the current channel by pressing TIME-SHIFT
()
key.
Press TIME-SHIFT
()
key to start time-shift of the current channel.
HD-information Bar will pop-up and red R-icon is displayed.
You can use trick play by pressing BLUE
()
, GREEN
()
, YELLOW
()
, or SLOW-MOTION
()
key.
To stop time-shift function, press WHITE
()
or ORANGE (LIST)key.
If HD-Program Guide menu is displayed, press ORANGE (LIST)or EXIT key to stop time-shift function.
Note : Channel up/down will stop time shift.
Page 48

46
Hard Disk Operation
7.2
Playing
1. Start Playing
You must select a program to play stored programs.
For entering HD-Program Guide menu, press ORANGE (LIST)key.
Press ORANGE (LIST)key.
In HD-Program Guide, select a program by pressing or .
CH
CH
Press to start playing.
Note : You can use , , , keys while playing.
HD-Program Guide
-Delete, -Satellite Mode
11:5 2
00:01
00:03
00:01
00:01
00:25
Title
Play time 00:03
28/08/2001 11:22
Free 37.3 GB (95.6%)
CH 23 - Indus
Play Type
1
2
3
4
5
Default Event
CH 23 - Indus
CH 25 - DBN24
RAI Internati
CH 22 - Indus
/ -Wotoh,
2. Trick Play Controls
For trick play, press or INFO key then HD-Information Bar will pop-up.
Trick Play Mode : Pause, Jump, Fast Forward, Fast Reverse, Resume.
5 CH 22 - Indua
00:05:04 / 00:24:53
CH 22 - Indus
2 Ch
(
(
(
(
(
(
S
HD Playing HD Paused HD Playing HD Paused
YELLOW Fast Forward Jump Forward GREEN Fast Reverse Jump Backward
BLUE Pause Resume IVORY Stop Stop
SLOW-MOTION Slow-Motion Slow-Motion INFO or Info On/Off Info On/Off
Hard Disk Operation
Note : In case of rewinding of recorded scrambled contents, it may not work properly. If you want to
activate rewinding function, descramble the contents with relevant CAM module first and then
do rewind.
Page 49

47
Hard Disk Operation
Hard Disk Operation
Press to delete the program or EXIT key to void.
Note : For deleting any stored program, you must stop both playing and recording.
HD-Program Guide
-Delete, -Satellite Mode
11:5 2
00:01
00:03
00:01
00:01
00:25
Title
Play time 00:03
28/08/2001 11:22
Free 37.3 GB (95.6%)
CH 23 - Indus
Play Type
1
2
3
4
5
Default Event
CH 23 - Indus
CH 25 - DBN24
RAI Internati
CH 22 - Indus
/ -Wotoh,
Do you want to delete this ?
Yes /
Q
No
E
1. Descrambling Start
You must select a program to descramble stored programs.
Press Orange (LIST)Key.
In HD-Program Guide, select a scrambled program by pressing or .
Press Time shift
()
to start descramble.
Note : Necessarily correct CAM must be inserted for descrambling.
CH
CH
7.4
Descrambling Service
You can delete any program in HD-Program Guide menu.
Press ORANGE (LIST)key then HD-Program Guide menu will pop-up.
In HD-Program Guide, select a program with or .
Press RED
()
key to delete the program then Delete dialog menu will pop-up.
CH
CH
7.3
Delete Programs
If you want to lock any program, enter the advanced menu by pressing MENU key with HD- Information
Bar. After locking a program, you must enter the password for playing the program.
Start playing a program.
Press then HD-Information Bar will pop-up.
Press MENU key, the advanced menu will pop-up.
7.5
Lock Programs
Page 50

48
Hard Disk Operation
Hard Disk Operation
Select ‘LOCK’ using or .
Press , LOCK enable or disable will be setted with Yes or No.
Note : The password for playing a stored program is the same password for any other lock operation.
CH
CH
1 SABe TV Netwo
00:00:16 / 00:01:10
Default Event
2 Ch
(
(
(
(
(
(
S
Lock
Clear skip points
Split take
Yes
Temperary start point will be displayed with a red pointer on the Bar.
Press RED
()
key to set the end point you want.
You can set the part you don't want to play, such asadvertisements.
The skip part consists of start and end points.
In all, 10 skip points are available.
Select a program with or , and press to play in HD-Program Guide menu.
Start playing and search the start point of skip play using trick play controls.
Press RED
()
key to set the start point.
CH
CH
5 CH 22 - Indus
00:06:03 / 00:24:53
CH 22 - Indus
2 Ch
(
(
(
(
(
(
S
7.5
Lock Programs
7.6
Skip Play
Page 51

49
Hard Disk Operation
Hard Disk Operation
Then a proper pair of start and end points will be displayed with yellow pointers on the Bar.
Note : To try to set an improper pair will be rejected.
Press RED
()
key at the position between start and end points, then the skip-point will be removed.
Press MENU key and select ‘Clear skip points’.
Press , to remove all skip points.
5 CH 22 - Indus
00:06:03 / 00:24:53
CH 22 - Indus
2 Ch
(
(
(
(
(
(
S
5 CH 22 - Indus
00:07:06 / 00:24:53
CH 22 - Indus
2 Ch
(
(
(
(
(
(
S
Lock
Clear skip points
Split take
No
7.6
Skip Play
You can jump to a position directly by bookmark function in playback and time-shifted playback. To
search positions very quickly and easily, use bookmarks.
To add a bookmark, press bookmark
()
key at the position you want to add it.
Green dot is displayed at HD-information bar.
1 RAI Internati
00:00:09 / 00:01:10
RAI Internati
2 Ch
(
(
(
(
(
(
S
7.7
Bookmark
Page 52

50
Hard Disk Operation
Hard Disk Operation
Press go to bookmark
()
key to jump to the previous bookmark.
To remove a bookmark, select the bookmarked position by go to bookmark
()
key and press
bookmark
()
key.
7.7
Bookmark
7.8
Repeat
1. Repeat Mode
You can repeat playback by pressing REPEAT
()
key.
Start playback a stored program on HD.
Press REPEAT
()
key to repeat playback.
Whenever press REPEAT
()
, Repeat 1, Repeat All, Normal mode are displayed in turn.
Note : If Repeat 1 mode is selected, only current program is repeated. If Repeat all mode is selected,
every program on HD is repeated. If Normal mode is selected, any program will not be repeated.
2. Repeat A-B
You can repeat selected region by pressing REPEAT A-B
()
key.
Start playback a stored program on HD.
Press REPEAT A-B
()
key to display repeat A message.
If HD-Information bar pops up, icon is displayed on HD-Information bar.
1 RAI Internati
00:00:10 / 00:01:10
RAI Internati
2 Ch
(
(
(
(
(
(
S
Page 53

51
Hard Disk Operation
Hard Disk Operation
Once more, Press REPEAT A-B
()
key to display repeat A-B message.
And selected region is played repeatedly.
If HD-Information bar pops up, , icon display on HD-Information bar.
To stop repeat A-B function, press REPEAT A-B
()
key once more.
1 RAI Internati
00:00:10 / 00:01:10
RAI Internati
2 Ch
(
(
(
(
(
(
S
7.8
Repeat
Select ‘Split take’ menu and press , then Split take dialog will pop-up.
You can split a program in two programs. The operation takes a few minutes to complete splitting.
Select a program with or , and press to play in HD-Program Guide menu.
Go to the split point using trick play control.
Press MENU key, then the additional menu will pop-up.
CH
CH
4 CH 22 - Indus
00:05:06 / 00:23:12
CH 22 - Indus
2 Ch
(
(
(
(
(
(
S
Lock
Clear skip points
Split take
No
4 CH 22 - Indus
00:05:06 / 00:23:12
CH 22 - Indus
2 Ch
(
(
(
(
(
(
S
Lock
Clear skip points
Split take
No
Split this program in two ?
Yes /
Q
No
E
7.9
Split Operation
Page 54

52
Hard Disk Operation
Press to start splitting or EXIT key to cancel.
If split operation starts, the progress window will pop-up and you can see the status of process.
HD-Program Guide
-Delete, -Satellite Mode
12:00
00:01
00:01
00:01
00:23
Title
Play time 00:23
28/08/2001 11:27
Free 37.7 GB (96.6%)
CH 22 - Indus
Play Type
1
2
3
4
Default Event
CH 25 - DBN 24
RAI Internati
CH 22 - Indus
/ -Wotoh,
Now splitting program
42%
After splitting, HD-Program Guide menu will pop-up and splitted program will be selected.
HD-Program Guide
-Delete, -Satellite Mode
12:00
00:01
00:01
00:01
00:05
00:18
Title
Play time 00:10
28/08/2001 11:27
Free 37.5 GB (96.1%)
CH 22 - Indus
Play Type
1
2
3
4
5
Default Event
CH 25 - DBN 24
RAI Internati
CH 22 - Indus
CH 22 - Indus
/ -Wotoh,
7.9
Split Operation
7.10
Trick Play Controls without OSD
You can use trick play controls without HD-Information Bar.
Small yellow icon will be displayed for trick play controls.
At pause state, pressing GREEN
()
/ YELLOW
()
will make the program be played step by step.
In HD-Program Guide menu select a program with or and press to play.
Press BLUE
()
and then GREEN
()
or YELLOW
()
to start trick play without any OSD.
You can control trick play while yellow icons are displayed.
Besides, you can control step by step play with GREEN
()
/ YELLOW
()
at pause state.
CH
CH
Hard Disk Operation
Page 55

53
Trouble Shooting
Trouble Shooting
There may be various reasons for the abnormal operation of the unit. Therefore, if the unit does not
work properly, check it according to the procedures shown in the table below :
Problem
LED on front panel
does not light.
No Picture or sound.
Black-and-white
screen or V-Hold.
Possible causes
AC power cord disconnected.
Wrong connection of the
video/audio output to TV input
terminal.
Wrong connection of satellite
antenna cable.
Wrong direction of satellite
antenna.
No signal or weak signal.
Wrong setting of channel
information in MENU screen.
Your TV mode is different from
satellite broadcasting mode.
Connect power cord properly into
the power socket.
Connect terminals correctly with
scart cable or RCA or RF cable.
Connect the antenna cable
correctly.
Adjust the direction of antenna.
Check the cable connections,
LNB and other equipment
connected between the LNB and
the receiver or adjust the antenna.
Type the setting value correctly.
Use TV of same mode.
Remedy
The remote
controller is not
working.
Battery exhausted.
Fluorescent light interfering
with the remote controller
Remote controller is
incorrectly aimed.
Use the NTSC/PAL converter
connected to the receiver and TV.
Change the batteries.
Switch off the light.
Page 56

50MHz 870MHz
-20dBm
32bit processor (166MHz)
32Mbyte
8Mbyte
4Kbyte
Main Proflie @ Main Level
up to 15Mbits/s
720 X 576, 720 X 480
NTSC, PAL-M
4:3, 16:9
VBI insertion and OSD
Mono, Dual mono, Stereo, Joint Stereo
32, 44.1 and 48 KHz
9pin D-sub male, Max 115Kbps
NEC-IR
up to 7 Meter
Connector
Frequency range
Signal level
Front end
Symbol rate
Input impedance
Processor
SDRAM
FLASH
EEPROM
MPEG 2
Data Rate
Resolution
Video format
Aspect Ratio
DVB compliant
MPEG 1 layer 1 & 2
Type
Sampling rates
Connector
Code
Operating condition
System capabilities
LNB/Tuner input
Demodulator
System resource
Video Decoder
Teletext
MPEG Audio
Serial data interface
Remote control
54
Specifications
Specifications
2Msps 5.5Msps
Fully DVB compliant
IEC 169-24, female
+30dBm
QAM
75 Ohm unbalanced
Power supply
Power consumption
Supply voltage
Supply frequency
max 60W
98V 240V
47Hz 63Hz
Page 57

55
Specifications
Specifications
Rear Panel connectors
Physical Specification
Video out
Audio L/R
DIGITAL OUT
S-VHS out
Digital tuner input
Loop-through Digital tuner
RF ANT IN
RF OUT
Size (W X H X D
Weight (Net
)
)
1 X RCA cinch
2 X RCA cinch
1 X RCA cinch
1 X 4P MINI DIN
IEC 169 24
IEC 169 24
IEC 169 - 24
IEC 169 - 24
335 X 58.5 X 268(mm)
3.2Kg
 Loading...