


Quick Manual

Contents
PART 1. UVO eServices ........................................................................................ 3
Chapter 1. Name and function of the each part ................................................... 3
1.1 Room Mirror Switch ............................................................................. 3
Chapter 2. Before using UVO eServices ............................................................ 3
2.1 What is the UVO eServices? .................................................................. 3
2.2 What is the telematics? ........................................................................ 3
2.3 About receiving/sending signal ............................................................. 3
Chapter 3. Starting UVO eServices ................................................................... 4
3.1 UVO eServices ..................................................................................... 4
3.3 UVO Settings ....................................................................................... 4
Chapter 4. UVO eServices ............................................................................... 5
4.1 Roadside Assist .................................................................................. 5
4.2 Vehicle Diagnostics ............................................................................. 5
4.3 My POIs .............................................................................................. 5
4.4 eSevices Guide .................................................................................... 5
4.5 Apps .................................................................................................. 5
Chapter 5. UVO Settings ................................................................................. 6
5.1 Service Activation ............................................................................... 6
5.2 911 Connect ........................................................................................ 7
5.3 Modem Information .............................................................................. 7
5.4 Wi-Fi Settings ..................................................................................... 7
PART 1. UVO eServices
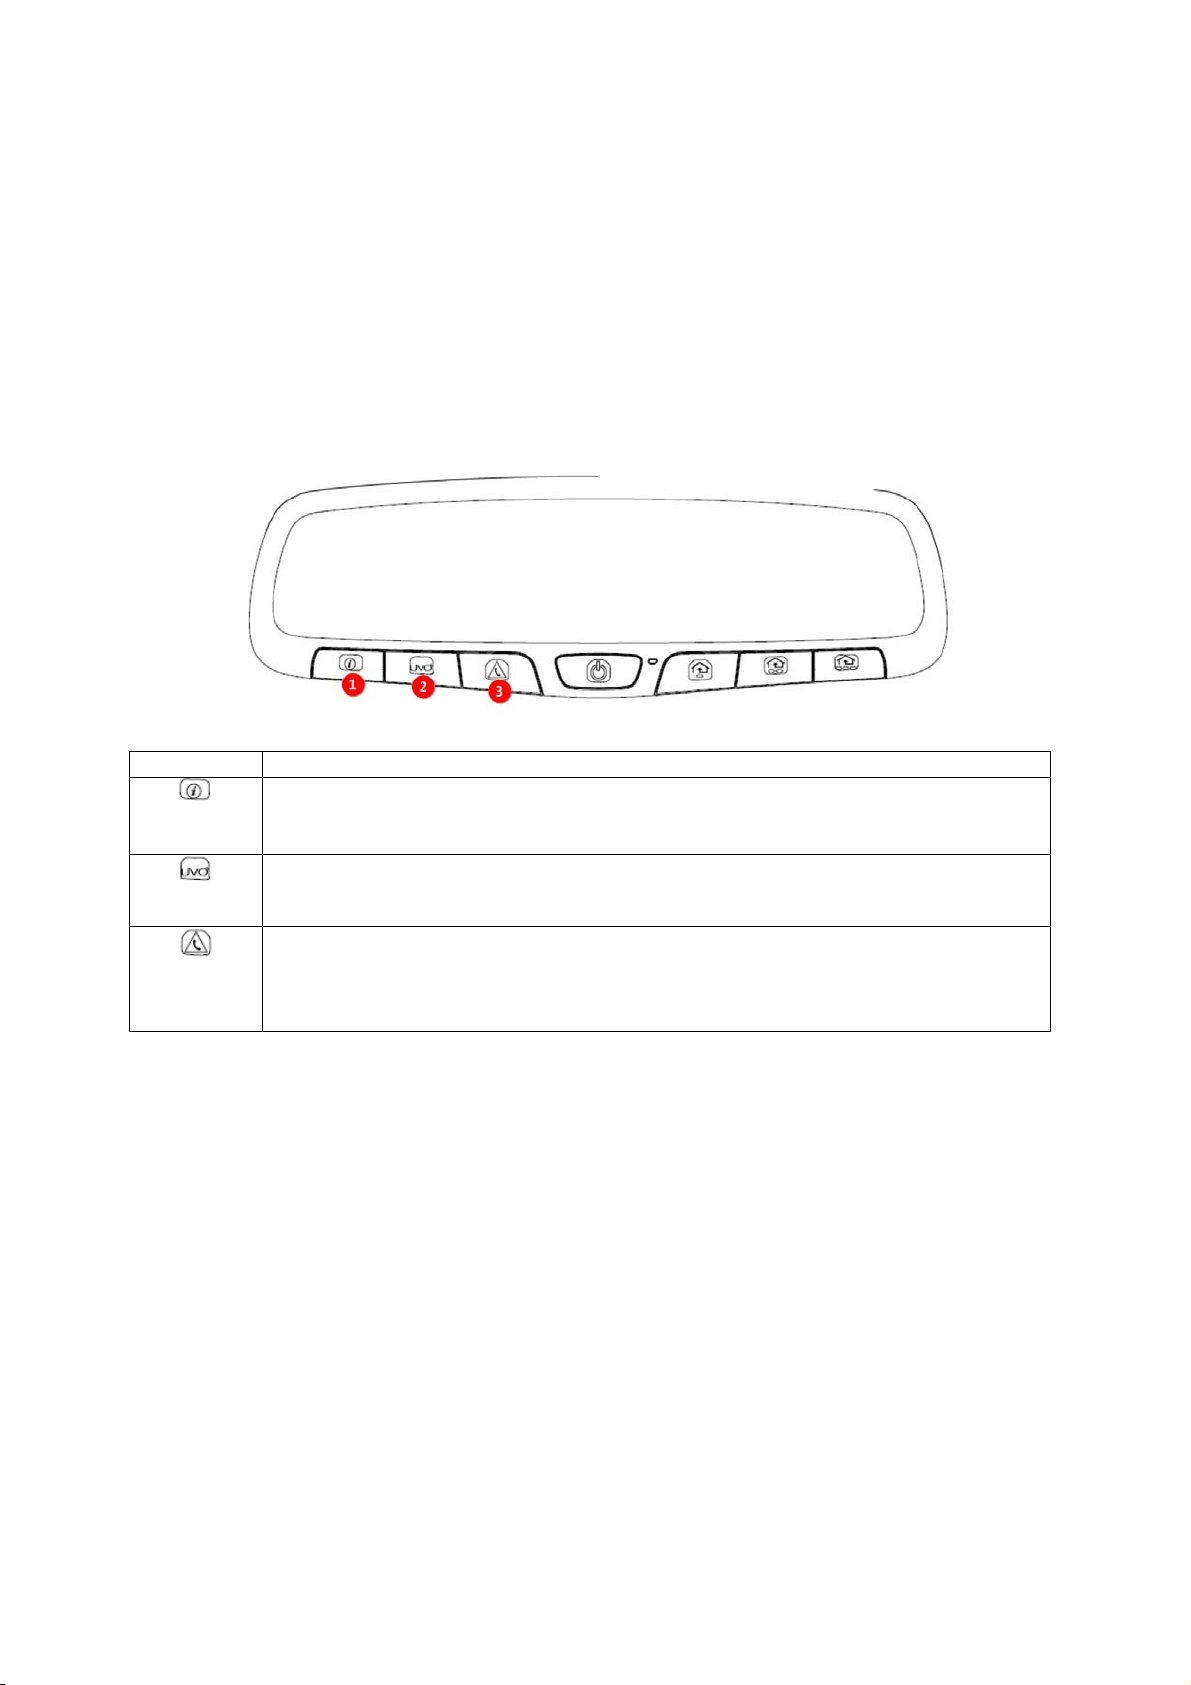
Chapter 1. Name and function of the each part
1.1 Room Mirror Switch
Items Contents
eServices Guide
• It provides guidance on how to use UVO eServices.
• If re-select it while calling to the center agents, the call will be terminated.
Google Local Search (Voice Recognition)
Search Points of Interest in Google map by voice recognition.
Roadside Assist
• If there is any issues in the vehicle, you can connect with a Roadside Assist
agent.
• If re-select SOS Key, connection will be terminated.
Chapter 2. Before using UVO eServices
2.1 What is the UVO eServices?
The UVO eServices is telematics service provided by KIA. Not only It based on high-technology IT
system, but also it provides safety, security, diagnostics, remote control and connection with smart
phone so that you can enjoy and feel convenient while you driving.
You will enjoy smart driving life with UVO eServices.
2.2 What is the telematics?
The telematics combines Telecommunication and informatics. Through system built in the car, it
analyzes various symptoms and driving status, so it can provide variety information to the driver.
Therefore the drivers can drive safely and conveniently.
2.3 About receiving/sending signal
Connect to the UVO Center and wireless data transfer might be influenced in below areas.

You can check receiving/sending signal status as referring to the status is shown in the UVO eServices phone
screen.
We recommend you use UVO eServices system when the antenna signal (
Some areas might be influenced by receiving/sending signal so that the use of UVO eServices is limited.
• Tunnel
• Mountain or forest
• Road closed to cliff
• Buildings concentrated in areas
• Highway or under the bridge
• Inside building
) is higher than 4.
Chapter 3. Starting UVO eServices
In general, UVO menu consists of Roadside Assist, Vehicle Diagnostics, My POIs, eServices Guide,
Apps, UVO Settings and each menu is described in below.
3.1 UVO eServices
Select [UVO] key in the Headunit
1. Roadside Assist: On Kia vehicles with UVO eServices, you can reach our call center and
ask for assistance with the touch of a button..
2. Vehicle Diagnostics: Diagnose the car and then you can receive the result of the diagnosis.
3. My POIs: You can check POI information which is sent from Webpage and Smart Phone.
4. Apps : You can download apps such as Yelp, iHeart Radio.
5. UVO Settings: You can activate the service and check the modem information.
3.3 UVO Settings
▶ Select [UVO] key in the Headunit Select [UVO] Select [UVO Settings]

1. Service Activation: You can activate the service via accessing Center.
2. 911 Connect: This feature is used to turn on or off the 911 Connect feature.
3. Wi-Fi Settings: The network of the digital device can be shared to the system
device through Wi-Fi.
4. Modem Information: You can check phone number, USIM and IMEI information.
Chapter 4. UVO eServices
4.1 Roadside Assist
Select [UVO] key in the Headunit Select [Roadside Assist]
If there is any issues in the vehicle, you can connect with a Roadside Assist agent.
4.2 Vehicle Diagnostics
Select [UVO] key in the Headunit Select [Vehicle Diagnostics]
Vehicle Diagnostics is available only when the ignition is turned on and the vehicle is parked.
It also requires that UVO eServices is activated.
If try to change screen while diagnosis, the diagnosis will be canceled.
4.3 My POIs
Select [UVO] key in the Headunit Select [My POIs]

1. Point of Interest: It shows received POI list.
2. Delete Selected Items: Select POI and delete it.
3. Delete All: Delete all POI list.
4. Call: Call to POI.
5. Show Map: POI will be shown on the map.
6. Previous/Nest: It shows previous or next POI information.
You can check POI information which received from Smart Phone and UVO Website. POI can be
saved maximum 200 lists, if the storage is full, it delete the recently saved POI automatically.
Registering UVO eServices is required to use My POIs.
4.4 eServices Guide
Select [UVO] key in the Headunit Select [eServices Guide]
eServices Guide provides guidance on how to use UVO eServices.
4.5 Apps
Select [UVO] key in the Headunit Select [Apps]
With Download Center, you can install paid/free applications or check for related information. Only
UVO center verified applications can be installed.
Chapter 5. UVO eServices Settings
5.1 Service Activation
▶ Select [UVO] key in the Headunit Select [UVO Settings] Select [Service Activation]
Select [Activation]
5.2 911 Connect
▶ Select [UVO] Select [UVO Settings] Select [911 Connect] Select [On or Off]
This feature is used to turn on or off the 911 Connect feature. To enable 911 Connect, ensure that
the ‘On’ button is selected. To disable this feature, ensure the ‘Off’ button is selected.

▶ When enabling this feature, you must first agree to the 911 Connect terms of use.
After reading the terms of use, press the ‘Agree’ button to accept.
5.2 Modem Information
▶ Select [UVO] key in the Headunit Select [UVO Settings] Select [Modem Information]
1. USIM : It shows ICCID information.
2. IMEI: It shows identity number of the mobile phone.
5.3 Wi-Fi Settings
▶ Select [UVO] Select [UVO Settings] Select [Wi-Fi Settings]
The network of the digital device can be shared to the system device through Wi-Fi.

▶ Screen Structure
1. Wi-Fi : You can turn on/off Wi-Fi.
2. MAC Address : It shows the MAC Address (It is not a button.)
3. Refresh : It searches nearby AP(Access Point) (Manual Search function)
4. AP name : It shows searched AP's name.
5. Add Wi-Fi Network : It registers AP to connect the hidden AP.
▶ The order of network connection
1. In the digital device, turn on the Hotspot option in network settings.
2. Select the digital device what you want to share, from the list of the car, and then connect it. If
there is the security option, input the passwords and connect it.

"!! #$('&'%
3=>G 9EI>DA9BH =5G 699B H9GH98 5B8 ;CIB8 HC 7CAD@M K>H= H=9 @>A>HG ;CF 5 -@5GG , 8><>H5@ 89J>79# DIFGI5BH
HC D5FH ') C; H=9 .-- 2I@9G$ 3=9G9 @>A>HG 5F9 89G><B98 HC DFCJ>89 F95GCB56@9 DFCH97H>CB 5<5>BGH =5FA;I@
>BH9F;9F9B79 >B 5 F9G>89BH>5@ >BGH5@@5H>CB$
3=>G 9EI>DA9BH <9B9F5H9G# IG9G 5B8 75B F58>5H9 F58>C ;F9EI9B7M 9B9F<M 5B8# >; BCH >BGH5@@98 5B8 IG98 >B
577CF85B79 K>H= H=9 >BGHFI7H>CBG# A5M 75IG9 =5FA;I@ >BH9F;9F9B79 HC F58>C 7CAAIB>75H>CBG$ /CK9J9F#
H=9F9 >G BC <I5F5BH99 H=5H >BH9F;9F9B79 K>@@ BCH C77IF >B 5 D5FH>7I@5F >BGH5@@5H>CB$ 0; H=>G 9EI>DA9BH 8C9G
75IG9 =5FA;I@ >BH9F;9F9B79 HC F58>C CF H9@9J>G>CB F979DH>CB# K=>7= 75B 69 89H9FA>B98 6M HIFB>B< H=9
9EI>DA9BH C;; 5B8 CB# H=9 IG9F >G 9B7CIF5<98 HC HFM HC 7CFF97H H=9 >BH9F;9F9B79 6M CB9 CF ACF9 C; H=9
;C@@CK>B< A95GIF9G*
" 29CF>9BH CF F9@C75H9 H=9 F979>J>B< 5BH9BB5$
" 0B7F95G9 H=9 G9D5F5H>CB 69HK99B H=9 9EI>DA9BH 5B8 F979>J9F$
" -CBB97H H=9 9EI>DA9BH >BHC 5B CIH@9H CB 5 7>F7I>H 8>;;9F9BH ;FCA H=5H HC K=>7= H=9 F979>J9F >G
7CBB97H98$
" -CBGI@H H=9 895@9F CF 5B 9LD9F>9B798 F58>C%34 H97=B>7>5B ;CF =9@D
-5IH>CB* +BM 7=5B<9G CF AC8>;>75H>CBG HC H=>G 89J>79 BCH 9LD@>7>H@M 5DDFCJ98 6M A5BI;57HIF9F 7CI@8 JC>8
MCIF 5IH=CF>HM HC CD9F5H9 H=>G 9EI>DA9BH$
3=>G 89J>79 7CAD@>9G K>H= D5FH ') C; H=9 .-- 2I@9G$ 1D9F5H>CB >G GI6?97H HC H=9 ;C@@CK>B< HKC 7CB8>H>CBG*
!'" 3=>G 89J>79 A5M BCH 75IG9 =5FA;I@ >BH9F;9F9B79# 5B8 !(" H=>G 89J>79 AIGH 5779DH 5BM >BH9F;9F9B79
F979>J98# >B7@I8>B< >BH9F;9F9B79 H=5H A5M 75IG9 IB89G>F98 CD9F5H>CB$
3=>G 9EI>DA9BH 7CAD@>9G K>H= .-- F58>5H>CB 9LDCGIF9 @>A>HG G9H ;CFH= ;CF 5B IB7CBHFC@@98 9BJ>FCBA9BH$
3=>G 9EI>DA9BH G=CI@8 69 >BGH5@@98 5B8 CD9F5H98 K>H= A>B>AIA (& 7A 69HK99B H=9 F58>5HCF 5B8 MCIF
6C8M$ 3=>G HF5BGA>HH9F AIGH BCH 69 7C@@C75H98 CF CD9F5H>B< >B 7CB?IB7H>CB K>H= 5BM CH=9F 5BH9BB5 CF
HF5BGA>HH9F IB@9GG 5IH=CF>N98 HC 8C GC 6M H=9 .--$
 Loading...