

Page 1

Car Infotainment System | Quick Reference Guide
PALISADE
Page 2
To access the online manual for Car Infotainment
System, scan the
Be sure to read this User’s Manual before using the product to ensure safety and usability.
QR code.
Page 3
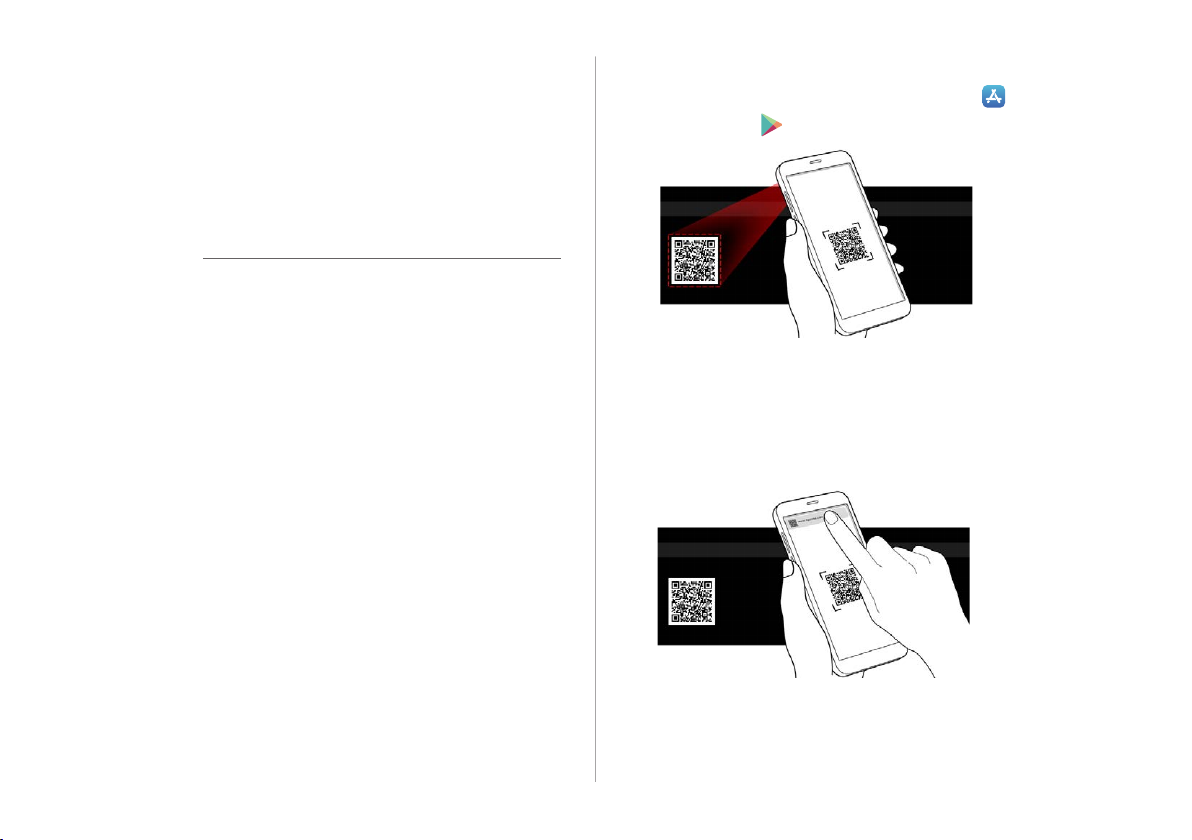
Reading the manual on web
with the QR code
You can access the online user’s manual of the system by
scanning the QR code with your smartphone.
Warning
Ý
Park the vehicle at a safe place and scan the QR code. To ensure
your safety, the system does not provide QR codes while driving.
Scan the QR code by using any of the following
1
methods:
On the All Menus screen, press User's Manual.
•
On the All Menus screen, press Setup > General >
•
System Info > User's Manual on Web (QR Code).
Or scan the QR code in the Quick Reference Guide.
•
Scan the QR code after installing the QR code
2
reader application from App Store (
Play Store (
Press the URL for User’s Manual on Web from the
3
).
) or Google
smartphone display.
The online user’s manual of the system appears in the
Internet browser application on the smartphone.
1
Page 4

AA
Depending on how you scan the QR code, the online manual
may open without pressing the URL.
AA
With a camera application of your iPhone or Android
smartphone, the QR code can also be scanned. Depending
on the Android smartphone model, the QR code scanning
may not be supported for the provided application. For more
details, see the smartphone’s manual.
AA
When you scan the QR code on each function menu, you
can see the usage of the function running (except for several
functions).
A-
Run the desired function on the system and then press
Menu > User's Manual on Web (QR Code).
AA
Without scanning the QR code, you can directly enter the URL
address to see User’s Manual on Web. (http://webmanual.
hyundai.com/STD_GEN5_WIDE/AVNT/USA/English/index.
html)
Safety Warnings
Be sure to keep the following instructions. Otherwise, it may
cause serious injury or accident.
Driving
Ý
Obey all trac laws while driving.
Relying solely on the navigation system may cause violation of trac rules
•
and regulations, resulting in an accident.
In order to check the vehicle speed, see the speedometer rst,
not the speed on the navigation system.
The speed on the navigation system may dier from actual vehicle speed.
•
While driving, refrain from watching the screen.
An accident may occur by negligence in keeping your eyes forward.
•
To manipulate the screen or buttons requiring multiple steps, be sure to
•
stop your vehicle.
To use your mobile phone, rst stop your vehicle.
When you use your mobile phone while driving, it may disperse your
•
attention, resulting in an accident.
When making a call while driving, use the Bluetooth Hands-free function
•
and if possible, minimize the call time.
2
Page 5

Make sure that the volume of the phone is suciently low so
that the external sound is audible.
When you drive with no external sound present may cause a trac accident.
•
When you drive for a long time with a loud audio volume, it may aect your
•
hearing.
For emergency services (e.g. hospital, re station), do not rely
solely on the navigation system.
Some emergency services may not be included in the navigation map.
•
Check relevant information in advance to stay prepared for an emergency.
System handling
Ý
Do NOT arbitrarily disassemble or modify the system.
It may cause an accident, re, or electric shock.
•
Exercise caution to make sure that no liquid or foreign
materials enter the system.
It may cause smoke generation, re ignition, or system failure.
•
When the screen is not displayed, the volume is muted, or
other system failures occur, immediately stop using the
system.
Otherwise, it may cause re, electric shock, or fatal system failure.
•
AA
If you experience any problems with the system, contact your
place of purchase or dealer.
Safety Precautions
Be sure to keep the following instructions. Otherwise, it may
cause minor injury or system damage.
Operation
Ü
Use the system with the vehicle started.
When you use the system for a long time with the vehicle stopped, it may
•
cause battery discharge.
Do NOT arbitrarily install an unauthorized aftermarket
product in your vehicle.
Using unapproved products may cause an error while using the system.
•
System errors caused by installing unapproved products are not covered
•
under the warranty.
System handling
Ü
Do NOT apply excessive force to the system.
When you apply excessive pressure to the screen, the LCD panel or touch
•
panel may get damaged.
To clean the screen or button panel, rst turn o the vehicle
and then use a dry, soft cloth to wipe it.
Do not wipe using a rough or hard cloth, chemical ber, organic solvent (e.g.
•
alcohol, benzene, thinner), or air freshener. The panel surface may become
scratched or damaged due to a chemical reaction.
When you install an air freshener on the air conditioner vent,
the surface may be deformed due to leakage.
AA
If you experience any problems with the system, contact your
place of purchase or dealer.
3
Page 6
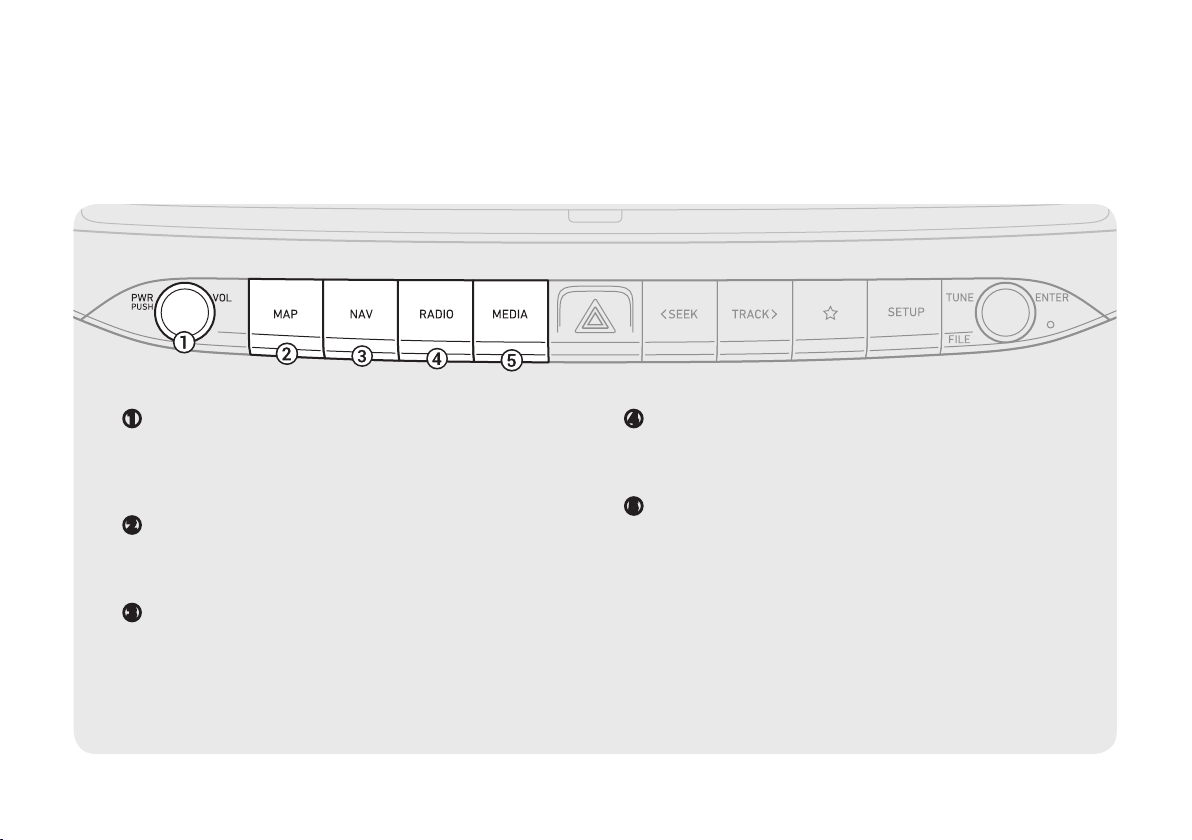
Component names and functions
Control panel
a
POWER button/VOLUME knob
Press the button to turn on or o the Radio/Media.
•
Press and hold the button to turn o the screen and sound.
•
Turn the knob left or right to adjust the system volume (except
•
for navigation sound).
b
MAP button
Returns to the current location on the map.
•
When pressed while in guidance on the map screen, the voice
•
guidance is repeated.
c
NAV button
Moves to the navigation/route screen.
•
When you press and hold the button, the Places screen appears.
•
AA
4
The system shape and menu arrangement may dier depending on the vehicle model and specications.
d
RADIO button
Turns on the radio.
•
When you press the button repeatedly with the radio turned on,
•
it toggles between FM, AM and SiriusXM modes.
e
MEDIA button
Run the media.
•
Press and hold to display the media selection window.
•
Page 7
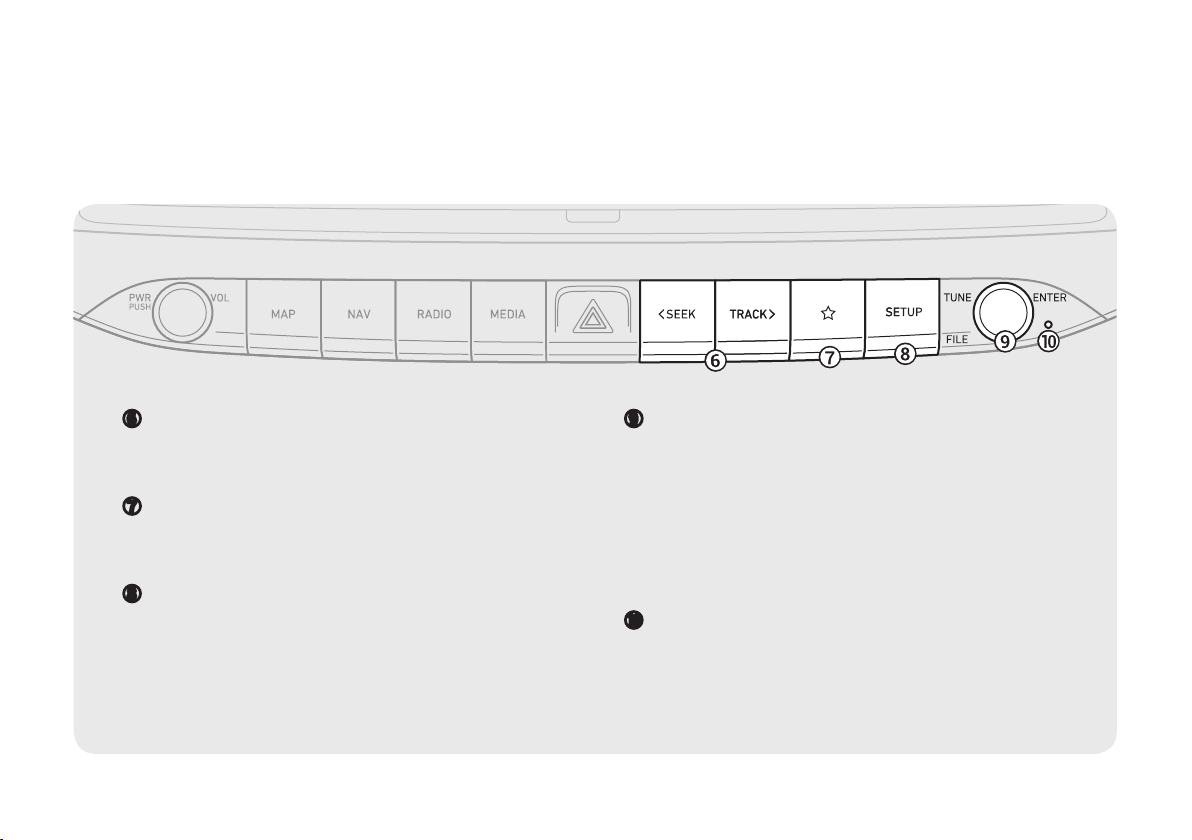
f
SEEK/TRACK button
While listening to the radio, change the station.
•
While playing media, change the track/le. Press and hold to
•
rewind or fast forward (except for the Bluetooth audio mode).
g
Custom button
Runs the user-dened function.
•
Press and hold the button to display the Custom Button settings
•
screen.
h
SETUP button
Displays the Settings screen.
•
When you press and hold the button the SW Info/Update screen
•
appears.
i
TUNE knob/FILE knob/ENTER button
Turn the knob to change the frequency and channel while
•
listening to the radio.
Turn the knob to search for music or le while playing media.
•
Press the button to select a channel, music, or le during a
•
search.
Turn the knob on the map screen to zoom in or out the map (if
•
activated).
When you press and hold the button, the TUNE Knob Function
•
screen appears.
j
System Reset button
Restarts the system.
•
5
Page 8

Steering wheel remote control
a
Voice Recognition button
Press to start voice recognition and press and hold to end
•
voice recognition.
Press and hold to start or end voice recognition of a
•
connected smartphone via phone projection. (The
button’s operation may vary depending on smartphone
specications.)
b
MODE button
Press the button repeatedly to change the system mode
•
(radio, media, etc.).
Press and hold the button to display the settings for the
•
Steering wheel MODE button.
c
Volume lever/button
Volume adjustment.
•
Press the button to mute or unmute the volume (except for navigation sound).
•
Press the button to pause or resume playback.
•
d
Move lever
While listening to the radio, switch between the stations on the preset list. Press and hold to search for a station.
•
While playing media, change the track/le. Press and hold to rewind or fast forward (except for the Bluetooth audio mode).
•
e
Call button
Before connection of Bluetooth: Press to display the Bluetooth connection window.
•
After connection of Bluetooth: Press to display the recent calls list, press and hold to redial the last number, and press for an incoming
•
call to answer it.
On a Bluetooth call: Press to switch to Call Waiting and press and hold to switch between the system and mobile phone.
•
f
End Call button
During a Bluetooth call, press to end the call.
•
Press to ignore a call with the Bluetooth connected.
•
AA
6
The system shape and menu arrangement may dier depending on the vehicle model and specications.
Page 9

Turning the system on or o
Turning on the system
Turn on the vehicle.
1
When a safety warning message appears, read it
2
and press Conrm.
AA
To change the display language, press Language.
Turning off the system
To turn o the system while driving, press and hold
the Power button on the panel.
The screen and sound will be turned o.
AA
To use the system again, press the Power button.
AA
When a specied period of time elapses after turning o the
vehicle, the system automatically shuts down. When you open
the driver's door, the system immediately shuts down.
Warning
Ý
Driving while distracted can result in a loss of vehicle control
•
that may lead to an accident, severe bodily injury, or death.
The driver's primary responsibility is the safe and legal
operation of the vehicle, and the use of any vehicle systems,
including the touch screen and steering wheel controls, which
take the driver's eyes, attention, and focus away from the safe
operation of the vehicle, or which are not permissible by law,
should never be used during the operation of the vehicle.
Some functions may not be active while driving to ensure
•
safety. Those functions run only when the vehicle is stationary.
In order to use them, rst stop the vehicle.
When the screen is not displayed, the volume is muted, or
•
other system failures occur, immediately stop using the
system. When you use the faulty system continuously, it may
cause re, electric shock, or fatal system failure.
Caution
Ü
The system can be turned on even when the ignition switch is
•
in “ACC” or “ON.” However, when you use the system without
turning on the vehicle for a long time, it may cause battery
discharge. To use the system for a long time, be sure to turn
on the vehicle.
When you use the system with the vehicle turned o, the
•
battery warning message appears. The warning message
disappears as soon as you turn on the vehicle.
7
Page 10

Product specications
Display
Item Specications
Common specications
Item Specications
External dimensions 271.6 x 141.4 x 178.6 mm
Weight 1.917 kg (Ext AMP) / 1.938 kg (Int AMP)
Display size AV body - 10.25 inch (243.65 x 91.37 mm)
Number of pixels AV body - 1,382,400 pixels
(resolution: 1920 x 720)
Drive system TFT (Thin Film Transistor) active matrix
system
Viewing angle AV body - Left/right, Horizontal/vertical:
89°
Internal lighting LED
8
Page 11

FCC Certication
This equipment has been tested and found to comply with the
limits for a Class B digital device, pursuant to part 15 of the FCC
Rules. These limits are designed to provide reasonable protection
against harmful interference in a residential installation.
This equipment generates, uses and can radiate radio
frequency energy and, if not installed and used in accordance
with the instructions, may cause harmful interference to
radio communications. However, there is no guarantee that
interference will not occur in a particular installation. If this
equipment does cause harmful interference to radio or television
reception, which can be determined by turning the equipment o
and on, the user is encouraged to try to correct the interference
by one or more of the following measures:
Reorient or relocate the receiving antenna.
•
Increase the separation between the equipment and receiver.
•
Connect the equipment into an outlet on a circuit dierent
•
from that to which the receiver is connected.
Consult the dealer or an experienced radio/TV technician for
•
help.
Caution: Any changes or modications to this device not explicitly
approved by manufacturer could void your authority to operate
this equipment.
This device complies with part 15 of the FCC Rules. Operation is
subject to the following two conditions: (1) This device may not
cause harmful interference, and (2) this device must accept any
interference received, including interference that may cause
undesired operation.
This equipment complies with FCC radiation exposure limits set
forth for an uncontrolled environment.
This equipment should be installed and operated with minimum
20 cm between the radiator and your body. This transmitter must
not be co-located or operating in conjunction with any other
antenna or transmitter unless authorized to do so by the FCC.
9
Page 12
Page 13

Car Infotainment System
User’s Manual
This guide covers specications for all vehicle models, including optional specications, and is based on the latest version of system
[
software.
The design and specication of the system may change without prior notice for performance improvement.
[
In order to improve the product performance, the functions and services in this manual are subject to change without notice. In case of
[
software update, the screens in this manual may dier from actual ones on the product.
For more information about the functions and services updated for performance improvement, access the online user's manual.
[
Functions and services in this manual may dier from those in the actual vehicle. For more details, refer to the owner’s manual or brochure
[
of your vehicle.
Your system is not compatible with the system software and map data for regions outside of the country of purchase.
[
1
Page 14
Available materials for operation
Quick
Provided in the format of a booklet. It provides brief information of the system,
Reference
Guide
including basic controls and main functions.
User's
Manual on
To see the information while using the system, press Menu > User's Manual on Web
(QR Code). By scanning the QR code with your smartphone, you can access the online
user's manual.
Web
2
Page 15
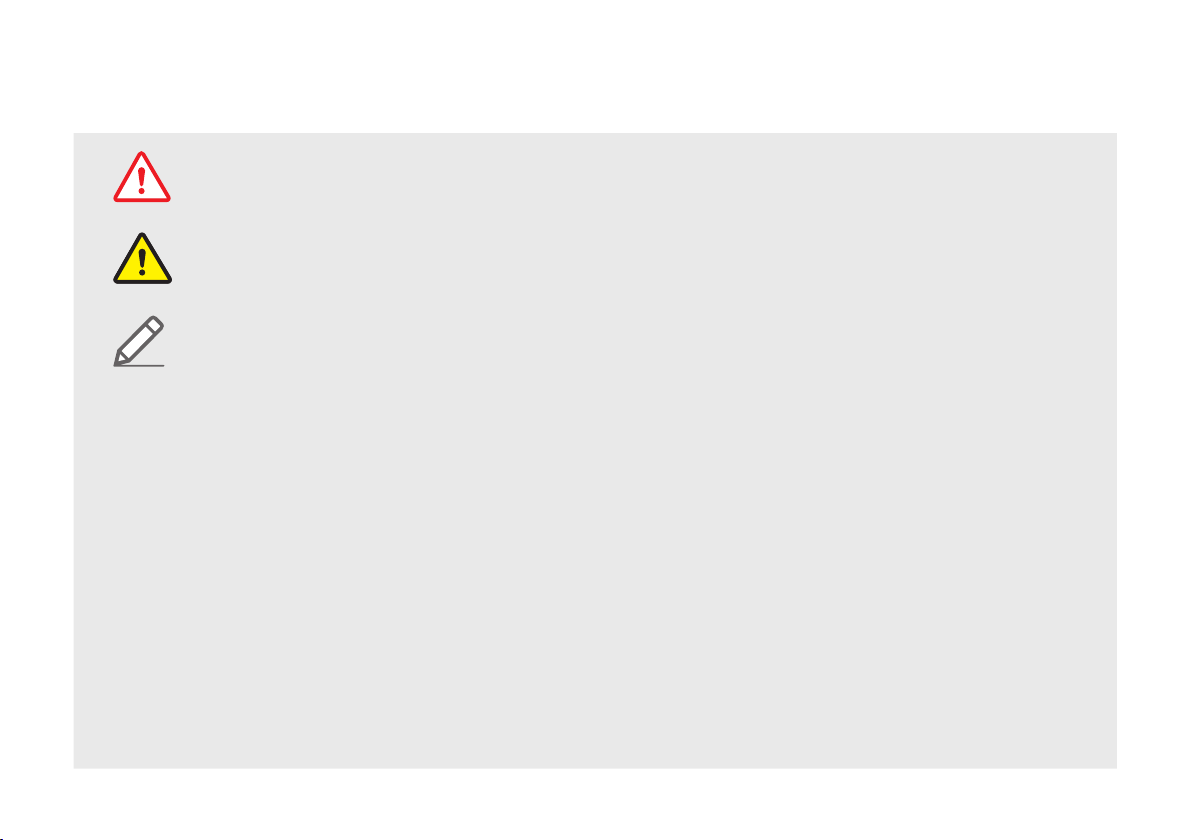
Symbols in this User’s Manual
Indicates very important information directly related to user safety. Failure to follow
Warning
Caution
instructions may cause serious injury.
Indicates important information directly related to user safety. Failure to follow
instructions may cause minor injury or vehicle damage or breakdown.
Note
If equipped
HEV only
PHEV only
EV only
Indicates helpful information for operation of the product.
Indicates descriptions for optional features, which may not be available on your specic
vehicle depending on the model or trim level.
This guide covers specications for all vehicle models, including optional specications.
It may include descriptions for features that are not equipped in your vehicle or are
unavailable for your vehicle model.
Displays only the functions that can be used in a hybrid vehicle.
Displays only the functions that can be used in a plug-in hybrid vehicle.
Displays only the functions that can be used in an electric vehicle.
3
Page 16

Safety Warnings
Be sure to keep the following instructions. Otherwise, it may
cause serious injury or accident.
Driving
Ý
Obey all trac laws while driving.
Relying solely on the navigation system may cause violation of trac rules
•
and regulations, resulting in an accident.
In order to check the vehicle speed, see the speedometer rst,
not the speed on the navigation system.
The speed on the navigation system may dier from actual vehicle speed.
•
While driving, refrain from watching the screen.
An accident may occur by negligence in keeping your eyes forward.
•
To manipulate the screen or buttons requiring multiple steps, be sure to
•
stop your vehicle.
To use your mobile phone, rst stop your vehicle.
When you use your mobile phone while driving, it may disperse your
•
attention, resulting in an accident.
If necessary, use handsfree (Bluetooth) calling when driving and minimize
•
the call time.
Make sure that the volume of the phone is suciently low so
that the external sound is audible.
When you drive with no external sound present may cause a trac accident.
•
When you drive for a long time with a loud audio volume, it may aect your
•
hearing.
For emergency services (e.g. hospital, re station), do not rely
solely on the navigation system.
Some emergency services may not be included in the navigation map.
•
Check relevant information in advance to stay prepared for an emergency.
System handling
Ý
Do NOT arbitrarily disassemble or modify the system.
It may cause an accident, re, or electric shock.
•
Exercise caution to make sure that no liquid or foreign
materials enter the system.
It may cause smoke generation, re ignition, or system failure.
•
When the screen is not displayed, the volume is muted, or
other system failures occur, immediately stop using the
system.
Otherwise, it may cause re, electric shock, or fatal system failure.
•
AA
If you experience any problems with the system, contact your
place of purchase or dealer.
4
Page 17

Safety Precautions
Be sure to keep the following instructions. Otherwise, it may
cause minor injury or system damage.
Operation
Ü
Use the system with the vehicle started.
When you use the system for a long time with the vehicle stopped, it may
•
cause battery discharge.
Do NOT arbitrarily install an unauthorized aftermarket
product in your vehicle.
Using unapproved products may cause an error while using the system.
•
System errors caused by installing unapproved products are not covered
•
under the warranty.
System handling
Ü
Do NOT apply excessive force to the system.
When you apply excessive pressure to the screen, the LCD panel or touch
•
panel may get damaged.
To clean the screen or button panel, rst turn o the vehicle
and then use a dry, soft cloth to wipe it.
Do not wipe using a rough or hard cloth, chemical ber, organic solvent (e.g.
•
alcohol, benzene, thinner), or air freshener. The panel surface may become
scratched or damaged due to a chemical reaction.
When you install an air freshener on the air conditioner vent,
the surface may be deformed due to leakage.
AA
If you experience any problems with the system, contact your
place of purchase or dealer.
5
Page 18

HYUNDAI VEHICLE OWNER PRIVACY POLICY
Your Hyundai vehicle may be equipped with technologies and
services that use information collected, generated, recorded
or stored by the vehicle. Hyundai has created a Vehicle Owner
Privacy Policy to explain how these technologies and services
collect use and share this information.
You may read our Vehicle Owner Privacy Policy on the
Hyundaiusa.com website at:
https://www.hyundaiusa.com/owner-privacy-policy.aspx
If you would like to receive a hard copy of our Vehicle Owner
Privacy Policy, please contact our Customer Connect Center at:
Hyundai Customer Care
P.O. Box 20850
Fountain Valley, CA 92728
800-633-5151
consumera[email protected]
Hyundai's Customer Connect Center representatives are
available Monday through Friday, between the hours of 5:00 AM
and 7:00 PM PST and Saturday and Sunday between 6:30 AM and
3:00 PM PST (English).
For Customer Connect Center assistance in Spanish or Korean,
representatives are available Monday through Friday between
6:30 AM and 3:00 PM PST.
6
Page 19

Contents
01
Component names and functions 1-2
Turning the system on or o 1-4
Using the touch screen 1-6
Using the Home screen 1-10
Seeing the all menus screen 1-12
System overview
Control panel 1-2
Steering wheel remote control 1-3
Turning on the system 1-4
Turning o the system 1-5
“Press” gesture 1-7
“Press and hold” gesture 1-7
“Slide” gesture 1-8
“Drag” gesture 1-8
“Swipe” gesture 1-9
“Spread/pinch” gesture 1-9
Home screen 1-10
Editing widgets on the Home screen 1-11
Editing icons on the Home screen 1-11
Using the split screen 1-12
Opening the split screen 1-12
Editing the split screen 1-13
Closing the split screen 1-13
02
Using the First Run Setup 2-2
Using the phone projection function 2-4
Using the driving assist display 2-8
Using the climate control system 2-13
Using the rear-seat climate control system 2-14
Using the Passenger Talk mode in the rear seat 2-15
Using the Quiet mode in the rear seat 2-16
Useful functions
Pairing to an Android smartphone via Android Auto 2-4
Pairing to an iPhone via Apple CarPlay 2-6
Using the rear-view display 2-9
Surround View Monitor 2-11
Playing Sounds of Nature 2-16
7
Page 20

Using the HD Radio Data 2-17
Seeing trac information by using HD radio data 2-18
Seeing weather information by using Doppler weather radar 2-19
Seeing fuel price information by using HD radio data 2-20
Seeing the driving information 2-20
Seeing notications 2-21
04
Using media 4-2
Media
Listening to music from a USB device 4-2
Listening to music via Bluetooth 4-7
03
Listening to the radio 3-2
Listening to HD Radio™ 3-6
Listening to SiriusXM™ radio 3-8
8
Radio
Radio screen 3-2
Changing the radio mode 3-4
Changing the radio channel 3-4
Saving radio channels 3-5
Editing the radio channel list 3-6
HD Radio™ Technology 3-7
Changing to SiriusXM mode 3-8
Searching for SiriusXM radio channels 3-9
Selecting channels by using channel numbers 3-10
Seeing the program schedule 3-10
Listening to Featured Favorites channels 3-11
05
Navigation functions 5-2
Various ways to nd routes 5-9
Navigation
Navigation Menu overview 5-2
Finding a route easily 5-3
Map screen 5-6
Adjusting the navigation volume 5-8
Stopping the route guidance 5-8
Seeing trac Information 5-8
Searching by keyword 5-10
Searching by previous destinations 5-11
Searching for Hyundai Dealerships 5-13
Searching the nearby points of interest 5-14
Editing the route 5-16
Changing the route search criteria 5-19
Avoiding specic zones 5-20
Searching for restaurants 5-20
Searching for emergency services 5-21
Page 21

Using the address book 5-22
Registering a searched place as a favorite place 5-22
Registering the current position as a favorite place 5-23
Registering a frequently visited place as a favorite place 5-24
Setting a registered favorite place as a destination 5-24
Registering a frequently visited place as a destination 5-25
Editing the registered place 5-25
Deleting a registered favorite place(s) 5-26
Searching for gas stations 5-27
Accepting an incoming call over Bluetooth 6-15
Rejecting a call 6-16
Using functions during a call 6-16
Checking a new message over Bluetooth 6-18
Checking a new message 6-18
Checking a new message from the list 6-19
Sending a text by using the voice recognition 6-20
Searching for EV (Electric Vehicle) charging stations 5-28
06
Connecting a Bluetooth device 6-2
Making a call via Bluetooth 6-6
Phone
Registering a device 6-3
Connecting a registered device 6-4
Disconnecting a registered device 6-5
Deleting a registered device 6-6
Dialing from the recent call list 6-7
Dialing from the favorites list 6-8
Dialing from the contacts 6-10
Using the dial pad 6-13
Dialing with voice recognition 6-15
07
Voice recognition 7-2
Using the Siri Eyes Free 7-18
Voice Memo 7-19
Voice functions
Using the voice recognition 7-2
Seeing the voice recognition help 7-4
Available voice commands 7-6
POI names 7-10
Using the voice memos 7-19
Recording a voice memo 7-20
Playing a voice memo 7-20
9
Page 22

08
Blue Link
09
Settings
Blue Link service 8-2
Service restrictions 8-2
Subscribing to the service 8-3
Running the Blue Link 8-3
Using the received location information 8-4
Checking the weather information 8-5
Diagnosing the vehicle 8-6
Checking maintenance service intervals 8-7
Conguring the Blue Link settings 8-7
Using Voice Local Search 8-7
Using safety and security services 8-8
Auto Collision Notication 8-8
SOS 8-9
Stolen Vehicle Recovery 8-9
Contacting the Blue Link Center 8-10
Route guidance service 8-10
Finding the route to the destination by manual entry 8-10
Conguring the vehicle settings 9-2
Head-Up Display 9-2
Driver Assistance 9-3
Drive Mode 9-8
Climate 9-10
ECO Vehicle 9-11
Lights 9-11
Door 9-12
Cluster 9-14
Convenience 9-15
Seat 9-16
Digital Key 9-18
Reset 9-18
Conguring the device connection settings 9-19
Bluetooth 9-19
Android Auto 9-21
Apple CarPlay 9-21
10
Page 23

Conguring the advanced system settings 9-22
Return to Map: Set Time 9-22
TUNE Knob Function 9-23
Custom Button ☆ 9-23
Steering Wheel MODE Button 9-24
Home Screen 9-24
Split Screen 9-25
My Data 9-25
Extend Rear Camera Use 9-26
Conguring the button settings 9-26
TUNE Knob Function 9-27
Custom Button ☆ 9-27
Steering Wheel MODE Button 9-28
Conguring the sound settings 9-28
Premium Sound 9-29
Sound Tuning 9-29
Driving Guidance 9-30
System Volumes 9-30
FM Radio Noise Control 9-31
Reset 9-32
Turning on/o the screen touch sound 9-32
Conguring the voice recognition settings 9-32
Guidance 9-32
Conguring the navigation settings 9-33
Display 9-33
Guidance 9-35
Alerts 9-36
Others 9-37
Conguring the Blue Link settings 9-39
Activate Blue Link 9-39
Modem Information 9-39
Modem Status 9-40
Conguring the user prole settings 9-40
Prole Settings 9-41
Conguring the general system settings 9-42
SW Info/Update 9-42
System Info 9-43
My Data 9-44
Date/Time 9-45
Language 9-46
Keyboard 9-46
Units 9-47
11
Page 24

Conguring the display settings 9-47
Illumination 9-48
Blue Light Filter 9-49
Screen Saver 9-49
Home Screen 9-50
Split Screen 9-50
Media Change Notications 9-51
Extend Rear Camera Use 9-51
Reset 9-51
Conguring the media settings 9-52
Media Change Notications 9-52
Repeat Folder 9-52
Updating the system software and map 9-53
10
Solutions 10-2
System status indicator icons 10-9
FAQ 10-11
Product specications 10-13
Important information 10-17
Index 10-19
Trademarks 10-23
Open Source Information 10-24
Appendix
12
Page 25

01
System overview
Component names and functions
Turning the system on or o
Using the touch screen
Using the Home screen
Seeing the all menus screen
Using the split screen
Page 26
Component names and
functions
The following describes the part names and controls on the
control panel and steering wheel.
Control panel
AA
The shape may dier depending on the vehicle model and
specications. For more information, see “Quick Reference
Guide” that is separately provided.
POWER button
(POWER/PWR)/
VOLUME knob
(VOLUME/VOL)
MAP button
NAV button
Press the button to turn on or o the
•
Radio/Media.
Press and hold the button to turn o
•
the screen and sound.
Turn the knob to adjust the system
•
volume (except for navigation sound).
Returns to the current location on the
•
map.
When pressed while in guidance on
•
the map screen, the voice guidance is
repeated.
Moves to the navigation/route screen.
•
When you press and hold the button,
•
the Places screen appears.
“Searching by keyword.”
> See
RADIO button
MEDIA button
SEEK/TRACK
button
Custom button
(
)
SETUP button
Turns on the radio.
•
When you press the button
•
repeatedly with the radio turned
on, it toggles between FM, AM and
SiriusXM modes.
Run the media.
•
Press and hold to display the media
•
selection window.
While listening to the radio, change
•
the station.
While playing media, change the
•
track/le. Press and hold to rewind or
fast forward (except for the Bluetooth
audio mode).
Runs the user-dened function.
•
Press and hold the button to display
•
the Custom Button settings screen.
Displays the Settings screen.
•
When you press and hold the button
•
the SW Info/Update screen appears.
> See “SW Info/Update.”
1-2
Page 27
TUNE knob/
FILE knob/
ENTER button
(if equipped)
System Reset
button
Turn the knob to change the
•
frequency and channel while listening
to the radio.
Turn the knob while playing media to
•
scan for music or le.
Press the button to select a channel,
•
music, or le during a search.
Turn the knob on the map screen to
•
zoom in or out the map (if activated).
When you press and hold the button,
•
the TUNE Knob Function screen
appears.
Restarts the system.
•
Steering wheel remote control
AA
The shape may dier depending on the vehicle model and
specications. For more information, see “Quick Reference
Guide” that is separately provided.
Voice Recognition
button
(
)
MODE button
Volume lever/
button (+/-)
Press to start voice recognition
•
and press and hold to end voice
recognition.
Press and hold to start or end
•
voice recognition of a connected
smartphone via phone projection.
(The button’s operation may
vary depending on smartphone
specications.)
Press the button repeatedly to
•
change the system mode (radio,
media, etc.).
Press and hold the button to display
•
the settings for the Steering Wheel
MODE button.
Volume adjustment.
•
Mute button
)
(
Press the button to mute or unmute
•
the volume (except for navigation
sound).
Press the button to pause or resume
•
playback.
1-3
Page 28
Move lever/
button (
Call button
(
End Call button
(
/ )
)
)
While listening to the radio, switch
•
between the stations on the preset
list. Press and hold to search for a
station.
While playing media, change the
•
track/le. Press and hold to rewind or
fast forward (except for the Bluetooth
audio mode).
Before connection of Bluetooth: Press
•
to display the Bluetooth connection
window.
After connection of Bluetooth: Press
•
to display the recent calls list, press
and hold to redial the last number,
and press for an incoming call to
answer it.
On a Bluetooth call: Press to switch
•
to Call Waiting and press and hold
to switch between the system and
mobile phone.
During a Bluetooth call, press to end
•
the call.
Press to ignore a call with the
•
Bluetooth connected.
Turning the system on or o
The following explains how to turn on or o the system. Before
using the system, be sure to read the user's manual for safe and
convenient manipulation.
Turning on the system
Turn on the vehicle.
1
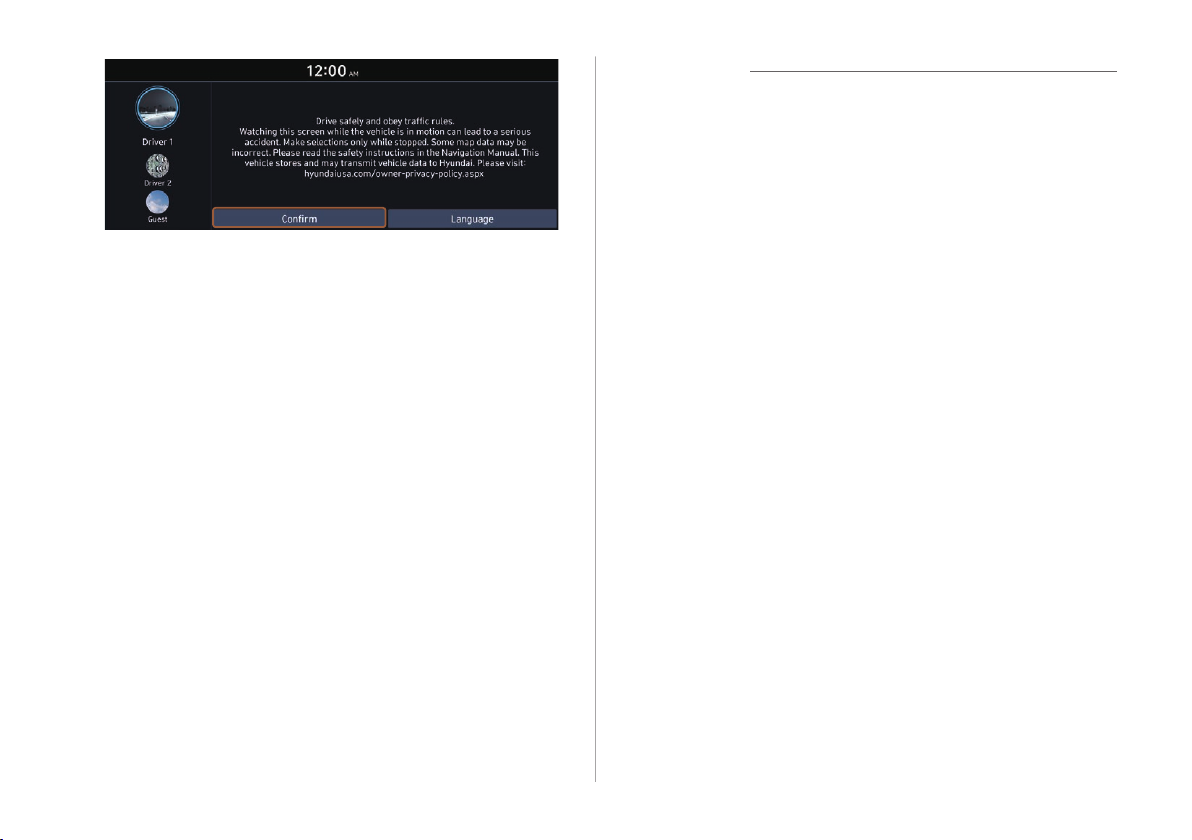
When a safety warning message appears, read it
2
and press Conrm.
AA
To change the display language, press Language.
Type A
1-4
Page 29
Type B
AA
The screen may dier depending on the vehicle model and
specications.
AA
To set the user prole, note the following.
Run Setup (if equipped).”
> See “Using the First
Turning off the system
To turn o the system while driving, press and hold
the Power button on the panel.
The screen and sound will be turned o.
AA
To use the system again, press the Power button.
AA
When a specied period of time elapses after turning o the
vehicle, the system automatically shuts down. When you open
the driver's door, the system immediately shuts down.
Warning
Ý
Driving while distracted can result in a loss of vehicle control
•
that may lead to an accident, severe bodily injury, or death.
The driver's primary responsibility is the safe and legal
operation of the vehicle, and the use of any vehicle systems,
including the touch screen and steering wheel controls, which
take the driver's eyes, attention, and focus away from the safe
operation of the vehicle, or which are not permissible by law,
should never be used during the operation of the vehicle.
Some functions may not be active while driving to ensure
•
safety. Those functions run only when the vehicle is stationary.
In order to use them, rst stop the vehicle.
When the screen is not displayed, the volume is muted, or
•
other system failures occur, immediately stop using the
system. When you use the faulty system continuously, it may
cause re, electric shock, or fatal system failure.
1-5
Page 30
Caution
Ü
The system can be turned on even when the ignition switch is
•
in “ACC” or “ON.” However, when you use the system without
turning on the vehicle for a long time, it may cause battery
discharge. To use the system for a long time, be sure to turn
on the vehicle.
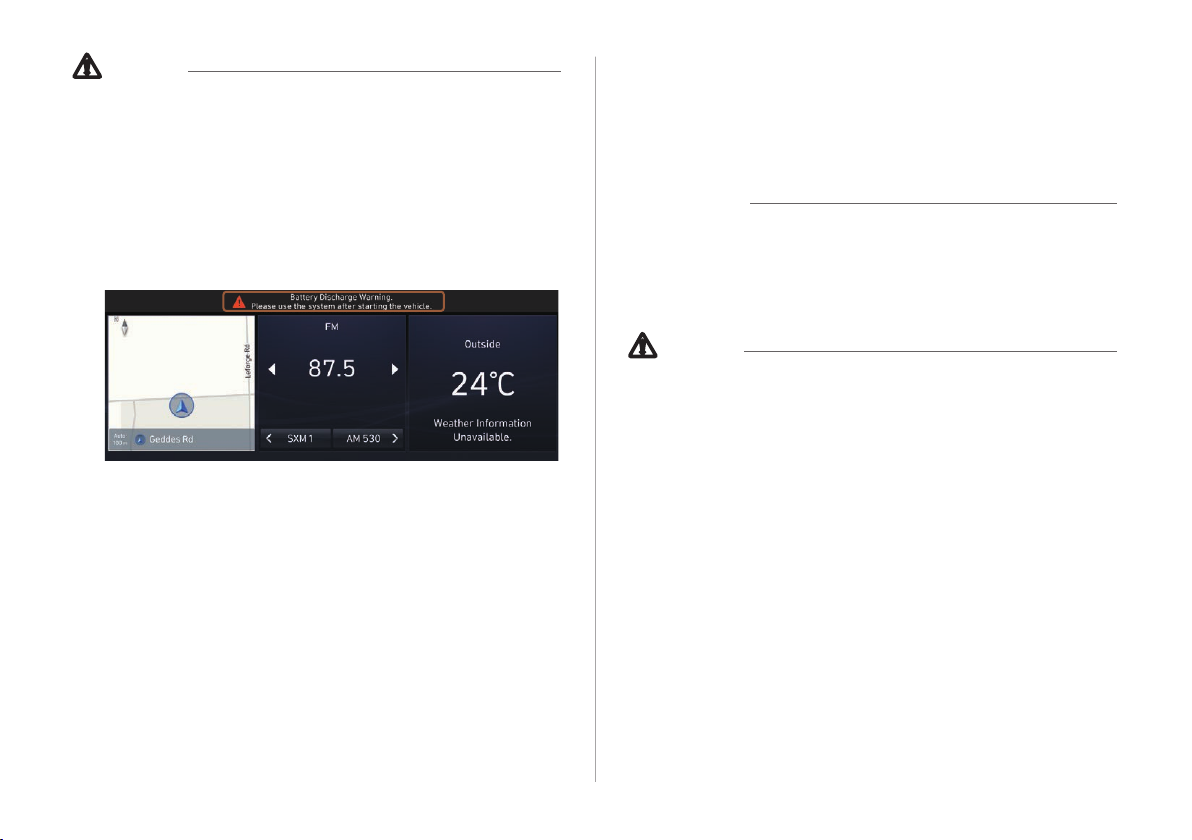
When you use the system with the vehicle turned o, the
•
battery warning message appears. The warning message
disappears as soon as you turn on the vehicle.
AA
The screen may dier depending on the vehicle model and
specications.
AA
When you turn o and on the vehicle, the system is turned on
with the mode and settings used when the vehicle was turned
o.
AA
To prevent audio from playing loud when you turn on the
vehicle, adjust the system volume to an adequate level.
AA
To automatically decrease the system volume, move to the All
Menus screen and press Setup > Sound > System Volumes
>
Start-up Volume Limit to set the function.
Volume Limit.”
> See “Start-up
Using the touch screen
This system is equipped with a touch-enabled screen. You can use
various practices by using this feature.
Warning
Ý
Do not use the touch screen while driving as this will divert your
attention away from the safe operation of the vehicle. You may
lose your steering control which could cause an accident and
severe bodily injuries.
Caution
Ü
Do not press the touch screen with excessive force or a sharp
•
object. The touch screen may become damaged.
Be careful for the touch screen not to contact any electrically
•
charged object. Static or other electric shock may cause the
system to malfunction or damage the touch screen.
AA
The touch screen does not respond when you are wearing
gloves. Take o the gloves or wear electrostatic touch gloves.
1-6
Page 31
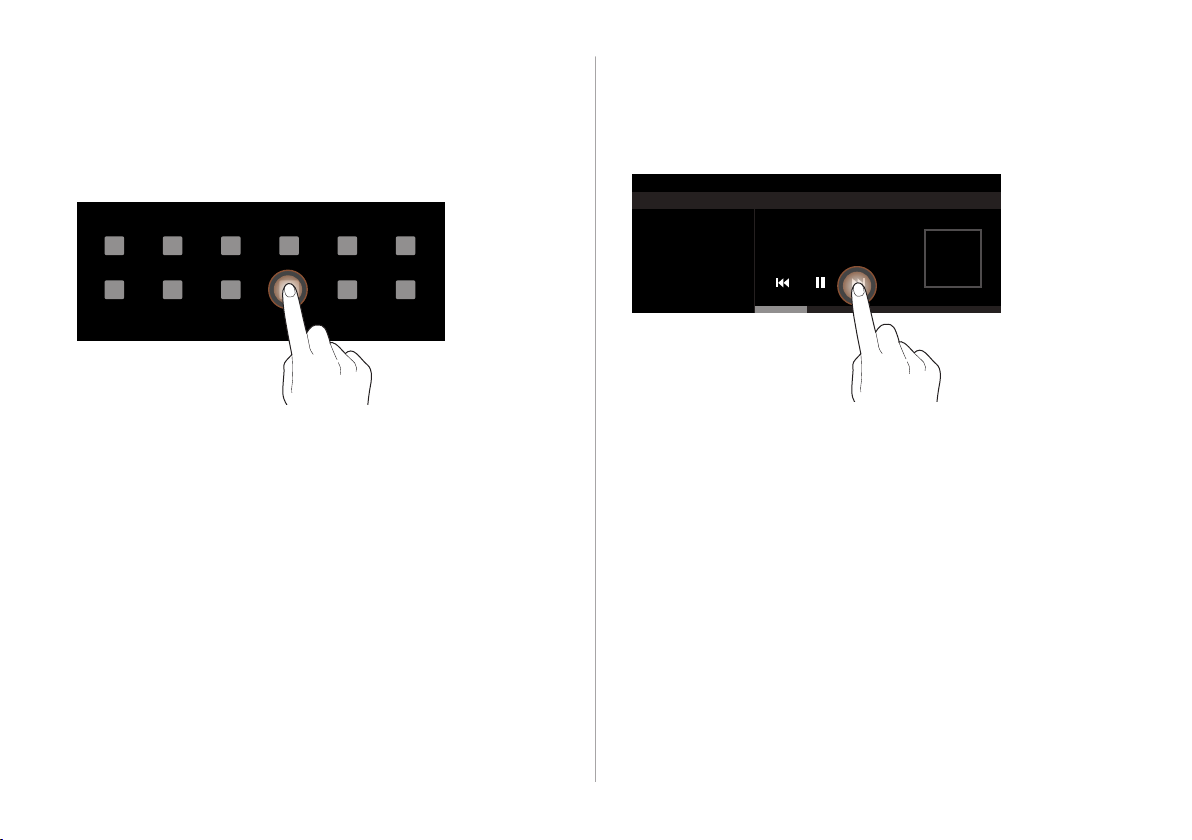
“Press” gesture
“Press and hold” gesture
Lightly press the desired item and release the nger.
The corresponding function is run or the corresponding menu is
selected.
Press and hold the desired item.
It is used to fast forward or rewind during playback.
1-7
Page 32
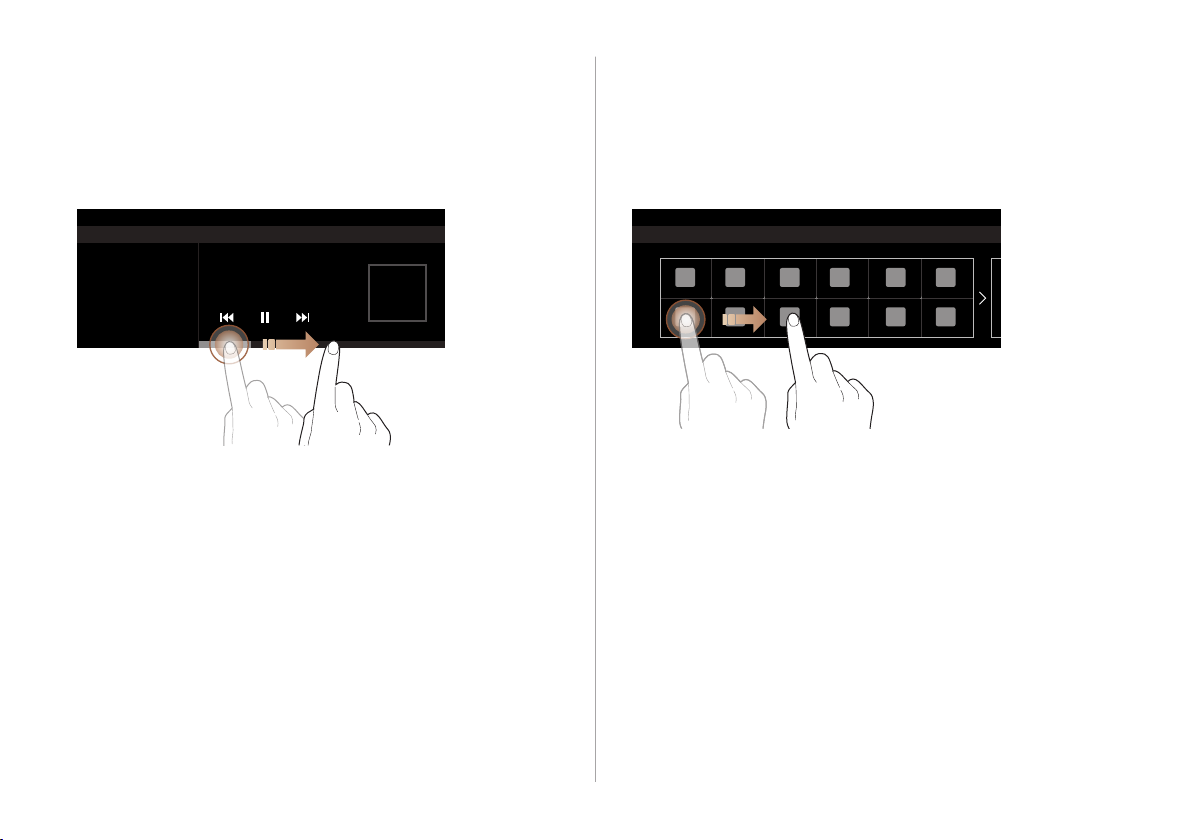
“Slide” gesture
“Drag” gesture
On the media playback screen, press the slide bar to
change the playback position.
You can change the playback position during playback.
Press and hold the desired item and drag it to
another position.
The selected item moves to the new position.
1-8
Page 33
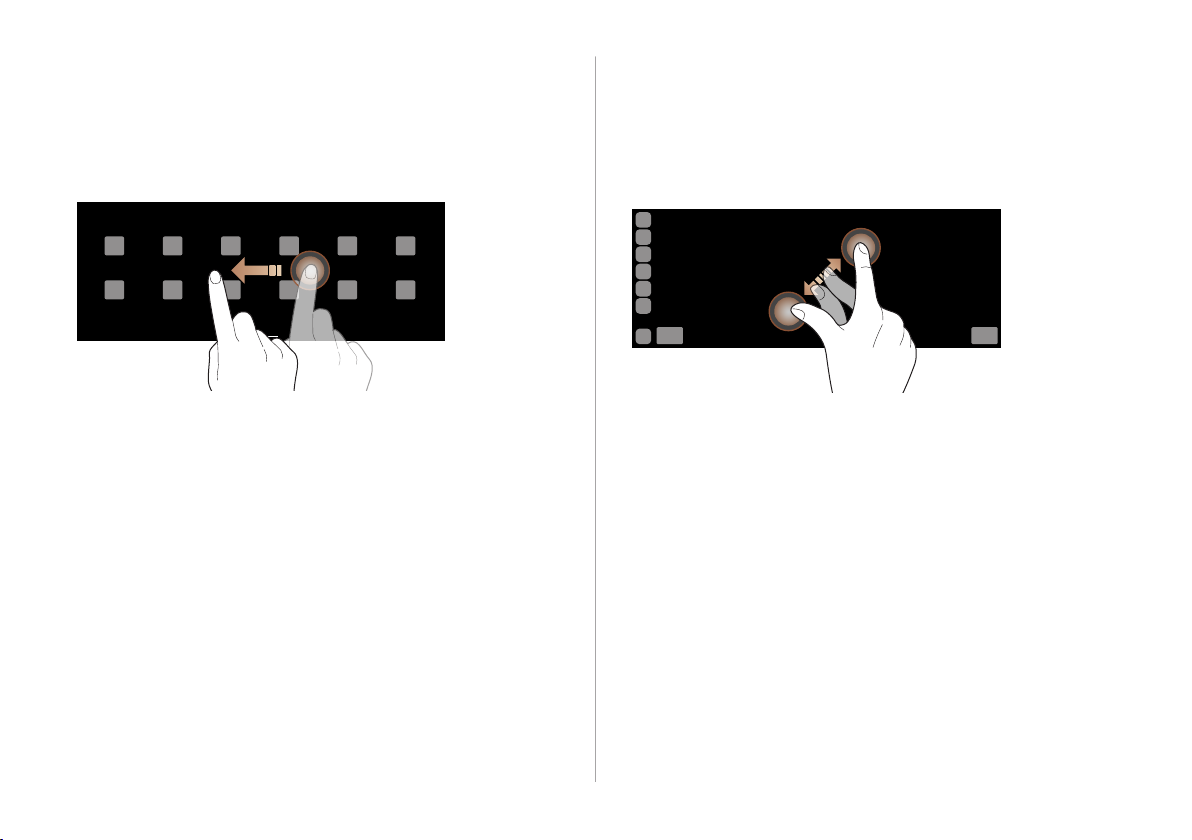
“Swipe” gesture
“Spread/pinch” gesture
Lightly swipe the screen in the desired direction.
It is used to move fast vertically or horizontally across the menu
screen or options list.
On the map screen, press and hold the screen with
two ngers and spread or pinch the ngers.
It is used to zoom in or out the map.
1-9
Page 34
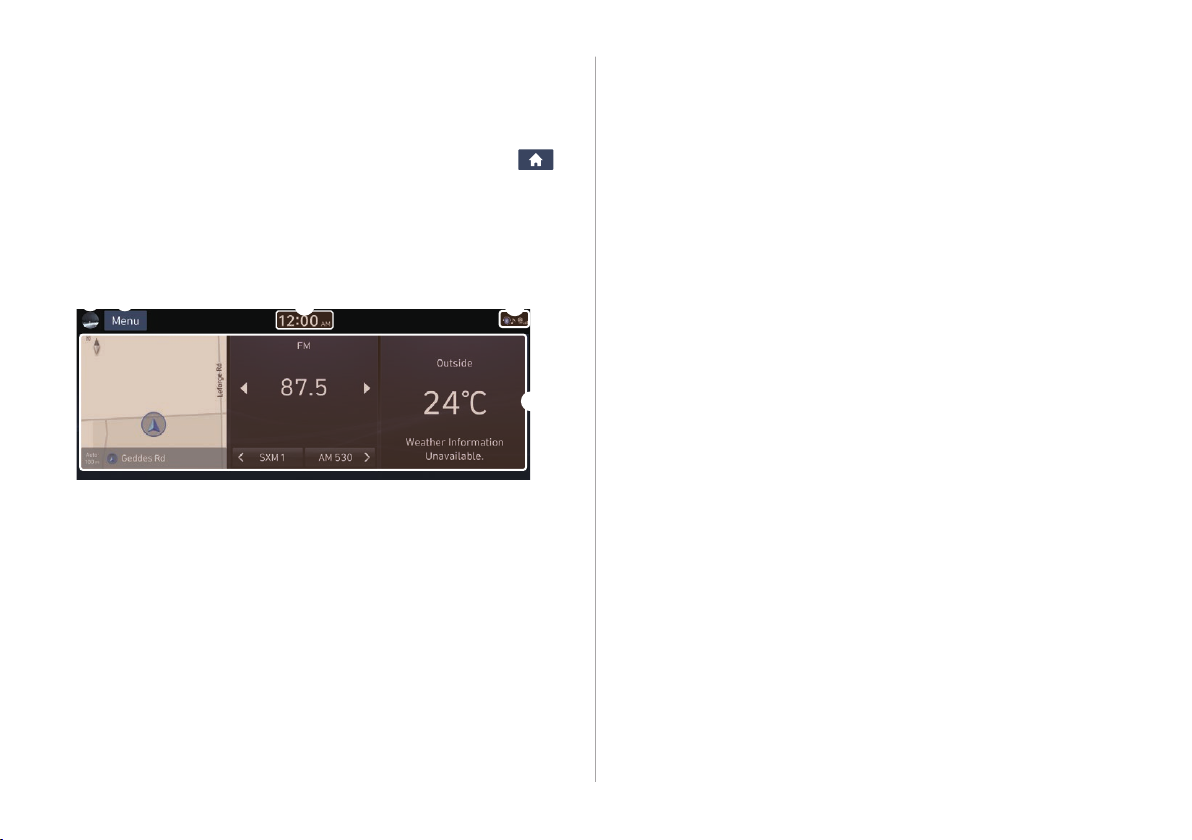
Using the Home screen
c
The Home screen provides various functions.
AA
To return to the Home screen from other screens, press
Home screen
The layout of the Home screen is as follows:
d e
Current time. Depending on the vehicle model or
a
specications, time and date display may vary. Press to access
the time and date settings screen.
System status icons. Status icons are not included in the
b
screenshots in this guide, because their appearance may
dier depending on the system status or mode.
status indicator icons.”
Displays active widgets. When a widget is pressed, the
c
corresponding function runs in full screen.
widgets on the Home screen.”
a
> See ″Date/Time.″
> See “System
> See “Editing
b
Displays the specied user prole image. When the image is
d
pressed, the user prole setting screen appears (if equipped).
> See “Conguring the user prole settings (if equipped).”
The list of menu items appears.
.
e
Edit Home Widgets: Used to edit the types and positions
•
of widgets on the Home screen.
Edit Home Icons: Used to edit the types of icons on the
•
Home screen.
User's Manual on Web (QR Code): Displays the QR code
•
that provides access to the online user manual for the
system.
AA
The screen may dier depending on the vehicle model and
specications.
AA
To see all menus on the Home screen, swipe the screen to the
left.
1-10
Page 35
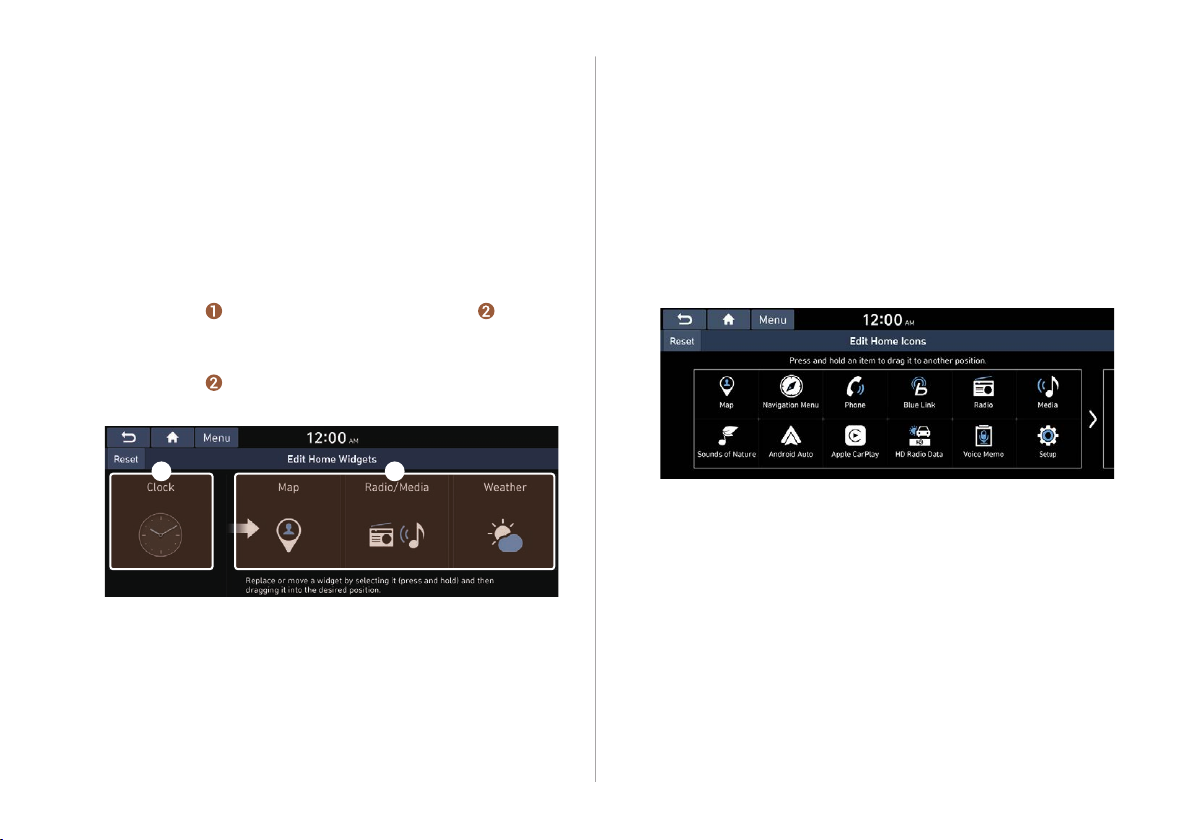
Editing widgets on the Home screen
Editing icons on the Home screen
You can edit the types and positions of the widgets to display on
the Home screen.
At the upper left of the Home screen, press Menu
1
>
Edit Home Widgets.
Perform any of the following methods:
2
To change the widget type, press and hold the desired
•
widget on
area.
To change the listed order for widgets, press and hold a
•
widget on
position.
a b
List of widgets
a
Widget area
b
AA
The screen may dier depending on the vehicle model
and specications.
AA
To initialize the types and positions of widgets, press
Reset.
List of widgets and then drag it to Widget
Widget area and then drag it to the desired
You can see the icon list on the Home screen and change the
locations for icons.
At the upper left of the Home screen, press Menu
1
>
Edit Home Icons.
To change the location of an icon, press and hold,
2
and drag the icon to the desired position.
AA
The screen may dier depending on the vehicle model
and specications.
AA
To initialize the positions of icons, press Reset.
1-11
Page 36
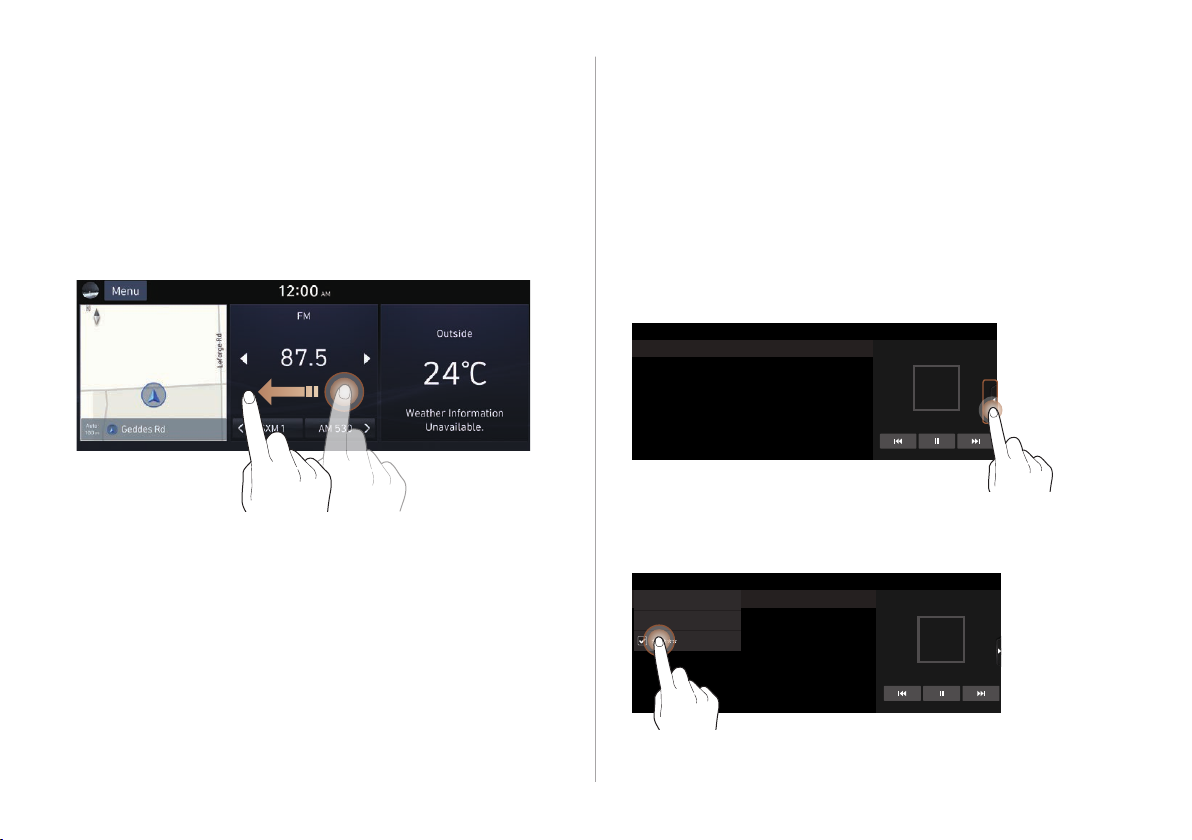
Seeing the all menus screen
Using the split screen (if equipped)
You can see all menus on the Home screen.
Press and gently swipe the Home screen to the left
as shown below.
The all menus screen appears. You can see the list of all functions
of the system.
AA
The screen may dier depending on the vehicle model and
specications.
You can set to display various information such as map, Radio/
Media info, driving info, and clock on the split system screen.
Opening the split screen
Press the split screen button.
The split screen appears on the right.
AA
When the Menu button exists at the top of the screen, you
can open the split screen by pressing Menu > Split Screen.
1-12
Page 37
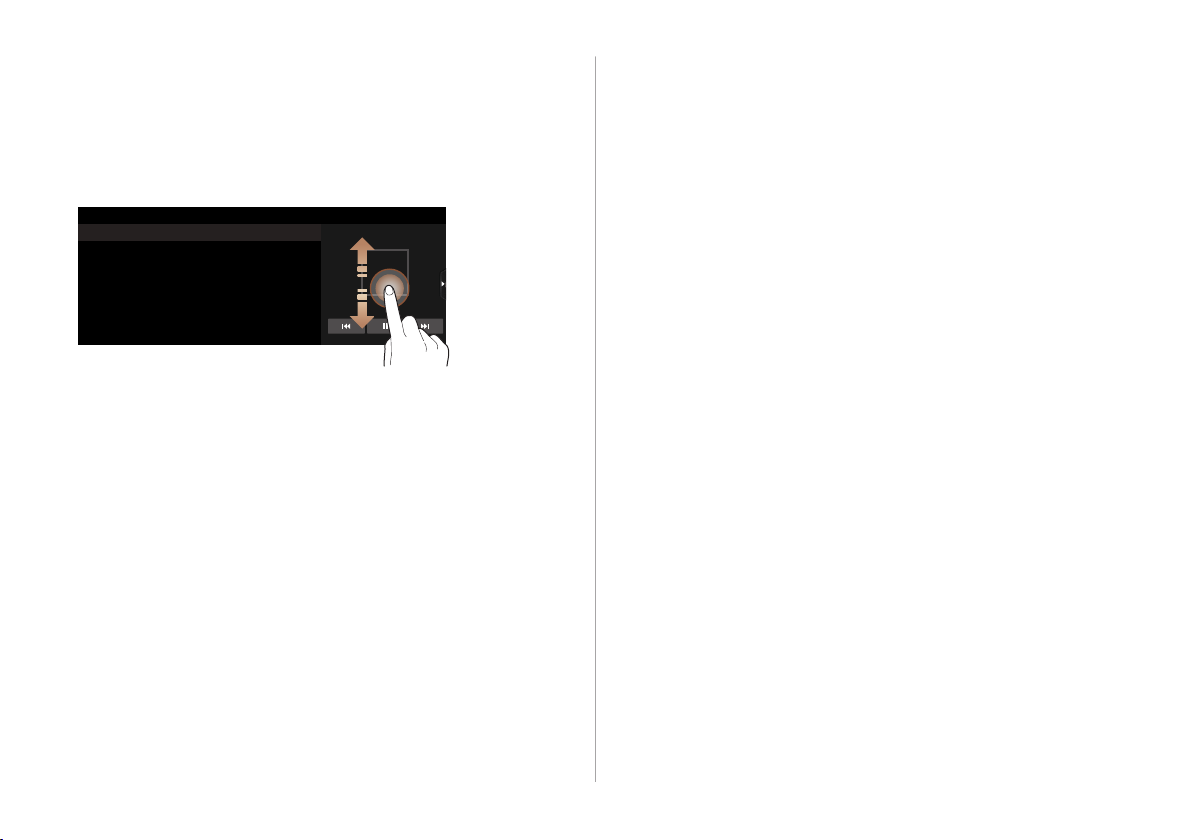
Editing the split screen
You can change information on the split screen.
Press and hold, and then drag the split screen up or
down to select the desired information item.
Closing the split screen
Press the split screen button when the split screen is
open.
AA
When the Menu button exists at the top of the screen, you
can close the split screen by pressing Menu > Split Screen.
1-13
Page 38
Page 39

02
Useful functions
Using the First Run Setup
Using the phone projection function
Using the driving assist display
Using the climate control system
Using the rear-seat climate control system
Using the Passenger Talk mode in the rear seat
Using the Quiet mode in the rear seat
Playing Sounds of Nature
Using the HD Radio Data
Seeing the driving information
Seeing notications
Page 40
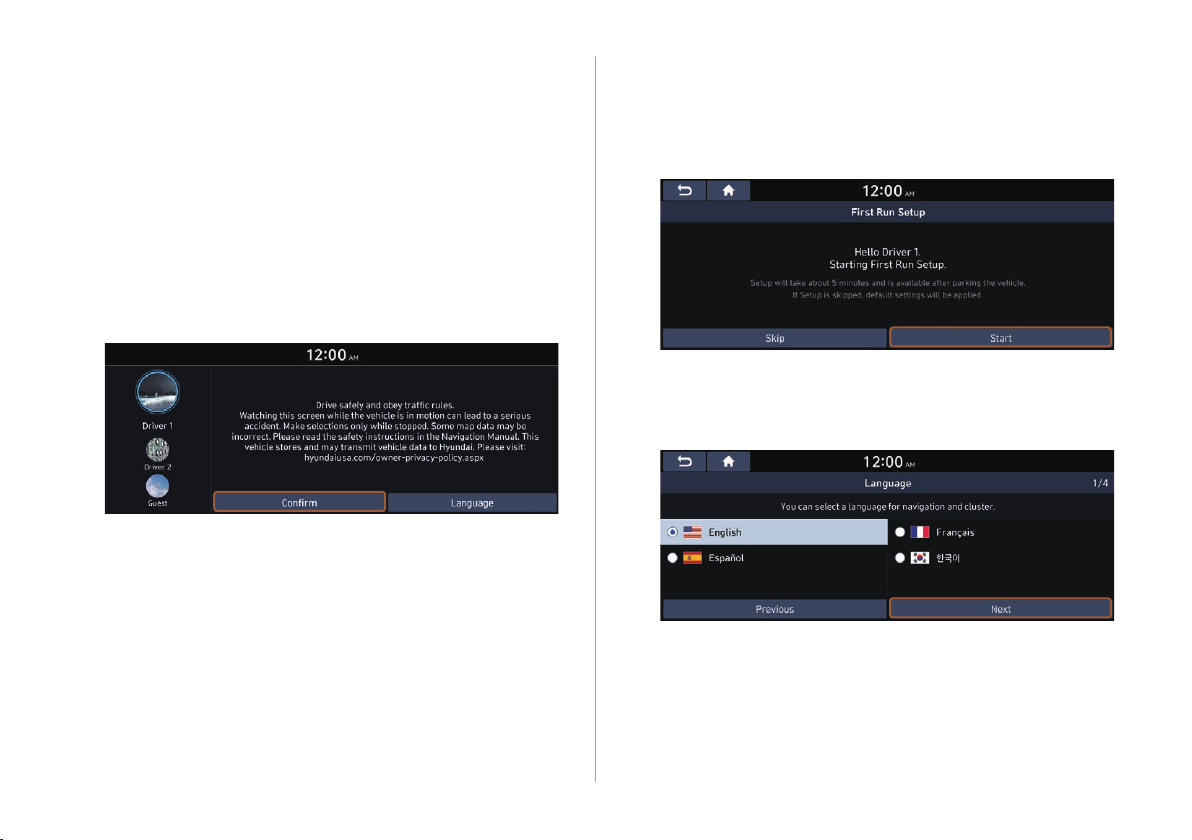
Using the First Run Setup
(if equipped)
You can congure the system settings for each driver when
multiple people are using the vehicle.
In First Run Setup, you can congure the values to display on the
screen such as user name, language, and map display method.
When a safety warning message appears, read it,
1
select the driver image, and then press Conrm.
AA
When you log in as guest, you cannot congure the prole
settings. To set a dierent prole, select another user.
AA
You can register up to 2 users.
When the First Run Setup screen appears, press
2
Start.
AA
To use the default settings without changing the
environment, press Skip.
Set the language to display on the screen and
3
then press Next.
2-2
Page 41
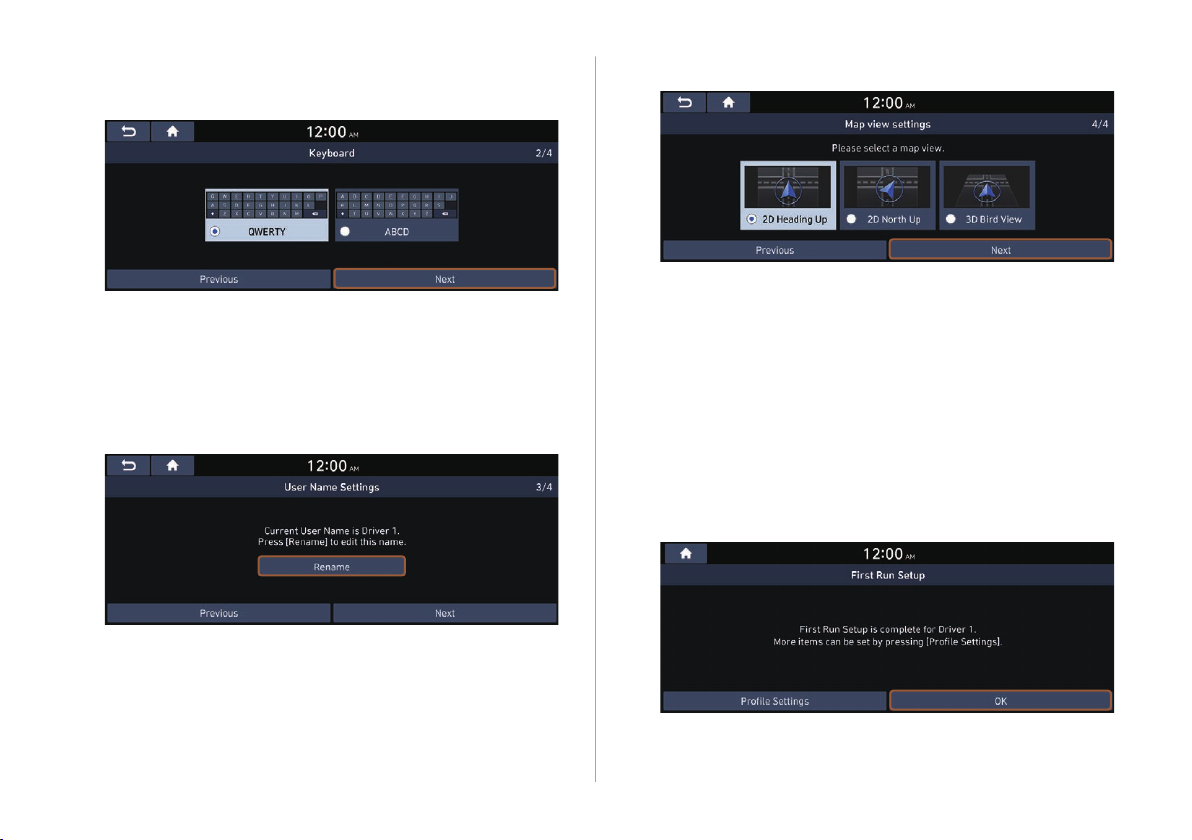
Set the keyboard type for text entry and then
4
press Next.
To set the driver’s name, press Rename.
5
The name change screen appears.
AA
To proceed with First Run Setup without changing the
driver’s name, press Next.
Set the map display method and then press Next.
6
2D Heading Up: The map is rotated depending on the
•
driving direction.
2D North Up: Displays the map with the north xed at the
•
top.
3D Bird View: The map is rotated depending on the
•
driving direction and it is displayed in three dimensions.
When the First Run Setup screen appears, press
7
OK.
Displays the Home screen.
AA
To set the detailed user information and operation
environment, press Prole Settings.
user prole settings (if equipped).”
> See “Conguring the
2-3
Page 42
Using the phone projection
function
When you connect an Android smartphone or iPhone to the
vehicle with a USB cable, you can run and control applications
on the phone through the widescreen using its user-friendly
interface.
Warning
Ý
Do not adjust or set up any phone settings while driving. You may
lose your steering control which could cause an accident and
severe bodily injuries.
Caution
Ü
Using an approved USB cable provided by your smartphone
manufacturer is recommended. Using unapproved USB cables
may cause a phone projection error or a system malfunction.
Pairing to an Android smartphone via
Android Auto
When you connect an Android smartphone to the vehicle with
Android Auto, you can run and control applications on the phone
through the widescreen using its user-friendly interface.
To use Android Auto, rst check the following.
1
Visit the Android Auto website at https://www.android.
•
com/auto to check the list of countries, device types, and
models that support Android Auto.
Download and install the Android Auto application from
•
Google Play Store. It is not possible to install Android Auto
in countries that do not support the feature.
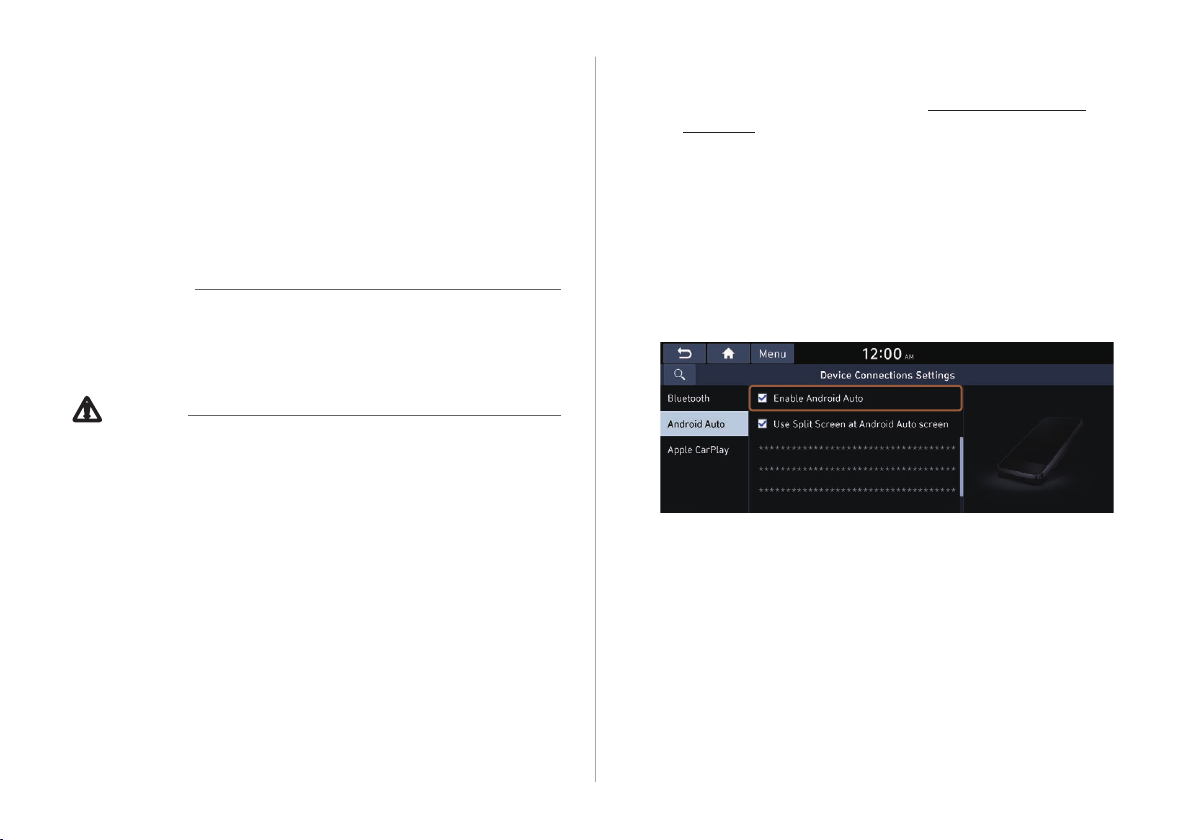
On the All Menus screen, press Setup > Device
2
Connections > Android Auto and select the
Enable Android Auto checkbox.
AA
The screen may dier depending on the vehicle model
and specications.
AA
Select Use Split Screen at Android Auto screen to show
split screen when using Android Auto.
2-4
Page 43

Connect a smartphone to the USB port on the
3
vehicle by using the provided USB cable.
AA
When the connection is made for the rst time, the system
screen displays a notication window. Check the details
and then press OK.
AA
To end the Android Auto and disconnect from the
smartphone, remove the USB cable from the system.
Caution
Ü
Do not repeatedly connect and remove the USB connector
within a short time. It may cause device errors or system
failures.
When the smartphone is locked, unlock it rst and
4
then consent to the use of Android Auto.
When the smartphone is recognized successfully, the Android
Auto menu is activated on the All Menus screen.
Using the Android Auto
On the All Menus screen, press Android Auto.
1
Perform the desired function.
2
To run the functions for phone, music, or navigation on
•
the smartphone, press the corresponding app icon.
AA
When you are using your smartphone′s navigation
via phone projection, sounds from both the system′s
radio/media function and the navigation will be output
through your vehicle′s speakers. When you turn the
Volume knob while both sounds are being output, the
navigation volume is adjusted rst.
To use the Google voice recognition, press and hold the
•
Voice Recognition button on the steering wheel.
AA
By pressing the [MODE] button on the steering wheel, you
can run the media application on your smartphone as well as
the Radio/Media mode of the system.
AA
To specify which functions to run when the [MODE] button
on the steering wheel is pressed, press and hold the [MODE]
button to display the settings screen.
AA
By pressing the Call button on the steering wheel, you can
make a call via Bluetooth connection.
AA
When phone projection is active, you cannot change the
phone projection settings. To change the settings, remove the
USB cable from your system.
AA
The icons on the screen are subject to change according to
the policy of Google Corporation.
2-5
Page 44
AA
Applications or functions used through Android Auto
are subject to change according to the policy of Google
Corporation. For supportable functions, visit the Android
website at https://www.android.com/auto.
AA
To use the functions on your smartphone with the minimized
system settings, update the smartphone OS to the latest
version.
AA
The recognition time may dier depending on the device
type, rmware, and OS version.
AA
Charges may apply for any mobile data used while Android
Auto is running.
AA
Some functions may not work properly depending on the
network signal strength.
AA
Avoid interacting with the smartphone while using Android
Auto.
AA
You cannot use the following functions when Android Auto is
in use.
USB mode
-
Apple CarPlay
-
Searches using the control panel or the steering wheel
-
remote control
Pairing to an iPhone via Apple CarPlay
After you connect an iPhone to the vehicle with Apple CarPlay,
you can run and control applications on the phone through the
system screen.
To use Apple CarPlay, rst check the following:
1
For iPhone models that support Apple CarPlay, visit the
•
Apple website at https://www.apple.com/ios/carplay.
Make sure Apple CarPlay and Siri are enabled in your
•
iPhone settings. If you do not see options for Apple
CarPlay or Siri, update to the latest iOS version.
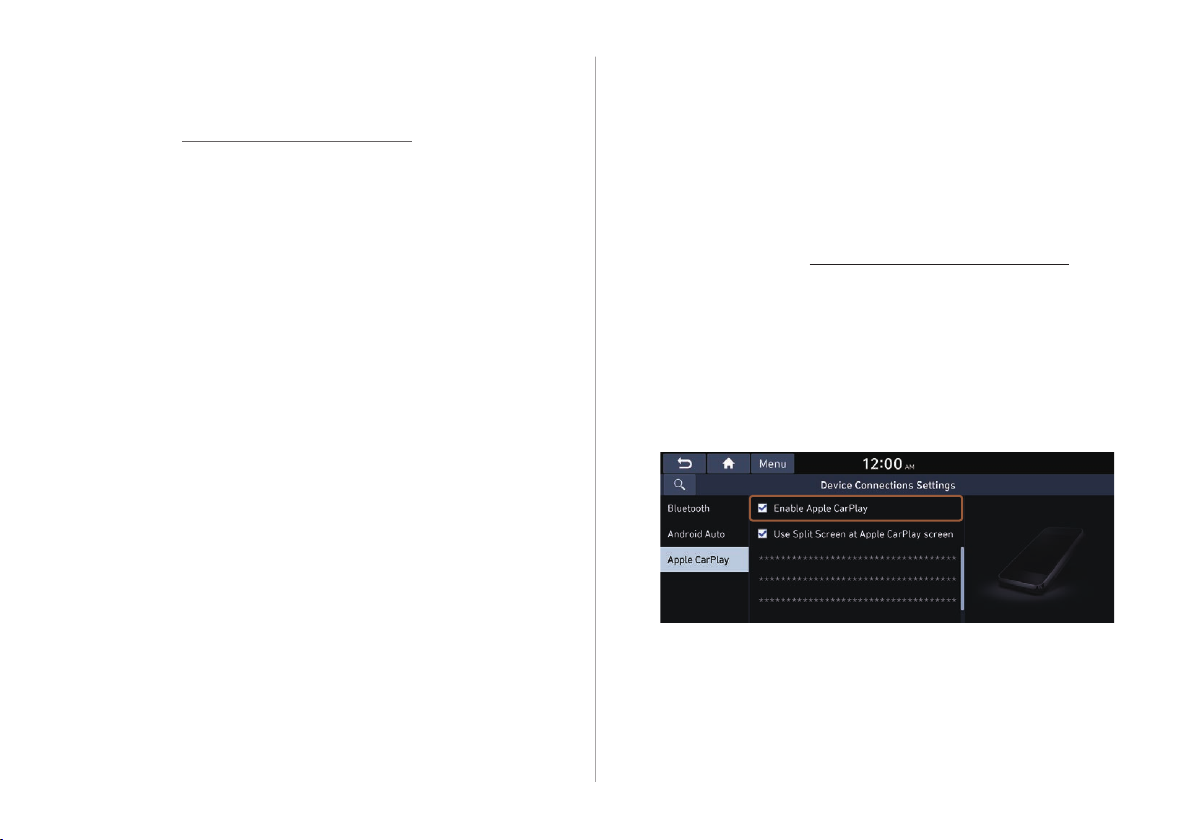
On the All Menus screen, press Setup > Device
2
Connections > Apple CarPlay and then check
Enable Apple CarPlay.
2-6
AA
The screen may dier depending on the vehicle model
and specications.
AA
Select Use Split Screen at Apple CarPlay screen to show
split screen when using Apple CarPlay.
Page 45

Connect an iPhone to the USB port on the vehicle
3
by using the provided USB cable.
AA
When the connection is made for the rst time, the system
screen displays a notication window. Check the details
and then press OK.
AA
To end the Apple CarPlay and disconnect from the iPhone,
remove the USB cable from the system.
Caution
Ü
Do not repeatedly connect and remove the USB connector
within a short time. It may cause device errors or system
failures.
When the iPhone is locked, unlock it rst and then
4
consent to the use of Apple CarPlay.
When the iPhone is recognized successfully, the Apple
CarPlay menu is activated on the All Menus screen.
Using the Apple CarPlay
On the All Menus screen, press Apple CarPlay.
1
Perform the desired function.
2
To run any of functions (phone, messaging, navigation,
•
etc.) on your iPhone, press the corresponding function
icon.
AA
When you are using your smartphone′s navigation
via phone projection, sounds from both the system′s
radio/media function and the navigation will be output
through your vehicle′s speakers. When you turn the
Volume knob while both sounds are being output, the
navigation volume is adjusted rst.
To run the Siri voice recognition, press and hold the Voice
•
Recognition button on the steering wheel.
AA
To display the system Home screen, press
AA
By pressing the [MODE] button on the steering wheel, you
can run the media application on your smartphone as well as
the Radio/Media mode of the system.
AA
To specify which functions to run when the [MODE] button
on the steering wheel is pressed, press and hold the [MODE]
button to display the settings screen.
AA
When you receive a call, press the Call button on the steering
wheel to answer it.
AA
When phone projection is active, you cannot change the
phone projection settings. To change the settings, remove the
USB cable from your system.
.
2-7
Page 46

AA
Applications or functions used through Apple CarPlay
are subject to change according to the policy of Apple
Corporation. For supportable functions, visit the Apple
Corporation website at http://www.apple.com/ios/carplay.
AA
To use the functions on your smartphone with the minimized
system settings, update the smartphone OS to the latest
version.
AA
The recognition time may dier depending on the device
type, rmware, and OS version.
AA
Charges may apply for any mobile data used while Apple
CarPlay is running.
AA
Some functions may not work properly depending on the
network signal strength.
AA
Avoid interacting with the smartphone while using Apple
CarPlay.
AA
You cannot use the following functions when Apple CarPlay is
in use.
Bluetooth
-
USB mode
-
Android Auto
-
Browsing using the [TUNE/FILE] knob on the control panel
-
(if equipped)
Using the driving assist display
You can see the view around the vehicle through the system
screen.
AA
The displayed screen may dier depending on the vehicle
model.
Warning
Ý
When backing up, make sure to follow the guidelines below:
Before entering your vehicle, always check the area behind
•
your vehicle.
Do not solely rely on the rear view camera when backing up.
•
Always ensure that it is safe to back up by checking behind
you and looking in the rearview mirrors.
Always back up slowly and stop immediately if you suspect
•
that a person, especially a child, might be behind you.
Caution
Ü
Objects on the screen may not be as close or far as they appear.
Be sure to check the rear, left, and right sides with your own eyes
for safety.
2-8
Page 47
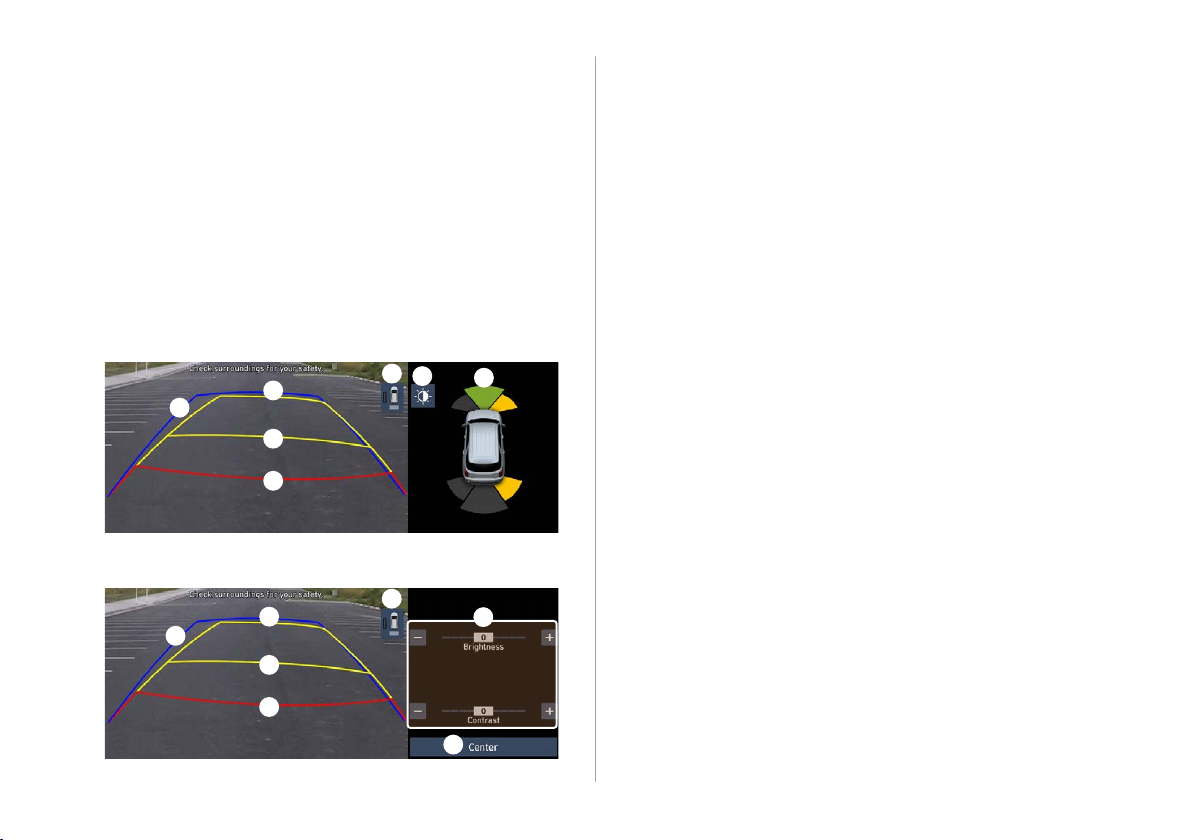
Using the rear-view display
d
d
Press the “R” (Reverse) button shifter (or move the
1
shift lever to “R” in a previous vehicle model) with
the vehicle turned on.
The system automatically displays the rear view with parking
assist guidelines.
Safely park your vehicle, checking the rear view
2
and guidelines.
AA
The example may dier from the actual screen display.
b
b
a
a
c
a
a
c
Type A
f
e
f
Moving direction lines (yellow)
a
Displays the vehicle’s moving direction based on the
steering angle.
Neutral steering lines (blue)
b
Displays the moving direction if you reverse the vehicle in
neutral. Noting these lines, you can determine whether
the vehicle is stopped in correct direction and the
distances to the neighboring vehicles are adequate.
Collision warning lines (red)
c
Used to prevent collision.
Rear top view button (if equipped)
d
Press the button to display the rear top view.
Parking distance warning (if equipped)
e
Depending on the distance to obstacles, the warning
color and alert sound change along with the level (1/2/3)
to notify of the distance.
Camera image adjustment
f
Used to adjust the brightness and contrast of camera
images.
Center
g
Used to initialize the brightness and contrast of camera
images.
Type B
g
2-9
Page 48
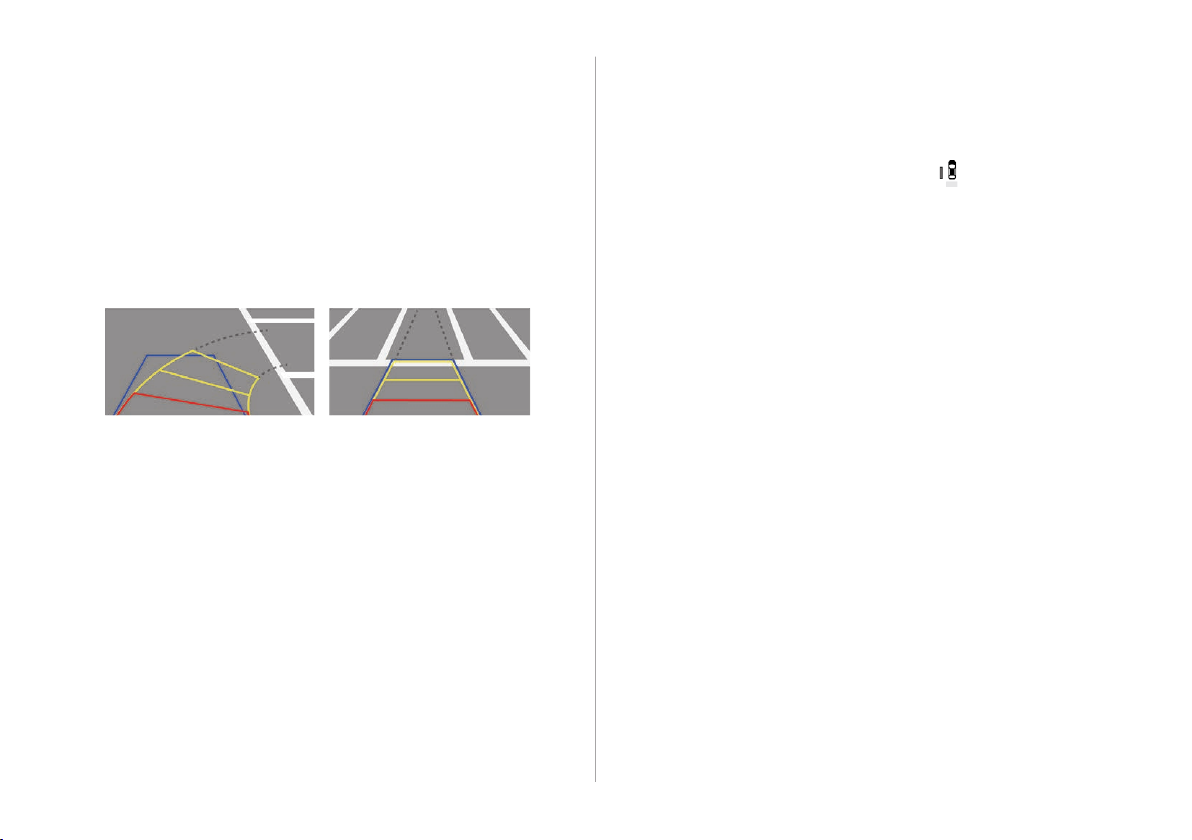
AA
Available settings may dier depending on the vehicle model
and specications.
AA
You can change the motion settings of the rear camera. On
the All Menus screen, press Setup > Display > Extend Rear
Camera Use and then check Extend Rear Camera Use to
turn on the function. The rear view appears continuously even
when you change the shift position other than “R” (Reverse)
after reversing (if equipped).
AA
Noting the parking assist guide lines based on the steering,
you can see the moving direction.
AA
A warning sound is heard when the vehicle approaches
obstacles while parking. When you set to automatically lower
the audio volume while parking, it can prevent accidents
caused by failure to hear the warning sound. On the All
Menus screen, press Setup > Sound > Driving Guidance >
Parking Safety Priority.
> See “Parking Safety Priority.”
Viewing the rear top view display (if equipped)
You can look down the rear view from the top through the rearview display.
On the rear-view screen, press .
1
Check the top view display and assist guide lines.
2
AA
The guide lines appear on the rear top view.
Displays the space required to open the trunk (liftgate).
-
After a parking, check whether the space is sucient to
open the trunk (liftgate) and there is no obstacle.
Displays the extension line from the center of the
-
vehicle. According to the steering direction, the moving
direction of the center is displayed on the screen.
2-10
Page 49
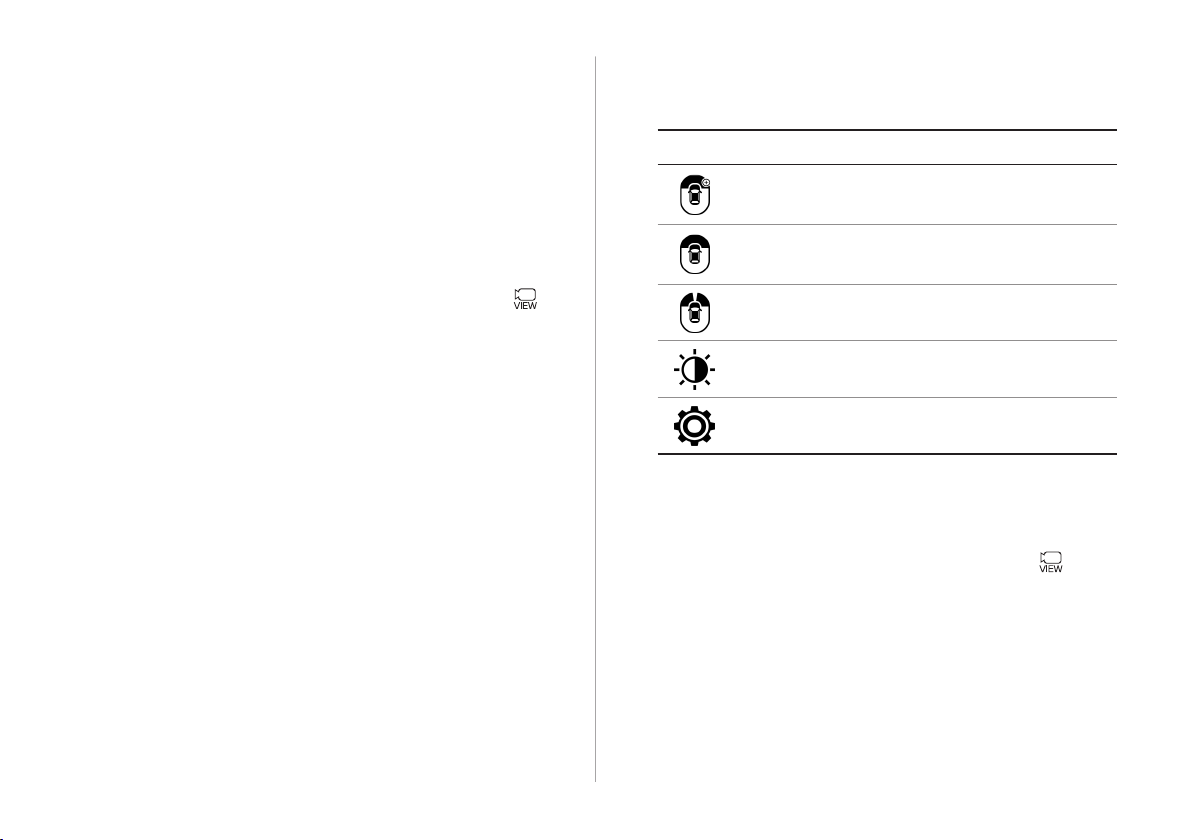
Surround View Monitor (if equipped)
You can check the surroundings by using multiple cameras on the
vehicle.
AA
Use the +/- button on the right of the screen to zoom in or
out.
Press the icon to get a view in the desired
2
direction.
Icon Description
Displays the zoom-in front top view and top view.
Viewing the surround view while driving
In order to see the surround view, press the [ ]
1
button.
The system displays both the front view and surround view.
AA
The surround view monitor function operates only when
any of the following conditions are met.
The driving speed is below 9mph with the shift position
-
in “D” (Drive).
The vehicle is stationary and the shift position is in “D”
-
(Drive) or “N” (Neutral).
Displays the front wide view and top view (default).
Display the front blind spot view and top view.
Used to adjust the brightness and contrast of the
camera images.
Displays the surround view settings.
AA
When any door or trunk (liftgate) is open or outside rear-
view mirrors are folded, an alert icon appears on the
screen.
AA
To turn o the surround view screen, press the [
button.
]
2-11
Page 50
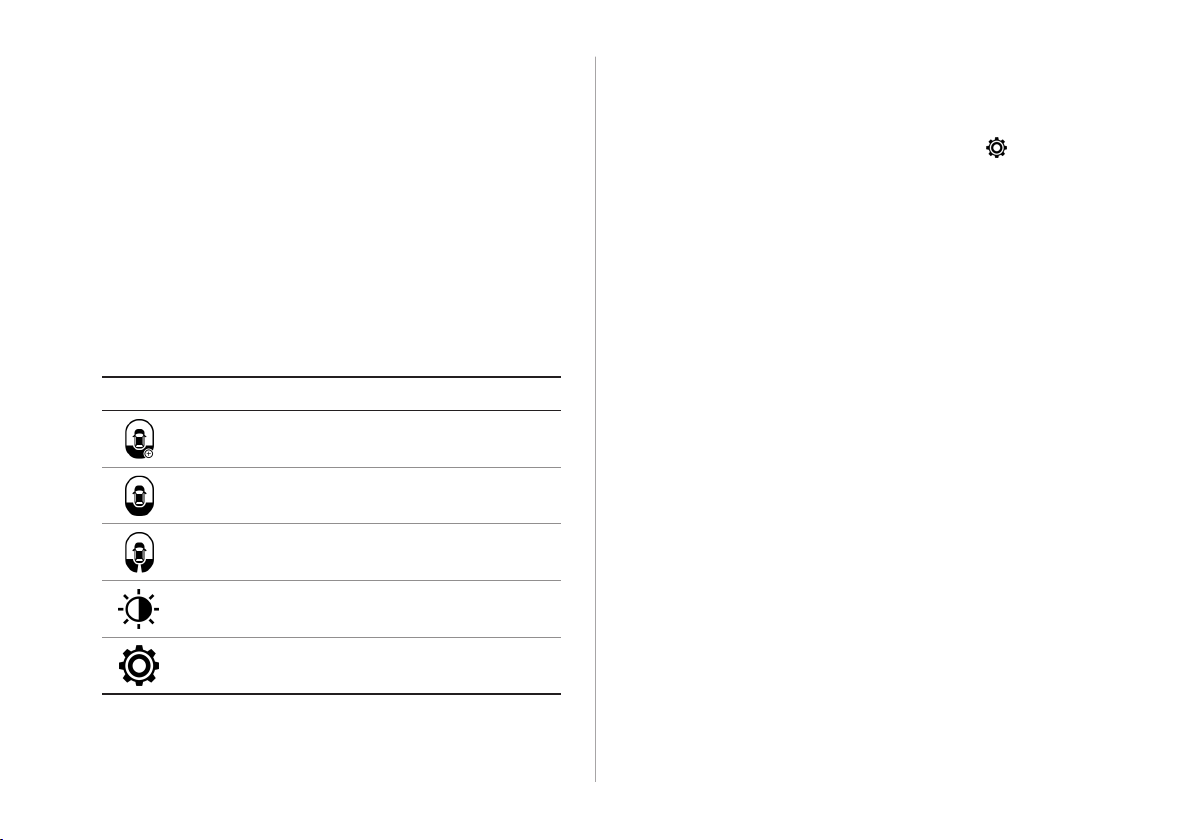
Viewing the surround view while reversing
Press the “R” (Reverse) button shifter (or move the
1
shift lever to “R” in a previous vehicle model) with
the vehicle turned on.
The system displays the rear view of the vehicle.
AA
The surround view monitor function is not available when
you change the shift position to “P” (Park).
Press the icon to get a view in the desired
2
direction.
Icon Description
Displays the zoom-in rear top view and top view.
Displays the rear wide view and top view (default).
Display the rear blind spot view and top view.
Used to adjust the brightness and contrast of the
camera images.
Conguring the surround view monitor
settings
On the surround view screen, press .
1
Select and then change the settings.
2
To select the information to appear on the video, press
•
Display Contents. (e.g. Top view parking guidance, rear
view parking guidance, parking distance warning).
To select the default view for top view monitoring, press
•
Top View Default Mode.
To select the default view for using the surround view
•
monitor function while driving, press Front View Default
Mode.
2-12
Displays the surround view settings.
Page 51
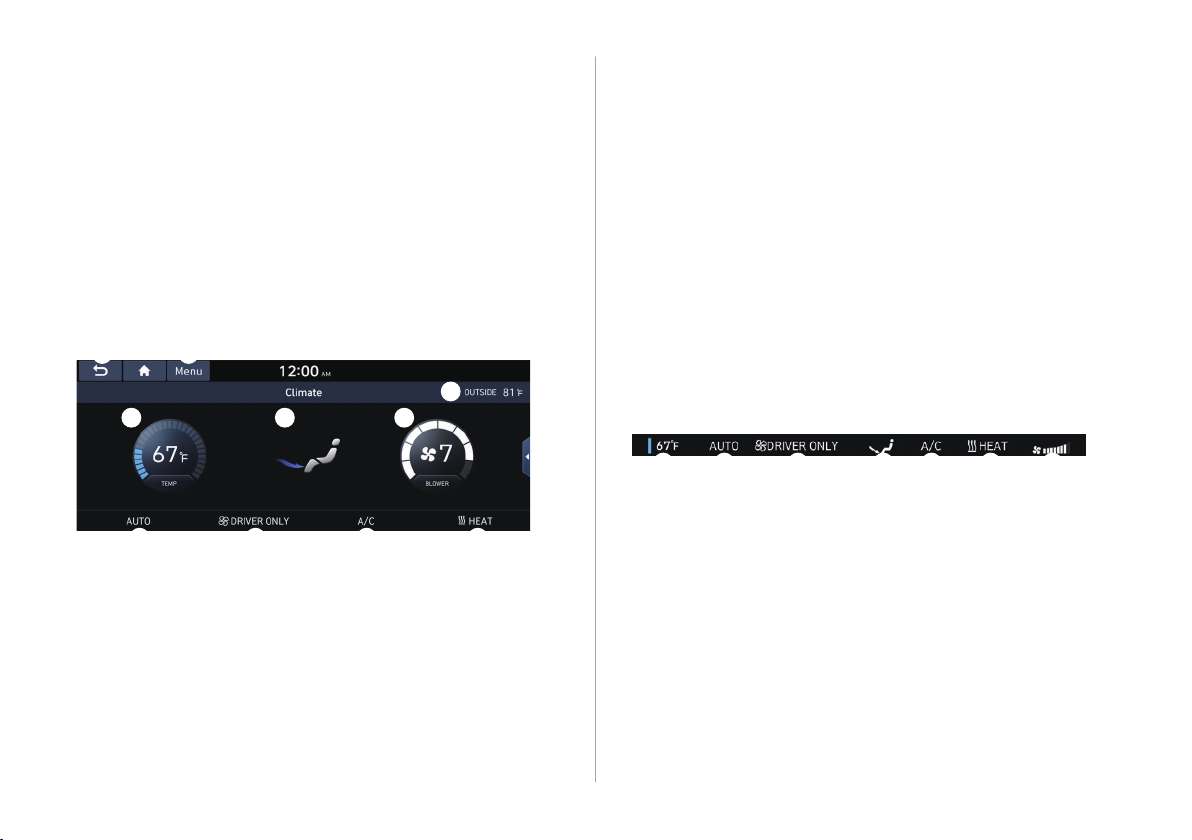
ic d ef g h
Using the climate control
a
f g ih
j
system
You can check and adjust the climate system settings on the
screen.
Press the [CLIMATE] button on the climate control
system.
AA
For more information about how to use the heater and air
conditioner, refer to Owner’s Manual of the vehicle.
c d e
Returns to the previous step.
a
Displays the outside temperature.
b
Can adjust the driver’s seat temperature.
c
Can adjust the fan speed.
d
Can adjust the air direction.
e
(if equipped)
b
Can turn on or o the automatic temperature control
f
function.
Can activate Climate mode for the driver’s seat only.
g
Can turn on or o the air conditioner.
h
Can turn on or o the heater.
i
The list of menu items appears.
j
User's Manual on Web (QR Code): Displays the QR code
•
that provides access to the online user manual for the
system.
Split Screen: Can turn on or o the split screen mode.
•
When you manipulate the climate control system while using
the product, the climate settings appear on the upper part of the
screen.
AA
The temperature of the climate system can be adjusted by
1 ℉ increments. When the temperature is set to the lower
limit or upper limit, “LOW” or “HIGH” appears on the screen.
AA
In Auto mode, the mode turns o in the following situations:
The fan speed or air direction is changed.
-
The air conditioner is turned on or o.
-
The Auto Defog function is turned on to ensure driver’s
-
visibility.
AA
Available settings may dier depending on the vehicle model
and specications.
2-13
Page 52
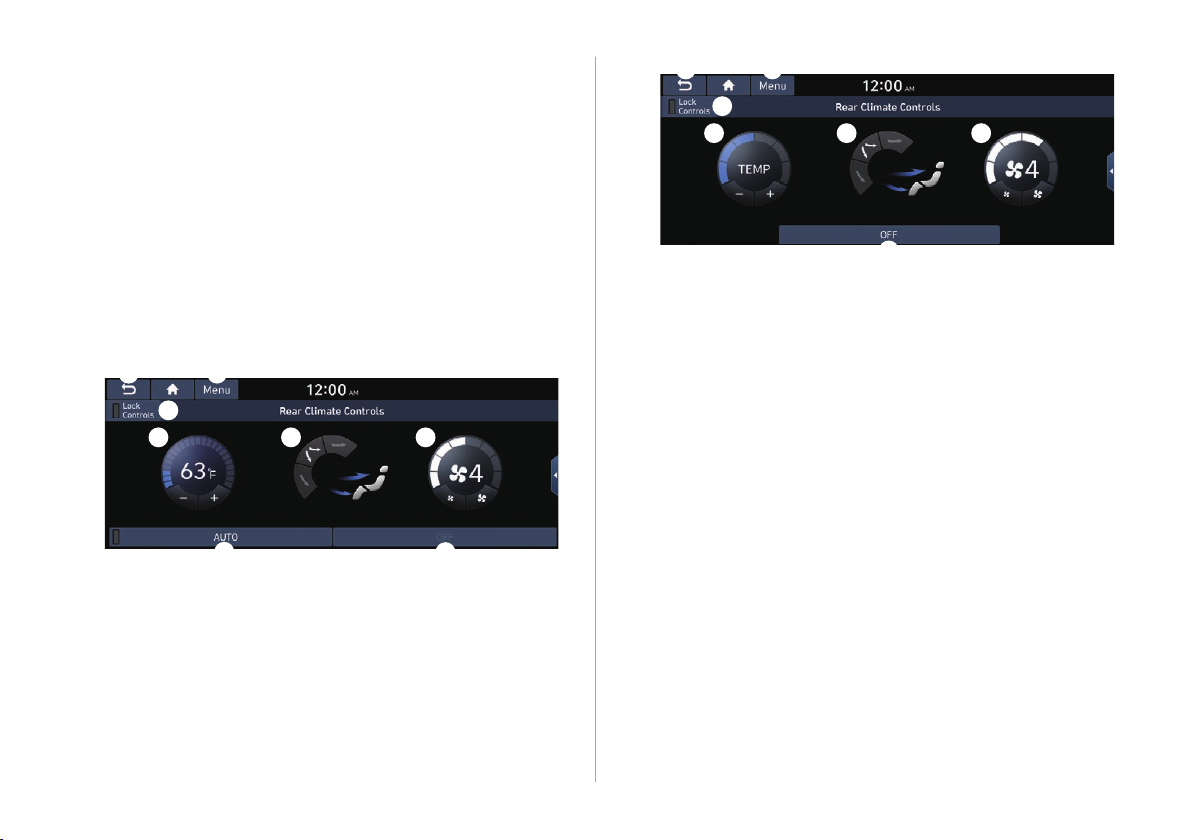
a
f
h
Using the rear-seat climate
a
e
f
h
control system
You can check or set the rear-seat climate status on the system
screen.
Perform any of the following methods:
1
Press the [REAR] button on the climate control system.
•
On the All Menus screen, press Rear Climate Controls.
•
Select and then change the settings.
2
g
b
For automatic temperature control
(if equipped)
c
d
g
b
For manual temperature control
Returns to the previous step.
a
Can set the inside temperature.
b
Can adjust the air direction.
c
Can adjust the fan speed.
d
Can turn on or o the automatic temperature control
e
function of the rear seat.
The climate for the rear seat is turned o.
f
Can lock to prevent any occupant from controlling the
g
climate control system.
The list of menu items appears.
h
User's Manual on Web (QR Code): Displays the QR
•
code that provides access to the online user manual
for the system.
Split Screen: Can turn on or o the split screen mode.
•
AA
Available settings may dier depending on the vehicle
model and specications.
c
d
2-14
Page 53
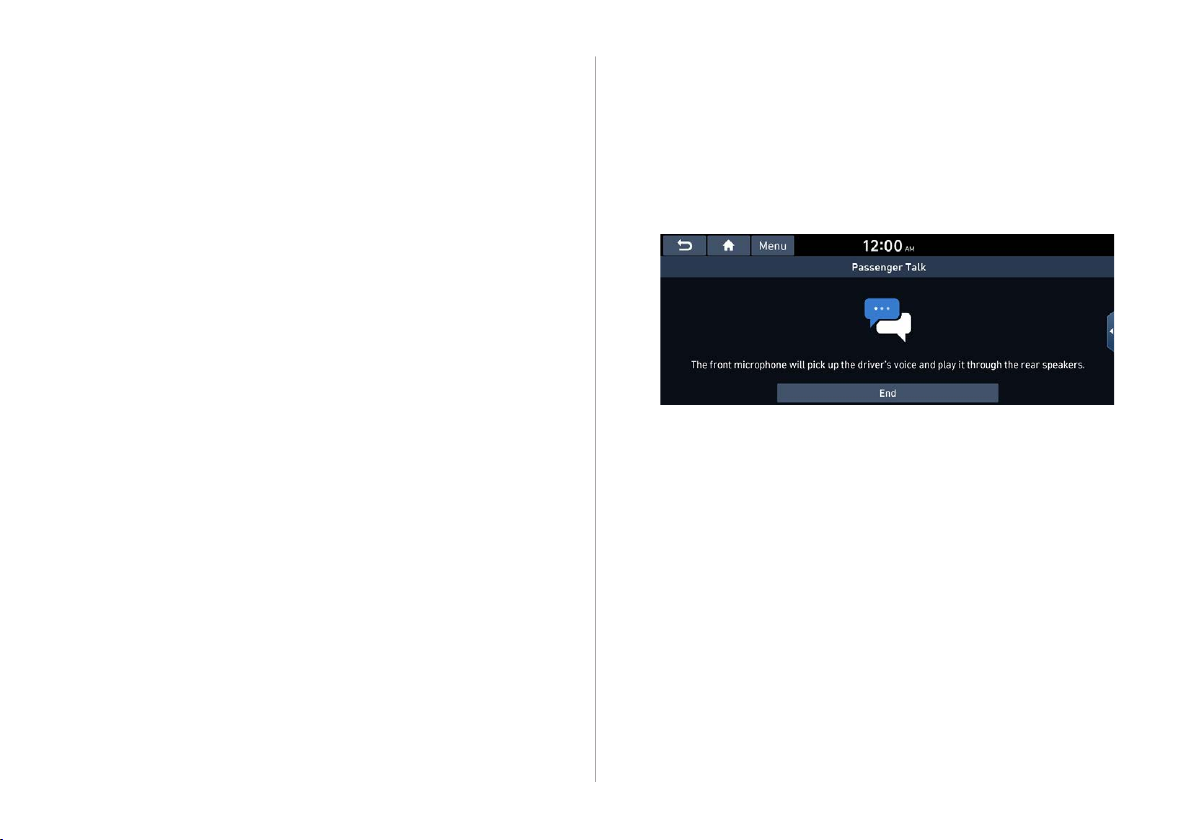
Using the Passenger Talk
mode in the rear seat
When the driver’s voice cannot be delivered well to the rear seat,
you can use the microphone of the driver’s seat for smooth
communication.
On the All Menus screen, press Passenger Talk.
1
The passenger talk icon appears at the top right of the system
screen to display its status.
(if equipped)
Make conversation through the microphone of
2
the driver’s seat.
AA
To end the Passenger Talk mode, press End.
AA
When you move to another screen without pressing End,
shortly press the End Call button on the steering wheel to
end the passenger talk function.
AA
When the Passenger Talk mode is active, the Radio/Media
functions are unavailable.
AA
To access the online user’s manual on the Passenger Talk
screen, press Menu > User's Manual on Web (QR Code) and
then scan the displayed QR code.
2-15
Page 54
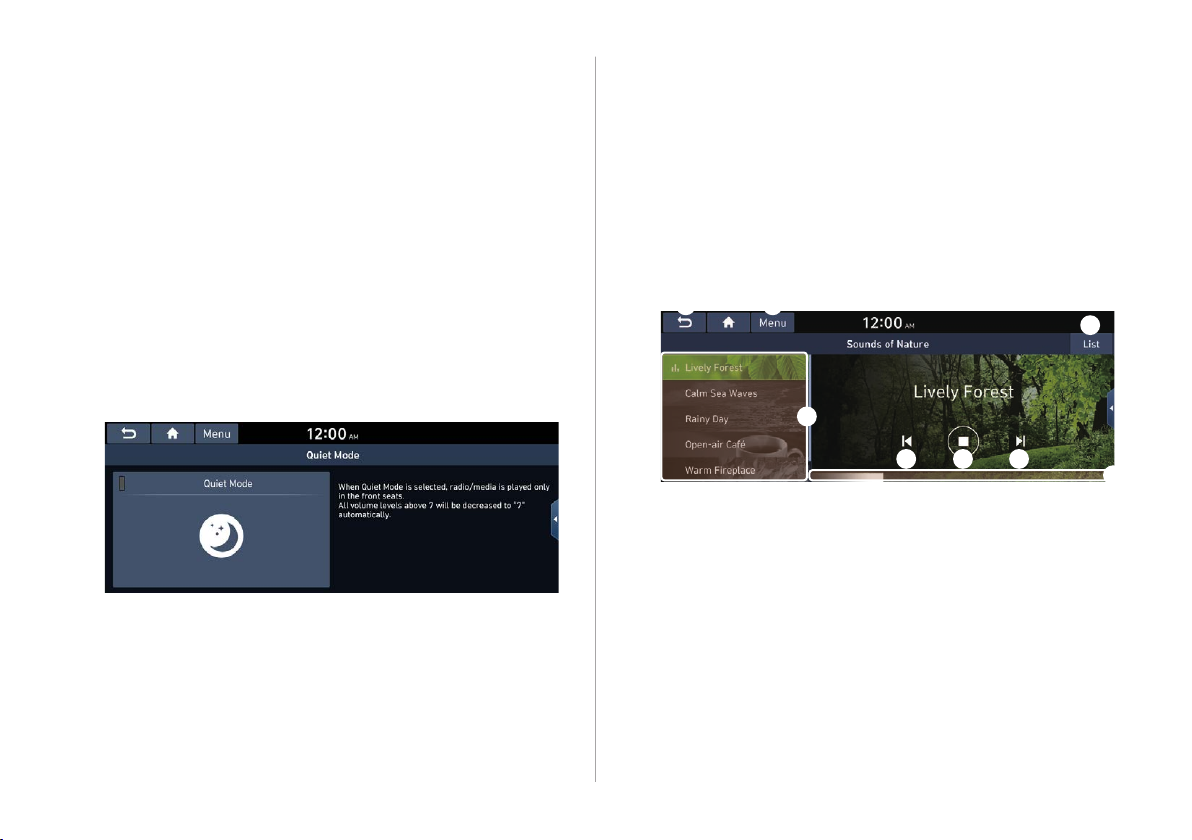
h
a
f
Using the Quiet mode in the
Playing Sounds of Nature
rear seat
To allow occupants in the rear seat to have rest and sleep, you
can set to adjust the system volume.
On the All Menus screen, press Quiet Mode.
1
Press Quiet Mode.
2
The audio volume in the rear seat is muted. When the volume
for the front seats is set too high, the volume decreases
automatically.
AA
To end the Quiet mode, press Quiet Mode once more.
AA
To access the online user’s manual on the Quiet mode screen,
press Menu > User’s Manual on Web (QR Code) and then
scan the displayed QR code.
(if equipped)
Listen to the calming sound of rain, waves, and more to relax
while driving by turning on a Sounds of Nature.
On the All Menus screen, press Sounds of
1
Nature.
Select from the Sounds of Nature list to play.
2
b
c d
Returns to the previous step.
a
Select and play Sounds of Nature.
b
Play the previous sound.
c
Stop or play playback.
d
Play the next sound.
e
You can check the playback status of Sound of Nature.
f
Select and play Sounds of Nature.
g
e
g
2-16
Page 55
a
e
The list of menu items appears.
h
Media Sources: Open the media selection window.
•
Sound Settings: Displays the system sound settings
•
screen.
User's Manual on Web (QR Code): Displays the QR
•
code that provides access to the online user manual
for the system.
Split Screen: Can turn on or o the split screen mode.
•
AA
Playing Sounds of Nature will mute or pause other sound
eects and music that may be active at the moment.
AA
Incoming or outgoing calls will pause Sounds of Nature
playback.
AA
The sound eect settings button may appear on the screen
depending on the amp specications.
Using the HD Radio Data
You can access an array of information with HD radio data such
as HD Radio™.
AA
HD radio data are available only in metropolitan areas.
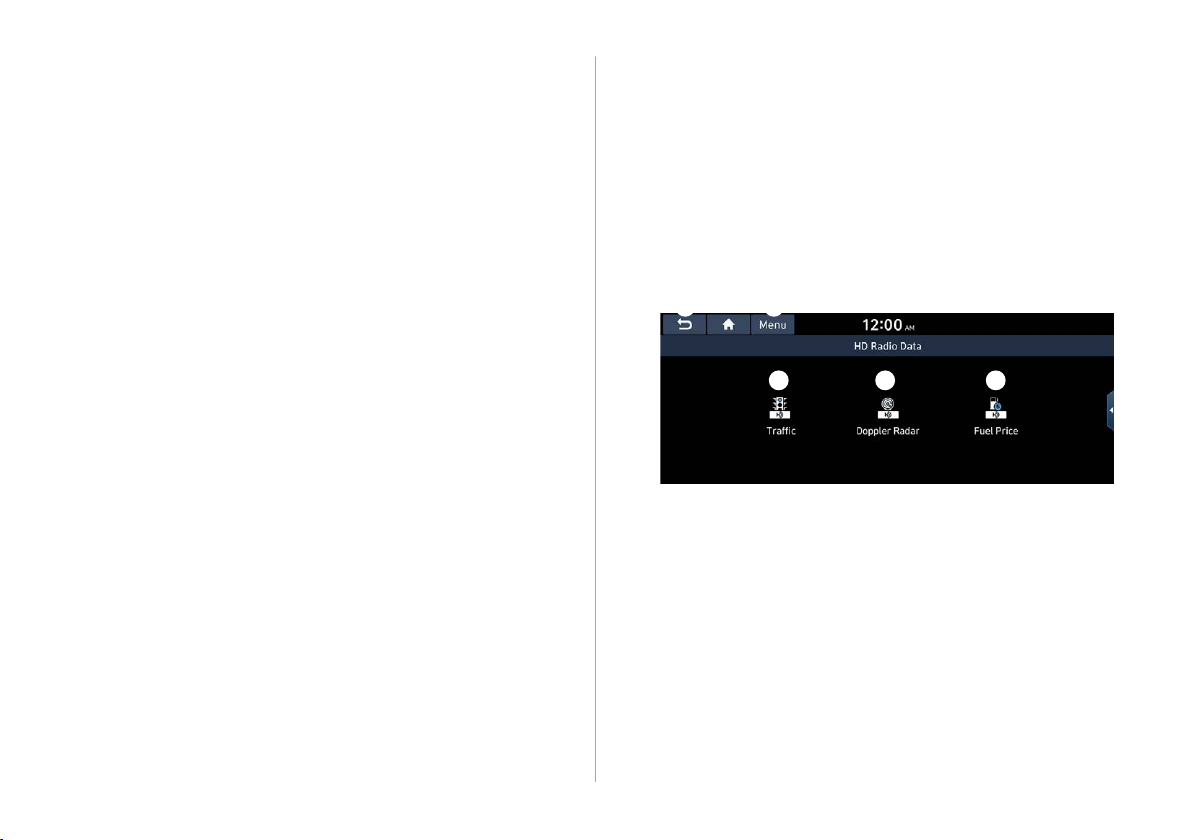
On the All Menus screen, press HD Radio Data.
1
Perform any of the following methods:
2
b c d
Returns to the previous step.
a
Can see trac information by using HD Radio data.
b
> See “Seeing trac information by using HD radio data.”
Can see weather information from the Doppler Radar.
c
> See “Seeing weather information by using Doppler weather
radar.”
Can see fuel price information by using HD Radio data (if
d
equipped).
radio data (if equipped).”
> See “Seeing fuel price information by using HD
2-17
Page 56
The list of menu items appears.
e
User's Manual on Web (QR Code): Displays the QR
•
code that provides access to the online user manual
for the system.
Split Screen: Can turn on or o the split screen mode.
•
AA
The screen may dier depending on the vehicle model
and specications.
Seeing trac information by using HD
radio data
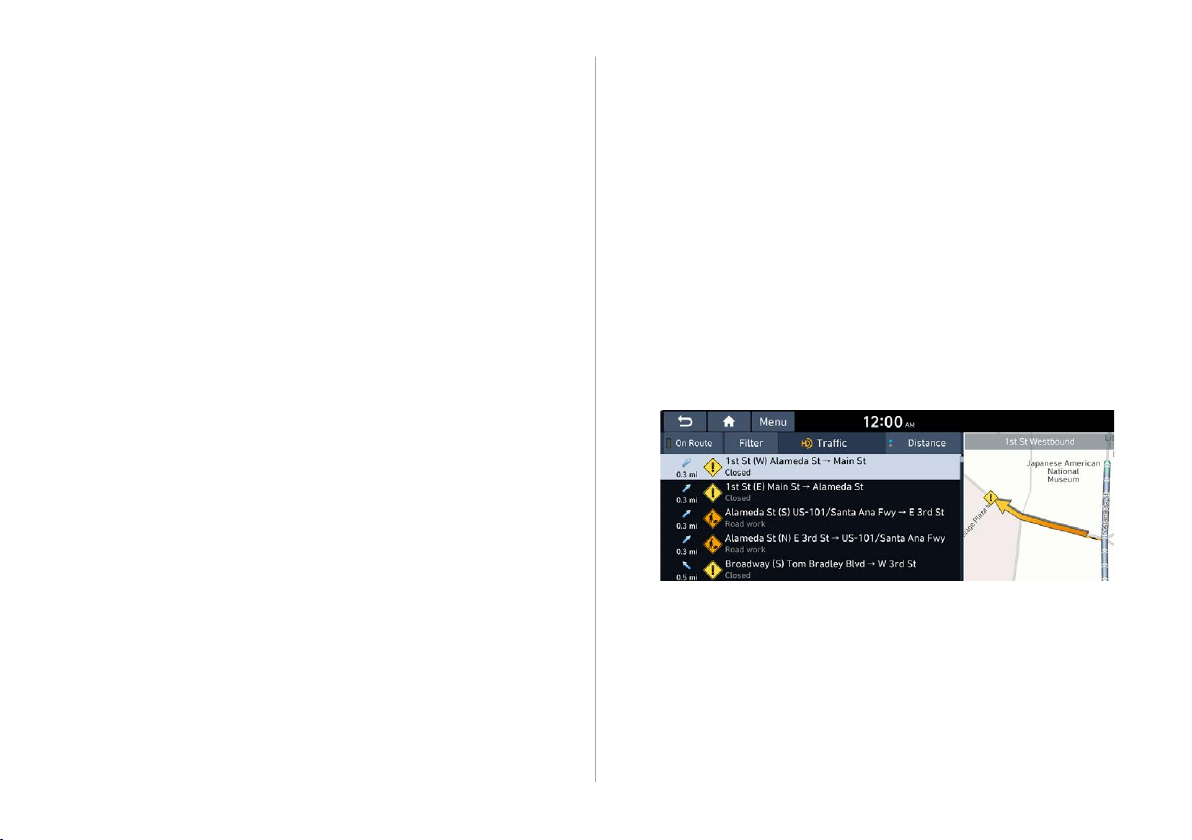
On the All Menus screen, press HD Radio Data.
1
Press Trac.
2
Select an item from the trac information list to
3
see the details.
AA
To see trac information along with your current route or
to see all available trac information, press On Route.
AA
To select the types of trac information to see, press
Filter.
2-18
Page 57
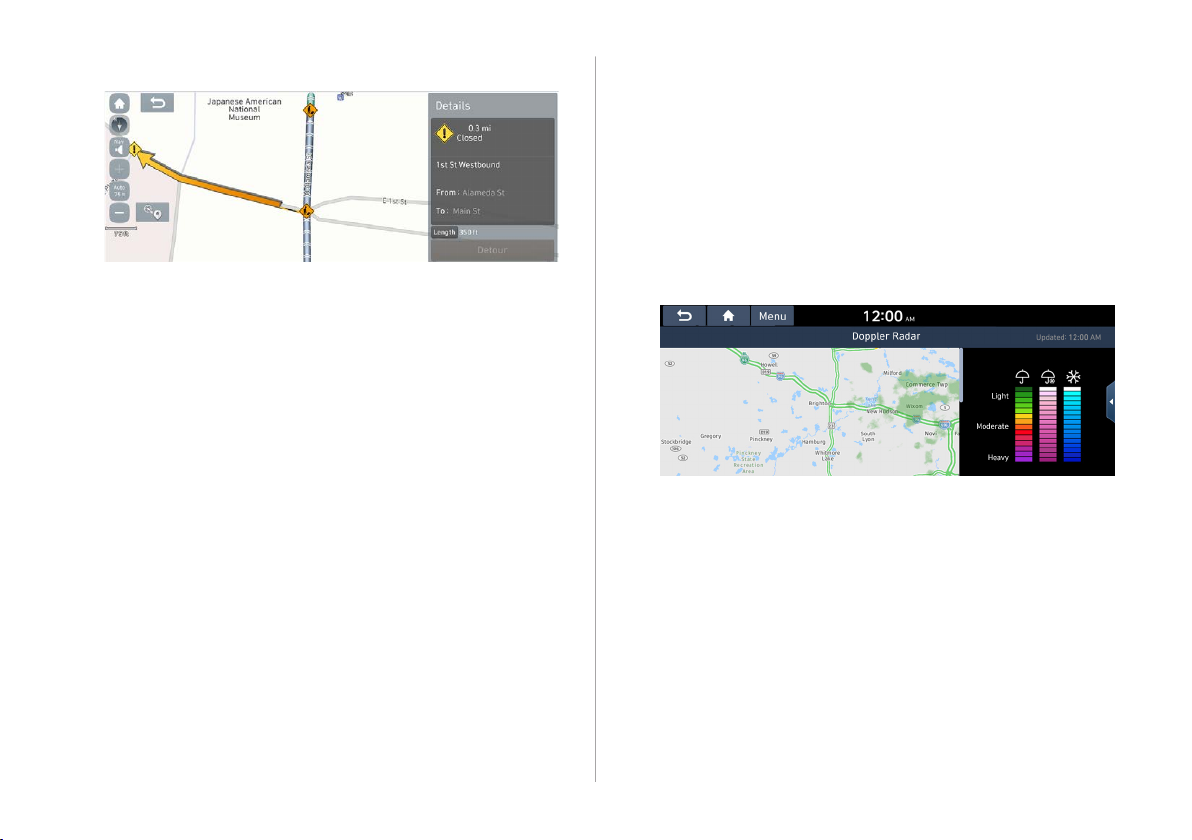
Check the trac information details.
4
AA
Trac information for border crossings and speed limits
in local roads may not be accurate. Use the information at
your discretion.
Seeing weather information by using
Doppler weather radar
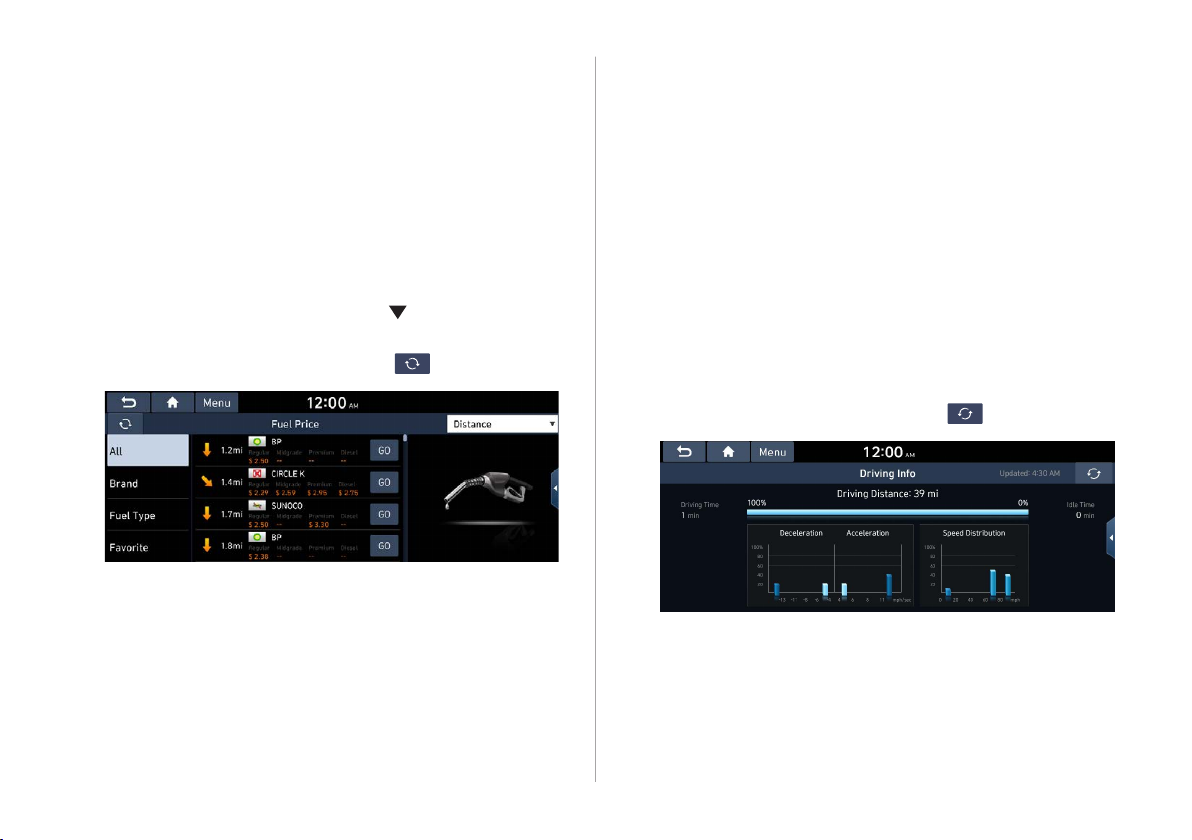
On the All Menus screen, press HD Radio Data.
1
Press Doppler Radar.
2
See the weather condition details in the HD Radio
3
coverage area.
2-19
Page 58
Seeing fuel price information by using
HD radio data
On the All Menus screen, press HD Radio Data.
1
Press Fuel Price.
2
Search nearby gas stations or charging stations,
3
and check the current fuel or charging prices.
AA
To change the sorting order, press
list and then select the sorting criteria.
AA
To see the latest information, press
(if equipped)
on the drop-down
.
Seeing the driving information
(if equipped)
You can analyze the driving patterns by checking the driving
information such as driving time, distance, idle time, and vehicle
speed distribution. Use this information to ensure safe and
economical driving.
AA
This function is available only when your vehicle is stationary
with the vehicle started.
On the All Menus screen, press Driving Info.
1
Check the driving information of your vehicle.
2
AA
To see the latest information, press
AA
To access the online user’s manual on the driving information
screen, press Menu > User's Manual on Web (QR Code) and
then scan the displayed QR code.
.
2-20
Page 59
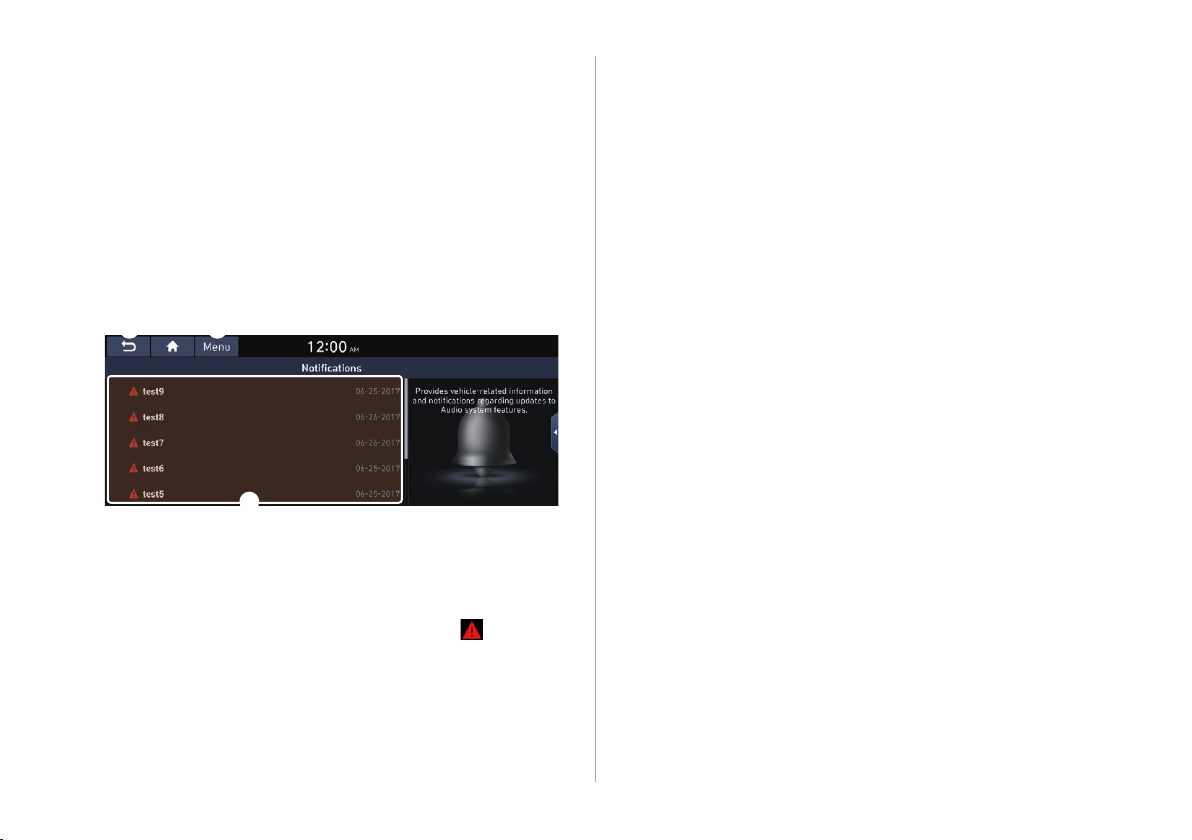
Seeing notications (if equipped)
ca
b
View Blue Link notications including the navigation and map
update information.
AA
Subscribe to Blue Link to check the function.
to the service.”
On the All Menus screen, press Notications.
1
Select to view the item.
2
Returns to the previous step.
a
View the list of received notications. Select from the list
b
to view details.
AA
Important notications are marked with
the title.
AA
You cannot display notication details while driving.
Stop the vehicle rst to view notications.
> See “Subscribing
next to
The list of menu items appears.
c
Notication Popup: Set to display notications upon
•
receipt in a pop-up.
User's Manual on Web (QR Code): Displays the QR
•
code that provides access to the online user manual
for the system.
Split Screen: Can turn on or o the split screen mode.
•
2-21
Page 60
Page 61

03
Radio
Listening to the radio
Listening to HD Radio™
Listening to SiriusXM™ radio
Page 62
Listening to the radio
a
h
k
You can scan radio channels by using various options. Save your
favorite channels to the presets list.
Perform any of the following methods:
On the All Menus screen, press Radio.
•
On the control panel, press the [RADIO] button.
•
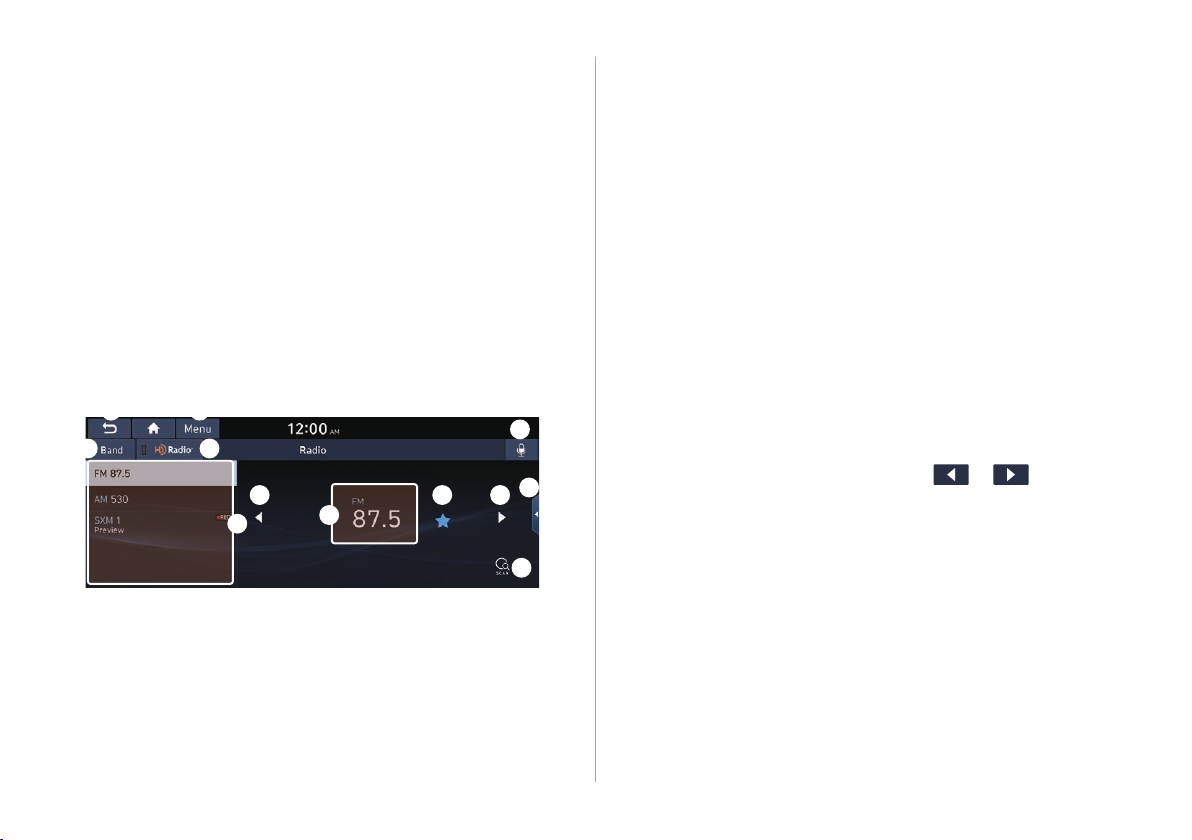
Radio screen
The radio screen provides various functions while listening to
radio broadcasts.
b c
j j
e
f
g
d
i
Returns to the previous step.
a
Can change the radio mode.
b
Activate the HD Radio mode.
c
You can change radio channels by using voice commands.
d
> See “Changing the channel by using voice commands.”
Presets list
e
Radio broadcast information
f
You can delete or save the current frequency to the presets
g
list.
> See “Saving radio channels.”
Can turn on or o the split screen mode.
h
You can listen to each radio channel for a short time and
i
select the desired channel.
Can change the frequency. Shortly press to switch to the
j
previous/next frequency, or press and hold to quickly change
the frequency. When you release the
previous or next channel with good reception is automatically
selected (if equipped).
> See “Using the scan function.”
or button, the
3-2
Page 63

The list of menu items appears.
k
Enter Station: Can select or directly enter the desired
•
radio frequency.
Station List: Can see the list of available radio stations.
•
FM Radio Noise Control: Customise sound quality when
•
listening to FM radio by adjusting background noise of the
original sound.
Info: Turns the Radio text information transmitted from
•
the broadcasting station on and o.
Delete Presets: Can delete a registered channel from the
•
presets list.
Sound Settings: Displays the system sound settings
•
screen.
User's Manual on Web (QR Code): Displays the QR code
•
that provides access to the online user manual for the
system.
Split Screen: Can turn on or o the split screen mode.
•
AA
The screen may dier depending on the vehicle model and
specications.
AA
The broadcast station names and local information are
displayed using GPS data. Those information may not appear
when there is no GPS data received.
AA
The displayed broadcast station names may not match the
actual ones.
> See “Deleting a registered channel.”
> See “Conguring the sound settings.”
Warning
Ý
Driving while distracted can result in a loss of vehicle control
that may lead to an accident, severe bodily injury, or death. The
driver's primary responsibility is the safe and legal operation of
the vehicle, and the use of any vehicle systems, including the
touch screen and steering wheel controls, which take the driver's
eyes, attention, and focus away from the safe operation of the
vehicle, or which are not permissible by law, should never be used
during the operation of the vehicle.
3-3
Page 64
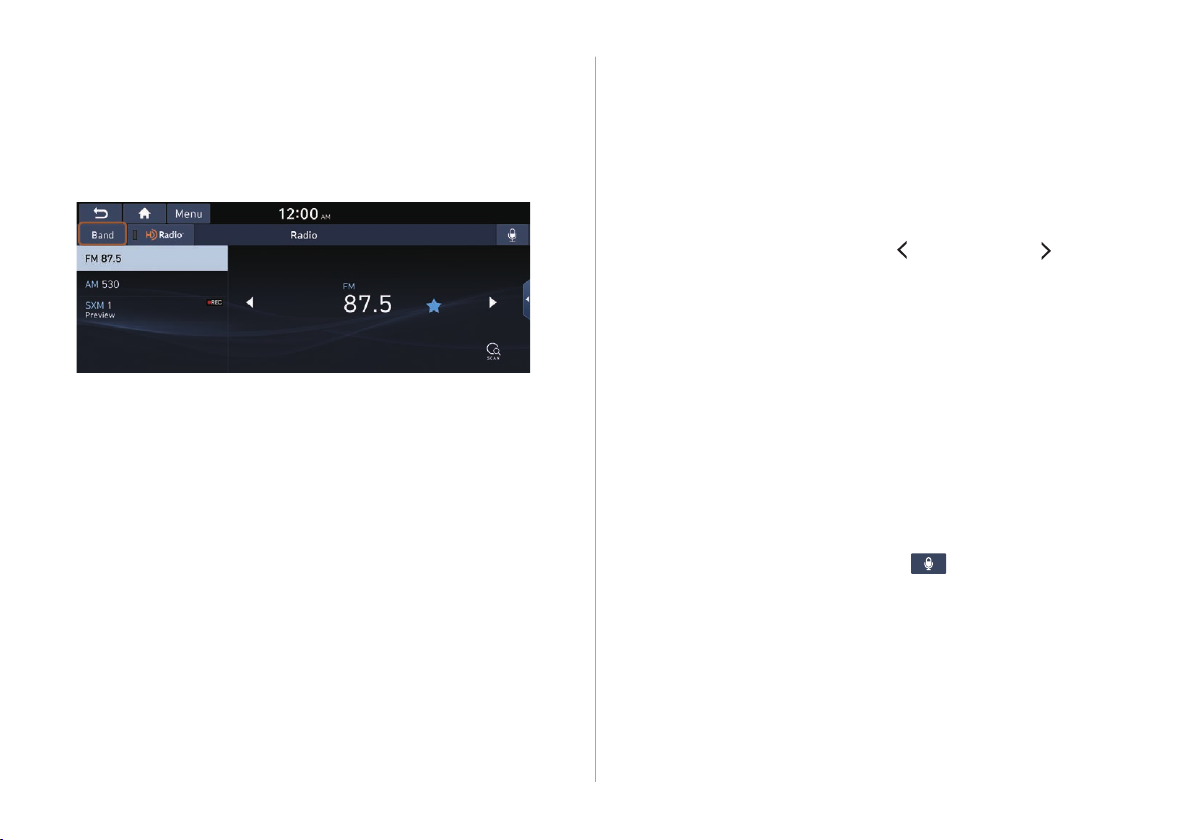
Changing the radio mode
Changing the radio channel
Perform any of the following methods:
On the Radio screen, press Band.
•
On the control panel, press the [RADIO] button repeatedly.
•
AA
The screen may dier depending on the vehicle model and
specications.
Perform any of the following methods:
On the Radio screen, press the desired channel from the
•
presets list.
AA
You can also change the channel by using the Move lever/
button on the steering wheel.
On the control panel, press the [
•
You can move to the previous or next channel with good
reception.
You can listen to the changed radio broadcast.
AA
If any [TUNE/FILE] knob on the control panel, you can also
change the frequency by turning the knob.
SEEK] or [TRACK ] button.
Changing the channel by using voice
commands
You can change the radio channel by using voice commands.
On the Radio screen, press .
1
When a guiding beep is heard, say the desired
2
radio station channel.
3-4
Page 65
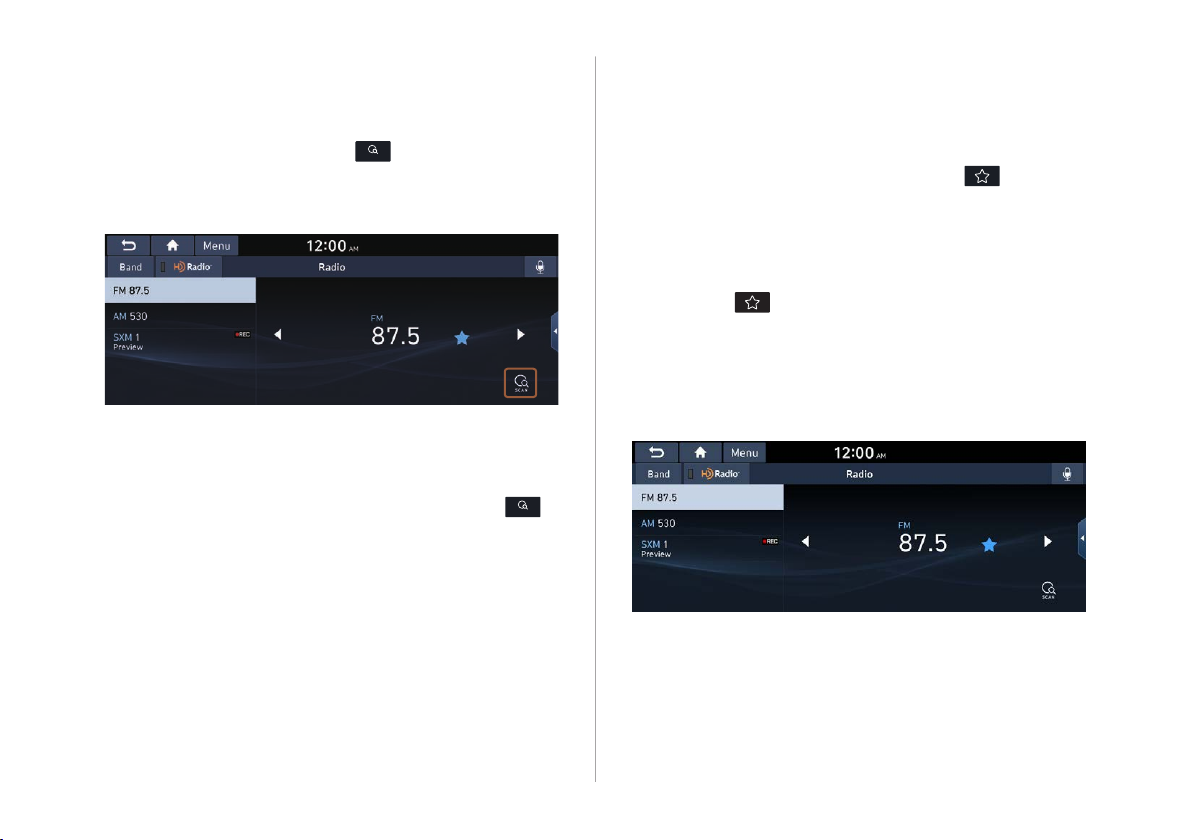
Using the scan function
Saving radio channels
You can listen to each broadcast briey and select a desired one.
On the Radio screen, press
1
Only the channels with good reception can be listened for 5
seconds in turn.
AA
The screen may dier depending on the vehicle model
and specications.
When you nd the desired broadcast, press
2
You can continue listening to the scanned channel.
SCAN
.
SCAN
You can save a specic radio station’s channel and easily access
the channel.
While listening to a broadcast, press in the
middle of the screen.
The current channel is added to the presets list.
AA
Alternatively, on the Radio screen, select Menu > Station List
and press
is saved to the preset list.
AA
You can register up to 40 channels.
AA
The screen may dier depending on the vehicle model and
specications.
of the channel you want to save. The channel
.
3-5
Page 66
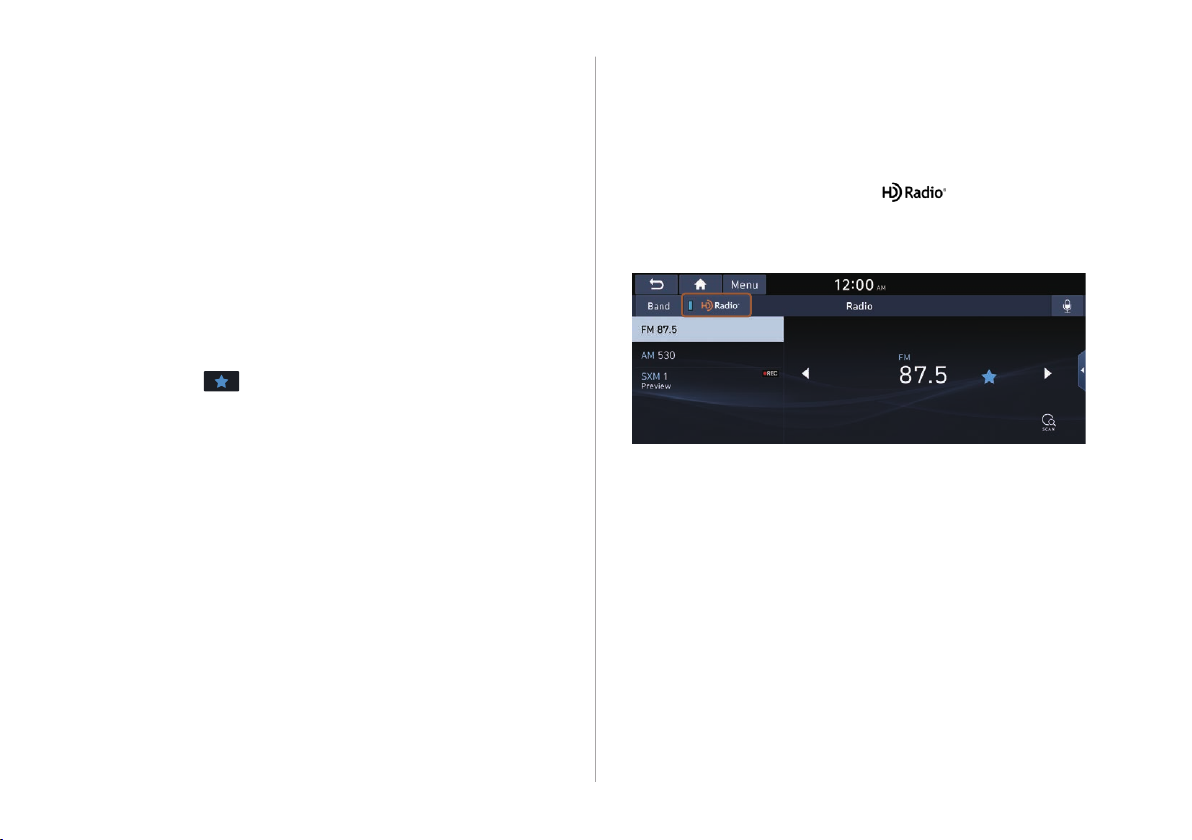
Editing the radio channel list
Listening to HD Radio™
Deleting a registered channel
At the upper left of the Radio screen, press Menu
1
>
Delete Presets.
Select the channel to delete and press Delete >
2
Yes.
The channel is deleted and the preset number is emptied.
AA
When the current channel is already assigned to the presets
list, press the
icon to remove the channel from the list.
You can listen to radio from HD radio stations when they are
available.
On the Radio screen, press .
When HD Radio signals are received, the radio switches from the
analog mode to the HD mode.
AA
The screen may dier depending on the vehicle model and
specications.
AA
In HD mode, the buttons for HD Radio stations appear at the
top of the radio screen. Press a button to select any available
HD radio station.
AA
HD radio is available only in metropolitan areas.
3-6
Page 67
HD Radio™ Technology
Program Info: Presents song
name, artist, station IDs, and
other relevant data streams.
Digital, CD-quality sound. HD
Radio™ Technology enables
local radio stations to broadcast
a clean digital signal. AM
sounds like today's FM and FM
sounds like a CD.
FM stations can provide
additional digital-only audio
programming on HD2/HD3
Channels.
Real-Time Trac reports, alerts,
and ow data displayed on
screen via interactive trac
maps and/or data.
3-7
Page 68
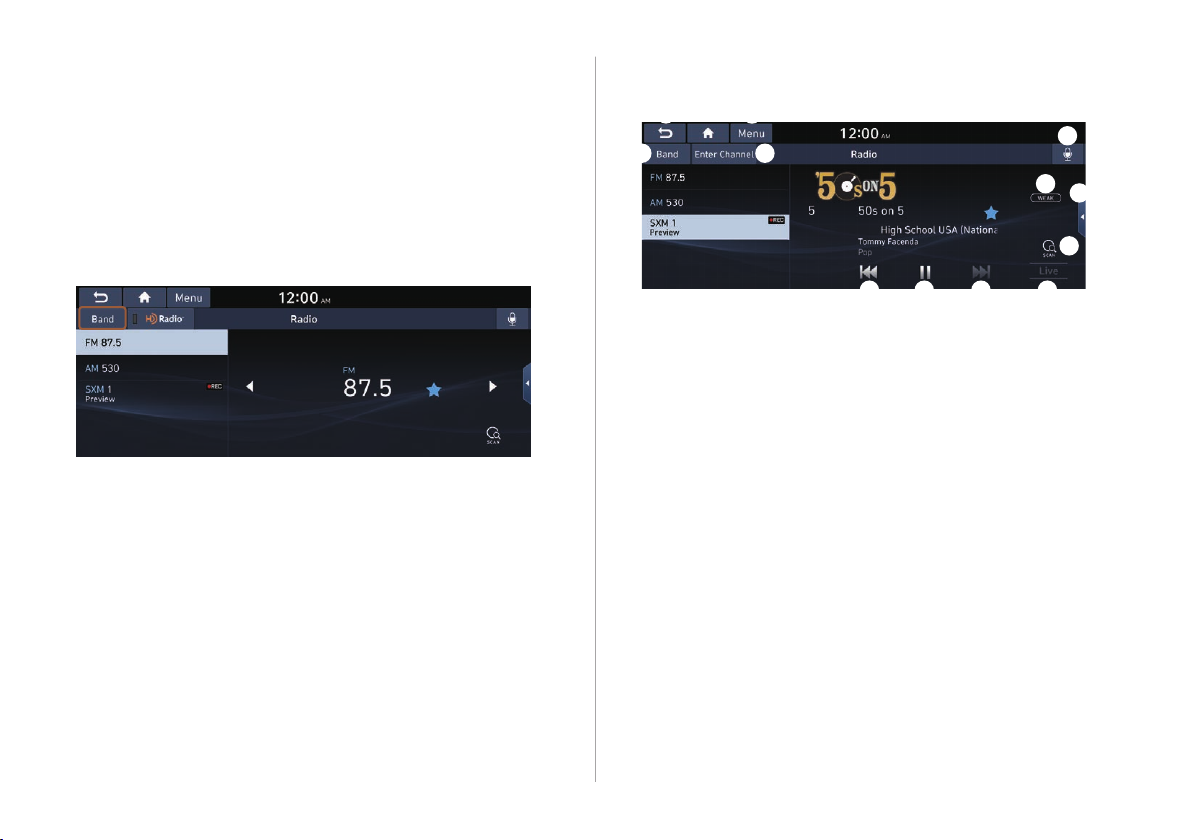
h
a
b
f g
j
k
l
Listening to SiriusXM™ radio
SiriusXM mode screen
You can listen to radio channels provided by SiriusXM, a satellite
radio service.
Changing to SiriusXM mode
On the Radio screen, press Band > SiriusXM.
AA
The screen may dier depending on the vehicle model and
specications.
c
e
Returns to the previous step.
a
Can change the radio mode.
b
Can access the list of available SiriusXM radio channels.
c
You can change radio channels by using voice commands.
d
> See “Changing the channel by using voice commands.”
The indicator turns on when signal reception is weak.
e
Moves to the previous segment. Press and hold to rewind the
f
broadcast by ve-second decrements.
Pauses or stops the broadcast.
g
Moves to the next segment. Press and hold to fast forward
h
the broadcast by ve-second increments.
Scans through all available SiriusXM radio channels.
i
Switches to the live broadcast mode. This button is activated
j
only when a live broadcast is available for the selected
channel.
d
i
3-8
Page 69
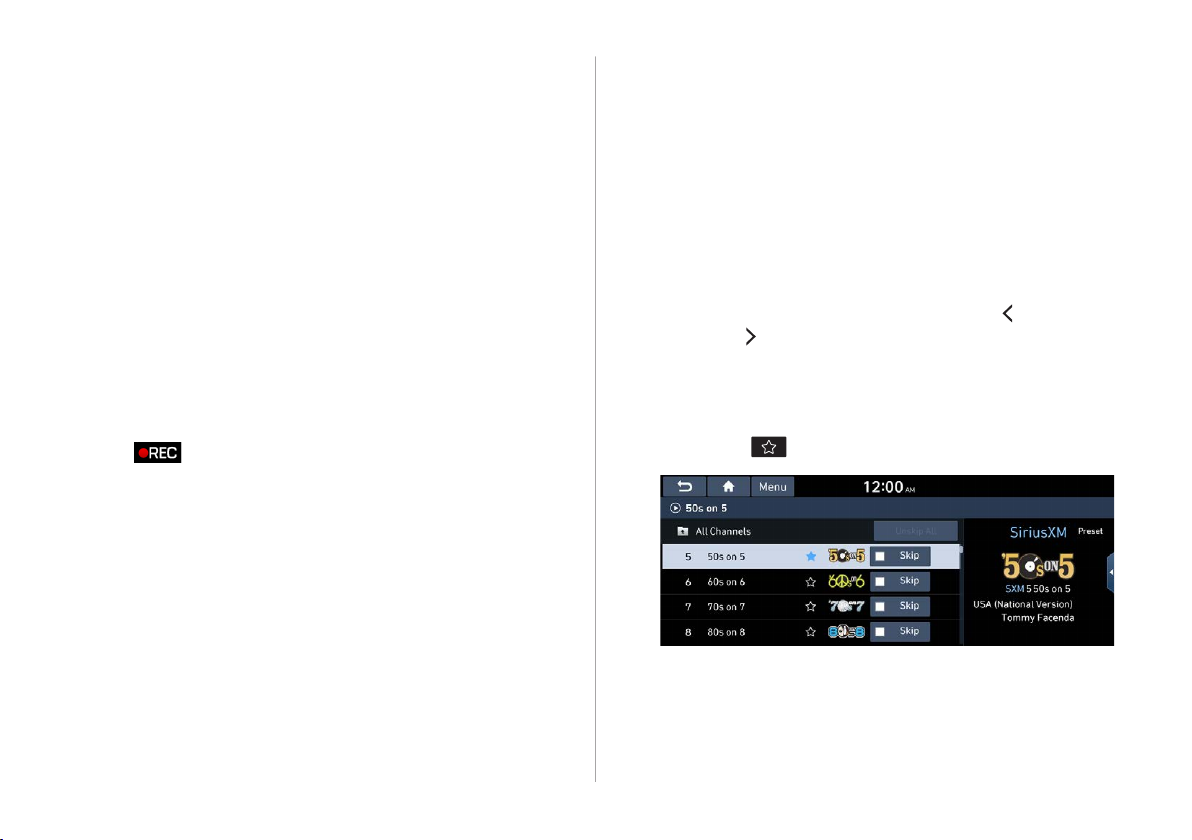
Can turn on or o the split screen mode.
k
Displays the options list.
l
Channel List: Can see the list of available SiriusXM
•
channels.
What is on My Presets?: Displays the broadcast schedule.
•
Featured Favorites: Can listen to groups of channels
•
provided by SiriusXM.
Delete Presets: Can delete a registered channel from the
•
presets list.
Sound Settings: Displays the system sound settings
•
screen.
User's Manual on Web (QR Code): Displays the QR code
•
that provides access to the online user manual for the
system.
Split Screen: Can turn on or o the split screen mode.
•
AA
The
saved. Once preset channels have been saved, the broadcasts
from them are buered automatically for your convenience
each time you start the vehicle.
icon appears next to the rst 10 SiriusXM channels
Searching for SiriusXM radio channels
You can select a channel from available SiriusXM channels.
On the Radio screen, press Band > SiriusXM.
1
On the SiriusXM radio screen, press Menu >
2
Channel List.
Select a category and a channel.
3
AA
To skip a channel when scanning with the [
[TRACK
AA
If there is a [TUNE/FILE] knob on the control panel, you
can also scan for channels by turning the knob.
AA
The current channel is added to the presets list when
pressing
] button, press Skip.
.
SEEK] or
3-9
Page 70
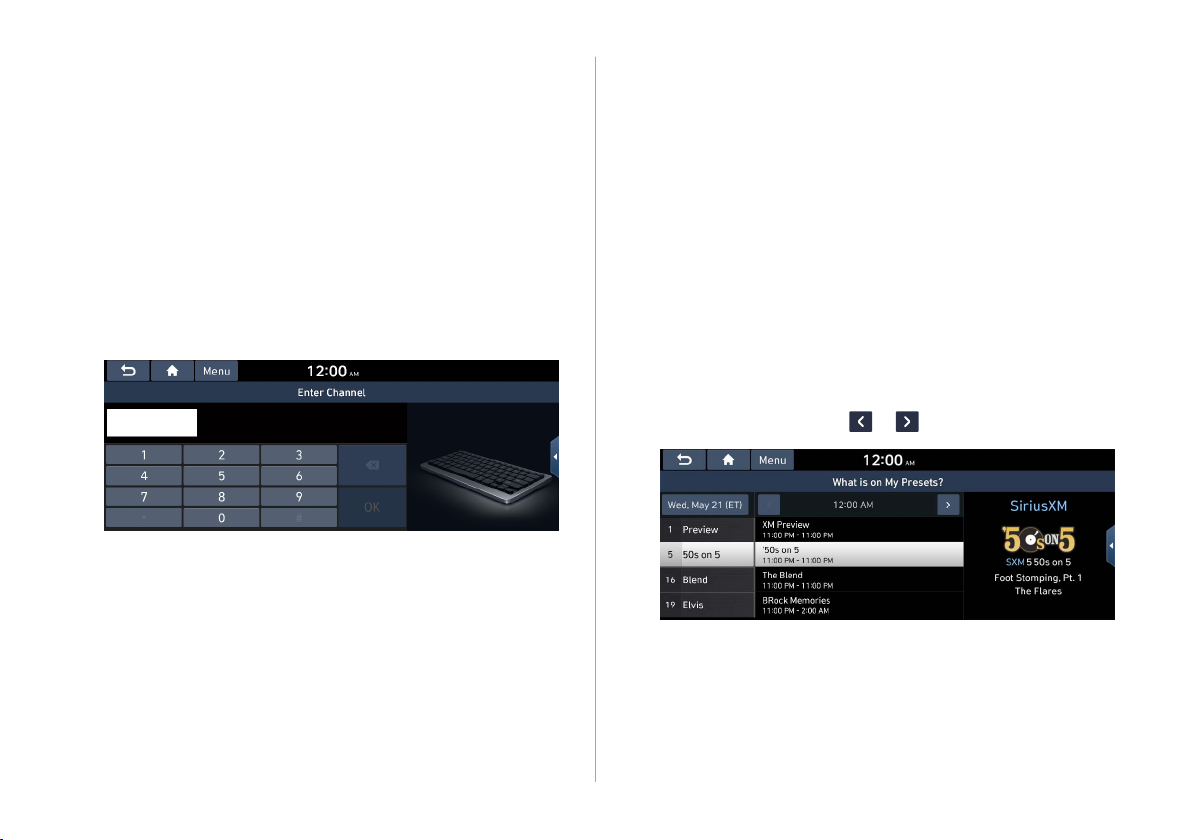
Selecting channels by using channel
numbers
When you know the exact channel number, you can enter it to
select the channel directly.
On the Radio screen, press Band > SiriusXM.
1
On the SiriusXM radio screen, press Enter
2
Channel.
Enter a channel number and press OK.
3
Seeing the program schedule
You can see the program schedule and information for the
channels saved in your preset list.
On the Radio screen, press Band > SiriusXM.
1
On the SiriusXM radio screen, press Menu >
2
What is on My Presets?.
Set the date and time on the top line of the
3
screen.
AA
To select a date, press the date display eld at the top left
of the preset list and select the date and time zone.
AA
To select a time, press
or .
3-10
Select a channel and a program to see its detailed
4
information.
AA
If any hidden information, an arrow appears next to the
program. Press the arrow to see the hidden information.
Page 71
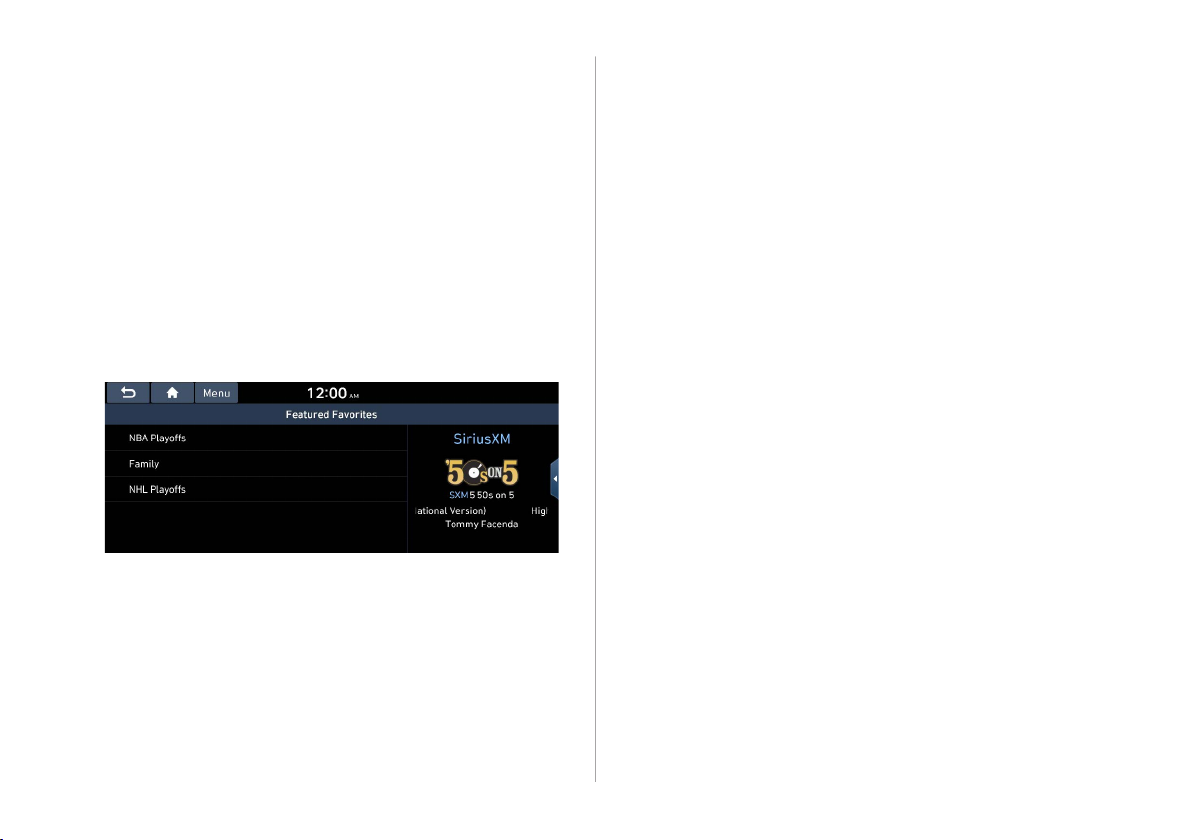
Listening to Featured Favorites
channels
You can listen to Featured Favorites channels on the SiriusXM
radio. Multiple sets of channels can be broadcast and can be
changed by SiriusXM.
On the Radio screen, press Band > SiriusXM.
1
On the SiriusXM radio screen, press Menu >
2
Featured Favorites.
Select a channel.
3
3-11
Page 72
Page 73

04
Media
Using media
Page 74
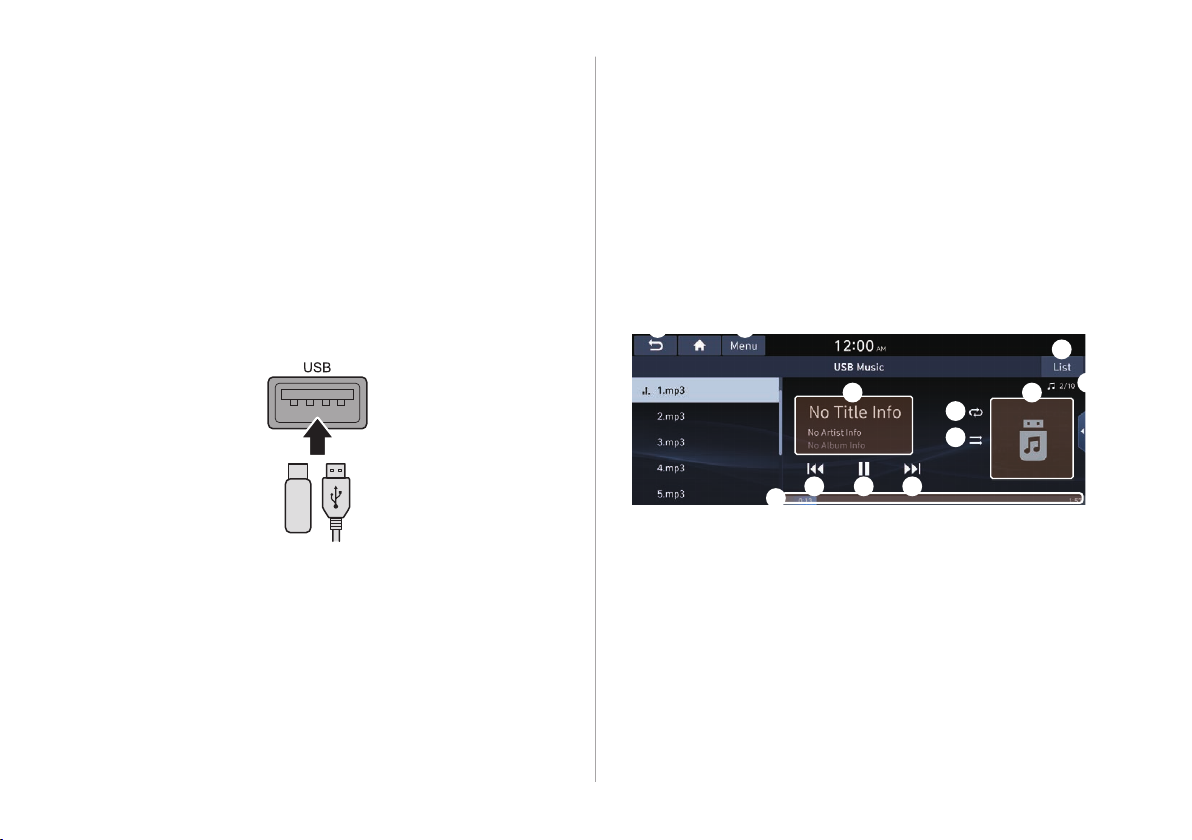
Using media
a
j
c
You can use the USB mode to play music les on a connected
mobile device, such as USB device and MP3 player. You can also
play Bluetooth music by connecting a Bluetooth device, which
supports a Bluetooth function.
Listening to music from a USB device
Connect a media device to play to the USB port on
1
the vehicle.
Perform any of the following methods:
2
On the Home screen, press the Radio/Media info widget
•
or on the All menu screen, press Media.
On the control panel, press the [MEDIA] button.
•
AA
When multiple media are connected, press the [MEDIA]
button once more and then press the desired media
source from the media selection window.
USB music screen
b
4-2
AA
Playback may start automatically depending on the media
type.
AA
For more information about supportable devices and le
types:
> see “USB mode.”
AA
The shapes and arrangement of the buttons and USB
port may dier depending on the vehicle model and
specications.
d d
g hki
Returns to the previous step.
a
Moves to the le list screen.
b
Displays the sequence number of the current le and the total
c
number of les for playback.
Displays the information of the current music. Press the artist
d
or album info of the current song to go to list of songs by the
artist or from the album.
Used to change the repeat playback mode.
e
Used to turn on or o the random playback mode.
f
e
f
Page 75

Restart playing the current le or previous le.
g
Can pause or resume playback.
h
Can play the next le.
i
Can see the duration of the playing song and the current
j
playback position.
The list of menu items appears.
k
Media Sources: Opens the media selection window.
•
Songs by this Artist: Moves to the list of the artist’s songs.
•
Songs from this Album: Moves to the list of music albums
•
that contain the current song.
Hide Current File: You can hide the le that is playing.
•
Sound Settings: Displays the system sound settings
•
> See “Conguring the sound settings.”
screen.
User's Manual on Web (QR Code): Displays the QR code
•
that provides access to the online user manual for the
system.
Split Screen: Can turn on or o the split screen mode.
•
AA
The sound eect settings button may appear on the screen
depending on the amp specications.
Warning
Ý
Driving while distracted can result in a loss of vehicle control that
may lead to an accident, severe bodily injury, or death. The driver's
primary responsibility is the safe and legal operation of the
vehicle, and the use of any vehicle systems, including the touch
screen and steering wheel controls, which take the driver's eyes,
attention, and focus away from the safe operation of the vehicle,
or which are not permissible by law, should never be used during
the operation of the vehicle.
Pause/Resume
You can pause or resume playback of a USB music le.
On the USB music playback screen, press or .
Rewind
By using the rewind function, you can listen to music in the USB
device from the desired point during playback.
Perform any of the following methods:
On the USB music playback screen, press and hold
•
On the control panel, press and hold the [
•
AA
You can also run the function by using the Move lever/button
on the steering wheel.
SEEK] button.
.
4-3
Page 76
Fast forward
Playing the previous le
By using the fast forward function, you can listen to music in the
USB device from the desired point during playback.
Perform any of the following methods:
On the USB music playback screen, press and hold
•
On the control panel, press and hold the [TRACK
•
AA
You can also run the function by using the Move lever/button
on the steering wheel.
.
] button.
Resuming playback of the current music
You can play the current music in the USB device from the
beginning.
Perform any of the following methods:
On the USB music playback screen, press
•
during playback.
On the control panel, press the [
•
seconds during playback.
AA
You can also run the function by using the Move lever/button
on the steering wheel.
SEEK] button after 3
after 3 seconds
You can play the previous le during playback in the USB device.
Perform any of the following methods:
On the USB music playback screen, press
•
seconds during playback.
On the control panel, press the [
•
seconds during playback.
AA
To play the previous music during playback, press
or pressing the [
after 3 seconds from the start of the playback.
AA
You can also run the function by using the Move lever/button
on the steering wheel.
AA
If any [TUNE/FILE] knob on the control panel, you can search
for the desired music by turning the knob. When you press
the knob within 5 seconds, music is played. However, if no
input within 5 seconds, the search stops and the system
displays the information of the current le.
SEEK] button on the control panel twice
SEEK] button within 3
within 3
twice
4-4
Page 77

Playing the next le
You can play the next le in the USB device during playback.
Perform any of the following methods:
On the USB music playback screen, press
•
On the control panel, press the [TRACK
•
AA
You can also run the function by using the Move lever/button
on the steering wheel.
AA
If any [TUNE/FILE] knob on the control panel, you can search
for the desired music by turning the knob. When you press
the knob within 5 seconds, music is played. However, if no
input within 5 seconds, the search stops and the system
displays the information of the current le.
.
] button.
Changing the repeated playback mode for USB
music
You can change the repeated playback mode for USB music:
Repeat One, Repeat Folder, and Repeat All.
On the USB music playback screen, press
repeatedly.
Each time the icon is pressed, the playback repetition modes are
toggled and the activated mode icon appears on the screen.
Turning on/off the random playback mode for
USB music
You can turn on or o the random playback mode for USB music.
On the USB music playback screen, press
repeatedly.
Each time the icon is pressed, the random playback mode is
turned on and o. When the random playback is active, the les
are played randomly with no sequence.
4-5
Page 78
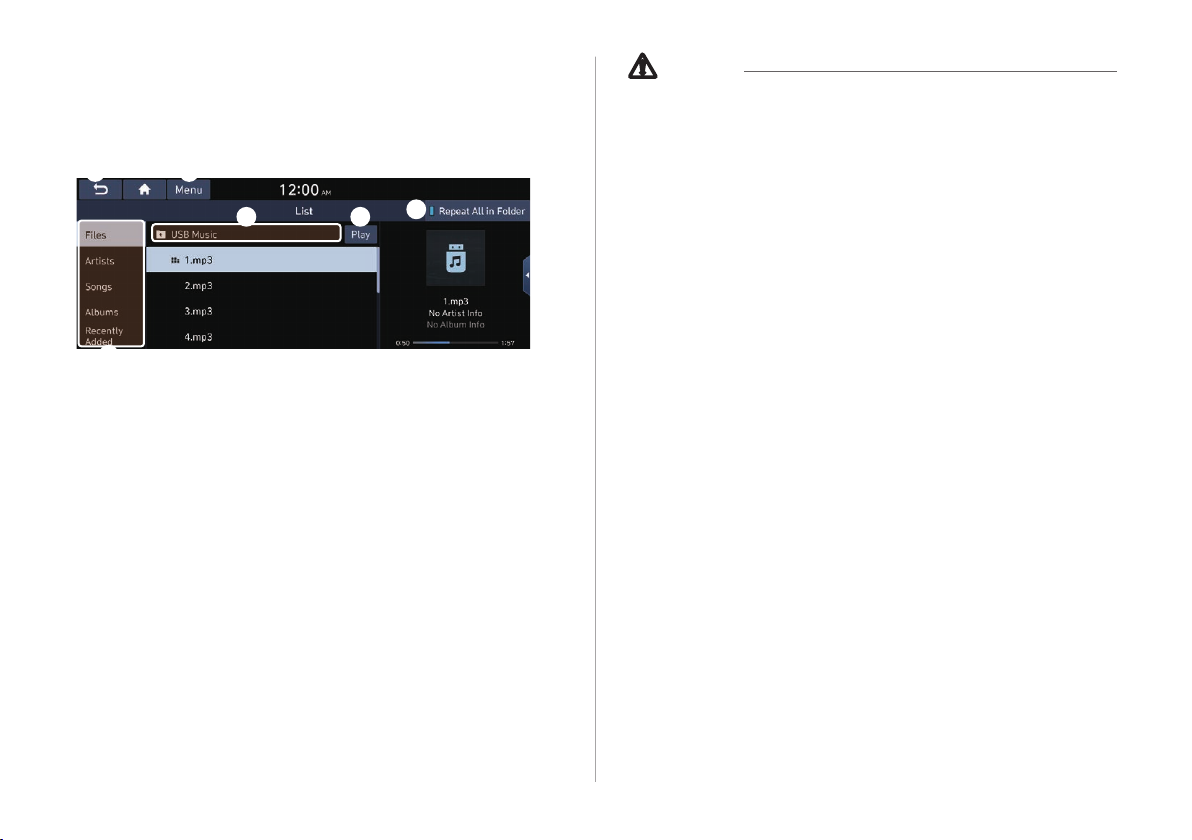
USB music list screen
a f
d
You can search and play the desired music from the list by
pressing List on the USB music playback screen.
Returns to the previous step.
a
Moves to the upper folder or category.
b
Play all songs in this category.
c
Can see music les for each category. In the artist or album
d
category, you can select multiple artists or albums to play
their songs.
Set to play media les in all sub-folders included in the current
e
playlist.
The list of menu items appears.
4-6
f
AA
The sound eect settings button may appear on the screen
depending on the amp specications.
b c
Media Sources: Opens the media selection window.
•
Now Playing: You can return to the folder of the playing
•
le while searching in the list.
Split Screen: Can turn on or o the split screen mode.
•
e
Caution
Ü
Be sure to start the vehicle before connecting a USB device.
•
When you start the vehicle after connecting a USB device, the
USB device may get damaged.
Be careful of static electricity when connecting or removing a
•
USB device. It may cause a system failure.
Be careful and avoid your body or any object coming into
•
contact with the USB port on the vehicle. It may cause an
accident or system failures.
Do not repeatedly connect and remove the USB connector
•
within a short time. It may cause device errors or system
failures.
Do not use a USB device for purposes other than playback.
•
When you connect a USB for charging or heating, the system
performance may decrease or it may cause system failures.
Page 79

AA
When connecting a USB storage, do not use a separate
extension cable and directly connect to the USB port. When
you connect a USB storage via a USB hub or extension cable,
the device may not be recognized.
AA
Push the USB connector fully into the USB port. When the
connector is not fully inserted, a communication problem
may occur.
AA
Noise may occur when removing a USB device from the
system.
AA
You can play only the les that have been encoded in the
standard format.
AA
The following USB devices may not be recognized or may not
work properly.
Encrypted MP3 players
-
USB devices that are not recognized as removable disks
-
AA
USB devices may not be recognized depending on the device
status.
AA
Some USB devices may not be supported due to compatibility
issues.
AA
USB device recognition may take longer than usual depending
on the device type, capacity, and le formats on the device.
AA
Some devices may not be charged through USB connection. It
depends on the USB specications.
AA
You can hide les only in the USB device formatted in exFAT,
FAT16/32, or NTFS. The hidden les can be found in the
“Hidden_” folder.
Listening to music via Bluetooth
To use a Bluetooth device for audio playback, connect a device
that supports Bluetooth communication such as mobile phone
and MP3 player.
For more information about Bluetooth connection:
> see “Connecting a Bluetooth device.”
AA
The controls or display screens may dier depending on the
connected Bluetooth device, phone model, and music player
application.
AA
The streaming may not be supported in some music player
applications.
AA
Some functions may not be available depending on the
connected Bluetooth device or phone model.
AA
When a media device or mobile phone is connected by both
the Bluetooth and USB cable at the same time, the device
or system may not work properly. To use the Bluetooth
connection, remove all cables from the device.
4-7
Page 80
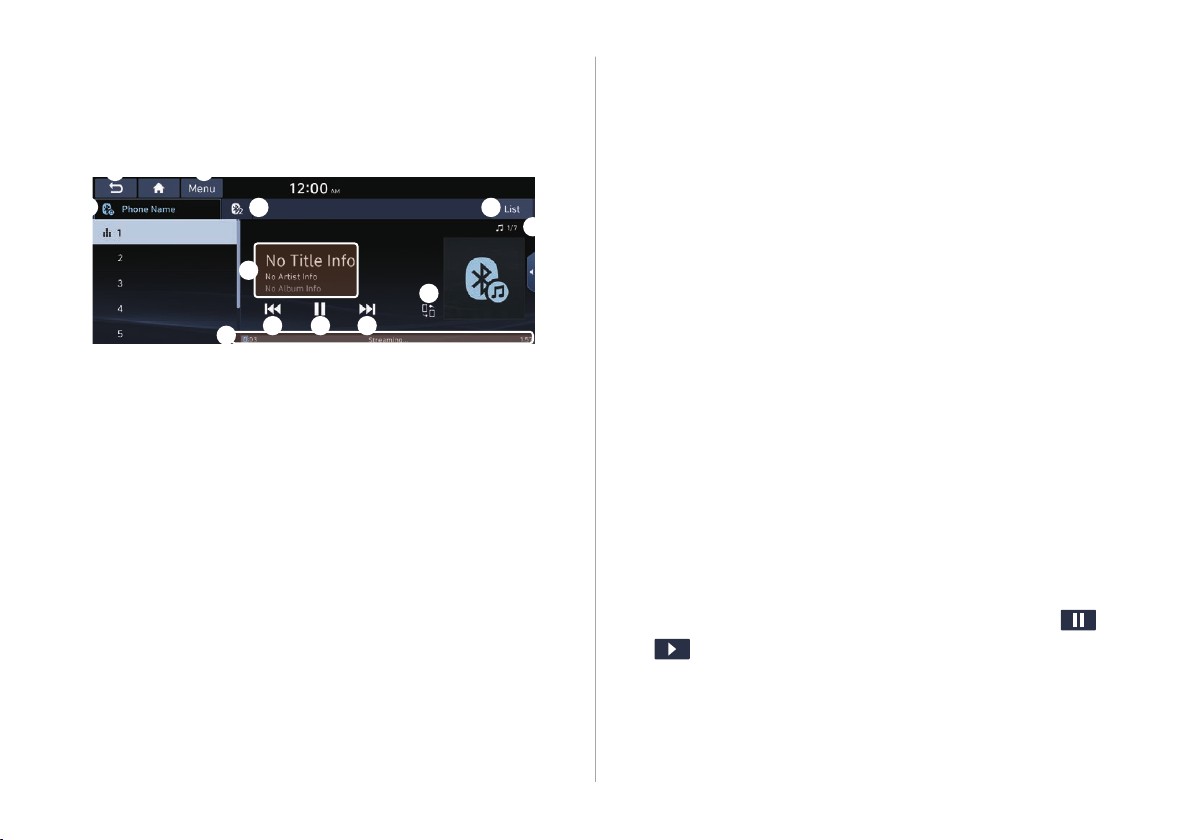
Bluetooth audio playback screen
a
l
h
The media player runs when you play a music le from a
connected audio device via Bluetooth.
b
d
e f g
Returns to the previous step.
a
Name of the connected Bluetooth device
b
When two Bluetooth audio devices are connected to the
c
system, select a device to play music.
Displays the information of the current music.
d
Restart playing the current le or play the previous le.
e
Can pause or resume playback.
f
Can play the next le.
g
Can see the duration of the playing song and the current
h
playback position.
Find and connect other Bluetooth devices.
i
Displays the sequence number of the current le and the total
j
number of les for playback.
i
Moves to the music list screen.
k
AA
The list of Bluetooth audio les may not appear
depending on the connected device or app.
The list of menu items appears.
l
Media Sources: Opens the media selection window.
•
Change Device: Find and connect other Bluetooth
kc
j
•
devices.
Sound Settings: Displays the system sound settings
•
> See “Conguring the sound settings.”
screen.
User's Manual on Web (QR Code): Displays the QR code
•
that provides access to the online user manual for the
system.
Split Screen: Can turn on or o the split screen mode.
•
AA
The screen may dier depending on the vehicle model and
specications.
AA
The sound eect settings button may appear on the screen
depending on the amp specications.
Pause/Resume
You can pause or resume playback of a Bluetooth audio le.
On the Bluetooth audio playback screen, press
or
.
4-8
Page 81

Resuming playback of the current Bluetooth
audio le
Resuming playback of the previous Bluetooth
audio le
You can play the current Bluetooth audio le from the beginning.
Perform any of the following methods:
On the Bluetooth audio playback screen, press
•
On the control panel, press the [
•
AA
The actions required may dier depending on the connected
device.
AA
You can also run the function by using the Move lever/button
on the steering wheel.
SEEK] button.
.
You can play the previous Bluetooth audio le during playback.
Perform any of the following methods:
On the Bluetooth audio playback screen, press
•
On the control panel, press the [
•
AA
The actions required may dier depending on the connected
device.
AA
You can also run the function by using the Move lever/button
on the steering wheel.
AA
If any [TUNE/FILE] knob on the control panel, you can search
for the desired music by turning the knob. When you press
the knob within 5 seconds, music is played. However, if no
input within 5 seconds, the search stops and the system
displays the information of the current le.
SEEK] button twice.
twice.
4-9
Page 82

Resuming playback of the next Bluetooth audio
le
You can play the next Bluetooth audio le during playback.
Perform any of the following methods:
On the Bluetooth audio playback screen, press
•
On the control panel, press the [TRACK
•
AA
You can also run the function by using the Move lever/button
on the steering wheel.
AA
If any [TUNE/FILE] knob on the control panel, you can search
for the desired music by turning the knob. When you press
the knob within 5 seconds, music is played. However, if no
input within 5 seconds, the search stops and the system
displays the information of the current le.
] button.
.
4-10
Page 83

05
Navigation
Navigation functions
Various ways to nd routes
Using the address book
Searching for gas stations
Searching for EV (Electric Vehicle) charging stations
Page 84
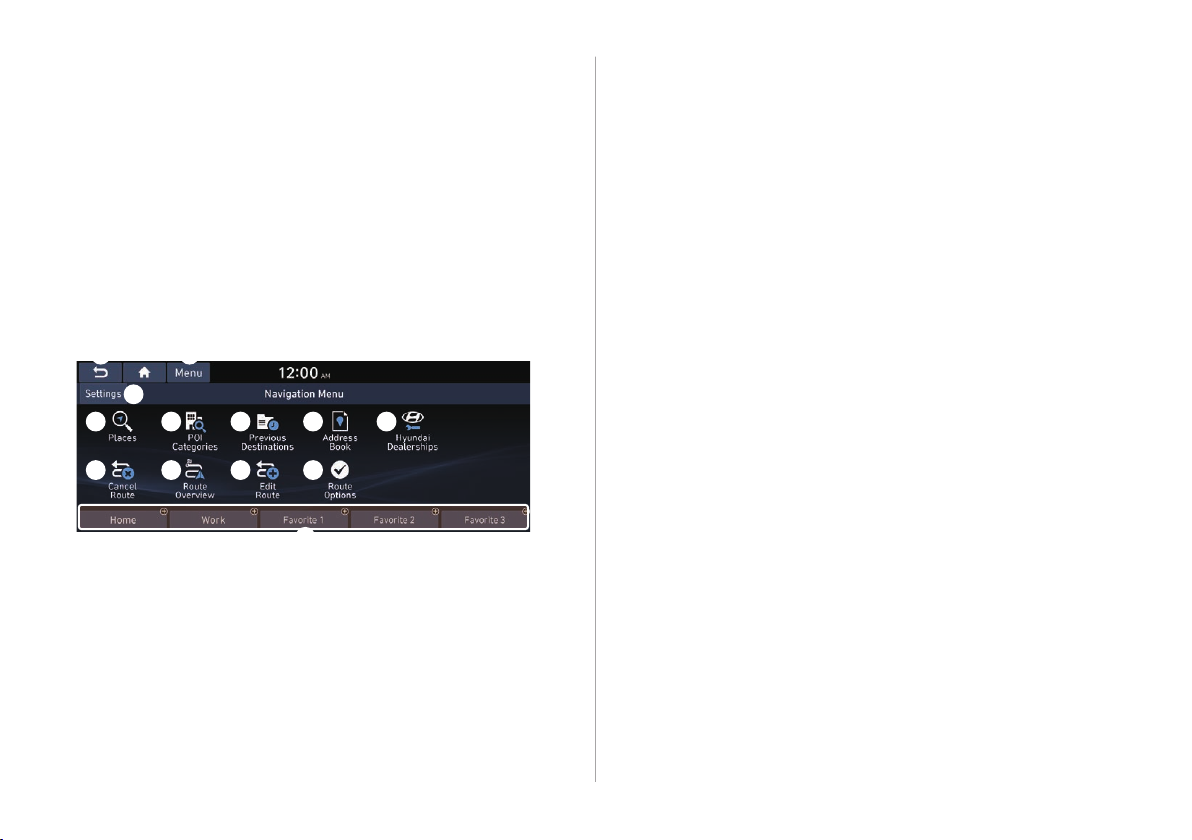
Navigation functions
a m
l
Navigation Menu overview
You can use the navigation system conveniently through various
functions on the Navigation Menu screen.
Perform any of the following methods:
On the All Menus screen, press Navigation Menu.
•
On the control panel, press the [NAV] button.
•
b
c
h i j k
a
b
c
d
d e f g
Returns to the previous step.
You can change the Navigation-related settings.
Search for a location by entering various types of keywords
such as place name and address.
Search for POIs by category to set as a destination.
> See “Searching the nearby points of interest.”
> See “Searching by keyword.”
Select any of previous destinations to set as a destination.
e
> See “Searching by previous destinations.”
Register the location or use the address book for setting a
f
destination.
You can easily search for Hyundai Dealerships. > See “Searching
g
for Hyundai Dealerships.”
You can cancel guidance to the destination. > See “Stopping the
h
route guidance.”
You can see the entire route information to the destination.
i
You can edit the current route so that you can travel via
j
waypoints on the way to the destination.
route.”
You can change the route search criteria to resume routing.
k
> See “Changing the route search criteria.”
You can register your home, oce, or other frequently visited
l
places as a favorite for ease of search.
frequently visited place as a favorite place.”
The list of menu items appears.
m
Reorder Icons: Can change the location of an icon on the
•
Navigation Menu screen.
User's Manual on Web (QR Code): Displays the QR code
•
that provides access to the online user manual for the
system.
AA
Available icons and their arrangement may dier depending
on the vehicle model and specications.
> See “Using the address book.”
> See “Editing the
> See “Registering a
5-2
Page 85
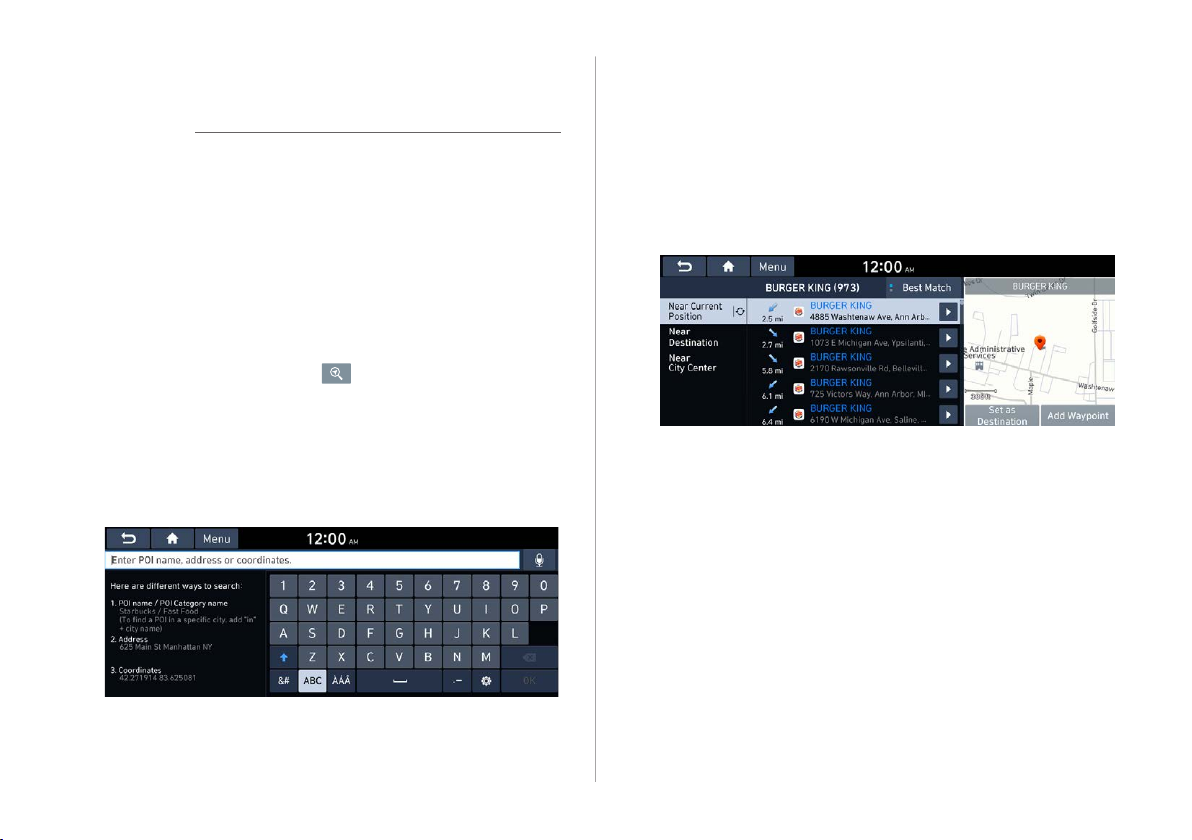
Finding a route easily
Warning
Ý
Driving while distracted may cause a loss of vehicle control
that may lead to an accident, severe bodily injury, or death. The
driver’s primary responsibility is the safe and legal operation of
the vehicle, and the use of any devices or systems that take the
driver’s attention away from driving.
Perform any of the following methods:
1
On the All Menus screen, press Navigation Menu >
•
Places.
On the map screen, press
•
AA
Press and hold the [NAV] button on the control panel to
enter into Places.
Enter the location data such as place name,
2
address, or coordinates and then press OK.
.
Select a destination from the search result.
3
AA
When communication is available, online search is
performed rst.
AA
You can see the sites in the list on the preview screen at
the right.
AA
To sort the search results in a dierent order, press on the
attribute to toggle between options.
5-3
Page 86
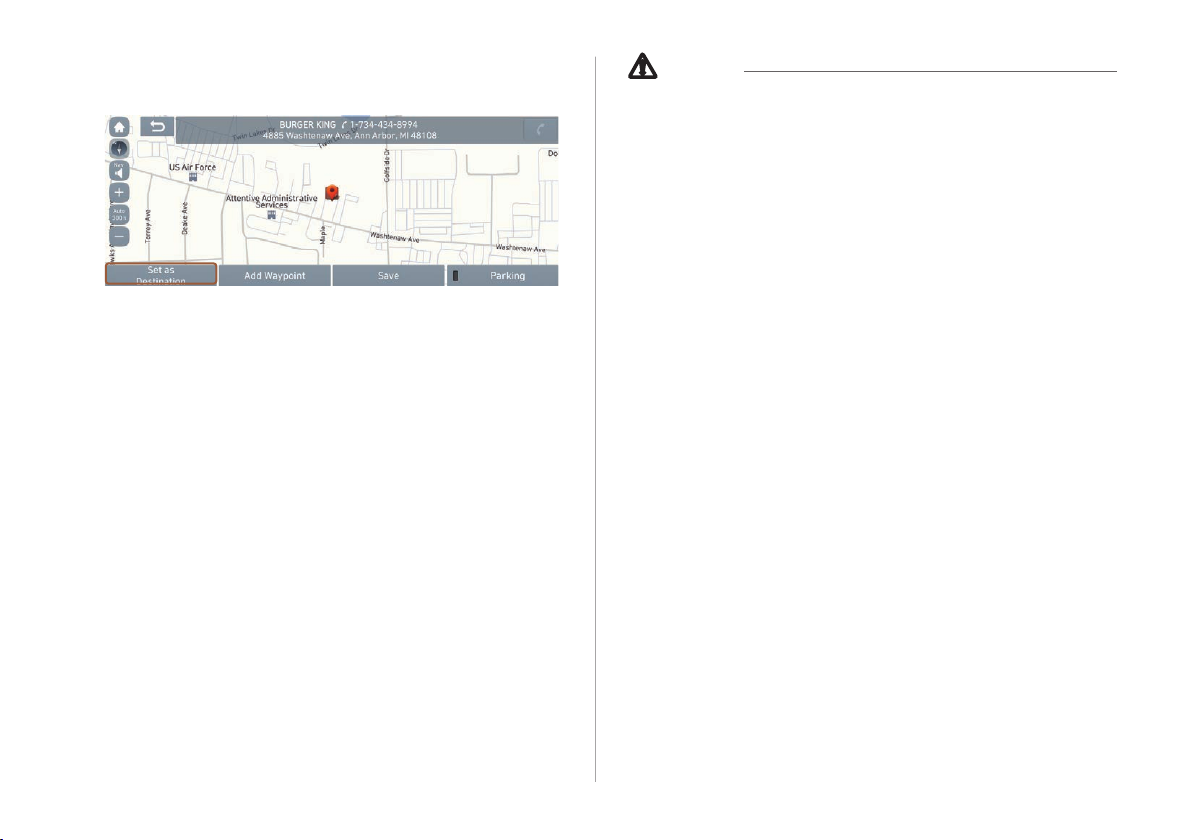
Check the location of the destination and then
4
press Set as Destination.
AA
If you press Parking at the bottom right of the screen, the
map screen displays the parking lot icon.
Select the desired route from the searched ones
5
and press Start Guidance.
Caution
Ü
Distracted driving or negligence in keeping your eyes forward
•
may cause a loss of vehicle control. Never use any devices or
systems that take the driver’s attention away from driving.
The information on the map may dier from actual road
•
conditions, depending on the location or driving conditions.
Digitalized roads may not be identical to the actual roads.
-
When guidance does not match the actual route, drive the
vehicle according to actual road conditions.
The system may provide guidance that diers from the
-
actual route due to a change in road conditions. When
guidance does not match the actual route, drive the vehicle
according to road conditions with observing the trac
regulations. When the vehicle reaches a zone that matches
the actual route, the system guides the route correctly.
AA
Vehicle location may not be displayed correctly if:
The vehicle is driving on a Y-shaped or winding road with
-
narrow angles.
The vehicle is driving closely to another road.
-
The vehicle is driving on a road where there are many tall
-
buildings in the vicinity.
The vehicle is driving on a new road or a road under
-
construction.
The vehicle is transported by a ferry or heavy-duty transport
-
vehicle.
5-4
Page 87

The vehicle is driving in a rugged mountain area or on a
-
steep curve road.
The vehicle is entering a public road after making a turn
-
through the turntable in an underground parking lot or
multi-story parking lot.
The vehicle stops and starts repeatedly or moves slowly in
-
front of an intersection.
The system reboots after the vehicle battery has been
-
recharged or replaced.
The vehicle is driving on a slippery road due to heavy snow,
-
etc.
The tires have been replaced recently or spare tires (or
-
studless tires) are used.
Improper-sized tires are used or the pressure of each tire is
-
dierent.
The replaced tire is worn out or the studless tires have been
-
used for over two seasons.
A roof carrier is installed on the vehicle.
-
On a highway. continued driving causes the system to
-
perform map matching or apply the updated GPS data.
AA
Navigation service may not be provided correctly under the
following conditions:
When the vehicle drives on a straight road continuously,
-
the system may guide you to drive straight. It is not a
malfunction.
Guidance may not be followed immediately after the
-
vehicle makes a turn at an intersection or drives through an
intersection.
The system may guide you to make a U-turn in a prohibited
-
area.
The system may guide you to a trac-blocked road (e.g. no-
-
entry road or road under construction).
The system may guide you to a road away from the
-
destination when there is no road to the destination or
there are only narrow roads on the way.
Guidance may not be proper when the vehicle is o the
-
route.
Guidance may not match the actual distance on an
-
overpass or underpass due to the dierence of the start
point.
When you are driving at high speeds, route recalculations
-
may take longer.
AA
Because the navigation system is used for information
purposes only, Hyundai does not assume responsibility of the
accuracy of the information.
AA
When the trac information is not received, the status icon
appears at the top of the map screen.
HD Radio: The system is using the HD radio data. If no
-
trac information is available, the status icon (
displayed instead.
) will be
5-5
Page 88
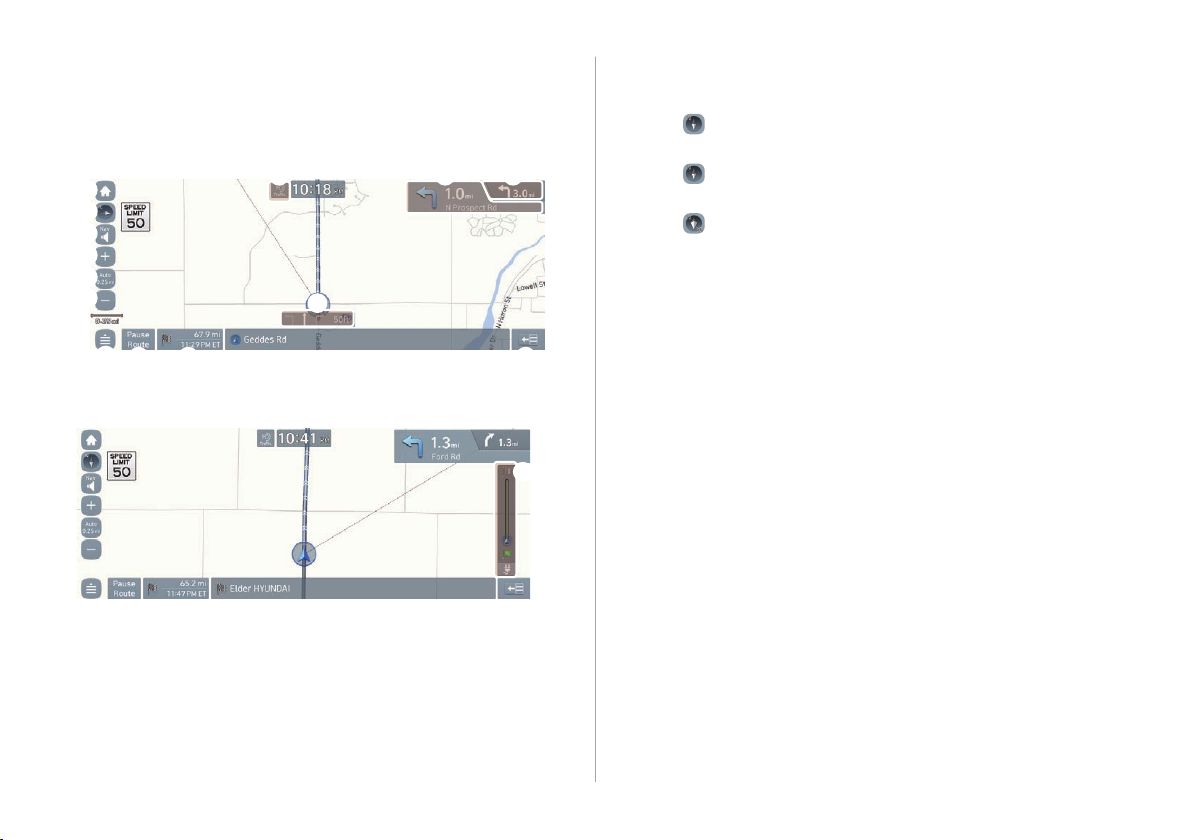
Map screen
hg
j
k l m
n
o
The map screen provides various functions and information, as
follows:
a
b
c
d
e
f
i
Type A
Displays the Home screen.
a
Used to change the map display mode.
b
(Heading Up): Rotates the map depending on the
•
travel direction.
(North Up): Displays the map with the north xed at
•
the top.
(3D Map): Rotates the map depending on the travel
•
direction for 3D view.
You can adjust the volume of navigation or GPS warning
c
sound.
Zooms in the map.
d
The scale of the map automatically changes.
e
Zooms out the map.
f
Displays the point to change the driving direction.
g
Displays the next point to change the driving direction.
h
Displays the lanes in dierent colors.
i
Blue: Recommended lane
•
White: Available lane
•
Gray: Unavailable lane
•
5-6
Type B (EV only)
Page 89
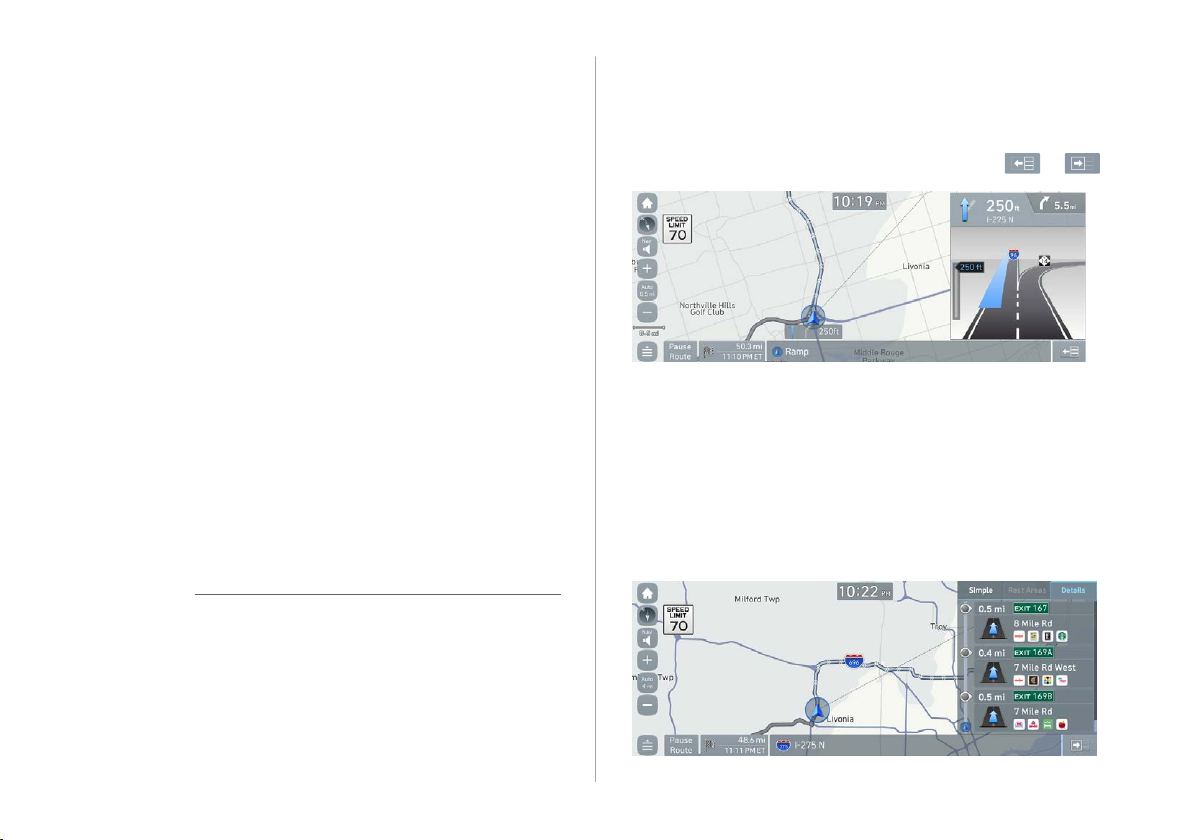
Displays quick menu items that can be used during guidance.
j
Can cancel the route guidance. > See “Stopping the route
k
guidance.”
Displays the remaining distance to the destination and
l
the estimated time of arrival. For more details, press the
information item.
Displays or hides the detailed guidance.
m
You can see the system information on the map. (It can
n
display up to two items.)
Trac information (with an icon if there is no HD data
•
reception)
Bluetooth connection status
•
Check the range you can drive with the current amount of
o
battery (EV only).
AA
To see only the map with no destination, press the map area
on the Home screen or on the All menu screen, press Map. Or
press the [MAP] button on the control panel.
AA
The screen may dier depending on the vehicle model and
specications.
Warning
Ý
Be sure to check the road conditions while driving, because the
camera information may get changed occasionally after a map
update to the latest version. Relying solely on the driving assist
system may cause violation of trac rules and regulations,
resulting in an accident.
Using the detailed guidance
When the vehicle needs to change the driving direction or lanes,
a zoomed-in map automatically appears.
AA
To display or hide the detailed guidance, press
or .
When the detailed guidance appears while driving,
select and perform the desired function.
To check information on the zone for a turn, press Simple.
•
To check the types and locations of convenience facilities in a
•
rest area, press Rest Area.
For information details about each zone such as intersections,
•
interchanges, and rest areas, press Details.
5-7
Page 90
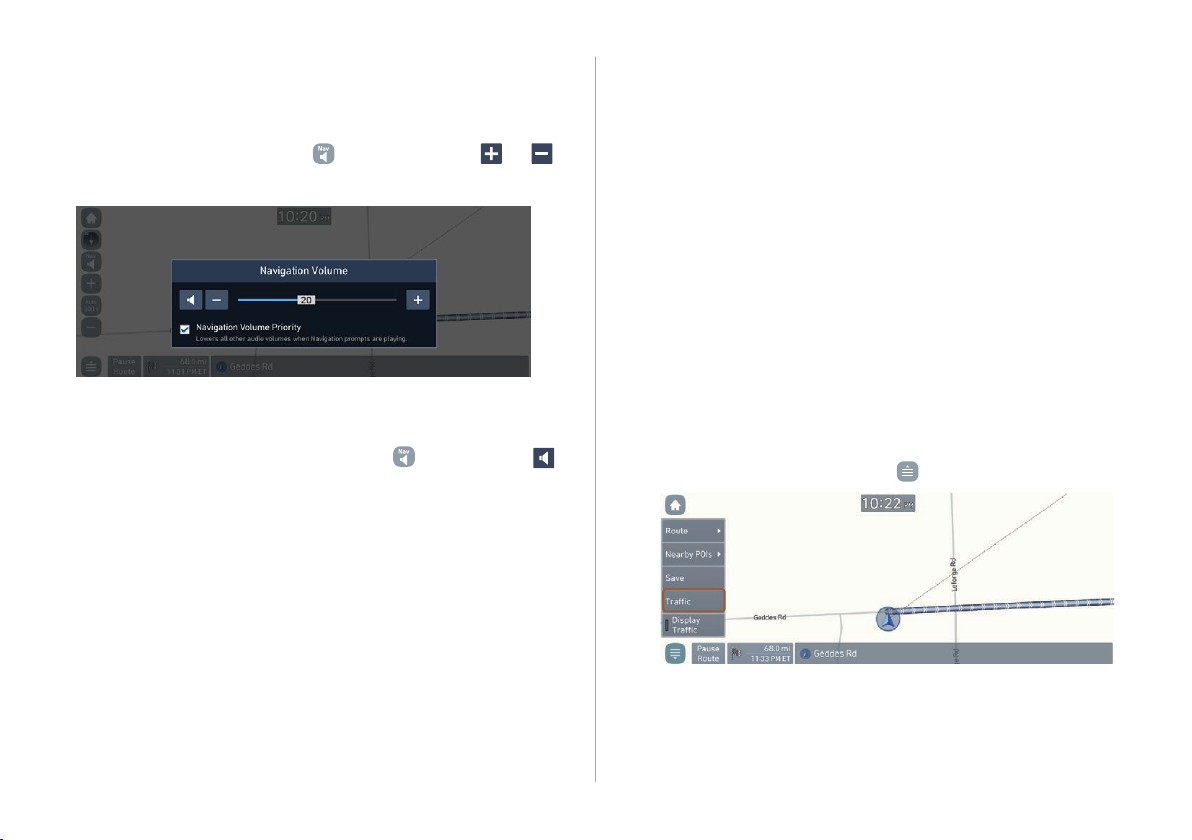
Adjusting the navigation volume
Stopping the route guidance
You can adjust the volume of navigation or GPS warning sound.
On the map screen, press and then press or ,
or use the control bar to adjust the volume.
AA
To have the navigation sound always output rst over media
sound, check Navigation Volume Priority.
AA
To turn o the navigation sound, press
and then press .
To stop route guidance, press Pause Route.
The destination displayed at the bottom of the screen disappears
and the Pause Route is replaced by Resume Route.
AA
To resume guidance to the previous destination, press
Resume Route.
AA
To cancel guidance to the destination, press and hold Pause
Route, Resume Route, or Navigation Menu > Cancel Route
on the All Menus screen.
Seeing trac Information
You can see real-time trac information such as ongoing road
works or accidents.
On the map screen, press
1
>
Trac.
5-8
Page 91
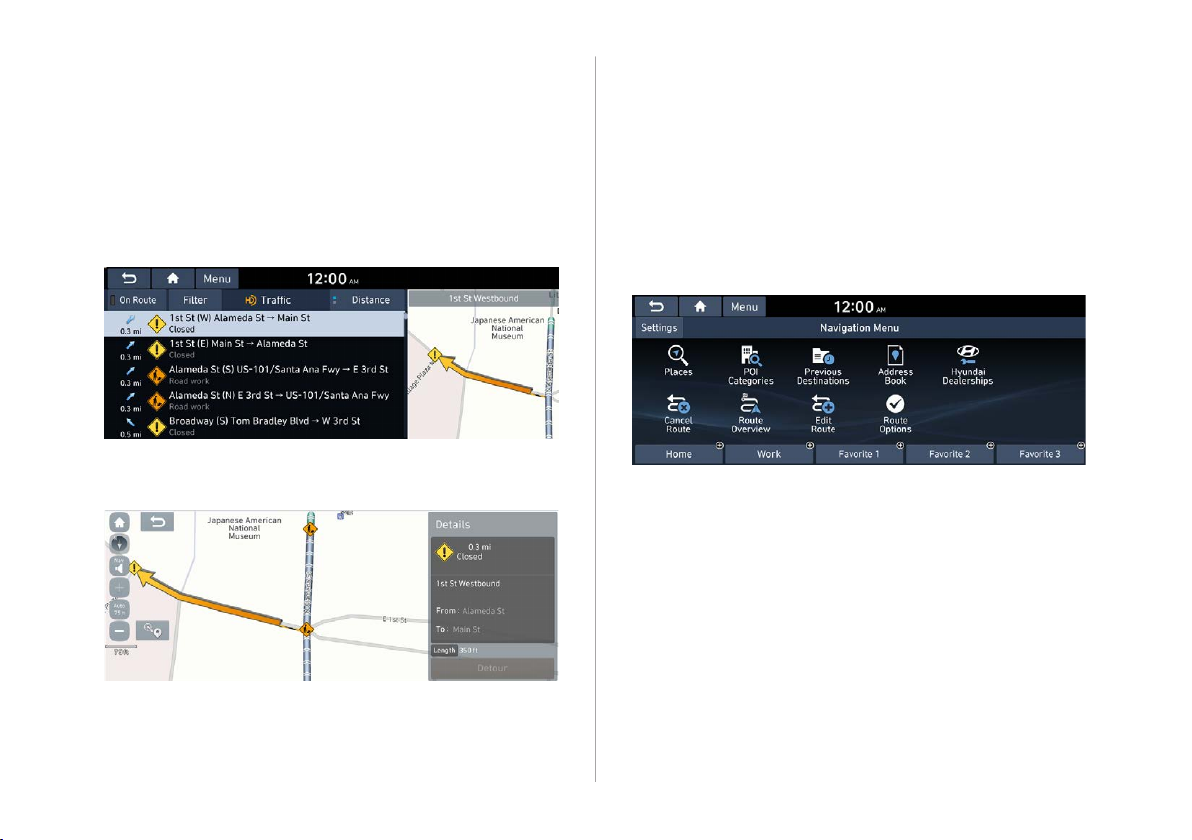
Select an item from the real-time trac
2
information list and see the details.
AA
To reroute using recent trac information while in
guidance, press Detour.
AA
To see trac information along the current route or to see
all available trac information, press On Route.
AA
To select the type of trac information, press Filter.
Check the detailed trac information.
3
Various ways to nd routes
On the Navigation menu, you can set the destination by using
various searches, such as entering the location information or
selecting from recent destinations or categorized places.
Perform any of the following methods:
On the All Menus screen, press Navigation Menu.
•
On the control panel, press the [NAV] button.
•
AA
Available icons and their arrangement may dier depending
on the vehicle model and specications.
AA
Trac information for border crossings and speed limits
for individual roads may not be accurate. Depending on
the road conditions, note the information.
5-9
Page 92
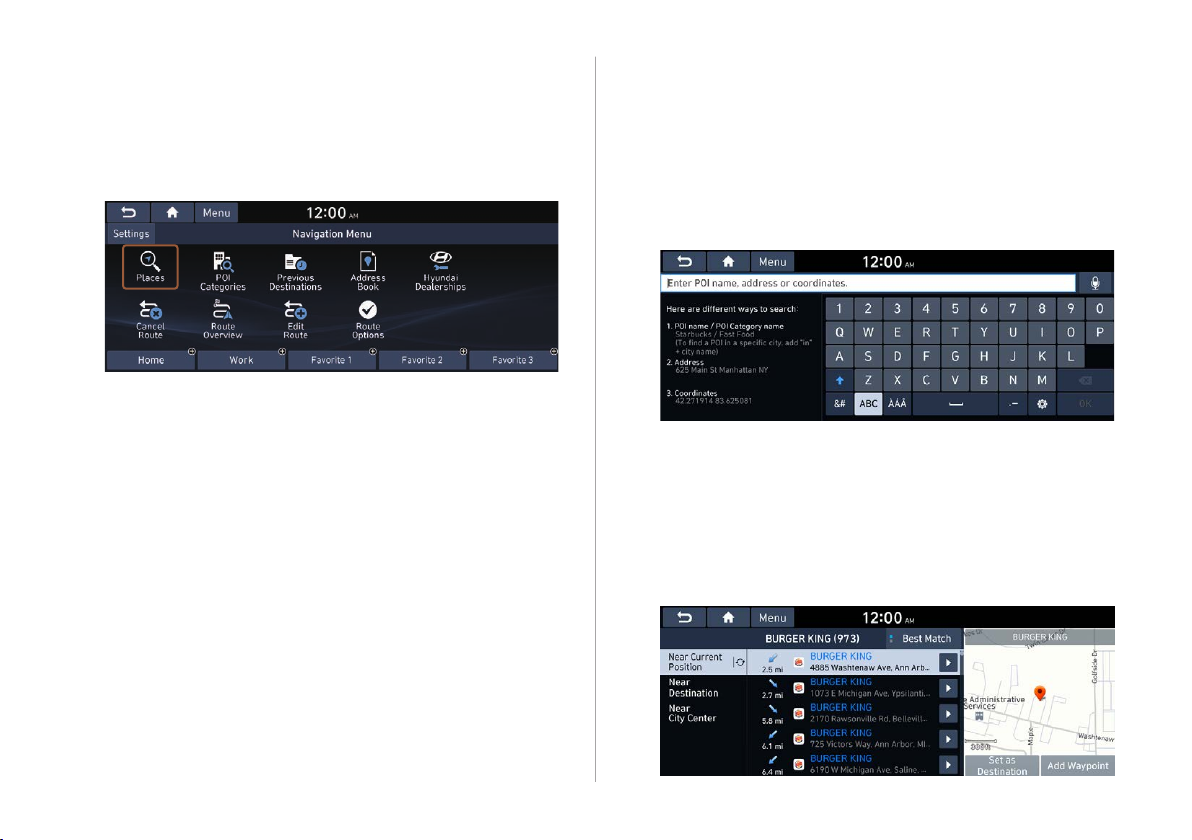
Searching by keyword
Enter various types of keywords such as place name and address
and then search for the destination.
On the Navigation Menu screen, press Places.
1
AA
Available icons and their arrangement may dier
depending on the vehicle model and specications.
Enter the location data such as place name,
2
address, or coordinates and then press OK.
AA
When there are any similar matches, the
recommendations appear at the right of keypad.
AA
To access the online user’s manual on the Places screen,
press Menu > User's Manual on Web (QR Code) and
then scan the displayed QR code.
Select a destination from the search result.
3
AA
You can see the sites in the list on the preview screen at
the right.
AA
To sort the search results in a dierent order, press on the
attribute to toggle between options.
5-10
Page 93
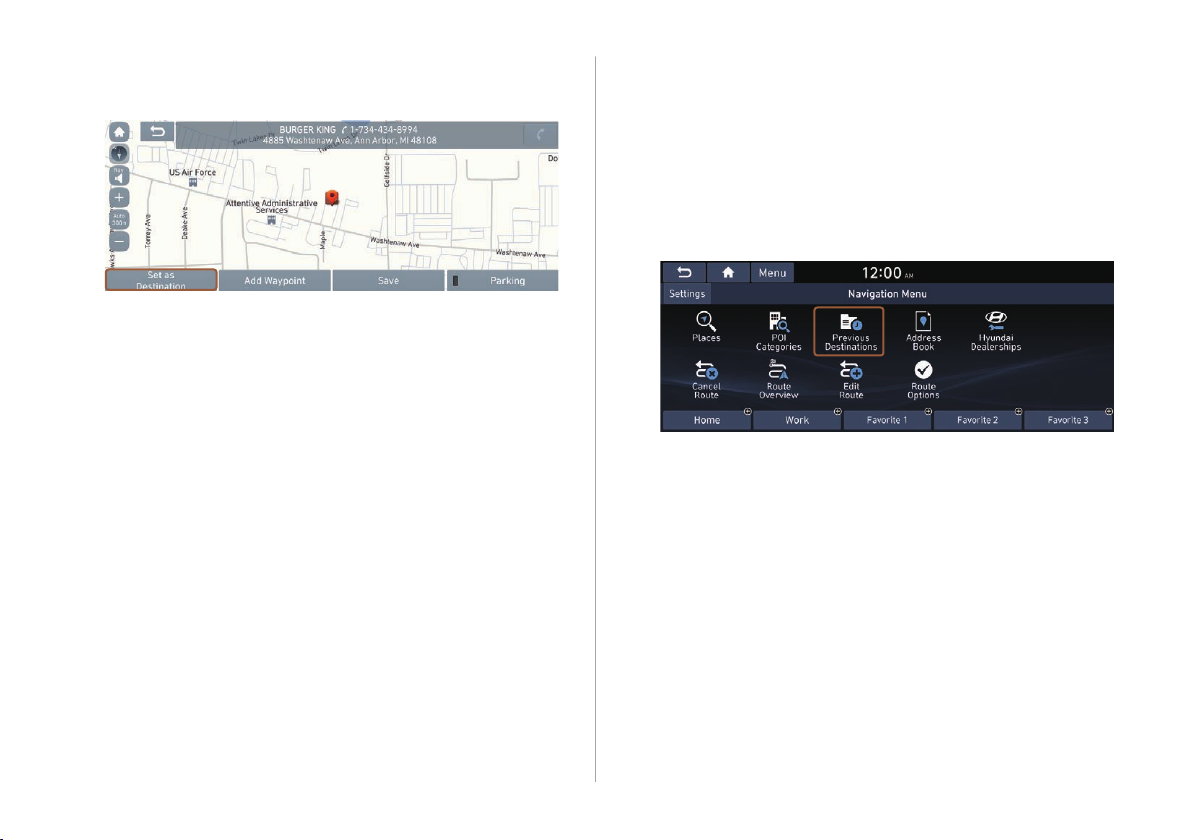
Check the location of the destination and then
4
press Set as Destination.
AA
If you press Parking at the bottom right of the screen, the
map screen displays the parking lot icon.
Select the desired route from the searched ones
5
and press Start Guidance.
Searching by previous destinations
You can set a destination by selecting from the recently searched
ones.
On the Navigation Menu screen, press Previous
1
Destinations.
The navigated destinations appear in the list.
AA
Available icons and their arrangement may dier
depending on the vehicle model and specications.
5-11
Page 94
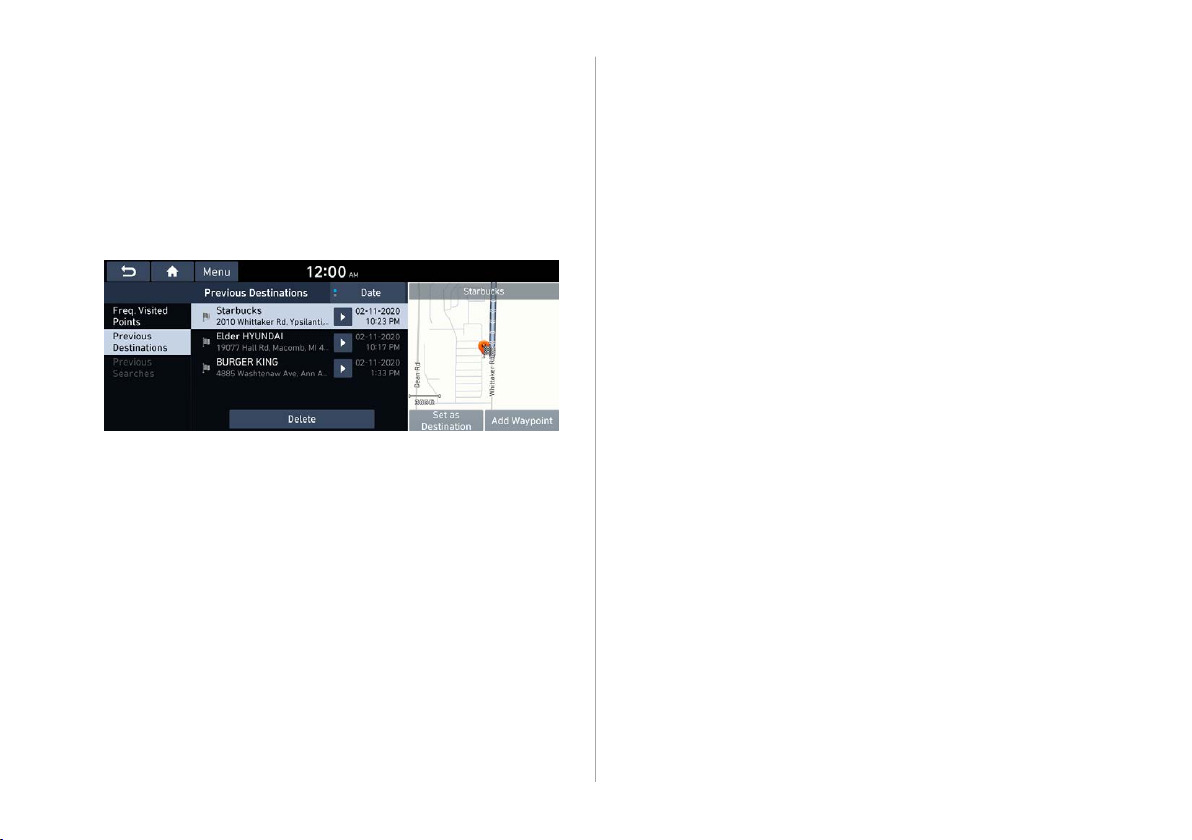
Select the desired destination from the list.
2
AA
To categorize the searched items, select a category.
AA
To sort the search results in a dierent order, press on the
attribute to toggle between options.
AA
To access the online user’s manual on the Previous
Destinations screen, press Menu > User's Manual on
Web (QR Code) and then scan the displayed QR code.
Check the location of the destination and then
3
press Set as Destination.
Select the desired route from the searched ones
4
and press Start Guidance.
Deleting a previous destination
On the Previous Destinations screen, press
1
Delete.
Select the destination(s) to delete and press
2
Delete.
You can delete the selected place(s) or all places.
5-12
Page 95
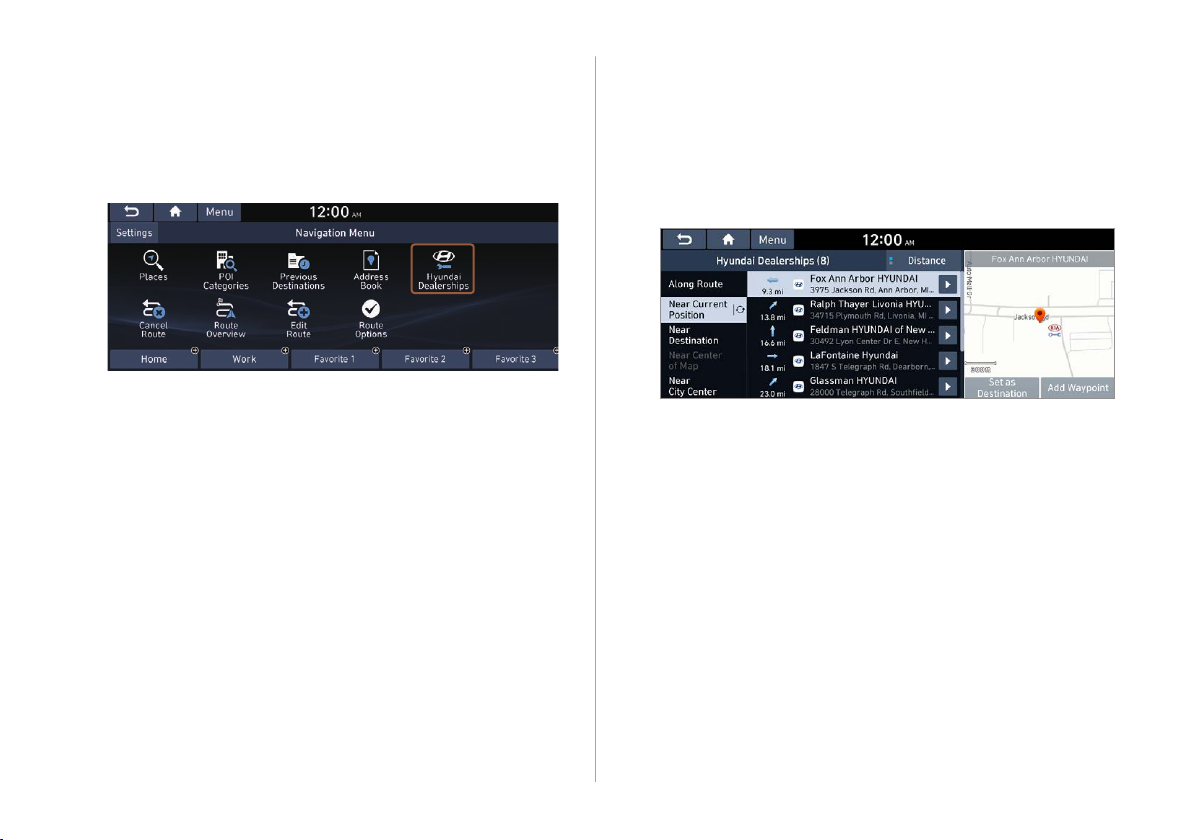
Searching for Hyundai Dealerships
You can easily search for service centers or service stations.
On the Navigation Menu screen, press Hyundai
1
Dealerships.
AA
Available icons and their arrangement may dier
depending on the vehicle model and specications.
Select a Hyundai Dealerships from the list.
2
AA
To sort the search results in a dierent order, press on the
attribute to toggle between options.
AA
To access the online user’s manual, on the Hyundai
Dealerships screen, press Menu > User’s Manual on Web
(QR Code) and then scan the displayed QR code.
Check the location of the destination and then
3
press Set as Destination.
Select the desired route from the searched ones
4
and press Start Guidance.
5-13
Page 96
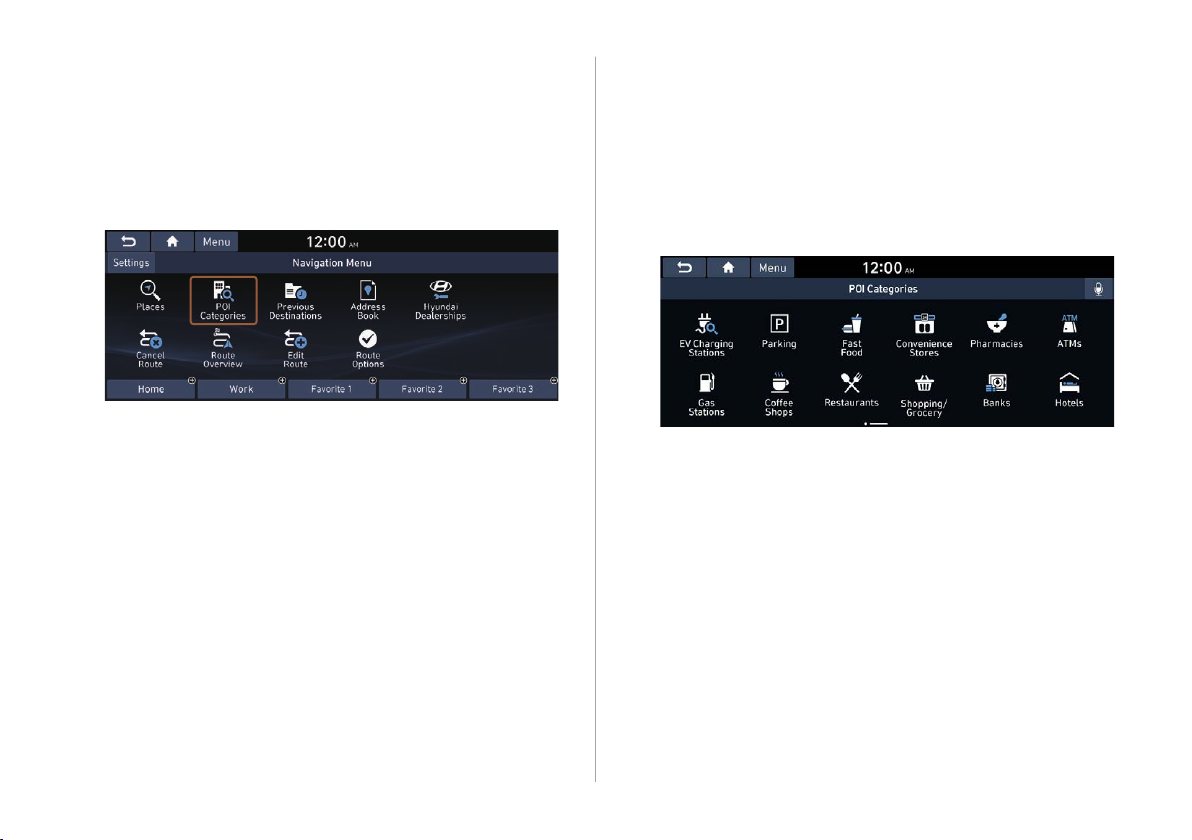
Searching the nearby points of interest
You can set a destination after searching the nearby points of
interest by the category.
On the Navigation Menu screen, press POI
1
Categories.
AA
Available icons and their arrangement may dier
depending on the vehicle model and specications.
Select a desired point according to the
2
instructions.
AA
To access the online user’s manual on the POI Categories
screen, press Menu > User's Manual on Web (QR Code)
and then scan the displayed QR code.
AA
The screen may dier depending on the vehicle model
and specications.
5-14
Page 97
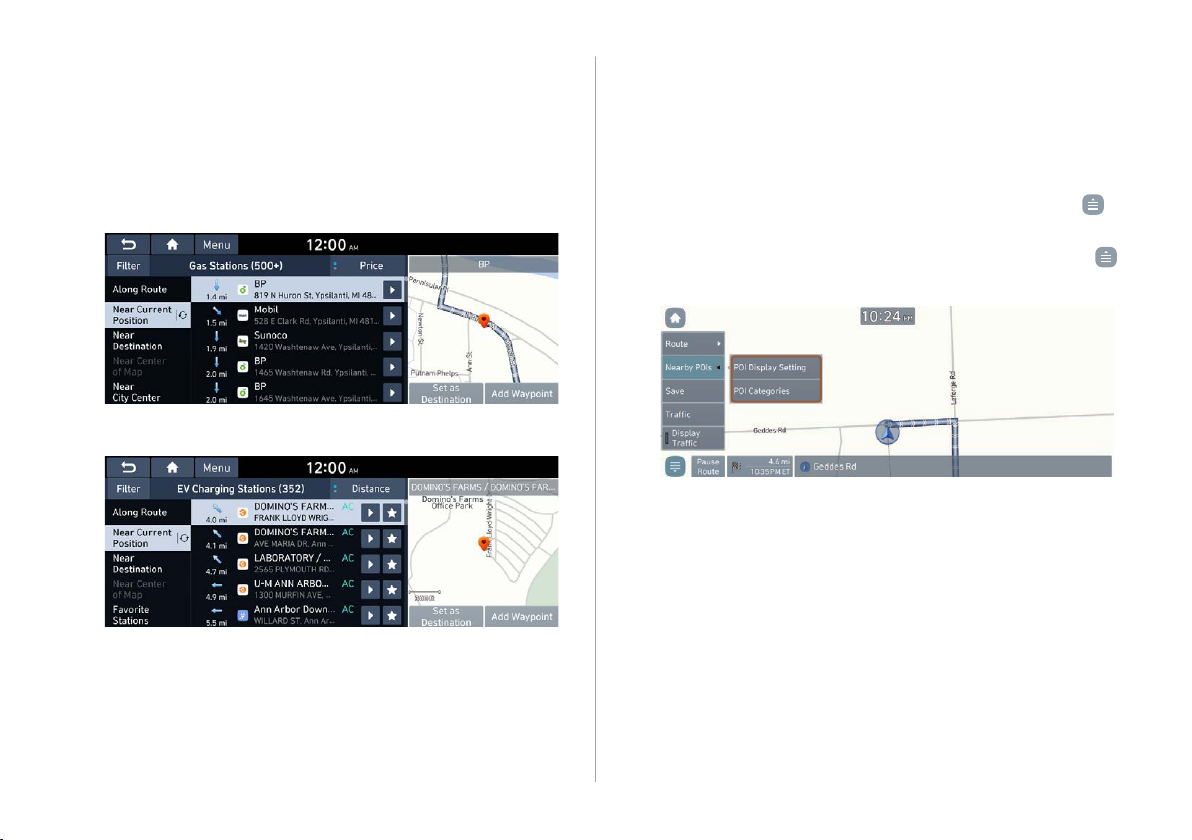
Select a destination from the search result.
3
AA
To categorize the searched items, select a category.
AA
To sort the search results in a dierent order, press on the
attribute to toggle between options.
AA
The screen may dier depending on the vehicle model
and specications.
Type A
Check the location of the destination and then
4
press Set as Destination.
Select the desired route from the searched ones
5
and press Start Guidance.
AA
To change the type of nearby POIs on the map, press
>
Nearby POIs > POI Display Setting.
AA
To see nearby POIs during guidance on the map, press
>
Nearby POIs > POI Categories.
Type B (EV only)
5-15
Page 98
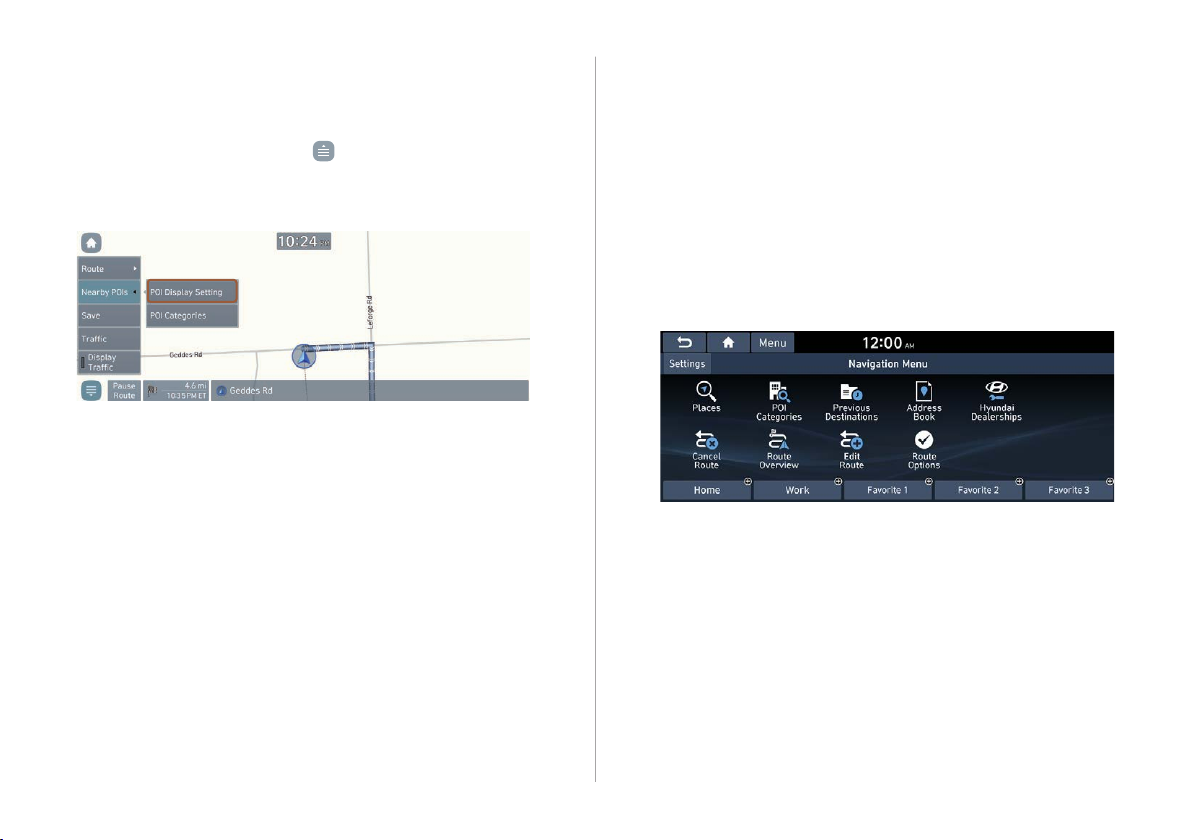
Displaying the points of interest on the map
Editing the route
You can set to display nearby points of interest on the map.
On the map screen, press
>
Nearby POIs > POI
Display Setting and then select an item to display on
the map.
You can edit the current route so that you can travel via waypoints
on the way to the destination. You can add up to two waypoints.
Setting a waypoint
You can search for the desired place and set it as a waypoint.
On the Navigation Menu screen, press the
1
desired search method to search for a waypoint.
AA
Available icons and their arrangement may dier
depending on the vehicle model and specications.
AA
For more information about the waypoint search:
> see “Searching by keyword,” “Searching by previous
destinations,” “Searching the nearby points of interest,”
“Searching for restaurants (if equipped),” “Searching for
emergency services (if equipped).”
5-16
Page 99
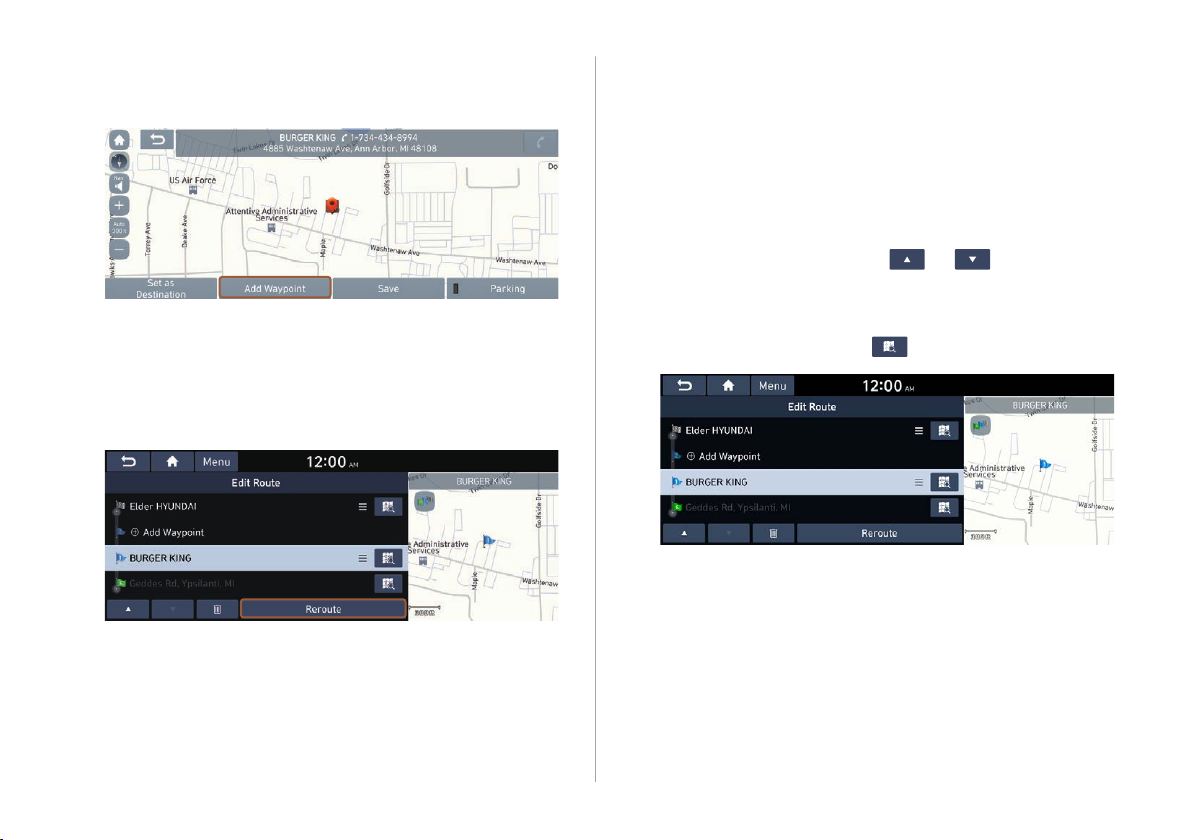
On the map for a search, press Add Waypoint.
2
The selected waypoint is immediately added to the route.
After adding waypoints, press Reroute.
3
AA
To access the online user’s manual on the Edit Route
screen, press Menu > User's Manual on Web (QR Code)
and then scan the displayed QR code.
Select the updated route and then press Start
4
Guidance.
Changing the order of waypoints
You can change the order of waypoints on the route.
On the Navigation Menu screen, press Edit
1
Route.
To change the order of waypoints, select a
2
waypoint and then press
AA
To add another waypoint on the Edit Route screen, press
Add waypoint.
AA
To see on the map, press
After editing the route, press Reroute.
3
Select the updated route and then press Start
4
or .
next to the name.
Guidance.
5-17
Page 100
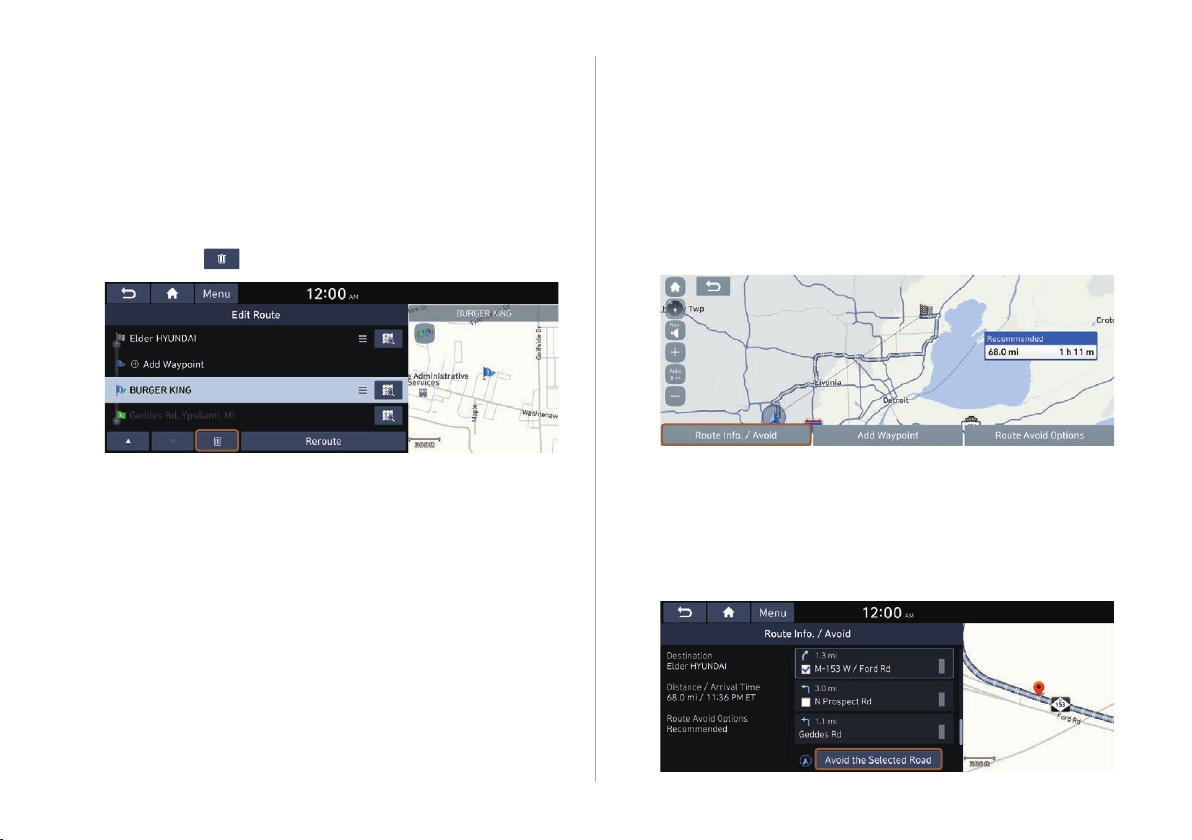
Deleting a waypoint
Avoiding specic zones (if equipped)
You can delete a waypoint from the route.
On the Navigation Menu screen, press Edit
1
Route.
Select a waypoint to delete from the route and
2
then press
To search the route again after removing the
3
waypoint, press Reroute.
Select the updated route and then press Start
4
Guidance.
.
You can resume routing after excluding the specied roads such
as congested roads or roads under construction.
On the Navigation Menu screen, press Route
1
Overview.
Press Route Info. / Avoid.
2
AA
The screen may dier depending on the vehicle model
and specications.
Select the roads to avoid and press Avoid the
3
Selected Road.
5-18
 Loading...