

Page 1
Scheduled Maintenance Normal Usage Severe Usage*
Engine Oil and Filter* Replace 7,500 or 12 mos. Replace 3,750 or 6 mos.
Fuel Additive Add 7,500 or 12 mos. Add Same as Normal
Tire Rotation Perform 7,500 Perform 7,500
Air Cleaner Filter
Inspect
Replace
7,500
30,000
Inspect
Replace
Same As Normal
More Frequently
Vacuum Hose Inspect 7,500 Inspect Same As Normal
Climate Control Air Filter
(for Evaporator and Blower Unit)
Replace 15,000 Replace More Frequently
Air Conditioning Refrigerant Inspect 15,000 Inspect Same As Normal
Brake Hoses & Lines Inspect 15,000 Inspect Same As Normal
Drive Shafts & Boots Inspect 15,000 Inspect 7,500
Exhaust Pipe & Mufer Inspect 15,000 Inspect Same As Normal
Front Disc Brake/Pads, Calipers & Rotors Inspect 15,000 Inspect More Frequently
Rear Brake Disc/Pads Inspect 15,000 Inspect More Frequently
Steering Gear Box, Linkage & Boots/
Lower Arm Ball Joint, Upper Arm Ball Joint
Inspect 15,000 Inspect More Frequently
Suspension Mounting Bolts Inspect 15,000 Inspect Same As Normal
Brake Fluid Inspect 30,000 Inspect Same As Normal
Engine Clutch Actuator Fluid Replace 22,500 Replace Same As Normal
Crankcase Ventilation Hose Inspect 30,000 Inspect Same As Normal
Fuel Filter Inspect 30,000 Inspect Same As Normal
Fuel Lines, Fuel Hoses and Connections Inspect 30,000 Inspect Same As Normal
Fuel Tank Air Filter Inspect 30,000 Inspect Same As Normal
Parking Brake Inspect 30,000 Replace More Frequently
Vapor Hose, Fuel Tank & Fuel Filler Cap Inspect 30,000 Replace Same As Normal
Spark Plugs Replace 105,000 Replace More Frequently
HSG Belt
Inspect
Replace
7,500 or 12 mos.
60,000 or 48 mos.
Inspect
Replace
3,750 or 6 mos.
30,000 or 24 mos.
Coolant
1st Replace 120,000 or 120 mos.
Add’l Replace 30,000 or 24 mos.
Replace Same As Normal
Dual Clutch Transmission Fluid Inspect 37,500 Replace 75,000
*Check the engine oil regularly between recommended oil change. Hyundai recommends Quaker State oil.
*See Owner’s Manual for details.
NP150AE193
(Rev 08/15/18)
Printing 08/18/18
Looking for more detailed information?
This Quick Reference Guide does not replace your vehicle’s
Owner’s Manual. If you require additional information or are unsure of a specific issue, we
recommend that you always refer to the vehicle’s Owner’s Manual or contact your authorized
Hyundai dealer. The information contained in this Quick Reference Guide is correct at the time
of printing; however, specifications and equipment can change without notice. No warranty or
guarantee is being extended in this Quick Reference Guide, and Hyundai reserves the right to
change product specifications and equipment at any time without incurring obligations.
Some vehicles are shown with optional equipment.
MAINTENANCE
Roadside Assistance: 1-800-243-7766
Consumer Affairs: 1-800-633-5151
Sirius XM
®
Radio: 1-800-967-2346
Blue Link: 1-855-2BLUELINK
(1-855-225-8354)
Quick Reference Guide
HYUNDAI
IONIQ PLUG-IN
VOICE
RECOGNITION TIPS
Command Example
BLUETOOTH®
Dial <Phone #>
Call <Name>
“Dial
7-1-4-9-6-5-3-0-0-0”
“Call John Smith”
Command
(
If equipped
)
Example
NAVIGATION
Find Address
<House #, Street,
City, State>
“1-2-3-4-5 1st Street,
Fountain Valley”
Command Example
Located on Rearview Mirror
LOCAL SEARCH
Find <POI Name>
<POI Name>
“Find Lowe’s® near me”
“Starbucks®”
Improving how you store your contacts can optimize your
Bluetooth® Voice Recognition performance:
• Use full names instead of short or single-syllable names
(“John or Dad”)
• Avoid using special characters/emojis or abbreviations
(“Dr.”) when saving contacts
Find <POI Name> “Find McDonald’s®”
• To activate wipers, move the switch down
to one of the three positions (INT, LO, HI).
• To adjust "INT" speed, move switch.
• To spray washer fluid, pull lever toward you.
• Push lever up for a single wiper pass.
☐
WINDSHIELD WIPER / WASHER
- page 08
INT
LO
HI
MIST
OFF
☐
HOW TO DEFROST
- page 15
1 Press the front defrost button.
2 Set to warmest temperature setting.
3 Set to highest fan speed.
☐
INTRODUCTION AND LOCATION OF THE SERVICE DEPARTMENT
☐
SET FIRST SERVICE APPOINTMENT
☐
REVIEW FACTORY RECOMMENDED MAINTENANCE SCHEDULE
☐
WAS THE CONDITION OF YOUR VEHICLE (AT DELIVERY) TO YOUR
SATISFACTION?
Sales Consultant Date Sales Manager Date
Customer Date
Email
Page 2

HYUNDAI VEHICLE OWNER PRIVACY POLICY
Your Hyundai vehicle may be equipped with technologies and services
that use information collected, generated, recorded or stored by the
vehicle. Hyundai has created a Vehicle Owner Privacy Policy to explain
how these technologies and services collect, use, and share this
information.
You may read our Vehicle Owner Privacy Policy on the Hyundaiusa.com
website at https://www.hyundaiusa.com/owner-privacy-policy.aspx
If you would like to receive a hard copy of our Vehicle Owner Privacy
Policy, please contact our Customer Connect Center at:
Hyundai Motor America
Hyundai Customer Connect Center
P.O. Box 20850
Fountain Valley, CA 92728-0850
800-633-5151 [email protected]
Hyundai's Customer Connect Center representatives are available
Monday through Friday, between the hours of 5:00 AM and 7:00 PM PST
and Saturday and Sunday between 6:30 AM and 3:00 PM PST (English).
For Customer Connect Center assistance in Spanish or Korean,
representatives are available Monday through Friday between
6:30 AM and 3:00 PM PST.
Page 3

Instrument
cluster
Page 09
Navigation
Page 21
Instrument
panel lillumination
Page 13
Headlights
Page 07
Cruise control/
Smart cruise control
Page 28
Wiper and
washer
Page 08
Dual clutch
transmission
Page 25
WARNING!
To reduce the risk of serious injury to yourself and others,
read and understand the important SAFETY
INFORMATION in your Owner’s Manual.
* Some vehicles may not be equipped
with all the listed features.
Use this Quick Reference Guide to learn
about the features that will enhance
your enjoyment of your Hyundai. More
detailed information about these
features are available in your Owner’s
Manual.
Driver's main
controls
Page 02
FEATURES AND CONTROLS
Aux. Battery saver+ 13
Charging the vehicle 03
Climate control 17
Driver’s main controls 02
Dynamic bending light (DBL) 08
Fuel filler door 06
Headlights 07
Hybrid battery SOC(State Of Charge) gauge
12
Instrument cluster 09
Instrument panel illumination 13
LCD display control 15
LCD display modes 16
Liftgate opening 06
Plug-in Hybrid electric vehicle system modes
14
Plug-in hybrid mode
12
Seat-Front seat adjustment (manual) 01
Seat-Front seat adjustment (power) 01
Vehicle power gauge 12
Warning and indicators 11
Wiper and washer 08
MULTIMEDIA
AUX, USB and iPod® port 22
Clock adjustment 23
Navigation 21
Radio mode 19
DRIVING
Cruise control/smart cruise control 28
Dual clutch transmission 25
Paddle shifter 27
Page 4

Quick Reference Guide I 02
01 I Quick Reference Guide
IONIQ plug-inHYUNDAI
FEATURES AND CONTROLS
FRONT SEAT ADJUSTMENT Manual
• Push down on the lever several times
to lower the seat.
• Pull up the lever several times to raise it.
FRONT SEAT ADJUSTMENT Power
Forward and backward
1
Seat height
1
Lumbar support
3
1
2
3
2
3
Forward and backward
1
Seat height
2
Seatback angle
3
1
Seatback angle
2
DRIVER'S MAIN CONTROLS
Side view mirror
• Press the L or R button.
• Adjust the mirror by using
the directional switch.
Power window lock button
Disables the power window
switches on the rear passenger
doors.
Door lock
Locks/unlocks all doors.
Window switches
• Front doors power window
switches.
• Rear doors power window
switches.
Page 5

Quick Reference Guide I 04
03 I Quick Reference Guide
IONIQ plug-inHYUNDAI
FEATURES AND CONTROLS
CHARGING THE VEHICLE
1. Move the shift lever to P (Park),
turn off all switches, and turn
OFF the vehicle.
2. Press center edge of the charging
door to open the charging door.
The charging door opens only when
the vehicle door is unlocked.
3. Insert the charging connector
into the charging inlet until you
hear a clicking sound.
4. Connect the charging plug to the
electric outlet at a normal charging
station to start charging.
5. Check if the charging cable
indicator light of the high voltage
battery on the instrument cluster is
turned ON.
Unlock Charging Connector in Emergency
If the charging connector does not disconnect due to battery
discharge
and failure of the electric wires, open the hood and slightly pull the
emergency cable. The charging connector will then disconnect.
Page 6
Quick Reference Guide I 06
05 I Quick Reference Guide
IONIQ plug-inHYUNDAI
FEATURES AND CONTROLS
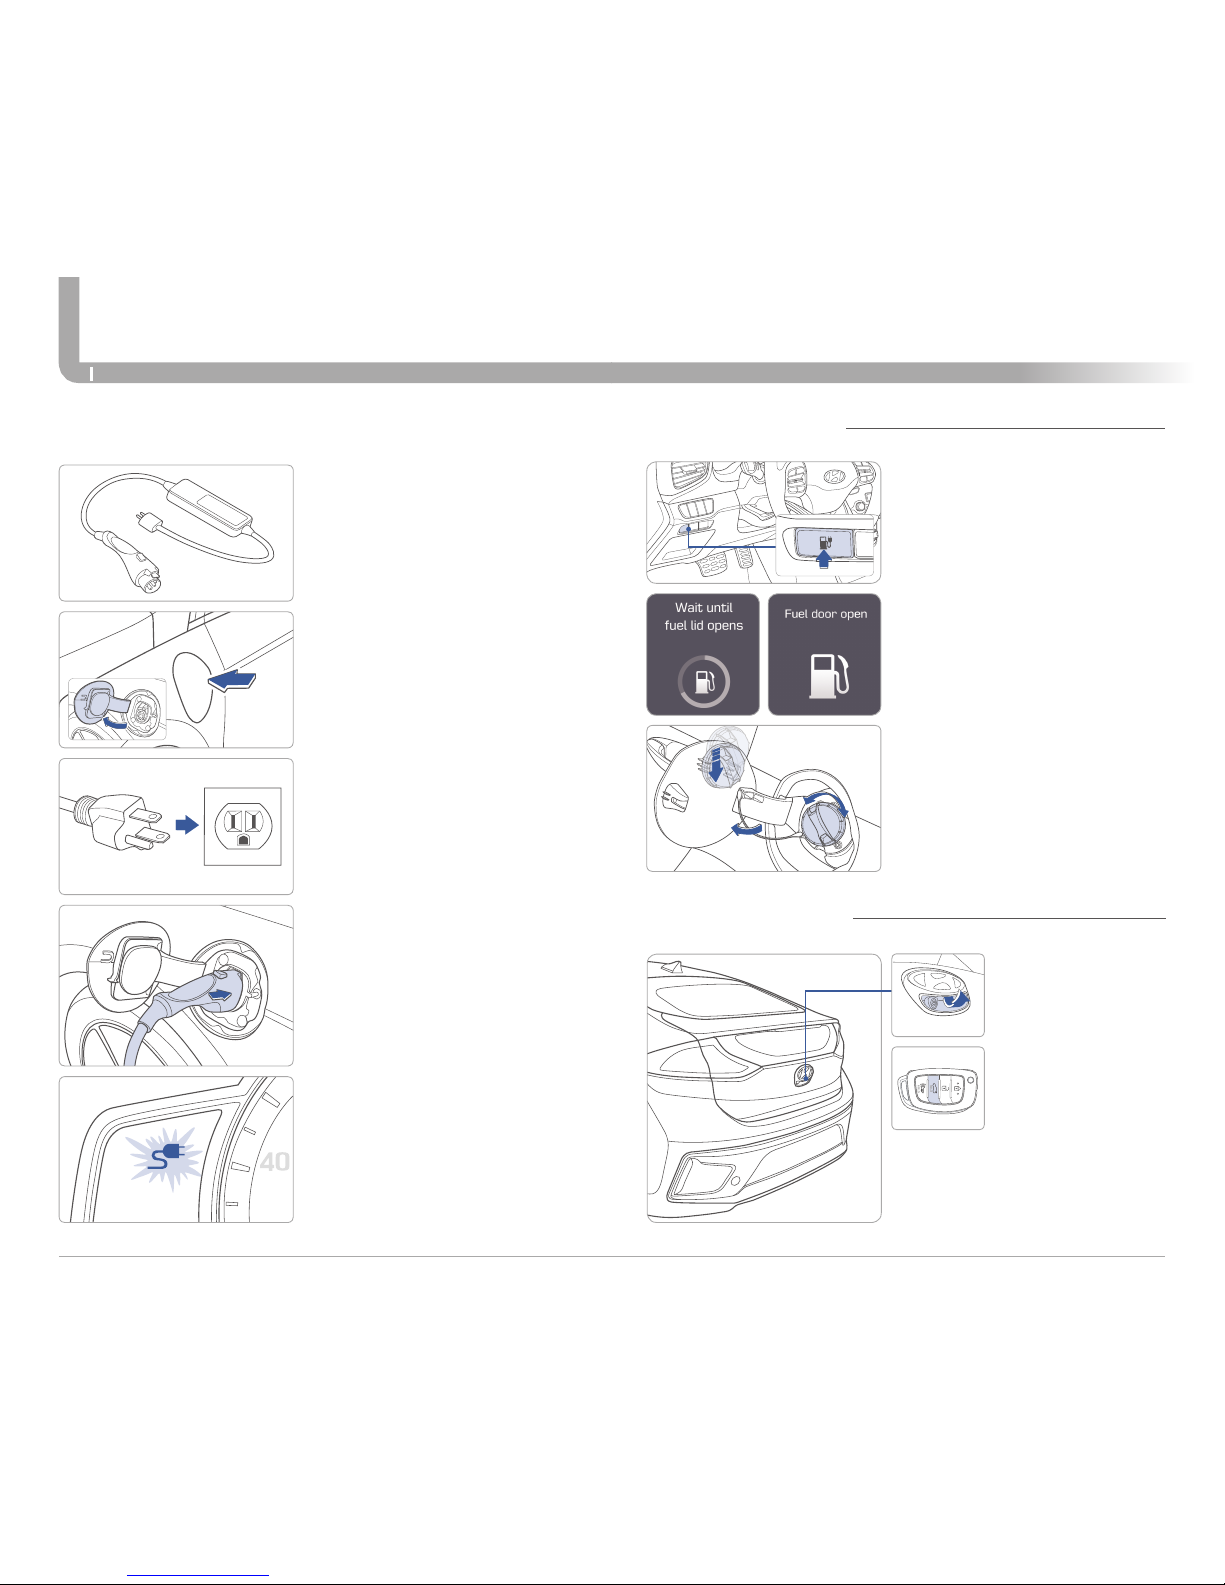
Level 1 Charger
1. Move the shift lever to P (Park),
turn off all switches, and turn
OFF the vehicle.
2. Press center edge of the charging
door to open the charging door.
The charging door opens only when
the vehicle door is unlocked.
3. Connect the plug to a household
electric outlet.
4. Check if the power lamp (green)
illuminates on the control box.
Level 1 charging can be used if a
Level 2 charger is not available.
7. Check if the charging indicator
light of the high voltage battery on
the instrument cluster is turned ON.
5. Insert the charging connector
into the charging inlet until you
hear a clicking sound.
6. Charging starts automatically
(charging lamp on the control
box blinks).
1. Push the fuel filler door opener
button.
2. Wait until the fuel tank is
depressurized.
It may take up to 20 seconds
to open the fuel filler door.
3. Remove the fuel tank cap.
NOTE: Tighten the fuel filler cap
until one click is heard.
FUEL FILLER DOOR
Press and hold button
to unlock tailgate.
Press to open.
Smart key needs to be
within the range.
LIFTGATE OPENING
Page 7
Quick Reference Guide I 08
07 I Quick Reference Guide
IONIQ plug-inHYUNDAI
FEATURES AND CONTROLS
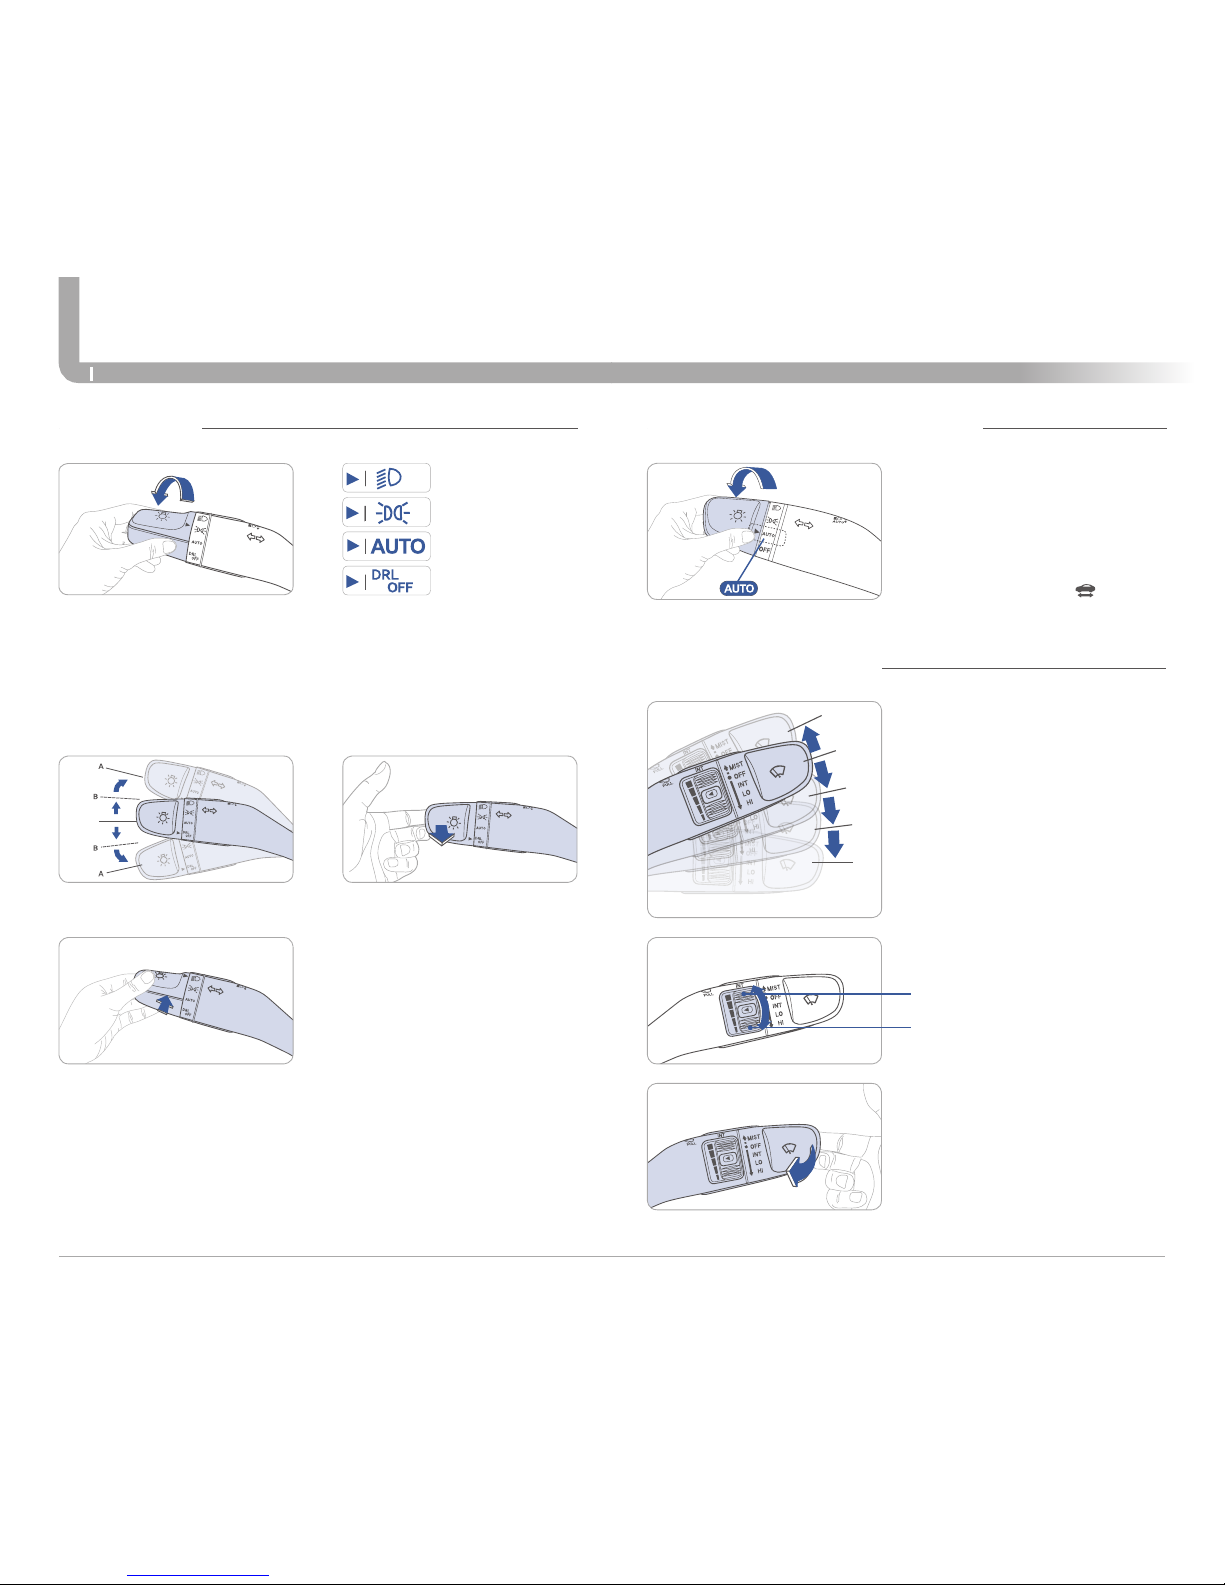
HEADLIGHTS
Headlight Delay
Headlights may stay on for 15 seconds after exiting and locking vehicle.
Press the lock button on the smart key twice to turn the headlights off.
Turn signals and lane change
signals
Flashing headlights
PULL
High beam / Smart high
beam
PUSH
NOTE:
To turn off the high beam,
pull the lever towards you.
Parking lights
All Lights Off
Auto headlights
Headlights
Windshield Washer
Pull the lever gently towards you to
spray washer fluid on the
windshield and to run the wipers1-3
cycles.
OFF - Off
OFF
MIST - Single wipe
MIST
INT - Intermittent wipe
INT
LO - Low wiper speed
LO
HI - High wiper speed
HI
Intermittent wipe time adjustment
Move the speed control switch
Fastest wiper speed
Slowest wiper speed
PULL
WIPERS AND WASHER
DBL uses the steering angle and
vehicle speed to help keep your
field of vision wide by swiveling
and leveling the headlamp.
• To turn DBL on, turn the knob
to the AUTO position when the
vehicle is in the ready ( )mode.
• To turn DBL off, turn the knob
back to the former position.
DYNAMIC BENDING LIGHT DBL
Smart High Beam Function
1. Select auto position.
2. Push lever forward to engage Auto High Beam.
3. Push lever forward again to disengage.
Page 8
Quick Reference Guide I 10
09 I Quick Reference Guide
IONIQ plug-inHYUNDAI
FEATURES AND CONTROLS
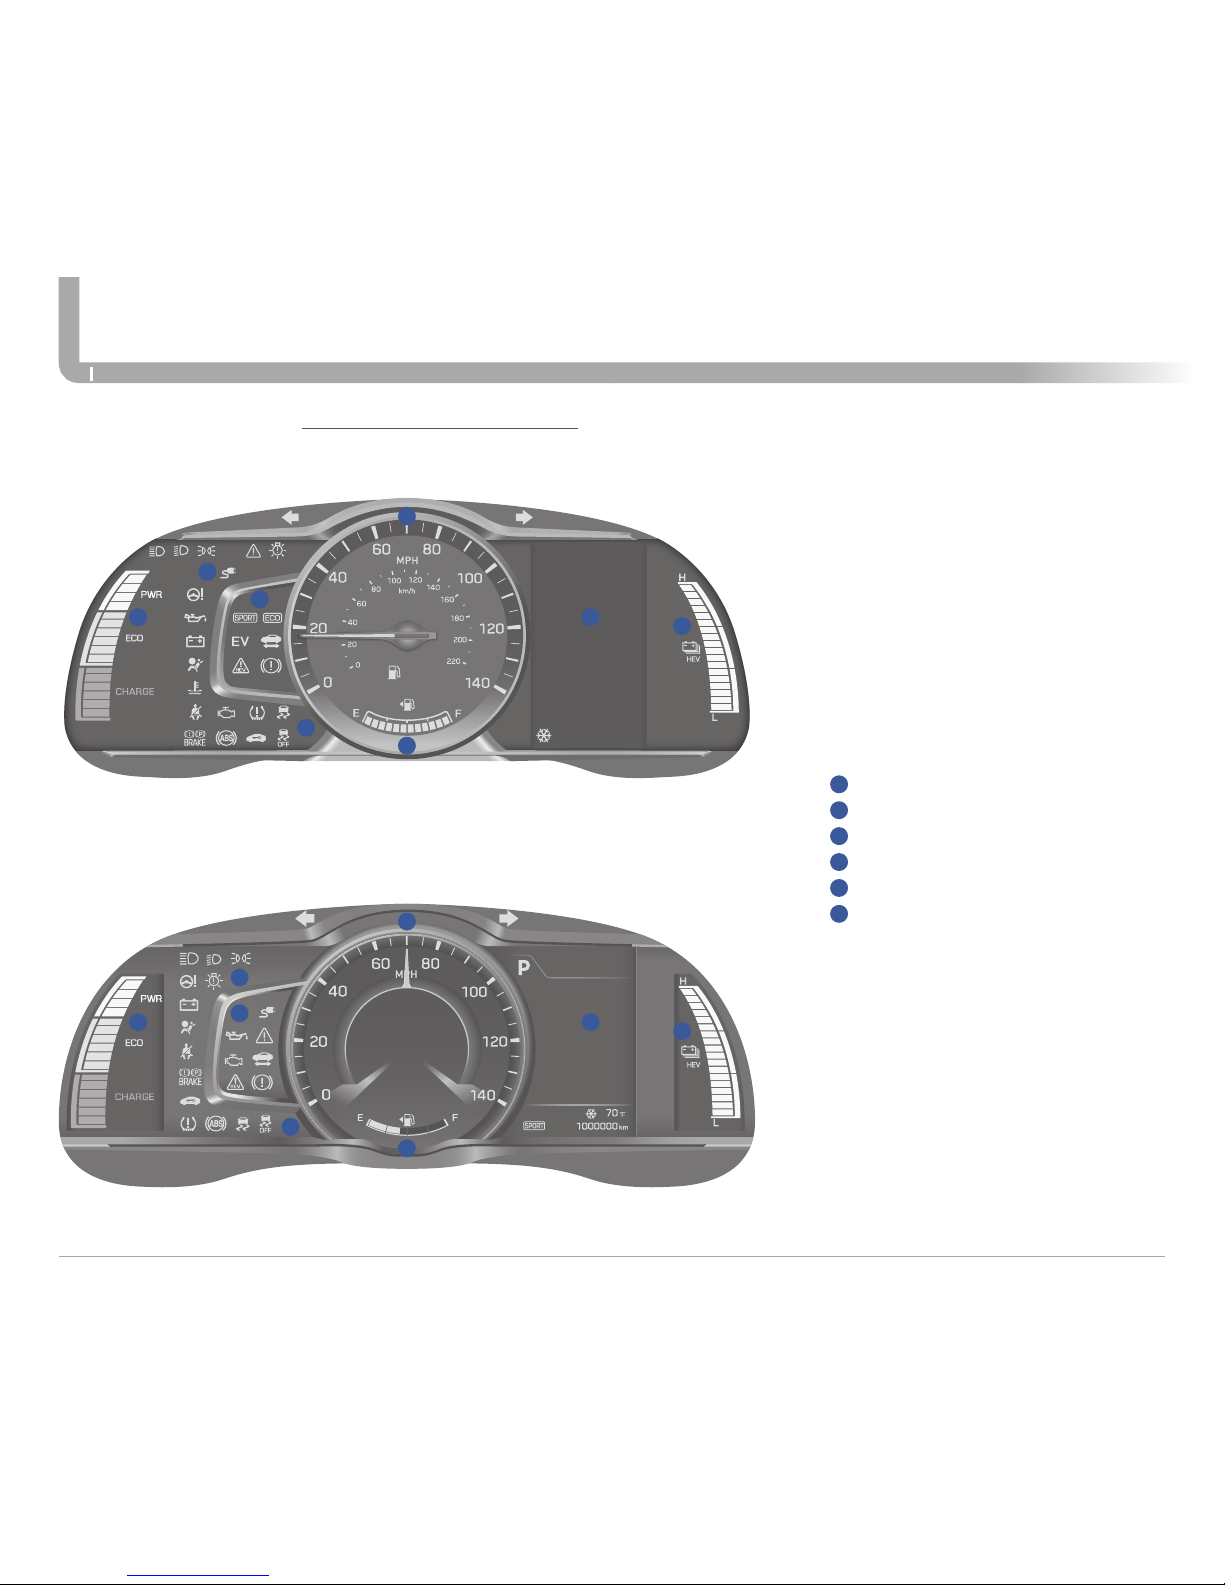
1
Power gauge
2
Speedometer
3
Battery SOC (State of Charge) gauge
4
Fuel gauge
5
Warning and indicator lights
6
LCD display (including Trip computer)
5
5
5
5
5
5
4
4
1
1
2
2
3
3
6
6
INSTRUMENT CLUSTER
Type B
Type A
Page 9
Quick Reference Guide I 12
11 I Quick Reference Guide
IONIQ plug-inHYUNDAI
FEATURES AND CONTROLS
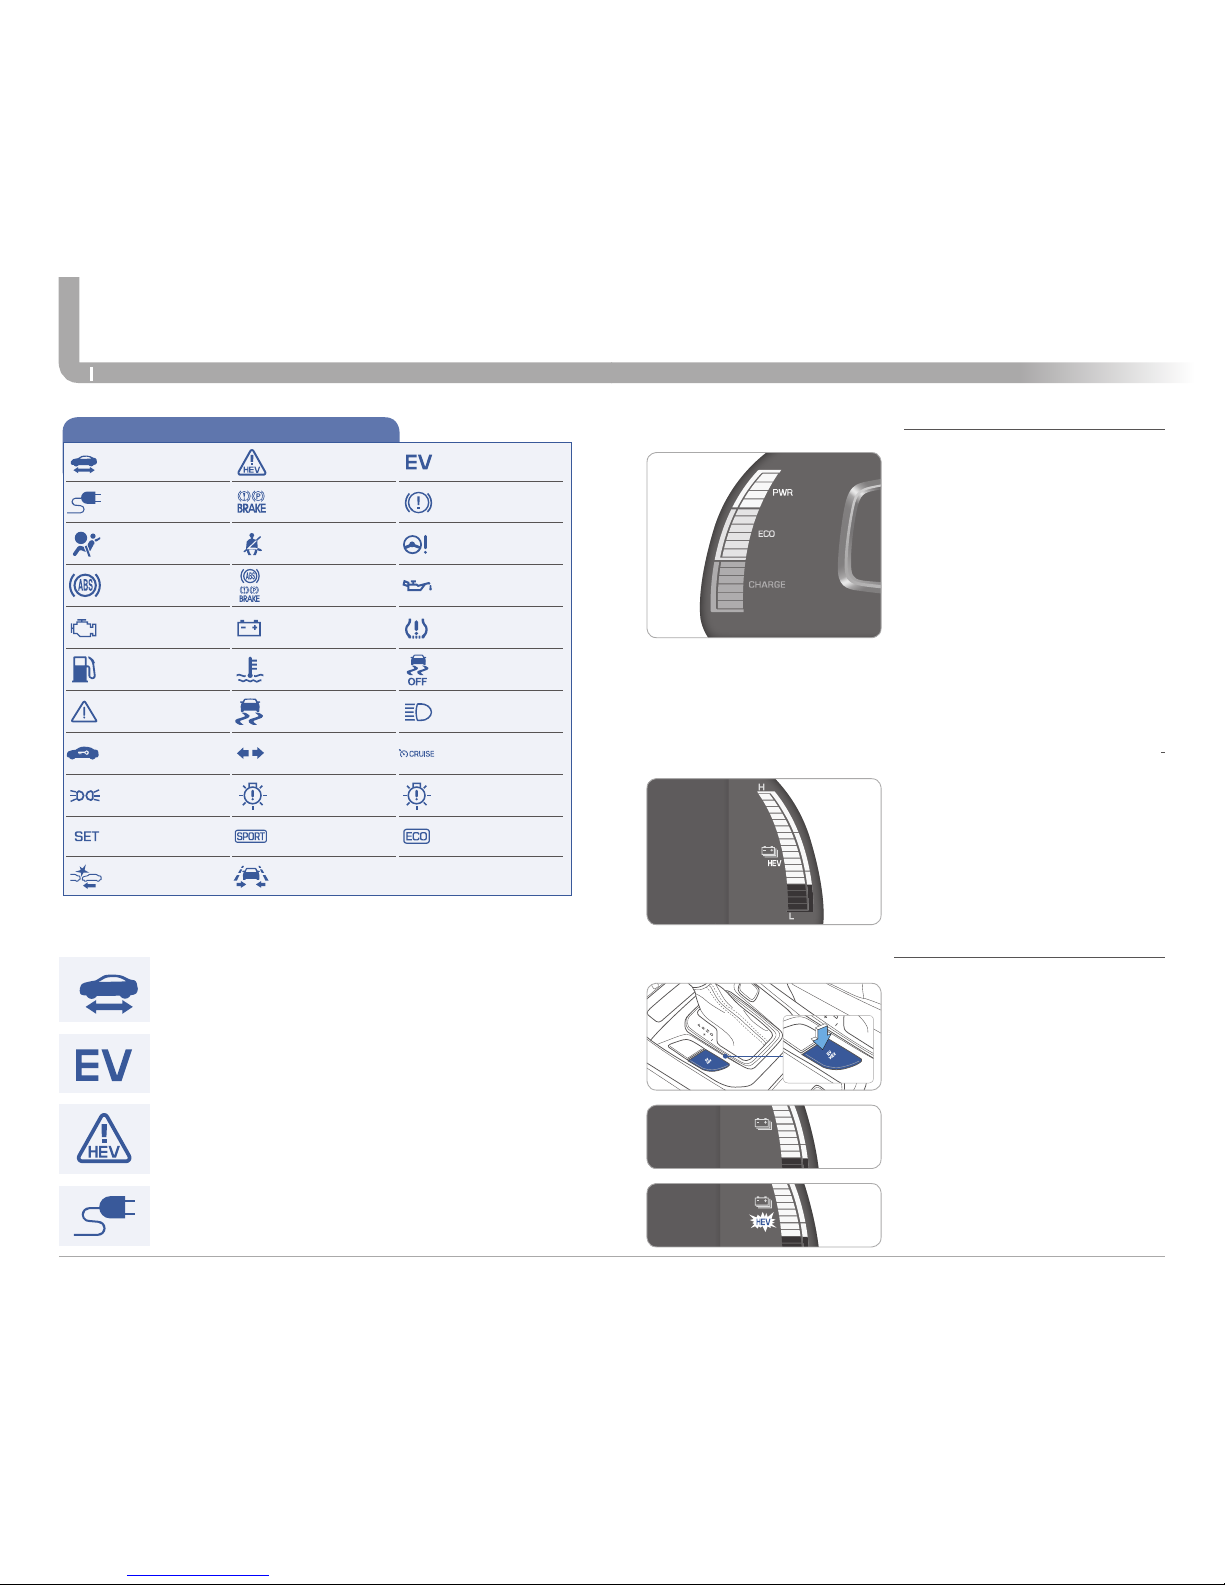
WARNINGS AND INDICATORS
EV mode indicator
Parking brake & brake
Fluid warning light
Air bag warning light
Service warning
light
Low tire pressure
warning light / TPMS
malfunction
LED Headlight
warning light
Exterior light
warning light
Autonomous
Emergency Braking
(AEB) warning light
Anti-lock Brake
System (ABS)
warning light
Electronic Brake force
Distribution (EBD)
System warning light
Charging system
warning light
Engine coolant
temperature
warning light
Regenrative brake
warning light
Seat belt
warning light
Electric Power Steering
(EPS) warning light
Immobilizer indicator
Master warning light
Light ON indicator
light
Turn signal indicator
light
High beam indicator
light
Cruise indicator
Cruise SET indicator
SPORT mode
indicator
ECO mode indicator
Ready indicator
Engine oil pressure
warning light
Malfunction Indicator
Lamp (MIL)
Low fuel level
warning light
The vehicle power gauge indicates
whether the current driving
condition is fuel efficient or not.
CHARGE
Shows that the energy made by
the vehicle is being converted to
electrical energy. (Regenerated
energy)
ECO
Shows that the vehicle is being
driven in an Eco-friendly manner.
POWER
Shows that the vehicle is exceeding
the Eco-friendly range.
VEHICLE POWER GAUGE
This gauge indicates the remaining
hybrid battery power. If the SOC is
near the "L (Low)" level, the vehicle
automatically operates the engine to
charge the battery.
EV/HEV Button
Press the [EV/HEV] button to
change the plug-in hybrid system
modes, between Electric (CD)
mode and Hybrid (CS) mode.
CD (Charge Depleting, Electric) mode
The high-voltage (hybrid) battery is
used to drive the vehicle.
CS (Charge Sustaining, Hybrid) mode
The high-voltage (hybrid) battery and
gasoline engine is used to drive the vehicle.
* : Plug-in hybrid
HYBRID BATTERY SOC STATE OF CHARGE GAUGE
PLUGIN HYBRID MODE
Ready indicator
When the vehicle is ready to be driven, this indicator is illuminated.
When the ready indicator goes off or blinks, we recommend
the vehicle be checked by an authorized HYUNDAI dealer.
EV mode indicator
This indicator illuminates when the vehicle is driven by the
electric motor.
Main indicators in cluster for Hybrid Vehicle
Charging cable
connection indicator*
Service warning light
If a problem with the hybrid vehicle control system occurs,
the service warning light will illuminate. We recommend the
vehicle be checked by an authorized HYUNDAI dealer.
Charging cable connection indicator (Plug-in Hybrid)
This indicator illuminates in red when
the charging cable is connected.
Lane Keeping Assist
System (LKAS)
indicator
Electronic Stability
Control (ESC)
Indicator Light
Electronic Stability
Control (ESC) OFF
indicator light
Page 10
Quick Reference Guide I 14
13 I Quick Reference Guide
IONIQ plug-inHYUNDAI
FEATURES AND CONTROLS
PLUGIN HYBRID ELECTRIC VEHICLE SYSTEM MODES
Type A
Type A
Type B
Type B
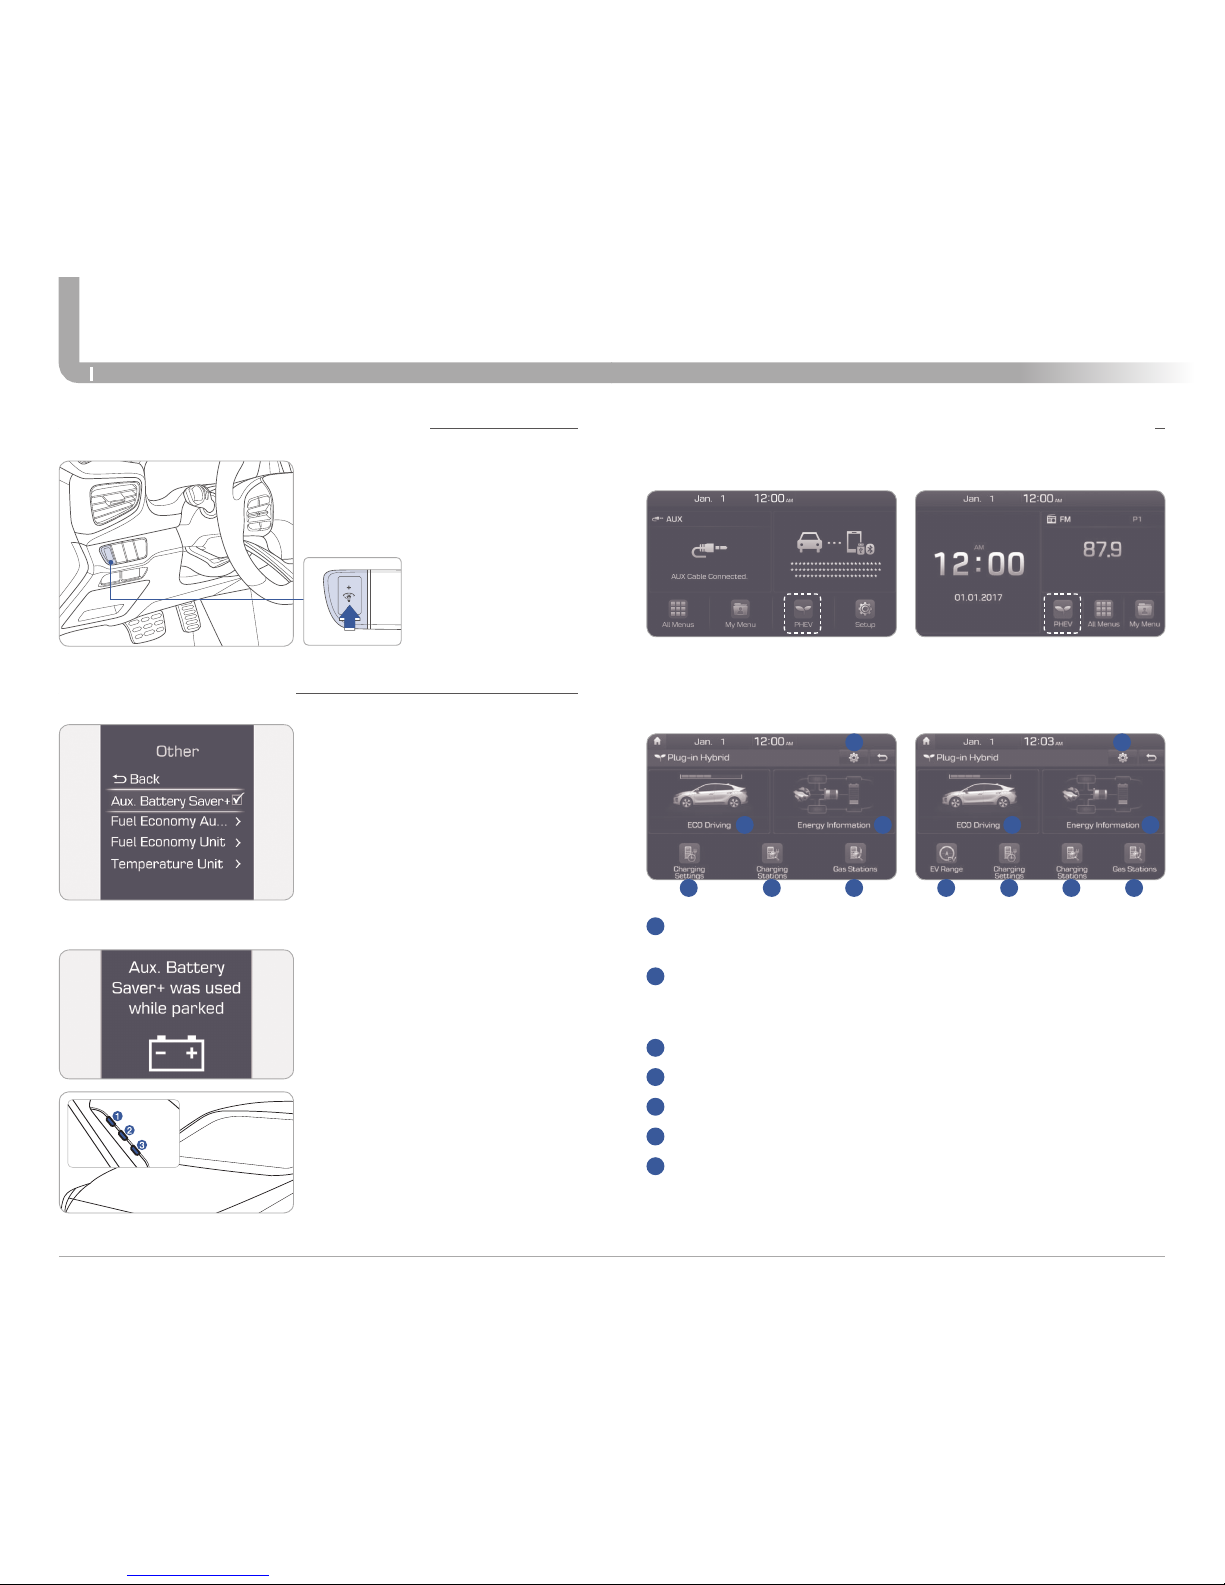
AUX. BATTERY SAVER+
Press the illumination control
button to adjust the instrument
cluster illumination brightness.
Select the PHEV menu on the home screen, or select the PHEV
menu from the main menu.
ECO driving : Displays a real-time image for fuel economy or
ECO level based on the user’s selection.
Energy information : Displays a real-time image showing
information about the battery and the ow
of energy based on the user’s selection.
EV range : Displays the possible driving distance on a map(for type B).
Charging settings : Goes to the menu to set times for charging.
Charging stations : Displays a list of EV charging stations nearby.
Gas stations : Displays a list of gas stations nearby.
Settings : Goes to the settings menu to select the real-time
information that will be displayed on the home screen.
The Aux. Battery Saver+ function
monitors the charging status of the
12 V auxiliary battery. If the auxiliary
battery level is low, the main
high voltage battery charges the
auxiliary battery.The default setting
for Aux. Battery Saver+ is ON.The
driver may cancel the function. Go
to ‘User Settings Other Features
Aux. Battery Saver+‘.
The message is displayed if the
Aux. Battery Saver+ function was
activated.
When the function is activating the third
Charging Indicator Lamp will blink.
NOTE: Do not touch the high voltage
electric wire (orange), connector, and
all electric components and devices
when the function is activating.
INSTRUMENT PANEL ILLUMINATION
1
1 1
2
2 2
34 4 5 6
7 7
5 6
3
4
5
6
7
Page 11
Quick Reference Guide I 16
15 I Quick Reference Guide
IONIQ plug-inHYUNDAI
FEATURES AND CONTROLS
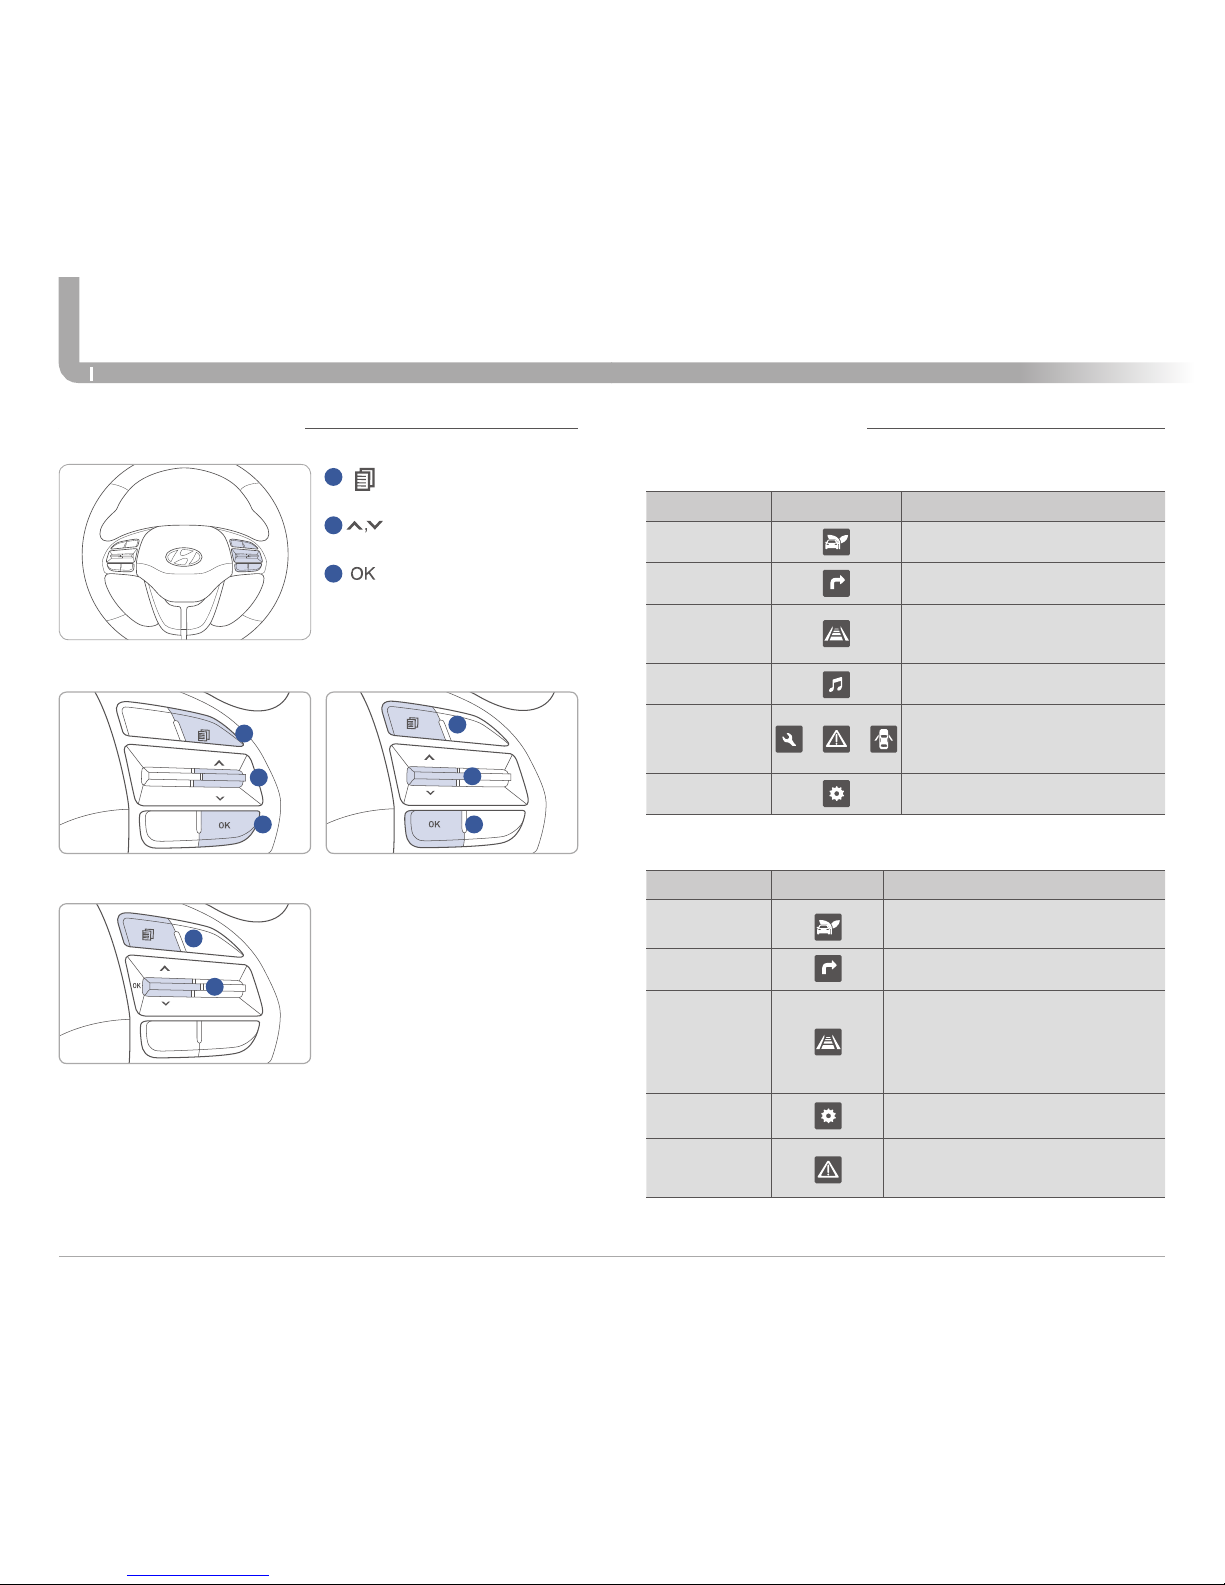
LCD DISPLAY MODES
Type A
Modes Symbol Description
Trip Computer
This mode displays driving information
like the tripmeter, fuel economy, etc.
Turn By Turn (TBT)
This mode displays the state of the
navigation.
SCC / LKAS
This mode displays the state of the
Smart Cruise Control (SCC) and Lane
Keeping Assist System (LKAS).
A / V
This mode displays the state of the A /
V (Audio / Video) system.
Information or or
This mode displays the service interval
(mileage or days) and warning messages
related to the Blind Spot Detection system, etc.
User Settings
In this mode, you can change settings
of the doors, lamps, etc.
LCD DISPLAY CONTROL
Type B
Type C
Type A
3 3
2
2
1
1
1
: MODE button for changing
modes
2
: MOVE switch for changing
items
3
: SELECT / RESET button for
setting or resetting the
selected item
Modes Symbol Explanation
Trip Computer
This mode displays driving information such
as the tripmeter, fuel economy, etc.
Turn By Turn (TBT)
This mode displays the state of the
navigation.
Assist
• This mode displays the state of the Smart
Cruise Control (SCC) and Lane Keeping
Assist System (LKAS).
•
This mode displays information related to
Tire Pressure.
User Settings
In this mode, you can change settings of
the doors, lamps, etc.
Warning
This mode displays warning messages
related to the Blind Spot Detection system,
etc.
Type B
2
1
Page 12
Quick Reference Guide I 18
17 I Quick Reference Guide
IONIQ plug-inHYUNDAI
FEATURES AND CONTROLS
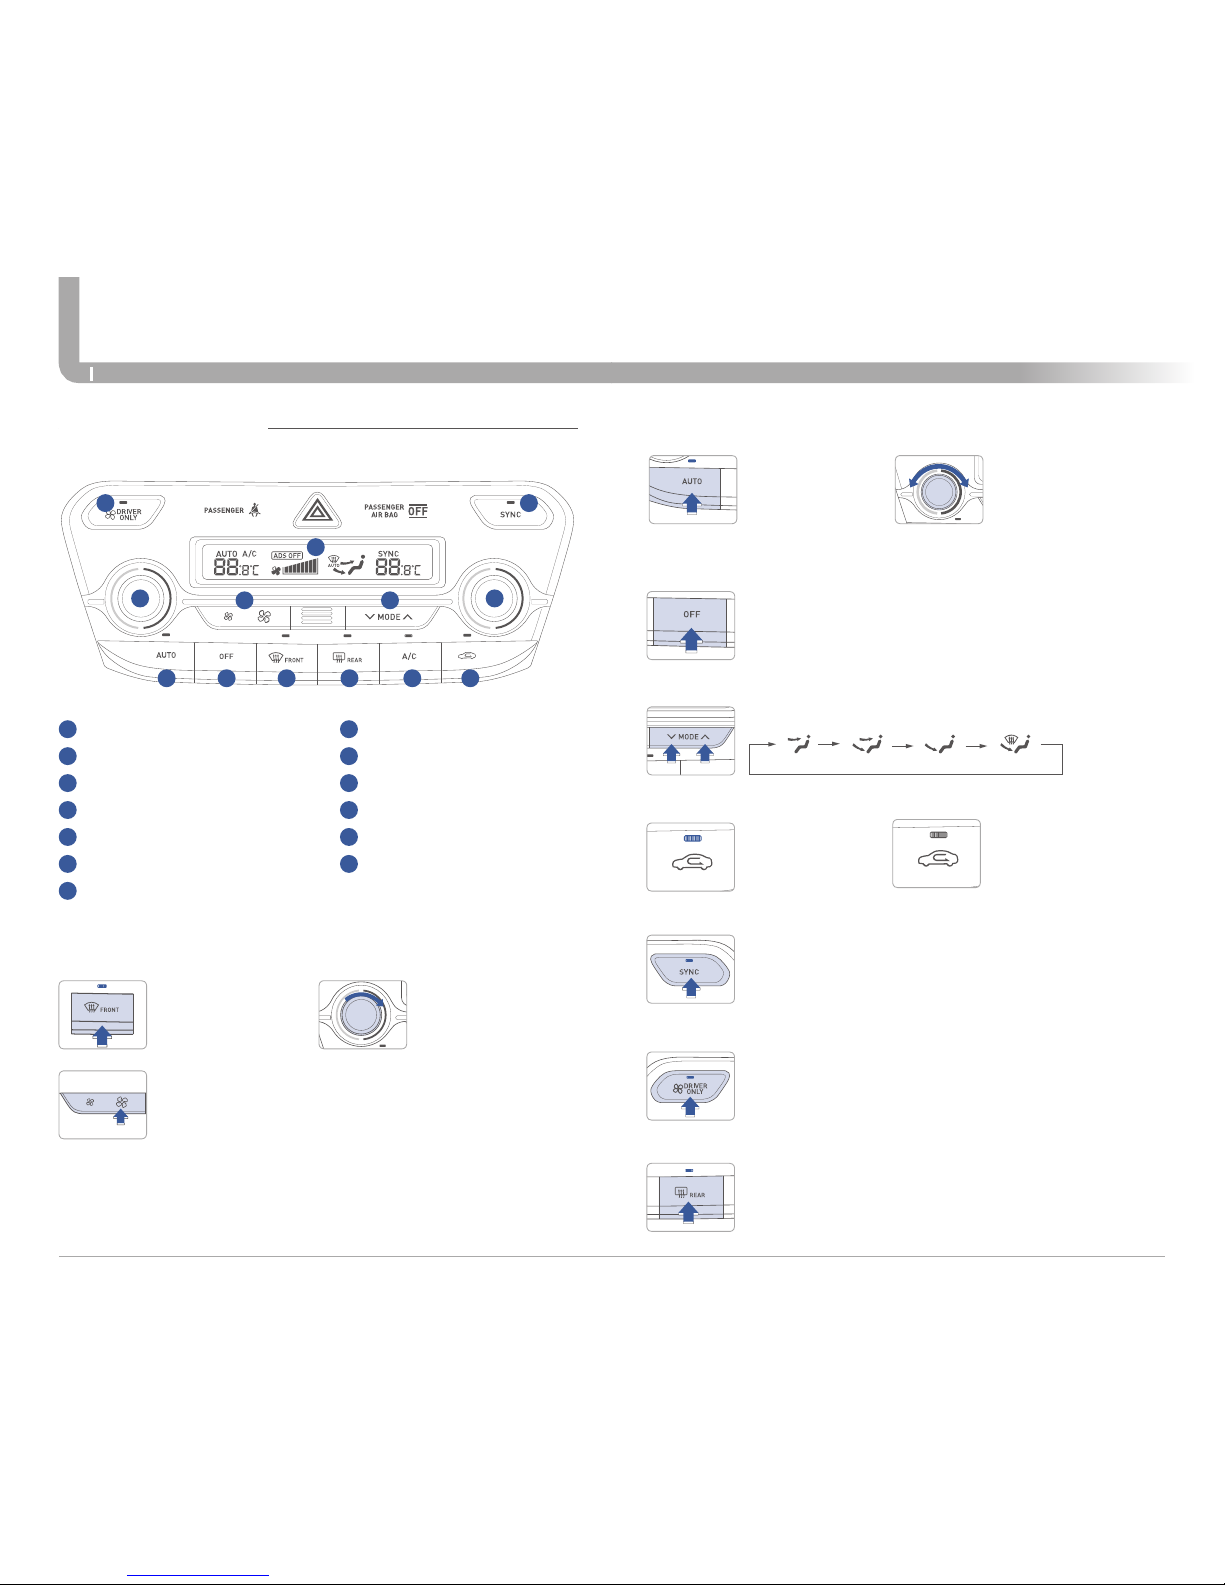
NOTE: To reduce the tendency of the glass fogging and also to improve
visibility, keep the interior surface of the windshield clean by wiping it with
a clean cloth and glass cleaner. In addition, select air intake control to the
outside (fresh) air position whenever possible while operating the vehicle.
DEFOGGING / DEFROSTING
3. Set the fan
speed
to the highest
setting.
2. Set the temperature
control to the
warmest setting.
1. Press the front
windshield
defrost control
button.
DRIVER ONLY
Only the driver’s vent will operate if enabled (LED on).
AUTOMATIC HEATING / AIR CONDITIONING
2. Set the temperature
control to the desired
setting.
1. Press the AUTO
button.
Controls the modes, fan speeds, air intake and air-conditioning automatically.
SYSTEM OFF
Pressing the OFF button will place the system in the OFF mode.
• Blower will turn off.
• Outside (fresh) air position will be selected.
• Vented air will be at last set temperature.
SYNC BUTTON
Press the SYNC button to adjust the driver and
passenger side temperature and air flow direction
equally.
REAR WINDOW DEFROSTER
Press to activate/deactivate the rear window
defroster.
AIR INTAKE CONTROL
Outside (fresh) air
position
Recirculated
air position
Changes the direction of the air flow as follow.
MODE SELECTION
CLIMATE CONTROL
8
Air intake control button
9
Fan speed control button
10
Mode selection button
11
Driver only button
12
SYNC button
13
Climate control information screen
1
Driver's temperature control knob
2
Passenger's temperature control konb
3
AUTO (automatic control) button
4
OFF button
5
Front windshield defrost button
6
Rear window defrost button
7
Air conditioning button
3 4 5 76 8
9 10
13
1
1211
2
Page 13
Quick Reference Guide I 20
19 I Quick Reference Guide
IONIQ plug-inHYUNDAI
MULTIMEDIA
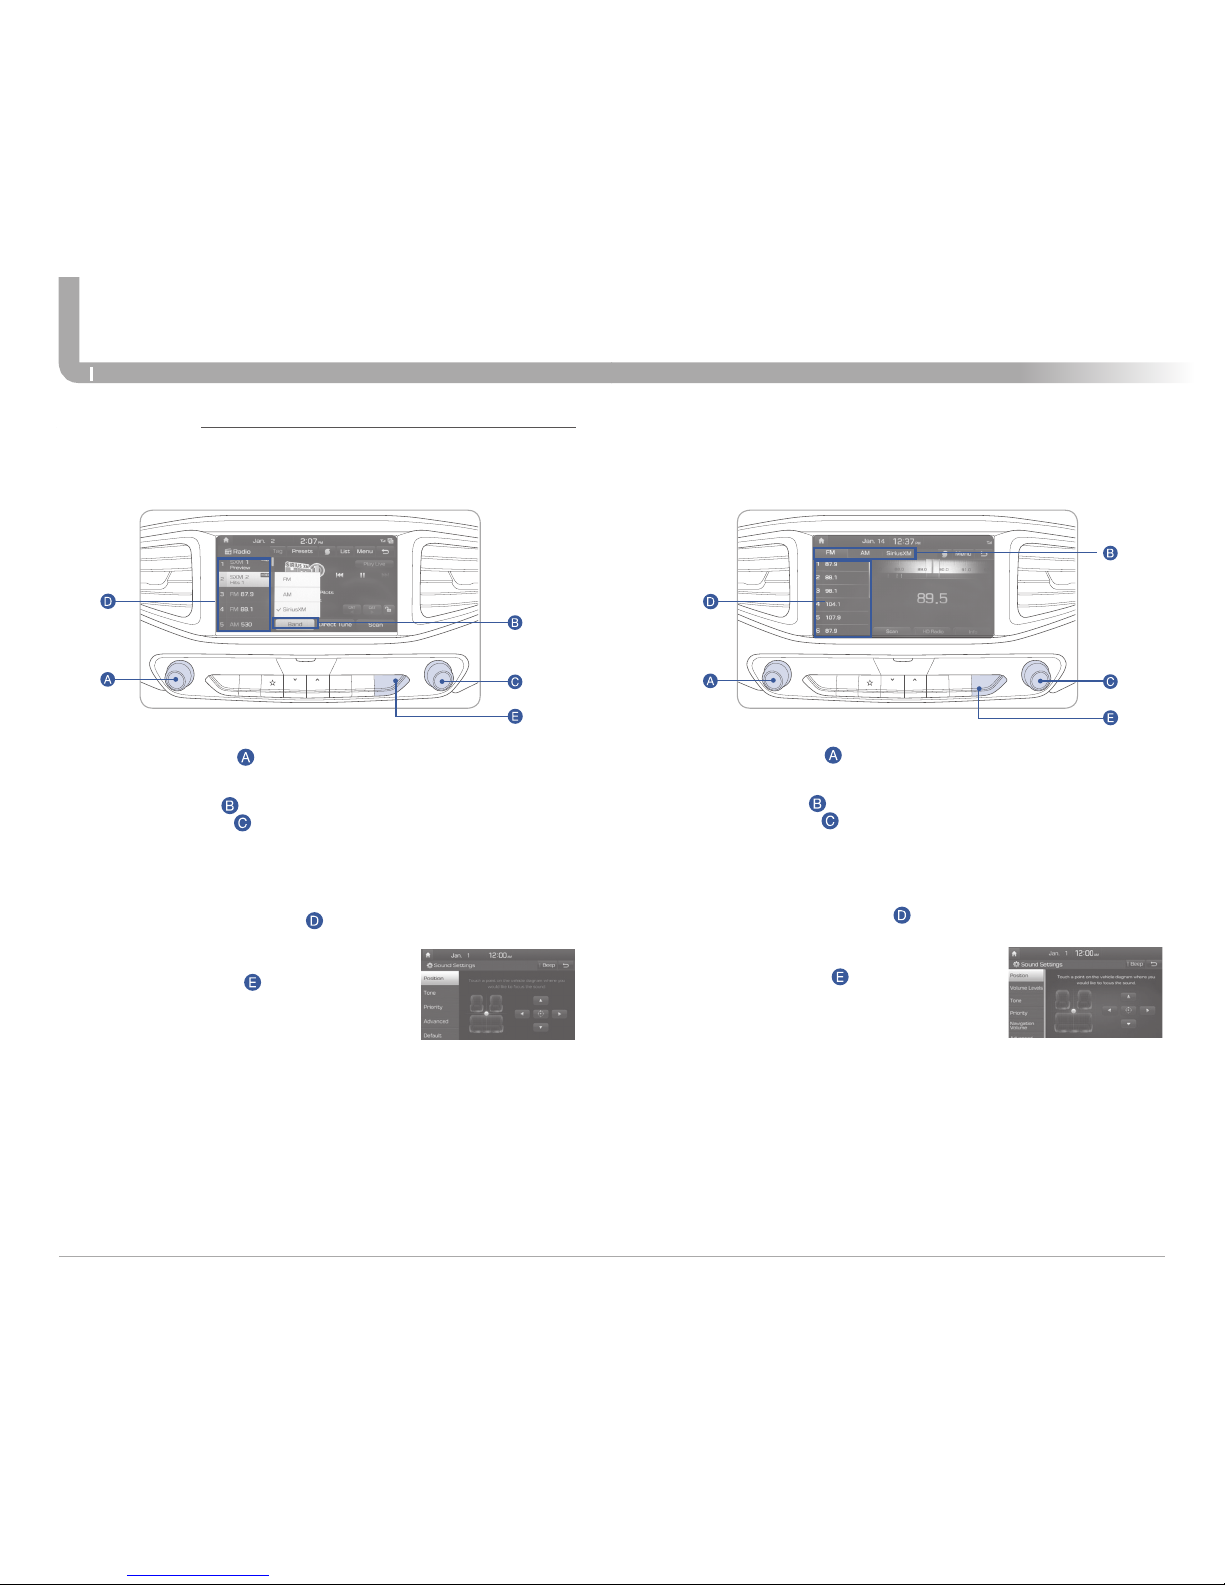
RADIO MODE
Navigation
Display Audio
RADIO
VOL
PWR
PUSH
MEDIA
SEEK
TRACK
TUNEENTER
SETUPNAVMAP
FILE
RADIO
VOL
PWR
PUSH
MEDIA
SEEK
TRACK
TUNEENTER
SETUPNAVMAP
FILE
Press POWER button to turn radio on.
• TUNING/LISTENING TO CHANNELS
1. Press BAND button on screen to select FM/AM/SiriusXM®.
2. ROTATE TUNE knob to desired channel.
NOTE
A clear view of the southern sky helps ensure SiriusXM® radio
reception.
• SETTING PRESET MEMORY BUTTONS
Press and hold any preset button on the screen until
an audible beep is heard to store current channel.
• ADJUSTING THE SOUND CONTROL
1. Press the SETUP button and press the SOUND
button on screen to display the Sound Settings
screen.
2. Touch on-screen arrows to adjust desired setting.
Press POWER button to turn radio on.
• TUNING/LISTENING TO CHANNELS
1. Press BAND button on screen to select FM/AM/SiriusXM®.
2. ROTATE TUNE knob to desired channel.
NOTE
A clear view of the southern sky helps ensure SiriusXM
®
radio
reception.
• SETTING PRESET MEMORY BUTTONS
Press and hold any preset button on the screen until
an audible beep is heard to store current channel.
• ADJUSTING THE SOUND CONTROL
1. Press the SETUP button and press the SOUND
button on screen to display the Sound Settings
screen.
2. Touch on-screen arrows to adjust desired setting.
Page 14
Quick Reference Guide I 22
21 I Quick Reference Guide
IONIQ plug-inHYUNDAI
MULTIMEDIA
Use the input jack to connect an
external audio device and listen
to it through the audio system in
your vehicle.
iPod® is a trademark of Apple, Inc.
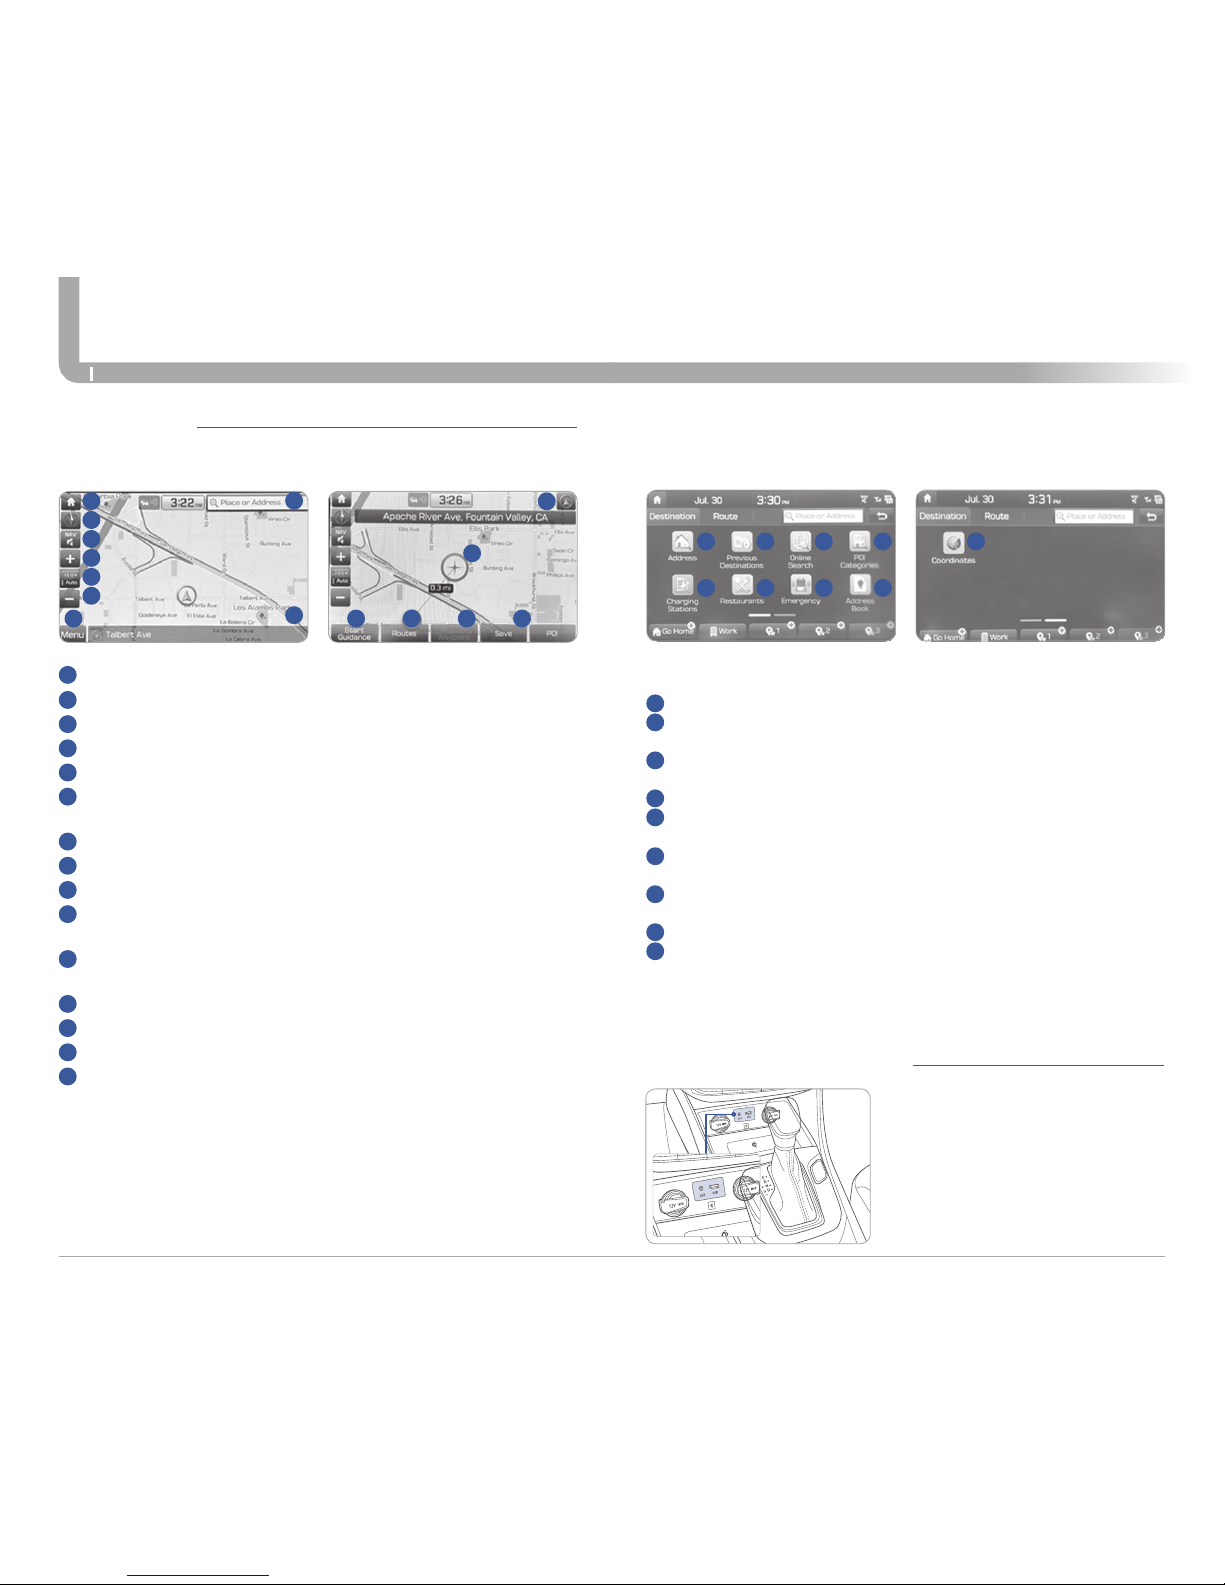
Basic features on map screen
1
Place button : Move to the Place menu.
2
Home button : Go to the Home screen.
3
Map button : Change the map view mode.
4
NAV volume button : Adjusts the volume.
5
Zoom in button : Zoom in the map.
6
Map scale display : Set the zoom level automatically according
to the guidance.
7
Zoom out button : Zoom out the map.
8
Quick menu button : Quick Menu for destination selection and options.
9
Map scroll mark : Touch to scroll the map.
10
Guidance button : Start the preferred navigation route to
selected location.
11
Route button : Choose the preferred navigation route to
selected location.
12
Waypoint button : Set a waypoint to the current route.
13
Save button : Save frequently used address to address book.
14
POI button : Find a POI(Point Of Interest) around the current position.
15
Vehicle position mark : View the vehicle’s current position on
the map screen.
NAVIGATION
AUX, USB AND iPod® PORT
Destination search screen
1
Address : Set destination by address search.
2
Previous destinations : Select from previously inputted addresses
and POIs.
3
Local search : Uses Google Local Search via the vehicle’s
connected services system.
4
POI categories : Select the desired item in the sub-categories.
5
Charging stations : Select the desired destinations among the
searched charging stations.
6
Restaurants : Lists available restaurants within a predefined
radius of the current vehicle position.
7
Emergency : Select the desired destination among the searched
emergency facilities.
8
Address Book : Search the destination with the address book.
9
Coordinates : You can find a destination by entering the
coordinates of latitude and longitude.
Press [NAV] on the map screen and, finds a destination by using the
[Destination] menu.
2 3 41
5 6 7 8
9
15
11
10
12 13 14
2
3
4
1
5
6
7
8
9
Page 15
Quick Reference Guide I 24
23 I Quick Reference Guide
IONIQ plug-inHYUNDAI
MULTIMEDIA
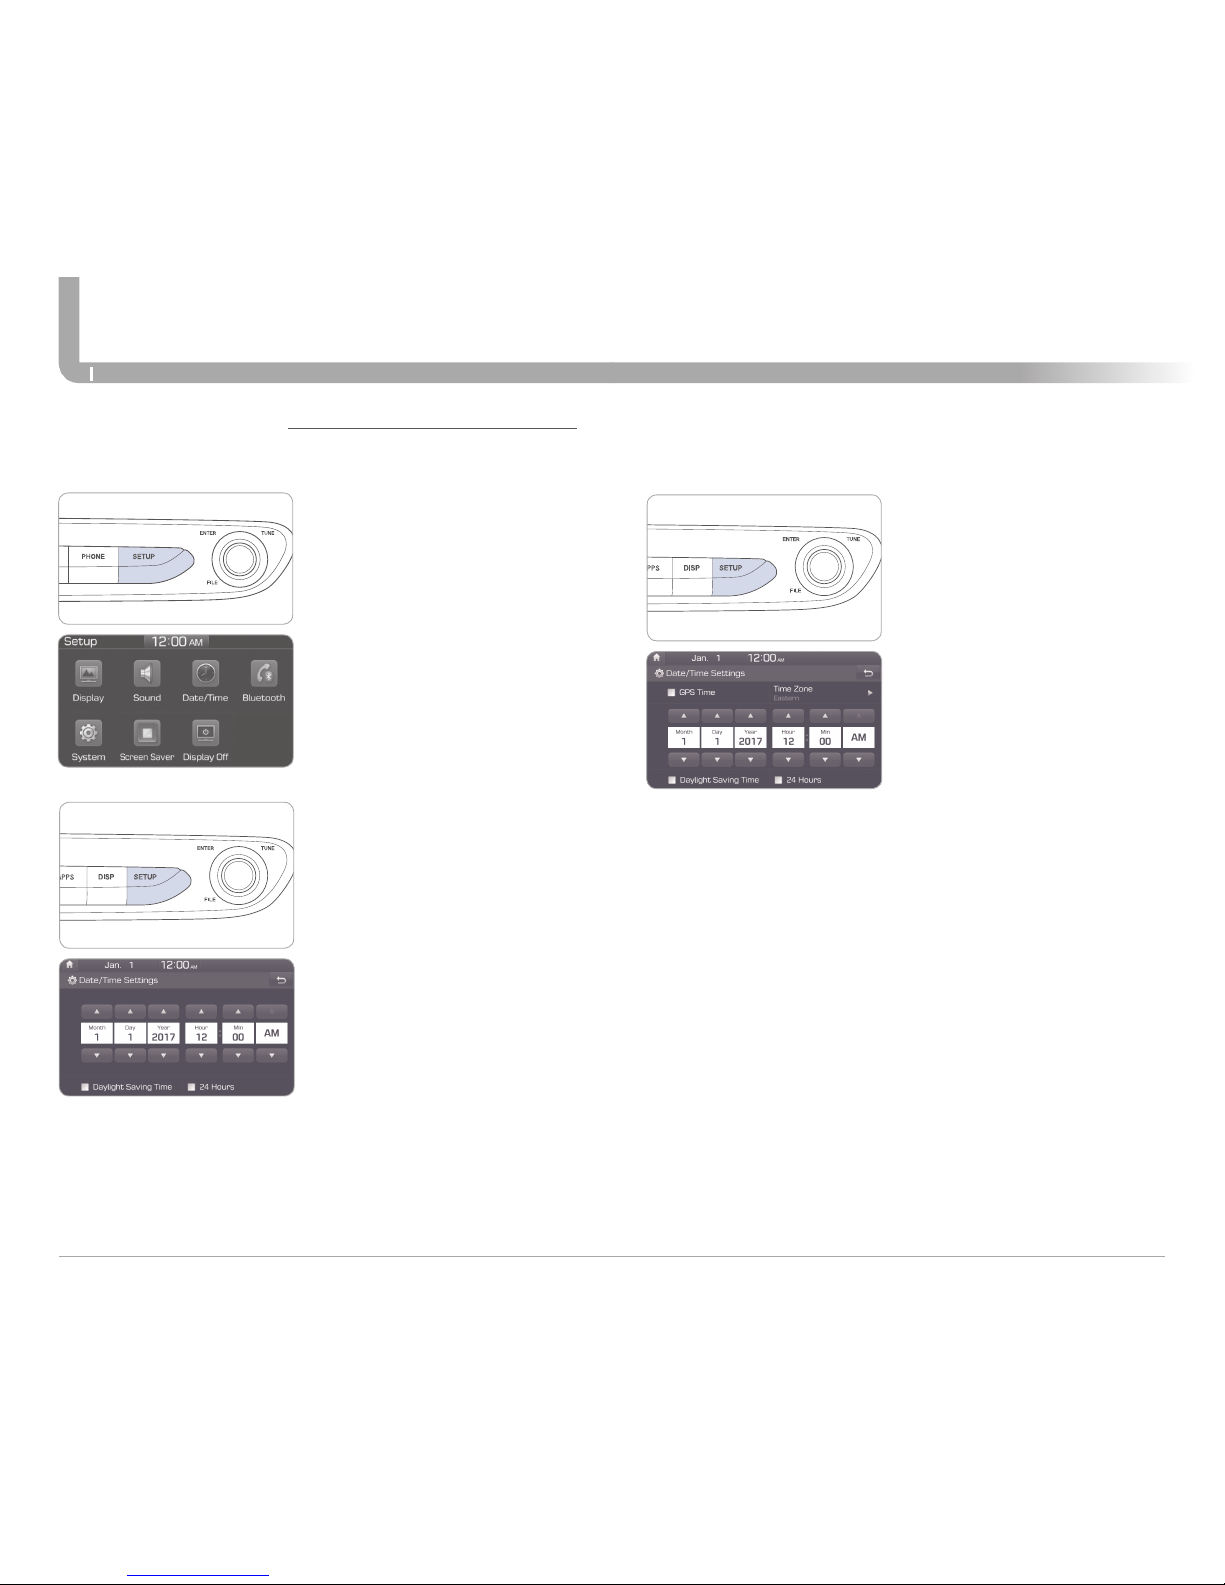
CLOCK ADJUSTMENT
1. Press the SETUP button on the
audio head unit.
2. Select Date/Time.
Set Time
Set the time displayed on the audio
screen.
Time Format
Choose between 12-hour and 24hour time formats.
Set Date
Set the date displayed on the audio
screen.
With Audio
Type A
1. Press the SETUP button on the
audio head unit.
2. Select Date/Time.
3. Select the desired items.
Date/Time
If you tap any value, you can directly
enter the number in the screen.
24 Hours
The time display is set in 24-hour
format.
Daylight Saving Time
The daylight saving time(DST) is
applied.
1. Press the SETUP button on the
navigation head unit.
2. Select Date/Time.
3. Select the desired items.
Date/Time
Using the arrow buttons, you can
change the values. If you tap any
value, you can directly enter the
number in the screen.
GPS time
Displays time according to the
received GNSS(Global Navigation
Satellite System) time.
Daylight Saving Time
The daylight saving time(DST) is
applied.
24 Hours
The time display is set in 24-hour format.
With Navigation
Type B
Page 16
Quick Reference Guide I 26
25 I Quick Reference Guide
IONIQ plug-inHYUNDAI
DRIVING
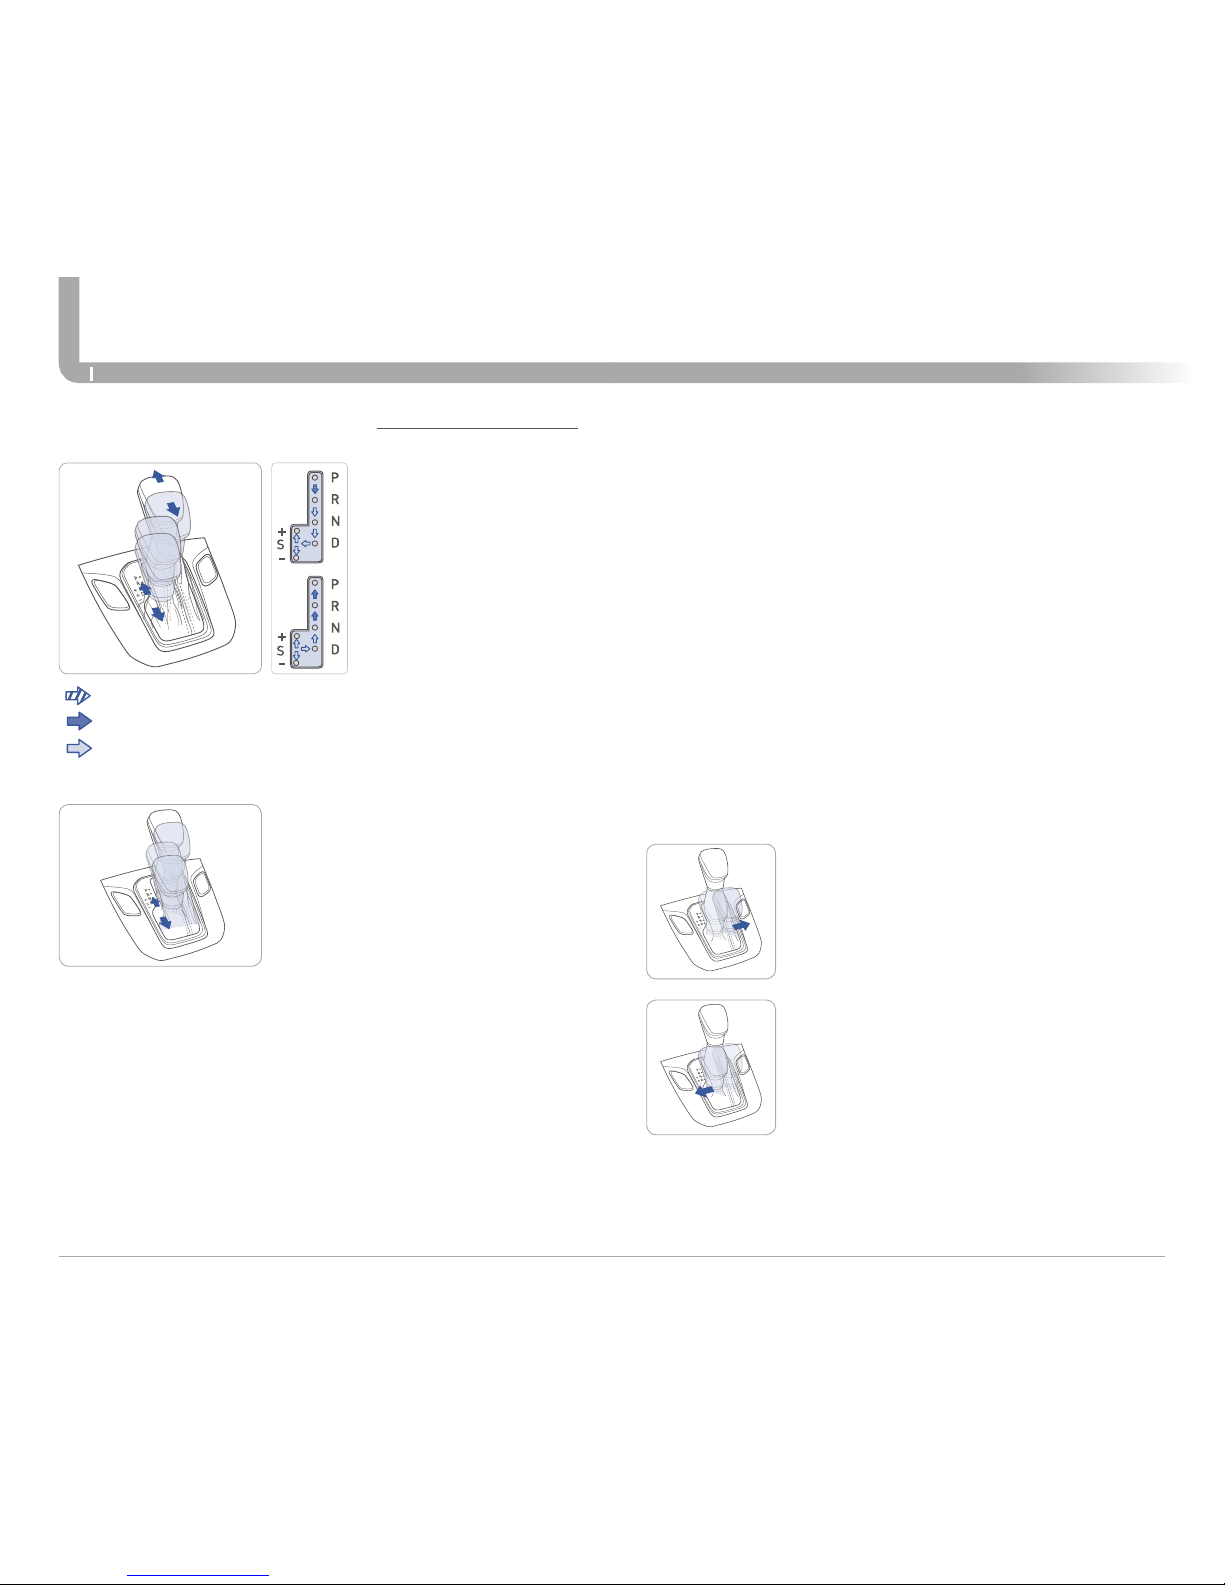
DUAL CLUTCH TRANSMISSION
NOTE: Dual Clutch Transmission characteristics
The new technology of the Dual Clutch Transmission is different from a
traditional automatic or manual transmission:
• The Dual Clutch Transmission is an automatically shifting manual
transmission.
• Dual Clutch Transmission utilizes two clutches connected to a
computer-controlled manual gearbox. It provides the convenience of a
transmission that shifts automatically, with the efficiency of a manual
transmission.
• When you turn the engine on and off, you may hear clicking sounds as
the system goes through a self test.
This is a normal sound for the Dual Clutch Transmission.
( ) : Depress the brake pedal and press the shift button while moving the shift lever.
( ) : Press the shift button while moving the shift lever.
( ) : The shift lever can freely operate.
Shift the lever from D into the manual
gate to activate manual shift mode.
Manual shift mode is a recalibrated
automatic mode that will hold gears
longer and downshift at higher RPM for
a more dynamic driving style. Gasoline
engine will be engaged more frequently.
Manual shift mode
• When you stop on a hill, if you remove your foot from the brake pedal,
the vehicle will remain stationary for approximately two seconds to
prevent the vehicle from rolling backwards. If you depress the
accelerator pedal during the two second interval, the vehicle will
accelerate.
If you wait more than two seconds, the vehicle will enter creep mode
and may roll backwards if the hill is steep.
Caution
• You should always use the foot brake to hold the car on a hill until you
are ready to drive. Using creep mode to hold the car on a hill may
damage the clutch.
• If the clutch becomes overheated by excessive use of the clutch to hold
on a hill, you may notice a shudder feeling and a blinking display on
the instrument cluster. When this occurs, the clutch is disabled until the
clutch cools to normal temperatures. If this occurs, pull over to a safe
location, shift into P (Park) and apply the foot brake for a few minutes.
ECO mode
If you drive the vehicle with the shift lever in D (Drive),
the vehicle will automatically change to ECO mode.
The ECO indicator will illuminate on the instrument
cluster.
When driving in ECO mode, the vehicle
improves fuel efficiency for eco-friendly driving.
SPORT mode
If you drive the vehicle with the shift lever in S (Sport), the
vehicle will automatically change to SPORT mode.
The SPORT indicator will illuminate on the instrument
cluster.
When driving in SPORT mode, the vehicle provides more
responsive powertrain performance, sporty but firm
handling, and the fuel efficiency may decrease.
ECO/SPORT mode
Page 17
Quick Reference Guide I 28
27 I Quick Reference Guide
IONIQ plug-inHYUNDAI
DRIVING
Vehicle with factory installed
navigation system:
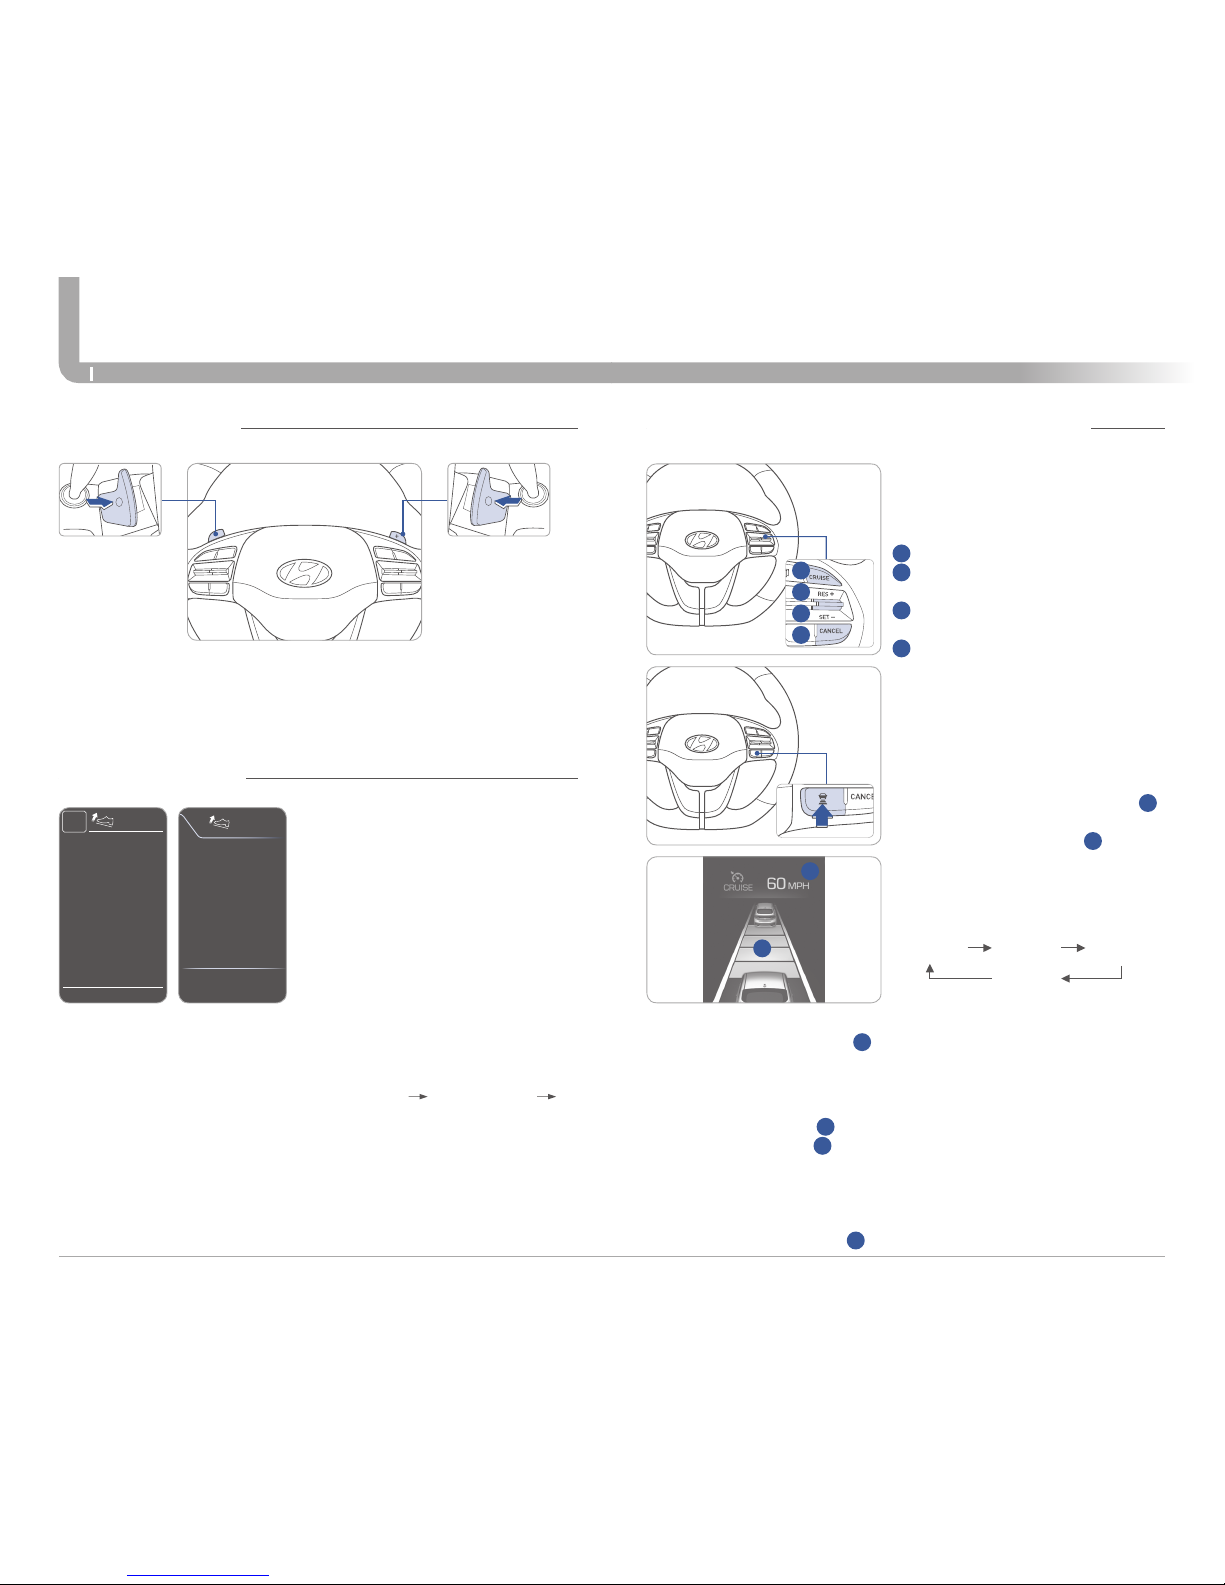
PADDLE SHIFTER
The paddle shifter is available when the shift lever is in the D (Drive) or
S (Sport) position, or the manual shift mode.
It will operate when the vehicle speed is more than 3mph.
Pull the [+] or [-] paddle shifter once to shift up or down one gear.
Coasting Coasting
To activate the system, select
“User Settings Driving Assist
Coasting Guide”.
The driving speed should be
between 25 mph and 100 mph.
After an address is inputted and
navigation is in progress, the coasting
guide informs the driver when to take
the foot off from the accelerator by
anticipating a decelerating event
based on the analysis of driving routes
and road conditions of the navigation.
This helps increase fuel efficiency by
allowing coasting down the road with
EV motor only.
COASTING GUIDE
-
Press (+) to
upshift
Type A Type B
Press (-) to
downshift
The Cruise Control system allows you to
program the vehicle to maintain a
constant speed without depressing the
accelerator pedal.
CRUISE CONTROL / SMART CRUISE CONTROL
Setting Vehicle Distance (Smart
Cruise Control only)
2
1
Distance 2Distance 3
Distance 4
(Longest)
Distance 1
(Shortest)
2
3
4
1
1
To turn On/Off cruise control.
2
Toggle switch UP to Resume or
Increase the cruise control speed.
3
Toggle switch DOWN to Set or
Decrease the cruise control speed.
4
To Cancel the Cruise Control.
Press the button to set and
maintain the vehicle-to-vehicle
distance without pressing the
accelerator or brake pedal.
The vehicle-to-vehicle distance 1
will automatically activate when
you set the cruise speed 2.
Each time the button is pressed,
the vehicle-to-vehicle distance
changes as follows:
Setting Cruise Control
1. Press the “CRUISE” button 1 to turn on Cruise Control. The icon will
illuminate in the instrument cluster.
2. Toggle “-SET” switch (3) DOWN to set cruising speed.
Adjusting the vehicle speed
1. Toggle “+RES” switch 2 UP to increase cruising speed.
2. Toggle “-SET” switch 3 DOWN to decrease cruising speed.
Note Quick toggle up/down will change speed by 1 mph. Holding
switch up/down will change speed by 10 mph.
To Cancel Cruise Control
Press the “CANCEL” button 4 or depress the brake pedal.
Page 18

29 I Quick Reference Guide
HYUNDAI
MEMO
IONIQ CUSTOMER DELIVERY CHECKLIST
Quick Reference Guide I 30
IONIQ plug-in
BLUETOOTH
®
HANDS-FREE
SWITCHING BETWEEN PAIRED PHONES
On the radio:
1. Push the SETUP button.
2. Select Bluetooth.
3. Select Bluetooth Connection .
4. Select Connect next to the
desired phone.
CONNECTING YOUR PHONE
On the radio:
1. Push the SETUP button.
2. Select Bluetooth.
3. Select Bluetooth Connection .
4. Select Add New.
In your phone’s
Bluetooth settings:
5. Select the <Vehicle Name>
on your phone.
6. Enter the passkey from the
radio or accept the authorization
pop-up on your phone.
For more information, visit
HyundaiBluetooth.com
Using Voice Command:
“Change Bluetooth device”
☐ SET TIRE PRESSURE LF
RF RR LR
☐ VERIFY VEHICLE IS CLEAN, IN GOOD CONDITION,
FREE OF CHIPS AND SCRATCHES · CLEAN WINDSHIELD
AND BACK WINDOW
☐ ENSURE FLOOR MATS ARE SNAPPED INTO PLACE
BEFORE DELIVERY
WALK THE CUSTOMER THROUGH EACH OF
THE FOLLOWING KEY DELIVERY FEATURES
☐
REVIEW QUICK REFERENCE GUIDE
☐
PAIR CUSTOMER'S PHONE TO THE BLUETOOTH SYSTEM
☐
OPERATION OF THE NAVIAGATION SYSTEM
☐
REVIEW AND TEAR OFF VOICE COMMAND / QUICK TIP CARD
☐
OPERATION OF THE AUDIO SYSTEM
 Loading...