

Page 1

ELECTRIC CHAINSAW
HYC1600E / HYC2400E
Instruction Manual
Page 2

Introduction
Thank You For Purchasing Your HYUNDAI Chainsaw
We work very hard to give all of our customers the best possible service.
If you have any problems, before leaving negative feedback, please contact
us to give us a chance to resolve the issue.
We would be delighted if you left us positive feedback!
Thank you for purchasing this product.
This manual has been produced by Hyundai Power Products and should be kept with the
product. Please read and understand these instructions before you use your product. Failure to
do this may result in personal injury or damage to the product.
The safety precautions and warnings are to ensure your safety and protect you from harm or
damage to the product.
The information contained in this manual was accurate at the time of production, however
HYUNDAI Power Products may make modifications to the product without notification.
GENPOWER LTD
Isaac Way, London Road,
Pembroke Dock, UNITED KINGDOM, SA72 4RW
T: +44 (0) 1646 687 880 F: +44 (0) 1646 686 198
www.hyundaipowerproducts.co.uk
Page 3

Contents
Symbols On The Machine..................................4
Safety Information.........................................5-14
Understand Your Machine........................5
Personal Safety......................................5-6
Inspect Your Machine...............................7
Work Area..............................................7-8
During Use................................................8
Noise.........................................................9
Service......................................................9
Intended Use.............................................9
Vibrations................................................10
Personal Protective Equipment...............11
Electrical Safety..................................12-13
Electrical Connections.............................13
Power Tool Use And Care.......................14
Chainsaw Safety Warnings................15-17
Kickback..................................................18
Features............................................................19
Unboxing...........................................................20
Assembly......................................................21-23
Filling With Oil.........................................21
Attaching The Chain Bar And Chain.......22
Chain Tension.........................................23
Adjusting The Chain Tension..................23
Starting / Stopping.....................................24-25
Before Each Use.....................................24
Connecting To Power..............................25
Starting....................................................25
Stopping..................................................25
Operating..........................................................26
The Chain Brake......................................26
Correct Use Of Chain Brake....................27
Testing The Brake....................................27
Using The Chainsaw........................................28
Holding The Chainsaw Correctly.............28
Working.......................................................29-34
Basic Cutting procedure....................29-30
Felling A Tree..........................................31
Notching Undercut..................................32
Felling Back Cut......................................32
Limbing And pruning...............................33
Cutting Spring Poles...............................33
Bucking A Log.........................................34
Maintenance And Care..............................35-38
Maintenance Safety.................................35
Bar Maintenance.....................................35
Other Maintenance..................................36
Cleaning...................................................36
Storage....................................................36
Transporting............................................37
Automatic Chain Lubrication...................37
New Chain Bar And Chain.......................37
Removing Existing Bar And Chain..........38
Fitting A New Bar And Chain...................38
Sharpening The Saw Chain.....................38
Specifications...................................................39
Spare Parts.......................................................40
Disposal.............................................................41
Our Product Range..........................................42
Useful Information...........................................43
Our YouTube Channel.............................43
Warranty..................................................43
Manual Updates......................................43
Returning Your Product...........................43
Ordering Spare Parts...............................43
Notes............................................................44-45
Contact Us........................................................46
Declaration Of Conformity..............................47
Page 4

Symbols On The Machine
Symbols On The Machine
We have provided safety messages in this manual and on the machine. This information alerts
you to potential hazards that could hurt you or others. Please read these messages carefully.
However, we may not have listed all of the possible hazards, you must also use your own
judgment.
CAUTION!
Handle carefully.
INSTRUCTION MANUAL
Read and understand operator’s manual before using the machine. Failure to
follow instructions could result in death or serious injury.
HEARING PROTECTION
Suitable safety hearing protection is recommended.
EYE PROTECTION
Always wear safety glasses/goggles and/or face shields. Everyday eyeglasses
have only impact resistant lenses; they are not safety glasses/goggles.
PROTECT FROM MOISTURE
Do not expose the product to rain or wet conditions.
DISCONNECT THE PLUG
Disconnect the plug from the mains immediately if the cable has been
damaged or cut.
WEEE SYMBOL
Waste electrical products should not be disposed of with household waste.
Please recycle where facilities exist. Check with your local authority or local
store for recycling advice.
PROTECTION CLASS II
Equipped with enhanced or double insulation.
4
CE SYMBOL
Double insulation. This product complies with the applicable European directives and an evaluation method of conformity for these directives was done.
GS MARK
Product has met the quality and safety requirements set forth in the German
product Safety Act.
Page 5

Safety Information
!
WARNING : READ THE INSTRUCTION BOOKLET THOROUGHLY BEFORE
USING THE MACHINE. Keep for future reference and pass it on if the machine
is loaned or sold to another user. In all warnings below, the term “power tool”
refers to you electric chainsaw.
!
Understand Your Machine
• WARNING! You must read these instructions carefully before operating the machine. Make
sure that you are familiar with the controls and properly operate the machine. You must learn how
to stop the machine quickly. If you do not follow the warnings and instructions, it may result in fire
and/or serious injury. Make sure to save all warnings and instructions for future reference.
• Read this manual and labels affixed to the machine to understand its limitations and potential
hazards.
• Be thoroughly familiar with the controls and their proper operation. Know how to stop the
machine and disengage the controls quickly.
• If the unit is to be used by someone other than original purchaser, or is to be loaned, rented, or
sold, always provide this manual and any needed safety training before operation. The user can
prevent and is responsible for accidents or injuries that may occur to themselves, to other
people, or to property.
• Do not force the machine beyond its limits. Use the correct machine for your application.
• Know how to stop the machine quickly in case of emergency. Understand the use of all
controls.
• ALL MAINTENANCE other than that listed in this manual, should be carried out by
professionally trained and certified personnel.
!
Personal Safety
• Stay Alert. Watch what you are doing and use common sense when operating a power tool.
Do not operate tool when you are tired or under the influence of drugs, alcohol or medication. A
moment of inattention while operating power tools may result in serious personal injury.
• Use Safety Equipment. Always wear eye protection. Safety equipment such as dust mask,
non-skid safety shoes, hard hat, or hearing protection used for appropriate conditions will reduce
personal injuries.
• Avoid Accidental Starting. Ensure the switch is in the off position before plugging in.
Carrying power tools with your finger on the switch or plugging in power tools that have the
switch on invites accidents.
5
Page 6

Safety Information
!
Personal Safety (Continued)
• Remove adjusting key or wrench before turning the power tool on. A wrench or a key left
attached to a rotating part of the power tool may result in personal injury.
• Do Not Overreach. Keep proper footing and balance at all times. This enables better control in
unexpected situations.
• If dust extraction and collection equipment can be installed, make sure they are connected and
used properly. Using a dust extractor can reduce dust hazards.
• WARNING! Never allow children or people unfamiliar with these instructions to use the
product. Local regulations can restrict the minimum age of the operator.
• Keep children, pets, and other people not using the unit away from the work area. Be alert and
shut off the unit if anyone enters work area. Keep children under the watchful care of a
responsible adult.
• Appropriate Personal Protective Equipment (PPE), MUST be worn at all times when operating
or repairing the machine. Always wear anti-slip and resistant work footwear and long trousers
while using the machine. Do not use the machine when barefoot, wearing sandals or similar
lightweight footwear. Do not wear chains, bracelets or clothing that is loose fitting or hanging
ties or cords. Tie long hair back. Always wear protective earplugs. Loose clothes, jewellery, or
long hair can be caught in moving parts. Protect eyes, face, and head from objects that may be
thrown from the unit. Always wear safety goggles or safety glasses with side shields when
operating.
• Always keep hands and feet away from all moving parts during operation. Moving parts can cut
or crush body parts. • Always keep hands and feet away from all pinch points.
• Do not touch parts that might be hot from operation. Allow parts to cool before attempting to
maintain, adjust, or service.
• Do not overreach. Keep proper footing and balance at all times. This enables better control of
the machine in unexpected situations. Extending your body too far can result in a loss of balance
and you may fall which will result in injury.
• Never place any part of your body where it would be in danger if movement should occur
during assembly, installation, and operation, maintenance, repairing or moving.
• Start the machine carefully according to instructions and with feet away from the moving parts.
• Keep in mind that the operator or user is responsible for accidents, hazards or unexpected
events involving the machine that occur to other people or their property. It is the responsibility of
the user to assess the potential risk of the area where work is being carried out. The operator or
user must take all necessary precautions to ensure their own safety and that of others, especially
on slopes or rough, slippery and unstable ground.
6
Page 7

Safety Information
!
Inspect Your Machine
• Check your machine before starting it. Keep guards in place and in working order. Make sure all
nuts, bolts, etc., are securely tightened.
• You must check the general condition of the machine before use.
• Never operate the machine when it is in need of repair or is in poor mechanical condition.
Replace damaged, missing, or failed parts before using it. Check for fuel leaks. Keep the machine
in safe working condition.
• Do not use the machine if the machine’s switch does not turn off when running.
• Avoid accidental starting. Be sure the switch is off before transporting the machine or
performing any maintenance or service on the unit. Transporting or performing maintenance or
service on a machine with its switch on invites accidents.
• If the machine should start to vibrate abnormally, stop the machine and check immediately for
the cause. Vibration is generally a warning sign of trouble.
• Do not tamper with or disable safety systems.
• Only use manufacturer-recommended attachments.
• Before using, always visually inspect to see that the tools are not worn out or damaged.
Replace worn out or damaged elements and bolts.
• Keep the machine in good operating condition. Operating a machine in poor or questionable
condition could result in serious injury.
• Be sure all safety devices are in working order and warning labels are in place. These items are
installed for your safety.
!
Work Area
• Make sure to keep your work area clean and tidy and well lit. Messy and dark areas lead to
accidents. You must only work in daylight or with good artificial light in good visibility conditions.
Keep people, children and animals away from the working area. Distractions can cause you to
lose control.
• Never operate power tools in explosive atmospheres, such as in the presence of flammable
liquids, gases or dust. Power tools create sparks which may ignite the dust or fumes.
• Keep children and bystanders away while operating a power tool. Distractions can cause you to
lose control.
• Make sure you thoroughly inspect the entire work area and remove all objects and anything
that could be a trip hazard. Any liquid spilled on the floor may result in you slipping.
7
Page 8

Safety Information
!
Work Area (Continued)
• Use the unit in dry conditions only. Protect it from rain and moisture. If there has been heavy
rain on the working site, wait until the ground has dried up.
• Never place the machine in a place with unstable ground which could give way.
• You must be careful near ravines, ditches or embankments.
• Exercise extreme caution when operating on or crossing gravel drives, walks, or roads. Stay
alert for hidden hazards or traffic.
• Do not work in the rain or when there is a thunderstorm or lightning risk. If there is bad weather
conditions, do not use the machine.
• Do not operate power tools in explosive atmospheres, such as in the presence of flammable
liquids, gases or dust. Power tools create sparks which may ignite the dust or fumes.
!
During Use
• Always hold the unit with both hands when operating. Keep a firm grip on the handlebars.
• Walk, never run with the machine.
• Do not operate the machine in confined areas where there may be a risk of crushing the
operator between the machine and another object.
• WARNING! If something breaks or an accident happens whilst working, you must turn off the
machine immediately and move the machine away to prevent further damage. If an accident
happens with injuries or third parties are injured, carry out the first aid measures most suitable for
the situation immediately and contact the medical authorities for any necessary health care.
Carefully remove any debris that might cause damage or harm persons or animals should it not
be seen.
• The excessive speed of movement or the absence of maintenance have a significant influence
on noise emissions and vibrations. It is necessary to take preventive steps to eliminate possible
damage due to high levels of noise and stress from vibration. You must maintain the machine
well, wear ear protection and take breaks from working.
• You must turn the machine off (making sure that all moving parts are stationary):
- Before checking or working on the machine.
- When lifting or transporting the machine.
- Whenever you leave the machine unattended.
- If the unit starts vibrating excessively.
• Do not switch on the unit if there are persons (particularly children) or animals in the immediate
vicinity. Ensure that children do not play with the unit. Stop working if you notice that persons
(particularly children) or pets are nearby. When stopping work, never leave the unit unattended
and keep it in a safe place.
8
Page 9

Safety Information
!
Noise (Where Applicable)
• The operating noise of the machine can damage your hearing. Wear hearing protection such
as earplugs or ear defenders to protect your hearing. Long-term and regular users are advised to
have hearing checked regularly. Be especially vigilant and cautious when wearing ear protection
because your ability to hear alarm warnings will be reduced.
• Noise emissions for this equipment is unavoidable. Carry out noisy work at approved times and
for certain periods. Limit the working time to a minimum. For your personal protection and
protection of people working nearby it is also advisable for them to wear hearing protection.
!
Service
1. Make sure your power tool serviced by a qualified repair person using only identical
replacement parts. This will ensure that the safety of the power tool is maintained.
2. Do not remove or modify any safety components as this may result in damage to your machine
or serious personal injury.
!
Intended Use
The HYC1600E / HYC2400E is an electric chainsaw from HYUNDAI.
The product is only intended for sawing wood for domestic purposes. The saw is not designed
for cutting any other material.
The chainsaw is manufactured according to the latest safety requirements. Every precaution is
only effective when it is followed exactly.
9
Page 10

Safety Information
!
Vibrations (Where Applicable)
• Prolonged use of hand held (operated) machines will cause the user to feel the effects of/from
vibrations. These vibrations can lead to white finger (Raynaud’s phenomenon) or carpal tunnel
syndrome. This condition reduces the ability of the hand to feel and regulate temperature,
causing numbness and heat sensations and may cause nerve damage and circulatory tissue
death.
• Not all factors that lead to white finger disease are known, but cold weather, smoking and other
diseases that affect blood vessels and blood circulation as well as large and long-lasting impact
of shocks are considered factors in the formation of white finger. Note the following to reduce the
risk of white finger and carpal tunnel syndrome;
• Wear gloves and keep your hands warm.
• Take regular breaks.
• All of the above precautions may help reduce the risk of white finger disease but not rule out
the carpal tunnel syndrome. Long-term and regular users are therefore recommended to observe
the condition of your hands and fingers. Seek medical attention immediately if any of the above
symptoms should occur.
!
Effects Of Vibration
Vibration white finger (VWF) is an injury triggered by continuous use of vibrating hand-held
machinery. If you continue to use high-vibration tools these symptoms will probably get worse, for
example:
• The numbness in your hands could become permanent and you won’t be able to feel things at all;
• You will have difficulty picking up small objects such as screws or nails;
• Vibration White Finger (VWF) could happen more frequently and affect more of your fingers.
!
Protecting Your Body From Vibration
Please observe the following matter, in order to protect the health of your body.
• Always use the right tool for each job (to do the job more quickly and expose you to less
hand-arm vibration).
• Check tools before using them to make sure they have been properly maintained and
repaired to avoid increased vibration caused by faults or general wear.
• Make sure cutting tools are kept sharp so that they remain efficient.
• Reduce the amount of time you use a tool in one go, by doing other jobs in between.
• Avoid gripping or forcing a tool or workpiece more than you have to.
• Store tools so that they do not have very cold handles when next used.
10
Page 11
Safety Information
!
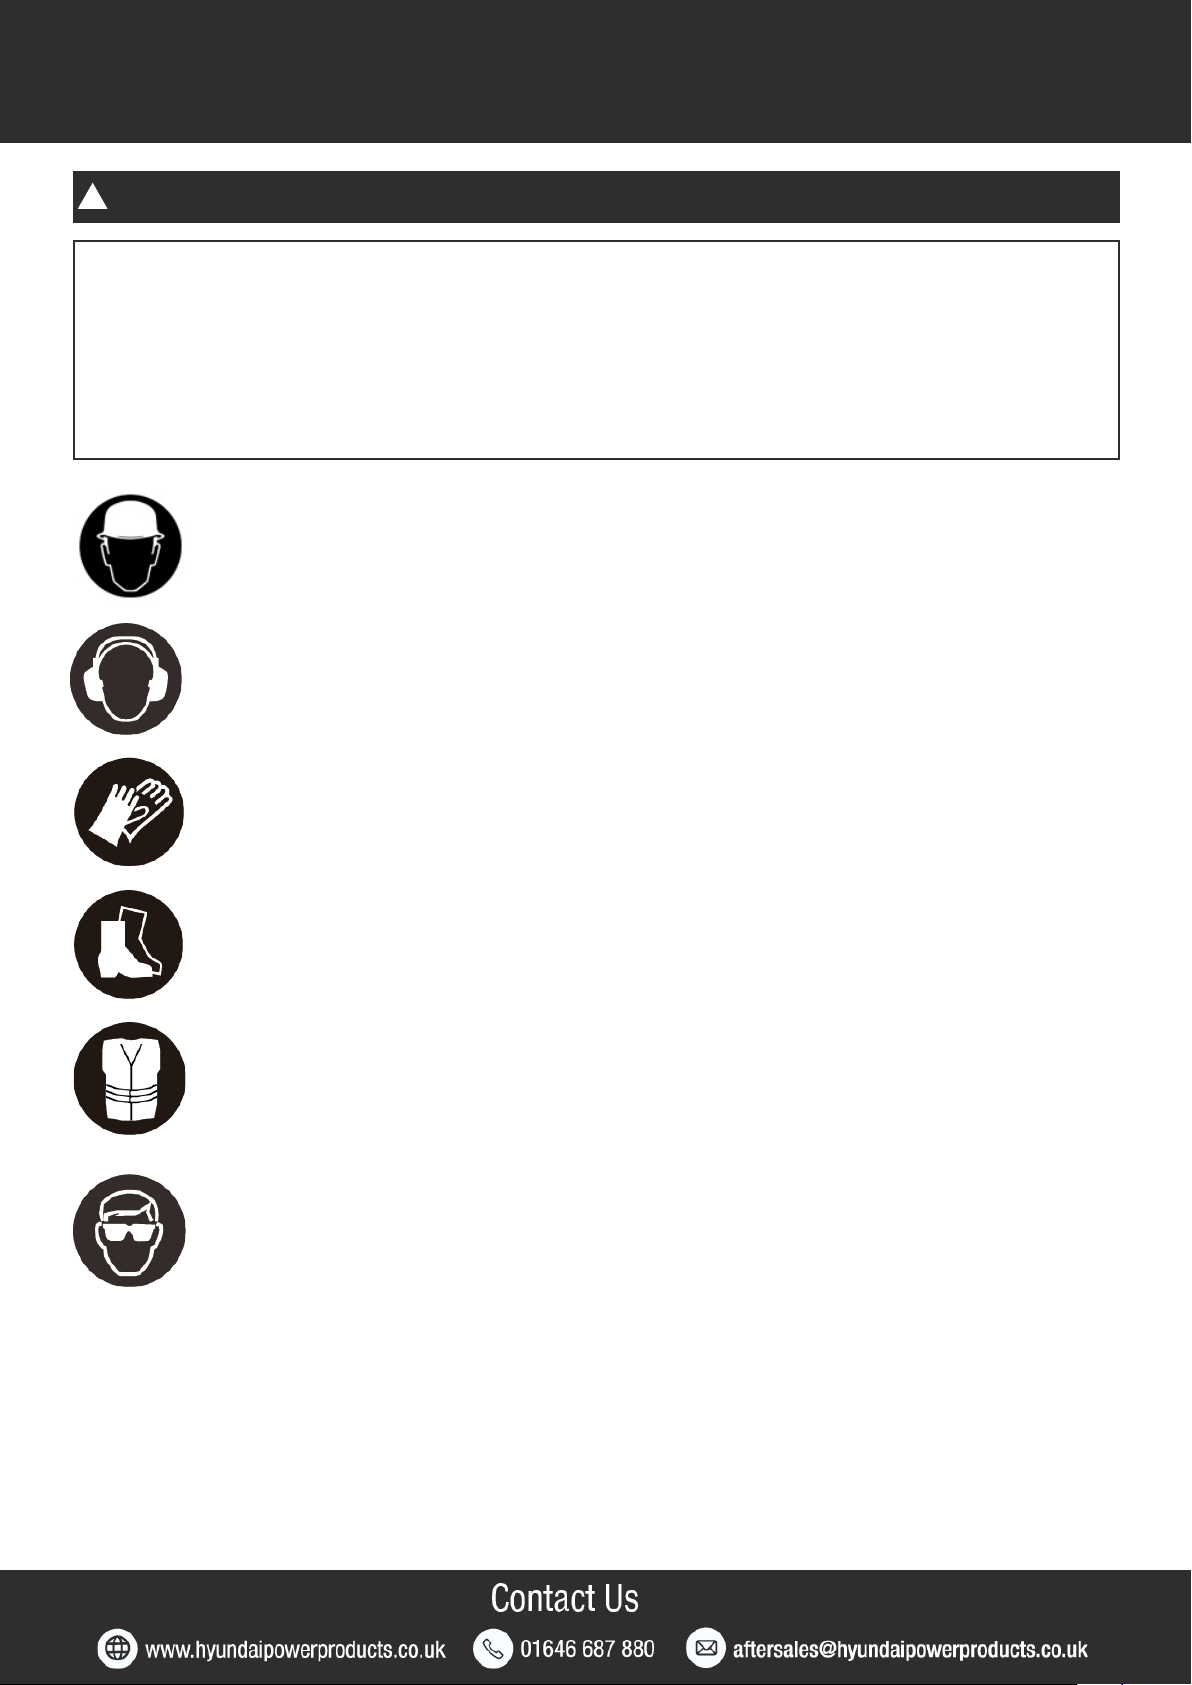
Clothing And Personal Protective Equipment (PPE)
Appropriate Personal Protective Equipment (PPE), MUST be worn at all times when
operating or repairing the machine. No protective equipment can ensure 100%
protection.
When selecting PPE, make sure it’s CE marked and it suits the user in terms of size, fit etc. If
more than one item of PPE is worn at the same time, make sure they can be used together, e.g.
wearing safety glasses may disturb the seal of a respirator, causing air leaks.
HELMET
Safety helmet with mesh visor.
HEARING PROTECTION
Suitable safety hearing protection is recommended.
GLOVES
Protective electrically non-conductive gloves are highly recommended when working.
Specialist chainsaw gloves with approved saw protection.
BOOTS
Non-skid heavy duty footwear are highly recommended when working. Safety boots
with toe and shin protection.
CLOTHING
Do not wear loose clothing, gloves, scarfs, neckties or jewellery (rings, wrist watches),
which can be caught in moving parts. Trousers or chaps suitable for chainsaw use
(they contain a clogging material which stops the chain if cut). Close fitting hi-visibility
jacket. Do secure long hair so that it is above shoulder level.
EYE PROTECTION
Always wear safety glasses/goggles and/or face shields. Everyday eyeglasses have
only impact resistant lenses; they are not safety glasses/goggles.
11
Page 12

Safety Information
!
Electrical Safety
DANGER!
ELECTRICITY CAN KILL - NEVER WORK ON LIVE/ENERGISED EQUIPMENT.
• Prior to carrying out any maintenance work you MUST identify electrical isolation methods and
isolate all electrical supplies.
• Prior to use and with all electrical supplies isolated, you MUST check all electrical cables, plugs
and connectors for the following;
- Are intact and have no signs of damage, to include but not limited to bare wires, chaffing, cuts
and loose wiring.
- If there are any signs of damage, the damaged item MUST be taken out of service until the
damage has been repaired by an electrically competent person.
• All trailing cables should be routed so as not to cause any kind of trip hazard.
• NEVER work on or near electricity with wet hands, wet clothing and wet gloves.
• Power tool plugs must match the outlet. Never modify the plug in any way. Do not use any
adapter plugs with earthed (grounded) power tools. Unmodified plugs and matching outlets will
reduce risk of electric shock.
• Avoid body contact with earthed or grounded surfaces, such as pipes, radiators, ranges and
refrigerators. There is an increased risk of electric shock if your body is earthed or grounded.
• Do not expose power tools to rain or wet conditions. Water entering a power tool will increase
the risk of electric shock.
• Do not abuse the cord. Never use the cord for carrying, pulling or unplugging the power tool.
Keep cord away from heat, oil, sharp edges and moving parts. Damaged or entangled cords
increase the risk of electric shock.
• When operating a power tool outdoors, use an extension cord suitable for outdoor use. Use of
a cord suitable for outdoor use reduces the risk of electric shock.
• If operating a power tool in a damp location is unavoidable, use a residual current device (RCD)
protected supply. Use of an RCD reduces the risk of electric shock.
• You must avoid body contact with earthed or grounded surfaces such as pipes, radiators,
ranges or refrigerators. There is an increased risk of electric shock if your body is earthed or
grounded.
• Never expose power tools to rain or wet conditions. Water entering a power tool will increase
the risk of electric shock.
12
Page 13
Safety Information
!
Electrical Safety (Continued)
• When operating a power tool outdoors, use an extension cord suitable for outdoor use. Use of
a cord suitable for outdoor use reduces the risk of electric shock.
• Use outdoor extension leads. If working outdoors, always use an approved cable extension
suitable for the power rating of this tool, the conductor size should also be at least the same size
as that on the machine, or larger. When using a cable reel, always unwind the cable completely.
We strongly recommend that this machine is connected to the mains supply via a Residual
Current Device (RCD).
• Do not use the cord to carry the power tool, hang it up or pull it out of the socket. Keep the
cable away from heat, oil, sharp edges or moving parts of the equipment. Damaged or entangled
cables increase the risk of electric shock.
• The plug of the power tool must fit into the socket. The plug must not be changed in any way.
Do not use adapter plugs together with electrically grounded power tools. Unmodified plugs and
matching sockets reduce the risk of electric shock.
!
Electrical Connections
WARNING! You must read these electrical safety instructions thoroughly before
!
connecting the product to the mains supply.
The fuse in the plug must be rated at 13 amps and approved to BS1362. We recommend that
this machine is connected to the mains supply via a Residual Current Device (RCD). If in any
doubt, DO NOT attempt any connections or repairs yourself. Consult a qualified electrician, or
contact Genpower Ltd.
We strongly recommend that this machine is connected to the mains supply via a
Residual Current Device (RCD).
If in any doubt, consult a qualified electrician. DO NOT attempt any repairs yourself.
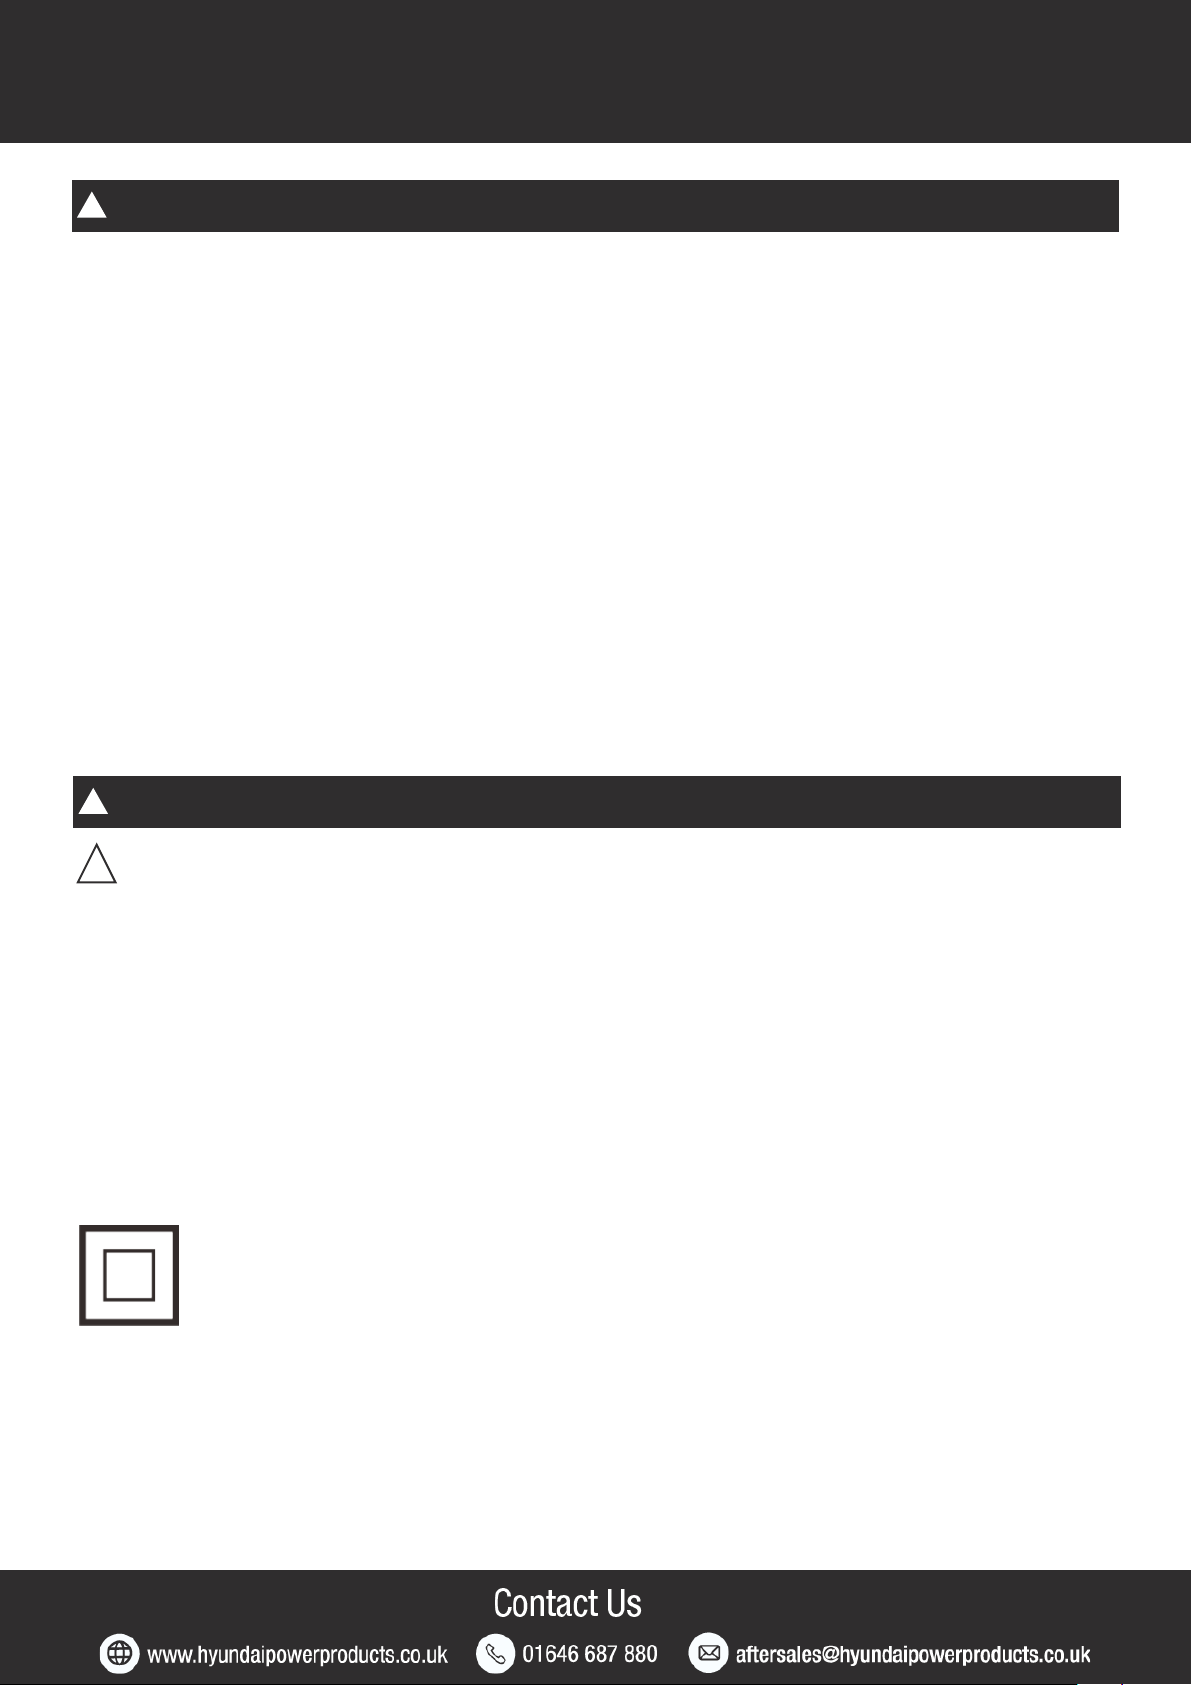
This symbol indicates that this is a Class II product, and does not require an
earth connection.
13
Page 14

Safety Information
!
Power Tool Use And Care
• Do Not Force The Tool. Use the correct power tool for your application. The correct power
tools will do the job better and safer at the rate for which it was designed.
• Do Not use the power tool if the switch does not turn it on and off. Any power tool that cannot
be controlled with the switch is dangerous and must be repaired.
• Disconnect the plug from the power source before making any adjustments, changing
accessories, or storing power tools. Such preventive safety measures reduce the risk of starting
the power tool accidentally.
• Store idle power tools out of the reach of children and do not allow persons unfamiliar with
the power tool or these instructions to operate the power tool. Power tools are dangerous in the
hands of untrained users.
• Maintain power tools, check for misalignment or binding of moving parts, breakage of parts and
any other condition that may affect the power tools operation. If damaged, have the power tool
repaired before use. Many accidents are caused by poorly maintained power tools.
• Use the power tool, accessories and tool bits etc., in accordance with these instructions and in
the manner intended for particular type of power tool, taking into account the working
conditions and the work to be performed. Use of the power tool for operations different from
intended could result in a hazardous situation.
• Before use check the supply and extension cord for signs for signs of damage or aging.
• If the cord becomes damaged during use, disconnect the cord from the supply immediately.
• WARNING: Cutting elements continue to rotate after the motor is switched off.
• Check plug and cable for damage before inserting the plug into the socket. If damaged, have
it replaces by a specialist immediately. Damaged cables and plugs or connection cables that do
not comply with the regulations must not be used.
• Only insert the plug into the socket when the machine is switched off.
14
Page 15

Safety Information
!
Chainsaw Safety Warnings
• You must keep all parts of the body away from the chain when the chainsaw is operating.
Before you start the chainsaw, make sure the chain is not contacting anything. A moment of
inattention while operating chainsaws may cause entanglement of your clothing or body with the
saw chain.
• Always hold the chainsaw with your right hand on the rear handle and your left hand on the
front handle. Holding the chainsaw with a reversed hand configuration increases the risk of
personal injury and should never be done.
• Hold the power tool by insulated gripping surfaces only, because the saw chain may contact
hidden wiring or its own cord. Saw chains contacting a “live” wire may make exposed metal parts
of the power tool “live” and could give the operator an electric shock.
• Wear safety glasses and hearing protection. Further protective equipment for head, hands, legs
and feet is recommended. Adequate protective clothing will reduce personal injury by flying
debris or accidental contact with the saw chain.
• Do not operate a chainsaw in a tree. Operation of a chainsaw while up in a tree may result in
personal injury.
• Always keep proper footing and operate the chainsaw only when standing on a fixed, secure
and level surface. Slippery or unstable surfaces such as ladders may cause a loss of balance or
control of the chainsaw.
• When cutting a branch that is under tension be alert for spring back. When the tension in the
wood fibres is released the spring loaded limb may strike the operator and/or throw the chainsaw
out of control.
• Use extreme caution when cutting bush and saplings. The slender material may catch the saw
chain and be whipped toward you or pull you off balance.
• Carry the chainsaw by the front handle with the chainsaw switched off and away from your
body. When transporting or storing the chainsaw always fit the guide bar cover. Proper handling
of the chainsaw will reduce the likelihood of accidental contact with the moving saw chain.
• Follow instructions for lubricating, chain tensioning and changing accessories. Improperly
tensioned or lubricated chain may either break or increase the chance for kick-back.
• Keep handles dry, clean and free from oil and grease. Greasy, oily handles are slippery causing
loss of control.
• Cut wood only. Do not use chainsaw for purposes not intended. For example: do not use
chainsaw for cutting plastic, masonry or non-wood building materials. Use of the chainsaw for
operations different than intended could result in a hazardous situation.
15
Page 16

Safety Information
!
Chainsaw Safety Warnings (Continued)
• Never operate a chain saw when you are fatigued, ill, or upset, or under the influence of
medication that may make you drowsy, or if you are under the influence of alcohol or drugs - risk
of accident!
• Cut wood only. Do not use chainsaw for purposes not intended. For example: do not use
chainsaw for cutting plastic, masonry or non-wood building materials. Use of the chainsaw for
operations different than intended could result in a hazardous situation.
• Never operate a chain saw when you are fatigued, ill, or upset, or under the influence of
medication that may make you drowsy, or if you are under the influence of alcohol or drugs - risk
of accident!
• Do not allow other persons to be near the chain saw when starting or cutting. Keep bystanders
and animals out of the work area. Children, pets and bystanders should be a minimum of 10m
away when you start or operate the chainsaw - risk of accident!
• Never start cutting until you have a clear work area, secure footing, and a planned retreat path
from the falling tree - risk of accident!
• Never allow children to use the machine.
• The chainsaw has been specially designed for tree maintenance and should only be used by
trained operators.
• Always inspect the chainsaw before use for worn, loose or damaged parts.
• Do not let anyone near the chainsaw when starting or cutting. Keep everyone, especially
children, away from the work area.
• Do not start cutting until you have a clear cutting area and a secure footing.
• Never cut trees or foliage in high wind, bad weather or when there is poor visibility.
• Do not operate the chainsaw with one hand. Always hold the chainsaw firmly with both hands.
• Be alert for the phenomena of “skating” and “bouncing”.
• Be cautious not to lose balance of your body due to “drop” at the end of a cut.
• Always turn the chainsaw off before putting it down.
• Switch off the chainsaw before releasing the chain brake.
• The saw must be free when starting up.
16
Page 17

Safety Information
• The chainsaw must only be operated by one person. Other persons are forbidden to stay in the
swivelling range of the chainsaw. Pay special attention to children and pets.
• Children and adolescents are not allowed to operate the chainsaw. If you pass this chainsaw on
to anybody else, you must give them the instruction manual.
• First time users should practise cutting logs on a saw horse or stand.
• Working with the chainsaw is only allowed if you are well-rested and healthy, e.g. in good
physically condition. Take regular breaks. You must not operate the chainsaw after drinking
alcohol.
• Pull the chainsaw out of the wood with only a running saw chain.
• Do not work whilst on a ladder, in a tree or similar unstable locations.
• Mains cable should always be routed from behind the operator and away from the machine.
• If replacement of the cable is required, this must be done by the manufacturer to avoid any
safety hazards.
• When sawing thin wood, use a safe support (saw horse). The wood should not be stacked and
should not be held by anyone else or by your foot.
• Round logs are to be secured.
• The chain saw can be pushed toward the operator when cutting with the top of the rail when the
saw chain gets stuck. Therefore, if possible, sawing should be done with the underside of the rail,
as the saw is pulled away from the body towards the wood.
• Be careful when cutting splintered wood. Saw cut pieces of wood can be carried along.
• Do not use the chainsaw for lifting and scooping when removing pieces of wood or other.
• This chainsaw is not suitable for forestry work i.e. felling and de-foresting. The necessary
mobility and safety of the saw guide is not guaranteed here by the cable connection.
• Even if you operate the power tool correctly, residual risks always remain. The following hazards
may occur in connection with the design and construction of this power tool:
- Injuries and property damage caused by flying parts.
- Ear damage if you do not wear suitable hearing protection or use the power tool for a long
period of time.
- Health damage resulting from hand-arm vibrations if the power tool is used for an extended
period of time or is not properly managed and maintained.
17
Page 18

Safety Information
!
Causes And Prevention Of Kickback
Kick-back may occur when the nose or tip of the guide bar touches an object, or when the wood
closes in and pinches the saw chain in the cut.
Tip contact in some cases may cause a sudden reverse reaction, kicking the guide bar up and
back towards the operator. Pinching the saw chain along the top of the guide bar may push the
guide bar rapidly back towards the operator. Either of these reactions may cause you to lose
control of the saw which could result in serious personal injury. Do not rely exclusively upon the
safety devices built into your saw. As a chainsaw user, you should take several steps to keep
your cutting jobs free from accident or injury.
Kick-back is the result of tool misuse and/or incorrect operating procedures or conditions and
can be avoided by taking proper precautions as given below:
Maintain a firm grip, with thumbs and fingers encircling the chainsaw handles with both hands
1
on the saw and position your body and arm to allow you to resist kick- back forces. Kick-back
forces can be controlled by the operator, if proper precautions are taken. Do not let go of the
chainsaw.
Do not overreach and do not cut above shoulder height. This helps prevent unintended tip
2
contact and enables better control of the chainsaw in unexpected situations.
Only use replacement bars and chains specified by the manufacturer. Incorrect replacement
3
bars and chains may cause chain breakage and/or kick-back.
Follow the manufacturer’s sharpening and maintenance instructions for the saw chain.
4
Decreasing the depth gauge height can lead to increased kick-back.
Do not rely exclusively on the safety devices built into your saw.
5
When the chainsaw fails to dig in during a cut, the guide bar can begin hopping or
6
dangerously skidding along the surface of the log or branch, possibly resulting in the loss of
control of the chainsaw. To prevent or reduce skating or bouncing, hold the chainsaw with two
hands and make sure the saw chain establishes a groove for cutting.
You cannot control reactive forces and you may lose control of the saw, which can result in
7
skating and bouncing of the bar along the limb or log.
Work cautiously and methodically.
8
Do not cut above shoulder height and do not lean too far forward.
9
10
11
12
18
Always cut with a correctly sharpened, properly tensioned saw chain – the depth gauge setting
must not be too large.
Be alert for shifting of the log or other forces that may cause the cut to close and pinch the
chain.
Use extreme caution when re-entering a previous cut.
Page 19

Features
1 - Rear Handle
2 - On/Off Switch
3 - Oil Filler Cap
4 - Front Handle
5 - Chain Brake
6 - Cable Sheath
7 - Cable Hook
8 - Oil Level Indicator
9 - Chain Adjuster
10 - Chain
11 - Chain Guide Bar
19
Page 20
Unboxing
Unboxing Safety
!
WARNING! Unboxing and assembling the machine should be done on a flat, stable surface
with enough room. Disposal of the packaging should be done in accordance with the local
regulations in force.
Carefully remove the product from the packaging and examine it for any sign of damage caused
during shipping. Lay the contents out and check them. If any part is damaged or missing, you
must not use the machine. Contact HYUNDAI Power Products immediately. You must keep the
packaging material in case the machine needs to be returned or repaired.
!
WARNING! Some of the packaging material may be harmful to children. Keep out of reach of
children.
!
NOTE! The batteries are not fully charged on delivery. Prior to initial operation, charge the
batteries fully. See user manual of the battery charger.
Box Contents
• HYC1600E / HYC2400E Chainsaw
• Guide Bar
• Saw Chain
• Bar Cover
• User Manual
20
Page 21
Assembly
Assembly Safety
WARNING - Make sure that you have read and understood all the safety warnings
!
before continuing with the assembly.
!
WARNING - Make sure that the chainsaw is disconnected from the mains supply during
all checks and adjustments.
CAUTION - This guide is meant to serve as a quick reference for operating your HYUNDAI
!
machine. We always advise reading the manual in full before operation.
!
NOTE - Images may vary depending on model.
!
NOTE - The machine can be supplied with some parts already assembled. Prior to
assembly, check all items have been received.
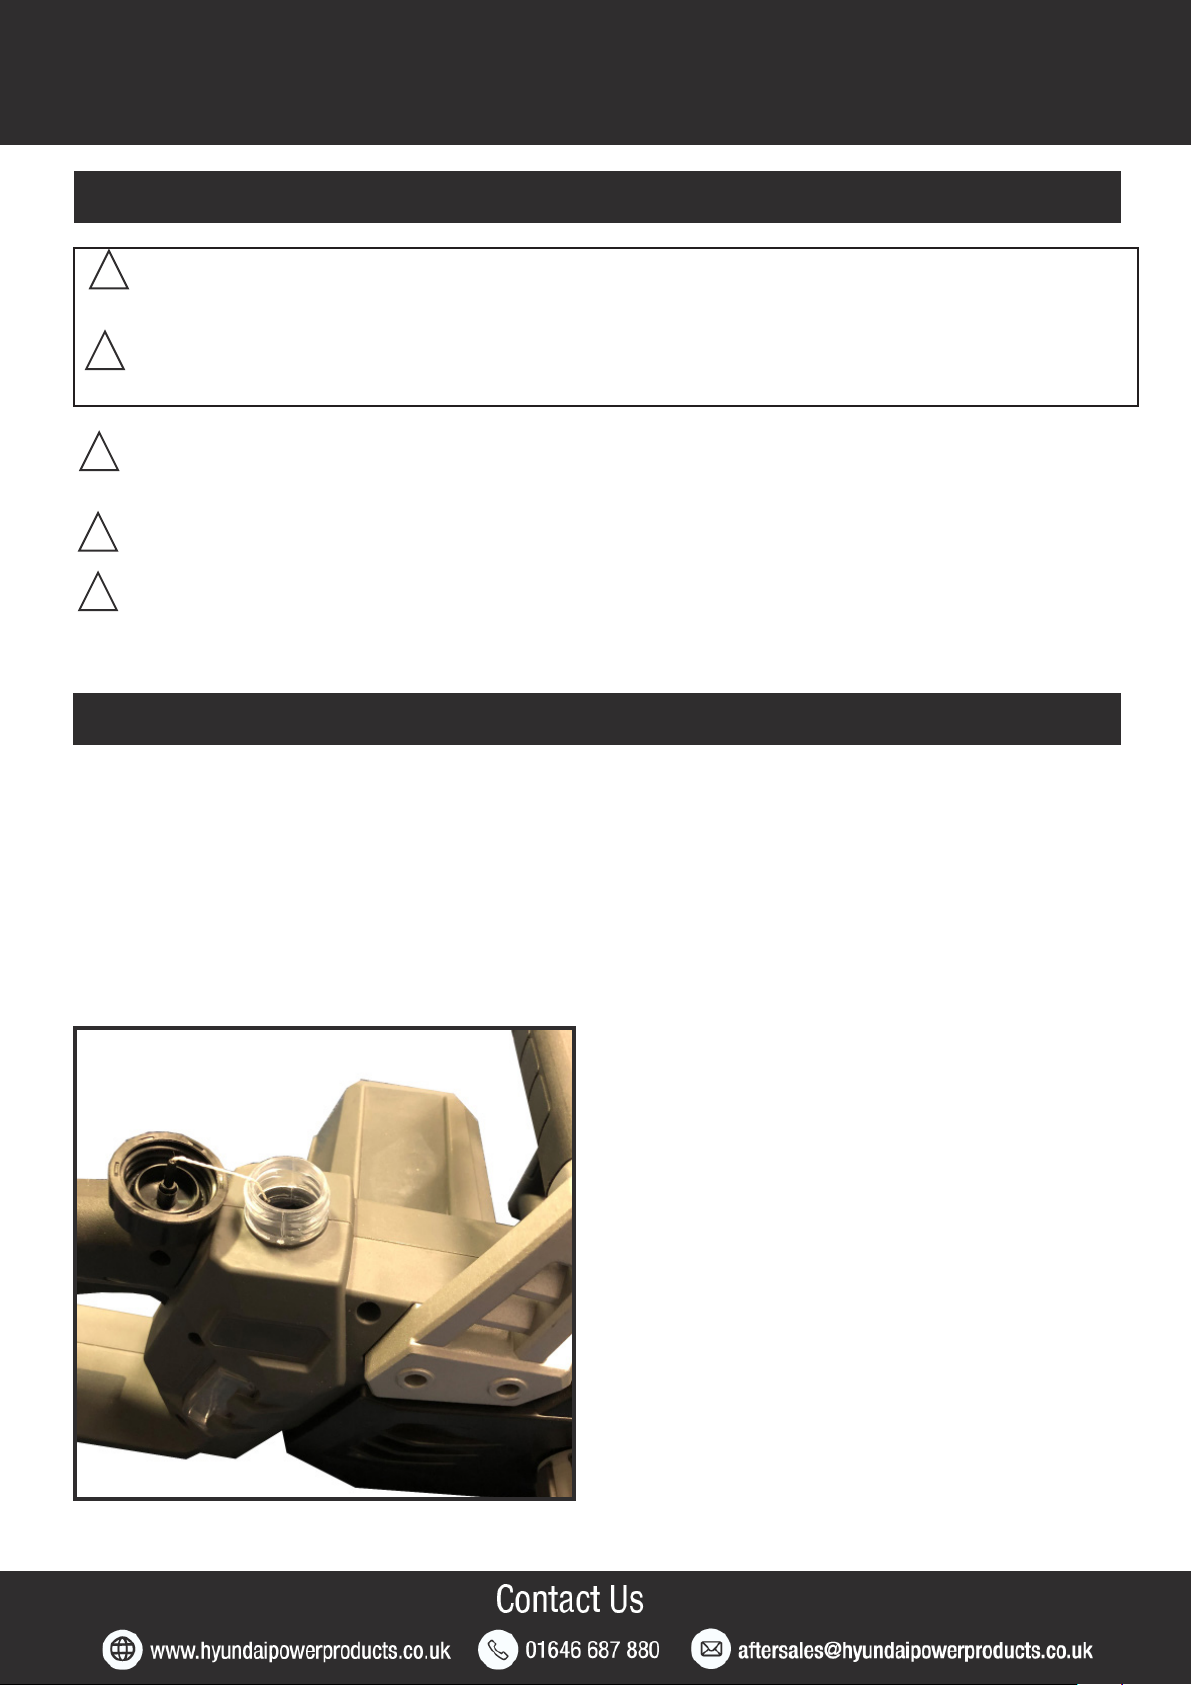
Filing With Oil
1. Place the chainsaw on a stable and flat surface.
2. Unscrew and remove the oil filler cap.
3. Fill the oil tank with chainsaw oil using a funnel.
4. Refit the oil filler cap. Wipe up any spillage before continuing. The oil level should be checked
frequently during use and topped up as necessary. Using the saw without chainsaw oil will
damage the chain, sprocket and bar.
NOTE - The machine is delivered without oil in the machine. All machines are tested and
inspected so there may be some residual oil left in the machine so please fill with caution.
21
Page 22
Assembly
Attaching The Chain Bar And Chain
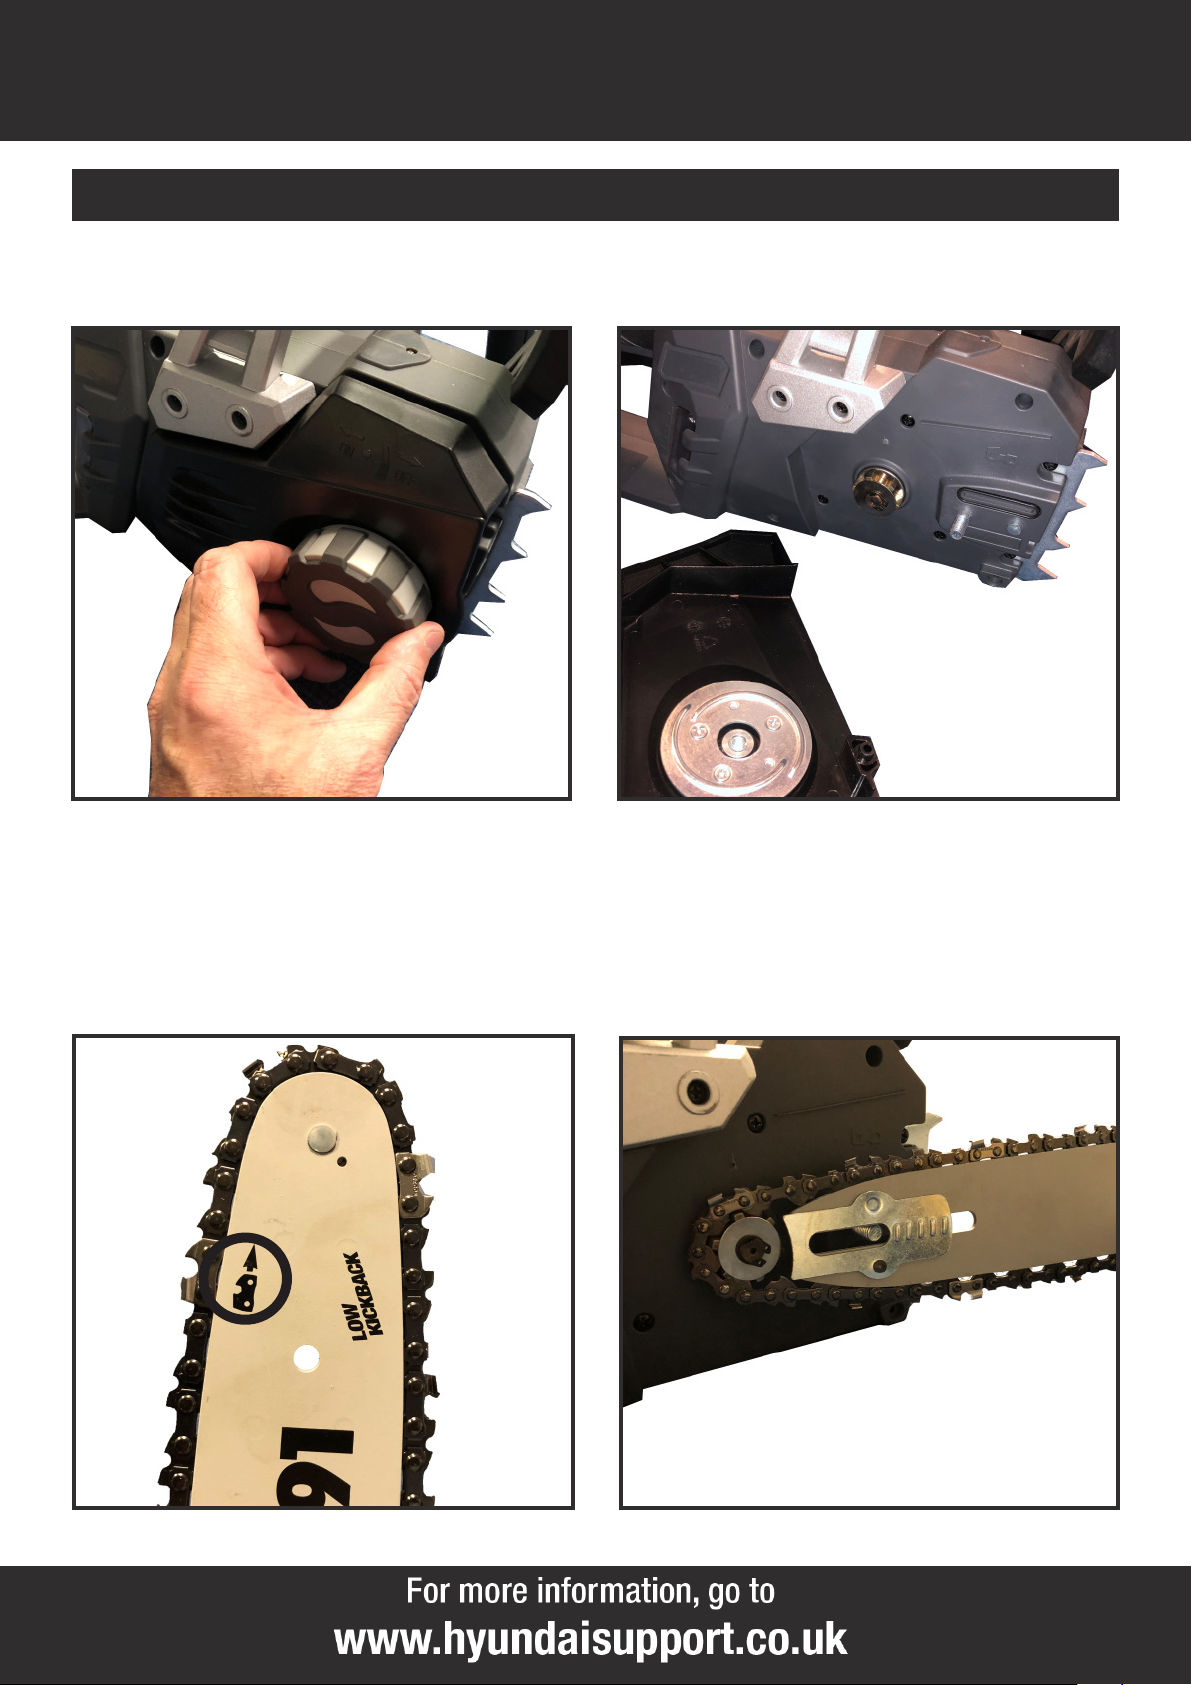
1. Place the chainsaw on a stable and flat surface. Unplug the chainsaw from electric supply.
2. Loosen the large adjusting knob by turning anticlockwise and remove the cover.
3. Place the chain onto the bar. The chain bar is marked with an arrow that shows you the
direction in which the chain will travel. Make sure all the chain links are seated correctly into the
groove in the chain bar. The cutting teeth on the upper side of the bar must point forward, as
marked on the bar.
4. Put the free end of the chain over the drive sprocket. To secure the bar, replace the cover and
tighten the large adjusting knob finger tight. Adjust the blade tension as follows.
22
Page 23

Assembly
Chain Tension
Correct chain tension is extremely important and must always be checked before starting work.
When using the chainsaw for the first time (or after replacing the chain) the tension should be
checked regularly, as a new chain will stretch after several cuts.
If the chain is too loose or too tight, the sprocket, bar and chain will wear more rapidly. The
tension should be sufficient to keep the chain snug on the bar, but loose enough to allow the
chain to be pulled around by a gloved hand. Taking time to adjust the chain tension correctly will
result in improved cutting performance and prolonged chain life.
To Adjust The Chain Tension
WARNING! Always wear protective gloves, when adjusting the chain tension and never
check the chain tension when the chainsaw is connected to the mains supply.
1. Unplug from mains electric supply. Tighten the large adjuster knob clockwise one and a half
turns.
2. When the chain needs re-tensioning, loosen the large adjuster knob two to three turns until the
tension on the bar is released, then tighten clockwise until tension is is applied to the bar, then a
further one and a half turns.
3. Pull the chain gently downwards at the centre of the bar. The chain is correctly adjusted when
gentle pulling only results in it moving 2-3 mm away from the chain bar.
4. Finally, with chain brake pulled back, push in the trigger lock and squeeze the trigger, whilst
holding thetrigger, pull the chain around the bar with a gloved hand - it should fit snugly around
the bar and move freely and smoothly.
NOTE: If the chain binds or is difficult to rotate by hand, too much tension has been
applied. Repeat steps 2 to 6, turning the blade tensioning wheel anticlockwise slightly to
reduce the tension.
23
Page 24

Starting / Stopping
Before Each Use
WARNING! Do not start the chainsaw until it is fully assembled and adjusted and you have
read all warnings and safety instructions.
For ‘first time’ users of this type of product, we recommend that introductory training is
undertaken from an experienced person before use.
Check the following points before each use to work safely:
Condition Of The Chainsaw
Examine the chainsaw for damage to the chassis, power cord, saw chain, and blade before
beginning work. Never put an obviously damaged device into operation.
Oil Container
Check the level of the oil tank. Also check during work that there is always enough oil. Never
operate the saw when there is no oil or the oil level has dropped below the minimum mark.
Saw Chain
Check the tension of the saw chain and the state of the saw chain. The sharper the chain, the
easier and more controllable the chainsaw can handle. A dull chain will increase cutting time,
and pressing a dull chain through wood will increase the vibrations transmitted to your hands.
A saw with loose components or with damaged or worn AV bushes will also tend to have higher
vibration levels. You must check the chain tension every 15 minutes during work to increase your
safety. Especially new chains, which are prone to increased expansion.
Chain Brake
Check the chain brake function as described on page 26-27.
24
Page 25
Starting / Stopping
Connecting To Power
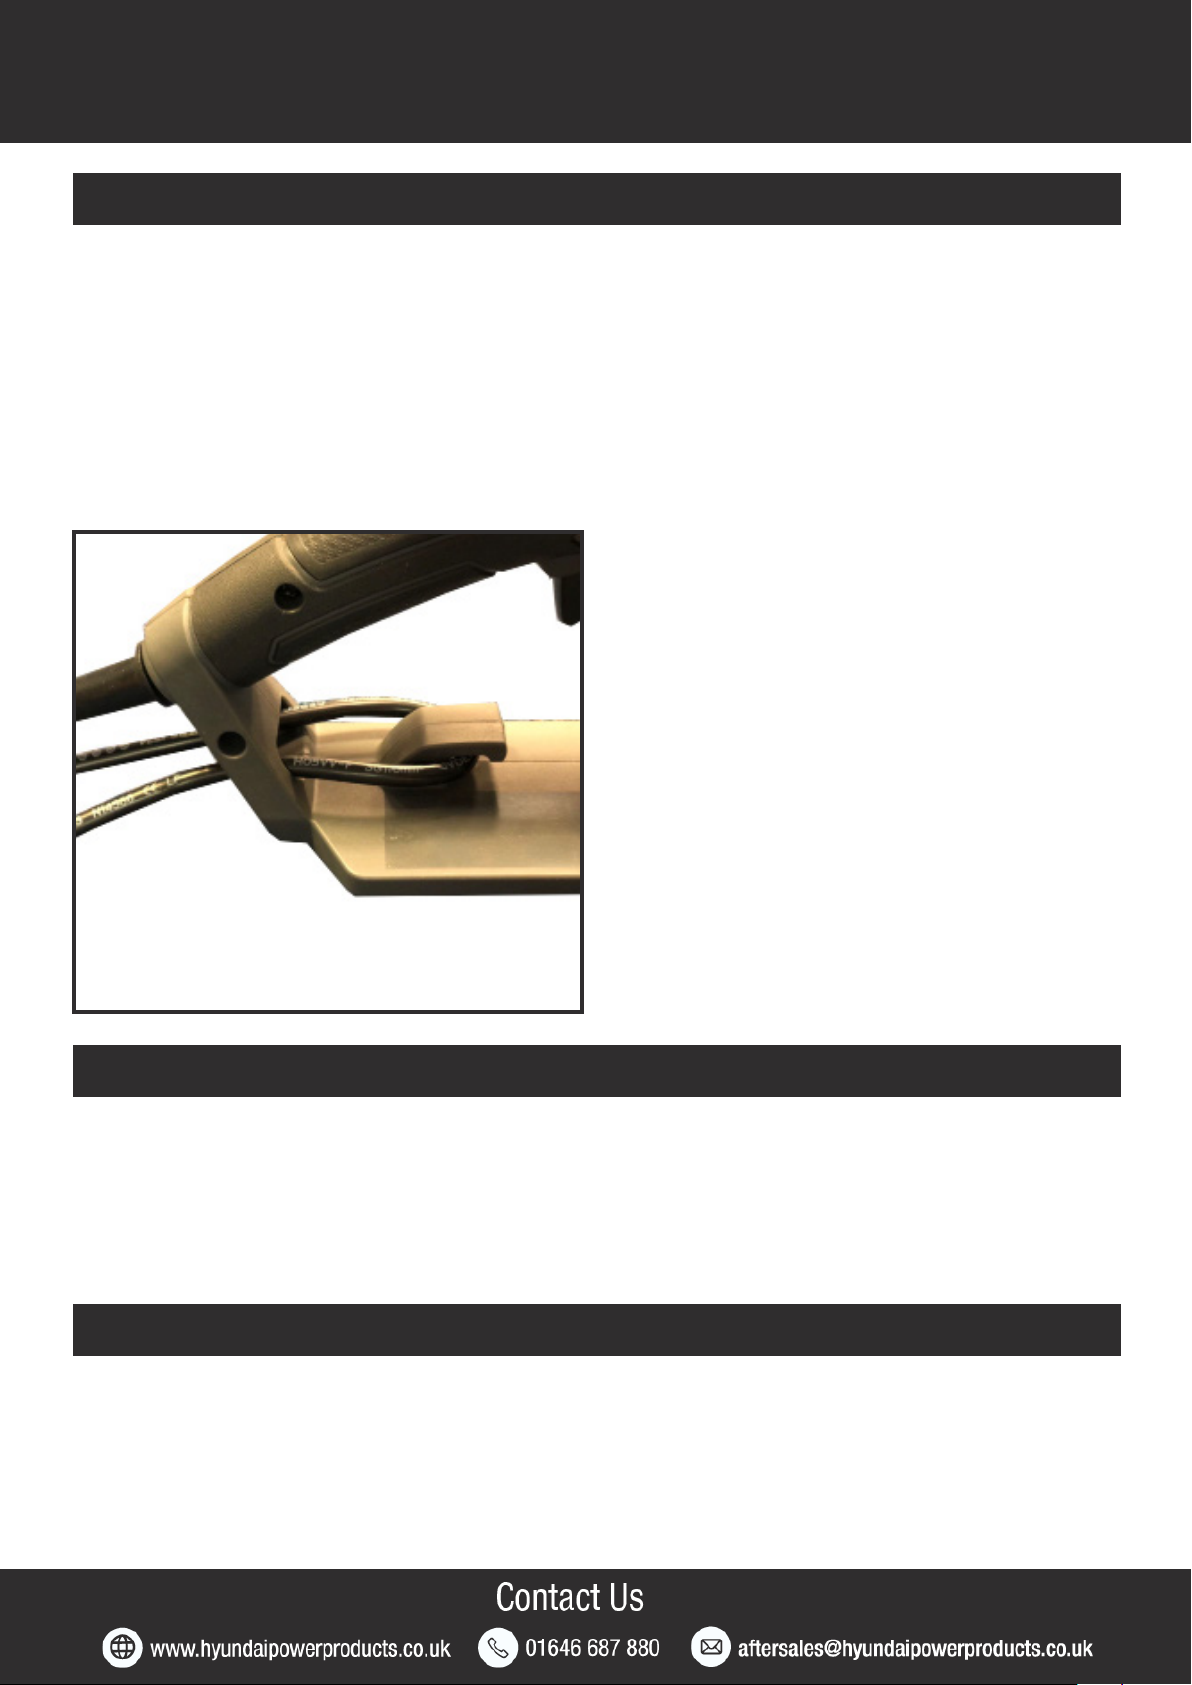
1. To prevent strain on the cable during use, make a small loop in the power cable.
2. Put the loop through the hole in the handle and on the hook.
3. Slowly pull the loop back to remove the slack.
4. Connect the plug to a power socket.
NOTE: We strongly recommend that this machine is connected to the mains supply via a
Residual Current Device (RCD).
Starting
1. Make sure that the chain brake is in the disengaged position (pulled back towards the handle).
2. Start the chainsaw by pushing the trigger lock button with your thumb and squeezing the
trigger switch.
NOTE: Check the blade tension after every 15 minutes of use.
Stopping
1. Release the trigger to stop the chainsaw.
25
Page 26

Operating
The Chain Brake
Always check that chain brake works properly before use.
!
CAUTION! The chain brake has been designed to reduce the possibility of injury if kickback
occurs. However, it cannot be relied upon to protect you against injury if the chainsaw is
used carelessly. Take great care when cutting, and always test the brake before using the
saw.
During kickback, the chain brake will strike your left forearm, engaging the chain brake. When the
brake is activated the chain will stop.
The chain brake is a device which stops the chain should the chainsaw recoil due to kickback.
Normally, the brake is activated automatically by inertial force, however it can also be activated
manually by pressing the brake lever forward / away from you.
• The chain brake is released (the chain can move) when the chain brake lever is pulled back
towards the handle.
• The brake is engaged (chain is stopped) when the chain brake lever pushed forward away from
the handle.
Release the chain brake by pulling the chain brake lever back towards the handle.
WARNING! If the chain fails to stop when the chain brake is engaged, do not use the
chainsaw. You should return your chainsaw to your dealer for advice.
Continuous operation while the brake is engaged will generate excessive heat, which can melt
the brake assembly and damage the clutch.
To Release The Brake
Release the chain brake by pulling the handle towards you when holding the saw. Some force
maybe required to disengage the brake. This is to prevent the accidental releasing of the brake
while in use.
To Engage The Brake
Engage the brake by pushing the brake handle away from you when holding the saw. The brake
is spring loaded so after some initial force the brake will move forward on its on momentum. If the
brake operates during use immediately release the throttle to reduce speed and when deemed
safe release the brake and resume use.
26
Page 27

Operating
Correct Use Of Chain Brake
• If the chain brake is clogged with wood chips the effectiveness of the brake is diminished.
• You must always keep the device clean.
• Do not increase motor revolutions while the chain brake is engaged.
• Do not use it unless absolutely necessary.
• Never test the brake in an area where petrol fumes are present.
The following may interfere with the brake’s ability to protect the operator:
• Saw wrongly held too close to operator’s body.
• Kickback time may be too fast even for a perfectly maintained brake to work in time.
• The operator’s hand may not be in position to contact the hand guard. Brake will not be tripped.
• Lack of proper maintenance lengthens the brake’s stopping time, making it less effective.
• Dirt, grease, oil, pitch, etc. getting into the working parts of the mechanism may lengthen the
stopping time.
• Wear and fatigue of the activating brake spring, and wear of the brake / clutch drum and pivot
points may lengthen the brake’s stopping time.
• A damaged hand guard and lever may render the brake inoperative.
Testing The Brake
1. Start the chainsaw
2. Place the chain saw on the ground.
3. Hold the rear handle with your right hand and the front handle with your left hand.
4. Accelerate the chainsaw to high speed by using the throttle trigger.
5. Operate the chain brake by turning your left wrist against the front hand guard whilst gripping
the front handle.
6. The chain should stop immediately.
7. Release the power trigger.
If the chain does not stop immediately contact Hyundai Power Products.
27
Page 28

Using The Chainsaw
NOTE: We strongly recommend that this machine is connected to the mains supply via a
Residual Current Device (RCD).
Holding The Chainsaw Correctly
Hold the chainsaw firmly with both hands. Always keep your left hand on the front handle and
your right hand on the rear handle. Holding the chainsaw with a reversed hand configuration
increases the risk of personal injury and should never be done.
Use a firm and proper grip when holding the handles to maintain control, your finger and thumbs
should encircle the handles.
Keep your body to the left of the blade at all times.
WARNING! Do not use the front guard as a handle. Never use a left handed (cross-handed)
grip or any grip that places your body or arm across the cutting line.
28
Page 29

Working
Basic Cutting Procedure
WARNING! Chainsaws by their very nature are extremely dangerous machines and should
be handled with respect!
We strongly recommend that before use of this product, you attend a chainsaw training course
to familiarise yourself with the maintenance and usage of these products! Thoroughly read this
manual and adhere to all safety instructions at all times. The manufacturer will not be held liable
for any accidents/injuries caused due to misuse or incorrect maintenance of this product!
1. To become proficient, attend a recognised chainsaw training course to learn how to operate
chainsaws safely and effectively. Familiarise yourself with all the controls and switches. Practice
all movements with the product switched off.
2. Always hold the product firmly with both hands; front handle with the left hand and rear handle
with the right hand. Fully grip both handles at all times during operation. Never operate the
product using only one hand.
3. Only use the product with a secure stance. Hold the product at the right-hand side of your
body (See below image 1).
4. Check the lubrication. Start the machine and check whether the chain can give off a spray of
oil within a few seconds. If an oil trace can be seen, the chainsaw is lubricating. (Image 2).
1
2
Continued
29
Page 30
Working
Basic Cutting Procedure (Continued)
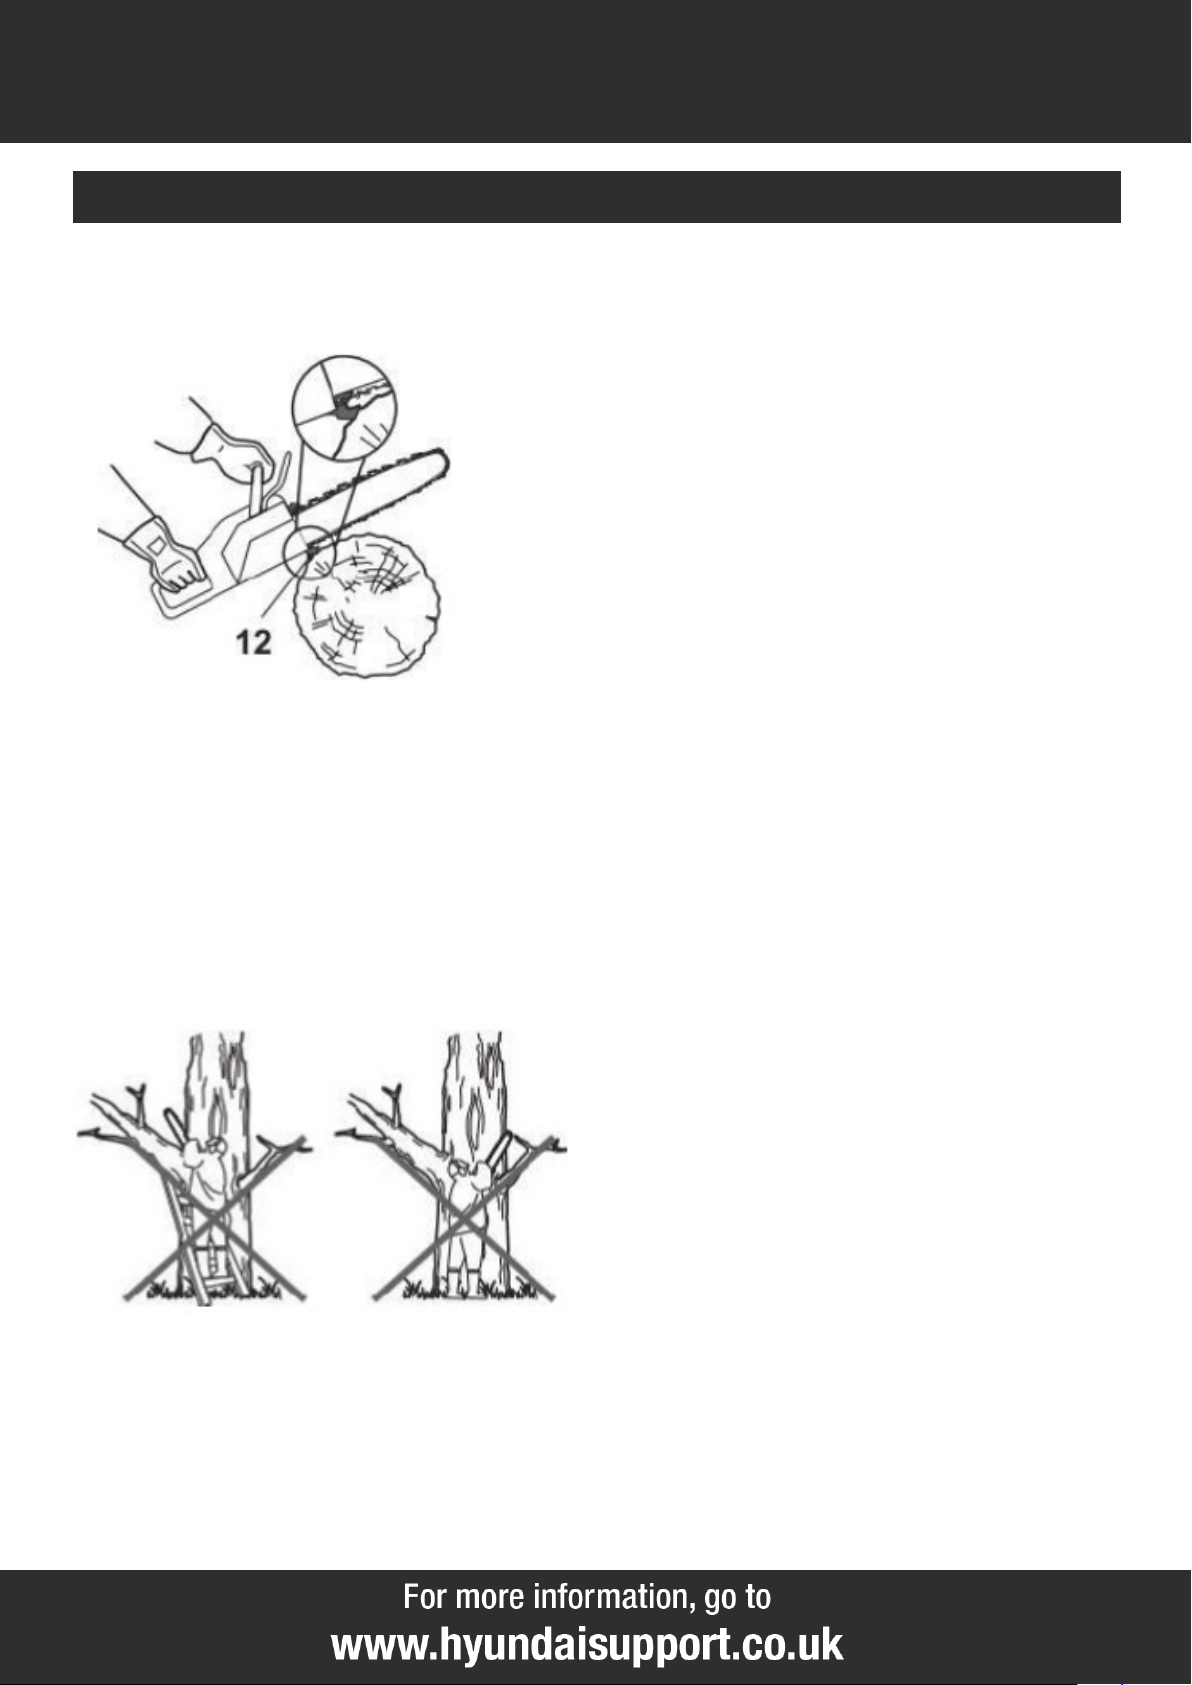
5. Ensure the saw chain is running at full speed before it makes contact with the wood. Use
spiked bumper to secure the product onto the wood before starting to cut and use it as a
leverage point while cutting (See below).
6. Reset the spiked bumper at a low point when cutting thicker logs by pulling the product slightly
backwards, until the gripping teeth release and re-position at lower level to continue sawing. Do
not remove the product completely from the wood.
7. Do not force the saw chain while cutting, let the chain do the work using the gripping teeth to
apply minimal leverage pressure.
8. Do not operate the product with arms fully extended or attempt to saw areas which are difficult
to reach, or on a ladder. Never use the product above shoulder height (See below).
9. Optimum sawing is achieved if the chain speed remains constant during cutting.
10. Be careful when reaching the end of the cut. The weight of the product may change
unexpectedly as it cuts free from the wood. This can cause accidents to the legs and feet.
Always remove the product from a wood cut while the product is running.
11.Check that the oil feed to the chain is operating correctly; run the chain saw at medium speed
and ensure that the chain has received a consistent coating of oil.
30
Page 31

Working
Felling A Tree
WARNING! Before commencing work or attempting to fell any tree, check with your local
council to ensure you have permission!
Even in your own garden you may be in a conservation area, the tree you wish to fell may have a
conservation order against it or the tree may be visible on the plans of your house – In all these
instances and more, you may be required to obtain permission before work can begin.
1. When bucking and felling operations are being performed by two or more persons at the same
time, the felling operations should be separated from the bucking operation by a distance of at
least twice the height of the tree being felled. Trees should not be felled in a manner that would
endanger any person, strike any utility line or cause any property damage. If the tree does make
contact with any utility line, the company should be notified immediately.
2. The product operator should keep on the uphill side of the terrain as the tree is likely to roll or
slide downhill after it is felled.
3. An escape path should be planned and cleared as necessary before cuts are
started. The escape path should extend back and diagonally to the rear of the expected line of fall
(See below).
4. Before felling is started, consider the natural lean of the tree, the location of larger branches
and the wind direction to judge which way the tree will fall.
5. Remove dirt, stones, loose bark, nails, staples and wire from the tree.
31
Page 32

Working
Notching Undercut
Make the notch (see figure below - B) 1/3 the diameter of the tree, perpendicular to the direction
of falls. Make the lower horizontal notching cut first. This will help to avoid pinching either the
saw chain or the guide bar when the second notch is being made.
Felling Back Cut
1. Make the felling back cut (see below - A) at least 50mm higher than the horizontal notching
cut. Keep the felling back cut parallel to the horizontal notching cut. Make the felling back cut so
enough wood is left to act as a hinge. The hinge wood (see below - C) keeps the tree from
twisting and falling in the wrong direction. Do not cut through the hinge.
2. As the felling gets close to the hinge, the tree should begin to fall. If there is any chance that
the tree may not fall in the desired direction or it may rock back and bind the saw chain, stop
cutting before the felling back cut is complete and use wedges of wood, plastic or aluminium to
open the cut and drop the tree along the desired line of fall.
3. When the tree begins to fall, remove the product from the cut, stop the motor, put the product
down, and then use the retreat path planned. Be alert for overhead limbs falling and watch your
footing.
32
Page 33
Working
Limbing And Pruning
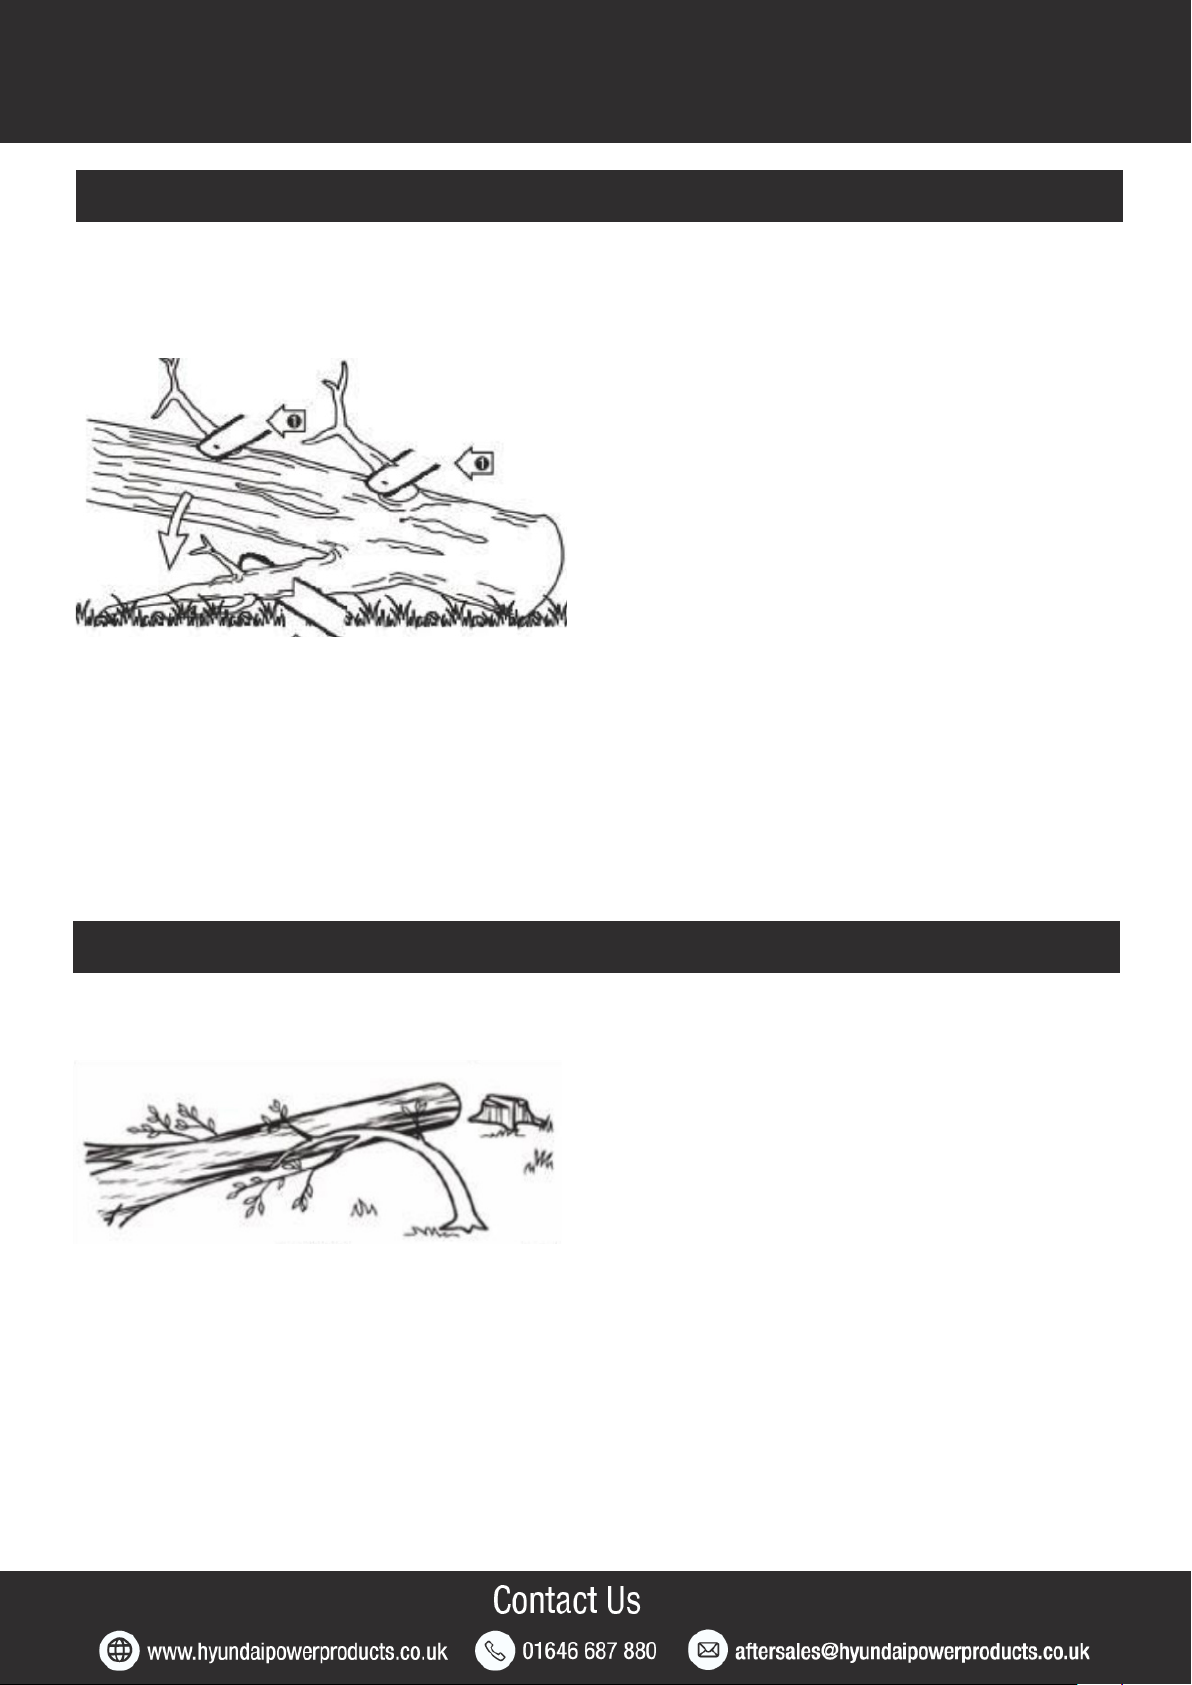
Limbing is removing the branches from a fallen tree. When limbing leave larger lower limbs to
support the log off the ground. Remove the small limbs in one cut (see below). Branches under
tension should be cut from the bottom up to avoid binding the product.
WARNING! Never climb into a tree to limb or prune! Do not stand on ladders, platforms,
logs, or in any position which may cause you to lose the balance or control of the saw!
When pruning trees, it is important not to make the flush cut next to main limp or trunk until
you have cut off the limb further out to reduce the weight! This prevents stripping the bark
from the main member!
WARNING! If the branches to be pruned are above chest height, hire a professional to
perform the pruning!
Cutting Spring Poles
1. A spring pole is any log, branch, rooted stump, or sapling which is bent under tension by other
wood, so that it springs back if the wood holding it is cut or removed (see figure below).
2. On a fallen tree, a rooted stump has a high potential of springing back to the upright position
during the bucking cut to separate the log from the stump.
3. Watch out for spring poles, they are dangerous.
33
Page 34

Working
Bucking A Log
Bucking or cross-cutting is cutting a log into lengths. It is important to make sure your footing is
firm and your weight is evenly distributed on both feet. When possible, the log should be raised
and supported by the use of limbs, logs or chocks.
1. Follow the simple directions for easy cutting. When the log is supported along its entire length
(see below image 1), it is cut from the top (over buck).
2. When the log is supported on one end (see below image 2), cut 1/3 the diameter from the underside (under buck). Then make the finished cut by over-bucking to meet the first cut.
1 2
3. When the log is supported on both ends (see below image 1), cut 1/3 the diameter from the top
(over buck). Then make the finished cut by under bucking the lower 2/3 to meet the first cut.
4. When bucking on a slope always stand on the uphill side of the log (figure below image 2).
When “cutting through”, to maintain complete control release the cutting pressure near the end of
the cut without relaxing your grip on the product handles. Don’t let the chain contact the ground.
After completing the cut, wait for the saw chain to stop before you move the product. Always
stop the motor before moving from tree to tree.
1 2
5. Support small logs on a sawing stand or another log while bucking (see below image 1).
6. If the wood diameter is large enough for you to insert a soft bucking wedge without
touching the chain, you should use the wedge to hold the cut open to prevent pinching (see
below image 2).
1 2
34
Page 35
Maintenance And Care
Maintenance Safety
IMPORTANT - Routine and accurate maintenance is essential for maintaining original
!
machine safety and performance levels.
!
WARNING - Before cleaning or doing maintenance work, you need to unplug the chainsaw
from the mains. You need to wear proper clothing and protective gloves whenever your hands
are at risk.
!
If there are worn or damaged parts, never use the machine. Faulty or worn-out parts must be
replaced and not repaired. You must only use original spare parts. The use of non-original and/or
incorrectly fitted parts will jeopardize the safety of the machine. This may also cause accidents or
personal injuries for which the manufacturer is under no circumstance liable or responsible.
!
Any maintenance operations or adjustments not explained in this manual must be carried out
by your Dealer or a specialised Service Centre with the necessary knowledge and equipment to
ensure that the work is done correctly maintaining the machine’s original safety level. Any
operations performed in unauthorised centres or by unqualified persons will invalidate the
Warranty and all obligations and responsibilities of the Manufacturer
Bar Maintenance
WARNING! Make sure that the chainsaw is disconnected from the mains supply before
continuing.
Most guide bar problems can be prevented merely by keeping the product well maintained.
Incorrect filing and non-standard cutter and depth gauge settings are the causes of most guide
bar problems, primarily resulting in uneven bar wear. As the bar wears unevenly, the rails widen,
which may cause the chain to clatter and make it difficult to complete straight cuts. If the guide
bar is insufficiently lubricated and the product is operated with a saw chain which is too tight, this
will contribute to rapid bar wear. To help minimise bar wear, maintenance of the guide bar as well
as the saw chain, is recommended.
To keep the bar in good working order, you must follow these maintenance procedures.
1. After approximately 5 hours use, the bar should be turned, to ensure even
wear on the top and bottom of the bar.
2. The bar rails should be cleaned every time the bar is turned, or the chain is removed.
Using a suitable implement, clear any debris from the bar rails. This will keep the oil
passages open and provide correct lubrication to the bar and chain.
35
Page 36

Maintenance And Care
Other Maintenance
1. Check the chain tension regularly and adjust as often as necessary to keep the chain snug on
the bar. A new chain will require more frequent adjustment.
2. Check the mains cable before each use. Do not use the chainsaw if the cable is damaged in
any way.
3. Always check the chain brake before each use.
4. Make sure that the automatic oiler system is working properly. Keep the oil tank filled with
chain oil during use.
Cleaning
1. After use, you must clean all excess sawdust, chippings and debris from the chainsaw, chain
and chain bar using a dry cloth and a soft brush for areas that are hard to reach.
2. Keep the air vents (end of motor housing) clean to prevent the motor overheating. Use a cloth
and brush.
3. Keep the main body of the chainsaw clean using a soft cloth.
4. Remove stubborn dirt with high pressure air (max. 3 bar).
5. Check for worn or damaged parts. Replace worn parts as necessary or contact an authorised
service centre for repair before using the product again.
NOTE: Do not use chemicals, alkaline, abrasive or other aggressive detergents or disinfectants to
clean this product, as they might be harmful to its surfaces.
Sprocket Wheel
NOTE: It is not necessary to remove the saw chain to lubricate the sprocket. Lubrication can be
done with the automatic lubrication system.
Storage
• Always store the chainsaw with the guard in place. Avoid the sharp teeth of the saw chain when
doing so. It is highly recommended to clean the chainsaw before storing it.
• Make sure that the chainsaw is stored out of the reach of children and do not stack other items
on top of the machine when in storage.
• Never hang the chainsaw by the handle, always store the chainsaw on a flat and stable surface.
36
Page 37

Maintenance And Care
Transporting
• Always stop the chainsaw before putting a chainsaw down or carrying it. Carrying a chainsaw
with the motor running is extremely dangerous.
• Accidental acceleration of the motor can cause the chain to rotate.
• BY HAND: When carrying your saw by hand, the chainsaw must be stopped and the saw must
be in the proper position.
The chain guard (scabbard) should be over the chain and the guide bar, which should point
backwards. When carrying your saw, the bar should be behind you.
• BY VEHICLE: When transporting in a
vehicle, keep chain and bar covered with the chain guard. Properly secure your saw to
prevent it moving around during transit, which in turn can cause spillage and damage to the saw.
Checking Automatic Chain Lubrication
Regularly check the automatic chain lubrication function to prevent overheating and damage to
the blade and saw chain. To do this, aim the sword tip against a smooth surface (board, part of a
tree) and let the chainsaw run.
If an increasing trace of oil appears during this process, the automatic chain lubrication works
perfectly.
Attention! Do not touch the surface. Keep a safe distance (about 20 cm).
New Chain Bar And Chain
A dull chain will increase cutting time, and pressing a dull chain through wood will increase the
vibrations transmitted to your hands. A saw with loose components or with damaged or worn AV
buffers will also tend to have higher vibration levels.
Only use compatible chains to avoid damaging your machine. Using non-recommended
replacement parts may result in damage to your machine or serious personal injury.
Replacement chain bars and chains can be obtained from HYUNDAI Power Products.
The bar needs to be renewed if:
• The guide groove of the bar is worn.
• The spur gear at the end of the guide bar is damaged or worn.
37
Page 38
Maintenance And Care
Removing Existing Bar And Chain
WARNING! Make sure that the chainsaw is disconnected from the mains supply before
continuing.
1. Loosen the chain tension and then remove the housing cover by rotating the cover
locking screw anticlockwise.
2. Using a pair of gloves, remove the existing bar and chain by pulling it towards you. Your local
recycling centre can advise you on the best method of disposal.
NOTE: When you replace the bar, you will need to remove the wheel which is attached to it and
fit it onto the new bar.
3. Make sure that any debris is cleared from the mechanism and housing using a soft brush. A
clean paint brush is ideal.
Fitting A New Bar And Chain
See page 22.
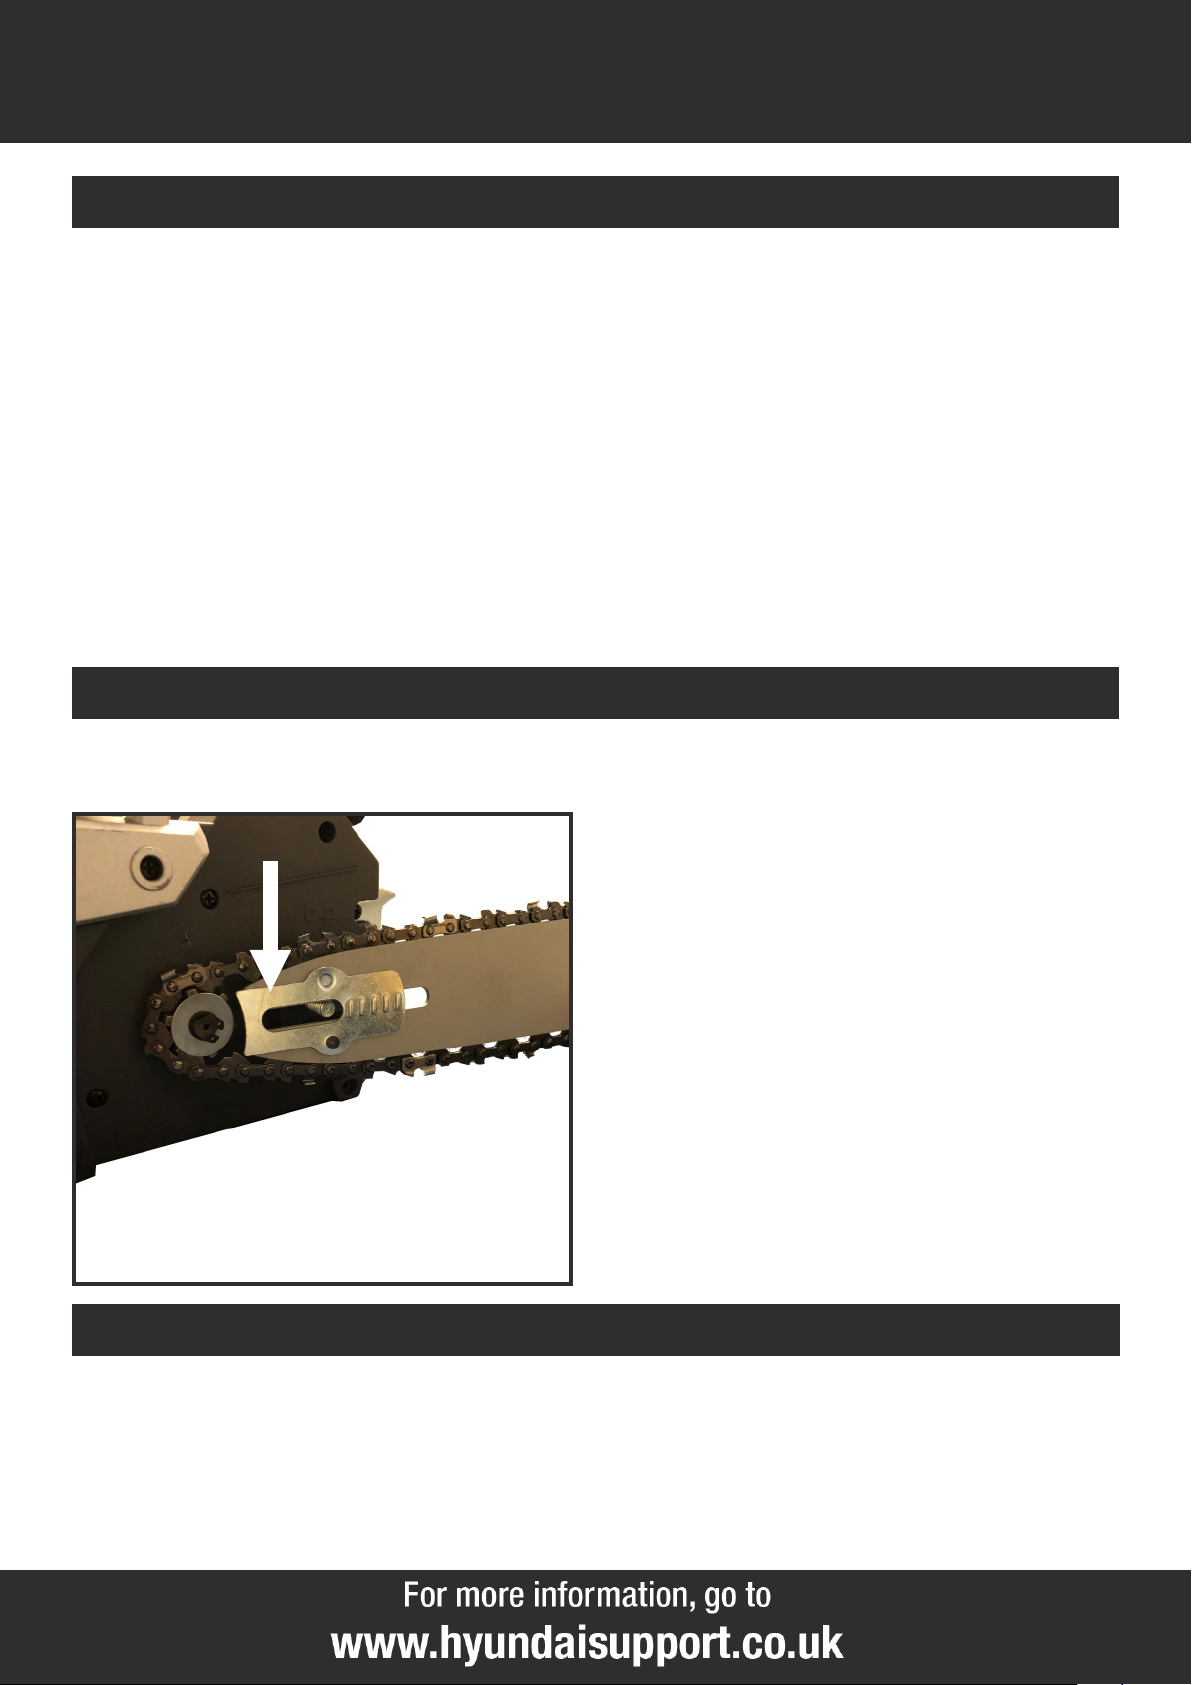
Be sure to fit adjuster bracket to new chain bar. See below.
Sharpening The Saw Chain
Effective working with the chainsaw is only possible if the saw chain is in good condition and
sharp. This also reduces the risk of kickback.
The saw chain can be reground at every dealer. Do not try to sharpen the saw chain yourself if
you do not have the proper tool and experience.
38
Page 39

Specifications
Model HYC1600E HYC2400E
Rated Voltage 230-240V~50Hz 230-240V~50Hz
Motor Power Rating 1600W 2400W
Chain Speed 13m/s 15m/s
Chain Stopping Time
(Kickback)
Maximum Cutting Length 335mm / 33.5cm 385mm / 38.5cm
Oil Type Chain lubricating oil Chain lubricating oil
Dimensions (L x W x H) 78 x 24 x 21cm 78 x 24 x 31cm
Weight 4.1kg 6.6kg
Vibration Level 5.15m/s2, K=1.5m/s2 6.55m/s2, K=1.5m/s2
Measured Sound Level 106dB(A) 104.5dB(A)
Guaranteed Sound Level 107dB(A) 107dB(A)
Guide Bar 350mm (14”) 400mm (16”)
0.15 seconds 0.15 seconds
The declared vibration emission value has been measured according to a standardized test
procedure and can be used to compare one power tool with another.
The specified vibration emission value can also be used for an initial assessment of the exposure.
The vibration emission value may differ from the indication value during the actual use of the
power tool, depending on the manner in which the power tool is used.
Try to minimize the impact of vibration as much as possible. Exemplary measures to reduce
vibration exposure include wearing gloves while using the tool and limiting working time. In this
case, all parts of the operating cycle are to be considered (for example, times when the power
tool is switched off and those in which it is switched on, but runs without load).
39
Page 40

Spare Parts
Only use original spare parts: The use of non-original and/or incorrectly fitted parts will jeopardize
the safety of the machine, may cause accidents or personal injuries for which the Manufacturer is
under no circumstance liable or responsible.
HYC1600E
Description Part Number
Chain HYC1600ECHAIN
Chain Bar HYC1600ECHAINBAR
Chain Scabbard HYC1600ECHAINSCABBARD
Tensioning Wheel HYC1600ETENSIONINGWHEEL
Housing Cover HYC1600EHOUSINGCOVER
Oil Filler Cap HYC1600EOILFILLERCAP
HYC2400E
Description Part Number
Chain HYC2400ECHAIN
Chain Bar HYC2400ECHAINBAR
Chain Scabbard HYC2400ECHAINSCABBARD
Tensioning Wheel HYC2400ETENSIONINGWHEEL
Housing Cover HYC2400EHOUSINGCOVER
Oil Filler Cap HYC2400EOILFILLERCAP
40
Page 41
Disposal
Environmental Protection
1. Environmental protection should be a priority of considerable importance when using the
machine, for the benefit of both social coexistence and the environment in which we live. Try not
to cause any disturbance to the surrounding area.
2. You must comply with local regulations and provisions for the disposal of packaging, oils,
petrol, filters, damaged parts or any elements which have a strong impact on the environment.
This waste must not be disposed of as normal waste. It needs to be separated and taken to
specified waste disposal centres where the material will be recycled.
3. You must comply with local regulations for the disposal of waste materials after mowing.
4. When disposing, do not pollute the environment with the machine, but hand it over to a
disposal centre, in accordance with the local laws in force.
Recycling And Disposal
We do not offer a takeback scheme for the recovery of Waste Electrical Electronic
Equipment (WEEE) & Batteries. Instead the responsibility to dispose of WEEE and
or Batteries is passed onto you by us.
So when it becomes necessary to dispose of your machine you must take it to your
local Civic Amenity Site. For further information please contact your local Authority
for disposal advice.
You MUST make sure that all unused oil and fuel is disposed of correctly either
beforehand or at your local Civic Amenity Site.
Under NO circumstances must any fuel or oil be put down any drains.
Certain products contain WEEE waste which should not be disposed of in your domestic waste.
You MUST recycle WEEE in accordance with your local authority or recycling centre.
Certain products contain batteries which should not be disposed of in your domestic waste.
You MUST recycle batteries in accordance with your local authority or recycling centre.
Unwanted packaging and materials should be stored and taken to a recycling centre so it can be
disposed of in a manner which is compatible with the environment.
This symbol means you should ‘Reduce - Reuse - Recycle’
We are a Member of the VALPAK National Compliance Scheme and our registration number is
RM08660. For further information about disposal please contact your Local Authority.
You can also get more advice and guidance about recycling at the following website
http://www.recycle-more.co.uk
Should you pass this product on to another user either sold or loaned, you MUST pass on this
user manual. This will make sure that all other users can use and maintain this machine safely.
41
Page 42

Our Product Range
Generators
Leisure Inverter, Petrol, Diesel And Built-In
Motorhome Generators
Pressure Washers
Petrol, Diesel And Electric Pressure Washers
Water Pumps
Submersible, Clean And Dirty Water And
Professional Chemical Water Pumps
Lawnmowers
Petrol, Cordless, Electric, Roller, Self Propelled,
Electric Start And Robotic Lawnmowers
Grass Trimmers And Brush Cutters
Petrol, Cordless, Electric And Wheeled Grass
Trimmers And Brush Cutters
Chainsaws
Petrol, Cordless And Electric Chainsaws
Hedge Trimmers
Petrol And Cordless Hedge Trimmers
Leaf Blowers
Petrol, Electric, Cordless, Backpack And 3 -in-1
Leaf Blowers
Log Splitters
Horizontal, Vertical, Petrol And Electric Log
Splitters
Wood Chippers
Petrol And Electric Start Wood Chippers
Tillers
Petrol Garden Tiller And Cultivator
Earth Augers And Trenchers
Petrol Earth Augers And Heavy Duty Trenchers
Compactor Plates
Petrol Compactor Plates
Cement Mixers
Portable Electric Cement Mixers
Mini Dumpers
4-Wheel Drive Mini Dumpers And Tracked
Dumpers
Yard Sweeper
Self Propelled Yard Sweeper Power Brush
Scarifiers
Petrol Lawn Scarifier And Aerator
Stump Grinders
Petrol 4-Stroke Stump Grinders
Welders And Plasma Cutters
MIG, TIG, MMA, ARC Welders And Plasma Cutters
Power Tools And Tool Chests
Electric And Cordless Power Tools And Filled Tool
Chests
Vacuum Cleaners
Wet And Dry Vacuum Cleaners
Engines
Petrol And Electric Start Engines
Battery Chargers / Starters
6V, 12V, 24V Battery Chargers, Jump Starters And
Hydraulic Floor Jack
Air Compressors
Home, Domestic, DIY And Professional Use Air
Compressors
Lighting Towers
Mobile Lighting Towers With Diesel Generators
Portable Power Stations
Camping Power Packs And Solar Chargers
And More
We Are Constantly Expanding Our Range With
New Products
If you would like more information on any of
these products, please contact our sales team
on 01646 687880 or visit our website
www.hyundaipowerproducts.co.uk
42
Page 43

Useful Information
Check Out Our YouTube Channel
Our videos on YouTube include:
• Unboxing • Assembly of your machine • How to service your machine • Products in use
• ‘How To’ videos • Product features • And more.
Go to www.hyundaisupport.co.uk or search ‘Hyundai Power Products’ in YouTube.
Warranty
Proof of purchase will be required before you make a warranty claim.
Full warranty terms and conditions can be found on the HYUNDAI POWER PRODUCTS website:
www.hyundaipowerproducts.co.uk
Manual Updates
Our manuals are constantly being reviewed and updated. Should you find an error, omission or
something unclear, please contact us for assistance.
We reserve the right to make any modifications without prior notice whenever necessary.
Our latest manuals are also placed online. All our manuals can be downloaded at:
www.hyundaipowerproducts.co.uk
Returning Your Product
If you are returning your product, please contact the dealer for their returns policy.
Leaving A Review
We work very hard to give all of our customers the best possible service. If you have any
problems, before leaving negative feedback, please contact us to give us a chance to resolve the
issue. We would be delighted if you left us positive feedback!
To leave a review, please go to:
uk.trustpilot.com/review/hyundaipowerequipment.co.uk
Ordering Spare Parts
Only use original spare parts: The use of non-original and/or incorrectly fitted parts will jeopardize
the safety of the machine, may cause accidents or personal injuries for which the Manufacturer is
under no circumstance liable or responsible.
43
Page 44

Notes
44
Page 45

Notes
45
Page 46

Need Help? Talk To Our Experts
Contact Us
Our friendly aftersales team will be more than hapy to help you.
Phone
Call our team on 01646 687880, open Monday-Friday 8.30am-5pm.
Email
[email protected]
Online Live Chat
Go to www.hyundaipowerproducts.co.uk
Live chat is open Monday-Friday from 8.30am-5pm.
As soon as you have purchased the machine, we recommend that you fill out the
following. If you need to contact an authorised dealer or customer service for
information on servicing, you may need to provide the following information.
The model number and serial number can be found on the grey specification sticker.
Date Of Purchase: ........................................................................................................................
Dealer Name:.................................................................................................................................
Dealer Phone:................................................................................................................................
Model Number:.............................................................................................................................
Serial Number:..............................................................................................................................
46
Page 47
Declaration Of Conformity
EC Declaration of Conformity
We hereby declare that the machine detailed in this declaration complies to all the relevant
provisions of the following EC directives.
• 2006/42/EC The Machinery Directive
• 2014/30/EU Annex ll Electromagnetic Compatibility Directive
• 2000/14/EC & 2005/88/EC Outdoor Noise Emissions Directive
And is in conformity with the applicable requirements of the following documents:
• EN ISO 3744:1995
• EN ISO 9207:1995
• EN 55014-1, EN55014-2, EN6100-3-2, EN6100-3-3
Notified Body: TÜV SUD Shanghai Branch.
Model Type Motor watts Measured Sound
Power
HYC1600E
HYC2400E
Product Details
Brand: Hyundai
Model: HYC1600E, HYC2400E
Description: Electric chainsaw
Name and address of technical documentation holder and EU distributor:
Genpower Ltd, Isaac Way, Pembroke Dock, Pembrokeshire, SA72 4RW, UK.
Signed by: Roland Llewellin, Managing Director
Date: 10/12/2019
Electric chainsaw 1600w
2400w
106dB(A)
104.5dB(A)
Guaranteed
Sound Power
107dB(A)
107dB(A)
47
Page 48

Importer:
GENPOWER LTD
Isaac Way, London Road,
Pembroke Dock, UNITED KINGDOM, SA72 4RW
T: +44 (0) 1646 687 880 F: +44 (0) 1646 686 198
E: [email protected]
www.hyundaipowerproducts.co.uk
Imported/Distributed by Genpower Ltd for The United Kingdom & Ireland
Licensed by Hyundai Corporation, Korea
 Loading...