

Hyundai H-TV2501PF Instruction Manual
H-TV2501PF
|
|
25"(63cm) COLOUR TELEVISION |
c 25 (63 ) |
Instruction manual |
|

TABLE OF CONTENTS |
|
TABLE OF CONTENTS ............................................................................................................................................................................................... |
2 |
IMPORTANT SAFEGUARD ........................................................................................................................................................................................ |
3 |
COLOR TV FEATURES............................................................................................................................................................................................... |
4 |
DESCRIPTION AND PREPARATION......................................................................................................................................................................... |
5 |
OPERATION OF REMOTE CONTROL....................................................................................................................................................................... |
8 |
MENU OVERVIEW.................................................................................................................................................................................................... |
11 |
TV OPERATION......................................................................................................................................................................................................... |
12 |
ADVANCED FUNCTIONS ........................................................................................................................................................................................ |
20 |
TROUBLESHOOTING ............................................................................................................................................................................................... |
24 |
SPECIFICATIONS...................................................................................................................................................................................................... |
26 |
2

IMPORTANT SAFEGUARD
WARNING
TO REDUCE THE RISK OF FIRE OR ELECTRIC SHOCK, DO NOT EXPOSE THIS APPLIANCE TO RAIN OR MOISTURE.
CAUTION
∙To reduce the risk of electric shock, do not attempt to open the cabinet. There are no parts inside you can service yourself. Refer all servicing to qualified personnel.
∙To ensure reliable operation and to protect the unit from overheating, the ventilation slots and openings must not be blocked or covered. Avoid placing the unit in enclosed spaces such as a bookcase, unless there is adequate ventilation.
∙Keep this unit away from radiators and other heat sources.
∙Avoid using the unit near strong magnetic fields.
∙Do not push objects of any kind into this unit through the cabinet slots as they could touch current carrying parts or short-circuit parts, resulting in fire, electric shock, or damage to the unit.
∙Be careful not to spill liquid of any kind on this unit. If liquid is spilled into the unit, consult a qualified service engineer.
∙Use this unit in the horizontal (flat) position only.
∙Avoid places the unit to strong vibration.
∙Do not place heavy objects on the unit. This may damage the cabinet or cause trouble within the unit.
∙Unplug the unit from the AC outlet when it is not to be used for a long period of time.
∙When there is lightning, unplug the unit from the AC outlet immediately. Never touch the antenna wire during a lightning storm.
∙You may experience static discharge when touching the unit. If this happens, and the unit fails to operate, turn off the power and disconnect the plug from the wall outlet.
∙When installing the TV receiver, please make sure that a clearance of minimum 10 cm is kept between the top, side, back of the TV and the nearest wall or furniture enclosure in order to allow proper ventilation for the TV set.
CLEANING THE UNIT
∙When the cabinet has become dirty or stained, dip a piece of gauze or soft cloth into a dilute solution of neutral cleanser and wipe clean. Never use thinner or benzene since they will damage the surface of the cabinet.
∙When the television screen becomes dirty, wipe it gently with a piece of soft, lint-free cloth. Do not scratch the surface of the screen.
NOTE ON CONDENSATION
Moisture condensation may occur inside the unit when it is moved from a cold place to a warm place or under high humidity. Be sure any condensation has evaporated completely before power on the unit.
3

COLOR TV FEATURES
Color systems |
- PAL, SECAM, NTSC3.58 &NTSC4.43 |
Sound systems |
- DK, BG |
Sound Effect |
- B.E, Treble, Bass, Balance, S.E |
Preset Programs |
- 100 |
Preset Method |
- Auto Search, Manual Store, Fine Tune |
Tuning Method |
- Voltage Synthesized |
Frequency Range |
- Hyper Band Tuner |
Voltage Range |
- 180-240V, ~50Hz |
Display |
- ENGLISH, RUSSIAN |
Functions select |
- Pop up menu |
Remote Control |
- Full Function Infra-red Remote Controller |
AV I/O |
- 1 RCA-type AV Input |
|
- 1 S-video Input |
|
- 1 SCART AV Input/output |
Useful functions |
- Sleep Timer (10-120min.) |
|
- Auto Off (after 15 min with no signal) |
|
- Blue Background selection (while no signal) |
|
- 3 Default, 1 User Picture Settings |
|
- Channel Adjustment |
|
- Channel Skip |
|
- AV Stereo |
|
- Surround Sound |
|
- On/Off Timer |
|
- Game |
|
- Notebook |
|
- Calendar |
|
- Biological Clock |
|
- Favorite Channel Setting |
|
- Program Prearrange |
|
- AT Function |
|
- Power & Energy Saving |
4
1. DESCRIPTION AND PREPARATION
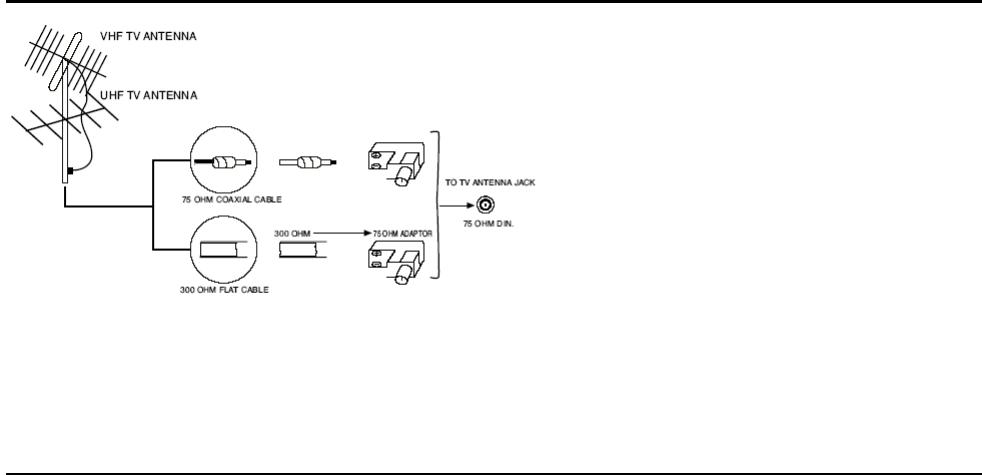
1.1 INSTALLATION OF ANTENNA
Connect the 75 OHM coaxial cable from the antenna to the antenna jack on the rear panel, as shown above.
NOTE:
∙For better reception, especially in outlying area or where ghost or interference happens, an external roof-mounted antenna is recommended.
∙For UHF TV reception, use the specified UHF antenna. Consult the local sale dealer.
∙When using 300 OHM flat cable, a 300 OHM - 75 OHM adapter should be adopted for a proper connection to the antenna jack.
1.2POWER CONNECTION
Plug the AC cord into an AC outlet.
NOTE:
∙This unit should be operated from a household 180-240V, ~50Hz.
∙When you disconnect the power supply cord, pull it out by the plug. Never pull the cord itself.

1.3 EXTERNALCONNECTION
NOTE:
∙ The S-video input and video input 1 are sharing the same channel, therefore cannot based simultaneously.
∙The AUDIO/VIDEO input terminals on the side panel (if provided) and rear terminals can be connected to VCR AV, LD player, VCD player or the satellite receiver/decoder output terminals.
∙The AUDIO/VIDEO output can be connected to other TV monitor or VCR for video monitoring or Recording.
∙To switch between Video 1, Video 2 and TV mode by pressing TV/AV button on front panel or on remote control handset.
6
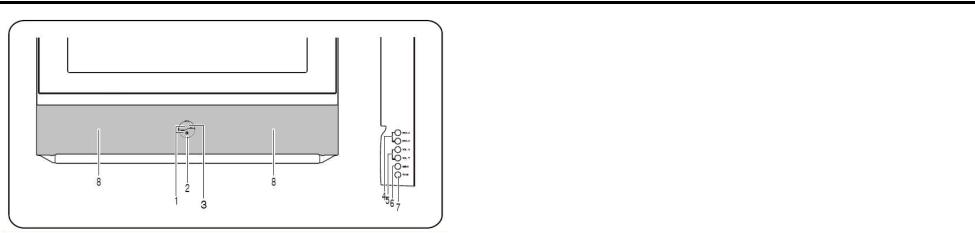
1.4 FRONT PANEL
1. POWER BUTTON
To turn ON/OFF the TV set.
2. STANDBY INDICATOR
Lights when TV is in the STANDBY MODE.
3. REMOTE SENSOR
To receive the infra-red signals from remote handset.
4. PROGRAM( ) BUTTONS
Select program number cyclically. To turn on the TV when it is in standby mode. To select item in sub-menu.
5. VOLUME/PICTURE CONTROL ( ) BUTTONS
To decrease / increase the sound volume and picture settings level.
Channel searching upward/downward in MANUAL STORE and FINETUNE menu.
6. MENU BUTTON
To display the main menu. Press and hold the MENU button for over seconds, it will perform AUTO SEARCH function.
7. TV/AV BUTTON
To switch between TV program and AV input. To turn on the TV when it is in standby mode.
8. SPEAKERS
7
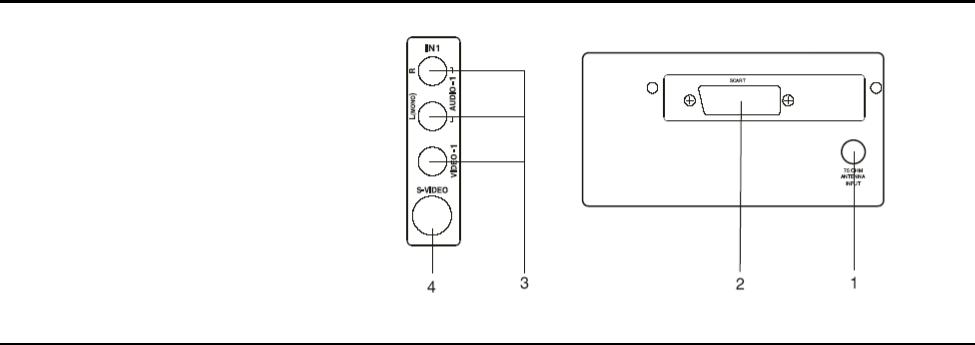
1.5 REAR TERMINAL & SIDE AV
1.75 OHMANTENNA INPUT
2.SCART AV INPUT/OUTPUT
3.AV 1 INPUT
4.S-VIDEO INPUT
2 OPERATION OF REMOTE CONTROL
2.1 DESCRIPTION OF REMOTE CONTROL KEYS
INTRODUCTION OF KEY FUNCTION
This TV features with a full-function remote control handset. For a more compact remote unit design, some of the keys are multiple with more than one function. The following text describes the function of keys on remote control unit. Functions related to notebook operated are marked with a symbol*.
1 STANDBY BUTTON
When the main power is on, to turn the TV set on or off.
2 MUTE BUTTON
To temporarily turn off the sound and to restore it by pressing it again.
3 TV/AV BUTTON
To switch between TV program and AV input sources.
4 COLOR SYSTEM BUTTON
To select color system without going into submenu.
8
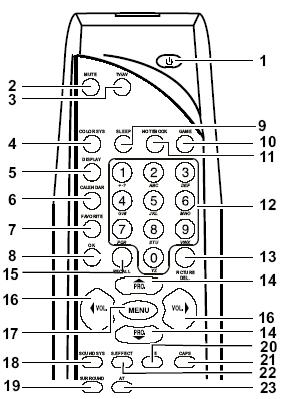
5 DISPLAY BUTTON
To display the current program number and function status. Press the button once again to display the current time on the screen.
6 CALENDAR BUTTON
To enter or exit the perpetual calendar directly.
7 FAVORITE BUTTON
To browse the preset favorite channels. This button will not function if you have not set any favorite program.
8 OK BUTTON
Within the on-screen menu, press to enter some special function such as game, notebook, calendar and etc.
9 SLEEP BUTTON
Set the sleep timer from 120 to 10 minutes by pressing the SLEEP button repeatedly. To display the remaining time, press SLEEP button once. To cancel the sleep timer, press the SLEEP button untilOFF appears.
10 GAME BUTTON
To enter or exit the game directly.
11 NOTEBOOK BUTTON
* To activate the notebook function.
12 (0-9) DIGIT KEYS
To select program number directly.
*To select 0-9 digits, A-Z(or a-z) letters, common marks and punctuation marks when writing data or information to be stored in notebook.
13 PICTURE/* DELETE BUTTON
Cyclically select the default setting level of picture.
Within the on-screen menu of FAV.CH, press to delete the undesired channel NO. * In notebook mode, to delete the word or symbols previously stored.
14 PROGRAM UP/DOWN BUTTON
To select the next higher or lower program number. To select the item in submenu.
15 RECALL BUTTON
Press to return to the previously viewed channel.
16 VOLUME UP/DOWN BUTTON
To decrease or increase the sound volume and picture setting level. In MANUAL TUNE and FINE TUNE menu, search channel upward or downward.
17 MENU BUTTON
Press to display the main menu. Also goes back to the previous screen menu or exits the menu from screen.
9
* To insert or overwrite a letter, digit or symbol when you edit the information previously stored in notebook.
18 SOUND SYSTEM BUTTON
To directly select sound system without going into the submenu.
19 SURROUND BUTTON
Cyclically select the surround sound effect among SIMULATED, SURROUND1, SURROUND2 AND SURROUND OFF.
20 B.E BUTTON
To turn Bass Enhancement function on or off.
21 CAPS BUTTON
* To select the input form before data or information writing between capital and small letter.
22 S.EFFECT BUTTON
Cyclically select the sound effect among NATURAL, NEWS, SPACIAL, PERSONAL.
23 AT BUTTON
Press two times to turn off the display and enjoy music.
2.2 INSTALLATION OF BATTERIES
1.Open the battery compartment cover.
2.Install two size AA batteries in correct direction.
3.Close the battery cover.
NOTE:
∙The lifetime of the batteries may last up to one year, depending on how often the remote control is used. For the best performance, the batteries should be replaced on a yearly basis, or when remote operation becomes erratic.
∙Be sure to place the batteries in the correct direction.
∙Do not mix old and new batteries, or different types.
∙Old batteries may leak chemical and damage the remote control. Always remove batteries as soon as they become weak.
2.3EFFECTIVELY USING THE REMOTE CONTROL
Point the remote toward the infra-red remote sensor on the main unit.
NOTE:
∙If direct sunlight, incandescent light, or any other strong light sources hit the remote control sensor, the remote control may not operate properly.
∙If there is an obstacle between the main unit and the remote control, the remote control signal may not be received.
10
3. MENU OVERVIEW
MAIN MENU |
|
|
SUB-MENU |
|
|
|
|
|
SUB-MENU ENTRY |
|||
|
|
|
|
CONT |
50 |
|
|
|
|
|||
|
|
|
|
|
||||||||
|
|
|
|
BRIGHT |
50 |
|
|
|
|
|||
|
|
|
|
COLOR |
50 |
|
|
|
|
|||
PICTURE |
|
|
|
TINT |
± 00 |
|
|
|
|
|||
|
|
|
|
SHARP |
50 |
|
|
|
|
|||
|
|
|
|
PIC.M |
DYNAMIC/PERSONAL/MILD/STANDARD |
|||||||
|
|
|
|
|||||||||
|
|
|
|
B.E |
ON/OFF |
|
||||||
|
|
|
|
|
||||||||
|
|
|
|
B.E |
00 |
|
|
|
|
|||
SOUND |
|
|
|
BASS |
± 00 |
|
|
|
|
|||
|
|
|
|
TREBLE |
± 00 |
|
|
|
|
|||
|
|
|
|
BALANCE |
± 00 |
|
|
|
|
|||
|
|
|
|
S.E |
NATURAL/NEWS/SPACIAL/PERSONAL |
|||||||
|
|
|
|
|||||||||
|
|
|
|
|
|
|
|
|
|
|
B.B |
ON/OFF |
|
|
|
|
|
|
|
|
|
|
|
||
|
|
|
|
|
|
|
|
|
|
|
COLOR |
AUTO/443PAL/SECAM/443NTSC/358NTSC |
|
|
|
|
|
|
|
|
|
|
|
SOUND |
BG/DK |
|
|
|
|
|
|
|
|
|
|
|
||
|
|
|
|
|
|
|
|
|
|
|
LANGUAGE |
ENGLISH / RUSSIAN |
|
|
|
|
SETTING |
|
|
|
|
|
AUTO SLEEP |
ON |
|
|
|
|
|
|
|
|
|
|
||||
|
|
|
|
|
|
|
|
|
||||
|
|
|
|
|
|
|
|
|
|
|
PRESENT |
30 |
|
|
|
|
|
|
|
|
|
|
|
||
|
|
|
|
|
|
|
|
|
|
|
STORE TO |
34 |
|
|
|
|
|
|
|
|
|
|
|
||
|
|
|
|
CH ADJUST |
|
|
|
|
|
SURE |
OK |
|
|
|
|
|
|
|
|
|
|
||||
|
|
|
|
|
|
|
|
|
|
|
||
|
|
|
|
|
|
|
|
|
|
|
||
FEATURE |
|
|
FAV.CH |
|
|
|
|
|
|
FAV. CH1 |
1 |
|
|
|
|
|
|
|
|
|
|||||
|
|
|
|
|
|
|
|
|
|
|
FAV. CH2 |
2 |
|
|
|
|
CALENDAR |
|
|
|
|
|
FAV. |
3 |
|
|
|
|
|
|
|
|
|
|
|
|
FAV. CH4 |
- |
|
|
|
|
GAME |
|
|
|
|
|
FAV. CH5 |
- |
|
|
|
|
|
|
|
|
|
|
|
|
FAV. CH6 |
- |
|
|
|
|
|
|
|
|
|
|
|
||
BIOLOGICAL CLOCK
11

MAIN MENU |
|
|
SUB-MENU |
SUB-MENU ENTRY |
|
|
|
CLOCK |
0:13 |
|
|
|
||
|
|
|
OFF TIMER |
OFF/ONCE/DAILY |
|
|
|
|
0:00 |
TIMER |
|
|
ON TIMER |
OFF/ONCE/DAILY |
|
|
|
|
0:00 |
|
|
|
POSITION |
0 |
|
|
|
||
|
|
|
POSITION |
30 |
|
|
|
||
|
|
|
BAND |
VHFL/VHFH/UHF |
PRESET |
|
|
MANUAL |
UP/DOWN |
|
|
|
SKIP |
ON/OFF |
|
|
|
FINE |
UP/DOWN |
|
|
|
AUTO MEMORY |
|
|
|
|
4. TV OPERATION
4.1 BASIC OPERATION
4.1.1 POWER ON
∙ Press POWER button on the main unit to turn on/off the TV set. ∙ If the standby indicator lights up, TV is in standby mode.
To turn on the TV from STANDBY mode, press STANDBY button on the remote control or the PROGRAM UP /DOWN, TV/AV button on the front panel of the main unit.
4.1.2 POWER OFF
∙ Press POWER button on the main unit to turn off the TV set.
∙ Or press STANDBY button on the remote control to switch the TV to standby mode and the STANDBY indicator will light up.
4.1.3 SELECT MAIN MENU
∙By pressing the MENU button, the main menu bar will appear on the top screen, and PICTURE menu will be highlighted with yellow color, which means the pull down menu PICTURE is selected and its corresponding menu entries will be displayed underneath it.
12
∙Then press VOLUME UP/DOWN button on the set or remote control, you can move the yellow cursor right or left for selecting other pull-down menus in the main menu bar.
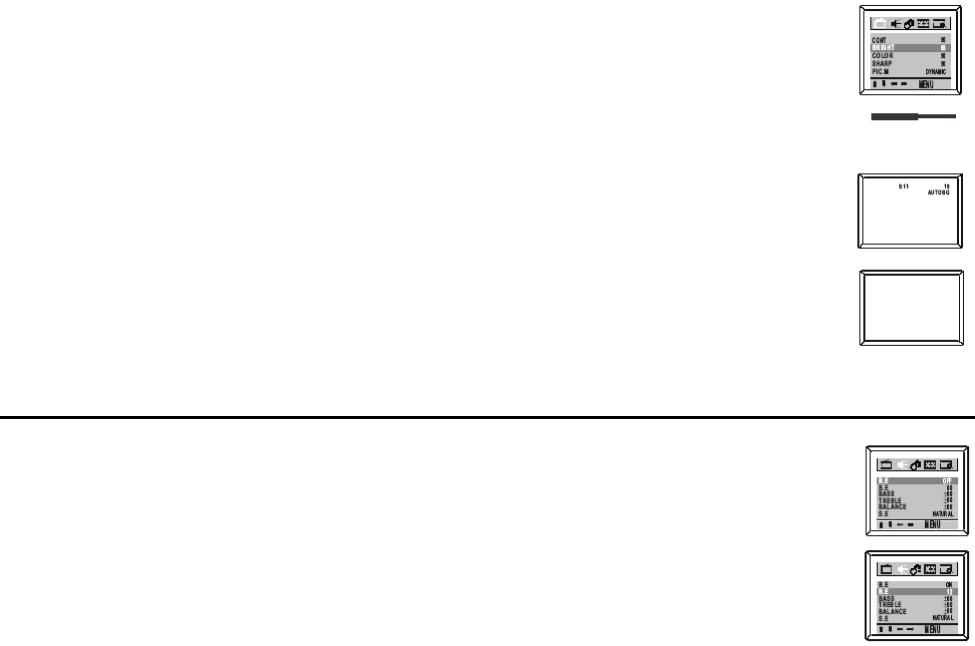
4.1.4 SELECT MENU ENTRIES
∙ After selecting function menu, press PROGRAM UP/DOWN button to move cursor up/down to select the menu entries (e.g. The BRIGHT of picture menu is selected if it is highlighted with red color).
4.1.5 ADJUST OPTION
∙ Press VOLUME UP/DOWN button to adjust the data or status. E.g., The BRIGHT is adjusted to 65% as shown.
∙ The menu will time out and disappear from the screen when you finish, or you can press the MENU button to clear the menu from the screen.
4.1.6 DISPLAY
∙ Press DISPLAY button on remote control to display the current status of the TV set, such as the current channel No. (or AV input), the color & sound system.
∙ Press DISPLAY button again, current time will displayed on the top screen if you set correct time in menu entry CLOCK of TIMER.
4.1.7 MUTE
∙Press MUTE button on remote control to temporarily turn off the sound and the word MUTE as shown will appear on the screen. Press the Mute button once again to restore the sound. Besides, press VOLUME UP button also can restore the normal sound output.
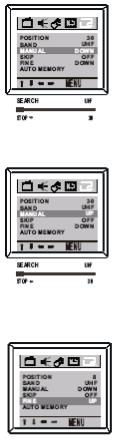
4.2SOUND ADJUSTMENTS
4.2.1 BASS ENHANCEMENT
∙Activate SOUND menu.
∙Press PROGRAM UP/DOWN button to select B.E OFF (or ON).
∙Press VOLUME UP/DOWN to turn B.E on or off.
∙Press PROGRAM UP/DOWN button to select B.E 00.
∙Press VOLUME UP to adjust B.E 00 to your desired level, e.g. 12, at the same time B.E will change to ON automatically if B.E is in OFF mode.
NOTE: You can press B.E button on the remote controller directly to turn B.E function on or off.
13

4.2.2 BASS, TREBLE, BALANCE
∙Activate SOUND menu.
∙Press PROGRAM UP/DOWN button to select BASS.
∙Press VOLUME UP/DOWN to adjust for your favorable sound, e.g., adjust BASS to +30.
∙The same adjusting procedure is applicable to treble and balance.
BASS: Decrease the low frequency (bass) by adjusting toward -50, increase the low frequency (bass) by adjusting toward +50. TREBLE: Decrease the high frequency (treble) by adjusting toward -50,increase the high frequency (treble) by adjusting toward +50.
BALANCE: Adjust the sound source position from left speaker to center to right speaker as balance is adjusted from L(-50) to R(+50).
4.2.3 SOUND EFFECT
∙Activate SOUND menu.
∙Press PROGRAM UP/DOWN button to select S.E.
∙Press VOLUME UP/DOWN to adjust to your desired setting. NATURAL NEWS
NEWS SPACIAL
  PERSONAL
4.2.4 SURROUND SOUND
∙Press SURROUND button on the remote controller to adjust to your desired setting:
∙SURROUND OFF SIMULATED
 SURROUND 1
 SURROUND 2
4.3CHANNEL PRESET
Please preset all the active channels in your area to the TV set before you enjoy with the TV programs.
4.3.1 AUTO SEARCH
All the active channels will be stored automatically from channel No. 1 and upward in order.
∙Activate PRESET menu.
∙Press the PROGRAM DOWN button to select AUTO MEMORY.
14
∙Press the OK button to start the auto searching, and then all available channels will be stored from No.1 and upward in order. Auto-searching will stop after all the frequency bands are searched, and the program of the first searched, channel 1, will show. If you want to exit auto search, just pressing the VOLUME DOWN button.
∙The menu will time out and disappear from the screen when you finish, or you can press the MENU button to clear the menu from the screen.
4.3.2 MANUAL SEARCH
To preset the TV channel to your desired position number, manual searching should be used.
∙Activate PRESET menu.
∙Press the PROGRAM UP/DOWN button to select POSITION, then press the VOLUME UP/DOWN button to select the program No., e.g. 30.
∙Press the PROGRAM UP/DOWN button to select BAND, then press the VOLUME UP/DOWN button to select the frequency band among VHFL/ VHFH/UHF.
∙Press the PROGRAM UP/DOWN button to select MANUAL, then press the VOLUME UP/DOWN button to start the channel searching upward or downward from the current position of this channel and current frequency band.
Note:
∙If the searched channel is not as your desired, you can simply restart the searching upward or downward by pressing the VOLUME UP/DOWN button.
∙To stop manual searching, press the VOLUME DOWN button when searching upward, or press VOLUME UP button when searching downward.
∙The menu will time out and disappear from the screen when you finish, or you can press the MENU button to clear the menu from the screen.
4.3.3 FINE TUNE
Fine tuning function may improve the receiving quality for some weak /unstable Channels by adjusting the channel frequency manually.
∙Select your desired TV channel by digit keys or PROGRAM UP/DOWN buttons.
∙Activate PRESET menu.
∙Press the PROGRAM UP/DOWN button to select FINE, then press the VOLUME UP/DOWN button to fine tune the channel upward or downward until satisfied picture and sound quality are achieved.
∙The menu will time out and disappear from the screen when you finish, or you can press the MENU button to clear the menu from the screen.
NOTE: SIMULATED is used when a mono broadcast is received. SURROUND 1 and SURROUND 2 are used when a stereo broadcast is received.
15

4.3.4 CHANNEL ADJUSTMENT
∙After the auto or manual search, you may want to rearrange the program numbers in which the channels are stored, channel adjustment function may be useful to you.
∙Activate FEATURE menu.
∙Press the PROGRAM UP/DOWN button to select CH. ADJUST.
∙Press the OK button to display CH ADJUST menu entries as shown.
∙Press the PROGRAM UP/ DOWN button to select PRESENT, then press the VOLUME UP/DOWN button to select the program number you want to change, e.g. 30.
∙Press the PROGRAM UP/DOWN button to select STORE TO, then press the VOLUME UP/DOWN button to select the program No. to be replaced, e.g. 22, that means to replace channel 22 by 30.
∙Then press the PROGRAM UP/DOWN button to select sure and press the OK button to confirm the setting.
∙If you want to set other channel, follow the above procedure.
∙The menu will time out and disappear from the screen when you finish, or you can press the MENU button to clear the menu from the screen.
4.3.5 PROGRAM SKIP
After the auto search, some fault stations may be memorized because the TV station broadcasts with different frequencies for your and your neighborhood regions. These additional stations are weak and should be removed from channel memory.
∙Activate PRESET menu.
∙Press the PROGRAM UP/ DOWN button to select POSITION, then press the VOLUME UP/DOWN button to select the channel No. you want to skip, e.g. 18.
∙Press the PROGRAM UP/DOWN button to select SKIP.
∙Press the VOLUME UP button to select ON to confirm. If you do not want to skip this channel, or want to find out skipped channel, just press the VOLUME DOWN button to select OFF.
∙If you want to skip other channel, follow the above procedure.
∙The menu will time out and disappear from the screen when you finish, or you can press the MENU button to clear the menu from the screen.
4.3.6 FAVORITE CHANNEL SETTING
You can store six favorite channels in memory and preview those channels by FAVORITE button.
∙Activate FEATURE menu.
∙Press the PROGRAM UP/DOWN button to select FAV.CH.
∙Press the OK button to display FAV.CH. menu entries as shown.
16
 Loading...