

Hyundai H-PS1201 User Manual [ru]

PORTABLE AUDIO SYSTEM
H-PS1201
ПОРТАТИВНАЯ
АУДИОСИСТЕМА
Instruction manual
Руководство по эксплуатации
Instruction manual
Dear customer!
Thank you for purchasing our product. For safety, it is strongly
recommended to read this manual carefully before connecting, operating
and/or adjusting the product and keep the manual for reference in future.
Description
2
1
3
4
10
5
89
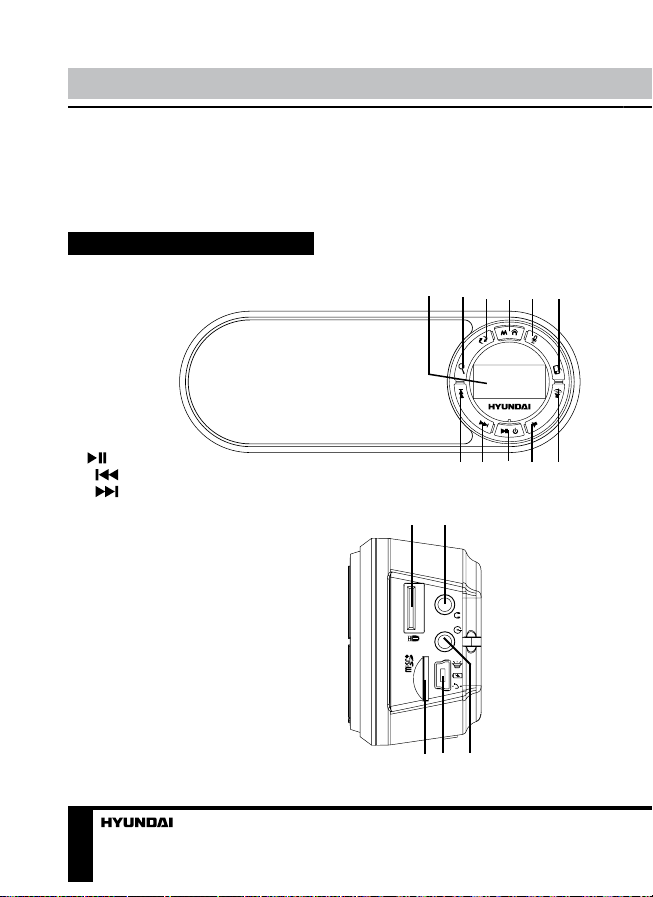
Front panel
1. Display
2. SEARCH button
3. REPEAT button
4. MODE/MENU
button
5. REC button
6. RADIO button
7. VOL+ Button
8. VOL- Button
9. /POWER button
10. button
11. button
Side panel
1. USB port
2. Earphone socket
3. AUX input
4. Mini-USB port
5. MicroSD card slot
11
1
2
6
7
4
3
5
2

Utilization of the product
If you want to dispose this product,
do not mix it with general household
waste. There is a separate collection
system for used electronic products
in accordance with legislation that
requires proper treatment, recovery
and recycling.
Please contact your local authorities
for the correct method of disposal.
By doing so, you will ensure that
your disposed product undergoes the
necessary treatment, recovery and
recycling and thus prevent potential
negative effects on the environment
and human health.
Important safeguards
• The instruction manual contains
important operating and maintenance
instructions. For your safety, it is
necessary to refer the manual. Keep
the manual for use in future.
• Do not hit or drop the unit.
• Do not expose the unit to
vibration, direct sunlight, too high or
low temperature or humidity.
• Do not disassemble the unit
yourself. Refer servicing to qualified
service personnel.
• When the battery is exhausted,
it should be removed from the set to
Instruction manual
prevent leakage.
Power supply
Power source
This unit is operated by a 3.7V BL5C, 1000 mA/h rechargeable lithium
ion battery (included) or via USB cable.
Battery installation
To install the battery:
1.) Remove the battery
compartment door.
2.) Follow the polarity to install the
accompanied lithium ion battery
3.) Replace the battery compartment
door.
WARNING:
• Be sure that the battery is installed
correctly.
• Only batteries of the same or
equivalent type as recommend are to
be used.
• If the unit is not to be used for an
extended period of time, remove the
battery to prevent damage or injury
from possible battery leakage.
• Do not dispose of the battery in
fire, the battery may explode or leak.
WARNING: The rechargable lithium
ion battery is a consumable and its
malfunction is not a warranty case.
General operations
Earphone socket
For private listening please insert
3
Instruction manual
the earphones (not included) into the
earphone socket (the speaker inside
the radio disconnects automatically),
now you can listen to the radio by
earphones.
Clock
Press and MODE/MENU button to
enter the menu. Using / buttons
choose SETTINGS and press MODE/
MENU button. Then select TIME
option and press MODE/MENU button
again.Set date and time with and
buttons and pressing MODE/
MENU button for confirmation. When
the time is set you will be returned to
SETTINGS menu.
AUX input
To connect an external audio device
(eg. MP3-player/cellphone), please use
a standard stereo cable with 3.5 mm to
3.5 mm plugs to connect the audio lineout of the external device to the AUX
input socket of this unit.
Card reader mode
You can play the audio files directly
from the plugged in the micro SD card
or USB-drive.
You can copy and delete files
from microSD card after the unit is
connected to the computer/laptop via
mini-USB cable.
Record
Press button, and choose the
recording mode. Press M button to
enter recording mode.
Press / button to pause when
recording, press again to continue
recording.
Press and hold M button for 3
seconds to stop and save the record to
your Micro SD card.
The device will automatically create
a “VOICE” folder on the Micro SD card.
You can celect and play the recorded
file from this folder.
Radio operation
• Press RADIO button. Radio will
start playing. Press MENU/MODE
button and use and buttons
to select AUTO SEARCH or MANUAL
SEARCH.
• When the station you need is
searched, enter the menu and select
SAVE STATION.
FM record
• Press REC button to start
recording. Press this button one more
time to pause/continue recording. Or
Press MODE/MENU button in radio
mode and choose FM RECORD to
start recording. Press this button one
more time to pause/continue recording.
• Press and hold /POWER button
to save the broadcast on a USB drive
or a microSD card.
Attention: you must insert a USB
drive or a microSD card to operate this
4

Instruction manual
function.
POWER ON timer
• Enter the menu and select
SYSTEM SETTINGS.
• Select TOOL and go to TIME FM
SET.
• If the first option is CLOSE TIME
FM, change it to OPEN.
• Select FM TIME and set the time
for the device to turn on the radio.
Playback operations
• Use and buttons to select
tracks.
• Press MODE/MENU button
during the playback and select EQ
SETTINGS. You can change presets
between Normal, Rock, Pop, Classic,
Soft, Jazz, DBB and SRS WOW.
• Press MODE/MENU button during
the playback and select CYCLE MODE
to switch between Normal, Cycle one,
Folder, Cycle folder, Cycle all, Random
and Intro.
• The system supports the LRC
format, so if you have a file with lyrics
on your USB-drive/microSD card they
will be displayed on the screen during
the playback.
Warning: The name of the LRC file
should be identical to the audio file
name.
Repeat mode
During the playback, press REPEAT
button to select the “Repeat Mode”,
and repeat the operation again, till an
icon“A-B” will appear on the display.
When the “A” icon starts flashing, press
button to set the beginning time. Then
“B” will start flashing. Press button
again to set the end time. The system
will repeat the section you selected 5
times, then return to normal play.
USB/SD operation
Connecting USB/SD
• Insert a USB device into the USB
port or insert a memory card into the
memory card slot. The playback will
start automatically. When Micro SD
card and USB device are both plugged
in, press MODE/MENU button and
select “Card Folder” or “U-disk Dir” to
switch to Micro SD card or USB device
input.
General USB/SD notes
• This unit is equipped with a USB
socket that can accept and play MP3/
WMA files stored on standard USB
flash (compatible with USB version 2.0)
up to 16 Gb.
• This unit is also equipped with a
microSD card socket that can accept
and play MP3/WMA files stored on
standard microSD cards up to 16 Gb.
Always switch off the unit or
change mode to another one before
removing a USB flash drive or microSD
card, to prevent damage to your USB
5
 Loading...