

Hyundai HLT 1711 Users Manual

Test Report No.: GETEC-E3-04-016
FCC Class B Certification
APPENDIX H
: USER’S MANUAL
EUT Type: 17” LCD TV/Monitor
FCC ID : RQQHLT-1711
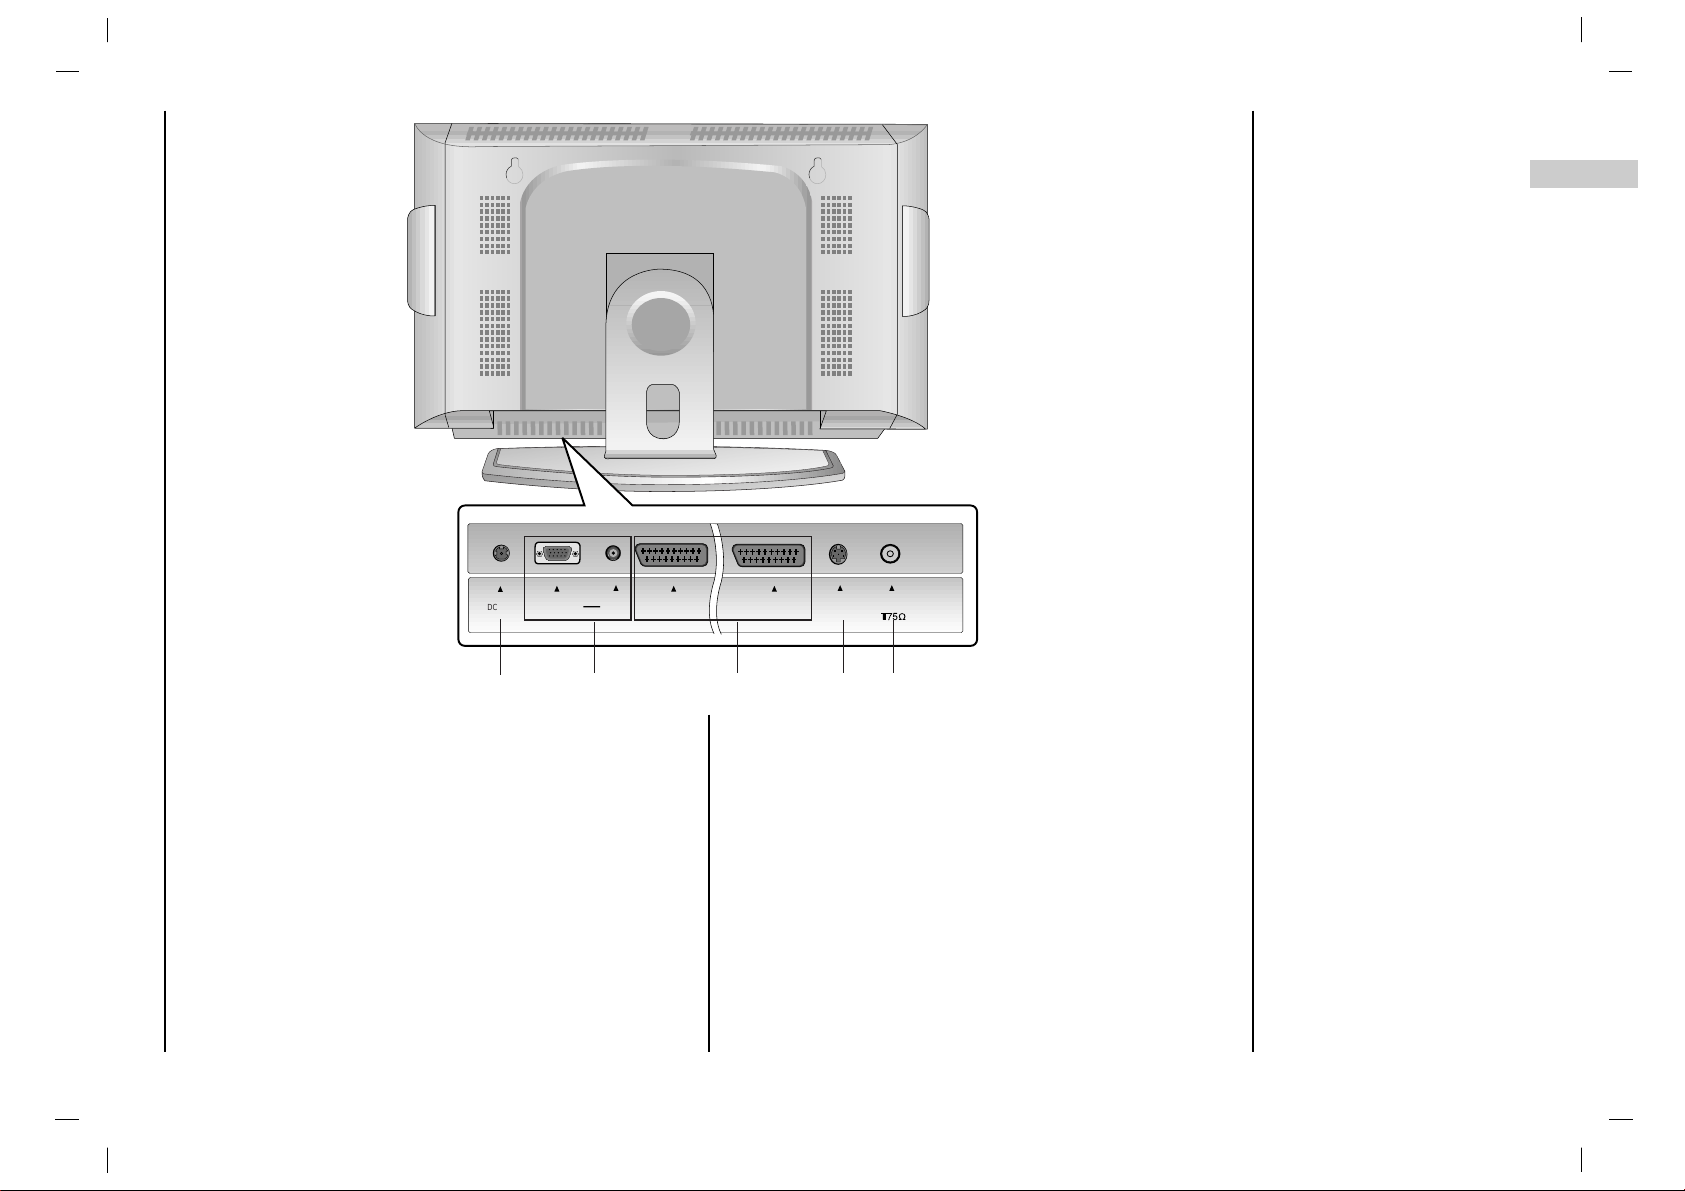
1. POWER CORD SOCKET
2. RGB INPTUT(PC/DTV INPUT) / L/R IN
Connect the set output socket of the PERSONAL COMPUTER to this socket.
3. EURO SCART SOCKET
connect the euro scart socket of the VCR to these sockets.
4. S-VIDEO INPUT
connect video out from an S-VIDEO VCR to the SVIDEO input.
5. AERIAL SOCKET
connect the RF socket of the VCR to the aerial sockets.
Connections of
Back panel
7
EN
( )
DC-12VDC-12V
RGB I NRGB I N
(PC /DT V I NPUT)(PC /DT V I NPUT)
L/R INL/R IN
AAV1V1
AAV2 V2
S-VIDEOS-VIDEO
ANTANT IN IN
1
2
3
5
4
8
Connection to
External equipment
( )
NN
PUT)PUT)
L/R INL/R IN
AAV1V1
AAV2 V2
S-VIDEOS-VIDEO
ANTANT IN IN
VCR
Aerial socket
1
1
S-VIDEO
OUT
IN
(R) AUDIO (L) VIDEO
( )
AAV2 V2
S-VIDEOS-VIDEO
ANTANT IN IN
Watching VCR
2
2
< Back panel of the set >
< Back panel of the set >
< Back panel of the VCR>
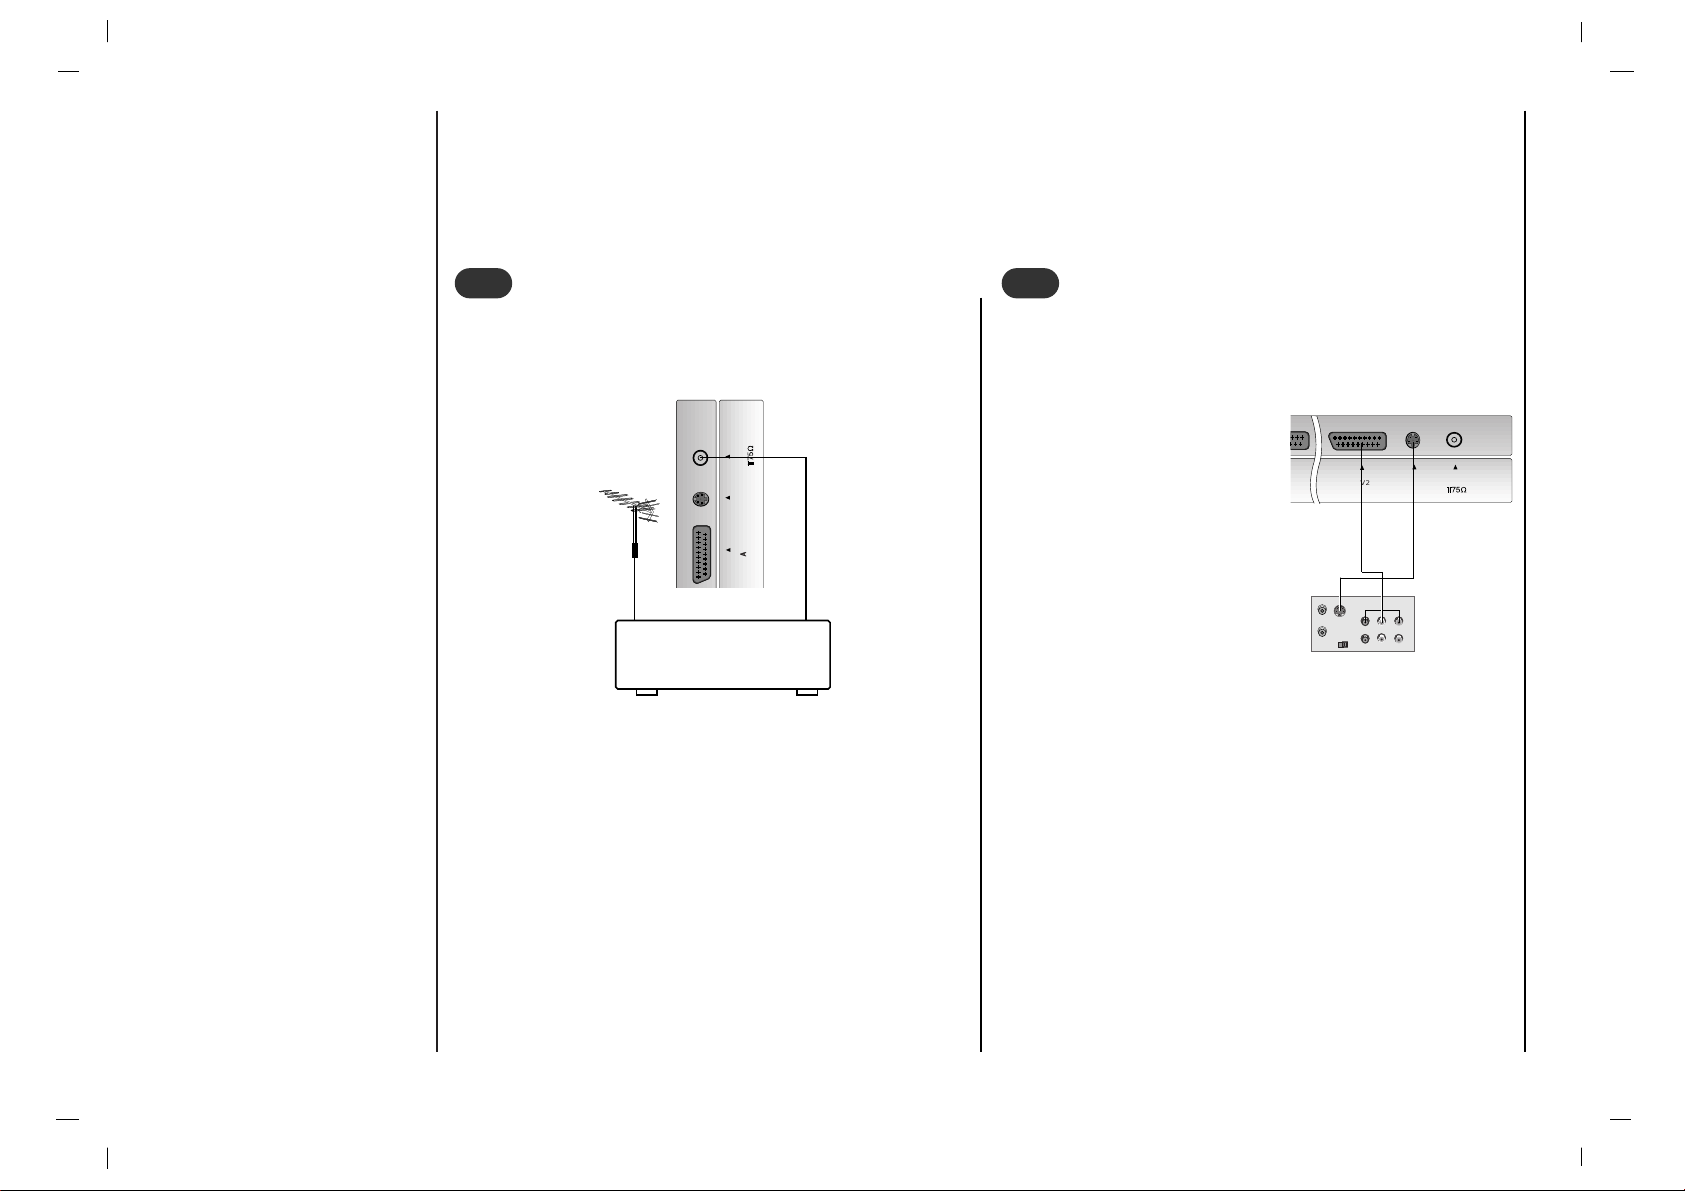
You can connect additional equipment, such as VCRs, camcorders etc. to your set. Examples are shown below.
1.Connect the RF out socket of the VCR to the aerial
socket of the set.
2.Connect the aerial cable to the RF aerial in socket of
the VCR.
3.Store the VCR channel on a desired programme number using the ‘Manual programme tuning’ section.
4.Select the programme number where the VCR channel
is stored.
5.Press the PLAY button on the VCR.
- If you connect an S-VIDEO
VCR to the S-VIDEO input,
the picture quality is
improved ; compared to connecting a regular VCR to the
Video input.
If a 4:3 picture format is
used;the fixed imgae may
remain visible on the screen.
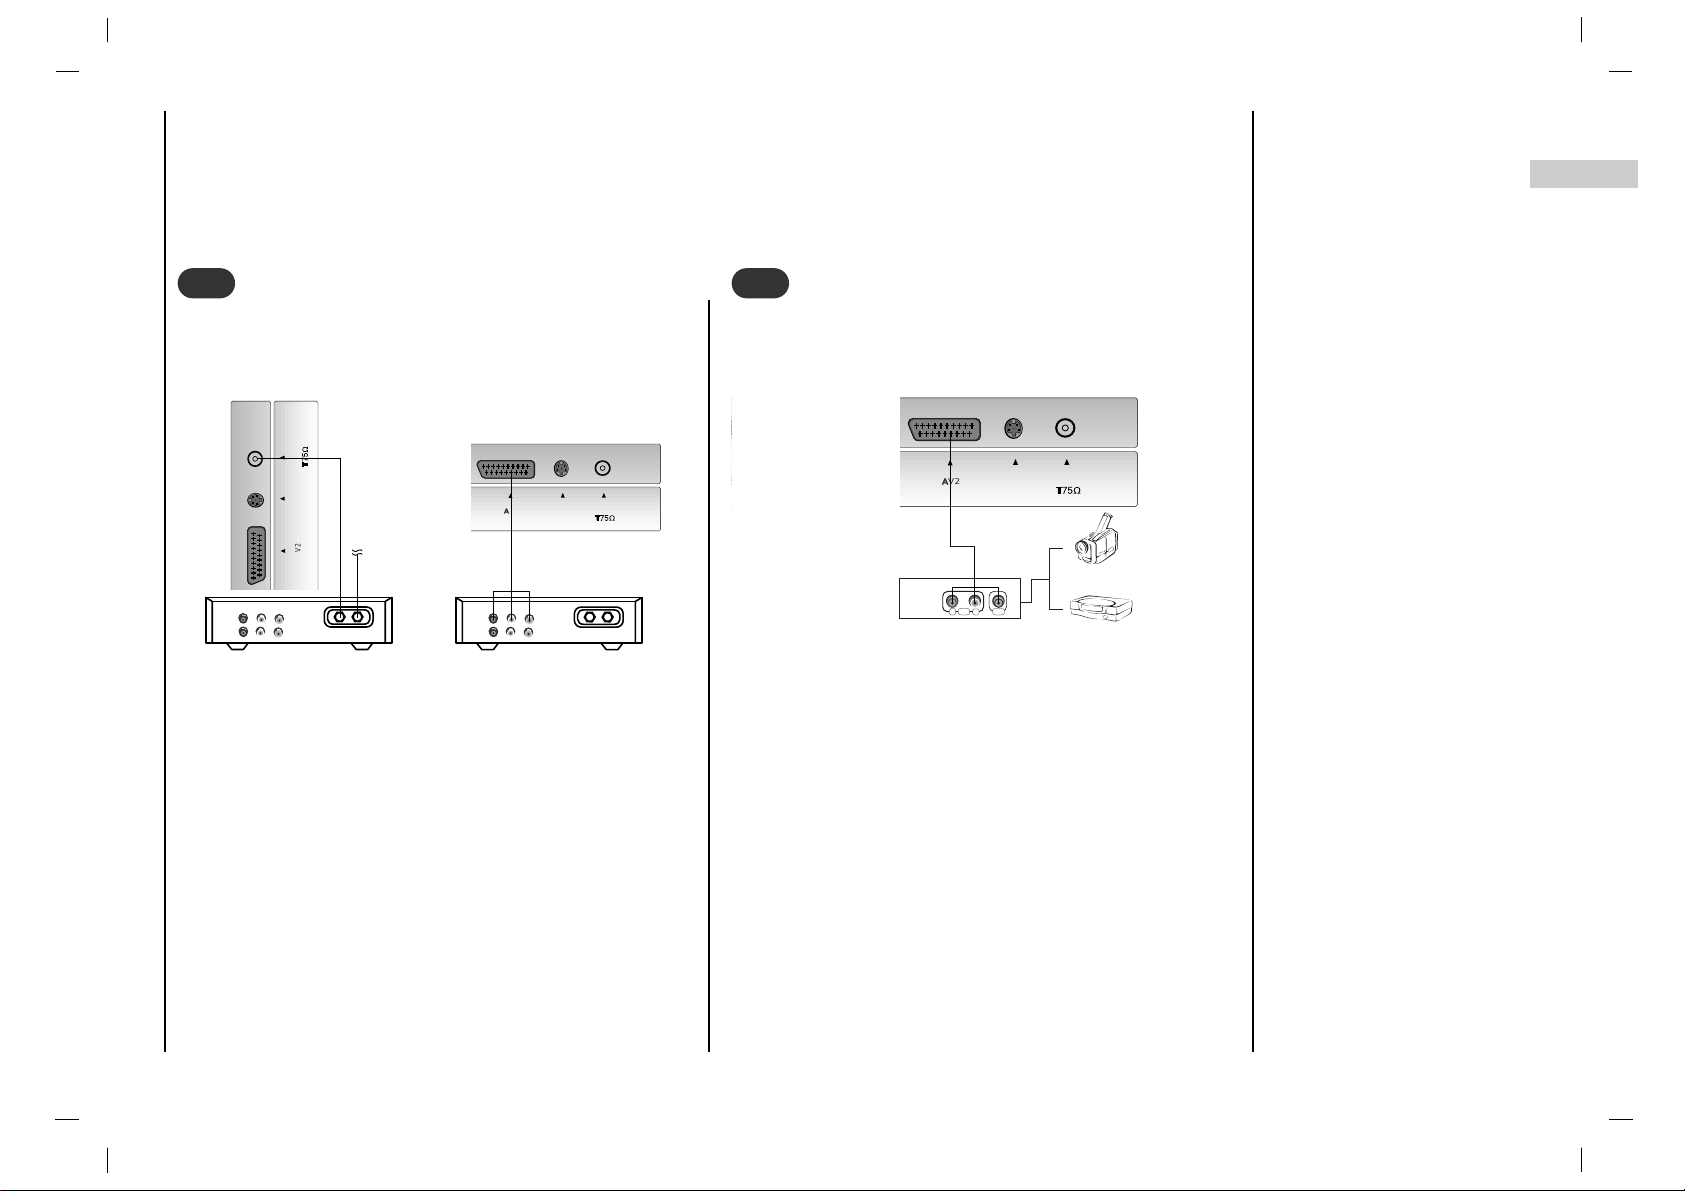
- To avoid picture noise (interference), leave an adequate
distance between the VCR
and set.
1.Use the INPUT SELECT button on the remote control
to select AV1 or AV2.
(If connected to S-VIDEO, select the SAV external input
source.)
2. Insert a video tape into the VCR and press the PLAY
button on the VCR.
(See VCR owner’s manual)
9
EN
Connection to
External equipment
Watching Cable TV
( )
DC-12VDC-12V
RGB INRGB IN
(PC/DTV INPUT)(PC/DTV INPUT)
L/R INL/R IN
AAV1V1
AAV2 V2
S-VIDEOS-VIDEO
ANTANT IN IN
( )
AAV2 V2
S-VIDEOS-VIDEO
ANTANT IN IN
AAV1V1
Cable
TV
(R) AUDIO (L) VIDEO
VCR
RF
Cable
TV
(R) AUDIO (L) VIDEO
VCR
RF
3
3
Watching external AV source
R L
AUDIO VIDEO
( )
V INPUT)V INPUT)
L/R INL/R IN
AAV1V1
AAV2 V2
S-VIDEOS-VIDEO
ANTANT IN IN
4
4
< Back panel of the set >
< Back panel of the set >
< Back panel of the external equipment >
Camcorder
Video game set
< Back panel of the set >
< Cable Box >
For cable Box
After subscribing for a local cable TV station and
installing a converter you can watch cable TV.
For further information of cable TV, contact the local TV
station.
In using connection 1
1.Select programme number in programme switch of
cable box.
2.Match the set programme with selected programme of
cable box.
3. Select your desired programme with the remote control
for cable box.
In using connection 2
1.Use the INPUT SELECT button on the remote control
and select AV1 or AV2.
2.Tune to cable service provided channels using the
cable box.
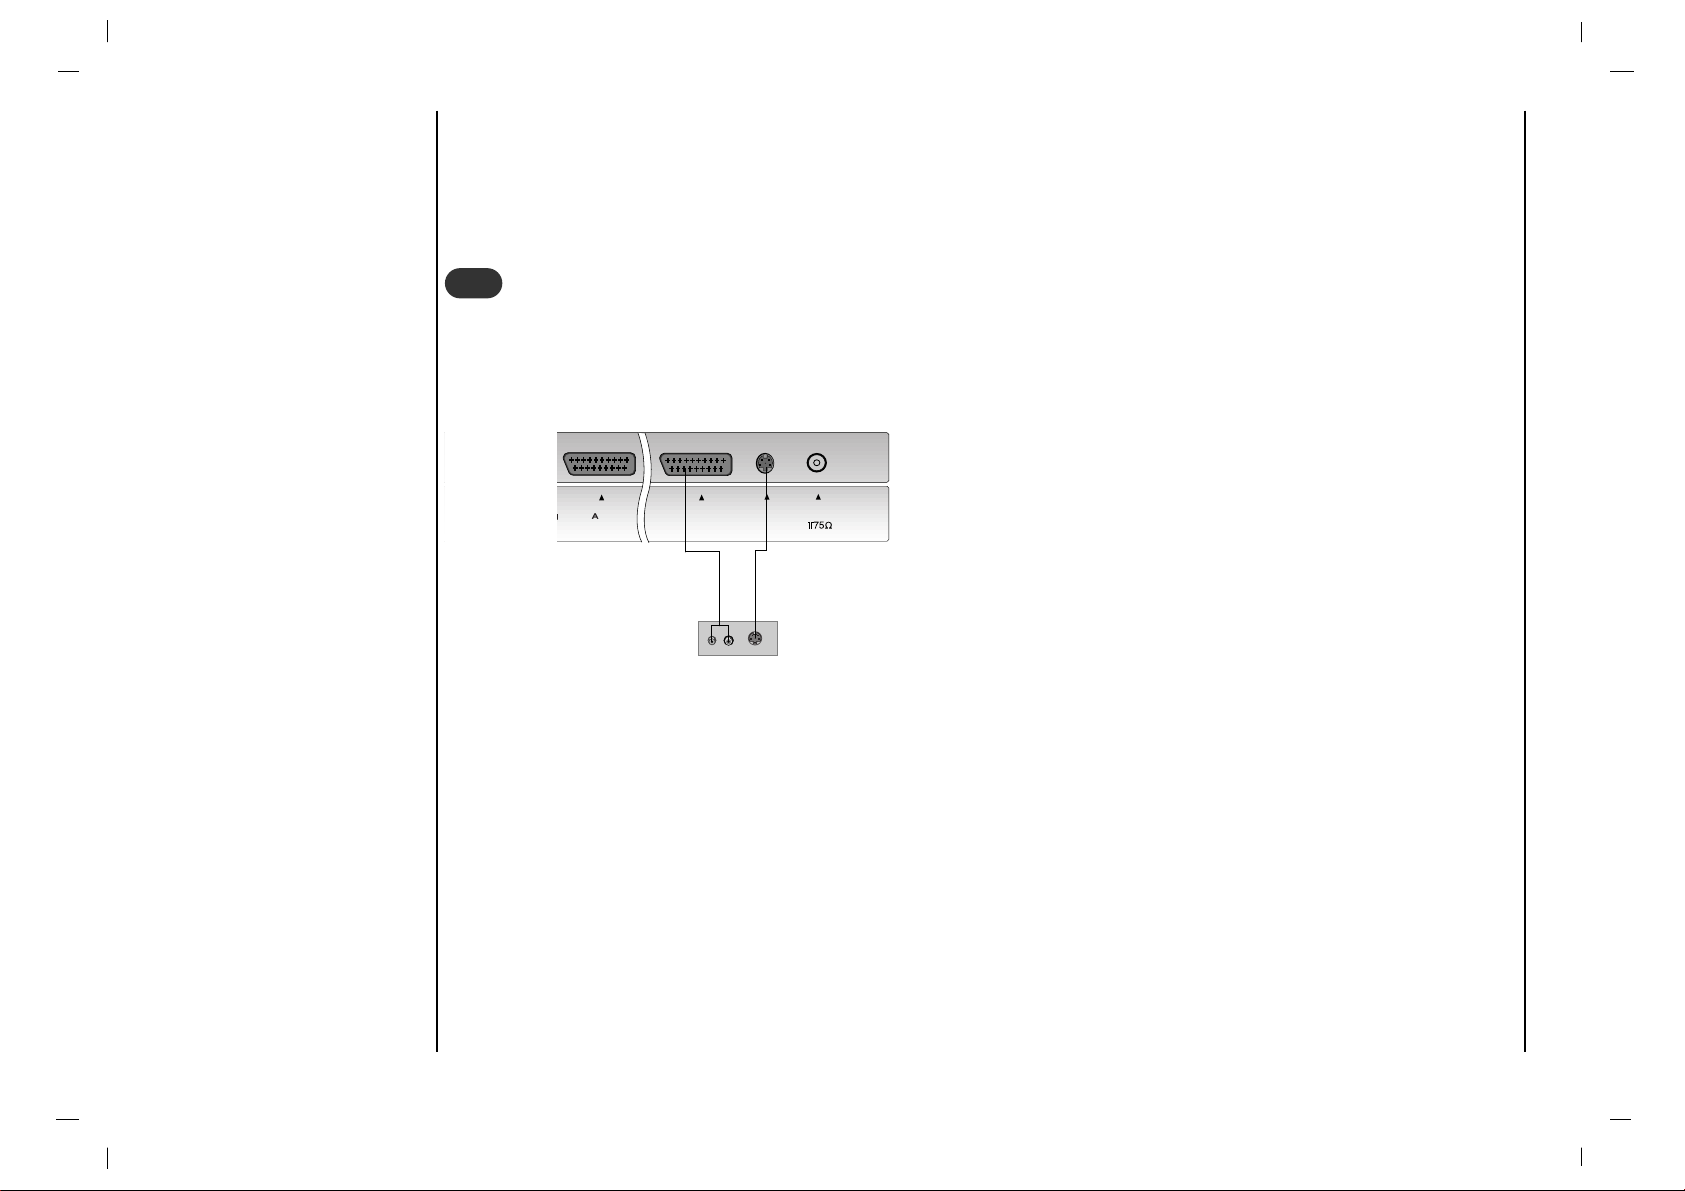
When connecting the set to an external source,match
the colours of AUDIO/VIDEO input jacks on the set with
the output jacks on the audio/video eqipment : Video =
yellow, Audion(Left) = white, Audio (Right) = red.
1.Use the INPUT SELECT button on the remote control
to select AV1 or AV2.
2.Operate the corresponding external equipment.
See external equipment operating guide.
Connection to
External equipment
10
How to connect
Connect DVD Video or S-Video output to VIDEO or S-VIDEO input and DVD Audio outputs to AUDIO INPUTof the
TV.
How to use
1.Turn on the DVD player, and insert a DVD.
2.Use INPUT SELECT button on the remote control to select AV1 or AV2. Refer to the DVD player's manual for oper-
ating instructions.
Watching DVD
(R) AUDIO (L)
S-VIDEO
()
RGB IN
(PC/DTV INPUT)
L/R IN
AV1
AV2
S-VIDEO
ANT IN
5
5
< Back panel of the set >
< Back panel of a DVD player >
EN
Connection to
External equipment
11
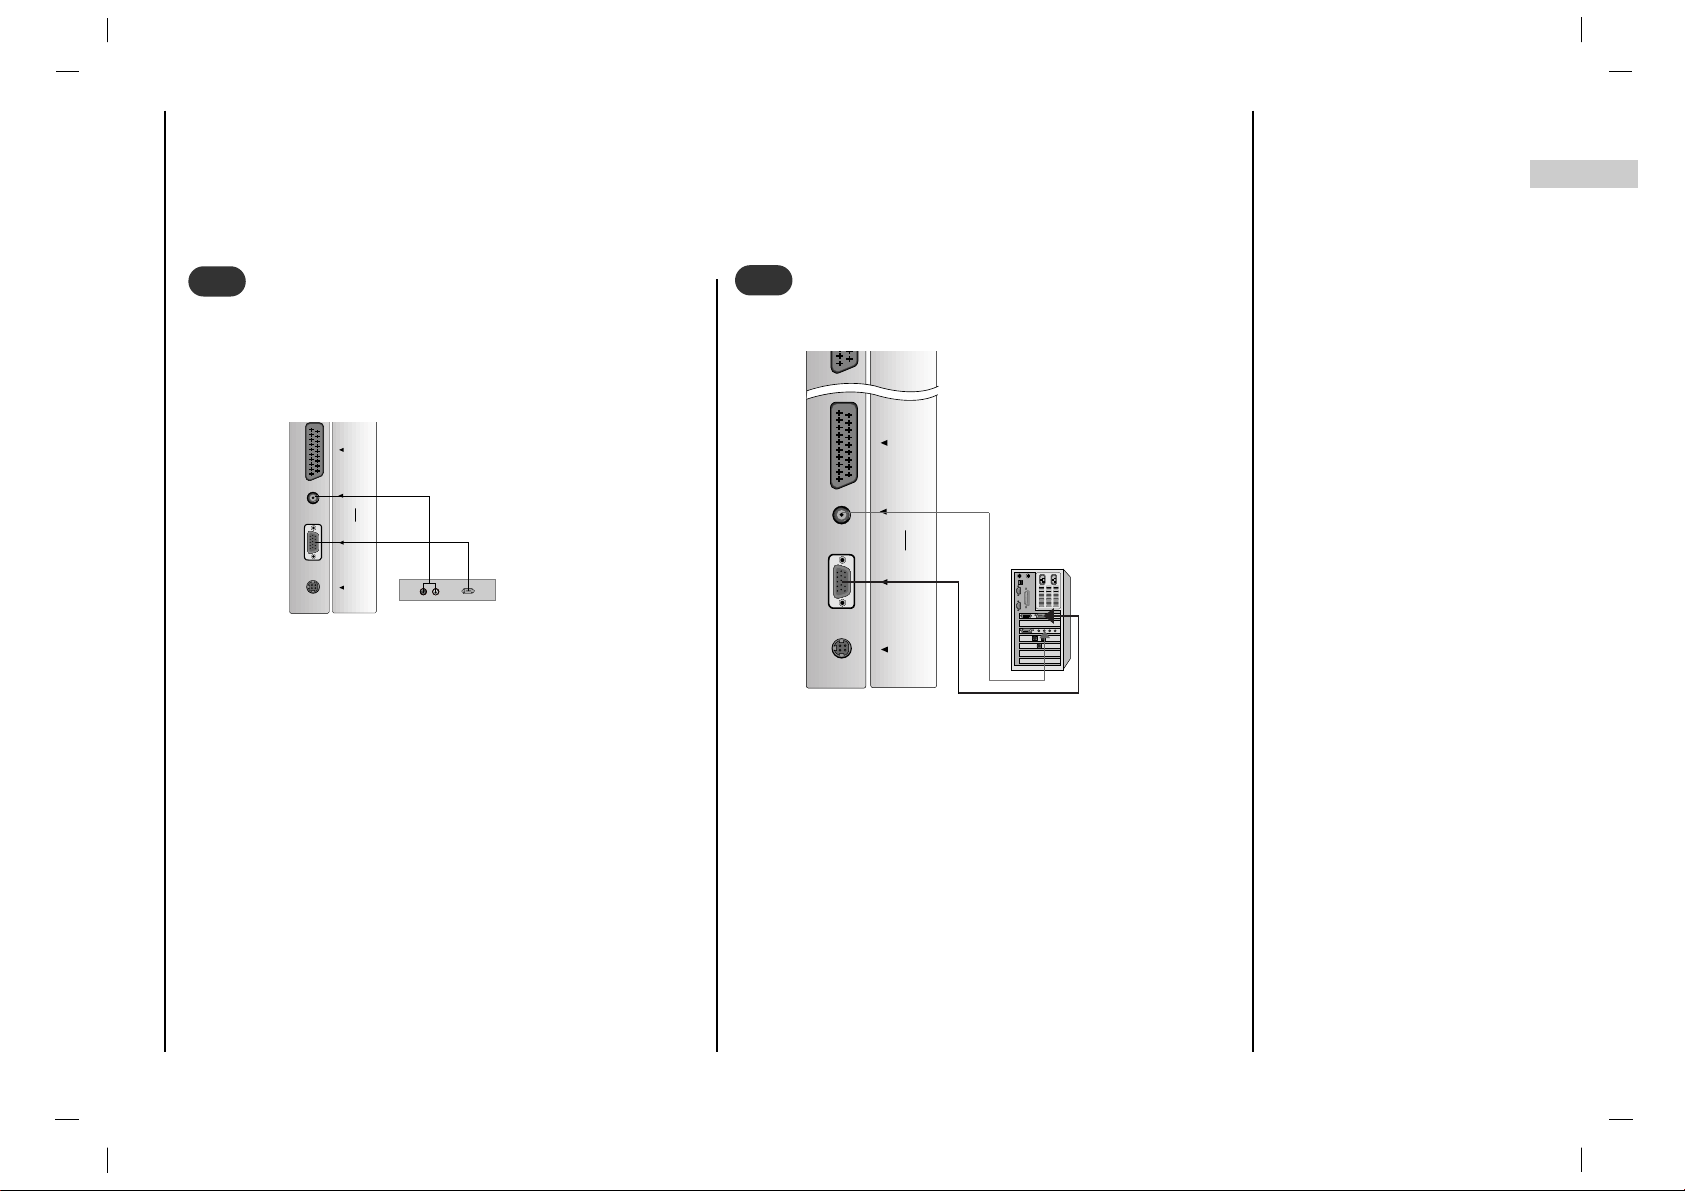
1.Connect the signal cable from the monitor output
socket of the PERSONAL COMPUTER to the RGB
INPUT (PC/DTV INPUT) socket of the set.
2.Connect the audio cable from the PC to the L/R IN
sockets of the set.
3.Press the INPUT SELECT button to select PC.
4.Switch on the PC, and the PC screen appears on the
set.
Connecting PC
DC-12VDC-12V
RGB INRGB IN
(PC/DTV INPUT)(PC/DTV INPUT)
L/R INL/R IN
AAV1V1
7
7
< Back panel of the set >
- To watch digitally broadcast programs, purchase and connect a digital set-top box.
How to connect
Use the set’s RGB jack for video connections,
depending on your set-top box connector. Then,
make the corresponding audio connections.
How to use
1.Turn on the digital set-top box. (Refer to the
owner’s manual for the digital set-top box.)
2.Use INPUT SELECT button on the remote con-
trol to select PC.
Watching DTV
(R) AUDIO (L)
DTV OUTPUT
DC-12VDC-12V
RGB INRGB IN
(PC/DTV INPUT)(PC/DTV INPUT)
L/R INL/R IN
AAV1V1
AAV2 V2
6
6
< Back panel of the set >
< Back panel of a digital SET-TOP BOX >

1212
Press the FF / GG button to
adjust the volume.
Press the POWER,
DD / EE
,
INPUT SELECT or NUMBER buttons to switch it on
fully.
Press the POWER button.
The set reverts to standby
mode.
Pull out mains plugs to
switch the set off.
Note : If, while the set is
switched on, the mains plug
is disconnected the set will
switch to standby or power
on when the mains plug is
replaced in the mains power
socket.
Basic operation
1
1
On and Off
3
3
Volume adjustment
Press the Q.VIEW button to
view the last programme
you were watching.
Note : This function works
only when Favourite pro-
gramme
is set to Off.
Otherwise each press of this
button will select a stored
favourite programme.
4
4
Quick view
You can select a programme
number with the DD / EE or
NUMBER buttons.
2
2
Programme selection
Press the MUTE button. The
sound is switched off and
the display
W
appears.
You can cancel it by pressing the MUTE,
FF / GG, SSM,
I/II button.
5
5
Mute function
The menu can be displayed
on the screen in your
desired language. First
select your language.
Repeatedly press the
MENU button to select the
Special menu.
Press the
DD / EE
button to
select
Language.
Press the OK button.
Press the
DD / EE
button to
select your desired language.
Press the OK button.
All the on screen displays
will appear in the selected
language.
Repeatedly press the
MENU button to return to
normal TV viewing.
6
6
On screen language
selection (option)
EN
13
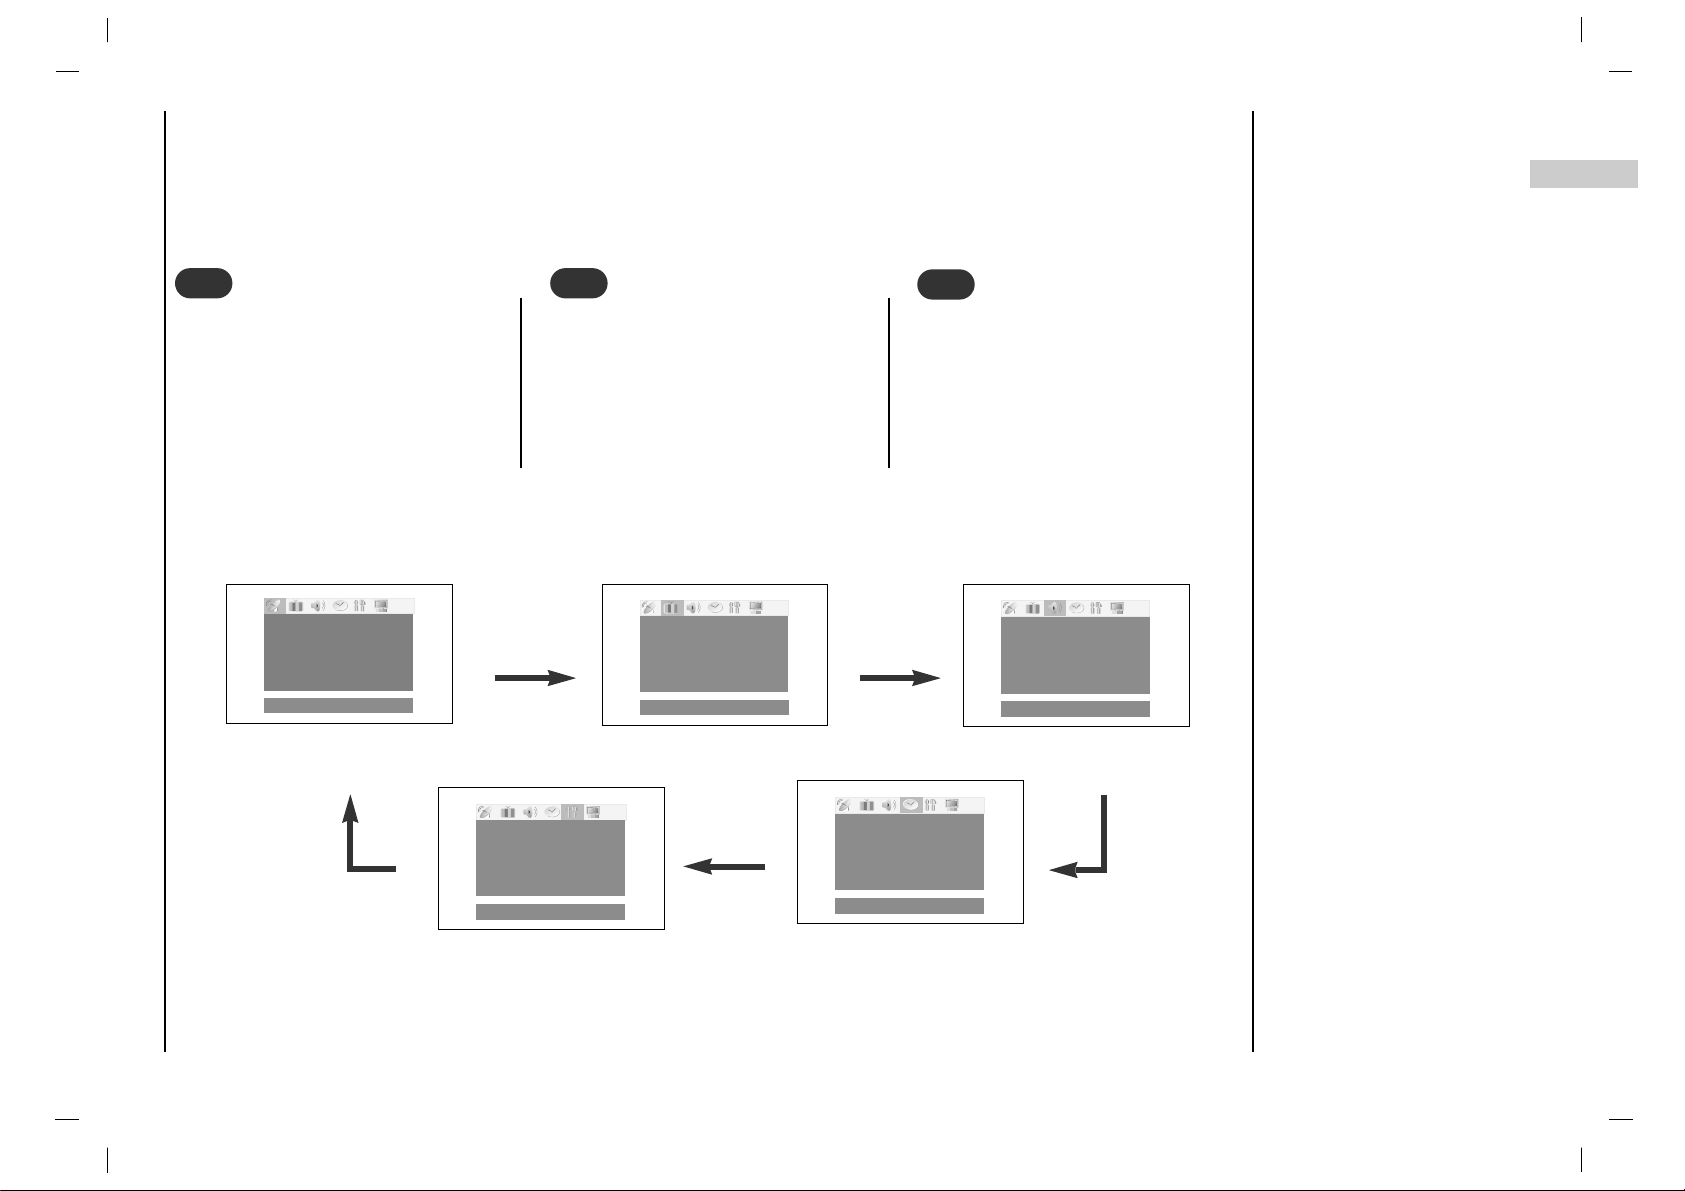
The dialogue between you and your set takes place on screen with an operator menu.
The buttons required for the operating steps are also displayed.
Repeatedly press the MENU button to display each menu.
On screen menus
Menu selection
1
1
Press the
DD / EE
button to select a
menu item.
The selected menu item changes
from white to red.
2
2
Press the FF / GG button to change
the setting of a menu item or OK
button to display the sub menu.
3
3
Picture menu
()O}{OOKOMENUOEXIT
Station menu
()OOKOMENUOEXIT
Sound menu
()OOKOMENUOEXIT
Time menu
()O}{OOKOMENUOEXIT
Special menu
()O}{OMENUOEXIT
AutoOprogramme
ManualOprogramme
Program meOedit
FavouriteOprogramme
CSM Normal
Contrast 100
Brightness 95
Colour 85
Sharpness 80
Equalizer
Balance 0
AVL Off
Clock
-i-i:i-i-
AM
OffOtime
-i-i:i-i-
AM
Off
OnOtime
-i-i:i-i-
AM
Pr. 1
VOL. 30
Off
Input TV
ChildOlock Off
AutoOsleep Off
Language
1414
Up to 100 TV stations can be stored in this set by programme numbers (0 to 99). Once you have preset the stations, you will
be able to use the
DD / EE
or NUMBER buttons to scan the stations you have programmed. Stations can be tuned using automatic or manual modes.
All stations that can be received are stored by this method. It is recommended that you use auto programme during installation of this set.
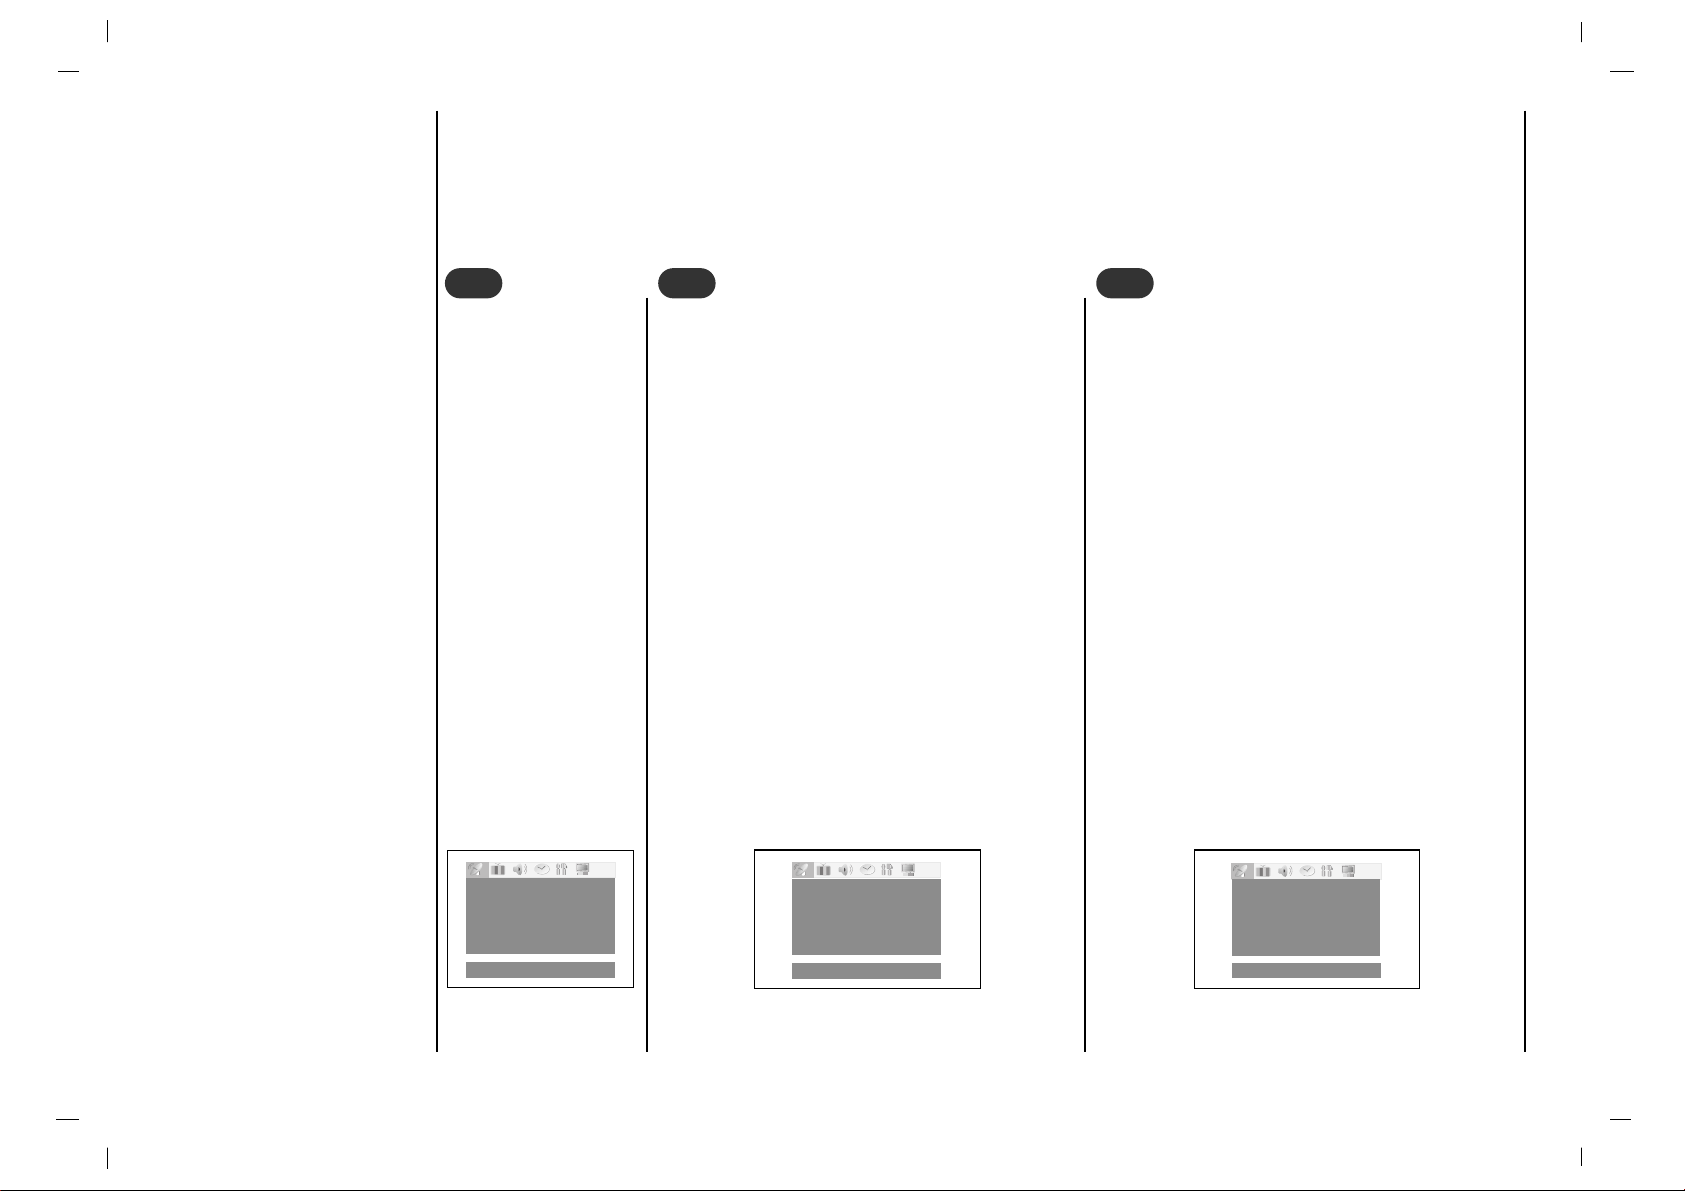
Repeatedly press the
MENU button to
select the Station
menu.
Setting up TV stations
Auto programme tuning
1
1
Press the
DD / EE
button to select Auto pro-
gramme
.
Press the OK button to display the
Auto pro-
gramme
menu.
Press the
DD / EE
button to select System.
Select a TV system with the
FF / GG button;
L : SECAM L/L’(France)
BG : PAL B/G, SECAM B/G (Europe/East
Europe)
I : PAL I/II (U.K./Ireland)
DK: PAL D/K, SECAM D/K (East Europe)
Press the
DD / EE
button to select Storage
from
.
Select the beginning programme number with
the
FF / GG button or NUMBER buttons. Any
number under 10 is entered with a numeric Ô
0Õ
in front of it, i.e. Ô
05Õ for 5.
Press the OK button.
2
2
Press the
DD / EE
button to select Start.
Press the OK button to begin auto programming.
All receivable stations are stored. The station
name is stored for stations which broadcast
VPS (Video Programme Service), PDC
(Programme Delivery Control) or TELETEXT
data. If no station name can be assigned to a
station, the channel number is assigned and
stored as
C (V/UHF 01-69) or S (Cable 01-47),
followed by a number.
To stop auto programming, press the MENU
button.
When auto programming is completed, the
Programme edit menu appears on the
screen. See the ‘Programme edit’ section to
edit the stored programme.
Repeatedly press the MENU button to return
to normal TV viewing.
3
3
()O}{OMENUOEXIT
()O}{OMENUOEXIT
MENU
1
2%
System BG
Storage Ofrom 1
Start
System BG
Storage Ofrom 1
Start
System BG
StorageOfrom 1
Start CO002
 Loading...