

Hyundai H-ARI17-07H/I, H-ARI17-09H/I, H-ARI17-12H/I, H-ARI17-18H/I, H-ARI17-24H/I User Manual [ru]
...
Электрический кондиционер воздуха
Cплит-система инверторного типа
RU
Руководство по эксплуатации
Гарантийный талон
Electric air conditioner
Split system Inverter
Модели / Models
Внутрениий блок
Indoor unit
Наружный блок
Outdoor unit
Instruction manual
EN
Warranty card
H-ARI17-07H/I
H-ARI17-09H/I
H-ARI17-12H/I
H-ARI17-18H/I
H-ARI17-24H/I
H-ARI17-07H/O
H-ARI17-09H/O
H-ARI17-12H/O
H-ARI17-18H/O
H-ARI17-24H/O
www.hyundai-hvac.com

2.
CONTENTS
Electric air conditioner (split system)
EN
1.Important information
2.Safeguards
3.Specications
4.Appliance description
5.Delivery set
6.Appliance control
Control panel for indoor unit
Remote control board
7.Operating modes
8.Maintenance
3
3
4
6
6
7
8
9
9
10

Electric air conditioner (split system)
3.
Dear Customer!
Thank you for a shrewd choice and purchase of Hyundai portable electric air conditioner.
It will serve you for a long time.
1. IMPORTANT INFORMATION
The appliance is designed for air cooling in domestic premises. The manufacturer reserves
the right to introduce changes in design, conguration and processing of the article with a
view to improve its properties without any prior notication of customers. There may be some
misprints in text and digital notations of the present manual.
If aer reading of this manual you have any questions concerning work and operation of the
appliance, please, refer to a shop assistant or to a specialized service center for further explanations.
The article has a label with all the needed technical data and other useful information about
the appliance. Use the appliance only for its intended purpose indicated in this manual.
2. SAFEGUARDS
1. Don’t try to install the conditioner by yourself. Call for a qualied installation specialist.
2. While using the air conditioner, it is necessary to observe several precautions. Incorrect operation due to ignoring of precautions may result in personal injury of a user and other people, as
well as in damaging of their property.
3. The electric appliance should be under observation while operated, especially if there are any
children near it.
4. Don’t pass your ngers or foreign objects through an air outlet grille of indoor and outdoor
units, since it may result in a trauma caused by a revolving fan.
5. Don’t let children turn the conditioner on by themselves. Children may turn the conditioner on
only under the care of adults.
6. Don’t try to repair the conditioner by yourself. Internal units of the conditioner carry a voltage
and it is life-threatening! For repair of the appliance refer to an authorized service center.
7. Don’t use the appliance if it is faulty, or if it was dropped or damaged.
8. Don’t open a front panel of the appliance during its work.
9. Don’t dismantle and modify the appliance.
10. Unplug the conditioner immediately, if it emits strange odours or smoke.
11. Don’t splash and pour water and other liquids on the conditioner.
12. Always unplug the conditioner during a lighting storm.
13. Always unplug the conditioner, when it is not used.
14. Before cleaning and maintenance of the conditioner unplug it. Cleaning and maintenance
should be performed in accordance with instructions of this manual.
15. To ensure the eective work of the conditioner, operate it in environment described in the
present manual.
16. Don’t use dangerous chemicals for cleaning of the appliance and don’t let them on the appliance.
17. When removing an air lter, don’t touch metal parts of the appliance.
18. To avoid overheating and risk of ash re, as well as damage of internal electric network, don’t
change the length of a power cord and don’t connect the appliance via extension cords.
19. To avoid electrical hazards, damaged power cord must be changed only at authorized service
centers qualied professionals.
20. To avoid risk of electric shock, do not place the power cord near a heater and ammable or
combustible substances.
21. Do not start or stop the unit by connecting or disconnecting electrical power.
22. To avoid electric shock, a damaged power cord should be replaced only in authorized service
centers by qualied specialists.
23. To avoid electric shock, don’t place the power cord near heating appliances and ammable
or combustible substances.
24. Don’t start and stop the appliance by power-up and down.
25. Don’t press the buttons of the remote control board by anything but your ngers.
26. Don’t use the appliance for purposes not intended by this user manual.
EN
4.
3.SPECIFICATIONS
Tab.1
Electric air conditioner (split system)
EN
Indoor unit
Outdoor unit
Capacity (cooling) BTU (kW)
Capacity (heating) BTU (kW)
Rated power consumption (cooling) (W)
Rated power consumption (heating) (W)
Power supply V/Hz
Rated power current (cooling/heating) A
Air circulation (indoor unit) m
Air circulation (outdoor unit) m
Noise level (indoor unit) dB(A)
Noise level (outdoor unit) dB(A)
Refrigerant
Energy eciency (cooling/heating)
Electrical protection class
Degree of protection against moisture
(indoor unit)
Degree of protection against moisture
(outdoor unit)
Refrigerant piping, Liquid side / Gas side, (inch)
Max. refrigerant pipe length, m
Maximum dierence in level, m
Filling of Freon, g
Operating temperature range: cooling, ° C
Operating temperature range: heating, ° C
Net weight, indoor unit (kg)
Net weight, outdoor unit (kg)
Gross weight, indoor unit (kg)
Gross weight, outdoor unit (kg)
Net dimensions, indoor unit (mm)
Net dimensions, outdoor unit (mm)
Packing dimensions, indoor unit (mm)
Packing dimensions, outdoor unit (mm)
3
/h
3
/h
H-ARI17-07H/I
H-ARI17-07H/О
7677 (2,25)
8121 (2,38)
681
652
220~/50
2,96/2,83
550
1980
36/34/32
51
R410A
A/A
I class
IPXO
IPX4
1/4 / 3/8
15
10
700
+18°~+43°
-15°~+24°
7
26
8,15
23,0
770×240×180
700x256x552
805×305×255
803×325×585
H-ARI17-09H/I
H-ARI17-09H/О
9383 (2,75)
9827 (2,88)
829
785
220~/50
3,60/3,41
550
2500
36/34/32
52
R410A
A/A
I class
IPXO
IPX4
1/4 / 3/8
15
10
830
+18°~+43°
-15°~+24°
7
28
8,15
23,0
770×240×180
700x256x552
805×305×255
803×325×585
Electric air conditioner (split system)
5.
Indoor unit
Outdoor unit
Capacity (cooling) BTU (kW)
Capacity (heating) BTU (kW)
Rated power consumption (cooling) (W)
Rated power consumption (heating) (W)
Power supply V/Hz
Rated power current (cooling/heating) A
Air circulation (indoor unit) m
Air circulation (outdoor unit) m
Noise level (indoor unit) dB(A)
Noise level (outdoor unit) dB(A)
Refrigerant
Energy eciency (cooling/heating)
Electrical protection class
Degree of protection against moisture
(indoor unit)
Degree of protection against moisture
(outdoor unit)
Refrigerant piping, Liquid side / Gas side, (inch)
Max. refrigerant pipe length, m
Maximum dierence in level, m
Filling of Freon, g
Operating temperature range: cooling, ° C
Operating temperature range: heating, ° C
Net weight, indoor unit (kg)
Net weight, outdoor unit (kg)
Gross weight, indoor unit (kg)
Gross weight, outdoor unit (kg)
Net dimensions, indoor unit (mm)
Net dimensions, outdoor unit (mm)
Packing dimensions, indoor unit (mm)
Packing dimensions, outdoor unit (mm)
3
/h
3
/h
H-ARI17-12H/I
H-ARI17-12H/О
11942 (3,5)
12454 (3,65)
1038
981
220~/50
4,51/4,27
650
2500
38/36/34
53
R410A
A/A
I class
IPXO
IPX4
1/4 / 3/8
20
15
1150
+18°~+43°
-15°~+24°
8,5
28,0
9,5
29,0
800×280×185
760×256×552
855×305×255
803×325×585
H-ARI17-18H/I
H-ARI17-18H/О
17913 (5,25)
18766 (5,5)
1563
1426
220~/50
6,8/6,2
750
2800
42/40/38
58
R410A
A/A
I class
IPXO
IPX4
1/4 / 1/2
20
15
1150
+18°~+43°
-15°~+24°
11,0
40,0
12,0
35,0
1033×313×202
780×290×605
985×365×298
863×325×585
H-ARI17-24H/I
H-ARI17-24H/О
23884 (7,0)
24566 (7,2)
2148
1997
220~/50
9,34/8,68
1000
2800
42/40/38
58
R410A
A/A
I class
IPXO
IPX4
1/4 / 1/2
20
15
1150
+18°~+43°
-15°~+24°
13,0
43,0
14,0
53,0
1033×313×202
820×300×605
1103×400×300
930×380×635
EN

6.
4. APPLIANCE DESCRIPTION
Electric air conditioner (split system)
EN
3 1011
2
1
56
Fig. 1
The conditioner consists of indoor and outdoor units connected by pipelines. The conditioner
may be controlled from a remote control board or from an indoor unit control panel.
1. Conditioner unit for indoor installation.
2. Front panel.
3. Air-intake grille of the indoor unit.
4. Control panel (start/stop button, mode selection button) if there is no remote control board.
5. Blinds (deectors) for distribution of treated air.
6. Air outlet of the indoor unit.
7. Copper tube for gas (freon), connection line*.
8. Tube for condensate removal*.
9. Air-outlet grille of the outdoor unit.
10. Conditioner unit for outdoor installation.
11. Air-intake grilles of the outdoor unit.
4
5. DELIVERY SET
7
8
9
Complete set of air conditioner (split system) includes:
Conditioner unit for indoor installation -1 piece
Conditioner unit for outdoor installation -1 piece
Remote control board -1 piece
Batteries for remote control board - 2 pcs.
User manual -1 piece
Guarantee slip -1 piece
Packing of indoor-installation unit -1 piece
Packing of outdoor-installation unit -1 piece
* not supplied
Electric air conditioner (split system)
7.
6. DEVICE CONTROL
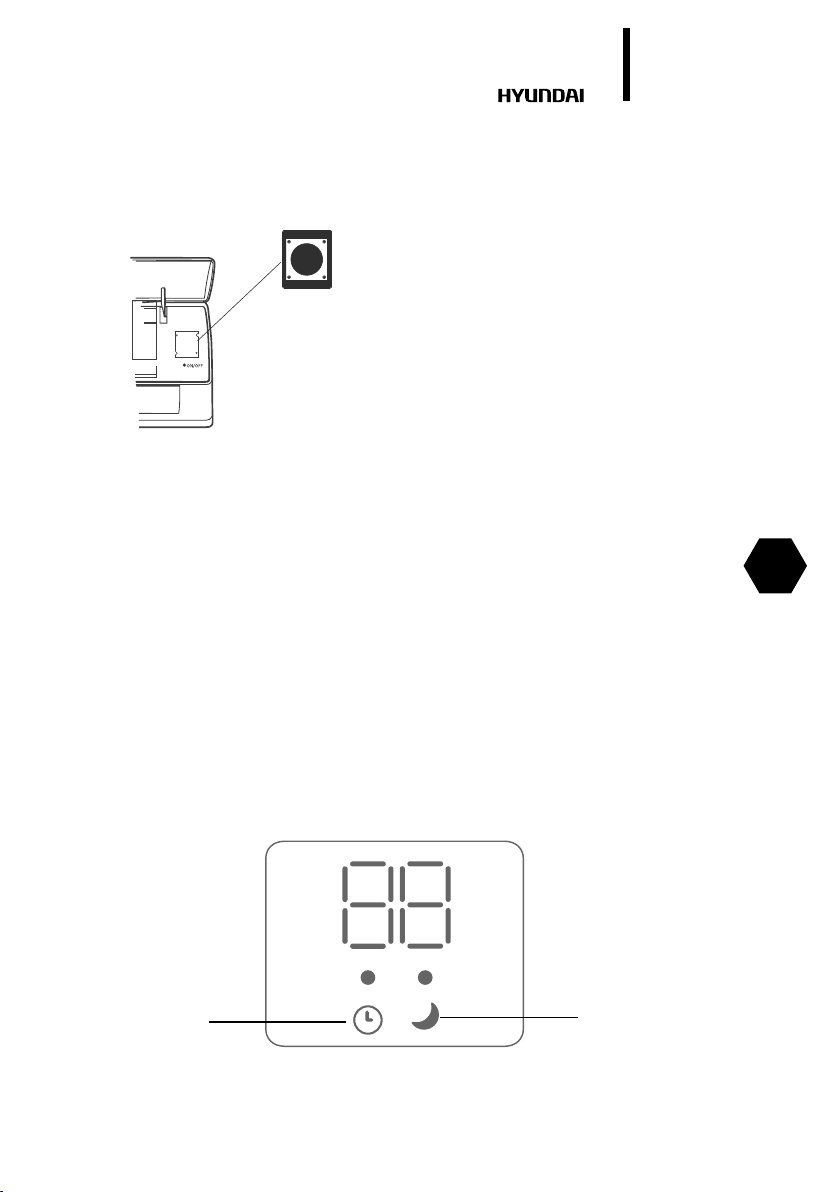
Fig. 2. Description of indoor unit control panel
The conditioner may be controlled from a remote control board or from an indoor unit control
panel.
If the remote control board is lost or cannot be used at the moment, you may use a control
button «on/o» located behind the front panel.
For that, open the front panel carefully by pulling it from the le and right.
1. Press once to activate the automatic mode.
2. Press again within ve seconds to activate the forced cooling mode.
The front panel of air conditioner there is a display that shows the current temperature and
dened, and indicators* display modes and settings: power, night mode, temperature, timer,
compressor operation (see Fig. 3**).
The front panel of the conditioner comprises a display showing specied and current temperature, as well as indicators* reecting modes and parameters of work: power supply, sleep
mode, temperature, timer, compressor operation (see Fig. 3**).
* Presence of this function depends on the delivery lot.
EN
Timer
Sleep indicator

8.
b
h
Fig. 3
TIMER ECO
SUPER SLEEP
HEALTH OPTION
FAN SWING
Electric air conditioner (split system)
а) Temperature indicator
b) Indicators timer
с) Indicator operation indicator functions
d) Indicators Cooling
a
e) Indicators dry
f) Indicators fan
c
j) Indicators heat
h) Indicators speed
d
* use of particular indicators depends on
e
model and series.
f
** design of indicator symbols may dier
j
depending on model and series.
EN
REMOTE CONTROL
1
7
6
5
4
2
TIMER ECO
SUPER SLEEP
HEALTH OPTION
FAN SWING
MODE
9
Fig. 4
Indication of the control board display shall
correspond to selected modes.
8
10
3
11
4
1. Button “ON/OFF” (Power). Using this button, you may turn the conditioner on or o.
2. Button for selection of operating mode “MODE”. Using this button, you may select
a needed operating mode: AUTO, COOL,
DRY, HEAT, FAN.
3. Button “SLEEP”. Using this button, you
may turn the sleep mode on and o. In this
mode the fan speed will be low.
4. Button “SWING”.Using this button, you
may regulate position of air-outlet blinds
and forward treated air up and down, le
and right.
5. Button “Health. Using this button, you may
turn on or o the ion funtion. (In this model
the function is not available).
6. Button “SUPER”. With this button you can
enable or disable the intensive mode. When
swithing modes, or when you increase /
decrease the fan speed, the function is
automatically disabled.
7. Button “TIMER”. This button sets the
automatic swich-on (set the desired time by
pressing button “SET”, “MODE”, “SPEED” or
button “TIMER”). The device automatically
turns on aer a selected period of time.
8. Button “INDICATORS LIGHT”. Using this
button you may disable the backlight of the
display of the indoor unit. By re-pressing
the button, you can turn on the display
backlight.
9. Кнопка «INCREASE THE TEMPERATURE».
With this button, you can control the
temperature.
10. Button «ECO».
11. Button «OPTION». This option is not
available for conditioner H-AR10-H.
Work with remote control
board
Mounting and replacement of batteries:
mount two LR03 alkaline batteries, according to polarity indicated on the remote

Electric air conditioner (split system)
control board.
In order to avoid malfunction of the remote control board do not insert used batteries or
batteries of various types.
If the conditioner is not used for a long time, remove batteries from the board or else electrolyte may leak and damage the board.
In normal operation of the conditioner average service life of batteries will be about a half-year.
Replace batteries, if command receiving is not conrmed with an audio signal, or if the display
does not show a sign of command transfer. When generating commands from the remote
control board, point an IR-radiator at a remote-control signal receiver situated on the indoor
unit. Hold the remote control board at the distance of no more than 8 m from the indoor unit.
The remote control board will not work, if there are any curtains, doors or other things between
it and the indoor unit. Protect the board from water and exposure to direct sunlight and heat
sources.
9.
7. OPERATING MODES
AUTO mode
The auto mode is turned on and o with the use of the button «MODE» on the remote control
board.
During operation in this mode, the air conditioner automatically selects the cooling/heating/
fan mode maintaining the set temperature.
COOL, HEAT and FAN
1. Turn the conditioner on pressing the «ON/OFF» button.
2. Pressing the «MODE» button, select COOL, HEAT or FAN mode manually.
3. Pressing the «TEMP» button (up-down), set the desired air temperature indoors (except for
FAN mode).
4. Pressing the «FAN SPEED» button on the remote control board, select the fan rotation
speed: AUTO, LOW, MIDDLE, HIGH, and the conditioner will start working in accordance with
the selected setting.
5. To turn the conditioner o, press the «ON/OFF» button once again.
In the FAN mode air temperature indoors is not set.
DRY
Turn the conditioner on pressing the «ON/OFF» button. Pressing the “MODE” button, select the
DRY mode. The conditioner will start working in the set mode. To turn the conditioner o, press
the «ON/OFF» button once again.
When indoor temperature decreases to 10°C, the air conditioner is automatically switched o
and it resumes work aer increase of temperature up to 12°C.
TIMER mode
Procedure of timing:
1. Press the Timer ON button to activate Timer ON. Each time you press the button you increase
the activation time by 30 minutes ranging from 0 to 10 hours and by 1 hour ranging from 10 to
EN
EN
10.
24 hours. The air conditioner will switch on automatically in the set interval of time.
2. Press the Timer OFF button to activate Timer OFF. Each time you press the button you
increase the activation time by 30 minutes ranging from 0 to 10 hours and by 1 hour ranging
from 10 to 24 hours. The air conditioner will switch o automatically in the set interval of
time.
Electric air conditioner (split system)
SLEEP mode
Using this button you may turn on or o the sleep mode. When the key pressed in the cooling
mode increases the temperature relative to the set at one degree per hour for two hours and
in heating mode lowers the temperature at two degrees per hour for two hours. Aer 7 hours
working in this mode, the air conditioner will turn o.
When the power is turned o, the sleep mode is automatically disabled.
Regulation of treated air ow direction
Regulating the position of deectors (blinds), set the direction of treated air ow ensuring
uniform distribution of temperature and the most comfort conditions in the room. To change
the position of deectors, use the «SWING» button.
8. MAINTENANCE
• Before cleaning unplug the conditioner.
• Cleaning of the indoor unit and remote control board:
• Indoor unit and remote control board should be cleaned with a dry so cloth.
• If the indoor unit is too unclean, moisten the cloth with cold water.
• It is prohibited to clean the remote control board with moist cloth.
• In order to avoid the damage of paint or details of the conditioner, do not clean it with brush-
es and do not leave them on the surface of indoor unit.
• In order to avoid the damage of surface or deformation of the conditioner details, do not
clean it with petrol, solvents, cleaning powders or other chemically active substances.
• Before a sustained interruption in the conditioner work:
• Turn the conditioner on for several hours in the FAN mode. It will allow you to dry its inner
cavities
• Unplug the conditioner. Remove the batteries from the remote control board. Checks before
starting:
• Make sure that an air lter is installed.
• Make sure that air inlet and outlet grilles of the outdoor unit are not blocked by foreign
objects.
• Cleaning of air lter
• Air lter cleans the air entering the conditioner from dust and foreign particles. If the lter is
contaminated, the conditioner capacity decreases sharply.
• If the conditioner is operated permanently, the lter should be cleaned once per two weeks.
• If the conditioner is installed in a room with dusty atmosphere, then the air lter should be
cleaned more oen.
• To remove the lter, open the indoor unit panel.
• Remove air lters. Clean the lter with a vacuum cleaner or rinse it in clean water. If the lter
is contaminated heavily, clean it with a so brush and wash in diluted washing solution, then
dry it in a cool place.
• While cleaning the lter with the vacuum cleaner, hold it with contaminated surface up. While
washing the lter in water, hold it with contaminated surface down.
• Do not dry the lter in the sun or near a re.
• Set the air lter to initial position and close the panel.

Electric air conditioner (split system)
11.
EN

12.
Содержание
Электрический кондиционер воздуха (сплит-система)
RU
1. Важная информация
2. Меры предосторожности
3. Технические характеристики
4. Описание прибора
5. Комплект поставки
6. Управление прибором
Панель управления внутреннего блока
Пульт дистанционного управления (ПДУ)
7. Режимы работы
8. Уход и обслуживание
9. Гарантийный талон
13
13
14
16
16
17
18
19
19
20
22
 Loading...