

Hyundai H-1503U User Manual [ru]

H-1503U
RADIO WITH ALARM
РАДИОПРИЕМНИК C
БУДИЛЬНИКОМ
Руководство по эксплуатации Instruction manual
Instruction manual
Dear customer!
Thank you for purchasing our product. For safety, it is strongly recommended to read
this manual carefully before connecting, operating and/or adjusting the product and keep
the manual for future reference.
Description
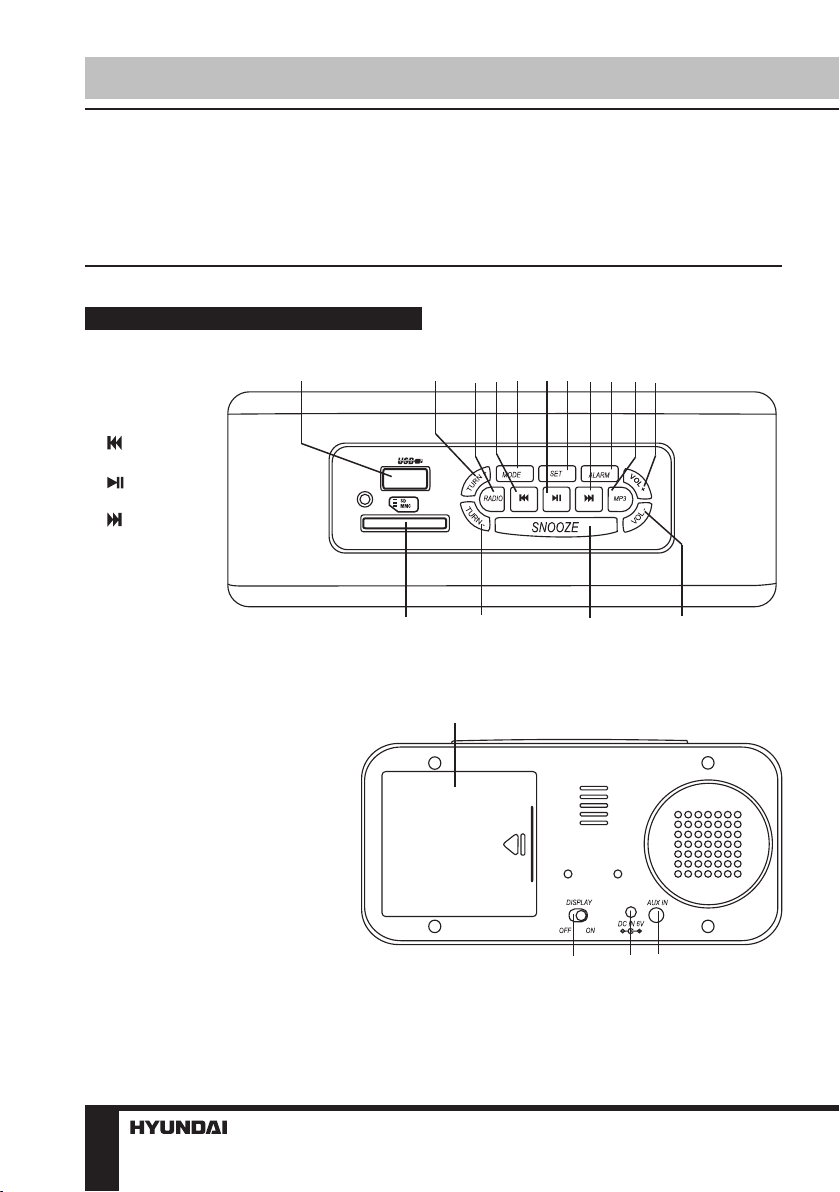
Top panel
1. USB port
2. TURN+ button
3. RADIO button
4. button
5. MODE button
6. button
7. SET button
8. button
9. ALARM button
10. MP3 button
11. VOL+ button
12. VOL- button
13. SNOOZE button
14. TURN- button
15. SD/MMC memory card slot
1
15
2
3
14
4 5
6 7
8
13
9 1011
12
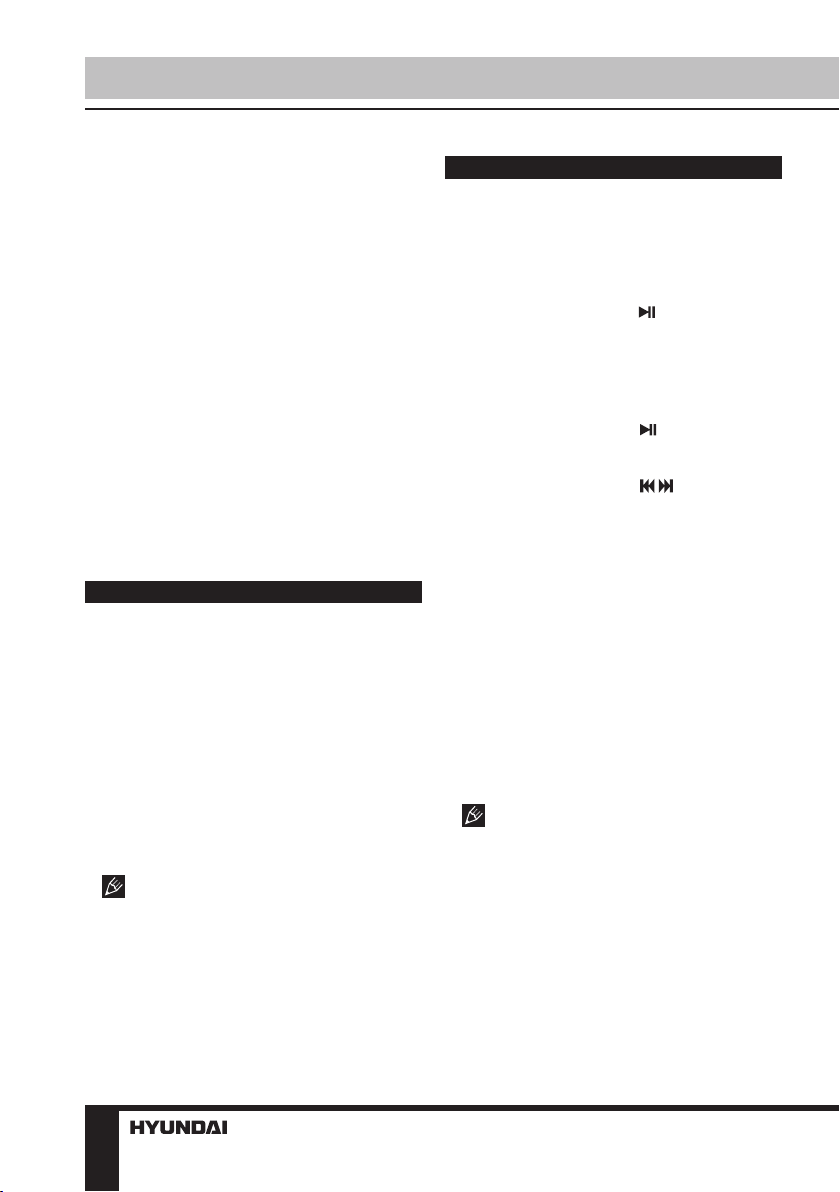
Back panel
1. Battery compartment
2. AUX input
3. Power (DC6V) input
4. DISPLAY ON/OFF switch
Not indicated: display (front panel)
2
1
2
3
4

Instruction manual
Utilization of the product
If you want to dispose of this product, do not
mix it with general household waste. There is a
separate collection system for used electronic
products in accordance with legislation that
requires proper treatment, recovery and
recycling.
Please contact your local authorities for
the correct method of disposal. By doing so,
you will ensure that your disposed product
undergoes the necessary treatment, recovery
and recycling and thus prevent potential
negative effects on the environment and
human health.
Important safeguards
• The instruction manual contains important
operating and maintenance instructions. For
your safety, it is necessary to refer to the
manual. Keep the manual at hand for future
use.
• Do not hit or drop the unit.
• Do not expose the unit to vibration, direct
sunlight, too high or low temperature or humidity.
• Do not disassemble the unit yourself.
Refer servicing to qualified service personnel.
• When the battery is exhausted, it should
be removed from the set to prevent leakage.
Additional power
• There are 3 extra AG13 batteries (1.5 V)
included with the receiver to be inserted to the
terminal inside the battery compartment. This
is additional power intended for saving the
clock and alarm settings. Without the additional
power the time and alarm settings will not be
stored if the power is switched off.
• When the batteries are exhausted they
should be replaced. New batteries should be
aquired by user. Replace the batteries only
with batteries of the same type.
ATTENTION: AG13 batteries are
consumables not covered by warranty, and
their failure (discharge) is not a ground for
addressing to service and repair centers
AC adaptor power
• Plug the supplied AC/DC power adaptor
into the power input on the back of the unit.
Connect the power cord to a household mains
outlet. Make sure the voltage is compatible.
• Always remember to disconnect the
power cord from the main supply before
disconnecting it from the unit.
• Disconnect the power cord from the mains
when not in use.
General operations
Power supply
Battery power
• Open the battery compartment cover.
Insert 4 x AA (1.5 V) batteries (not included).
Please observe correct battery polarities
or the unit will not work. Close the battery
compartment cover.
• When the batteries are exhausted, they
should be replaced.
• Do not use new and old batteries together.
Clock
• In clock mode press and hold SET button
to enable time setting mode. Press repeatedly
SET button to go to setting of parameters
in following sequence: hours => minutes =>
year => month => date => exit. The selected
parameter will blink meaning readiness for
adjustment.
• Press TURN+ button to adjust the
parameter up. Press TURN- to adjust the
parameter down.
• Day of week will be set automatically.
• In clock mode press TURN+ to change
between 12/24 hours systems.
3
Instruction manual
• In time setting mode, if no button is pressed
within 30 seconds after a parameter is selected,
the unit will automatically go to clock mode.
• In time setting mode, press MODE button
to return to clock mode.
AUX input
To connect an external audio device (e.g.
MP3-player), please use a standard stereo
cable with 3.5 mm to 3.5 mm plugs to connect
the audio line-out of the external device to the
AUX input socket of this unit.
LED display functions
• You can turn the display off by setting the
DISPLAY OFF/ON switch to “OFF“ position. In
this mode you can switch it on for 10 seconds
by pushing any button or by a loud sound (e.g.
clapping your hands).
• The brightness of the display is set to be
half-bright during 21:00PM - 6:59:59AM.
Radio operation
• In clock mode press RADIO button to
switch the radio on.
• To adjust the frequency step by step
press repeatedly TURN-/TURN+ buttons.
For automatic search of a station, press and
hold TURN- or TURN+ button; the unit will
look for the next available station and start
its broadcast. Repeat the operation to search
more stations.
• To save a station, press and hold SET
button. Press SET button to switch between
saved stations.You can save up to 20 stations
in the memory.
During program saving, if no button is
pressed within several seconds, the unit will
return to normal radio mode.
• To adjust volume, in radio mode press
repeatedly VOL+/VOL- buttons.
• To switch off the radio, press RADIO
button.
USB/SD/MMC operation
Connecting USB/SD/MMC
• Insert a USB device into the USB port
or insert a memory card into the memory
card slot. Press MP3 button to enable USB/
SD/MMC mode. The unit will start reading
the device. Press and hold button to
select between USB or SD/MMC mode, if
both devices are inserted (USB is played by
default).
Playback operations
• During playback press button to pause
playback. Press this button again to resume
playback.
• During playback press / buttons to go
to previous or next track.
• To adjust volume, press repeatedly VOL+/
VOL- buttons.
• In playback mode, press MP3 button
switch off the player and go to clock mode.
General USB/SD/MMC notes
• This unit is equipped with a USB socket
that can accept and play MP3 files stored on
standard USB flash (compatible with USB
version 2.0) up to 32 GB.
• This unit is also equipped with an SD/
MMC card socket that can accept and play
MP3 files stored on standard SD/MMC cards
up to 16 GB.
Always switch off the unit or change
mode to another one before removing a
USB flash drive or SD/MMC card, to prevent
damage to your USB device or memory card.
Note: Although this product is fully
compatible with USB 2.0 and SD/MMC card
standard formats, a small percentage of USB
flash drives and SD/MMC cards might not be
readable, due to those device manufacturers’
non-compliance with the full (official) USB and
SD/MMC card standards.
• FAT32 file system is supported by USB
4
 Loading...