

Hyundai GD-02 User Manual
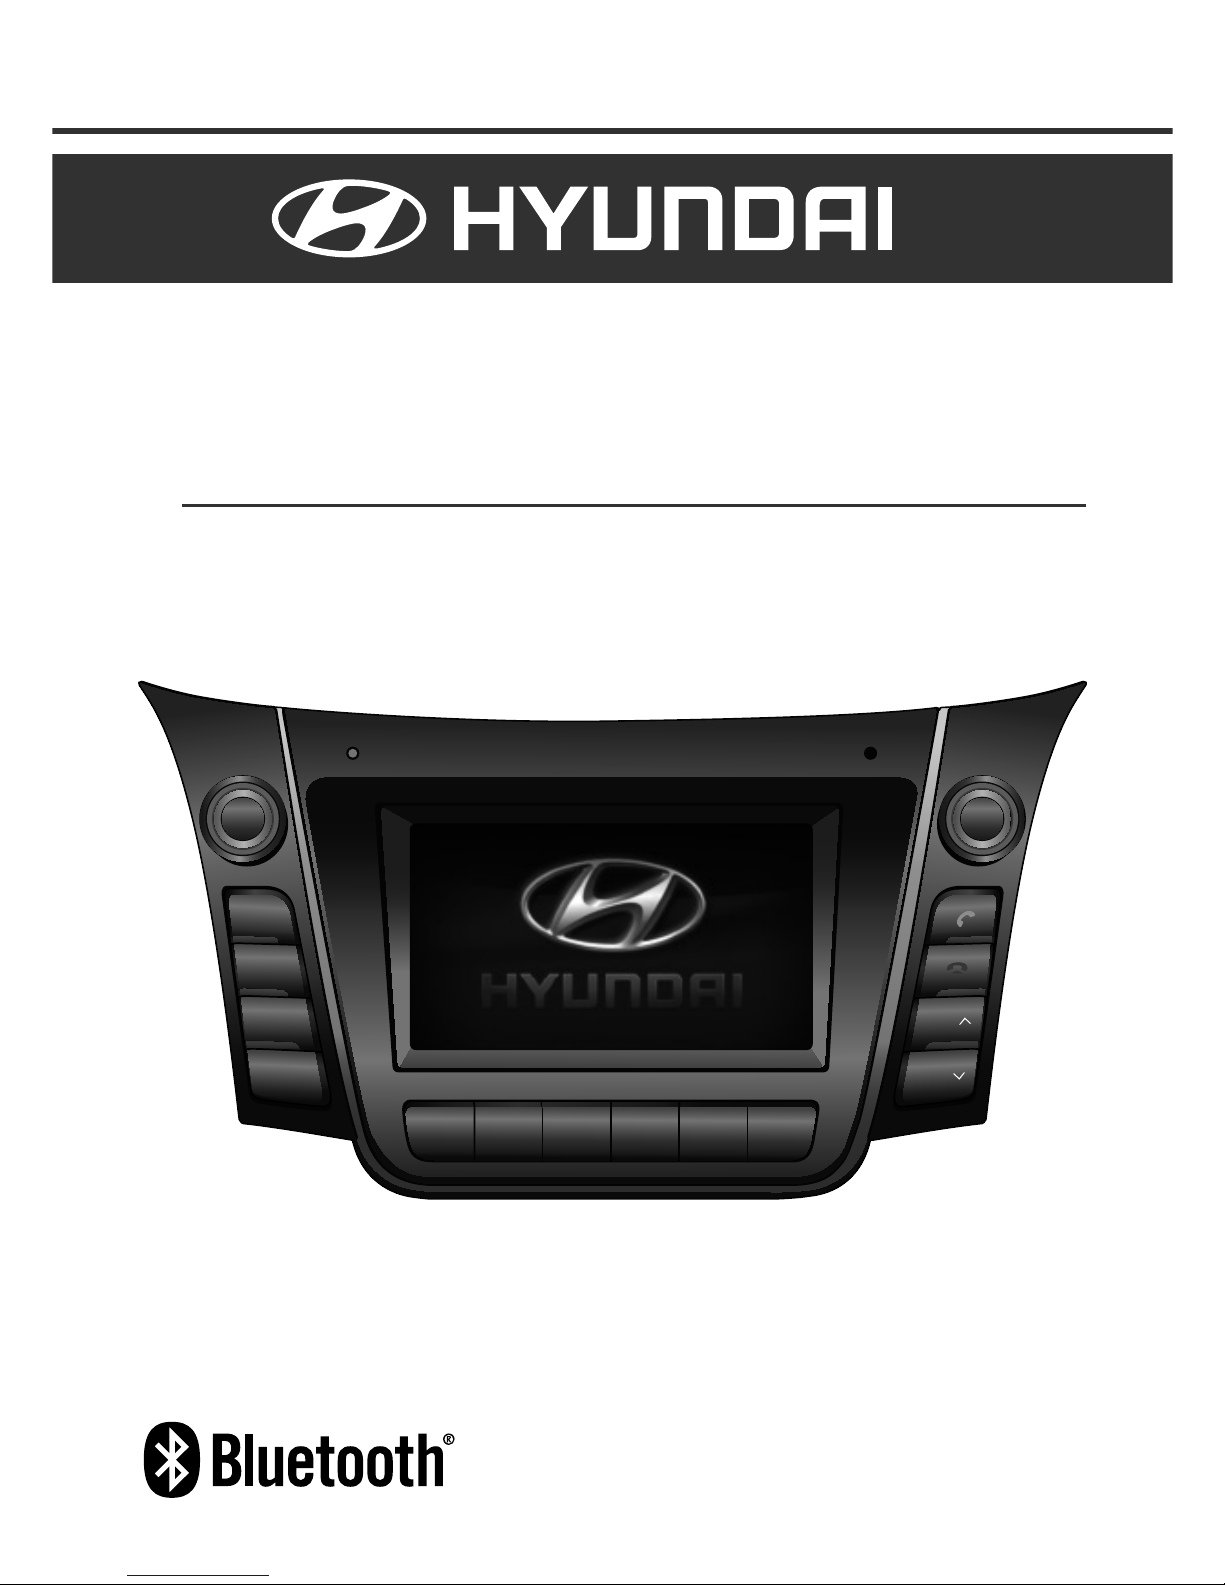
Front Panel Controls
User Manual
GD-02
MP3/WMA/USB/AUX/Bluetooth/iPod
Player with AM/FM Radio
SEEK
TRACK
RADIO
AUDIO
PUSH
GD-02
TUNE
POWER
PUSH
VOL
MEDIA
SETUP
EQ
654321

Important Note:
Before operating the unit, please read this manual thoroughly and retain it for future
reference.
Please refer to the main vehicle user manual section "Features of Your Vehicle" for
general information regarding radio reception and care and use of the vehicle mounted
antenna, and care and use of media (USB etc.).
The operation of the Steering wheel controls in the main vehicle user manual are not
relevant to the radio model depicted in this user manual.

Contents
Contents
Location of Controls
.............................................................
2
Getting Started
......................................................................
4
Radio
......................................................................................
7
USB/AUX player
....................................................................
9
My Music
..............................................................................
13
Bluetooth Audio
..................................................................
14
Memo
....................................................................................
15
Pandora
®
..............................................................................
16
Bluetooth
.............................................................................
18
Phone
...................................................................................
22
Settings
................................................................................
26
Appendix
..............................................................................
29
Specifications
......................................................................
31
1
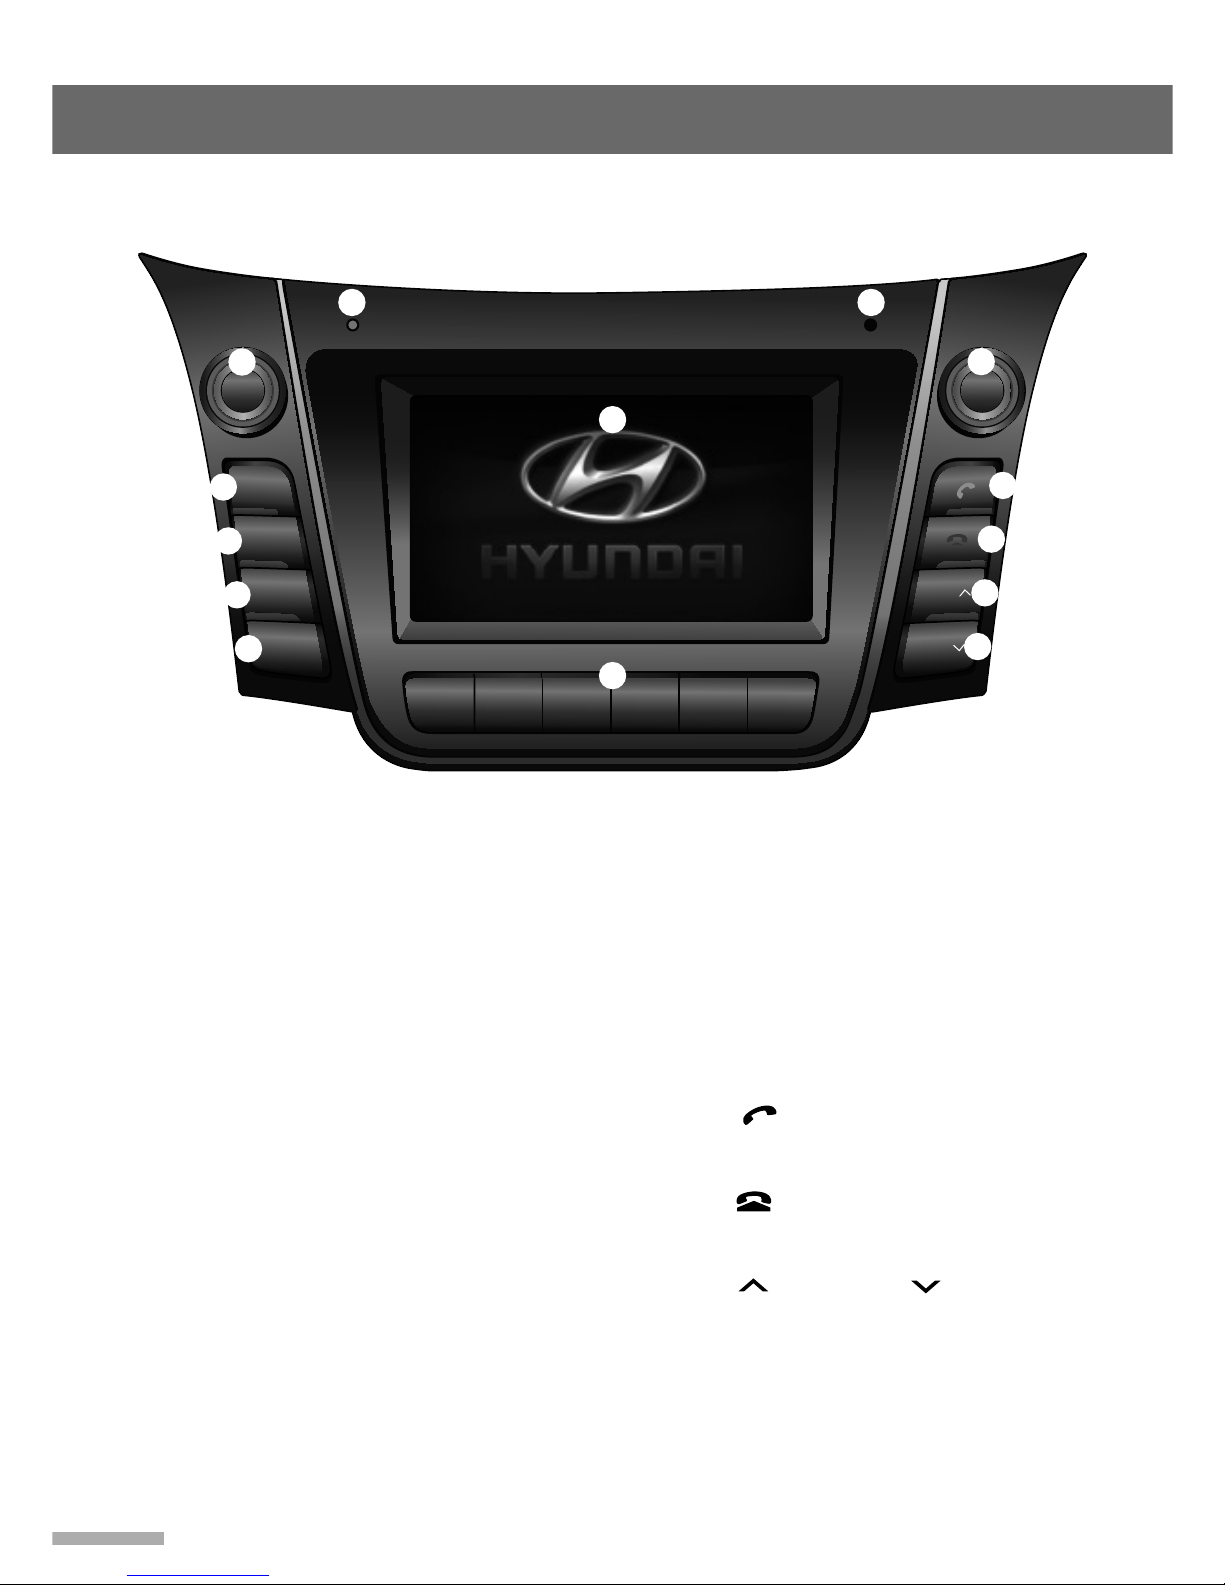
Location of Controls
2
SEEK
TRACK
RADIO
AUDIO
PUSH
GD-02
TUNE
POWER
PUSH
VOL
MEDIA
SETUP
EQ
654321
Front View of the Unit
➐
Display window
➑
PRESET [1] ~ [6] buttons:
Receive each
stored station (press); store each station
(press and hold).
➒
Microphone: for Hands-free, V oice
Recognition and Memo function.
➓
POWER button with VOLUME [VOL]
dial:
Turn the power on or of f (press), turn
the display on or off (press and hold);
adjust the volume (rotate).
CALL [
] button: Enter the Phone menu
or receive a call (press); make a call via
last call (press and hold).
END [
] button: Reject/sends a call, go
to the previous screen or cancels Phone
menu screen.
SEEK
/ TRACK buttons: Seek
a station or skip a track (press); fast tune
up/down the frequency or fast-forward/
rewind a track (press and hold).
➊
Warning LED:
When the ignition switch is
in the OFF position, blinks every 1 second
to act as a deterrent against theft.
➋
ENTER button with TUNE/FILE dial:
Enter the Audio setting mode or change
the item for setting/searching (press); find
a station manually , show the previous/next
track/file name (rotate).
➌
RADIO button:
Selects the radio function
or band (press : FM1 → FM2 → FM3 →
AM → FM1 → ....).
➍
MEDIA button:
Select the connected
external device (USB/iPod, AUX or
Bluetooth audio) / available internal media
(My Music or Memo) playback (press:
USB/iPod → AUX → My Music → BT
Audio → Memo → USB/iPod → ....).
➎
SETUP button:
Enters the System setting
mode. (General/Sound/Bluetooth/Time)
➏
EQ button:
Select the EQ style (press :
NOR (Normal) → CLA (Classic) → POP
→ ROCK → JAZZ → NOR (Normal) →
....).
➊
➋
➌
➐
➑
➍
➎
➏
➓
➒
Location of Controls
3
VOL
MUTE
MODE
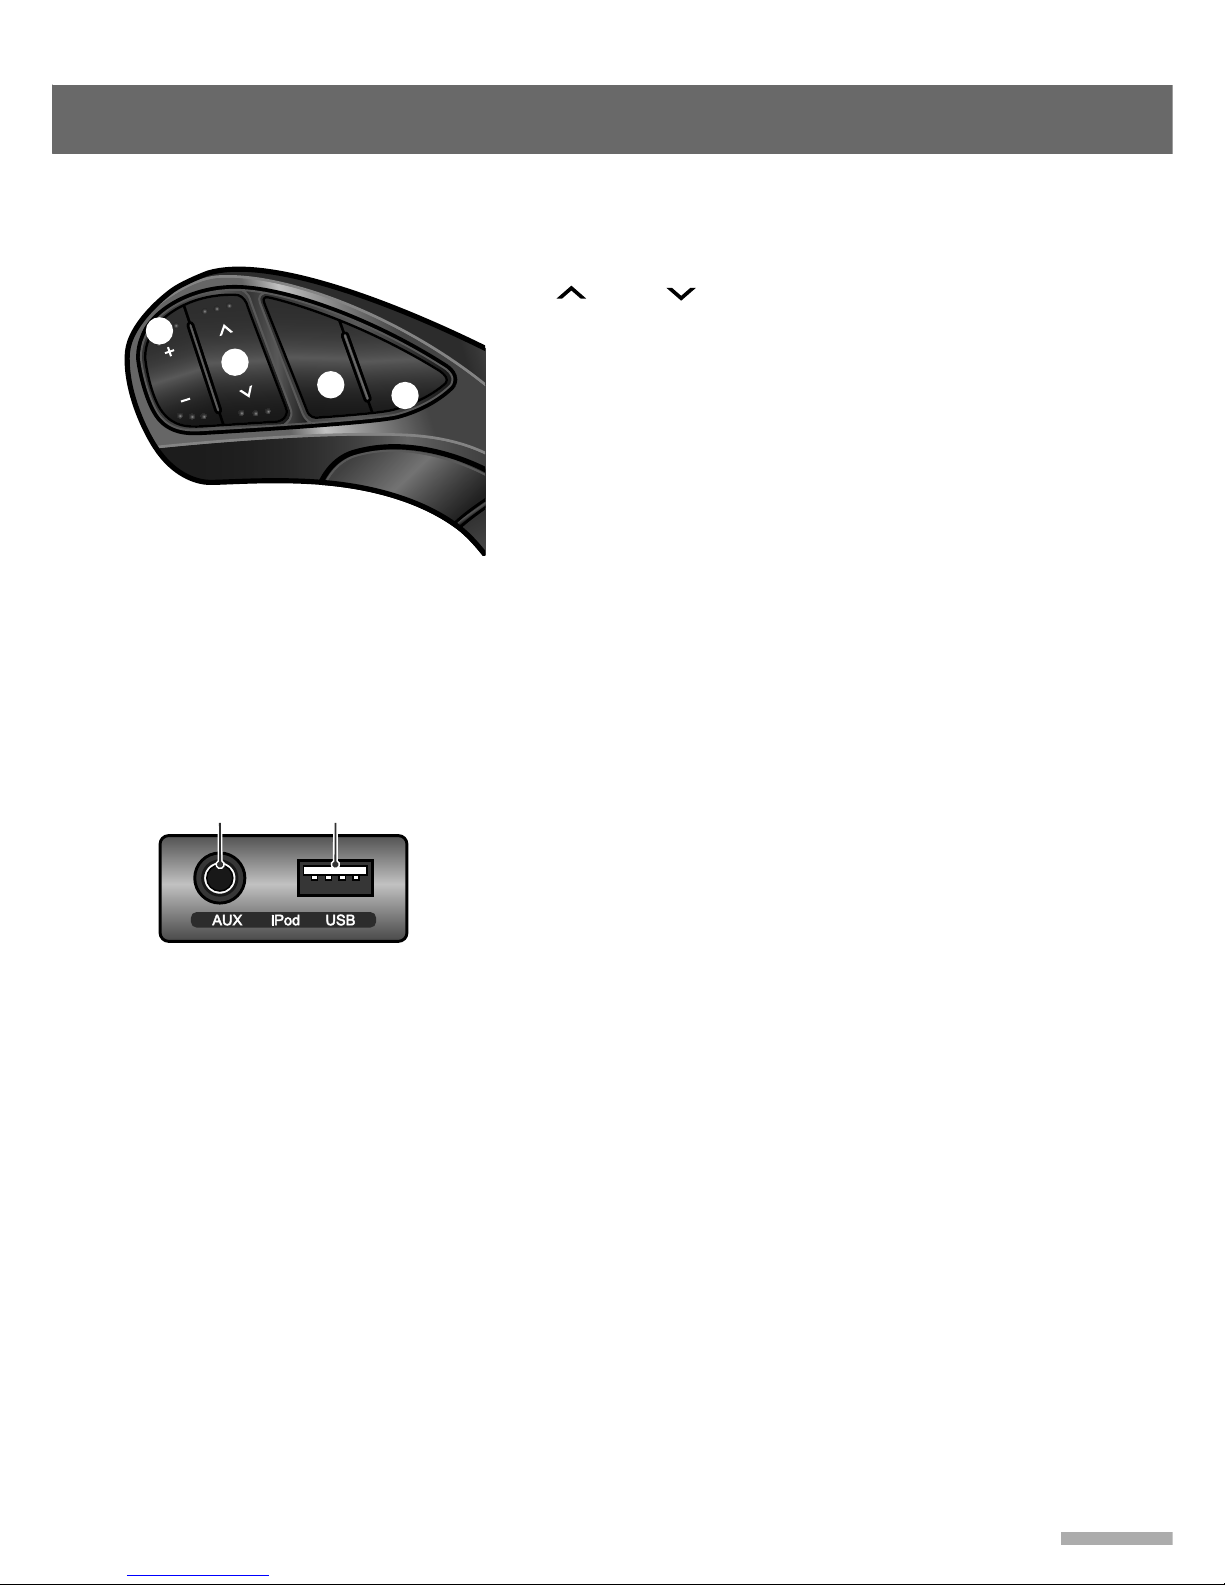
➊
+ VOLUME
[
VOL] - buttons:
Adjust the volume.
➋
SEEK buttons: Skip the previous/next preset
station/track (press); fast tune up/down frequencies
and seek a station or fast-forward/rewind a track
(press and hold).
➌
MODE button:
T urn the car audio system on, select
the Radio or connected external device (USB/iPod,
AUX or Bluetooth audio)/available internal media (My
Music or Memo) playback (press); turn the Car audio
system off or on (press and hold).
➍
MUTE button:
T urn the mute function on/off (press);
activate the voice recognition function of connected
mobile phone (press and hold).
➊
AUX Input terminal:
Connect an external device.
➋
iPod/USB port:
Connect iPod/iPhone or USB storage
device.
Steering Wheel Controls
Media Hub Input Port
➊ ➋
➊
➋
➌
➍
Getting Started
4
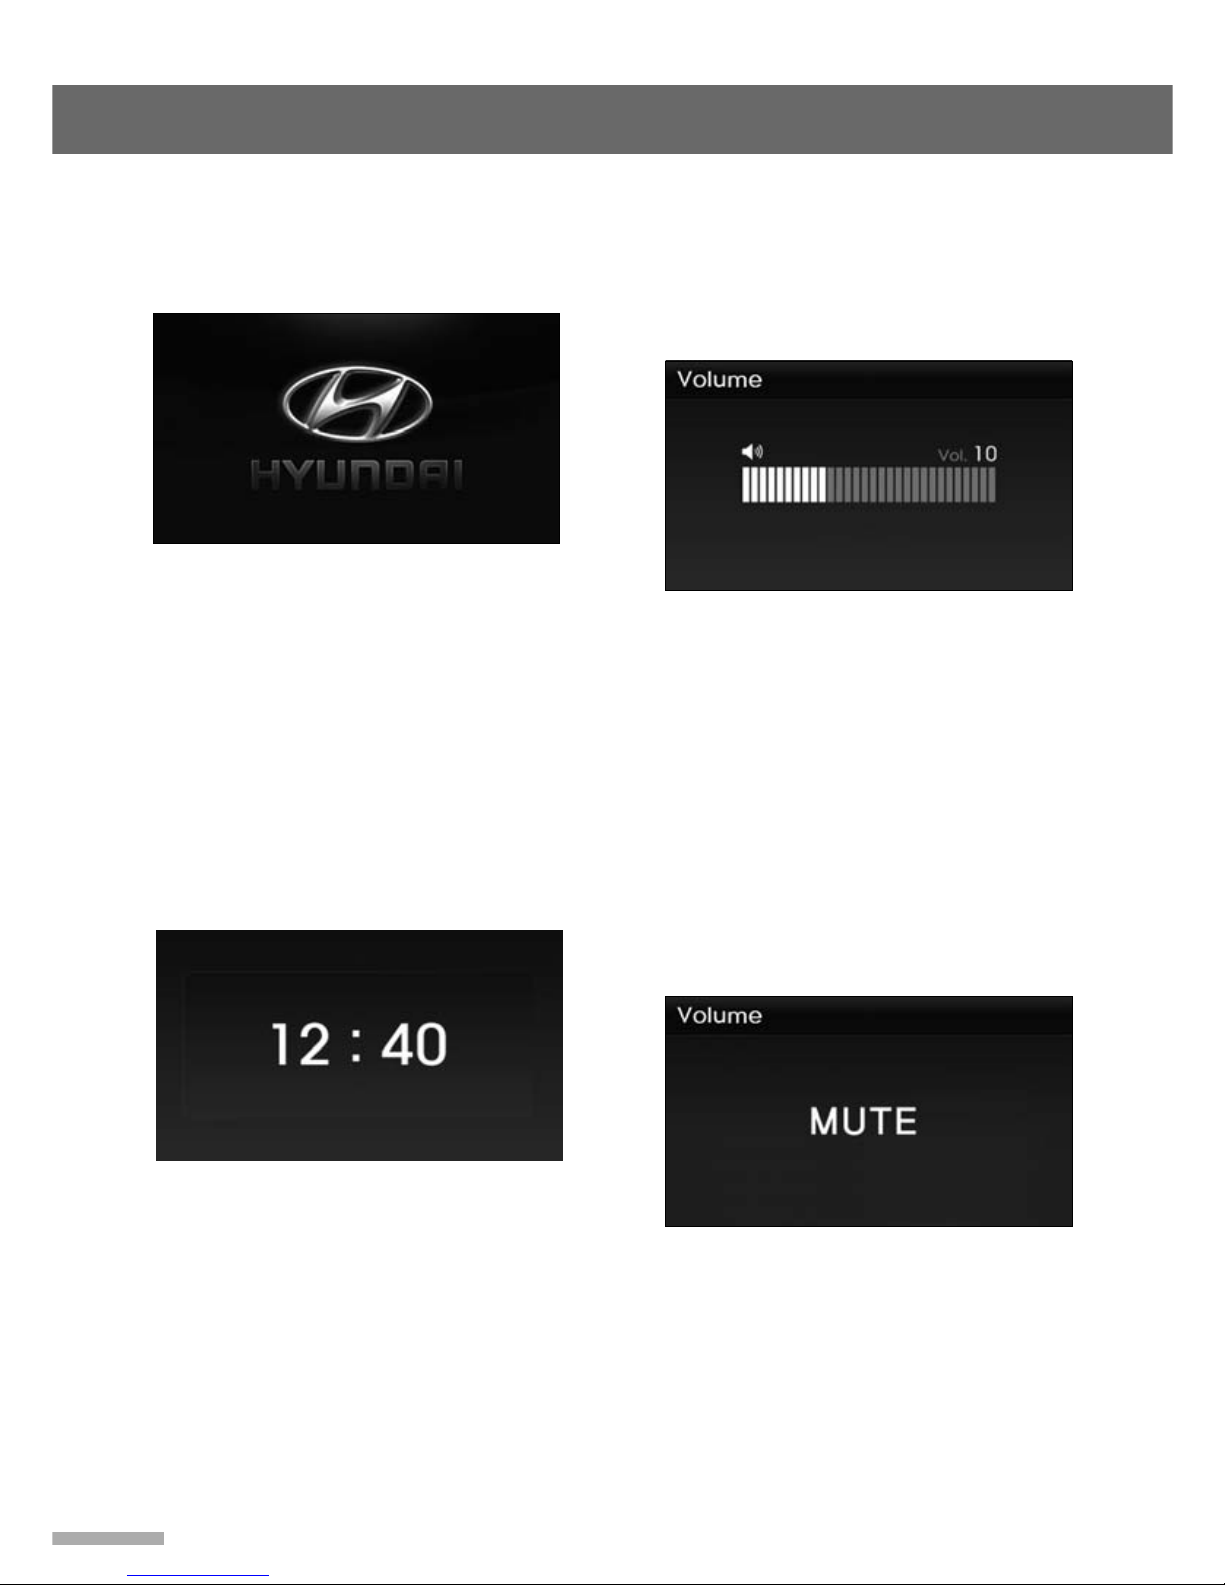
Turning On/Off the Unit
1 Switch the vehicle to ACC or IGN (ON)
position.
Adjusting the Volume Level
1 Rotate the VOLUME
[
VOL] dial or push
the + VOLUME [VOL] - buttons on the
steering wheel controls to increase/
decrease the volume level.
2 Press the POWER button or MODE
button on the steering wheel controls to
turn the unit on.
The previously selected station is
received or the last selected song is
played if the media is available.
3 To turn the unit off, press the POWER
button or press and hold the MODE
button on the steering wheel controls.
When the unit is turned off, the clock
display appears on the screen.
Setting the Equalizer Style
An equalizer style for different music types may be
selected (CLASSIC, POP, ROCK, and JAZZ).
1 Press the EQ button repeatedly until the
desired Equalizer style icon is displayed
on the top of the screen.
The sequence of Equalizer styles is
displayed as follows: NOR (Normal) →
CLA (Classic)
→
POP
→
ROCK
→
JAZZ
→
NOR (Normal) → ....
The volume level will be shown on the
display. See page 25 for details of
adjustment of hands-free phone call and
ringer volume adjustments.
Muting the Sound Quickly
1 Press the MUTE button on the steering
wheel controls to set mute on.
'MUTE' screen is displayed.
To restore the sound, press the MUTE
button on the steering wheel controls or
rotate the VOLUME [VOL] dial.
Turning On/Off the Display
1 Press and hold the POWER button to
turn off on the display screen.
2 When display is off, tap the screen or
press the POWER button to turn on the
display screen.
Getting Started
5
MUTE
MODE
Recording Function
• It is possible to record the audio whilst listening to
RADIO, IPOD, AUX or BT AUDIO.
• A function to record voices inside the car cabin
using the in-build microphone is also possible.
(Refer to page 15 for details to record voice using
the MEMO feature)
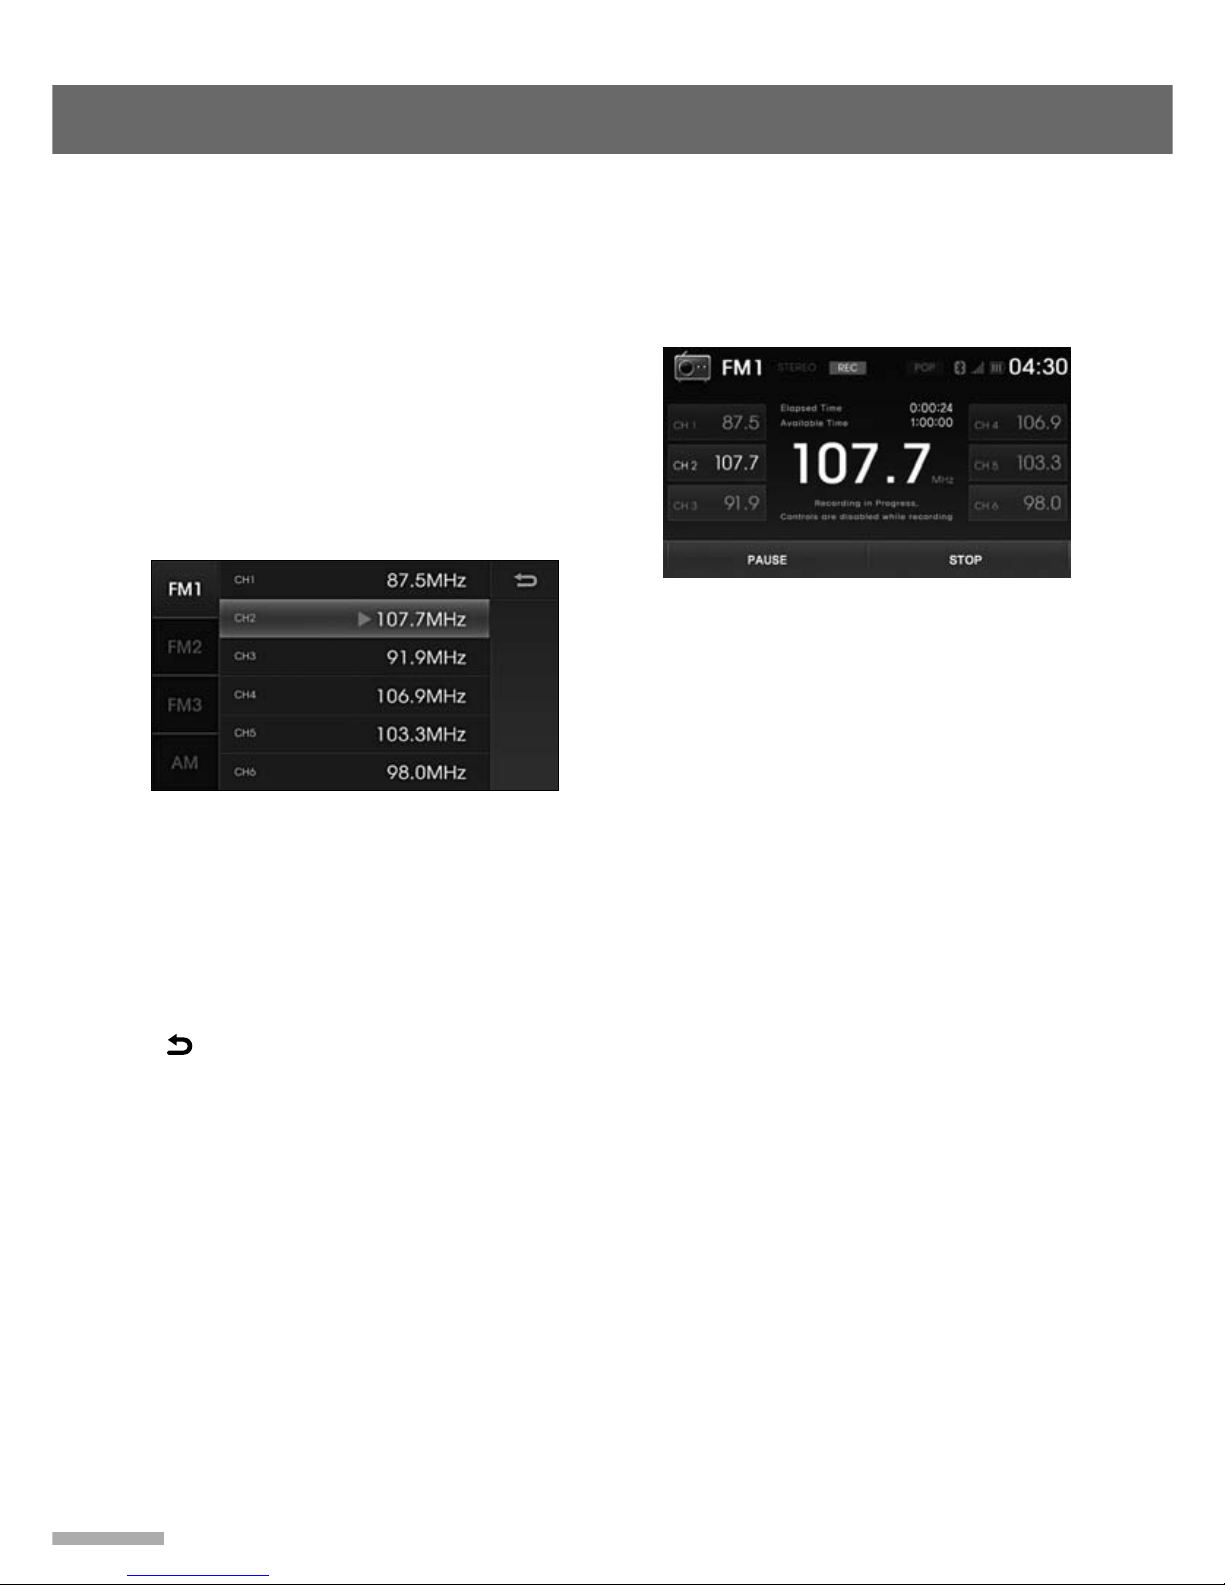
1 While listening to any of the above
media sources RADIO, iPod, AUX or BT
Audio, tap the REC on the screen to
record the current playing media.
Once recording starts, the REC will blink
on the screen and the elapsed time of
the current recording and total available
General Controls
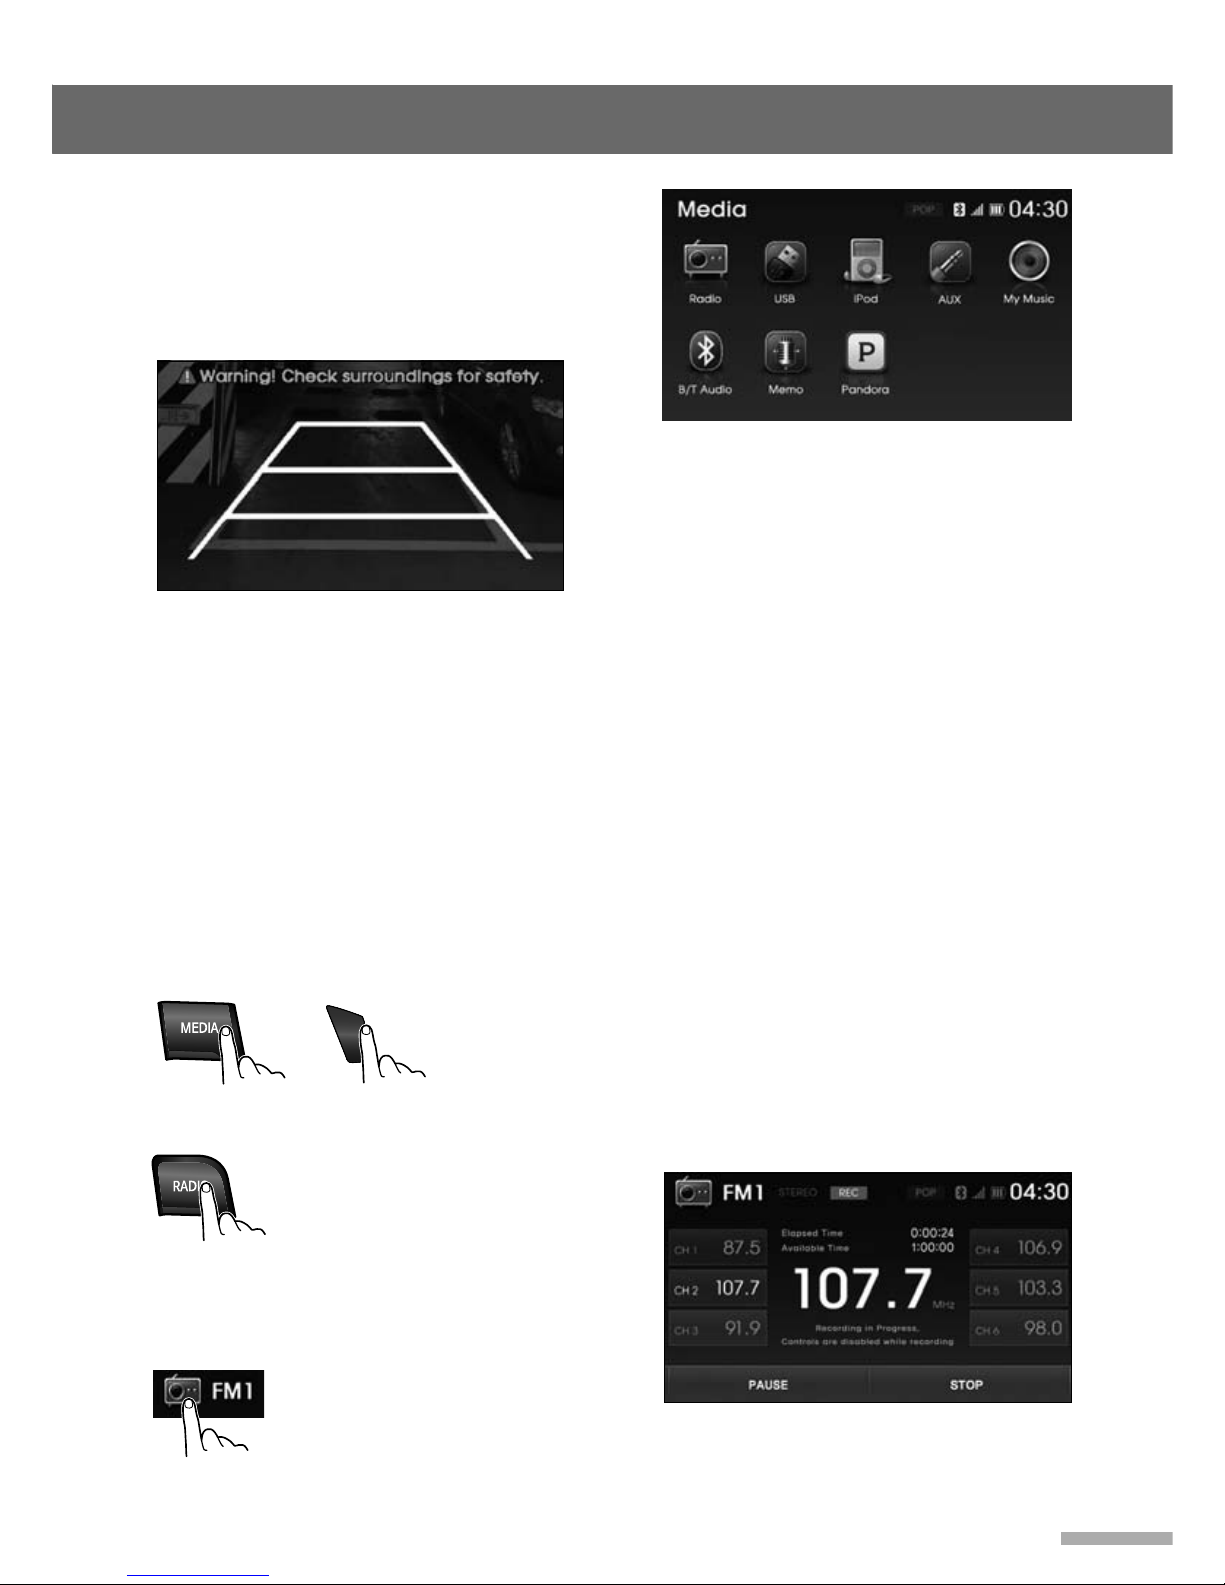
● Selecting the Media function
1 Press the MEDIA button on the unit or
MODE button on the steering wheel
controls repeatedly until the desired
Media mode is displayed.
2 Tap the Current media icon on the top
left hand corner of the screen to enter
the Media menu screen.
Tap the desired media icon to select
that mode.
Or press the MEDIA button repeatedly
to select the desired media mode.
• If a selection is not made selected within 10
seconds, the previous screen will be restored
automatically.
• If the icon of a media mode is ‘greyed’ out, it is
not available for selection as it may not be
connected or have any media available to play.
• If the media is not connected, corresponding
modes will be disabled.
Or press the Radio button repeatedly to
select the desired radio band directly .
Rear view camera screen
If fitted, a rear view camera displays the
area behind the vehicle on the screen
when the ignition is in the ‘ON’ position
and reverse gear is selected.
Parking guidelines and distance scale
are displayed on the audio set screen.
Getting Started
6
time for recording remaining are
displayed on the screen.
2 During the recording, tap the PAUSE to
pause recording.
Tap the REC again to re-start recording.
3 Tap the STOP on the screen to stop
recording.
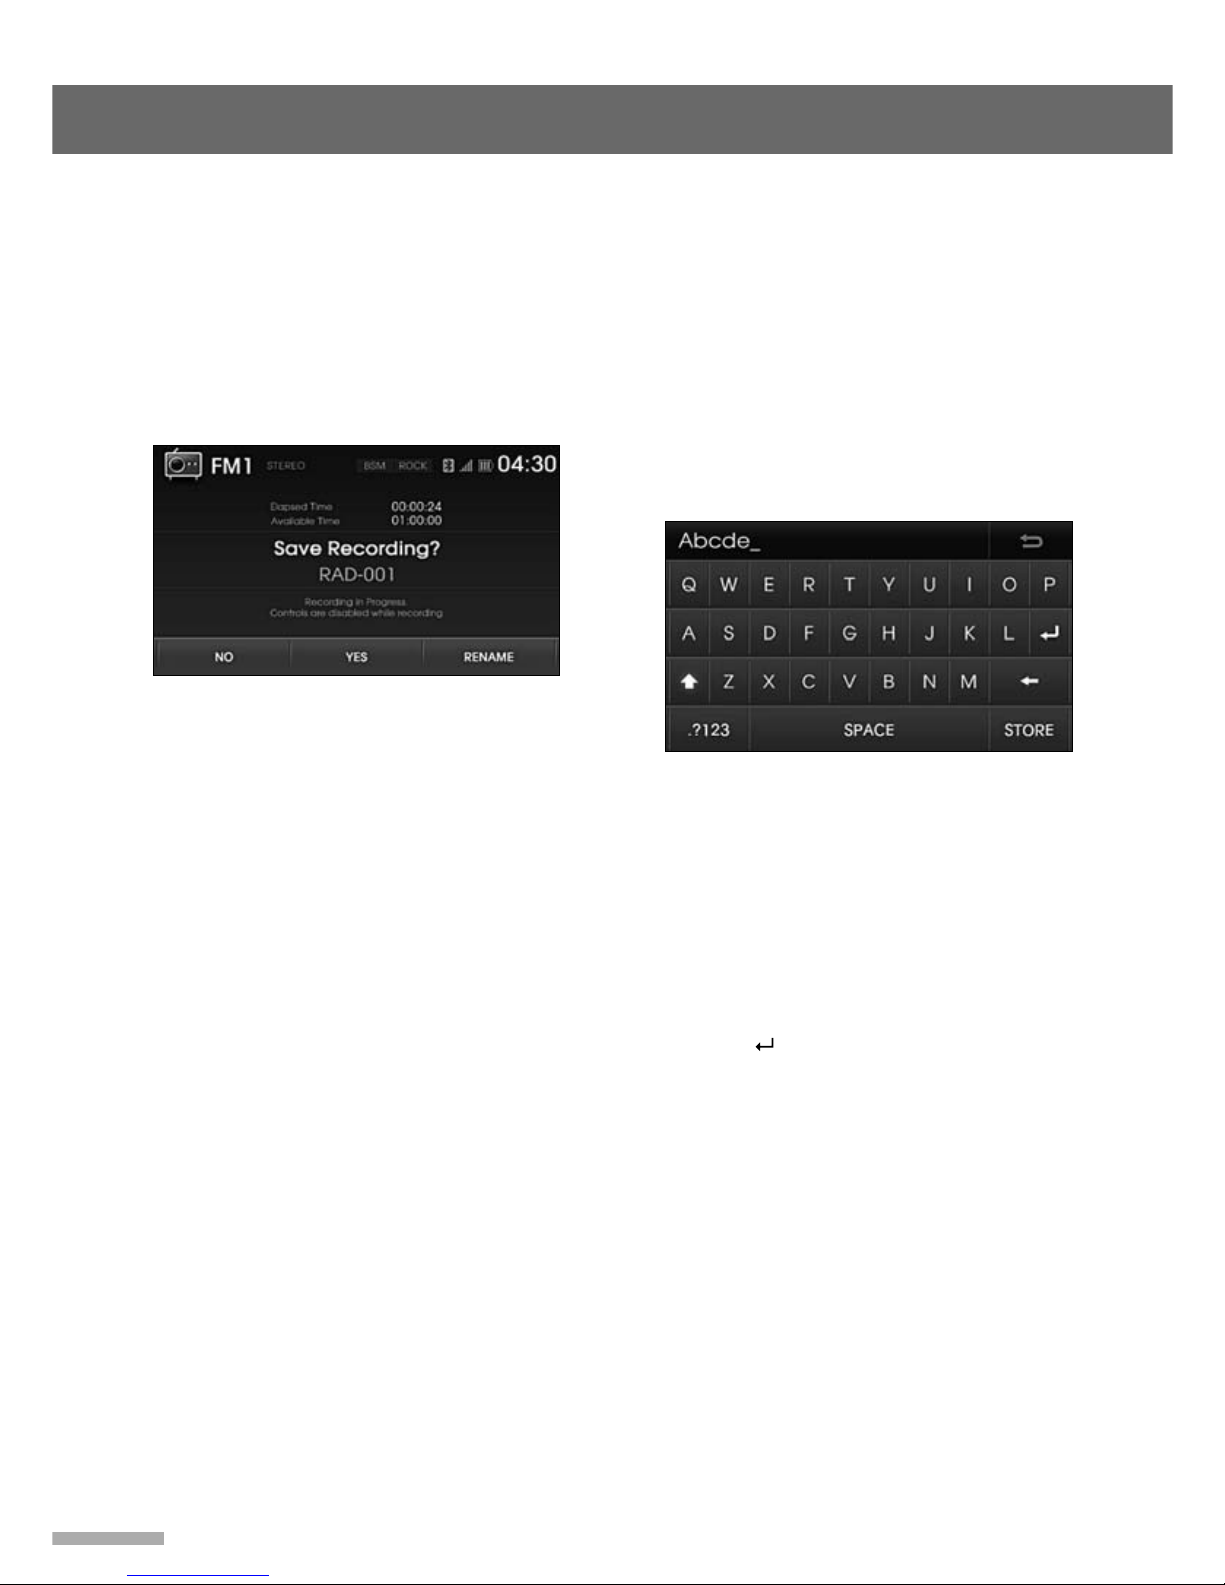
To save the recording tap the YES to
save the recorded file with the file name
displayed on the screen.
Tap the NO to cancel and discard the
recording.
Tap the RENAME to change the file
name (see following below for details).
4 The recorded file is stored in the internal
memory of the car audio set and can be
played from the ‘My Music’ mode.
For more information regarding My
Music, refer to pages 13.
Notes
• All buttons and controls other than VOL, MUTE,
PAUSE and STOP are disabled during
recording.
• PAUSE is not usable during recording of iPod/
BT Audio.
• USB/iPod recordings are saved as a continuous
file.
• When the internal memory of the unit is full,
'MEMORY FULL' appears on the display.
The RECORD and COPY feature is then not
available until some stored files are deleted.
Check the memory usage level by pressing the
SETUP button and then selecting 'About'.
• This unit can store 999 files within internal
memory. When the 1000th file is stored, 'INDEX
FULL' appears on the display. The RECORD
and COPY feature is then not available until
some stored files are deleted.
● Changing the Recording File
Name
1 If the recorded file is to be renamed, tap
the RENAME on the screen.
The display shows the following:
2 Use the keypad to change the file name.
The table below shows more information
of the buttons displayed within the
keypad screen.
3 Tap the STORE to save changes to the
file name.
Notes
• Some characters may not be supported. (eg: ?, “
,<, > ,* ,/ , :, , etc... ).
• Files with identical file names cannot be saved.
• Up to 27 characters can be used for file names.
Radio
7
Tuning in a Station
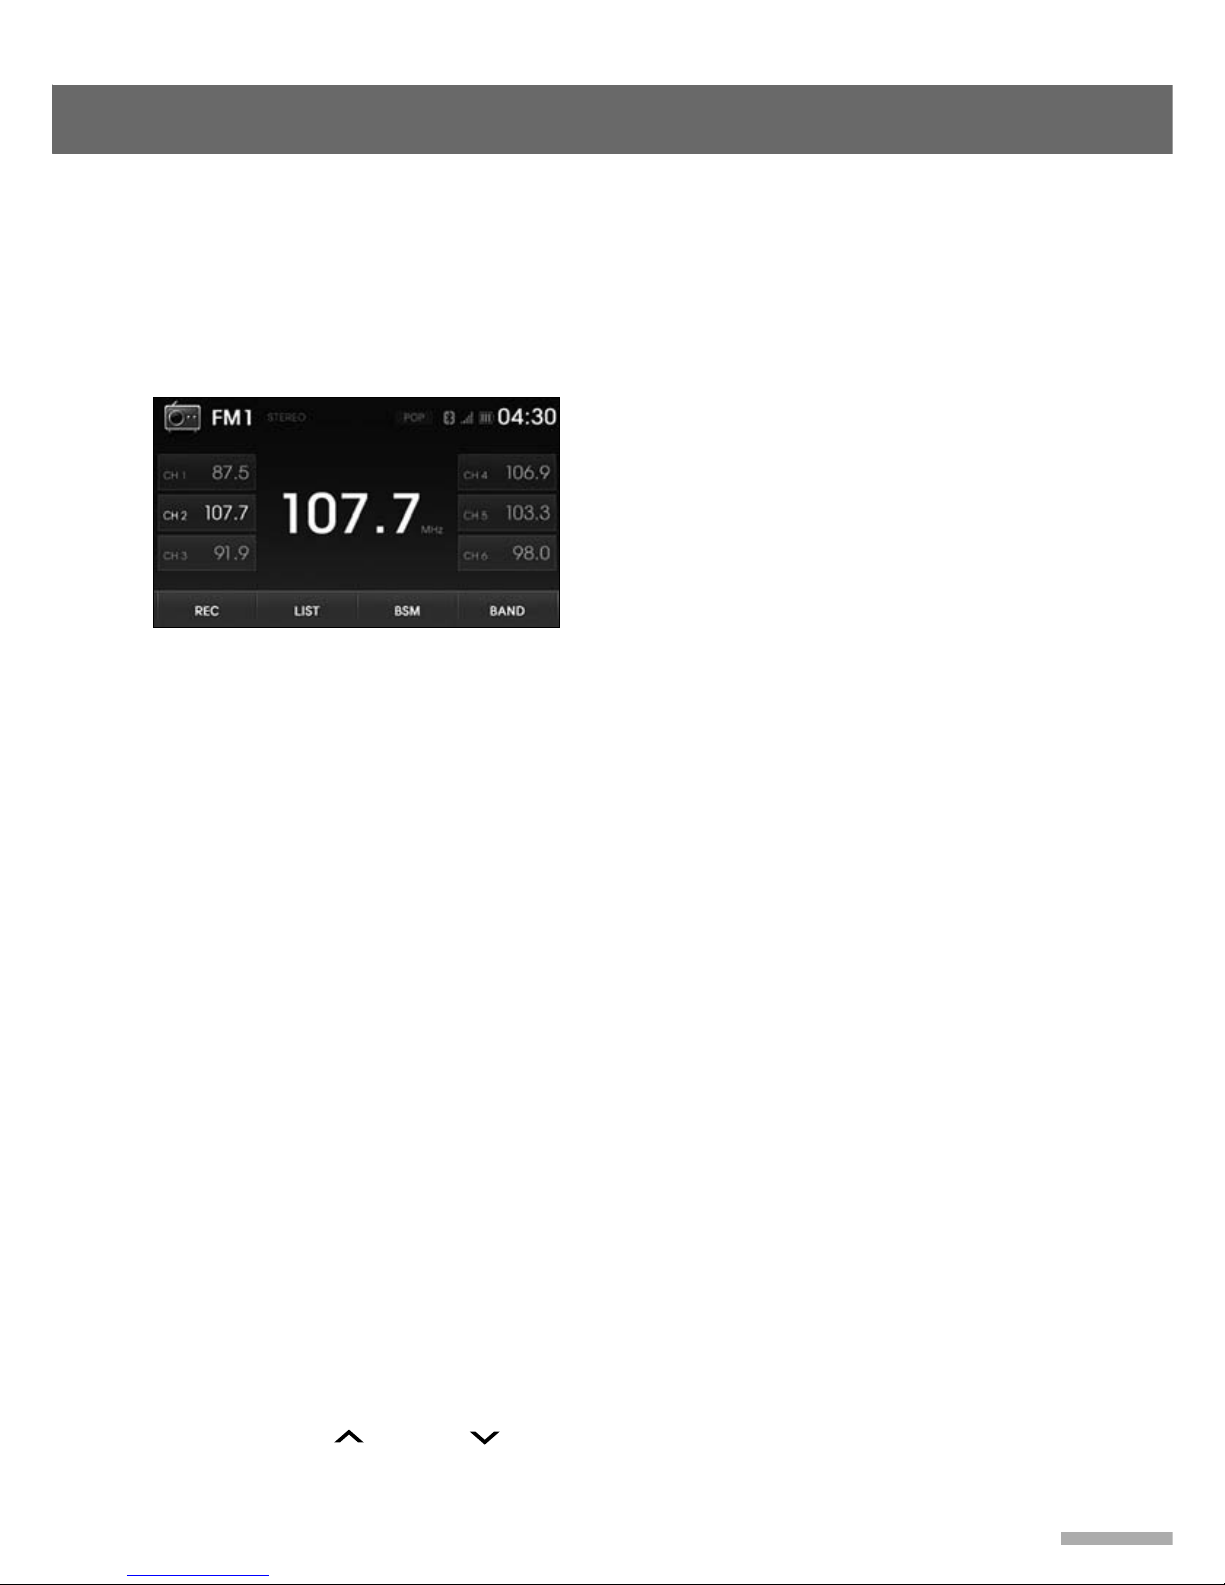
● Turn On the Radio
1 Press the RADIO button or tap Radio
icon on the Media menu screen to enter
the Radio mode.
The previously selected station is
received.
• FM1/FM2/FM3/AM: Show the currently
frequency bandwidth
• 107.7
MHz: Show the currently playing
frequency
•
CH1 87.5 ~ CH6 98.0: Show each preset
number and frequencies
• REC: Records currently playing
broadcast
• LIST: Display the preset list
• BSM: Store the frequencies with
superior reception to each preset
buttons
• BAND: Switch the frequency
bandwidth in order of FM1 → FM2 →
FM3 → AM
2 Press the RADIO button or tap the
BAND repeatedly to change the band in
order of
FM1 → FM2 → FM3 → AM →
FM1 ....
● Tuning a Station Manually
3 Rotate the TUNE dial repeatedly to tune
to a desired frequency .
● Tuning a Station Automatically
4 Press the SEEK /TRACK buttons
to automatically search for frequencies.
The tuning automatically stops at the
stations whose signals can be received,
and the station is selected.
Note
• When tuning in stations while driving, use preset
number button to prevent accidents.
Using the Preset Station
You can save up to 6 preset channels each for FM1,
FM2, FM3, and AM.
● Storing Stations Manually
1 Follow steps 2 to 4 on this page
"Tuning in a Station" to tune to the
frequency you wish to preset.
2 Press and hold the PRESET [ 1] ~ [6]
buttons or tap the CH1 ~ CH6 on the
Radio screen for more than 2 seconds.
A 'beep' will sound and the frequency is
saved to the selected preset button.
To preset another station, repeat these
steps.
Note
• If you try to store another station using the same
preset number, the previously stored station will be
replaced.
• Preset station memories are lost if the vehicle
battery is disconnected.
● Storing Stations Automatically
• The unit selects the stations with the strongest
signals within the selected band, and stores them in
the order of their frequency.
• Up to six stations can be stored in the current band.
1 Tap the BSM (Best Station Memory)
on the Radio mode screen.
Starting from the current frequency,
frequencies with superior reception are
scanned and stored in the radio preset
button.
Notes
• If only a few stations can be received due to weak
signals, some number buttons will retain their
former settings.
Radio
8
● Listening to a Preset Station
1 Press the RADIO button or tap the
BAND repeatedly to change the band in
order of
FM1 → FM2 → FM3 → AM →
FM1 ....
2 Press the PRESET [ 1] ~ [6] button or tap
CH1 ~ CH6 to start the listening.
Using the Preset Frequency
Lists
1 Tap the LIST button to display the
Preset station frequencies.
Up to 6 stations can be saved in presets
for each band FM1, FM2, FM3 and AM.
• FM1/FM2/FM3/AM: Selects the radio
band
• CH1 ~ CH6: Selects the station.
•
: Returns to the previous screen.
To select the station directly, tap the
desired the Band/station.
Recording to Current
Broadcast
1 Tap the REC to start recording the
current broadcast.
For more information on the recording
feature, refer to pages 5 ~ 6.

USB/AUX Player
9
Precautions for Handling USB/
iPod
• When using the external USB device, make sure
to keep the device disconnected and connect
only sometime after turning on the vehicle
ignition. The USB device may be damaged if the
USB device is already connected when the
ignition is turned on. (USB device is not an
electronic automotive component)
• Some USB devices may not operate properly
because of compatibility issues. Check that the
external device is supported by the device
before starting use.
• The device will only recognize USB devices
formatted in FAT 16 or FAT 32. (NTFS format is
not supported.) When formatting the external
USB device, the device may not properly
recognize a Byte/Sector selection other than
512Byte or 2048Byte.
• Avoid contact of body parts and foreign
substances with the USB connector.
• Repeatedly connecting/disconnecting the USB
in a short period of time may cause damage to
the device.
• When disconnecting the USB, an abnormal
sound may occur occasionally.
• Abruptly disconnecting the external USB device
while the USB is operating may cause the
device to be damaged or function abnormally.
Make sure to disconnect the USB device only
after the audio power is turned off or when the
audio is operating in a different mode.
• The amount of time required to recognize the
external USB device may differ depending on
the type, size, or file formats stored on the USB.
Such differences in the required time are not
indications of malfunction. Please wait the
period of time required to recognize the device.
• The device supports only USB devices used to
play music files.
• Do not use the USB I/F to charge batteries or
USB accessories which generate heat. Such
acts may lead to deteriorated performance or
damage to the device.
About MP3/WMA
• This unit can play MP3/WMA files with the
extension code<.mp3> or <.wma> (regardless of
the letter case-upper/lower).
• This unit can show the names of albums, artists
(performer), and Tag (Version 1.0, 1.1, 2.1, 2.2, 2.3,
or 2.4) for MP3 files and for WMA files.
• This unit can display only one-byte characters, no
other characters can be correctly displayed.
• This unit can play MP3/WMA files meeting the
conditions below:
- Type: MPEG 1, 2, 2.5 Layer 3 including VBR for
MP3/ v9 standard for WMA
- Bit rate: 32 ~ 320 kbps (VBR) for MP3 / 5 ~ 384
kbps (VBR) for WMA
- Sampling frequency: 8 ~ 48 kHz for MP3 or WMA
• The maximum number of characters for file/folder
names vary among the disc format used (includes
four extension characters - <.mp3> or <.wma>).
- ISO 9660 Level 1: up to 12 characters
- ISO 9660 Level 2: up to 31characters
- Romeo: up to 128 characters
- Joliet: up to 64 characters
- Windows long file name: up to 128 characters
• The unit can be playback files recorded in VBR
(variable bit rate). Files recorded in VBR have a
discrepancy in elapsed time display, and do not
show the actual elapsed time. After performing the
search function, this difference becomes
noticeable.
• The unit can recognize a total of 999 files, of 999
folders.
Note
Microsoft and Windows Media are either registered
trademarks or trademarks of Microsoft Corporation in
the United States and/or other countries.
 Loading...