

Page 1
Read the following safety cautions for your
safety.
Notations used within this User's Manual
Safety Warnings
Please read the following safety matters for your safety. This
User's Manual describes circumstances that may
inflict injury onto drivers and others with the following notations
(Warning, Caution, Information, Notice).
Before using the product, read the contents of this user's
manual carefully and use this product safely.
Failure to observe the safety instructions within this category
could result in serious injury or death.
Safety Cautions
Failure to observe the safety instructions within this category
could result in accident related injuries or damage
to the vehicle.
Caution
• Information on matters that could potentially lead to injury or vehicle
damage/malfunction
• Information that could lead to higher user safety
Information
Ȅ The design and specification of this product may change
without prior notification for product improvement.
(Confidential) / 1 / / 10.230.25.192 / 2012-04-02 08:49 / .㞬⽸ⱬ㉐ 䜸⯜⽸㏘ 䐤㉘ 䐴 Ḱ㣙 㣙ὤ䚐 ⸬ ⱬ㉐⏈ ⸨㙼ⱬ㉐⦐㉐ 㞬⺴ ⵌ㻐㡸 Ἴ䚝⏼␘
• Information and tips that provides additional user convenience in
using the product
Notice
• Information on specific features that facilitate proper product use and
functional understanding
• Information on terminology used within this manual
Page 2
Cautions upon Using SD Cards
Ejecting and Inserting SD Cards
• Ejecting and inserting SD cards while the Navigation system is operating may result in SD Card or
System errors. To eject or insert the SD card, first turn off the Navigation system and the vehicle
ignition.
• Eject/insert SD cards only to update the navigation system with a new version.
Ȅ When an SD Card with the new version is inserted, then system update will occur automatically
Usage of SD Cards
• The SD Card is formatted to include only MAP and new system update files.
• The SD Card cannot be used to save and play Music/Videos.
• Do not add, delete, or format files within the SD Card.
(Confidential) / 1 / / 10.230.25.192 / 2012-04-02 08:49 / .㞬⽸ⱬ㉐ 䜸⯜⽸㏘ 䐤㉘ 䐴 Ḱ㣙 㣙ὤ䚐 ⸬ ⱬ㉐⏈ ⸨㙼ⱬ㉐⦐㉐ 㞬⺴ ⵌ㻐㡸 Ἴ䚝⏼␘
Page 3

iPod
տ
տ
iPod®is a registered trademark of Apple Inc.
Bluetooth
The Bluetooth® word mark and logos are registered
trademarks owned by Bluetooth® SIG, Inc. and any use of
such marks by Hyundai/Kia is under license.
A Bluetooth® enabled cell phone is required to use
Bluetooth® wireless technology.
For more information on Bluetooth® compatibility, refer to
the Hyundai Motor website (http://www.hyundaiusa.com).
(Confidential) / 1 / / 10.230.25.192 / 2012-04-02 08:49 / .㞬⽸ⱬ㉐ 䜸⯜⽸㏘ 䐤㉘ 䐴 Ḱ㣙 㣙ὤ䚐 ⸬ ⱬ㉐⏈ ⸨㙼ⱬ㉐⦐㉐ 㞬⺴ ⵌ㻐㡸 Ἴ䚝⏼␘
Page 4

Basic
1
Warnings and Cautions
Key Product Features
Component Names and Functions
㞬⽸ⱬ㉐ 䜸⯜⽸㏘ 䐤㉘ 䐴 Ḱ㣙 㣙ὤ䚐 ⸬ ⱬ㉐⏈ ⸨㙼ⱬ㉐⦐㉐ 㞬⺴ ⵌ㻐㡸 Ἴ䚝⏼␘
(Confidential) / 1 / / 10.230.25.192 / 2012-04-02 08:49 / .
Page 5

Warnings and Cautions
Safety Warnings
Even when receiving route guidance from the Navigation
system, please abide by actual traffic and road regulations.
Following only the Navigation route guidance may lead to
violations of actual traffic and road regulations and lead to
traffic accidents.
Do not stare at the screen while driving. Staring at the
screen for prolonged periods of time could lead to traffic
accidents.
Do not operate the Navigation system while driving, such
as entering POIs or conducting route searches. Such acts
could lead to accidents, fire, or electric shock. Park the
vehicle before operating the device.
Do not disassemble, assemble, or modify the Navigation
system. Such acts could result in accidents, fire, or electric
shock.
Heed caution not to spill water or introduce foreign objects
into the device. Such acts could lead to smoke, fire, or
product malfunction.
Please refrain from use if the screen is blank or no sound
can be heard as these signs may indicate product
malfunction. Continued use in such conditions could lead to
accidents (fires, electric shock) or product malfunctions.
Do not touch the antenna during thunder or lightening as
such acts may lead to lightning induced electric shock.
Do not stop or park in parking-restricted areas to operate
the product. Such acts could lead to traffic accidents.
For most AV and multimedia modes, the display will not
operate when the vehicle is in motion. For your safety, first
park the vehicle to watch or view the screen. (The screen
will operate when the parking brake is set to ON for manual
transmission vehicles and when set to P or Parking Brake
On state for auto transmission vehicles.)
ࢇ ء ্ࣛࢇ
(Confidential) / 1 / / 10.230.25.192 / 2012-04-02 08:49 / .㞬⽸ⱬ㉐ 䜸⯜⽸㏘ 䐤㉘ 䐴 Ḱ㣙 㣙ὤ䚐 ⸬ ⱬ㉐⏈ ⸨㙼ⱬ㉐⦐㉐ 㞬⺴ ⵌ㻐㡸 Ἴ䚝⏼␘
Page 6

Safety Cautions
Pay attention to traffic conditions while driving.
0
In some instances, the navigation may provide guidance
.
through restricted areas.
1
0
Operating the device while driving could lead to accidents
2
due to a lack of attention to external surroundings. First
park the vehicle before operating the device. In addition,
the touch screen may not work for some functions when
the vehicle is in motion. The touch screen feature will be
supported once the vehicle has stopped.
0
3
Adjust the volume to levels that allow the driver to hear
sounds from outside of the vehicle. Driving in a state
where external sounds cannot be heard may lead to
0
accidents.
4
Pay attention to the volume setting when turning the
device on. A sudden output of extreme volume upon
turning the device on could lead to hearing impairment.
0
(Adjust the volume to a suitable levels before turning off
5
the device.
If you want to change the position of device installation,
please inquire with your place of purchase or service
maintenance center.
0
Technical expertise is required to install or disassemble
6
the device.
0
Turn on the car ignition before using this device. Do not
7
operate the Navigation system for long periods of time with
the ignition turned off as such operations may lead to battery
discharge.
0
Upon using the Navigation system for more than 10 minutes
8
with the car engine turned off, the following warning will be
displayed. After 10 minutes, the warning will be displayed for
5 seconds every 1 minute.
0
Do not subject the device to severe shock or impact.
9
Direct pressure onto the front side of the monitor may
cause damage to the LCD or touch screen.
1
When cleaning the device, make sure to turn off the
0
device and use a dry and smooth cloth.
1
Never use tough materials, chemical cloths, or solvents
1
(alcohol, benzene, thinners, etc.) as such materials may
damage the device panel or cause color/quality deterioration.
1
When experiencing product malfunctions, inquire with
2
your place of purchase or service maintenance center.
ળઝ
(Confidential) / 1 / / 10.230.25.192 / 2012-04-02 08:49 / .㞬⽸ⱬ㉐ 䜸⯜⽸㏘ 䐤㉘ 䐴 Ḱ㣙 㣙ὤ䚐 ⸬ ⱬ㉐⏈ ⸨㙼ⱬ㉐⦐㉐ 㞬⺴ ⵌ㻐㡸 Ἴ䚝⏼␘
ળઝ / ࢇ ء (ࡉ্ࢇ)
Page 7

Key Product Features
This device is an Audio Navigation system equipped with a multifunctional disc player that supports Radio (FM1, FM2,
AM), Audio CD, MP3, USB, iPod, and Audio AUX features. The WIDE VGA LCD provides a high quality resolution while
the powerful and rich sound system adds to driving enjoyment.
Display
Radio
Multimedia
Player
Navigation
Blue Link
Wide TFT-LCD Display
• Provides high quality video and music through a Wide TFT-LCD Display using an LED Back Light
• Touch screen for maximum user convenience
Digital Tuner Feature
• Digital Tuner using PPL method that supports memory of 6 broadcast stations for each AM, FM1, and FM2 modes
Integrated Antenna (RADIO+NAVI)
• Outstanding reception via integrated antenna with high sensitivity
Radio broadcast station name
• Displays broadcast station names for key locations
HD Radio / Satellite Radio feature
• Supports HD Radio and Satellite Radio (XM)
- Support for various Media Formats
• Support for various media formats, including Radio, audio MP3 CD, USB, iPod and AUX
• Supports USB, iPod, and Bluetooth Audio Streaming modes
-My Music
• Supports copying of music stored within USB or iPod devices into My Music (internal memory) mode
- USB Image
• Copy to view and save images saved in USB devices
- Voice Guidance
• Voice route guidance to safely and conveniently reach set destinations
• Various map scales that enables drivers to accurately view map and surrounding areas
-Automatic Correction for Current Location
• Automatically corrects current position using map matching and GPS information
Sync with Blue Link Center
Vehicle Diagnostics/Maintenance
- Bluetooth Handsfree
• Convenient use of Bluetooth Handsfree by using buttons within the steering remote controller
Miscellaneous
ࢇ ء ্ࣛࢇ
(Confidential) / 1 / / 10.230.25.192 / 2012-04-02 08:49 / .㞬⽸ⱬ㉐ 䜸⯜⽸㏘ 䐤㉘ 䐴 Ḱ㣙 㣙ὤ䚐 ⸬ ⱬ㉐⏈ ⸨㙼ⱬ㉐⦐㉐ 㞬⺴ ⵌ㻐㡸 Ἴ䚝⏼␘
- Digital Screen Control Features
• Easy control of screen controls through touch screen options
- Steering Remote Controller
• Control over audio features, voice recognition and Bluetooth through the steering remote controller for maximum convenience
Page 8

Component Names and Functions
Head Unit
ળઝ
Notation Description
[PHONE] Converts to Bluetooth® Handsfree mode
When [SEEK TRACK] keys are pressed shortly
(under 0.8 seconds)
• In FM/AM mode, plays previous/next frequency
• In XM mode, plays the previous/next channel
• In CD/MP3/USB/iPod/My Music modes, changes the
track, file or chapter
[SEEK
TRACK
[FM/AM]
When [SEEK TRACK] keys are pressed and held (over
]
0.8 seconds)
• In FM/AM mode, continuously changes the frequency until
the key is released and plays the current frequency
• In XM mode, continuously changes the channel until
the key is released and plays the current channel
• In CD/MP3/USB/iPod/My Music modes, rewinds or fast
forwards the track or file
• Converts to FM/AM mode
• Each time the key is pressed, the mode is changed in order
of FM1 ȥ FM2 ȥ AM ȥ FM1
[INFO] Displays the Info mode screen
• Displays CD, MP3, USB, iPod, AUX, Bluetooth Audio
[MEDIA]
SAT
(Confidential) / 1 / / 10.230.25.192 / 2012-04-02 08:49 / .㞬⽸ⱬ㉐ 䜸⯜⽸㏘ 䐤㉘ 䐴 Ḱ㣙 㣙ὤ䚐 ⸬ ⱬ㉐⏈ ⸨㙼ⱬ㉐⦐㉐ 㞬⺴ ⵌ㻐㡸 Ἴ䚝⏼␘
Streaming, My Music modes
• If the media is not connected or a disc is not inserted,
corresponding modes will be disabled.
Converts to XM mode
• Each time the key is pressed, the mode is changed in order
of XM1 ȥ XM2 ȥ XM3 ȥ XM1
ળઝ ࢇ ء ࡉ্ࢇ
Page 9

Component Names and Functions
Head Unit
Notation Description
• When power is off, press to turn power on
• When power is on, press and hold (over 0.8 seconds)
ೠ PWR key
VOL Knob
ೠ
[Route] Displays Route menu screen
[Setup] Displays the Setup mode
[Map] Displays the map for the current position
to turn power off
• When power is on, press shortly (under 0.8 seconds) to
turn AV off
• Turn left/right to control volume
ࢇ ء ্ࣛࢇ
(Confidential) / 1 / / 10.230.25.192 / 2012-04-02 08:49 / .㞬⽸ⱬ㉐ 䜸⯜⽸㏘ 䐤㉘ 䐴 Ḱ㣙 㣙ὤ䚐 ⸬ ⱬ㉐⏈ ⸨㙼ⱬ㉐⦐㉐ 㞬⺴ ⵌ㻐㡸 Ἴ䚝⏼␘
[TUNE]
[Dest] Displays the Destination setup menu
[ENTER] Executes the selection
[ ] Press to insert or eject disc
[Clock] Displays current time and date
[RESET] Resets and restarts the system
[ ]
• In FM/AM mode, changes the frequency
• In XM mode, changes the channel
• In CD, MP3, USB, iPod, My Music modes, changes the
track/file
SD Card insert slot
Page 10
Steering Remote Controller
ળઝ
Notation Description
[ࡸԛ࣏
1
ࢸ]
2 [MUTE] Mutes the sound
3 [ű, V]
Controls the volume
When , keys are pressed shortly (under 0.8 seconds)
• In FM/AM mode, searches broadcast frequencies saved to
Presets
• In XM modes, s earches broadcast channels saved to Presets
• In CD/MP/USB/iPod/My Music modes, changes the track, file or
chapter. \
When , keys are pressed and held (ov er 0.8 seconds)
• In FM/AM mode, automatically searches broadcast frequencies
and channels
• In XM modes, automatically searches broadcast channels
• In CD/MP/USB/iPod/My Music modes: rewinds or fast forwards
the track of file.
Notation Description
• Each time this key is pressed, the mode is changed in
order of FM1ȥ FM2ȥ AMȥ XM1ȥ XM2ȥ XM3 ȥ USB(Music ȥ Image)
or iPod ȥ AUXȥ Bluetooth Audio ȥ My Music
4 [MODE]
5 [ࡸ۽ࢉݥ] Converts to voice recognition mode
6 []
7 [ࣗՎ]
• If the media is not connected or a disc is not inserted,
corresponding m odes will be disabled.
• Press and hold the key (over 0.8 seconds) to turn the AV
system on/off
• When power is off, press the key to turn power back on
When pressed shortly (under 1.2 seconds)
• When pressed in the phone screen, displays call history screen
• When pressed in the dial screen, makes a call
• When pressed in the incoming call screen, answers the call
• When pressed during call waiting, switches to waiting call (Call Waiting)
When pressed and held (over 1.2 seconds)
• When pressed in the Bluetooth® Handsfree wait mode,
redials the last call
• When pressed during a Bluetooth® Handsfree call,
switches call back to mobile phone (Private)
• When pressed while calling on the mobile phone, switches
call back to Bluetooth® Handsfree
(Operates onl y when Bluetooth® Handsfree is connected)
When pressed during a call, ends the phone call
When pressed in the incoming call screen, rejects the call
(Confidential) / 1 / / 10.230.25.192 / 2012-04-02 08:49 / .㞬⽸ⱬ㉐ 䜸⯜⽸㏘ 䐤㉘ 䐴 Ḱ㣙 㣙ὤ䚐 ⸬ ⱬ㉐⏈ ⸨㙼ⱬ㉐⦐㉐ 㞬⺴ ⵌ㻐㡸 Ἴ䚝⏼␘
ળઝ ࢇ ء ࡉ্ࢇ
Page 11

Component Names and Functions
Climate System
Notation Description
1 [MODE] Sets the fan direction
2 [CLIMATE] Displays the climate info screen
3 [ ]
4 [ ] The side mirror and rear window defroster is turned on/off
5 [A/C] Turns the air conditioner on/off
6 [TEMP] Controls the driver-side temperature
7 [ ] Switches the air intake mode to recirculation
8 [ ] Switches the air intake mode to outside air
9 [DUAL]
[PASSAN
GER
10
TEMP]
11 [AUTO]
12 [OFF] Turns the climate system off
13 [ ] Sets the fan level
Removes humidity and frost by blowing fan towards the
front window
Turns DUAL mode on/off.
Upon turning on DUAL, the driver-side and passenger-side
temperature can be operated independently
Controls the passenger-side temperature
Operates auto temperature mode to maintain cabin
temperature at suitable levels relative to outside
temperature
ࢇ ء ্ࣛࢇ
(Confidential) / 1 / / 10.230.25.192 / 2012-04-02 08:49 / .㞬⽸ⱬ㉐ 䜸⯜⽸㏘ 䐤㉘ 䐴 Ḱ㣙 㣙ὤ䚐 ⸬ ⱬ㉐⏈ ⸨㙼ⱬ㉐⦐㉐ 㞬⺴ ⵌ㻐㡸 Ἴ䚝⏼␘
Page 12

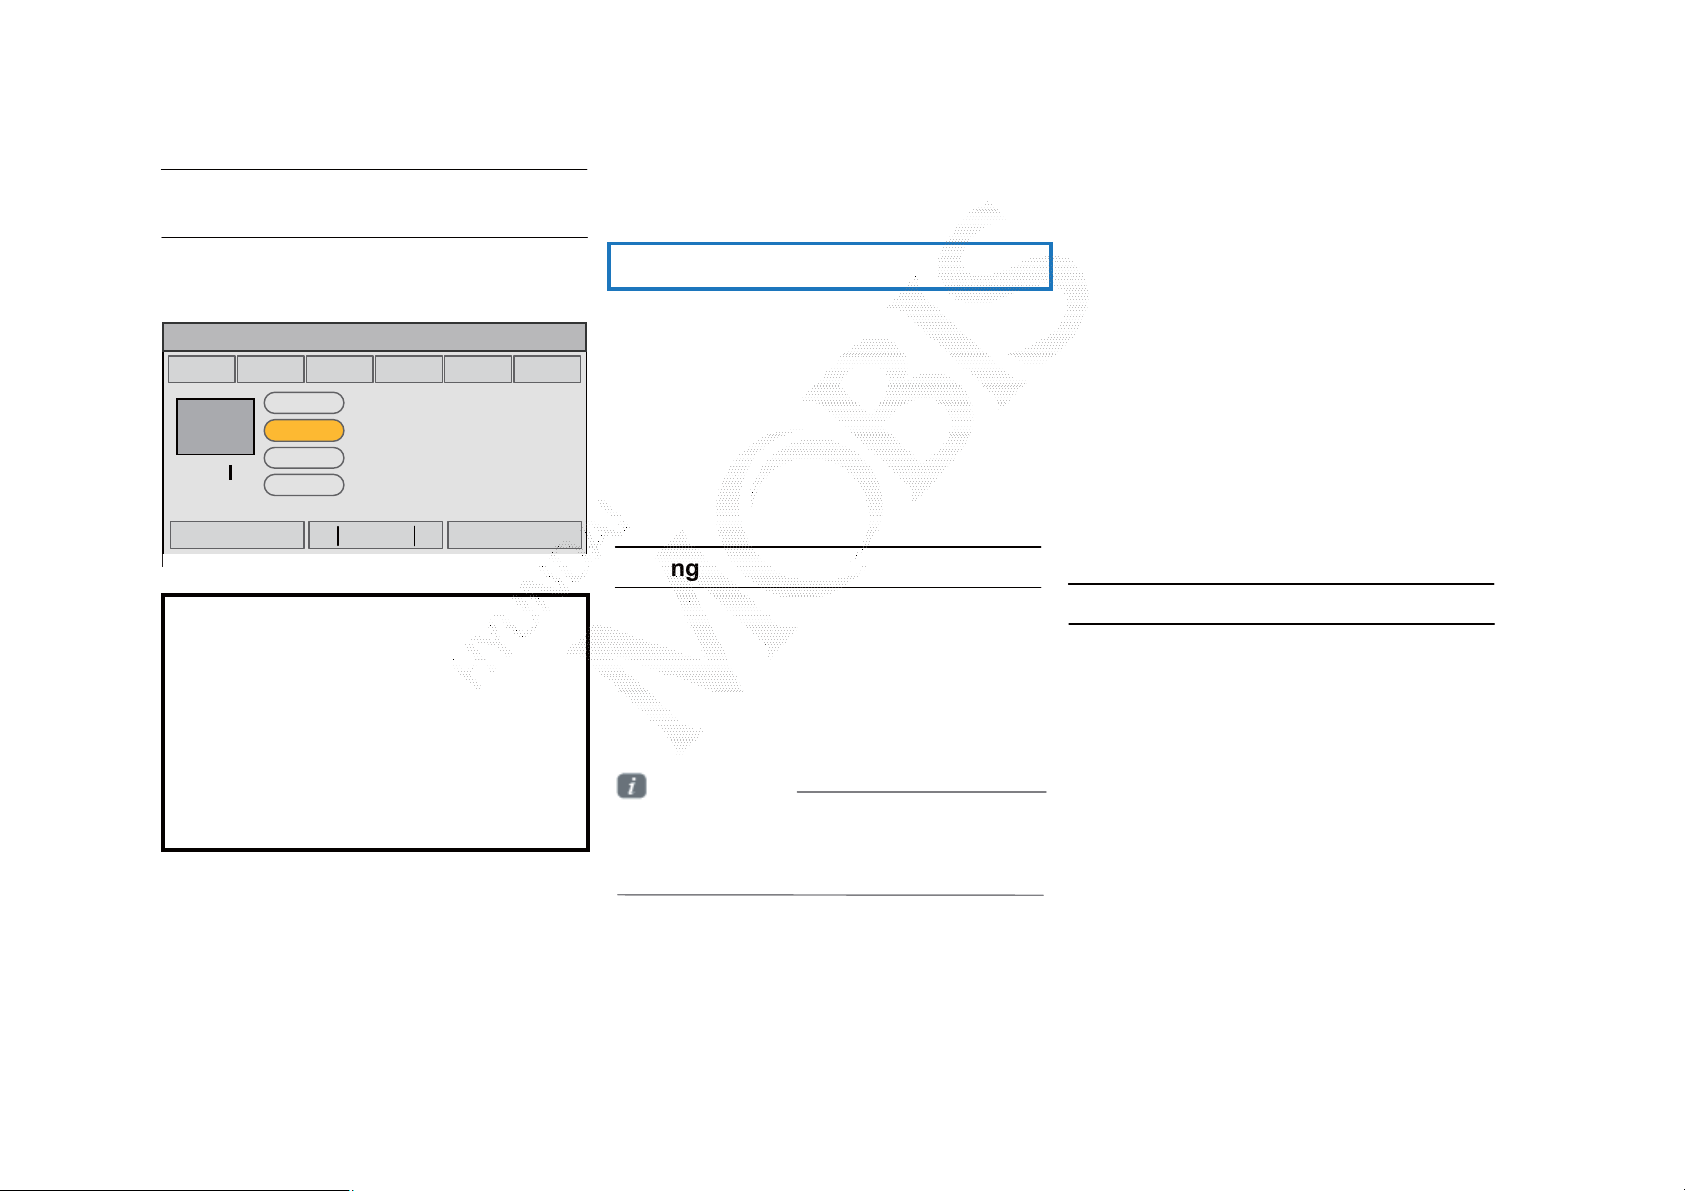
Turning the System On/Off
Turning the System On
Information
• If the engine start button is pressed without
pressing the brakes, then the ACC and system
will turn on . If the brakes are pressed, then the
IGN and system will turn on and the ignition
will start. .
• No operations are supported while the
system is booting. Some time may be required
until all features are ready for use.
Caution
Turning the System Off
ળઝ
Press the engine start button again or press and
hold the ೣ power key on the system to turn the
system off.
Information
•If the system is turned off while the Handsfree
is being used, then the call will automatically
switch back to the mobile phone.
Once the system is turned on, the booting
process will start and the safety warning page is
displayed.
• The safety warning page is displayed every
time the ignition is turned on. As these matters
are related to safety, closely read and comply
with the safety warnings.
Caution
• Pay attention to the volume setting when
turning the device on. A sudden output of
extreme volume upon turning the device on
could lead to hearing impairment.
Adjust the volume to a suitable levels before
turning off the device.
ળઝ ࢇ ء ࡉ্ࢇ
(Confidential) / 1 / / 10.230.25.192 / 2012-04-02 08:49 / .㞬⽸ⱬ㉐ 䜸⯜⽸㏘ 䐤㉘ 䐴 Ḱ㣙 㣙ὤ䚐 ⸬ ⱬ㉐⏈ ⸨㙼ⱬ㉐⦐㉐ 㞬⺴ ⵌ㻐㡸 Ἴ䚝⏼␘
Page 13
Component Names and Functions
Resetting the System
This feature is used to reset the system in the
occurrence of an unforeseen error or problem.
Press and hold the RESET key (about 1 second).
The use of a clip or pin is recommended when
resetting the system.)
Information
• ݤݛ ট ݤ ࣑߾ ࢵࢠ ۶ࢽѸ߭
ыࢽؿ(Ԃҡࠝ ࣯ળܹࢵࢠ, ࡸԛ۶ࢽ, ִ۶
ࢽҟ)Қࢇ ষˈ ۘԻ টѼТЬ. ࢇЕ ٙ
ԛୃۘࢇ ߅Ф, ձ ট ଜִ۰ ֻ֩չ߾
ࢵࢠѸ߹ы ࢽؿѦ টѸ ҶחТЬ.
Battery Warning Message
Use the system only when the engine is running.
If the system is turned on with the engine off,
then the following warning will be displayed.
This message will automatically disappear once
the engine is turned on.
Notice
• Using the system for prolonged periods of time
without the engine running may result in battery
discharge.
ࢇ ء ্ࣛࢇ
(Confidential) / 1 / / 10.230.25.192 / 2012-04-02 08:49 / .㞬⽸ⱬ㉐ 䜸⯜⽸㏘ 䐤㉘ 䐴 Ḱ㣙 㣙ὤ䚐 ⸬ ⱬ㉐⏈ ⸨㙼ⱬ㉐⦐㉐ 㞬⺴ ⵌ㻐㡸 Ἴ䚝⏼␘
Page 14

2
• FM/AM Mode
• HD Radio Mode
• XM Mode
• About DISC
• CD Mode
• MP3 CD Mode
• USB Mode
• iPod Mode
• AUX Mode
• Bluetooth ® Audio Mode
• My Music Mode
Audio
㞬⽸ⱬ㉐ 䜸⯜⽸㏘ 䐤㉘ 䐴 Ḱ㣙 㣙ὤ䚐 ⸬ ⱬ㉐⏈ ⸨㙼ⱬ㉐⦐㉐ 㞬⺴ ⵌ㻐㡸 Ἴ䚝⏼␘
(Confidential) / 1 / / 10.230.25.192 / 2012-04-02 08:53 / .
Page 15

FM/AM Mode
Basic Mode Screen (HD Radio OFF)
Text On
Name Description
Mode Display Displays currently operating mode
Preset Shows saved presets for user selection
Setting
Display
Stereo
Reception
Frequency Displays the current frequency
Broadcast
Station
Menu Displays Preset Scan and Text On (Text Off) menus
Displays currently operating features/options
Indicates that the current broadcast is a stereo
broadcast
Displays the current broadcast station
Scan
Auto store
Text On
(Text Off)
Preset Scan Plays preset frequencies for 5 seconds each
ࢇ ء ্ࣛࢇ
(Confidential) / 1 / / 10.230.25.192 / 2012-04-02 08:53 / .㞬⽸ⱬ㉐ 䜸⯜⽸㏘ 䐤㉘ 䐴 Ḱ㣙 㣙ὤ䚐 ⸬ ⱬ㉐⏈ ⸨㙼ⱬ㉐⦐㉐ 㞬⺴ ⵌ㻐㡸 Ἴ䚝⏼␘
Plays frequencies with superior reception for 5
seconds each
Saves frequencies with superior reception to Preset
buttons
Turns the Radio Text information on and off
Page 16

FM/AM Mode
Basic Mode Screen (HD Radio ON)
FM1
101.992.9 105.1 87.196.9 91.3
HD 3
HD 1 2 3 4 5 6 7 8
Name Description
PS NAME
Song Title Song Title Song Title
Artist Artist Artist
Album Album Album
FM1
101.992.9 105.1 87.196.9 91.3
Autostore
Preset Scan
Song Title Song Title Song Title
Scan
Artist Artist Artist
Album Album Album
Info Off
87.1
ඔ Menu Tagging
87.1
ඔ Menu Tagging
HD 3
Genre
HD 1 2 3 4 5 6 7 8
Genre
HD Radio
Reception
Broadcast
Station
Genre Displays the current broadcast genre
Broadcast
Info
Selection
buttons
Tagging
Info On
(Info Off)
Displays main HD Radio channels
Displays the current broadcast station
Displays detailed information about the current
broadcast
Used to select the previous/next HD radio broadcast
channel
Used to save song information for the currently
playing broadcast.
Upon connecting an iPod, song information is
transferred to the iPod and can be downloaded
through iTunes.
When pressed, shows detailed information about
the current broadcast.
When pressed again, detailed information is turned
off.
(Confidential) / 1 / / 10.230.25.192 / 2012-04-02 08:53 / .㞬⽸ⱬ㉐ 䜸⯜⽸㏘ 䐤㉘ 䐴 Ḱ㣙 㣙ὤ䚐 ⸬ ⱬ㉐⏈ ⸨㙼ⱬ㉐⦐㉐ 㞬⺴ ⵌ㻐㡸 Ἴ䚝⏼␘
Page 17
Starting Mode
Press the [FM/AM] key to change the mode
in order of FM1 ȥ FM2 ȥ AM.
Using SEEK
Press the [ SEEK, TRACK ] keys to
automatically search for frequencies.
• Shortly press the key (under 0.8 seconds):
Plays previous/next frequency
• Press and hold the key (under 0.8
seconds): Changes the frequency while
pressed and receives the next frequency
upon release.
Selecting Presets
ળઝ
When the power is OFF, pressing the
[FM/AM] key will turn the power on and
play a radio broadcast.
Using TUNE
Press the [ TUNE] key to manually select
the frequency.
• FM1 / FM2: Increases/decreased by
100kHz
• AM: Increases/decreased by 9kHz
From the 6 presets, select the frequency
you want to listen to.
Information
• You can save up to 6 preset channels
for each FM1, FM2 and AM.
• The station name and region is displayed
by using GPS coordinates and
are not displayed when the information
cannot be received.
• The displayed station name and region
is unrelated to radio sensitivity. The station
name inf ormation m ay differ from
the actual broadcast.
ળઝ / ࢇ ء (ࡉ্ࢇ)
(Confidential) / 1 / / 10.230.25.192 / 2012-04-02 08:53 / .㞬⽸ⱬ㉐ 䜸⯜⽸㏘ 䐤㉘ 䐴 Ḱ㣙 㣙ὤ䚐 ⸬ ⱬ㉐⏈ ⸨㙼ⱬ㉐⦐㉐ 㞬⺴ ⵌ㻐㡸 Ἴ䚝⏼␘
Page 18
FM/AM Mode
Saving Radio Frequency
Saving Manually
After selecting frequency Press and
hold (over 0.8 seconds) the preset
button.
• A 'beep' will sound and the frequency is
saved to the selected preset button.
Saving Automatically
Press the |ȿAuto Store| to automatically
save receivable frequencies to Preset
buttons. A total of 18 frequencies with six
preset frequencies each for FM1/FM2/AM
modes can be saved..
Information
While |ȿAuto Store| is operating, pressing
the Auto Store button again will cancel
the function and play the previous
frequency.
Scanning Radio Frequency
Press the |ȿScan |button to scan all
radio frequencies.
Starting from the current frequency,
frequencies with superior reception are
scanned for 5 seconds and the previous
frequency is restored.
ࢇ ء (্ࣛࢇ)
(Confidential) / 1 / / 10.230.25.192 / 2012-04-02 08:53 / .㞬⽸ⱬ㉐ 䜸⯜⽸㏘ 䐤㉘ 䐴 Ḱ㣙 㣙ὤ䚐 ⸬ ⱬ㉐⏈ ⸨㙼ⱬ㉐⦐㉐ 㞬⺴ ⵌ㻐㡸 Ἴ䚝⏼␘
Page 19
Using the Menu Buttons
Text On/Text Off
About HD Radio
Press the |ȿMenu| button to use the Preset
Scan menu.
Text On
Preset Scan
Press the |ȿMenu| button Press |ȿAuto
Store|
Frequencies saved to the 6 preset buttons
are each played for 5 seconds and the
previous frequency is restored.
Press the |ȿMenu| button Press the
|ȿText On|
The Text feature is turned on/off.
If the |ȿText On| button is displayed (Text
off state), information will not be displayed
even if there is information being transmitted
from the broadcast station.
If the |ȿText Off| button is displayed (Text
on state), then broadcast information will be
displayed. Information may not be displayed
if there is no information being transmitted
from the broadcast station.
ળઝ
ۘࢊ ˕ࢠ ࢉ ଗࡁ
(Confidential) / 1 / / 10.230.25.192 / 2012-04-02 08:53 / .㞬⽸ⱬ㉐ 䜸⯜⽸㏘ 䐤㉘ 䐴 Ḱ㣙 㣙ὤ䚐 ⸬ ⱬ㉐⏈ ⸨㙼ⱬ㉐⦐㉐ 㞬⺴ ⵌ㻐㡸 Ἴ䚝⏼␘
ળઝ / ࢇ ء (ࡉ্ࢇ)
Page 20

Starting Mode
Operating HD Radio Mode
Press the [FM/AM] key to turn on Radio
mode.
If an HD Radio broadcast is received, the
radio mode will switch from analog
broadcast to HD Radio broadcast.
Information
• The HD Radio screen is displayed only when
a HD Radio broadcast is being received.
To ensure HD Radio stations are received, turn
the feature on at [Setup] key > [HD Radio] >
[HD Radio Setting]
Selecting a Frequency
FM1
101.992.9 105.1 87.196.9 91.3
PS NAME
Song Title Song T itle Song Title
Artist Artist Artist
Album Album Album
HD 3
HD 1 2 3 4 5 6 7 8
87.1
ೞ Menu Taggi ng
Genre
As HD Radio reception is included within
Radio mode, the methods of moving
between channels, saving presets,
searching, or methods of searching
frequencies are identical. However, while
the HD Radio related icon display will
become active when within regions where
an HD Radio signal can be received.
Using TUNE
Press the [ TUNE] key to manually select
the frequency.
Selecting through Preset
FM1
101.992.9 105.1 87.196.9 91.3
PS NAME
Song Title Song T itle Song Title
Artist Artist Artist
Album Album Album
HD 3
87.1
ඔ Menu Taggi ng
HD 1 2 3 4 5 6 7 8
Genre
From the 6 presets, select the HD Radio
broadcast you want to listen to.
Information
• For HD Radio broadcast channels without
sub channels, sub channels will be skipped
and only main channels will be received.
(Confidential) / 1 / / 10.230.25.192 / 2012-04-02 08:53 / .㞬⽸ⱬ㉐ 䜸⯜⽸㏘ 䐤㉘ 䐴 Ḱ㣙 㣙ὤ䚐 ⸬ ⱬ㉐⏈ ⸨㙼ⱬ㉐⦐㉐ 㞬⺴ ⵌ㻐㡸 Ἴ䚝⏼␘
Page 21

Song-Tagging
Song-tagging is a feature that song data of
the currently playing broadcast.
Upon connecting an iPod, song information
is transferred to the iPod and can be
downloaded through iTunes.
Information
• Up to 50 songs can be saved if an iPod
device is not connected.
• Song data can be transferred to an iPod only
if there is available space within the device.
(Confidential) / 1 / / 10.230.25.192 / 2012-04-02 08:53 / .㞬⽸ⱬ㉐ 䜸⯜⽸㏘ 䐤㉘ 䐴 Ḱ㣙 㣙ὤ䚐 ⸬ ⱬ㉐⏈ ⸨㙼ⱬ㉐⦐㉐ 㞬⺴ ⵌ㻐㡸 Ἴ䚝⏼␘
Page 22

XM Mode
Basic Mode Screen
1
XM 2
1210 35 255157 158
2
Name Description
10
11
12
6
Channel
Logo
Ch 15
Cate gory
Channel
Title
Arti st
7
Menu Listೞ Category
Category 1
4
Channel 1-3
5
Title
Artist
1 Mode Display Displays currently operating mode
1
3
2
2 Preset
Setting
3
3
Display
4 Category Displays the current category
4
Channel
5
5
Number
Channel
6
6
Name
7 Menu Displays Search, Preset Scan and Scan menus
7
Category
8
Selection
8
Buttons
9
9 List Displays XM Radio Categories / Channel Lists
10
10 Search
The desired frequency can saved as a preset and
selected.
Displays currently operating features/options
Displays the current channel number
Displays the current channel name
Used to select the previous/next channel
Used to search for channels by entering channel
numbers
98
ࢇ ء (্ࣛࢇ)
(Confidential) / 1 / / 10.230.25.192 / 2012-04-02 08:53 / .㞬⽸ⱬ㉐ 䜸⯜⽸㏘ 䐤㉘ 䐴 Ḱ㣙 㣙ὤ䚐 ⸬ ⱬ㉐⏈ ⸨㙼ⱬ㉐⦐㉐ 㞬⺴ ⵌ㻐㡸 Ἴ䚝⏼␘
11 Preset Scan Plays preset frequencies for 5 seconds each
11
Scan Plays all receivable channels for 5 seconds each
12
Page 23
Starting Mode
Press the [SAT] key to change the mode in
order of XM1ȥ XM22 ȥ XM3.
Information
• Within category mode, channels within the
current channel will be played.
• Within channel mode, all channels in all
categories will be played.
• If there are no operations for 5 seconds while
in category mode, then channel mode will
automatically be restored.
Using TUNE
Selecting Presets
ળઝ
From the 6 presets, select the channel you
want to listen to.
When the power is OFF, pressing the [SAT]
key will turn the power on and play a XM
Press the [ TUNE] key to manually select
the channel.
Radio broadcast.
Using SEEK
Press the [ SEEK, TRACK ] key on the
control panel for under 0.8 seconds.
The previous or next channel will be
selected.
Press the < TUNE> key to display the
previous or next channel information. After a
brief moment, the selected channel will be
displayed.
(Confidential) / 1 / / 10.230.25.192 / 2012-04-02 08:53 / .㞬⽸ⱬ㉐ 䜸⯜⽸㏘ 䐤㉘ 䐴 Ḱ㣙 㣙ὤ䚐 ⸬ ⱬ㉐⏈ ⸨㙼ⱬ㉐⦐㉐ 㞬⺴ ⵌ㻐㡸 Ἴ䚝⏼␘
ળઝ ࢇ ء ࡉ্ࢇ
Page 24
Selecting through
Channel/Category List
Press the |List| button Select the
desired category and channel
XM 2
1210 35 255157 158
Title
Arti st
Category 1
Channel 1-3
Title
Artist
Channel
Logo
Ch 15
Menu Listೞ Category
Cate gory
Channel
Saving XM Channels
Saving Manually
Using the Menu Buttons
Press the |ȿMenu| button to use the Search,
Preset Scan, and Scan menus
After selecting channel Press and
Search
hold (over 0.8 seconds) the preset
button.
Category չݛઝ
۴ִ
• A 'beep' will sound and the channel is
saved to the selected preset button.
Information
• Six preset frequencies each for XM1/ XM2/
XM3 modes can be stored using the above
instructions.
Select the desired category and the channel.
Once selected, the previous screen will be
restored and the selected channel will begin
playing.
ࢇ ء ্ࣛࢇ
(Confidential) / 1 / / 10.230.25.192 / 2012-04-02 08:53 / .㞬⽸ⱬ㉐ 䜸⯜⽸㏘ 䐤㉘ 䐴 Ḱ㣙 㣙ὤ䚐 ⸬ ⱬ㉐⏈ ⸨㙼ⱬ㉐⦐㉐ 㞬⺴ ⵌ㻐㡸 Ἴ䚝⏼␘
Press the |ȿMenu| button Press
|ȿSearch| Enter numbers and press
|Done|
Enter the number of the channel you want to
receive.
Page 25

XM Mode
Preset Scan
Press the |ȿMenu| button Press
|ȿPreset Scan|
Channels saved to the 6 preset buttons are
each played for 5 seconds and the previous
channel is restored.
Scan
Press the |ȿScan |button to scan all
channels.
Starting from the current channel,
channels with superior reception are
scanned for 5 seconds and the previous
channel is restored once scanning is
complete.
(Confidential) / 1 / / 10.230.25.192 / 2012-04-02 08:53 / .㞬⽸ⱬ㉐ 䜸⯜⽸㏘ 䐤㉘ 䐴 Ḱ㣙 㣙ὤ䚐 ⸬ ⱬ㉐⏈ ⸨㙼ⱬ㉐⦐㉐ 㞬⺴ ⵌ㻐㡸 Ἴ䚝⏼␘
Page 26
About Discs
Precautions upon handling discs
After using a disc, put the disc back in its original case to
prevent disc scratches.
Do not use abnormally shaped discs (8cm, heart-shaped,
octagon-shaped) as such discs could lead to malfunctions.
Do not clean discs with chemical solutions, such as record
sprays, antistatic sprays, antistatic liquids, benzene, or
thinners.
Do not expose the disc to direct sunlight or high
temperatures for prolonged
periods of time. Such exposure may lead to disc deformation.
Upon playing a disc contaminated by dirt or other
substances, the sound and video quality may deteriorate and
result in skipping sounds. Writing on either side of the disc
could result in damage to disc surfaces.
Clean fingerprints and dust off the disc surface (coated side)
with a soft cloth.
Do not disassemble the device. Contact a designated
service center in case of malfunction. (Complete after
service assistance will not be provided if the user
disassembles the device.)
Do not use water to clean the device. Exposure to water
could lead to product malfunction.
Do not to introduce foreign substances into the disc
insert/eject slot. Introducing foreign substances could
damage the device interior.
The device may fail to properly operate in extremely hot or
cold temperatures. (The operating temperature range is: 10Ȕ ~ 65Ȕ)
Steam can become condensed on the fiber-optic lens due to
rain, wet conditions, or upon operating the heating system. In
such cases, discs may not be properly recognized could be
the cause of product malfunction. Remove the disc and wait
until the moisture dries.
Copy-protected CDs, such as S-type CDs, may not properly
operate in the device.
ࢇ ء ্ࣛࢇ
(Confidential) / 1 / / 10.230.25.192 / 2012-04-02 08:53 / .㞬⽸ⱬ㉐ 䜸⯜⽸㏘ 䐤㉘ 䐴 Ḱ㣙 㣙ὤ䚐 ⸬ ⱬ㉐⏈ ⸨㙼ⱬ㉐⦐㉐ 㞬⺴ ⵌ㻐㡸 Ἴ䚝⏼␘
Skipping may occur to the audio and video when driving on
bumpy roads for prolonged periods of time or upon severe
shock to the vehicle. In case of severe shock, video and
audio may not properly play.
Page 27

Supported disc formats
Disc Format
Disc/Content format compatibility
This device supports the following disc
formats.
Disc Type
Disc
Type
CD
SACD
Disc Format Device Support
3ࢉ (8cm)
5ࢉ (12cm)
CD
CD-R
CD-RW
MultisessionCD
SACD (Single,
SACD layer)
SACD
(Hybrid)
O
O
O
O (Read Only)
O (Read Only)
O (Read Only)
X
O (Only CD
layer)
Disc
Type
CD
Disc Format Device Support
3CD-DA
MP3
WMA
MPEG4 AAC
DTS-CD
CD-RM
CD-G
CD-EXTRA
CD-TEXT
O
O
O
X
O
O
O
O
O
By Format according to Disc Type
Disc
Type
CD
MP3
WMA
Disc Format Device Support
LPCM
MEPG1,
Layer3
MEPG2,
Layer3
MEPG2.5
Ver9
O
O
O
O
O
ળઝ
(Confidential) / 1 / / 10.230.25.192 / 2012-04-02 08:53 / .㞬⽸ⱬ㉐ 䜸⯜⽸㏘ 䐤㉘ 䐴 Ḱ㣙 㣙ὤ䚐 ⸬ ⱬ㉐⏈ ⸨㙼ⱬ㉐⦐㉐ 㞬⺴ ⵌ㻐㡸 Ἴ䚝⏼␘
ળઝ / ࢇ ء (ࡉ্ࢇ)
Page 28

About Discs
Ordinary Disc Compatibility CD-R/RW Compatibility
This device has been designed/
manufactured to be compatible with software
bearing the following logo marks.
• CD-R/RW discs (Audio CD) created
with CD recording devices or PCs may
not properly operate in the device.
• This is a result of various causes, including
disc format, recording method, and
contamination to the disc or lens.
• This device supports CD-R, CD-RW,
and MP3 discs burned in Audio CD formats.
• The recording of CD-R and CD-RW
discs with this device is not supported.
• CD-R/RW discs recorded as audio CDs
that were not finalized are not supported
by this device.
PC-created disc compatibility
• When burning a disc on the PC, the disc
may not operate in this device depending on
the software settings. In such cases, inquire
with the software manufacturer.
• Additional information regarding
compatibility is displayed on the CD-R/RW
software disc box.
• DVD-R/W discs are not compatible with
this device..
ࢇ ء ্ࣛࢇ
(Confidential) / 1 / / 10.230.25.192 / 2012-04-02 08:53 / .㞬⽸ⱬ㉐ 䜸⯜⽸㏘ 䐤㉘ 䐴 Ḱ㣙 㣙ὤ䚐 ⸬ ⱬ㉐⏈ ⸨㙼ⱬ㉐⦐㉐ 㞬⺴ ⵌ㻐㡸 Ἴ䚝⏼␘
Page 29

Cautions upon writing CDs
• When a multi-session disc is being
recorded, make sure to close the session
before recording.
• If mp3/wma file extensions are changed,
such could result in malfunctions.
• In the case of MP3/WMA, write using
only English. (Other languages are not
supported)
• Unauthorized use of copy-protected
music files is prohibited by law.
• Prolonged use of CD-R/CD-RW products
that do not satisfy related specifications
may result in product malfunction.
• When writing CDs, low-speed writing is
recommended.
Compressed audio compatibility
• Physical formats of CD: Model 1, Model
2 XA format 1.
• This device supports audio file compressed
through MPEG-1 audio stream layer 3 (MP3)
using 8kbps ~ 320kbps (CBR), VBR..
• For stable operation, the use of files in
95kbps~192kbps bit rate range and 44.1kHz
SAMPLING frequency is recommended.
• This device supports WMA audio files
using 20kbps ~ 320kbps(CBR), VBR.
• Variable bit rate files may operate, but
the play time information may not be
properly displayed.
• This device only supports tracks with
file extension of ".mp3" or “.wma".
• This device does not support multisession
discs.
• This device supports only 8 layer folders.
• This device supports MP3 ID3 tag versions
of Ver. 1.0, Ver. 1.1, Ver. 2.2, Ver. 2.3, Ver.
2.4. When using discs with other versions,
the ID3 info will not be displayed.
• Although this device has been designated
to be compatible with various bit rates,
playing low bit rate MP3 tracks may result in
low quality sound.
Before playing a MP3 Disc
Supported MP3 File Specification
• Acceptable standard: MPEG1 AUDIO
LAYER 33
• Acceptable sampling frequency: 8, 11.025,
12, 16, 22.05, 24, 32, 44.1,, 48(KHz)
• Acceptable bit rate: 8 ~ 320 (Kbps)
Recommended bit rates and frequency
• Sampling frequency: 96 ~ 192 Kbps
fixed bit rate /44.1kHz
Notice
• Supported ID3 tags : ID3v1 0, ID3v1 1,
ID3v 2 2, ID3v2 3, ID3v2 4
• Supported MP3 Media: : CD-ROM
• Supported media formats: ISO9660 LEVEL1
and LEVEL2
ળઝ
(Confidential) / 1 / / 10.230.25.192 / 2012-04-02 08:53 / .㞬⽸ⱬ㉐ 䜸⯜⽸㏘ 䐤㉘ 䐴 Ḱ㣙 㣙ὤ䚐 ⸬ ⱬ㉐⏈ ⸨㙼ⱬ㉐⦐㉐ 㞬⺴ ⵌ㻐㡸 Ἴ䚝⏼␘
ળઝ ࢇ ء ࡉ্ࢇ
Page 30

About Discs
Detailed Specification
• Maximum directory layers: 8 layers
• Maximum folder length: 64 bytes, file
name length: 64 bytes
• Supported characters for folder name/
file name: Alphanumeric characters,
Korean standard character set 2350
characters, Simplified Chinese 4888
characters
• Maximum number of folders per disc:
256 folders (including ROOT)
• Maximum number of files per disc: 512 files
Precautions upon burning MP3 files
• The use of ISO 9660 LEVEL 2 JOLIET
format is recommended.
• Up to 32 characters in Korean/Chinese
are supported for file names and up to
20 characters in Korean/Chinese are
supported for folder names.
• The use of CDs exceeding 700M may
result in faulty disc recognition or errors
upon play.
MP3 File Structure
Recognition occurs through the same folder structure used within the disc.
Folder structure as saved in CD-ROM
Folder structure as saved in the system
ࢇ ء (্ࣛࢇ)
(Confidential) / 1 / / 10.230.25.192 / 2012-04-02 08:53 / .㞬⽸ⱬ㉐ 䜸⯜⽸㏘ 䐤㉘ 䐴 Ḱ㣙 㣙ὤ䚐 ⸬ ⱬ㉐⏈ ⸨㙼ⱬ㉐⦐㉐ 㞬⺴ ⵌ㻐㡸 Ἴ䚝⏼␘
Page 31

CD Mode
Basic Mode Screen
10
1
5
3 2
4
6
7
8
15
16
9
Name Description
Mode Displays currently operating mode
1
Track Index Shows the current track/total tracks
2
Repeat/
3
Shuffle/ Scan
Play Time Displays the current play time
4
Track Track number of current song
5
Menu
6
Repeat Repeats the current track
7
Shuffle Plays disc tracks in random order
8
Scan
9
Info Off
10
(Info On)
11
Previous Track
Play/ Pause Plays/pauses the current track
12
From Repeat/Shuffle/Scan, displays the curr ently operating
function
Displays Repeat, Shuffle, Scan, and Info On (Inf o Off)
menus
Scans the beginning parts of disc tracks (approx 10
seconds
per track)
Info Off: shows only track info
Info On: shows track inf o, artist and album info
Ȅempty when there is no corresponding information.
• When the play time is under 2 seconds: Moves to the
previous track
• When the play time is over 2 seconds: Plays the current
song from the beginning
ળઝ
14
Next Track Moves to the next track
11 12 13
13
List Moves to the track list screen
14
15
16
Artist Info
Album Info
Displays artist info f or current song
(Will not be displayed if the information does not exist)
Displays album info for current song
(Will not be displayed if the information does not exist)
(Confidential) / 1 / / 10.230.25.192 / 2012-04-02 08:53 / .㞬⽸ⱬ㉐ 䜸⯜⽸㏘ 䐤㉘ 䐴 Ḱ㣙 㣙ὤ䚐 ⸬ ⱬ㉐⏈ ⸨㙼ⱬ㉐⦐㉐ 㞬⺴ ⵌ㻐㡸 Ἴ䚝⏼␘
ળઝ / ࢇ ء (ࡉ্ࢇ)
Page 32

Starting Mode
Press the [MEDIA] key Press |CD|
Information
• CD mode will automatically start once a CD is
inserted.
Playing a CD
Fast-forwarding or Rewinding CD Tracks
While Playing Press and hold the [SEEK
TRACK] key (over 0.8
seconds)
This will rewind or fast-forward the track.
While the [SEEK TRACK] key is
being pressed, the track will rewind or
fast-forward at 20x speed.
Once released, the track will begin playing
at normal speed.
Notice
• Only genuine audio CDs are supported. Other
discs may result in recognition failure (e.g. copy
CD-R, CDs with labels)
ࢇ ء (্ࣛࢇ)
(Confidential) / 1 / / 10.230.25.192 / 2012-04-02 08:53 / .㞬⽸ⱬ㉐ 䜸⯜⽸㏘ 䐤㉘ 䐴 Ḱ㣙 㣙ὤ䚐 ⸬ ⱬ㉐⏈ ⸨㙼ⱬ㉐⦐㉐ 㞬⺴ ⵌ㻐㡸 Ἴ䚝⏼␘
• Press the || button to play the track.
• Press the |ll| button to pause the track.
Page 33

CD Mode
Searching CD Tracks
Press the [TUNE] key Search tracks
Once the desired track name is displayed,
press the [ENTER] key
When searching tracks, the track number is
displayed in blue. Pressing the [ENTER] key
will play the corresponding track.
Information
• If the [TUNE] key is not pressed within 5
seconds of searching tracks, the track info for
the current track is restored.
Using the Menu Buttons
Press the |ȿMenu| button to set the repeat,
shuffle, scan and Info On/Info Off menus.
Repeat
Press the |ȿMenu| button Press
|ȿRepeat|
The current track is repeated.
Information
Press the |ȿRepeat| button again to turn off
repeat. If nothing is selected, then all tracks will
be played in sequential order.
Shuffle
Press the |ȿMenu| button Press
|ȿShuffle|
ળઝ
Tracks within the disc are played in random
order.
Information
• Press the |ȿShuffle| button again to turn the
shuffle option off.
Scan
Press the |ȿMenu| button Press |ȿScan|
The beginning (approx 10 seconds) of
all tracks within the CD are scanned.
Information
• Press the |ȿScan| button again to turn the
scan option off.
(Confidential) / 1 / / 10.230.25.192 / 2012-04-02 08:53 / .㞬⽸ⱬ㉐ 䜸⯜⽸㏘ 䐤㉘ 䐴 Ḱ㣙 㣙ὤ䚐 ⸬ ⱬ㉐⏈ ⸨㙼ⱬ㉐⦐㉐ 㞬⺴ ⵌ㻐㡸 Ἴ䚝⏼␘
ળઝ / ࢇ ء (ࡉ্ࢇ)
Page 34

Info On/Info Off
Press the |ȿMenu| button Press the
|ȿInfo on|
The amount of information displayed on the
screen can be selected. The title, artist, and
album info are additionally displayed and the
button will automatically change to |ȿInfo
Off|. Press |ȿInfo Off| to restore the
previous information display setting.
Information
• Artist/album info are supported within Text
CDs.
ࢇ ء (্ࣛࢇ)
(Confidential) / 1 / / 10.230.25.192 / 2012-04-02 08:53 / .㞬⽸ⱬ㉐ 䜸⯜⽸㏘ 䐤㉘ 䐴 Ḱ㣙 㣙ὤ䚐 ⸬ ⱬ㉐⏈ ⸨㙼ⱬ㉐⦐㉐ 㞬⺴ ⵌ㻐㡸 Ἴ䚝⏼␘
Page 35

MP3 CD Mode
Basic Mode Screen
Name Description
Mode Displays currently operating mode
File Index Shows the c urrent MP3 file/total number of MP3 files
Repeat/ Shuffle/
Normal Play
Play Time Displays the current play time
Folder Time Displays Folder Name for current file
File Name Displays the name of the current file
Menu
List Moves to the list screen
Copy Copies the currently playing file into My Music
Repeat
Shuffle
Scan
Info Off
(Info On)
Previous File
Play/Pause Plays/pauses the c urrent file
Next File Moves to the next file
From Repeat All/Repeat One Song/Repeat
Folder/Shuffle Folder/Shuffle All/Folder Scan/Scan All,
displays the currently operating function
Displays Copy, Repeat, Shuffle, Scan and Info On (Info
Off) menus
Repeats the current file (each time the button is
pressed, changes in order of Repeat Once ȥ R epeat
Folder ȥ Off).
Plays files in random order (each time the button is
pressed, changes option in order of Shuffle Folder ȥ
Shuffle All ȥ Off)
Scans the beginning parts of MP3 files (approx. 10
seconds per file)
(Each time the button is pressed, changes option in
order of Folder Scan ȥ Sc an All ȥ Off)
Changes the display method between Info Off/Info On
• Info Off: shows folder name/file name
• Info On: shows folder name, file name, title, artist, and
album info
• When the play time is under 2 seconds: Moves to the
previous file
• When the play time is over 2 seconds : Plays the
current file from the beginning
ળઝ ࢇ ء ࡉ্ࢇ
ળઝ
(Confidential) / 1 / / 10.230.25.192 / 2012-04-02 08:53 / .㞬⽸ⱬ㉐ 䜸⯜⽸㏘ 䐤㉘ 䐴 Ḱ㣙 㣙ὤ䚐 ⸬ ⱬ㉐⏈ ⸨㙼ⱬ㉐⦐㉐ 㞬⺴ ⵌ㻐㡸 Ἴ䚝⏼␘
Page 36

List Menu Screen
Name Description
Folder Name Folder name of current list
Current Song Shows current file name highlighted
Back button Converts to basic mode screen
Previous list Moves to the previous list
Next list Moves to the next list
List page Shows current file list page/total number of pages
List Focus Creates focus upon operating Tune
Home Folder Moves to home folder
Parent Folder Moves to the parent folder
When moving to a different list screen, moves to the
Now Playing
list page where the current file is located.
Becom es disabled when the current list includes the
current file.
ࢇ ء ্ࣛࢇ
(Confidential) / 1 / / 10.230.25.192 / 2012-04-02 08:53 / .㞬⽸ⱬ㉐ 䜸⯜⽸㏘ 䐤㉘ 䐴 Ḱ㣙 㣙ὤ䚐 ⸬ ⱬ㉐⏈ ⸨㙼ⱬ㉐⦐㉐ 㞬⺴ ⵌ㻐㡸 Ἴ䚝⏼␘
Page 37

MP3 CD Mode
Starting Mode
Press the [MEDIA] key Press |MP3|
Information
• MP3 mode automatically starts when an MP3
disc is inserted.
• If there are numerous songs and folders
within the disc, reading time could take more
than 10 seconds and the list may not be
displayed or song searches may not operate.
Once loading is complete, try again.
• Only genuine audio CDs are supported.
Other discs may result in recognition failure
(e.g. copy CD-R, CDs with labels)
Playing MP3
Selecting MP3 files
Selecting from the Mode Screen
• Press the [SEEK TRACK] keys to select
the previous or next file.
•Pressing and holding the[SEEK TRACK]
keys will rewind or fast-forwarding the
current file.
ળઝ
• Press the || button to play the file.
• Press the |ll| button to pause the file.
(Confidential) / 1 / / 10.230.25.192 / 2012-04-02 08:53 / .㞬⽸ⱬ㉐ 䜸⯜⽸㏘ 䐤㉘ 䐴 Ḱ㣙 㣙ὤ䚐 ⸬ ⱬ㉐⏈ ⸨㙼ⱬ㉐⦐㉐ 㞬⺴ ⵌ㻐㡸 Ἴ䚝⏼␘
ળઝ ࢇ ء ࡉ্ࢇ
Page 38

Using Menus within List
Screen
Press the |ȿList| button Select the file
from the list
Searching MP3 Files
Press the [TUNE] key Search files
Once the desired file name is displayed,
press the [ENTER] key
Using the Menu Buttons
Press the |ȿMenu| button to set the copy,
repeat, shuffle, scan, and Info On/Off
options.
Fast-forwarding or
Rewinding MP3 Files
While playing Press and hold the [SEEK
TRACK] key (over 0.8 seconds)
This will rewind or fast-forward the file.
While the [SEEK TRACK] key is
being pressed, the file will rewind or
fast-forward at 20x speed.
Once released, the file will begin playing
at normal speed.
ࢇ ء ্ࣛࢇ
(Confidential) / 1 / / 10.230.25.192 / 2012-04-02 08:53 / .㞬⽸ⱬ㉐ 䜸⯜⽸㏘ 䐤㉘ 䐴 Ḱ㣙 㣙ὤ䚐 ⸬ ⱬ㉐⏈ ⸨㙼ⱬ㉐⦐㉐ 㞬⺴ ⵌ㻐㡸 Ἴ䚝⏼␘
When searching files, the file number is
displayed in blue. Pressing the [ENTER] key
will play the corresponding file.
Information
• If the [TUNE] key is not pressed within 5
seconds of searching files, the file info for the
current track is restored.
Copy
Press the |ȿMenu| button Press |ȿCopy|
The currently playing file is copied and
saved in My Music.
Information
• Copied and saved files can be played within
My Music mode.
Page 39

MP3 CD Mode
Repeat
Press the |ȿMenu| button Press
|ȿRepeat|
Each time the button is pressed, the option
is changed from Repeat Once ȥ Off.
Information
• Repeat Once: repeats the current file
• Repeat Folder : repeats all files in current
folder
Shuffle
Press the |ȿMenu| button Press
|ȿShuffle|
Each time the button is pressed, the option
is changed from Shuffle Folder ȥ Shuffle All
ȥ Off.
Information
• Shuffle Folder : plays files in current folder in
random order.
• Shuffle All : plays all files in DISC in random
order.
Scan
Press the |ȿMenu| button Press |ȿScan|
Each time the button is pressed, the option
is changed from Folder Scan ȥScan All ȥ
Off.
Information
• Folder Scan : scans files in current folder.
• Scan All: scans all files in the disc.
Info On/Info Off
Press the |ȿMenu| button Press
|ȿInfo On|
The amount of information displayed on
the screen can be selected.
The title, artist, and album info are
additionally displayed and the button will
automatically change to |ȿInfo Off|. Press
|ȿInfo Off| to restore the previous
information display setting.
Notice
• The title, artist and album info are displayed
only when such information is recorded within
the MP3 file ID3 tag.
Using Menus within List Screen
Moving between Lists
ળઝ
Press |ȿList| button Press the |ɀ|,|Ɂ|
buttons
(Confidential) / 1 / / 10.230.25.192 / 2012-04-02 08:53 / .㞬⽸ⱬ㉐ 䜸⯜⽸㏘ 䐤㉘ 䐴 Ḱ㣙 㣙ὤ䚐 ⸬ ⱬ㉐⏈ ⸨㙼ⱬ㉐⦐㉐ 㞬⺴ ⵌ㻐㡸 Ἴ䚝⏼␘
ળઝ / ࢇ ء (ࡉ্ࢇ)
Page 40

If five (5) or more files or folders exist the
same folder, in the list will be displayed
across two or more pages.
Press the |ɀ|, |Ɂ| cursor buttons to
quickly find the desired page
Moving between folders
Press the |ȿ| button Select folder
from the folder list
Information
• If there are no more parent folders, both
|Home|,|ȿ| buttons will be disabled.
Returning to current location
Information
• A lag may occur in displaying the previous/
next list page depending on the file
name or file size.
While searching files within other folders,
press the |Now Playing| button to return to
the currently playing file screen.
Pressing the |ȿ| button will move to the
folder one level above the current folder.
Pressing the |Home| button folder will
move to the root folder.
ࢇ ء (্ࣛࢇ)
(Confidential) / 1 / / 10.230.25.192 / 2012-04-02 08:53 / .㞬⽸ⱬ㉐ 䜸⯜⽸㏘ 䐤㉘ 䐴 Ḱ㣙 㣙ὤ䚐 ⸬ ⱬ㉐⏈ ⸨㙼ⱬ㉐⦐㉐ 㞬⺴ ⵌ㻐㡸 Ἴ䚝⏼␘
Page 41

USB Mode
About USB
Before playing a USB MP3
Connect the USB device after turning on the engine. The USB
device may become damaged if it is already connected when
the ignition is turned on.
Files that are not standard format music/image files will not
be played.
For MP3/WMA files, only music files with compression rates
between 8Kbps ~ 320Kbps can be played.
Heed caution to static electricity when
connecting/disconnecting external USB devices.
Encoded MP3 Players will not be recognized when
connected as an external device.
When connecting an external USB device, the device may
not properly recognize the USB is in some states.
Only products formatted with byte/sectors under 64Kbyte will
be recognized.
This device recognizes USB devices formatted in FAT
12/16/32 file formats. This device does not recognize files in
NTFS file format.
Some USB devices may not be supported due to
compatibility issues.
ળઝ
Avoid contact between the USB connector with bodily
parts/foreign objects..
Repeated connecting/disconnecting of USB devices within
short periods of time may result in product malfunction.
Make sure to connect/disconnect external USB devices with
the audio power turned off.
The amount of time required to recognize the external USB
device may differ depending on the type, size, or file formats
stored on the USB. Such differences in required time are not
indications of malfunction.
The use of USB devices for purposes other than playing
music and image files is prohibited.
Do not use the USB I/F to charge batteries or USB
accessories that generate heat. Such acts may lead to
worsened performance or damage to the device.
The device may not recognize the USB device if separately
purchased USB hubs and extension cables are being used.
Connect the USB directly with the multimedia terminal of the
vehicle.
(Confidential) / 1 / / 10.230.25.192 / 2012-04-02 08:53 / .㞬⽸ⱬ㉐ 䜸⯜⽸㏘ 䐤㉘ 䐴 Ḱ㣙 㣙ὤ䚐 ⸬ ⱬ㉐⏈ ⸨㙼ⱬ㉐⦐㉐ 㞬⺴ ⵌ㻐㡸 Ἴ䚝⏼␘
ળઝ ࢇ ء ࡉ্ࢇ
Page 42

When using mass storage USB devices with separate logical
drives, only files saved to the root drive can be played.
When application programs are installed to specific USBs,
files may not properly play.
The device may not operate normally if MP3 Players, cellular
phones, digital cameras, or other electronic devices (USB
devices not recognized as portable disk drives) are
connected with the device.
Charging through the USB may not work for some mobile
devices.
USB memory sticks used by connecting an Adaptor (SD
Type or CF Type) may not be properly recognized.
Only use Plug type connector products, as shown in the
figure below.
The device may not support normal operation when using a
USB memory type besides Metal Cover Type USB Memory.
The device may not support normal operation when using
formats such as HDD Type, CF, or SD Memory.
Upon playing iPods, please use a dedicated iPod car cable.
Normal operations cannot be guaranteed when other cables
are being used.
The device will not support files locked by DRM (Digital
Rights Management.)
ࢇ ء ্ࣛࢇ
Product Name Manufacturer
XTICK LG
BMK BMK Technology
SKY-DRV Sky Digital
TRANSCEND JetFlash Transcend
Sandisk Cruzer SanDisk
Micro ZyRUS ZyRUS
NEXTIK Digiworks
Information
• Problems that occur through use of USB devices not listed within
the above table are not covered by the product warranty.
(Confidential) / 1 / / 10.230.25.192 / 2012-04-02 08:53 / .㞬⽸ⱬ㉐ 䜸⯜⽸㏘ 䐤㉘ 䐴 Ḱ㣙 㣙ὤ䚐 ⸬ ⱬ㉐⏈ ⸨㙼ⱬ㉐⦐㉐ 㞬⺴ ⵌ㻐㡸 Ἴ䚝⏼␘
Page 43

USB Mode
MP3 USB Information and Precautions
Name Description
MP3 File
Specification
Recommended
bit rates and
sampling
frequency
ID3 tag
Detailed
Specifications
Specification: MPEG1 AUDIO LAYER 3
Acceptable sampling frequency: 32, 44.1, 48
(KHz)
Acceptable bit rate: 32, 40, 48, 56, 64, 80, 96,
112, 128, 160, 192, 224, 256, 320 (Kbps)
96, 128, 192 Kbps fixed bit rate/ 44.1KHz
Supports ID3v1.0 and ID3v1.1, ID3v2.2, ID3v2.3,
ID3v 2.4 ID3 tags
Maximum directory layers: 20 layers
Maximum length of folder name/file name:
255Bytes
Supported characters for folder name/file name:
Alphanumeric characters, Korean standard
character
set 2350 characters, Simplified Chinese 4888
characters
Maximum number of folders which can be stored
onto one USB: 2000 folders (including ROOT)
Maximum number of files which can be stored
onto
one USB: 8000
Information
• In cases that are not fixed bit rates, the play time may not be
properly displayed.
• If a problem occurs while playing or when playing an unsupported
video format file, use an up-to-date encoding software
to change the format for use.
ળઝ
(Confidential) / 1 / / 10.230.25.192 / 2012-04-02 08:53 / .㞬⽸ⱬ㉐ 䜸⯜⽸㏘ 䐤㉘ 䐴 Ḱ㣙 㣙ὤ䚐 ⸬ ⱬ㉐⏈ ⸨㙼ⱬ㉐⦐㉐ 㞬⺴ ⵌ㻐㡸 Ἴ䚝⏼␘
ળઝ ࢇ ء ࡉ্ࢇ
Page 44

Basic Mode Screen
USB Music Mode
Name Description
Mode Displays currently operating mode
File Index Shows the current file/total files within the USB
Repeat /
Shuffle /Scan
Play Time Displays the current play time/total play time
Folder Name Displays f older Displays the name of the current file
File Name Displays the name of the current file
Menu
List Moves to the list screen
Copy C opies the currently playing file into My Music
Repeat
Shuffle
Scan
From Repeat All/Repeat One Song/Repeat Folder/Shuffle
Folder/Shuffle All/Folder Scan/Scan All, displays the
currently operating function
Displays Copy, Repeat, Shuffle, Scan and Info On (Info
Off) menus
Repeats the current file (each time the button is pressed,
changes in order of Repeat Once ȥ Repeat Folder ȥ
Off)
Plays files in random order (each time the button is
pressed, changes option in order of Shuffle Folder ȥ
Shuffle All ȥ Off)
Scans the beginning parts of USB files (approx. 10
seconds per file)
Each time the button is pressed, changes option in order
of Fol der Sc an ȥ Scan All ȥ Off)
Info Off
(Info On)
Previous File
ࢇ ء ্ࣛࢇ
(Confidential) / 1 / / 10.230.25.192 / 2012-04-02 08:53 / .㞬⽸ⱬ㉐ 䜸⯜⽸㏘ 䐤㉘ 䐴 Ḱ㣙 㣙ὤ䚐 ⸬ ⱬ㉐⏈ ⸨㙼ⱬ㉐⦐㉐ 㞬⺴ ⵌ㻐㡸 Ἴ䚝⏼␘
Play/ Pause Plays/pauses the current file
Next File Moves to the next file
• Info Off: shows folder name/file name
• Info On: shows folder name, file name, title, artist, and
album info
• When the play time is under 2 seconds: Moves to the
previous file
• When the play time is over 2 seconds: Plays the current
file from the beginning
Page 45

USB Image Mode
Name Description
ળઝ
Mode Displays currently operating mode
Folder Name Displays folder name where image is located
File Name Name of image file
File Index
Menu
Previous Image Shows previous image
Next Image Shows next image
List Moves to the list screen
Slideshow
Rotate Image Rotate image in clockwise direction
Adjust Image
Size
Save Image
Info
Shows the current image file/total image files within
the USB
Displays Slideshow, Rotate Image, Adjust Image
Size, Save Image, and Info menus (Press the
button again to hide the buttons)
View images as slideshow in 5, 10, 20, 30 second
intervals
Enlarge/reduce (zoom-in/zoom-out) image size
Add im age as frame screen displayed when the
system power is turned off
Shows the file name, resolution and file type of
current image
ߖࢵࢠ 6DYH,PDJH!6DYHDV)UDPHࡳԻ ضˁ ʦ
(Confidential) / 1 / / 10.230.25.192 / 2012-04-02 08:53 / .㞬⽸ⱬ㉐ 䜸⯜⽸㏘ 䐤㉘ 䐴 Ḱ㣙 㣙ὤ䚐 ⸬ ⱬ㉐⏈ ⸨㙼ⱬ㉐⦐㉐ 㞬⺴ ⵌ㻐㡸 Ἴ䚝⏼␘
ળઝ ࢇ ء ࡉ্ࢇ
Page 46

USB Mode
Starting USB Music Mode
Press the [MEDIA] key Press |USB Music|
Information
• Once a USB is connected, USB Music
mode will operate automatically.
• If a previously played USB is reconnected,
then the song after the most recently played
song is played. However, if a different USB is
connected or the file information within the
USB was changed, then the USB file order
information is deleted and will start playing
from the first song within the USB
Playing USB Music
Searching USB Music Files
While Playing Press the |<|,|>| buttons or
the [SEEK TRACK] key to play the
previous/next file
• Pressing and holding the [SEEK TRACK]
keys (over 0.8 seconds) will
rewind or fast-forward the current file.
• While the [SEEK TRACK] key is
being pressed, the track will rewind or
fast-forward at high speeds. Once the
key is released, the USB Music will begin
playing at normal speed.
• Press the || button to play the USB Music.
If the USB is not connected, then the |USB
Music| button will be disabled.
ࢇ ء (্ࣛࢇ)
(Confidential) / 1 / / 10.230.25.192 / 2012-04-02 08:53 / .㞬⽸ⱬ㉐ 䜸⯜⽸㏘ 䐤㉘ 䐴 Ḱ㣙 㣙ὤ䚐 ⸬ ⱬ㉐⏈ ⸨㙼ⱬ㉐⦐㉐ 㞬⺴ ⵌ㻐㡸 Ἴ䚝⏼␘
• Press the |ll| button to pause USB Music.
Information
• The |<|, |>| buttons displayed on the screen
allow you to select the previous/next file.
These buttons will not rewind or fast-forward
the file.
Page 47

Using the Menu Buttons
Repeat
Scan
Press the |ȿMenu| button to set the Copy,
Repeat, Shuffle, Scan, Info On (Info Off)
menus.
Copy
Press the |ȿmenu| button Press
|ȿCopy|
The currently playing file is copied and
saved in My Music.
Information
• Copied and saved files can be played within
My Music mode.
Press the |ȿMenu| button Press
|ȿRepeat|
Each time the button is pressed, the option is
changed from Repeat Once ȥ Off.
Information
• Repeat Once: repeats the current file
• Repeat Folder : repeats all files in current
folder
Shuffle
Press the |ȿMenu| button Press
|ȿShuffle|
Each time the button is pressed, the option
is changed from Shuffle Folder ȥ Shuffle All
ȥ Off.
Information
• Shuffle Folder : Plays files within the current
folder in random order.
• Shuffle All : Plays files within the USB in
random order.
Press the |ȿMenu| button Press |ȿScan|
ળઝ
Each time the button is pressed, the option is
changed from Folder Scan ȥScan All ȥ Off.
Information
• Folder Scan : Searches files within the
current folder.
• Scan All: Scans files within the USB in
random order.
Info On/Info Off
Press the |ȿMenu| button Press
|ȿInfo On|
The screen display can be set differently
depending on user selection.
The title, artist, and album info are
additionally displayed and the button is
changed to|ȿInfo Off|
Press |ȿInfo Off| to restore the previous
information display setting.
Information
• The title, artist and album info are displayed
only when such information is recorded within
the MP3 file ID3 tag.
(Confidential) / 1 / / 10.230.25.192 / 2012-04-02 08:53 / .㞬⽸ⱬ㉐ 䜸⯜⽸㏘ 䐤㉘ 䐴 Ḱ㣙 㣙ὤ䚐 ⸬ ⱬ㉐⏈ ⸨㙼ⱬ㉐⦐㉐ 㞬⺴ ⵌ㻐㡸 Ἴ䚝⏼␘
ળઝ / ࢇ ء (ࡉ্ࢇ)
Page 48

USB Mode
Starting USB Image Mode
Press the [MEDIA] key Press |USB Image|
Searching USB Image Files
While Playing Press the |<|,|>| buttons to
view the previous/next image
Information
• Press the |ȿList| button to view the list
of USB images.
Using the Menu Buttons
Press the|ȿMenu| button to set the
Slideshow, Rotate Image, Adjust Image
Size, Save Image and Info menus.
Slideshow Interval
Press the |ȿMenu| button Press
|ȿSlideshow|
ࢇ ء ্ࣛࢇ
(Confidential) / 1 / / 10.230.25.192 / 2012-04-02 08:53 / .㞬⽸ⱬ㉐ 䜸⯜⽸㏘ 䐤㉘ 䐴 Ḱ㣙 㣙ὤ䚐 ⸬ ⱬ㉐⏈ ⸨㙼ⱬ㉐⦐㉐ 㞬⺴ ⵌ㻐㡸 Ἴ䚝⏼␘
Page 49

Image slideshow intervals can be set at
|5sec|, |10sec|, |20sec|, |30sec| intervals
Rotating Image
Press the |ȿMenu| button Press
|ȿRotate Image| Press |Done|
Each time the |ȿRotate| button is pressed,
the image is rotated from 0 ȥ 90 ȥ 180 ȥ
270 degrees.
Information
• Rotated images are not saved.
• The image will restore its original angle
when returning to it after viewing a different
image.
Adjusting Image Size
Press the |ȿMenu| button Press
|ȿAdjusting Image Size| Press |Done|
Press the |-|, |+| buttons to enlarge or
reduce the image size. The scale can be
changed from 1/4, 1/2, 1x, 2x, to 4x.
Information
• Enlarged or reduced images are not
Saved. The image will restore its original size
when returning to it after viewing a different
image.
• If the image cannot be fully displayed
on the screen, touch the image to move
the screen.
Saving Image
Press the |ȿMenu| button Press |ȿSave
Image|
ળઝ
Information
• For details on using the picture frame,
refer to the Picture Frame Settings within
Setup.
Viewing Info
Press the |ȿMenu| button Press
|ȿInfo|
This menu is used to check image
information, such as the image resolution
and file type.
(Confidential) / 1 / / 10.230.25.192 / 2012-04-02 08:53 / .㞬⽸ⱬ㉐ 䜸⯜⽸㏘ 䐤㉘ 䐴 Ḱ㣙 㣙ὤ䚐 ⸬ ⱬ㉐⏈ ⸨㙼ⱬ㉐⦐㉐ 㞬⺴ ⵌ㻐㡸 Ἴ䚝⏼␘
ળઝ ࢇ ء ࡉ্ࢇ
Page 50

iPod Mode
Using iPod Devices
iPod is a registered trademark of Apple Inc.
iPod mode will not operate if the connected iPod cannot be
recognized due to operation of unsupported versions that do
not support related protocols, iPod abnormalities, or iPod
device defects. Some iPods with unsupported
communication protocols may not properly operate in the
Navigation system.
• For fifth generation iPod Nano devices, the iPod may not
be recognized when the battery level is low. Please charge
the iPod for use.
Search/play orders shown within the iPod device may differ
with the orders shown within the Navigation system.
If the iPod malfunctions due to an iPod device defect, reset
the iPod and try again. (To learn more, refer to your iPod
manual)
• For some iPod Touch and iPhone devices, connecting
Bluetooth® while the iPod is operating may result in
discontinued iPod sound. When such devices with
Bluetooth® support is connected, this problem occurs as the
sound source is changed from the Dock Connector (USB
connector cable) to Bluebird (Bluetooth® Module).
To listen to the iPod sound, re-connect the USB cable or exit
then re-enter iPod mode.
In order to use the iPod while operating the keys, you must
use a dedicated iPod cable. (the cable that is supplied when
purchasing iPod/iPhone products)
During ACC ON state, connecting the iPod through the iPod
cable (the cable that is supplied when purchasing iPod/
iPhone products), will charge the iPod through the head unit.
ȉ The use of genuine iPod cables supplied by Apple is
recommended. (The use of other products may result in
noise or abnormal operation)
When connecting with the iPod cable, make sure to fully
insert the jack to prevent communication interference. If the
iPod is connected to the vehicle while it is playing, a high
pitch tone may sound for about 1~2 seconds immediately
after connection. If possible, connect the iPod to the vehicle
with the iPod stopped/paused.
Within iPhones, streaming audio and iPod control may
occasionally conflict. If problems persist, remove the iPhone
and connect again.
ࢇ ء ্ࣛࢇ
(Confidential) / 1 / / 10.230.25.192 / 2012-04-02 08:53 / .㞬⽸ⱬ㉐ 䜸⯜⽸㏘ 䐤㉘ 䐴 Ḱ㣙 㣙ὤ䚐 ⸬ ⱬ㉐⏈ ⸨㙼ⱬ㉐⦐㉐ 㞬⺴ ⵌ㻐㡸 Ἴ䚝⏼␘
Page 51

Some iPod versions may not sync with the system. then the
system may not properly restore the previously operated
mode. (For iPads, battery charging is not supported.)
Applications that are not exclusively used as iPod
Applications within iPhone/iPod Touch devices are not
supported.
Steps upon Initial Connection
Supported iPod devices
• Operation is supported and Apple Inc. certified: ɂ
• Operation is supported but uncertified:
Device/Gener
ation
iPod Mini Not Supported
st
1
nd
2
rd
3
th
4
5
ળઝ
th
th
6
Search Steps may differ depending on the type of iPod device.
1Step 2 Step 3 Step 4 Step 5 Step
Play List Play List
Artist Artist
Album Album
Genre Genre
Song Song Song Name
Composer
Compos
er
Artist
Name
Album
Name
Genre
Name
Compos
er
Name
Play List name
(category is same as iPod)
Album
Name
Song
Name
Artist
Name
Album
Name
Song
Name
Album
Name
Song
Name
Song
Name
iPod Shuffle Not Supported
iPod NanoOOOOOO
iPod TouchOOOONot Released
iPod Classic O Not Released
iPod with
video
Device/Type 3GS 4G 4S
iPhone Not Released O
O Not Released
(Confidential) / 1 / / 10.230.25.192 / 2012-04-02 08:53 / .㞬⽸ⱬ㉐ 䜸⯜⽸㏘ 䐤㉘ 䐴 Ḱ㣙 㣙ὤ䚐 ⸬ ⱬ㉐⏈ ⸨㙼ⱬ㉐⦐㉐ 㞬⺴ ⵌ㻐㡸 Ἴ䚝⏼␘
ળઝ ࢇ ء ࡉ্ࢇ
Page 52

iPod Mode
Basic Mode Screen
Name Description
Mode Displays currently operating mode
File Index Shows the current file/total files within the iPod
Repeat /
Shuffle
Play Time Displays the current play tim e/total play time
Title Displays name of current title
Artist Info Artist name
Album Info Album name
Menu
Previous File Moves to the previous file
Play/ Pause Plays/pauses the current file
Next File Moves to the next file
List Moves to the list screen
Repeat Repeats the currently playing file.
Shuffle
From Repeat Once/Shuffle Category/Shuffle
Random,
displays the currently operating function
Displays Repeat, Shuffle, and Info On (Info Off)
menus
Plays files in random order (each time the button
is pressed, changes option in order of Shuffle
Category ȥ Shuffle Album ȥ Off)
Changes the display method between Info Off/Info
Info Off
(Info on)
ࢇ ء ্ࣛࢇ
(Confidential) / 1 / / 10.230.25.192 / 2012-04-02 08:53 / .㞬⽸ⱬ㉐ 䜸⯜⽸㏘ 䐤㉘ 䐴 Ḱ㣙 㣙ὤ䚐 ⸬ ⱬ㉐⏈ ⸨㙼ⱬ㉐⦐㉐ 㞬⺴ ⵌ㻐㡸 Ἴ䚝⏼␘
On
• Info Off: Shows title, artist, and album Info
• Info On: Shows title, artist, album, genre, and
composer info
Page 53

Starting Mode
Press the [MEDIA] key Press |ȿiPod|
Information
• Once an iPod is connected, iPod mode
will operate automatically.
Notice
• Some iPods with unsupported communication
protocols may not properly operate in the
Navigation system.
Playing iPod
Searching iPod
Press the |ȿList| button to display the
initial iPod list screen.
ળઝ
• Press the || button to play the iPod.
If the iPod is not connected, then the
• Press the |ll| button to pause the iPod.
|ȿiPod| button will be disabled.
(Confidential) / 1 / / 10.230.25.192 / 2012-04-02 08:53 / .㞬⽸ⱬ㉐ 䜸⯜⽸㏘ 䐤㉘ 䐴 Ḱ㣙 㣙ὤ䚐 ⸬ ⱬ㉐⏈ ⸨㙼ⱬ㉐⦐㉐ 㞬⺴ ⵌ㻐㡸 Ἴ䚝⏼␘
When searching an iPod, it is possible to
search by playlists, artists, albums, songs,
genres, composers, audiobooks, and
Podcasts.
ળઝ / ࢇ ء (ࡉ্ࢇ)
Page 54

iPod Mode
Information
• If the search mode is accessed while
playing a song, the most recently searched
step is displayed.
• Search steps upon initial connection may
differ depending on the type of iPod device.
Selecting iPod file
While Playing Press the |<|,|>| buttons or
the [SEEK TRACK] key to play the
previous/next file
Searching iPod Files
Press the [TUNE] key Search files
Once the desired file name is displayed,
press the [ENTER] key
Pressing and holding the [SEEK TRACK]
keys (over 0.8 seconds) will rewind or fastforward the current song.
When searching files, the file number is
displayed in blue. Pressing the [ENTER] key
will play the corresponding file.
Information
• If the [TUNE] key is not pressed within 5
seconds of searching files, the file info for the
current track is restored.
ࢇ ء (্ࣛࢇ)
(Confidential) / 1 / / 10.230.25.192 / 2012-04-02 08:53 / .㞬⽸ⱬ㉐ 䜸⯜⽸㏘ 䐤㉘ 䐴 Ḱ㣙 㣙ὤ䚐 ⸬ ⱬ㉐⏈ ⸨㙼ⱬ㉐⦐㉐ 㞬⺴ ⵌ㻐㡸 Ἴ䚝⏼␘
Page 55

Using the Menu Buttons
Press the |ȿMenu| button to set the
Repeat, Shuffle, and Info On (Info Off)
menus.
Repeat
Press the|ȿMenu| button Press
|ȿRepeat|
Information
• The currently playing file is repeated.
• Press the |ȿRepeat| button again to turn off
repeat.
Shuffle
Press the|ȿMenu| button Press
|ȿShuffle|
ળઝ
Information
• Each time the |ȿShuffle| button is pressed,
the option is changed from Shuffle Category ȥ
Shuffle Album ȥ Off.
• Shuffle Category : Plays files within the
current category in random order.
• Shuffle Album : Plays files within the
current category in random order.
Info On/Info Off
Press the|ȿMenu| button Press |ȿInfo
On|
The screen display can be set differently
depending on user selection.
The title, artist, and album info are
additionally displayed and the button is
changed to |ȿInfo Off|
Press |ȿInfo Off| to restore the previous
display setting.
(Confidential) / 1 / / 10.230.25.192 / 2012-04-02 08:53 / .㞬⽸ⱬ㉐ 䜸⯜⽸㏘ 䐤㉘ 䐴 Ḱ㣙 㣙ὤ䚐 ⸬ ⱬ㉐⏈ ⸨㙼ⱬ㉐⦐㉐ 㞬⺴ ⵌ㻐㡸 Ἴ䚝⏼␘
ળઝ / ࢇ ء (ࡉ্ࢇ)
Page 56

AUX Mode
Starting Mode Connecting an External Device
Press the [MEDIA] key Press |ȿAUX|
Information
• If an external device connector is connected
with the AUX terminal, then AUX mode will
automatically operate. Once the connector is
disconnected, the previous mode will be
restored.
• AUX mode can be used only when an
external audio player (camcorder, car VCR,
etc.) has been connected.
• The AUX volume can be controlled
separately from other AV modes.
External AUDIO players can be played
through a dedicated cable. The position of
Notice
• Connecting a connector jack to the AUX
terminal without an external device will convert
the system to AUX mode, but only output noise.
When an external device is not being used,
also remove the connector jack.
• When the external device power is connected
to the power jack, playing the external device
may output noise. In such cases, disconnect
the power connection before use.
the AUX jack is at the top of the gear box
located between the driver and passenger
seats.
ࢇ ء ্ࣛࢇ
(Confidential) / 1 / / 10.230.25.192 / 2012-04-02 08:53 / .㞬⽸ⱬ㉐ 䜸⯜⽸㏘ 䐤㉘ 䐴 Ḱ㣙 㣙ὤ䚐 ⸬ ⱬ㉐⏈ ⸨㙼ⱬ㉐⦐㉐ 㞬⺴ ⵌ㻐㡸 Ἴ䚝⏼␘
Page 57

Bluetooth® Audio Mode
Basic Mode Screen
1
2
3
4
65 7
Name Description
1 Mode Displays currently playing mode
1
2 Phone Name Displays name of connected phone
2
3 Title Name of current song
3
4 Artist Info Name of current artist
4
5 Play Plays Bluetooth® Audio
5
6 Pause Pauses Bluetooth® audio
6
Connections Displays the Connections screen.
7
ળઝ
Information
• The title/artist info may not be supported in some mobile phones.
When not supported, a symbol will be displayed.
• The play/pause feature may operate differently depending on the
mobile phone.
(Confidential) / 1 / / 10.230.25.192 / 2012-04-02 08:53 / .㞬⽸ⱬ㉐ 䜸⯜⽸㏘ 䐤㉘ 䐴 Ḱ㣙 㣙ὤ䚐 ⸬ ⱬ㉐⏈ ⸨㙼ⱬ㉐⦐㉐ 㞬⺴ ⵌ㻐㡸 Ἴ䚝⏼␘
ળઝ / ࢇ ء (ࡉ্ࢇ)
Page 58

Bluetooth® Audio Mode
Using Bluetooth® Audio
Bluetooth® Audio Mode can be used
only when a Bluetooth® phone has been
connected.
While Bluetooth® Audio is playing, if the
Bluetooth® phone is connected, then the
music will also stop.
Bluetooth® streaming audio may not be
supported in some
mobile phones.
Starting Mode
Press the [MEDIA] Key Press
|ȿBluetooth Audio|
Playing Bluetooth® Audio
• Press the || button to play files saved
within the Bluetooth® phone.
• Press the |ll| button to pause the file.
Information
• If the Bluetooth® audio does not play,
|ȿSetup| |ȿBluetooth| |ȿStreaming
Audio Setting| If the option is set to |Off|
change to |On| and try again.
Information
If the Bluetooth® device is not connected, then
the |ȿBluetooth Audio| button will be disabled.
ࢇ ء (্ࣛࢇ)
(Confidential) / 1 / / 10.230.25.192 / 2012-04-02 08:53 / .㞬⽸ⱬ㉐ 䜸⯜⽸㏘ 䐤㉘ 䐴 Ḱ㣙 㣙ὤ䚐 ⸬ ⱬ㉐⏈ ⸨㙼ⱬ㉐⦐㉐ 㞬⺴ ⵌ㻐㡸 Ἴ䚝⏼␘
Page 59

Selecting Bluetooth® Audio
While Playing Press the [SEEK TRACK]
key Select the previous/next file
Information
• The title/artist info may not be supported in
some mobile phones. When not supported,
a sym bol will be displayed.
• The play/pause feature may operate
differently depending on the mobile phone.
Setting Connection
Press the |Connections| button to add a new
Bluetooth® phone, connect/disconnect, delete,
delete all, or view the Help section.
Name Description
Help
Add New Pair a new Bluetooth® device
Connect/
Disconnect
Delete
Delete All
Displays Bluetooth® Help
screen
Connect or disconnect a
Bluetooth® device
Delete a paired Bluetooth®
device
Delete all paired Bluetooth®
devices
ળઝ
Auto
Connection
Set Bluetooth® phone Auto
Connection upon starting car
ignition
Information
• If music is not yet playing from your mobile
device after converting to streaming audio
(Bluetooth® Audio) mode, pressing the ||
button once may begin mode play. Check to
see whether music is playing from the
Bluetooth® device after converting to
streaming audio mode. The Streaming audio
feature may not be supported in some mobile
phones.
For more information on mobile phone
compatibility, visit the Hyundai Motor website
(http://www.hyundaiusa.com).
ળઝ ࢇ ء ࡉ্ࢇ
(Confidential) / 1 / / 10.230.25.192 / 2012-04-02 08:53 / .㞬⽸ⱬ㉐ 䜸⯜⽸㏘ 䐤㉘ 䐴 Ḱ㣙 㣙ὤ䚐 ⸬ ⱬ㉐⏈ ⸨㙼ⱬ㉐⦐㉐ 㞬⺴ ⵌ㻐㡸 Ἴ䚝⏼␘
Page 60

My Music Mode
Basic Mode Screen
ࢇ ء ্ࣛࢇ
Name Description
Mode
File Index
Repeat/Shuffle
/ Scan
Play Time
File Displays the name of the current file
Menu
Repeat Repeats the current file
Shuffle Plays files in random order
Scan
Info Off
(Info on)
Previous File
Play/Pause Plays/pauses the current file
Next File Moves to the next file
List Moves to the list screen
Title Info
Artist Info
Album Info
Displays currently operating mode
Shows the current file/total files within the iPod
From Repeat Once/Shuffle Category/Shuffle Random,
displays the currently operating function
Displays the current play time/total play time
Displays Repeat, Shuffle, Scan and Info On (Info Off)
menus
Scans the beginning parts of files (approx. 10 seconds per
file)
Changes the display method between Info Off/Info On
• Info Off: shows file name
• Info On: shows file name, title, artist, and album info
When the play time is under 2 seconds: Moves to the
previous file
• When the play time is over 2 seconds: Plays the current
file from the beginning
Displays the song title (Not displayed when information is
not available)
Displays the artist information(Not displayed when
information is not available)
splays the album inf ormation(Not displayed when
information is not available)
(Confidential) / 1 / / 10.230.25.192 / 2012-04-02 08:53 / .㞬⽸ⱬ㉐ 䜸⯜⽸㏘ 䐤㉘ 䐴 Ḱ㣙 㣙ὤ䚐 ⸬ ⱬ㉐⏈ ⸨㙼ⱬ㉐⦐㉐ 㞬⺴ ⵌ㻐㡸 Ἴ䚝⏼␘
Page 61

Starting Mode
Playing My Music
Selecting My Music
Press the [MEDIA] Key Press |My Music|
• Press the || button to play the file.
• Press the |ll| button to pause the file.
While Playing Press the |<|,|>| buttons or
the [SEEK TRACK] key to play the
previous/next file
• Pressing and holding the [SEEK
TRACK] keys (over 0.8 seconds) will
rewind or fast-forward the current file.
• While the [SEEK TRACK] key is
being pressed, the track will rewind or
fast-forward at high speeds. Once the
key is released, the USB Music will begin
playing at normal speed.
ળઝ
Information
• The |<|, |>| buttons displayed on the screen
allow you to select the previous/next file.
• These buttons will not rewind or fast-forward
the file.
(Confidential) / 1 / / 10.230.25.192 / 2012-04-02 08:53 / .㞬⽸ⱬ㉐ 䜸⯜⽸㏘ 䐤㉘ 䐴 Ḱ㣙 㣙ὤ䚐 ⸬ ⱬ㉐⏈ ⸨㙼ⱬ㉐⦐㉐ 㞬⺴ ⵌ㻐㡸 Ἴ䚝⏼␘
ળઝ ࢇ ء ࡉ্ࢇ
Page 62

My Music Mode
Using the Menu Buttons
Press the |ȿMenu| button to set the Repeat,
Shuffle, Scan, Info On (Info Off) menus.
Repeat
Press the |ȿMenu| button Press
|ȿRepeat|
The currently playing file is repeated.
Shuffle
Press the |ȿMenu| button Press
|ȿShuffle|
When turned on, files are played in random
order.
Information
Press the |ȿShuffle| button again to turn the
shuffle option off.
Scan
Press the |ȿMenu| button Press
|ȿShuffle|
The beginning (approx 10 seconds) of
all files are scanned.
Information
• Press the |ȿScan| button again to turn the
scan option off.
Info On/ Info Off
Press the |ȿMenu| button Press
|ȿInfo On|
The screen display can be set differently
depending on user selection.
The title, artist, and album info are
additionally displayed and the button is
changed to|ȿInfo Off|
Press |ȿInfo Off| to restore the previous
information display setting.
.
Information
The title, artist and album info are displayed
only when such information is recorded within
the MP3 file ID3 tag.
Information
Press the |ȿRepeat| button again to turn off
repeat. If nothing is selected, then all files will
be played in sequential order.
ࢇ ء (্ࣛࢇ)
(Confidential) / 1 / / 10.230.25.192 / 2012-04-02 08:53 / .㞬⽸ⱬ㉐ 䜸⯜⽸㏘ 䐤㉘ 䐴 Ḱ㣙 㣙ὤ䚐 ⸬ ⱬ㉐⏈ ⸨㙼ⱬ㉐⦐㉐ 㞬⺴ ⵌ㻐㡸 Ἴ䚝⏼␘
Page 63

Using Menus within List Screen
Deleting FilesReturning to current location
Moving between Lists
Press the |ȿList| button Press | ɀ |, |Ɂ|
buttons
While searching files within other folders,
press the |Now Playing| button to return to
the currently playing file screen.
Press the |ȿList| button Select the files to
delete Press |ȿDelete Items|
ળઝ
Information
• The audio system will not operate while files
If six (6) or more files or folders exist the
same folder, in the list will be displayed
across two or more pages.
Press the |ɀ|, |Ɂ| cursor buttons to quickly
find the desired page.
(Confidential) / 1 / / 10.230.25.192 / 2012-04-02 08:53 / .㞬⽸ⱬ㉐ 䜸⯜⽸㏘ 䐤㉘ 䐴 Ḱ㣙 㣙ὤ䚐 ⸬ ⱬ㉐⏈ ⸨㙼ⱬ㉐⦐㉐ 㞬⺴ ⵌ㻐㡸 Ἴ䚝⏼␘
are being deleted.
• If the currently playing file is deleted, the next
file will begin playing.
ળઝ / ࢇ ء (ࡉ্ࢇ)
Page 64

Memo
ࢇ ء (্ࣛࢇ)
(Confidential) / 1 / / 10.230.25.192 / 2012-04-02 08:53 / .㞬⽸ⱬ㉐ 䜸⯜⽸㏘ 䐤㉘ 䐴 Ḱ㣙 㣙ὤ䚐 ⸬ ⱬ㉐⏈ ⸨㙼ⱬ㉐⦐㉐ 㞬⺴ ⵌ㻐㡸 Ἴ䚝⏼␘
Page 65

3
• Before Use
• Starting Navigation
• Using the Navigation
• Map Landmarks and Logos
Navigation
㞬⽸ⱬ㉐ 䜸⯜⽸㏘ 䐤㉘ 䐴 Ḱ㣙 㣙ὤ䚐 ⸬ ⱬ㉐⏈ ⸨㙼ⱬ㉐⦐㉐ 㞬⺴ ⵌ㻐㡸 Ἴ䚝⏼␘
(Confidential) / 1 / / 10.230.25.192 / 2012-04-02 08:55 / .
Page 66

Before Use
Precautions for safe driving
Please observe and comply with local traffic rules and regulations.
0
Some features cannot be operated while driving for your
.
safety. Features that cannot be operated will be disabled.
1
The route displayed for destination guidance is a reference
0
that will take you to the vicinity of your destination.
2
This does not always refer to the shortest distance route,
route with the least traffic or the fastest route.
Road, name, and POI information may not always been
completely updated. Some places may not include up to
0
3
date information.
The car position mark does not always indicate your
0
exact location. This system uses GPS information, various
4
sensors, and road map data to display the current
position. However, errors in displaying your location may
occur if the satellite is transmitting inaccurate signals or
two or less satellite signals can be received. Errors that
occur in such conditions cannot be corrected.
0
The position of the vehicle within the navigation may differ
5
from your actual location depending on various reasons,
including the satellite transmission state, vehicle state
(driving location and conditions), etc. Additionally, the car
position mark may differ from the actual position if the map
data is different from the actual road landscape, such as
changes due to the construction of new roads. If such
differences occur, driving for a short period of time will
automatically correct the position of the vehicle through map
matching or GPS information (several minutes may be
necessary in certain cases).
ࢇ ء (্ࣛࢇ)
(Confidential) / 1 / / 10.230.25.192 / 2012-04-02 08:55 / .㞬⽸ⱬ㉐ 䜸⯜⽸㏘ 䐤㉘ 䐴 Ḱ㣙 㣙ὤ䚐 ⸬ ⱬ㉐⏈ ⸨㙼ⱬ㉐⦐㉐ 㞬⺴ ⵌ㻐㡸 Ἴ䚝⏼␘
Page 67

Operating the Navigation
The navigation can be operated via touch. Touch the
corresponding button on the screen to operate.
If the button does not respond, take your finger off the
screen and try again.
When a button function is operating, the color of the selected
button will be displayed differently.
To return to the previous screen, press the |ȿࢇࢷ| button
Press the |ȿࢇࢷ| button to cancel functions that can
operate on the current screen.
(Some functions may not be canceled.)
Information
• Buttons that cannot be operated will be disabled.
ળઝ
(Confidential) / 1 / / 10.230.25.192 / 2012-04-02 08:55 / .㞬⽸ⱬ㉐ 䜸⯜⽸㏘ 䐤㉘ 䐴 Ḱ㣙 㣙ὤ䚐 ⸬ ⱬ㉐⏈ ⸨㙼ⱬ㉐⦐㉐ 㞬⺴ ⵌ㻐㡸 Ἴ䚝⏼␘
ળઝ / ࢇ ء (ࡉ্ࢇ)
Page 68

Before Use
About the Map
Some roads, site names and facility
information may have changed after map
data update and may differ with actual
road conditions.
About Map Scale
• If |100m| is displayed on the left side of the
map, this represents a map scale of 1/10,000.
• For more information on Changing
Map Scale, refer to the ‘Changing Map
Scale’ section.
Actual Distance
Level mi/ft km / m
1 150ft 50m
2 300ft 100 m
3 700 ft 200 m
40.25 mi400 m
50.5 mi800 m
6
7
8
9
10
11
12
13
14
1 mi
2 mi
4 mi
8 mi
16 mi
32 mi
64 mi
130 mi
250 mi
1.6 km
3.2 km
6.4 km
12 km
25 km
50km
100 km
200 km
400 km
About Map Icons
Icons displayed on the map may differ
from actual conditions. Multiple icons
may also be displayed as one mark.
About Map Database
Unlicensed map copying in any form, in
full or in part, is strictly prohibited.
About Map Updates
• Map updates can be downloaded from the
designated website (http://www.hyundaiusa.com)
and updated through the SD card.
• For more information, refer to the ‘System
Update’ section in Setup.
ࢇ ء (্ࣛࢇ)
(Confidential) / 1 / / 10.230.25.192 / 2012-04-02 08:55 / .㞬⽸ⱬ㉐ 䜸⯜⽸㏘ 䐤㉘ 䐴 Ḱ㣙 㣙ὤ䚐 ⸬ ⱬ㉐⏈ ⸨㙼ⱬ㉐⦐㉐ 㞬⺴ ⵌ㻐㡸 Ἴ䚝⏼␘
Page 69

About Voice Recognition
During destination guidance, voice
guidance will be provided when reaching
an intersection or you are nearby the
destination.
ࡸ۽߇ΰ߾ оଞ یତࡵ ࡸ۽ࢉݥࡶ ࣏ ଜ
ݤ ԇТЬ.
Voice Guidance
Voice guidance is provided in the following instances.
Example of voice guidance during
destination guidance
In front of an intersection:
In about a half mile, turn right.
After a moment, turn right
Example of voice guidance when
arriving at the destination
In front of the destination :
You are near you
destination. Voice
guidance will end.
Information
• The above voice guidance examples are
normal cases. However, the actual voice
guidance may differ depending on the road
type.
• If the car position is not accurately measured,
then voice guidance may not be given, or may
be given later or improperly.
• It is possible to adjust the Navigation
guidance volume.
Guidance when using other modes
• Voice guidance will continue even
when converting from the navigation
screen to a different mode screen.
About GPS
GPS (Global Position System) :
GPS is a system developed and operated
by the United States which determines the
current location of the user (Longitude/
Latitude, Coordinates, etc.) by generally
using 4 or more satellites. This system is
used with related GPS information, various
sensors, road map data, and other related
information for the purposes of navigation.
For more information on GPS, refer to Part 5
‘GPS Information’.
ળઝ
Upon entering a toll road
Information
Even when voice guidance has been muted,
destination guidance will continued to be
You must turn right in a moment.
You are reaching an
expressway. There is a toll gate
ahead.
provided.
ȄPlease use voice guidance only as a
reference to assist in your driving.
(Confidential) / 1 / / 10.230.25.192 / 2012-04-02 08:55 / .㞬⽸ⱬ㉐ 䜸⯜⽸㏘ 䐤㉘ 䐴 Ḱ㣙 㣙ὤ䚐 ⸬ ⱬ㉐⏈ ⸨㙼ⱬ㉐⦐㉐ 㞬⺴ ⵌ㻐㡸 Ἴ䚝⏼␘
ળઝ / ࢇ ء (ࡉ্ࢇ)
Page 70

Starting Navigation
Map Screen
11
6
7
8
10
12
Name Description
9
Car Direction
1
Map Scale Shows current map scale
2
Function/ Info Window Shows map function buttons or current position inf o
3
Current Position
4
Info W indow
Route G uidanc e
5
Mode Conversion
Used to set split map and shows map display mode
and
GPS status
Shows current road name and destination name in 5
second intervals
Switches route guidance mode between preliminary
guidance mode, motorway mode and TBT mode
1 2 3 4 5
ࢇ ء (্ࣛࢇ)
(Confidential) / 1 / / 10.230.25.192 / 2012-04-02 08:55 / .㞬⽸ⱬ㉐ 䜸⯜⽸㏘ 䐤㉘ 䐴 Ḱ㣙 㣙ὤ䚐 ⸬ ⱬ㉐⏈ ⸨㙼ⱬ㉐⦐㉐ 㞬⺴ ⵌ㻐㡸 Ἴ䚝⏼␘
Quick Menu
6
Current Time Shows the time
7
ETA/Remaining Time
8
9
Preliminary Guidance
Destination Direction
10
11
Lane Info
Car Position Mark Displays current car position
12
Allows users to easily and quickly acc ess desired
menus
Shows the ETA (Estimated time of arrival),
remaining time and distance from current position to
the destination
Provides distanc e, direction guidance at turn points
and directions within the set route
Shows the direction to the destination fr om the
current position through the dotted line
Shows recommended lanes for use by considering
upcoming
intersections and expected routes
Page 71

Initial Screen
Press the |Agree| button to display the
most recently used mode.
If Audio mode is used with the navigation
turned on, navigation guidance will be
provided in the background. If you turn
the ignition on, then the most recently
played mode will restart.
Current Position
Information
• When riding in a new car or after replacing
the battery terminal, the car position mark may
at first appear at a different location.
• Even if the car position mark on the map is
different, map matching and GPS coordinates
are utilized to automatically update the current
position. It may take up to several minutes to
find your current position.
ળઝ
Information
• Once the vehicle ignition is turned on, the
User Warning screen will always be displayed.
Make sure to carefully read the warning page
as it contains important information related to
system operations while driving.
(Confidential) / 1 / / 10.230.25.192 / 2012-04-02 08:55 / .㞬⽸ⱬ㉐ 䜸⯜⽸㏘ 䐤㉘ 䐴 Ḱ㣙 㣙ὤ䚐 ⸬ ⱬ㉐⏈ ⸨㙼ⱬ㉐⦐㉐ 㞬⺴ ⵌ㻐㡸 Ἴ䚝⏼␘
Press the [MAP] key or the || button displayed
at the upper right side in some map conditions to
display the map of the current position and the
neighboring area.
ળઝ / ࢇ ء (ࡉ্ࢇ)
Page 72

Starting Navigation
Map Display Settings
Press the [MAP] key Press the |Ο؆|
1
2
This button is used to set map screen related options,
such as Split screen, Heading-Up/North Up, and
Left/Right screen display.
Name Description
Information
• The Heading-Up/North-Up, 2D/3D, and map
scale adjustments can be used when using
Split Screen map.
Changing Map Scale
Press the [MAP] key Press the |0.25mi|
Set the desired map scale
2
1
3
Name Description
Adjust Map
1
Scale
Administrati
2
ve District
Scale
Auto Scale
3
Use the|+| / |-| buttons
to display the scale bar
Shows map scales in
categories of detail
(300ft), Near (0.25mi),
Street (1mi), City (4mi),
State (16mi)
When |ȿAuto| is enabled,
automatically adjust map
scale according to driving
situation
Information
The |+| will be disabled when set to max scale
(1/250mi) and the |–| button will be disabled
when set to min scale (1/150ft).
Split Screen /
1
Single Screen
Heading-Up/
2
North-Up
ࢇ ء (্ࣛࢇ)
(Confidential) / 1 / / 10.230.25.192 / 2012-04-02 08:55 / .㞬⽸ⱬ㉐ 䜸⯜⽸㏘ 䐤㉘ 䐴 Ḱ㣙 㣙ὤ䚐 ⸬ ⱬ㉐⏈ ⸨㙼ⱬ㉐⦐㉐ 㞬⺴ ⵌ㻐㡸 Ἴ䚝⏼␘
Select between Split
Screen or Single Screen
Map.
Display Map in Vehicle
Traveling Direction
(Heading-Up) or NorthUp direction
Press the |0.25mi| button to display the map
scale menu and change the map to the
desired scale.
Page 73

Adjusting Navigation Volume POI DisplayMap Menu
Press the |>| button Press the |Menu|
button
Features frequently used within the map
screen, such as |Set as Destination|,
|Add Waypoint|, |View Destination|,
|Cancel Route|, |Call| are displayed.
Information
• If the screen is scrolled, then the top menu is
changed to the |Set As Destination| button.
Press the |>| button Press the |ࡸԛ|
Adjust volume
Press the |>| button and then the |ࡸԛ|
button. The volume menu is displayed and
allows you to adjust the navigation voice
guidance volume.
The volume can be adjusted from 0~45
through the |+|/|-| button. Press the |Mute|
button to turn off the sound.
Press the |>| button Press the |POI|
1
2
3
4
When POI menus are displayed, pressing
one of the 6 POI icon buttons will display
the corresponding POI icons.
Name Description
Shows/hides
1
POI Icon
corresponding
POIs
ળઝ
2
Unmark All
Edit POI
3
Icon
Search by
4
local POI
(Confidential) / 1 / / 10.230.25.192 / 2012-04-02 08:55 / .㞬⽸ⱬ㉐ 䜸⯜⽸㏘ 䐤㉘ 䐴 Ḱ㣙 㣙ὤ䚐 ⸬ ⱬ㉐⏈ ⸨㙼ⱬ㉐⦐㉐ 㞬⺴ ⵌ㻐㡸 Ἴ䚝⏼␘
Unmarks selected POI
Icons
Edit the 6 POI icons
shown within the menu
Searches selected POI
ળઝ / ࢇ ء (ࡉ্ࢇ)
Page 74

Starting Navigation
Editing POI Icons Searching POIs
Press the |Edit POI Icon| button Press
the |POI| Press |Done|
Press the |Edit POI Icon| button to select
the desired facility from the various facility
types. Up to six favorite facilities can
be set.
Press the |Default| button to reset the
displayed POI icons.
Initially, Gas Station, Parking, Fast Food,
Hospital, Auto Service, and Bank are set as
default.
Press the Search by local |POI button|
Press the search criteria (Near current
position, Near scroll mark, Near destination)
1
1
2
2
3
3
The POI mark is displayed according to
the selected criteria.
ࢇ ء (্ࣛࢇ)
(Confidential) / 1 / / 10.230.25.192 / 2012-04-02 08:55 / .㞬⽸ⱬ㉐ 䜸⯜⽸㏘ 䐤㉘ 䐴 Ḱ㣙 㣙ὤ䚐 ⸬ ⱬ㉐⏈ ⸨㙼ⱬ㉐⦐㉐ 㞬⺴ ⵌ㻐㡸 Ἴ䚝⏼␘
Page 75

Name Description
Adding a My Place
Near
1
Current
Position
Near Scroll
2
Mark
Near
3
Destination
Within the ‘Search by
POI’ menu, searches
facilities based on the
current vehicle position
Within the ‘Search by
POI’ menu, searches
facilities based on the
current scrolled position
Within the ‘Search by
POI’ menu, searches
facilities based on the
location of the
destination
Information
• When searching POIs, you can only search
POIs within selected categories.
• The |Near scroll mark| menu is enabled only
when the map has been scrolled.
Press the |ȿࢺҟԼ| button Press the
desired group
ળઝ
This feature is used to save the current
position or the scrolled position as a My
Place or Speed Alert.
Information
• My Places are saved without distinction for
the driving or scrolled state.
• The Speed Alert button is displayed when
a point is saved with the speed limit of the
road while driving on the road.
(Confidential) / 1 / / 10.230.25.192 / 2012-04-02 08:55 / .㞬⽸ⱬ㉐ 䜸⯜⽸㏘ 䐤㉘ 䐴 Ḱ㣙 㣙ὤ䚐 ⸬ ⱬ㉐⏈ ⸨㙼ⱬ㉐⦐㉐ 㞬⺴ ⵌ㻐㡸 Ἴ䚝⏼␘
ળઝ / ࢇ ء (ࡉ্ࢇ)
Page 76

Using the Navigation
Destination Search
Press the [DEST] key to display the Destination Search menu
screen.
1
5
9
2
6
10
3
7
11
4
8
12
The Destination Search screen includes various search
menus as well as shortcuts to Favorites that provide
maximum convenience in searching for destinations.
Name Description
POI
1
(Point of
Interest)
Previous
2
Destination
Previous
3
Searches
Previous
4
Start Point
Address
5
My Place Display list of saved My Places
6
Intersection
7
Search
Map Moves to the map screen
8
Emergency Used to make emergency related searches
9
Used to search for neighboring POIs near current
position/near scroll position/near destination/near
city center
Used for route guidance to recently set destinations
Used for route guidance to recently searched
Locations
Used for route guidance to recent start positions
Used to search destinations by selecting specific
states/cities/roads
Used to search destinations by selecting
streets/intersections
Coordinates
10
Phone
11
Number
Exit/Entrance
12
ࢇ ء (্ࣛࢇ)
(Confidential) / 1 / / 10.230.25.192 / 2012-04-02 08:55 / .㞬⽸ⱬ㉐ 䜸⯜⽸㏘ 䐤㉘ 䐴 Ḱ㣙 㣙ὤ䚐 ⸬ ⱬ㉐⏈ ⸨㙼ⱬ㉐⦐㉐ 㞬⺴ ⵌ㻐㡸 Ἴ䚝⏼␘
Used to search destinations by entering the
Coordinates
Used to search destinations by entering POI phone
numbers
Used to search destinations by searching for
expressway exits/entrances
Page 77

Quick Menu
Name Description
1
3
2
4 5 6
Press the |೦| button on the left side of the
map screen to display the Quick Menu.
Quick Menu
1
(೦)
2
Quick Menu Bar
3
Edit
4
Current Quick
Menus
5
Add/Remove
Quick Menu
6
Categories
Display/hide Quick
Menus
Menus added to the
Quick Menu (possible to
set up to 6 menus)
Add/Delete Quick
Menus
Shows list of current
Quick Menus
Add or remove Quick
Menus
List of categories that
can be added to Quick
Menus
Point of Interest (POI) Search
Press the [DEST] key Press |POI|
1
2
3
4
ળઝ
POI Search is a feature that allows you to
search for POIs that are near your current
position, near a scroll mark, near the
destination, or near the city center.
Categories are sub-categorized and the
selected area and category are displayed at
the top of the screen for user convenience.
(Confidential) / 1 / / 10.230.25.192 / 2012-04-02 08:55 / .㞬⽸ⱬ㉐ 䜸⯜⽸㏘ 䐤㉘ 䐴 Ḱ㣙 㣙ὤ䚐 ⸬ ⱬ㉐⏈ ⸨㙼ⱬ㉐⦐㉐ 㞬⺴ ⵌ㻐㡸 Ἴ䚝⏼␘
ળઝ / ࢇ ء (ࡉ্ࢇ)
Page 78

Name Description
Near
1
Current
Position
Near Scroll
2
Mark
Near
3
Destination
Searches POIs based on the
current vehicle position
Searches POIs based on the
current map scroll position
Searches POIs nearby the
set destination (feature is
disabled when a destination
has not been set)
Previous Destination, Previous
Searches, Previous Start Point
Press the [DEST] Key Press |Previous
Destination|
Press the [DEST] Key Press |Previous
Start Point|
Near City
4
Center
Searches POIs nearby a
selected area
Information
• The searched location may not be the exact
location of a specific destination, but display a
representative position of a POI address.
CATEGORY / ZAGAT Res taurant G uide
М ࠉѰ ۶ָ ɼ ଗࡁ
۶ࢽࢂ
Press the [DEST] Key Press |Previous
Searches|
1
2
3
These search features allow you to search
previous routes, previous searches and start
points.
Name Description
Sorts POIs and
By Date
1
By Name
2
Delete Items
3
locations by added
date
Sorts POIs and
locations by name
From various entries,
items can be selected
and deleted all at once.
Information
• If the POI or region name is too long and
cannot be displayed within one screen,
pressing the |>| button will move the name to
the left to display the full name.
ࢇ ء (্ࣛࢇ)
(Confidential) / 1 / / 10.230.25.192 / 2012-04-02 08:55 / .㞬⽸ⱬ㉐ 䜸⯜⽸㏘ 䐤㉘ 䐴 Ḱ㣙 㣙ὤ䚐 ⸬ ⱬ㉐⏈ ⸨㙼ⱬ㉐⦐㉐ 㞬⺴ ⵌ㻐㡸 Ἴ䚝⏼␘
Page 79

Using the Navigation
Address
Press the [DEST] key Press |Address|
This search feature is used to search
destinations by addresses through state
city/street.
My Places
1
2
3
This search feature is used to search
destinations by selecting previously saved
My Places to set as destinations. My Places
can be placed in groups, and group names
can be edited within Setup.
Name Description
By
1
Name
Sort POIs and locations by
name
Intersection Search
ળઝ
ʠչ۴/ Ѧݤ۴/ ࣯۴
۶ࢽࢂ М ࠉѰ ۶ָ ɼ ଗࡁ
2
3
By
Symbol
By Date
Sort POIs and locations by
symbol
Sort POIs and locations by
date
This search feature is used to search
destinations by streets and intersections
through state/city/state.
Information
• If the POI or region name is too long and
cannot be displayed within one screen,
pressing the |>| button will move the name to
the left.
• It is possible to save up to 100 My
Places per Group.
(Confidential) / 1 / / 10.230.25.192 / 2012-04-02 08:55 / .㞬⽸ⱬ㉐ 䜸⯜⽸㏘ 䐤㉘ 䐴 Ḱ㣙 㣙ὤ䚐 ⸬ ⱬ㉐⏈ ⸨㙼ⱬ㉐⦐㉐ 㞬⺴ ⵌ㻐㡸 Ἴ䚝⏼␘
ળઝ / ࢇ ء (ࡉ্ࢇ)
Page 80

Map
1
2
3
4
5 6
Emergency
Coordinates
The map screen can be scrolled to display
other positions where you can set
destinations.
Name Description
Sets the POI or region
Set as
1
Destination
Add W aypoint
2
View
3
Destination
Cancel
4
Route
Call
5
Details
6
ࢇ ء (্ࣛࢇ)
where the cursor is
positioned as the new
destination
Sets the POI or region
where the cursor is
positioned as a
waypoint
Displays information for
the set destination
Cancels the currently
set route
Calls the selected POI
facility
Displays details for the
selected POI facility
This feature is used to search for police
stations, hospitals, and dealerships in
emergency situations.
Name Description
Displays list of Police
Police Station
1
Hospital
2
Dealership
3
Stations closest from
the current position
Displays list of
Hospitals closest from
the current position
Displays list of Hyundai
Motor Dealerships
closest from the current
position
This feature is used to search destinations
by entering coordinates. Two coordinate
entry formats are supported. Select the
desired format upon starting search.
(Confidential) / 1 / / 10.230.25.192 / 2012-04-02 08:55 / .㞬⽸ⱬ㉐ 䜸⯜⽸㏘ 䐤㉘ 䐴 Ḱ㣙 㣙ὤ䚐 ⸬ ⱬ㉐⏈ ⸨㙼ⱬ㉐⦐㉐ 㞬⺴ ⵌ㻐㡸 Ἴ䚝⏼␘
Page 81

Phone Number Search
This search feature is used to search the
locations of POIs by entering the phone
number of the desired POI destination.
• Area codes must be entered to complete
the search.
Information
The phone number and location may differ for
some POIs. In addition, the following types of
facilities may be more frequently located in
other locations.
• Locations of department stores, museums,
and amusement parks may somewhat differ
from the set destination. Check the exact
address when trying to reach such destinations.
• Within general information newspapers, there
are cases when phone numbers of concert
halls actually list the numbers of management
companies. In such cases, destination
searches will be made to the management
companies.
• The telephone number and addresses may
change at any time.
Setting a Destination
[Press the [DEST Key] Search for the
Destination Press |Set as Destination|
ળઝ
(Alternative Route)
(Route Overview)
• Conducting a destination search through
the desired search method, select the
desired destination from the list. (For more
information on destination search methods,
refer to the ‘Destination Search’ section.)
• After verifying the location of the searched
destination, press the |Set as Destination|
button to calculate the route. The Route
Overview or Alternative Route screen will be
the displayed.
(Confidential) / 1 / / 10.230.25.192 / 2012-04-02 08:55 / .㞬⽸ⱬ㉐ 䜸⯜⽸㏘ 䐤㉘ 䐴 Ḱ㣙 㣙ὤ䚐 ⸬ ⱬ㉐⏈ ⸨㙼ⱬ㉐⦐㉐ 㞬⺴ ⵌ㻐㡸 Ἴ䚝⏼␘
ળઝ / ࢇ ء (ࡉ্ࢇ)
Page 82

Using the Navigation
• Press the |Add Waypoint| button to
add a waypoint destination.
• Within the Route Overview or Alternative
Route screen, press the MAP key or the
Start Guidance button to start route guidance.
Information
• If you press the Set as Destination button
while a previous destination has already been
set, the pop-up ‘Do you want to change the
destination?’ will be displayed.
• If you press Yes, then the previous
destination is deleted and the new destination
will be set. Pressing the Add Waypoint button
will add a waypoint destination.
One Touch Scroll Setting
The destination can be set to the current
map display.
• While in the map screen, touching a
position on the map will move the map to the
center of the selected position and display
the scroll mark.
• Press the |Menu| button to set the selected
position as a waypoint or destination.
Route Calculation
• Once you have set a destination, calculate
the route. The route overview and route
option menus will be displayed
• After checking the Route Overview, press
the [MAP] key or the |Start Guidance| button
or just drive for over 5km/h or approximately
5 seconds to begin guidance.
Information
• To learn more about ‘Alternative Route’,
‘Route Overview’ or ‘Detailed Route Settings’,
refer to the ‘Route Menu’ section.
Demo
After a route has been calculated, press the
|Demo| button to begin simulated driving of
the calculated route.
ࢇ ء (্ࣛࢇ)
(Confidential) / 1 / / 10.230.25.192 / 2012-04-02 08:55 / .㞬⽸ⱬ㉐ 䜸⯜⽸㏘ 䐤㉘ 䐴 Ḱ㣙 㣙ὤ䚐 ⸬ ⱬ㉐⏈ ⸨㙼ⱬ㉐⦐㉐ 㞬⺴ ⵌ㻐㡸 Ἴ䚝⏼␘
Page 83

• Within the Route Overview screen, press
the |Demo| button.
• During Demo, press the [MAP] key to end
the demo and display the current map
position. If you start driving while viewing the
route demo, demo will end and route
guidance will start
Information
• Demo will not operate after starting route
guidance. To use the Demo feature, use after
route calculation but prior to starting route
guidance.
• ɼ࣯ۘଭ ࣸ ֕֩ЍЕ “ˈܖ/ࢊ؆/Ѱ”ࢂତ
ּࡶ ݤଜֲ, ɼ࣯ۘଭࢂ ܖѦ ࣏ࢽࢇ ɼМ
ଢТЬ.
Add Waypoint Route Recalculation
ળઝ
After searching for waypoints, press the
|Add Waypoint| button to add the waypoint to
the current route.
Once a route has been set, the
|Recalculate| button is displayed at the
top of the menus.
Pressing the |Recalculate| button will
display a pop-up that allows you to
change route options. Once the settings
are changed, the route is recalculated by
reflecting the changes.
(Confidential) / 1 / / 10.230.25.192 / 2012-04-02 08:55 / .㞬⽸ⱬ㉐ 䜸⯜⽸㏘ 䐤㉘ 䐴 Ḱ㣙 㣙ὤ䚐 ⸬ ⱬ㉐⏈ ⸨㙼ⱬ㉐⦐㉐ 㞬⺴ ⵌ㻐㡸 Ἴ䚝⏼␘
ળઝ / ࢇ ء (ࡉ্ࢇ)
Page 84

Using the Navigation
Information
For more information on Fastest, Shortest, and
other route calculation options, refer to the
route calculation section.
Cancel Route
In the Map menu screen, press the |Cancel
Route| button.
Information
You can cancel the route by pressing the
|Cancel Route| button that is displayed after
pressing the |Menu| button.
ࢇ ء (্ࣛࢇ)
(Confidential) / 1 / / 10.230.25.192 / 2012-04-02 08:55 / .㞬⽸ⱬ㉐ 䜸⯜⽸㏘ 䐤㉘ 䐴 Ḱ㣙 㣙ὤ䚐 ⸬ ⱬ㉐⏈ ⸨㙼ⱬ㉐⦐㉐ 㞬⺴ ⵌ㻐㡸 Ἴ䚝⏼␘
Page 85

Route Guidance
Information
• Within all guidance mode screens, pressing
the button at the bottom right side of the
screen will change the route guidance mode..
• Each time the button is pressed, the guidance
mode will change in order of preliminary
guidance ȥ turn list ȥ motorway guidance
mode. (The icon within the button indicates the
mode that will be displayed upon next press.)
• Motorway and intersection zoom guidance
are displayed on during guidance at
corresponding roads.
Intersection Zoom Mode
ળઝ
Preliminary guidance, motorway mode, turn
list guidance and other guidance screens are
displayed according to the current road
condition.
Within the guidance map screen, if the
current position is on route, then intersection
guidance will be provided once you are
nearby an intersection.
Also, the intersection zoom screen is
displayed when nearby an intersection.
Preliminary Guidance Mode
At the top right side of the screen, the next/
after next turn info, remaining distance,
direction and other information are displayed.
This mode provides detailed guidance
nearby intersections before the next turn.
This mode is displayed starting from 300m
before the intersection.
ળઝ / ࢇ ء (ࡉ্ࢇ)
(Confidential) / 1 / / 10.230.25.192 / 2012-04-02 08:55 / .㞬⽸ⱬ㉐ 䜸⯜⽸㏘ 䐤㉘ 䐴 Ḱ㣙 㣙ὤ䚐 ⸬ ⱬ㉐⏈ ⸨㙼ⱬ㉐⦐㉐ 㞬⺴ ⵌ㻐㡸 Ἴ䚝⏼␘
Page 86

Using the Navigation
Motorway Mode
1 2 3
Upon entering a motorway during route
guidance, the motorway mode will
automatically be displayed. This mode is
displayed when driving on a motorway and
mainly displays motorway related POIs.
You can check information for various
POIs by using the |View All|, |Summary|
and |Rest Area| buttons.
Name Description
1
View All
2
Summary
3
Rest Area
Guidance for all POIs
on the Motorway
Shows List of turn
points and other
directional route
guidance while driving
within motor ways
Guidance for only the
rest areas on the
motorway
• When scrolling through POIs by using the
|ɀ|, |Ɂ| buttons, pressing the button will
select the POI closest to the current position.
Information
• When there are more than four POI marks
that can be listed, some POIs may be omitted
and not displayed.
Turn List Mode
Turn list mode shows turn information on
the current route.
ࢇ ء (্ࣛࢇ)
(Confidential) / 1 / / 10.230.25.192 / 2012-04-02 08:55 / .㞬⽸ⱬ㉐ 䜸⯜⽸㏘ 䐤㉘ 䐴 Ḱ㣙 㣙ὤ䚐 ⸬ ⱬ㉐⏈ ⸨㙼ⱬ㉐⦐㉐ 㞬⺴ ⵌ㻐㡸 Ἴ䚝⏼␘
Page 87

Route Menu
Pres the |ROUTE| key to use, edit, or optimize various route
options.
1
4
7
2
5
8
3
6
Name Description
Cancel
1
Route
Route
2
Overview
Route Info Shows detailed info for the current route
3
Route
4
Option
5
Detour Used to select and edit detour road/streets
Avoid
6
Streets
7
Edit Route
Avoid Area
8
Cancels the currently set route
Shows the route overview to the set destination
Route calculation features with various route
calculation options and settings
Used to edit the route by selecting avoid streets
Used to add /delete/change the order of
destinations/waypoints
Used to edit route by adding Avoid Areas/Editing
Avoid Areas and Deleting Avoid Areas
ળઝ
(Confidential) / 1 / / 10.230.25.192 / 2012-04-02 08:55 / .㞬⽸ⱬ㉐ 䜸⯜⽸㏘ 䐤㉘ 䐴 Ḱ㣙 㣙ὤ䚐 ⸬ ⱬ㉐⏈ ⸨㙼ⱬ㉐⦐㉐ 㞬⺴ ⵌ㻐㡸 Ἴ䚝⏼␘
ળઝ / ࢇ ء (ࡉ্ࢇ)
Page 88

Using the Navigation
Cancel Route
Press the [ROUTE] key and then press
the |ȿ Cancel Route| button to cancel
the currently set route.
Route Overview
Press the [ROUTE] key Press |ȿ Route
Overview|
1
2
3
4
5
Name Description
Start
1
Guidance
Edit Route
2
3
Route Info
Alternative
4
Route
Starts guidance to the set
Route/Displays the current
vehicle position
Used to add/ delete/
change order of
destinations/ waypoints
Shows route info to the set
destination
Displays various alternative
route options for route
calculation
Within the Route Overview screen, press
the Alternative Route button to display
other potential routes to the set destination.
From the alternative route options,
select the desired route.
1
2
Name Description
Fastest route that
Recommended
1
Shortest
2
reflects distance and
traffic conditions
The shortest distance
from start point to
destination
Information
• Even if the “Use Alternative Route Search”
option is turned on, the Route Overview screen
(not the Alternative Route screen) when
calculating routes that include waypoints.
Route Info
Press the [ROUTE] Key Press |Route
Info|
The turn points and distance information
by key roads within the set route are is
played. Press the [MAP] button next to
each road name to display the map position
for the corresponding location.
Demo
5
ࢇ ء (্ࣛࢇ)
(Confidential) / 1 / / 10.230.25.192 / 2012-04-02 08:55 / .㞬⽸ⱬ㉐ 䜸⯜⽸㏘ 䐤㉘ 䐴 Ḱ㣙 㣙ὤ䚐 ⸬ ⱬ㉐⏈ ⸨㙼ⱬ㉐⦐㉐ 㞬⺴ ⵌ㻐㡸 Ἴ䚝⏼␘
Starts demo to the set
destination
Page 89

Route Option
Name Description
Detour
Press the [ROUTE] Key Press |Route
Option| Set and press |Done|
1
3
5
7
2
4
6
Route Options refer to conditions used to
calculate the route to the destination. The
route is automatically recalculated if the
route options and detailed route settings
are changed.
Recommended
1
Shortest
2
Minimise
3
Motorway
Minimise
4
Toll Roads
Use Ferries
5
Use HOV
Lanes
6
7
Use Easy Pass
Optimal route as
determined by the system
upon consideration of
various route conditions
The shortest distance
from start point to the
destination
Route calculation with
minimal use of motorways
Route calculation with
minimal use of toll roads
Route calculation by
including use of ferries
Route calculation by
including use of HOV
lanes
Route calculation by
including use of Easy
Pass
Press the [ROUTE] Key Press |Detour|
ળઝ
The Detour menu is used to re-define the
route by setting a detour to a certain distance
from the current position.
(Confidential) / 1 / / 10.230.25.192 / 2012-04-02 08:55 / .㞬⽸ⱬ㉐ 䜸⯜⽸㏘ 䐤㉘ 䐴 Ḱ㣙 㣙ὤ䚐 ⸬ ⱬ㉐⏈ ⸨㙼ⱬ㉐⦐㉐ 㞬⺴ ⵌ㻐㡸 Ἴ䚝⏼␘
ળઝ / ࢇ ء (ࡉ্ࢇ)
Page 90

Using the Navigation
Avoid Streets Edit Route Avoid Area
Press the [ROUTE] Key Press |ȿAvoid
Streets| Select the streets you want to
avoid and press |Done|
This feature is used to select specific streets
to avoid within the current route.
Press the [ROUTE] Key Press |ȿEdit
Route| Set and press |Done|
The Edit Route menu displays the start point,
waypoints and the destination in list format
and is used to edit corresponding positions
or the order of destinations within the route.
Press the ROUTE Key Press
|ȿAvoid Area| ۴ ۶ࢽ ୯ |Done|
This feature is used by creating a rectangle
over the area to avoid.
An area set as an avoid area is excluded
from the calculated route. If a route had
been calculated prior to creating an avoid
area, the route will automatically be
recalculated.
ࢇ ء (্ࣛࢇ)
(Confidential) / 1 / / 10.230.25.192 / 2012-04-02 08:55 / .㞬⽸ⱬ㉐ 䜸⯜⽸㏘ 䐤㉘ 䐴 Ḱ㣙 㣙ὤ䚐 ⸬ ⱬ㉐⏈ ⸨㙼ⱬ㉐⦐㉐ 㞬⺴ ⵌ㻐㡸 Ἴ䚝⏼␘
Page 91

Map Landmarks and Logos
2D Landmarks
These are landmark and logo icons that display facilities within 2D map mode. The size of the symbol may be displayed
differently according to the map scale. Symbols may change without prior notice during map updates. Symbols shown
within the manual represent a portion of all symbols and should only be used as a reference.
Navi s/w жк ʦیତࡳԻ ܹࢽ
ળઝ
(Confidential) / 1 / / 10.230.25.192 / 2012-04-02 08:55 / .㞬⽸ⱬ㉐ 䜸⯜⽸㏘ 䐤㉘ 䐴 Ḱ㣙 㣙ὤ䚐 ⸬ ⱬ㉐⏈ ⸨㙼ⱬ㉐⦐㉐ 㞬⺴ ⵌ㻐㡸 Ἴ䚝⏼␘
ળઝ / ࢇ ء (ࡉ্ࢇ)
Page 92

Map Landmarks and Logos
3D Landmarks
These are landmark and logo icons that display facilities within 3D map mode. The size of the symbol may be displayed
differently according to the map scale. Symbols may change without prior notice during map updates. Symbols shown
within the manual represent a portion of all symbols and should only be used as a reference.
Navi s/w жк ʦیତࡳԻ ܹࢽ
ࢇ ء (্ࣛࢇ)
(Confidential) / 1 / / 10.230.25.192 / 2012-04-02 08:55 / .㞬⽸ⱬ㉐ 䜸⯜⽸㏘ 䐤㉘ 䐴 Ḱ㣙 㣙ὤ䚐 ⸬ ⱬ㉐⏈ ⸨㙼ⱬ㉐⦐㉐ 㞬⺴ ⵌ㻐㡸 Ἴ䚝⏼␘
Page 93

Bluetooth®
4
• Before Use
• Basic Mode Screen
• Using Bluetooth
Handsfree
Page 94

Before Use
Before using the Bluetooth® Handsfree
What is Bluetooth®?
Bluetooth® refers to a short-distance wireless networking
technology which uses a 2.45GHz frequency to connect
various devices within a certain distance.
Supported within PCs, external devices, Bluetooth®
phones, PDAs, various electronic devices, and automotive
environments, Bluetooth® allows data to be transmitted at
high speeds without having to use a connector cable.
Bluetooth® Handsfree refers to a device which allows the
user to conveniently make phone calls with Bluetooth®
mobile phones through the Navigation system.
Precautions for safe driving
Bluetooth® Handsfree is a feature that enables drivers
to practice safe driving. Connecting the head unit with a
Bluetooth® phone allows the user to conveniently make
calls, receive calls, and manage the phone book. Before
using the Bluetooth®, carefully read the contents of this
user’s manual.
Excessive use or operations while driving may lead to
negligent driving practices and be the cause of accidents.
Do not operate the device excessively while driving.
Viewing the screen for prolonged periods of time is
dangerous and may lead to accidents. When driving, view
the screen only for short periods of time.
The Bluetooth handsfree feature may not be supported in
some mobile phones.
For more information on mobile phone compatibility, visit the
Hyundai Motor website (http://www.hyundaiusa.com).
ࢇ ء ্ࣛࢇ
Page 95

Cautions upon connecting Bluetooth® phone
Before connecting the head unit with the mobile phone,
check to see that the mobile phone supports Bluetooth®
features.
Even if the phone supports Bluetooth®, the phone will not be
found during device searches if the phone has been set to
hidden state or the Bluetooth® power is turned off. Disable
the hidden state or turn on the Bluetooth® power prior to
searching/connecting with the Head unit.
If Auto Connection is used, the Bluetooth® phone is
automatically connected when the ignition is turned on,
making it unnecessary to have to connect the phone with the
head unit every time.
If you do not want automatic connection with your
Bluetooth® device, turn the Bluetooth® power off.
To set Auto Connection, go to [Setup] |ȿBluetooth|
|ȿAuto Connection Setting|
The car name can be set at [Setup] |ȿBluetooth|
|ȿAdvanced Settings| |ȿDevice Information|.
0
The passkey needed to connect the mobile phone can
7
be verified/changed at [Setup] |ȿBluetooth|
|ȿAdvanced Settings| |ȿChange Passkey|.
If the Bluetooth® audio does not play, go to [Setup]
0
8
|ȿBluetooth| |ȿStreaming Audio Setting|. If the feature
is set to |Off|, turn |On| and try again.
Park the vehicle when connecting the head unit with the
0
9
mobile phone.
Bluetooth® connection may become intermittently
1
0
disconnected in some mobile phones. Follow these steps to
try again.
1. Turn the Bluetooth® function within the mobile phone
off/on and try again.
2. Turn the mobile phone power Off/On and try again.
3. Completely remove the mobile phone battery, reboot,
and then again.
4. Reboot the Audio Video Navigation System and try again.
5. Delete all paired devices, pair and try again.
The handsfree call volume and quality may differ depending
on the mobile phone.
1
1
Pairing Bluetooth devices and use of other Bluetooth
1
features are not supported when the vehicle is in motion.
2
For safety, please first park your vehicle.
ળઝ
ળઝ / ࢇ ء (ࡉ্ࢇ)
Page 96

Basic Mode Screen
When no phones have been
paired
Press the [೨] key on the steering remote
controller or press the [PHONE] Press
|Yes|
ࢇ ء (্ࣛࢇ)
Information
• Press the |Help| button within the pop-up to
view the help section with information related
to pairing and connecting Bluetooth® devices,
and using Handsfree related features.
• The same Help section can be viewed by
going to |ȿInfo| |ȿHelp| |ȿBluetooth|.
Pairing from the Bluetooth® Device
Press the |Add New Device| button
Select car name Enter passkey
From the Bluetooth® device, search for
the car name and pair the device.
When searching from the Bluetooth® device,
the car name is Santa Fe and the default
passkey is ‘0000’.
Information
• To learn more about searching from
Bluetooth® devices and pairing, refer to the
user's manual for your Bluetooth® device.
• Bluetooth® devices cannot be paired when
the vehicle is in motion. For your safety, first
park the vehicle to pair a Bluetooth® device.
Page 97

Basic Mode Screen
When a phone is already paired
Press the [೨] key on the steering remote
controller or the [PHONE] key Press |Yes|
Select the device from the device list
Press |Connect|
• Select the device you want to connect
and press the |Connect| button.
• If the phone you want to connect does
not exist, press the |Add New| button to
pair a new Bluetooth® device.
Name Description
Help section related to
pairing and
Help
Add New
Connect /
Disconnect
Delete
Delete All
Auto
Connection
connecting/disconnecting
Bluetooth® devices and
Handsfree phone features
Pair a new Bluetooth®
device
Connect or disconnect a
Bluetooth® device
Delete a paired Bluetooth®
Device
Delete all paired Bluetooth®
Devices
Set Bluetooth® auto
connection when car ignition
is turned on
When pairing additional device
Press the |Add New| button to pair a new
Bluetooth® device.
For more information on pairing, refer to
the ‘When no phones have been paired’
section.
ࢇ ء ্ࣛࢇ
Information
• When a Bluetooth® device is connected,
a new device cannot be paired.
If you want to pair a new phone, first
disconnect the connected Bluetooth®
device.
Page 98

When there is a connected device
Press the |೨| key on the steering remote controller or the
[PHONE] key on the head unit to display the following screen
9 10
1
4
2
7
Enter the phone number you wish to call and press the |ȿSend|
button
3 5 6
8
Name Description
Info Display
1
Window
Send
2
End
3
4
Dial Pad
5
Favorites Displays the Favorites list screen
6
Delete Deletes entered numbers one digit at a time
Contacts Displays contacts list screen
7
Displays name of currently connected device
If no number has been entered, switches to call
history screen
If a number has been entered, calls the number
If a number has been entered, deletes the
number
During a call, ends the current call
Used to enter the phone number
Press the hold |0| to enter a ‘+’
Press the hold |1| ~ |9| to connect to the
speed dial saved within the mobile phone
ળઝ
Information
• The mobile phone battery and signal strength icons may not be
supported in some mobile phones.
• The remaining battery level displayed on your mobile phone battery
icon may slightly differ with the device display.
• The speed dial feature may not be supported in some mobile phones.
8
Connections
Remaining
9
Battery
Call Signal
10
Strength
Displays the Bluetooth® device Connections
screen
Displays the remaining battery for the connected
Bluetooth® device
Displays the call signal strength
ળઝ ࢇ ء ࡉ্ࢇ
Page 99

Using Bluetooth®
During a call
The name of the other party is displayed if the number is saved
within your contacts. If not, only the phone number is displayed.
During a call, the other party's name/number and the call time
are displayed.
Name Description
Info
Display
Window
Switch
End Ends call
Dial Pad Used to enter phone number
Contacts Displays the Contacts screen
Private
Outgoing
Vol.
Displays other party’s name/number. If there is a
call waiting, displays call waiting information
If there is a call waiting, switches the current call
and connects the waiting call
During a handsfree call, this function is used to
switch the call to the mobile phone
Upon switching the call to Private, the vehicle mic
and speaker will turn off to allow a private
conversation through the mobile phone
Adjusts outgoing volume during calls
Sets call volume as heard by the other party
(Levels 0~5) The outgoing volume may be heard
differently depending on the connected
Bluetooth® device
Status Bar Icons
Information
• The telephone number may not be displayed in some mobile phones.
ࢇ ء ্ࣛࢇ
Name Description
ȿ Mutes call volume
ȿ Bluetooth® phone call state
ȿ Mobile phone contacts or call history download status
A state when Bluetooth® Handsfree and streaming Audio is all
ȿ
connected
ȿ State when Bluetooth® streaming Audio is connected
ȿ State when Bluetooth® Handsfree is connected
Page 100

Making/Answering Calls
Calling by dialing a number
Enter number on the dial pad Press
the |೨Send | or the [೨] key on the steering
remote controller.
If you press the |೨Send | button without
entering a number, the Call History
screen is displayed
Press and hold the dial pad |0 +| (over
0.8 seconds) to enter a "+".
Name Description
Send
1
2
End Deletes all entered numbers
Calls the entered phone
number
Making a call from Speed Dial
Enter the 1 or 2 digit speed dial number
with the Dial Pad Press and hold the
last number
3
Favorites
1
2 3
Information
• Most audio and SETUP mode features will
not operate during a Bluetooth® handsfree call.
Only the call volume and Navigation mode
screen can be operated.
Displays the Favorites list
screen
Information
• For speed dials saved within mobile
phones, up to 2 digits are supported.
• Saving or changing speed dial numbers
through the head unit is not supported.
ળઝ
ળઝ / ࢇ ء (ࡉ্ࢇ)
 Loading...