

Page 1
HYUNDAI IMAGEQUEST LCD TV
USA
Hyundai ImageQuest America
3101 North First Street San Jose, CA 95134
Hyundai tech support
Te l : +800-568-0061,408-232-8654
Fax : +408- 232-8146
e-mail : [email protected]
AVC USA. INC.
777 Mark Street, Wood Dale, IL 60191
Te l : 630-595-0123 / 800-568-0060
Fax : 630-595-2345 / 800-784-9422
e-mail : [email protected]
NEW ZEALAND
TRANSTECH DISTRIBUTORS Ltd.
PO Box 12985 Penrose,
Auckland New Zealand
Te l : 09-571-0775
Fax : 09-571-0776
e-mail : [email protected]
WWW : www.transtech.co.nz
AUSTRALIA
Thomas Electronics Australia Pty Ltd.
3 Sheridan Close
Milperra NSW 2214, Australia
Te l : +61 2 9773 7400
Fax : 61 2 9773 7177
Attn : Ms. Shiely Poniman
GERMANY
Hyundai ImageQuest Europe GmbH
Geheimrat Hummel Platz 2
65239, Hochheim, Germany
Te l : 06146 / 904 444
Fax : 06146 / 904 410
e-mail : [email protected]
WWW : www.hyundaiq.com
JAPAN
Hyundai ImageQuest JAPAN
Shin-Hibiya Bldg, East 5F 1-3-6
Uchisaiwai-Cho, Chiyoda-ku,
To kyo, Japan 100-0011
Te l : 03-5157-2286
Fax : 03-5157-2284
e-mail : [email protected]
C/S P.J.Kim
P/N 632 0238 103 Rev.02
* The above image may look different from the real product.
Page 2
FCC Information
User Instructions
The Federal Communications Commission Radio Frequency Interference Statement includes the
following warning :
NOTE : This equipment has been tested and found to comply with the limits for a Class B digital device
pursuant to Part 15 of the FCC Rules.
These limits are designed to provide reasonable protection against harmful interference in a
residential installation. This equipment generates, uses, and can radiate radio frequency energy and, if
not installed and used in accordance with the instructions, may cause harmful interference to radio
communications. However, there is no guarantee that interference will not occur in a particular
installation.
If this equipment does cause harmful interference to radio or television receptions, which can be
determined by turning the equipment off and on, the user is encouraged to try to correct the
interference by one or more of the following measures :
• Reorient or relocate the receiving antenna.
• Increase the separation between the equipment and receiver.
• Connect the equipment into an outlet on a circuit different from that to which the receiver is
connected.
• Consult the dealer or an experienced radio/TV technician for assistance.
User Information
Changes or modifications not expressly approved by the party responsible for compliance could void
the user’s authority to operate the equipment.
Connecting of peripherals requires the use of grounded shielded signal cables.
Page 3
HYUNDAI LCD TV HQL260WR/320WR
Kind of equipment : LCD TV
Safety : EN 60065 : 1998 / IEC60065 : 1998
EMC : EN 55013 / 1990+A12 : 1994+A13 : 1996+A14 : 1999
EN 55022 : 1998+A1 : 2000 Class B
EN 55024 : 1998+A1 : 2001
EN 55020 : 1994+A11 : 1996+A13 : 1996+A14 : 1999+A12 : 1999
EN 61000-3-2 : 2000, EN 61000-3-3 : 1995+A1 : 2001
Type-Designation : LT26AW000 / LT32AW000
WE HYUNDAI ImageQuest CO., LTD.
Ami-ri Bubal-Eub Ichon-Si Kyungki-Do
467-860 KOREA
declare under our sole responsibility that the product:
to which this declaration relates is in conformity with the
following standard(s) or other normative document(s)
following the provisions of the Low Voltage Directive 73/23/EEC,
93/68/EEC and the EMC Directive 89/336/EEC.
KOREA /MAY. 15, 2004 HONG KI, KIM
Place and date of issue) (Name and signature of
authorized person)
Accredited testlaboratory:
TÜV Rheinland
Am Grauen Stein
51105 Köln
DECLARATION OF CONFORMITY
Page 4
Important Tips
Image Retention Effect(Image Sticking)
1. Cause :
- If LCD TV displays the same pattern for a long period of time, Image Retention Effect may develop
due to the LCD structure.
- This is a common phenomenon that occurs in all LCD products on current market.
2. Prevention :
- To avoid this matter, use the product after reducing brightness and contrast, especially when a still
image is displaying for a long time. (Example : Contrast 50, Brightness 50 - See the page 36)
Once Image retention occurs, change the mode into Video mode which displays more motion
pictures. It will help reduce this effect, but cannot completely eliminate the effect once it occurs.
When a fixed pattern is displayed often, screen brightness may get worse.
3. Solution :
- Displaying a full white pattern for around 10 hours might help reduce latent image effect temporarily.
- It is not possible to permanently prevent Image Sticking Effect using current technology.
4. Notice :
- It is very important to notify every buyer/customer of this information and all distributors/buyers/
customers should be fully aware of this.
- A manufacturer cannot provide a technical support of Image Sticking Effect of LCD TV. And Warranty
does not include Image Sticking Effect.
Second Tip
• Pixel Defect:
LCD TV panel is made of a group of refined pixels (cells). Due to the technological constraints of
building an LCD chip, manufacturers can only guarantee that approximately 99.9% of pixels will be
functional. Only a few of abnormal pixels may appear but this has no influence upon LCD TV's
performance.
* Specification on ‘dead pixel’ of LCD panel complies to ISO13406-2 Standard.
Page 5
HYUNDAI LCD TV HQL260WR/320WR
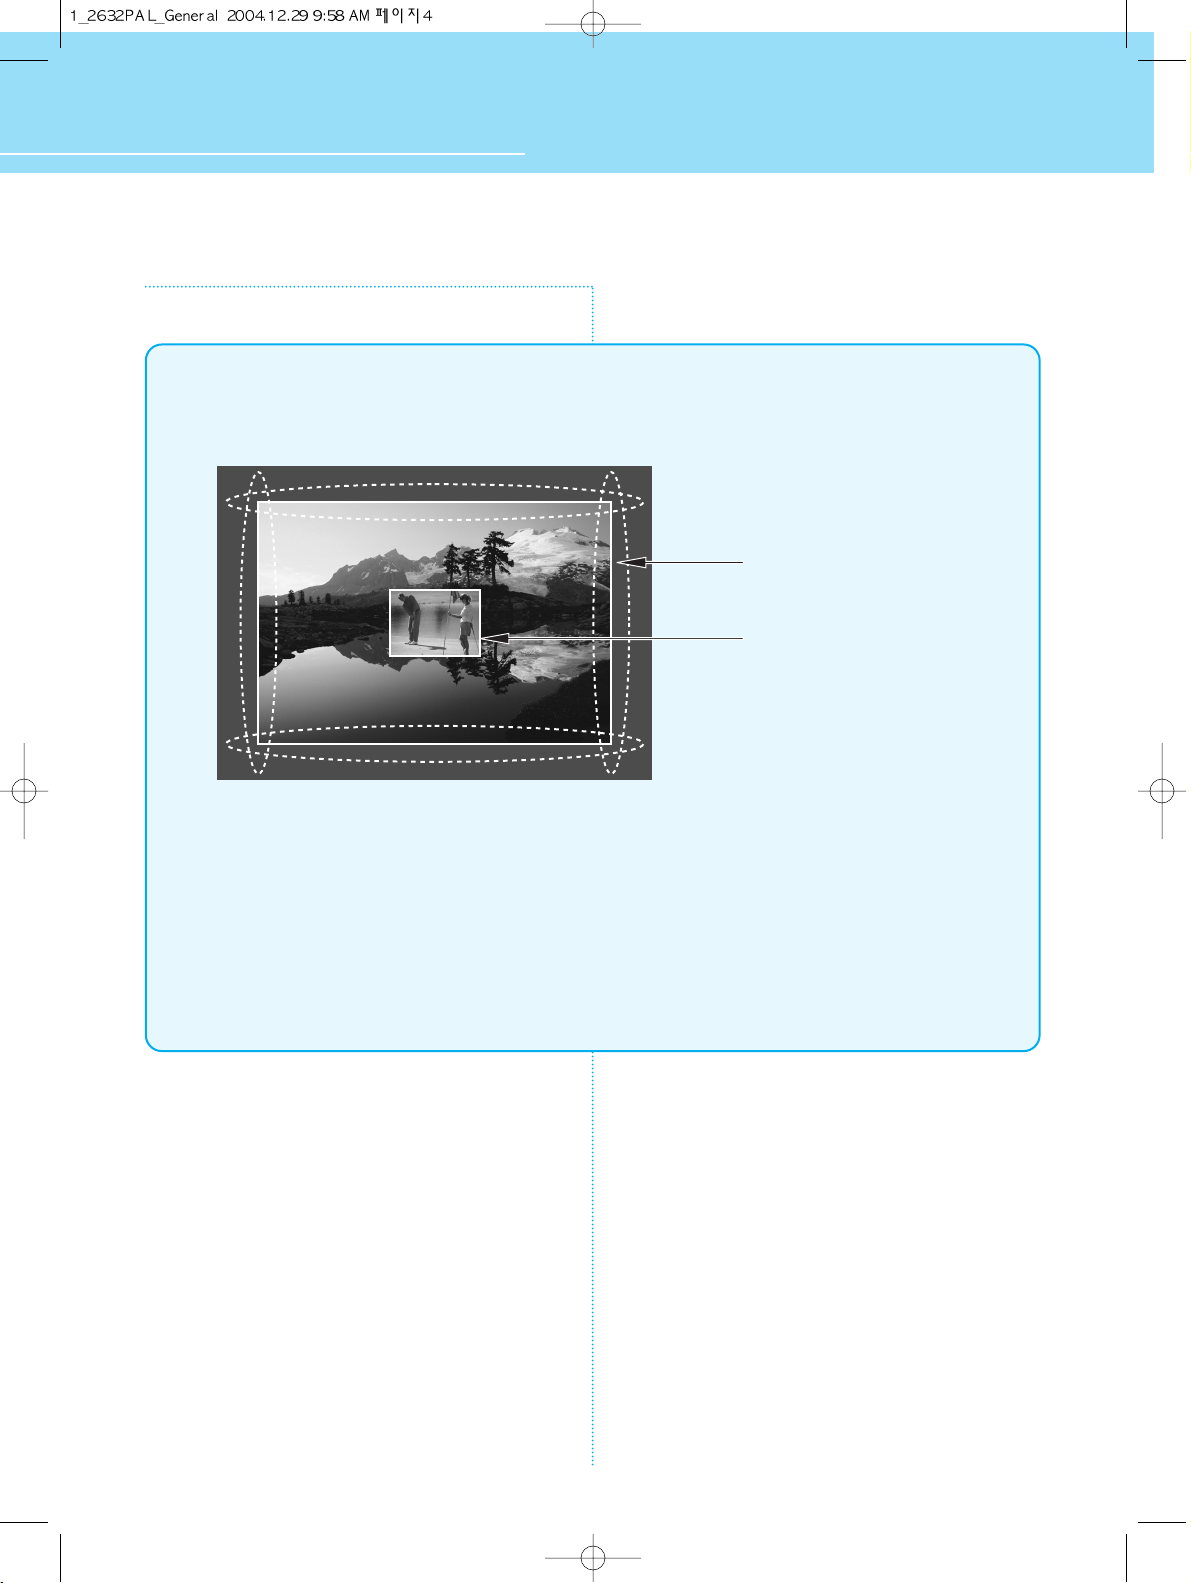
Image Sticking Precaution
Still Image/Panorama/Wide/4:3 in Motion Image
• Precaution :
- Image Sticking could be come from Still Image and Boundary line for a long time display and
Brightness gap in Boundary.
- This Matter(Image Sticking) is same thing under the other LCD's Company.
- Still Image/Letter in watching TV also will be effect to Image sticking.
*This matter(Image Sticking) is out of warranty.
Panorama, Wide, 4:3 aspect ratio
Box or Still image
Page 6
Features
A Wide Array of Screen Settings
You can choose different screen settings depending on the type of program you are watching
or the surrounding conditions (the lighting or the outside weather conditions).
You can switch among Standard, Sport, Natural and Mild, or you can configure the screen
settings for yourself.
A Wide Array of Sound Settings
You can choose an optimal sound setting for the type of program you are watching.
You can switch among Standard, Music, Film and Speech, or you can configure the settings for
yourself.
Favorite Channel Memory
You can store your favorite channels in the order of preference for easy channel selection.
Teletext Function
You can display teletext information at any time on your TV.
SRS WOW(Surround) Audio Function
You can listen to dynamic and surround sound only with ordinary speakers.
Variable Aspect Ratio
You can adjust Aspect Ratio as you want
Auto ON/OFF Function
This function allows you to turn on/off your LCD TV at the preset time.
Page 7
HYUNDAI LCD TV HQL260WR/320WR
Table of Contents
General Information
Safety Precaution ................................................................ 5
Contents of the Package .................................................... 11
Separately Sold Products .................................................. 11
How to Use the Kensington Security Slot ........................... 12
How to Use the Rear Cap and Cable Holder ........................ 13
How to Adjust the View Angle ............................................ 14
How to Install Wall Mount Support ......................................15
How to Install Wall Mount Frame ........................................16
Parts Names and Functions ............................................. 17
Remote Control ................................................................. 19
Connections
Connecting Indoor/Outdoor TV Antenna (UHF/VHF) ............. 23
Connecting to the antenna input connection
on the external equipment ................................................. 24
Before connecting the video connections to
external devices .................................................................25
Connecting VCR, Cable/Satellite Receiver .......................... 26
Connecting a DTV Receiver or DVD Player .......................... 27
Playing back a tape recorded on a camcorder ................... 28
Connecting to a PC ............................................................ 29
Resolutions Supported in PC ...............................................30
Scart Connection to the External Input/Output .................... 31
Scart Pin Specifications ..................................................... 32
Picture Setup
How to Select the Picture Mode ........................................ 35
How to Set the Desired Picture .......................................... 36
How to Set PIP [Mode] ...................................................... 37
Supported PIP Table ...........................................................38
How to Set the Geometry (In PC mode) ............................. 39
How to Set the Geometry (In DTV mode) ........................... 40
Sound Setup
How to Select the Audio Mode ........................................... 43
How to Select the Desired Mode ........................................ 44
How to Select the Balance, Volume and Sound Source ..... 45
How to Select SRS WOW(Surround) ................................... 46
How to Listen to Stereo Sound/Dual Sound ........................ 47
Channel Setup
How to Store Program Automatically .................................. 51
How to Edit Program Manually ........................................... 52
Teletext Feature ................................................................ 55
Displaying the Teletext Information ................................... 56
Function Setup
How to Select the Aspect Ratio .......................................... 59
How to Freeze Picture ........................................................ 60
How to Set Key-Lock ......................................................... 61
How to Set OSD(On-Screen-Display) Display Time ............ 62
How to Set No Key Operation Auto Power Off...................... 63
How to Set No Signal Timeout ........................................... 64
How to Set Your Favorite Channels .................................... 65
How to Set Noise Reduction and Use Factory Preset .......... 66
Displaying Information and Clock ....................................... 67
Choosing Your Language ................................................... 68
Clock Setup
How to Set Date and Clock ................................................ 71
How to Set On/Off Time ..................................................... 72
How to Set Update Program ............................................... 74
How to Set Sleep Time ..................................................... 75
Appendix
Glossary ............................................................................ 77
Troubleshooting ................................................................. 79
Care and Cleaning ............................................................. 81
Product Specifications ....................................................... 82
Page 8
WARNING
WARNING
5
GENERAL INFORMATION
Safety Precaution
The contents of this section are provided for the safety of users and their property.
Please read the instructions carefully before using.
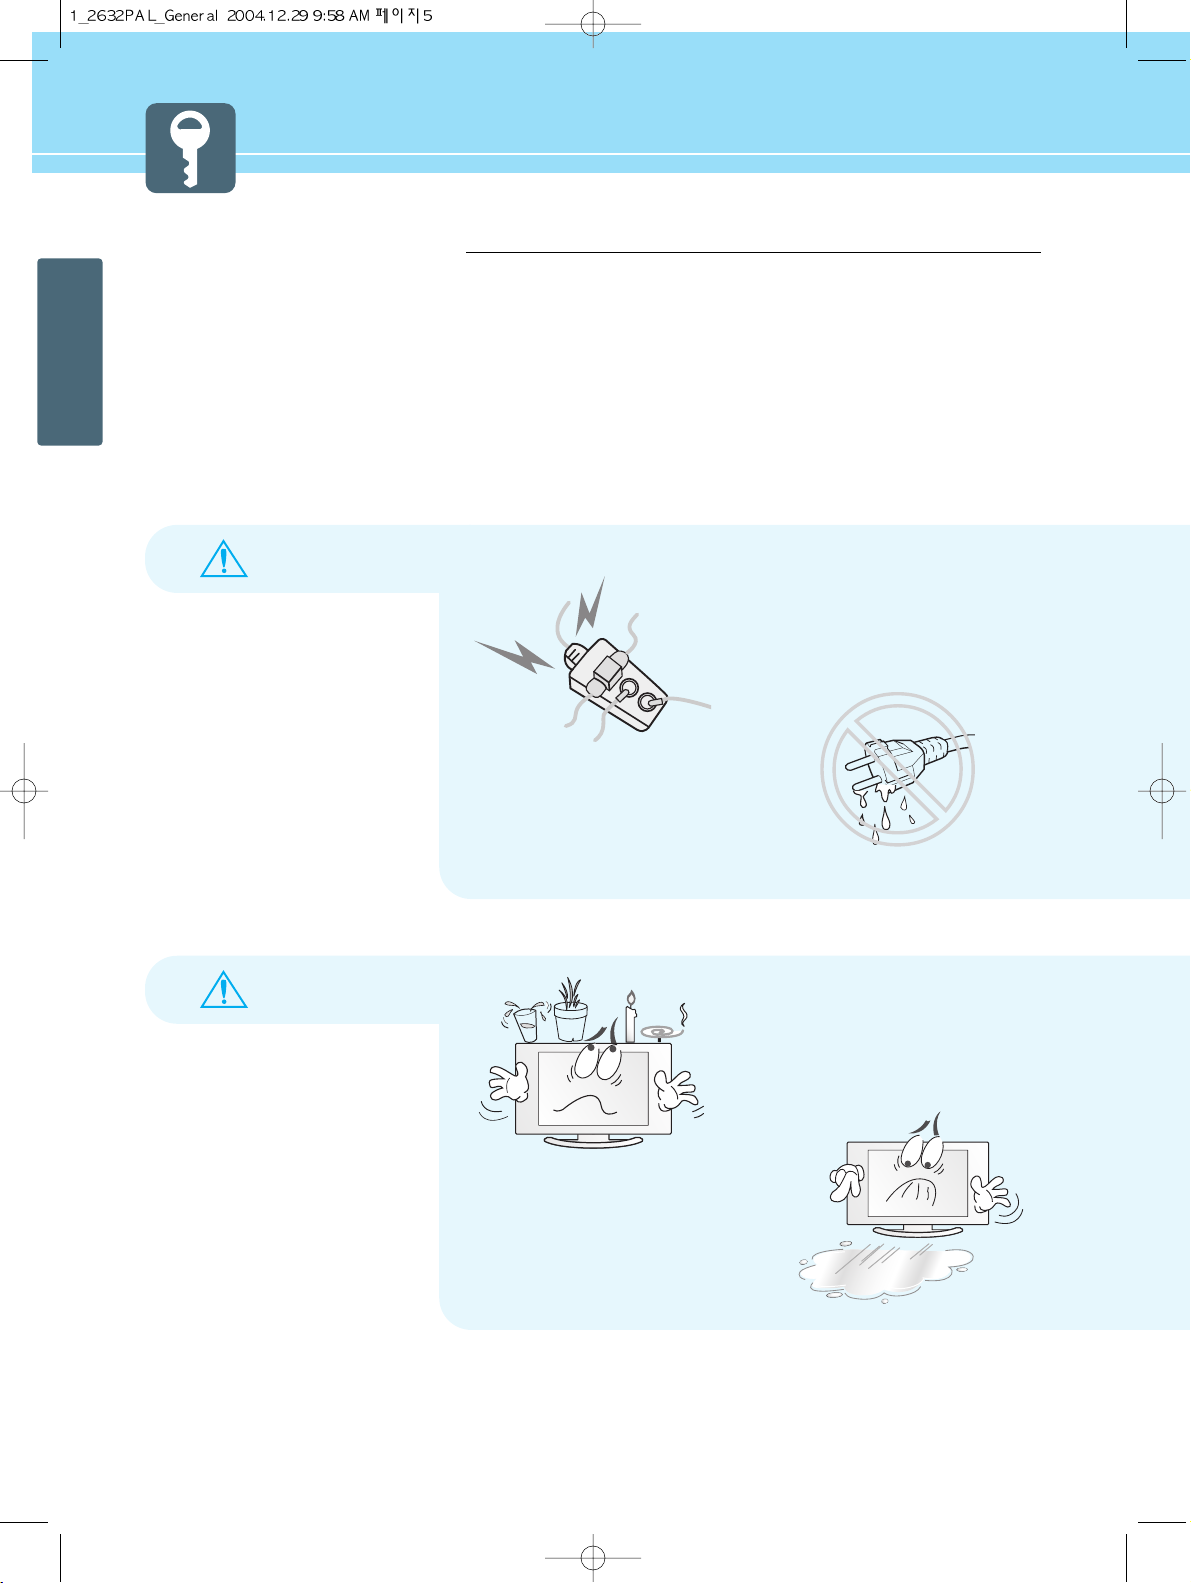
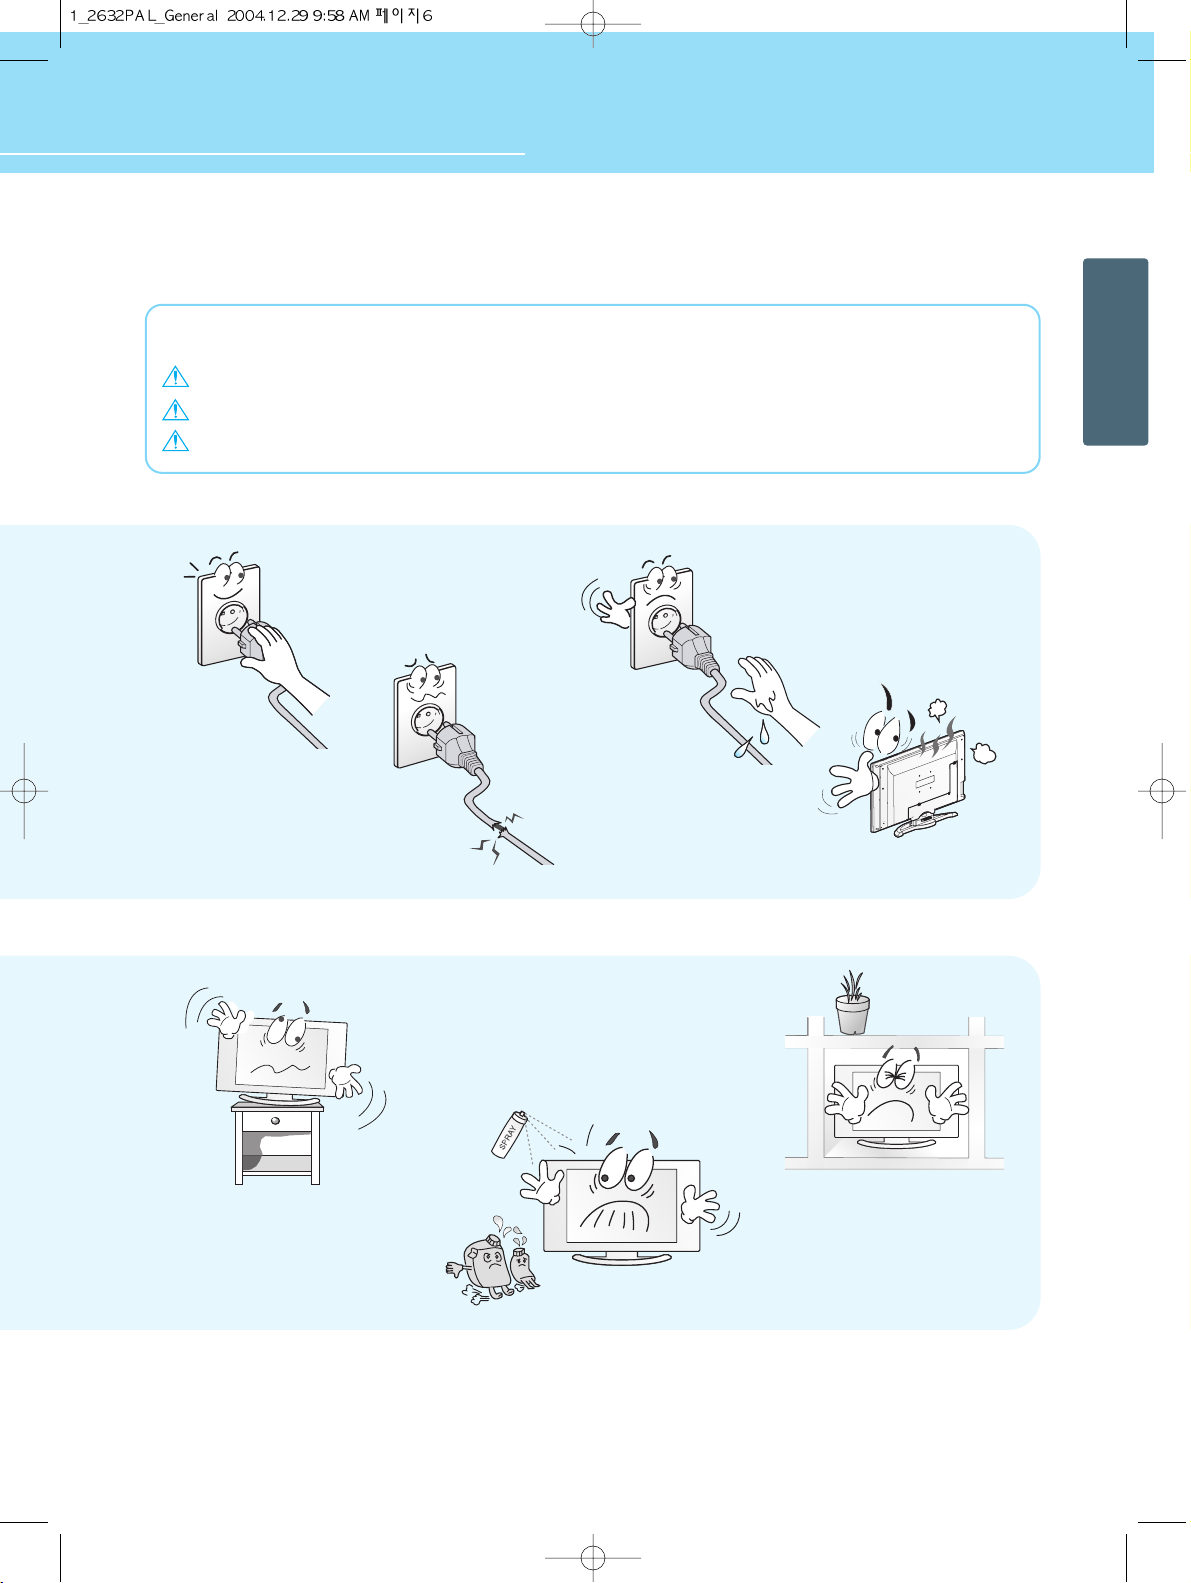
Do not connect multiple electrical
appliances to a single outlet.
- It may cause a fire due to overheating from the
outlet.
Do not put a water bowl, vase, candle,
bug repellant smoke, cigarette, plants,
or heavy thing on the LCD TV.
- It may cause electric shock or fire and also heavy
things may cause injury when they fall.
If there is a persistent accumulation
of dusts or water on the plug, please
make sure to wipe it off using a dry
cloth.
- It may cause a fire or an electric shock.
Do not install in a place where there
is oil, smoke, excessive humidity, or
where water may be sprinkled,
dripped, splashed on it.
- This may cause electric shock or fire.
Page 9
Safety instructions are divided into “Warning” and “Alert”. Their meanings are as follows.
This icon is intended to alert the user to the presence of potential danger and important operating instructions.
Warning : When there is a possibility of serious injury or death if not observed.
Alert : When there is a possibility of slight injury or product damage if not observed.
6
GENERAL INFORMATION
HYUNDAI LCD TV HQL260WR/320WR
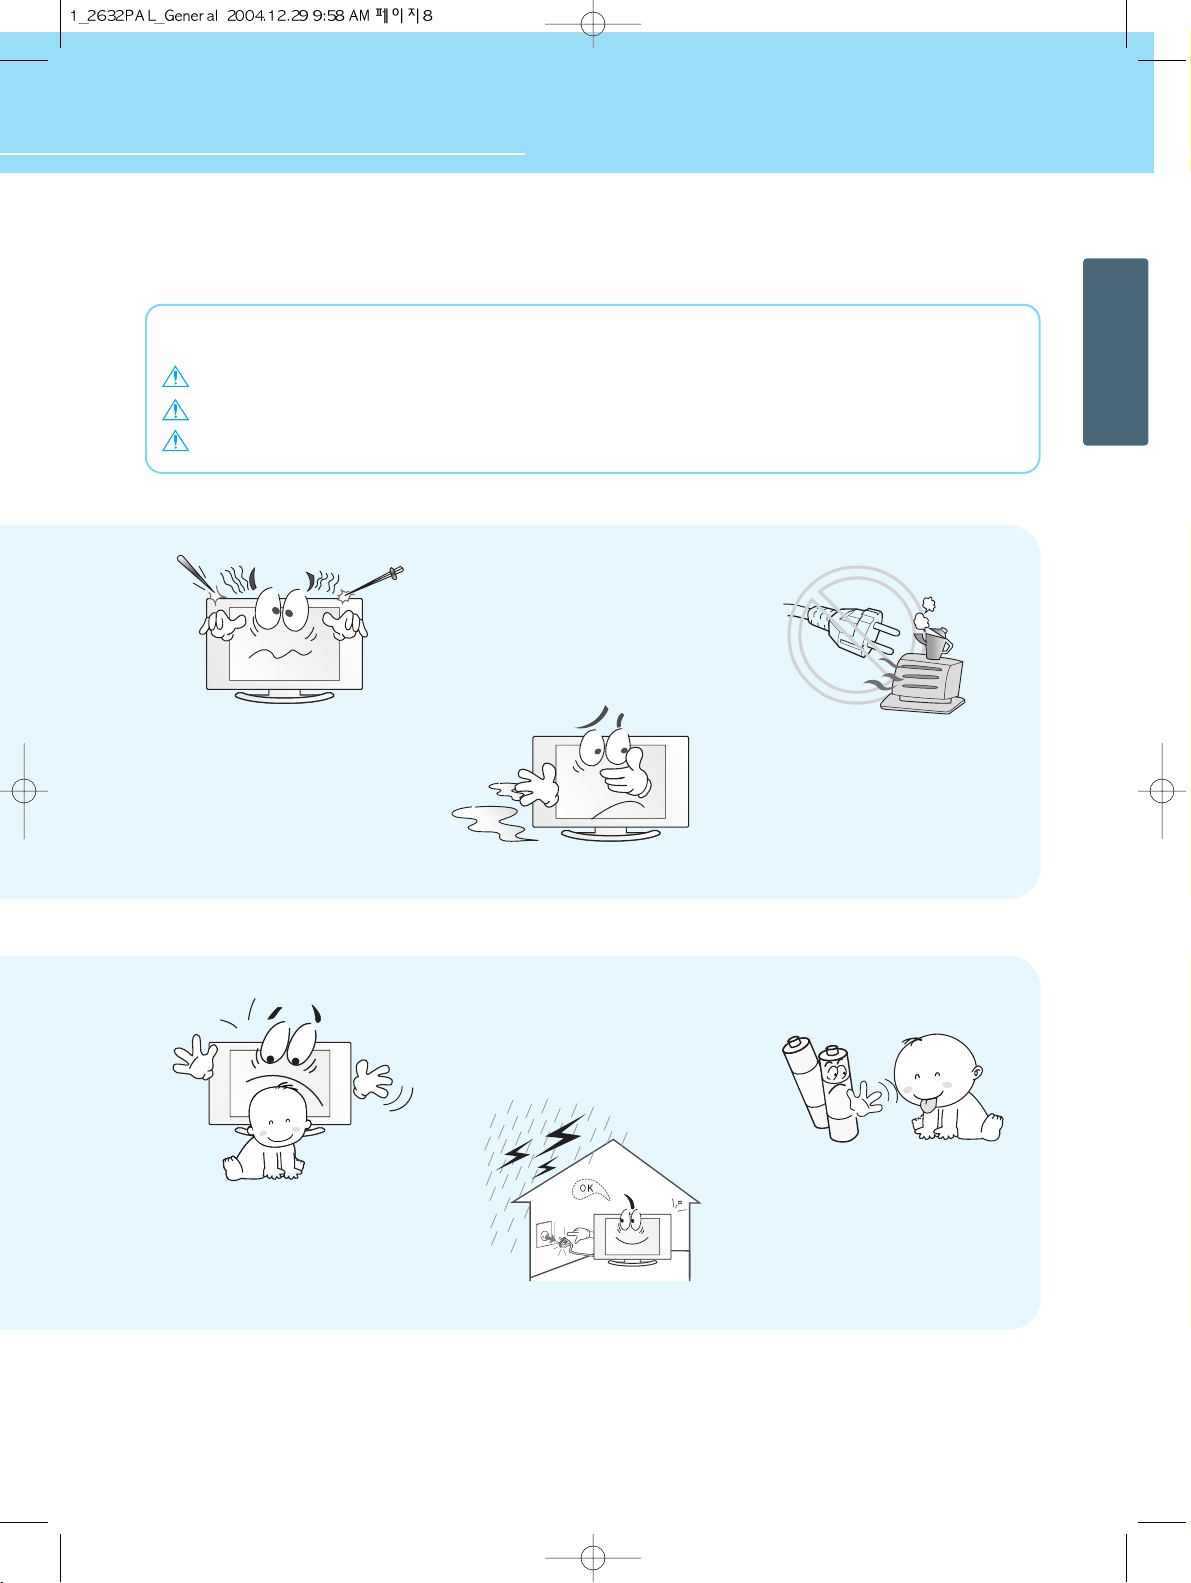
Do not install on an unstable place
or small support.
- This may cause the LCD TV to fall, resulting in
serious injury to a child or adult.
Do not use or store a flammable
spray or inflammable things near the
LCD TV.
- They may cause explosion or fire.
Do not install the LCD TV in a
bookshelf, closet, or a place where
there is poor air circulation.
- Fire may be caused due to the rise of internal
temperature.
Firmly plug in the power
cord so that it does not pull
out.
- An unstable connection may cause
fire.
Do not use a damaged
power cord or plug, or loose
outlet.
- They may cause electric shock or fire.
Please avoid touching the panel
at the rear of LCD TV as it is
producing high temperature.
- Direct contact with the hot surface may
cause physical burns.
Never touch the power plug
or outlet with wet hands.
- This may cause electric shock.
Page 10

7
GENERAL INFORMATION
Safety Precaution ....................................Continued from previous page
The contents of this section are provided for the safety of users and their property.
Please read the instructions carefully before using.
WARNING
WARNING
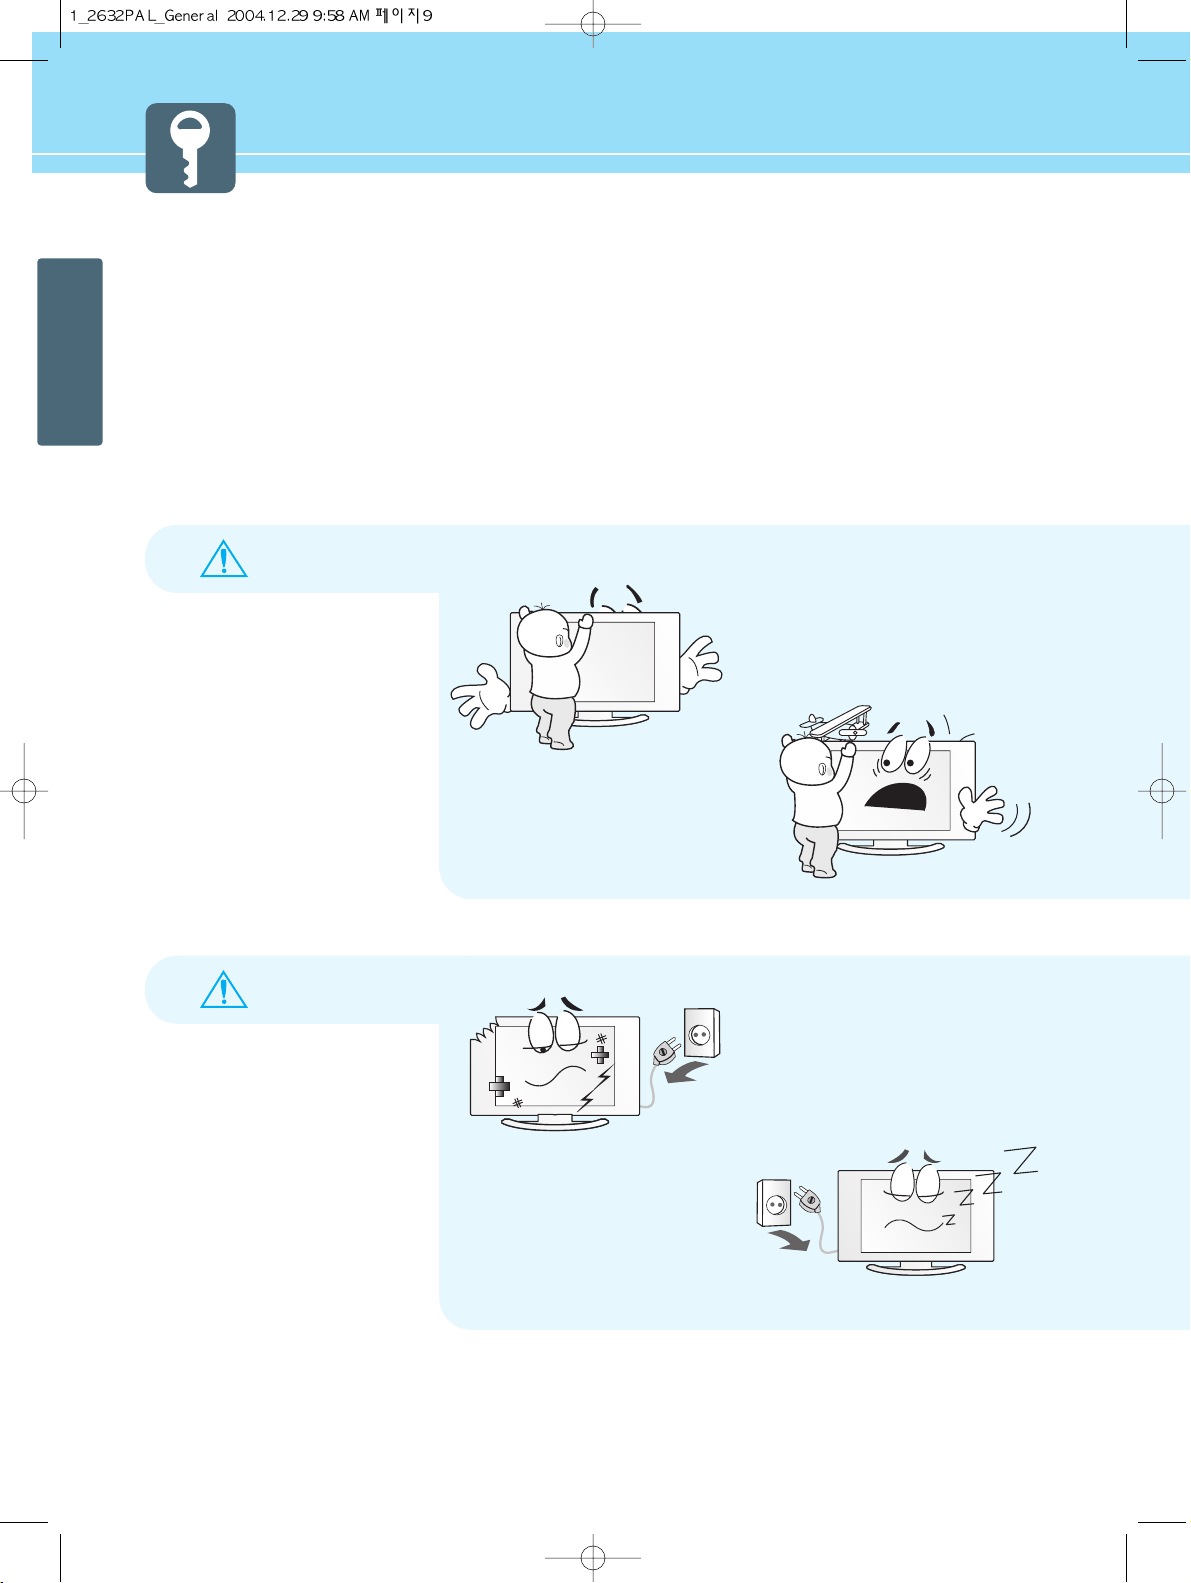
Do not place any heat sources such
as radiators and heat registers, etc.
on or near the LCD TV.
- It may cause a fire.
Do not block ventilating slits.
- Blocking the ventilation slits prevents inner heat
from escaping, which may lead to a fire.
Make the antenna cable loop at the entrance
of the building. Any necessary action such as
making the antenna cable loop at the
entrance of the building should be taken to
prevent rainwater on the outdoor antenna
cable from possibly running into the indoor.
- If raindrop gets into the LCD TV, it may cause a
fire or an electric shock.
Never attempt to open, fix, or modify
the LCD TV.
- When there is a need for fixing, call a service
center. Fire or electric shock may be caused.
Page 11
Safety instructions are divided into “Warning” and “Alert”. Their meanings are as follows.
This icon is intended to alert the user to the presence of potential danger and important operating instructions.
Warning : When there is a possibility of serious injury or death if not observed.
Alert : When there is a possibility of slight injury or product damage if not observed.
8
GENERAL INFORMATION
HYUNDAI LCD TV HQL260WR/320WR
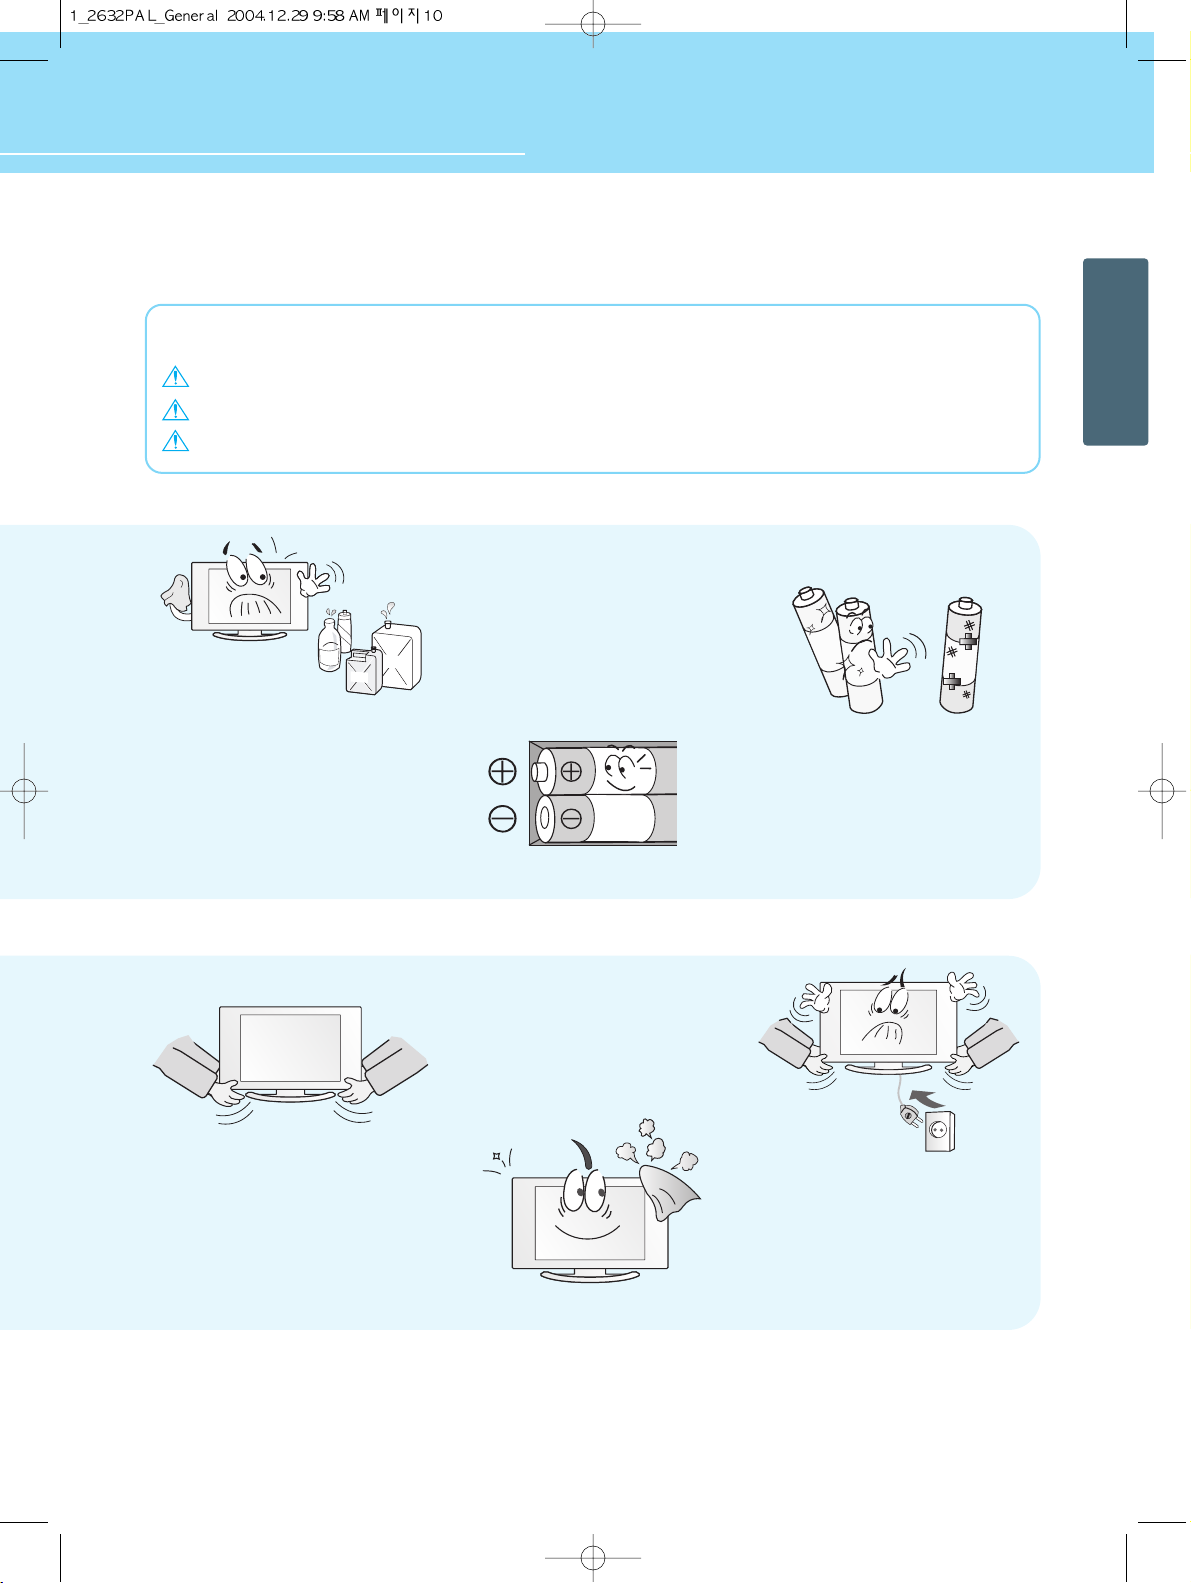
Do not install the product on the
floor.
- If it falls over, your child may be injured.
Unplug the product during lightning
or thunderstorms and never touch
the antenna cable.
- It may cause a fire or an electric shock.
Keep the remote control batteries
out of sight and out reach of
children.
- If your child swallows a battery, see your doctor
immediately.
Do not put a metallic object like
chopstick, wire, or puncher or
inflammables like paper or a match
in a vent, headphone jack, or AV
jacks of the LCD TV.
- Electric shock or fire may be caused.
When the LCD TV produces abnormal
noise, burning smell, or smoke,
unplug the LCD TV immediately and
call a service center.
- Electric shock or fire may be caused.
Ensure the power cord
doesn’t trail across any hot
objects like a heater.
- This may cause a fire or an electric shock.
Page 12
Safety Precaution ....................................Continued from previous page
The contents of this section are provided for the safety of users and their property.
Please read the instructions carefully before using.
9
GENERAL INFORMATION
ALERT
WARNING
Do not allow children to climb or
play on the LCD TV.
- If it falls over on children, it may cause serious
injury.
Do not place toys and cookies, etc.
on the LCD TV, which may attract
children’s attention. Children will
climb on the LCD TV to reach
whatever they have their eyes on.
- If it falls over on children, it may cause serious
injury.
In the event of damaging or
dropping the product, switch off the
power and remove the plug.
- Using a damaged product may cause an electric
shock or a fire.
- Contact your local service center.
Unplug when you do not use your
LCD TV for a long time.
- If dust is stacked on the LCD TV, electric shock
or fire may be caused from heat, fire, or
deterioration of insulation.
Page 13
10
GENERAL INFORMATION
HYUNDAI LCD TV HQL260WR/320WR
When cleaning the LCD TV, make sure
to disconnect the power plug and use
a dry, soft cloth for a cleanup.
- Please avoid using chemicals such as wax,
benzene, alcohol, thinner, mosquito spray,
air freshener, lubricant or synthetic
detergent.
When replacing batteries, make
sure to match the batteries to the
(+) and (-) marks in the battery
compartment.
- Mismatching of polarities may result in internal
damage to batteries, fire due to leakage or
contamination.
Always use the standard batteries
and avoid using old batteries
together with new ones.
- Otherwise it may result in internal damage to
batteries, fire due to leakage or contamination.
When moving the LCD TV, 2 or more
people are advised to carry it.
- Injury or damage may be caused when the LCD
TV falls.
Before moving your LCD TV, ensure to
switch off the power and unplug all the
electrical cords and the external
connection cords such as an antenna
cable and other source connections, etc.
- An electrical cord(s) may be damaged resulting
in a fire or an electrical shock.
Consult a service center or customer
service for inside cleaning about
once a year.
- When dust is piled inside the LCD TV for a long
time, fire or malfunction may be caused.
Safety instructions are divided into “Warning” and “Alert”. Their meanings are as follows.
This icon is intended to alert the user to the presence of potential danger and important operating instructions.
Warning : When there is a possibility of serious injury or death if not observed.
Alert : When there is a possibility of slight injury or product damage if not observed.
Alcohol
Benzene
LUBRICANT
Page 14
GENERAL INFORMATION
11
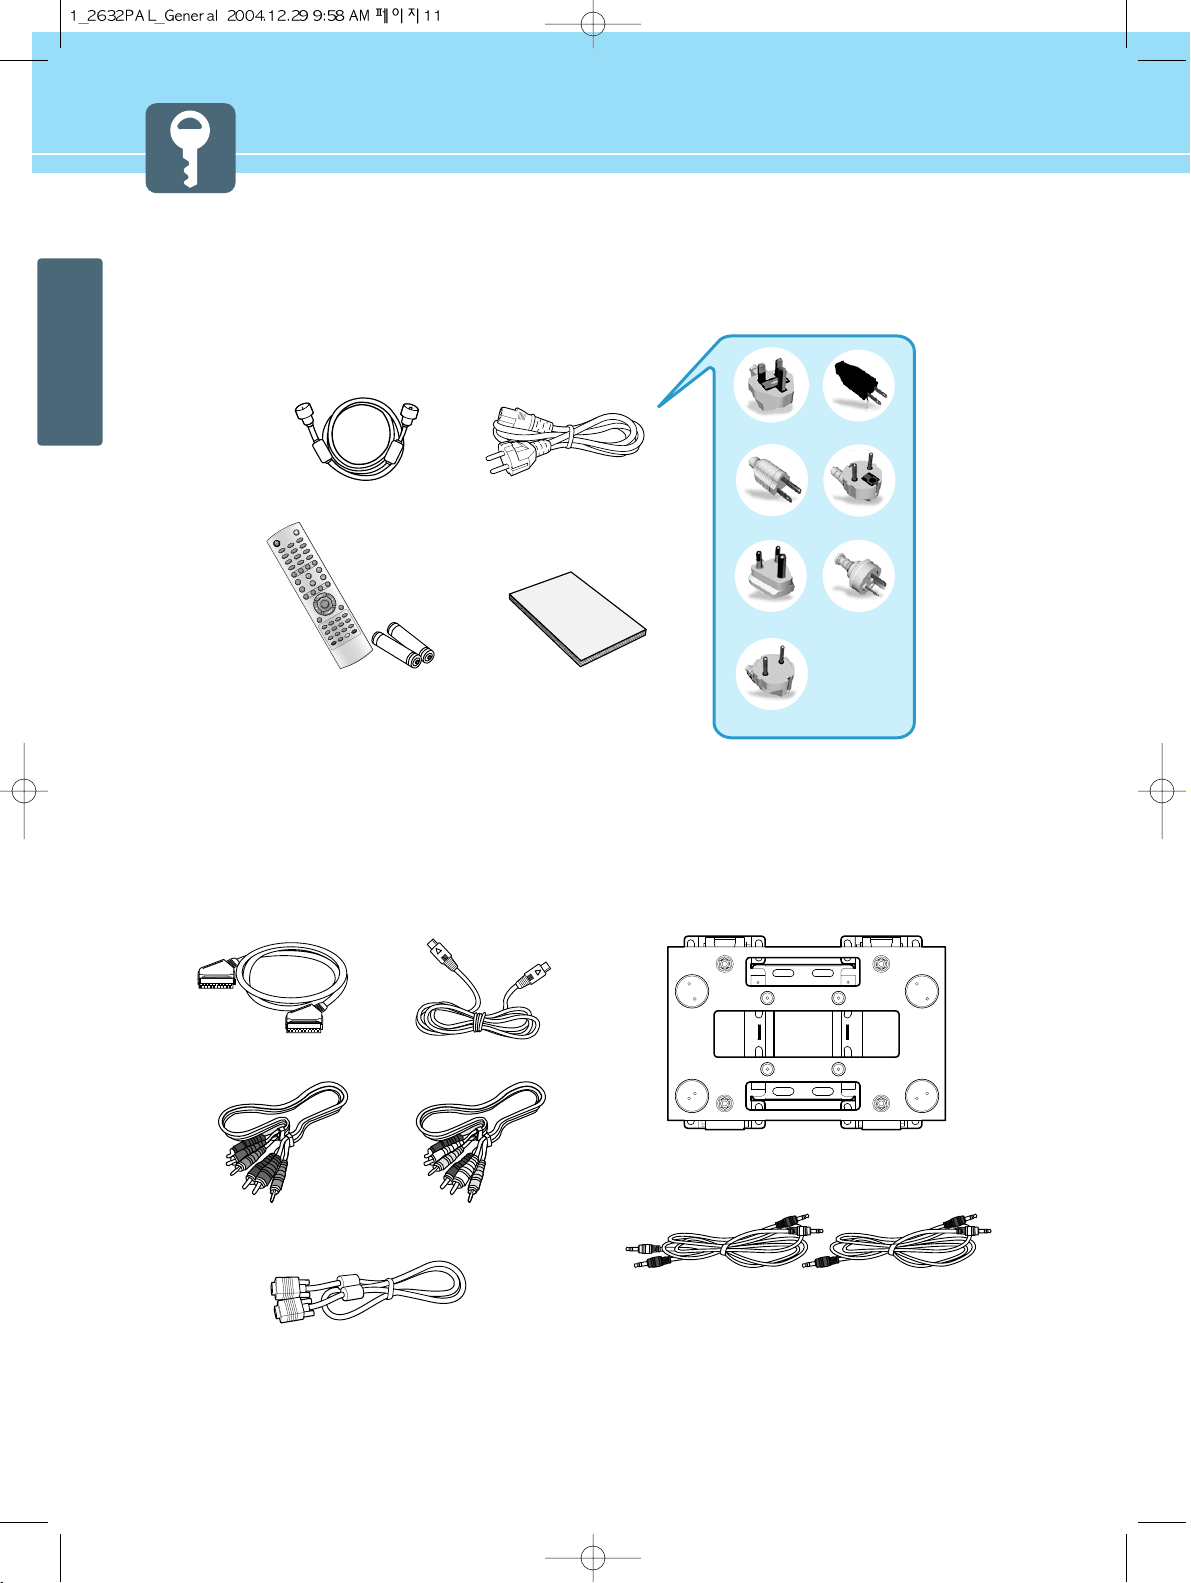
Contents of the Package
To purchase additional parts, consult a distributor or selling agent.
Products Sold Separately
If you want to purchase separately sold products, consult a service center, electronics shops, or parts seller.
1
2
0
3
4
7
5
8
6
9
P
IP
M
E
N
U
T
V
/
A
V
I
N
F
O
M
UT
E
P
REVIEW
SO
U
ND
M
T
S
VO
LU
M
E
SLEE
P
O
N/OF
F
H
I
G
H
/
L
O
W
P
R
O
T
E
C
T
I
O
N
P
C
.
A
U
T
O
C
A
P
T
I
O
N
T
T
X
/
M
I
X
I
N
D
E
X
L
I
S
T
/
F
L
O
F
S
T
O
R
E
H
O
L
D
S
I
Z
E
R
E
V
E
A
L
S
U
B
P
A
G
E
SO
UR
CE
SIZE
SW
AP
C
HA
N
NEL
PICT
UR
E
AS
PEC
T
S
TIL
L
P
O
W
E
R
UK
America/Canada
Japan
Australia
Korea
Europe
South Africa
Power CordAntenna Cable
User’s GuideRemote Control/2 Batteries
(1.5V AAA)
Scart cable S-video cable
Component
(Y, Pb, Pr) cable
Composite
(Video & Audio) cable
PC signal cable(D-SUB)
Audio cable(PC)Audio cable(DVD/DTV)
Wall mounting frame
Page 15
HYUNDAI LCD TV HQL260WR/320WR
GENERAL INFORMATION
12
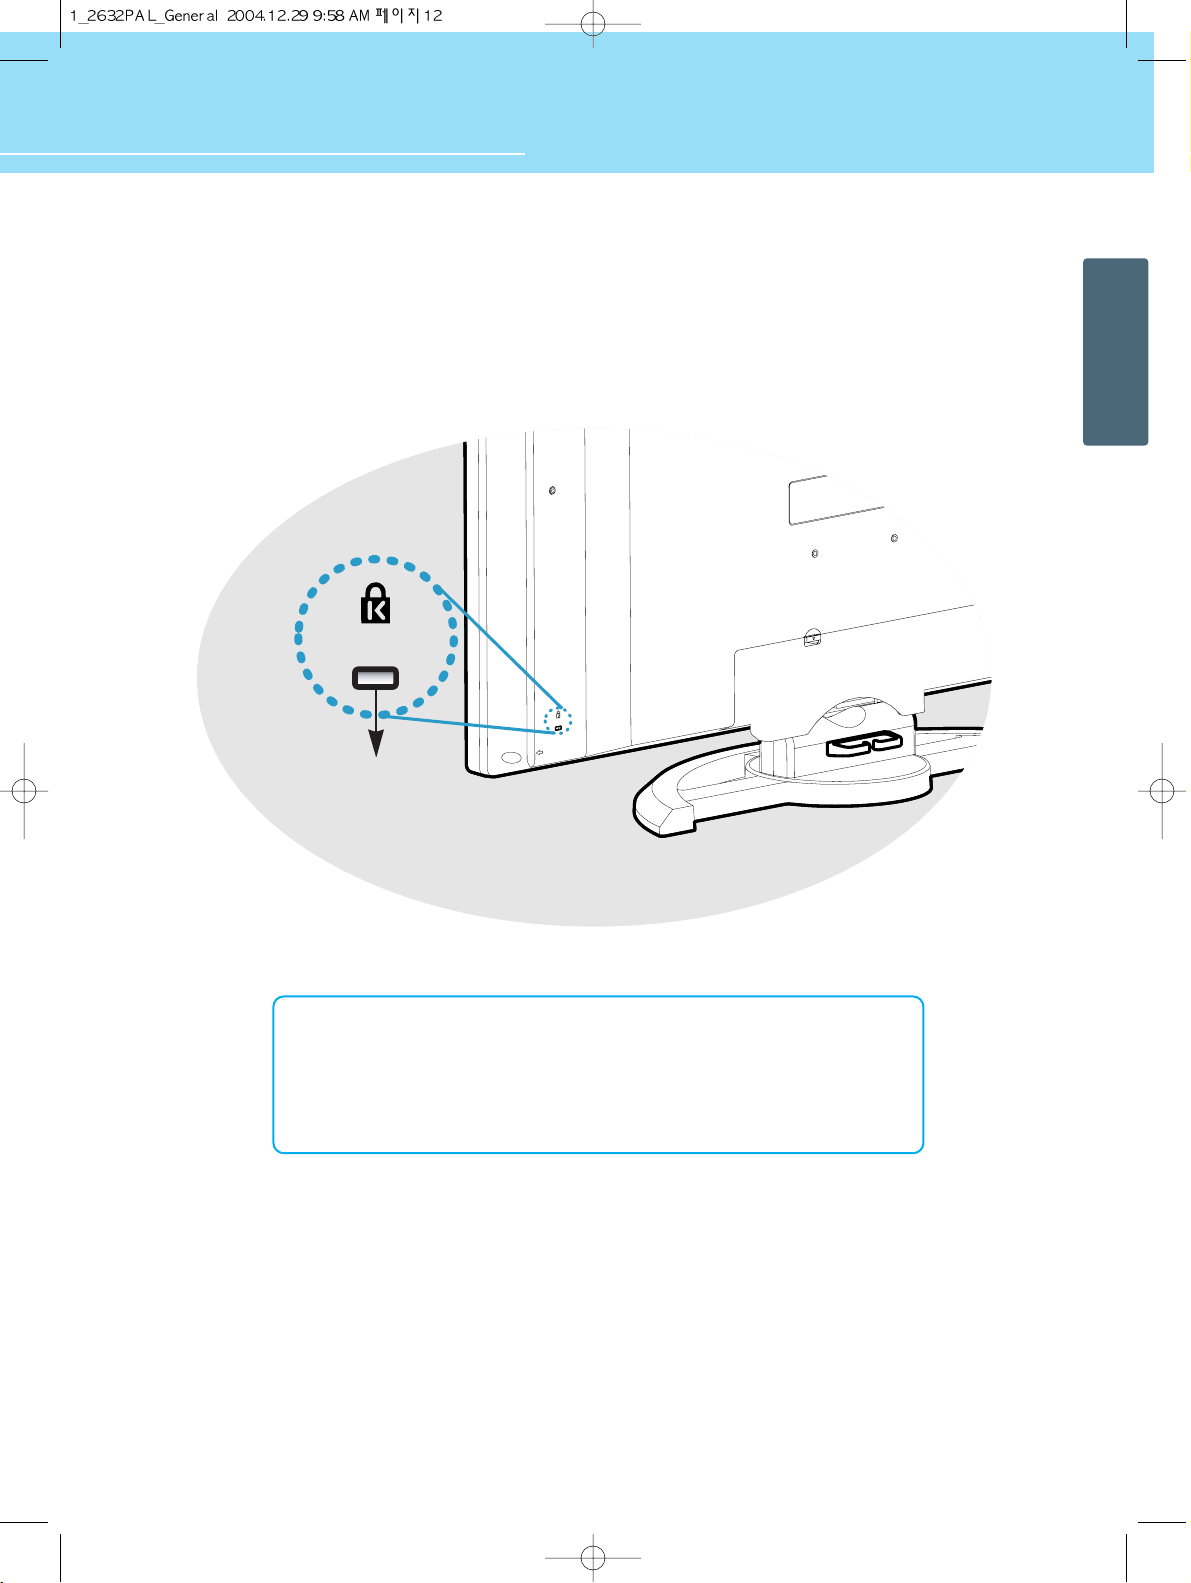
How to Use the Kensington Security Slot
- This display unit supports a Kensington-type security device to secure your LCD TV. Kensington lock is not
included.
- To purchase and install the Kensington locking device, please refer to the following contact information.
* Kensington Technology Group
• Address : 2000 Alameda de las Pulgas 2F san mateo, California 94403-1289
• Tel : +1 650 572 2700 • Fax : +1 650 572 9675
• Web-site : www.kensington.com
Kensington
security slot
Page 16
13
GENERAL INFORMATION
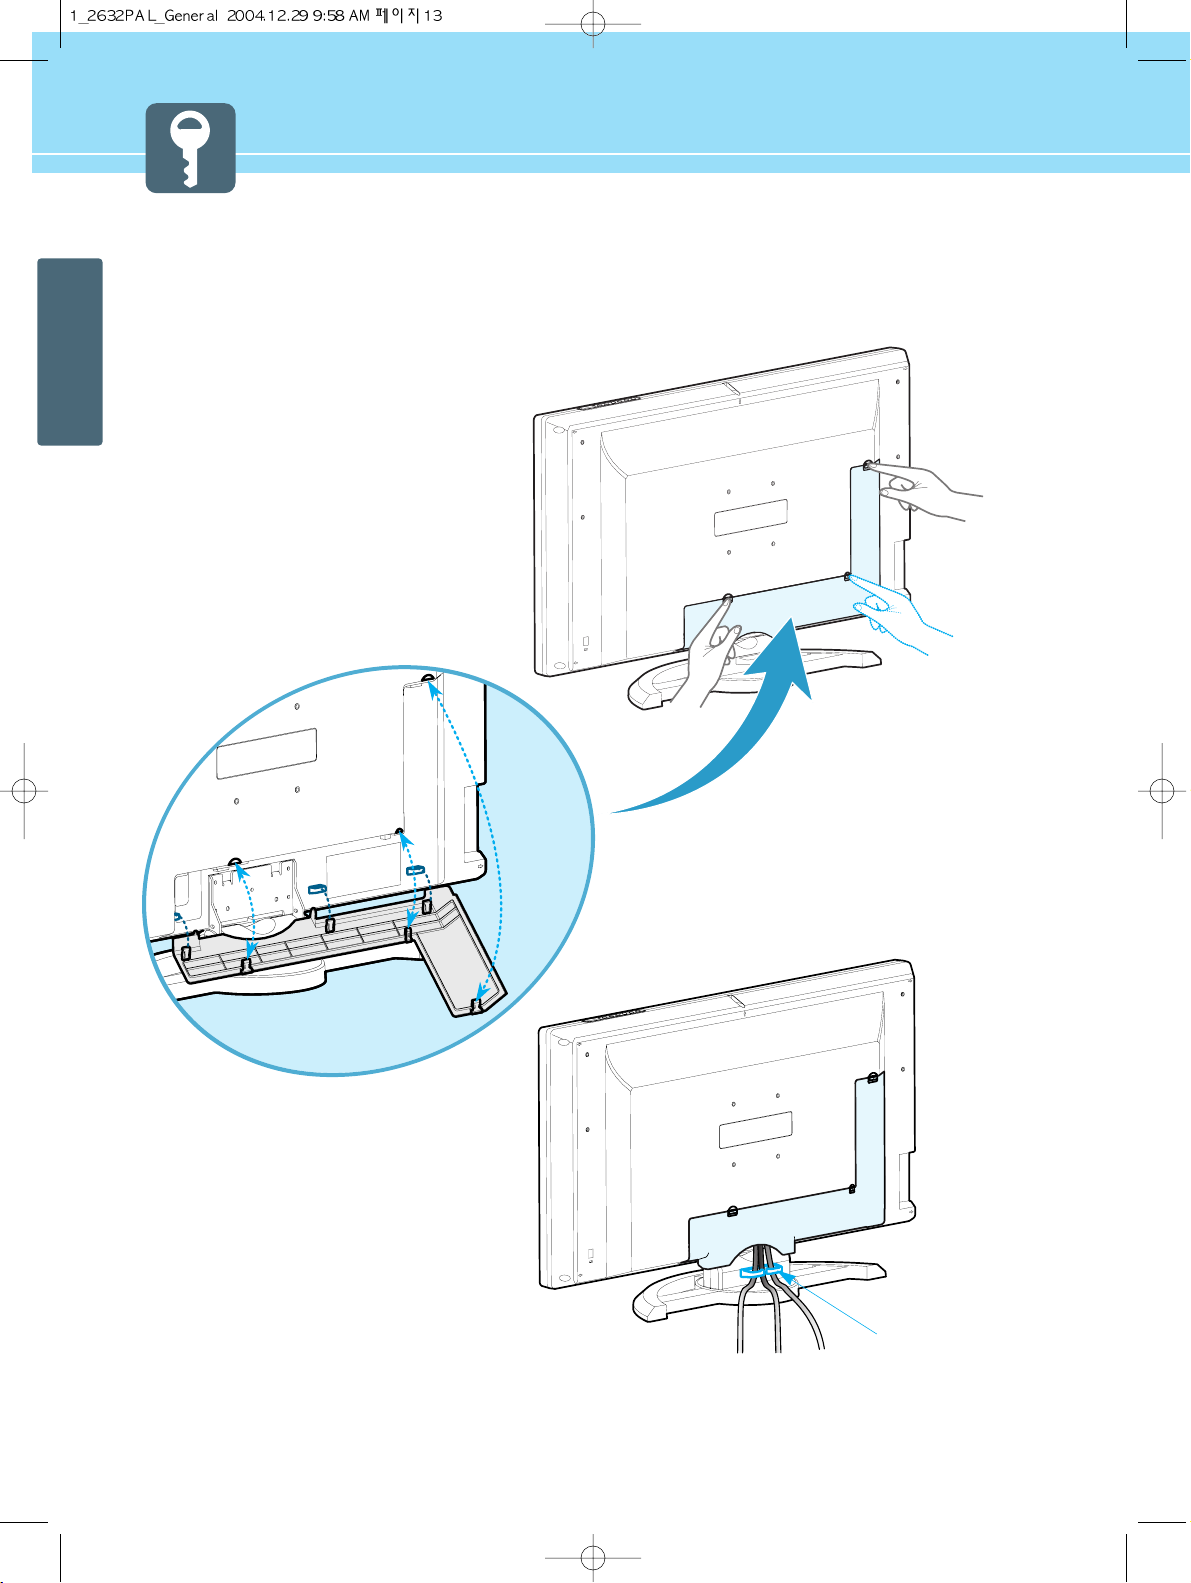
How to Use the Rear Cap and Cable Holder
The Rear Cap and Cable Holder allow you to organize the connection cables on the rear of the product.
1. Pressing and pulling the three hooks
on the rear can detach the Rear Cap.
2. Connect your cables to the terminals
of the rear.
3. Organize the connected cables neatly
using the Cable Holder.
4. Align the rear cover with three guide
holes on the bottom of the TV and
push the cover firmly toward the
front of the TV until the latches click
into the locked position.
Cable Holder
Page 17
14
GENERAL INFORMATION
HYUNDAI LCD TV HQL260WR/320WR
-5
O
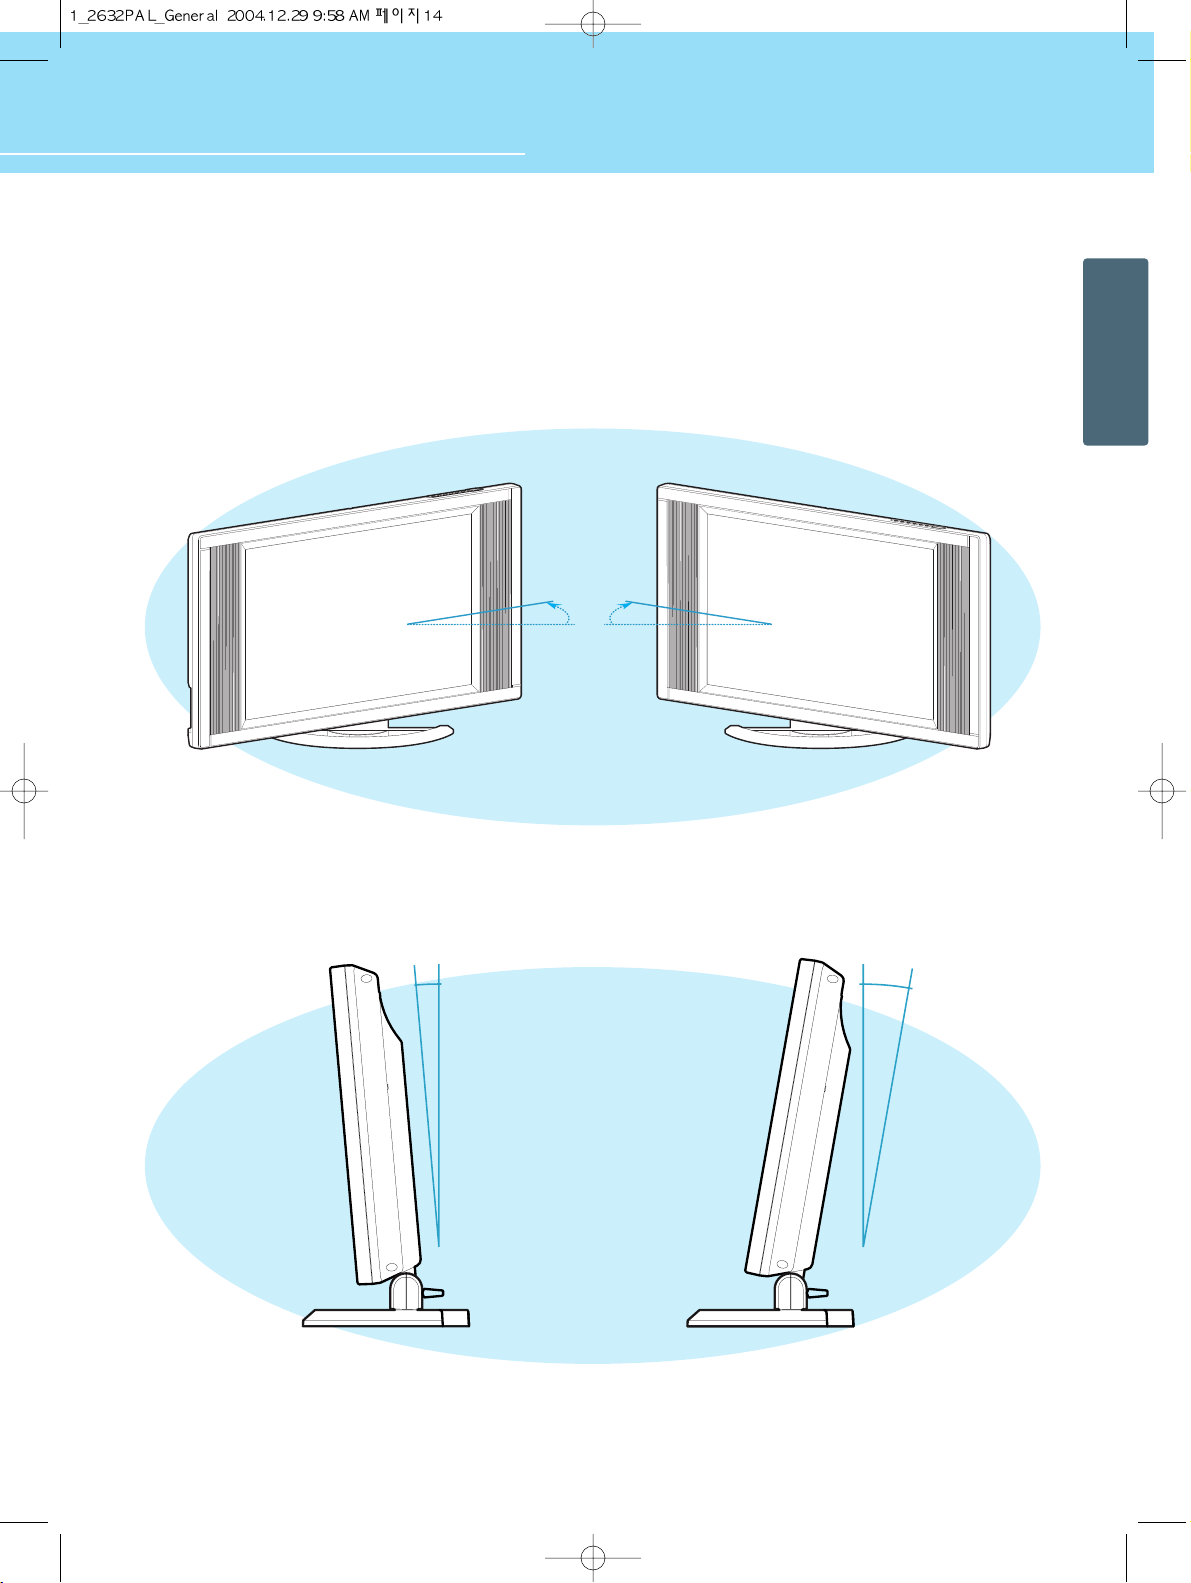
How to Adjust the View Angle
You can adjust the angle of the view for the desired view angle.
You can adjust any angle within a range of 30º to the left or right.
You can adjust the tilt of the TV from -5º to 10º after the installation.
10
O
30
O
30
O
Page 18
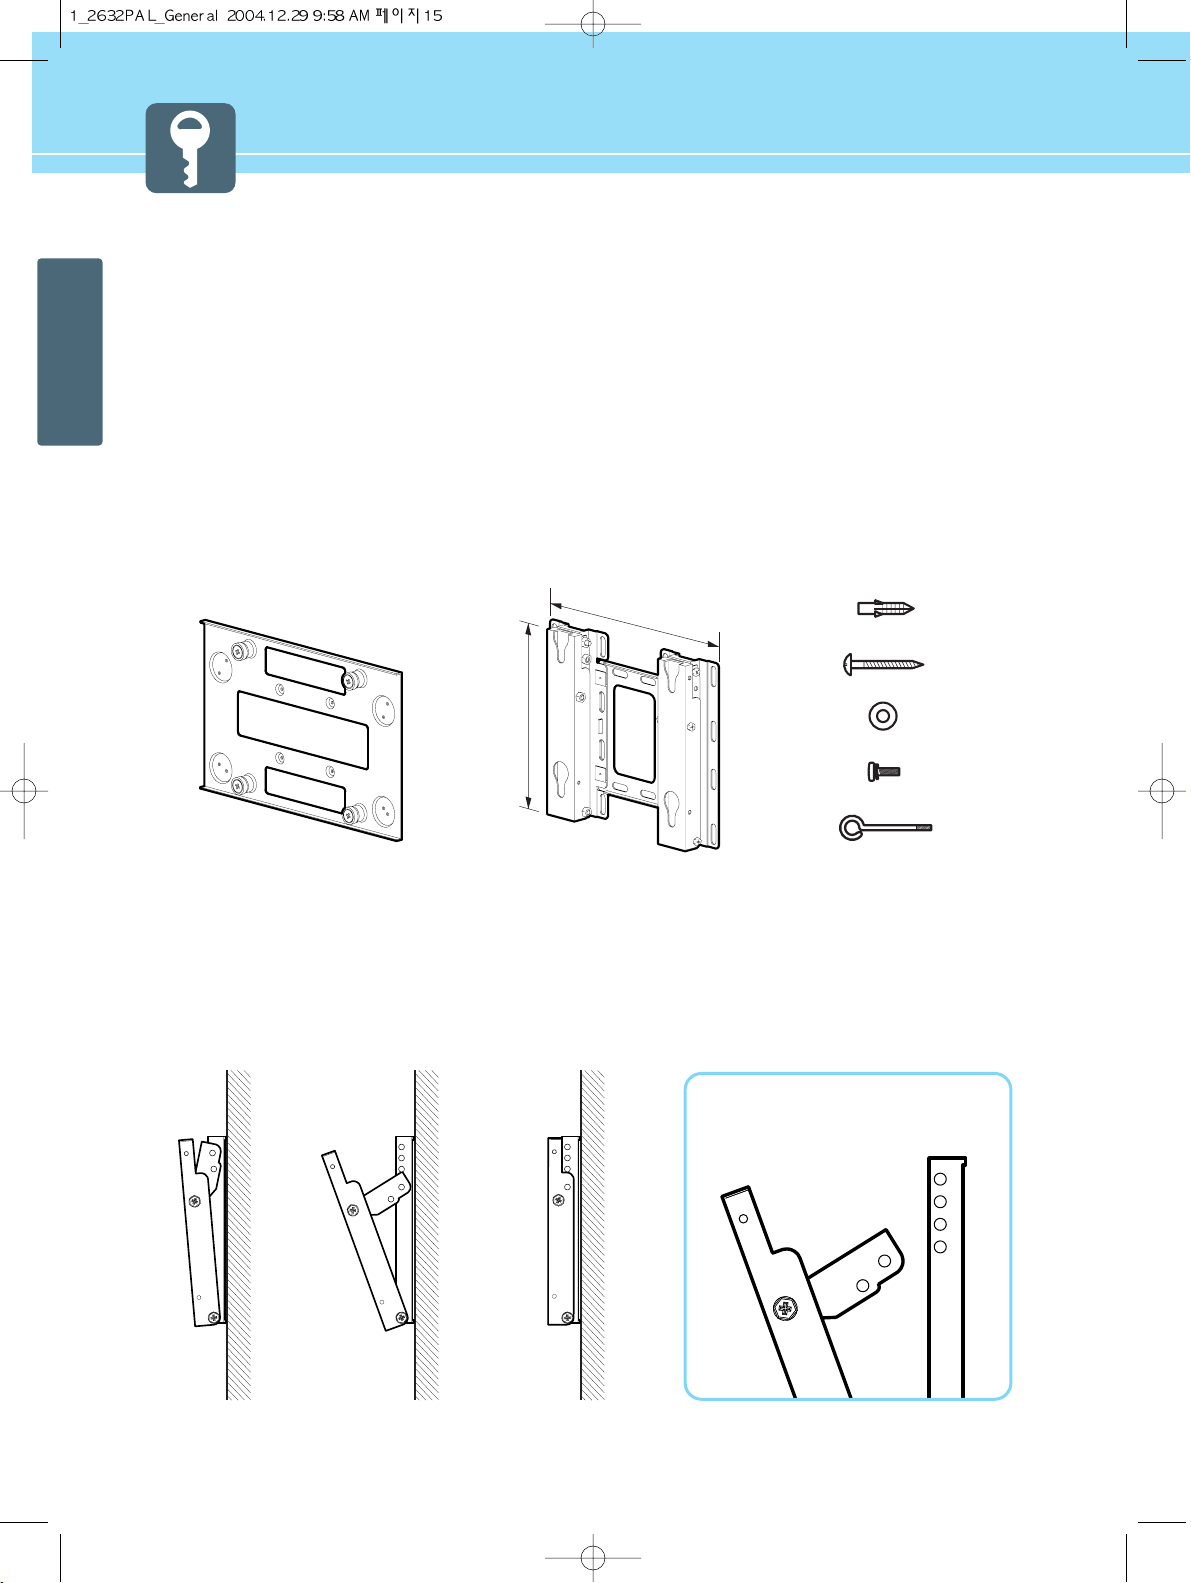
15
GENERAL INFORMATION
How To Install Wall Mount Support
1. Caution
1. Install on the vertical wall surface only.
2. Do not install on the following places to protect the performance of LCD TV and to prevent malfunction.
·Near sprinkler Detector, ·Near heating devices,
·Places where vibration or shock may be applied , ·Near high voltage electric power line
3. Install in a proper method with the structural materials of the wall. If the wall is not strong enough to stand weight of TV set, reinforce the
wall surface before installation.
4. Do not install within a wall.
2. Parts configuration chart
* The above image may look different from the real product.
3. Angle Adjustment(Option)
The angle of LCD TV may be adjusted from 0 degree to 20 degree in 5 steps with 5 degrees.
Use the angle adjustable hole on the side of fixing panel when adjustment is needed.
50angle 200angle No angle
267.5
328.3
Base frame assembly
Stopper Pin - 2 EA
Screws - 8 EA
Washer - 12 EA
Screws - 12 EA
Plastic Anchor - 12 EA
Fixing Panel assembly
a
b
c
d
Angle adjustable hole
0Oangel : A + a
5Oangel : B + c
10Oangel : A + b
15Oangel : A + c
20Oangel : A + d
A
B
Page 19
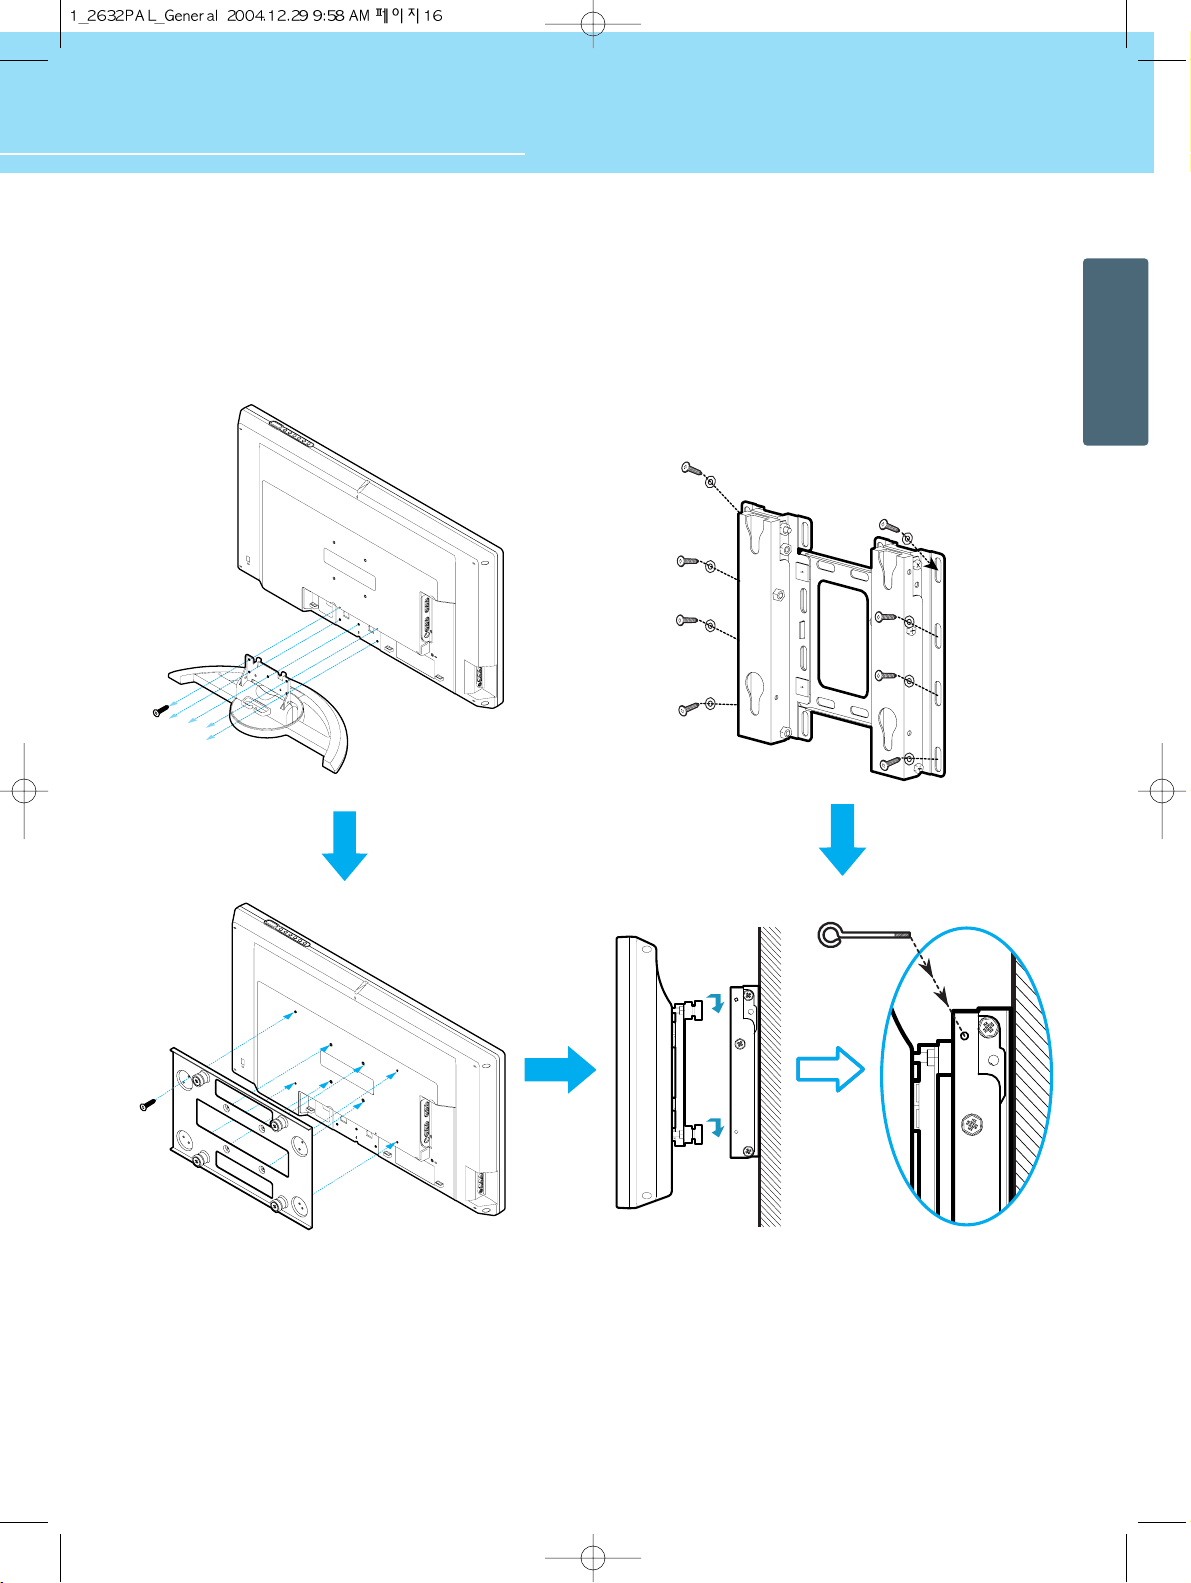
16
GENERAL INFORMATION
HYUNDAI LCD TV HQL260WR/320WR
How To Install Wall Mount Frame
4. Installation Method
1. Unscrew screws fasted on 5 spots on the stand of LCD TV.
2. Fasten the Fixing Panel assembly on the back of LCD TV as
shown on the picture. (Numbering step)
3. Fix the Base Frame Assy on the wall with screws or nails.
4. Hang the LCD TV assembled the Fixing Panel Assy on the
Base Frame Assy. (Tighten the Stopper Pin as shown so
that the LCD TV cannot be separated from the Base
Frame Assembly.)
1
2
3
4
7
8
5
6
Stopper Pin
Page 20
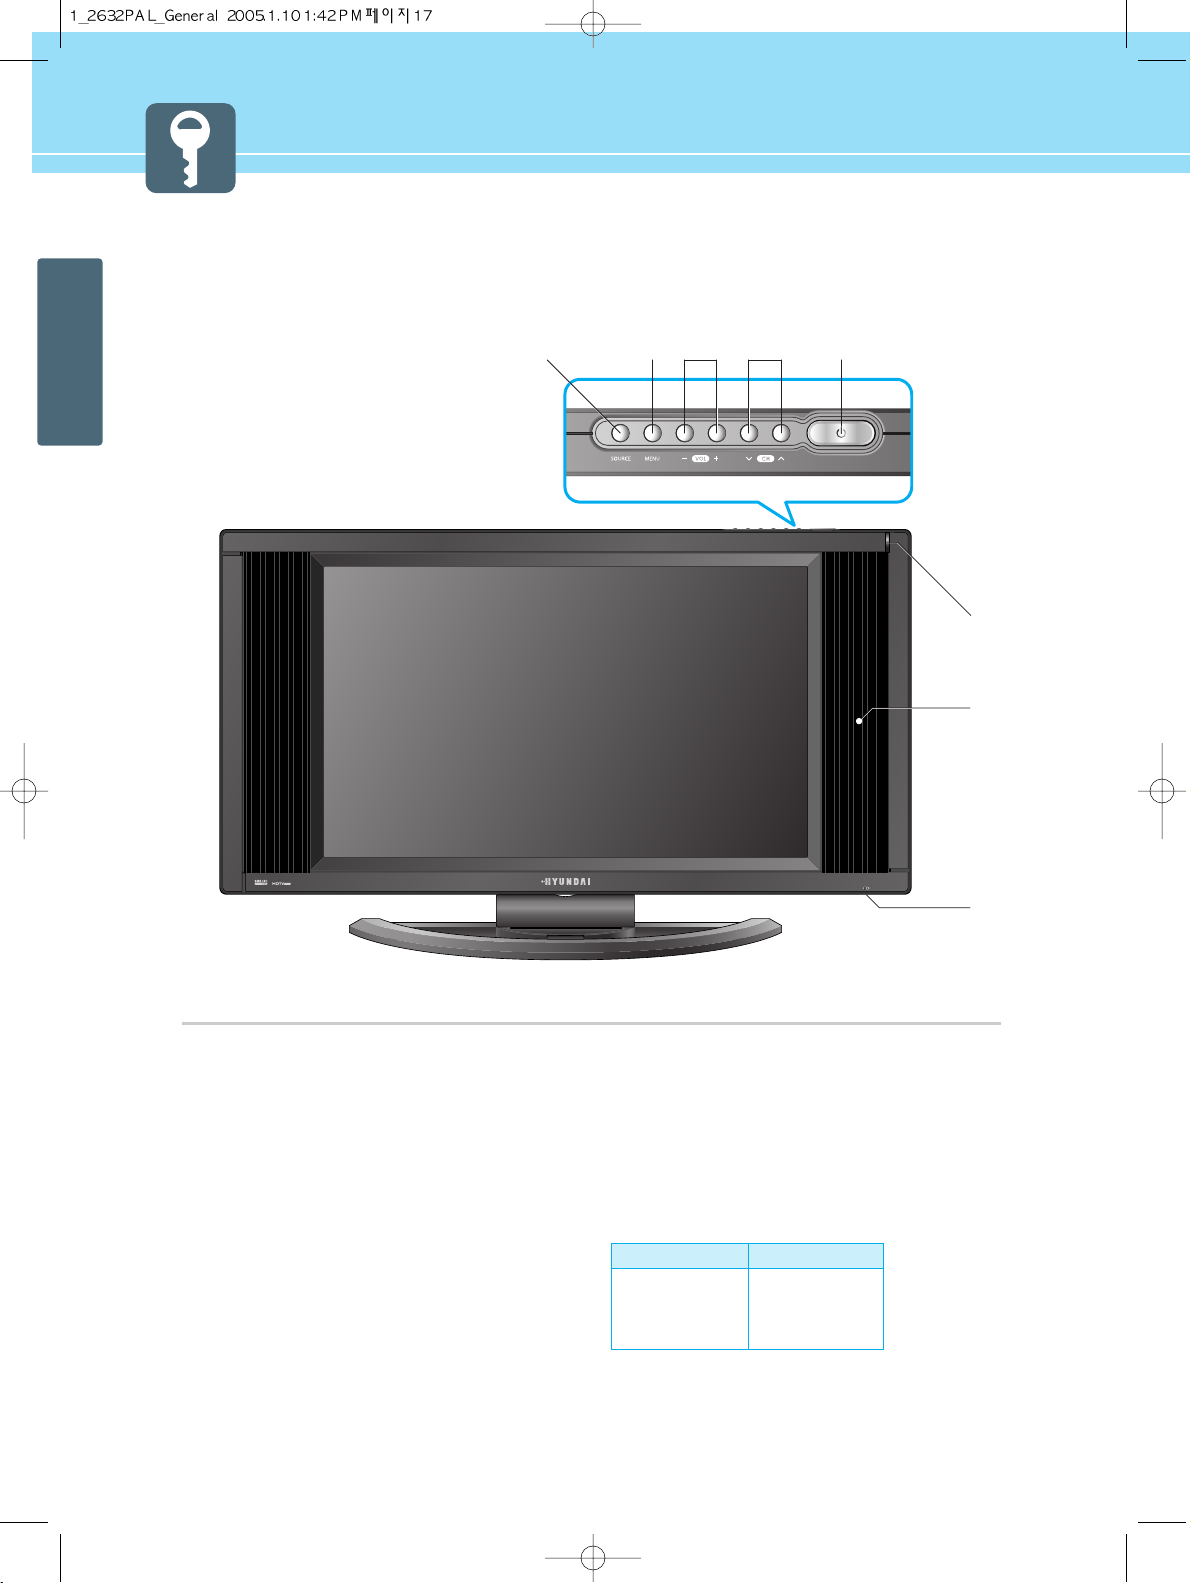
17
GENERAL INFORMATION
- Power Indicator Staus -
Parts Names and Functions
Front View
ɱ Source button
Use this button to switch among inputs
connected to the LCD TV.
ɲ Menu button
Use this button to display or exit from menus.
ɳ Volume buttons
Use these buttons for your desired sound
level. These buttons also serve as the cursor
of Select/Adjust when in Menu mode.
ɴ Channel buttons
Use these buttons to change channels. These
buttons also serve as the cursor of Down and
Up buttons when in Menu mode.
ɵ Standby/On button
Use this button to turn on or off the LCD TV.
ɶ Remote sensor and power LED.
- Point the remote control toward here.
- It displays standby or operation status.
ɷ Speaker
ɸ Power Switch (For 32" TV only)
ɶ
ɷ
ɸ
ɲɱ
ɳɴ ɵ
Indicator
Red
Green
Green blinking
Status
Stand-by
Power on
Remote control
* The above image may look different from the real product.
Page 21
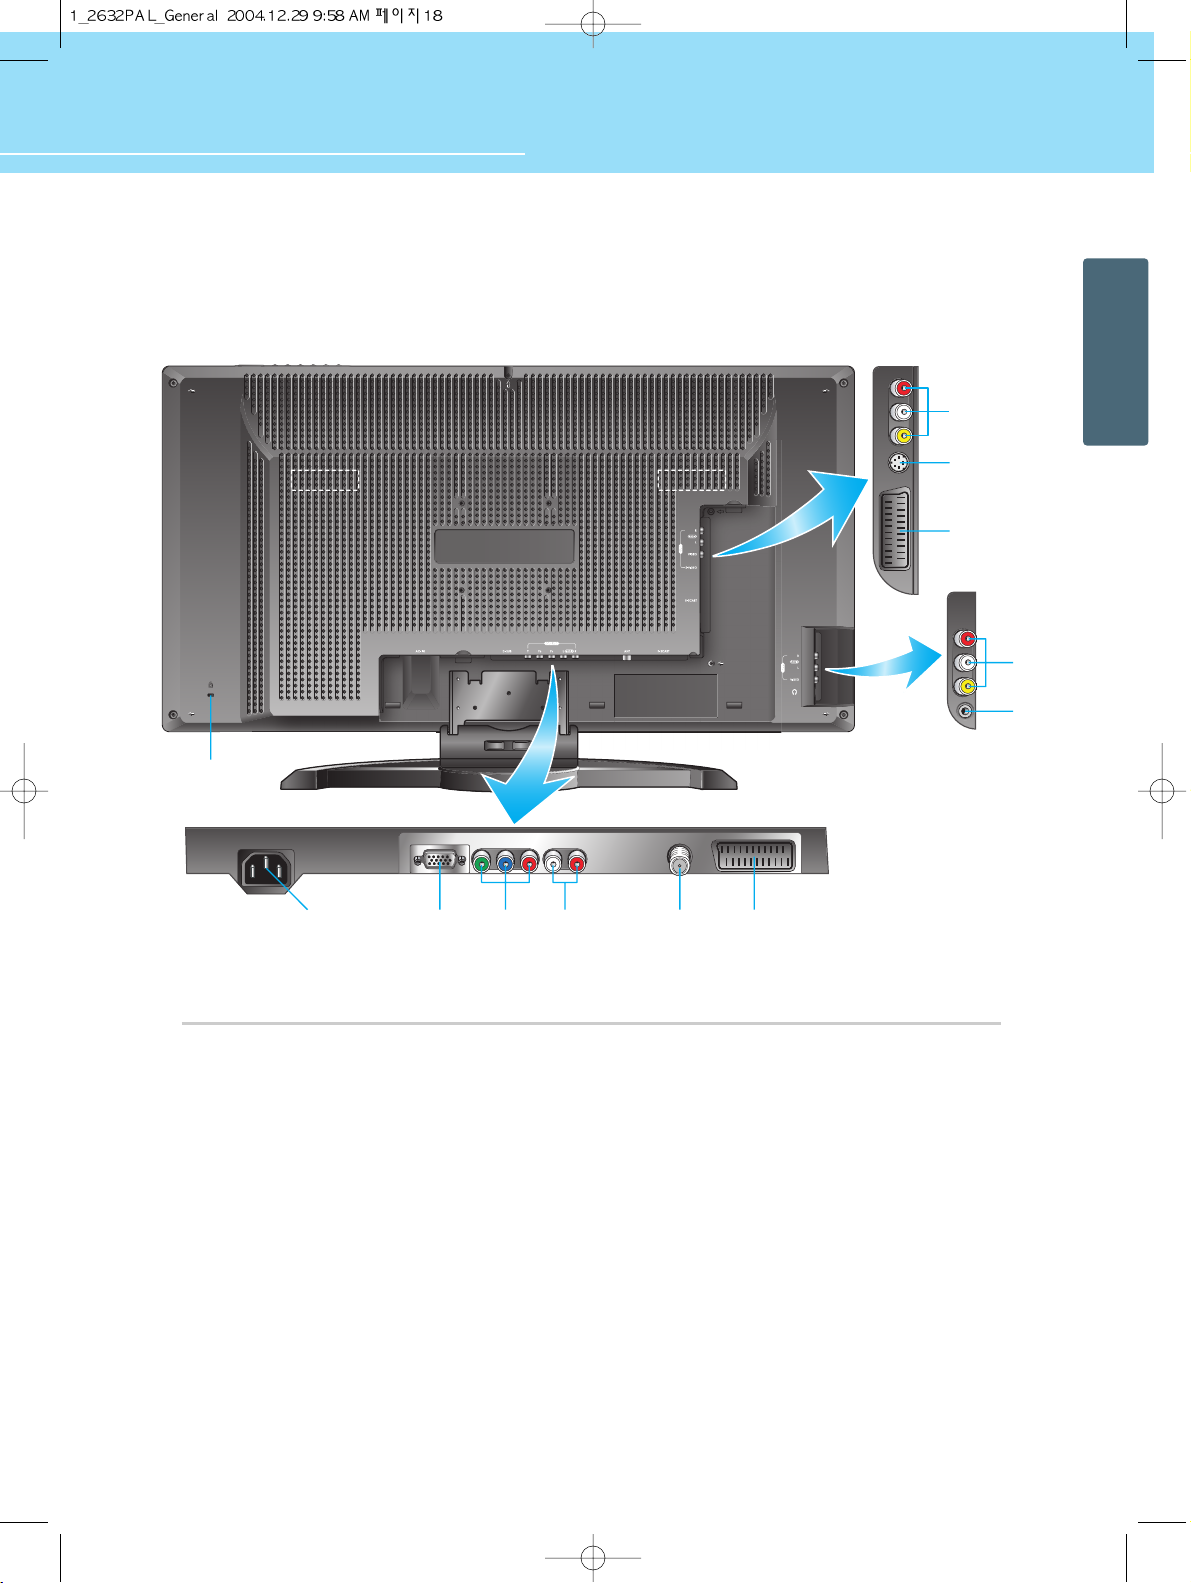
HYUNDAI LCD TV HQL260WR/320WR
GENERAL INFORMATION
18
Rear View
Power input terminal
Power cord is connected here.
D-SUB input terminal
Connect to the DTV Receiver with D-Sub terminal
or to RGB output terminal of a PC.
Component input terminal for DVD or DTV
Connect to the Component output terminal of DVD
player/DTV receiver.
Audio input terminal for PC, DVD or DTV
Connect to the audio output terminal of PC/DVD
player/DTV receiver.
ANT. input
This allows you to connect your antenna.
F SCART input terminal
For Composite Video/Audio or R,G,B inputs used
in the European area.
Headphone Jack
Connect to the Headphone.
Video Composite input terminal for VCR
Connect to the Composite Video output terminal
of VCR or DVD player.
H SCART input terminal
For Composite Video input and audio inputs used
in the European area.
S-Video input terminal
Use this for the better video quality than Composite
Video input terminal.
Kensington security slot
This display unit supports a Kensington-type
security device to secure your LCD TV. Kensington
lock is not included.
Handgrip for carrying(For 32" TV only)
* The above image may look different from the real product.
Page 22
GENERAL INFORMATION
19
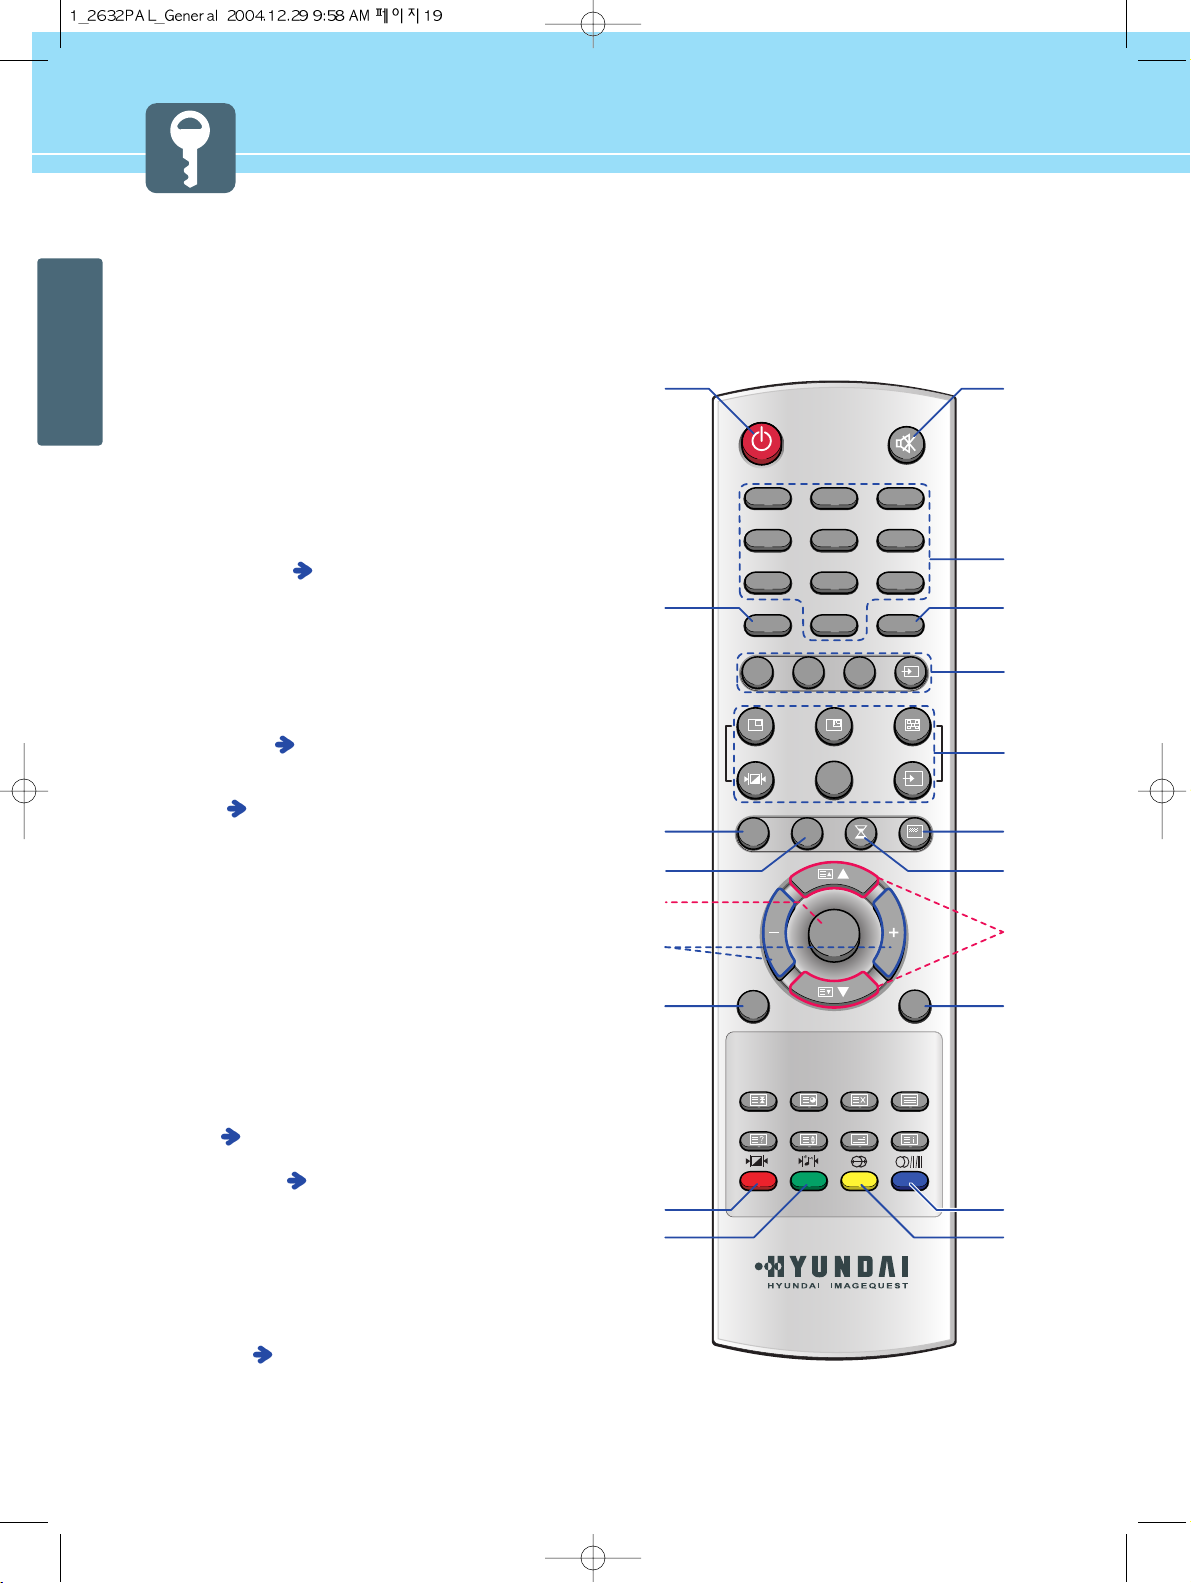
Remote Control
❶ POWER/STANDBY
Use this button to turn the TV set on or off.
❷ MUTE
Use this button to turn the sound off completely.
❸ NUMERIC KEYS
- Use these buttons to select channels and input digit.
❹ Pr/C/S(Program/Brodcast Channel/Cable Channel)
Use this button to select TV input source.
❺ EXTERNAL SOURCE INPUT SELECTION
Use this button to display the available video sources.
(TV, Video1·2, S-Video, DTV/DVD, PC, H Scart, F Scart)
❻ PIP FUNCTIONS (
P. 37)
- PIP : Use this button for PIP On/Off.
- SIZE : Use this button to select Size.
- POSITION : Use this button to select Position.
- P.MODE : Use this button to select Picture Mode.
- SWAP : Use this button to swap between main picture
and sub-picture.
- INPUT : Use this button to select the Input Source.
❼ INFOMATION (
P. 67)
Use this button to display resolution or various program
information.
❽ SLEEP (
P. 75)
Use this button to allow your TV to turn off automatically at
designated time.
❾ CHANNEL SELECTION
- Use these buttons to select channels. You can also use
these buttons when changing pages in TTX mode.
- Use these buttons to move each item of menu you want
to choose.
- Use these buttons to jump back to TV mode from other
mode.
❿ OK
- Use this button to select each item of menu.
- Use this button to display clock.
PREVIEW
Use this button to return to the previous channel.
STILL (
P. 60)
Use this button to freeze a picture.
ASPECT RATIO (
P. 59)
Use this button to change the picture size.
MENU
Use this button to bring up the OSD on the screen and jump
back to the previous menu.
SELECT/ADJUST
- Use this button to select or adjust each item of menu.
- Use this button to quickly adjust volume.
FAVORITE (
P. 65)
Use this button to select the favorite channel.
1 2
0
3
4
7
5
8
6
9
MENU
MUTE
Pr/C/SPREVIEW
PC
PIP SIZE POSITION
SWAPP.MODE
STILL
HOLD
SUB PAGE
CANCEL
TTX ON/OFF
REVEAL
SIZE MIX INDEX
ASPECT SLEEP INFO
FAVORITE
CHANNEL
VOL
OK
INPUT
DTV VIDEO INPUT
POWER
❷
❸
❺
❹
❻
❼
❽
❾
❿
❶
Page 23
HYUNDAI LCD TV HQL260WR/320WR
20
GENERAL INFORMATION
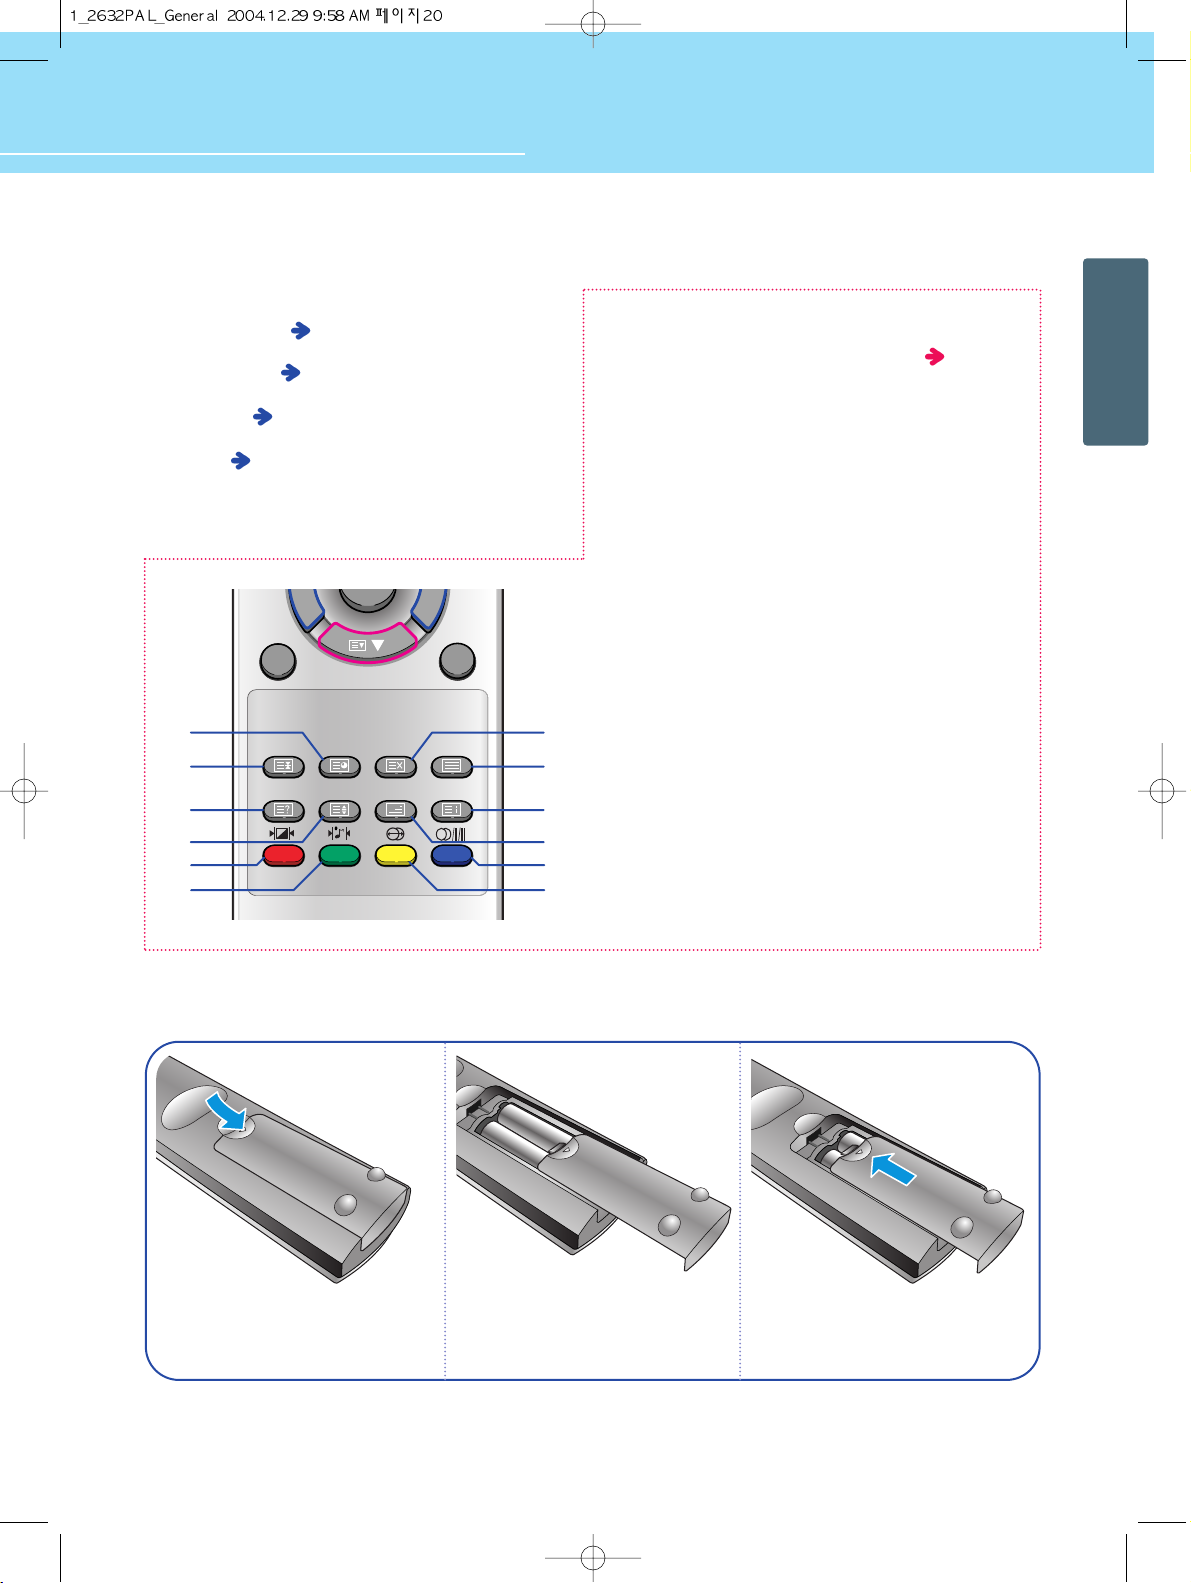
How to Insert Batteries in Remote Control
*Battery type : 1.5V/BP-2KM(AAA/LR03G)
Press and hold ∆ part and push to
open cover.
Insert batteries with proper
polarities of + and - .
Use the remote control with cover
closed.
PICTURE MODE ( P. 35)
Use this button to select Picture Mode.
SOUND MODE (
P. 43)
Use this button to select Sound Mode.
SRS WOW (
P. 46)
Use this button to select SRS WOW.
SOUND (
P. 47)
Use this button to display types of audio signals currently
aired on TV. Or you can use this button to switch to other
Sound Mode available.
Teletext & Fastext Function
( P. 55 ~ 57)
① TTX ON/OFF
Use this button to activate the teletext mode.
② INDEX
To move to INDEX in FLOF or move to INFO in TOP.
③ MIX
To select TTX or MIX mode.
④ BLUE
To move between BLOCK and BLOCK.
⑤ YELLOW
To move to NEXT GROUP PAGE.
⑥ GREEN
To move to NEXT EXISTING PAGE.
⑦ RED
To return to the previous selection
⑧ SIZE
The size is changed from Normal, Double to Double
Bottom mode in order.
⑨ REVEAL
To reveal the hidden TTX information.
⑩ HOLD
To freeze the TV screen when in Multi Page.
⑪ SUB PAGE
To move to Sub Page.
⑫ CANCEL
To return to normal viewing
⑦
⑥
⑧
⑨
⑩
⑪
HOLD
SUB PAGE
CANCEL
TTX ON/OFF
REVEAL
SIZE MIX INDEX
FAVORITE
OK
CHANNEL
①
⑫
②
③
④
⑤
123
Page 24
21
GENERAL INFORMATION
Page 25
Connecting Indoor/Outdoor TV Antenna (UHF/VHF) .................... 23
Connecting to the antenna input connection
on the external equipment ......................................................... 24
Before connecting the video/audio connections to
external devices ......................................................................... 25
Connecting VCR, Cable/Satellite Receiver .................................. 26
Connecting a DTV Receiver or DVD player ................................. 27
Playing back a tape recorded on a camcorder .......................... 28
Connecting to a PC ..................................................................... 29
Resolution Supported in PC ........................................................ 30
Scart Connection to the External Input/Output .......................... 31
Scart Pin Specifications ............................................................. 32
Connections
HYUNDAI WIDE LCD TV
Page 26
23
CONNECTIONS
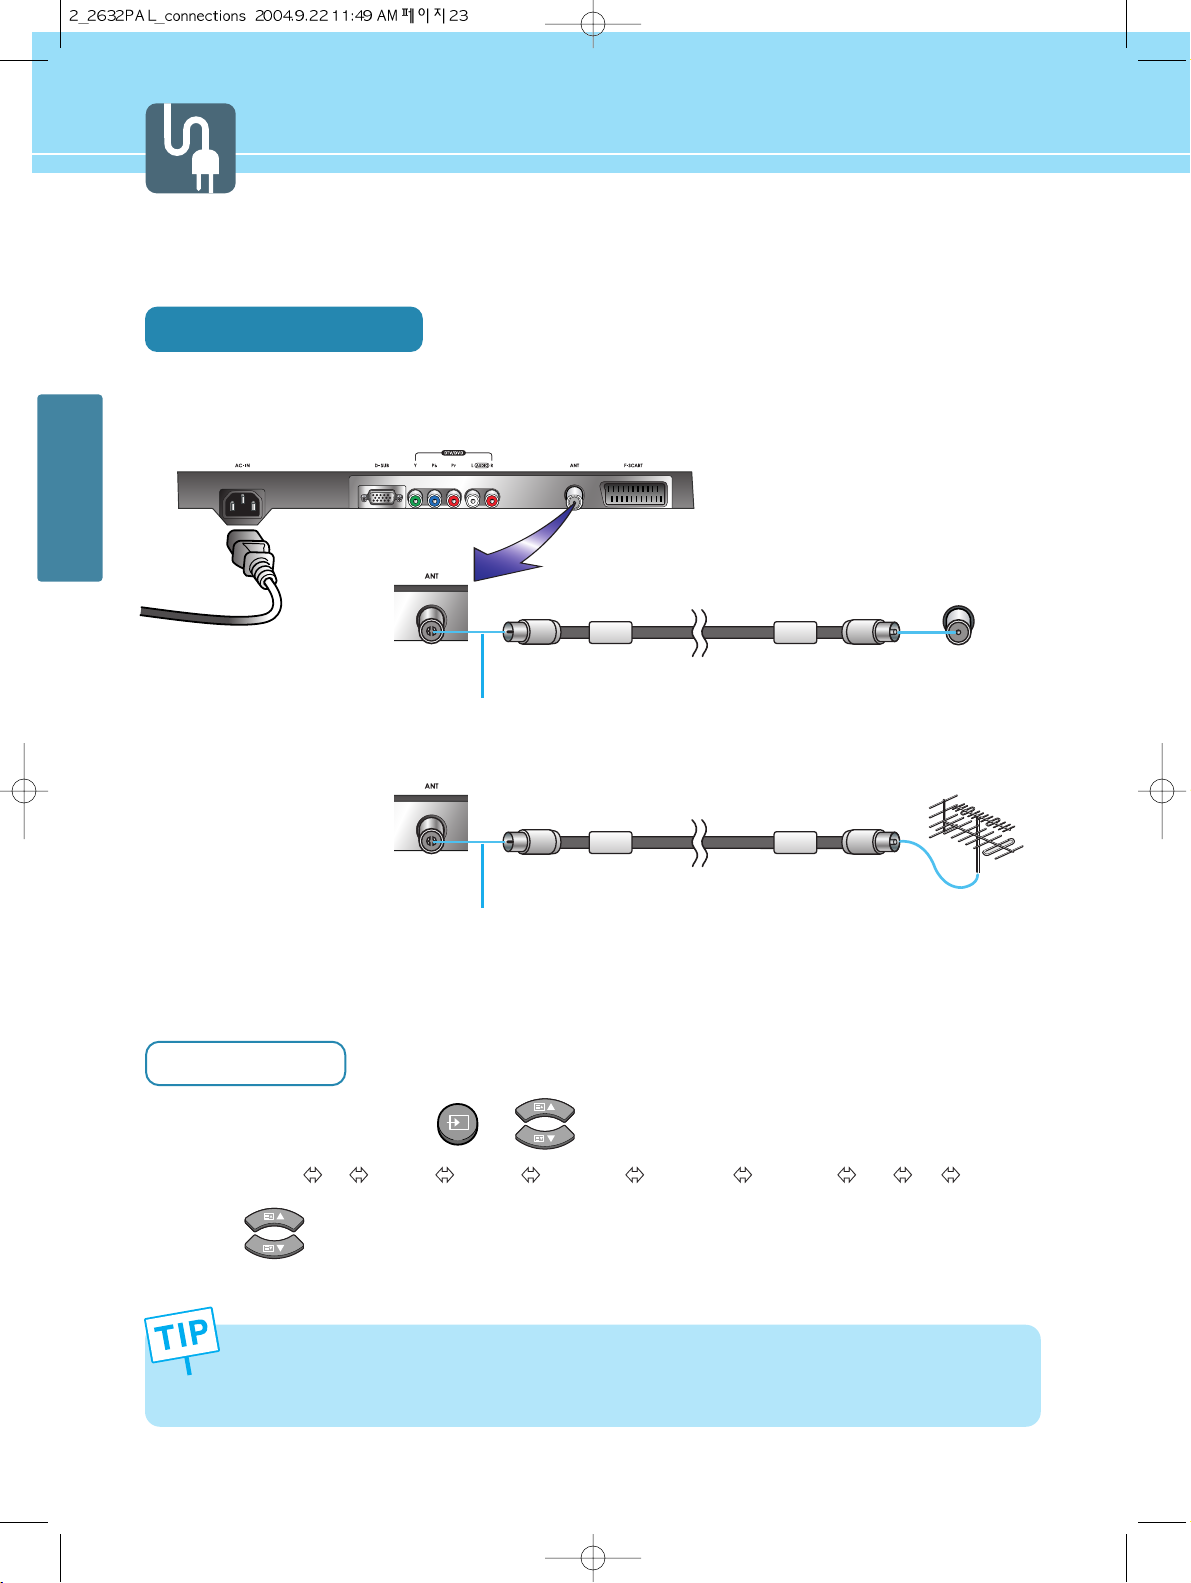
Connecting Indoor/Outdoor TV Antenna(UHF/VHF)
Connection Method
Ensure to connect an antenna cable to the antenna input connection.
How to Watch
Turn on your LCD TV and press or on remote control unit to select TV.
You can select TV SCART1 SCART2 AV1 VIDEO AV1 S-VHS AV2 VIDEO DTV PC in order.
Press or numeric keys to select the desired channels.
1
2
• When inserting a 75-ohm coaxial cable into the input connection, ensure the wire tip not to bend.
• If you experience poor signal reception, we recommend you purchase a signal amplifier for better picture
quality.
INPUT
outdoor antenna
indoor antenna
Antenna cable
Antenna cable
Coaxial cable
Coaxial cable
Power Cable
Page 27
HYUNDAI LCD TV HQL260WR/320WR
24
CONNECTIONS
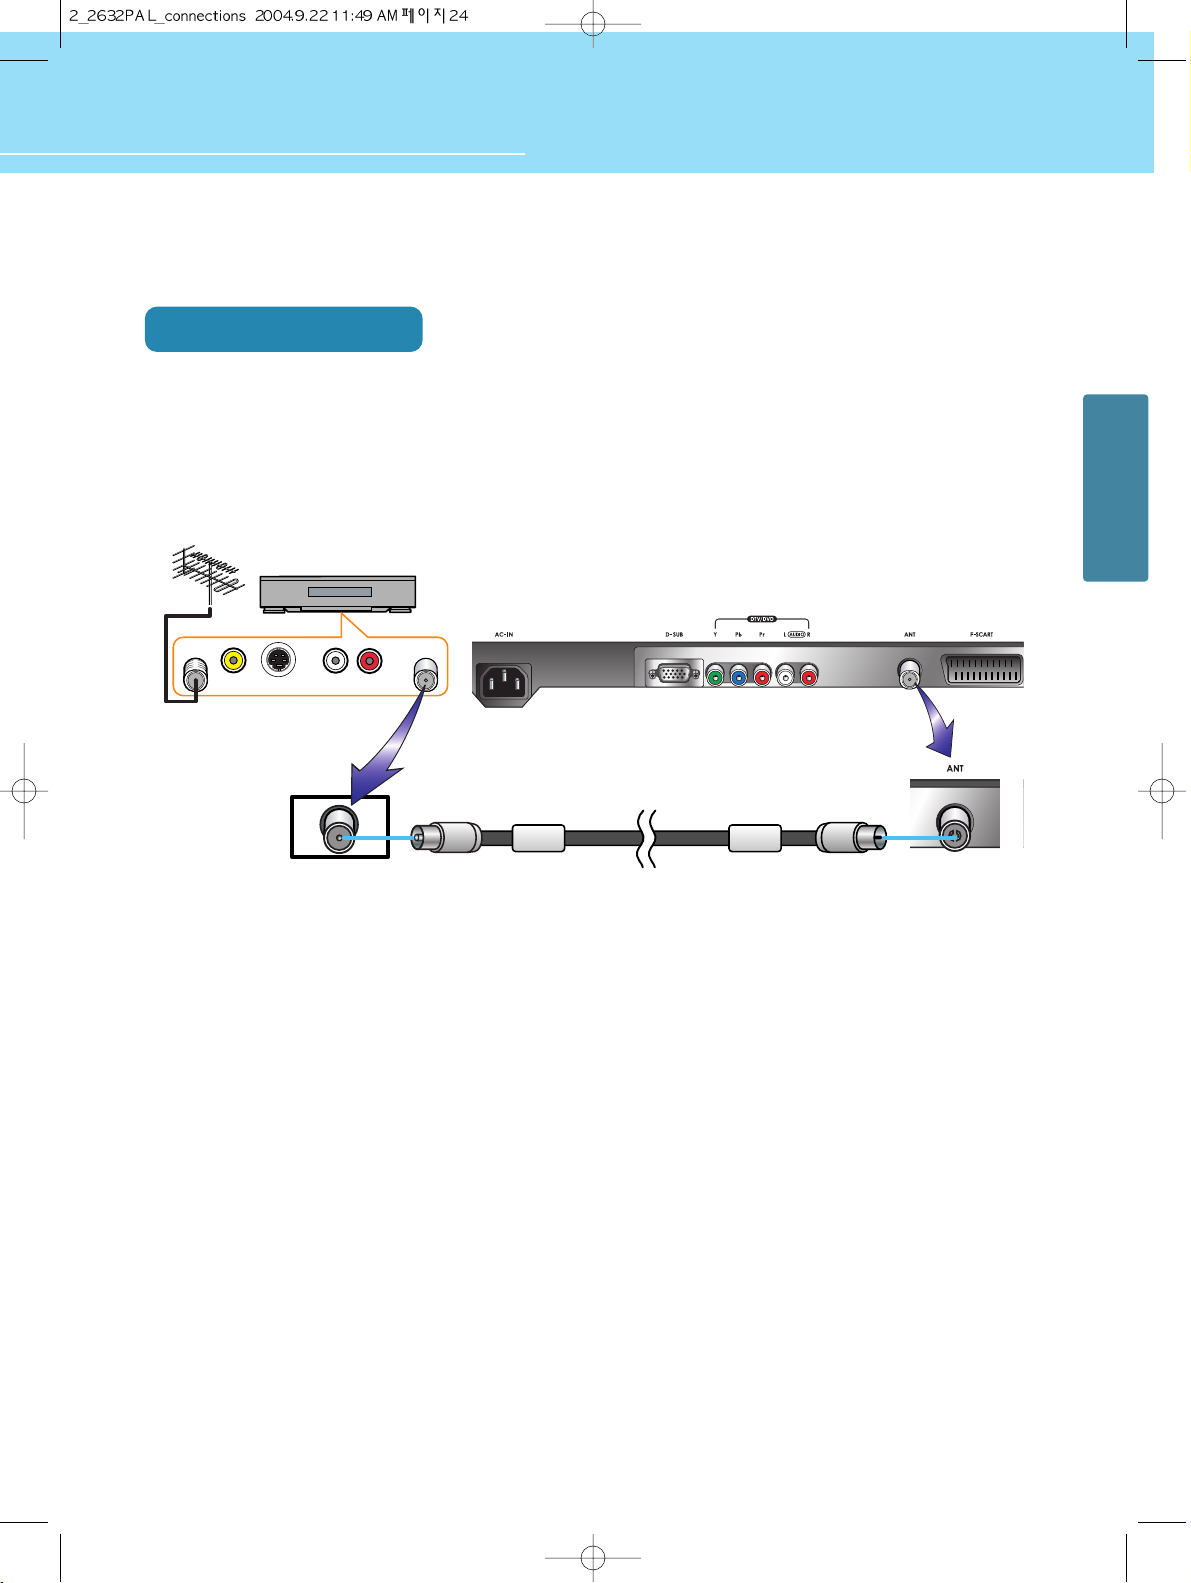
Connecting to the Antenna Input Connection on the External Equipment
Connection Method
Connect an antenna cable to VCR/Cable/Satellite Receiver with the antenna input.
Use a coaxial cable to connect VCR/Cable/Satellite Receiver's antenna output to the antenna input on your
LCD TV.
1
2
)=,17
;>1,-7
>1,-7
:4
)6<7=<
)6<16
Coaxial cable
VCR/Cable Receiver
Page 28
CONNECTIONS
25
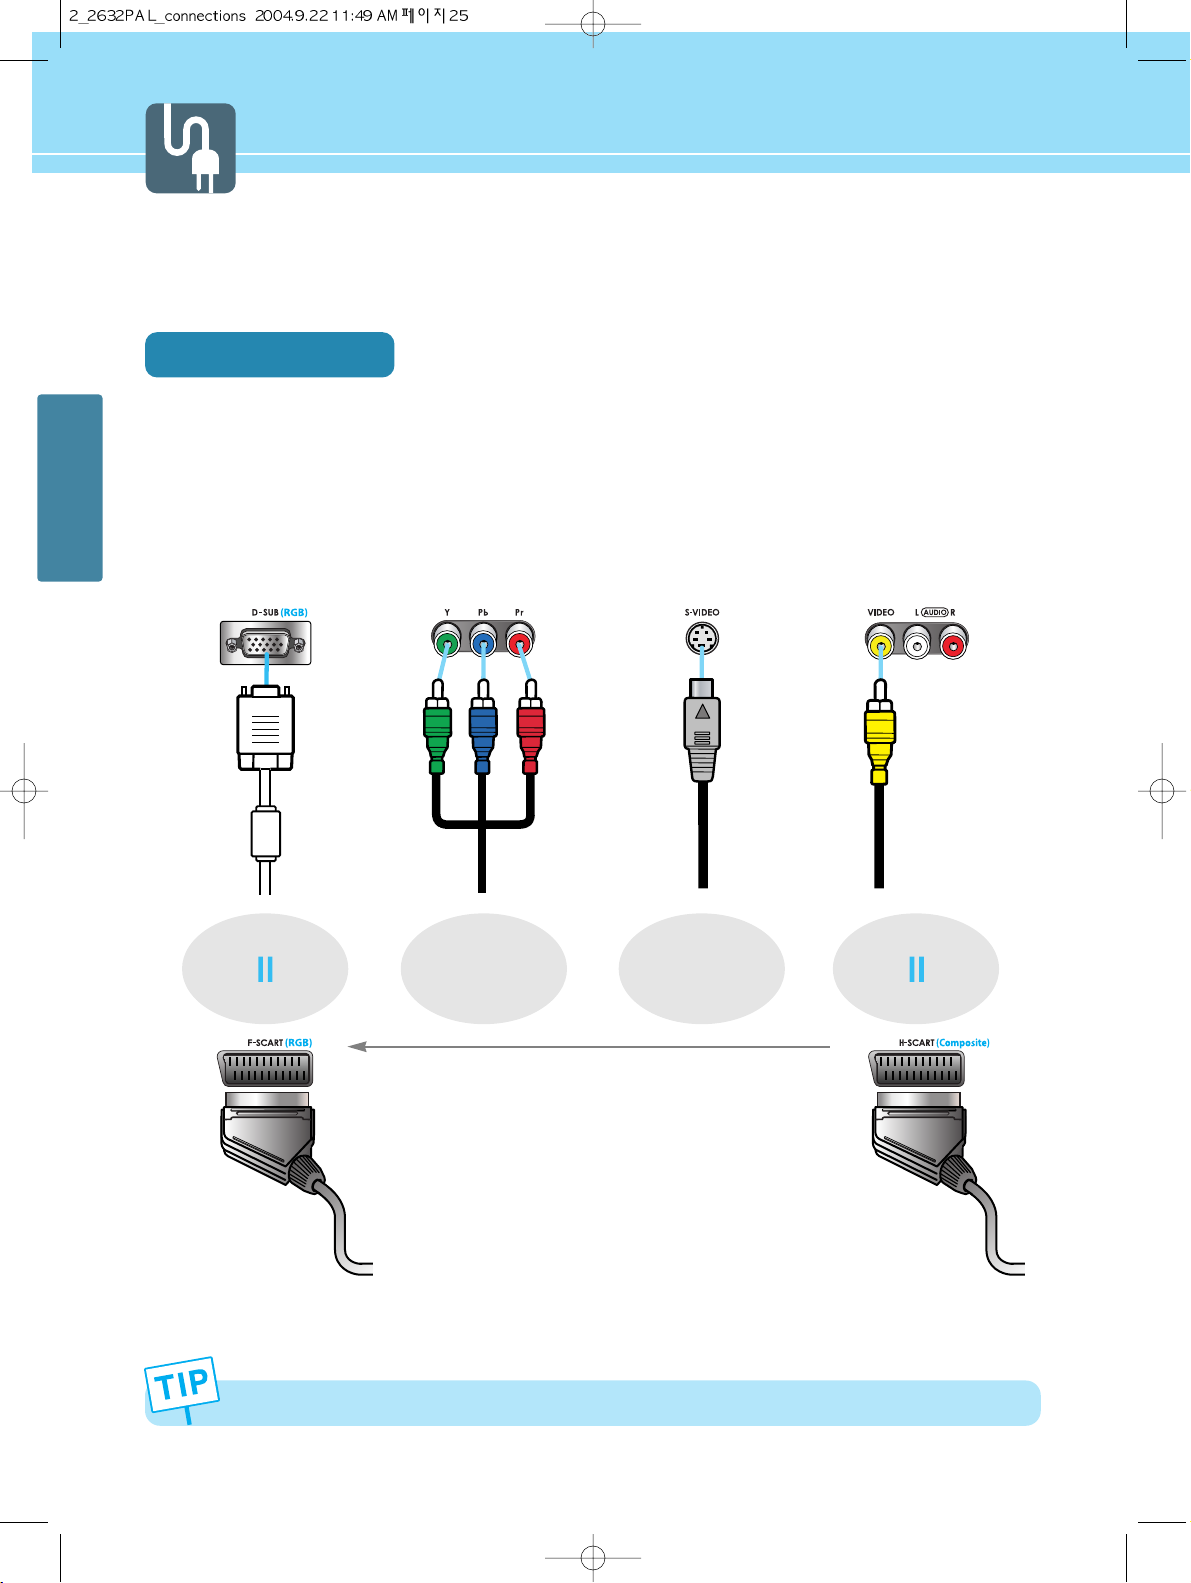
Before connecting the video connections to external devices .....
Please make sure to read the following information on connection to enjoy best picture quality.
Video connectors
Types of video cable :
➀ 15-Pin D-SUB ➁ COMPONENT ➂ S-VIDEO ➃ COMPOSITE ➄ FULL SCART ➅ HALF SCART
Best picture quality is displayed in the following order.
Full Scart supports Composite simultaneously
15 Pin-D-Sub
COMPONENT
FULL SCART
>>>
S-VIDEO
COMPOSITE
HALF SCART
The superior picture quality starts from the far left side.
Page 29
HYUNDAI LCD TV HQL260WR/320WR
CONNECTIONS
26
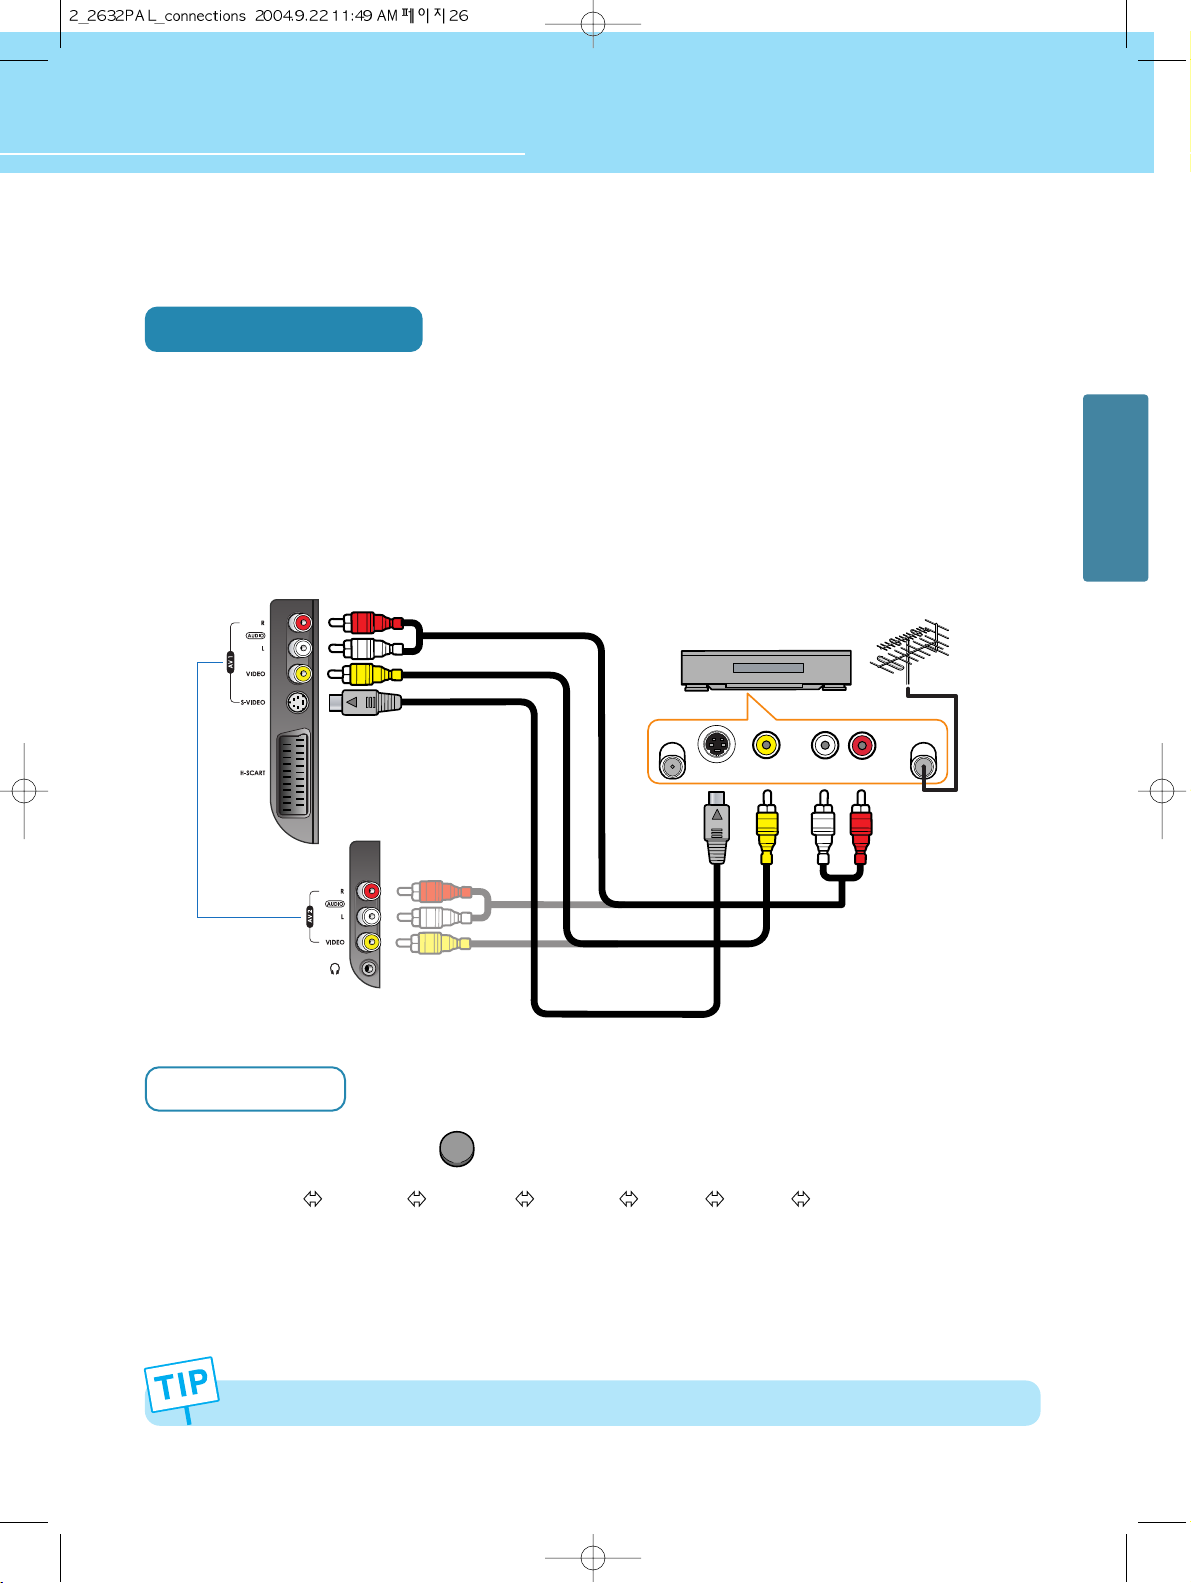
Connecting a VCR, Cable/Satellite Receiver
Connection Method
Connect Video/S-Video cable between Video/S-Video output terminal of VCR or Cable/Satellite receiver and
Video/S-Video input terminal of LCD TV.
(Connect cables and terminal in the same colors)
Connect Audio cable (left:white color, right:red color) between Audio output terminal of VCR or cable/satellite
receiver and Audio input terminal of LCD TV.
(Connect cables and terminal in the same colors)
How to Watch
Turn on your LCD TV and press on remote control unit to select Video or S-Video.
You can select AV2 VIDEO AV1 S-VHS AV1 VIDEO SCART2 SCART1 TV in order.
VCR play : Turn on the VCR and insert a tape and play it.
Cable/Satellite receiver play : Turn on the receiver and select a channel.
Read a user manual of VCR, Cable/Satellite Receiver for more details.
1
2
1
2
Use S-video cables for better picture quality.
VIDEO
)=,17>1,-7
;>1,-7
:4
)6<16
)6<7=<
OR
Audio Cable
VIDEO Cable or
S-VIDEO Cable
VCR/Cable Receiver
Page 30
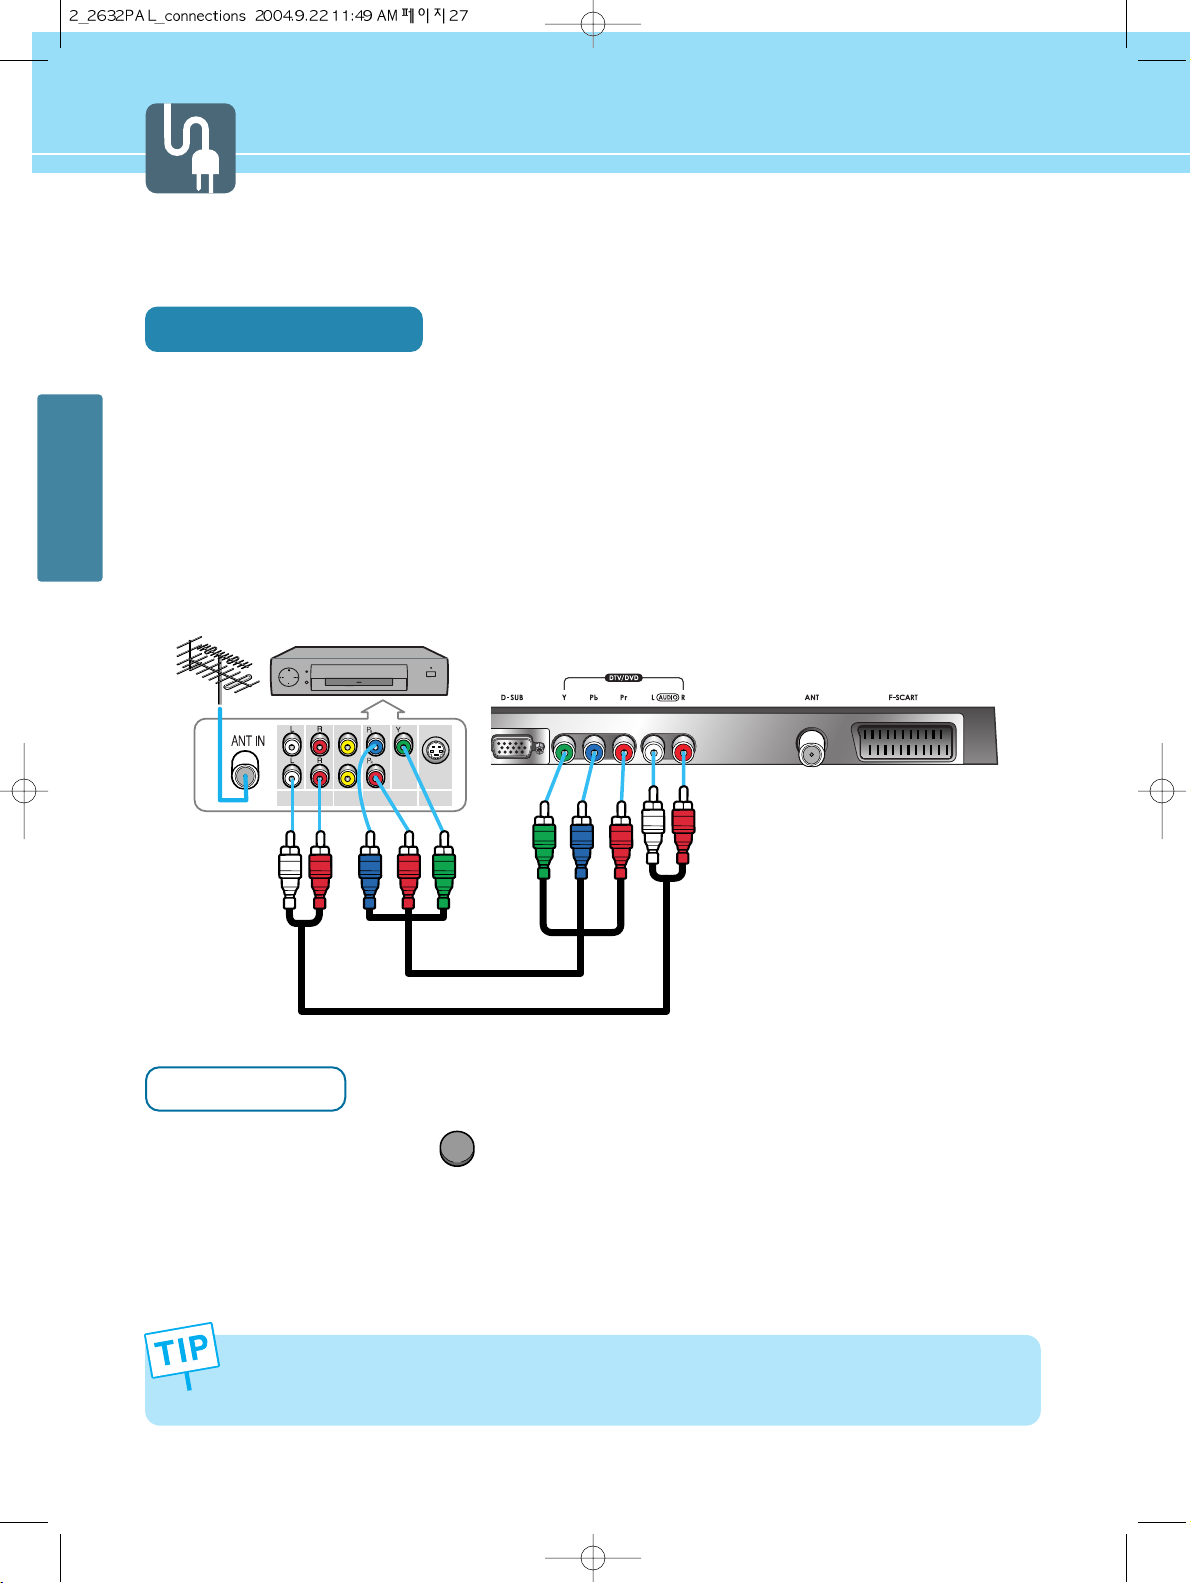
27
CONNECTIONS
)=,17
>1,-7 ;>1,-7
+75876-6<>1,-7
Connecting a DTV Receiver or DVD Player
Connection Method
Connect video cables(Y, Pb, Pr) between output terminals(Y, Pb, Pr) of DTV receiver or DVD player and the
input terminals(Y, Pb, Pr) of DTV/DVD(480i/480p/720p/1080i) on the rear of LCD TV.
(Connect cables and terminal in the same colors)
Connect Audio cable between Audio output terminal of DTV receiver or DVD player and Audio input terminal
for DTV/DVD Audio on the rear of LCD TV.
(Connect cables and terminal in the same colors)
How to Watch
Turn on your LCD TV and press on remote control unit to select DTV or DVD.
Turn on a DVD player and use it.
Read the user manual of DTV receiver or DVD player for more details.
1
- Output terminal mark(Y, Pb, and Pr) of DVD player may be written as Y, B-Y, R-Y/Y-Cb-Cr / Y-Pb-Pr. (It depends
on DVD player)
- To watch digital broadcast, you have to separately purchase a digital set-top box and connect it to LCD TV.
2
DTV
1
2
DTV receiver
/DVD Player
Audio Cable
VIDEO(Y, Pb, Pr) Cable
Page 31
HYUNDAI LCD TV HQL260WR/320WR
CONNECTIONS
28
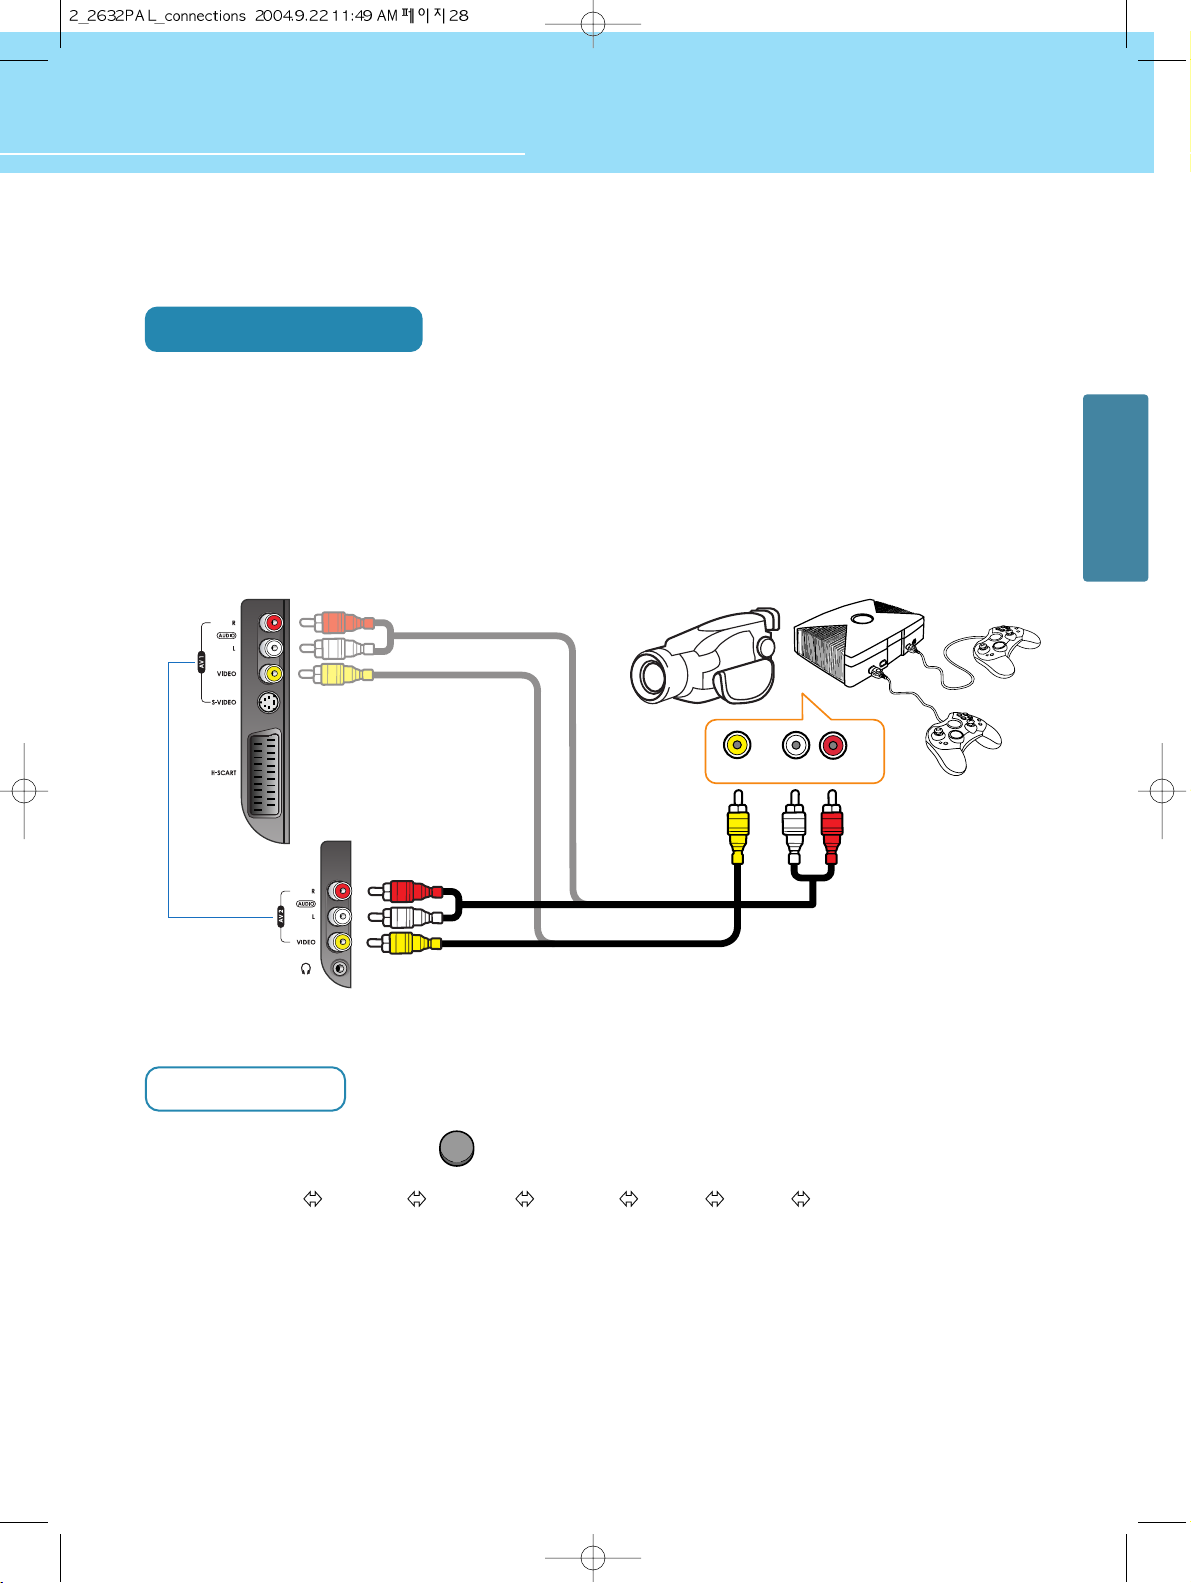
Playing Back a Tape Recorded On a Camcorder
Connection Method
Connect Video cable between Video output terminal of Camcoder/Game player and Video input terminal of
LCD TV.
(Connect cables and terminal in the same colors)
Connect Audio cable (left:white color, right:red color) between Audio output terminal of Camcoder/Game
player and Audio input terminal of LCD TV.
(Connect cables and terminal in the same colors)
How to Watch
Turn on your LCD TV and press on remote control unit to select Video.
You can select AV2 VIDEO AV1 S-VHS AV1 VIDEO SCART2 SCART1 TV in order.
Turn on a Game player or Camcorder and use it.
Read the user manual of Game player or Camcorder for more details.
)=,17>1,-7
:4
Game PlayerCamcorder
1
2
1
2
VIDEO
Audio Cable
VIDEO Cable
OR
Page 32
CONNECTIONS
29
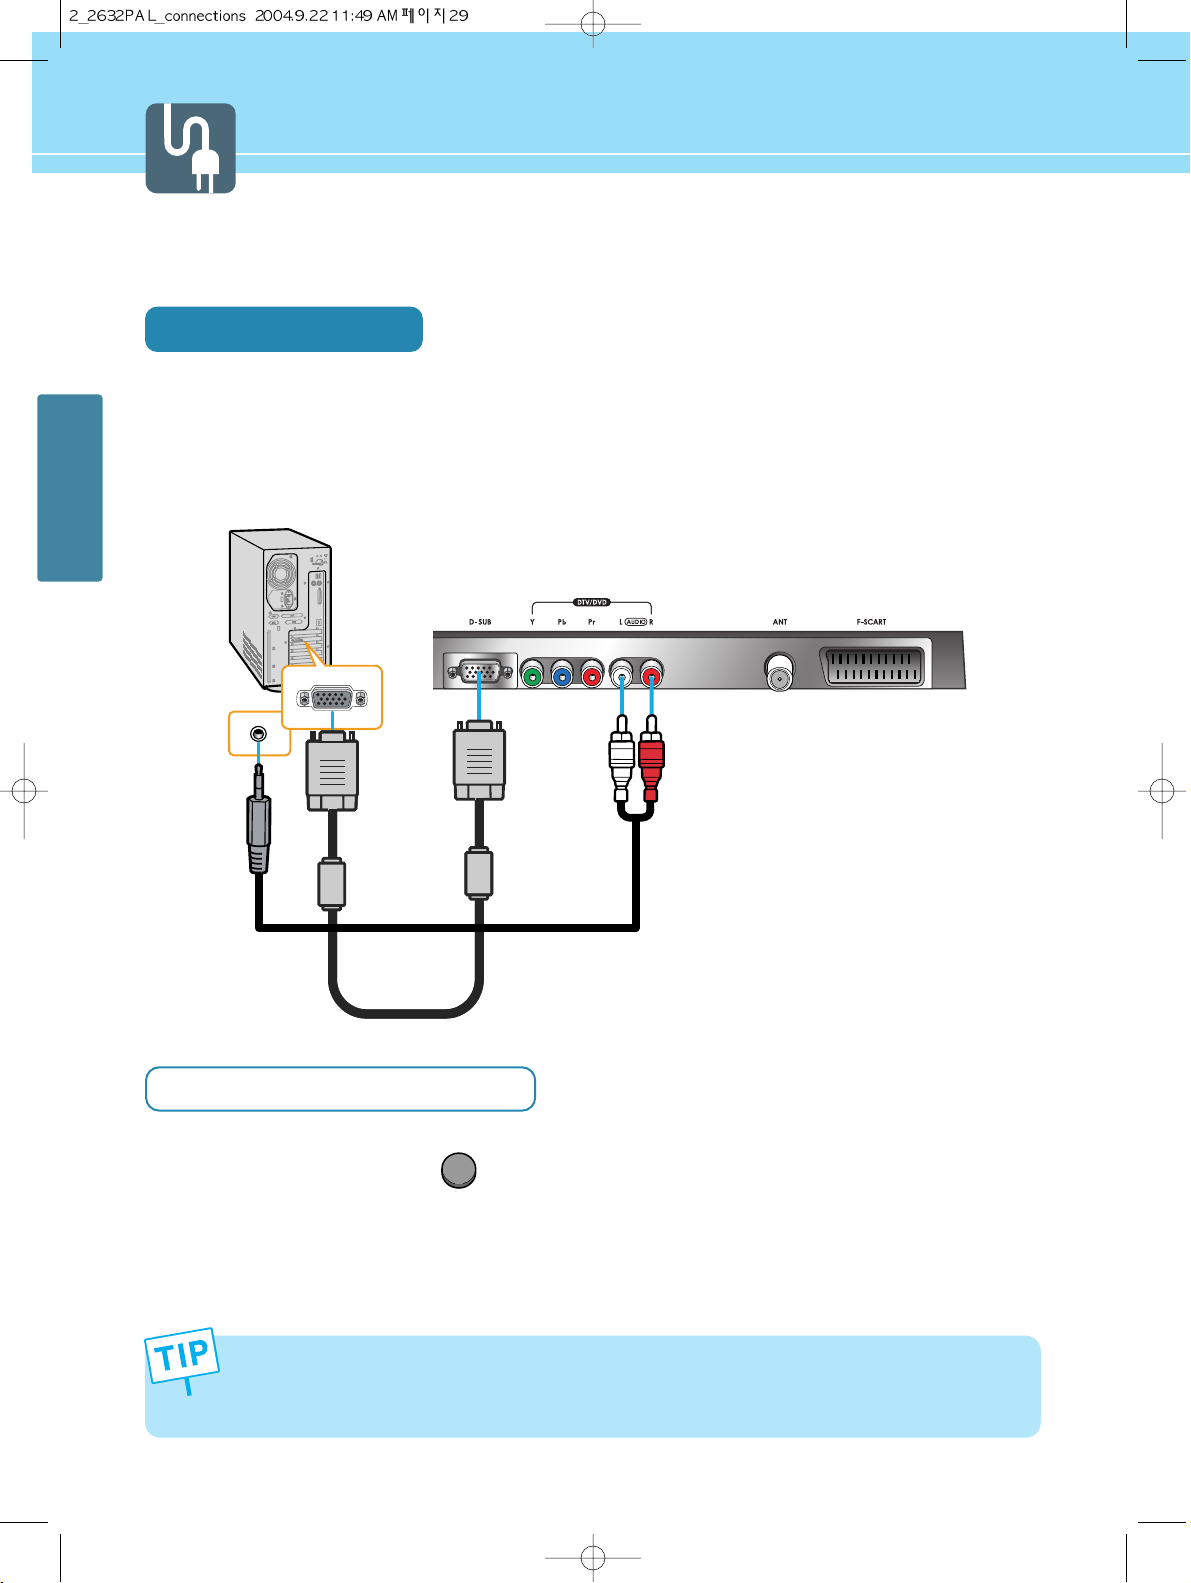
Connecting to a PC
Connection Method
Connect PC signal cable(15 pins D-SUB) between output terminal of PC and the D-SUB input terminal of
a LCD TV.
Connect Audio cable between Audio output terminal of PC and Audio input terminal for PC of LCD TV.
(Connect cables and terminal in the same colors)
When Using as a PC Monitor
Turn on your LCD TV and press on remote control unit to select PC.
Turn on the PC and use it. (Refer to next page on the back for the supported resolutions for PC)
- This product supports plug-and-play function.
- We recommend the above method if the satellite receiver supports DTV signal with D-SUB(15 pin) cable for the
better quality picture.
- The audio port of the PC and the DTV/DVD uses with commonness.
1
2
1
2
PC
Audio Cable
D-SUB Cable
(15pin)
Page 33
HYUNDAI LCD TV HQL260WR/320WR
CONNECTIONS
30
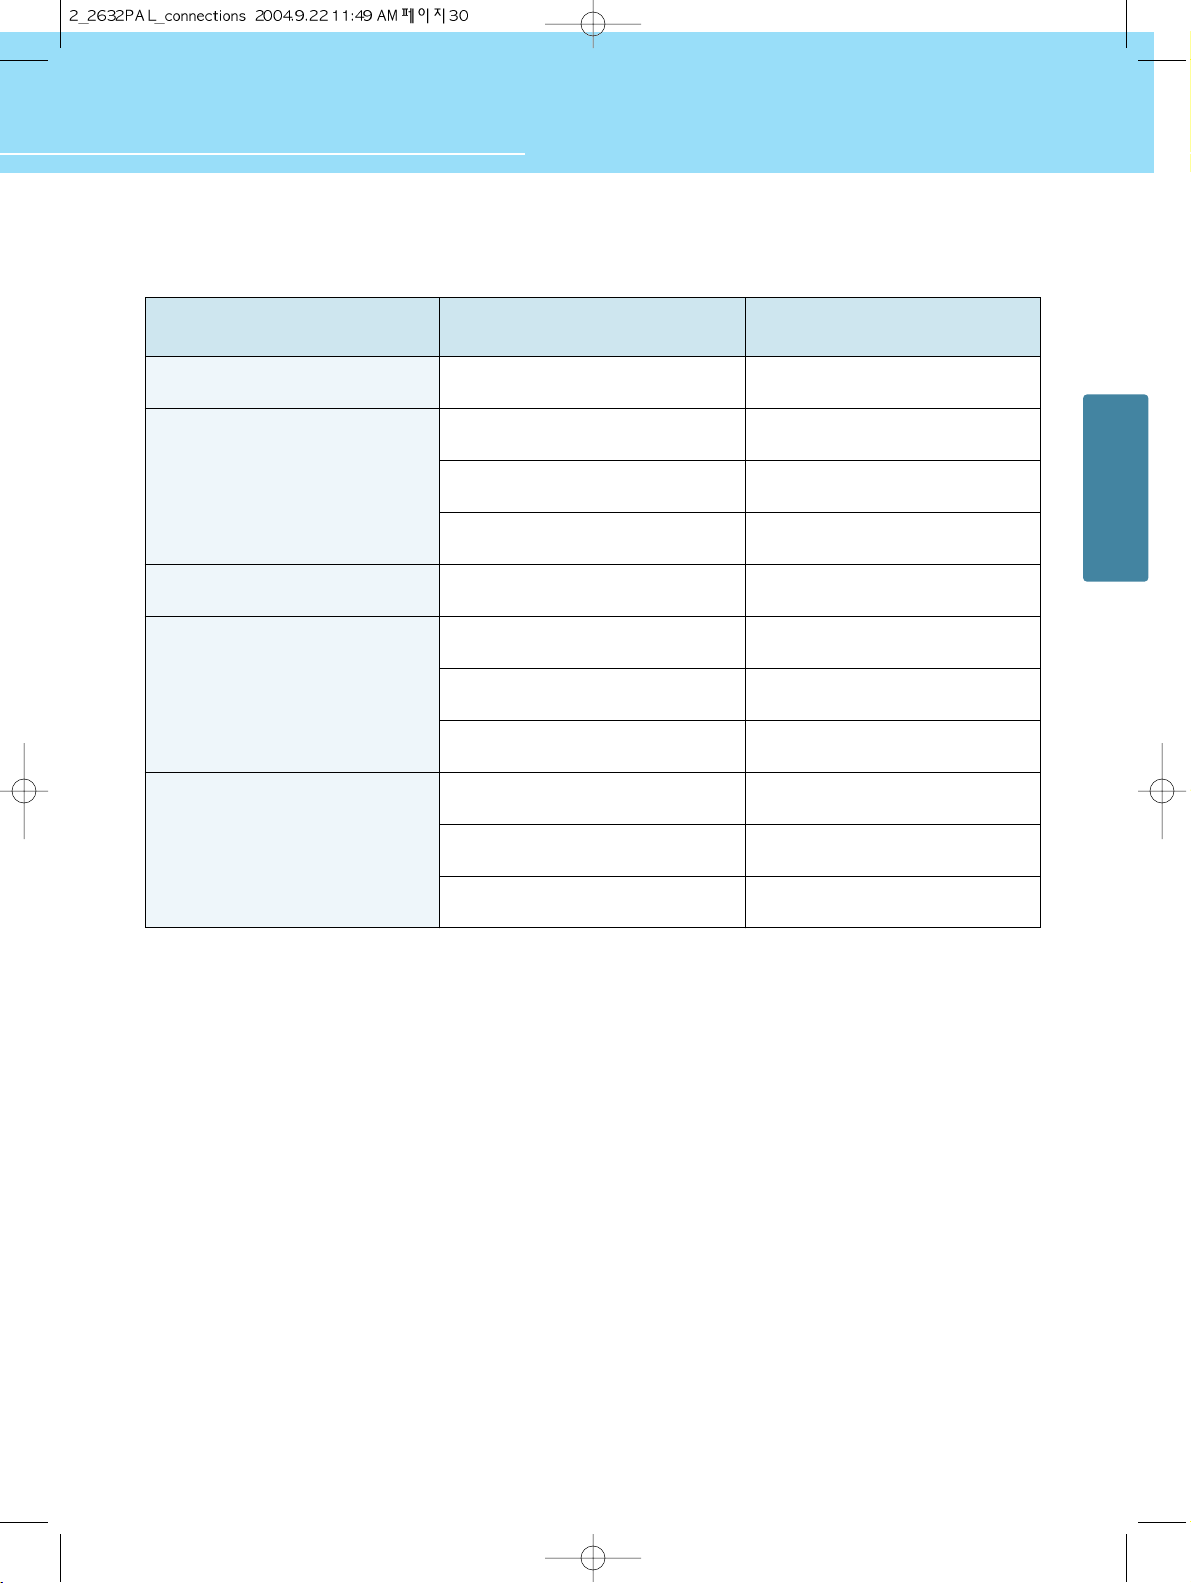
Resolutions Supported in PC
* Recommended Resolution is 1024x768@60Hz
* Max Resolution is 1024x768@75Hz
Resolution
31.47
31.47
37.86
37.50
31.47
37.88
48.08
46.88
48.36
56.48
60.02
Vertical frequency
70.09
59.94
72.80
75.00
70.08
60.32
72.18
75.00
60.00
70.07
75.03
640 x 350
720 x 400
800 x 600
1024 x 768
640 x 480
Horizontal frequency
Page 34
31
CONNECTIONS
Video Game Device
Video Disc Player
Satellite Receiver
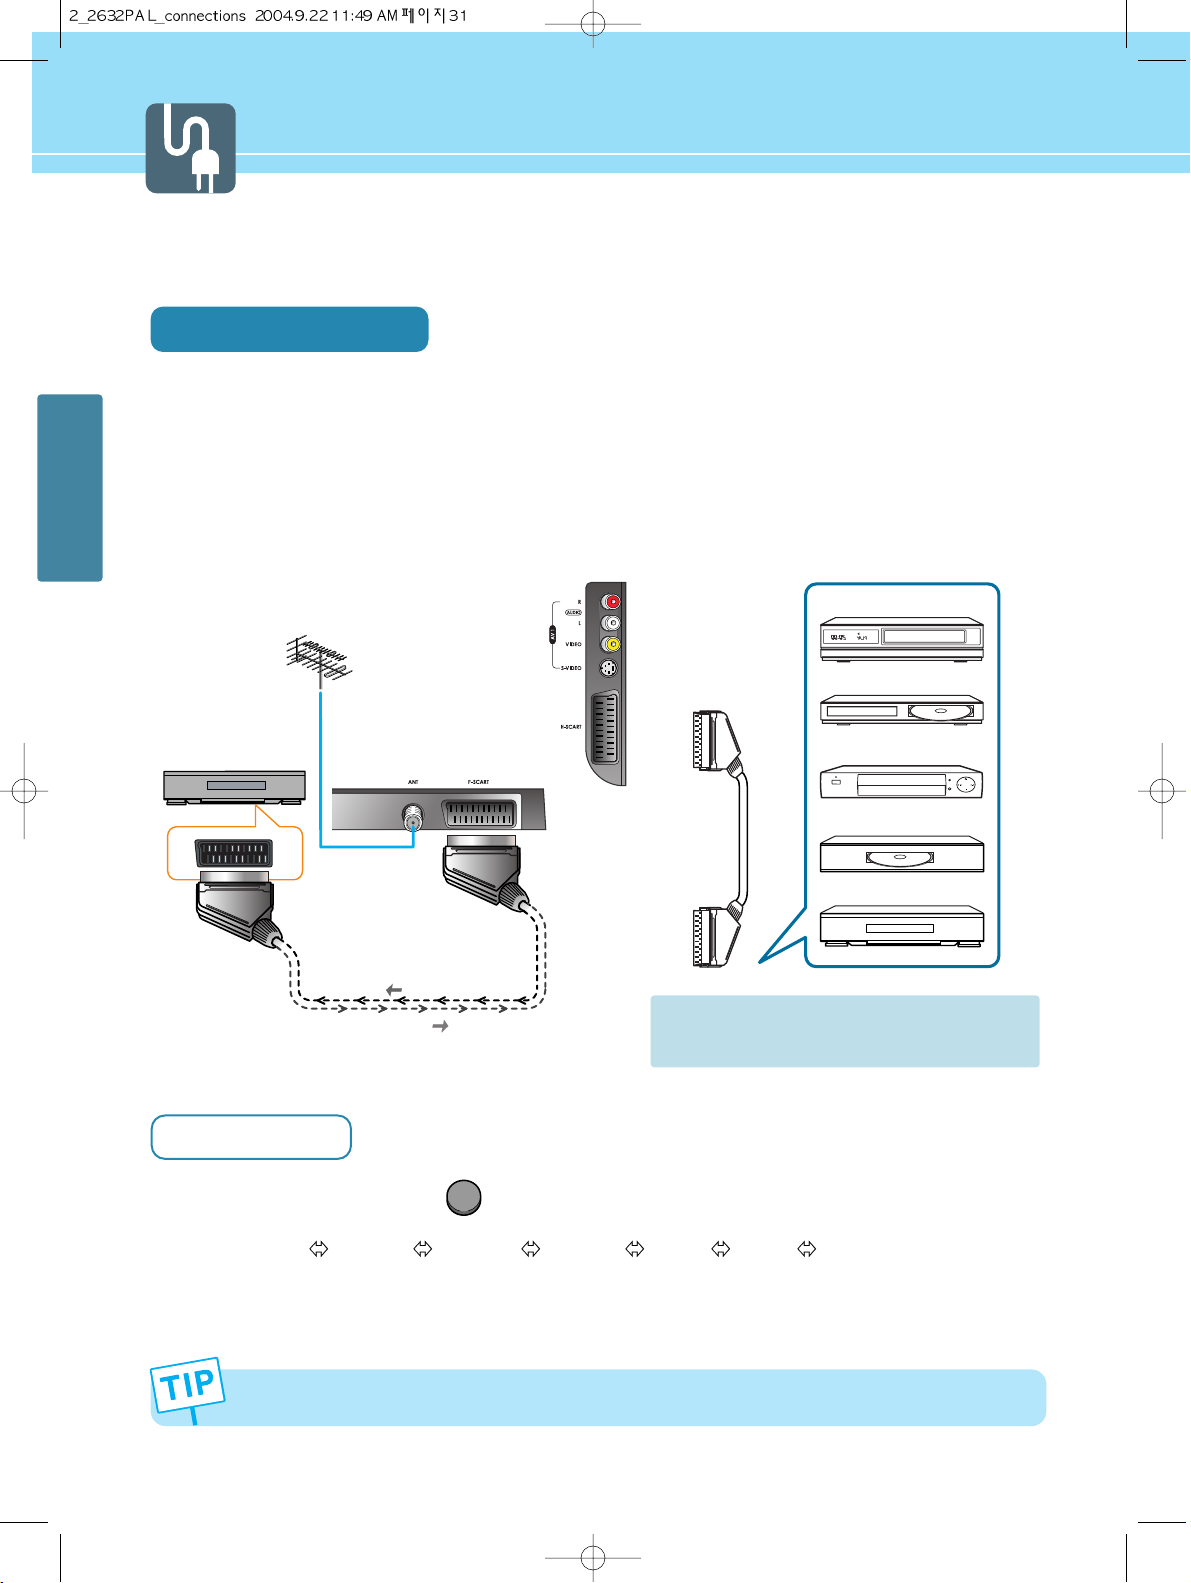
When switching voltage comes into the Scart-Pin 8 during viewing a TV program, the current mode will be
switched to Scart mode.
Scart Connection to the External Input/Output
Connection Method
This end can be fitted with : A Scart connector
If you have a second VCR and wish to copy a cassettes tape, connect the source VCR to “F Scart” and the
target VCR to “H Scart” so that you can redirect the signal from “F Scart” to “H Scart”.
“F Scart” sends the TV broadcast signal received through an antenna to a set-top box and it receives that
broadcast signal that the set top box has descrambled, which allows you to view the TV broadcast in AV
Mode.
How to Watch
Turn on your LCD TV and press on remote control unit.
You can select AV2 VIDEO AV1 S-VHS AV1 VIDEO SCART2 SCART1 TV in order.
Read a user manual of VCR, DVD, Satellite Receiver and other etc. for more details.
- F Scart Input : RGB, CVBS - F Scart Output : CVBS
- H Scart Input : CVBS - H Scart Output : CVBS
1
2
1
2
DVD
VCR
VIDEO
SET TOP BOX
VIDEO(CVBS) + Audio(L/R)
F SCART
TV OUT
TV IN
Page 35
32
CONNECTIONS
HYUNDAI LCD TV HQL260WR/320WR
Scart Pin Specifications
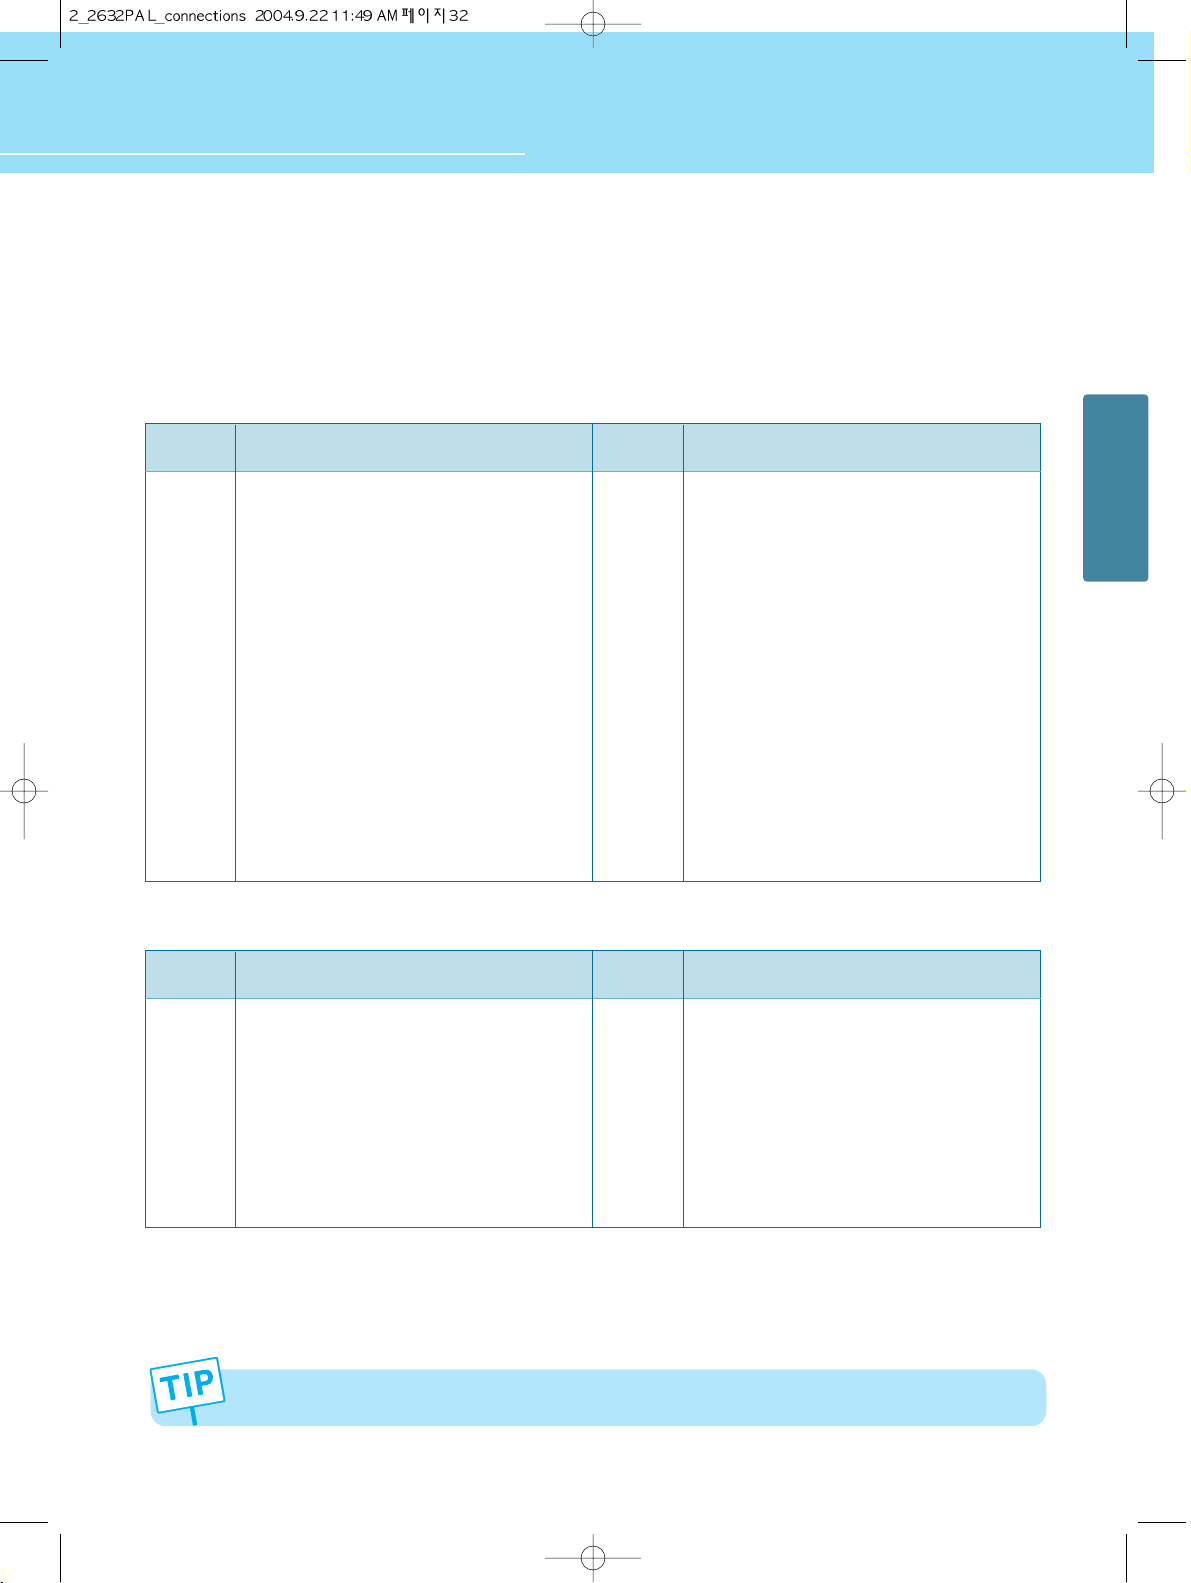
If you wish to connect other equipment via the scart connectors on your TV, contact your dealer or a qualified
technician to wire the A/V cable as illustrated below.
- SCART 1 (FULL SCART)
- SCART 2 (HALF SCART)
PIN SIGNAL
1 Audio Output R
2 Audio Intput R
3 Audio Output L
4 Audio Intput GND
5 Blue Intput GND
6 Audio Intput L
7 RGB Blue Input
8 Switching Voltage Input
9 Green Intput GND
10 -
11 RGB Green Intput
PIN SIGNAL
12 -
13 Red Intput GND
14 -
15 RGB Red Input
16 RGB Blinking Signal Input
17 Video Output GND
18 Video Intput GND
19 Video Output (CVBS)
20 Video Intput (CVBS)
21 Scart Connector GND
PIN SIGNAL
1 Audio Output R
2 Audio Intput R
3 Audio Output L
4 Audio Intput GND
6 Audio Intput L
8 Switching Voltage Input
PIN SIGNAL
17 Video Output GND
18 Video Input GND
19 Video Output (CVBS)
20 Video Input (CVBS)
21 Scart Connector GND
If RGB signals come into “SCART 1”, Input Mode will change from “SCART 1” to “RGB”.
Page 36
33
CONNECTIONS
Page 37
How to Select the Picture Mode ............................................... 35
How to Set the Desired Picture .................................................. 36
How to Set PIP [Mode] ............................................................... 37
Supported PIP Table ................................................................... 38
How to Set the Geometry(In PC mode) .................................... 39
How to Set the Geometry(In DTV mode) .................................. 40
Picture Setup
HYUNDAI WIDE LCD TV
Page 38
35
PICTURE SETUP
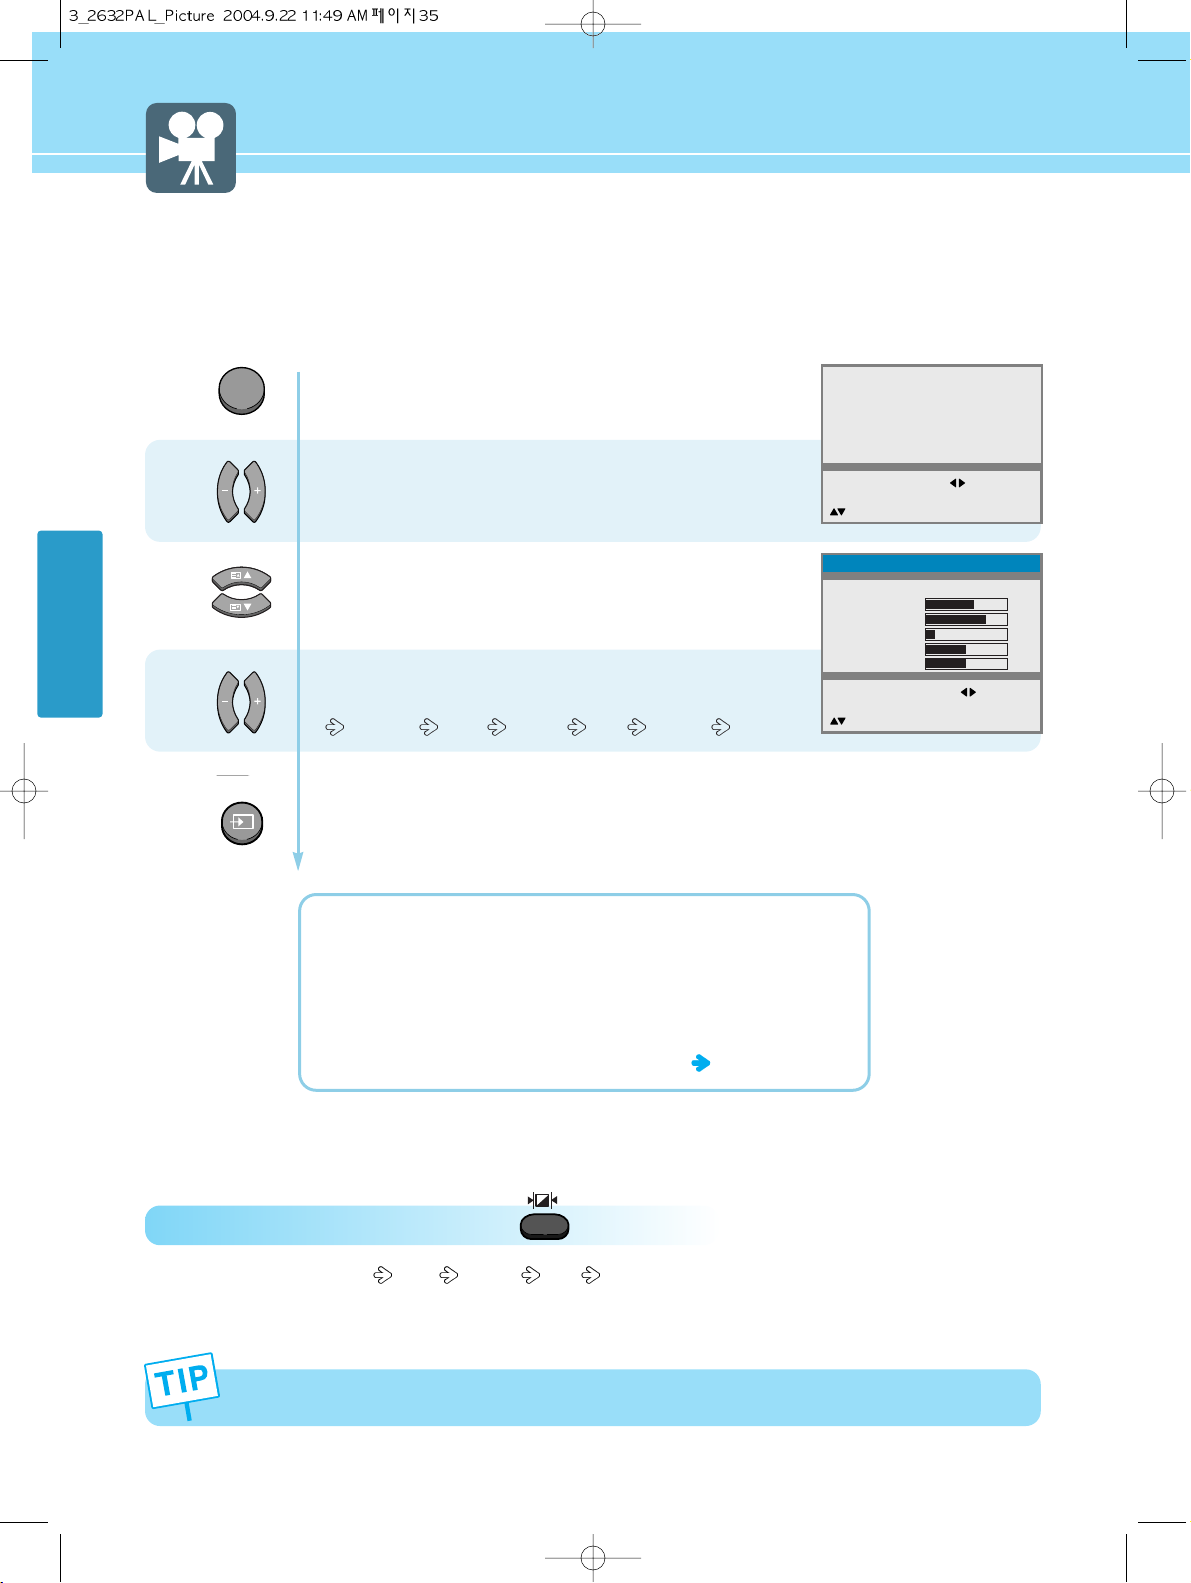
Press Menu button.
Menu items appear on the screen.
Press Left, Right or OK button to select
“Picture”.
Press Up and Down buttons to move to
“Mode”.
Press Left and Right buttons, then the menu
changes in order below.
Standard Sport Natural Mild Custom
Press MENU button after the setting is done, and Menu goes to the previous menu.
If the INPUT button is pressed, the menu disappears.
STANDARD : For general contents. It fits most video contents.
SPORT : For a clear display or watch sports.
NATURAL : For movies or live music.
MILD : For a soft display.
CUSTOM : When the user wants to set the values
see the next page
1
2
3
How to Select the Picture Mode
Users can adjust picture mode automatically according to the input mode(TV, Video1·2, S-Video, F/H Scart, DVD/DTV).
How To Directly Select Picture Mode : Press button.
- Users can select Standard Sport Natural Mild Custom, when the input mode is TV, Video1/2, S-Video, F/H
Scart, DVD or DTV.
MENU
In the user’s mode, the users can adjust at their preference Contrast, Brightness, Sharpness, Color, Tint(Hue)
in Standard, Sport, Natural, or Mild mode.
INPUT
Picture
Sound
Clock
Install
Language
Advanced
MENU : Previous : Select
INPUT : Exit OK : Select
: Position
Picture
Mode
Contrast
Brightness
Sharpness
Color
Tint
MENU : Previous : Select
INPUT : Exit
: Position
Standard
61
70
14
50
0
Page 39
36
PICTURE SETUP
HYUNDAI LCD TV HQL260WR/320WR
How to Set the Desired Picture
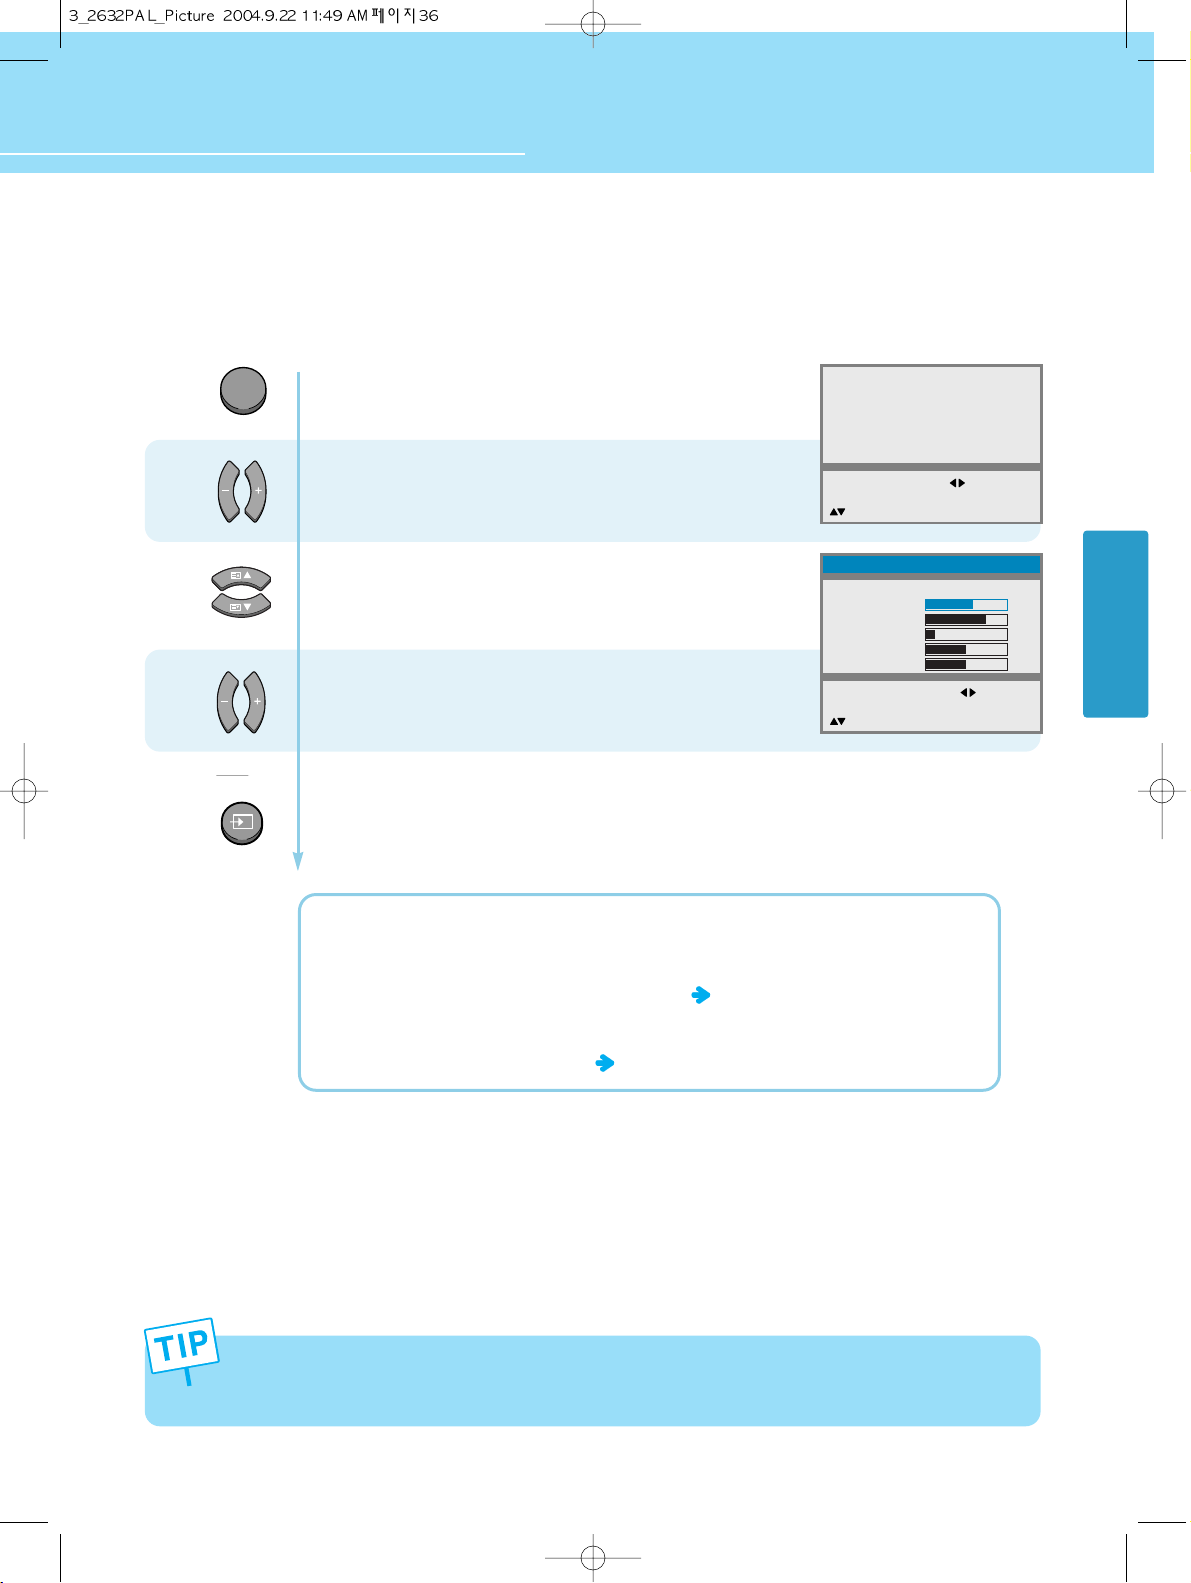
Users can manually adjust the picture in their own ways.
Press Menu button.
Menu items appear on the screen.
Press Left, Right or OK button to select
“Picture”.
Press Up and Down buttons to Choose
one of the items listed.
Press Left and Right buttons to adjust.
Press MENU button after the setting is done, and Menu goes to the previous menu.
If the INPUT button is pressed, the menu disappears.
CONTRAST : Adjust the brightness and darkness of object and background.
BRIGHTNESS : Adjust the brightness of the entire picture.
SHARPNESS : Adjust clarity of outline of objects. This is not applied to DTV, PC mode.
COLOR : Adjust colors into deeper or lighter colors.
TINT(HUE) : Adjust colors naturally.
This is not applied to PC, TV mode.
If you adjust the Picture in step 3 while it is in Standard, Sports, Natural or Mild mode, the mode will change
to Custom mode.
*Adjustments menu may be different according to the input source.
1
2
3
MENU
INPUT
Picture
Sound
Clock
Install
Language
Advanced
MENU : Previous : Select
INPUT : Exit OK : Select
: Position
Picture
Mode
Contrast
Brightness
Sharpness
Colour
Tint
MENU : Previous :
INPUT : Exit
: Position
Custom
Adjust
61
70
14
50
0
Page 40
How to Set PIP [Mode]
-
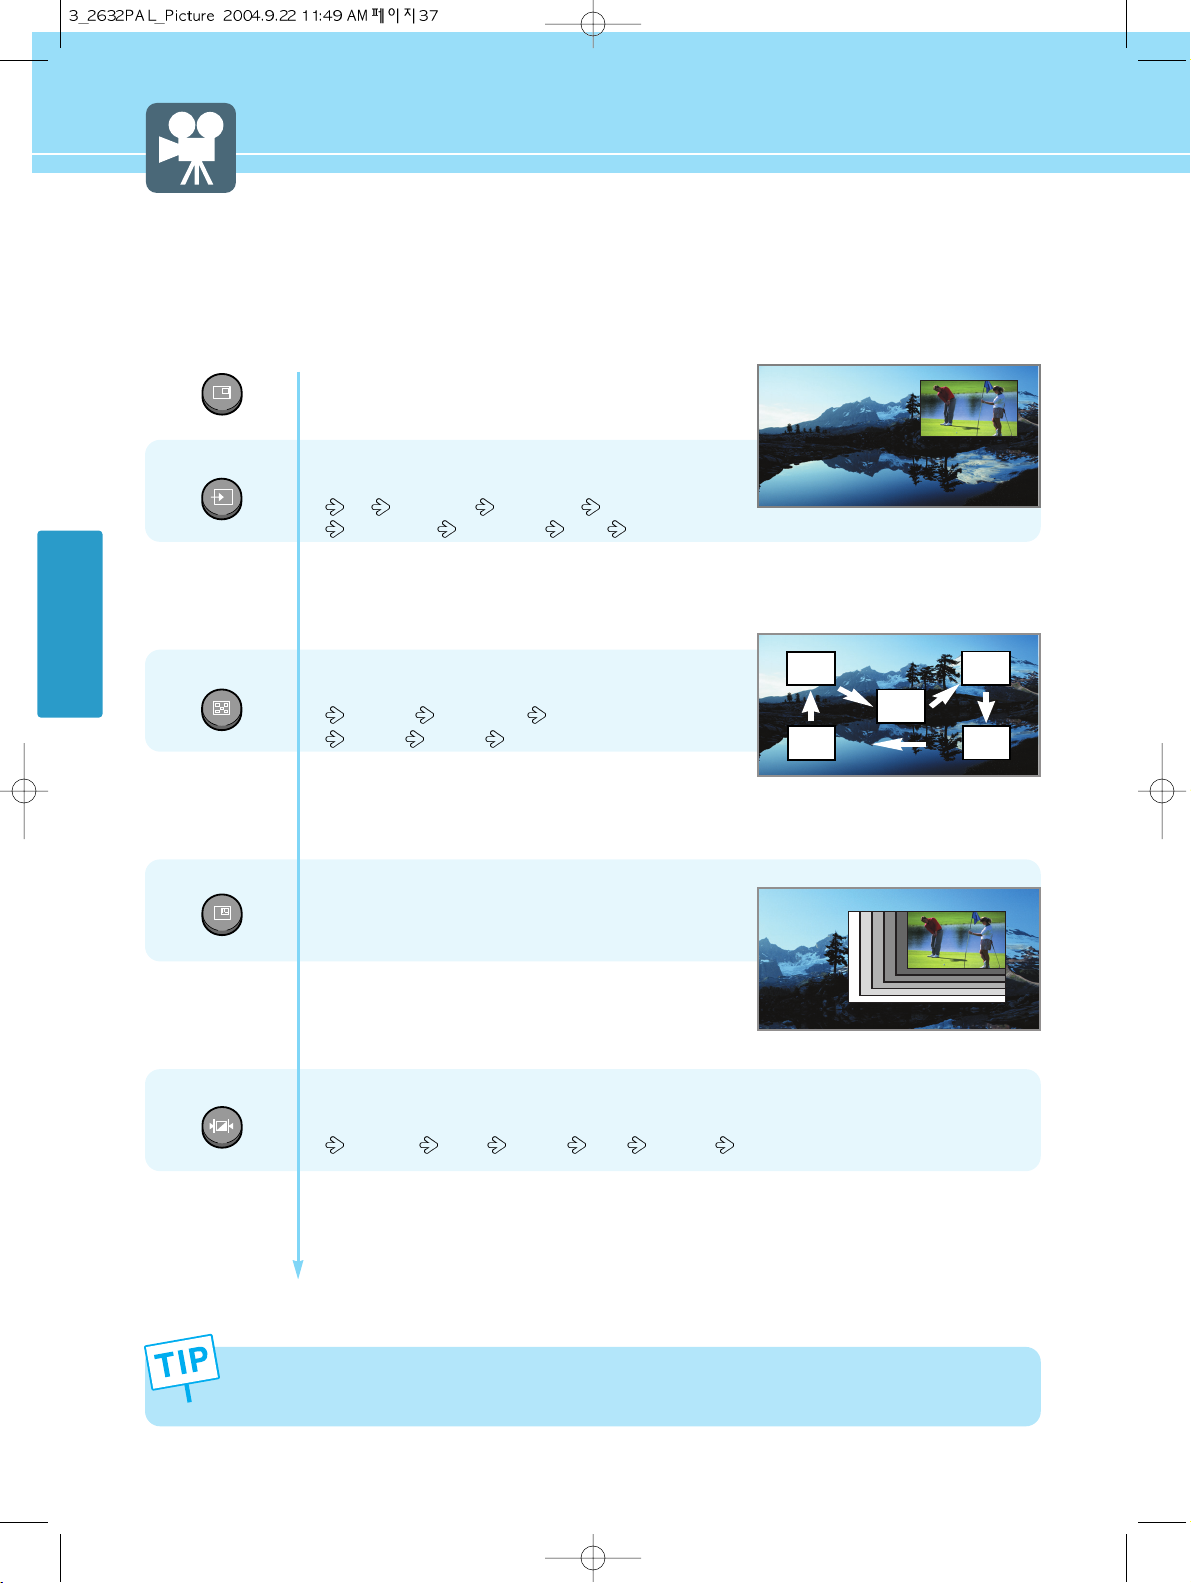
You can watch another device's image in the PIP while watching the TV, S-Video, DTV, Scart1/2 or VIDEO in the main image.
- This function is available only with the remote control.
37
PICTURE SETUP
Press the PIP button.
You will see the PIP at the upper right corner.
Press the INPUT button, then input source
changes in order below.
TV SCART1(F) SCART2(H) AV1 VIDEO
AV1 S-VHS AV2 VIDEO DTV PC
In case of TV mode, you can change the main or PIP TV channel
by pressing the Up and Down buttons.
Press the Position button, then position
changes in order below.
Right Up Right Down Left Down
Left Up Center
Press the SIZE button.
The PIP will change among 6 different sizes
whenever you press this button.
Press the P.MODE button, then PIP picture mode
changes in order below.
Standard Sport Natural Mild Custom
5
4
3
1
2
PIP
Main
- Main and sub pictures cannot have the same input source.
- While PIP is on, any change to Picture or Geometry in the OSD control menu is applied only for the PIP function. If you
wish to make adjustment to Picture or Geometry in the main image, please make sure the PIP function is off.
POSITION
PIP
INPUT
SIZE
P.MODE
Page 41
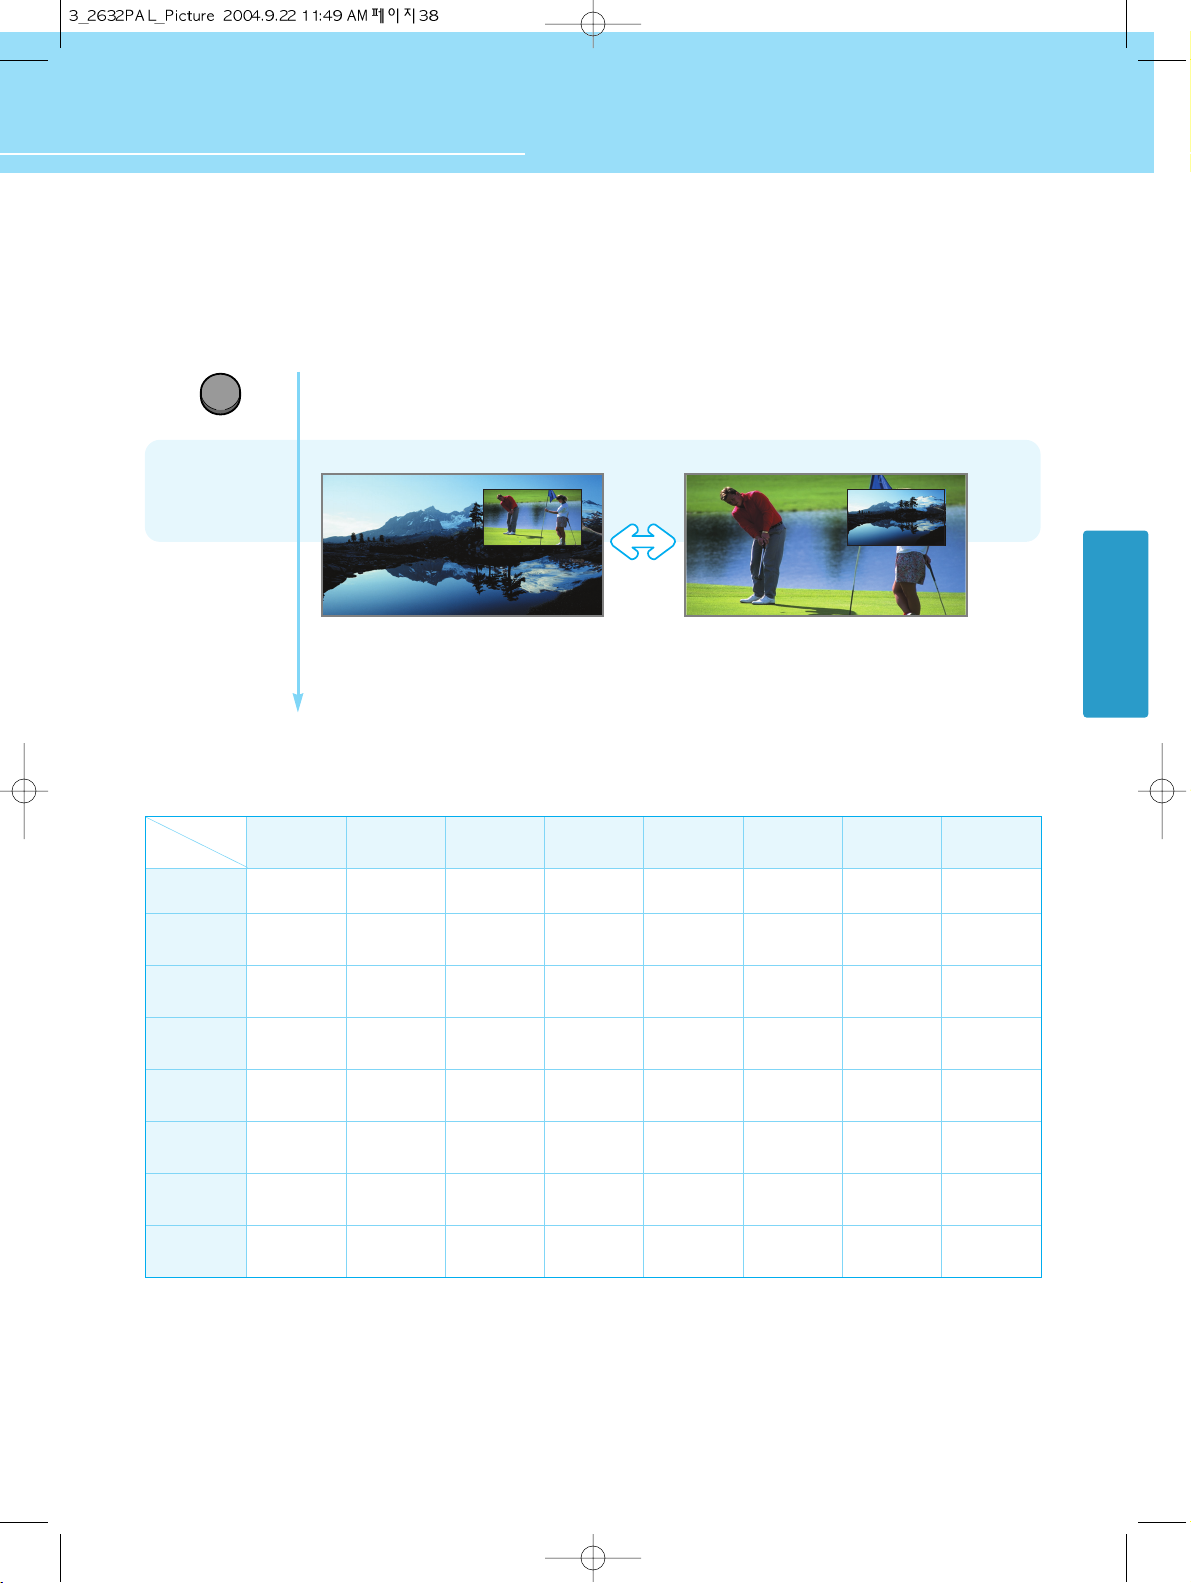
Supported PIP Table PIP : O → Supported, X → Not Supported
38
PICTURE SETUP
HYUNDAI LCD TV HQL260WR/320WR
Press the SWAP button.
The Main image and PIP image will switch with each other
whenever you press this button.
PC
X
X
O
O
O
O
O
O
DTV
X
X
O
O
O
O
O
O
PC
DTV
TV
S-Video
AV1 Video
AV2 Video
Scart1(F)
Scart2(H)
Sub
Main
SWAP
PIP
Main
PIP
Main
Scart2(H)
O
O
O
O
O
O
O
X
Scart1(F)
O
O
O
O
O
O
X
O
AV2 Video
O
O
O
O
O
X
O
O
AV1 Video
O
O
O
O
X
O
O
O
S-Video
O
O
O
X
O
O
O
O
TV
O
O
X
O
O
O
O
O
Page 42
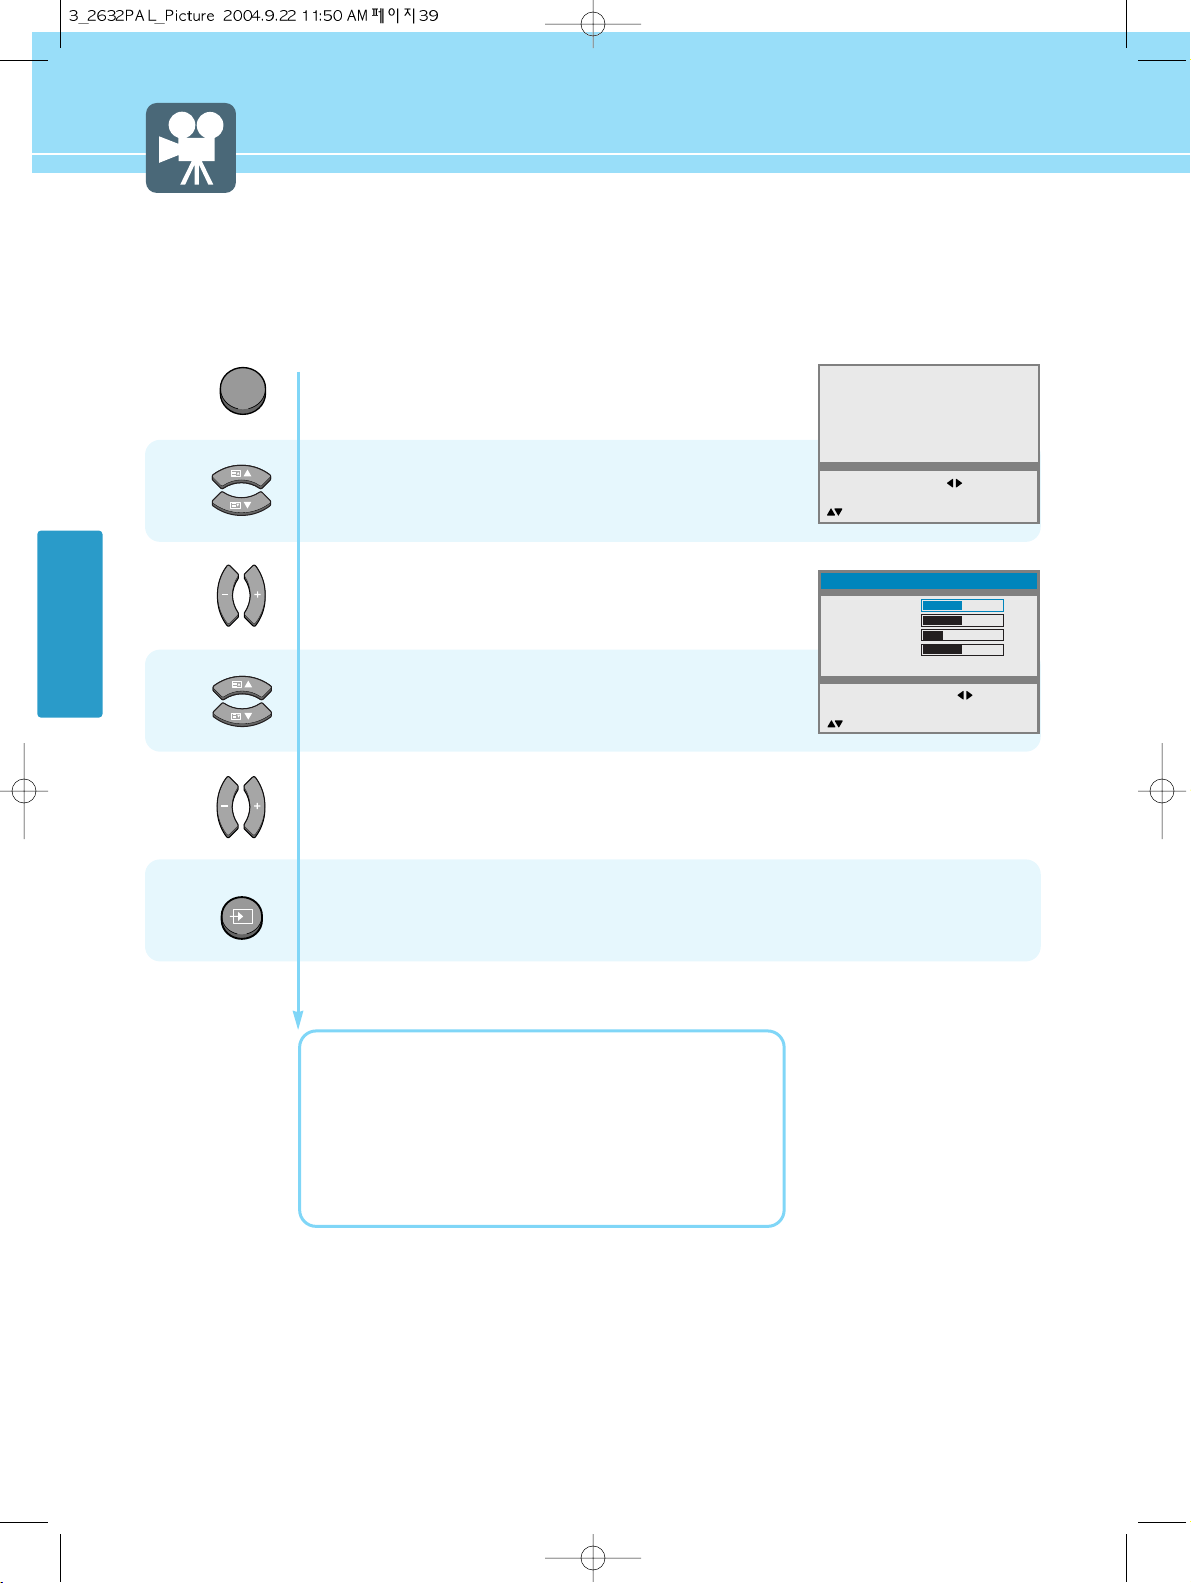
39
PICTURE SETUP
Press Menu button.
Menu items appear on the screen.
Press Up and Down buttons to move to
“Geometry”.
Press Left, Right or OK button to move to select
“Geometry”.
Geometry menu appears.
Press Up and Down buttons to Choose
one of the items listed.
Press Left and Right buttons to adjust.
Press MENU button after the setting is done, and Menu goes to the previous menu.
If the INPUT button is pressed, the menu disappears.
H. SIZE : To adjust the horizontal size of the picture.
H. POSITION : To adjust the horizontal position of the picture.
V. POSITION : To adjust the vertical position of the picture.
PHASE : To adjust to eliminate the shake of picture.
RELOAD : To set the Geometry to the default.
1
2
3
4
How to Set the Geometry (In PC mode)
This function allows you to tune your screen in PC Input Mode.
MENU
INPUT
Geometry
Picture
Sound
Clock
Language
Advanced
MENU : Previous : Select
INPUT : EXIT OK : Select
: Position
Geometry
H.Size
H.Position
V.Position
Phase
Reload
MENU : Previous : Adjust
INPUT : Exit
: Position
100
128
26
16
Page 43
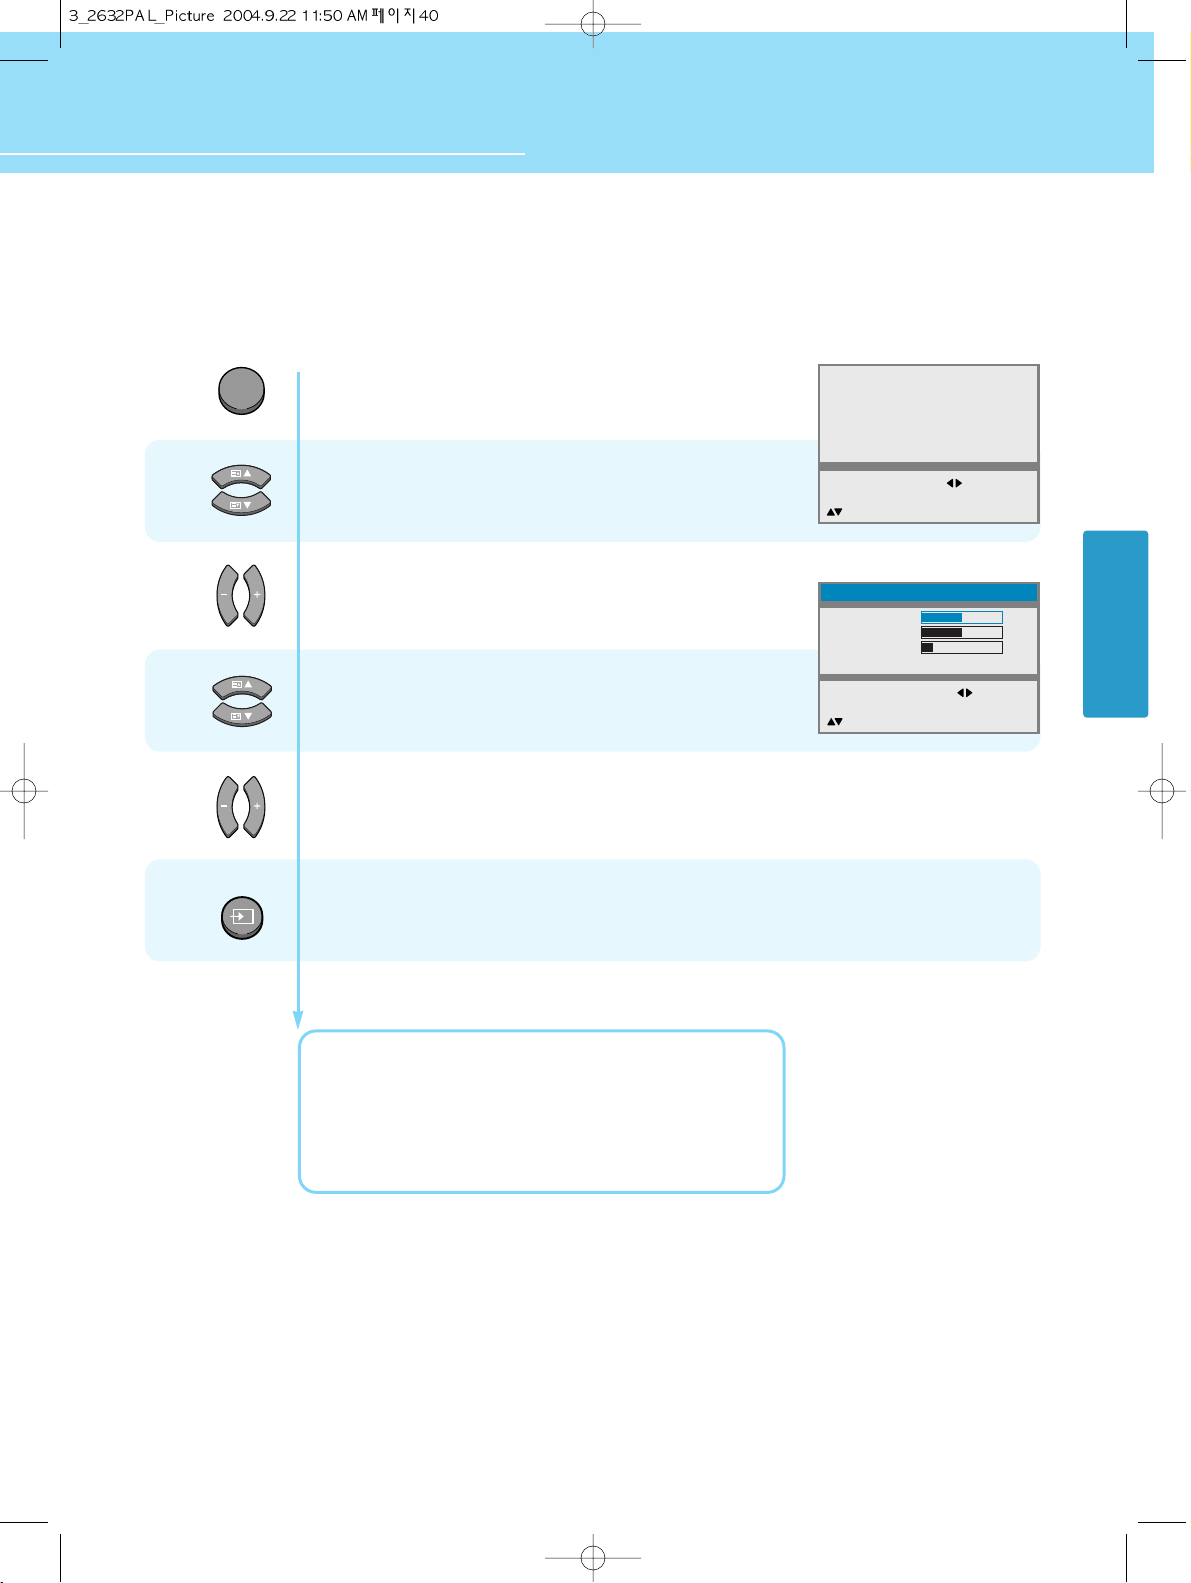
HYUNDAI LCD TV HQL260WR/320WR
40
PICTURE SETUP
Press Menu button.
Menu items appear on the screen.
Press Up and Down buttons to move to
“Geometry”.
Press Left, Right or OK button to move to select
“Geometry”.
Geometry menu appears.
Press Up and Down buttons to Choose
one of the items listed.
Press Left and Right buttons to adjust.
Press MENU button after the setting is done, and Menu goes to the previous menu.
If the INPUT button is pressed, the menu disappears.
H. SIZE : To adjust the horizontal size of the picture.
H. POSITION : To adjust the horizontal position of the picture.
V. POSITION : To adjust the vertical position of the picture.
RELOAD : To set the Geometry to the default.
1
2
3
4
How to Set the Geometry (In DTV mode)
This function allows you to tune your screen in DTV Input Mode.
MENU
INPUT
Geometry
Picture
Sound
Clock
Language
Advanced
MENU : Previous : Select
INPUT : EXIT OK : Select
: Position
Geometry
H.Size
H.Position
V.Position
Reload
MENU : Previous : Adjust
INPUT : Exit
: Position
100
128
22
Page 44
41
PICTURE SETUP
Page 45
How to Select the Audio Mode .................................................. 43
How to Set the Desired Audio .................................................... 44
How to Set the Balance, Volume and Source ............................ 45
How to Select SRS WOW(Surround) ......................................... 46
How to Listen to Stereo Sound/Dual Sound ............................... 47
Sound Setup
HYUNDAI WIDE LCD TV
Page 46
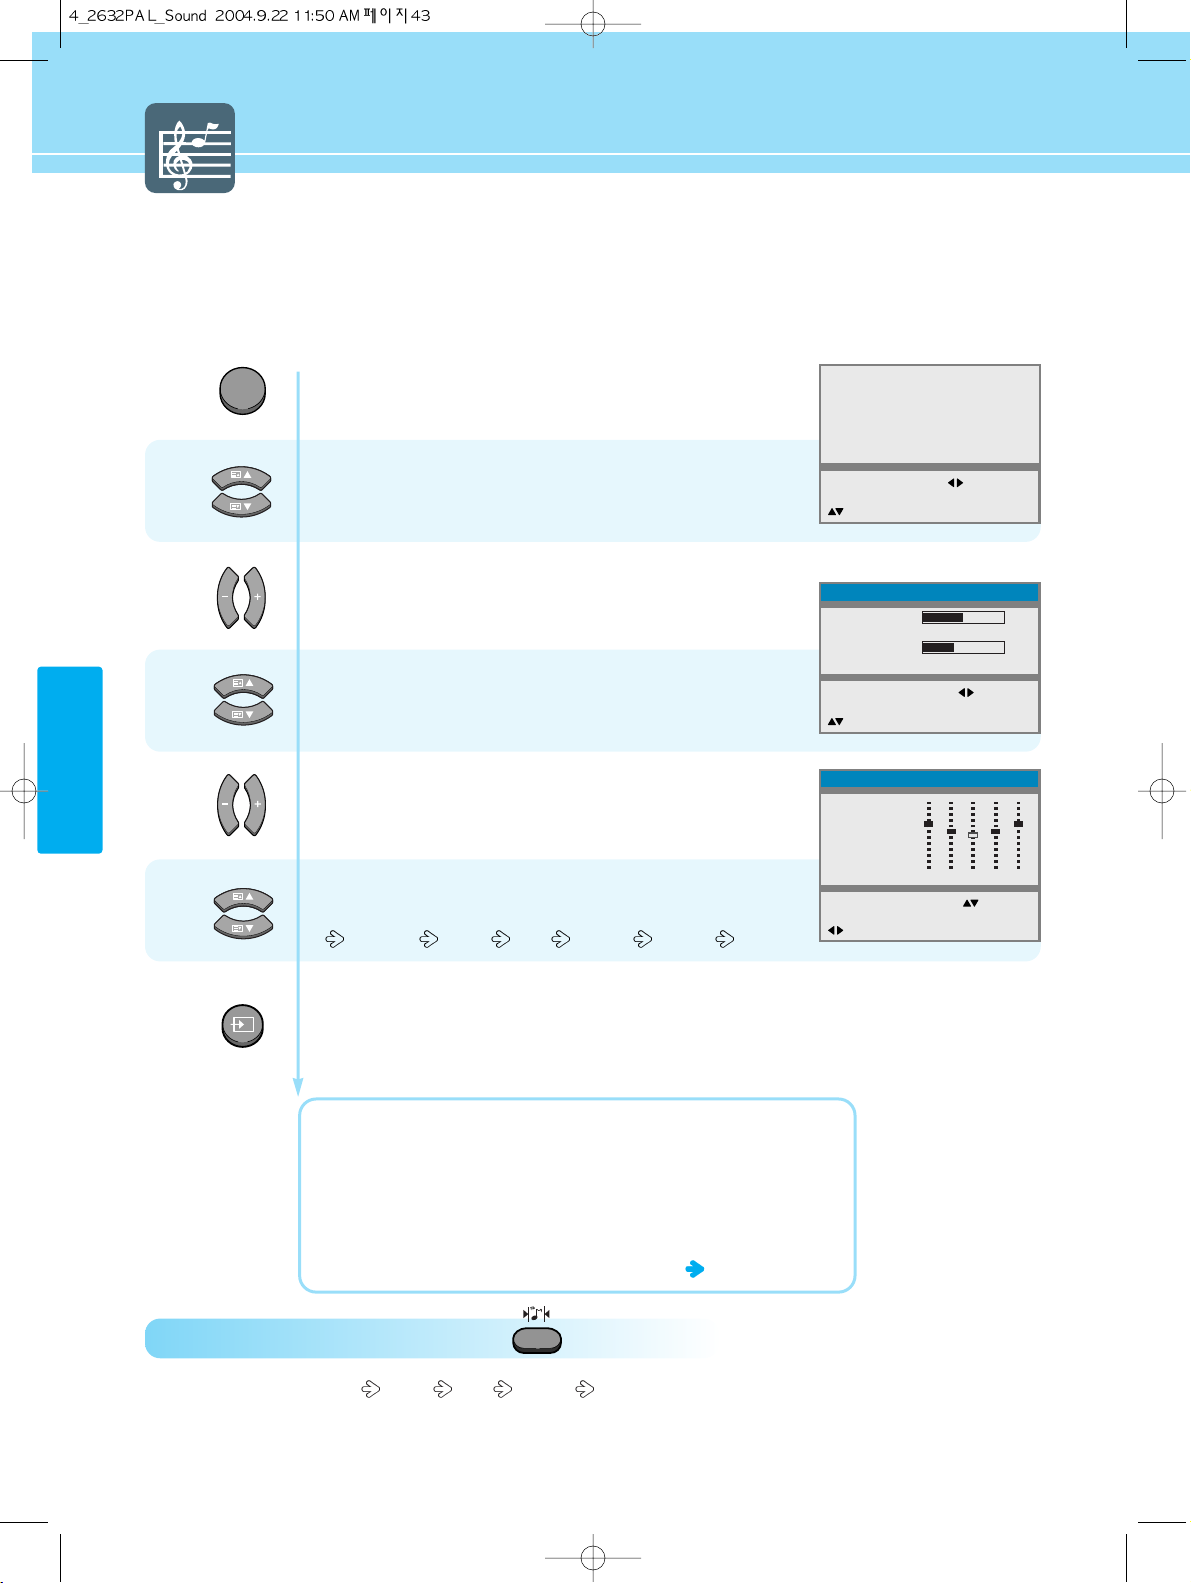
How to Select the Audio Mode
- Users can adjust sound mode automatically as users want.
- In SRS On mode, Equalizer in Sound Menu is not activated.
How To Directly Select Sound Mode : Press button.
Users can select Standard Music Film Speech Custom in order.
43
SOUND SETUP
Press Menu button.
Menu items appear on the screen.
Press Up and Down buttons to move to
“Sound” .
Press Left, Right or OK button to select
“Sound”.
Press Up and Down buttons to move to
“Equalizer”.
Press Left, Right or OK button to select
“Equalizer”.
Press Up and Down buttons, then the mode
changes in order below.
Standard Music Film Speech Custom
Press MENU button after the setting is done, and Menu goes to the previous menu.
If the INPUT button is pressed, the menu disappears.
STANDARD : For the general sound. This fits most audio contents.
MUSIC : For enjoying original sound.
FILM : For grandiose sound.
SPEECH : For the clear sound.
CUSTOM : When the user wants to set the value
see the next page
1
2
MENU
3
4
5
Picture
Sound
Clock
Install
Language
Advanced
MENU : Previous : Select
INPUT : Exit OK : Select
: Position
Sound
Balance
Equalizer
Volume
Input Source
MENU : Previous : Select
INPUT : Exit
: Position
Equalizer
Mode
>>
Standard
Music
Film
Speech
Custom
MENU : Previous : Select
INPUT : Exit
: Position
100
300
1K3K10K
Main
0
40
INPUT
Page 47
HYUNDAI LCD TV HQL260
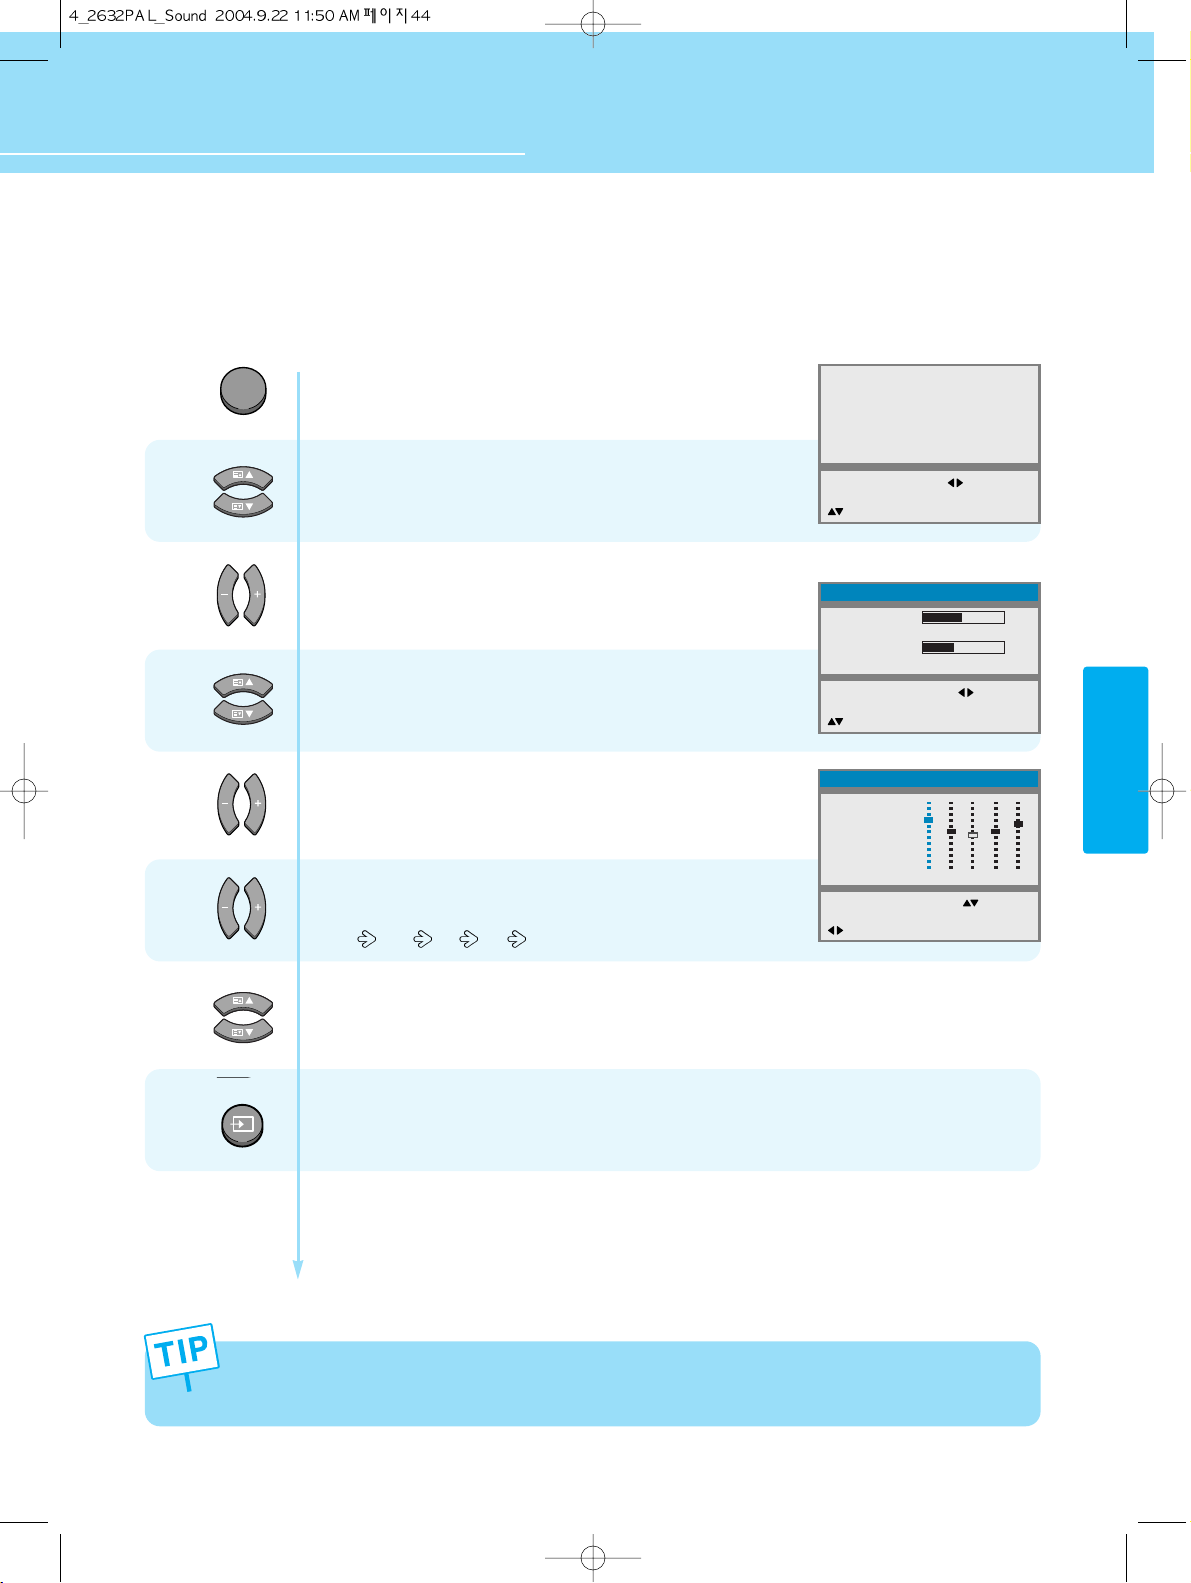
How to Set the Desired Audio
Users can manually adjust the sound in thier own ways.
44
SOUND SETUP
HYUNDAI LCD TV HQL260WR/320WR
Press Menu button.
Menu items appear on the screen.
Press Up and Down buttons to move to
“Sound”.
Press Left, Right or OK button to select
“Sound”.
Press Up and Down buttons to move to
“Equalizer”.
Press Left, Right or OK button to select
“Equalizer”.
Press Left and Right buttons to
choose one of the items listed.
100
300 1K 3K 10K
Then Press Up and Down buttons to adjust.
Press MENU button after the setting is done, and Menu goes to the previous menu.
If the INPUT button is pressed, the menu disappears.
MENU
1
2
3
4
5
6
If you adjust the frequency (100Hz, 300Hz, 1KHz, 3KHz, 10KHz) in Standard, Music, Film or Speech mode, the
mode will change to Custom mode.
Picture
Sound
Clock
Install
Language
Advanced
MENU : Previous : Select
INPUT : Exit OK : Select
: Position
Sound
Balance
Equalizer
Volume
Input Source
MENU : Previous : Select
INPUT : Exit
: Position
Equalizer
Mode
Standard
Music
Film
Speech
>>
Custom
MENU : Previous : Adjust
INPUT : Exit
: Position
100
300
1K3K10K
Main
0
40
INPUT
Page 48
SOUND SETUP
45
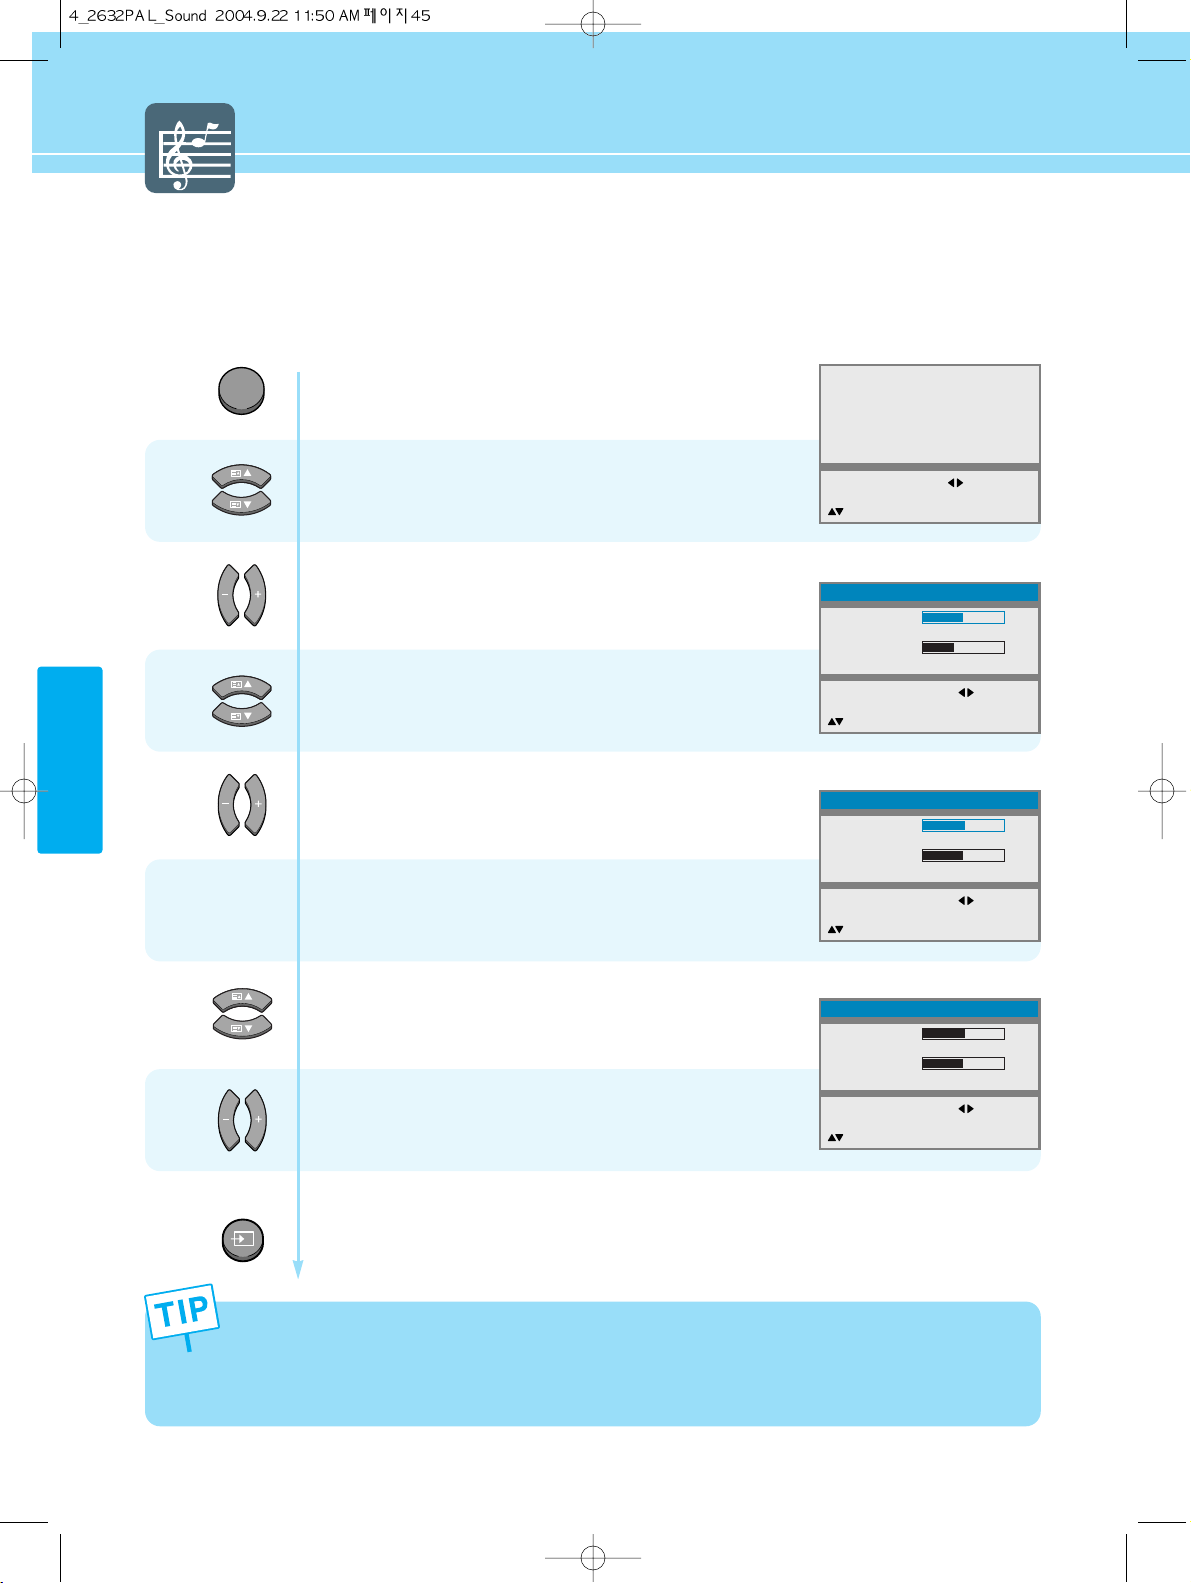
How to Set the Balance, Volume and Sound Source
Press Menu button.
Menu items appear on the screen.
Press Up and Down buttons to move to
“Sound”.
Press Left, Right or OK button to select
“Sound”.
Press Up and Down buttons to move to
“Balance” or “Volume”.
Then Press Left and Right buttons to adjust.
If you need to select the sound source,
go to step 5
Press Up and Down buttons to move to
“Input Source”.
Press Left and Right buttons,
then input source changes to “Main/Pip”.
Press MENU button after the setting is done, and Menu goes to the previous menu.
If the INPUT button is pressed, the menu disappears.
MENU
1
2
3
4
5
6
- You can listen to the main picture's sound when the PIP is off even if you select PIP mode sound.
- You will have sound only through the headphones, not the speakers, if you connect headphones. (mute) You
can adjust the headphones' volume by pressing the
button.
- When you would like to have sound through the headphones, if you connect a set of headphones to your TV,
the volume level will be decreased automatically without concerrning the previous volume setting.
Picture
Sound
Clock
Install
Language
Advanced
MENU : Previous : Select
INPUT : Exit OK : Select
: Position
Sound
Balance
Equalizer
Volume
Input Source
MENU : Previous : Select
INPUT : Exit
: Position
Sound
Balance
Equalizer
Volume
Input Source
MENU : Previous : Adjust
INPUT : Exit
: Position
Main
Main
0
40
R5
50
INPUT
Sound
Balance
Equalizer
Volume
Input Source
MENU : Previous : Select
INPUT : Exit
: Position
R5
Main
50
Page 49
HYUNDAI LCD TV HQL260WR/320WR
46
SOUND SETUP
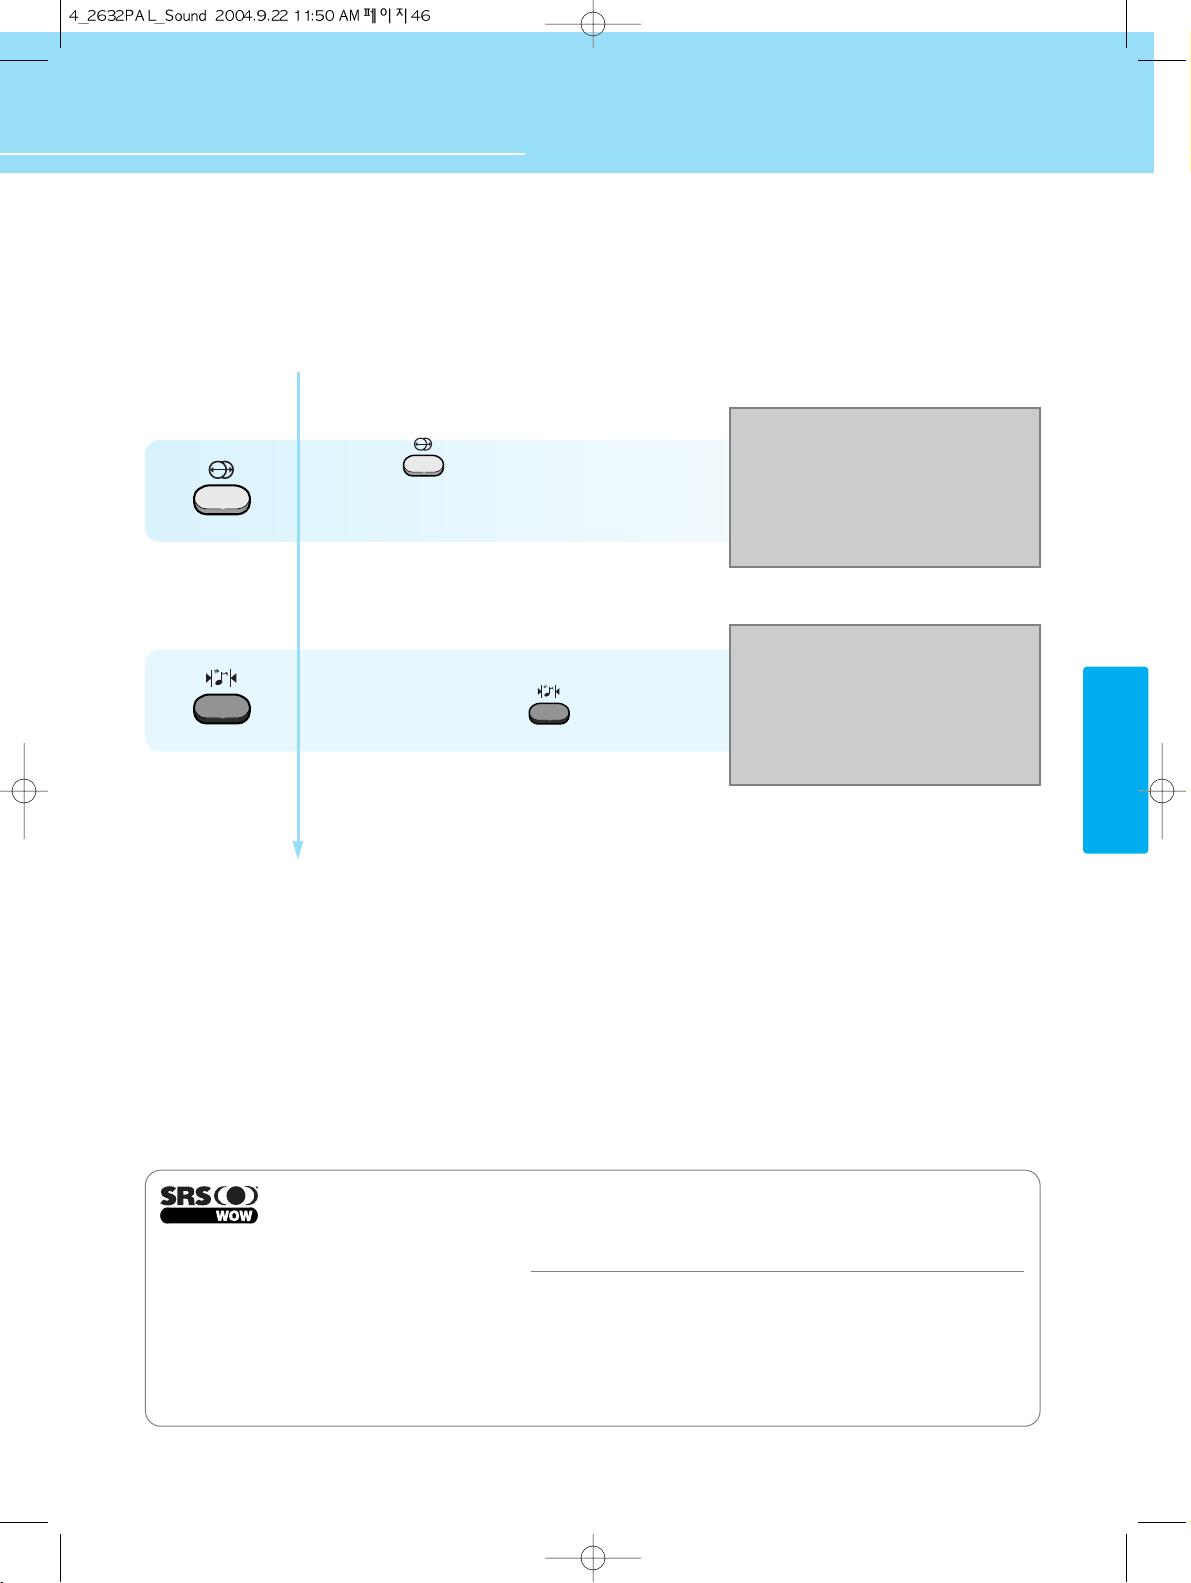
How to Select SRS WOW(Surround)
- You can enjoy the spectacular, clear and crisp sound.
- This function is available only with the remote control.
Press the button on the remote control
to select SRS WOW.
Then SRS WOW changes to “On/Off”.
*In SRS On mode, Equalizer in Sound Menu
is not activated.
*In SRS On mode, pressing on the
remote control displays "SRS working".
is a trademark of SRS Labs, Inc.
WOW technology is incorporated under license from SRS Labs, Inc.
Remarkable Enhancement for Mono or Stereo Playback
WOWTM‚ is an award-winning, patented technology that significantly enhances the quality of mono and stereo audio material. It creates the
perception of improved dynamics and bass performance over standard speakers or headphones.
WOW makes up for the limitations inherent in smaller speakers and headphones by providing a panoramic three-dimensional audio image
that extends the sound in both the horizontal and vertical planes well beyond the speakers or headphones themselves. As a result,
manufacturers of small audio devices, televisions, wireless and personal/portable products can dramatically improve their product’s audio
performance without enlarging the speaker size. The enriching effects of WOW are especially noticeable on digitally compressed mono or
stereo audio in formats such as MP3, WMA and audio CD in which the “tinny” hollow sound is greatly reduced.
SRS On
SRS working
Page 50
47
SOUND SETUP
How to Listen to Stereo Sound / Dual Sound
- Users can set sound mode as users want.
- This function is available only with the remote control.
- Listening to stereo sound
- Listening to the Dual sound
Press the button on the remote control to select Mono or Stereo.
Mono or Stereo be will selected in turn whenever you press the button.
(*During FM MONO broadcast, pressing the button will display the current status.)
Press the button on the remote control to select Dual sound.
Dual 1 : Your national language.
Dual 2 : Foreign language
(*Dual 1 or Dual 2 be will selected in turn whenever you press the button.)
Page 51
48
SOUND SETUP
HYUNDAI LCD TV HQL260WR/320WR
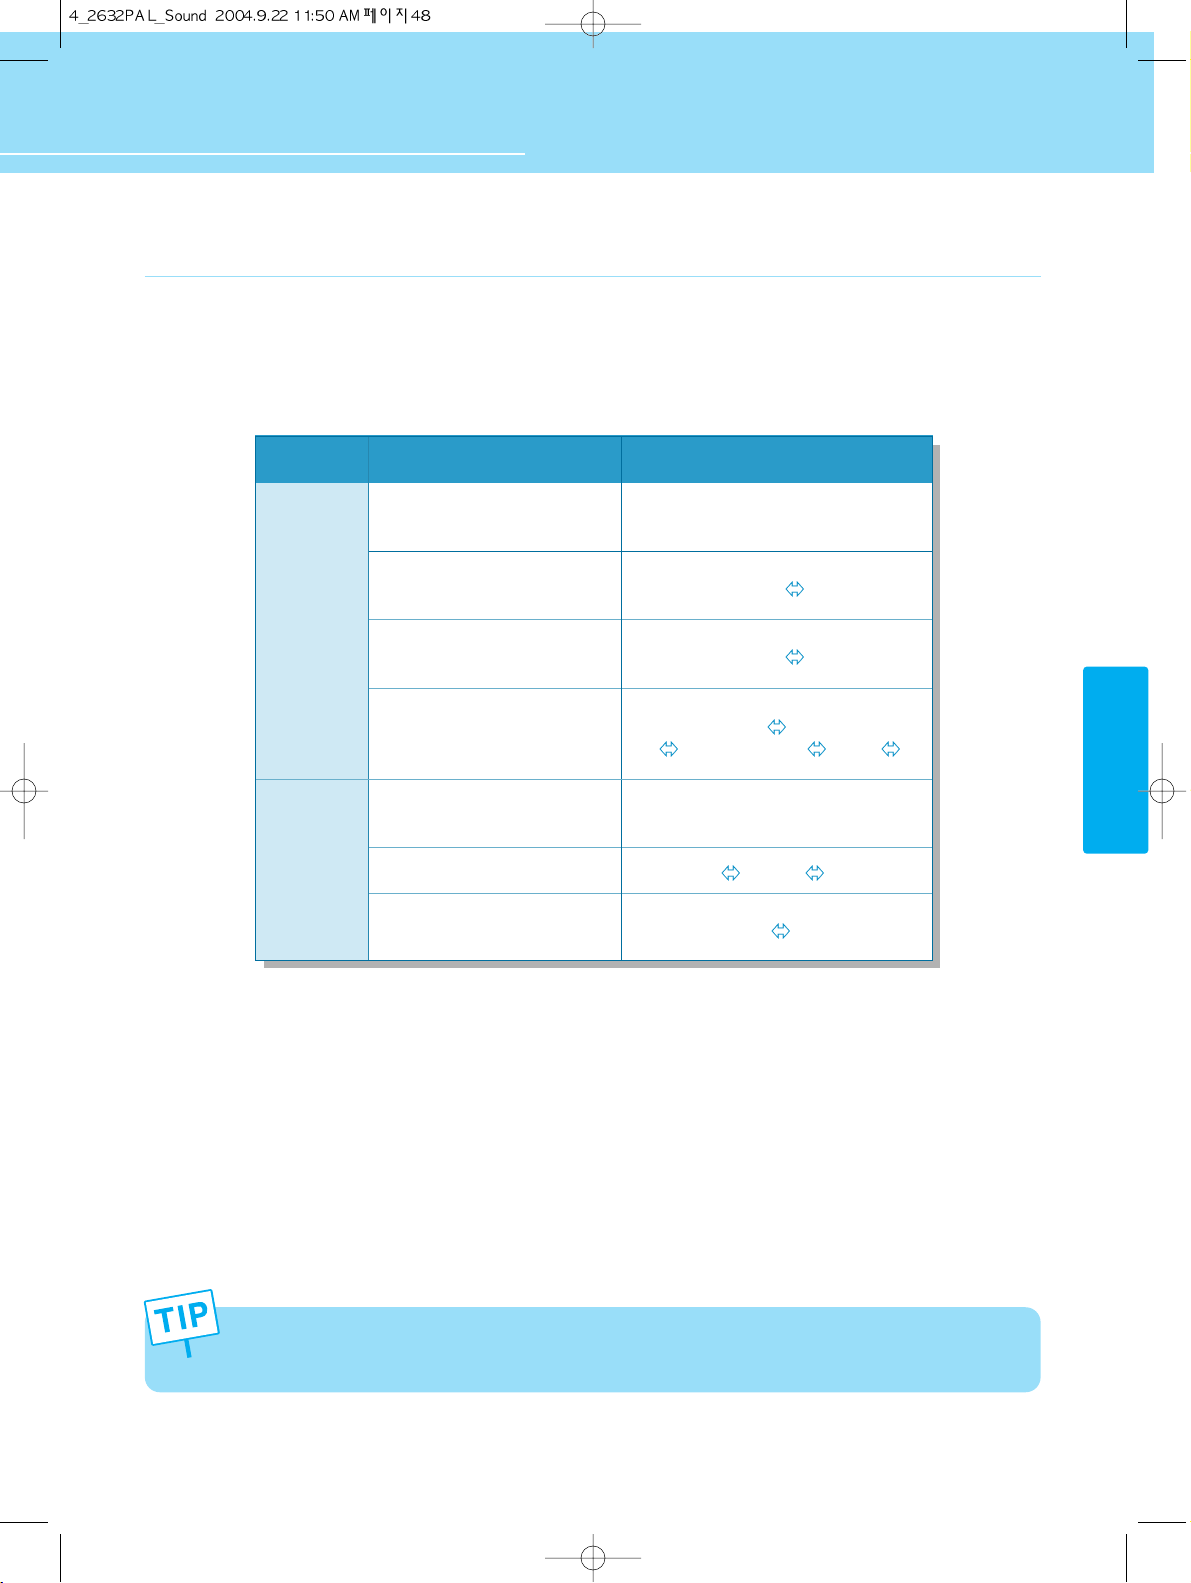
This S. Mode displays the current Audio signal status, and controls the processing of Audio signal. When power
is switched on, the mode is automatically preset to either “Dual-I” or “Stereo”, depending on the current signal
transmission condition.
• If the signal reception conditions deteriorate, setting to Mono will make your listening condition better.
• If the stereo signal is weak and automatic mode switching occurs, then the current mode is switched to the
Mono.
NICAM
Stereo
A2
Stereo
Type of Broadcast
Regular Broadcast
(Standard audio)
Regular+
NICAM Mono
NICAM Stereo
NICAM Dual-I/II
Regular broadcast
(Standard audio)
Bilingual or Dual-I/II
Stereo
On-Screen Indication
Mono
(Normal use)
NICAM Mono Mono
NICAM Stereo Mono
NICAM Dual 1
NICAM Dual 2
NICAM Dual 1/2 Mono
Mono
(Normal use)
Dual 1
Dual 2 Dual 1/2
Stereo Mono
Page 52
49
SOUND SETUP
Page 53
How to Store Program Automatically ......................................... 51
How to Edit Program Manually .................................................. 52
Teletext Feature ......................................................................... 55
Displaying the Teletext Information ........................................... 56
Channel Setup
HYUNDAI WIDE LCD TV
Page 54
51
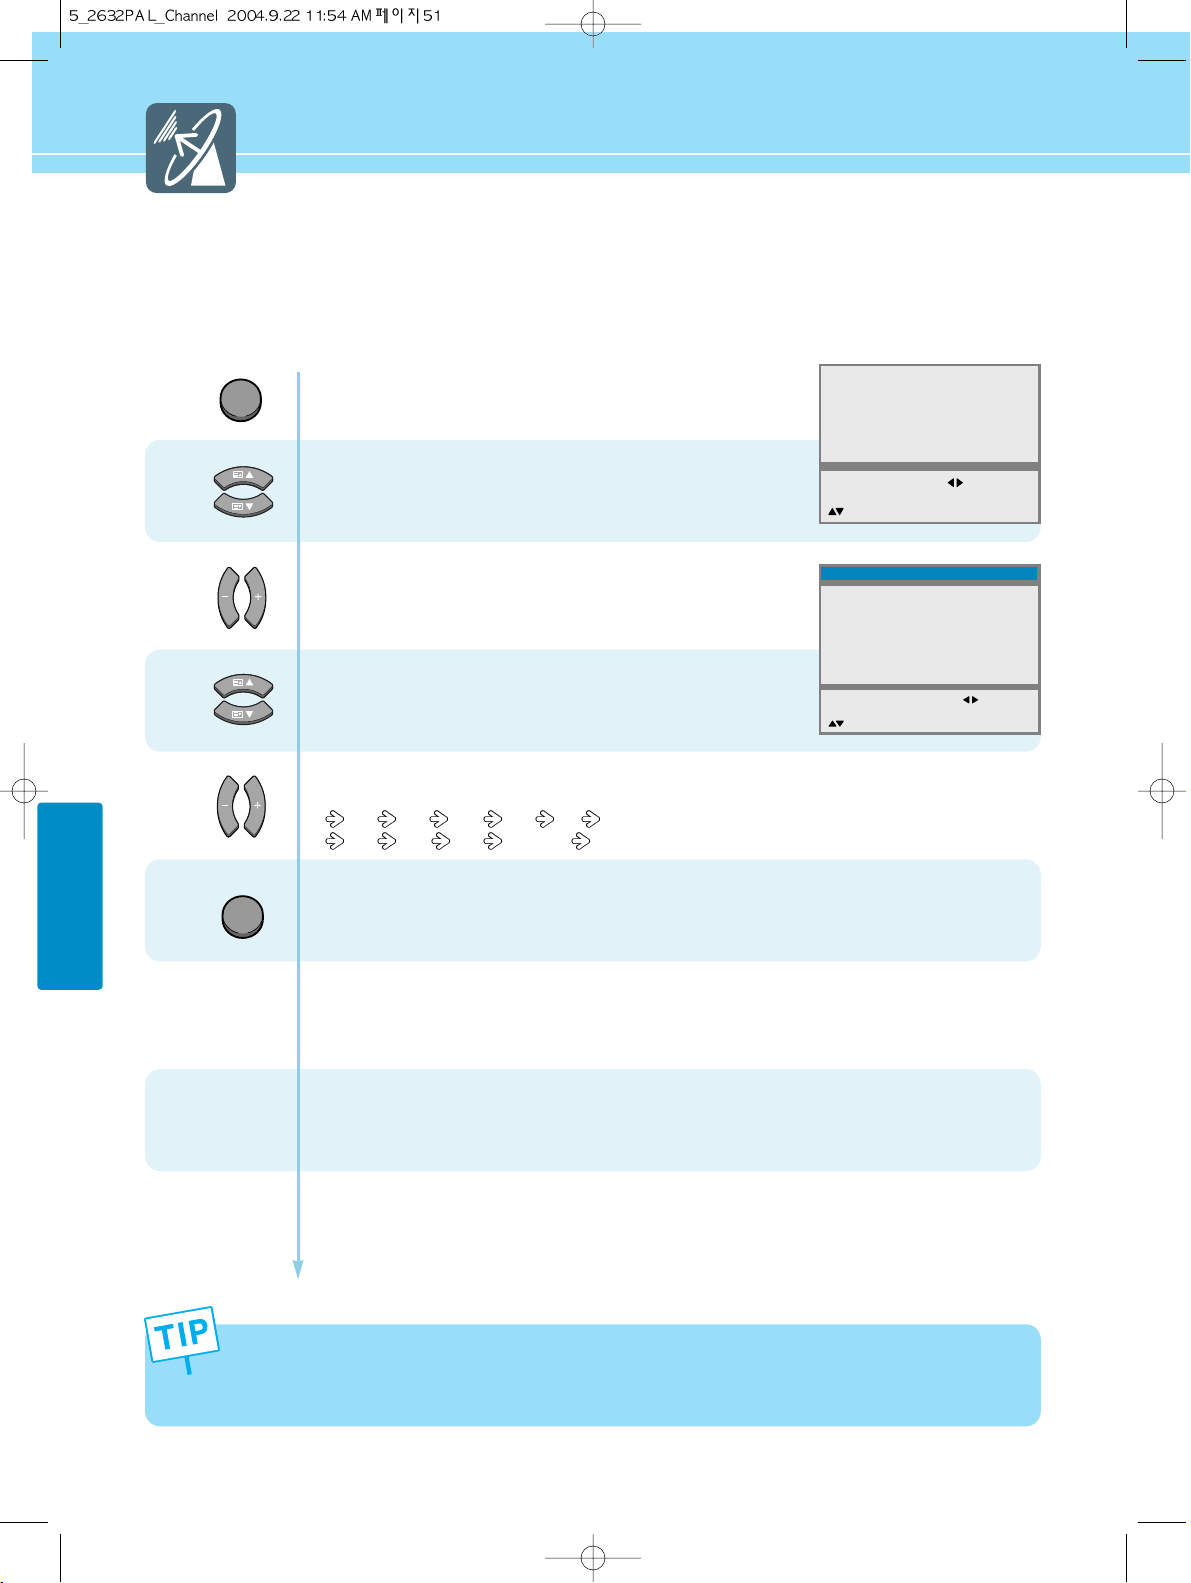
CHANNEL SETUP
How to Store Program Automatically
You can scan channels available to you and their availability depends on your country. Automatically allocated programme numbers
may not correspond to actual or desired programme numbers. However, you can sort the numbers manually and clear any channels
you do not wish to watch. (Ensure to do this during TV broadcast available.)
1
2
3
If you press the MENU button in the middle of Auto tuning, the first stored channel will be displayed, and the
Auto tuning stops.
* BE(Belgium), DE(Germany), ES(Spain), FR(France), IT(Italy), NL(Netherlands), SE(Sweden / Singapore),
CH(Switzerland), UK (United Kingdom), E/EURO(East Europe), Other (Others countries)
OK
4
5
Press Menu button.
Menu items appear on the screen.
Press Up and Down buttons to move to
“Install”.
Press Left, Right or OK buttons to select
“Install”.
Press Up and Down buttons to move to
“Auto Tuning”.
Press Left and Right buttons to select your country.
You can select the countries in order below.
BE DE ES FR IT NL
SE CH UK E/EURO Others
Press OK buttons, then it will be stored the
searched channels.
When the Auto tuning is finished, menus on the screen
will be changed to the Program Edit screen automatically.
Press the Menu button and then go to step 6
if you need to Program edit manually.
OK
Picture
Sound
Clock
Install
Language
Advanced
MENU : Previous : Select
INPUT : Exit OK : Select
: Position
Install
Auto tunning
Program
Colour
System
Manual Tunning
Fine Tuning
Name
Program Edit
MENU : Previous : Select
INPUT : Exit OK : Access
: Position
E/Euro
471.25
- - - - -
PAL
C21
01
BG
Page 55
HYUNDAI LCD TV HQL260WR/320WR
52
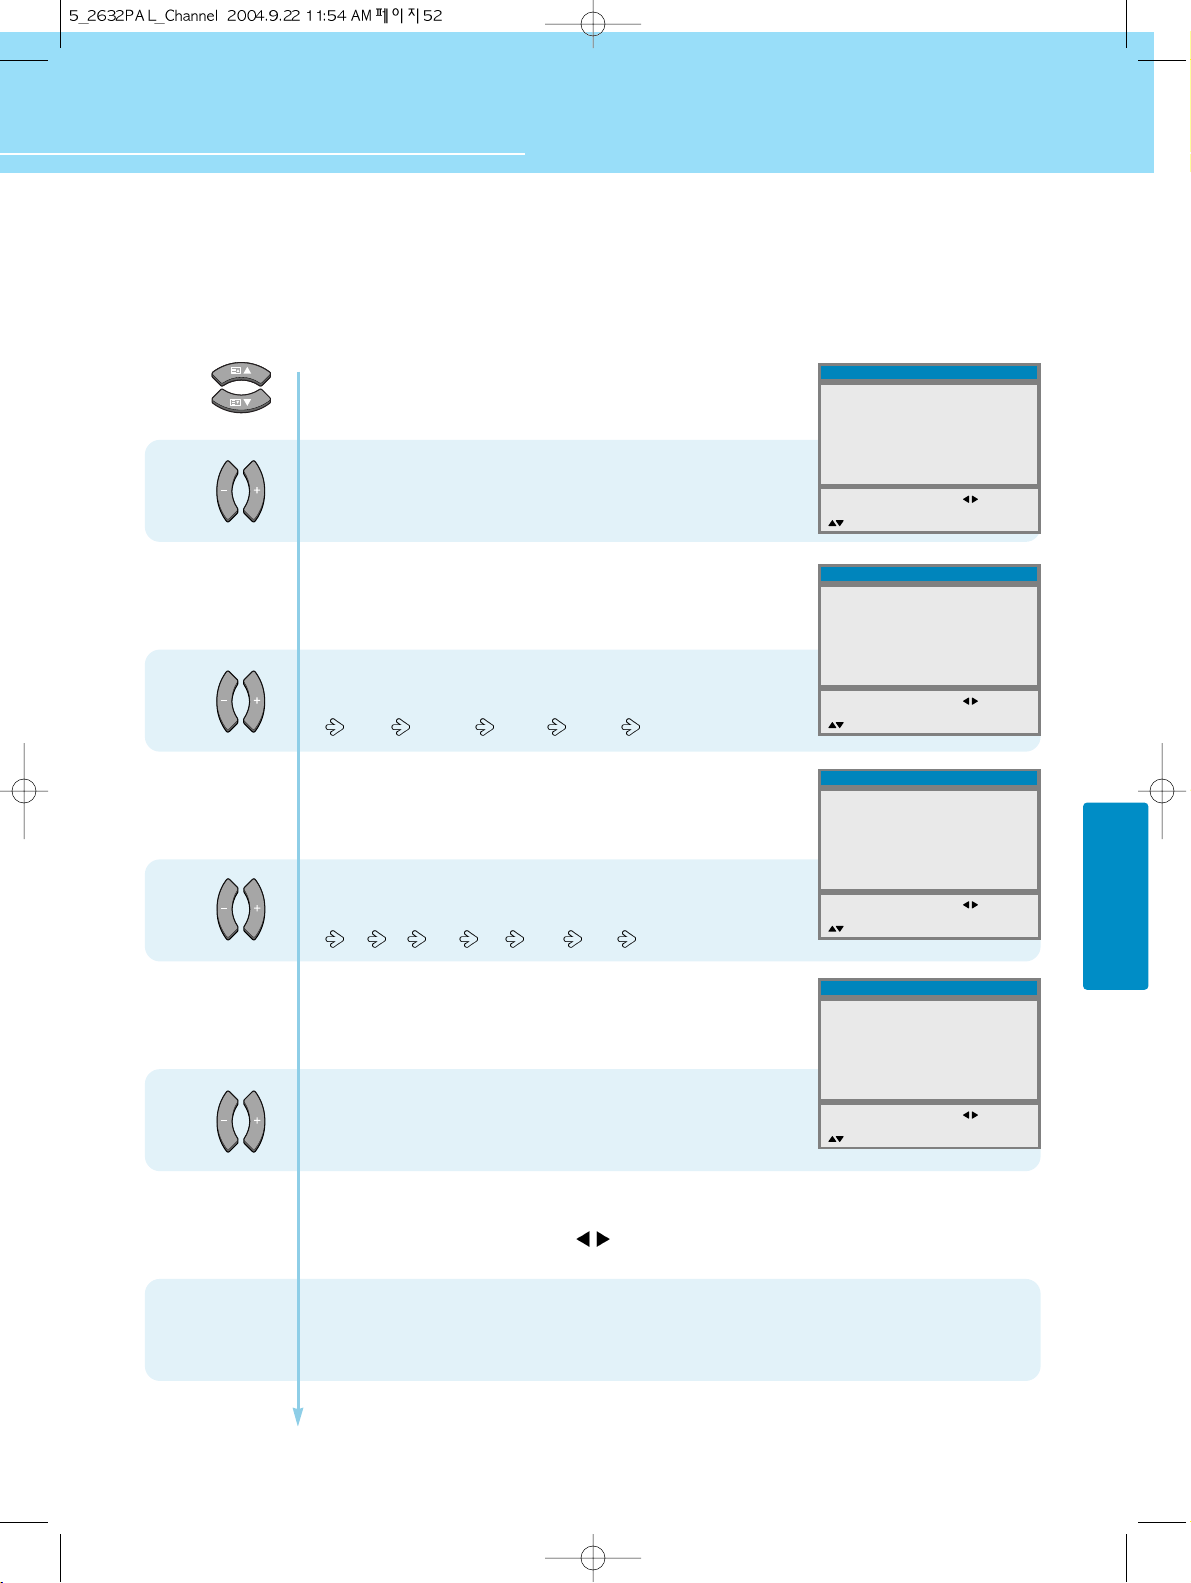
CHANNEL SETUP
8
6
7
How to Edit Program Manually
You can store the TV channels, including those received via cable networks when storing channels.
Press Up and Down buttons to move to
“Program”.
Press Left and Right buttons to select to
program.
Press the Down button and then go to step 8
if you need to set colour system.
Press Left and Right buttons,
then colour system changes in order below.
PAL SECAM NTSC AUTO
Press the Down button and then go to step 9
if you need to set sound system.
Press Left and Right buttons,
then sound system changes in order below.
I L L ’ M BG DK
Press the Down button and then go to step 10
if you need to set manual tuning.
Press Left and Right buttons to set to Manual Tuning.
You can directly set channel by pressing
Pr/C/S and numeric(0~9) button.
*The MANUAL Search function will operate in the button direction
you pressed when you press the
button for more than 2 seconds.
Press the Down button and then go to step 11
if you need to set to Fine Tunning.
Continued on next page ......
9
10
Install
Auto tunning
Program
Colour
System
Manual Tunning
Fine Tuning
Name
Program Edit
MENU : Previous : Adjust
INPUT : Exit
: Position
Install
Auto tunning
Program
Colour
System
Manual Tunning
Fine Tuning
Name
Program Edit
MENU : Previous : Select
INPUT : Exit
: Position
Install
Auto tunning
Program
Colour
System
Manual Tunning
Fine Tuning
Name
Program Edit
MENU : Previous : Select
INPUT : Exit
: Position
E/Euro
PAL
C21
471.25
- - - - -
E/Euro
PAL
C21
471.25
- - - - -
E/Euro
PAL
C21
471.25
- - - - -
01
BG
12
BG
12
BG
Install
Auto tunning
Program
Colour
System
Manual Tunning
Fine Tuning
Name
Program Edit
MENU : Previous : Select
INPUT : Exit
: Position
0~9 : Adjust
E/Euro
PAL
C21
471.25
- - - - -
12
DK
Page 56
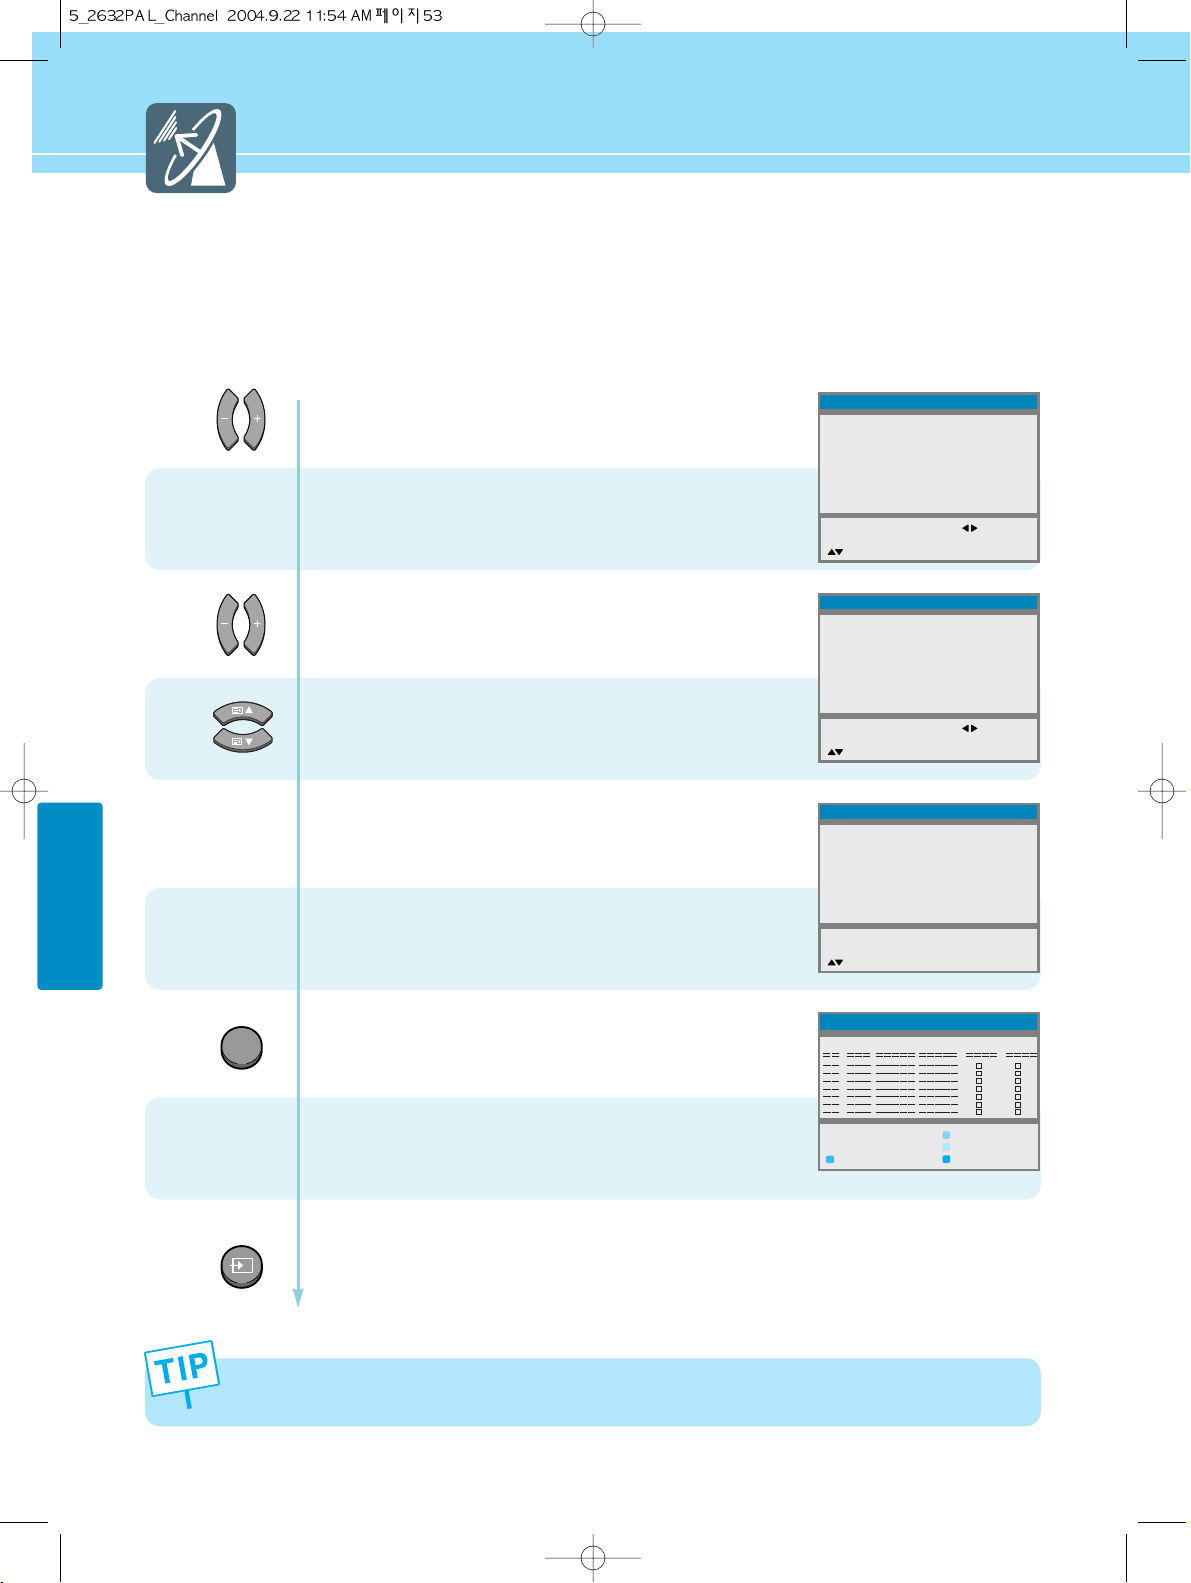
CHANNEL SETUP
53
...... Continued from previous page.
Press Left and Right buttons to set to
“Fine Tuning”. (Band limit ±2M byte)
Press the Down button and then go to step 12
if you need to assign name to channel.
Press Left and Right buttons,
then cursors are appear and edit is available.
Press Up and Down buttons to select
characters.
You can set up to 5 characters.
( A~Z, a~z, 0~9, space, !, x, +,
,
, -, ·, / )
Press the Right button after you input
the program name to store it.
Press the Down button and then go to step 14
if you need to set Program Edit.
Press OK button to select “Program Edit”.
Program Edit menu appears.
Users can edit program in their own ways.
(Program Move / Swap / Lock / Skip / Delete)
For details on the remote control, please go to next page.
Press MENU button after the setting is done, and Menu goes to the previous menu.
If the INPUT button is pressed, the menu disappears.
11
12
14
13
OK
NTSC or SECAM may not be supported in some regions.
Install
Auto tunning
Program
Colour
System
Manual Tunning
Fine Tuning
Name
Program Edit
MENU : Previous : Access
INPUT : Exit
: Position
Install
Auto tunning
Program
Colour
System
Manual Tunning
Fine Tuning
Name
Program Edit
MENU : Previous :
INPUT : Exit OK : Cancel
: Position
Install
Auto tunning
Program
Colour
System
Manual Tunning
Fine Tuning
Name
Program Edit
MENU : Previous OK : Access
INPUT : Exit
: Position
E/Euro
PAL
C23
471.25
- - - - -
E/Euro
PAL
C23
473.25
- - - - -
Adjust
E/Euro
PAL
C23
487.25
ABC - -
12
BG
12
BG
12
BG
INPUT
Program Edit
Pr Ch. Freq Name Lock Skip
MENU : Previous : Swap
TEXT : Delete : Lock
: Move : Skip
Page 57
HYUNDAI LCD TV HQL260WR/320WR
CHANNEL SETUP
54
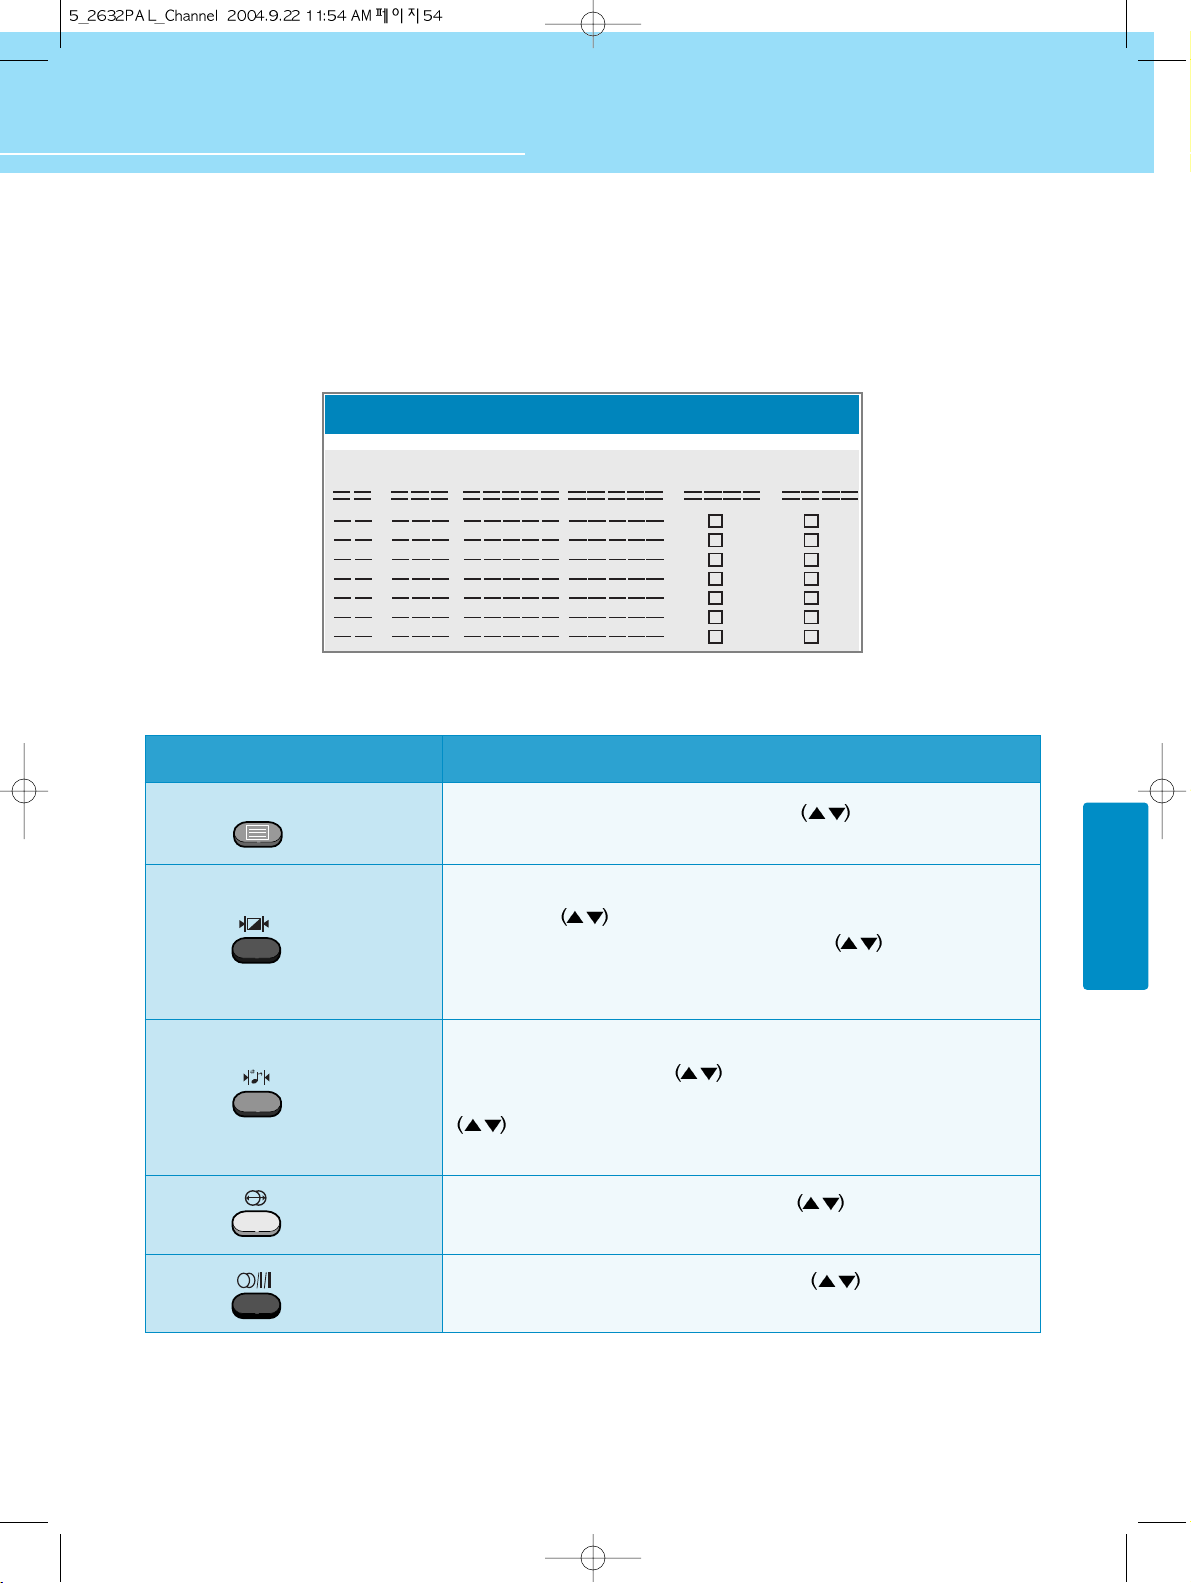
...... Continued from previous page. (Set to Program Edit.)
Pr Ch. Freq Name Lock Skip
Program Edit
DISPLAY(ACTION)
After moving to an unwanted channel by using
button or numeric key
pad, you can clear the channel by pressing this button.
If you want to change the order of programs, move to the channel you will
edit, by using
button or numeric key pad. Then press this button to
display ">>". You can move up and down by using
button or numeric
key pad. And then if this button is pressed a second time, your setting is
completed and the ">>" disappears.
If you want to swap one channel with another channel, move to the
appropriate channel by using
button or numeric key pad. Then press
this button to display ">>". You can move to the destination channel by using
button or numeric key pad. And then if this button is pressed a second
time, the first channel will be swapped with the second channel.
You can move to a channel you want by using
button or numeric key
pad. You can set Channel Lock by pressing this button.
You can move to an unwanted channel by using
button or numeric key
pad. You can set Channel Skip by pressing this button.
BUTTON
Delete
MOVE
SWAP
LOCK
SKIP
TTX ON/OFF
Page 58
55
CHANNEL SETUP
Teletext Feature
Most TV channels provide written information services via teletext.
Information provided includes with the next entry it is same :
Teletext information is often divided between several pages displayed in sequence,
which can be accessed by :
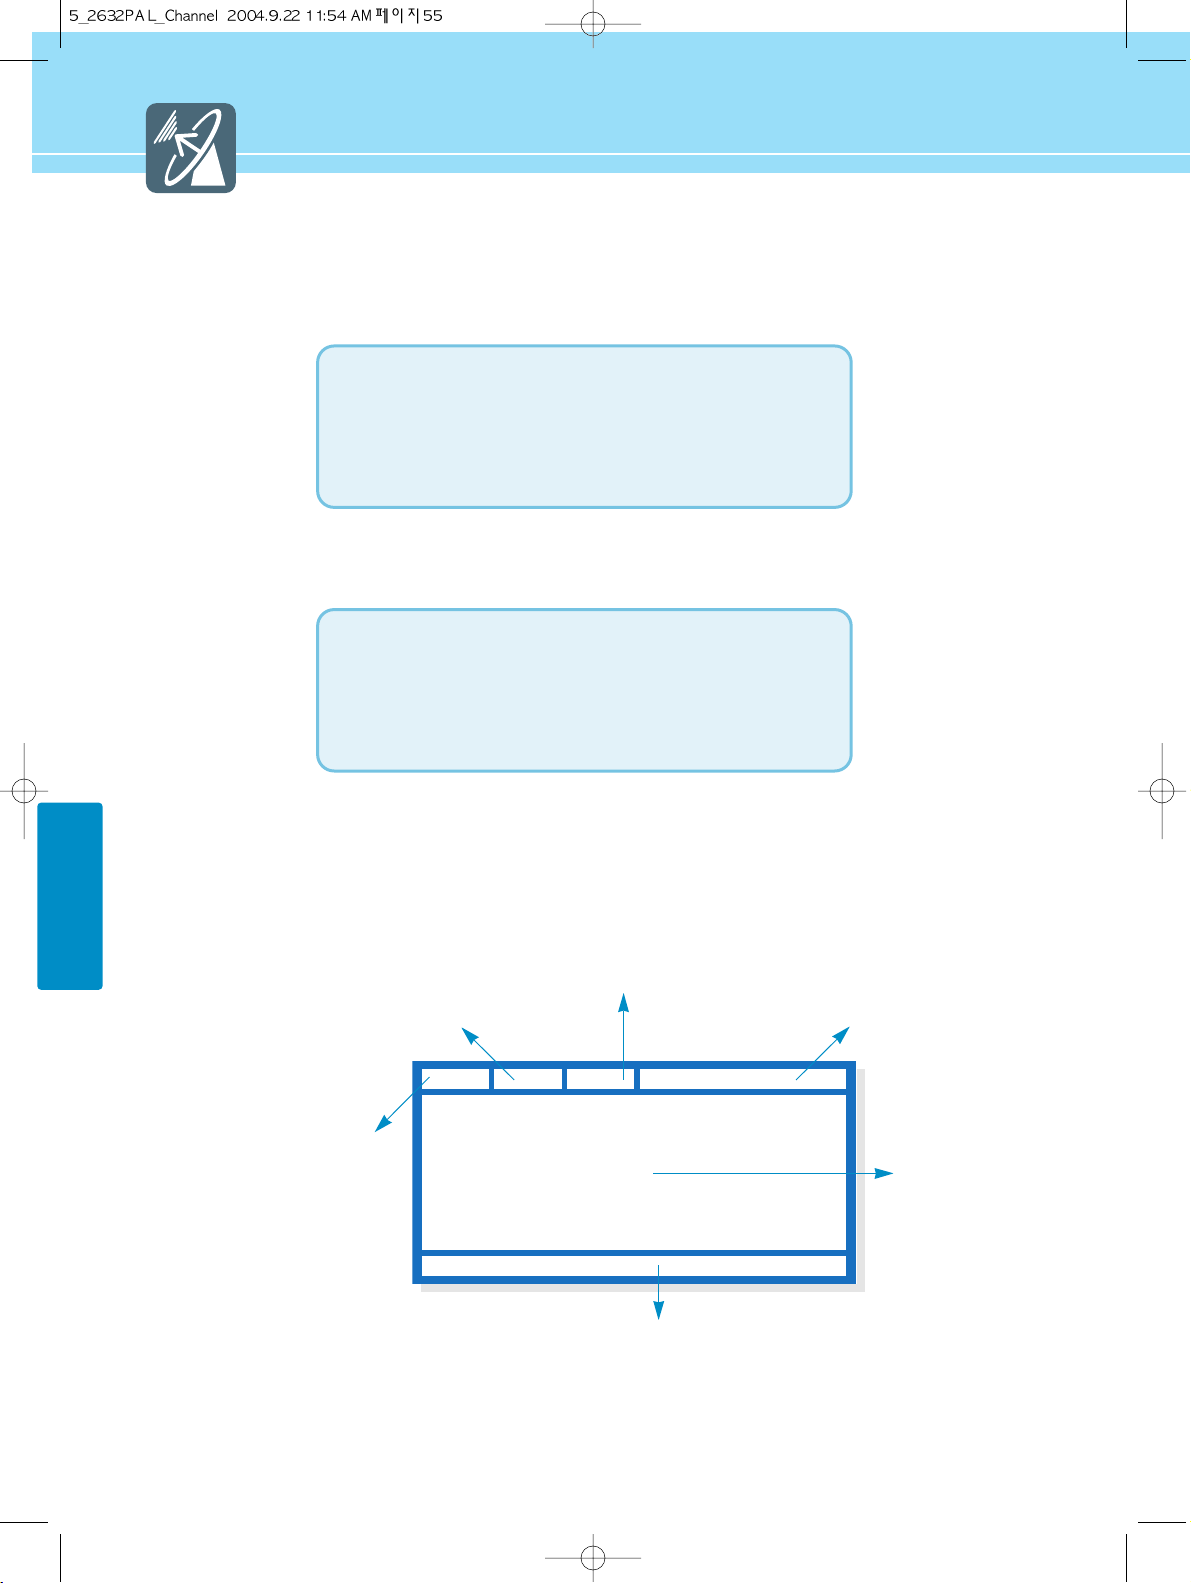
Teletext OSD(On-Screen-Display) Picture
Data and Time
D
F
E
CBA
Selected page number
Broadcasting channel identity
Text
Current page number or
search indications.
Status information
Fastext information
- TV programme times
- News bulletins and weather forecasts
- Sports results
- Travel information
- Entering the number
- Selecting a title in a list
- Selecting a coloured heading (FASTEXT SYSTEM)
- Travel information
Page 59
HYUNDAI LCD TV HQL260WR/320WR
CHANNEL SETUP
56
Displaying the Teletext Information
You can display Teletext information at any time on your TV.
For Teletext information to be display correctly channel reception to be stable otherwise
- Information maybe missing or some pages may not be displayed.
Selecting Display Options
When you have displayed a teletext page, you can have various options to suit you requirements.
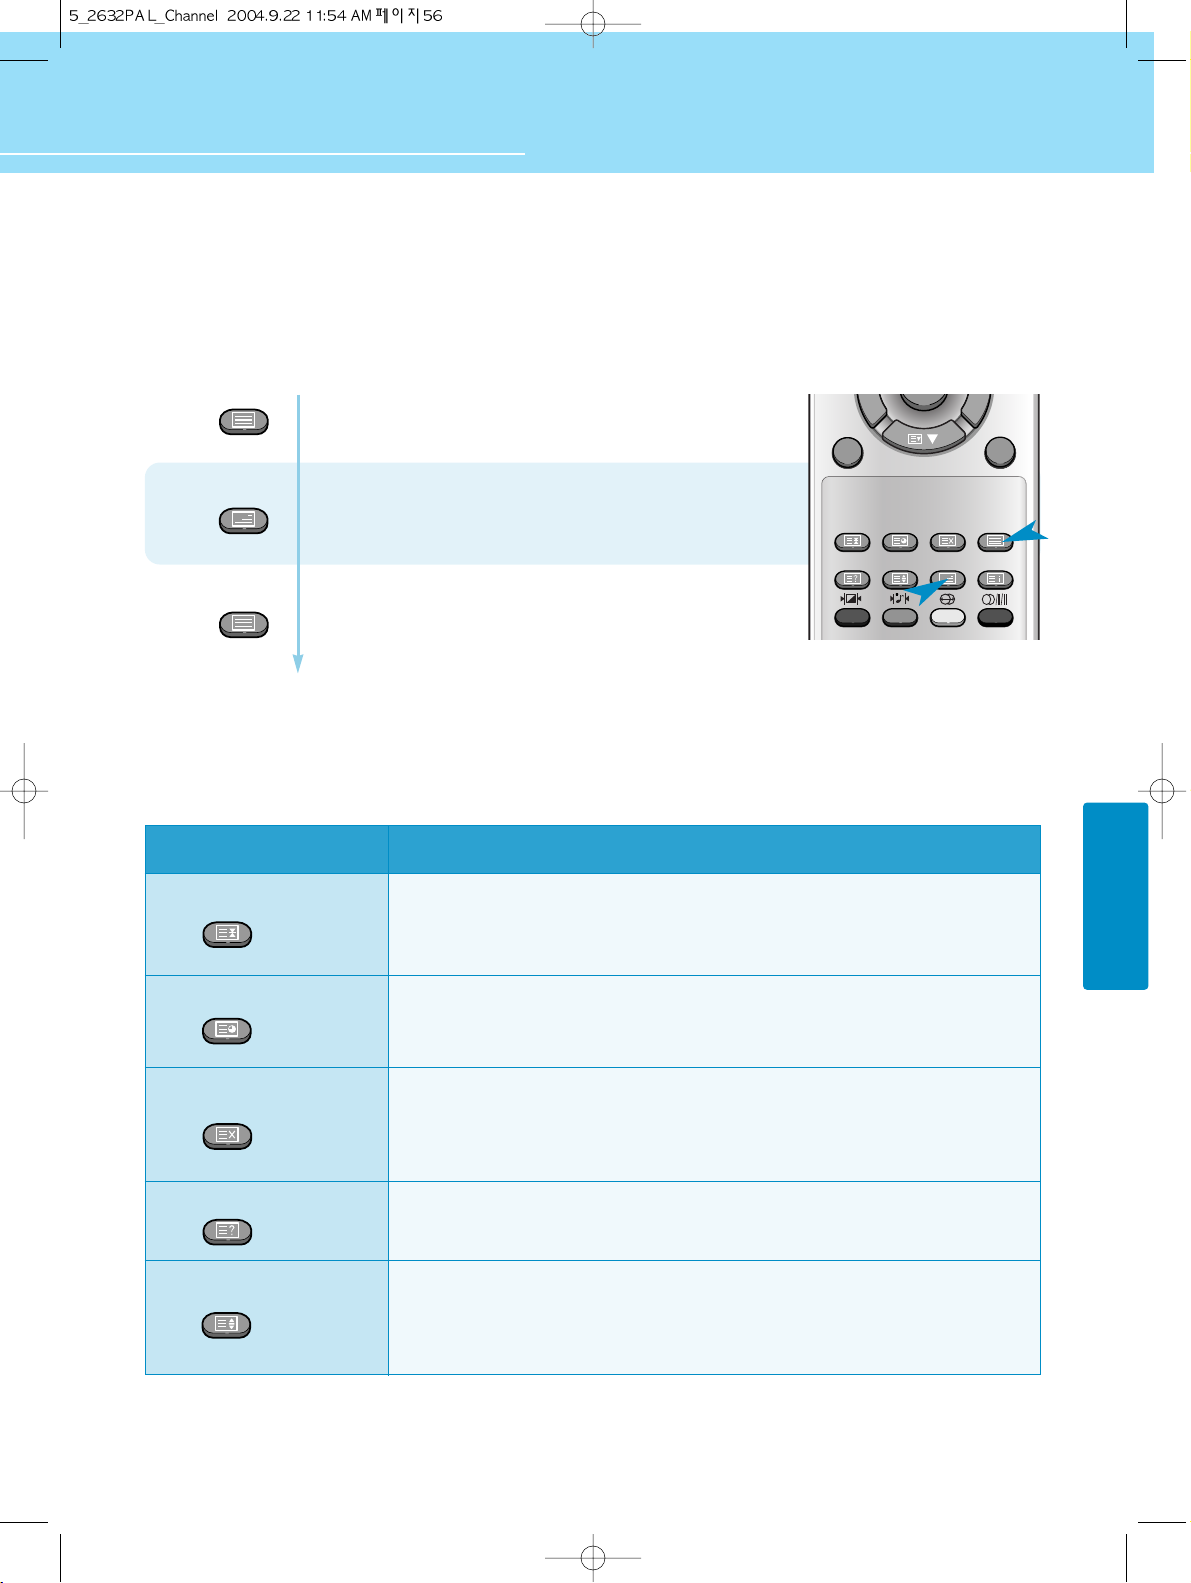
Press TTX ON/OFF button to activate the TTX mode.
(The contents of page 252 are displayed.)
If you wish to display the actual broadcast
at the same time as the teletext page, press MIX button.
- If the button is pressed a second time,
the function will be deactivated.
Press TTX ON/OFF button again to
exit from the teletext display.
2
1
3
HOLD
SUB PAGE
CANCEL
TTX ON/OFF
REVEAL
SIZE MIX INDEX
CHANNEL
FAVORITE
OK
TTX ON/OFF
TTX ON/OFF
MIX
DISPLAY(ACTION)
When the secondary pages are displayed in sequence, press the HOLD button.
To freeze the current display page, press the HOLD button again to resume.
Displays a secondary page by entering its number.
To return to normal viewing press the CANCEL button.
"???" (specific characters) is displayed at the upper left until
the new screen is selected.
Displays concealed text such as answer to quiz games.
To return to normal viewing, press this button again.
Whenever you press this button, the letter size of the page will be changed.
Once press : The letter of the top half page enlarge to double size.
Twice press : The letter of the bottom half page enlarge to double size.
Three times press : Return to the normal viewing
BUTTON
HOLD
SUB PAGE
CANCEL
REVEAL
SIZE
HOLD
SUB PAGE
CANCEL
REVEAL
SIZE
Page 60
57
CHANNEL SETUP
TTX
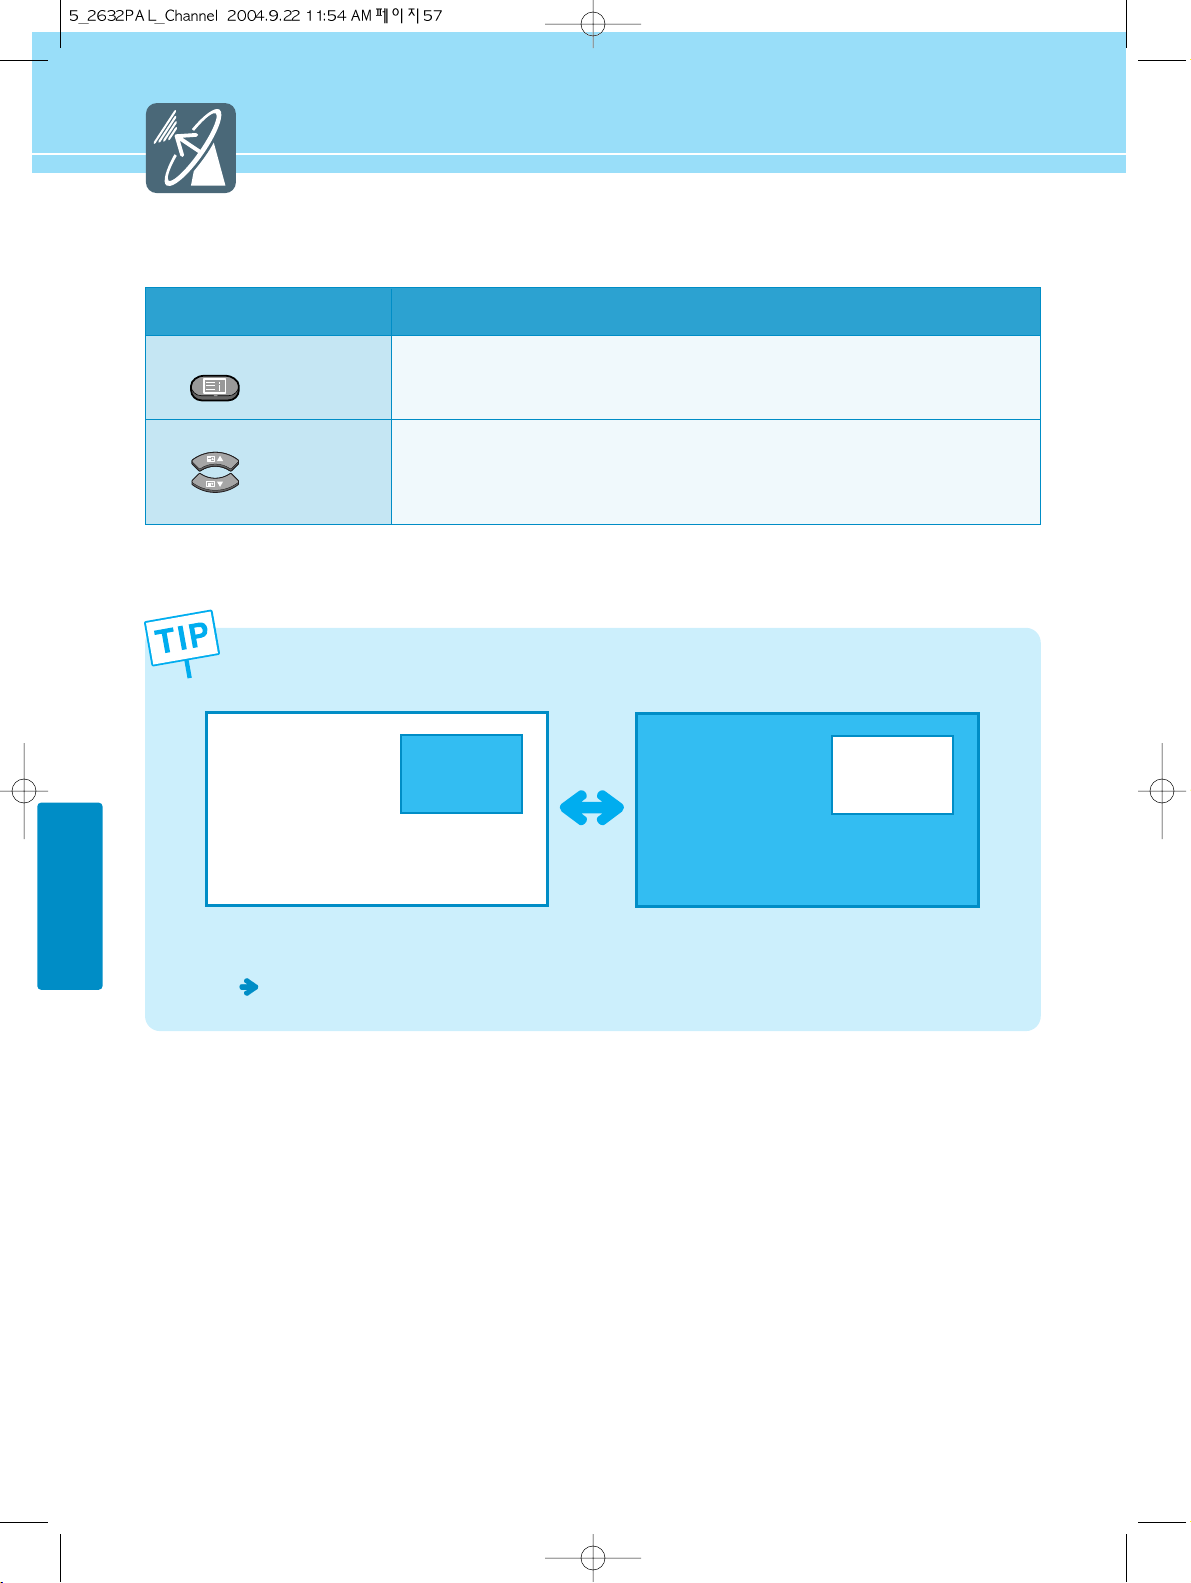
You can activate PIP while viewing TTX information.
The TTX function is not available in the PIP image when the PIP is on. The original screen will be restored
when the SWAP is active.
For details on PIP feature, please refer to the Picture Setup section on page 37~38.
TV or VCR,
DVD, PC
Restore
input source
of original
DISPLAY(ACTION)
To display the index page, press the INDEX button.
Displays the next page.
Displays the previous page.
BUTTON
INDEX
PAGE UP
PAGE DOWN
INDEX
TV or VCR,
DVD, PC
SWAP
Page 61
How to Select the Aspect Ratio ................................................. 59
How to Freeze Picture ............................................................... 60
How to Set Key-Lock ................................................................. 61
How to OSD(On-Screen-Display) Display Time ......................... 62
How to Set No key Operation Auto Power Off ............................ 63
How to Set No Signal Timeout ................................................... 64
How to Set Your Favorite Channels ............................................ 65
How to Set Noise Reduction and Use Factory Preset ................ 66
Displaying Information and Clock .............................................. 67
Choosing Your Language ........................................................... 68
Function Setup
HYUNDAI WIDE LCD TV
Page 62
59
FUNCTION SETUP
How to Select the Aspect Ratio
- Users can adjust Aspect Ratio as users want.
- This function is available only with the remote control.
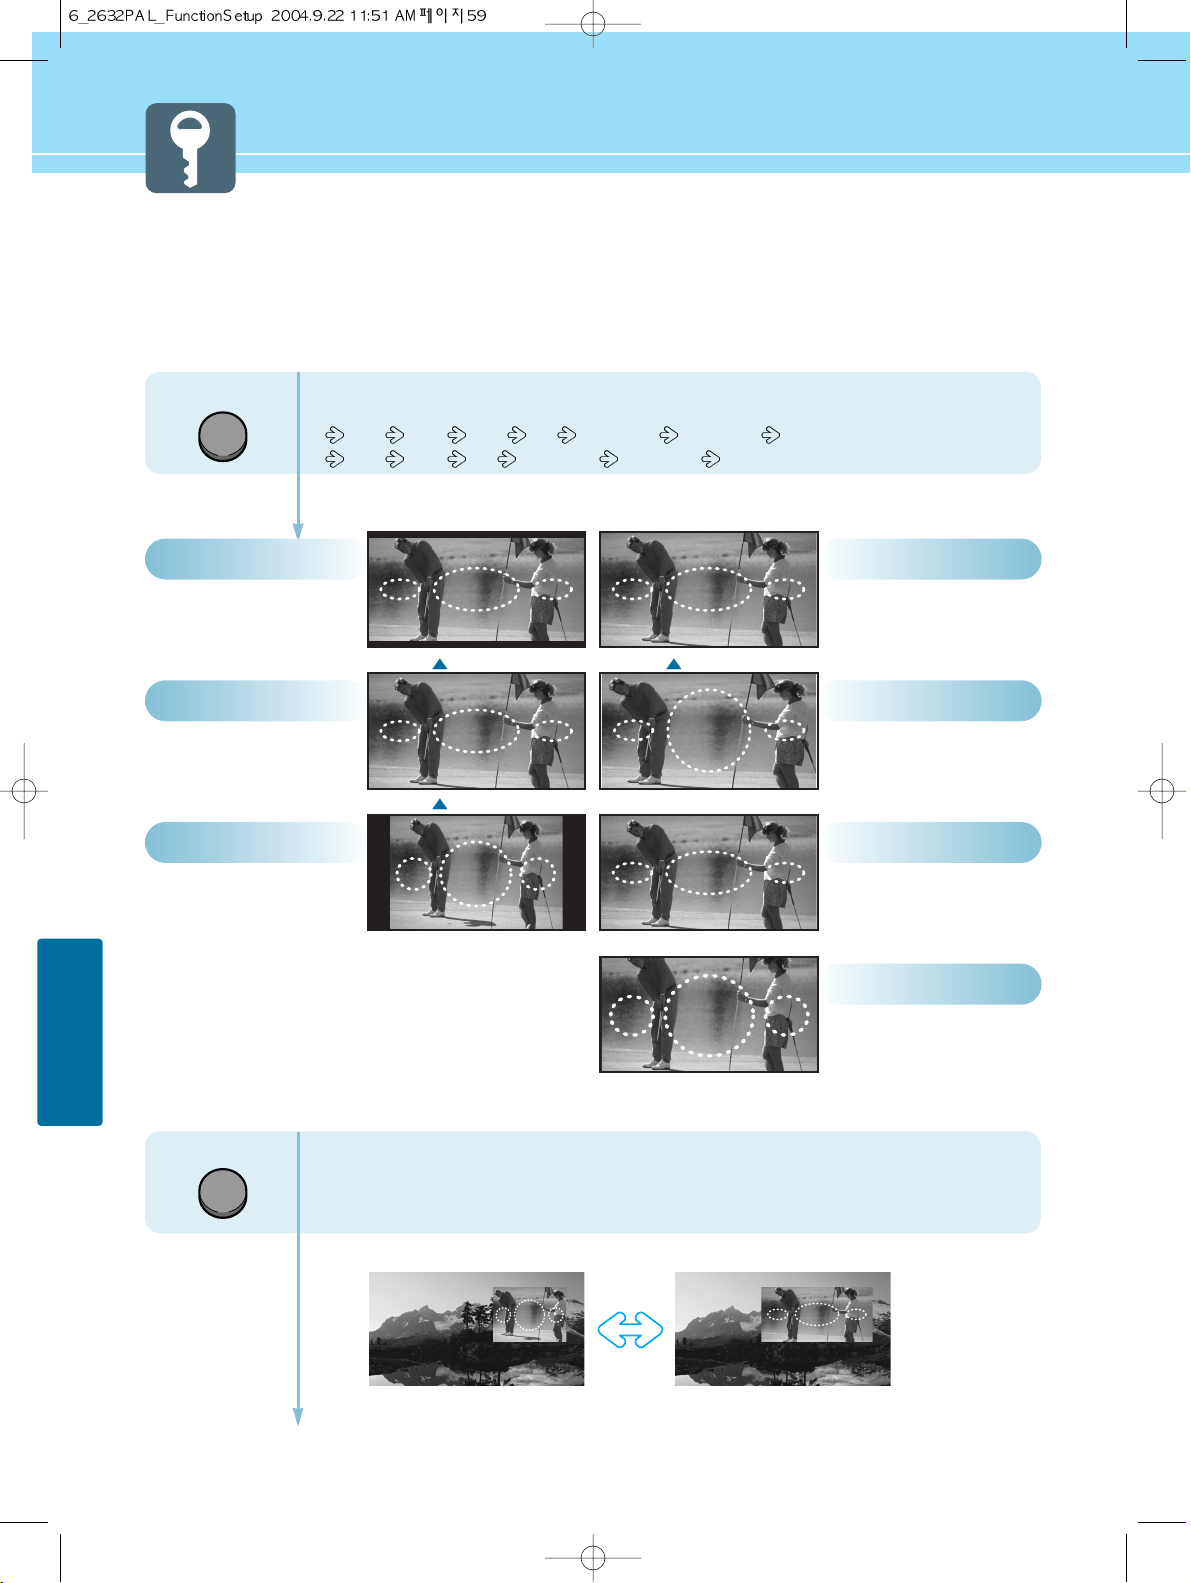
Press the ASPECT button, then Aspect Ratio
changes in order below.
Auto 16:9 15:9 4:3 Zoom 1~5 Panorama (HQL260WR)
Auto 16:9 4:3 Zoom 1~5 Panorama (HQL320WR)
- In case the PIP mode
When you are viewing the main and PIP images at the same time :
The PIP image will change only from 4:3 to 16:9.
General broadcast picture
is adjusted to 16:9.
16:9
Picture size for panorama
video.
Panorama
General broadcast picture is
adjusted to 16:9.
16:9
The full screen of the
image adjusted to 15:9.
15:9
The size of the image is
automatically stretched
out by receiving WSS
(Wide Screen Signal) data.
AUTO
General picture size.
4:3
Zoom1~5
16:94:3
ASPECT
ASPECT
Zoom in 4:3 in horizontal
and vertical direction.
(This mode is recommended
in letter box format.)
HQL260WR
HQL260WR
HQL320WR
Page 63
60
FUNCTION SETUP
HYUNDAI LCD TV HQL260WR/320WR
How to Freeze Picture
The user can temporarily stop the playing picture.
OSD menu displays the current aspect ratio.
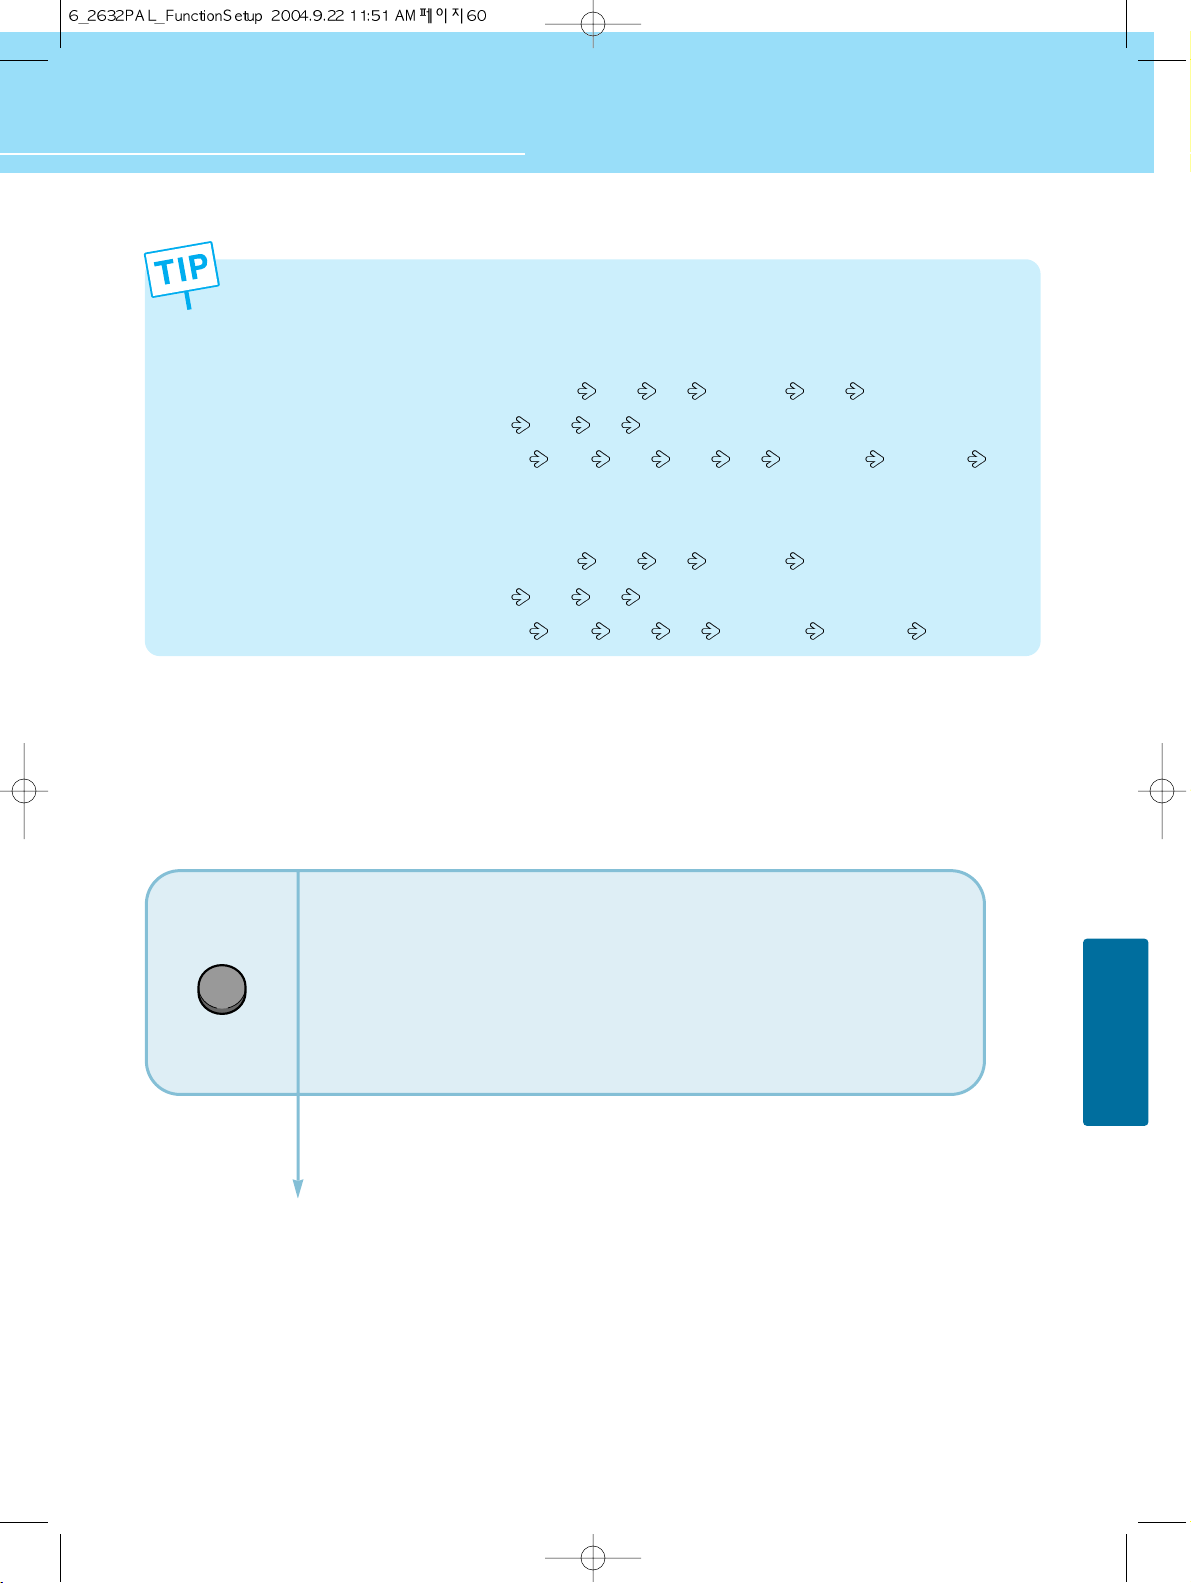
If you press the ASPECT button second time, aspect ratio will be changed according to Input mode as follows :
HQL260WR -
- Under DTV or DVD inputs : Users can select
15:9 4:3 Zoom1~5 16:9 in order.
- Under PC inputs : Users can select
15:9 4:3 in order.
- Under other inputs : Users can select
Auto 16:9 15:9 4:3 Zoom 1~5 Panorama
in order.
HQL320WR -
- Under DTV or DVD inputs : Users can select
16:9 4:3 Zoom1~5 in order.
- Under PC inputs : Users can select
16:9 4:3 in order.
- Under other inputs : Users can select
Auto 16:9 4:3 Zoom 1~5 Panorama in order.
Press Still button.
Playing picture is stopped.
* In PIP mode, the main picture stops.
To deselect Still function.
Press Still button once more.
STILL
Page 64
61
FUNCTION SETUP
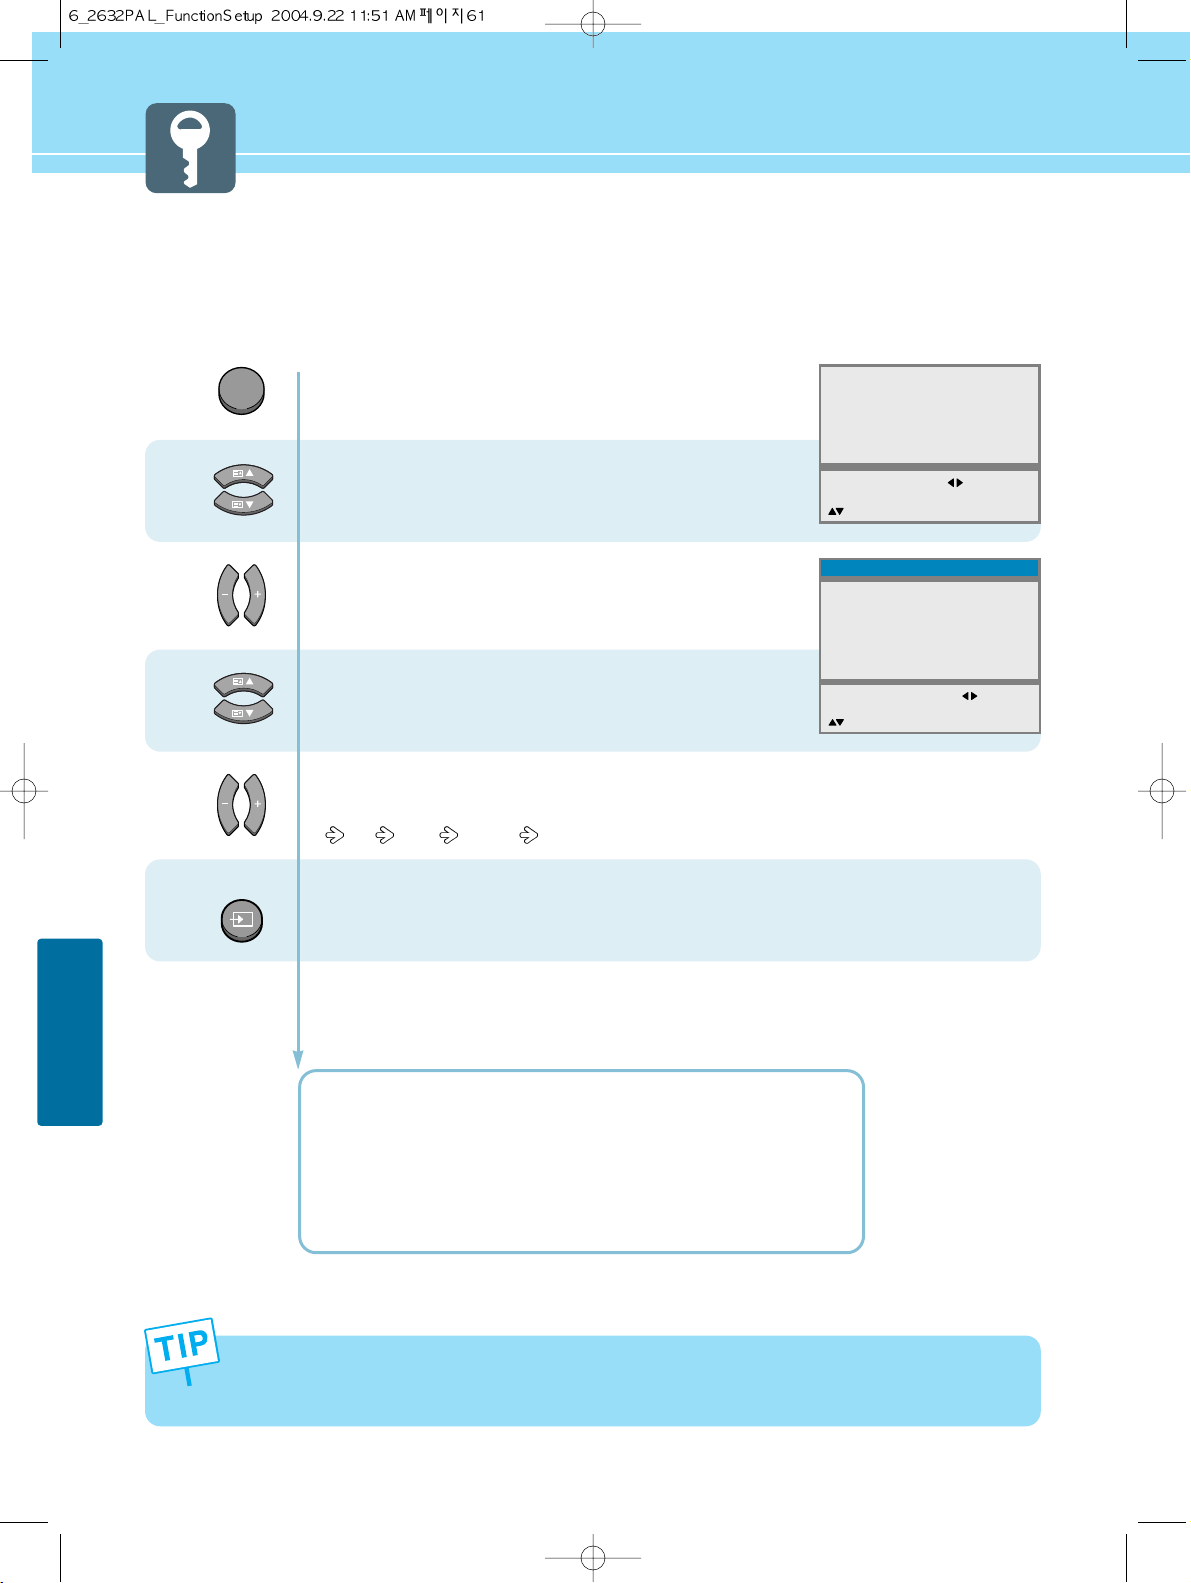
How to Set Key-Lock
This is to lock the control buttons on the front top of LCD TV.
Press Menu button.
Menu items appear on the screen.
Press Up and Down buttons to move to
“Advanced”.
Press Left, Right or OK button to select
“Advanced”.
Press Up and Down buttons to move to
“Local Lock”.
Press Left and Right buttons, then the menu
changes in order below.
Off Once Always
Press MENU button after the setting is done, and Menu goes to the previous menu.
If the INPUT button is pressed, the menu disappears.
OFF : With the lock function off, you can control the TV with both
the remote control and the buttons on the TV.
ONCE : The lock function will turn off automatically after you turn
the TV on/off once with the remote control.
ALWAYS : With the lock function always on, you can control the TV
only with the remote control, not with the buttons on the TV.
- This function prevents children from controlling the TV when parents are not home.
- It is available after setting this function with the remote control.
* How to Unlock Local-Lock : Press “-” and “Power” buttons simultaneously(Buttons on the front top of TV).
1
2
3
4
MENU
INPUT
Picture
Sound
Clock
Install
Language
Advanced
MENU : Previous : Select
INPUT : Exit OK : Select
: Position
Advanced
Local Lock
Osd Timeout
No Operation Timeout
No Signal Timeout
Favorite Channel
NR
Factory Preset
MENU : Previous : Select
INPUT : Exit
: Position
Off
0
0
0
Off
Page 65
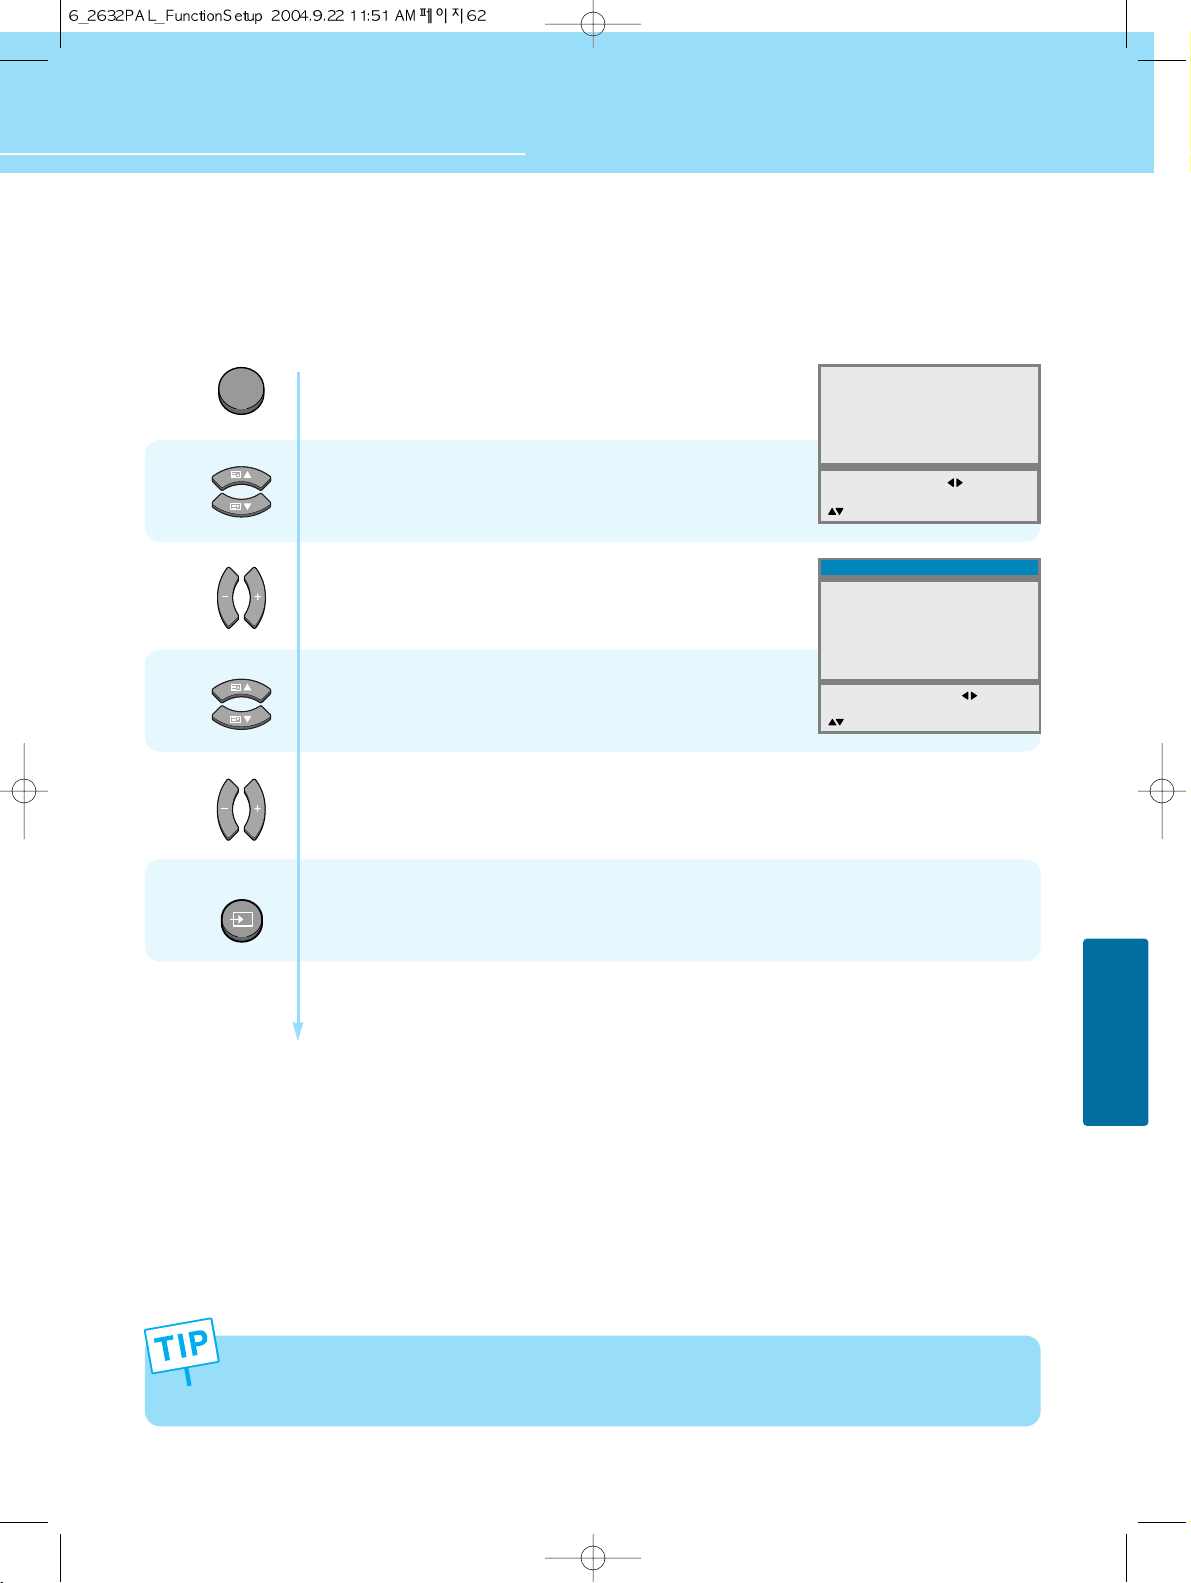
How to Set OSD(On-Screen-Display) Display Time
62
FUNCTION SETUP
HYUNDAI LCD TV HQL260WR/320WR
1
2
3
MENU
4
Press Menu button.
Menu items appear on the screen.
Press Up and Down buttons to move to
“Advanced”.
Press Left, Right or OK button to select
“Advanced”.
Press Up and Down buttons to move to
“Osd Timeout”.
Press Left and Right buttons to adjust the OSD display time.
Whenever you press this button, you can adjust it in 5-second increments from 0 to 60 seconds.
Press MENU button after the setting is done, and Menu goes to the previous menu.
If the INPUT button is pressed, the menu disappears.
- If you do not press the MENU button after adjusting the OSD timeout, the menu screen will disappear
automatically after the set time.
- If you set 0, menu screen will not disappear automatically.
INPUT
Picture
Sound
Clock
Install
Language
Advanced
MENU : Previous : Select
INPUT : Exit OK : Select
: Position
Advanced
Local Lock
Osd Timeout
No Operation Timeout
No Signal Timeout
Favorite Channel
NR
Factory Preset
MENU : Previous : Adjust
INPUT : Exit
: Position
On
Off
0
0
0
Page 66
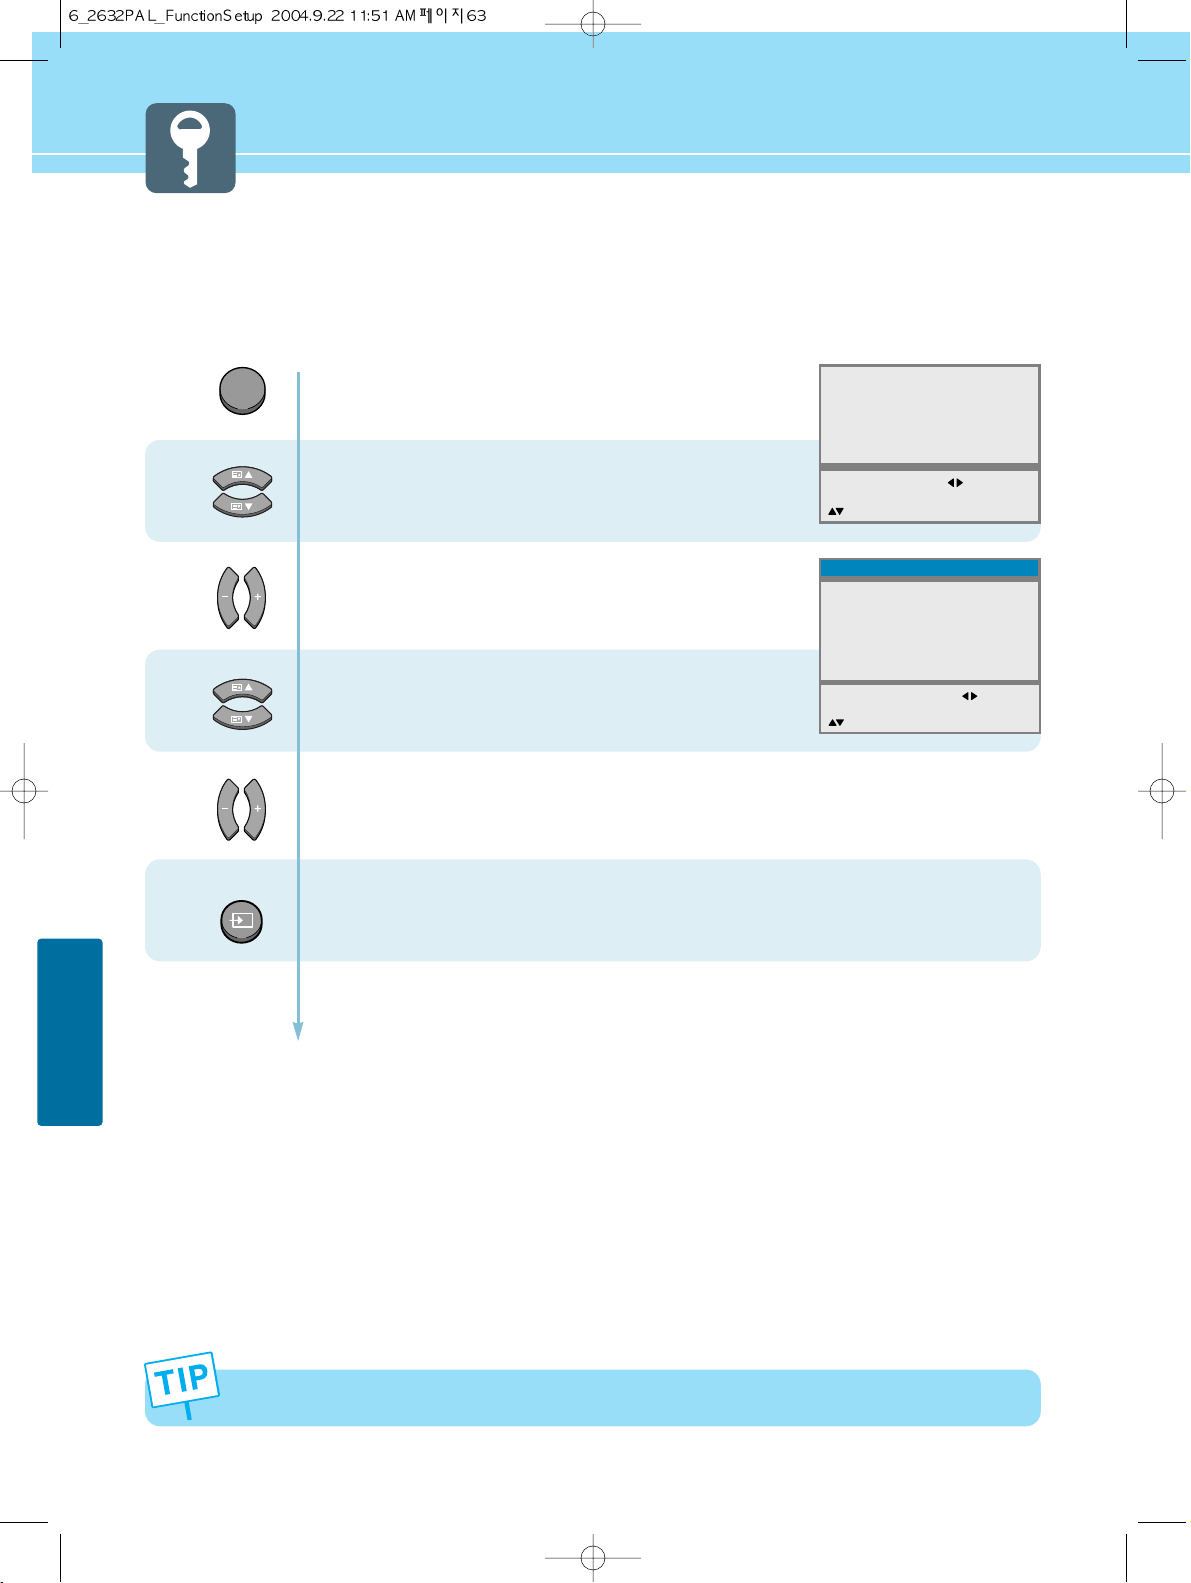
How to Set No Key Operation Auto Power Off
Automatically turns the power off if there is no button pressed for a period of time
after AUTO Wake-Up turns the power on.
63
FUNCTION SETUP
1
2
3
MENU
4
Press Menu button.
Menu items appear on the screen.
Press Up and Down buttons to move to
“Advanced”.
Press Left, Right or OK button to select
“Advanced”.
Press Up and Down buttons to move to
“No Operation Timeout”.
Press Left and Right buttons to adjust the auto power off time.
You can adjust it in 30-minute increments from 0 to 180 minutes.
Press MENU button after the setting is done, and Menu goes to the previous menu.
If the INPUT button is pressed, the menu disappears.
If you set the time to 0, the TV will not use the auto power off function.
INPUT
Picture
Sound
Clock
Install
Language
Advanced
MENU : Previous : Select
INPUT : Exit OK : Select
: Position
Advanced
Local Lock
Osd Timeout
No Operation Timeout
No Signal Timeout
Favorite Channel
NR
Factory Preset
MENU : Previous : Adjust
INPUT : Exit
: Position
Off
10
0
0
Off
Page 67
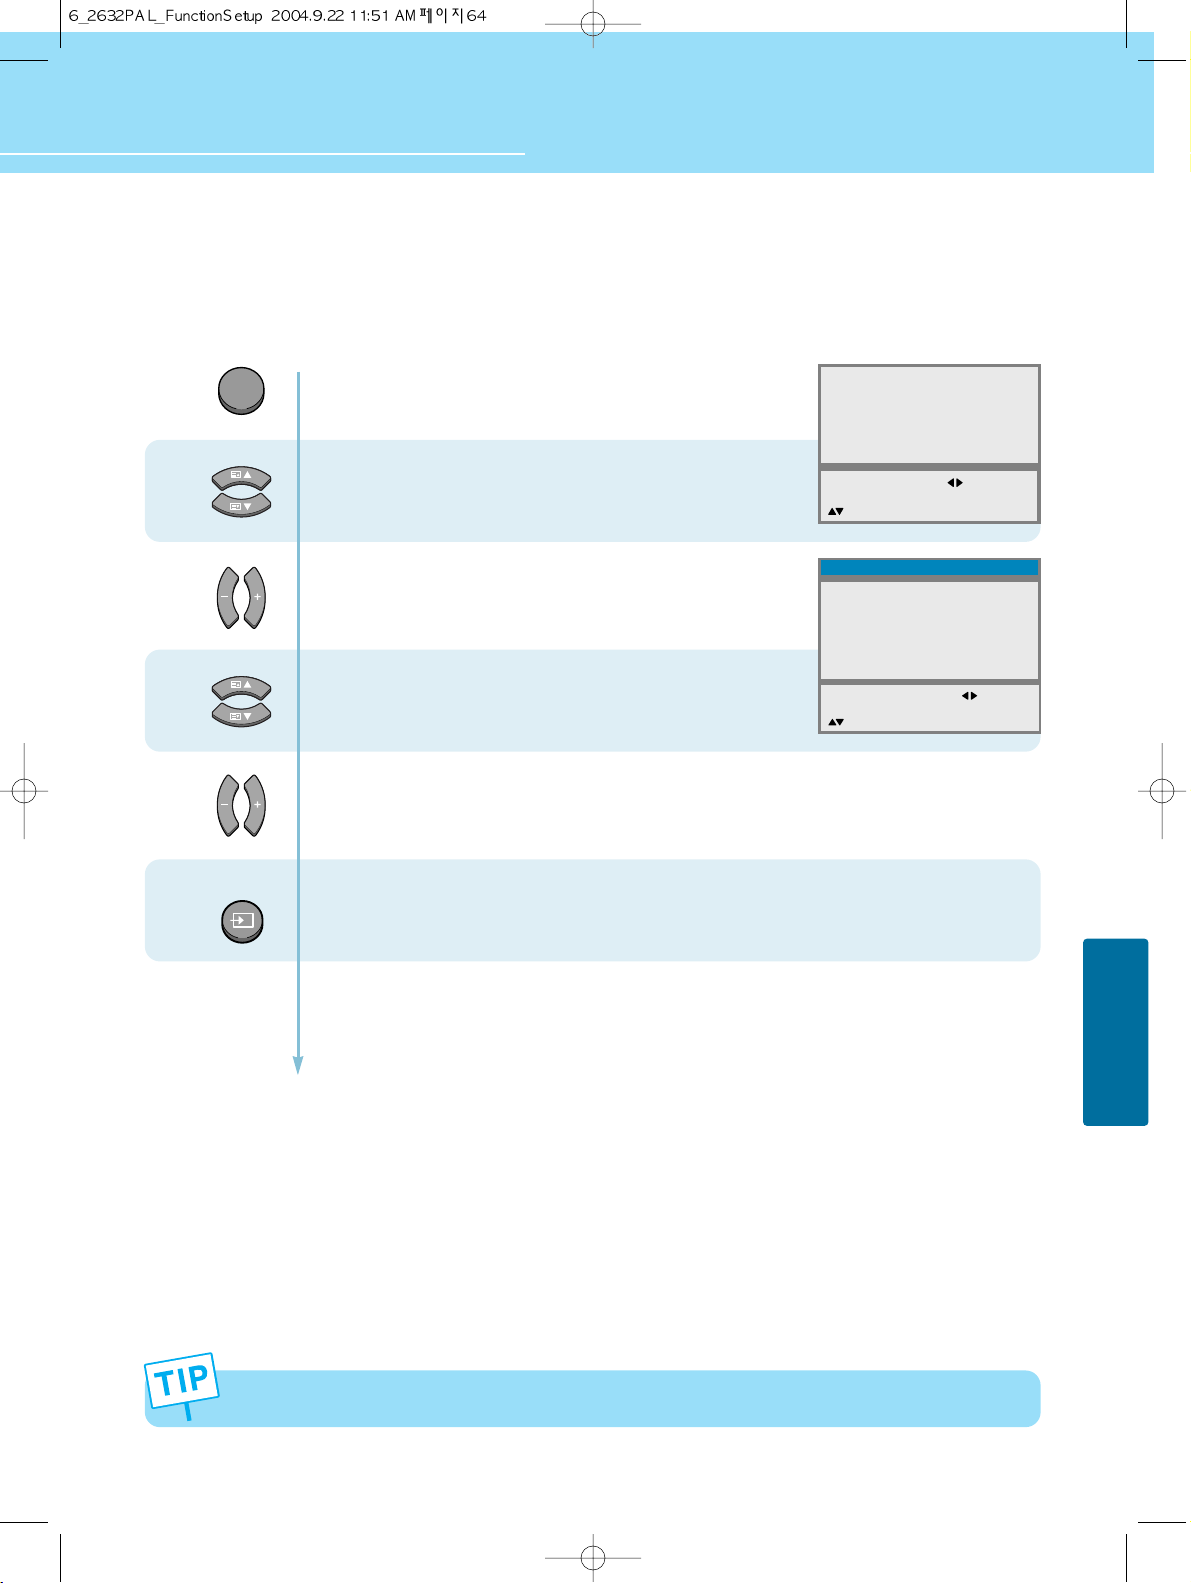
How to Set No Signal Timeout
- Automatically turns the power off if there is no broadcast signal for the set time.
- This Function is available only to TV mode.
64
FUNCTION SETUP
HYUNDAI LCD TV HQL260WR/320WR
1
2
3
If you set the time to 0, the TV will not use the auto power off function.
MENU
4
Press Menu button.
Menu items appear on the screen.
Press Up and Down buttons to move to
“Advanced”.
Press Left, Right or OK button to select
“Advanced”.
Press Up and Down buttons to move to
“No Signal Timeout”.
Press Left and Right buttons to adjust
the auto power off time.
You can adjust it in 1-minute increments from 0 to 20 minutes.
Press MENU button after the setting is done, and Menu goes to the previous menu.
If the INPUT button is pressed, the menu disappears.
INPUT
Picture
Sound
Clock
Install
Language
Advanced
MENU : Previous : Select
INPUT : Exit OK : Select
: Position
Advanced
Local Lock
Osd Timeout
No Operation Timeout
No Signal Timeout
Favorite Channel
NR
Factory Preset
MENU : Previous : Adjust
INPUT : Exit
: Position
Off
10
30
0
Off
Page 68
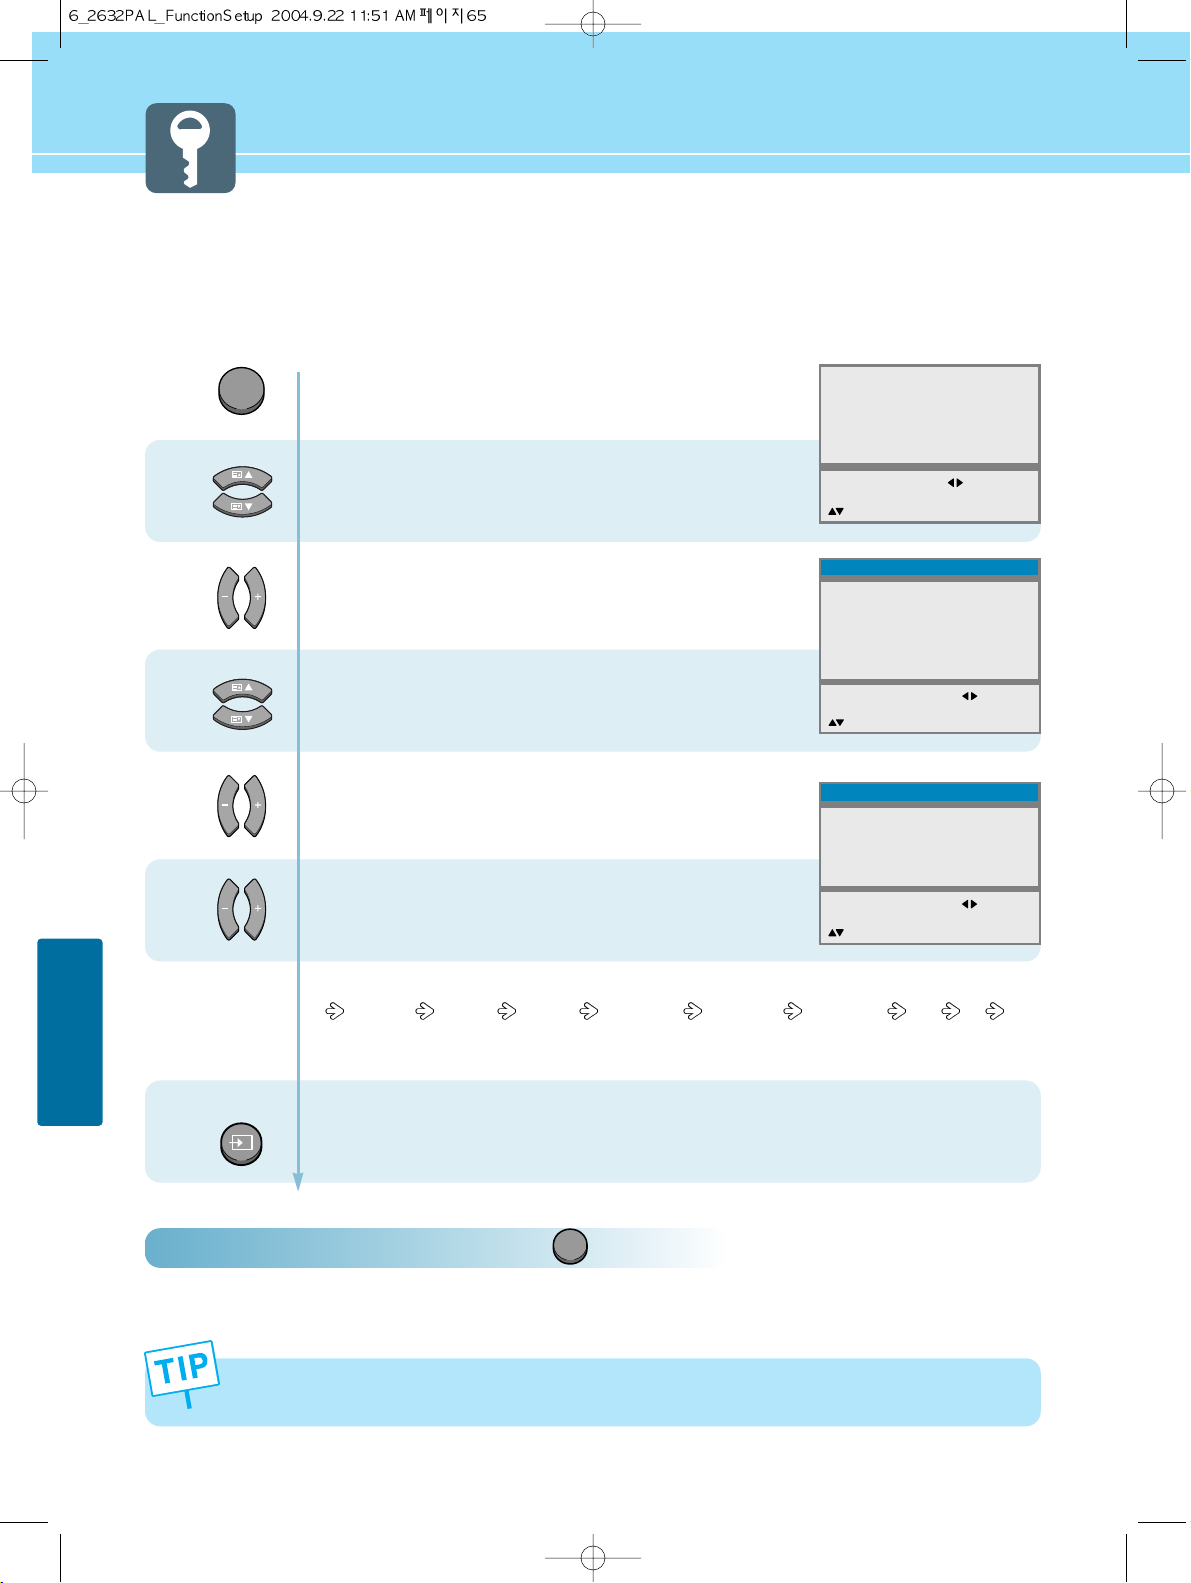
How to Set Your Favorite Channels
This is to store TV channels or input sources you most frequently use.
How To Directly Select
Favorite Channel : Press button.
The selection will switch whenever you press the Favorite button on the remote control.
65
FUNCTION SETUP
- You can delete the selection by pressing the OK button
- You can set up to 5 in turn.
1
2
3
MENU
4
5
Press Menu button.
Menu items appear on the screen.
Press Up and Down buttons to move to
“Advanced”.
Press Left, Right or OK button to select
“Advanced”.
Press Up and Down buttons to move to
“Favorite Channel”.
Press Left and Right buttons to select
“Favorite Channel”.
Favorite Channel menu appear.
Press Left and Right buttons to set
favorite channel or input source.
The channel or input source are changed in order below.
Pr00~99 SCART1 SCART2 AV1 VIDEO AV1 S-VHS AV2 VIDEO DTV PC
You can directly set channel or input source by pressing numeric(0~9), PC, DTV
and Video button.
Press MENU button after the setting is done, and Menu goes to the previous menu.
If the INPUT button is pressed, the menu disappears.
FAVORITE
Picture
Sound
Clock
Install
Language
Advanced
MENU : Previous : Select
INPUT : Exit OK : Select
: Position
Advanced
Local Lock
Osd Timeout
No Operation Timeout
No Signal Timeout
Favorite Channel
NR
Factory Preset
MENU : Previous : Select
INPUT : Exit
: Position
Favorite Channel
Pr01
Pr12
SCART1
AV1 VIDEO
- - - - -
MENU : Previous : Adjust
INPUT : Exit 0~9 : Adjust
: Position OK : Clear
Off
Off
10
30
5
INPUT
Page 69
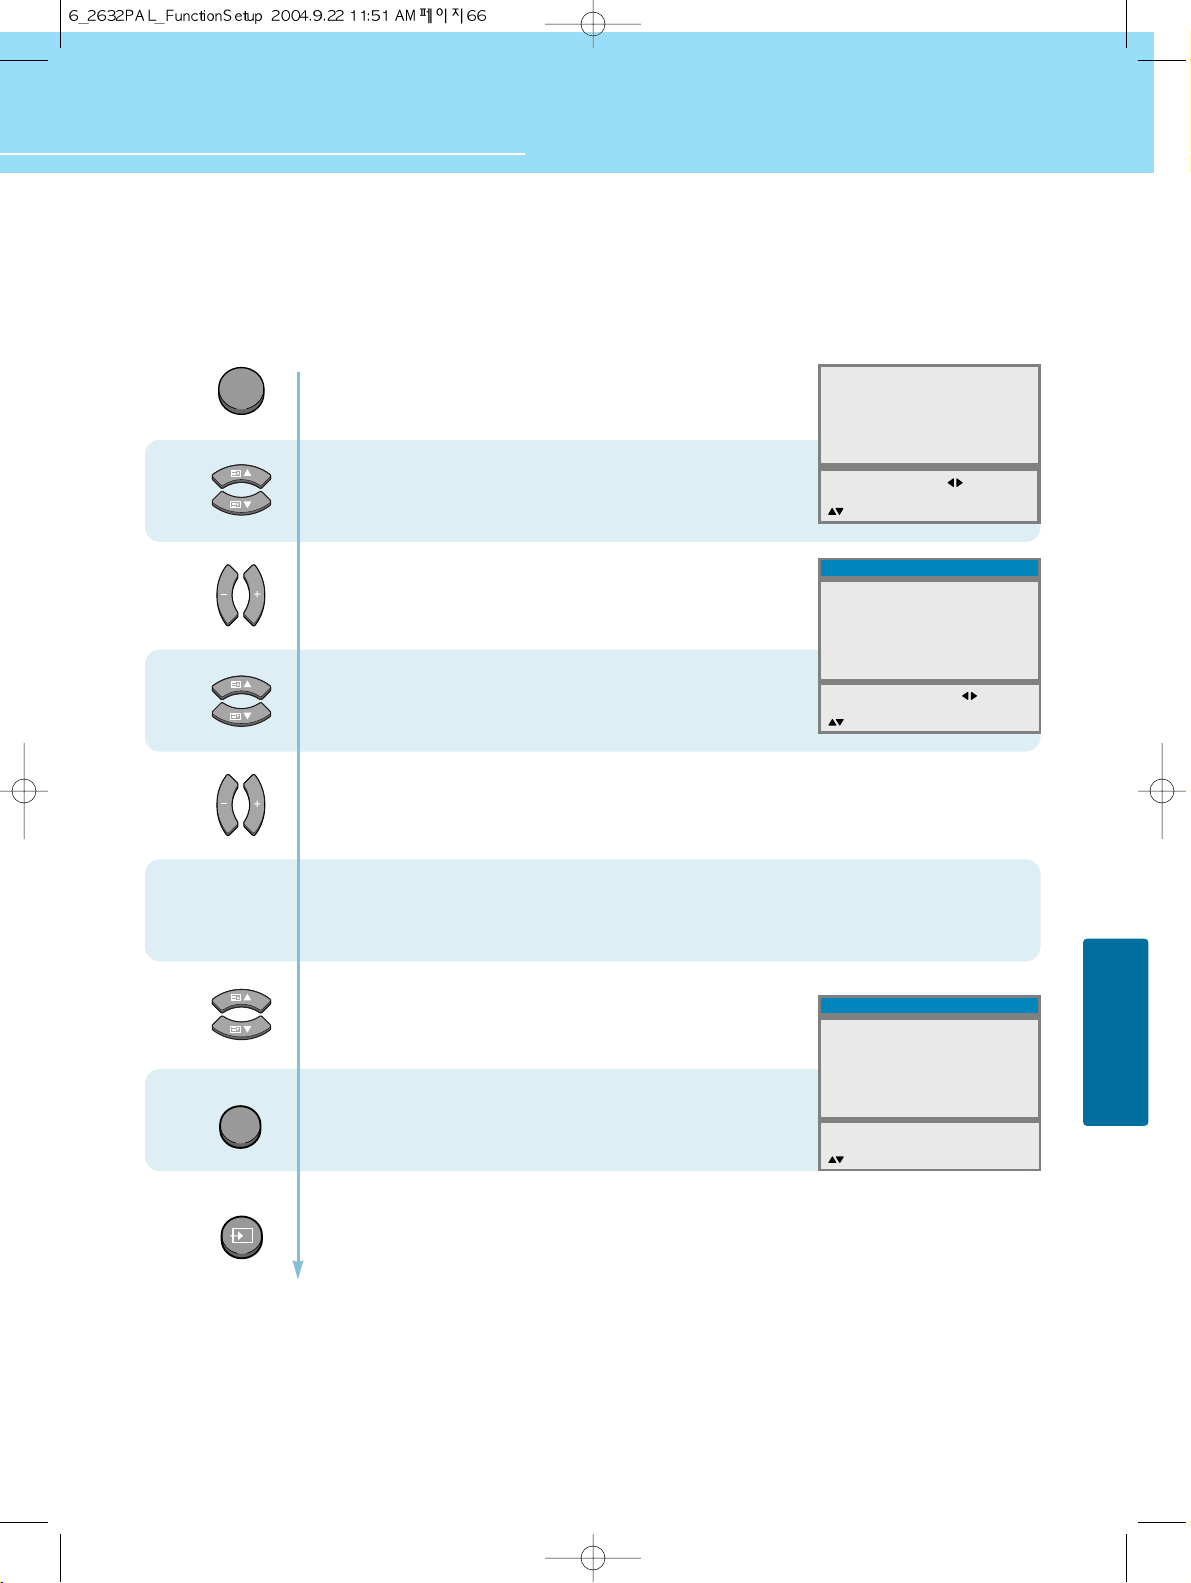
How to Set Noise Reduction and Use Factory Preset
Noise Reduction is to eliminate some noise on the screen and It is not applied to DTV and PC mode.
66
FUNCTION SETUP
HYUNDAI LCD TV HQL260WR/320WR
Press Menu button.
Menu items appear on the screen.
Press Up and Down buttons to move to
“Advanced”.
Press Left, Right or OK button to select
“Advanced”.
Press Up and Down buttons to move to
“NR”.
Press Left and Right buttons to “On/Off”.
Go to step 5
if you need to recall to the default.
Press Up and Down buttons to move to
“Factory Preset”.
Press the OK button.
Then, It will recall to the defult.
(Except for Favorite Channel and Clock)
Press MENU button after the setting is done, and Menu goes to the previous menu.
If the INPUT button is pressed, the menu disappears.
MENU
1
2
3
4
5
6
Picture
Sound
Clock
Install
Language
Advanced
MENU : Previous : Select
INPUT : Exit OK : Select
: Position
Advanced
Local Lock
Osd Timeout
No Operation Timeout
No Signal Timeout
Favorite Channel
NR
Factory Preset
MENU : Previous : Select
INPUT : Exit
: Position
Off
10
30
5
On
OK
INPUT
Advanced
Local Lock
Osd Timeout
No Operation Timeout
No Signal Timeout
Favorite Channel
NR
Factory Preset
MENU : Previous OK : Access
INPUT : Exit
: Position
Off
10
30
5
On
Page 70
67
FUNCTION SETUP
Displaying Information and Clock
- You can view the channel information and setting status by pressing the “INFO” button on the remote control.
- You can view the clock by pressing the “OK” button on the remote control.
In case of applying TV input
Press the INFO button.
In case of applying DTV input
Press the INFO button.
In case of applying PC input
Press the INFO button.
In case of applying PIP input
Press the INFO button.
In case of viewing only clock information.
Press the OK button.
INFO
INFO
INFO
INFO
OK
Pr02 -----
PM 12:30
Mono
Sleep Off
DTV
PM 12:30
Stereo
Sleep Off
1080i@60Hz
PC
PM 12:30
Stereo
Sleep Off
1024x768@60Hz
Pr02 -----
PM 12:30
Pr02 SCART1
Mono
Sleep Off
PM 12:30
Page 71
HYUNDAI LCD TV HQL260WR/320WR
FUNCTION SETUP
68
Choosing Your Language
When you start using your TV for the first time, you must select your language preference in order to display main
menus and sub menues, etc.
1
2
3
MENU
4
Press Menu button.
Menu items appear on the screen.
Press Up and Down buttons to move to
“Language”.
Press Left and Right buttons to select
“Language”.
Language menu appears.
Press Up and Down buttons to move
to languge you want.
(English, Français, Deutch, Italian, Español)
Press Left, Right or OK button to select
Language.
When it selects, the “>>” mark is indicated.
Press MENU button after the setting is done, and Menu goes to the previous menu.
If the INPUT button is pressed, the menu disappears.
INPUT
Picture
Sound
Clock
Install
Language
Advanced
MENU : Previous : Select
INPUT : Exit OK : Select
: Position
Language
>>
English
Français
Deutsch
Italiano
Español
MENU : Previous : Select
INPUT : Exit OK : Select
: Position
Page 72
69
FUNCTION SETUP
Page 73
How to Set Date and Clock ........................................................ 71
How to Set On/Off Time ............................................................. 72
How to Set Update Program ...................................................... 74
How to Set Sleep Time ............................................................. 75
Clock Setup
HYUNDAI WIDE LCD TV
Page 74
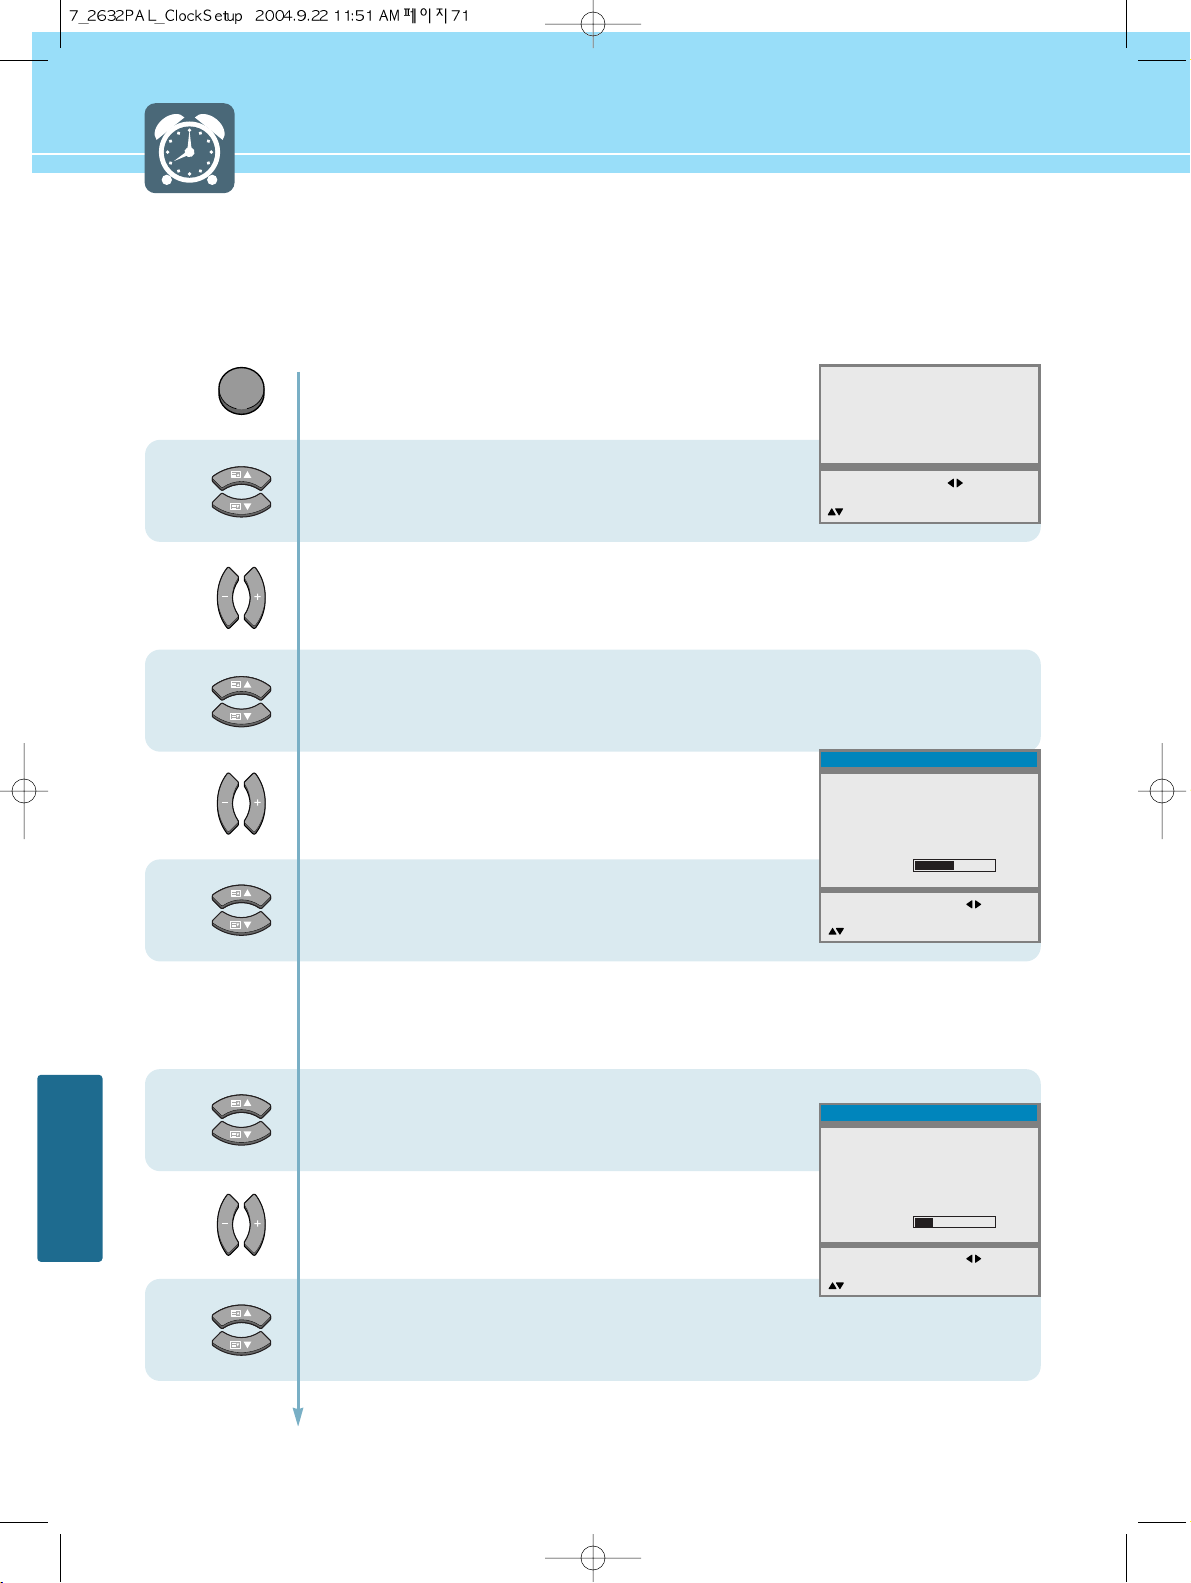
71
CLOCK SETUP
How to Set Date and Clock
You can set the current time so that it may be displayed by pressing the “INFO” button. You must also set a clock if
you wish to use the automatic on or off timers.
1
2
3
MENU
4
5
6
7
Press Menu button.
Menu items appear on the screen.
Press Up and Down buttons to move to
“Clock”.
Press Left, Right or OK button to select
“Clock”.
Press Up and Down buttons to move to
“Date”.
Press Left and Right buttons to move
between Date-Month-Year.
Press Up and Down or numeric (0~9) buttons
to adjust the Date, Month and Year.
Press the Right button and then go to step 6
if you need to set clock.
Press Up and Down buttons to move to
“Clock”.
Press Left and Right buttons to move
between Hour-Minute.
Press Up and Down or numeric (0~9) buttons
to adjust the Hour, Minute.
Adjust the Hour using the 24-hour system :
Example : 6 P.M. Press 1 and 8.
8
Picture
Sound
Clock
Install
Language
Advanced
MENU : Previous : Select
INPUT : Exit OK : Select
: Position
Clock
Date
Clock
Update Pr.
Wake Up
Clock
Pogram
Volume
Off Time
MENU : Previous : Move
INPUT : Exit OK : Clear
: Position
DD/MM/YY
- - : - -
- - : - -
- - : - -
- -
- -
50
Clock
Date
Clock
Update Pr.
Wake Up
Clock
Pogram
Volume
Off Time
MENU : Previous : Move
INPUT : Exit OK : Clear
: Position
22/03/04
- - : - -
- - : - -
- - : - -
- -
- -
30
Page 75
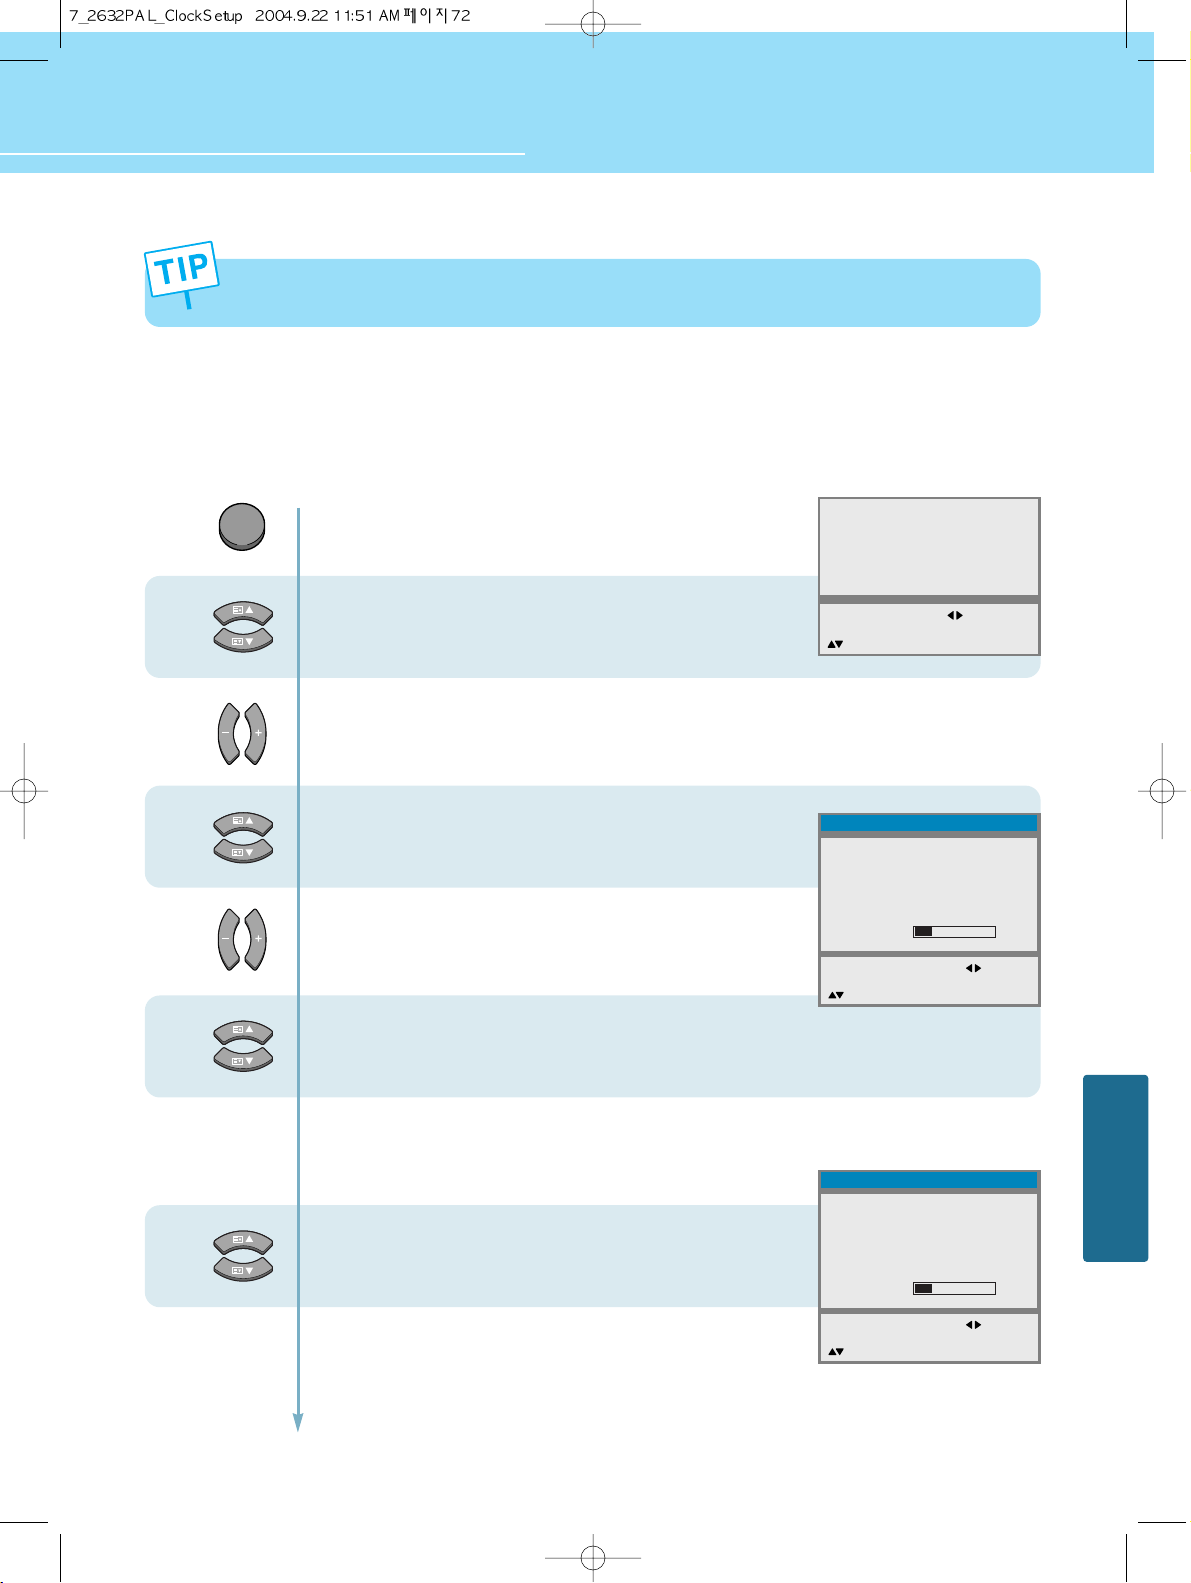
72
CLOCK SETUP
HYUNDAI LCD TV HQL260WR/320WR
How to Set On/Off Time
This function allows you to automatically turn on your LCD TV at the preset time.
1
2
3
4
5
6
Press Menu button.
Menu items appear on the screen.
Press Up and Down buttons to move to
“Clock”.
Press Left, Right or OK button to select
“Clock”.
Press Up and Down buttons to move to
“Wake Up(Clock)”.
Press Left and Right buttons to move
between Hour-Minute.
Press Up and Down or numeric (0~9) buttons
to adjust the Hour-Minute.
Press the Right button and then go to step 6
if you need to set Program(TV Channel).
Press Up and Down buttons to move to
“Program”.
And press Right button to select “Program”.
Continued on next page ......
- You can erase and reset the Date and Clock by pressing the OK button.
- When the power supply AC main power is cut off, the clock is reset to the value before the Time set.
MENU
Picture
Sound
Clock
Install
Language
Advanced
MENU : Previous : Select
INPUT : Exit OK : Select
: Position
Clock
Date
Clock
Update Pr.
Wake Up
Clock
Pogram
Volume
Off Time
MENU : Previous : Move
INPUT : Exit OK : Clear
: Position
Clock
Date
Clock
Update Pr.
Wake Up
Clock
Pogram
Volume
Off Time
MENU : Previous : Move
INPUT : Exit OK : Clear
: Position
22/03/04
12 : 30
22/03/04
12 : 30
06 : 30
- - : - -
- - : - -
- - : - -
- -
- -
30
- -
- -
30
Page 76
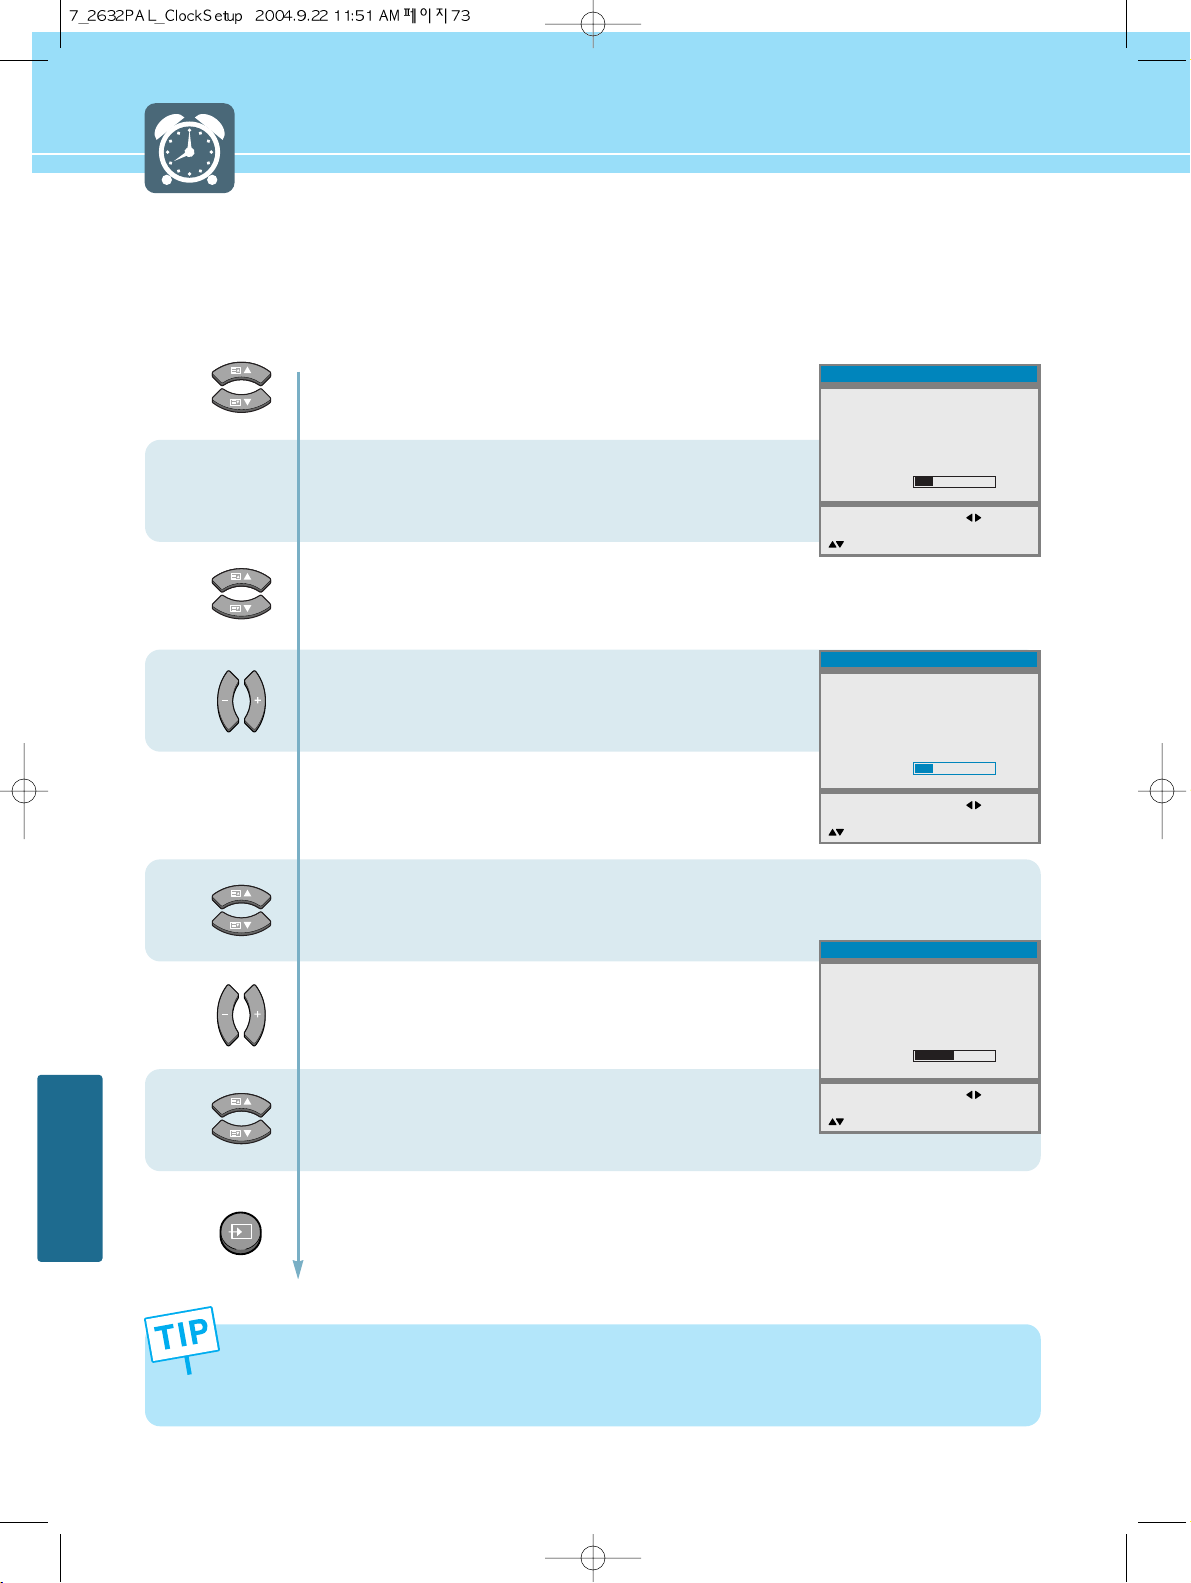
...... Continued from previous page. (Set the volume level and channel at the time when your LCD turns on.)
8
7
9
10
11
12
73
CLOCK SETUP
- You can erase and reset the Wake Up(Clock, Program), Off time by pressing the OK button.
- Regardless of which Input Mode you set On Time in, your LCD TV will turn on in TV Mode only.
- If the Off time has been set, “Off time 1” or “Off time 2” will be displayed 1 minute or 2 minutes before your
TV turns off.
Press the Up and Down or numeric (0~9) buttons
to set the Program(Channel).
Press the Right button and then go to step 8
if you need to set the Volume.
Press Up and Down buttons to move to
“Volume”.
Press Left and Right buttons to adjust Volume.
Go to step 10
if you need to set the Off Time.
Press Up and Down buttons to move to
“Off time”.
Press Left and Right buttons to move
between Hour-Minute.
Press Up and Down or numeric (0~9) buttons
to adjust the Hour-Minute.
Press MENU button after the setting is done, and Menu goes to the previous menu.
If the INPUT button is pressed, the menu disappears.
INPUT
Clock
Date
Clock
Update Pr.
Wake Up
Clock
Pogram
Volume
Off Time
MENU : Previous : Move
INPUT : Exit OK : Clear
: Position
Clock
Date
Clock
Update Pr.
Wake Up
Clock
Pogram
Volume
Off Time
MENU : Previous : Adjust
INPUT : Exit
: Position
Clock
Date
Clock
Update Pr.
Wake Up
Clock
Pogram
Volume
Off Time
MENU : Previous : Move
INPUT : Exit OK : Clear
: Position
22/03/04
12 : 30
06 : 30
- - : - -
22/03/04
12 : 30
06 : 30
- - : - -
22/03/04
12 : 30
06 : 30
23 : 30
- -
- -
30
- -
17
30
- -
17
50
Page 77
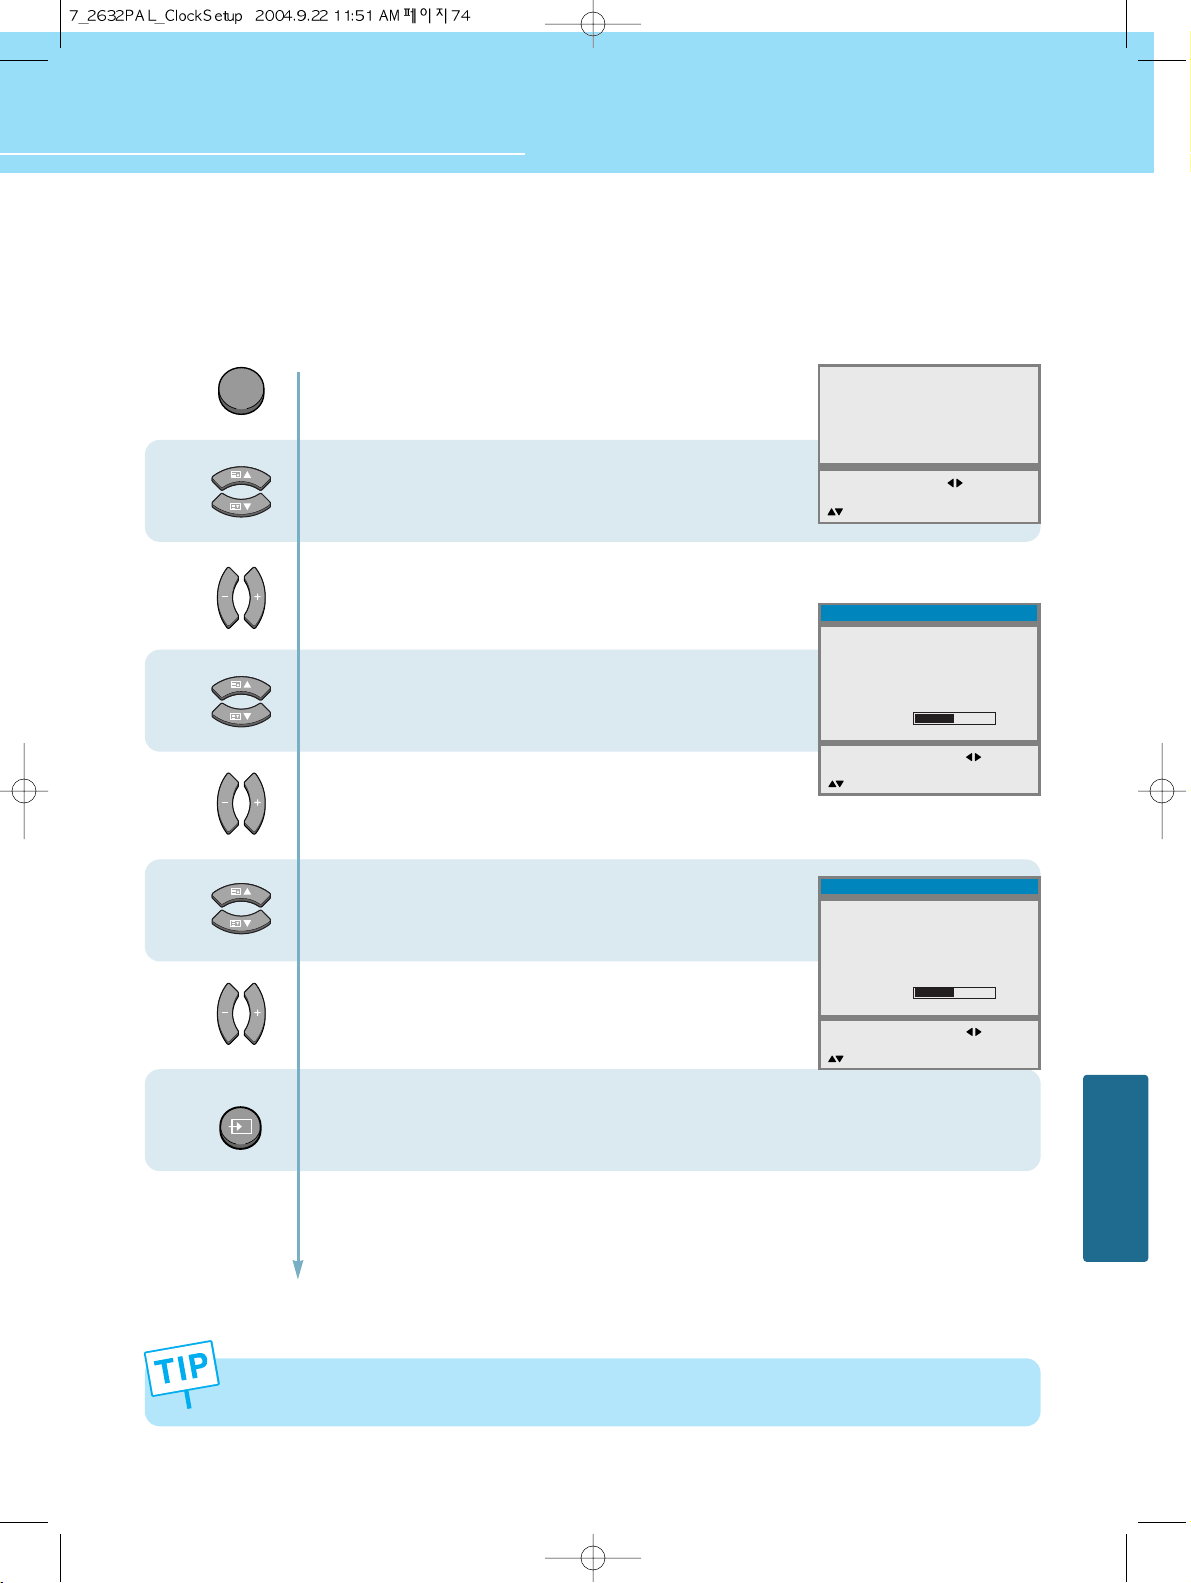
HYUNDAI LCD TV HQL260WR/320WR
5
6
How to Set Update Program
Set the Program number if you want to update the time and date with the information carried by the broadcast signal.
If you clear the Pr. number, the auto update function does not work.
74
CLOCK SETUP
- You can erase and reset the program number by pressing the OK button.
- If you select Pr00, it applies to all programs.
INPUT
Press Menu button.
Menu items appear on the screen.
Press Up and Down buttons to move to
“Clock”.
Press Left, Right or OK button to select to
“Clock”.
Press Up and Down buttons to move to
“Update Pr.”.
Press Left and Right buttons to set to
“Update Pr.”
Press Up and Down or numeric (0~9) buttons
to set the program.
After the set is completed,
Press the Left and Right buttons.
(If you use to the numeric (0~9) buttons, omit the step 6.)
Press MENU button after the setting is done, and Menu goes to the previous menu.
If the INPUT button is pressed, the menu disappears.
1
2
3
MENU
4
Picture
Sound
Clock
Install
Language
Advanced
MENU : Previous : Select
INPUT : Exit OK : Select
: Position
Clock
Date
Clock
Update Pr.
Wake Up
Clock
Pogram
Volume
Off Time
MENU : Previous : Move
INPUT : Exit OK : Clear
: Position
Clock
Date
Clock
Update Pr.
Wake Up
Clock
Pogram
Volume
Off Time
MENU : Previous : Move
INPUT : Exit OK : Clear
: Position
DD/MM/YY
22/03/04
12 : 30
06 : 30
23 : 30
- - : - -
- - : - -
- - : - -
- -
- -
50
12
17
50
Page 78
75
CLOCK SETUP
How to Set Sleep Time
This function is available only with the remote control.
Press the Sleep button, then Sleep Time
changes in order below.
Sleep off Sleep5 Sleep10
Sleep20 Sleep30 Sleep60
Sleep90 Sleep120 Sleep180.
If the Sleep time has been set, “Sleep 1” or “Sleep 2” will be displayed 1 minute or 2 minutes before your TV
turns off.
Sleep Off
SLEEP
Page 79
Glossary ..................................................................................... 77
Troubleshooting ....................................................................... 79
Care and Cleaning ..................................................................... 81
Product Specifications ............................................................... 82
Appendix
HYUNDAI WIDE LCD TV
Page 80
77
APPENDIX
Glossary
Component video Component video is sent through three cables: two color shade (chrominance)
signals and one brightness (luminance) signal. Component video achieves greater
color accuracy than composite video or S-VIDEO by splitting chrominance into
two separate portions.
Composite video Composite video is sent through a single cable. Composite video combines the
color shade (chrominance) and brightness (luminance) information into one video
signal.
S-VIDEO S-VIDEO requires a single cable, which carries the brightness (luminance) and
color (chrominance) signals of the picture separately. S-VIDEO provides better
resolution than composite video, which carries the signals together.
Full Scart SCART connectors used with many European video equipments is designed to
carry composite video and RGB video signals. If the equipment which outputs
picture outputs RGB-signal, it will output RGB signal from the RGB pins and a
complete composite video signal at the same time.
Half Scart Basically is the same as Full Scart in function but does not support RGB Video
signals.
480i Provides 480 lines of resolution. Displays images using interlaced scanning,
which first transmits all the odd lines on the TV screen and then the even lines.
480p Provides 480 lines of resolution. Displays images using progressive scanning,
which transmits each line from top to bottom.
720p Provides 720 lines of resolution. Displays images using progressive scanning,
which transmits each line from top to bottom.
1080i Provides 1080 lines of resolution. Displays images using interlaced scanning,
which first transmits all the odd lines on the TV screen and then the even lines.
1080i is one of the formats used by HDTV (High Definition TV).
Digital television (DTV) A new technology for transmitting and receiving broadcast television signals. DTV
provides higher resolution and improved sound quality over analog television.
HDTV(High Definition TV) HDTV is a new kind of digital TV, creating a high quality picture, high definition.
The HDTV provides a theater-like screen with an aspect ratio of 16:9. Supports
480p or higher.
SDTV(Standard Definition TV) SDTV is a new kind of standard definition digital TV, having a range of lower
resolution than the HDTV. Supports 480i.
Cable Broadcast Receiver A device that receives cable broadcasting. Connecting it to your TV set allows you
to watch a various channels.
(Converter)
Page 81
78
APPENDIX
HYUNDAI LCD TV HQL260WR/320WR
Satellite Broadcasting Provides crisp picture and clear audio quality throughout the country via a
satellite.
VHF/UHF VHF (Very High Frequency) is the part of the frequency spectrum from 30 to 300
megahertz. UHF (Ultra High Frequency) is the part of the frequency spectrum
from 300 to 3,000 megahertz.
DVD DVD (digital versatile disc) is an optical disc that can store a huge volume of
multimedia such as video, game, and audio application, etc.
Coaxial Cable Coaxial cable is the kind of rounded copper cable, which is generally used for TV
antenna.
LNA(Low-Noise-Ampilfler) Satellite applied technology. It is capable of amplifying weak signals so that any
area experiencing a signal interruption may enjoy a clearer picture quality.
Aspect ratio Refers to the ratio between the width and height of the screen. This TV has a 16:9
(widescreen) aspect ratio, as opposed to a 4:3 aspect ratio.
PIP (Simultaneous Screen) PIP allows you to view two images at the same time in a single screen.
SWAP PIP function provides a main picture (larger image) and sub-picture (smaller
image). The SWAP is designed to swap the sub-picture for the main picture. For
example, while you are watching a main picture on TV and watching a subpicture on VCR, you can instantly switch the two pictures by using the SWAP
function.
Picture Mode Picture Mode features the optimal picture quality. There are Custom-Standard-
Sport-Natural-Mild features in order. “User Control” allows you to adjust
Contrast, Brightness, Colour, Tint, etc.
Sound Mode Sound Mode features the optimal sound quality. There are Standard-Music-Film-
Speech-Custom features in order. “User Control” allows you to adjust high
frequency sound, middle frequency sound and low frequency sound.
Channel Tuning The feature allows you to enjoy optimal broadcasting. This product provides
automatic tuning feature for the best broadcasting status. You can tune the
channels manually.
SRS WOW A well-recognized 3D sound technology developed by US SRS Labs, Inc. This
technology delivers the ultimate audio experience only with two speakers as if
through multi-channel speakers.
Teletext A signal coming along with TV images. Teletext function allows you to view
information service covering news, sport, travel offers, UK TV listings, weather,
showbiz interviews, film & theatre reviews and net issues.
Page 82
79
APPENDIX
Troubleshooting
Installation Problems
Picture Problems
Symptom
How can I install an
antenna?
TV screen is not clear after
installing an indoors
antenna.
How can I view cable
broadcasting?
Symptom
Neither picture nor
sound comes up.
Picture turns on slowly
after power is on.
Vertical and horizontal lines
and web patterns briefly
appear on the
picture and shake.
Input Source information
only appears on black
screen.
Poor reception on some
channels.
Black and white on some
channels.
TV won’t turn on.
Screen is too bright or too
dark.
Possible solution
Refer to pages 23~24.
Indoors antenna may experience poor reception due to surrounding buildings.
Please install an outdoors antenna or wireless antenna.
Please install a cable broadcasting receiver (Converter).
Possible solution
Check whether power is on.
Check whether the power is cut or whether power cord is properly connected.
Try to plug another product’s power cord to the outlet the LCD TV is plugged into.
This symptom is not a malfunction. This delay is designed to prevent the
distorted and noisy picture when power is on. However, if the picture does not
appear more than 5 minutes after power is on, call a service center.
This symptom may be caused by interference from other electric appliances.
Please avoid using a cordless phone, hairdryer, and electric drill, etc.
Check whether your TV is properly connected to external devices.
Check whether you selected proper channels. Try re-orienting your antenna.
Check other channels for black and white screen. Adjust colour.
Ensure the power cord is plugged.
Adjust brightness.
Page 83
80
APPENDIX
HYUNDAI LCD TV HQL260WR/320WR
Sound Problems
General
Auto On does not work.
After setting the time,
I turned TV off and turn it on.
The programmed information
has been erased.
Symptom
Too much noise occurs.
No sound while viewing a
cable channel
Picture is OK but sound does
not come out.
One of the speakers does not
produce sound.
Symptom
Remote control won't work.
Where does the S-Video
cable plug in for audio
output?
Strange noises are heard.
I tried to use the TV screen
as a PC monitor
but it doesn’t work.
Ensure to use the remote control or power button on the product to turn off your
TV. If you unplug the power cord, the stand-by consumption power becomes 0
(zero), which causes the programmed time to be erased.
Ensure to use the remote control or power button on the product to turn off your
TV. If you unplug the power cord, the stand-by consumption power becomes 0
(zero), which causes the programmed time to be erased.
Possible solution
Check whether the audio setting is in the Stereo mode. In the Stereo mode, the
sound may be distorted in the area where experiences poor reception or is
located far away from a TV broadcasting station.
Make sure an audio or audio/video component is securely inserted into the
appropriate jacks. Check other channels for sound. Check the volume settings on
the cable broadcasting receiver.
Try to press volume up/volume down buttons of your remote control.
Select sound balance and make proper adjustment. (Page 45)
Check the speaker connection cables.
Possible solution
Check whether there is a blocking object between the remote control and LCD TV.
Make sure your LCD TV is Power On. (In case of normal, LED on the front panel is
in Red.)
Check whether batteries are inserted with proper polarities(+, -).
When the batteries are worn out, replace with new ones.
Connect the two Audio jacks from the S-Video cable to the left and right ports on
the Composite.
Ticking noise during or after watching is caused by the change of ambient
environment such as humidity and temperature, which is characterized by plastic
products. Strange ticking noise occurs because a signal is suddenly transmitted
to the LCD panel. So, this is not a malfunction.
Adjust the resolution referring to the standard signal mode table. Check the
specification of your video card installed in your PC. If your video card does not
work in supported hardware. Try upgrading the video card’s driver.
Page 84
APPENDIX
81
Care and Cleaning
Cabinet Cleaning
Wipe a soft dry cloth.
Do not use inflammables like Benzene or Thinner, or wet clothes.
Do not scratch the panel of TV with a fingernail or pointed object.
Screen Cleaning
Clean the screen with a soft cloth moistened in mild glass
detergent and dry with a soft cloth.
Never use any solvent on the screen such as Acetone, Benzene, or
Thinner, etc.
Cleaning Inside
When the inside needs to be cleaned, contact a service center or
distribution agent where the item is purchased.
It is recommended cleaning is complete before the rainy season.
Page 85
HYUNDAI LCD TV HQL260WR/320WR
APPENDIX
82
Product Specifications
- Specification is subject to change without notice for performance improvement.
- Specification on ‘dead pixel’ of LCD panel applies to ISO13406-2 Standard.
MODEL
Display
Input/Output
Video System
Power
Dimension(W x D x H mm)
Weight
Control Type
HQL320WR
32" Diagonal (16:9)
a-si TFT active matrix
1000 :1
Typical 450
170 (H) /170 (V)
1366 X 768
0.51075 (H) x 0.51075 (V)
RGB Vertical stripe(Asymetric)
1 EA(with common A/V Audio)
2 EA (with Audio)
1 EA (with Audio)
1 EA
RGB (In), CVBS (In, Out)
CVBS (In, Out)
D-SUB
1024 X 768 @ 75 Hz
Component Audio(Common)
1 EA
CVBS, S-VHS, RGB, Component
AC 100 - 240 V, 50/60 Hz
Typical 140W
Typical 3W
957 x 223 x 556 (with stand)
18 Kg (with stand)
Remote Control, Key Control
HQL260WR
26" Diagonal (15:9)
a-si TFT active matrix
500 :1
Typical 450
170 (H) /170 (V)
1280 X 768
0.4425 (H) x 0.4425 (V)
RGB Vertical stripe(Asymetric)
1 EA(with common A/V Audio)
2 EA (with Audio)
1 EA (with Audio)
1 EA
RGB (In), CVBS (In, Out)
CVBS (In, Out)
D-SUB
1024 X 768 @ 75 Hz
Component Audio(Common)
1 EA
CVBS, S-VHS, RGB, Component
AC 100 - 240 V, 50/60 Hz
Typical 120W
Typical 1.8W / (< 2.5W)
814 x 223 x 491 (with stand)
16 Kg (with stand)
Remote Control, Key Control
Size
Type
Contrast Ratio
Luiminance (cd/m
2
)
Viewing Angle
Resolution
Pixel Pictch (mm)
Pixel arrangement
S-Video
A/V (RCA)
Component(Y/Cb/Cr)
RF
Scart Full
Half
PC Connector
Max. Resolution
Audio
Headphone
Supply
Consumption
Saving
 Loading...