

Hytronik HC404VRC-KD Instruction Manual
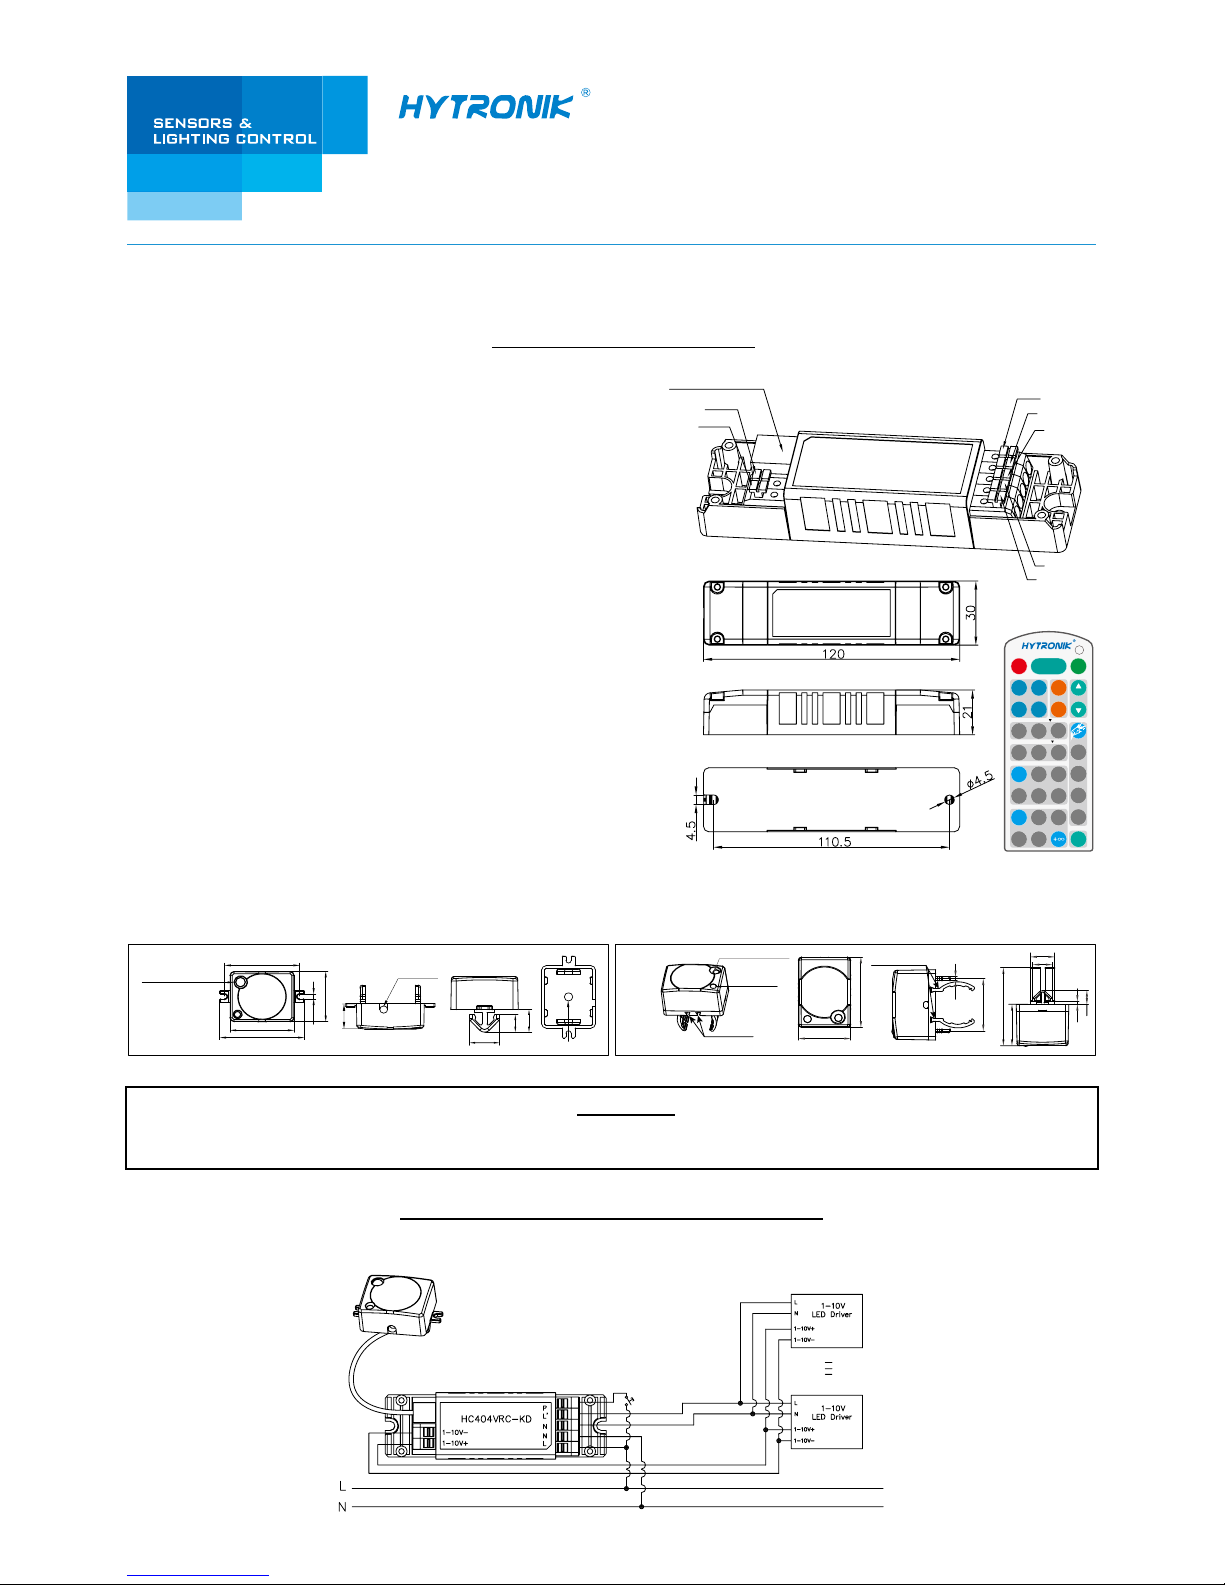
Instruction Manual for Microwave Motion Sensor
Tri-level Version, Model No.:HC404VRC-KD
Technical Specifications
PRODUCT TYPE: Microwave Motion Sensor
OPERATING VOLTAGE: 120-277VAC 50/60Hz
HF SYSTEM: 5.8GHz CW radar
RATED LOAD: 120V~ / 1.5A / 200W
230V~ / 1.5A / 350W
277V~ / 1.5A / 400W
DETECTION ANGLE: 30
O
~ 150
O
POWER CONSUMPTION: <1W
DETECTION RANGE (DxH): Max. 12 x 6m (SAM5)
Max. 16 x 15m (SAM6)
TIME SETTING: 2s, 30s~30min.
DAYLIGHT SENSOR: 2~50Lux; disable
STAND-BY PERIOD: 0s, 10s ~ 30min, +∞
STAND-BY DIMMING LEVEL: 10% ~ 50%
MOUNTING: Indoors, ceiling&wall mounted
WORKING TEMP.: -20
O
C ~ +60OC
(capacitive load)
HRC-05HC404VRC-KD
Stand-by dimming level
Detection range
ON/
OFF
Auto Mode
Reset
Power
80%
Test
2s
10%
20%
30s 1min
100%
30min10min5min
0s 10s 1min
30%
SC1 SC2
SC3
Scene mode
10min
50% 10%
30min
Hold-time
Stand-by period
5min
Lux
Disable
2Lux
10Lux
50Lux
Daylight Sensor
SC4
Power
100%
+
-
Dim
M/A
IMPORTANT
PLEASE READ THESE INSTRUCTIONS CAREFULLY PRIOR TO INSTALLATION AND RETAIN THIS LEAFLET IN A KNOWN
AND SAFE PLACE FOR FUTURE REFERENCE.
SECTION 1 INSTALLATION AND WIRING
1.1 Ensure that the electricity supply is switched off before installing or servicing this product.
1.2 Wiring diagram
RJ12 (sensor antenna)
1-10V+
1-10V-
Push
L’
N
N
L
The sensor is an active motion detector; it emits a high-frequency
electro-magnetic wave at 5.8GHz and receives its echo.The sensor
detects the change in echo from movement in its detection zone.
A microprocessor then triggers the switch light ON command. Detection
is possible through doors, panes of glass and thin walls.
Note: the high-frequency output of this sensor is <0.2mW; approximately
just 0.2‰ of the transmission power of a mobile telephone.
SAM6
12
2
26.5
50.2
9
15
32.2
45.2
Slots for T8 tube
33.5
2.5
Slots for T5 tube
Infrared remote receiver
Daylight sensor
SAM5
Cable side entry
Infrared remote receiver
Daylight sensor
40.4
11.2
6.8
8.8
35.9
2.5
13
25.2
30.7
Cable back entry
3rd Floor, block C, complex building, 155#, Bai'gang road south,
Bai'gang village, Xiao Jin Kou town, Huicheng district, Huizhou 516023
Tel:86-752-2772020 F:86-752-2777877
E: info@hytronik.com W:www.hytronik.com
CHINA FACTORY
Room D, 10/f, Tower A, Billion Center, 1 wang Kwong Road,
Kowloon Bay, Kowloon, Hongkong
T: 00852-35197525 F: 00852-30116936
E: info@hytronik.com
HYTRONIK INDUSTRIAL LIMITED
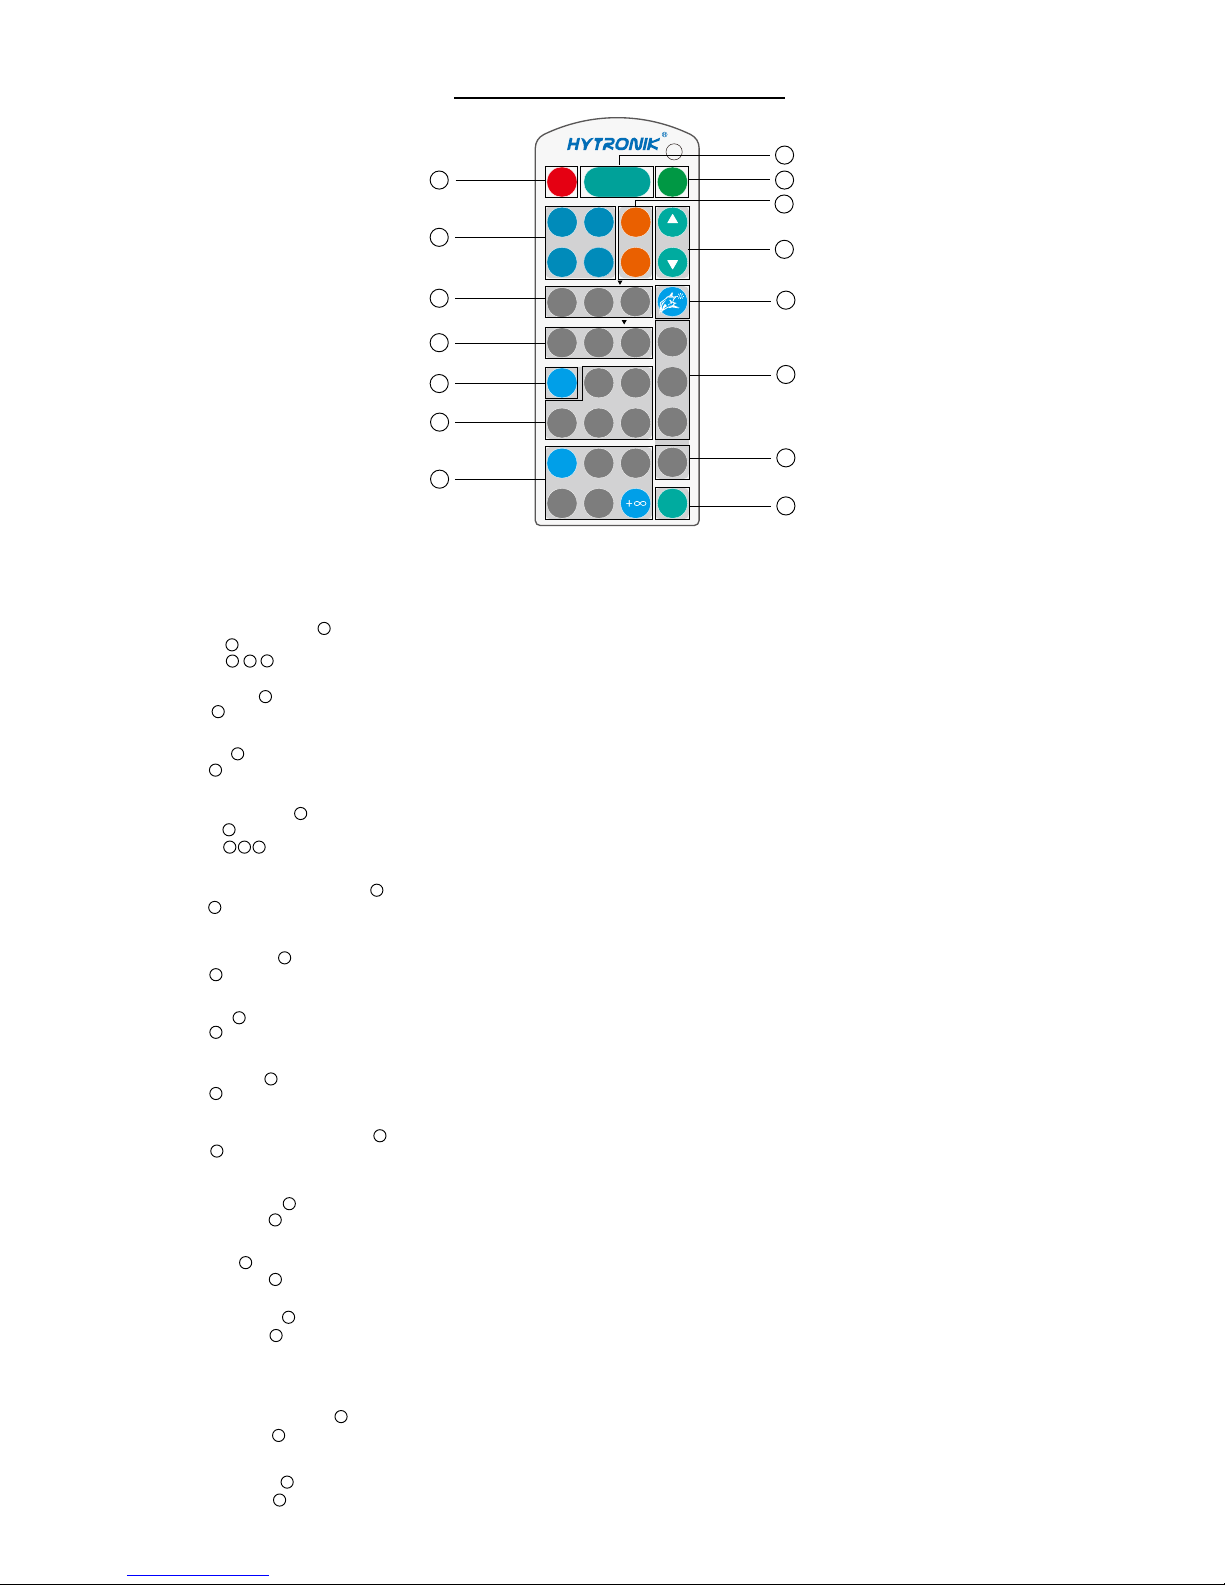
SECTION 2 REMOTE CONTROL
Permanent ON/OFF [ ]
1. Press button , to select permanent ON or permanent OFF mode.
2. Press button to resume automatic operation. (Please refer to explanation below)
Auto Mode [ ]
Press button to in initiate automatic mode. The sensor starts working and all settings remain as before the light was switched ON/OFF.
RESET [ ]
Press button , all settings go back to the value of DIP switch settings.
Test 2s function [ ]
1.Press button ,the sensor goes into testmode (hold time2s). N.B. the stand-by period and daylight sensor settings are disabled in test mode.
2.Press button to exit from this mode, and the sensor settings are changed accordingly.
Ambient daylight threshold [ ]
Press button , the latest surrounding lux value overwrites previous lux value learned, and is set as the daylight threshold. This feature enables the fixture
to function well in any environment.
Detection range [ ]
Press buttons in zone to set detection range at 100% / 50% / 10%.
Hold time [ ]
Press buttons in zone to set hold time at 30s / 1min / 5min / 10min / 30min.
Stand-by period [ ]
Press buttons in zone to set the stand-by period at 0s / 10s / 1min / 10min / 30min / +∞.
Note: “0s” means on/off control; “+∞” means bi-leve of dimming control, the light will never switch off.
(i.e. the light remains at the stand-by dimming level until motion is detected.)
Stand-by dimming level [ ]
Press buttons in zone to set the stand-by dimming level at 10% / 20% / 30% .
Daylight sensor [ ]
Pres
s buttons in zone to set daylight sensor at 2lux / 10lux / 50lux.
1
2
3
2
3
4
button
1
button
2
button
3
8
3
10
6
Press button ,the sensor goes to manual override or semi-auto function.
15
11
13
12
7
4
11
button
8
button
10
Power output [ ]
Press button , the output shifts between 80% and 100%, for energy saving purposes.
5
button
5
Dim +/- [ ]
Press button to adjust the light brightness between 10%~100% during hold-time.“+” increases the light level, “-” will decrease the light level.
9
button
9
Lux disable [ ]
Press button , the built-in daylight sensor is disabled, the light will always operate upon detection regardless of ambient light level.
14
button
14
Manual override/ Semi-auto [ ]
Note: The buzzer beeps twice if it is in manual override mode, and beeps once if shifts to semi-auto mode.
button
15
zone
6
zone
11
zone
12
zone
7
zone
13
5
9
4
11
12
Stand-by dimming level
Detection range
ON/
OFF
Auto Mode
Reset
Power
80%
Test
2s
10%
20%
30s 1mi n
100%
30min10min5min
0s 10s 1min
30%
SC1 SC2
SC3
Scene mode
10min
50% 10%
30min
Hold-time
Stand-by period
5min
Lux
Disable
2Lux
10Lux
50Lux
Daylight Sensor
SC4
Power
100%
+
-
Dim
M/A
3
1
2
7
8
6
10
13
14
15
HRC-05
Note: the buzzer beeps one time when RC
receives signal successfully
 Loading...