


PDC760Multi-modeAdvancedRadio
U s e r M a n u a l

Preface
Welcome to the world of Hytera and thank you for purchasing this product. This manual includes a
description of the functions and step-by-step procedures for use. To avoid bodily injury or property loss
caused by incorrect operation, please carefully read the
This manual is applicable to the following product:
PDC760 Multi-mode Advanced Radio
Safety Information Booklet
before use.

Copyright Information
Hytera is the trademark or registered trademark of Hytera Communications Corporation Limited (the
Company) in the People's Republic of China (PRC) and/or other countries or areas. The Company retains
the ownership of its trademarks and product names. All other trademarks and/or product names that
may be used in this manual are properties of their respective owners.
The product described in this manual may include the Company's computer programs stored in
memory or other media. Laws in PRC and/or other countries or areas protect the exclusive rights of the
Company with respect to its computer programs. The purchase of this product shall not be deemed to
grant, either directly or by implication, any rights to the purchaser regarding the Company's computer
programs. The Company's computer programs may not be copied, modified, distributed, decompiled, or
reverse-engineered in any manner without the prior written consent of the Company.
Disclaimer
The Company endeavors to achieve the accuracy and completeness of this manual, but no warranty of
accuracy or reliability is given. All the specifications and designs are subject to change without notice
due to continuous technological development. No part of this manual may be copied, modified,
translated, or distributed in any manner without the prior written consent of the Company.
We do not guarantee, for any particular purpose, the accuracy, validity, timeliness, legitimacy or
completeness of the third-party products and contents involved in this manual.
If you have any suggestions or would like to receive more information, please visit our website at
http://www.hytera.com.
FCC Statement
This equipment has been tested and found to comply with the limits for a Class B digital device,
pursuant to part 15 of FCC Rules. These limits are designed to provide reasonable protection against
harmful interference in a residential installation. This equipment generates and can radiate radio
frequency energy. If not installed and used in accordance with the instructions, it may cause harmful
interference to radio communications. However, there is no guarantee that interference will not occur in
a particular installation. Verification of harmful interference by this equipment to radio or television

reception can be determined by turning it off and then on. The user is encouraged to try to correct the
interference by one or more of the following measures:
Reorient or relocate the receiving antenna. Increase the separation between the equipment and
receiver.
Connect the equipment into an outlet on a different circuit to that of the receiver's outlet.
Consult the dealer or an experienced radio/TV technician for help.
Operation is subject to the following two conditions:
This device may not cause harmful interference.
This device must accept any interference received, including interference that may cause undesired
operation.
Note: Changes or modifications to this unit not expressly approved by the party responsible for
compliance could void the user's authority to operate the equipment.
Compliance with RF Exposure Standards
Hytera's radio complies with the following RF energy exposure standards and guidelines:
United States Federal Communications Commission, Code of Federal Regulations; 47CFR § 1.1307,
1.1310 and 2.1093
American National Standards Institute (ANSI)/Institute of Electrical and Electronic Engineers (IEEE)
C95. 1:2005; Canada RSS102 Issue 5 March 2015
Institute of Electrical and Electronic Engineers (IEEE) C95.1:2005 Edition
RF Exposure Compliance and Control Guidelines and
Operating Instructions
To control your exposure and ensure compliance with the occupational/controlled environmental
exposure limits, always adhere to the following procedures.
Guidelines:
Do not remove the RF Exposure Label from the device.
User awareness instructions should accompany device when transferred to other users.

Do not use this device if the operational requirements described herein are not met.
Operating Instructions:
Transmit no more than the rated duty factor of 50% of the time. To transmit (talk), push the
Push-To-Talk (PTT) key. To receive calls, release the PTT key. Transmitting 50% of the time, or less, is
important because the radio generates measurable RF energy only when transmitting (in terms of
measuring for standards compliance).
Keep the radio unit at least 2.5 cm away from the face. Keeping the radio at the proper distance is
important as RF exposure decreases with distance from the antenna. The antenna should be kept
away from the face and eyes.
W
hen worn on the body, always place the radio in a Hytera-approved holder, holster, case,
r body harness
o
exceed the FCC's occupational/controlled environmental RF exposure limits.
Use of non-approved antennas, batteries, and accessories causes the radio to exceed the FCC RF
exposure guidelines.
Contact your local dealer for the optional accessories of the product.
This equipment complies with FCC radiation exposure limits set forth for an controlled environment. This
equipment should be installed and operated with minimum distance 0cm between the radiator and your body.
This transmitter must not be co-located or operating in conjunction with any other antenna or transmitter.
or
by
use of the correct clip for this product. The exposure levels should not

IC Statement
The device has been tested and complies with SAR limits; users can obtain Canadian information on RF
exposure and compliance.
Après examen de cematériel aux conformité aux limites DAS et/ou aux limites d'intensité de champ RF,
les utilisateurs peuvent sur l'exposition aux radiofréquences et la conformité and compliance d'acquérir
les informations correspondantes.
This device complies with Innovation, Science and Economic Development Canada Compliance
license-exempt RSS standard(s). Operation is subject to the following two conditions:
This device may not cause harmful interference.
This device must accept any interference received, including interference that may cause undesired
operation.
Le présent appareil est conforme auxCNR d'Industrie Canada applicables aux appareils radio exempts de
licence. L'exploitation est autorisée aux deux conditions suivantes: (1) l'appareil ne doit pas produire de
brouillage, et (2) l'utilisateur de l'appareil doit accepter tout brouillage radioélectrique subi, même si le
brouillage est susceptible d'en compromettre le fonctionnement.
EU Regulatory Conformance
As certified by the qualified laboratory, the product is in compliance with the essential requirements and
other relevant provisions of 2014/53/EU, 2012/19/EU, 2011/65/EU, and 2006/66/EC.
Please note that the above information is applicable to EU countries only.

Contents
Documentation Information .................................................................................................................. 1
1. Packing List ......................................................................................................................................... 3
2. Product Layout .................................................................................................................................... 4
3. Before Use ........................................................................................................................................... 5
3.1 Attaching the Antenna ............................................................................................................................................... 5
3.2 Installing the Micro-SIM Card and Micro-SD Card .............................................................................................. 5
3.3 Attaching the Belt Clip ............................................................................................................................................... 6
3.4 Attaching the Battery .................................................................................................................................................. 7
3.5 Charging the Battery ................................................................................................................................................... 7
4. Basic Operations ................................................................................................................................. 9
4.1 Turning the Radio On or Off ..................................................................................................................................... 9
4.2 Adjusting the Volume ................................................................................................................................................. 9
4.3 Selecting Channels or Contacts .............................................................................................................................. 9
4.4 Understanding the Screens ...................................................................................................................................... 9
4.4.1 Top Screen ...................................................................................................................................................... 10
4.4.2 Main Screen .................................................................................................................................................... 10
4.5 Locking and Unlocking the Main Screen ............................................................................................................ 14
4.6 Managing the Widgets .............................................................................................................................................. 15
4.7 Switching the Operation Mode .............................................................................................................................. 16
4.8 Connecting to the Networks .................................................................................................................................. 17
4.8.1 Private Network .............................................................................................................................................. 17
4.8.2 Public Network ............................................................................................................................................... 18
i

4.8.3 WLAN Network ............................................................................................................................................... 18
4.8.4 Airplane Mode ................................................................................................................................................ 18
5. Status Indications ............................................................................................................................. 20
5.1 LCD Icons ..................................................................................................................................................................... 20
5.2 LED Indications .......................................................................................................................................................... 22
5.2.1 LED Indicator 1 ............................................................................................................................................... 22
5.2.2 LED Indicator 2 ............................................................................................................................................... 23
6. Call Services....................................................................................................................................... 24
6.1 Group Calls .................................................................................................................................................................. 24
6.1.1 Initiating Group Calls .................................................................................................................................... 24
6.1.2 Receiving and Responding to Group Calls ............................................................................................. 25
6.1.3 Ending or Exiting Group Calls ..................................................................................................................... 25
6.2 Private Calls and Phone Calls ................................................................................................................................ 25
6.2.1 Initiating Private Calls and Phone Calls ................................................................................................... 25
6.2.2 Receiving and Responding to Private Calls and Phone Calls ............................................................ 27
6.2.3 Ending Private Calls and Phone Calls ...................................................................................................... 27
6.3 All Calls ......................................................................................................................................................................... 28
6.3.1 Initiating All Calls ........................................................................................................................................... 28
6.3.2 Receiving All Calls .......................................................................................................................................... 28
6.3.3 Ending or Exiting All Calls ............................................................................................................................ 29
6.4 Broadcast Calls (Trunking Only) ............................................................................................................................ 29
6.4.1 Initiating Broadcast Calls ............................................................................................................................ 29
6.4.2 Receiving Broadcast Calls ........................................................................................................................... 29
6.4.3 Ending or Exiting Broadcast Calls ............................................................................................................. 29
ii

6.5 Calls on Analog Channels ....................................................................................................................................... 30
6.6 Emergency Calls ........................................................................................................................................................ 30
6.6.1 Initiating Emergency Calls .......................................................................................................................... 30
6.6.2 Receiving Emergency Calls ......................................................................................................................... 31
6.6.3 Ending or Exiting Emergency Calls ........................................................................................................... 31
7. Message Services ............................................................................................................................... 32
7.1 Viewing Messages ...................................................................................................................................................... 32
7.2 Sending Messages ..................................................................................................................................................... 32
7.3 Managing Messages .................................................................................................................................................. 32
8. Supplementary Features .................................................................................................................. 34
8.1 Basic Settings ............................................................................................................................................................. 34
8.2 Programmable Keys ................................................................................................................................................. 35
8.3 Contact Management .............................................................................................................................................. 37
8.3.1 Adding Private Contacts ............................................................................................................................... 37
8.3.2 Adding Contacts to Favorites ..................................................................................................................... 38
8.3.3 Deleting Private Contacts ............................................................................................................................ 38
8.3.4 Managing Zones ............................................................................................................................................ 38
8.3.5 Managing Subgroups ................................................................................................................................... 39
8.4 Wireless and Network .............................................................................................................................................. 39
8.4.1 Mobile Network .............................................................................................................................................. 39
8.4.2 WLAN ................................................................................................................................................................ 40
8.4.3 BT ....................................................................................................................................................................... 40
8.4.4 Tethering and Portable Hotspot ............................................................................................................... 41
8.4.5 NFC .................................................................................................................................................................... 42
iii

8.4.6 VPN .................................................................................................................................................................... 42
8.5 Applications ................................................................................................................................................................ 42
8.5.1 Camera ............................................................................................................................................................. 42
8.5.2 Gallery .............................................................................................................................................................. 45
8.5.3 Clock ................................................................................................................................................................. 47
8.5.4 Calendar........................................................................................................................................................... 50
8.5.5 Browser ............................................................................................................................................................ 52
8.5.6 Calculator ........................................................................................................................................................ 52
8.5.7 Compass .......................................................................................................................................................... 53
8.5.8 Recorder ........................................................................................................................................................... 53
8.5.9 App Store ......................................................................................................................................................... 54
8.5.10 File Manager ................................................................................................................................................. 55
8.6 App Manager ............................................................................................................................................................... 55
8.7 Power Level ................................................................................................................................................................. 56
8.8 Audio Mode ................................................................................................................................................................. 56
8.9 Scan .............................................................................................................................................................................. 57
8.9.1 Scanning in Conventional Mode ............................................................................................................... 57
8.9.2 Scanning in Trunking Mode ........................................................................................................................ 57
8.10 Roam .......................................................................................................................................................................... 58
8.11 Position ...................................................................................................................................................................... 59
8.12 Analog Services ........................................................................................................................................................ 59
8.12.1 Turning the Monitor Feature On or Off .................................................................................................. 59
8.12.2 Turning the Squelch On Feature On or Off ........................................................................................... 59
8.12.3 Setting the Squelch Level ......................................................................................................................... 59
iv

8.13 Encryption ................................................................................................................................................................. 60
8.14 Stun ............................................................................................................................................................................. 60
8.15 Kill ................................................................................................................................................................................ 60
8.16 System Upgrade ...................................................................................................................................................... 60
9. Troubleshooting ................................................................................................................................ 62
10. Care and Cleaning ........................................................................................................................... 66
11. Optional Accessories ....................................................................................................................... 67
12. Abbreviations .................................................................................................................................. 68
v

Icon
Description
Indicates references that can further describe the related topics.
Caution
Indicates situations that could cause data loss or equipment damage.
Item
Description
Example
To save the configuration, click Apply.
The Log Level Settings dialogue appears.
Press the PTT key.
The screen displays "Invalid Battery!"
Open "PDT_PSS.exe".
Go to "D:/opt/local".
In the Port text box, enter "22".
>
Directs you to access a multi-level menu.
Go to File>New.
For details about using the DWS, refer to
Dispatch Workstation User Guide
.
Courier
To set the IP address, run the following
vos-cmd - m name IP
Documentation Information
Icon Conventions
Note
Notation Conventions
Boldface
" "
Italic
New
Denotes menus, tabs, parameter names,
window names, dialogue names, and
hardware buttons.
Denotes messages, directories, file
names, folder names, and parameter
values.
Denotes document titles.
Denotes commands and their execution
command:
results.
Key Operations
1
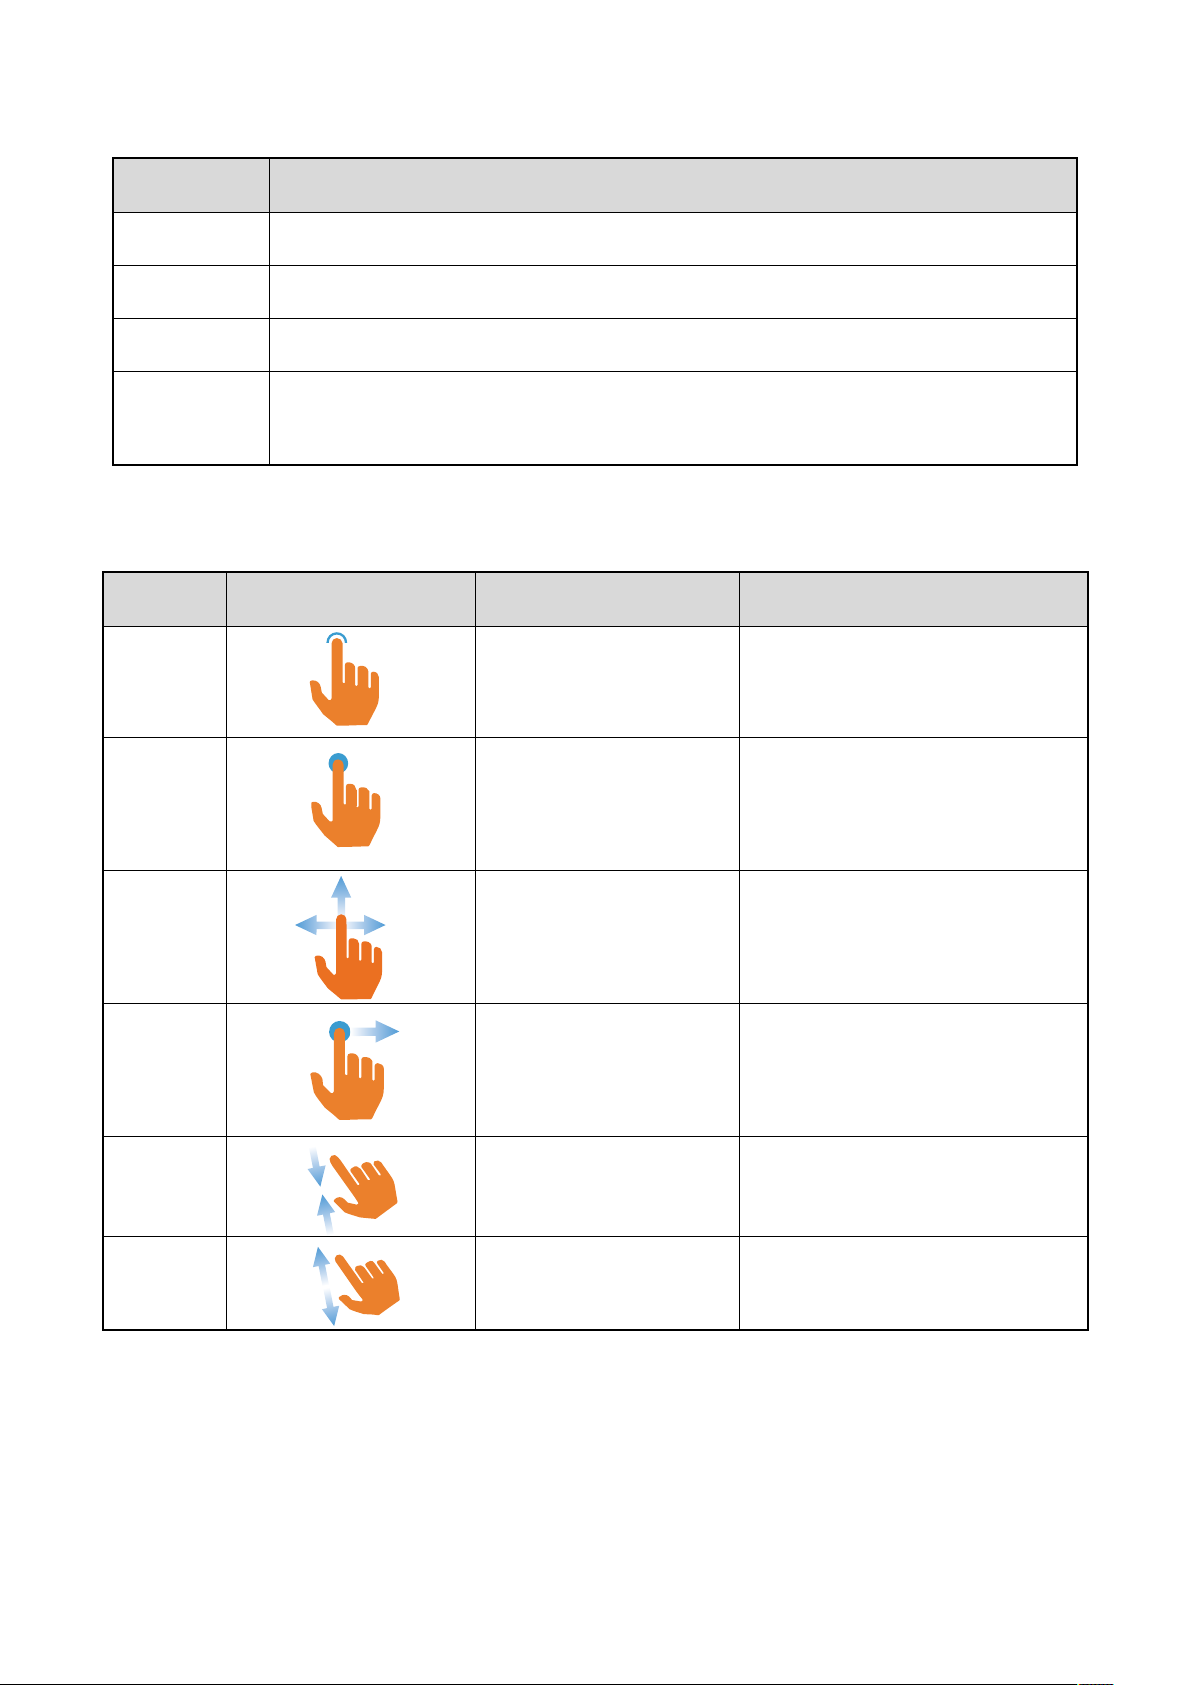
Operation
Description
Short press
Press and release quickly.
Long press
Press and hold for the preset duration.
Double press
Press twice continuously and quickly.
Press and
hold
Operation
Illustration
Description
Example
your finger.
Tap
to open the Camera app.
Touch an item with your
contact.
Touch and press until it jiggles.
Swipe down from the top edge of
notification panel.
Touch and press an item,
position.
Touch and press until it jiggles,
and then drag it to the proper
position.
on the screen.
Move two fingers apart on
the screen.
Keep the key pressed.
Main Screen Operations
Tap
Touch and
press
Swipe
Drag
Pinch
Touch an item once with
finger and maintain
Swipe your finger across
the screen.
and then move it to a new
Move two fingers together
any screen to access the
Pinch a photo to zoom out.
Spread
2
Spread a photo to zoom in.
Item
Quantity (PCS)
Item
Quantity (PCS)
Radio
1
Color Ring
4
Battery
1
Belt Clip
1
Charger
1
Strap
1
Power Adapter
1
Documentation Kit
1
Antenna
1 / /
Pictures in this manual are for reference only.
radio label. If not, please contact your dealer.
1. Packing List
Please unpack carefully and check that you have received the following items. If any item is missing or
damaged, please contact your dealer.
Check whether the frequency band marked on the antenna label matches that on the
3
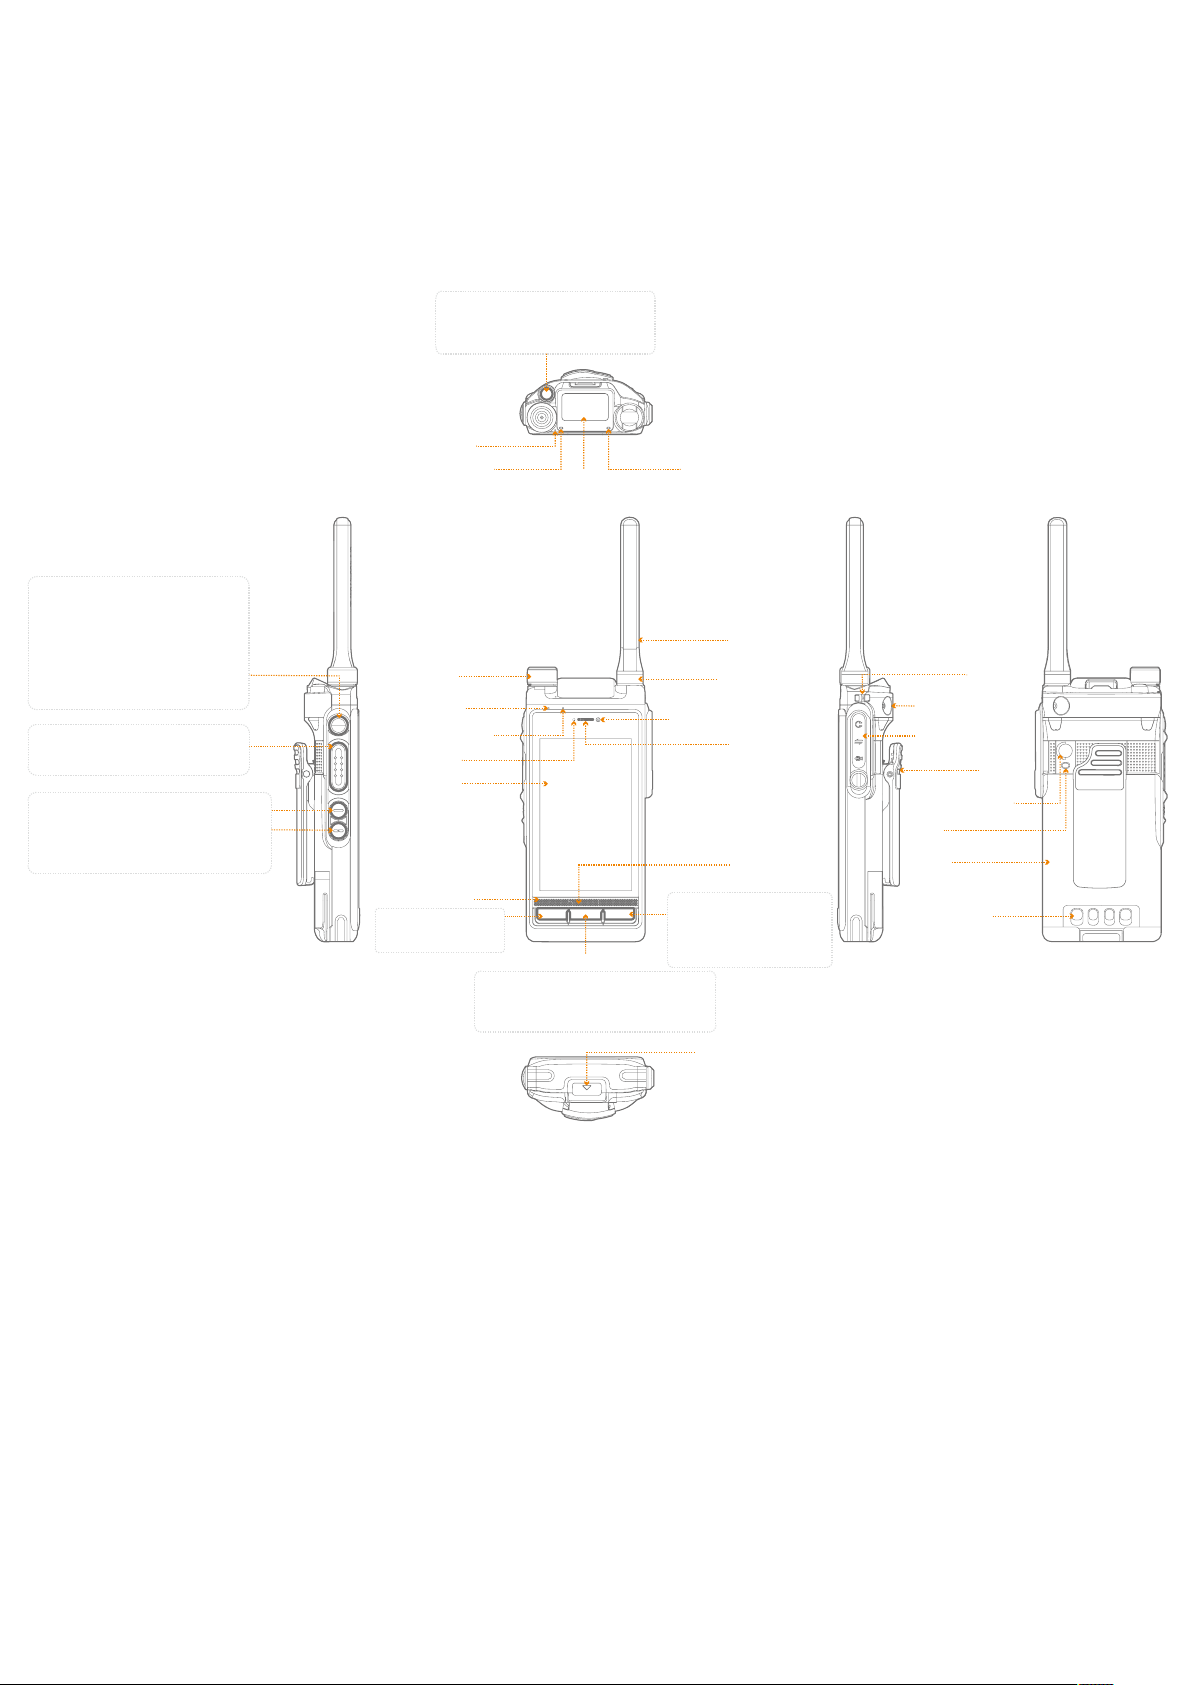
2. Product Layout
●When the main screen is on, press and hold to
turn the screen o.
●When the main screen is o, press to turn it on, or
press and hold to open the camera.
●Press to mute the ringtone or end calls.
●Press to view more or ip the page when viewing
the Home screen and App panel or browsing the
internet.
●Press to initiate or answer calls.
●Press and hold to speak during half-duplex calls.
Programmable keys. You can set the keys as shortcuts to
radio features. Then you can press, double press, or hold
the keys to trigger the assigned features.
Smart Key
Push-to-Talk (PTT) Key
Side Key 2 (SK2)
Side Key 3 (SK3)
Programmable key. You can set the key as
shortcut to radio features. Then you can press or
hold the key to trigger the assigned features.
Microphone 3
LED Indicator 2
Smart Knob
Microphone 2
Air Pressure Sensor
Light Sensor
Main Screen
Top Key (TK)
Top Screen
LED Indicator 1
Antenna
Color Ring
Front-facing Camera
Receiver
Speaker
Strap Hole
CARKIT RF Connector
Accessory Connector
Belt Clip
Rear-facing Camera
Flash
Battery
Microphone 1
Back/Answer Key
Press to return to the upperlevel menu or answer calls.
●When the main screen is o, press to wake the screen.
●When the main screen is on, press to return to the
Home screen, or double press to view running apps.
Home Key
On-O/End key
●Press to reject incoming calls or
end calls.
●Press and hold to turn the radio or
Android Platform (AP) on or o.
Battery Latch
Charging Piece
4

Caution
Do not hold the radio by the antenna, because it may reduce the radio performance and life
span of the antenna.
3. Before Use
3.1 Attaching the Antenna
1. (Optional) Place the color ring (for identification purpose) on the antenna connector.
2. Put the antenna on the antenna connector.
3. Rotate the antenna clockwise till hand tight.
3.2 Installing the Micro-SIM Card and Micro-SD Card
1. Open the card slot cover on the top of the battery compartment.
2. Install the micro-SIM card.
a. Pull the micro-SIM card tray out of the slot, and place the micro-SIM card with the gold contacts
facing up on the tray.
b. Insert the card tray with the micro-SIM card back into the slot.
3. (Optional) Insert the micro-SD card into the corresponding slot.
4. Put the card slot cover back in place.
5

Note
To re-install the micro-SD card, take the card out completely, and then re-insert it to the slot.
Note
To remove the belt clip, press and hold the spring when sliding the belt clip out of the
grooves on the battery.
Micro-SD card for the public network
Micro-SD card for the private network
Card slot cover
Micro-SIM card for the private network
Micro-SIM card for the public network
3.3 Attaching the Belt Clip
1. Align the rails on the belt clip with the grooves on the battery.
2. Press the belt clip downwards into place.
6

Caution
3.4 Attaching the Battery
1. Slide the battery into the slot.
2. Press the battery latch until it is fully fitted into the radio.
3.5 Charging the Battery
Read the
Use the approved charger to charge the battery.
The remaining lithium-ion battery power is limited to 30% pursuant to the new lithium
battery shipment regulation approved by International Air Transport Association (IATA).
Before initial use, fully charge the battery to ensure optimum performance. You can charge the radio with
battery attached or charge the battery alone.
Safety Information Booklet
before charging.
7

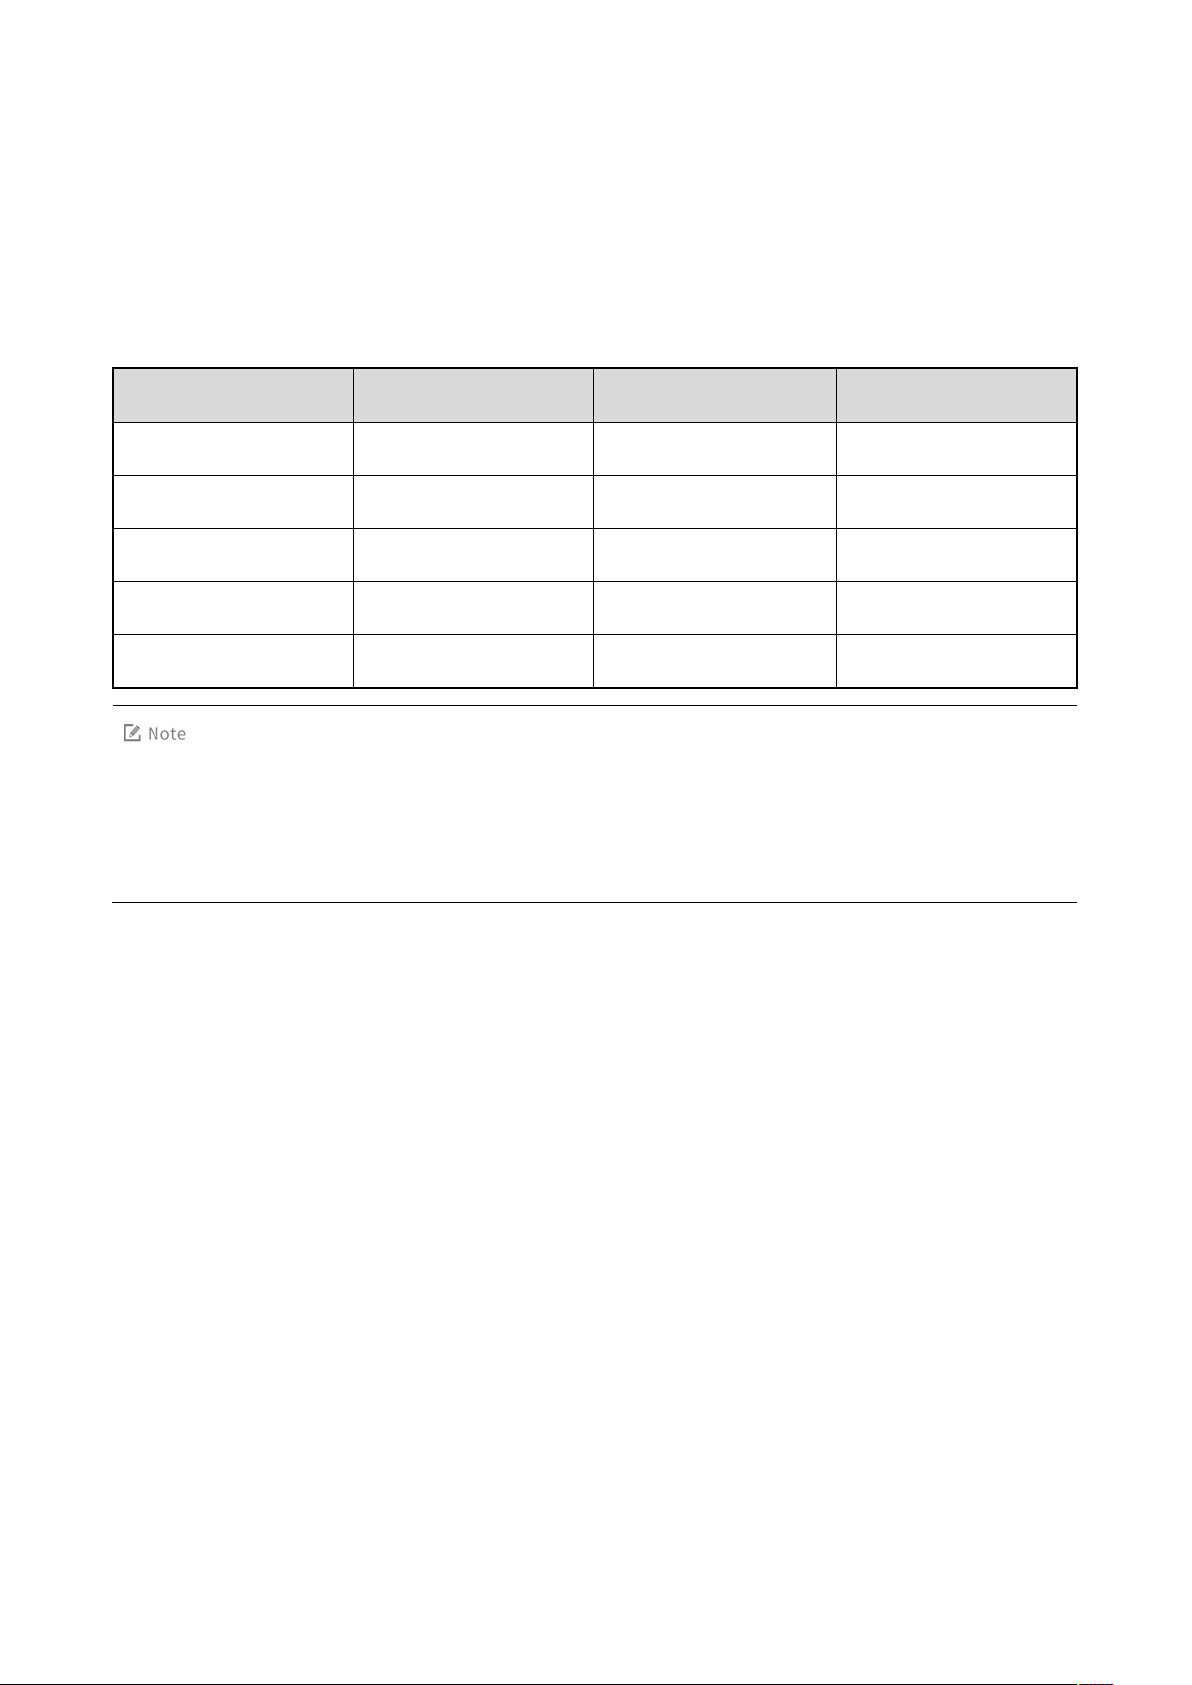
LED Indicator
Charging Status
Glows red
The battery is being charged.
When the radio is being charged with the battery attached:
is
charged to 95% or above.
Flashes red rapidly
The battery fails to be charged.
To determine the charging status, check the LED indicator on the charger according to the following
table:
Glows green
The battery is charged to 90% or above.
When the battery is being charged alone: The battery
8

Note
You can also go to Settings > General > Sounds > Volume to adjust the volume of ringtone,
media, alarm, and call.
Note
If you do not operate the knob for 5s or if you press it again within 5s, it automatically returns
to the volume control state.
Caution
The screens may be damaged or broken if they are hit or scraped by sharp or hard objects. All
4. Basic Operations
4.1 Turning the Radio On or Off
To turn the radio on, press and hold the On-Off/End key until the splash screen appears.
To turn the radio off, do as follows:
1. Press and hold the On-Off/End key until the power-off selection screen appears.
2. Tap Device Power Off, and then tap Sure.
4.2 Adjusting the Volume
To increase the volume, directly rotate the Smart Knob clockwise.
To decrease the volume, directly rotate the Smart Knob anticlockwise.
4.3 Selecting Channels or Contacts
1. Press the Smart Knob.
2. Rotate the knob to select the required channel or contact.
4.4 Understanding the Screens
The radio has two screens: top screen and main screen.
9

care must be taken to protect the screens.
4.4.1 Top Screen
The top screen, which shows information about narrow band (NB) services, includes the following three
bars:
Status bar: Shows icons indicating battery power, signal strength and other statuses.
Content bar: Shows the selected channel or contact and icons related to ongoing calls.
Information bar: Shows icons indicating the number of unread messages and missed calls, time, and
current operation mode.
Status bar
Content bar
Information bar
4.4.2 Main Screen
The main screen is a touch screen where you can manage widgets and apps, and make settings.
10

Home Screen
The Home screen is the main screen you view upon power-on. It contains the status bar, NB widget, and
broadband (BB) widgets.
Status bar
NB widget
BB widget
Apps Panel
To access Apps, do as follows:
1. Swipe right from the left edge of the Home screen.
2. Swipe up or down to view all apps.
To set your preferred way to access the apps panel, go to Settings > General > Personalization > App
Center, and then select Swipe from left edge, Swipe from right edge, or Swipe from both edges.
11

On the apps panel, you can do the following operations:
Open an app: tap the required app icon.
Reposition an app: touch and press the required app icon until it jiggles, and drag it to a new
location.
Uninstall an app: touch and press the required app icon until it jiggles, and tap
Double press the
and then tap it
all running apps, tap
key to
Home
. To close a running app, swipe the app left or right from the multitasking display. To close
.
reveal the multitasking screen,
swipe up or down to the required app,
.
Quick Setting Panel
The quick setting panel allows you to access handy features, such as Camera, Flashlight, and Calculator.
You can also adjust the brightness, and turn on or off the airplane mode, wireless local area network
(WLAN), NB network, etc. To access the quick setting panel, swipe up from the bottom edge of any
screen. You can swipe left to view more items.
12

To reposition an item, tap and hold the item until it is highlighted, and drag it to a new location.
Notification Panel
You can access the notification panel to view notifications and search for apps, contacts or messages.
To view notifications, do as follows:
1. Swipe down from the top edge of any screen.
2. Tap a notification to view the details.
To search for apps, contacts or messages, enter key words in the search box at the top of the screen.
To clear a notification, swipe the notification left or right. To clear all notifications, tap Clear at the
bottom of the notification panel.
13

4.5 Locking and Unlocking the Main Screen
When the main screen is not in use, you can lock it to avoid unintended operations and increase battery
life.
To manually lock the screen: press and hold the Smart Key when the main screen is on.
To allow the main screen to be turned off automatically: go to
Settings>General>Device>Display>Main Screen>Sleep, and then tap the required interval.
To wake up the screen: press the Smart Key or the Home key when the main screen is off.
To protect privacy, it is recommended that you secure your radio using a screen lock. The screen lock is
triggered after the main screen is turned off.
To set a screen lock, do as follows:
1. Go to Settings > General > Lock screen > Unlock pattern.
2. Tap Unlock pattern, and then tap one of the following:
None: The screen will never be locked.
Swipe: Swipe up to unlock.
Password: Create a password for unlocking the screen.
Pattern: Create a pattern that you draw on the screen to unlock it.
14

Note
The NB widgets cannot be deleted or repositioned.
4.6 Managing the Widgets
A widget is a miniature application that allows you to quickly open applications and view updates. On
the home screen, you can access, add, delete, or reposition widgets.
Accessing Widgets
On the Home screen, swipe up or down to the required widget, and then tap it.
Adding Widgets
1. Swipe down to the bottom of the Home screen, and tap Edit.
2. Tap Add, and then tap the required widget.
3. Tap OK.
15

Deleting Widgets
1. Swipe down to the bottom of the Home screen, and tap Edit.
2. Tap
in the upper right corner of the widget, and then tap OK.
Repositioning Widgets
1. Swipe down to the bottom of the Home screen, and tap Edit.
2. Press and hold the widget until it is highlighted, drag it up or down to a new location.
3. Press the Home key.
4.7 Switching the Operation Mode
The radio can operate in NB & BB mode or NB mode. Upon power-on, the radio operates in NB & BB
mode by default.
In NB & BB mode, both the top screen and main screen are on. The radio can access both private and
public network services.
In NB mode, only the top screen is on. The radio accesses only private network services. The NB mode
includes the following two types:
Conventional mode: The radio communicates with one or more other radios directly on the fixed
channel frequency or through repeaters.
16

Note
The trunking mode must be authorized by your dealer.
Trunking mode: The radio communicates with one or more other radios on the channel frequency
allocated by the trunking system.
To switch the specific NB mode, go to Settings>PMR>Work mode, and then tap Conventional or
Trunking.
To switch to NB mode, do as follows:
1. Press and hold the On-Off/End key until the power-off selection screen appears.
2. Tap AP Power Off, and then tap Sure.
To switch back to NB & BB mode, do as follows:
1. Press and hold the On-Off/End key until the AP Power On selection screen appears.
2. Tap AP Power On.
4.8 Connecting to the Networks
4.8.1
To allow the radio to access private network services, do either of the following:
Private Network
Swipe up from the bottom edge of any screen, and tap Narrowband.
17

Note
Before accessing the public network services, ensure that you have installed the
battery life.
Go to Settings > PMR > Narrowband, and then turn it on.
4.8.2 Public Network
To allow the radio to access the public network services, do either of the following:
Swipe up from the bottom edge of any screen, and tap Data.
Go to Settings > General > Mobile network, and then turn it on.
micro-SIM card properly.
If the data services are not in use, tap to turn it off to decrease data usage and increase
For more details on public network setting, see 8.4.1 Mobile Network.
4.8.3 WLAN Network
The WLAN feature provides Internet access over WLAN network.
To connect to a WLAN network, do as follows:
1. Go to Settings > General > Wireless & networks > WLAN.
2. Check whether WLAN is on. If yes, go to the next step. If no, tap Off to turn it on.
When WLAN is turned on, the radio automatically scans for available networks and displays them.
3. Tap the network you want to connect to.
When you select an open network, the radio automatically connects to it. Otherwise, enter a password to
connect.
For more details on WLAN network setting, see 8.4.2 WLAN.
4.8.4 Airplane Mode
You may be required to turn the radio off or make it enter the airplane mode when you are in an airplane or
other area where making or receiving calls or accessing data is prohibited. In airplane mode, the radio
in any
cannot make or receive any calls or access online information or applications. If permitted by the cabin crew,
you can turn on
WLAN network or BT, or initiate NB services.
18

To make the radio enter the airplane mode, do either of the following:
Swipe up from the bottom edge of any screen, and tap Airplane mode.
Go to Settings > General > Wireless & networks > Airplane mode, and then turn it on.
When airplane mode is on, appears in the status bar at the top of the main screen.
19

Type
Top
Screen
Main
Screen
Radio Status
power
The battery is fully charged.
The battery power is low.
network
/
G/E/3G/4G
A G /E/3G/4G cellular network is available.
/
The radio is connected to the WLAN network.
/
The radio operates in Airplane mode.
The number of bars indicates the signal strength of the BB
network.
The NB network is turned off.
Conventional mode: The radio is in standby state.
Trunking mode: The radio detects no signal.
The number of bars indicates the signal strength of the NB
network.
The number of bars indicates the signal strength when the
radio operates under a single site in trunking mode.
The digit indicates the number of missed calls.
The digit indicates the number of unread short messages.
An emergency call is in progress.
The radio is transmitting on an analog channel.
A private call is in progress over the NB network.
/
Initiating/receiving a private call over the NB network.
5. Status Indications
5.1 LCD Icons
Battery
Data
Signal
Call and
data services
/
/
20

Type
Top
Screen
Main
Screen
Radio Status
Establishing a private call in trunking mode over the NB
network.
A group call is in progress over the NB network.
/
Initiating/receiving a group call over the NB network.
Establishing a group call in trunking mode over the NB
network.
An all call is in progress over the NB network.
/
Initiating/receiving an all call over the NB network.
/
Establishing an all call in trunking mode over the NB network.
An encrypted private call is in progress over the NB network.
An encrypted group call is in progress over the NB network.
An encrypted all call is in progress over the NB network.
A phone call is in progress over the BB network.
/
Initiating/receiving a phone call over the BB network.
A phone call has been established over the BB network.
/
The radio operates in low or high power mode.
The radio is roaming.
The radio is scanning.
The radio stays on an active channel.
The End-to-End Encryption (E2EE) feature is enabled.
The Squelch Off feature is enabled.
The Monitor feature is enabled.
BB network
/
No micro-SIM card is detected.
/
/
NB network
21

Type
Top
Screen
Main
Screen
Radio Status
/
An error occurs to the micro-SD card.
/
The radio is downloading.
/
A hotspot is set up.
/
The Recorder feature is enabled.
/
The Alarm feature is enabled.
An accessory is connected.
The BT feature is enabled.
A BT device is connected.
The GPS feature is enabled, and the radio is receiving
positioning data.
The GPS feature is enabled, but the radio receives no
positioning data.
Others
The radio operates in silent mode.
LED Indicator
Radio Status
Flashes green
Being turned on.
Flashes green slowly
Standby in trunking mode.
Glows green
Receiving.
Glows red
Transmitting.
The radio in trunking mode is making a call. This indication is
applicable only to the calling radio.
Accessory
5.2 LED Indications
5.2.1
LED Indicator 1
Flashes red
22

The battery is low. Please recharge or replace the battery.
Conventional mode: Scanning or roaming
Trunking mode: Registering
Conventional mode: Operating in emergency mode.
This indication is applicable only to the called radio.
Call hang time: No voice is being transmitted or received during a call.
Within such a period, you can press and hold the PTT key to speak.
LED Indicator
Radio Status
Flashes blue
A BT device is connected.
Flashes red
There is/are unread message(s) or missed call(s).
Flashes orange slowly
Flashes orange rapidly
Glows orange
5.2.2 LED Indicator 2
Trunking mode: Establishing a Full Off Air Call Set-Up (FOACSU) call.
23

Note
When initiating an NB call by entering the target number, make sure that the number
complies with the dial rule. For the detailed dial rule, please consult your dealer.
6. Call Services
You can initiate and receive various types of calls in different ways. Over the private network, you can
initiate and receive NB calls including group calls, private calls, all calls, broadcast calls, and emergency
calls. Over the public network, you can initiate and receive phone calls as you do on your mobile phone.
6.1 Group Calls
A group call is a call from an individual user to all the other members in the group over the private
network.
6.1.1 Initiating Group Calls
You can make a group call through one of the following ways:
Preset Contact
1. Press the Smart Knob.
2. Do the following:
If you are in conventional mode, rotate the knob to select the channel associated with the
required group contact.
If you are in trunking mode, rotate the knob to select the required group contact.
3. Press and hold the PTT key.
Manual Dialing
1. Tap .
2. Enter the required group number.
3. Select "PMR group call".
4. Press and hold the PTT key.
24

Contact list
1. Tap >
2. Tap a group contact.
3. Press and hold the
Group
.
PTT
key.
6.1.2 Receiving and Responding to Group Calls
You can listen to a received group call without any operation.
To respond to the call, press and hold the PTT key or tap and hold the circle on the screen, and then
speak into the microphone.
6.1.3 Ending or Exiting Group Calls
In conventional mode and trunking mode, a group call ends automatically when the call hang time
expires.
In trunking mode, you can tap
or press the On-Off/End key to end an outgoing group call
or exit an incoming group call. In addition, a group call also ends in any of the following cases:
The preset total call time expires.
A preemptive or emergency call interrupts the call.
The base station signal is lost.
You have switched to another contact during the call (in the case that the Clear Down Via Contact
Switch feature is enabled by your dealer).
6.2 Private Calls and Phone Calls
A private call is a call initiated by one individual user to another over the private network. A phone call is
a call initiated by one individual user to another over the public network.
6.2.1 Initiating Private Calls and Phone Calls
You can make a private call or phone call through one of the following ways:
Preset Contact
1. Press the Smart Knob.
25

2. Do the following:
If you are in conventional mode, rotate the knob to select the channel associated with the
required private contact.
If you are in trunking mode, rotate the knob to select the required private contact.
3. Press and hold the PTT key.
Manual Dialing
To make a private call over the private network, do as follows:
1. Tap
2. Enter a private contact number.
3. Press and hold the PTT key.
To make a phone call over the public network, do as follows:
1. Tap .
2. Enter a phone number.
3. Press
.
or press and hold the PTT key.
Contact List
To make a private call over the private network, do as follows:
1. Tap
2. Tap a private contact.
3. Press and hold the PTT key.
> Private.
To make a phone call over the public network, do as follows:
1. Tap
2. Tap a phone number.
3. Tap .
> Private.
Call Logs
To make a private call over the private network, do as follows:
26

1. Tap or .
2. Tap Call logs at the bottom of the screen.
3. Tap All or Missed at the top of the screen, and then tap a private contact.
4. Press and hold the PTT key.
To make a phone call over the public network, do as follows:
1. Tap
2. Tap Call logs at the bottom of the screen.
3. Tap All or Missed at the top of the screen, and then tap a phone contact.
4. Tap
or .
.
6.2.2 Receiving and Responding to Private Calls and Phone Calls
Private Call
In conventional mode, you can listen to a call without any operation.
In trunking mode, you can listen to a call in different ways varying with the setup mode of the call:
FOACSU
The radio rings and vibrates to indicate the incoming call. You can press the PTT key or the
Back/Answer key to answer the call.
Off Air Call Set-Up (OACSU)
The call is established automatically. You can listen to it without any operation.
To respond to the call, press and hold the PTT key, and then speak into the microphone.
Phone Call
You can tap or press Back/Answer key to answer a call.
6.2.3 Ending Private Calls and Phone Calls
Private Call
In conventional mode and trunking mode, a call ends automatically when the call hang time expires.
27

Note
The All Call feature must be authorized by your dealer.
In trunking mode, you can also tap or press the On-Off/End key to end a call. For other
cases where a call ends, see 6.1.3 Ending or Exiting Group Calls.
Phone Call
To end a phone call, tap or press the On-Off/End key.
6.3 All Calls
In conventional mode, an all call is a call from an individual user to all the other users on the current
digital channel.
In trunking mode, an all call is a call from an individual user to all the other users in a specific base
station, area, or system.
In an all call, only the calling party can speak.
6.3.1 Initiating All Calls
You can make an all call through either of the following ways:
Preset Contact
1. Press the Smart Knob.
2. Rotate the knob to select an all call contact.
3. Press and hold the PTT key.
Manual Dialing
1. Tap
2. Enter an all call number.
3. Press and hold the PTT key.
.
6.3.2 Receiving All Calls
You can listen to an all call without any operation.
28

Note
The Broadcast Call feature must be authorized by your dealer.
6.3.3 Ending or Exiting All Calls
In conventional mode and trunking mode, an all call ends when the calling party releases the PTT key.
In trunking mode, as the call party, you can tap
call. In addition, an all call also ends in any of the following cases:
The preset transmission time expires.
The preset total call time expires.
The base station signal is lost.
You have switched to another contact during the call (in the case that the Clear Down Via Contact
Switch feature is enabled by your dealer).
As the called party, you can press the On-Off/End key to exit an all call. If the Clear Down Via Contact
Switch feature is enabled by your dealer, you can also exit the call by switching to another contact. You
can rejoin the call later.
or press the On-Off/End key to end an all
6.4 Broadcast Calls (Trunking Only)
A broadcast call is a special group call. In a broadcast call, only the calling party can speak.
6.4.1 Initiating Broadcast Calls
To initiate a broadcast call, do as follows:
1. Tap > Favorites/Group.
2. Tap a group contact, and then tap
.
6.4.2 Receiving Broadcast Calls
You can listen to a broadcast call without any operation.
6.4.3 Ending or Exiting Broadcast Calls
As the calling party, you can tap or press the On-Off/End key to end a broadcast call.
29

Note
If the Alarm w/Call To Follow feature is enabled by your dealer, you can speak into the
microphone without holding the PTT key.
A broadcast call also ends in any of the following cases:
The preset total call time expires.
The base station signal is lost.
A preemptive or emergency call interrupts the call.
You have switched to another contact during the call (in the case that the Clear Down Via Contact
Switch feature is enabled by your dealer).
As the called party, you can press the On-Off/End key to exit a broadcast call. If the Clear Down Via
Contact Switch feature is enabled by your dealer, you can also exit the call by switching to another
contact. You can rejoin the call later.
6.5 Calls on Analog Channels
On analog channels, you can initiate calls to all the other users on the channels.
To initiate such a call, do as follows:
1. Press the Smart Knob, and then rotate it to select the required channel.
2. Press and hold the PTT key, and speak into the microphone.
You can listen to a call on analog channels without any operation.
6.6 Emergency Calls
An emergency call is a call initiated to ask for help in case of emergency.
6.6.1 Initiating Emergency Calls
To initiate an emergency call, press the programmed Emergency On key, then press and hold the PTT
key to speak.
To set a programmable key as the shortcut to initiate an emergency call, go to Settings > General >
Programmable keys.
30

6.6.2 Receiving Emergency Calls
You can listen to an emergency call without any operation.
6.6.3 Ending or Exiting Emergency Calls
Conventional Mode
As the calling party, you can end an emergency call. However, as the called party, you can only exit an
emergency call. Do one of the following to end or exit an emergency call:
Press the programmed Emergency Off key.
Switch to trunking mode.
Turn the NB network off.
In addition to the above ways, you can also exit an emergency call by switching to another channel.
Trunking Mode
As the calling party, you can end an emergency call through one of the following ways:
Press the programmed Emergency Off key.
Switch to conventional mode.
Turn the NB network off.
Switch to another contact during the call (in the case that the Clear Down Via Contact Switch feature
is enabled by your dealer).
As the called party, you can only exit the emergency call. In addition to the above ways, you can also tap
or press the On-Off/End key to exit the emergency call. In the case of an emergency group
or all call, you can rejoin the call later.
31

7. Message Services
The Message feature allows you to send and manage messages.
7.1 Viewing Messages
To view a message, tap , and then tap the required message.
7.2 Sending Messages
1. Tap , and then tap in the lower right corner.
2. Tap the To text box to enter a recipient, or tap
3. Tap the Type message text box to enter the content.
4. (Optional) Tap
Quick reply texts
Status messages
: Take or select a photo to attach (for phone contacts).
Photo
: Record or select an audio to attach (for phone contacts).
Voice
: Record or select a video to attach (for phone contacts).
Video
Subject
Timed
Contact
Emojis
: Schedule the message to be sent later automatically
: Select an emoji (for phone contacts).
on the left for more operations.
: Add and edit a quick reply text.
: Add and edit a status message (trunking mode).
: Convert a text message into a multimedia message (for phone contacts).
: Send the contact information.
to select a recipient from your Contacts.
5. Tap
to send the message.
7.3 Managing Messages
1. Tap and then tap a message to be managed.
2. Tap and hold the message text until
3. In the managing interface, do one of following:
appears.
32

To copy the message, tap
To forward the message, tap
new contact.
To delete the message, tap
To add the message to the favorite list, tap
Copy text
Forward
Delete
.
and enter a new contact number or tap
.
More > Favorite
.
to select a
Then you can view the favorite messages by tapping
To view the message details such as message type and sending time, tap
Messaging > My favorites
.
More > View details
.
33

If you want to...
Then...
as
Go to Device > Programmable keys > SK2/SK3/TK > Short press/Long
8.2
Note: The double-press operation is applicable only to SK2 and SK3.
Go to System > Language & input > Language, and then tap the
required language.
2. Tap the required photo, and then tap confirm.
Go to Device > Display > Main/Top, and then drag the brightness slider.
off automatically.
Turn the LED indicator on or off
Go to Device > Display, and then tap LED.
Go to Device > Sounds, and then tap Vibrate on ring or Vibrate on
silent.
Set the profile
Go to Device > Sounds > Profiles, and then tap Ring or Silent.
Set the ring, media, alarm, and
call volume
Go to Device > Sounds > Volume, and then drag the corresponding
slider.
Select tones for call, message
and notification services
8. Supplementary Features
8.1 Basic Settings
You can go to Settings > General and then make the following settings:
Set SK2, SK3, and TK
shortcuts to radio features
Set the language
Set the wallpaper
Adjust the brightness of
backlight
press/Double-click, and then tap the required feature. See
Programmable Keys for details.
1. Go to Device > Personalization > Wallpaper.
Tap Auto-brightness to let the radio to automatically adjust the
brightness.
Tap Timed off to set the duration after which the screen will be turned
Turn vibration on or off
1. Go to Device > Sounds > Sounds and vibrations.
34

If you want to...
Then...
2. Tap the corresponding tone, and then set tap the required alert
tone.
Go to Device > Sounds > System Tone, and then tap the required alter
tone.
Go to Device > Storage > Internal storage > Cached data, and then tap
OK.
Set whether the main screen
the status bar
Go to Device > Assistance, and then tap Glove mode.
convenient operation when wearing a glove.
Set the date and time
Go to System > Date & time.
Feature
Description
Camera
Opens the camera to take photos.
Turn system tone on or off
Clear cached data
displays battery percentage in
Turn the glove mode on or off
Go to Device > Battery, and then tap Battery percentage.
In this mode, the radio increases the touch screen sensitivity for your
8.2 Programmable Keys
The radio has three programmable keys including SK2, SK3, and TK. When you assign a specific feature
to one key, you can press, hold or double press this key to quickly activate the feature.
To make the settings, go to Settings > General > Device > Programmable keys.
The table below lists the assignable features.
Emergency on
Initiates an emergency call.
Emergency call
35

Cancel emergency
call
Encryption
Enables or disables the E2EE feature.
Adjust power level
Switches the operating power between high and low.
Video
Records a video.
Audio path switch
Control Center
Accesses or closes the quick setting panel.
Screenshot
Takes a screenshot.
Zone up
Switches to the previous zone.
Zone down
Switches to the next zone.
Enables or disables the Squelch On feature for the current
On or Off for details.
or Off for details.
Removes the current channel from the scan list. See 8.9.1
Scan in Conventional Mode for details.
Subgroup up
Switches to the previous subgroup.
Subgroup down
Switches to the next subgroup.
Enables or disables the Background Hunt feature. See 8.9.2
Scan in Trunking Mode for details.
Enables or disables the Handover feature. See 8.9.2 Scan in
Trunking Mode for details.
Manual scan
Enables the Scan feature. See 8.9.2 Scan in Trunking Mode
Emergency off
Ends or exits an emergency call.
Selects the audio mode. See 8.8 Audio Mode for details.
Squelch on
Monitor
Nuisance delete
Background hunt
Handover
Conventional
mode
Trunking mode
analog channel. See 8.12.2 Turning the Squelch On Feature
Enables or disables the Monitor feature for the current
analog channel. See 8.12.1 Turning the Monitor Feature On
36

for details.
Note
Only phone contact and private contact can be edited, deleted or added.
8.3 Contact Management
The Contact feature allows you to manage contacts.
8.3.1 Adding Private Contacts
To add a private contact, do as follows:
1. Tap
2. Tap
Take photo: use the camera to take a photo.
Choose photo: choose a photo from the Gallery.
3. Tap the Name text box, and enter the contact name.
4. Tap the PMR text box, and enter the Private Mobile Radio (PMR) number of the contact.
5. Tap
6. Tap the Mobile text box and enter the phone number.
7. (Optional) Tap Add number to add another phone number.
8. Tap the Email, Address, and Remarks text boxes and enter the related information.
9. Tap Save in the upper right corner.
> Private > .
and assign a photo to the contact by choosing one the following options:
, and then tap the required type of phone number.
37

8.3.2 Adding Contacts to Favorites
To add frequently used contacts to the Favorites list, do as follows:
1. Tap
2. Tap the required contacts, and then tap OK.
> Favorites > .
8.3.3 Deleting Private Contacts
1. Tap , and then tap Private.
2. Tap Edit in the upper right corner.
3. Swipe up to the bottom, and then tap Delete contact.
4. Tap OK.
8.3.4 Managing Zones
In conventional mode, the radio receives and transmits data and voice on the selected channel. A zone is
a group of channels within the same operational area.
To switch the current channel, do as follows:
1. Tap
2. Tap the required zone, and then tap
, and then tap Manage in the upper right corner.
on the right of the required channel.
38

To edit a channel, do as follows:
3. Tap
4. Tap the required channel, and then tap Edit in the upper right corner.
5. On the editing interface, make the related settings as required.
6. Tap Save.
, and tap Manage in the upper right corner.
8.3.5 Managing Subgroups
In trunking mode, a subgroup consists of several contacts.
To switch the current contact, do as follows:
1. Tap , and then tap Manage in the upper right corner.
2. Tap the required subgroup, and then tap
To edit a private contact, do as follows:
1. Tap , and tap Manage in the upper right corner.
on the right of the required contact.
2. Tap the required contact, and then tap Edit in the upper right corner.
3. On the editing interface, make the related settings as required.
4. Tap Save.
8.4 Wireless and Network
8.4.1
Setting the Mobile Network
Go to Settings > General > Mobile network, and make the following settings:
To set the preferred network type, tap Network > Preferred network type > 4G/3G/2G.
To use LTE services to improve voice and other communications, tap Network > Enhanced 4G LTE
To connect to data services when roaming, tap Network > Data roaming, and then turn it on.
Mobile Network
Mode, and then turn it on.
39

Managing the Data Usage
You may pay additional charges if the data usage exceeds the cellular data plan. To avoid additional
charges, you can set a data plan by
automatically once the data usage reaches the limit you set.
You can tap Data usage to check the data usage for each app.
tapping Cellular data > Data limit. The cellular data will be turned off
8.4.2 WLAN
To set the WLAN, go to Settings > General > WLAN, tap in the upper right corner of the screen, and
do the following operations:
Adding WLAN Networks
To add a WLAN network not displayed on the available network list, do as follows:
1. Tap Add network.
2. Set the parameters as required.
3. Tap Save.
Advanced WLAN Settings
You can tap Advanced to make the following advanced settings:
To receive notification when a public network is available, tap Network notification to turn it on.
To transfer files to a nearby device directly through WLAN connection, tap WLAN Direct > Peer
devices, and then tap the required device.
To connect to WLAN network using WLAN Protected Setup (WPS), do either of the following:
Tap
WPS Push Button
Tap
WPS Pin Entry
, and then press the WLAN Protected Setup button on your router.
to enter the pin code displayed on the screen on your router.
8.4.3 BT
The BT feature allows the radio to exchange data with another BT-enable device over short distances.
To pair the radio with another BT device, do as follows:
1. Go to Settings > General > Wireless & networks > BT.
40

2. Check whether BT is on.
If yes, go to the next step.
If no, tap Off to turn it on.
3. Tap the name of the target device.
After successful pairing and connection, the radio can exchange information (e.g., files, photos, and
videos) with other BT-enabled devices.
8.4.4 Tethering and Portable Hotspot
The Personal Hotspot feature allows you to share the radio's data connection with nearby devices.
Setting up a Portable Hotspot
To set up a hotspot, do as follows:
1. Go to Settings > General > Wireless & networks > Tethering & portable hotspot.
2. Tap Portable WLAN hotspot to turn it on.
3. Tap Set up WLAN hotspot, and enter the related information.
4. Tap Save.
Using BT Tethering
BT Tethering allows the radio to share data connection with nearby devices through BT.
41

Note
Set a screen lock (pattern or password) before editing VPN profile.
Consult your dealer for detailed configurations.
To turn the BT tethering feature on or off, go to Settings > General > Wireless & networks > Tethering
& portable hotspot, and tap BT tethering.
8.4.5 NFC
The Near Field Communication (NFC) feature allows the radio to recognize nearby NFC-capable devices.
To turn NFC on or off, go to Settings > General > Wireless & networks > More, and then tap NFC.
8.4.6 VPN
A virtual private network (VPN) extends a private network across a public network. Applications running
across the VPN may benefit from the functionality, security, and management of the private network.
To set up a VPN, do as follows:
1. Go to Settings > General > Wireless & networks > More > VPN, and then tap VPN to turn it on.
2. Tap VPN settings.
3. Tap
4. Tap the configured VPN, enter the username and password, and then tap Connect.
to edit and save VPN profile.
8.5 Applications
On the apps panel, you can use embedded apps as you do on your mobile phone. To open an app, tap
the related app icon. Besides embedded apps, you can also download and install more apps using APP
Store. For details, see 8.5.9 App Store.
8.5.1 Camera
The app allows you to take photos and record videos. To switch between taking photos and recording
videos, swipe left or right on the screen or double press the Smart Key after opening the camera.
42

Taking Photos
To take a photo, do as follows:
1. Tap
2. Swipe left or right to the tab with
3. Tap
HDR: High Dynamic Range helps you get a brighter and richer photo.
4. Tap
detection.
5. Aim the camera at the subject, and pinch the screen to zoom out or spread the screen to zoom in if
required.
6. Tap
.
.
to do the following basic settings:
: Turn the flash on or off, or allows the camera to turn the flash on automatically depending
on the ambient light.
: Take time-delayed photos
: Switch between the front-facing and rear-facing camera.
in the upper right corner to do other settings, such as resolution, watermark, and face
or press the Smart Key.
7. Tap the thumbnail in the lower left corner to view the full photo you have taken.
8. Press the Back/Answer key to switch back to photo taking.
43

Recording Videos
To record a video, do as follows:
1. Tap
2. Swipe left or right to the tab with
3. Tap
4. Tap
5. Aim the camera at the subject, and pinch the screen to zoom out or spread the screen to zoom in if
required.
6. Tap
7. (Optional) Tap
8. (Optional) Tap
9. Tap
10. Tap the thumbnail in the lower left corner to view the video you have shot.
.
.
to do the following basic settings:
: Turn the flash on or off.
: Switch between the front-facing and rear-facing camera.
in the upper right corner to do other settings, such as resolution and watermark.
or press the Smart Key to start recording.
to pause, and then tap to continue.
to take a photo.
or press the Smart Key to stop recording.
11. Press the Back/Answer key to switch back to video recording.
44

8.5.2 Gallery
The app allows you to manage photos and videos.
Viewing Photos and Watching Videos
To view a photo or watch a video, do as follows:
1. Tap
2. Tap
All: View photos and videos organized by date.
Albums: View photos and videos organized by album.
3. Depending on the view mode, either tap a photo or video to view it, or first tap an album or folder
and then tap a photo or video.
4. (Optional) Swipe left or right to view the next or previous photo or video.
While viewing a photo, you can tap the screen, and then tap More to do the following operations:
To Folder: Move the photo into an existing or a new folder.
Set picture as: Set the photo as a contact photo or the wallpaper.
Slideshow: Start a slideshow with the photos and videos in the current folder.
Details: View information about the photo, including the title, time, and other properties.
While watching a video, you can tap the screen, and then do the following operations:
.
, and then tap one of the following options to select the view mode:
Tap
Tap
Tap
Tap
to watch the videos in the current folder one by one.
to watch the current video repeatedly.
to pause.
to watch the video in full screen.
45

Zooming In and Out
To zoom in or out a photo, do one of the following:
Double-tap anywhere on the screen.
Spread two fingers apart on any place to zoom in, and pinch the screen to zoom out.
Sharing Photos and Videos
To share a photo or a video, tap Share while viewing it, and then tap the required tools such as BT and
Messaging.
To share all photos and videos in a folder, do as follows:
1. Tap
2. Touch and press the folder to be shared until it is selected.
3. Tap Share, and then tap the required tools such as BT.
, and then tap Albums.
Deleting Photos and Videos
To delete a photo or a video, tap Delete while viewing it.
To delete all photos and videos in a folder, do as follows:
1. Tap
2. Touch and press the folder to be deleted until it is selected.
, and then tap Albums.
46

3. Tap Delete, and then tap OK.
8.5.3 Clock
The app allows you to use the alarm, view the world clock, set a stopwatch, and use a timer.
Using the Alarm
The Alarm feature allows you to set an alarm to alert yourself at specified time.
To create an alarm, do as follows:
1. Tap .
2. At the top of the screen, tap
3. Tap
4. Tap OK, and then tap the following items to set the alarm:
Repeat: Tap the days on which you want the alarm to ring.
Vibrate: Enable or disable alarm vibration.
Label: Add a label for the alarm.
5. Tap
Silence after: Set the period after which the alarm stops ringing.
, and then drag the pointer to set the time for the alarm to sound.
: Set the alarm tone.
> Settings to set the following options:
.
47

Snooze length: Set the period after which the alarm rings again.
Volume switch buttons: Set the function of the Smart Knob when the alarm sounds. The
following three options are available:
Snooze: Let the alarm ring again after the period set in Snooze length expires.
Dismiss: Let the alarm stop ringing immediately.
Do nothing: Rotating the knob does not affect the alarm at all.
Start week on: Set the beginning day of the week. The following three options are available:
Saturday, Sunday, and Monday.
When the alarm sounds, swipe left to temporarily stop the sounds or swipe right to dismiss the alarm.
To delete an alarm, tap
, and then tap . If you want to cancel the deletion, tap UNDO.
Using the World Clock
The World Clock feature displays the time for various cities around the world.
To access the world clock, open the Clock
To list a city on the world clock screen, tap
To remove a city from the list, tap
app, and then tap .
, and then tap the city to select it.
, and then tap the city to deselect it.
Using the Timer
The Timer feature allows you to count down to a particular event based on a preset interval.
48

To use a timer, do as follows:
1. Tap .
2. At the top of the screen, tap
3. Tap the digits on the screen to set the length.
4. Tap to start the timer.
After the timer starts, you can do the following operations:
Tap
Tap
Tap
If you create more than one timers, swipe up or down to view them.
to pause the timer.
to delete the timer.
to add another timer.
.
Using the Stopwatch
The stopwatch feature allows you to measure intervals of time.
49

To use the stopwatch, do as follows:
1. Tap .
2. At the top of the screen, tap
3. Tap
4. (Optional) Tap
5. Tap
6. View the timing result on the screen, or tap
7. Click
to begin timing.
to measure another interval of time.
to stop timing.
to reset the stopwatch.
.
to share the result.
8.5.4 Calendar
The app allows you to view the calendar by day, week, or month, and manage your important events.
Viewing the Calendar
To set the calendar view, do as follows:
1. Tap
.
2. Tap the date in the upper left corner of the screen to select the view options:
Day: Display the day view.
Week: Display the week view.
50

Month: Display the month view.
Agenda: Display the all tasks.
Setting the Calendar
To set the calendar, do as follows:
1. Tap
2. Set the related options following on-screen instructions.
> Settings > General settings.
Creating an Event
To create an event on the calendar, do as follows:
1. Tap
2. Set the parameters as required.
3. Tap Done in the upper right corner.
> New event.
Deleting an Event
To delete an event from the calendar, do as follows:
1. Tap
2. Tap the event to be deleted.
3. Tap
> Delete events.
, and then tap OK.
51

8.5.5 Browser
The app allows you to browse the web.
To set the browser, tap
To access a web site, tap the address bar, enter the web address, and then tap Go on the on-screen
keypad.
To open a new tab, tap
To close a tab, tap
To bookmark the current web page, tap
To view bookmarks, tap > Bookmarks.
> Settings, and set the parameters following on-screen instructions.
> , and enter the new web address.
, swipe up or down to view the tab, and then tap .
> Save to bookmarks.
8.5.6 Calculator
The Calculator app facilitates basic and advanced arithmetic calculations.
To perform basic arithmetic calculations, do as follows:
1. Tap
2. Enter the first number using the on-screen numeric keypad.
3. Tap the appropriate arithmetic function key.
4. Enter the next number.
.
52

5. Tap the equal sign to view the result.
To perform advanced arithmetic operations, swipe left from the edge of the calculator screen.
8.5.7 Compass
The app shows you a direction, latitude, longitude, and altitude.
To use the compass, do as follows:
1. Tap
2. Hold the radio flat in your palm.
3. Follow the on-screen instructions when prompted to calibrate.
4. View the information on the compass screen.
.
8.5.8 Recorder
The app allows you to record the voice and manage the audio files.
53

Recording Audio Files
To record an audio file, do as follows:
1. Tap
2. Tap
During recording, tap
3. Tap
.
, and then speak into the microphone.
to pause, and then tap to continue.
to stop recording.
Playing Audio Files
To listen to an audio file, tap , and then tap the required audio file.
Managing Audio Files
Tap , and then tap and hold the required file until appears.
To share the file, tap Share and select the required tools or applications to share the file.
To rename the file, tap Rename, enter a new name and tap Confirm.
To delete the file, tap Delete > OK.
8.5.9 App Store
The App Store allows you to download apps to your radio.
54

To view app messages, tap .
To view apps, tap
required.
To search an app, tap
To manage downloaded apps, tap
To open the app directly after downloading and installation, tap
To uninstall the app, tap
To update the app, tap Update in the upper right corner.
, tap CAT in the upper left corner, and then tap All, Top charts, or Latest as
> , and enter the keyword.
to do the following operations:
.
> OK.
8.5.10 File Manager
The File Manger allows you to view, download, and manage notices sent by the mobile device
management (MDM) server.
To view app messages, tap
To view latest notices, tap Flies.
.
To download the attachments, tap the required attachment and tap
To search a notice, tap
To manage downloaded apps, tap
To open the attachment, tap Open.
To delete the attachment, select it and tap
, and enter the keyword.
to do the following operations:
in the upper right corner, and tap OK.
.
8.6 App Manager
App Manager allows you to manage apps downloaded and installed in the radio.
Go to Settings > General > System > App management, and tap App manager:
To forcibly stop a running app, tap Running, select the required app, and then tap Force stop.
To uninstall an app, tap Download or All, select the required app, and then tap Uninstall.
To manage the authorization granted to an app for accessing other apps or your radio information,
tap Download or All, select the required app, and then tap Control.
55

Call Type
Wireless
Audio Device
Wired Audio
Device
Priority
Receiver>Speaker
Wireless audio device > Wired audio device >
Receiver > Speaker
8.7 Power Level
The radio can operate at either of the following power levels:
High Power: Enables communication with radios far away from you but consumes more battery
power.
Low Power: Enables communication with radios close to you and saves battery power.
In trunking mode, to set the power level, go to Settings > General > PMR > Power level, and then tap
Low or High.
In conventional mode, to set the power level for a channel, do as follows:
1. Go to Contacts > Manage.
2. Tap the channel.
3. Tap Edit in the upper right corner.
4. Tap TX power > High / Low.
5. Tap Save in the upper right corner.
8.8 Audio Mode
The radio applies internal speaker and receiver as well as external wired or wireless audio devices to
process audio. If multiple audio devices are available, you can press the programmed Audio path switch
key or tap the on-screen icons to set the audio mode during a call.
The table below describes the priority in which the radio sets the audio mode depending on the device
availability.
√ ×
Wireless/Wired audio device > Receiver > Speaker
× √
Full duplex
call
× ×
√ √
56

Call Type
Wireless
Audio Device
Wired Audio
Device
Priority
Speaker
Wireless audio device > Wired audio device > Speaker
Note
If both wireless and wired audio devices are available, the later connected one takes priority.
Half duplex
√ ×
Wireless/Wired audio device > Speaker
× √
call
× ×
√ √
8.9 Scan
8.9.1
In conventional mode, the Scan feature allows you to listen to activities on other channels, keeping track
of your team members. With this feature enabled, the radio searches the scan list preset for the current
channel and remains on the active channel.
To turn the Scan feature on or off, go to Settings > PMR, and then tap Scan.
Scanning in Conventional Mode
To select a scan list for a channel, do as follows:
1. Go to Contacts > Manage, and then tap the target channel.
2. Tap Edit in the upper right corner.
3. Tap Scan list, and then tap the required scan list.
4. Tap OK.
5. Tap Save in the upper right corner.
8.9.2 Scanning in Trunking Mode
In trunking mode, the radio must register with a base station (BS) for normal operation. The Scan feature
allows the radio to do the followings:
Hunt through the Trunked Station Control Channels (TSCCs) for an available BS for registration.
57

Note
The Scan and Roam feature cannot be enabled for the same digital channel
The roam list setting is not applicable to a direct channel.
Always work under a BS with a higher RSSI value after registration to ensure smooth communication.
Turning the Background Hunt Feature On or Off
The Background Hunt feature allows the radio in standby mode to keep detecting the signal strength of
the current BS. If the signal strength drops below the preset threshold, the radio switches to another BS
with higher signal strength.
To turn this feature on or off, go to Settings > PMR > Scan > Handover, and then tap Background hunt.
Turning the Handover Feature On or Off
The Handover feature allows the radio to automatically switch to another BS with higher signal strength
if the signal strength of the current BS drops below the preset threshold during a call. This prevents
dropouts or discontinuous voice caused by low signal strength.
To turn this feature on or off, go to Settings > PMR > Scan > Handover, and then tap Handover.
8.10 Roam
The Roam feature allows you to enjoy seamless communication across sites or networks.
In conventional mode, you can turn this feature on or off as follows: go to Settings > PMR, and then tap
Roaming.
To select a roam list for a channel, do as follows:
1. Go to Contacts > Manage, and then tap the target channel.
2. Tap Edit in the upper right corner.
3. Tap Roam list, and then tap the required roam list.
4. Tap OK.
5. Tap Save in the upper right corner.
simultaneously.
In trunking mode, this feature needs to be turned on or off by your dealer.
58

8.11 Position
The Position feature provides location information.
To turn this feature on or off, go to Settings > General > Privacy & Security > Security > Location, and
then tap GPS.
To view your location information, go to Settings > General > Privacy & Security > Security >
Location > Location Service.
8.12 Analog Services
The following features are available only on analog channels in conventional mode.
8.12.1 Turning the Monitor Feature On or Off
The Monitor feature allows the radio to receive weak signals.
To turn this feature on or off, press the preset Monitor key.
8.12.2 Turning the Squelch On Feature On or Off
The Squelch On feature allows the radio's speaker to keep turned on no matter whether the squelch
condition is satisfied.
To turn this feature on or off, press the preset Squelch On key.
8.12.3 Setting the Squelch Level
The squelch level refers to the squelch threshold required for the radio's speaker to be turned on.
To set the squelch level for a channel, do as follows:
1. Go to Contacts > Manage, and then tap the target channel.
2. Tap Squelch level, and then tap Open, Normal, or Tight (from low to high) as required.
Generally, a higher squelch level requires a higher RSSI value. If the squelch level is set to Open, the
speaker will always keep turned on.
59

Note
In conventional mode, when you turn on the Encryption feature, voice and data on the
whenever you switch back to this channel.
Caution
Before upgrading, ensure that the battery power is more than 30%. Power outage during
upgrade may cause radio failure.
8.13 Encryption
The Encryption feature prevents eavesdropping on calls and interception of data.
To turn this feature on or off, do one of the following:
Swipe up from the bottom edge of any screen to access the quick setting panel, and tap Encryption.
Go to Settings > PMR, and then tap Encryption.
current channel are encrypted. The Encryption feature will be turned on automatically
8.14 Stun
In trunking mode, when the radio is stunned, the icon appears on both the top and main screens.
In this case, the radio provides all functions except call or message services.
To restore normal operation, request your dealer to reprogram the radio or send a revive command. For
details, contact your dealer.
This feature needs to be turned on or off by your dealer.
8.15 Kill
In trunking mode, when the radio is killed, the icon appears on both the top and main screens. In
this case, the radio is incapable of any function.
To restore normal operation, request your dealer to burn the radio firmware. For details, contact your
dealer.
This feature needs to be turned on or off by your dealer.
8.16 System Upgrade
60

Note
It is recommended that you use a WLAN connection to download the software.
The radio receives a upgrade notification from MDM server when the latest software version becomes
available.
To upgrade the radio, do as follows:
1. Swipe up from the bottom edge of any screen, and tap Data or
.
2. Tap Settings > General > System upgrade to upgrade the broadband system or narrowband
system.
The radio restarts automatically when the upgrade is complete.
Do not operate the radio during upgrade.
61

Phenomena
Analysis
Solution
The battery may be installed
improperly.
The battery power may run out.
Recharge or replace the battery.
The battery may suffer from poor
damaged battery contacts.
The touch screen fails
quickly.
The keys do not work
normally.
The keypad may fail to function
temporarily.
The LCD does not
information.
Contact your dealer or Hytera
pattern or password remotely.
The radio may not detect signals
from the BS.
Make sure the radio is within the
coverage of the BS.
Contact the BS manager to check if
network management system.
The radio registers
repeatedly.
Make sure the radio is within the
coverage of the BS.
The radio cannot
The signal may be weak.
Make sure the radio is within the
9. Troubleshooting
The radio cannot be
turned on.
contact caused by dirtied or
to respond to any taps
Too many apps are running.
Remove and reattach the battery.
Clean the battery contacts or
replace the battery.
Forcibly stop some running apps or
restart the radio.
display any
The touch screen fails
to be unlocked.
The radio cannot
register.
The LCD may fail to function
temporarily.
The unlock pattern or password is
incorrect.
The radio may not be authorised.
Restart the radio.
Restart the radio.
technician to reset the unlock
the radio is authorised in the
The signal may be intermittent.
62

Phenomena
Analysis
Solution
establish a call.
coverage of the BS.
You cannot hear any
established.
The called party
during communication.
Make sure call participants are
within the communication range.
The battery voltage may be low.
Recharge or replace the battery.
Increase the volume or contact your
off.
The antenna may be loose or may be
installed incorrectly.
Turn the radio off, and then remove
and reattach the antenna.
The speaker may be blocked.
Clean the surface of the speaker.
The frequency or signaling type may
members.
The channel type (digital or analog)
may be set incorrectly.
Verify you are on the correct digital
or analog channel.
You may be too far away from other
members.
Make sure all members are within
the communication range.
You hear unknown
voices or noise.
You may be interrupted by radios
using the same frequency.
Change the frequency, or adjust the
squelch level.
voices after the call is
Contact the BS manager to check if
The called radio ID is not unique.
the called radio ID is unique.
disconnects repeatedly
The voice is unclear. The signal may be weak.
During receiving, the
voice is weak,
discontinuous or totally
inactive.
The signal may be intermittent or
weak.
The volume level may be low.
be inconsistent with that of other
Make sure the radio is within the
coverage of the BS.
dealer to turn the Mic AGC feature
Verify your TX/RX frequency and
signaling type are correct.
You cannot
communicate with
group members.
Move towards other members.
The signal may be weak.
63

Phenomena
Analysis
Solution
Set signaling for all radios operating
interference.
Make sure call participants are
within the communication range.
You may be located in an unfavorable
underground area.
It could be the result of external
interference).
The GPS cannot locate
your position.
GPS signals may not be received due
to unfavorable position.
Move to an open and flat area, and
try again.
The radio does not detect the
front-facing or rear-facing camera.
The storage space is not sufficient.
Clear up the storage space.
The micro-SIM card or micro-SD card
may be installed improperly
Remove and reattach the micro-SIM
card or micro-SD card.
The micro-SIM card or micro-SD card
contacts.
The micro-SIM card fails to function
of unpaid charges.
The data connection feature is not
Contact the carrier to enable the
You are unable to hear
anyone because of too
much noise and hiss.
The radio in analog mode may be set
with no signaling.
The signal may be weak.
position. For example, your
communication may be blocked by
high buildings or blocked in an
disturbance (such as electromagnetic
at the same frequency to avoid
Move to an open and flat area,
restart the radio, and try contacting
again.
Stay away from equipment that
may cause interference.
The camera does not
work.
The radio fails to detect
the micro-SIM card or
micro-SD card.
You cannot use the
data connection.
Restart the radio.
may suffer from poor contact caused
Clean the metal contacts.
by dirtied or damaged metal
Make sure micro-SIM card functions
properly or is out of service because
properly or pay the charges.
64

Phenomena
Analysis
Solution
enabled for the micro-SIM card.
data connection feature.
Make sure the radio is within the
network coverage.
Both Data and WLAN are turned on,
but the WLAN connection is unstable.
The battery may be placed into the
charger improperly.
The power adapter plug may be
inserted into the socket improperly.
The data signal may be weak.
Turn WLAN off.
Remove and reinsert the battery.
The battery fails to be
charged.
Remove and reinsert the plug.
If the above solutions cannot fix your problems, or you may have some other queries, please contact
your local dealer for more technical support.
65

Caution
Turn the product off and remove the battery before cleaning.
10. Care and Cleaning
To guarantee optimal performance as well as a long service life of the product, please follow these tips.
Product Care
Do not pierce or scrape the product.
Keep the product far away from substances that can corrode the circuitry.
Do not hold the product by the antenna or earpiece cable.
Close the accessory connector cover when no accessory is in use.
Product Cleaning
Clean up the dust and fine particles on the product surface and charging piece with a clean and dry
lint-free cloth or a brush regularly.
Use neutral cleanser and a non-woven fabric to clean the keys, knobs, and front case after long-time
use. Do not use chemical preparations such as stain removers, alcohol, sprays or oil preparations, so
as to avoid surface case damage.
If the radio is used in a harsh environment (such as sea and salt frog), periodically clean and dry the
radio.
Make sure the product is completely dry before use.
66

Caution
the use of any unauthorised accessories.
11. Optional Accessories
Contact your local dealer for the optional accessories used with the product.
Use the approved accessories only. We will not be liable for any loss or damage arising out of
67

Abbreviations
Full Names
FOACSU
Full Off Air Call Set-Up
GPS
Global Positioning System
HDR
High-Dynamic Range
ISO
International Standardization Organization
LCD
Liquid-Crystal Display
LED
Light-Emitting Diode
MDM
Mobile Device Management
NFC
Near Field Communication
OACSU
Off Air Call Set-Up
PTT
Push-To-Talk
SK
Side Key
12. Abbreviations
F
G
H
I
L
M
N
O
P
S
68

Abbreviations
Full Names
TK
Top Key
VoLTE
Voice over LTE
VPN
Virtual Private Network
WLAN
Wireless Local Area Networks
WPS
WLAN Protected Setup
T
V
W
69

is the trademar k or registered trademark of Hytera Communications Co rporation Limited.
2017 Hytera Comm un ic at io ns C or po ra tion Limited. All Rights Reserved.
Address: Hytera Tower, Hi-Tech Industrial Park North, 9108# Beihuan Road, Nanshan District,
Shenzhen, People's Republic of China
Postcode: 518057
http:// www.hytera.com
 Loading...