

Page 1

1. Product Overview
1.1 Product Layout
1.2 Programmable Keys
For enhanced convenience, the product provides the programmable keys including
, and P3. The TK is programmed with Emergency feature by default (short press: Emergency On;
P2
SK2, SK3, TK, P1
,
long press: Emergency Off).
To set up other shortcuts, click
, and then go to
Settings
>
Programmable keys
.
Page 2
2. Before Use
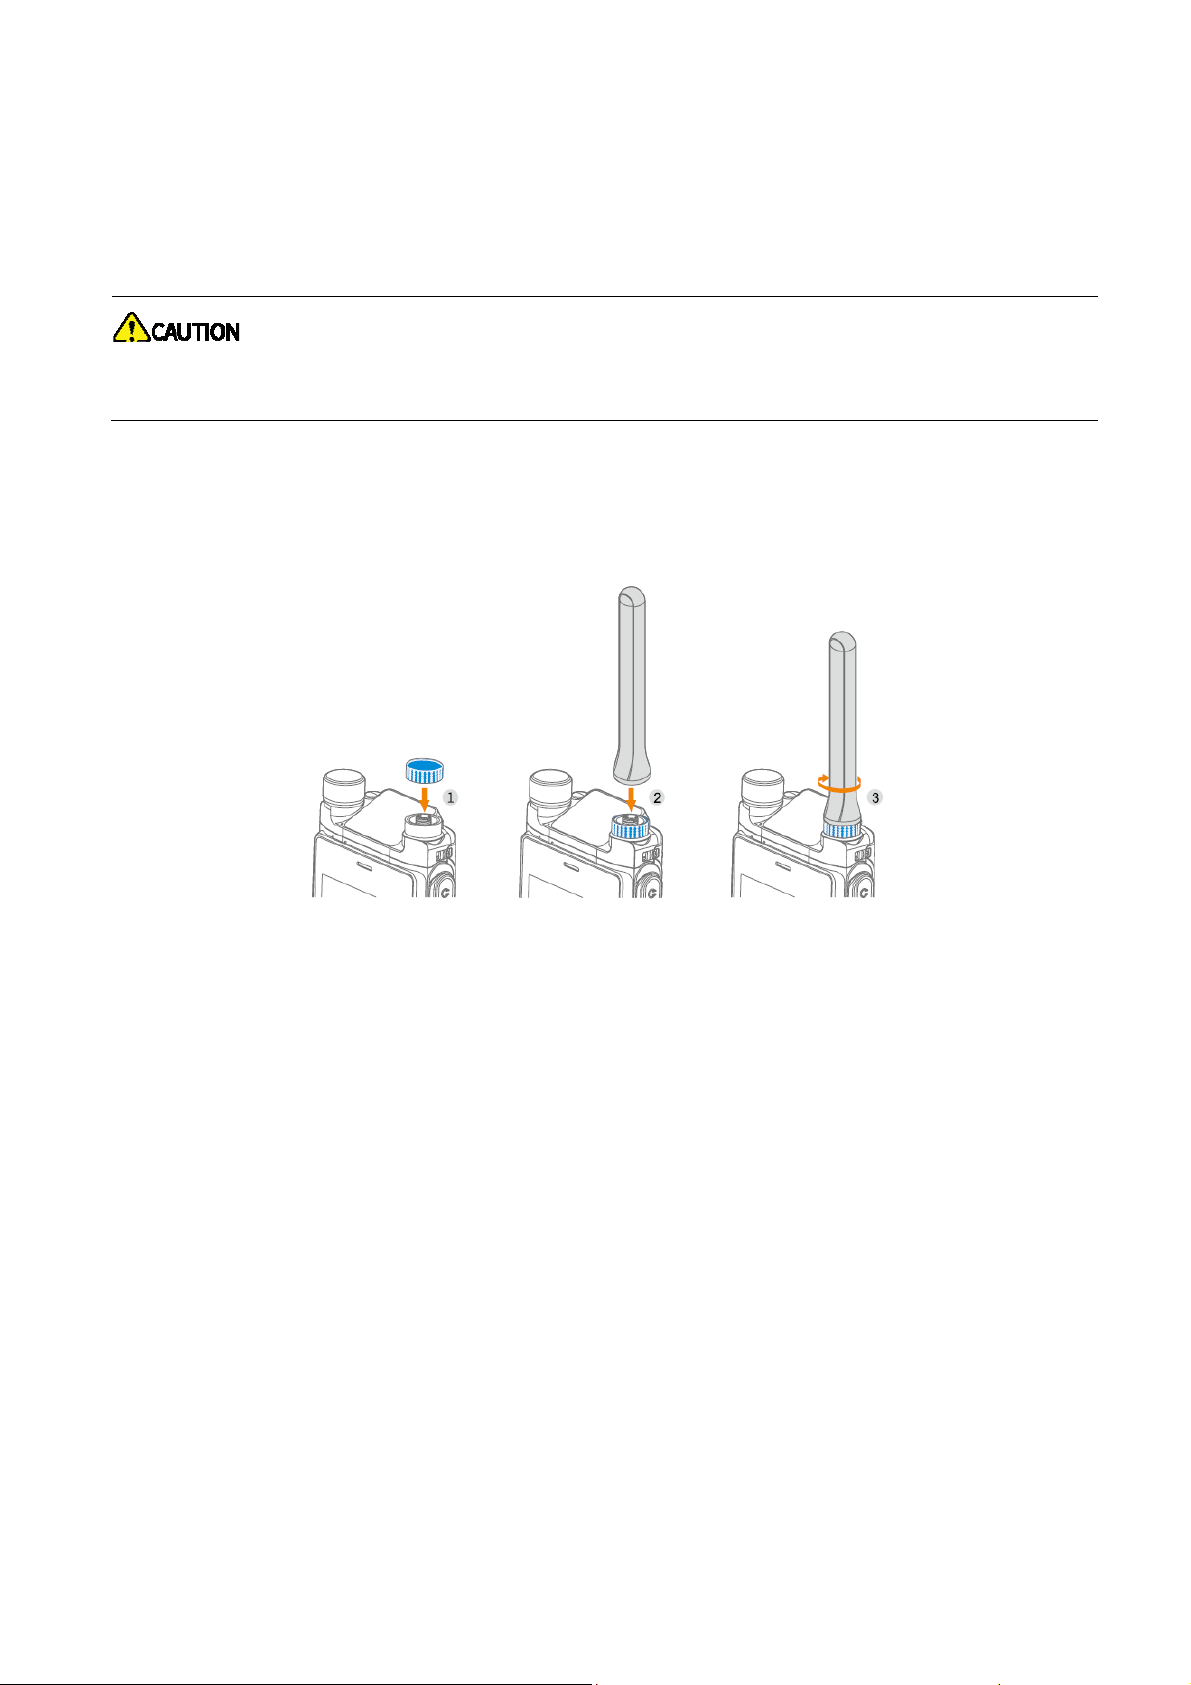
2.1 Attaching the Antenna
Do not hold the radio by the antenna and swing it. This may affect the antenna performance and
shorten the life span of the antenna.
1. (Optional) Place the color ring (for identification purpose) on the antenna connector.
2. Put the antenna on the antenna connector.
3. Rotate the antenna clockwise till hand tight.
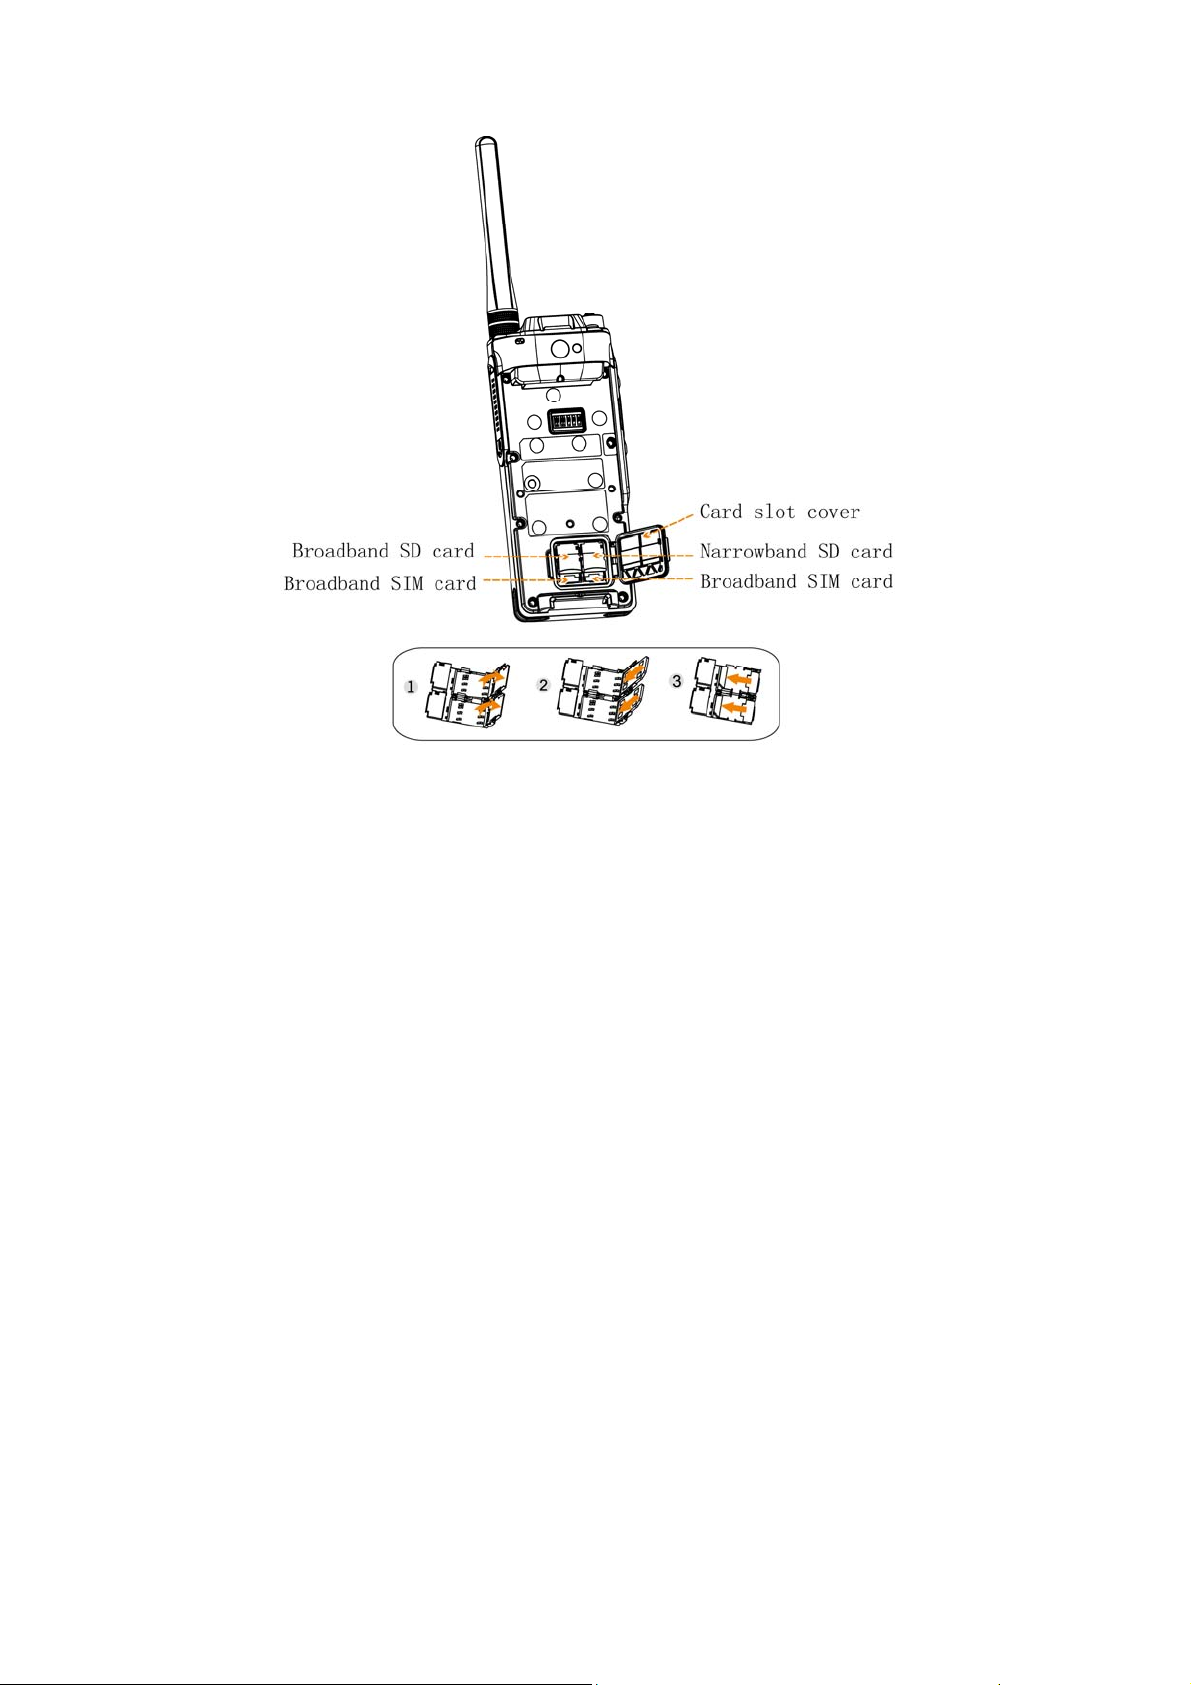
2.2 Installing the Cards
1. Open the card slot cover on the top of the battery compartment.
2. Insert the micro-SD cards and nano-SIM cards into the corresponding slots.
3. Put the card slot cover back in place.
Page 3
Page 4
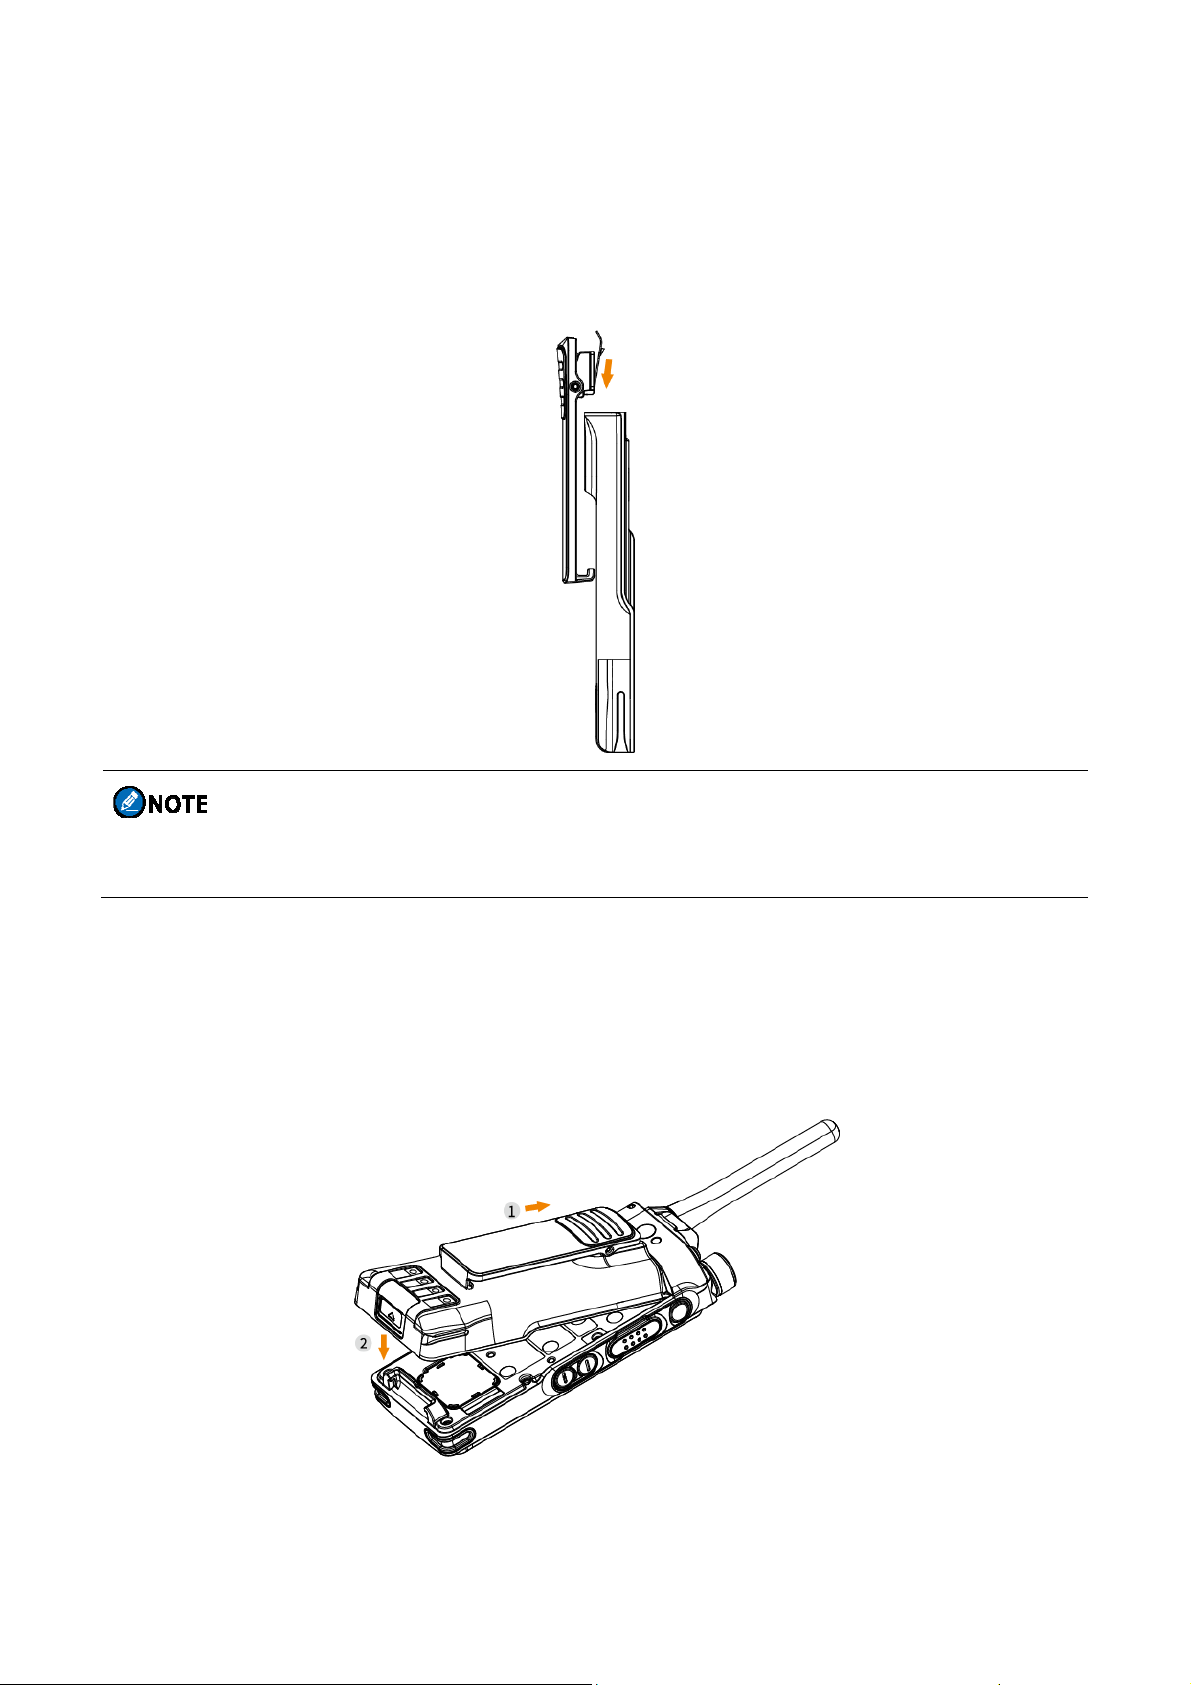
2.3 Attaching the Belt Clip
1. Align the rails on the belt clip with the grooves on the battery.
2. Press the belt clip downwards into place.
To remove the belt clip, press and hold the spring when sliding the belt clip out of the grooves on
the battery.
2.4 Attaching the Battery
1. Slide the battery into the slot.
2. Press the battery latch until it is fully fitted into the radio.
Page 5
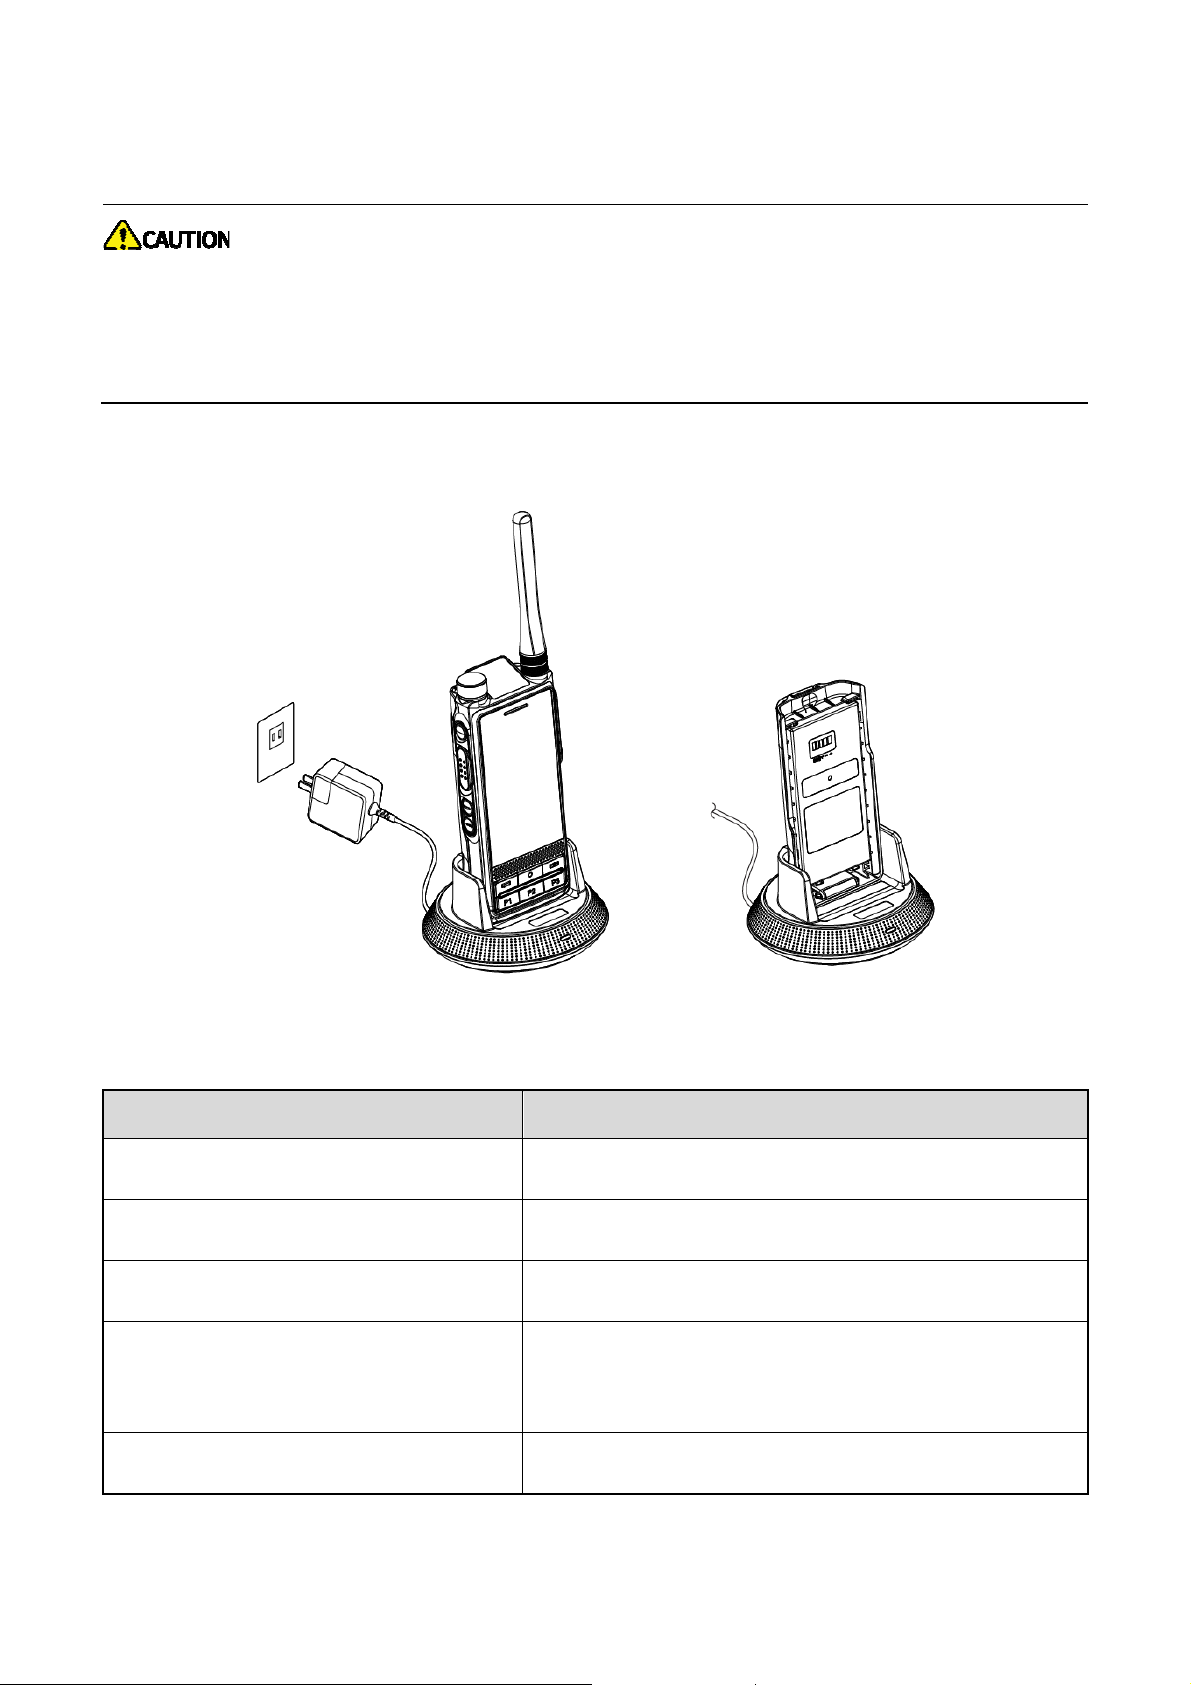
2.5 Charging the Battery
Use the approved charger to charge the battery.
Read the Safety Information Booklet before charging.
The remaining lithium-ion battery power is limited to 30% pursuant to the new lithium battery
shipment regulation approved by International Air Transport Association (IATA).
Before initial use, fully charge the battery to ensure optimum performance. You can charge the radio with
battery attached or charge the battery alone.
To determine the charging status, check the LED indicator on the charger according to the following
table:
LED Indicator Charging Status
Flashes red slowly No battery inserted.
Flashes orange slowly
Glows red
Waiting to charge.
Charging.
Glows green
Flashes red rapidly Battery fault.
90% (radio with battery).
≥
95% (standalone battery).
≥
Page 6
3. Basic Operations
3.1 Turning the Radio On or Off
To turn the radio on, press and hold the Power/End Call key until the splash screen appears.
To turn the radio off, do as follows:
1. Press and hold the Power/End Call key until the power-off selection screen appears.
2. Tap Power Off, and then tap OK.
3.2 Adjusting the Volume
To adjust the volume, directly rotate the
When in a call or enabling an alarm, you can rotate the
volume.
When playing music, video or recorded files, you can rotate the
Smart Knob
.
Smart Knob
to adjust the call volume or alarm
Smart Knob
to adjust the media volume.
3.3 Selecting Channels or Contacts
1. Press the Smart Knob. Then the radio prompts on the display.
2. Rotate the knob to select the required channel or contact.
If you do not operate the
the volume control state automatically.
Smart Knob
within 5s or if you press it again within 5s, the radio returns to
3.4 Understanding the Screens
3.4.1 Main Screen and Top Screen
The screens may be damaged or broken if they are hit or scraped by sharp or hard objects.
All care must be taken to protect the screens.
Page 7

3.4.2 Status Indications
3.4.2.1 LCD Icons
Type Top
Screen
Network and
/
signal
Main Screen Radio Status
/
3G/4G cellular network is available.
The radio is connected to the WLAN network.
The number of bars indicates the signal strength of the
Page 8

Type Top
Call and data
services
Main Screen Radio Status
Screen
BB network.
The NB network is turned off.
Conventional mode: The radio is in standby state.
Trunking mode: The radio detects no signal.
The number of bars indicates the signal strength of the
/
The digit indicates the number of unread messages.
A private/group call is in progress over the NB network.
/
NB network.
The digit indicates the number of missed calls.
A duplex call is in progress.
The radio is set at low/high power.
/
The radio is scanning.
The End-to-End Encryption (E2EE) feature is enabled.
Others
The radio operates in silent mode.
No nano-SIM card is detected.
/
An error occurs to the micro-SD card.
For details on other LCD icons, refer to the User Manual.
A phone call is in progress over the BB network.
3.4.2.2 LED Indications
LED Indicator 1
LED Indicator Radio Status
Flashes green rapidly The radio is being turned on.
Page 9

Flashes green slowly The radio is standby in trunking mode.
Glows green The radio is receiving.
Glows red The radio is transmitting.
The calling radio is establishing a call in trunking mode.
Flashes red rapidly
Flashes orange slowly
Flashes orange rapidly
Glows orange
The radio is under the low battery threshold. Recharge or replace the
battery in time.
The radio is scanning, hunting, or roaming.
Conventional mode: The radio is operating in emergency mode.
Trunking mode: The called radio is establishing a Full Off Air Call
Set-up (FOACSU) call.
Call hang time: No voice is being transmitted or received during a call.
Within such a period, you can press and hold the
LED Indicator 2
LED Indicator Radio Status
Flashes blue A BT device is connected.
key and speak.
PTT
Flashes red There is/are unread message(s) or missed call(s).
3.4.3 Widget
The widget shows important information in words and pictures on the main screen. Widget includes NB
widget and BB widget. NB widget displays the NB services and is not editable. BB widget displays the
shortcut apps, favorite contacts, calendar, and agenda, and allows you to quick access these
applications.
To scroll the wedge page, press a widget and swipe upward, or short press the
To add or delete a widget, swipe to the bottom of the widget, press "Edit", and then select "Exit" after
finishing editing.
Smart Key
.
3.4.4 Control Center
The control center allows you to adjust the brightness, and turn on or off the handy features.
Page 10

To access the control center, swipe up from the bottom edge of any screen.
To edit the switches of features displayed on the control center, press
.
3.4.5 Notification Center
The notification center allows you to view notifications and search for apps, contacts or messages.
To view notifications, swipe down from the top edge of screen, and the tap a notification to view details.
3.4.6 APP Center
To access apps, swipe right from the left edge of the home screen, and then swipe up or down to view all
apps.
Page 11

3.4.7 Locking or Unlocking the Screen
When the screen is not in use, you can lock it to avoid unintended operations and increase battery life.
When the screen is locked, you can still initiate emergency calls, answer calls, and receive messages
and notifications.
To lock or unlock the screen for initial use, do as follows:
To lock the screen, long press the
To unlock the screen, short press the
swipe upward, enter the right password or draw the right unlock pattern.
To set the lockable keys and lock patterns, tap
Smart Key
to put the screen to sleep.
Smart Key
or
Home
, and then go to
key to wake up the screen, and then
General > Lock screen.
3.5 Switching Apps
When multiple apps are running on the radio, press twice the
,
want to switch. Tap
and then you can end all the running apps and release the storage space.
key, and then select the app you
Home
3.6 Switching the Operation Mode
The radio can operate in NB & BB mode or NB mode. Upon power-on, the radio operates in NB & BB
mode by default.
In NB&BB mode, both the top screen and main screen are on. The radio can access both private and
public network services.
In NB mode, only the top screen is on. The radio accesses only private network services. The NB mode
Page 12

includes the following two types:
Conventional mode: The radio communicates with one or mo re other radios directly on the fixed
channel frequency or through repeaters.
Trunking mode: The radio communicates with one or more other radios on the channel frequency
allocated by the trunking system.
To switch the specific NB mode, tap
Trunking
To switch to NB mode, long press the
.
Power/End call
To switch to NB & BB mode, long press the
, go to
PMR > Work Mod
key, and then tap
Power/End Call
e, and then tap
Broadband Off.
key, and then tap
Conventional or
Broadband On.
Page 13

4. Call Services
4.1 Private Network Call
4.1.1 Group call
Initiating a Group Call
You can make a group call through one of the following ways:
Preset Contact
1. Press the
2. Rotate the knob to select the required channel or group contact.
3. Press and hold the
Manual Dialing
1. Tap
2. Enter the required group number.
3. Select "Group".
4. Press and hold the
In the dialing interface, you can also enter the required group number, and then press and hold the
Smart Knob
PTT
.
PTT
.
key.
key in conventional mode. (In trunking mode, omit this step.)
key.
PTT
To enter a number complying with the dialing rules, consult your dealer for more details.
Contact List
1. Tap
2. Tap the required gro up contact.
3. Press and hold the
>
Group
.
PTT
key.
Receiving a Group Call
When a group call is incoming, it will be established automatically, and you can listen to it without any
operation.
Page 14

Ending a Group Call
Conventional Mode: A group call ends automatically when the call hang time expires.
Trunking mode: A group call ends when the calling party taps
Power/End Call key.
4.1.2 Private Call
Initiating a Private Call
You can make a private call through one of the following ways:
Preset Contact
1. Press the
2. Rotate the knob to select the required channel or private contact.
3. Press and hold the
Manual Dialing
1. Tap
Smart Knob
PTT
.
.
key.
or presses the
2. Enter the required group number.
3. Select "Private".
4. Press and hold the
In the dialing interface, you can also enter the required private number, and then press and hold the
key.
PTT
Contact List
1. Tap
2. Tap the required private contact.
3. Press and hold the
>
Private
Receiving a Private Call
In conventional mode, you can answer an incoming private call without any operation.
key in conventional mode. (In trunking mode, omit this step.)
PTT
.
key.
PTT
In trunking mode, the operation varies with the setup mode of the incoming private call:
Full Off Air Call Set-Up (FOACSU)
Page 15

The radio rings and vibrates to indicate the incoming call. You can press the
Back/Answer Call
Off Air Call Set-Up (OACSU)
The call is established automatically. You can listen to it without any operation.
To respond to the call, press and hold the
key to answer the call.
PTT
key, and then speak into the microphone.
key or the
PTT
Ending a Private Call
Conventional mode: A private call ends automatically when the call hang time expires.
Trunking mode: A private call ends when the calling or called party taps
the
Power/End Call
key.
or presses
4.1.3 Emergency Call
In case of an emergency, you can initiate an emergency call to ask for help from other personnel or the
control center. An emergency call has the highest priority and can disrupt other calls with lower priority.
If the feature is configured and enabled by your dealer, you can press the preprogrammed
key to initiate an emergency call. The emergency call ends when the calling party presses the
On
preprogrammed
Emergency Off
key.
Emergency
Page 16

4.2 Public Network Call (Phone Call)
4.2.1 Initiating a Phone Call
You can make a phone call through one of the following ways:
Contact List
1. Tap
2. Tap the required ph one contact.
3. Tap
Manual Dialing
1. Tap
2. Enter the required phone number.
3. Tap "Phone".
In the dialing interface, you can also enter the required phone number, and then tap
to make the call.
.
>
Private
.
.
4.2.2 Receiving a Phone Call
When a phone call comes in, tap or press the
Back/Answer Call
key.
4.2.3 Ending a Phone Call
In the calling interface, tap or press the
Power/End Call
key.
4.2.4 Emergency Phone Call
In case of an emergency, you can initiate an emergency phone call within the coverage of the carrier’s
network without a SIM card.
When the screen is unlocked, do as follows:
1. Tap .
2. Enter the emergency phone number.
3. Tap "Phone".
Page 17

When the screen is locked with password or pattern, do as follows:
1. Tap
2. Tap "Emergency" and enter the emergency phone number.
3. Tap
and drag it to the lateral oblique direction.
.
Page 18

5. Message Services
The Message feature allows you to exchange the text messages, status messages and multimedia
messages (MMS) with other radios through
Status Message (trunking only): frequently used messages predefined by your dealer and not
editable. The radio sends status message over the NB network to a private network number.
MMS: contains photos, audio, video or other information of multimedia format. The radio sends
MMS through the wireless network or BB network to a public network number.
.
5.1 Sending Messages
1. Tap
2. Tap the To text box to enter the name or number of the recipient, or tap
from your Contacts.
3. Tap the
4. (Optional) Tap
required attachments.
and then tap
Type message
on the left to schedule the message to be sent later automatically or add
in the lower right corner.
text box to enter the text.
to select a recipient
5. Tap
to send the message.
For contacts over private network, you can also add contacts, quick reply texts, and status
messages (for trunking mode only).
For contacts over public network, you can also add contacts, photos, voices, videos,
multimedia message, quick reply text, and emojis.
5.2 Managing Messages
1. Tap
2. Touch and hold the message text.
3. In the editing interface, do one of following:
To copy the message, tap
To forward the message, tap
and then tap
a message to be managed.
Copy text
Forward
.
and enter a new contact number or tap
to select a
new contact.
To delete the message, tap
Delete
.
Page 19

To add the message to the favorite list,
tap "My favorites".
tap
More
>
Favorite
. To view the favorite messages,
To view the message details such as message type and sending time, tap
details
This device complies with Part 15 of the FCC Rules. Operation is subject to the following two conditions: (1)
this device may not cause harmful interference, and (2) this device must accept
any interference received, including interference that may cause undesired operation.
changes or modifications not expressly approved by the party responsible for compliance could void the
user’s authority to operate the equipment.
This equipment has been tested and found to comply with the limits for a Class B digital device, pursuant to
Part 15 of the FCC Rules. These limits are designed to provide reasonable protection against harmful
interference in a residential installation. This equipment generates, uses and can radiate radio frequency
energy and, if not installed and used in accordance with the instructions, may cause harmful interference to
radio communications. However, there is no guarantee that interference will not occur in a particular
installation.
If this equipment does cause harmful interference to radio or television reception, which can be determined by
turning the equipment off and on, the user is encouraged to try to correct the interference by one or more of
the following measures:
-- Reorient or relocate the receiving antenna.
-- Increase the separation between the equipment and receiver.
-- Connect the equipment into an outlet on a circuit different from that to which the receiver is connected.
-- Consult the dealer or an experienced radio/TV technician for help.
.
More
>
View
This equipment complies with FCC radiation exposure limits set forth for an controlled environment. This
equipment should be installed and operated with minimum distance 10mm between the radiator and your
body, operated with minimum distance 25mm between the front to face. This transmitter must not be colocated or operating in conjunction with any other antenna or transmitter.
This equipment complies with FCC radiation exposure limits set forth for an controlled environment. This
transmitter must not be co-located or operating in conjunction with any other antenna or transmitter.
 Loading...