

Page 1

QUICK REFERENCE G U I D E
MD7 8 XL D IGITAL M OBILE RAD I O
Page 2
Product Overview
Product Layout
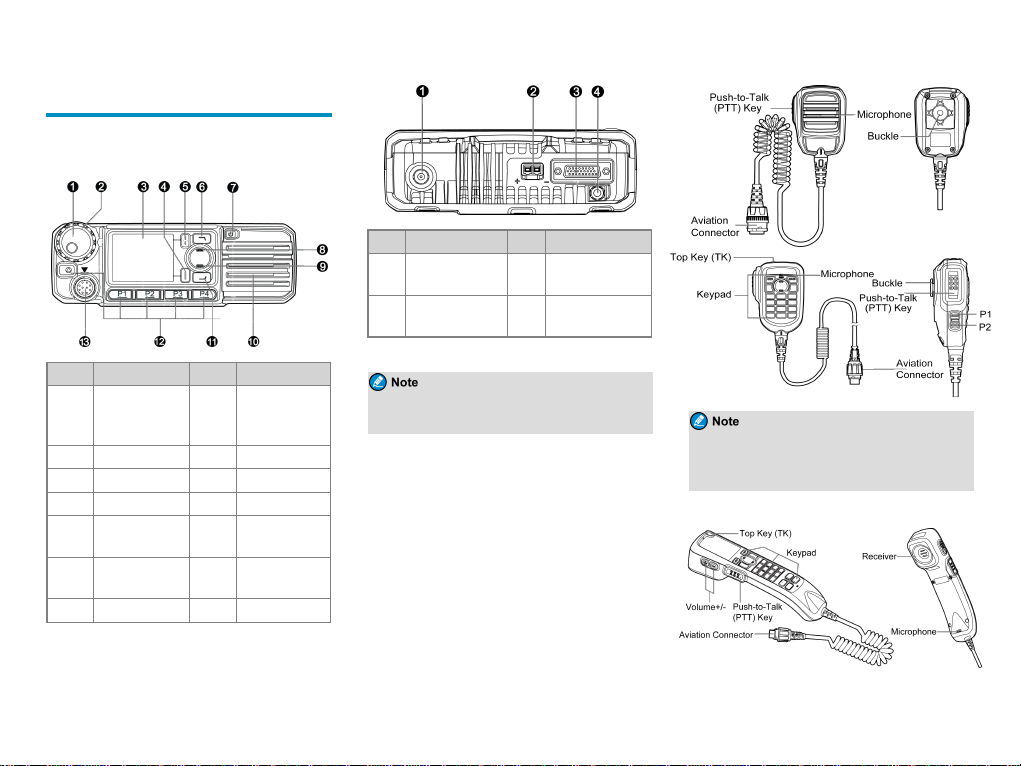
Fron t Panel
No. Part Name No. Part Name
Volume Control &
1
Channel/Group
Selector Knob
2 LED Indicator 9 Down Key
3 LCD D isplay 10 Speake r
4 OK/Menu Key 11 P5/Answer Key
Back/Subgroup
5
Key
6 P6/End Key 13
7 On-Of f Key / /
8 Up Key
Programmable
12
Keys
Aviation
Connector
Rear Panel
No. Part Name No. Part Name
RF Antenna
1
Connector
2 Power Inlet 4
The GPS antenna c onnector is used only by radios
with the GPS feature.
Acc essory
3
Connector
GPS Antenna
Connector
Palm Microph one
The pa lm microphone without ke ypad is ava ilable
for the digital ra dio and the one with keypad is for
the trunking ra dio.
Hand set
1
Page 3
The handset is ava ilable only for the duple x ra dio.
Programmable Keys
You ca n r equest your dea ler to progra m the f ollowing
keys as shor tcuts to a ssignable radio f eatur es:
l Mobile ra dio: P1 key, P2 key, P3 key, P4 key, TK,
P5/Answer key, P6/End key, Up ke y, a nd Down key.
l Palm microphone with keypa d: TK, P1 ke y, and P2
key.
l H andset: Same as the mobile radio.
Installation
Instructions
Before installing the ra dio in a vehicle, rea d the following
instructions ca ref ully:
l The ra dio must work with a 13.6V ± 15% ne gative
ground elec trical system only. Ensur e to c heck the
polarity a nd voltage of the vehicle power supply.
l Check how long the screws will e xtend f rom the
bottom surfac e of the r adio. Drill the mounting hole
ca utiously to a void damage to the vehicle wiring and
other parts.
l Connect the a ntenna a nd power cord to the radio
befor e you install the ra dio in the bracke t. Use the
antenna and powe r cord a uthorized by the Company
only.
l I nstall the radio with the mounting brac ket supplied by
the Company to avoid radio looseness in case of
ac cidents. The loose radio may c ause bodily injury.
l I nstall the radio in a location where you can rea ch the
front panel convenie ntly.
l Keep sufficient clea ranc e at the bac k of the ra dio for
wiring.
l Be sure to use the fuse with the same specific ation for
the DC power c ord upon repla ceme nt.
l Ensure tha t the antenna of the radio must be no less
than 10 meter s aw ay from tha t of other RF devices.
the manuf acture r dec lare, the in stall ation of
As
●
EUT is for built-in, only front enclosure can be touched, others parts can’t be touched.
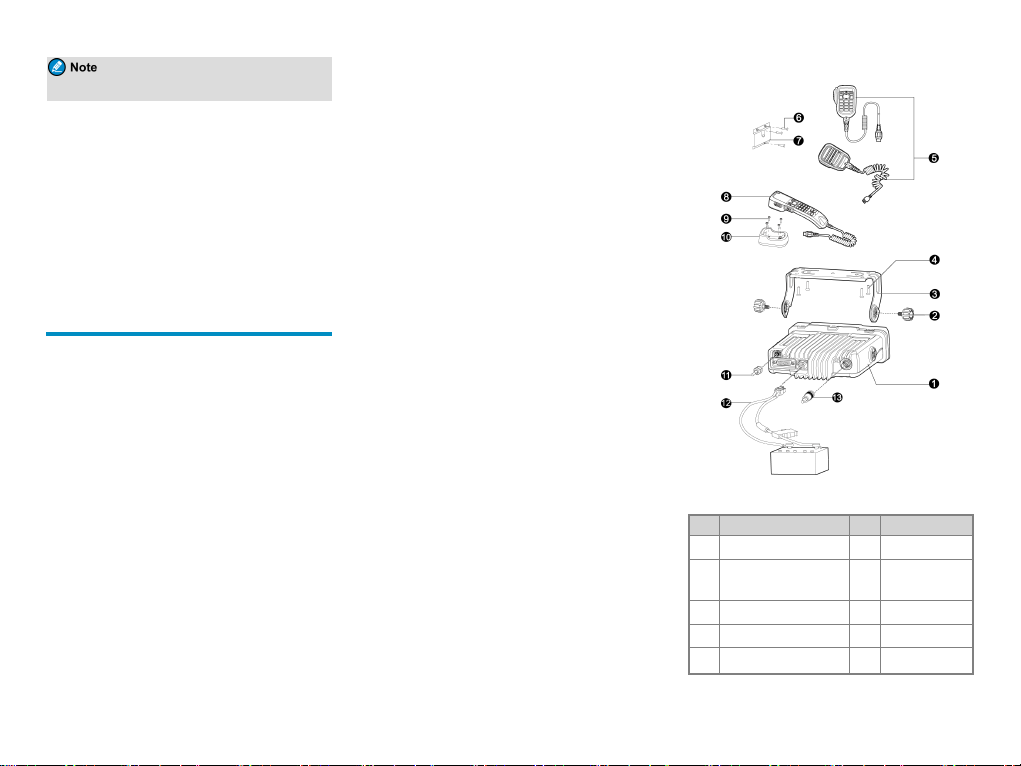
Tools
l E lectric drill
l Cross head scre wdriver
l T 20 torx scre wdriver
Parts
NO. Part Name NO. Part Name
1 Mobile Radio 8 Handset
2 Loc king Knob 9
3 Mounting Brac ket 10 Handse t Ha nger
4 Scr ew (4.8 mm x 20 mm) 11 GPS Antenna
5 Palm Micr ophone 12
Screw (4 mm x
16 mm)
Power Cord ( with
2
Page 4
NO. Part Name NO. Part Name
fuse)
6 Scre w ( 4 mm x 16 mm) 13 RF Antenna
7 Micr ophone Hanger / /
l T he RF a ntenna should be purc hased separately.
l The GPS a ntenna is ava ilable only for ra dios
with the GPS feature.
l The palm microphone without keypa d (with ⑥
and ⑦) is ava ilable for the digital radio and the
one with ke ypad (w ith ⑥ a nd ⑦) is for the
trunking radio. The handse t (with ⑨ and ⑩ ) is
for the duplex ra dio.
Procedure
1. Select a location, drill holes base d on the shape of the
mounting brac ket, and the n use the screw s (4.8 mm x
20 mm) to sec ure the bracke t.
2. Connect the RF a ntenna, GPS antenna ,and pow er
cord to the ra dio.
3. Slide the radio into the mounted bra cket and secure it
using the locking knobs.
4. Install the microphone hange r in a location where
you c an reach it easily, a nd use the scre ws (4 mm x
16 mm) to sec ure it.
5. Align the triangle index on the palm microphone or
the handset w ith the installation index, plug the
conne ctor into the ra dio, a nd rota te the conne ctor
clockw ise to secure it.
6. Place the palm microphone or the handset on the
hange r w hen you do not use it.
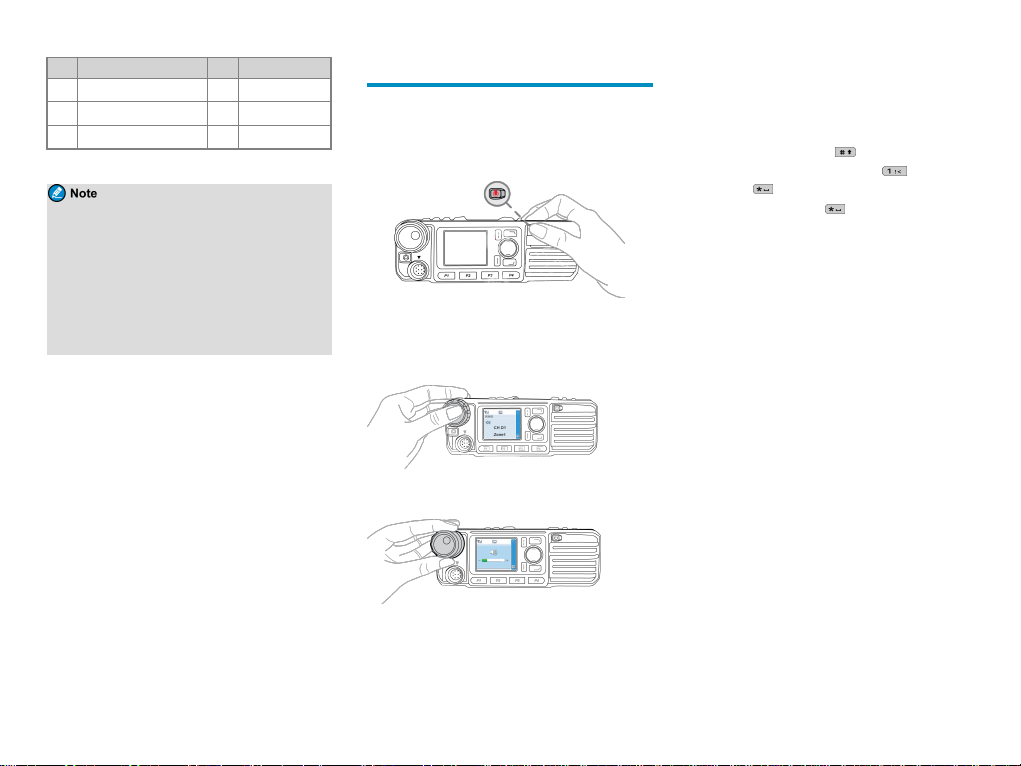
Basic Operations
Turning the Radio On or Off
To tur n the radio on, long press the On-Off key.
To tur n the radio off, press the On-Off key.
Adjusting the Volume
1. Press the Volume Control knob to switch to volume
control mode.
2. Rotate the Volume Control knob to adjust the
volume.
Using the Keypad
You ca n use the keypa d on the pa lm microphone or the
handset to edit user aliases or I Ds a nd text messages.
l To switch the input method be tween a lphabetic mode
and numeric mode, pr ess .
l To e nter spec ial char acters, press in alphabe tic
mode or in numeric mode.
l T o ente r a spa ce, press in a lphabetic mode.
Switching the Operation Mode
The ra dio can ope rate in conventional or trunking mode.
In conventional mode, you can re ceive and transmit voice
and data a fter selec ting the r equired cha nnel. In trunking
mode, you can r ece ive and transmit voice a nd data af ter
the radio r egisters with the base station (BS)succ essfully.
l To ma nually switch the operation mode, go to
Mode> Manual Switch, or pre ss the preprogr ammed
Operation M ode Switc h key.
l T o a llow the radio to automatically switch to
conve ntional mode whe n the signal dr ops below the
prese t leve l in trunking mode, go to Mode> Auto
Switch , or press the prepr ogrammed M ode
Automatic Switch key.
Con ventional Mode
In conve ntional mode, the ra dio r ece ives a nd transmits
data and voice on the selec ted c hannel.
Selecting Z ones and Chann els
A channe l is used to r ece ive and transmit da ta and voice.
A zone is a group of c hannels within the same ope rational
are a. The ra dio supports up to 64 zones, each of which
contains up to 256 cha nnels.
3
Page 5

To r ece ive and tra nsmit data and voice, do as follows:
1. Select a zone in either of the following wa ys:
l On the Zone me nu, press the Up or Dow n key to
selec t a zone , and then press the OK/Menu ke y.
l Press the pr eprogr ammed Zone U p or Zone
Down ke y.
2. Select a channe l in one of the following wa ys:
l Rotate the Channel Sele ctor knob.
l Press the preprogr ammed Channel Up or
Channel Down key.
l Pre ss the prepr ogrammed Pre set Channel ke y.
If the Voice Notify fe ature is enable d by your
dea ler, the r adio announce s the cha nnel number
upon c hannel switching.
Trun king Mode
In trunking mode, the radio communicates with e ach
other through base stations af ter succe ssful re gistration.
The r adio ca n communicate with a gr oup of r adios or a
single r adio.
Selecting Subgroups
A subgr oup is a group of gr oup or private conta cts. To
selec t a subgroup, do either of the following:
l Press the Back/Subgroup key and then pre ss the Up
or Down key.
l Press the preprogr ammed Subgroup Up or Subgroup
Down ke y.
Selecting Group or Private Contacts
l Rotate the Group Select or knob.
l Press the Back/Subgroup key and then pre ss the Up
or Down key to se lect from the member list.
l Press the pr eprogr ammed Group/Private U p or
Group/Private Down key.
Status Indications
Checking LCD Icons
The f ollowing tables list icons that may appe ar on the
radio's liquid-cr ystal display (LCD).
Operation Mo de
Icon Radio Status
Direc t mode: The radio transmits and
DM
rec eives directly.
Repea ter mode: The ra dio transmits a nd
RM
rec eives through a re peate r.
Trunking Mode - Digital W ide: The r adio
TM-D W
opera tes unde r multiple inter connec ted BSs.
Trunking Mode - Digital Local: T he r adio
TM-D L
opera tes unde r a single BS.
Direc t mode: The single fr equenc y re pea t
(SFR) fe ature is ena bled on the curr ent
DM-R
cha nnel.
The Mode Automatic Switch featur e is
ena bled.
Basic Status
Icon Radio Status
The Dual-Tone Multi-Freque ncy ( DTMF)
keypa d is e nabled.
Icon Radio Status
Ther e is no signal in DM, RM, or TM-DW
mode.
The number of ba rs indica tes the signal
strength in DM, RM, or TM- DW mode.
Ther e is no signal in TM-DL mode.
The number of ba rs indica tes the signal
strength in TM-DL mode.
The radio opera tes in high power mode.
The radio opera tes in low powe r mode .
An accessory is connec ted.
The Global Positioning System (GPS) featur e
is ena bled, and the ra dio re ceive s GPS data .
The GPS fea ture is ena bled, but the r adio
rec eives no GPS da ta.
The radio is in e mergenc y mode .
The radio is roa ming.
The radio is detec ting sites f or roaming.
The Scrambler or Encrypt fe ature is
ena bled.
The Over The Air Encrypt fea ture is
ena bled.
The radio is sca nning or hunting.
The radio stays on a non-priority c hannel.
4
Page 6

Icon Radio Status
The radio stays on priority c hannel 1.
The radio stays on priority c hannel 2.
The non-dedic ated control c hannel fea ture
is ena bled
The Voice Oper ated Transmit ( VOX)
fea ture is ena bled.
The Monitor fe ature is e nabled.
The speake r is turned on.
The radio opera tes in silent mode.
The Loudness and Q uality Optimizer (LQO )
fea ture is ena bled.
The SFR feature is e nabled.
Short Data Service
Icon Radio Status
Ther e is/ar e unread short me ssage(s) .
The Inbox is full.
Ther e is/ar e unread work order (s).
The work order list is full.
Call Service
Icon Radio Status
Ther e is/ar e alert call(s).
Icon Radio Status
The Call Diver t fe ature is e nabled.
A full-duplex c all is in progre ss.
A private call is in progr ess or a private
contac t is on the contact list.
A group c all is in progre ss or a group
contac t is on the contact list.
An all ca ll is in progress or an a ll ca ll
contac t is on the contact list.
An include c all is in progre ss.
Checking LED Indications
To de termine the r adio status, che ck the LED indicator on
the radio a cc ording to the following table:
LED Indicator Radio Status
Flashes gr een Being turne d on.
Flashes gree n
slowly
Glows gr een Rece iving.
Glows r ed Tr ansmitting.
Flashes r ed
Flashes or ange
slowly
Flashes ora nge
Standby in trunking mode.
Establishing a ca ll in trunking mode.
This indication is applicable only to
the calling ra dio.
Scanning, hunting, or roaming.
l Conventional mode: Opera ting in
LED Indicator Radio Status
emer gency mode.
l Tr unking mode: Establishing a
rapidly
Glows or ange
Full Off Air Call Set- Up
(FOACSU) call. This indica tion
is applica ble only to the called
radio.
Call hang time: N o voice is be ing
transmitted or rec eived on the
cha nnel during a call. Within such a
period, you ca n pre ss a nd hold the
PTT key and speak.
Call Services
Whe n you a re speaking during a call, keep the
microphone a bout 2.5 to 5 c m a way from your mouth.
This e nsures optimal voice quality on the re ceiving radio.
l Unless other wise specifie d, the PTT ke y
mentioned in this manua l indicates tha t on the pa lm
microphone or the ha ndset.
l The radio c annot make any c all if it fa ils to
register with the BS or you se lect an e mpty group.
Digital Calls
You ca n initiate or re ceive the following types of digital
ca lls:
l Group call: A call from an individual user in a group
to a ll the other me mbers.
5
Page 7

l Private c all: A ca ll fr om a n individual user to another
individual user .
Initiating Group Calls
The following table desc ribes how to initiate a gr oup c all
in c onventional mode a nd trunking mode. Whe n you
initiate a group call, the r adio displays .
Mode Manner Operation
1. Rotate the Channel
Select or knob to
selec t the channe l
associa ted with the
requir ed gr oup
contac t.
2. Pre ss and hold the
PTT key.
1. G o to Contact >
Contact
List/Favorite
Contact .
2. Sele ct the re quired
group contact.
3. Pre ss and hold the
PTT key.
1. G o to Contact >
Manual Dial.
2. Pre ss on the palm
microphone or the
handset to switch the
input mode to Group
ID.
3. E nter the re quired
group ID.
Conventional
Preset Contact
Contact
List/Favorite
Contact
Manual Dial
Mode Manner Operation
4. Pre ss and hold the
PTT key.
1. Rotate the Group
Select or knob to
Preset Contact
Group Contact
Trunking
Manual Dial
selec t the require d
group contact.
2. Pre ss and hold the
PTT key.
1. G o to Subgroup >
Me mbers.
2. Sele ct the re quired
group contact.
3.
Press on the
radio, or press
or press and hold the
PTT key on the palm
microphone or the
handset.
1. G o to Settings >
Radio Set > Keypad
Mode, and then
selec t Enable.
2. From the home
scre en, enter the
group number.
3. Pre ss on the
radio, or press or
or press and hold
the PTT key on the
palm micr ophone or
the handset.
For dialing rules, contact your de aler .
Receiving Group Calls
Whe n you rec eive a group ca ll in conventional mode, the
radio displays . The ca ll is e stablished automatica lly.
In trunking mode, the ra dio displays a fter the ca ll is
established succe ssfully.
Ending Group Calls
In conve ntional mode a nd trunking mode, a group c all
automatica lly ends when the c all ha ng time expires.
In trunking mode , a group c all a lso ends in a ny of the
following c ases:
l T he c alling pa rty e nds the call.
l T he c all dur ation pr eset by your deale r e xpires.
l A pre emptive or e mergenc y c all inter rupts the call.
l T he c alling pa rty switche s to an e mpty group.
l T he ba se station signal is lost.
Initiating Private Calls
You can initiate simplex or duplex c alls, w hich can be set
by going to Settings>Radio Set> Call Setup Mode or
pressing the pr eprogra mmed C all Setup Mode key.
l D uplex c all: both parties can speak at the same time.
l Simplex call: Only one party c an speak at one time.
The duplex c all is only ava ilable f or duplex ra dios.
6
Page 8

The following table desc ribes how to initiate a private call
in c onventional mode a nd trunking mode. Whe n you
initiate a private c all, the radio displays .
Mode Manner Operation
1. Rotate the Channel
Select or knob to
selec t the channe l
associa ted with the
requir ed pr ivate
contac t.
2. Pre ss and hold the
PTT key.
1. G o to Contact >
Contact
List/Favorite
Contact .
2. Sele ct the re quired
private contac t.
3. Pre ss and hold the
PTT key.
1. G o to Contact >
Manual Dial.
2. Pre ss on the palm
microphone or the
handset to switch the
input mode to Pr ivate
ID.
3. E nter the re quired
private ID.
4. Pre ss and hold the
PTT key.
1. Rotate the Group
Conventional
Trunking
Preset Contact
Contact
List/Favorite
Contact
Manual Dial
Preset Contact
Mode Manner Operation
Select or knob to
selec t the require d
private contac t.
2. Pre ss and hold the
PTT key.
1. G o to Contact >
Favorite Contac t/
Private Contac t.
2. Sele ct the re quired
Favorite
Contact/Private
Contact
Manual Dial
For dialing rules, contact your de aler .
private contac t.
3.
Press on the
radio, or press or
press and hold the
PTT key on the palm
microphone or the
handset.
1. G o to Settings >
Radio Set > Keypad
Mode, and then
selec t Enable.
2. From the home
scre en, enter the
private ca ll number.
3. Pre ss on the
radio, or press or
or press and hold
the PTT key on the
palm micr ophone or
the handset.
Receiving Private Calls
Conventi onal Mode
Whe n you rece ive a priva te call, the r adio displays .
The call is established automatically.
Trunking Mode
You can listen to a call in diff ere nt wa ys va rying w ith the
setup mode of the call:
l FOACSU
Whe n rec eiving a FOACSU private c all, the r adio rings
and vibrates, and displays .
To answer the ca ll, pre ss on the ra dio, or pre ss
or press and hold the PTT key on the palm microphone or
the handset within the pre set time per iod. Af ter the call is
established suc cessfully, the radio emits a tone and
displays . I f you don’ t a nswer this ca ll, the ra dio
displays .
l O ff Air Ca ll Set-Up (OACSU)
Whe n rece iving an OACSU private call, you can listen to
it without a ny ope ration.
Ending Private Calls
In c onventional mode and trunking mode, a pr ivate c all
automatica lly ends when the c all ha ng time expires.
In trunking mode, a priva te ca ll also ends in any of the
following c ases:
l T he c alling or ca lled pa rty e nds the call.
l T he c all dur ation pr eset by your deale r e xpires.
l A pre emptive or e mergenc y c all inter rupts the call.
7
Page 9

l The ca lling or ca lled pa rty switche s to a n empty
group.
l T he ba se station signal is lost.
Analog Calls
You c an initiate or re ceive a c all on a n ana log channe l
with or without signaling.
Call Withou t Sig naling
On an analog channe l without signaling, you c an initiate a
ca ll to all the othe r use rs on the channe l. Do as f ollows:
1. Select the r equired cha nnel.
2. Press a nd hold the P TT key, a nd spe ak into the
microphone.
Call With Signaling
On a n analog cha nnel w ith signaling, you c an initiate a
ca ll to a spec ific c ontact on the cha nnel. Do as follows:
1. Rotate the Channel Selec tor knob to select the
requir ed c hannel.
2. Press the OK/Menu ke y, and go to Contact >
Contact List.
3. Select the r equired cha nnel.
4. Press the PTT ke y or the preprogr ammed One Touch
Call/Menu key to se nd the code.
The ca ll is e stablished when the target radio rec eives and
dec odes the matche d signaling.
Emergency Call
In case of emer gency, you can initiate a n e mergency call
to a sk for help from other pe rsonnel or the contr ol ce ntre.
This feature needs to be conf igured and ena bled by your
dea ler. For de tails, refe r to the Emergenc y fea ture
descr ibed in the r eleva nt user manua l.
Message Services
The Messa ge fea ture a llows you to send and r ece ive the
following types of message s in trunking mode or on a
digital cha nnel in conventional mode:
l T ext messages: me ssages crea ted using the ke ypad.
l Q uick text messages: f reque ntly used message s
prede fined by your dea ler but editable .
l Status messages ( trunking only): fre quently used
message s pre defined by your de aler and not editable .
Viewing Messages
To view a message upon re ceiving, dire ctly press the
OK/Menu key.
To view a message f rom the I nbox or a sent me ssage, go
to M essage > Inbox/Outbox, a nd then sele ct the r equired
message .
Sending Messages
Sending Text Messages
1. Go to Me ssage > Ne w M sg, a nd then type the text.
2. Press the OK/Menu ke y, and then select Send.
3. Select or e nter the r equire d conta ct, a nd the n pre ss
the OK/Me nuke y.
Instea d of directly sending the new message , you
ca n also selec t Save in conventional mode or selec t
Save to Draf ts or Save to QuickText in trunking
mode to save the new message, and send it later.
Sending Quick Text Messages
1. Go to Me ssage > Quick Text, and then se lect the
requir ed quic k text message.
2. Select Send, a nd the n sele ct or ente r the re quired
contac t.
3. Press the OK/Menu ke y.
Sending Status Messages
1. Go to Me ssage > Status M sg, a nd then selec t the
requir ed sta tus message .
2. Press the OK/Menu ke y, and then select or e nter the
requir ed c ontact.
3. Press the OK/Menu ke y.
You c an a lso send status me ssages by manua l
dialing. For details, c ontact your de aler.
Deleting Messages
Deleting Text Messages
To delete a message from the I nBox, OutBox, or Draf ts,
do a s follows:
1. Go to Me ssage > InBox/OutBox/Draft s.
2. Select the r equired message , a nd then press the
OK/Menu key.
3. Select Delet e, and the n pre ss the OK/Menu key.
8
Page 10

Deleting Quick Text Messages
In trunking mode, you c an go to Message > Quick Text
to sele ct a nd de lete a quic k text.
For de tails on more fe atures and
opera tions, please visit our w ebsite a t
http://www.hyte ra.c om, or sca n the QR
code to downloa d the rele vant use r
manual.
Operational Instructions
o
ensure optimal performance and compliance with the
T
occupational/controlled environment RF energy
exposure limits in the above standards and guidelines,
users should transmit not more than 50% of the time and
always adhere to the following procedures:
z
z
FCC Statement
This equipm
the limits for a Class B digital device, pursuant to part 15
of FCC Rules. These limits are designed to provide
reasonable protection against harmful interference in a
residential installation. This equipment generates and can
radiate radio frequency energy. If not installed and used
in accordance with the instructions, it may cause harmful
interference to radio communications. However, there is
no guarantee that interference will not occur in a
particular installation. Verification of harmful
interference by this equipment to radio or television
Antenna gain must not exceed 5 dBi.
The antenna must be installed complying with the
requirements of manufacturer or supplier, and it
must be at least 0 cm away from human body.
ent has
and Training Guidelines
2
been tested and found to com
3
ply with
reception can be determined by turning it off and then on.
The user is encouraged to try to correct the interference
by one or more of the following measures:
z Reorient or relocate the receiving antenna. Increase
the separation between the equipment and receiver
z Connect the equipment into an outlet on a dif
circuit to that of the receiver's outlet.
z
Consult the dealer or an experienced radio/TV
technician for help.
Operation is subject to the following two conditions:
z
This device may not
This device m
z
including interference that may cause undesired
operation.
Note: Any changes or modifications to this unit not
expressly approved by the party responsible for
compliance could void the user's authority to operate the
equipment.
ISEDC Statement
This device complies with Innovatio
Economic Development Canada Compliance
license-exempt RSS standard(s). Operation is subject to
the following two conditions:
This device may not
This device must
including interference that may cause undesired
operation.
ferent
cause harmful interference.
ust accept any interference received,
n, Science and
cause harmful interference.
accept any interference received,
Le présent appareil est conforme aux CNR d'Industrie
Canada applicables aux appareils radio exempts de
licence. L'exploitation est autorisée aux deux conditions
suivantes: (1) l'appareil ne doit pas produire de brouillage,
.
et (2) l'utilisateur de l'appareil doit accepter tout
brouillage radioélectrique subi, même si le brouillage est
susceptible d'en compromettre le fonctionnement
ISEDC Radiation Exposure Statement:
device must be restricted to work related operations
This
in an Occupational/Controlled RF exposure
Environment.
This equipment should be installed and operated with
minimum distance
body.
ISEDC exposition aux radiations:
Ce dispositif doit être limité aux opérations liées au
travail dans un environnement d'exposition RF
professionnel/contrôlé.
Cet équipement doit être installé et utilisé avec un
minimum de
corps.
20cm between the antenna & your
20cm de distance
entre le antenne et votre
9
Page 11

is th e trade mark or r egist ere d tra dem ark o f Hyt era C ommun ica tio ns Co rpo rat ion L imite d.
201 7 Hyter a Co mmu nic ati ons C orp ora tion Li mit ed. Al l Rig hts R ese rve d.
Hy
tera Communications Corporation Limited
era Tower,Hi-Tech Industrial Park North, 9108# Beihuan Road, Nanshan
Hyt
District, Shenzhen, People's Republic of China
Pos tcode : 518 116
htt p:// ww w.hy ter a.c om
 Loading...