

Page 1
Product Overview
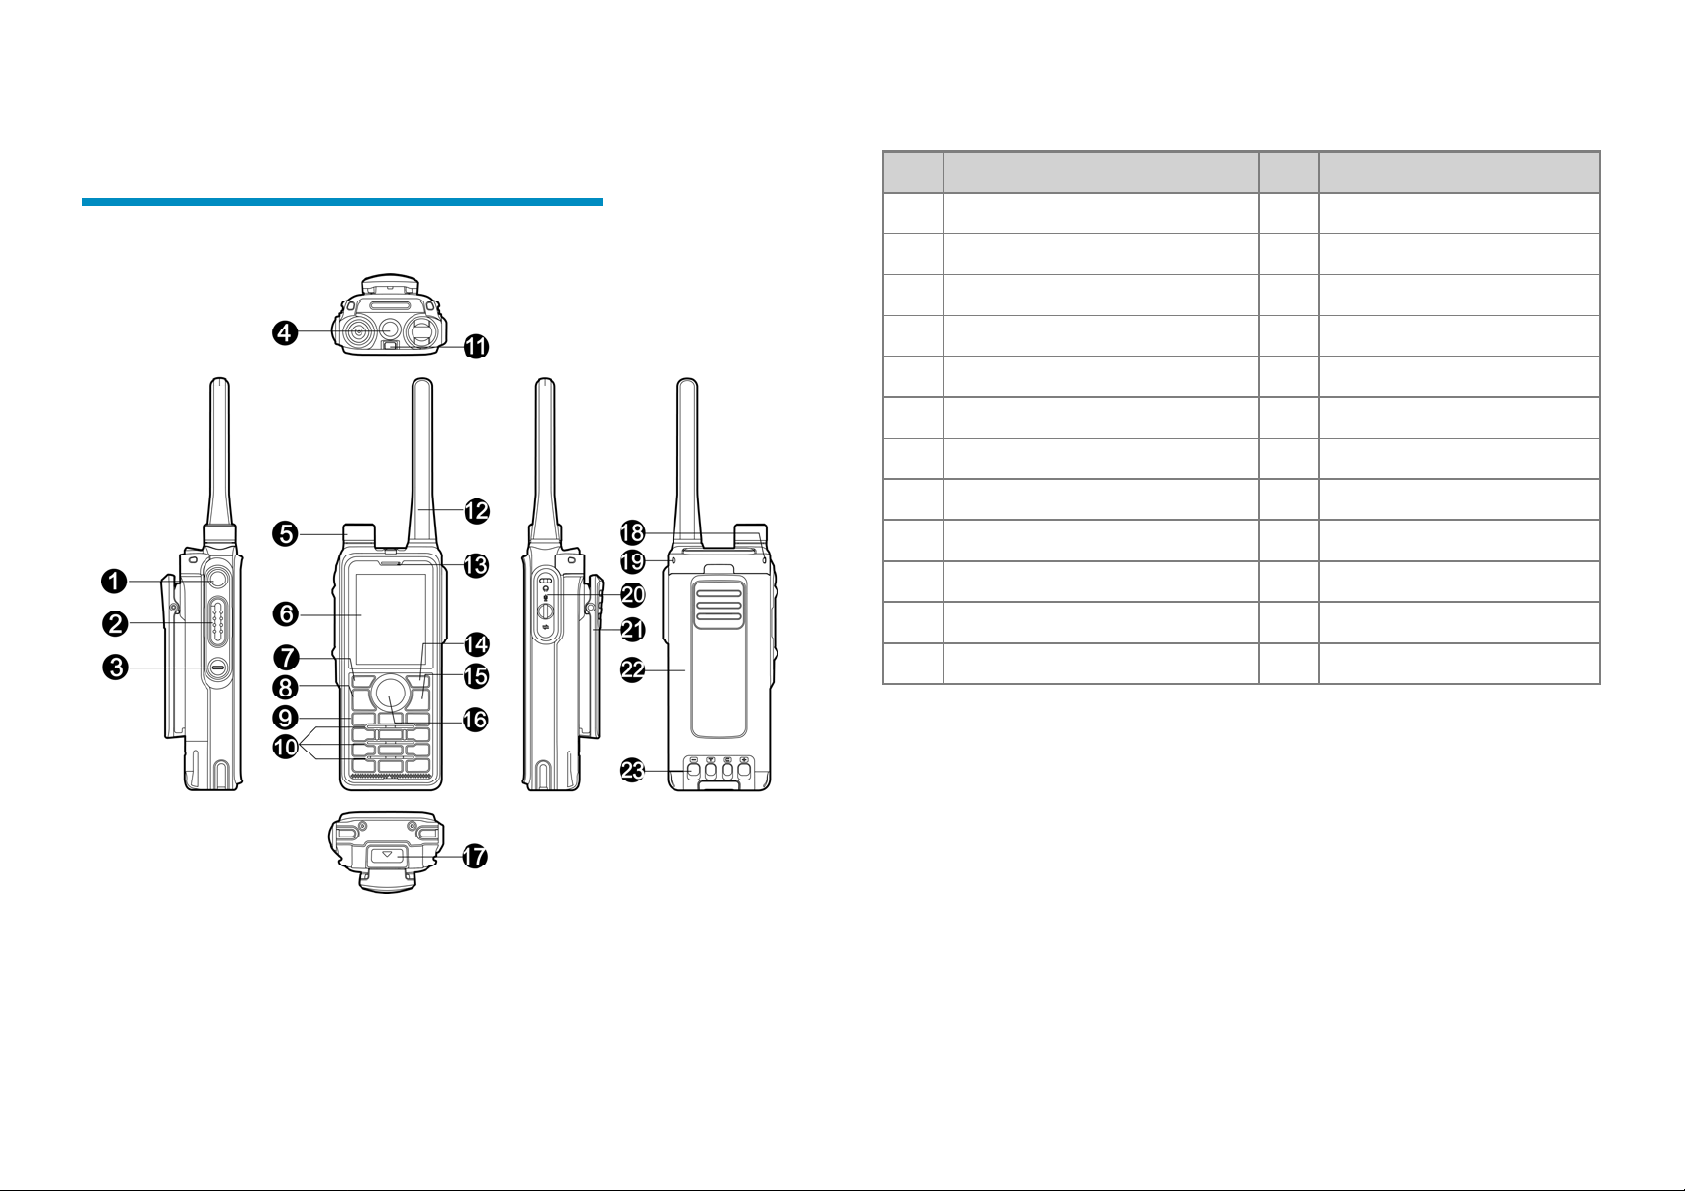
Product Layout
No. Part Name No. Part Name
1 Side Key 1 (SK1) 13 Microphone
2 Push-to-Talk (PTT) Key 14 Back/Subgroup Key
3 Side Key 2 (SK2) 15 On-Off/P2/End Key
4 Top Key (TK) 16 Navigation Keys
5 Smart Knob 17 Battery Latch
6 LCD Display 18 Strap Hole 1
7 OK/Menu Key 19 Strap Hole 2
8 P1/Answer Key 20 Accessory Connector
9 Numeric Keypad 21 Belt Clip
10 Speaker 22 Battery
11 LED Indicator 23 Charging Piece
12 Antenna / /
Programmable Keys
For enhanced convenience, you can request your dealer to program the following
keys as shortcuts to radio features: TK, SK1, SK2, P1/Answer key, P2/End key, Up
key, and Down key. Consult your dealer for assignable radio features.
1
Page 2
Basic Operations
Charging the Battery
Read the Safety Information Booklet before
charging.
Use the appro v ed charger to charge the
battery.
The remaining lithium-ion battery power is
limited to 30% pursuant to the new lithium
battery shipment regulation approved by
International Air Transport Association
(IATA).
Before initial use, charge the battery. You can cha rge
either the standalone battery or the radio with battery
attached. It is recommended that the radio remain
powered off during charging.
The LED indicator on the charger shows the charging
status. For details, see the following table.
LED Indicator Charging Status
Glows red The battery is being charged.
Glows orange
The battery is charged to 90%
LED Indicator Charging Status
Glows green The battery is fully charged.
Flashes red slowly
Flashes red rapidly The battery fails to be charged.
or above.
No battery is placed on the
charger.
Turning the Radio On or Off
To turn the radio on or off, press and hold .
Adjusting the Volume
To increase or decrease the volume, rotate the Smart
knob clockwise or counter-clockwise.
Selecting the Contact or
Channel
To select the contact or channel, press the Smart
knob, and then rotate the knob.
If you do not rotate the knob within 5s or if you
press it again within 5s, you can rotate it to adjust
the volume.
Locking or Unlocking the
Keypad
When the keypad is not in use, it is recommended that
you lock it to avoid unintended operations.
To allow the keypad to be locked automatically, do as
follows:
1. Go to Menu > Settings > Basic Settings >
Keypad Lock.
2. Enable AutoLock, and then go to Timed to set
the auto lock time.
If you do not operate the radio or if the radio receives
no call or message within the auto lock time, the
keypad is locked automatically.
To manually lock or unlock the keypad, do one of the
following:
Press the preprogrammed Keypad Lock key.
On the home screen, press the OK/Menu key,
and then press .
2
Page 3
If the Keypad Lock Backup feature is
enabled by your dealer, the radio
automatically saves the last settings of
keypad lock upon power-off.
You can go to Menu > Settings > Basic
Settings > Keypad Lock > Optional Key to
set whether the corresponding keys and
knobs still work when the keypad is locked.
Using the Keypad
You can use the keypad to enter contact aliases and
IDs, or edit messages.
To switch the input method between alphabetic
mode and numeric mod e, press .
To enter special characters, press in
alphabetic mode.
To enter a space, press in alphabetic mode.
Switching the Operation Mode
The radio can operate in conventional mode, or
trunking mode if enabled by your dealer.
To switch the operation mode, do one of the following:
Press the preprogrammed Operation Mode
Switch key.
Go to Menu > Mode, and then s elect the mode.
If the Zone/Subgroup Switch Mode feature is
enabled, you can switch the operation mode by
switching the contact through the menu or the
Smart knob.
To allow the radio to automatically switch to a mode
based on signal strength, do one of the following:
Press the preprogrammed Mode Auto Switch
key.
Go to Menu > Mode, and then enable Auto
Switch.
Conventional Mode
In conventional mode, a zone is a group of channels
within the same operational area. The radio receives
and transmits data and voice on the selected channel.
Selecting a Zone
To select a zone, do one of the following:
Go to Menu > Zone, select the zone, and then
select Set Default.
Press the preprogrammed Zone Up or Zone
Down key.
Selecting a Channel
Before selecting a channel, make sure that the
curr en t zone contains the channel.
To select a channel, do one of the following:
Press and rotate the Smart knob.
Go to Menu > Zone, select the zone, and then
select the channel.
Press the preprogrammed Channel Up or
Channel Down key.
Press the preprogrammed Preset Channel key.
If the Voice Notify feature is enabled, the radio
automatically announces the current channel
upon power-on and channel change.
Trunking Mode
In trunking mode, the radio hunts for available base
stations (BS) automatically. After registration, the
radio can receive and transmit data and voice.
Selecting a Group or Private Contact
To select a group contact or a private contact, do one
of the following:
3
Page 4

Press and rotate the Smart knob.
On the home screen, press the Back/Subgroup
key or go to Menu > Subgroup, select the
subgroup, and then select the group or private
contact.
Press the preprogrammed Group/Private Up or
Icon Radio Status
The battery power is low.
The battery power runs out. Recharge or
replace the battery.
The radio detects no signal.
Group/Private Down key.
Selecting a Subgroup
A subgroup consists of multiple groups or private
contacts.
To select a subgroup, do one of the following:
On the home screen, press the Back/Subgroup
key or go to Menu > Subgroup, select the
subgroup, and then select Set Defa ult.
Press the preprogrammed Subgroup Up or
Subgroup Do w n key.
Status Indications
LCD Icons
Icon Radio Status
The fuller the battery bar is, the stronger the
battery power remains.
The number of bars indicates the signal
strength.
The radio operates in Low Power mode.
The radio operates in High Power mode.
The keypad is locked.
An accessory is connected.
The Mode Auto Switch feature is enabled.
The radio is scanning or hunting.
The VOX feature is enabled.
The radio is mute.
The radio operates in Meeting mode.
The radio operates in Outdoor mode.
The radio is in Emergency mode.
Icon Radio Status
There is/are missed call(s).
There is/are unread short message(s).
The Inbox is full.
For details on other LCD icons, refer to the User
Manual.
LED Indications
LED Indicator Radio Status
Flashes green The radio is being turned on.
Flashes green slowly
Glows green The radio is receiving.
Glows red The radio is transmitting.
Flashes red
Flashes orange
slowly
The radio is standby in
trunking mode.
The radio is establishing a call
in trunking mode. (This
indication is applicable only to
the calling radio.)
The radio is scanning, hunting,
or roaming.
Flashes orange
4
Conventional mode: The
Page 5

LED Indicator Radio Status
rapidly
Glows orange
Flashes blue every 3
seconds
Flashes blue every
1.5 seconds
radio is working in
emergency mode.
Trunking mode: The called
radio is establishing a Full
Off Air Call Set-Up
(FOACSU) call.
Call hang time: No voice is
being transmitted or received
on the channel during a call.
Within such a period, you can
press and hold the PTT key
and speak.
The BT feature is enabl ed, but
no BT device is connected.
A BT device is connected.
mouth. This ensures optimal voice quality on the
receiving radio.
In trunking mode, if the radio is not registered or
attached, or an empty group is selected, you
cannot initiate a call.
Call on Digital Channel
You can initiate or receive the following types of
calls on a digital channel:
Group call: a call from an individual user in a
group to all the other members in the group.
Private call: a call from an individual user to
another individual user.
Initiating a Group Call
Through Preset Contact
Trunking mode: Go to Menu > Subgroup , select
the subgroup and group contact, and then press
or the PTT key.
Through Manual Dial
Conventional mode: With the dial authority for
group call enabled, on the home screen, use the
numeric keypad to enter the group ID, and then
press and hold the PTT key.
Trunking mode: On the home screen, use the
numeric keypad to enter the group ID, and then
press or the PTT key.
To input an ID that complies with the dialing
rules, consult your dealer for details.
Receiving a Group Call
Flashes blue every
0.1 second
Call Services
When you are speaking during a call, keep the
microphone about 2.5 cm to 5 cm away from your
The BT feature is being
disabled.
Press and rotate the Smart knob to select the chann el
or group contact, and then press and hold the PTT key.
Through Contact List
Conventional mode: Go to Menu > Contact >
Favorite/Contact, select the group contact, and
then press and hold the PTT key.
5
You can receive a grou p call without any
operation.
Page 6

Ending a Group Call
Conventional Mode
A group call ends when the call hang time expires.
Trunking Mode
A group call ends in one of the following
scenarios:
The call hang time expires.
The calling party ends the call.
The call duration exceeds the preset time.
The BS signal is lost.
A pr eemptive or emergency call interrupts
the call.
The calling party change s the contact with
the Clear Down Via Group Switch feat ure
enabled.
Initiating a Private Call
Through Preset Contact
Press and rotate the Smart knob to select the
channel or private contact, and then press and
hold the PTT key.
Through Contact List
Go to Menu > Contact > Favorite /Contact ,
select the private contact, and then press and
hold the PTT key.
Through Manual Dial
Conventional mode: With the dial authority
for private call enabled, use the numeric
keypad to enter the private ID, and then
press and hold the PTT key.
Trunking mode: On the home scre e n , use the
numeric keypad to enter the private ID , and
then press or the PTT key.
To input an ID that complies with the dialing
rules, consult your dealer for details.
Receiving a Private Call
Conventional Mode
You can receive a private call without any
operation.
Trunking Mode
FOACSU
Whe n receiving a FOACSU private call, the
radio vibrates and rings. Press or the
PTT key within the pre se t time to answer the
call.
OACSU
When receiving an Off Air Call Set- Up
(OACSU) private call, you can answer it
without any operation. The call is established
automatically.
Ending a Private Call
Conventional Mode
A private call ends when the call hang time
expires.
Trunking Mode
A private call ends in one of the following
scenarios:
The call hang time expires.
The calling or called party ends the call.
The call duration exceeds the pre set time.
6
Page 7

The BS signal is lost.
A preemptive or emergency call interrupts
the call.
The calling or called party chang es the
contact with the Clear Down Via Private
Switch feature enabled.
Call on Analog Channel
(Conventional Only)
Call without Signaling
On an analog channel without signaling, you can
initiate a call to all the other users on the channel. Do
as follows:
1. Rotate the Smart knob to select the channel.
2. Press and hold the PTT key.
Call with Signaling
On an a nalog chan nel with signaling, you c an initiate
a call to a specific contact on the channel. Do as
follows:
1. Press the preprogrammed Contact List key, or
go to Menu > Contact > Favorite/Contact.
2. Select the contact.
3. Press and hold the PTT key or the
preprogrammed One Touch Call key.
Emergency Call
In case of an emergency, you can initiate an
emer gency call to seek help from your companion or
the control centre. With the highest priority, the
emergency call can be initiated even when the radio
is transmitting or receiving.
This feature is configured and enabled by your
deale r . For details, refer to the User Manual.
Message Services
The radio can send and receive short messages.
Text message: a message containing text or
number.
Quick text message: a frequently used text
message that can be created, edited, and deleted.
Status message (trunking only): a predefined code
that transfers the message content.
Se n d ing a Message
To send a message, do as follows:
1. Go to Menu > Message > Msg New.
2. In the recipient field, enter the co ntact ID, and
then press to switch the contact type.
Alternatively, press the OK/Menu key to enter
the contact list, and then select the contact.
3. In the message content field, enter the message
content.
Alternatively, select Insert, and then insert a
quick text message or status message.
4. Select Send.
Replying to a Message
To reply to a message, do as follows:
1. Go to Menu > Message > Msg, and then select
the message.
2. Select Reply, and then enter the text content or
insert a quick text message or status message.
3. Select Send.
Managing a Message
Go to Menu > Message > Msg, select a message,
press the Up key, and then manage the message as
follows:
To forward the message, select Forward, and
then add the contact.
To resend the message, select Resend.
To delete the message, select De le te .
To delete all messages, select Delete All.
7
Page 8

Icon Conventions
: Indicates functions that are available on digital
channel only.
: Indicates functions that are available on analog
channel only.
Functions marked with no icon are available on both
analog and digital channels.
Disclaimer
Hytera
Communications Corporation Limited (the
Company) endeavors to achieve the accuracy and
completeness of this manual, but no warranty of
accuracy or reliability is given. All the specifications
and designs are subject to change without notice due
to continuous technology development. No part of
this manual may be copied, modified, translated, or
distributed in any manner without the express written
permission of us.
We do not guarantee, for any particular purpose, the
accuracy, validity, timeliness, legitimacy or completeness
of the Third Party products and contents involved in this
manual.
If you have any suggestions or would like to learn more
details, please visit our website at: http://www.hytera.
com.
RF Radiation Information
product must be restricted to operations in an
This
occupational/controlled RF exposure environment. Users
must be fully aware of the hazards of the exposure and
able to exercise control over their RF exposure to qualify
for the higher exposure limits.
Radio Frequency (RF) is a frequency of electromagnetic
radiation in the range at which radio signals are
transmitted. RF technology is widely used in
communication, medicine, food processing and other
RF Radiation Safety
In
order to ensure user health, experts from relevant
industries including science, engineering, medicine and
health work with international organizations to develop
standards for safe exposure to RF radiation. These
standards consist of:
ƽ
United States Federal Communications Commission,
Code of Federal Regulations; 47CFR part 2 sub-part
J;
ƽ
American National Standards Institute (ANSI)/
Institute of Electrical and Electronic Engineers (IEEE)
C95. 1-1992;
ƽ
Institute of Electrical and Electronic Engineers (IEEE)
C95.1-1999;
ƽ
International Commission on Non-Ionizing Radiation
Protection (ICNIRP) 1998;
FCC Regulations
Federal
Communication Commission (FCC) requires
that all radio communication products should meet the
requirements set forth in the above standards before
they can be marketed in the U.S, and the manufacturer
shall post a RF label on the product to inform users
of operational instructions, so as to enhance their
occupational health against exposure to RF energy.
FCC
Statement
This equipment has been tested and found to comply with the
limits for a Class B digital device, pursuant to part 15 of FCC
Rules. These limits are designed to provide reasonable
protection against harmful interference in a residential
installation. This equipment generates and can radiate radio
frequency energy. If not installed and used in accordance with
the instructions, it may cause harmful interference to radio
communications. However, there is no guarantee that
interference will not occur in a particular installation.
Verification of harmful interference by this equipment to
radio or television reception can be determined by turning it
off and then on. The user is encouraged to try to correct the
interference by one or more of the following measures:
z Reorient or relocate the receiving antenna. Increase the
separation between the equipment and receiver.
z Connect the equipment into an outlet on a different
circuit to that of the receiver's outlet.
z Consult the dealer or an experienced radio/TV technician
for help.
Operation is subject to the following two conditions:
z This device may not cause harmful interference.
z This device must accept any interference received,
including interference that may cause undesired
operation.
Note: Changes or modifications to this unit not expressly
approved by the party responsible for compliance could void
the user's authority to operate the equipment.
Page 9

RF Exposure Compliance and
Control Guidelines and Operating
Instructions
ntrol your exposure and ensure compliance with the
To co
occupational/controlled environmental exposure limits,
always adhere to the following procedures.
Guidelines:
Do not remove the RF Exposure Label from the device.
User awareness instructions should accompany device
when transferred to other users.
Do not use this device if the operational requirements
described herein are not met.
Operating Instructions:
Transmit no m ore than the rated duty factor of 50% of the
time. To transmit (talk), push the Push-To-Talk (PTT)
key. To receive calls, release the PTT key. Transmitting
50% of the time, or less, is important because the radio
generates measurable RF energy only when transmitting
(in terms of measuring for standards compliance).
Keep the radio unit at least 2.5 cm away from the face.
Keeping the radio at the proper distance is important as
RF exposure decreases with distance from the antenna.
The antenna should be kept away from the face and eyes.
When worn on the body, always place the radio in a
Hytera-approved holder, holster, case, or body harness or
by use of the correct clip for this product. Use of
non-approved accessories may result in exposure levels
which exceed the FCC's occupational/controlled
environmental RF exposure limits.
Use of non-approved antennas, batteries, and accessories
causes the radio to exceed the FCC RF exposure
guidelines.
Contact your local dealer for the optional accessories of
the product.
L'exposition aux champs rf de
conformité et de contrôle
d'orientations et instructions
Pour contrô
conformité avec les limites d'exposition
professionnelle / environnement contrôlé, toujours
respecter les procédures suivantes.
Lignes directrices:
Ne pas enlever l'étiquette de l'appareil d'exposition
aux radiofréquences.
Sensibilisation des utilisateurs instructions devraient
accompagner dispositif lorsque transférés à d'autres
utilisateurs.
opérationnelles décrites ci - après ne sont pas
remplies.
Les inst
nominal de 50% du temps.à transmettre (parler),
pousse le pousse à parler (ptt). Pour recevoir des
appels, les ptt.50% du temps de transmission, ou
moins, est important parce que la radio génère de
l'énergie rf seulement lors de la transmission des (en
termes de mesure de la conformité aux normes).
Ie groupe de la radio continue d'au moins 2,5 cm de la
surface.garde la radio à la bonne distance est
important, car l'exposition aux champs rf diminue
ler l'exposition et s'assurer de la
Ne pas utiliser cet appareil si les exigences
ructions de fonctionnement:
Transmettre non plus que le facteur d'utilisation
avec la distance de l'antenne.l'antenne doit se tenir
loin du visage et des yeux.
d portés sur le corps, toujours place de la
Quan
radio dans un étui, hytera approuvé titulaire, ou un
harnais ou par l'utilisation de la vidéo pour ce
produit.utilisation des accessoires non approuvés
peuvent entraîner des fac qui dépassent les niveaux
d'exposition professionnelle et environnementale
contrôlée des limites d'exposition aux rf.
Les opérations doivent satisfaire aux deux conditions suivantes:
Ce dispositif peut ne pas causer d 'interférences nuisibles.
Ce dispositif doit accepter toute interférence reçue,
Y compris les interférences qui peuvent provoquer des accidents.Operation
Non approuvé des antennes, les piles et les
accessoires causes la radio à dépasser les lignes
directrices sur l'exposition aux radiofréquences de fac.
Communiquez avec votre distributeur local pour
les accessoires facultatifs du produit.
ISEDC Statement
The device has been tested and complies with SAR limits,
users can obtain Canadian information on RF exposure and
compliance
Après examen
et/ou aux limites d’intensité de champ RF, les utilisateurs
peuvent sur l’exposition aux radiofréquences et la conformité
and compliance d’acquérir les informations correspondantes
EU
As certified by the qualified laboratory, the product is in
compliance with the essential requirements and other relevant
provisions of the following directives: 2014/53/EU,
2006/66/EC, 2011/65/EU, and 2012/19/EU.
Please note that the above information is applicable to EU
countries only.
de ce matériel aux conformité aux limites DAS,
Regulatory Conformance
 Loading...