

Page 1

Preface
Welcome to the world of Hytera and thank you for purchasing this product. To derive optimum performance from
the product, please carefully read this manual before use.
This manual is applicable to the following product:
VM68x Remote Video Speaker Microphone
Page 2

Note
Caution
Warning
Icon Conventions
The following icons are available through this manual:
Indicates references that can further describe the related topics.
:
Indicates situations that could cause data loss or equipment damage.
:
Indicates situations that could cause minor personal injury.
:
Copyright Information
Hytera is the trademark or registered trademark of Hytera Communications Corporation Limited (the Company)
in the People's Republic of China (PRC) and/or other countries or area. The Company retains the ownership of its
trademarks and product names. All other trademarks and/or product names that may be used in this manual are
properties of their respective owners.
The product described in this manual may include the Company's computer programs stored in memory or other
media. Laws in PRC and/or other countries or areas protect the exclusive rights of the Company with respect to its
computer programs. The purchase of this product shall not be deemed to grant, either directly or by implication,
any rights to the purchaser regarding the Company's computer programs. The Company's computer programs may
not be copied, modified, distributed, decompiled, or reverse-engineered in any manner without the prior written
consent of the Company.
Disclaimer
The Company endeavors to achieve the accuracy and completeness of this manual, but no warranty of accuracy or
reliability is given. All the specifications and designs are subject to change without notice due to continuous
technological development. No part of this manual may be copied, modified, translated, or distributed in any
manner without the prior written consent of the Company.
We do not guarantee, for any particular purpose, the accuracy, validity, timeliness, legitimacy or completeness of
the third-party products and contents involved in this manual.
If you have any suggestions or would like to receive more information, please visit our website at:
http://www.hytera.com.
EU Regulatory Conformance
As certified by the qualified laboratory, the product is in compliance with the essential requirements and other
relevant provisions of the following directives:
Page 3

2006/66/EC
2011/65/EU
2012/19/EU
2014/53/EU
Please note that the above information is applicable to EU countries only.
Caution
1.Risk of explosion if battery is replaced by an incorrect type. Dispose of used
batteries according to the instructions.
2..The product shall only use USB port to charging.
3.The max operating of the EUT is 60°C. and shouldn’t be lower than -30°C.
4.The device complies with RF specifications when the device used at 0cm form your body. Body SAR: 0.231
W/Kg
5.Declaration of Conformity
We, Hytera Communications Corporation Limited
hereby, declare that the essential requirements compliance with the Directive 2014/53/EU.
have been fully fulfilled on our product with indication below:
Product Name: RVM (Remote Video Speaker Microphone)
Brand Name : Hytera
Model : VM685
This product can be used across EU member states.
Caution:
§ 15.19 Labelling requirements.
This device complies with part 15 of the FCC Rules. Operation is subject to the following two conditions: (1) This
device may not cause harmful interference, and (2) this device must accept any interference received, including
interference that may cause undesired operation.
§ 15.21 Information to user.
Any Changes or modifications not expressly approved by the party responsible for compliance could void the
user's authority to operate the equipment.
§ 15.105 Information to the user.
Note: This equipment has been tested and found to comply with the limits for a Class B digital device, pursuant to
part 15 of the FCC Rules. These limits are designed to provide reasonable protection against harmful interference
in a residential installation. This equipment generates uses and can radiate radio frequency energy and, if not
installed and used in accordance with the instructions, may cause harmful interference to radio communications.
However, there is no guarantee that interference will not occur in a particular installation. If this equipment does
cause harmful interference to radio or television reception, which can be determined by turning the equipment off
and on, the user is encouraged to try to correct the interference by one or more of the following measures:
Page 4

-Reorient or relocate the receiving antenna.
-Increase the separation between the equipment and receiver.
-Connect the equipment into an outlet on a circuit different from that to which the receiver is connected.
-Consult the dealer or an experienced radio/TV technician for help.
Specific Absorption Rate (SAR) information:
This RVM (Remote Video Speaker Microphone) meets the government's requirements for exposure to radio
waves. The guidelines are based on standards that were developed by independent scientific organizations through
periodic and thorough evaluation of scientific studies. The standards include a substantial safety margin designed
to assure the safety of all persons regardless of age or health.
FCC RF Exposure Information and Statement The SAR limit of USA (FCC) is 1.6 W/kg averaged over one gram
of tissue. Device types:RVM (Remote Video Speaker Microphone) (FCC ID: YAMVM685) has also been tested
against this SAR limit. The highest SAR value reported when properly worn on the body is 0.27 W/Kg. This
device was tested for typical body-worn operations with the back of the handset kept 10mm from the body. To
maintain compliance with FCC RF exposure requirements, use accessories that maintain a 10mm separation
distance between the user's body and the back of the handset. The use of belt clips, holsters and similar
accessories should not contain metallic components in its assembly. The use of accessories that do not satisfy
these requirements may not comply with FCC RF exposure requirements, and should be avoided.
Body-worn Operation
This device was tested for typical body-worn operations. To comply with RF exposure requirements, a minimum
separation distance of 10mm must be maintained between the user’s body and the handset, including the antenna.
Third-party belt-clips, holsters, and similar accessories used by this device should not contain any metallic
components. Body-worn accessories that do not meet these requirements may not comply with RF exposure
requirements and should be avoided. Use only the supplied or an approved antenna.
French statement
Le présent appareil est conforme aux CNR d'Industrie Canada applicables aux appareils
radio exempts de licence. L'exploitation est autorisée aux deux conditions suivantes :
(1) l'appareil ne doit pas produire de brouillage, et
(2) l'utilisateur de l'appareil doit accepter tout brouillage radioélectrique
subi, même si le brouillage est susceptible d'en compromettre le fonctionnement.
IC Radiation Exposure Statement
This EUT is compliance with SAR for general population/uncontrolled exposure limits in IC RSS-102 and had
been tested in accordance with the measurement methods and procedures specified in IEEE 1528 and IEC 62209.
This equipment should be installedand operated with minimum distance 10 mm between the radiator and your
body. Thisdevice and its antenna(s) must not be collocated or operating in conjunction with anyother antenna or
transmitter.
Cet appareil est conforme aux limites d'exposition DAS incontrôlée pour la population générale de la norme
CNR-102 d'Industrie Canada et a été testé en conformité avec les méthodes de mesure et procédures spécifiées
dans IEEE 1528 et IEC 62209. Cet appareil doit être installé et utilisé avec une distance minimale de 10mm entre
This device complies with Canada Industry licence-exempt RSS standard(s). Operation is
subject to the following two conditions:
(1) this device may not cause interference; and
(2) this device must accept any interference. Including interference that may cause
undesired operation of the device.
Page 5

l'émetteur et votre corps. Cet appareil et sa ou ses antennes ne doivent pas être co-localisés ou fonctionner en
conjonction avec tout autre antenne ou transmetteur.
Page 6
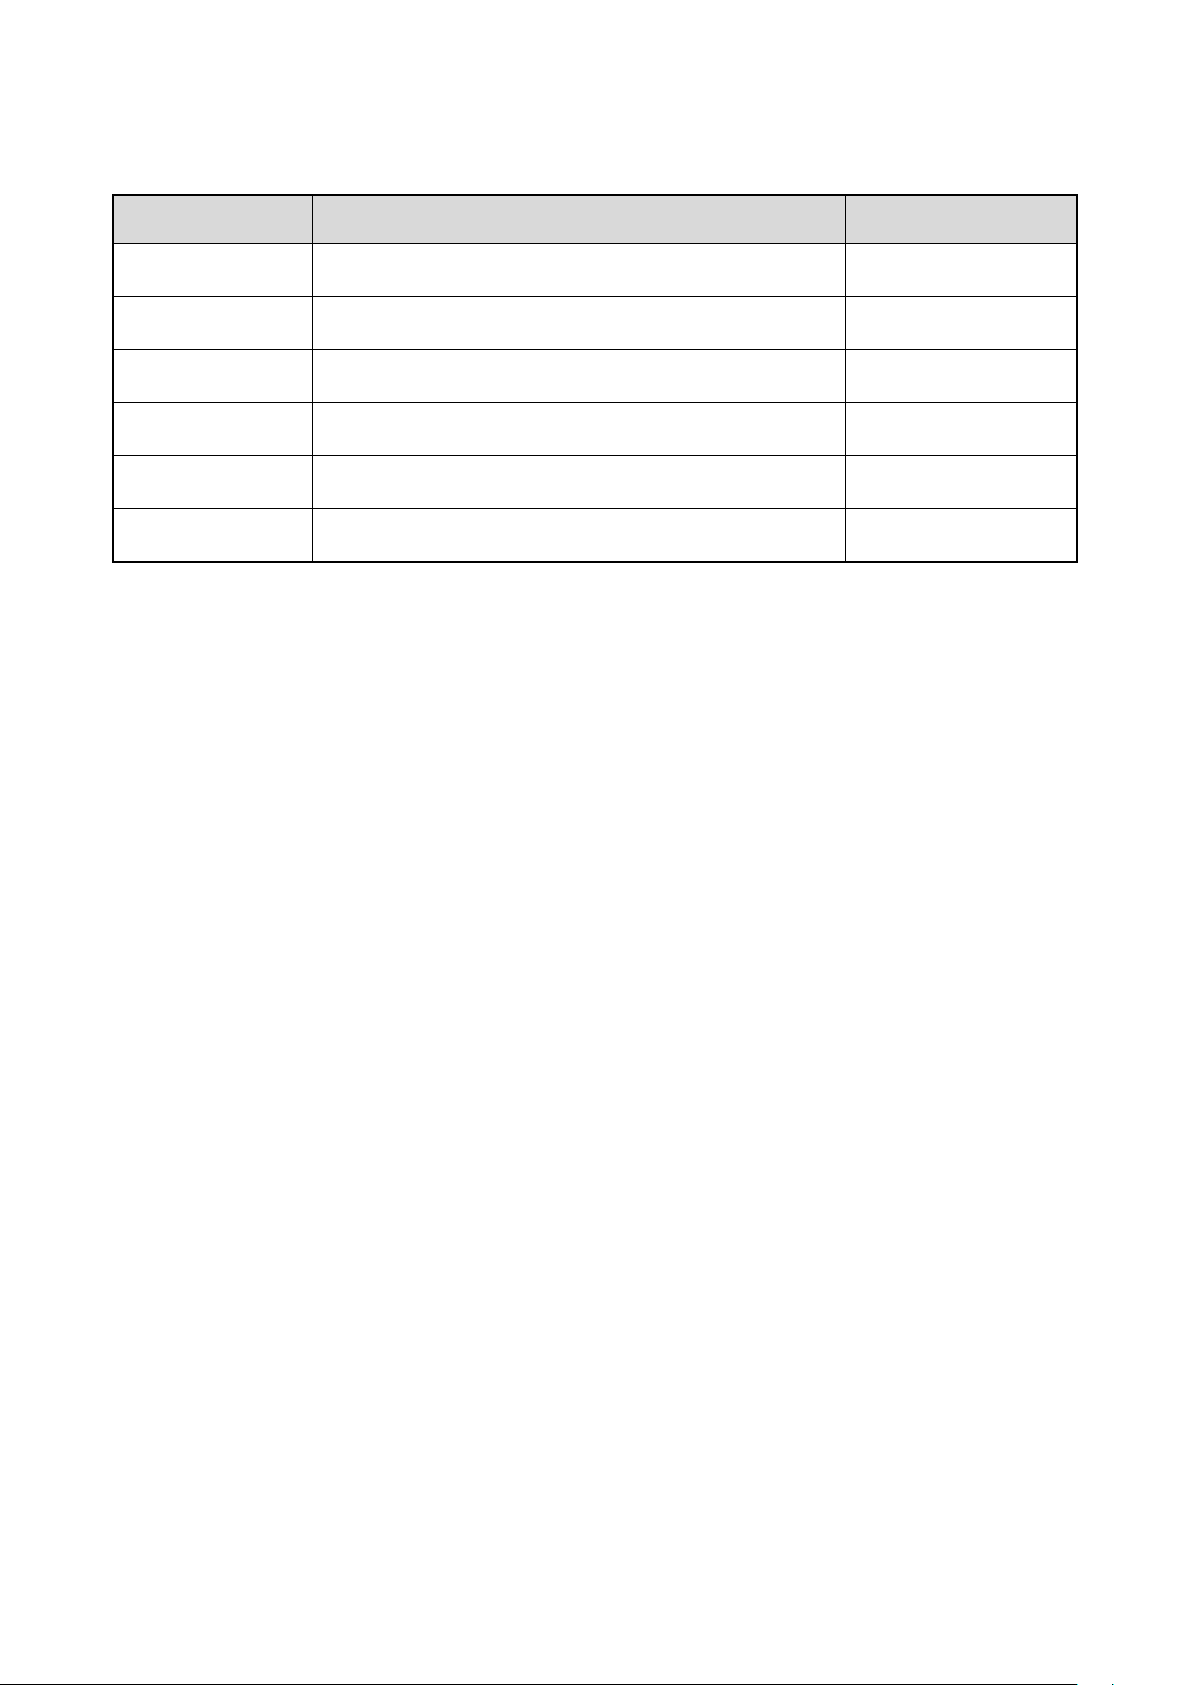
No.
Item
Qty.
1
Remote Video Microphone (RVM)
1
2
Battery
1
3
Belt Clip
1
4
USB Cable
1
5
Power Adapter
1
6
Documentation Kit
1
1. Packing List
Page 7
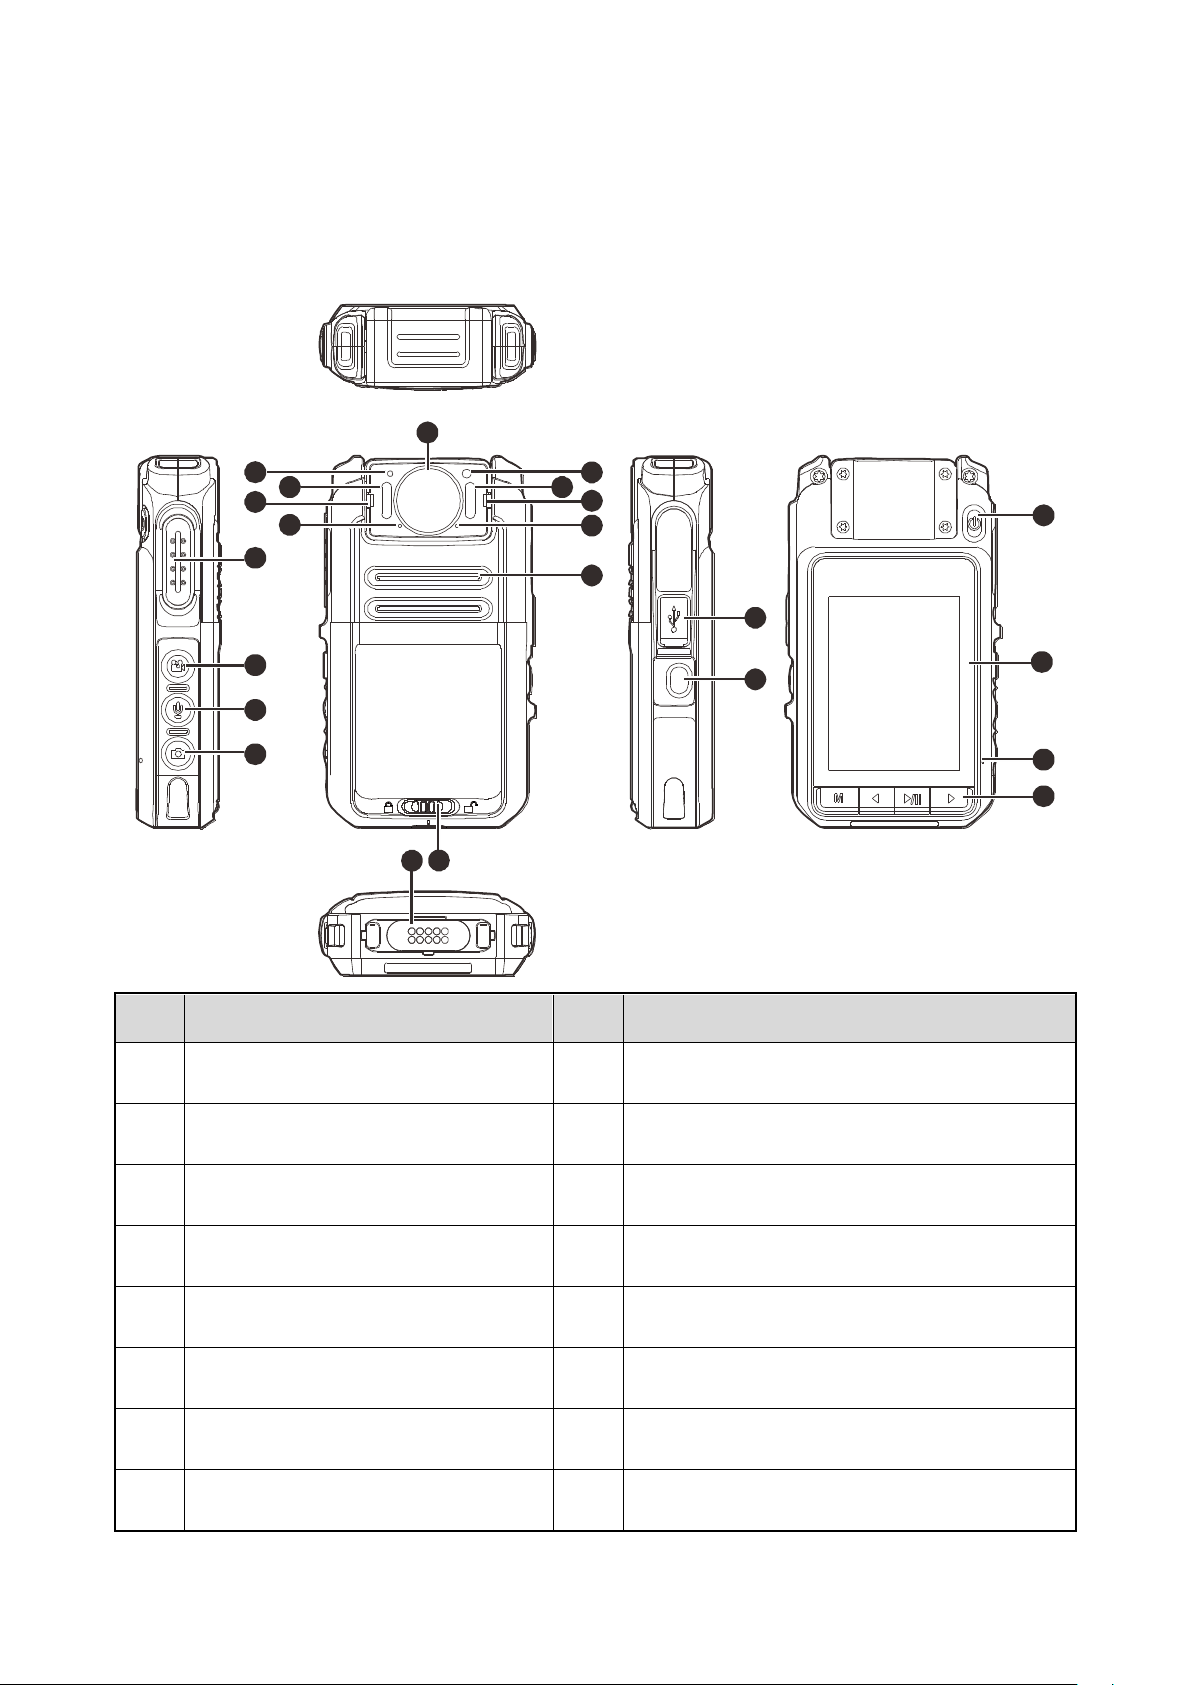
1
5
6
7
8
9
10
6
7
11
12
15
16
13
17
18
19
20
14
2
3
4
No.
Part Name
No.
Part Name
1
Push-to-Talk (PTT) Key
11
Microphone 1
2
Video Recording Key
12
Speaker
3
Audio Recording Key
13
Accessory Interface (10-pin)
4
Photo Taking Key
14
Battery Latch
5
Light Sensor
15
USB Connector
6
Infrared (IR) LED
16
Emergency Alarm Key
7
LED Indicator
17
On/Off Key
8
Microphone 2
18
LCD Display
2. Product Introduction
2.1 Product Layout
Page 8
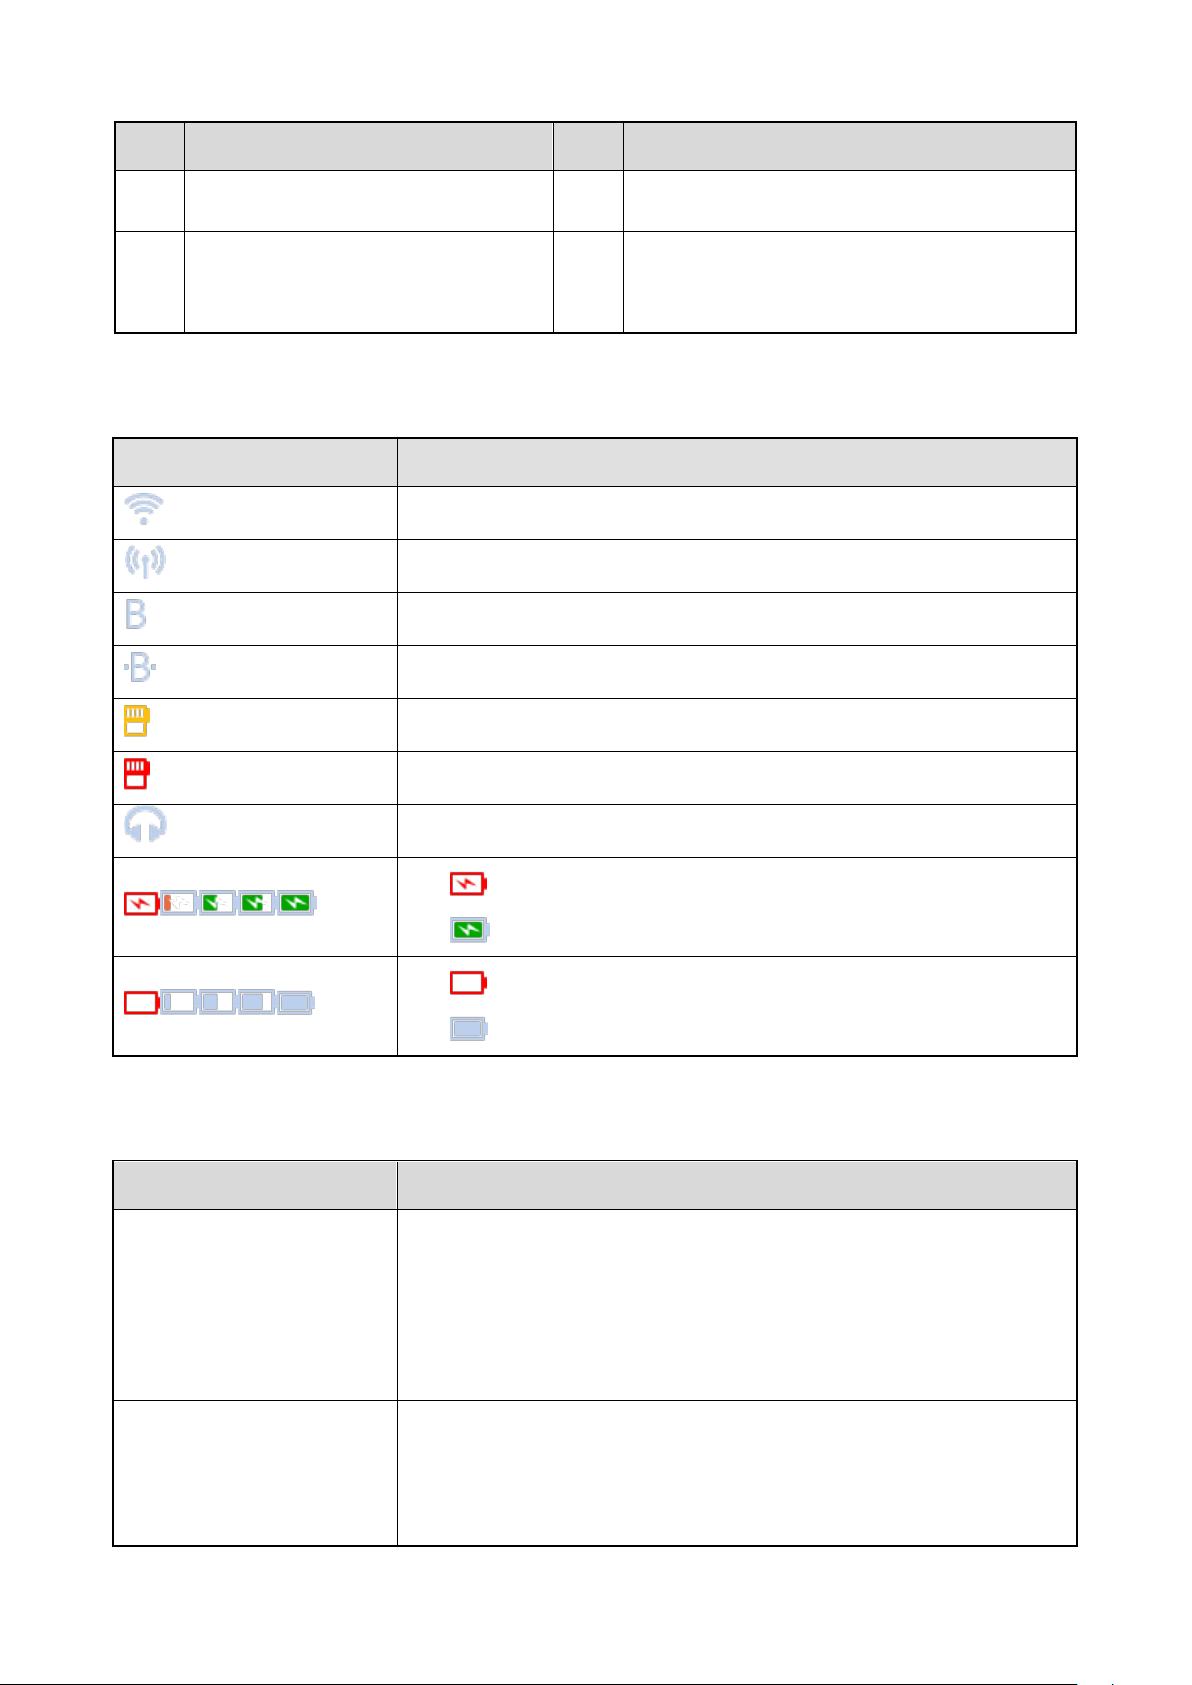
No.
Part Name
No.
Part Name
9
Lens
19
Microphone 3
10
Light Compensator
20
Keys (Menu/Back Key, Left Key,
Play/Pause/Confirm Key, Right Key)
Icon
Description
WLAN is enabled.
WLAN hotspot is enabled.
BT Feature is enabled.
The wireless connection is established.
The remaining capacity of the TF card is less than 2 GB.
The TF card is full.
Earpiece connected.
:
The product is being charged when the battery is low.
:
The product is fully charged.
:
Low battery.
:
Full battery.
LED Indication
Description
Glows red
The product is transmitting.
The product is being charged.
The TF card is full.
The product is being turned off.
Glows green
The product is receiving.
The product is fully charged.
The product is being turned on.
2.2 LCD Icons
2.3 LED Indicators
Page 9
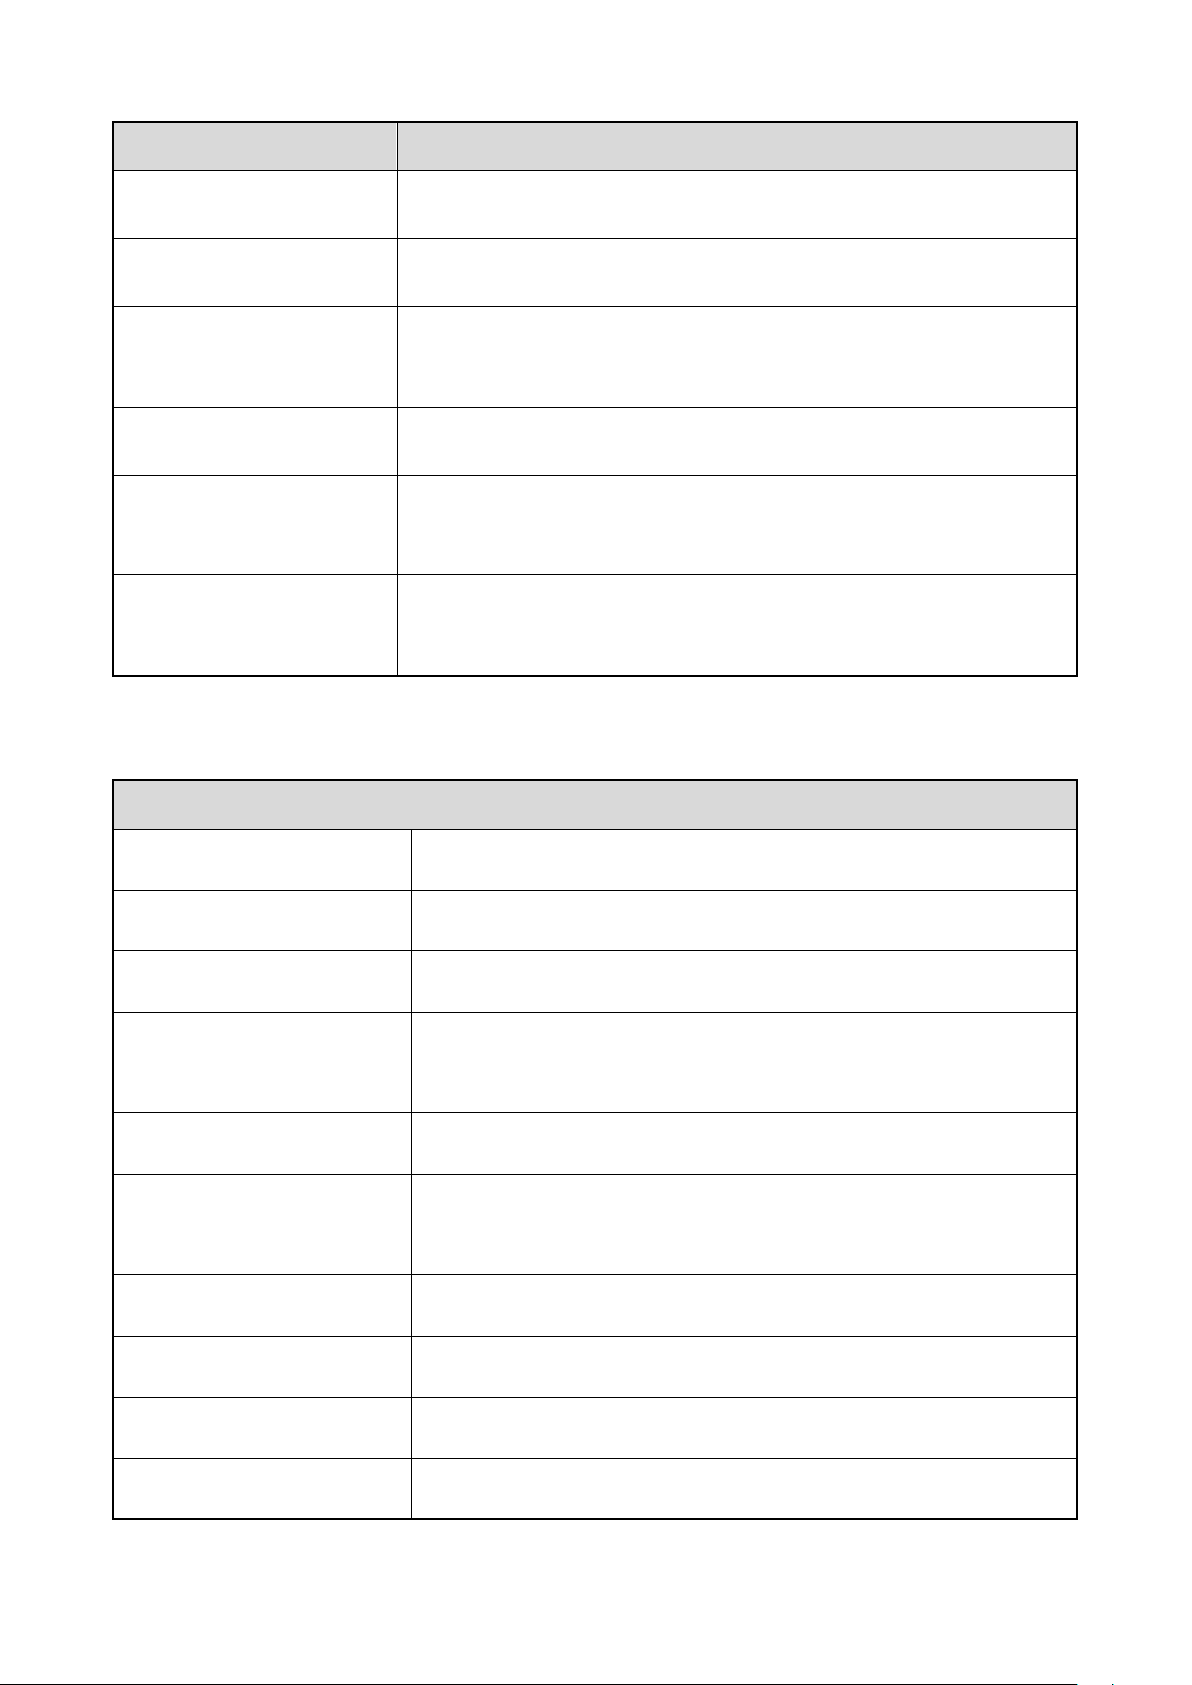
LED Indication
Description
Glows orange
Call idle. You can press and hold the
PTT
key to speak.
Flashes orange rapidly
Idle status in Emergency Alarm mode.
Flashes red once every five
seconds
The battery runs low. Please recharge or replace the battery in time.
Flashes red slowly
The product is recording video.
Flashes orange slowly
The product is recording audio.
The remaining capacity of the TF card is less than 2 GB.
The LED indicator flashes red
and blue in turn.
The BT is pairing.
RVM
Dimensions (H x W x D)
24 x 106.5 x 60 mm
Weight (with battery)
<
170g
Image Sensor
16-megapixel
Camera
Fixed angle, glass, 180° rotatable, diagonal 140°, horizontal 106°, vertical
78°
Focus Range
0.1 m to infinity
Battery Life (continuous video
recording)
≥8 hours
Battery
2500 mAh
Charging Time
≤ 4 hours
Display Size
2.4 inch
Display Resolution
240 (RGB) x 320
2.4 Specifications
Page 10
Display Type
TFT-LCD 262K color display
Built-in Storage Capacity
Standard: 16 GB
Optional: 32 GB/64 GB/128 GB
Video Format
mp4
Video Encoding Format
H.264
Video Resolution
VGA, 720P, 1080P
Video Frame Rate
30FPS/60FPS
Audio Format
AAC (Advanced Audio Coding)
Photo Format
JPG
Picture Resolution
4608 x 1296 (16-megapixel), 3072 x 1728 (5-megapixel), 2304 x 1296
(3-megapixel)
Pre-recording/Post-recording
Time
20s/30s
Speaker Power
2 W
Microphone
One silicon microphone, -38 dB
One Electret microphone, -42 dB
WI-FI
802.ll b/g/n (AP mode and STA mode supported)
BT
BT4.0
Connector
Micro USB port, 10-pin contact port
Infrared (IR) LED
OSRAM LED * 6
Night Vision Range (without
lighting)
≥3m
Light Compensator
1W
Ingress Protection
MIL-STD-810G, IP67
Drop Resistance
2 m
Page 11
ESD
±6 kV (contact discharge)
±12 kV (air discharge)
Operating Temperature
–30°C to +60°C
Storage Temperature
–40°C to +85°C
System Compatibility
Windows XP/Windows 7/Windows 8/Windows 10
Compatible Radio
Hytera Radio
Power Adapter
Input
110 V – 240 V AC, 50 Hz – 60 Hz
Output
5 V DC, 1A
Page 12
Use only the Hytera standard or optional battery. Polarity reverse and use of other batteries may result in
explosion and fire hazards.
Caution
3. Before Use
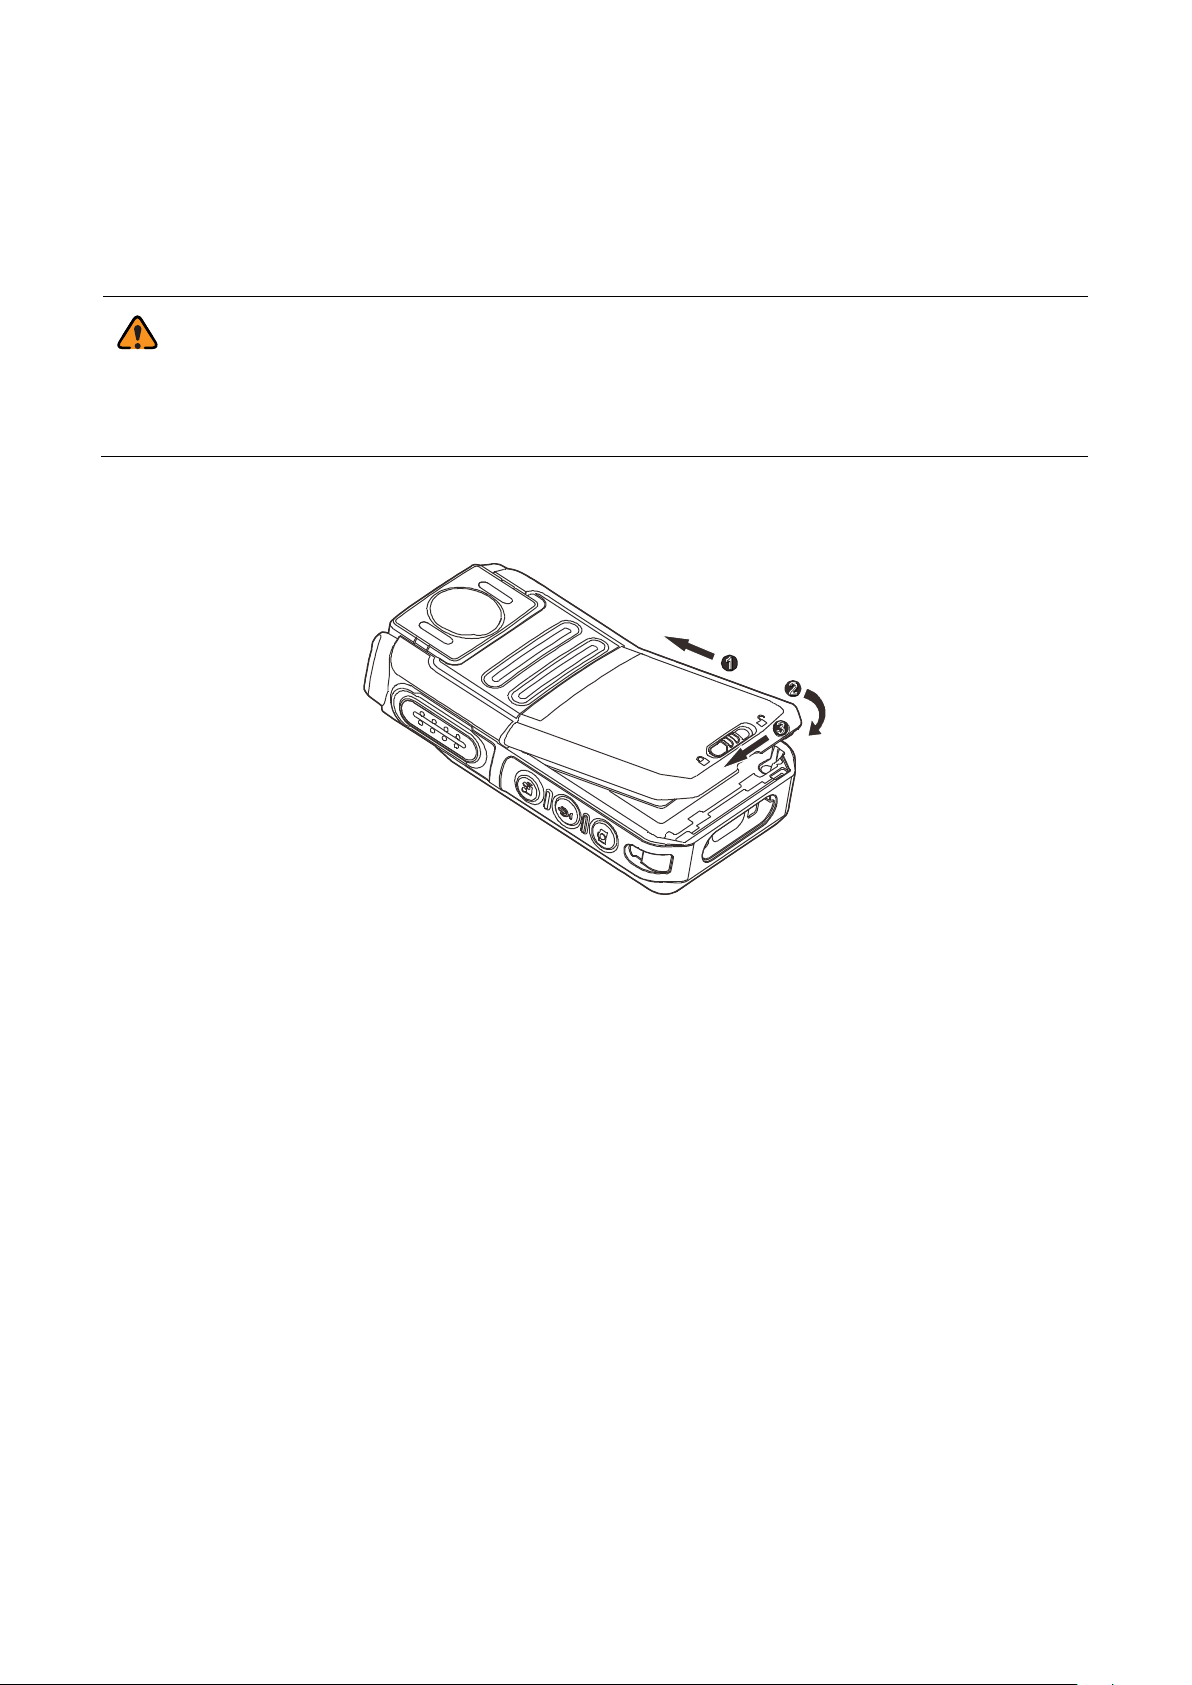
3.1 Attaching the Battery
The following figure shows how to install the battery. To remove the battery, turn off the product, and then go
through the following steps reversely.
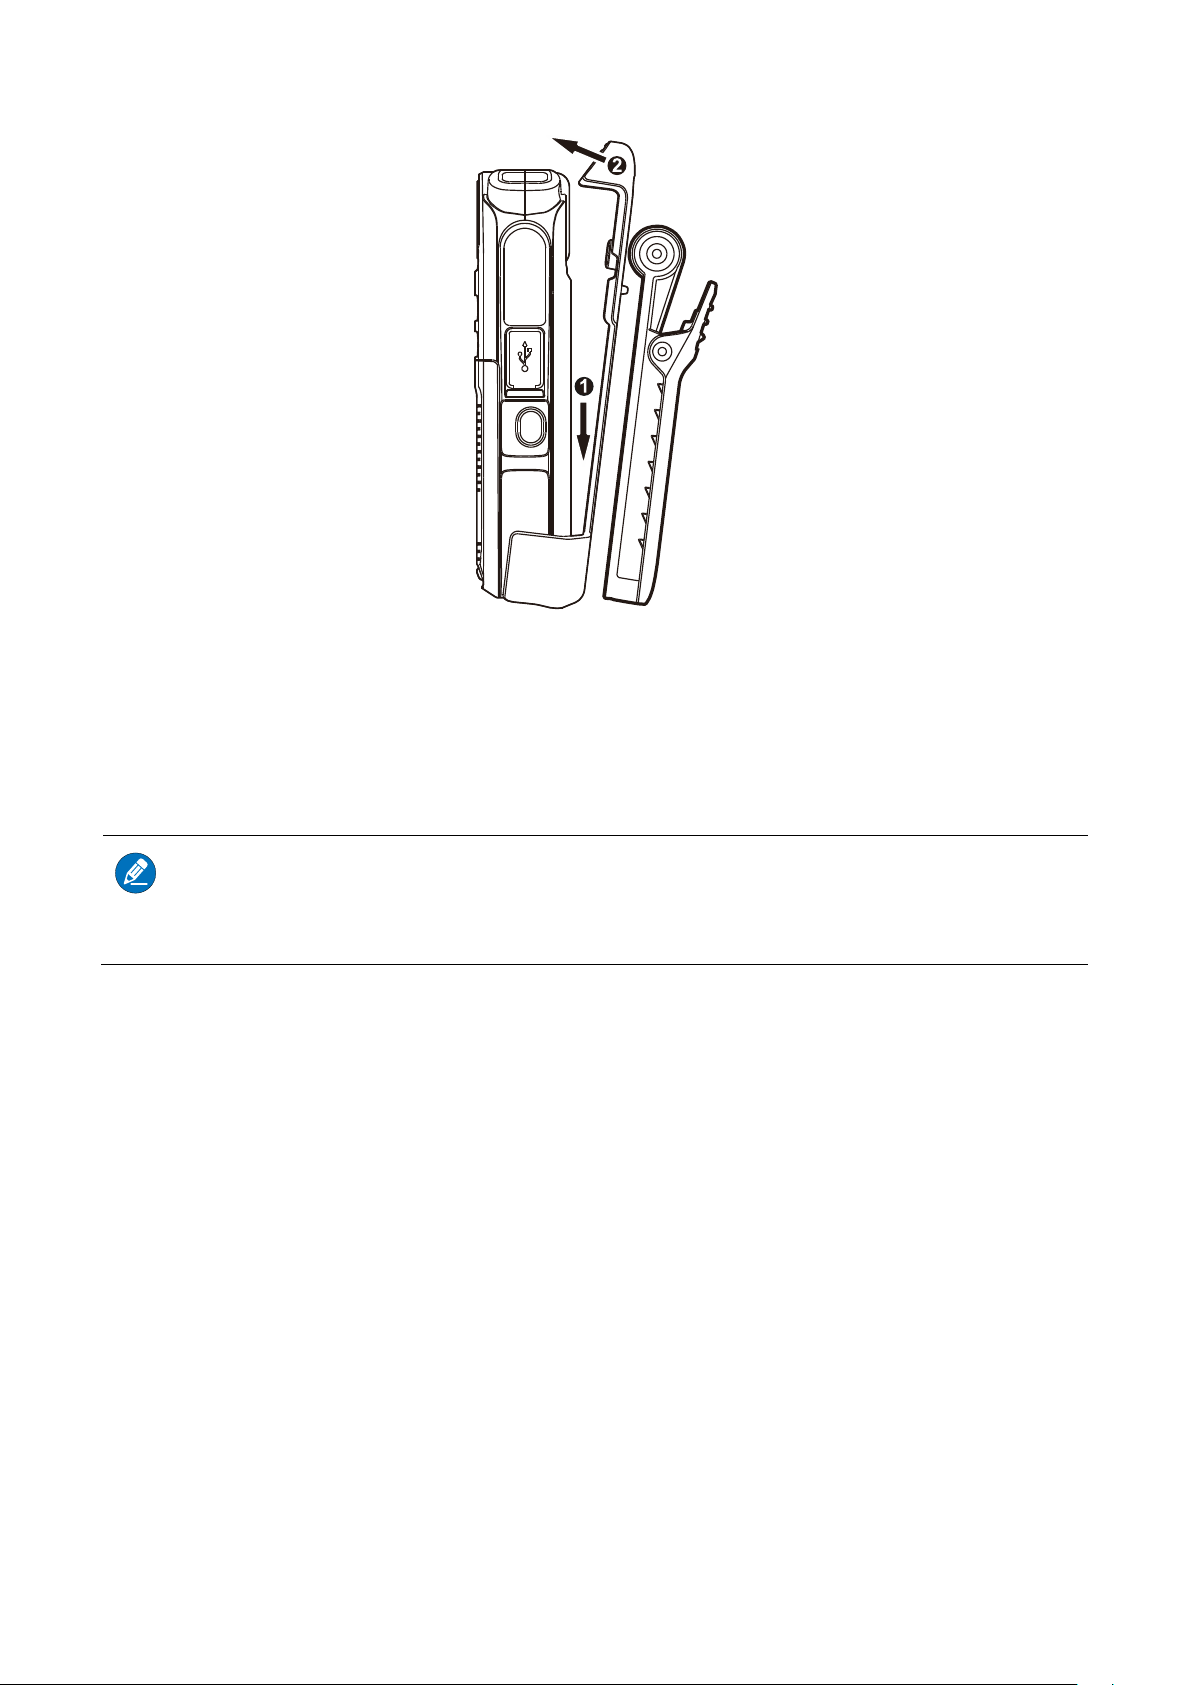
3.2 Installing the Belt Clip
The following figure shows how to install the belt clip. To remove the belt clip, go through the following steps
reversely.
Page 13
Skip this section if you have not purchase the accessory connection cable.
Note
3.3 (Optional) Connecting the Accessory Connection
Cable
The following figure shows how to connect the accessory connection cable.
To disconnect the cable, press both sides of the cable connector and remove the connector with proper force.
Page 14
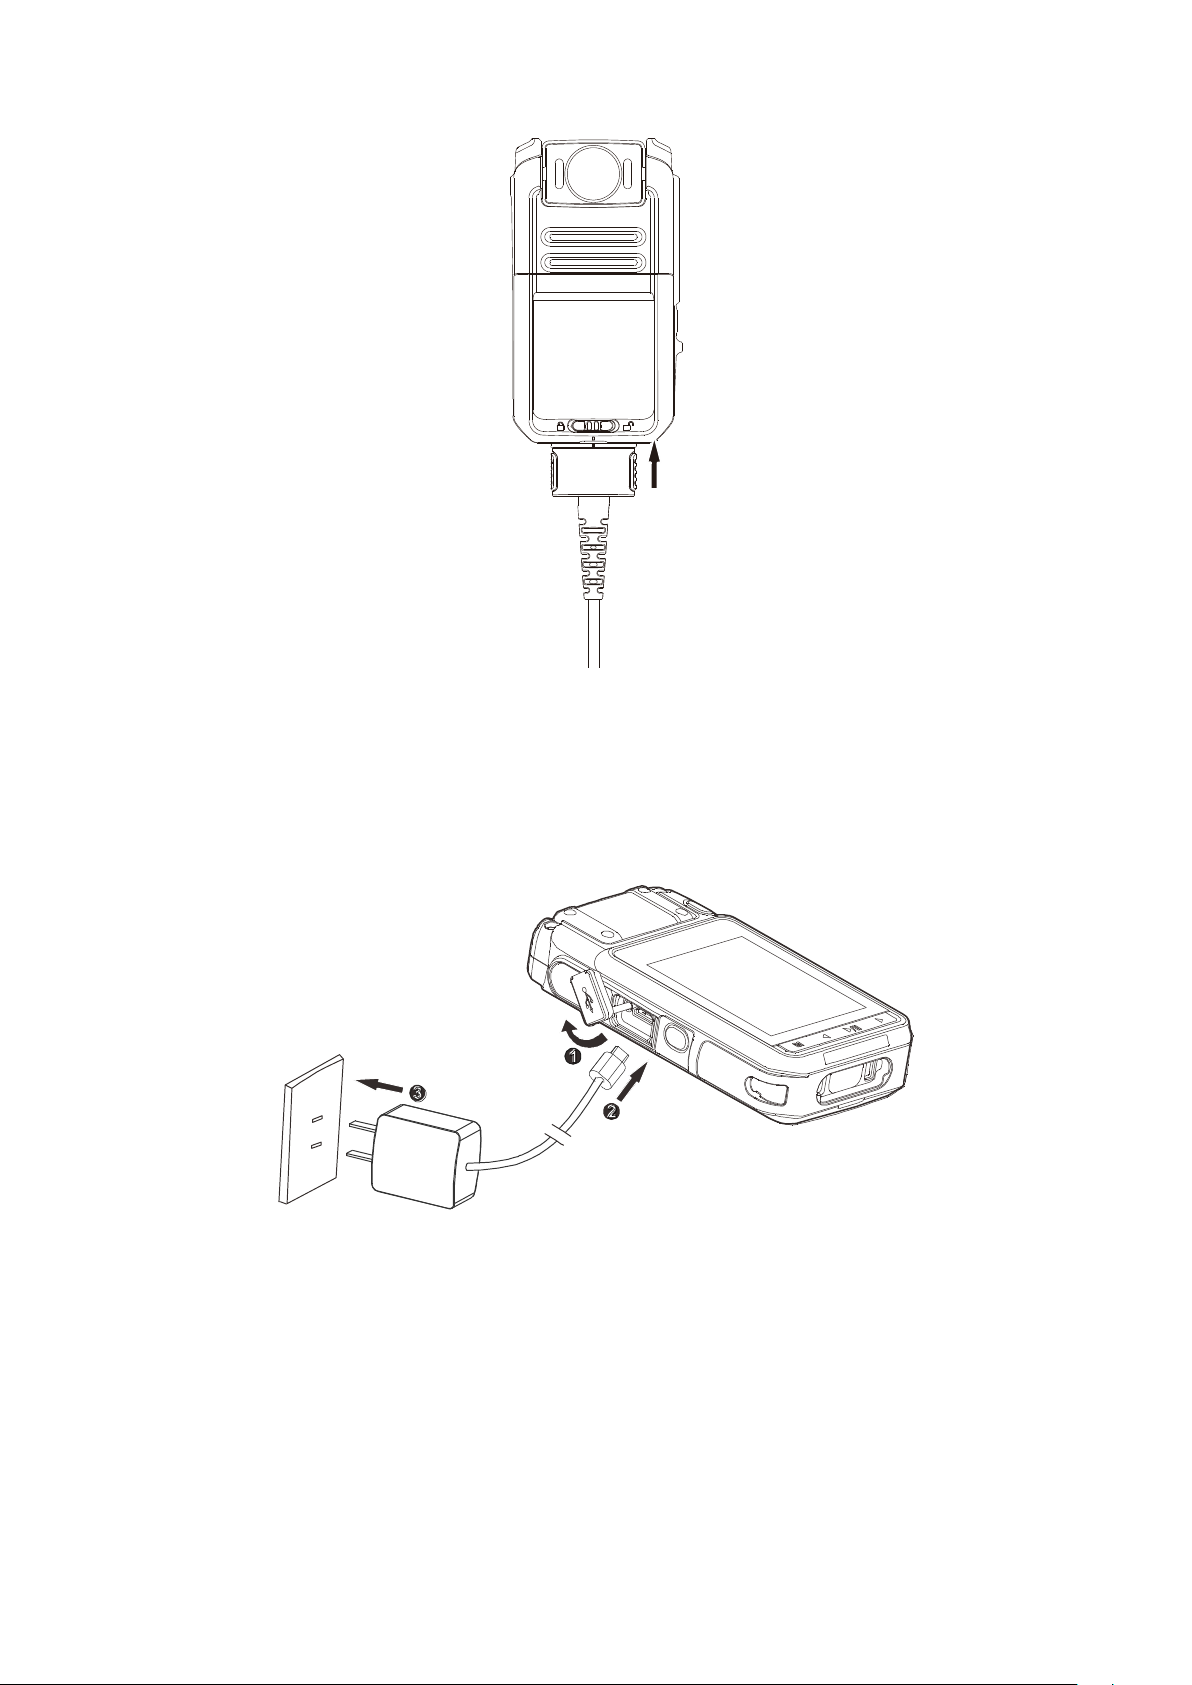
3.4 Charging the Product
The LED indicator flashes once every five seconds, indicating that the battery is low. To charge the product, do as
follows:
The LED indicator tells you the charging status of the product. See 0 Description for details.
Page 15

4. Basic Functions and Operations
4.1 Turning the Product On or Off
Turning the Product On
Press and hold the
On/Off
key for 3s to enter the Live View mode.
Turning the Product off
Press and hold the
On/Off
key for 3s.
4.2 Basic Settings
Basic settings allow you to set the BT, WLAN, WLAN hotspot, language, screen, volume, silent mode, night
vision, and other features. To enter the basic settings screen, press and hold the
mode.
Menu/Back
4.2.1 BT
BT setting allows you to enable or disable BT and Device Match features, view Device Name and MAC Address.
To enable the BT feature, do as follows:
key in the Live View
1. Press the
2. Press the
To enable or disable the Device Match, do as follows:
Press the
a.
key.
Press the
b.
To view Device Name or MAC Address, press the
MAC Address
To disable the BT feature, do as follows:
1. Press the
2. Press the
Play/Pause/Confirm
key or the
Left
key or the
Left
key or the
Left
, and then press the
Play/Pause/Confirm
key or the
Left
key to enter the
key to select On, and then press the
Right
key to select
Right
key to select On or
Right
Play/Pause/Confirm
key to enter the
key to select
Right
4.2.2 WLAN
screen.
BT
Play/Pause/Confirm
Device Match
Off
key or the
Left
key to view detailed information.
Hotspot On/Off
, and then press the
Off
, and then press the
, and then press the
Right
screen.
Play/Pause/Confirm
Play/Pause/Confirm
Play/Pause/Confirm
key to select
Device Name or
key.
key.
key.
WLAN setting allows you to enable or disable WLAN, view the network list, select the device to be connected
Page 16

and view the IP address.
To enable WLAN, do as follows:
1. Press the
2. Press the
You can press the
information.
To disable WLAN, do as follows:
1. Press the
2. Press the
Play/Pause/Confirm
key or the
Left
key or the
Left
To view the network list and select the device to be connected, do as follows:
1. Press the
Play/Pause/Confirm
2. Press the
Play/Pause/Confirm
To view the IP address, press the
Play/Pause/Confirm
Play/Pause/Confirm
Left
Left
or the
Left
key or the
key to enter the
key to select On, and then press the
Right
Right
key or the
key.
Right
key.
key.
key to enter the
key to select
Right
Hotspot On/Off
key to select the
key to select
Right
key to select the device to be connected, and then press the
key or the
Left
Hotspot On/Off
, and then press the
Off
Network List
Right
screen.
Play/Pause/Confirm
or
Network List
key to select
screen.
Play/Pause/Confirm
key.
IP Address
IP address
to view detailed
, and then press the
, and then press the
key.
4.2.3 WLAN Hotspot
WLAN Hotspot setting allows you to enable or disable hotspot, view hotspot name, hotspot password, MAC
address and IP address.
To enable WLAN Hotspot, do as follows:
1. Press the
2. Press the
You can press the
view detailed information.
To disable WLAN Hotspot, do as follows:
1. Press the
2. Press the
Play/Pause/Confirm
key or the
Left
key or the
Left
Play/Pause/Confirm
key or the
Left
key to enter the
key to select On, and then press the
Right
key to select the
Right
key to enter the
key to select
Right
Hotspot On/Off
Name, Password, MAC Address
Hotspot On/Off
, and then press the
Off
screen.
Play/Pause/Confirm
screen.
Play/Pause/Confirm
key.
or
IP Address
key.
to
4.2.4 Language
Language setting allows you to set the language displayed on the interface
1. Press the Left key or the Right key to select Language, and then press the Play/Pause/Confirm key.
Page 17

2. Press the Left key or the Right key to select the desired language, and then press the Play/Pause/Confirm
key.
4.2.5 Display
Brightness
To adjust the display brightness, do as follows:
1. Press the Left key or the Right key to select Screen, and then press the Play/Pause/Confirm key.
2. Press the Left or the Right key to select Brightness, and then press the Play/Pause/Confirm key.
3. Press the Left or the Right key to select the brightness value, and then press the Play/Pause/Confirm key.
Screen Off
To set the time for the screen to be turned off when no operation is detected, do as follows:
1. Press the Left key or the Right key to select Screen, and then press the Play/Pause/Confirm key.
2. Press the Left or Right key to select Screen off, and then press the Play/Pause/Confirm key.
3. Press the Left or Right key to select 10s, 20s, 30s or Off, and then press the Play/Pause/Confirm key.
Auto Brightness
With this feature enabled, the product will adjust the display brightness automatically for optimal effect. To
enable or disable the feature, do as follows:
1. Press the Left key or the Right key to select Screen, and then press the Play/Pause/Confirm key.
2. Press the Left key or the Right key to select Auto Brightness, and then press the Play/Pause/Confirm key.
3. Press the Left key or the Right key to select On or Off, and then press the Play/Pause/Confirm key.
Sleep Mode
This feature allows the product to save more power. To set the sleep mode, do as follows:
1. Press the Left key or the Right key to select Screen, and then press the Play/Pause/Confirm key.
2. Press the Left key or the Right key to select Sleep Mode, and then press Play/Pause/Confirm key.
3. Press the Left or the Right key to select 5min, 20min, 30min or Off, and then press Play/Pause/Confirm
key.
Page 18

The Sleep Mode starts when no operation is detected.
Note
4.2.6 Volume
This feature allows you to adjust the volume for the alert, video playback, and audio playback. To adjust the
volume, do as follows:
1. Press the Left key or the Right key to select Volume, and then press the Play/Pause/Confirm key.
2. Press the Left key or the Right key to select High, Medium, Low or Silent, and then press the
Play/Pause/Confirm key.
4.2.7 Silent Mode
With this feature enabled, the product gives no alert tones, the indicator will not light up, and the display
brightness is at the lowest level.
To enable or disable the Silent Mode, do one of the following:
Press the
Press the
Press and hold both the
Left
key or the
Left
key or the
key to select
Right
key to select On or
Right
On/Off
key and the
Silent Mode
, and then press the
Off
Menu/Back
, and then press the
Play/Pause/Confirm
key simultaneously.
Play/Pause/Confirm
key.
key.
4.2.8 Night Vision
With this feature enabled, the IR LED will light up when the product is recording video in the dark. To enable or
disable this feature, do as follows:
1. Press the Left key or the Right key to select Night Vision, and then press the Play/Pause/Confirm key.
2. Press the Left key or the Right key to select On or Off, and then press the Play/Pause/Confirm key.
4.2.9 About
This feature allows you to view the Model Name, Device ID, SN, Processor, and other information.
To view related information, do as follows:
1. Press the Left key or the Right key to select About, and then press the Play/Pause/Confirm key.
2. Press the Left key or the Right key to view the details.
Page 19
The display will be turned off automatically if you set a period for the Screen Off feature.
Note
4.3 Waking Up the Product
To wake up the product after it enters the Sleep Mode, press the
On/Off
key.
4.4 Turn the Display on or off
Turn the Display On
To turn the display on, press any key except
PTT
.
Turn the Display Off
To turn the display off, press the
On/Off
key.
4.5 Recording Videos or Audios and Taking Photos by
One Key
To record videos or audios or take photos, do as follows:
In power-off mode: press and hold the
In Sleep Mode: press the
To stop recording video or audio, press the
Video Recording
Video Recording
key/
Audio Recording
Video Recording
key/
key/
4.6 Recording Videos
To record videos in the Live View mode, press the
duration. Press the
Video Recording
key again to finish.
Video Recording
4.7 Pre-recording/Post-recording
Pre-recording
Audio Recording
key/
Photo Taking
Audio Recording
key. The LCD display will show the video
key/
Photo Taking
key.
key again.
key.
This feature allows you to record the video for a predefined time period before pressing the
to start recording.
To enter pre-recording mode, press and hold the
again to exit.
Video Recording
Video Recording
key in the Live View mode. Press and hold it
key
Page 20
The pre-recording and post-recording features can be programmed by your dealer.
Note
Post-recording
This feature allows you to record the video for a predefined time period after pressing the
to finish recording.
To enter post-recording mode, do as follows:
1. Press the Video Recording key to start recording normal video, or press the Emergency Alarm key or
Menu/Back key to start recording important video.
2. Press the Video Recording key again to stop recording.
The product will enter post-recording mode automatically.
To exit post-recording mode:
For normal video recording: press the
The product will start normal video recording again. To stop recording, press the
For important video recording: press the
The product will start important video recording again. To stop recording, press the
Video Recording
Emergency Alarm
key.
key.
Video Recording
Video Recording
Video Recording
key
key.
key.
4.8 Recording Audios
To record audios in the Live View mode, press the
Audio Recording
key. Press it again to finish.
4.9 Taking Photos
To take photos in the Live View mode, press the
Photo Taking
key.
4.10 Marking Videos/Audios as Important
To mark videos/audios as important when recording, press the
To directly record videos/audios marked as “important”, press the
press and hold the
Emergency Alarm
key or press the
Video Recording
Menu/Back
Emergency Alarm
key.
key.
key. To stop recording,
Page 21

4.11 Taking Photos When Recording Videos
To take photos when recording videos, press the
Photo Taking
key.
4.12 Preview and Playback
You can preview and play videos, audios, and photos in the similar way. This section takes video preview and
playback as an example.
To preview and play videos, do as follows:
1. In the Live View mode, press the Menu/Back key.
2. Press the Left key or the Right key to select Video.
3. Press the Play/Pause/Confirm key to preview the videos.
4. Press the Left key or the Right key to select the video to play.
5. Press the Play/Pause/Confirm key to play.
You can do the following during playing:
Pause: Press the Play/Pause/Confirm key.
Fast-forward: Press the Right key to select a speed.
Fast-backward: Press the Left key to select a speed.
Play the previous video: Press the Left key when the video is paused.
Play the next video: Press the Right key when the video is paused.
4.13 Turning the Flashlight On or Off
To turn the flashlight on, press and hold the
Audio Recording
key again.
Audio Recording
key. To turn the flashlight off, press and hold
4.14 IR Controlling by Light Sensor
With the Night Vision feature enabled, when the light sensor detects that the environment light dims in video
recording, the IR LED will be turned on. When the environment light brightens, the IR LED will be turned off.
Page 22
This feature is available only when the product is wirelessly connected to the multi-mode advanced radio.
This feature is available only when the product is wirelessly connected to the multi-mode advanced radio.
This feature is available only when the product is wirelessly connected to the multi-mode advanced radio.
Note
Note
Note
4.15 Adjusting the Volume
To adjust the call volume during a call, press the
increase it.
To adjust the alert tone volume when the product is in standby mode, press the
volume, press the
To adjust the video/audio volume when playback, press the
key to increase it.
key to increase it.
Right
key to decrease the volume, press the
Left
key to decrease the volume, press the
Left
4.16 Selecting the Channel/Contact
1. Press the Play/Pause/Confirm Key in Live View mode.
2. Press the Left key or the Right key to select the channel/contact.
Right
key to decrease the
Left
key to
Right
4.17 Selecting the Zone/Group (folder)
1. Press the Play/Pause/Confirm key in Live View mode.
2. Press the Left key or the Right key to select the zone/group (folder).
4.18 Pressing PTT to Talk
When the product is wiredly or wirelessly connected to the portable radio, press and hold the
into the microphone, and release it when you’ve finished.
If the product is connected to the radio by cable and BT simultaneously, the voice will be transmitted by cable.
key to speak
PTT
Page 23

The emergency alarm has the highest priority. You can initiate an emergency alarm when the radio is
transmitting or receiving. The duration of the
Emergency Alarm
key press can be set by your dealer.
Note
4.19 Initiating Emergency Alarm
When the product is wirelessly connected to the portable radio, pressing the
an emergency alarm to ask for help from your companion or the control center, and start important video
recording simultaneously.
Emergency Alarm
key can initiate
4.20 Video Transmitting with One-way Voice
The product supports Real Time Streaming Protocol (RTSP) video stream and one-way voice. You can view the
real-time video of the product and hear it via SmartOne Dispatch station.
4.21 Video Transmitting with Full-duplex Voice
The product supports Real Time Streaming Protocol (RTSP) video stream and full-duplex voice. You can view
the real-time video of the product and communicate with the product via SmartOne Dispatch station.
Page 24
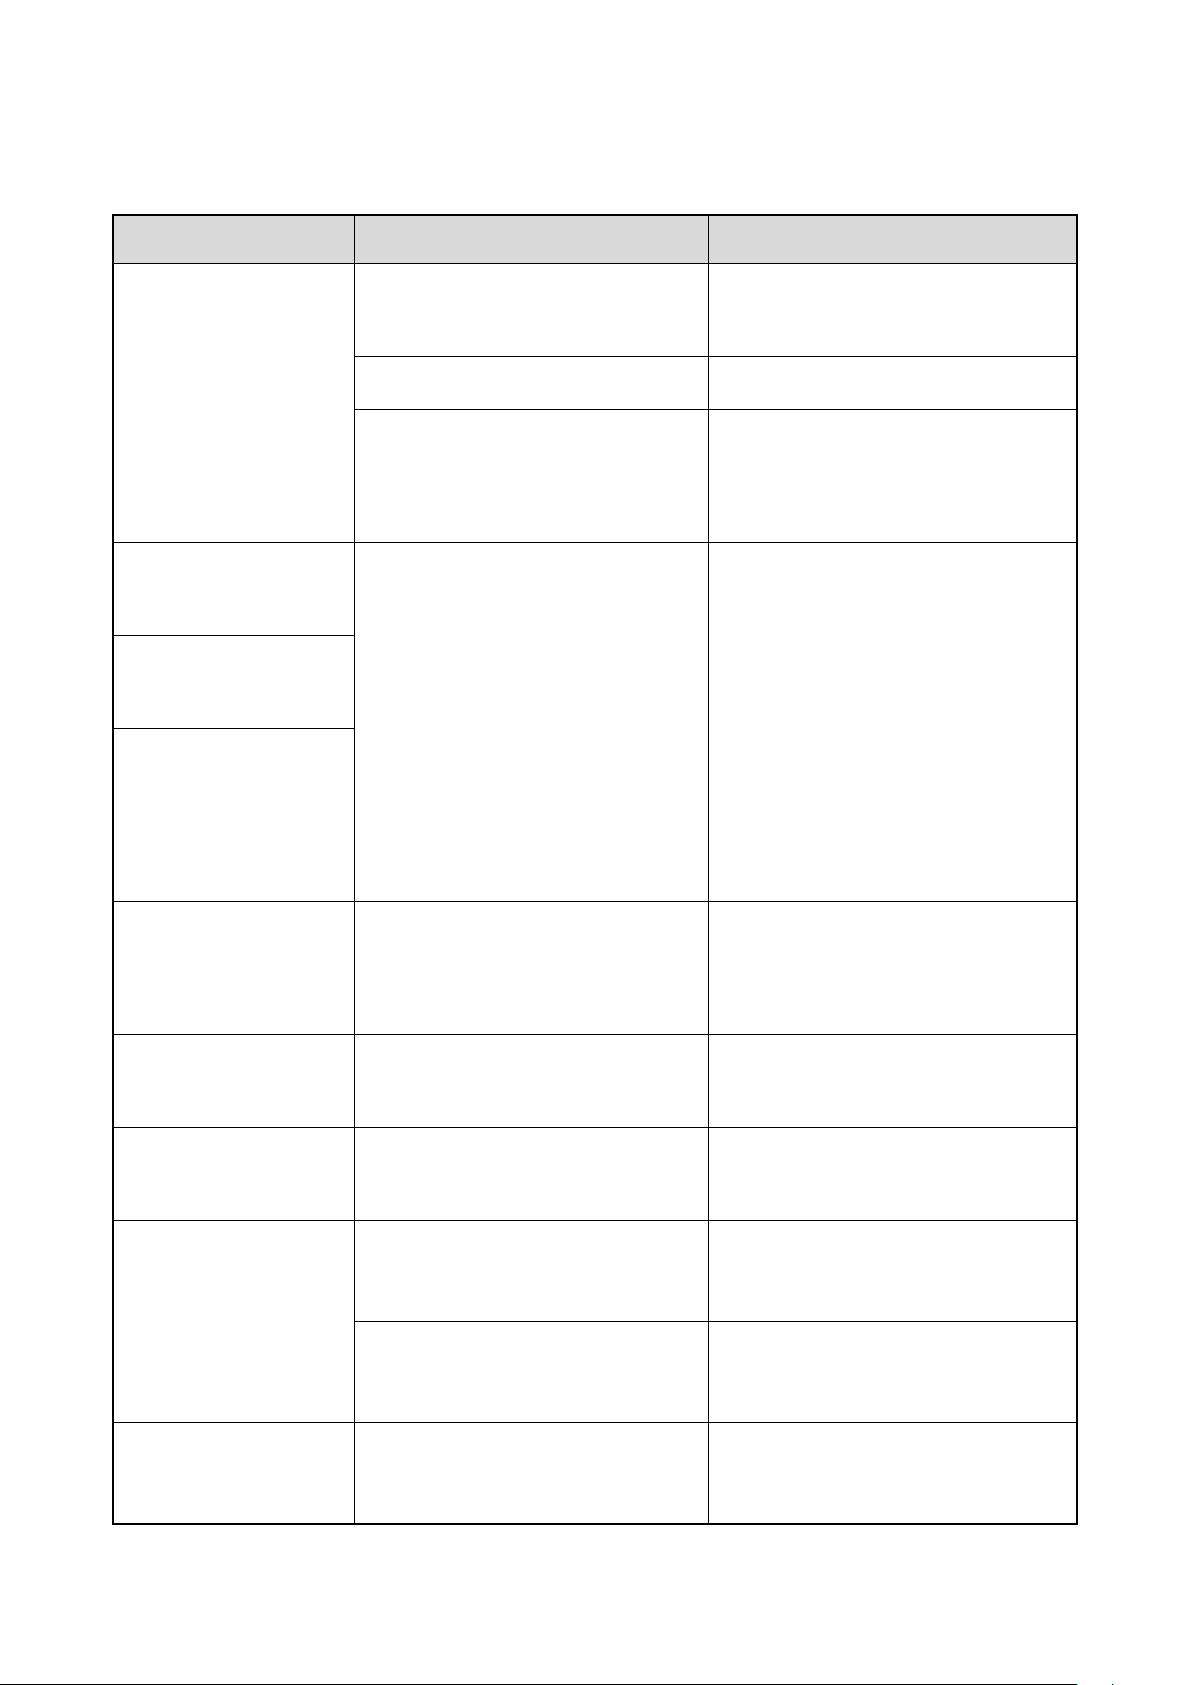
Phenomena Analysis
Solution
The product cannot be
powered on.
The battery may be improperly
installed.
Remove the battery and attach it again.
The battery may run out.
Recharge or replace the battery.
The radio battery and the charging
probes are in poor contact due to
dirtied or damaged battery contacts.
Clean the battery contacts.
Wireless connection
cannot be established.
The product is out of the
communication coverage of the radio.
Make sure that the product and the radio
are within the communication coverage
of each other.
You hear noise during
calls.
The LED indicator does
not glow red when you
press and hold the PTT
key.
The volume is low when
the product is used with
portable radio.
The microphone 2 and speaker are
blocked or damaged.
Clean the microphone 2 and speaker.
The video or audio
volume is low.
The microphone 1 is blocked or
damaged.
Clean the microphone 1.
The product cannot
record video or audio.
The TF card is full.
Delete all data from the TF card after
exporting the data.
The product cannot take
photos.
The TF card is full.
Delete all data from the TF card after
exporting the data.
The photo reaches the maximum
number (300).
Delete all the photos after exporting
them.
The product cannot
pre-record or post-record.
The pre-recording or post-recording
feature is not enabled.
Enable the features via CPS.
5. Troubleshooting
Page 25

The IR LED has not been
turned on automatically
when the product is
recording videos in the
dark.
The Night Vision feature is not
enabled.
Enable the Night Vision feature.
The product gives no
alert; the indicator does
not light up; the display
lightness is at the lowest
value.
The Silent Mode is enabled.
Disable the Silent Mode.
The product gives no
response to operations.
The system is crashed.
Press the
Audio Recording
key, the
Left
key, and the
Right
key
simultaneously to power off the product,
and then power on it again.
If the above solutions cannot fix your problems, or you may have some other queries, please contact us or your
local dealer for more technical support.
Page 26

Power off the product before cleaning.
Make sure the product is completely dry before use.
Caution
6. Care and Cleaning
To guarantee optimum performance as well as a long service life of the product, please follow the tips below.
Product Care
Do not pierce or scrape the product.
Keep the product away from substances that can corrode the circuitry.
Do not hold the product by connection cable.
Attach the USB port cover when the USB port is not in use.
Product Cleaning
Clean up the dust and fine particles on the product's surface with a clean and dry lint-free cloth or a brush
regularly.
Use a non-woven cloth with neutral cleanser to clean the device after long-time use. Do not use chemical
preparations such as stain removers, alcohol, sprays or oil preparations, so as to avoid potential damage on the
surface.
Page 27

Use the accessories specified by the Company only; otherwise, we shall not be liable for any losses or
damages arising out of the use of any unauthorized accessories.
Caution
7. Optional Accessories
Contact your local dealer for the optional accessories of the product.
 Loading...