

Hytera PD985i, PD982i, PD986i, PD988i User Manual

PD98Xi Digital Portable Radio
Preface
Thanks for your favor in our product. This manual provides guidance for you to quickly know how to use
the product. For detailed features and operations, see the DMR Conventional Radio Feature Description
and Operation Manual along with the product.
To avoid bodily injury or property loss caused by misoperations, please carefully read the Safety
Information Booklet before using the product.
This manual is applicable to the following product:
(X may represent 2, 5, 6 or 8)

Icon Conventions
z : indicates features that are available in digital mode only.
z
: indicates features that are available in analog mode only.
Features with no icon marked are available in both analog mode and digital mode.
Copyright Information
Hytera is the trademark or registered trademark of Hytera Communications Corporation Limited (the
Company) in PRC and/or other countries or areas. The Company retains the ownership of its trademarks
and product names. All other trademarks and/or product names that may be used in this manual are
properties of their respective owners.
The product described in this manual may include the Company's computer programs stored in memory
or other media. Laws in PRC and/or other countries or areas protect the exclusive rights of the Company
with respect to its computer programs. The purchase of this product shall not be deemed to grant, either
directly or by implication, any rights to the purchaser regarding the Company's computer programs. Any
of the Company's computer programs may not be copied, modified, distributed, decompiled, or
reverse-engineered in any manner without the prior written consent of the Company.
Disclaimer
The Company endeavors to achieve the accuracy and completeness of this manual, but no warranty of
accuracy or reliability is given. All the specifications and designs are subject to change without notice
due to continuous technology development. No part of this manual may be copied, modified, translated,
or distributed in any manner without the prior written consent of the Company.
We do not guarantee, for any particular purpose, the accuracy, validity, timeliness, legitimacy or
completeness of the Third Party products and contents involved in this manual.
If you have any suggestions or would like to learn more details, please visit our website at:
http://www.hytera.com.
FCC Regulations
Federal Communication Commission (FCC) requires that all radio communication products should meet
the requirements set forth in the FCC Radio Frequency (RF) exposure limits before they can be
marketed in the U.S., and the manufacturer shall post an RF label on the product to inform users of
operational instructions, so as to enhance their occupational health against exposure to RF energy.
FCC Statement
This equipment has been tested and found to comply with the limits for a Class B digital device, pursuant to part 15
of FCC Rules. These limits are designed to provide reasonable protection against harmful interference in a
residential installation. This equipment generates and can radiate radio frequency energy. If not installed and used in
accordance with the instructions, it may cause harmful interference to radio communications. However, there is no

guarantee that interference will not occur in a particular installation. Verification of harmful interference by this
equipment to radio or television reception can be determined by turning it off and then on. The user is encouraged to
try to correct the interference by one or more of the following measures:
Reorient or relocate the receiving antenna. Increase the separation between the equipment and receiver.
Connect the equipment into an outlet on a different circuit to that of the receiver's outlet.
Consult the dealer or an experienced radio/TV technician for help.
Operation is subject to the following two conditions:
This device may not cause harmful interference.
This device must accept any interference received, including interference that may cause undesired operation.
Note: Changes or modifications to this unit not expressly approved by the party responsible for compliance could
void the user's authority to operate the equipment.
RF Exposure Compliance and Control Guidelines and
Operating Instructions
To control your exposure and ensure compliance with the occupational/controlled environmental exposure limits,
always adhere to the following procedures.
Guidelines:
Do not remove the RF Exposure Label from the device.
User awareness instructions should accompany device when transferred to other users.
Do not use this device if the operational requirements described herein are not met.
Operating Instructions:
Transmit no more than the rated duty factor of 50% of the time. To transmit (talk), push the Push-To-Talk (PTT)
key. To receive calls, release the PTT key. Transmitting 50% of the time, or less, is important because the radio
generates measurable RF energy only when transmitting (in terms of measuring for standards compliance).
Keep the radio unit at least 2.5 cm away from the face. Keeping the radio at the proper distance is important as
RF exposure decreases with distance from the antenna. The antenna should be kept away from the face and
eyes.
When worn on the body, always place the radio in a Hytera-approved holder, holster, case, or body harness or
by use of the correct clip for this product. Use of non-approved accessories may result in exposure levels which
exceed the FCC's occupational/controlled environmental RF exposure limits.
Use of non-approved antennas, batteries, and accessories causes the radio to exceed the FCC RF exposure
guidelines.
Contact your local dealer for the optional accessories of the product.

EU Regulatory Conformance
As certified by the qualified laboratory, the product is in compliance with the essential requirements and
other relevant provisions of the following directives:
z 1999/5/EC or 2014/53/EU
z 2006/66/EC
z 2011/65/EU
z 2012/19/EU
Please note that the above information is applicable to EU countries only.

Contents
1. Items in the Package .......................................................................................................................... 1
2. Product Overview ............................................................................................................................... 2
2.1 Product Controls ............................................................................................................................. 2
2.2 LCD Icon ......................................................................................................................................... 3
2.3 LED Indicator .................................................................................................................................. 4
3. Before Use .......................................................................................................................................... 6
3.1 Attaching the Antenna ..................................................................................................................... 6
3.2 Installing the TF Card ...................................................................................................................... 6
3.3 Attaching the Battery ....................................................................................................................... 7
3.4 Attaching the Belt Clip ..................................................................................................................... 7
3.5 Attaching the Accessories ............................................................................................................... 7
3.6 Charging the Battery ....................................................................................................................... 8
4. Basic Operations .............................................................................................................................. 10
4.1 Turning On/Off the Radio .............................................................................................................. 10
4.2 Checking the Battery ..................................................................................................................... 10
4.3 Checking the Battery Power ......................................................................................................... 10
4.4 Adjusting the Volume .................................................................................................................... 11
4.5 Selecting a Zone ........................................................................................................................... 11
4.6 Selecting a Channel ...................................................................................................................... 11
4.7 Inputting via Keypad ..................................................................................................................... 11
4.8 Locking or Unlocking Keys and Knobs .......................................................................................... 12
4.9 Creating a Private Contact
...................................................................................................... 12
5. Call Services ..................................................................................................................................... 13
5.1 Private Call .............................................................................................................................. 13
5.2 Group Call
............................................................................................................................... 13
5.3 Call on Analog Channel without Signaling
............................................................................... 14
5.4 Emergency Call ............................................................................................................................ 14
6. Message Services
...................................................................................................................... 15
7. Troubleshooting ............................................................................................................................... 16
8. Care and Cleaning ............................................................................................................................ 18
9. Optional Accessories ....................................................................................................................... 19
1
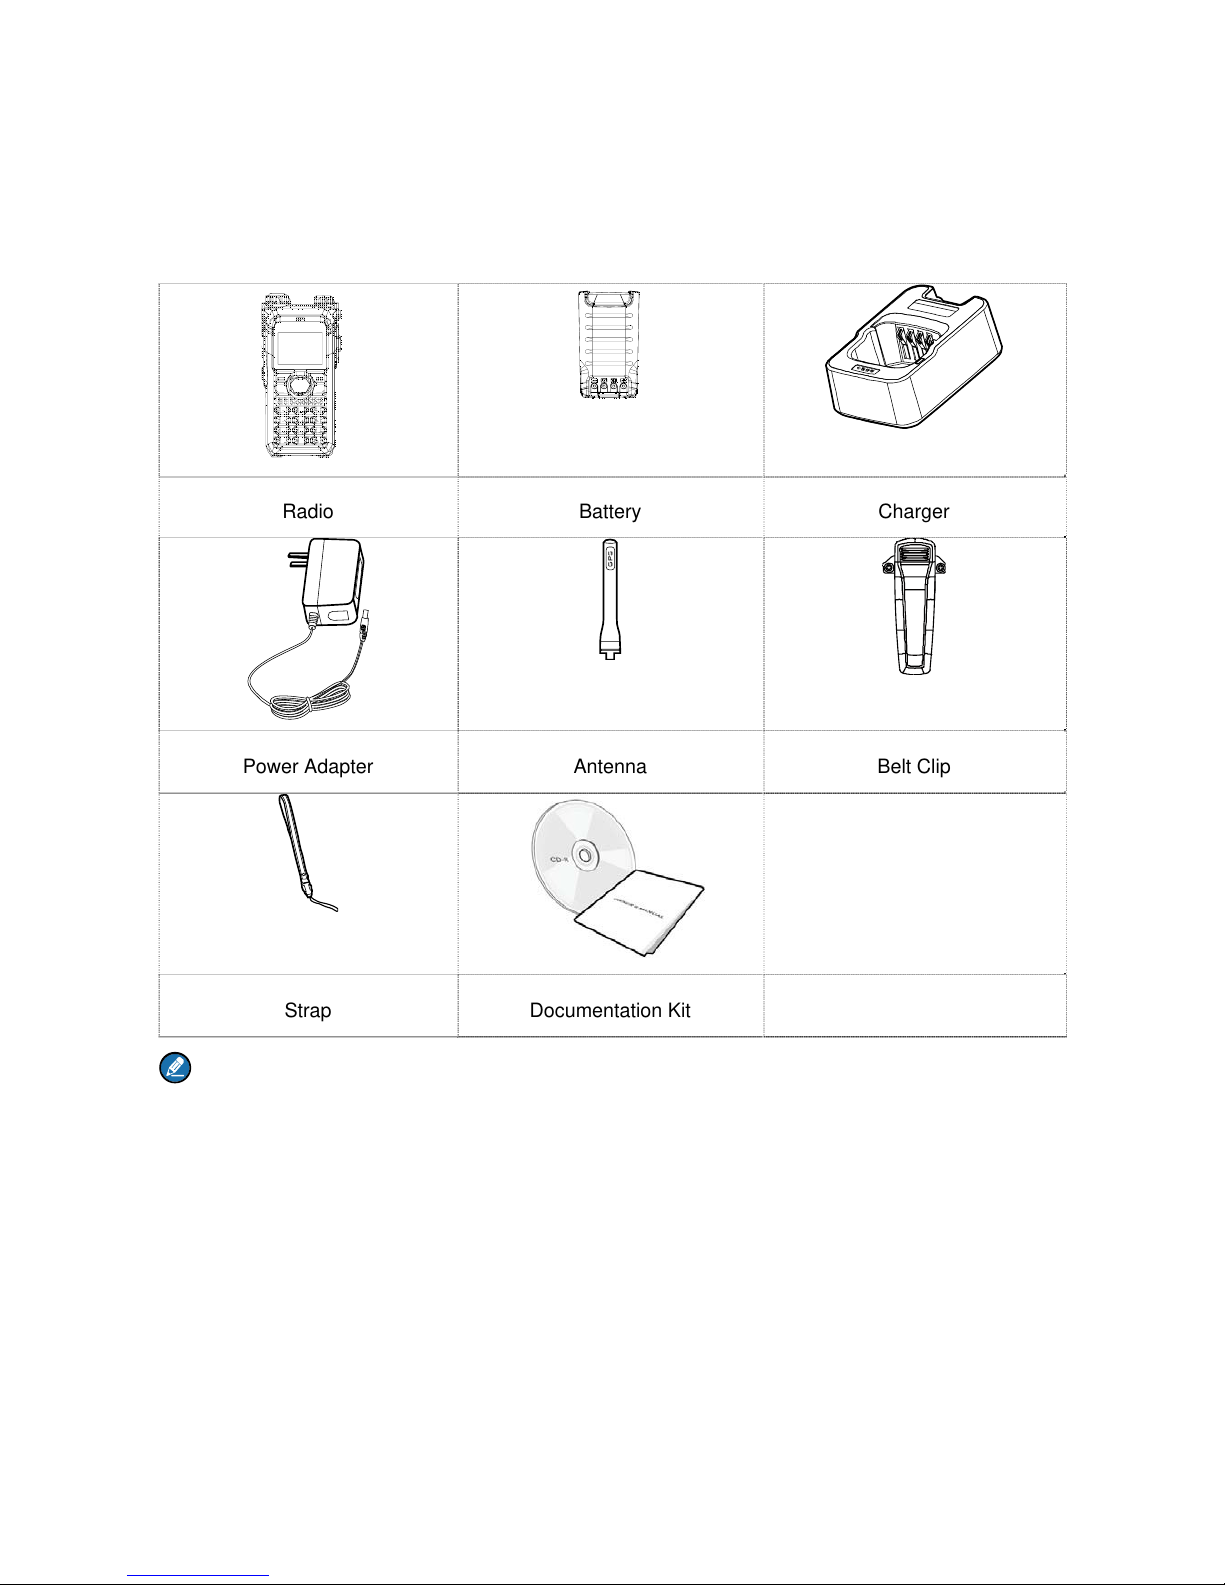
1. Items in the Package
Please unpack carefully and check if all items listed below are received. If any item is missing or
damaged, please contact your dealer.
Radio Battery Charger
Power Adapter Antenna Belt Clip
Strap Documentation Kit
Note
¾ The pictures in this manual are for reference only.
¾ The frequency band is marked on the label of antenna; if it is unavailable there, see the label on
the radio.
2
2. Product Overview
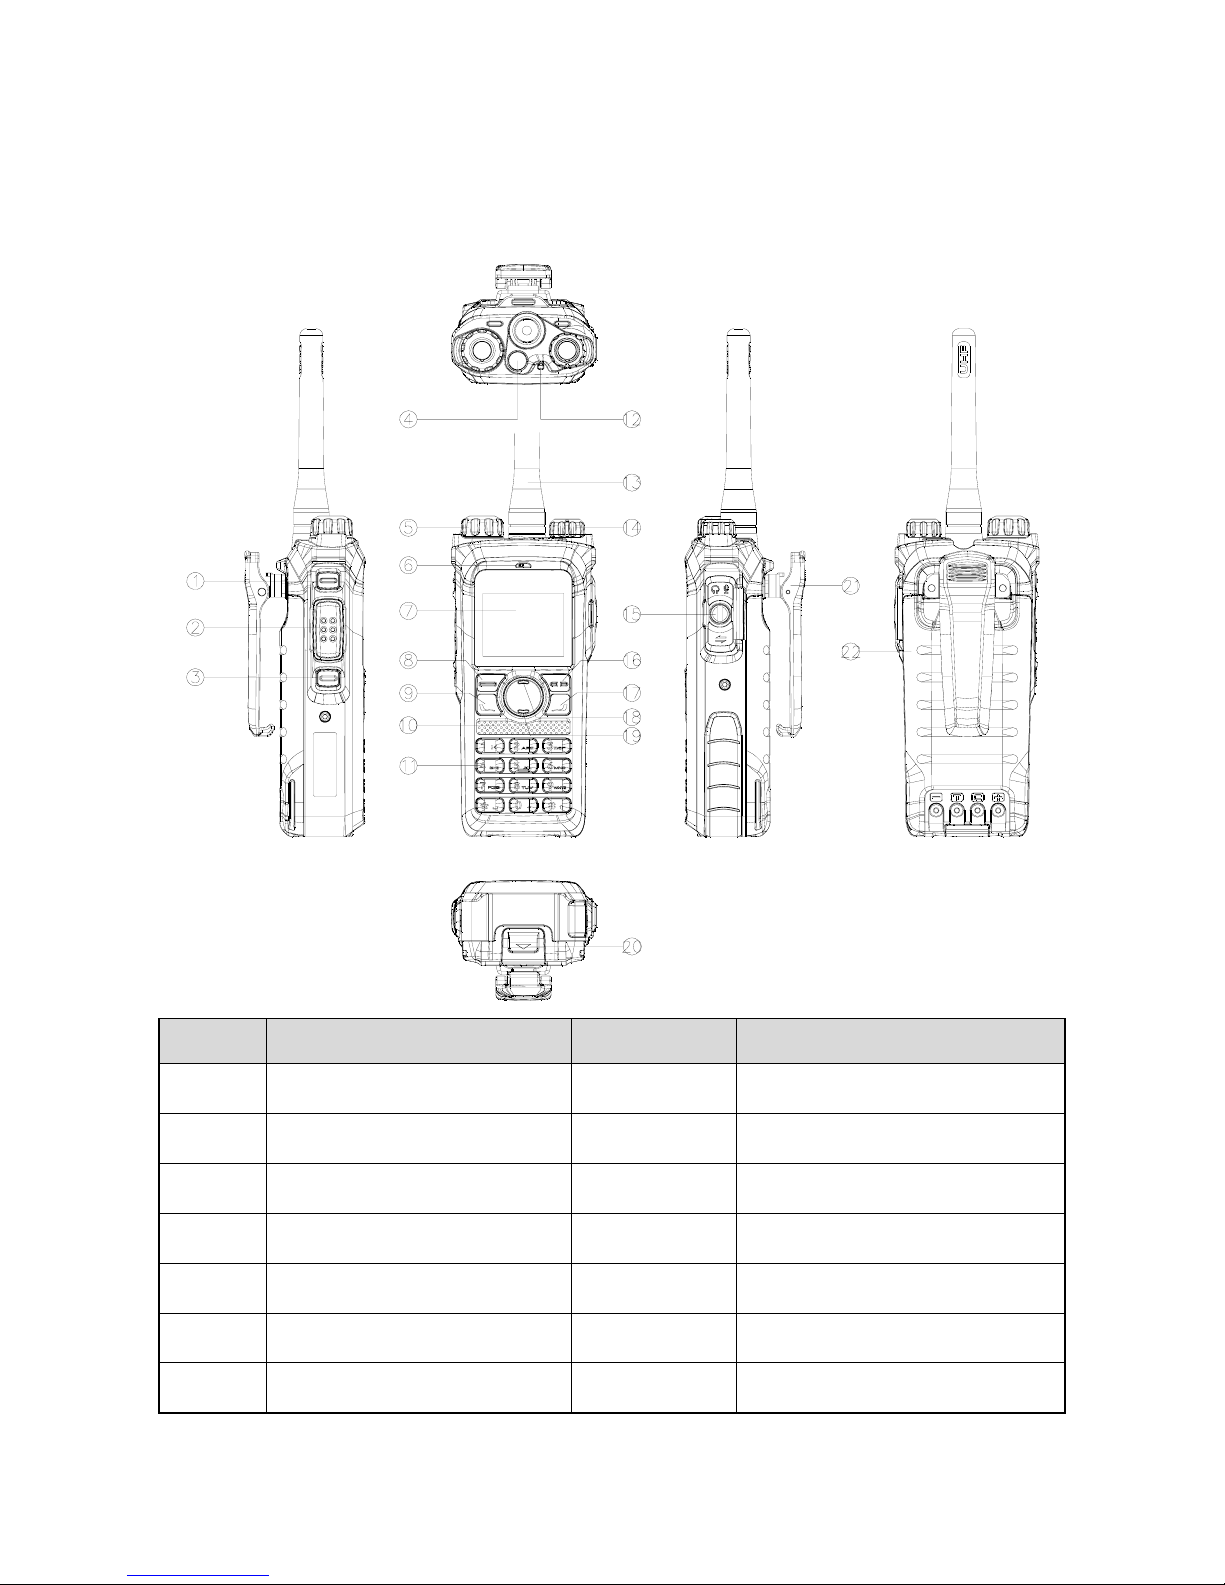
2.1 Product Controls
No. Part Name No. Part Name
1 Side Key 1 (SK1) 12 LED Indicator
2 Push-to-Talk (PTT) Key 13 Antenna
3 Side Key 2 (SK2) 14 On-Off/Volume Control Knob
4 Top Key (TK) 15 Accessory Connector
5 Channel Selector Knob 16 Back Key
6 Microphone 17 P2 Key
7 LCD Display 18 Up Key
3
No. Part Name No. Part Name
8 OK/Menu Key 19 Down Key
9 P1 Key 20 Battery Latch
10 Speaker 21 Belt Clip
11 Numeric Keypad 22 Battery
Note
For enhanced convenience, you may request your dealer to program the TK, SK1, SK2, P1, and P2
as shortcuts to radio features. For the detailed introduction, see the DMR Conventional Radio
Feature Description and Operation Manual along with the product.
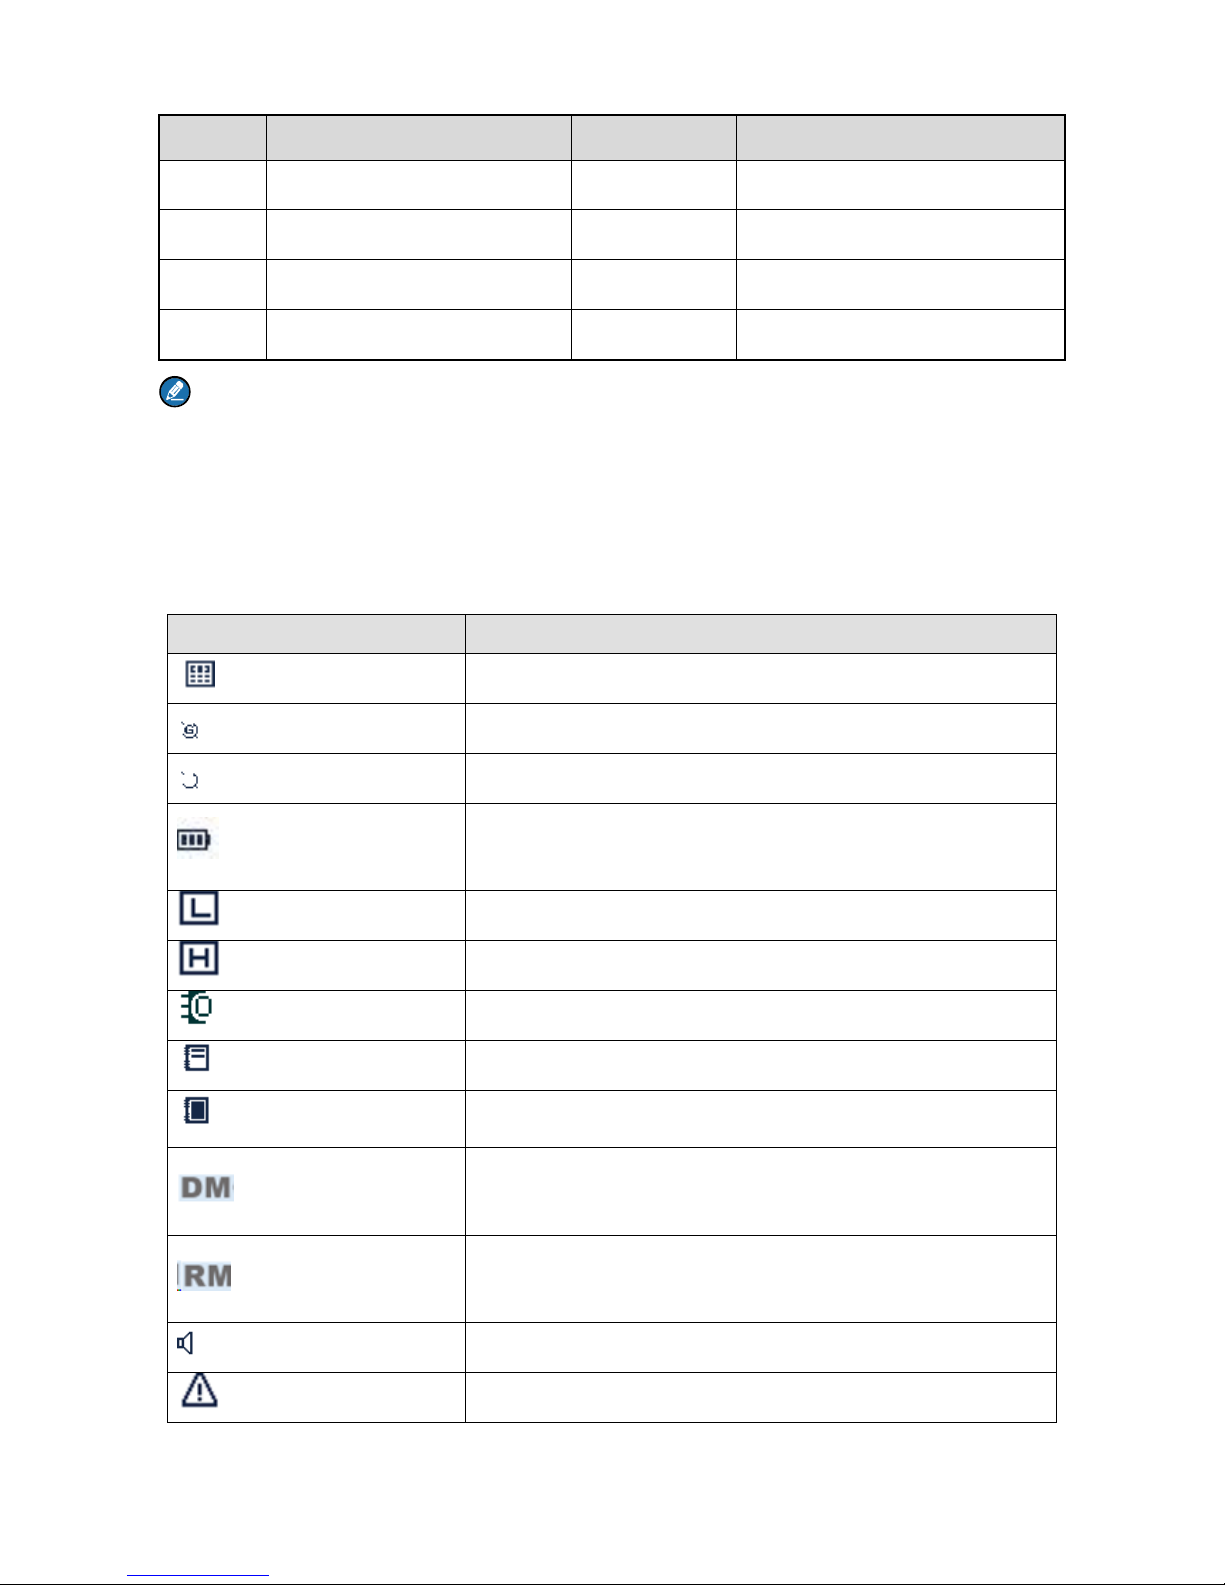
2.2 LCD Icon
Icon Radio Status
The DTMF keypad is enabled.
The GPS feature is enabled, and the radio receives GPS data.
The GPS feature is enabled, but the radio receives no GPS data.
The number of bars (0–3) indicates the charge remaining in the
battery.
The radio is set at Low power.
The radio is set at High power.
An accessory is connected.
One or more new work orders are received.
The maximum number of saved work orders is reached.
Direct Mode: In this mode, radios communicate with each other
directly.
Repeater Mode: In this mode, radios communicate with each
other via a repeater.
The Monitor feature is enabled.
The radio is in emergency mode (excluding silent emergency
 Loading...