

Page 1

Preface
Welcome to the world of Hytera and thank you for purchasing this product. This manual includes a description of
the functions and step-by-step procedures for use. To avoid bodily injury or property loss caused by incorrect
operation, please carefully read the Safety Informatio n Book let before use.
This manual is applicable to Jupiter TETRA radio.
Page 2

Copyright Information
Hytera is the trademark or registered trademark of Hytera Communications Corporation Limited (the Company) in
the People's Republic of China (PRC) and/or other countries or areas. The Company retains the ownership of its
trademarks and product names. All other trademarks and/or product names that may be used in this manual are
properties of their respective owners.
The product described in this manual may include the Company's computer programs stored in memory or other
media. Laws in PRC and/or other countries or areas protect the exclusive rights of the Company with respect to its
computer programs. The purchase of this produ ct shall not be deem ed to grant, ei ther directly or by im plication, any
rights to the purchaser regarding the Company's computer programs. The Company's computer programs may not
be copied, modified, distributed, decompiled, or reverse -engineered in any m anner without the prior written consent
of the Company.
Disclaimer
The Company endeavors to achieve the accuracy and completeness of this manual, but no warranty of accuracy or
reliability is given. All the specifications and designs are subject to change without notice due to continuous
technological development. No part of this manual may be copied, modified, translated, or distributed in any
manner without the prior written consent of the Company.
We do not guarantee, for any particular purpose, the accuracy, validity, timeliness, legitimacy or completeness of
the third-party products and contents involved in this manual.
If you have any suggestions or would like to receive more information, please visit our website at:
http://www.hytera.com.
FCC Statement
This equipment has been tested and f ound to com ply with the limits for a Cl ass B dig ital dev ice, pu rsuant t o part 15
of FCC Rules. These limits are designed to provide reasonable protection against harmful interference in a
residential installation. This equipment generat es and can radiate radio frequency energy. If not installed and used in
accordance with the instructions, it may cause harmful interference to radio communications. However, there is no
guarantee that interference will not occur in a particular installation. Verification of harmful interference by this
equipment to radio or television rec eption can b e determined by turning it off and then on. The user is encouraged to
try to correct the interference by one or more of the following measures:
z Reorient or relocate the receiving antenna. Increase the separation between the equipment and receiver.
Page 3

z Connect the equipment into an outlet on a different circuit to that of the receiver's outlet.
z Consult the dealer or an experienced radio/TV technician for help.
Operation is subject to the following two conditions:
z This device may not cause harmful interference.
z This device must accept any interference received, including interference that m ay cause undesire d operation.
Note: Changes or modifications to this unit not expressly approved by the party responsible for compliance could
void the user's authority to operate the equipment.
Compliance with RF Exposure Standards
Hytera's radio complies with the following RF energy exposure standards and guidelines:
z United States Federal Communications Commission, Code of Federal Regulations; 47 CFR § 1.1307, 1.1310
and 2.1093
z American National Standards Institute (ANSI) / Institute of Electrical and Electronic Engineers (IEEE) C95.
1:2005; Canada RSS102 Issue 5 March 2015
z Institute of Electrical and Electronic Engineers (IEEE) C95.1:2005 Edition
RF Exposure Compliance and Control Guidelines and
Operating Instructions
To control your exposure and ensure compliance with the occupational/controlled environmental exposure limits,
always adhere to the following procedures.
Guidelines:
z Do not remove the RF Exposure Label from the device.
z User awareness instructions should accompany device when transferred to other users.
z Do not use this device if the operational requirements described herein are not met.
Operating Instructions:
z Transmit no more than t he rated duty factor of 5 0% of the time. To transm it (talk), push the Push-To-Tal k (PTT)
key. To receive calls, release the PTT key. Transmitting 50% of the time, or less, is im portant because the ra dio
generates measurable RF energy only when transmitting (in terms of measuring for standards compliance).
Page 4

z Keep the radio unit at least 2.5 cm away from the face. Ke eping t he radio a t the proper dis tance is importa nt as
RF exposure decreases with distance from the antenna. The antenna should be kept away from the face and
eyes.
z When worn on the body, always place the radio in a Hytera-approved holder, holster, case, or body harness or
by use of the correct clip for this product. Use of non-approved access ories may result in exposure levels which
exceed the FCC's occupational/controlled environmental RF exposure limits.
z Use of non-approved antennas, batteries, and accessories causes the radio to exceed the FCC RF exposure
guidelines.
z Contact your local dealer for the optional accessories of the product.
ISED Statement
The device has been tested and complies with SAR limits, users can obtain Canadian information on RF exposure
and compliance
Après examen de ce matériel aux conformité aux limites DAS et/ou aux limites d’intensité de champ RF, les
utilisateurs peuvent sur l’exposition aux radiofréquences et la conformité and compliance d’acquérir les
informations correspondantes
This device complies with Innovation, Science and Economic Development Canada Compliance license-exempt
RSS standard(s). Operation is subject to the following two conditions:
z This device may not cause harmful interference.
z This device must accept any interference received, including interference that may cause undesired operation.
Le présent appareil est conforme aux CNR d'Industrie Canada applicables aux appareils radio exempts de licence.
L'exploitation est autorisée aux deux conditions suivantes: (1) l'appareil ne doit pas produire de brouillage, et (2)
l'utilisateur de l'appareil doit accepter tout brouillag e radi oélectr ique subi, m ême si le brouillag e est suscep tible d' en
compromettre le fonctionnement
EU
Regulatory Conformance
As certified by the qualified laboratory, the product is in compliance with the essential requirements and other
relevant provisions of the following directives: 1999/5/EC or 2014/53/EU, 2006/66/EC, 2011/65/EU, and
2012/19/EU.
Please note that the above information is applicable to EU countries only.
Page 5

1
Contents
1. Product Overview ............................................................................................................................... 3
1.1 Product Controls ............................................................................................................................. 3
1.2 Radio Screens ................................................................................................................................ 4
2. Before Use .......................................................................................................................................... 5
2.1 Charging the Battery ....................................................................................................................... 5
2.2 Installing the SIM Card .................................................................................................................... 6
2.3 Installing the TF Card ...................................................................................................................... 6
2.4 Attaching the Battery ....................................................................................................................... 6
2.5 Attaching the Antenna ..................................................................................................................... 6
2.6 Attaching the Belt Clip ..................................................................................................................... 6
2.7 Attaching the Accessories ............................................................................................................... 6
3. Basic Operations ................................................................................................................................ 8
3.1 Turning on or off the Radio ............................................................................................................. 8
3.2 Adjusting the Volume ...................................................................................................................... 8
3.3 Operating the Main Screen ............................................................................................................. 8
3.4 Locking and Unlocking the Main Screen ....................................................................................... 10
3.5 Switching the Operation Mode ...................................................................................................... 10
4. Status Indications............................................................................................................................. 12
4.1 LCD Icons ..................................................................................................................................... 12
4.2 LED Indications .............................................................................................................................
14
5. Call Services ..................................................................................................................................... 16
5.1 Group Call ..................................................................................................................................... 16
5.2 Individual Call ............................................................................................................................... 16
5.3 Broadcast Call (TMO Only) ........................................................................................................... 17
5.4 All Call ........................................................................................................................................... 17
5.5 Emergency Call ............................................................................................................................ 18
5.6 Phone Call .................................................................................................................................... 18
6. Message Services ............................................................................................................................ 20
6.1 Viewing a Message ....................................................................................................................... 20
6.2 Sending a Message ...................................................................................................................... 20
6.3 Deleting Messages ....................................................................................................................... 20
7. Supplementary Features .................................................................................................................. 22
7.1 Basic Settings ............................................................................................................................... 22
7.2 Contact Management .................................................................................................................... 23
7.3 Wireless and Network ................................................................................................................... 24
Page 6

2
7.4 APPs ............................................................................................................................................. 25
7.5 Radio over IP (RoIP) ..................................................................................................................... 31
7.6 Position ......................................................................................................................................... 31
7.7 Encryption ..................................................................................................................................... 32
7.8 Temporarily Disable ...................................................................................................................... 32
7.9 Permanently Disable ..................................................................................................................... 32
8. Troubleshooting ............................................................................................................................... 33
9. Care and Cleaning ............................................................................................................................ 35
10. Optional Accessories ..................................................................................................................... 36
Page 7
Doc
u
Icon C
o
Icon
Notati
o
Item
Boldface
" "
>
Italic
Courier
New
Key O
p
Operati
Short pres
s
Long pres
s
Double pr
e
Press and
h
men
t
nvent
i
Indicat
Indicat
n Con
v
Denotes
m
window n
a
hardware
b
Denotes
m
folder na
m
Directs yo
u
Denotes d
o
Denotes c
o
results.
eratio
n
on
Pres
s
Pres
s
ss Pres
s
old Kee
p
atio
n
ons
es reference
s
es situations
ention
s
Descr
i
enus, tabs, p
a
mes, dialog
u
uttons.
essages, dire
es, and para
m
to access a
cument title
s
mmands an
d
s
and release
r
and hold fo
r
twice conti
n
the key pre
s
Info
r
that can fur
t
that could c
a
ption
rameter na
m
e names, an
d
ctories, file
n
eter values.
multi-level
m
.
their execu
t
apidly.
the preset d
u
uously and
q
sed.
1
mati
o
Des
her describe
use data loss
es,
TTP
ames,
TOG
I
enu.
GFD
ion
T
De
s
ration (2s b
y
uickly.
n
cription
he related t
o
or equipme
n
o save the c
o
he Log Lev
ress the PT
T
he screen d
i
pen "PDT_
P
o to "D:/op
t
n the Port t
e
o to File >
N
or details a
b
ispatch Wo
r
o set the IP
vos-cmd
-
cription
default).
pics.
t damage.
Exa
m
nfiguration,
el Settings d
key.
splays "Inva
l
SS.exe".
/local".
xt box, enter
ew.
out using th
e
kstation Us
e
address, run
t
m name
ple
click Apply
ialogue appe
a
id Battery!".
"22".
DWS, refer
r Guide.
he followin
g
IP
.
rs.
to
command:
Page 8
Touch
Operati
Tap
Touch and
Swipe
Drag
Scree
n
on
Tap
hold Tou
c
Swi
p
Tou
c
Opera
t
to laun
c
h and hold
e down fro
m
h and hold
ions
h the Camer
a
until it ji
the top edg
e
until it ji
2
E
x
app.
ggles.
of any scree
ggles, and th
e
ample
n to access t
h
n drag it to
t
e notificatio
n
he proper p
o
panel.
sition.
Page 9

3
1. Product Overview
1.1 Product Controls
No. Part Name No. Part Name
1 Side Key 1 (SK1) 17 Pressure Sensor
2 Push-to-Talk (PTT) Key 18 Front-facing Camera
3 Side Key 2 (SK2) 19 Speaker
4 Side Key 3 (SK3) 20 Accessory Connector
5 Top Key (TK) 21 Speaker
6 Microphone 3 22 Home Key
Page 10
4
No. Part Name No. Part Name
7 LED Indicator 1 23 On-Off/End Key
8 Top Screen 24 Battery Latch
9
Volume Control / Channel Selector /
Contact Selector Knob
25 CARKIT RF Connector
10 Microphone 2 26 Strap Hole
11 Light Sensor 27 Rear-facing Camera
12 Main Screen 28 Flash
13 Microphone 1 29 Belt Clip
14 Back/Answer Key 30 Battery
15 LED Indicator 2 31 Charging Piece
16 Antenna / /
1.2 Radio Screens
The radio provides two screens: top screen and main screen.
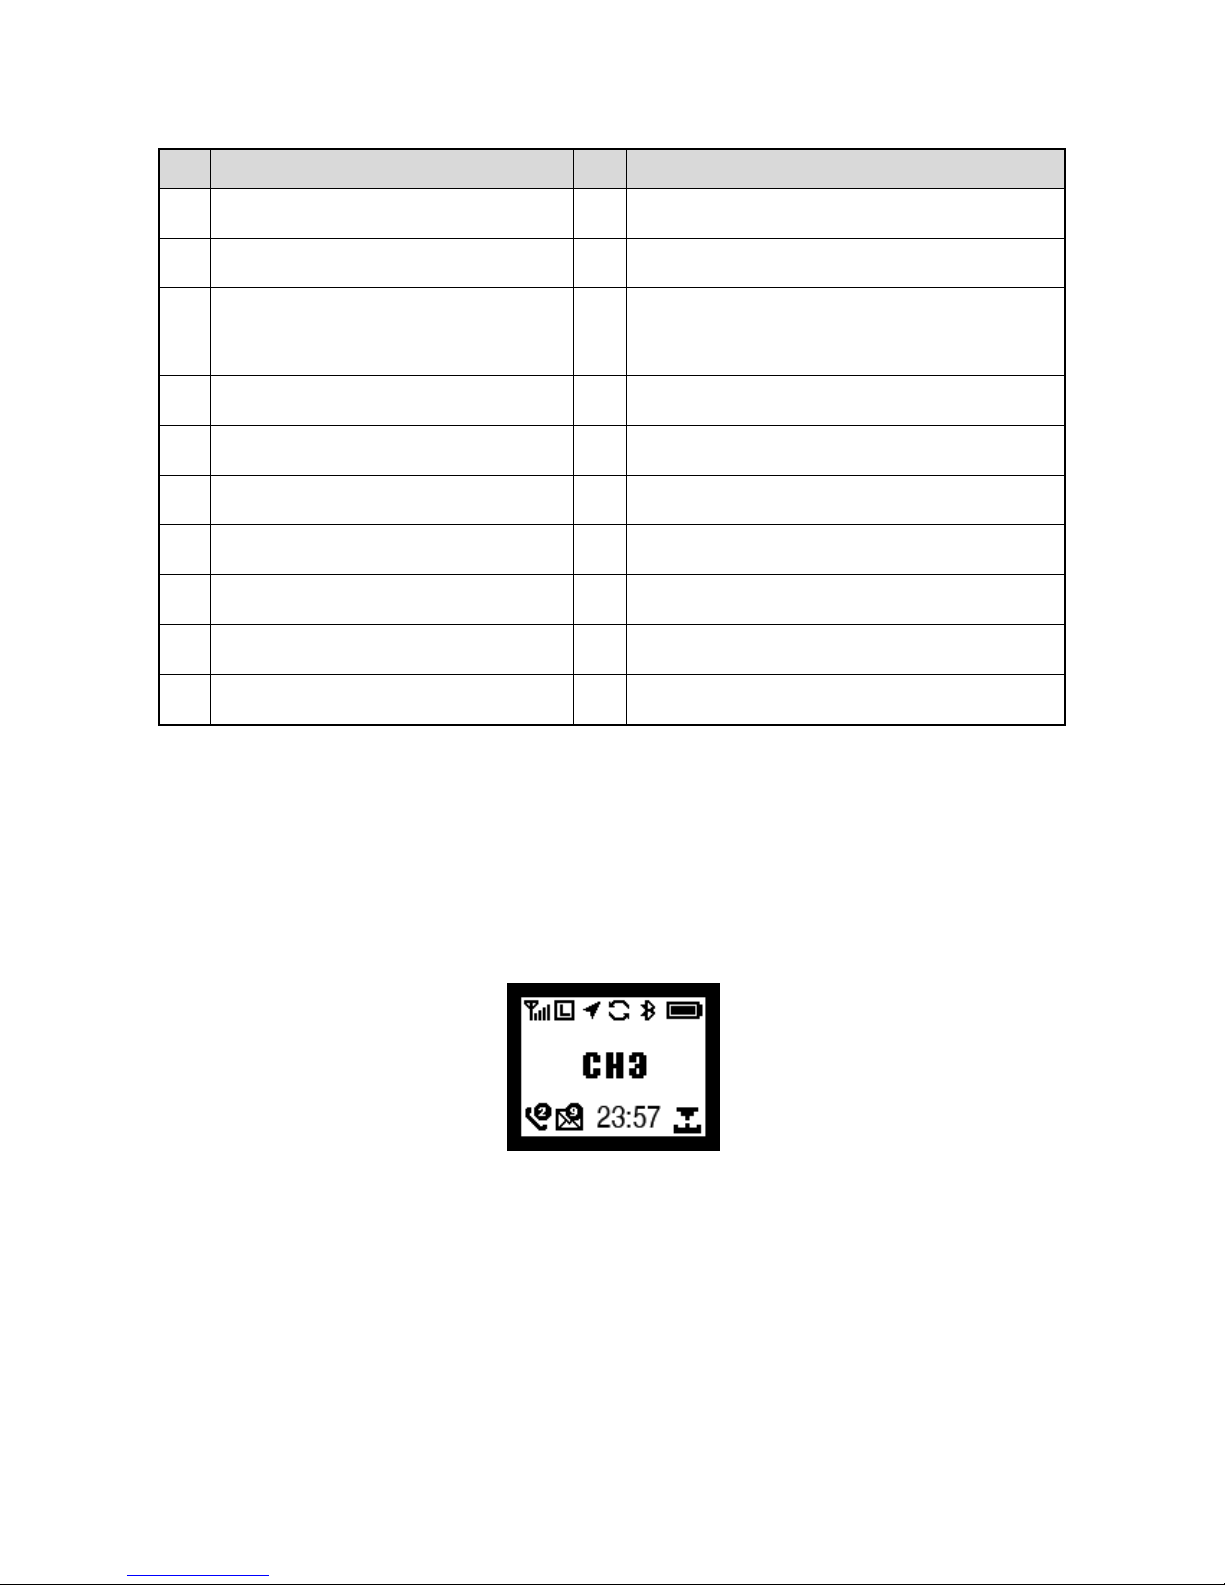
1.2.1 Top Screen
The top screen shows information about narrow band (NB) services. It includes the following three areas from top
to bottom: status bar, content bar, and information bar.
1.2.2 Main Screen
The main screen is a touch screen with Android Platform (AP). On the main screen, you can access the widgets,
notification panel, quick setting panel, and application panel. For details, see 3.3 Operating the Main Screen.
Page 11
2. B
e
2.1
Ch
¾
U
s
¾
R
e
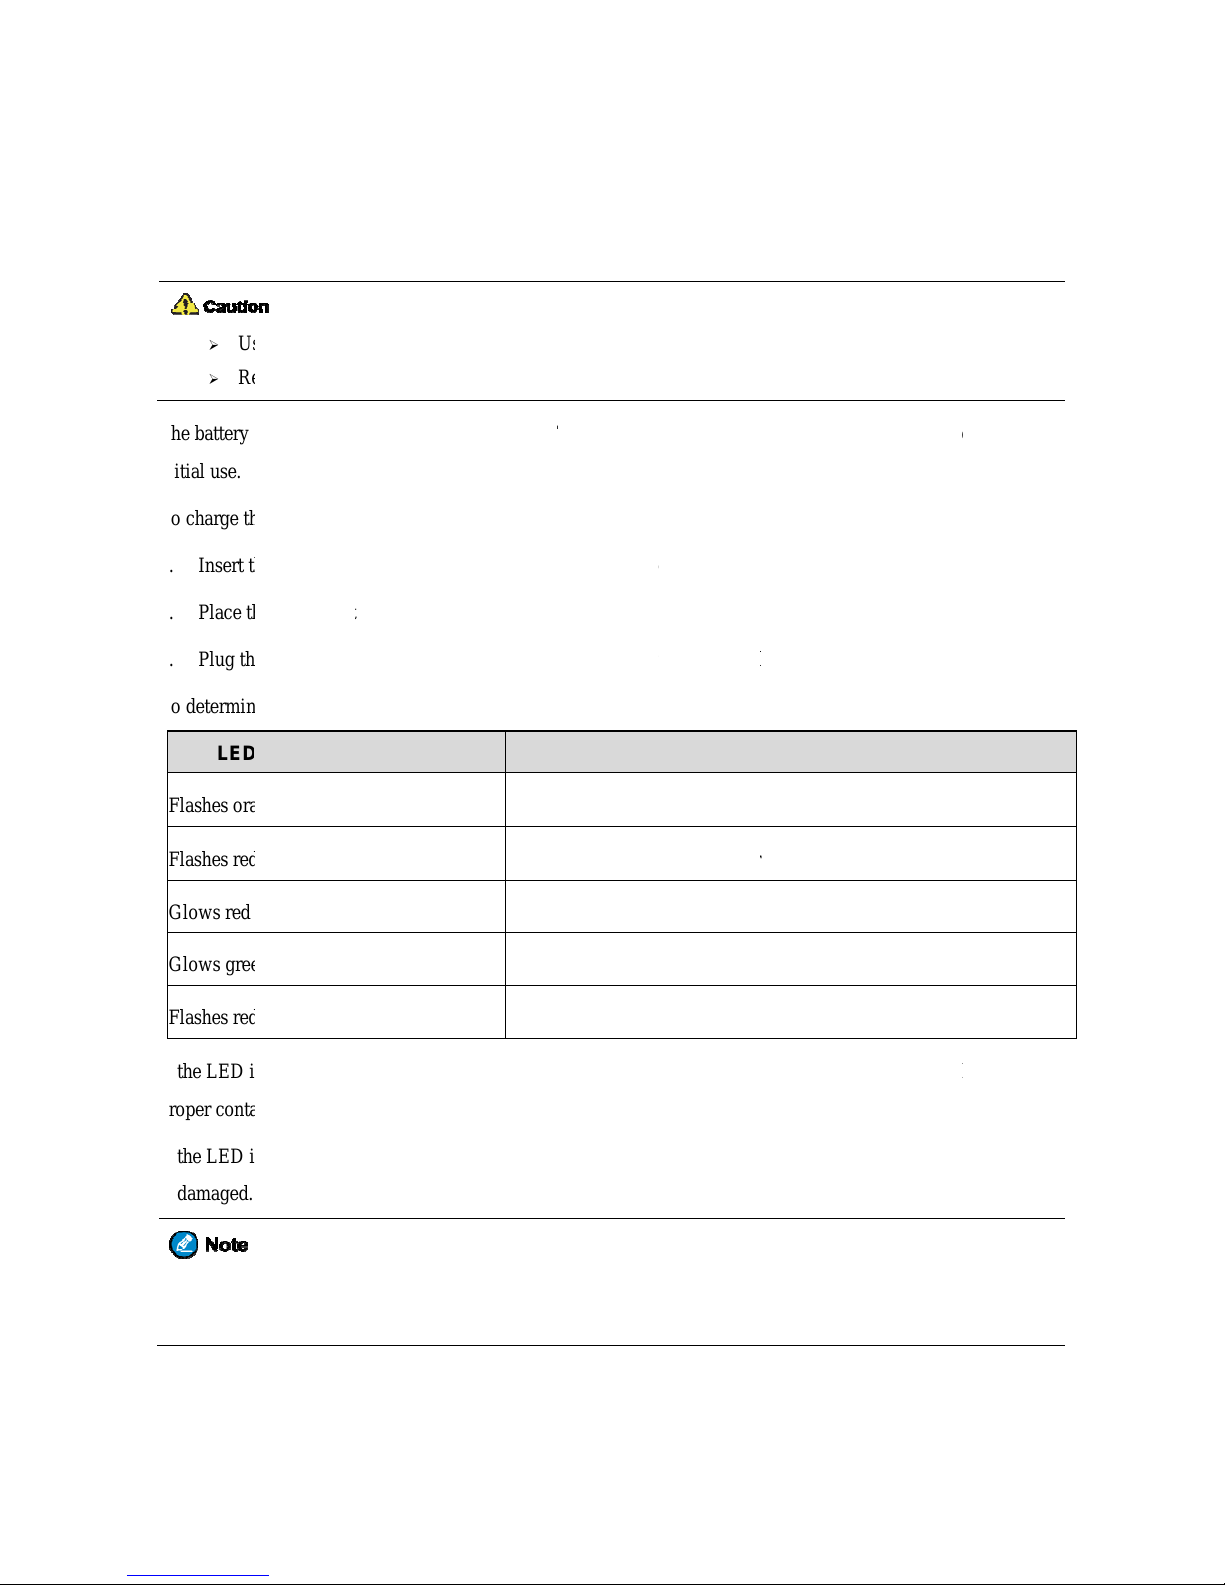
The battery
initial use.
To charge t
h
1. Insert t
h
2. Place t
h
3. Plug t
h
To determi
n
LE
D
Flashes or
a
Flashes re
d
Glows red
Glows gre
e
Flashes re
d
If the LED
i
proper cont
a
If the LED
i
is damaged.
You c
off d
u
fore
U
arging
e the specifi
ad the Safet
y
delivered wi
t
e battery, d
o
e output co
n
e battery in
t
e power ada
p
e the chargi
n
Indicator
o
nge slowly
slowly
n
rapidly
ndicator flas
h
ct.
ndicator flas
h
an also char
g
ring chargin
g
se
the Ba
t
ed charger t
o
Informatio
n
h the radio i
s
as follows:
nector of th
e
o the charge
r
ter into a po
w
g status, che
c
n Charger
es red slow
l
es red rapid
l
e the radio
w
.
tery
charge the
b
Booklet be
fo
uncharged.
T
power adap
.
er outlet th
a
k the LED i
n
The c
h
The b
a
The b
a
The b
a
The b
a
y, take the b
a
y, please co
n
ith battery a
t
5
attery.
re charging.
o ensure op
ter into the p
o
t is off, and
t
dicator on t
h
arger is bein
ttery fails to
ttery is char
g
ttery is char
g
ttery fails to
ttery out of
t
tact your de
a
tached. It is
r
imum perfo
r
rt on the bo
t
hen switch t
h
e charger a
c
Char
g activated.
make prope
r
ing.
ed to 95% o
r
be charged.
he charger,
a
ler to check
ecommende
d
mance, full
y
tom of the c
h
e power ou
t
cording to t
h
ging Statu
s
contact wit
h
above.
nd then plac
e
whether the
b
that your r
a
charge the
b
arger.
let on.
e following
t
the charger.
it into the c
h
attery or po
w
dio remains
attery before
able:
arger for
er adapter
p
owered
Page 12

2.2
In
s
1. Insert t
h
2. Place t
h
3. Slide t
h
2.3
In
s
Insert the T
F
2.4
At
t
1. Insert t
h
2. Press t
h
To re
m
2.5
At
t
1. Place t
h
2. Rotate
Do n
o
2.6
At
t
1. Align t
h
2. Press t
h
2.7
At
t
For o
p
screw
1. Turn t
h
2. Insert t
h
talling
e removal t
o
e SIM card
w
e SIM card
t
talling
card into t
h
aching
e top end o
f
e bottom en
d
ove the bat
t
aching
e antenna i
n
the antenna
c
t hold the ra
d
aching
e rails on t
h
e belt clip d
o
aching
timal water
p
when no ac
c
e screw on t
h
e accessory
the SI
M
ol into the
h
ith the gol
d
ray back int
o
the TF
C
e TF card sl
o
the Ba
t
the battery i
of the batt
e
ery, turn off
t
the An
its receptacl
lockwise un
t
io by the an
t
the Be
e belt clip w
i
wnwards in
t
the Ac
c
roof and du
s
essory is att
a
e accessory
plug into th
e
Card
ole on the SI
contacts fac
i
the slot.
ard
t on the top
o
tery
nto the top o
f
ry until the l
a
he radio, an
d
tenna
e.
il hand tight
.
enna, as it
m
lt Clip
th the groov
e
o place.
essor
i
tproof perfo
r
ched.
connector c
o
top of the a
c
6
M card tray,
ng up on th
e
f the batter
y
the battery
s
tch snaps in
t
then slide t
h
ay reduce th
e
s on the bat
t
es
mance, clos
e
ver counterc
l
cessory con
n
and push un
t
tray.
compartme
n
lot.
o place.
e battery lat
c
radio perfo
r
ery.
the accesso
r
ockwise, an
d
ector.
il the tray po
p
t.
h upwards t
o
mance and l
i
y connector
open the co
s out.
unlock the
b
fe span of t
h
cover and fa
s
ver.
attery.
e antenna.
ten the
Page 13

7
3. Turn the screw on the accessory plug clockwise until hand tight.
Page 14

3. B
a
3.1
Tu
r
To turn on t
h
To turn off
t
1. Press a
n
2. Tap D
e
3.2
Ad
j
To increase
3.3
O
p
3.3.1
M
On the hom
e
Accessi
n
To access a
Adding
a
To add a wi
d
1. Touch
2. Tap A
D
3. Tap O
K
Removin
To remove
a
1. Touch
2. Swipe
u
3. Tap
You c
sic
O
ning o
e radio, pre
s
he radio, do
d hold the
O
vice Power
O
j
usting
or decrease t
h
eratin
g
anaging
screen, yo
u
g a Widg
e
widget on th
e
Widget
get to the h
o
and hold an
y
D, and then
.
g a Widg
e
widget fro
m
and hold an
y
p or down t
o
on the up
p
annot remov
e
pera
t
n or of
f
s and hold t
h
as follows:
n-Off key
u
ff, and the
n
the Vo
e volume, r
o
the M
a
Widget
s
can access,
a
t
home scree
me screen,
d
widget on t
h
tap the requ
i
t
the home s
c
widget on t
h
the widget
t
er right corn
e
the widget
s
ions
the Ra
e On-Off k
e
ntil the pow
e
tap SURE.
lume
tate the Vol
u
in Scr
e
dd, remove,
n, swipe up
o
o as follows
:
e home scre
e
red widget.
reen, do as
fo
e home scre
e
o be deleted
r of the wid
g
howing NB
8
dio
y until the s
p
-off selecti
o
me Contro
l
en
or repositio
n
r down to th
e
n until the
w
llows:
n until the
w
.
et, and then
service infor
m
lash screen
a
n screen app
knob clock
w
a widget.
widget, an
d
idget is high
idget is high
tap OK.
ation.
ppears.
ears.
ise or coun
t
then tap it.
lighted.
lighted.
erclockwise.
Page 15

Repositi
o
To repositio
1. Touch
2. After t
h
3. Press t
h
3.3.2
U
s
The applica
t
z To acc
e
z To add
You ca
n
z To del
e
z To rep
o
positio
n
3.3.3
U
s
The notific
a
z To acc
e
z To vie
w
notific
a
z To cle
a
z To cle
a
The notific
a
and use the
o
3.3.4
U
s
The quick s
e
You can als
o
z To acc
e
view a
d
z To rea
r
ning a
W
n a widget,
d
and hold the
e widget is
h
e Home ke
y
ing the
ion panel pr
o
ss the appli
c
one or more
add at mos
t
te a shortcut
sition a sho
r
.
ing the
tion panel h
e
ss the notifi
c
details abo
u
tion panel.
r a notificati
o
r all notifica
t
tion panel al
s
n-screen ke
y
ing the
tting panel p
r
adjust the
b
ss the quick
ditional ite
m
range an ite
m
idget
o as follows:
widget.
ighlighted,
d
to save you
r
Applica
vides shortc
u
ation panel,
s
shortcut to t
h
four shortc
u
from the ed
g
tcut, touch a
n
Notific
a
lps you keep
ation panel,
t a notificat
i
n, swipe the
ions, tap Cl
e
o contains a
pad to enter
Quick
S
ovides insta
n
rightness, a
n
setting pane
l
s.
, touch and
h
rag it up or
d
arrangemen
t
tion Pa
n
ts to freque
n
wipe left or
r
e applicatio
n
ts.
e panel, tou
c
d hold the s
h
tion Pa
n
track of wh
a
swipe down
f
on, tap the n
o
notification
ar at the bot
t
search bar.
T
the keywor
d
etting P
a
t access to
S
d turn on or
o
, swipe up fr
o
old the ite
m
9
own to the
p
.
el
tly-used ap
p
ight from th
panel, tap
A
h and hold t
h
ortcut until
i
el
t's new.
rom the top
tification.
A
left or right.
om of the n
o
o search for
.
nel
ettings, Ca
m
ff the airpla
n
m the botto
m
, and drag th
e
roper positi
o
s. In additio
n
right or lef
t
dd, tap one
o
e shortcut u
n
t jiggles, an
d
edge of any
s
fter that, the
tification pa
n
an app, a me
era, Flashlig
h
e mode, Wi
-
edge of an
y
item to the
n.
, you can ta
p
edge of the
h
r more shor
t
til it jiggles,
then drag t
h
creen.
notification
i
el.
ssage, or a c
o
t, Calculato
r
Fi, NB netw
screen. Th
e
proper positi
to vie
w
ome screen
.
cuts, and th
e
and then tap
e shortcut to
s cleared fro
m
ntact, tap th
e
, and other h
a
ork, Bluetoo
t
n you can s
w
on after it is
h
all apps.
n tap OK.
.
the proper
the
search bar,
ndy feature
s
h, and so on
.
ipe left to
ighlighted.
.
Page 16

3.3.5
M
You can vie
z To vie
w
app in
t
z To clo
s
z To clo
s
3.4
Lo
c
When the
m
operations.
z To tur
n
z To allo
w
Main
S
z To tur
n
In addition,
main screen
To set the s
c
1. Go to
S
2. Tap U
n
z N
o
z S
w
z P
a
z P
a
3.5
S
w
The radio c
a
two types:
z Direct
M
withou
t
anaging
w and close
r
running ap
p
he list to ac
c
e a running
a
e all running
king a
ain screen is
off the scre
e
the main s
c
creen > Sle
e
on the scree
n
it is recomm
e
is turned of
f
reen lock, d
o
ettings > G
e
lock Patter
n
ne: The scr
e
ipe: Swipe
u
ssword: Cr
e
ttern: Creat
e
itching
n operate in
ode Opera
t
using the n
e
Runnin
g
unning apps
.
s, double-p
r
ess it.
pp, swipe it
l
apps, tap
nd Unl
o
not in use, it
n, long pres
s
reen to be t
u
p, and then
t
, press SK1
nded that y
o
.
as follows:
neral > Pri
v
, and then t
a
en will neve
r
p to unlock.
ate a passw
o
a pattern t
h
the O
p
NB mode or
ion (DMO):
twork.
Apps
ess the Hom
e
eft or right.
.
cking
t
is recomme
n
SK1.
rned off aut
o
ap the requi
r
or the Hom
e
u secure yo
u
acy & Secu
r
p one of the
be locked.
rd for unloc
k
at you draw
o
eratio
n
NB & broad
b
supports hal
f
10
key from a
n
he Mai
ded that yo
u
matically, g
o
ed duration.
key .
r radio using
ity > Scree
n
following:
ing the scre
e
n the scree
n
Mode
and (BB)
m
-duplex ope
r
y screen, an
d
n Scre
e
turn it off t
o
to Settings
a screen loc
k
Lock.
n.
to unlock it.
ode. The NB
ation and all
o
swipe up o
r
n
save the bat
t
> General >
. The scree
n
mode furthe
ws radios t
o
down. You
c
ery and avoi
Device > D
i
lock is trigg
e
r includes th
e
communica
t
an tap an
d unintende
d
splay >
red after th
e
following
e directly,
Page 17

11
z Trunked Mode Operation (TMO): supports half-duplex or full-duplex operation and allows radios to
communicate over the network. The radio must register with the network first, and then operates within the
network coverage.
Upon power-on, the radio operates in NB & BB mode. To allow the radio to operate only in NB mode, do as
follows:
1. Press and hold the On-Off key until the power-off selection screen appears.
2. Tap AP Power Off, and then tap SURE.
To switch the specific NB mode, go to Settings > Private > Mode, and then tap the required mode.
Page 18

4. St
a
4.1
LC
Top Scr
e
Icon
tus I
D Icon
s
en Icons
This icon s
h
The battery
The radio is
The NB net
w
There is no
The numbe
r
The numbe
r
registers wi
t
An accesso
r
The Blueto
o
A Bluetoot
h
The Positio
n
The Positio
n
Both Air In
t
The AIE fe
a
The E2EE
fe
The radio o
p
The digit in
d
The digit in
d
An emerge
n
ndic
a
ows the batt
e
power is lo
w
charging.
ork is turn
e
signal from t
h
of bars indi
c
of bars indi
c
h a single B
S
y is connect
e
th feature is
device is co
n
feature is e
n
feature is e
n
erface Encr
y
ture is enabl
e
ature is ena
b
erates in sil
e
icates the n
u
icates the n
u
cy call is in
p
tion
s
ry level.
.
d off.
e NB netw
o
ates the sig
n
ates the sig
n
.
d.
enabled.
nected.
abled, and t
h
abled, but t
h
ption (AIE)
a
d.
led.
nt mode.
mber of mis
mber of unr
e
rogress.
12
Radio
S
rk.
al strength o
f
al strength
w
e radio rece
i
e radio recei
v
nd End-to-
E
sed calls.
ad short me
s
tatus
the NB net
w
hen the radi
o
ves position
i
es no positi
o
nd Encrypti
o
sages.
ork.
operates in
T
ng data.
ning data.
n (E2EE) fe
a
MO mode
a
tures are en
a
nd
bled.
Page 19

/
/
/
/
/
/
Main Scr
e
Icon
A private/g
r
An encrypt
e
A private/g
r
A broadcas
t
en Icon
s
This icon s
h
The battery
The radio is
The NB net
w
There is no
The numbe
r
The numbe
r
registers wi
t
The numbe
r
A 3G netw
o
A 4G netw
o
An EDGE
n
No SIM car
d
The radio o
p
The radio is
The radio is
oup/all call i
d private/gr
o
oup/all call i
call is in pr
o
ows the batt
e
power is lo
w
charging.
ork is turn
e
signal from t
h
of bars indi
c
of bars indi
c
h a single B
S
of bars indi
c
rk is availab
l
rk is availab
l
etwork is av
a
is detected.
erates in D
o
downloadin
g
connected t
o
s in progress
up/all call is
s in progress
gress.
ry level.
.
d off.
e NB netw
o
ates the sig
n
ates the sig
n
.
ates the sig
n
e.
e.
ilable.
Not Disturb
.
the Internet
13
on the NB n
e
in progress
o
on an RoIP
n
Radio
S
rk.
al strength o
f
al strength
w
al strength o
f
mode.
over a Wi-F
i
twork.
n the NB ne
t
etwork.
tatus
the NB net
w
hen the radi
o
the BB net
w
network.
work.
ork.
operates in
T
ork.
MO mode and
Page 20

4.2
LE
LED Indi
c
LE
D
Flashes bl
u
Flashes re
d
LED Indi
c
LE
D
Flashes gr
e
Flashes gr
e
Glows gre
e
Glows red
Flashes or
a
The radio p
r
The radio o
p
The radio is
The radio is
An accesso
r
The Blueto
o
A Bluetoot
h
The Positio
n
The Positio
n
The Voice
R
The Alarm
f
The radio o
p
D Indic
a
ator 1
Indicator
e
ator 2
Indicator
en rapidly
en slowly
n
nge slowly
ovides a per
s
erates in Ai
r
set at low p
o
set at high p
y is connect
e
th feature is
device is co
n
feature is e
n
feature is e
n
ecorder feat
u
eature is en
a
erates in sil
e
tions
A Bl
u
Ther
e
Bein
g
Stan
d
Rece
i
z
Dz S
Regi
s
onal hotspo
t
plane mode.
wer.
ower.
d.
enabled.
nected.
abled, and t
h
abled, but t
h
re is enable
d
bled.
nt mode.
etooth devic
is/are unrea
d
turned on.
by in TMO
m
ving.
uring a call
:
tandby: The
tering in T
M
14
.
e radio rece
i
e radio recei
v
.
e is connect
e
short mess
a
ode.
Transmittin
g
battery runs
O mode.
ves position
i
es no positi
o
Radio St
a
d.
ges/notifica
t
Radio St
a
.
low. Please
r
ng data.
ning data.
tus
ions or miss
e
tus
echarge or r
e
d calls.
place the battery.
Page 21

15
Flashes orange rapidly Establishing a call with hook signaling.
Glows orange Call hang time: No voice is being transmitted or received during a call. Within
such a period, you can press and hold the PTT key and speak.
Page 22

5. C
a
5.1
Gr
o
A group cal
l
5.1.1
I
n
To initiate a
To initiate a
3. Set the
z P
r
z T
a
4. Press a
n
5.1.2
R
e
You can lis
t
During the
c
When your
r
talking part
y
5.1.3
E
n
To end an o
u
¾
T
hgr
¾
I
nen
5.2
In
d
An individu
a
to another. I
n
same time.
To set the c
a
ll Se
r
up Ca
l
is a half-du
p
itiating
a
call to the d
e
call to a no
n
target group
ess the Cha
n
p >
M
d hold the
P
ceivin
g
en to an inco
all, you can
p
adio is assig
n
and speak
a
ding o
r
tgoing grou
p
e Called Pa
r
oup call.
TMO mode
,
d an outgoin
ividual
l call is a ha
l
a half-dupl
e
lling mode i
n
vice
s
l
lex call fro
m
Group
fault group,
-default gro
u
contact as t
h
nel Selecto
r
anage, and
t
TT key.
a Grou
p
ming group
c
ress and ho
l
ed with the
t any time.
Exiting
call or exit
ty Exit Grou
p
your radio
m
g group call.
Call
-duplex (D
M
x call, only
o
TMO mod
e
an individu
a
Call
press and ho
l
p, do as foll
o
e default gro
u
Contact Se
l
hen tap
n
Call
all without
a
d the PTT k
e
pre-emptive
a Grou
p
an incoming
Call featur
e
ust be grant
e
Otherwise,
y
O and TM
O
ne party can
, go to Setti
n
16
l user in a g
r
d the PTT
k
ws:
p in one of
t
ector knob,
a
ext to the ta
r
ny operatio
n
y and speak
priority, you
Call
group call,
p
must be en
a
d with the
C
ou can only
e
) or full-du
p
speak at a ti
m
gs > Privat
e
oup to other
ey.
he followin
g
nd then rot
a
get group c
o
.
in call hang
t
can press an
d
ress the En
d
bled by you
r
all Owner p
e
xit an outg
o
lex call (TM
O
e. In a full-
d
> Default
c
members in
ways:
te it to select
ntact.
ime.
hold the P
T
key.
dealer for y
o
rmission by
ing group ca
l
only) initi
a
uplex call, b
o
alling mod
e
the group.
the target gr
o
T key to int
e
u to exit an
i
your dealer
f
l.
ted by one i
n
th parties ca
n
, and then ta
p
up.
rrupt the
ncoming
or you to
dividual use
r
speak at th
e
the
Page 23

required mo
5.2.1
I
n
To initiate a
1. Tap
2. Press t
h
5.2.2
R
e
When recei
v
When recei
v
5.2.3
E
n
To end an i
n
5.3
Br
o
A broadcast
b
roadcast c
a
5.3.1
I
n
To initiate a
1. Set the
z P
r
z T
a
2. Press a
n
5.3.2
R
e
You can lis
t
5.3.3
E
n
For details,
s
5.4
All
In DMO, a
n
de.
itiating
a
n individual
c
> Favor
i
e PTT key.
ceivin
g
ing an indiv
i
ing an indiv
i
ding a
n
dividual cal
l
adcas
t
call is a spe
c
ll only whe
n
itiating
a
broadcast c
a
broadcast gr
o
ess the Cont
p >
M
d hold the
P
ceivin
g
en to an inco
ding o
r
ee Ending o
r
Call
all call is a
c
n Indivi
all, do as fo
l
tes/Private
a
an Indi
v
dual call wi
t
dual call wi
t
Individ
u
, press the E
n
Call (
T
ial group ca
l
a broadcast
g
Broad
c
ll, do as foll
o
up as the d
e
act Selector
anage, and
t
TT key.
a Broa
d
ming broadc
a
Exiting
Exiting a
G
all from an i
n
dual Ca
l
lows:
nd select th
e
idual C
a
h direct sign
a
h hook signa
al Call
d key.
MO O
n
l. In a broad
c
roup is pre
p
ast Call
ws:
fault group i
n
knob, and th
e
hen tap
n
cast Ca
st call with
o
a Broad
roup Call.
dividual us
e
17
l
target cont
a
ll
ling, you ca
n
ling, press t
h
ly)
ast call, onl
y
rogrammed.
one of the
f
n rotate the
ext to the br
ll
ut any opera
t
cast Cal
r to other ra
d
ct, or tap
listen to th
e
e PTT key t
o
the calling
p
ollowing wa
y
knob to sele
c
oadcast grou
p
ion.
l
ios operatin
g
and ente
r
call withou
t
answer the
c
arty can spe
a
s:
t the broadc
a
.
at the same
the target n
u
any operati
o
all.
k. You can
i
st group.
frequency o
r
mber.
n.
nitiate a
operating at
Page 24

the same fr
e
system.
Your radio
m
5.4.1
I
n
To initiate a
1. Tap
2. Press a
n
5.4.2
R
e
You can lis
t
5.4.3
E
n
For details,
s
5.5
E
m
An emerge
n
dealer for y
o
5.5.1
I
n
To initiate a
5.5.2
R
e
You can lis
t
5.5.3
E
n
As the calli
n
As the calle
d
If you inser
t
5.6
Ph
5.6.1
I
n
To initiate a
quency and
n
ust be auth
o
itiating
a
n all call, do
> Grou
p
d hold the
P
ceivin
g
en to an inco
ding o
r
ee Ending o
r
ergen
c
cy call is a c
a
u to initiate
a
itiating
a
n emergenc
y
ceivin
g
en to an inco
ding o
r
g party, you
party, you
c
an SIM car
d
one Ca
itiating
a
phone call,
d
etwork. In
T
rized by yo
u
n All C
a
as follows:
and select t
h
TT key.
an All
C
ming all call
Exiting
Exiting a
G
y Call
ll initiated t
o
n emergenc
y
n Emer
g
call, press t
h
an Em
e
ming emerg
e
Exiting
can press th
e
an press the
, you can ini
t
ll
Phone
o as follows
MO, an all c
r dealer for
y
ll
e all call co
n
all
without any
an All C
roup Call.
ask for hel
p
call.
ency C
e Emergen
c
rgency
C
ncy call wit
h
an Eme
r
Emergenc
y
End key or
t
iate a call to
Call
:
18
all is a call f
r
ou to initiat
e
tact, or tap
operation.
all
in case of e
m
all
y On key.
all
out any ope
r
gency
C
Off key or
t
ap the on-sc
r
a phone nu
m
om an indiv
i
an all call.
and en
t
ergency. T
h
ation.
all
urn off the r
a
een end butt
o
ber.
dual user to
o
er the all ca
l
e radio mus
t
dio to end a
n
n to exit an
ther radios i
n
l number.
be authoriz
e
emergency
emergency c
a
the
d by your
call.
ll.
Page 25

1. Tap
2. Tap th
e
5.6.2
R
e
When recei
v
To answer t
h
To reject th
e
5.6.3
E
n
To end a ph
o
and enter
on-screen c
a
ceivin
g
ing a phone
e call, tap t
h
call, tap the
ding a
P
ne call, tap
t
the target nu
m
ll button.
a Phon
e
call, the radi
o
e on-screen
a
on-screen r
ej
hone c
a
he on-scree
n
ber, or tap
Call
displays th
e
nswer butto
n
ect button.
ll
end button.
19
> Favo
caller's nu
m
.
rites/Privat
e
ber or name
.
and tap the
t
arget contact.
Page 26

6. M
e
The Messa
g
6.1
Vie
To view a
m
6.2
Se
n
You can cre
6.2.1
S
e
To create a
n
1. Tap
2. Enter t
h
3. Tap th
e
You c
a
4. Tap
If yo
u
6.2.2
S
e
To send a q
u
1. Tap
2. Enter t
h
3. Tap
4. Slide r
i
5. Tap th
e
6.3
De
To delete m
e
1. Tap
ssag
e feature all
o
wing a
essage, tap
ding
a
ate a messag
e
nding
a
d send a ne
w
, and then
t
e target nu
m
Type mess
a
n also tap
to send t
h
do not tap
nding
a
ick text or s
t
, and then
t
e target nu
m
in the fr
o
ght to acces
s
required m
e
leting
M
ssages, do
a
.
e Se
r
ws you to se
n
Messa
g
, and the
n
Mess
a
or send a q
u
New M
e
message, d
o
ap in
t
ber in the T
o
ge text box,
to add th
e
e message.
, the cre
a
Quick
T
atus messag
e
ap in
t
ber in the T
o
nt of the Ty
p
the predefi
n
ssage, and t
h
essag
e
s follows:
vice
s
d and recei
v
e
tap the targ
e
ge
ick text or s
t
ssage
as follows:
he lower rig
h
text box, o
r
and enter th
e
required at
t
ted message
ext or
S
, do as follo
w
he lower rig
h
text box, o
r
e message t
e
ed message l
en tap
.
s
20
e messages.
t message.
atus messag
e
t corner.
tap to
text.
achment.
will be save
d
tatus M
e
s:
t corner.
tap to
xt box.
ist.
.
select a cont
as a draft.
ssage
select a cont
act.
act.
Page 27

21
2. Touch and hold a message until the delete screen appears.
3. Tap the messages to be deleted or tap Select all in the upper right corner.
4. Tap Delete > DELETE.
Page 28

22
7. Supplementary Features
7.1 Basic Settings
You can tap Settings > General and then do the following operations:
If you want to... Then...
Set SK2, SK3, and TK as
shortcuts to radio features
Go to Device > Program Keys > SK2/SK3/Tkey > Short Press / Long Press
/ Double Click, and then tap the required feature.
Set the language
Go to System > Language & input > Language, and then tap the required
language.
Set the wallpaper
1. Go to Device > Personalization > Wallpaper.
1. Tap the required picture, and then tap CONFIRM.
Adjust the brightness of backlight
Go to Device > Display > Main Screen / Top Screen, and then drag the
brightness slider.
Set whether you can access the
edge panel from the left edge or
right edge of the home screen
Go to Device > Personalization > Side_fence, and then tap Left, Right, or
Both.
Turn on or off vibration
Go to Device > Hytera Ringtones, and then tap Vibrate on Ring or Vibrate
on Silent.
Set the profile Go to Device > Hytera Ringtones > Profiles, and then tap Ring or Mute.
Set the ring, media, alarm, and call
volume
Go to Device > Hytera Ringtones > Volume, and then drag the corresponding
slider.
Set sound and vibration patterns
Go to Device > Hytera Ringtones > Sound and Vibration Patterns, tap the
corresponding tone, and then tap the required pattern.
Clear cached data Go to Device > Storage > Cached data, and then tap OK.
Set whether the main screen
displays battery percentage in the
status bar
Go to Device > Battery, and then tap Show Battery Usage.
Page 29

If y
Turn on or
o
Set the date
7.2
C
o
The Contac
t
7.2.1
A
d
To add a pr
i
1. Tap
2. Tap
z T
a
z C
h
3. Tap th
e
numbe
r
4. Tap
5. Tap th
e
6. (Optio
n
7. Tap th
e
8. Tap S
a
7.2.2
A
d
To add freq
u
1. Tap
2. Tap th
e
7.2.3
D
e
1. Tap
2. Tap th
e
3. Swipe
u
ou want to
.
ff the glove
s
and time
ntact
M
feature allo
w
ding a
vate contact,
> Privat
e
and assig
n
ke Photo: u
s
oose Photo
:
Name and
A
of the cont
a
, and then ta
p
Add Phon
e
al) Tap Ad
d
Email, Ad
d
ve in the up
p
ding a
C
ently used c
> Favori
t
required co
n
leting
a
, and then
t
contact to b
p to the bot
t
..
mode G
oGo
anage
m
s you to vie
w
Private
C
do as follo
w
> .
a picture to
e the camer
a
choose a p
h
dd PMR N
ct respective
the require
d
Number te
x
Number to
ress, and N
o
er right corn
e
ontact
ontacts to th
e
es > .
tacts, and t
h
Private
ap Private.
e deleted, an
d
om, and the
n
to Device
>
to System
>
ent
and mana
g
ontact
s:
the contact
b
to take a ph
oto from the
umber text
b
ly.
type of pho
n
t box and e
n
add another
p
te text boxe
s
r.
to Favo
r
Favorites l
i
en tap OK.
Contac
t
then tap
tap Delete.
23
Assistance,
Date & ti
m
e private an
d
y choosing
o
oto.
Gallery.
oxes, and e
n
e number.
ter the phon
e
hone numb
e
and enter t
h
ites
st, do as foll
o
.
The
n
and then tap
e.
group cont
a
ne the follo
w
ter the name
number.
r.
e related inf
o
ws:
...
gloves mod
e
cts.
ing options:
and Private
M
rmation.
.
obile Radio (PMR)
Page 30

24
4. Tap OK.
7.3 Wireless and Network
7.3.1
Wi-Fi
The Wi-Fi feature provides free Internet access.
To connect to a Wi-Fi network, do as follows:
1. Go to Settings > General > Wireless & networks > Wi-Fi.
2. Check whether Wi-Fi is on. If yes, go to the next step. If no, tap Off to turn on it.
When Wi-Fi is turned on, the radio automatically scans for available networks and displays them.
3. Tap the network you want to connect to.
When you select an open network, the radio automatically connects to it. Otherwise, ent er a password to
connect.
7.3.2 Bluetooth
The Bluetooth feature allows a wireless connection with another Bluetooth device for short-range communication.
To pair the radio with another Bluetooth device, do as follows:
1. Go to Settings > General > Wireless & networks > Wi-Fi.
2. Check whether Bluetooth is on. If yes, go to the next step. If no, tap Off to turn on it.
3. Tap the name of the target device.
7.3.3 Personal Hotspot
The Personal Hotspot feature allows you to share the radio's Internet connection with other devices.
To set up a hotspot, do as follows:
1. Go to Settings > General > Wireless & networks > Personal Hotpot > Set up Wi-Fi hotspot.
2. Enter the related information, and then tap Save.
To turn on or off the Bluetooth tethering feature, tap Bluetooth tethering under Personal Hotspot.
7.3.4 NFC
The Near Field Communication (NFC) feature allows data exchange when you touch the radio with another
compatible device.
Page 31

To turn on
o
7.4
A
P
On the AP,
y
icon.
7.4.1
C
a
The Camer
a
ordinary ph
o
Taking a
n
To take an
o
1. Launc
h
2. Swipe
l
3. Tap
z
z H
D
z
z
4. Tap
5. Aim th
6. Tap
Recordi
n
To record a
1. Launc
h
2. Swipe
l
3. Tap
z
z
4. Tap
r off NFC, g
o
Ps
ou can use
e
mera
app allows
y
to, or takin
g
Ordinar
y
rdinary phot
o
the Camera
eft or right t
o
to do the f
o
: Turn on
o
R: High D
y
: T ake tim
e
: Switch b
e
in the up
p
e camera at t
h
.
g a Vide
o
radio, do as
f
the Camera
eft or right t
o
to do the
: Turn on
o
: Switch b
e
in the up
p
to Settings
mbedded ap
p
ou to take p
h
a panorama
Photo
, do as foll
o
app.
the tab wit
h
llowing bas
i
r off the fla
s
namic Rang
e
-delayed ph
o
tween the fr
o
er right cor
n
e subject, a
n
ollows:
app.
the tab wit
h
following ba
s
r off the fla
s
tween the fr
o
er right cor
n
> General
>
s as you do
otos and re
c
photo.
ws:
.
c settings:
h.
, helps you
g
tos
nt-facing ca
m
er to do othe
r
d pinch the
s
.
ic settings:
h.
nt-facing ca
m
er to do othe
r
25
Wireless
&
on your mob
ord videos. I
t
et a brighter
era and rea
settings, su
c
creen to zoo
era and rea
settings, su
c
networks >
ile phone. T
o
includes ta
b
and richer p
h
-facing cam
e
h as resoluti
m out or spr
e
-facing cam
e
h as resoluti
More, and t
h
launch an a
p
s for recordi
n
oto.
ra.
on, waterma
r
ad the scree
n
ra.
on and wate
r
en tap NFC
p, tap the re
g a video, t
a
k, and face
d
to zoom in
i
mark.
.
lated app
king an
etection.
f required.
Page 32

5. Aim th
6. Tap
7. (Optio
n
8. Tap
Taking a
To take a p
a
1. Launc
h
2. Swipe
l
3. Tap th
e
4. Pan sl
o
7.4.2
G
The Gallery
V
iewing
P
To view a p
i
1. Launc
h
2. Tap
z A
l
z A
l
3. Depen
d
tap a p
i
4. (Optio
n
While view
i
z Move
t
z Edit:
V
z Set pi
c
z Slides
h
z Detail
s
e camera at t
h
to start re
c
al) Tap
to stop re
c
Panoram
a
norama phot
the Camera
eft or right t
o
panorama c
a
wly in the re
allery
app allows
y
ictures
a
cture or vid
e
the Gallery
, and then
t
l: View pict
u
bums: View
ing on the v
i
cture or vid
e
al) Swipe le
f
ng a picture,
o Folder: M
iew and use
ture as: Set
t
ow: Start a
s
: View infor
m
e subject, a
n
ording.
to pause, a
n
ording.
Photo
o, do as foll
o
app.
the tab for
t
mera icon.
quired direct
i
ou to view a
n
nd Video
s
o, do as foll
o
app.
ap one of th
e
res and vide
o
pictures and
ew mode, ei
t
o.
t or right to
v
you can tap
t
ove the pict
u
the editing t
o
he picture a
s
lideshow wi
t
ation about
d pinch the
s
d then tap
ws:
aking a pan
o
on.
d manage p
i
ws:
following o
p
s organized
videos orga
n
her tap a pic
iew the nex
t
he screen, a
n
re into an ex
i
ols.
a contact av
h the picture
the picture,
i
26
creen to zoo
to conti
n
rama photo.
ctures and v
i
tions to sel
e
by date.
ized by alb
u
ture or video
or previous
d then tap
M
sting or a ne
w
atar or the w
a
s and videos
ncluding the
m out or spr
e
ue.
deos.
ct the view
m
m.
to view it, o
r
picture or vi
d
ore to do th
e
folder.
llpaper.
in the curren
t
title, time, a
n
ad the scree
n
ode:
first tap an
a
eo.
following
o
folder.
d properties
to zoom in
i
lbum or fol
d
perations:
.
f required.
er and then
Page 33

Zooming
To zoom in
z Doubl
e
z Spread
Deleting
To delete an
To delete al
l
1. Tap
2. Touch
3. Tap D
e
7.4.3
C
The Clock
a
Alarm
The Alarm
f
To create a
n
1. Launc
h
2. Tap
3. Tap O
K
z R
e
z
z V
i
z L
a
4. Tap
z Si
z S
n
z V
o
th
r
In and O
u
or out a pict
u
-tap anywhe
r
two fingers
a
Pictures
a
image or a
v
pictures an
d
, and then ta
p
and hold the
lete, and the
n
lock
pp allows y
o
eature allow
s
alarm, do a
s
the Clock a
p
, and then
d
, and then t
a
peat: T ap t
h
: Set the al
a
brate: Enab
l
bel: Add a l
a
> Settings
lence after:
S
ooze length
lume butto
n
ee options a
r
t
re, do one o
f
e on the scr
e
part on any
p
nd Video
ideo, tap De
l
videos in a
f
Albums.
folder to be
d
tap OK.
u to access a
l
you to set
a
follows:
p, and then
t
rag the poi
n
p the follo
w
e days on w
h
rm tone.
e or disable
a
bel for the
a
to set the fo
l
et the perio
d
: Set a durati
o
s: Set the f
u
e available:
the followi
n
en.
lace to zoo
m
s
ete while vi
e
older, do as
eleted until
i
arms, view
t
n alarm to ri
n
ap .
ter to set the
ing items to
s
ich you wan
t
larm vibrati
o
larm.
lowing optio
after which
n for the al
a
nction of the
Snooze, Dis
m
27
g:
in, and pin
c
wing it.
follows:
t is selected.
he world clo
c
g at a speci
f
time for the
a
et the alarm
:
the alarm t
o
n.
ns:
the alarm st
o
rm while sn
o
Volume Co
n
iss, and Do
h the screen
k, set a stop
w
ic time.
larm to sou
n
ring.
ps ringing.
ozing.
trol knob w
h
nothing.
to zoom out.
atch, and u
s
d.
en the alar
m
e a timer.
sounds. The following
Page 34

z S
tSu
When the al
To delete a
n
World Cl
o
The World
C
z To ac
c
z To lis
t
z To re
m
Timer
The Timer
f
To use a ti
m
1. Launc
h
2. Tap th
e
3. Tap
After the ti
m
z Tap
z Tap
z Tap th
e
If you creat
e
Stopwat
c
The stopwa
t
To use the s
t
1. Launc
h
2. Tap
3. (Optio
n
4. Tap
art week on
nday, and
M
arm sounds,
alarm, tap
ck
lock featur
e
ess the wor
l
a city on th
e
ove a city
fr
eature allow
s
er, do as fol
l
the Clock a
p
digits on th
e
to start t
h
er starts, yo
u
to pause t
to delete
t
icon in the l
more than
o
h
ch feature al
l
opwatch, do
the Clock a
p
to begin
t
al) Tap the i
to stop ti
m
: Set the beg
i
onday.
swipe left to
, and then
allows you
t
d clock, lau
n
world cloc
k
om the list,
t
you to cou
n
ows:
p, and then
t
screen to s
e
e timer.
can do the
f
he timer.
he timer.
ower right c
o
ne timers, s
w
ows you to
m
as follows:
p, and then
t
iming.
con in the lo
w
ing.
nning day o
f
snooze or s
w
tap . If
y
o keep track
ch the Clock
screen, tap
ap , and
t down to an
ap .
t the length.
ollowing op
e
rner to add
a
ipe up or do
easure inte
r
ap .
er left corn
e
28
the week. T
h
ipe right to
d
ou want to
c
of the curre
n
app, and the
n
, and the
n
then tap the
c
event based
o
rations:
nother timer
.
wn to view t
h
vals of time.
r to measur
e
e following
ismiss the al
ancel the de
l
t time in mu
l
tap .
tap the city
ity to desele
n a preset p
e
e timers.
another inte
r
three option
s
arm.
etion, tap U
N
tiple cities a
r
to select it.
ct it.
riod.
val of time.
are availabl
e
DO instead
.
ound the wo
r
: Saturday,
ld.
Page 35

5. View t
h
6. Click
7.4.4
C
a
The Calend
a
a reminder.
V
iewing
t
To set the c
a
1. Launc
h
2. Tap th
e
z D
az Wz M
z A
g
Setting t
h
To set the c
a
1. Tap
2. Set the
Creating
To create a
n
1. Tap
2. Set the
3. Tap D
O
Deleting
To delete a
n
1. Tap
2. Tap th
e
3. Tap
e timing res
u
to reset
t
lendar
r app allows
he Calen
d
lendar view
,
the Calend
a
date in the
u
y: Display t
h
eek: Displa
y
onth: Displ
a
enda: Disp
l
e Calen
d
lendar, do a
s
> Settings
related opti
o
an Event
event on th
e
> New ev
e
parameters
a
NE in the u
p
an Event
event from
t
> Delete ev
e
event to be
d
, and then
t
lt on the sc
r
he stopwatc
h
you to consu
ar
do as follo
w
r app.
pper left co
r
e day view.
the week vi
e
y the month
v
ay the agend
a
ar
follows:
> General s
ns.
calendar, d
o
nt.
s required.
per right co
r
he calendar,
nts.
eleted.
ap OK.
een, or tap
.
lt the calend
a
s:
ner of the sc
r
w.
iew.
view.
ettings.
as follows:
ner.
do as follow
s
29
to share
t
r by day, we
e
een to displ
a
:
he result.
k, or month,
y the follow
i
create event
s
ng view opti
o
, and set an
a
ns:
larm to act as
Page 36

7.4.5
B
The Browse
z To set
t
z To acc
e
z T o ope
n
z To clo
s
z To boo
k
z To vie
w
7.4.6
C
a
The Calcul
a
To perform
b
1. Launc
h
3. Enter t
h
4. Tap th
e
5. Enter t
h
6. Tap th
e
To perform
7.4.7
C
o
The Compa
s
To use the c
1. Launc
h
2. Hold t
h
3. Follow
4. View t
h
rowser
r
app allows
he browser,
t
ss a web sit
e
a new tab,
t
e a tab, tap
mark th e c
u
bookmarks
lculato
r
tor app facili
asic arithm
e
the Calcula
t
e first num
b
appropriate
e next num
b
equal sign t
o
advanced ari
t
mpass
s app allow
s
ompass, do
a
the Compa
s
e radio flat i
n
the on-scree
n
e informati
o
you to acces
s
ap > Se
t
, tap the add
r
ap >
, swipe u
p
rrent web pa
g
, tap >
B
tates basic a
n
tic operatio
n
or app.
er using the
o
arithmetic f
u
er.
view the re
hmetic oper
a
you to find
a
s follows:
s app.
your palm.
instruction
s
n on the co
m
a web site.
tings, and s
e
ess bar, ente
, and enter t
h
or down to
v
e, tap
>
ookmarks.
d advanced
a
s, do as foll
o
n-screen nu
m
nction key.
sult.
tions, swipe
direction a
n
when prom
p
pass screen.
30
t the param
e
r the web ad
d
e new web
a
iew the tab,
Save to bo
o
rithmetic o
p
ws:
eric keypa
d
left from th
e
d see your l
a
ted to calib
r
ters followin
ress, and th
e
ddress.
and then tap
kmarks.
erations.
.
edge of the
c
titude, longi
t
ate.
g on-screen
i
n tap Go on
.
alculator sc
r
ude, and alti
t
nstructions.
the on-scree
n
een.
ude.
keypad.
Page 37

7.4.8
S
o
The Sound
R
To record a
n
1. Launc
h
2. Tap R
e
3. Tap D
o
To share an
7.4.9
A
The App St
o
z To vie
w
z To vie
w
require
z To sea
r
z To ma
n
7.5
Ra
When the r
a
smooth TM
O
To turn on
o
To set the
R
7.6
Po
The Positio
n
To turn on
o
tap GPS.
To view yo
u
Location S
e
Generally,
a
und R
e
ecorder app
audio file,
d
the Sound
R
cord, and th
e
ne to stop r
e
audio file, ta
p
pp Stor
e
re allows y
o
app messa
g
apps, tap
A
d.
ch an app, t
ap
age downlo
a
dio ov
e
dio operatin
g
services o
v
r off this fea
t
oIP network
,
sition
feature pro
v
r off this fea
t
r location in
f
rvice.
higher sque
l
corder
allows you
t
o as follows
ecorder app.
n speak int
o
cording.
File, tap th
u to downlo
a
es, tap Mess
pp Store, ta
p
App Store
>
ded apps, ta
p
r IP (R
o
in TMO m
o
er an RoIP
n
ure, go to S
e
go to Settin
ides locatio
n
ure, go to S
e
ormation, g
o
ch level req
u
o record an
a
:
the microp
h
e audio file,
a
d apps to yo
u
ages.
Cat in the
u
, and
e
Managem
e
IP)
de is out of
t
etwork.
ttings > Pri
v
gs > Private
informatio
n
ttings > Ge
n
to Settings
ires a higher
31
udio file an
d
one.
nd then tap
S
r radio.
pper left cor
n
nter the key
w
nt.
he network
c
ate > RoIP,
> RoIP Sett
.
eral > Priv
a
> General >
RSSI value.
share it.
hare.
er, and the
n
ord.
overage, the
and then tap
ings. For det
a
cy & Secur
i
Privacy &
S
If the squelc
h
tap All, Top
RoIP featur
e
RoIP.
ils, please c
o
ty > Securit
y
ecurity > S
e
level is set
charts, and
allows you
t
nsult your
d
> Locatio
n
curity > Lo
c
to Open, the
Latest as
o enjoy
ealer.
, and then
ation >
speaker will
Page 38

32
always keep turned on.
7.7 Encryption
The Encryption feature prevents eavesdropping on calls and interception of data.
To turn on or off this feature, go to Settings > Private, and then tap Security.
7.8 Temporarily Disable
When being stunned, the radio displays . In this case, you can only power on or off the radio.
To restore normal operation, request your dealer to program the radio or send an Enable command.
7.9 Permanently Disable
When being killed, the radio displays . In this case, you can do no operation.
To restore normal operation, request your dealer to burn the radio.
Page 39

33
8. Troubleshooting
Phenomenon Analysis Solution
The radio cannot be
powered on.
The battery power gets too low to supply
the radio.
Charge the battery.
Network registration
fails or no network is
found.
The radio is operating in DMO. Switch to TMO.
The radio gets out of the network
coverage.
Check the signal strength. Make sure the
radio is within the network coverage.
The radio is not granted access to the
network.
Contact the network operator for radio
authorization.
Calls cannot be
initiated.
The radio or the target radio (the called
party) is not within the network
coverage.
Check the signal strength. Make sure the
radios are within the network coverage.
The radio operates in an improper mode.
Check the operation mode. Make sure
the radios work in the proper mode.
A group call cannot be
initiated or received.
The radio is not a member of the group.
Contact your dealer to add the radio to
the group.
The radio is not authorized to access the
target group.
Contact the network operator for radio
authorization.
Calls are always
interrupted.
The current channel is assigned to
emergency calls or other calls with
higher priority.
Wait until the channel becomes
available and try again.
A half-duplex call
cannot be established.
The predefined time period for
establishing a call expires.
Make sure the call is established within
the predefined time period.
The channel is occupied by another radio
with higher call priority.
Wait until the channel becomes
available and try again.
The channel resources are allocated to
other services due to overloaded
Wait until the channel becomes
available and try again.
Page 40

34
network.
Abnormal
disconnection occurs
during a call.
The radio gets out of the network
coverage.
Check the signal strength. Make sure the
radio is within the network coverage.
The radio operates at an unfavorable
position where communication may be
blocked by high buildings or frustrated in
the underground areas (in DMO).
Move to an open and flat area, and
restart the radio.
As for the same status
message ID, the content
displayed at the
receiving party is
different from that
displayed at the sending
party.
The same status message ID has been
assigned with different contents.
Make sure the status message ID is
assigned with the same content.
If the above solutions cannot fix your problems, or you m ay have some other queri es, please contact us or y our local
dealer for more technical support.
Page 41

9. C
a
To guarante
Product
C
z Do not
z Keep t
h
z Do not
z Close t
h
Product
C
Turn
o
z Clean
u
cloth o
r
z Use ne
u
use ch
e
case d
a
z If the r
a
z Make
s
re a
n
e optimal pe
r
are
pierce or scr
e product fa
r
hold the pro
d
e accessory
leaning
ff the produ
c
p the dust a
n
a brush reg
u
tral cleanse
r
mical prepa
r
mage.
dio is used i
ure the prod
u
d Cl
e
formance as
ape the prod
u
away from
uct by the a
n
connector c
o
t and remov
d fine partic
l
larly.
and a non-w
ations such
a
n a harsh en
v
ct is comple
anin
well as a lo
n
ct.
substances t
h
tenna or ea
rp
ver when no
e the battery
es on the pr
o
oven fabric t
o
s stain remo
v
ironment (s
u
tely dry befo
35
g
g service lif
e
at can corro
d
iece cable.
accessory is
before clean
i
duct surface
clean the k
e
ers, alcohol,
ch as sea an
d
re use.
of the prod
u
e the circuit
r
in use.
ng.
and chargin
g
ys, knobs, a
n
sprays or oi
l
salt frog),
p
ct, please fo
l
.
piece with
a
d front case
a
preparation
s
eriodically c
l
low these ti
p
clean and d
r
fter long-ti
m
, so as to av
o
ean and dry
t
s.
y lint-free
e use. Do no
t
id surface
he radio.
Page 42

10.
O
Contact yo
u
Use t
h
dama
g
ptio
n
r local deale
r
e accessorie
s
e arising ou
t
al A
c
for the opti
o
specified b
y
of the use o
f
ces
s
nal accessor
i
Hytera onl
y
any unauth
o
36
orie
s
es used wit
h
; otherwise,
rised access
o
the product.
he Compan
y
ries.
will not be liable for any loss or
Page 43

PLMRS:
Operation Frequency Range:
454~455 MHz, 456~460 MHz
Rated Output Power:
1.8 Watts (32.55dBm)
Modulation Type:
π/4 DQPSK
Channel Separation:
25kHz
TETRA:
Operation Frequency Range:
450MHz ~ 470MHz
Rated Output Power:
1.8 Watts (32.55dBm)
Modulation Type:
π/4 DQPSK
Channel Separation:
25kHz
Bluetooth:
Version:
Supported BT2.1+EDR/4.0+BLE
Modulation:
GFSK, π/4DQPSK, 8DPSK
Operation frequency:
2402MHz~2480MHz
Channel number:
79/40
Channel separation:
1MHz/2MHz
WIFI:
Supported type:
802.11b
802.11g
802.11n(H20)
-
Modulation:
DSSS for 802.11b
OFDM for 802.11g/802.11n(H20)
Operation frequency:
2412MHz~2462MHz for 802.11b/802.11g/802.11n(H20)
Channel number:
11 for 802.11b/802.11g/802.11n(H20)
Channel separation:
5MHz
NFC:
Modulation:
FSK
Operation frequency:
13.56MHz
Channel number:
1
Page 44

2G:
Support Network:
GSM, GPRS, EGPRS
Support Band:
GSM850, PCS1900
Modulation:
GSM/GPRS/EGPRS: GMSK EGPRS: 8PSK
Transmit Frequency:
GSM850: 824.20MHz-848.80MHz
PCS1900: 1850.20MHz-1909.80MHz
Receive Frequency:
GSM850: 869.20MHz-893.80MHz
PCS1900: 1930.20MHz-1989.80MHz
GPRS Class:
12
EGPRS Class:
12
4G:
FDD Band 2
Operation Frequency:
Uplink:1850.7 MHz – 1909.3 MHz
Downlink: 1930.7 MHz – 1989.3 MHz
Channel bandwidth:
1.4MHz
3MHz
5MHz
10MHz
15MHz
FDD Band 4
Operation Frequency:
Uplink:1710.7 MHz – 1754.3 MHz Downlink: 2110.7 MHz – 2154.3 MHz
Channel bandwidth:
1.4MHz 3MHz 5MHz 10MHz 15MHz 20MHz
FDD Band 5
Operation Frequency:
Uplink:824.7 MHz – 848.3 MHz Downlink: 869.7 MHz – 893.3 MHz
Channel bandwidth:
1.4MHz 3MHz 5MHz 10MHz 15MHz 20MHz
FDD Band 7
Operation Frequency:
Uplink:2502.5 MHz – 2567.5 MHz Downlink: 2622.5 MHz – 2687.5 MHz
Channel bandwidth:
1.4MHz 3MHz 5MHz 10MHz 15MH z 20MHz
FDD Band 26
Operation Frequency:
Uplink: :814.7 MHz – 823.3 MHz Downlink: 859.7MHz – 868.3 MHz
Channel bandwidth:
1.4MHz 3MHz 5MHz 10MHz 15MHz 20MHz
TDD Band 41
Operation Frequency:
Uplink:2496 MHz – 2690 MHz Downlink: 2496 MHz – 2690 MHz
Channel bandwidth:
1.4MHz 3MHz 5MHz 10MHz 15MHz 20MHz
Power Class:
Class 1
Class 2
Class 3
Class 4
Modulation type:
QPSK
16QAM
64QAM
Page 45

FCC STATEMENT
This device complies with Part 15 of the FCC Rules. Operation is subject to the following
two conditions:
(1) This device may not cause harmful interference, and
(2) this device must accept any interference received, including interference that may
cause undesired operation.
NOTE 1: This equipment has been tested and found to comply with the limits for a Class
B digital device, pursuant to part 15 of the FCC Rules. These limits are designed to
provide reasonable protection against harmful interference in a residential installation.
This equipment generates, uses and can radiate radio frequency energy and, if not
installed and used in accordance with the instructions, may cause harmful interference to
radio communications. However, there is no guarantee that interference will not occur in
a particular installation. If this equipment does cause harmful interference to radio or
television reception, which can be determined by turning the equipment off and on, the
user is encouraged to try to correct the interference by one or more of the following
measures:
- Reorient or relocate the receiving antenna.
- Increase the separation between the equipment and receiver.
-Connect the equipment into an outlet on a circuit different from that to which the
receiver is connected.
-Consult the dealer or an experienced radio/TV technician for help.
NOTE 2: Any changes or modifications to this unit not expressly approved by the party
responsible for compliance could void the user's authority to operate the equipment.
RF Radiation Information
This product must be restricted to operations in an occupational/controlled RF exposure
environment. Users must be fully aware of the hazards of the exposure and able to exercise
control over their RF exposure to qualify for the higher exposure limits.
The information listed above provides the user with information needed to make him or her
aware of a RF exposure, and what to do to assure that this radio operates within the FCC
exposure limits of this radio.
1) PLMRS:The device complies with RF specifications when the device used at 25mm from your
front face and 0mm from your body, Third-party belt-clips, holsters, and similar accessories
used by this device should not contain any metallic components. Body-worn accessories that
do not meet these requirements may not comply with RF exposure requirements and should
be avoided. Maximun SAR Value (1g): 2.04W/Kg.
2) CMRS/WLAN:
This device meets the government's requirements for exposure to radio waves. The guidelines
are based on standards that were developed by independent scientific organizations through
periodic and thorough evaluation of scientific studies. The standards include a substantial safety
margin designed to assure the safety of all persons regardless of age or health.
Page 46

FCC RF Exposure Information and Statement The SAR limit of USA (FCC) is 1.6 W/kg averaged
over one gram of tissue. This device was tested for typical body-worn operations with the back of
the handset kept 10mm for body worn. To maintain compliance with FCC RF exposure
requirements, use accessories that maintain a 10mm for body worn. The use of belt clips,
holsters and similar accessories should not contain metallic components in its assembly. The use
of accessories that do not satisfy these requirements may not comply with FCC RF exposure
requirements, and should be avoided.
Body-worn Operation
This device was tested for typical body-worn operations. To comply with RF exposure
requirements, a minimum separation distance of 10mm for body worn must be maintained
between the user’s body and the handset, including the antenna. Third-party belt-clips, holsters,
and similar accessories used by this device should not contain any metallic components.
Body-worn accessories that do not meet these requirements may not comply with RF exposure
requirements and should be avoided. Use only the supplied or an approved antenna.
 Loading...