

HYT TC-518 OBR Owner's Manual
www.hytera.us
8110051 801100
TC-518 OBR
2015
Hytera Communications Corporation Limited.

1
Preface
Thank you for purchasing Hytera’s HYT TC-518 On-Site Business
Radio. With its stable output power, clear audio quality and its
unique form, the TC-518 OBR was designed with reliability and
productivity in mind. Hytera’s engineers have cleverly combined
the PTT button and volume knob, allowing retail employees,
restaurant workers, manufacturing and other small to mid-sized
personnel to handle this radio model with a single hand, making
the other hand always available to continue operations while
increasing productivity.
Note: Read this user guide carefully to ensure you know
how to properly operate the radio before use. The
information presented herein can help you to derive
optimum performance from your radio.
MODELS COVERED BY THIS MANUAL:
TC-518 OBR LP UHF Two-Way Radio
TC-518 OBR HP UHF Two-Way Radio
TC-518 OBR LP VHF Two-Way Radio
TC-518 OBR HP VHF Two-Way Radio

Icon Information
The following icons are available through this manual:
Warning/Caution: represents important safety information, to make
users aware of misoperations that may cause malfunction of the radio,
personal injury or property damage.
Note: indicates important information which helps you make better use of
your radio.
Copyright Information
HYT is registered trademarks of Hytera Communications Corporation Limited
(the Company) in P.R.C and other countries and/or areas. Hytera retains
the ownership of its trademarks and product names. All other company and/
or product names used in this manual are trademarks and/or registered
trademarks of their respective owners.
Disclaimer
Hytera endeavors to achieve the accuracy and completeness of this manual,
but no warranty of accuracy or reliability is given. All the above specications
and designs are subject to change without notice due to continuous
development. No part of this manual may be copied, reproduced, translated,
and stored in a retrievable system, distributed, or transmitted in any form or
by any means, electronic or mechanical, for any purpose without the express
written permission of Hytera.
FCC Regulations
Federal Communication Commission (FCC) requires that all radio
communication products should meet the requirements set forth in the above
standards before they can be marketed in the U.S, and the manufacturer shall
post a RF label on the product to inform users of operational instructions, so
as to enhance their occupational health against exposure to RF energy.
Operational Instructions and Training Guidelines
To ensure optimal performance and compliance with the occupational/
controlled environment RF energy exposure limits in the above standards and
guidelines, users should transmit not more than 50% of the time and always
adhere to the following procedures:
● RF energy will be generated only when the radio is transmitting.
● The radio must be at least 2.5 centimeters away from human body when
transmitting.

FCC License Information
This device complies with Part 15 of the FCC Rules. Operation is subject to
the condition that this device does not cause harmful interference.
On-Site business two-way radios operate on radio frequencies that are
regulated by the FCC. To transmit on these frequencies, you are required to
have a license issued by the FCC. Application is made available on FCC Form
601 and Schedules D, H, and Remittance Form 159. To obtain these FCC
forms, request document 000601 which includes all forms and instructions.
If you wish to have the document faxed, mailed or have questions, use the
following contact information.
Faxed contact the Fax-On-Demand system at: 1-202-418-0177
Mailed call the FCC forms hotline at:
1-800-418-FORM
1-800-418-3676
Questions regarding FCC license contact the
FCC at:
1-888-CALL-FCC
1-888-225-5322
Or: http://www.fcc.gov
Before lling out your application, you must decide which frequency (ies) you
can operate on. For questions on determining the radio frequency, please
contact us or your local dealer for more technical support.
Changes or modifications not expressly approved by Hytera may void the
user’s authority granted by the FCC to operate this radio and should not be
made. To comply with FCC requirements, transmitter adjustments should be
made only by or under the supervision of a person certified as technically
qualied to perform transmitter maintenance and repairs in the private land
mobile and xed services as certied by an organization representative of the
user of those services.
Replacement of any transmitter component (crystal, semiconductor, etc.) not
authorized by the FCC equipment authorization for this radio could violate FCC
rules.
Usage of this radio outside the country where it was intended to be distributed
is subject to government regulations and may be prohibited.

1
Contents
Safety Information --------------------------------------------------------------------------------- 2
Product Inspection -------------------------------------------------------------------------------- 3
Radio Overview ------------------------------------------------------------------------------------- 4
Battery Information -------------------------------------------------------------------------------- 6
Antenna Information ------------------------------------------------------------------------------ 9
Assembly and Disassembly ------------------------------------------------------------------- 10
Attaching/Removing the Battery ---------------------------------------------------------- 10
Attaching/Removing the Antenna --------------------------------------------------------- 11
Attaching/Removing the Belt Clip --------------------------------------------------------- 11
Attaching/Removing the Earpiece or Microphone ------------------------------------ 11
Basic Operations ----------------------------------------------------------------------------------- 12
Turning the Radio On/Off ------------------------------------------------------------------- 12
Adjusting the Volume ------------------------------------------------------------------------ 12
Selecting a Channel ------------------------------------------------------------------------- 13
Transmitting ------------------------------------------------------------------------------------ 13
Receiving --------------------------------------------------------------------------------------- 13
Programmable Auxiliary Functions ---------------------------------------------------------- 14
Advanced Operations ---------------------------------------------------------------------------- 14
CTCSS/CDCSS ------------------------------------------------------------------------------- 14
Battery Save ----------------------------------------------------------------------------------- 14
Time-out Timer (TOT) ----------------------------------------------------------------------- 15
Battery Strength Indicator ------------------------------------------------------------------ 15
Monitor/Squelch off -------------------------------------------------------------------------- 15
Scan --------------------------------------------------------------------------------------------- 16
Busy Channel Lockout (BCL) ------------------------------------------------------------- 18
Low Battery Alert ----------------------------------------------------------------------------- 18
Voice-Operated Transmit (VOX) ---------------------------------------------------------- 18
Compandor ------------------------------------------------------------------------------------ 20
Scrambler --------------------------------------------------------------------------------------- 20
Channel Lock ----------------------------------------------------------------------------------- 20
Troubleshooting ----------------------------------------------------------------------------------- 21
Care and Cleaning -------------------------------------------------------------------------------- 22
Optional Accessories ---------------------------------------------------------------------------- 22
Default Frequency List -------------------------------------------------------------------------- 24
Frequency and Codes Chart ------------------------------------------------------------------- 25
CTCSS and CDCSS CODES -------------------------------------------------------------------- 26
Default Factory Feature List -------------------------------------------------------------------- 28
Hytera’s Limited Warranty for the United States and Canada----------------------- 29
2
Safety Information
The following safety precautions shall always be observed during operation,
service and repair of this equipment.
● This equipment shall be serviced by qualied technicians only.
● Do not modify the radio for any reason.
● Use only Hytera supplied or approved batteries and chargers.
● To avoid electromagnetic interference and/or compatibility conicts, turn off
your radio in any area where posted notices instruct you to do so.
● Turn off your radio before boarding an aircraft. Any use of a radio must be
in accordance with airline regulations or crew instructions.
● For vehicles with an air bag, do not place a radio in the area over an air
bag or in the air bag deployment area.
● Turn off your radio prior to entering any area with explosive and ammable
materials.
● Do not charge your battery in a location with explosive and flammable
materials.
● Turn off your radio before entering a blasting area.
● Do not use any portable radio that has a damaged antenna. If a damaged
antenna comes into contact with your skin, a minor burn can result.
● Do not expose the radio to direct sunlight over a long time, nor place it
close to heating source.
● When transmitting with a portable radio, hold the radio in a vertical position
with the microphone 3 to 4 centimeters away from your lips. Keep antenna
at least 2.5 centimeters away from your body when transmitting.
WARNING: If you wear a radio on your body, ensure the radio
and its antenna are at least 2.5 centimeters away from your body
when transmitting.
3
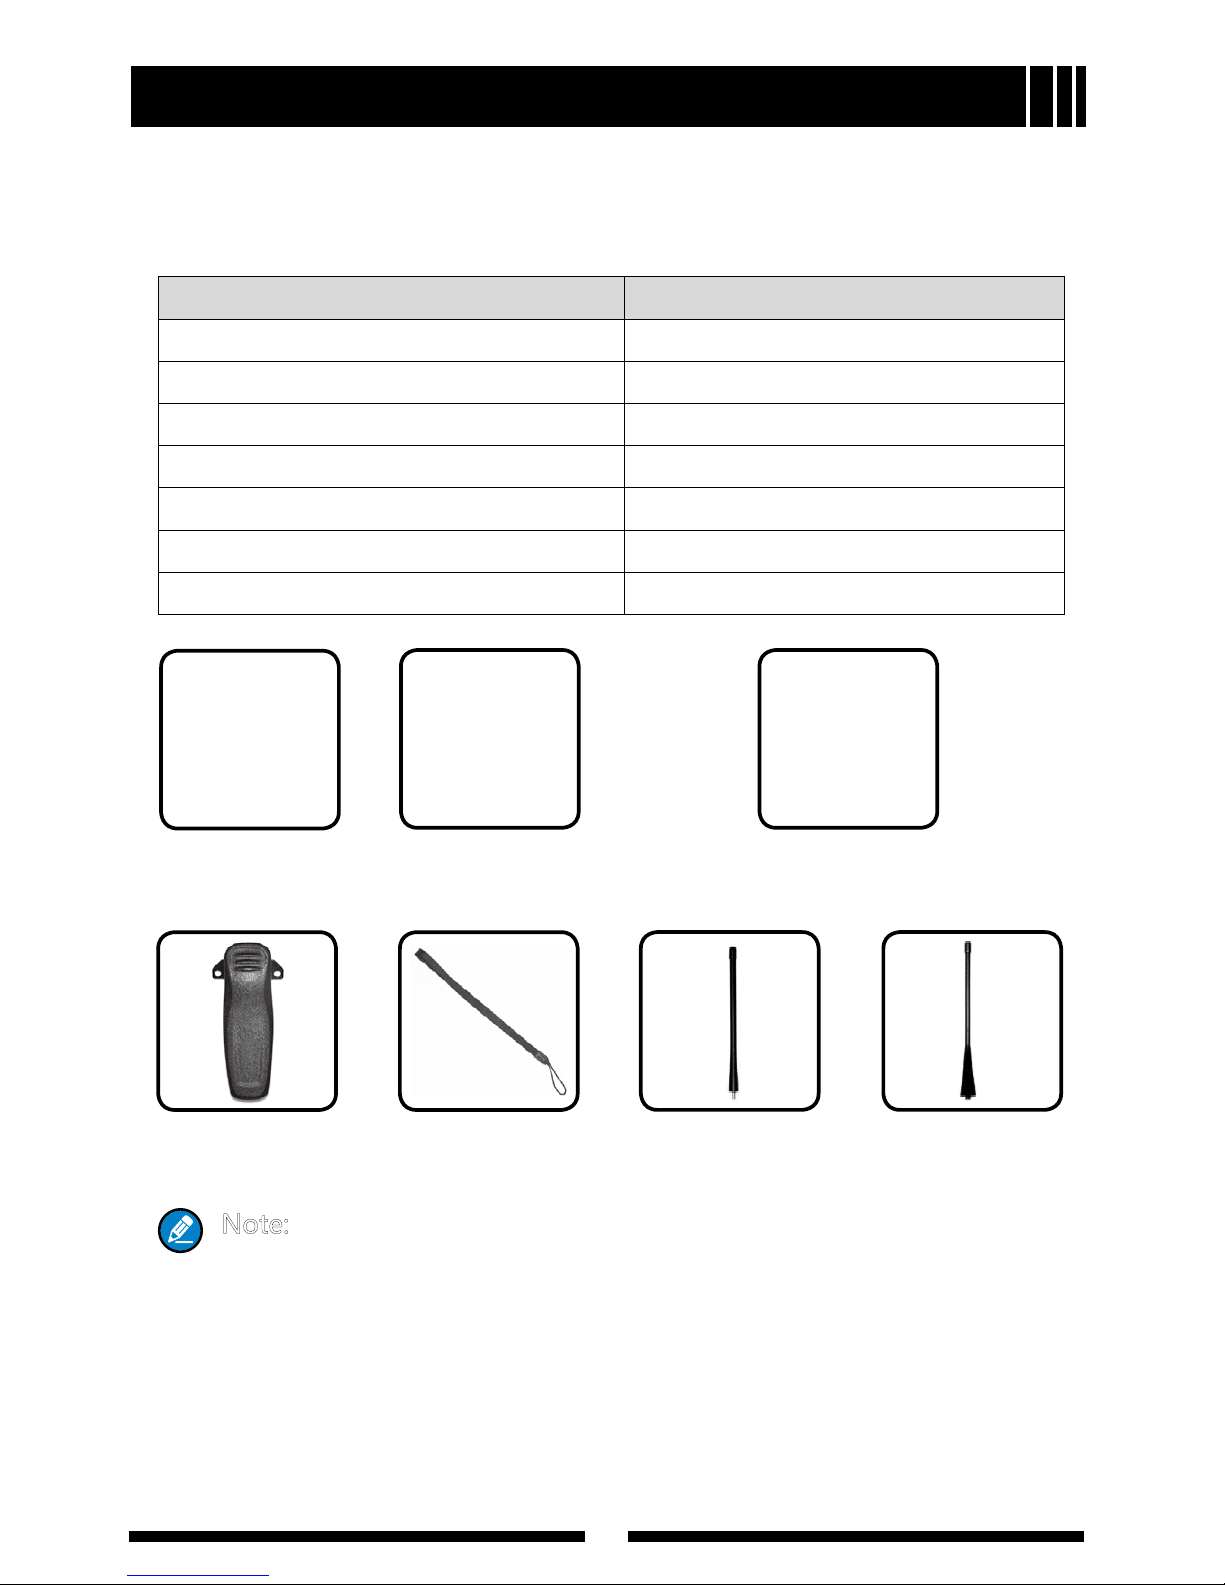
Product Inspection
Please unpack the package box carefully and check that all shipped items are
received; report any missing or damaged items to your reseller.
Accessories Supplied with the Radio
Item Qty. (PCS)
Antenna 1
Belt Clip 1
Strap 1
Battery 1
Rapid-Rate Charger 1
Switching Power 1
Owner’s Manual 1
Note:
1. Frequency band is marked on the label of antenna; if not, please
refer to the label on the radio unit for detailed frequency band
information.
2. The radio unit is shipped with the screws of belt clip mounted
from the factory.
Li-Ion Battery
Belt Clip Strap Antenna (VHF) Antenna (UHF)
Rapid-Rate Charger
(for Li-ion Battery)
Switching Power (different P/N for
different countries and areas)
4
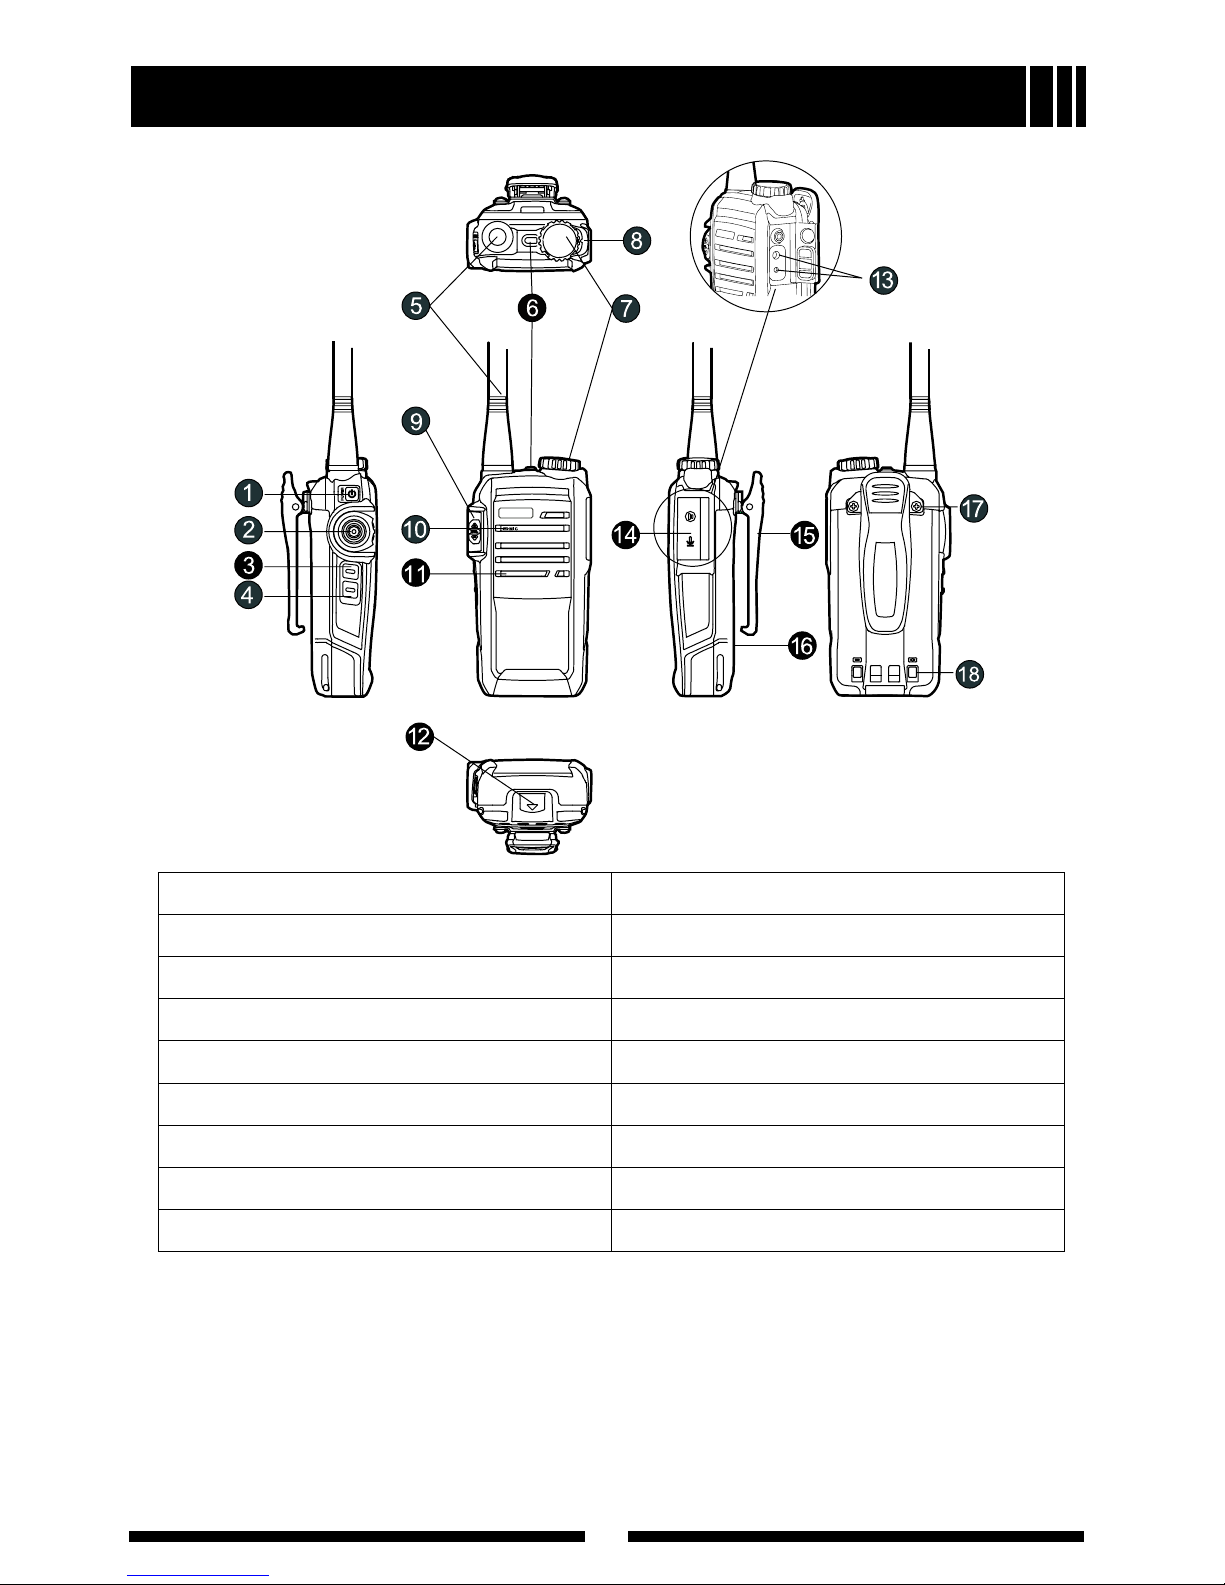
Radio Overview
(1) Power On/Off Key (10) Microphone
(2) PTT (Push-to-Talk) Key (11) Speaker
(3) SK1 (Side Key 1) (12) Battery Latch
(4) SK2 (Side Key 2) (13) Accessory Jack
(5) Antenna (14) Accessory Jack Cover
(6) LED Indicator (15) Belt Clip
(7) Channel Selector Knob (16) Battery
(8) Channel Indicator (17) Screw (Belt Clip)
(9) Volume Control Knob (18) Charging Piece
﹡PTT (Push-to-Talk) Key
Hold down the PTT key and speak into the microphone to transmit, and
release it to receive.
﹡SK1 (Side Key 1) / SK2 (Side Key 2)
SK1 and SK2 are programmable keys that can be assigned with long/short
press functions via CPS software and programming cable.
5
Radio Overview
Note:
Short Press Key press no longer than 1 second.
Long Press Key press longer than 1 second.
﹡LED Indicator
LED indications and alert tones are shown in the table below (see Advanced
Operations for details):
Status LED Indication and Alert Tone
Power On
1. The power-on alert tone is heard when the radio
is powered on.
2. When the current channel is a blank channel,
beeps are heard.
Radio Standby
The LED flashes blue if no operation is made or
no carrier is present within 2s. You can enable/
disable this LED indication via CPS software and
programming cable.
Low Battery Alert
The LED ashes red and a low pitched tone is heard
every ten seconds.
Transmitting
1. Red LED glows while the radio is transmitting.
2. When transmission times out, continuous beeps
are heard.
3. TOT Pre-alert: one beep is heard.
4.Transmitting PTT ID: continuous beeps
(programmable via CPS software and programming
cable) are heard.
5. Transmitting PTT ID is completed: a short beep
(programmable via CPS software and programming
cable) is heard.
Receiving The LED glows green when carrier presents.
Scanning
1. The LED flashes green every 1 second when
scanning is in process.
2. Scan Start Tone (programmable via CPS software
with programming cable): one beep is heard.
3. Green LED solidly glows when signal is received.
4. Scan Stop Tone (programmable via CPS software
with programming cable): one beep is heard.
Two beeps sound when the feature is disabled.

6
Radio Overview
VOX/Compandor/
Scrambler/Channel
Lock
Enable functions: one beep is heard.
Disable functions: two continuous beeps are heard.
﹡Channel Indicator
Used to indicate the currently selected channel.
﹡Battery Latch
Used to secure or remove the battery.
﹡Earpiece Jack & Programming Port
Used to connect accessories such as speaker/microphone, earpiece,
programming cable and cloning cable.
Battery Information
Initial Use
New batteries are shipped uncharged from the factory. Charge a new battery
for 5 hours before initial use. The maximum battery capacity and performance
is achieved after three full charge/discharge cycles. If you notice the battery
power runs low, please recharge the battery.
Applicable Battery Packs
To reduce the risk of injury, charge only the battery specied by Hytera. Other
batteries may burst, causing bodily injury and property damage.
Caution:
1. Do not dispose of the battery in fire!
2. Recycling and disposal of the battery shall comply with your local
regulations.
3. Never attempt to dismantle the battery.
Note:
1.Chargethebatteryatatemperatureamong5℃ -40℃ .Violation
of the said limit may cause battery leakage or even damage.
2. When charging the battery that is attached to a radio, turn the
radio off to ensure a full charge.
3. Never charge a wet battery or a wet radio with battery attached.
Please dry it with a soft cloth prior to charge.

7
Battery Information
4.The battery will eventually wear out. When the operating time
of a fully charged battery is noticeably shorter than its normal
performance, you need to buy a new one. Please replace it ASAP.
5. If the product shuts off automatically due to low battery, please
charge the battery soon, or the battery could suffer damage.
6. If you plan not to use the radio for a long time, please remove
the battery from it to avoid any unexpected damage.
7. Do not charge fully charged batteries for an "extra boost". This
action will significantly reduce battery life.
8. Do not insert the radio or battery into the charger when it
doesn't need to be charged, because continuous charging will
shorten the battery life.
To Prolong Battery Life
1. Battery performance will be greatly decreased at a temperature below 0℃.
A spare battery is necessary in cold weather. The cold battery unable to
work in this situation may work under room temperature, so keep it for later
use.
2. The dust on the battery contact may cause the battery cannot work or
charge. Please use clean dry cloth to wipe it before attaching the battery to
the radio.
Battery Storage
1. Fully charge a battery before you store it for a long time, to avoid battery
damage due to over-discharge.
2. Recharge a battery after several months’ storage (Li-Ion & Li-polymer
batteries: 6 months), to avoid battery capacity reduction due to over-
discharge.
3. Store your battery in a cool, dry place under room temperature, to reduce
self-discharge.
Charging the Battery
Use only the charger specied by Hytera. The charger’s LED indicates the
charging progress.
 Loading...