

Page 1

1
Preface
Thank you for your purchase of the HYT TC-300 Business Radio. TC-300 is unique for its
compact and delicate body. The customized wrist strap will give you exceptional
experience of portability, which especially suits for drivers and hotel staff.
This easy-to-use radio will deliver you secure, instant and reliable communications at
peak efficiency. Please read this manual carefully before use. The information presented
herein will help you to derive maximum performance from your radio.
MODELS COVERED IN THIS MANUAL
TC-300 UHF Two-way Radio
Page 2

2
Contents
Safety and General Information ........................................................................................ 3
Product Inspection ............................................................................................................ 4
Radio Overview................................................................................................................. 5
Battery Information............................................................................................................ 7
Antenna Information........................................................................................................12
Assembly and Disassembly............................................................................................12
Attaching/Removing the Battery............................................................................... 12
Attaching/Removing the Antenna............................................................................. 16
Attaching/Removing the Belt Clip............................................................................. 17
Attaching/Removing the Earpiece/Microphone........................................................19
General Radio Operations .............................................................................................. 20
Turning the Radio On/Off......................................................................................... 20
Adjusting the Volume............................................................................................... 21
Selecting a Channel................................................................................................. 21
Transmitting.............................................................................................................22
Receiving.................................................................................................................22
Programmable Auxiliary Functions.................................................................................. 22
Advanced Operations...................................................................................................... 23
CTCSS/CDCSS.......................................................................................................23
Battery Save ............................................................................................................ 23
Power Adjust............................................................................................................ 24
Time-out Ti mer (TOT) .............................................................................................. 24
Battery Strength Indicator........................................................................................ 24
Monitor..................................................................................................................... 25
Scan......................................................................................................................... 25
Busy Channel Lockout (BCL)................................................................................... 27
Low Battery Alert...................................................................................................... 27
VOX (Voice-Operated Transmit) .............................................................................. 27
Troubleshooting .............................................................................................................. 28
Care and Cleaning..........................................................................................................29
Optional Accessories....................................................................................................... 29
Glossary..........................................................................................................................30
Page 3
3
Safety and General Information
SAFETYTRAINING INFORMATION
Your HYT radio generates RF electromagnetic energy during transmit mode.
This radio is designed for and classified as “Occupational Use Only”, meaning
it must be used only during the course of employment by individuals aware of
the hazards, and the ways to minimize such hazards. This radio is NOT
intended for use by the “General Population” in an uncontrolled environment.
This radio has been tested and complies with the FCC RF exposure limits for
“Occupational Use Only”. In addition, your HYT radio complies with the following
Standards and Guidelines with regard to RF energy and electromagnetic energy levels
and evaluation of such levels for exposure to humans:
FCC OET Bulletin 65 Edition 97-01 Supplement C, Evaluating Compliance with FCC
Guidelines for Human Exposure to Radio Frequency Electromagnetic Fields.
American National Standards Institute (C95.1-1992), IEEE Standard for Safety Levels
with Respect to Human Exposure to Radio Frequency Electromagnetic Fields, 3 kHz
to 300 GHz.
American National Standards Institute (C95.3-1992), IEEE Recommended Practice
for the Measurement of Potentially Hazardous Electromagnetic Fields– RF and
Microwave.
The following accessories are authorized for use with this product. Use of accessories
other than those (listed in the instruction) specified may result in RF exposure levels
exceeding the FCC requirements for wireless RF exposure.
To ensure that your expose to RF electromagnetic energy is
within the FCC allowable limits for occupational use, always
adhere to the following guidelines:
DO NOT operate the radio without a proper antenna attached, as this may damaged
the radio and may also cause you to exceed FCC RF exposure limits. A proper
antenna is the antenna supplied with this radio by the manufacturer or antenna
specifically authorized by the manufacturer for use with this radio.
DO NOT transmits for more than 50% of total radio use time (“50%duty cycle”).
Transmitting more than 50% of the time can cause FCC RF exposure compliance
requirements to be exceeded. The radio is transmitting when the “TX indicator” lights
red. You can cause the radio to transmit by pressing the “PTT” switch.
Page 4

4
ALWAYS keep the antenna at least 2.5 cm (1 inch) away from the body when
transmitting and only use the HYT belt-clip which is listed in instructions when
attaching the radio to your belt, etc., to ensure FCC RF exposure compliance
requirements are not exceeded. To provide the recipients of your transmission the
best sound quality, hold the antenna at least 5 cm (2 inches) from your mouth, and
slightly off to one side.
The information listed above provides the user with the information needed to make
him or her aware of RF exposure, and what to do to as-sure that this radio operates with
the FCC RF exposure limits of this radio.
Electromagnetic Interference/Compatibility
During transmissions, your HYT radio generates RF energy that can possibly cause
interference with other devices or systems. To avoid such interference, turn off the radio in
areas where signs are posted to do so. DO NOT operate the transmitter in areas that are
sensitive to electromagnetic radiation such as hospitals, aircraft, and blasting sites.
Occupational/Controlled Use
The radio transmitter is used in situations in which persons are exposed as consequence
of their employment provided those persons are fully aware of the potential for exposure
and can exercise control over their exposure.
IMPORTANT
READ ALL INSTRUCTIONS
carefully and completely before using the
transceiver
SAVE THIS INSTRUCTION MANUAL- This instruction manual contains
important operating instructions for the Two-Way Radio
EXPLICIT DEFINITIONS
WORD DEFINITION
WARNING
Personal injury, fire hazard or electric shock
may occur.
CAUTION
Equipment damage may occur.
NOTE
If disregarded, inconvenience only. No risk
of personal injury, fire or electric shock.
Page 5

5
OPERATING NOTES
When transmitting with a portable radio, hold the radio in a vertical position with its
microphone 5 to 10 cm (2 to 4 inches) away from your mouth. Keep the antenna at
least 2.5 cm (1 inch) from your head and body.
If you wear a portable two-way radio on your body , ensure that the antenna is at least
2.5 centimeters (1 inch) from your body when transmitting.
PRECAUTIONS
WARNING! NEVER hold the transceiver so that the antenna is very close to, or
touching exposed parts of the body, especially the face or eyes, while transmitting.
The transceiver will perform best if the microphone is 5 to 10 cm (2 to 4 inches) away
from the lips and the transceiver is vertical.
WARNING! NEVER operate the transceiver with a headset or other audio accessories
at high volume levels.
CAUTION! NEVER short the terminals of the battery pack.
NEVER connect the transceiver to a power sourc e other than the Battery listed below
Such a connection will ruin the transceiver.
DO NOT push the PTT when not actually desiring to transmit.
AVOID using or placing the transceiver in direct sunlight or in areas with temperatures
below –30°C (–22°F) or above +60°C (+140°F).
DO NOT modify the transceiver for any reason.
MAKE SURE the flexible antenna and battery pack are securely attached to the
transceiver, and that the antenna and battery pack are dry before attachment.
Exposing the inside of the transceiver to water will result in serious damage to the
transceiver.
BE CAREFUL! The series transceivers employ waterproof construction, which
corresponds to IPX7 of the international standard IEC 60529 (2001), 1 m depth for 30
minutes. However, once the transceiver has been dropped, waterproofing cannot be
guaranteed due to the fact that the transceiver may be cracked, or the waterproof seal
damaged, etc.
The use of non-HYT battery packs/chargers may impair transceiver performance and
invalidate the warranty.
FCC CAUTION:
Changes or modifications to this device, not expressly approved by HYT, could void
your authority to operate this transceiver under FCC regulations.
Page 6
4
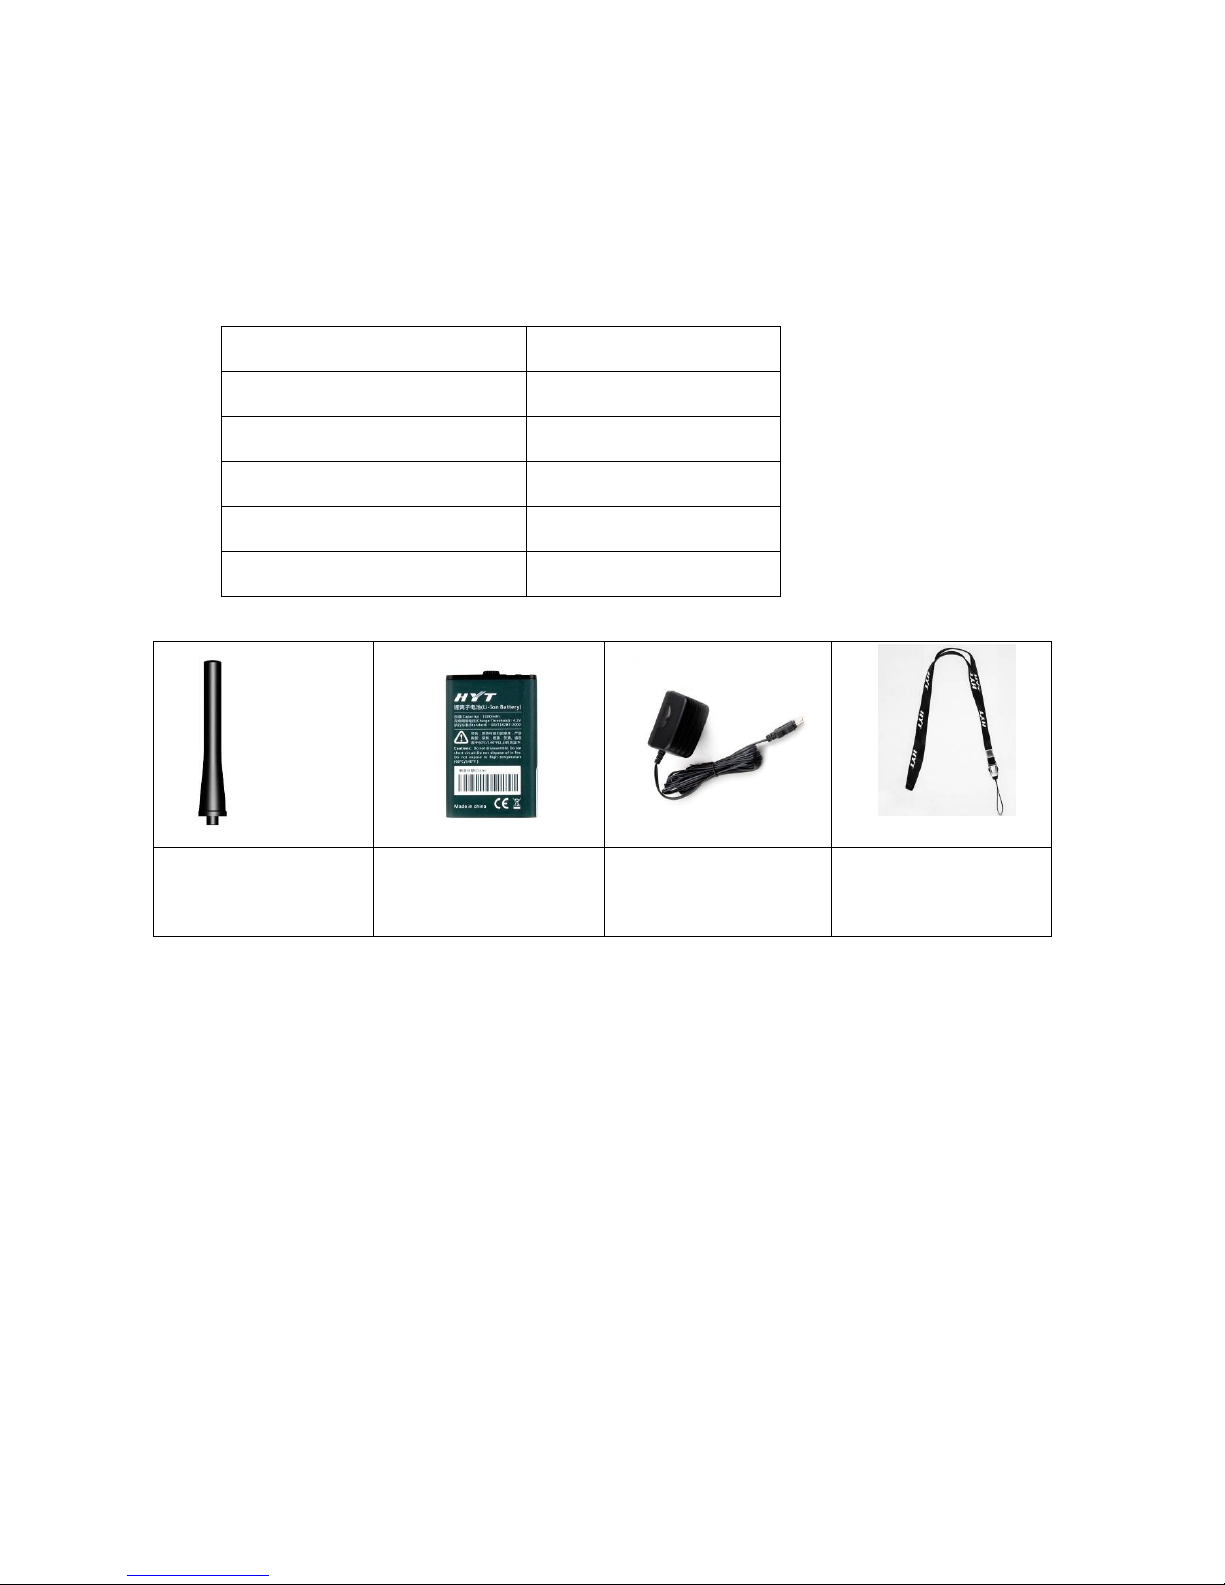
Product Inspection
Please unpack the package box carefully and check that all items shipped were received;
report any missing or damaged items to your dealer.
Accessories
Item Qty. (PCS)
Antenna 1
Strap 1
Li-Ion Battery 1
Switching Power 1
Owner’s Manual 1
Antenna Li-Ion Battery Switching Power (varying
in different countries and
regions)
Strap RO01
Note: Frequency band is marked on the label of antenna, if not, identify the frequency
band according to the color circle. Please refer to the label on the radio unit for detailed
frequency band information.
Page 7
5
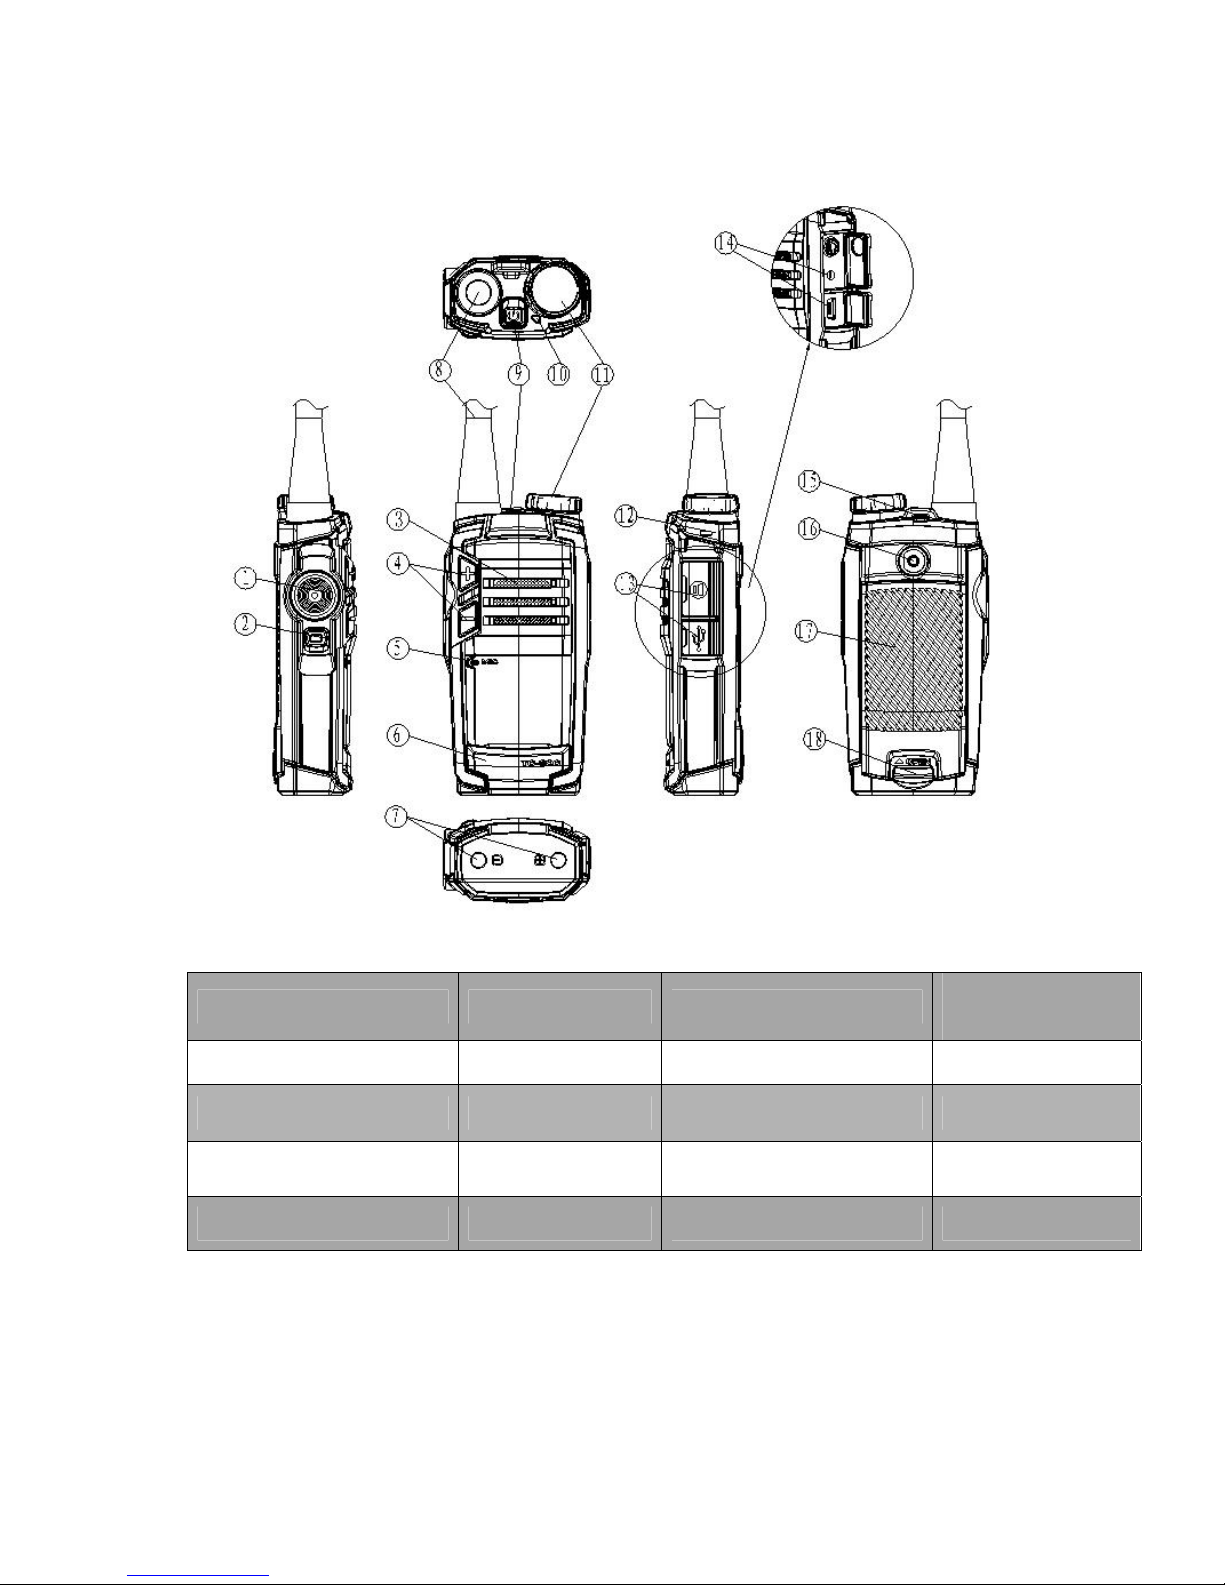
Radio Overview
(1) PTT (Push-to-Talk) Key (2) SK (Side Key) (3) Speaker
(4) Volume Adjust
Keys [+]/[-]
(5) Microphone (6) Nameplate (7) Charging Terminal (8) Antenna
(9) Power Switch (10) LED Indicator (11) Channel Selector Knob (12) Charge Indicator
(13) Accessory Jack Cover (14) Accessory Jack (15) Strap Hole (16) Screw (Belt Clip)
(17) Back Cover (18) Battery Latch
﹡PTT (Push-to-Talk) Key
Press and hold down the PTT key to transmit, and release it to receive.
﹡SK (Side Key)
Page 8

6
Side Key 1 is a programmable key that can be assigned with long press function and
short press function by your dealer.
See Glossary for definitions of short press and long press.
﹡LED Indicator
Status of LED indicator and alert tone see table below:
Power up in user mode
When the radio is turned on, the power up alert tone is heard.
When the current channel is a blank channel, the radio
sounds beep tone continuously.
Low battery alert
LED flashes red, and a low-pitched tone sounds at intervals
of 10 seconds.
Transmitting
LED glows red when transmitting.
When TOT timer expires, the radio sounds beep tone
continuously.
TOT pre-alert: a beep is heard.
Receiving LED glows green when carrier is present.
Scanning
Green LED flashes at every 1 second, while scanning is in
process.
Scan Start Alert Tone (programmable by your dealer): a beep
is heard.
Scan Exit Alert Tone (programmable by your dealer): a beep
is heard.
Power adjust
A low-pitched tone is heard when transmit power is switched
from high power to low power.
A high-pitched tone is heard when transmit power is switched
from low power to high power.
VOX
A high-pitched tone is heard when the VOX feature is
activated.
A low-pitched tone is heard when the VOX feature is
disabled.
Page 9

7
* Channel Selector Knob
Rotate the knob to select from channels 1 to 16.
* Power Switch
Long press the Power Switch until an alert tone is heard to turn the radio on.
To turn the radio off, do the same as you turn it off.
* Vol ume Adjust Keys
[+]/[-]
You may adjust the volume level through keys
[+]/[-].
* Battery Latch
Used to secure or remove the battery.
* Accessory Jack
The upper jack is used to connect audio accessories, and the lower jack is used to
connect accessories such as programming cable, cloning cable and power cord.
Battery Information
Initial Use
New batteries are shipped uncharged from the factory. Charge a new battery for 5 hours
before initial use. The maximum battery capacity and performance is achieved after three
full charge/discharge cycles. If you notice the battery power runs low, please recharge the
battery.
Applicable Battery Packs
To reduce the risk of injur y, charge only the battery specified by the manufacturer. Other
batteries may burst, causing bodily injury and damage.
Caution:
1. To avoid risk of personal injury, do not dispose of batteries in a fire!
2. Dispose of batteries according to local regulations (e.g. recycling). Do not dispose as
household waste.
3. Never attempt to disassemble the battery.
Battery Tips
1. When charging your battery, keep it at a temperature among 5℃ - 40℃. Temperature
Page 10

8
out of the limit may cause battery leakage or damage.
2. When charging a battery attached to a radio, turn the radio off to ensure a full charge.
3. Do not cut off the power supply or remove the battery when charging a battery.
4. Never charge a battery that is wet. Please dry it with soft cloth prior to charge.
5. The battery will eventually wear out. When the operating time (talk-time and standby
time) is noticeably shorter than normal, it is time to buy a new battery.
To Prolong Battery Life
1. Battery performance will be greatly decreased at a temperature below 0℃. A spare
battery is necessary in cold weather. The cold battery unable to work in this situation
may work under room temperature, so keep it for later use.
2. The dust on the battery contact may cause the battery cannot work or charge. Please
use clean dry cloth to wipe it before attaching the battery to the radio.
Battery Storage
1. Fully charge a battery before you store it for a long time, to avoid battery damage due
to over-discharge.
2. Recharge a battery after several months’ storage (Li-Ion & Li-polymer batteries: 6
months), to avoid reducing battery capacity due to over-discharge.
3. Store your battery in a cool, dry place under room temperature, to reduce
self-discharge.
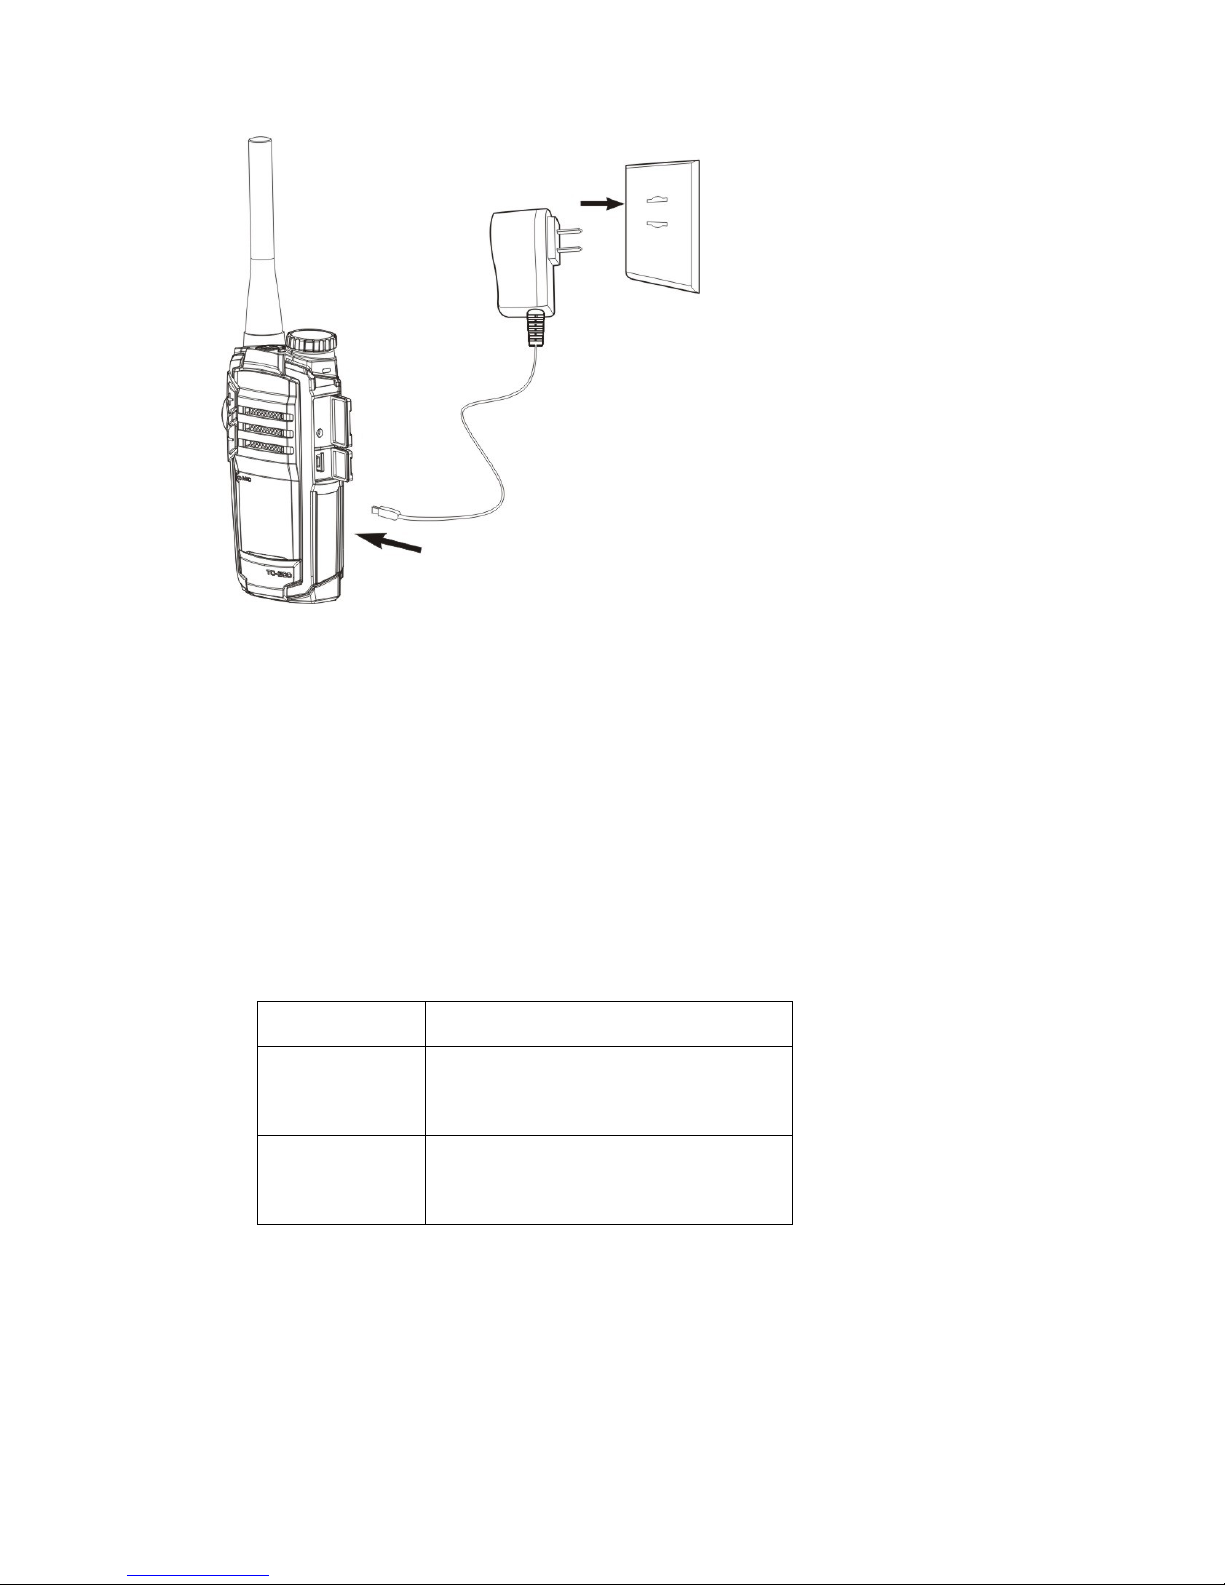
Charging the Battery
When the charge indicator flashes red and an alert tone sounds at intervals of ten
seconds indicating the battery power runs low, please recharge the battery. Use only the
charger specified by the manufacturer. The charger’s LED indicates the charging
progress.
Please follow these steps to charge your radio using the switching power:
Page 11
9
1. Plug the AC connector of the switching power into the AC outlet socket.
2. Plug the Mini USB connector of the switching power into the Mini USB jack of the
radio.
3. Make sure the radio is in well contact with the switching power. The charging process
initiates when the charge indicator glows red.
4. The charge indicator glows green when the battery is fully charged. Please remove
the radio then.
Status Charge Indicator
Battery is
charging.
Charge indicator solidly glows red.
Battery is fully
charged.
Charge indicator solidly glows green.
Please follow these steps to charge your radio using the desktop charger:
Page 12

10
1. Plug the AC connector of the switching power into the AC outlet socket.
2. Plug the Min i USB connector of the switching power into the Mini USB jack of the
charger.
3. Place the radio with the battery attached in the charger.
4. Make sure the radio is in well contact with the charger. The charging process initiates
when the charge indicator of the radio glows red.
5. The charge indicator of the radio glows green when the battery is fully charged.
Please remove the radio then.
Status Charge Indicator
Battery is
charging.
Charge indicator solidly glows red
Battery is fully
charged.
Charge indicator solidly glows green.
Please follow these steps to charge a battery using the desktop charger:
Page 13

11
1. Plug the AC connector of the switching power into the AC outlet socket.
2. Plug the Min i USB connector of the switching power into the Mini USB jack of the
charger.
3. Place the battery in the charger.
4. Make sure the battery is in well contact with the charging terminals. The charging
process initiates when the orange LED lights.
5. The greed LED lights about 3 hours later indicating the battery is fully charged.
Please remove the battery then.
Status Charge Indicator
Battery is
charging.
Orange LED solidly glows.
Standby or
Battery is fully
charged
Green LED solidly glows.
Page 14

12
Antenna Information
Stubby antenna is ideal for communication within limited range. Thin and long
antenna optimizes communication coverage, and its flexible and soft characteristic
makes it ideal for wearing your radio on the belt.
Communication range may vary with terrain and your operating conditions. Rainy
days or forest locations may narrow your communication range, please make
preparation in advance to avoid potential inconvenience.
Assembly and Disassembly
Attaching/Removing the BatteryAttaching the Battery
1. Hold the top part of the radio’s body, and slide the battery latch in the direction of
arrow ①, as shown in figure 1.
Figure 1
2. When the rear cover tilts with its bottom up, release the battery latch and lift the rear
cover from the radio’s body, as shown in figure 2.
Page 15

13
Figure 2
3. Hold the battery with the Logo side facing upwards, and insert the tab at the top of the
battery into the slots at the top of the radio’s body, as shown in figure 3. Note: Align
the discharging terminal of the battery with the radio’s charging piece.
Figure 3
4. Press the bottom of the battery towards the radio, until the battery is securely inserted
into the battery slot, as shown in figure 4.
Note: if the battery is not well locked, please remove the battery and attach it again.
Page 16

14
Figure 4
5. Fit the extensions at the top of the rear cover into the slots at the top of the radio’s
body, as shown in figure 5.
Figure 5
6. Slightly press the bottom of the rear cover towards the radio until a click is heard.
Note: if the rear cover is not well locked, please remove the rear cover and attach it again.
Page 17

15
Figure 6
Removing the Battery
1. Turn off the radio, if it is turned on. Then follow step s 1 and 2 in the section “Att aching
the Battery” to remove the rear cover.
2. Hold the top part of the radio's body , and lif t the battery by the notch at its bo ttom, and
then remove the battery from the radio’s body, as shown in figure 1.
Figure 1
Page 18

16
Attaching/Removing the Antenna
Attaching the Antenna
1. Align the threaded end of the antenna with the radio’s antenna connector.
2. Turn the antenna clockwise to fasten it.
Removing the Antenna
Turn the antenna counter-clockwise until you can remove it.
Page 19

17
Attaching/Removing the Belt Clip
Attaching the Belt Clip
1. Align the D-tab at the bottom of the belt clip with the D-slot at the back of the radio’s
body. Then secure the belt clip on the back of the radio's body (rotate the belt clip if
necessary), as shown in figure 1. Align the belt clip screw with the threaded hole on
the radio, and then secure the screw.
Figure 1
2. Rotate the belt clip 90 degrees to a normal use position, as shown in figure 2.
Figure 2
Page 20

18
Removing the Belt Clip
Rotate the belt clip 90 degrees, and turn the screwdriver counter-clockwise to loosen the
screw. Please refer to the operations for attaching the belt clip, as shown in figure 3.
Figure 3
Attaching/Removing the Battery When the Belt Clip is Attached
When the belt clip is attached to the radio, please first rotate the belt clip 90 degrees (as
shown in figure 1 and 2), and then attach/remove the rear cover and battery by the steps
mentioned above.
Figure 1
Page 21

19
Figure 2
Attaching/Removing the Earpiece/Microphone
Attaching the Earpiece/Mini USB
1. Open (not remove) the accessory cover, as shown in figure 1.
Figure 1
2. Plug the audio accessory firmly into the accessory jack, and plug the Mini USB into
the USB jack, as shown in figure 2.
Page 22

20
Figure 2
Removing the Earpiece/Mini USB
Open the accessory cover, and then remove the earpiece or Mini USB.
Note: Using the radio with audio accessory may affect the waterproof performance of the
radio.
General Radio Operations
Turning the Radio On/Off
Long press the Power Switch until an alert tone is heard to turn the radio on.
To turn the radio off, do the same as you turn it off.
Page 23

21
Figure 1
Adjusting the Volume
You may adjust the volume level through keys [+]/[-].Press the [+] key to increase the
volume, or press the
[-] key to decrease the volume.
Figure 2
Selecting a Channel
Turn the Channel Selector Knob to select a channel.
Page 24

22
Figure 3
Transmitting
To transmit, press and hold down the PTT key, speak into the microphone at your normal
voice level. Hold the radio about 2.5 to 5 centimeters away from your mouth.
Receiving
Release the PTT key to receive.
Programmable Auxiliary Functions
The SK key is a programmable function button. Your dealer may assign any of the
following auxiliary functions to a short or long programmable key-press.
None
Power Adjust
Monitor
Monitor Momentary
Scan
Scrambler
VOX (Voice-Operated Transmit)
Compandor
Page 25

23
Squelch Off
Squelch Off Momentary
Battery Strength Indicator
Channel Lock
Note See Glossary for definitions of Momentary, Monitor and Scan.
Advanced Operations
The following functions are programmable by your dealer.
CTCSS/CDCSS
Set up talkgroups with unique CDCSS/CTCSS to prevent unwanted conversations on the
same frequency. If CTCSS/CDCSS is set on the current channel, CTCSS/CDCSS match
is required for the radio to unmute to an incoming signal. If CTCSS/CCSS is not set, the
radio can receive calls from all users operating on the same frequency. Your dealer may
set CTCSS/CDCSS for some channels.
This feature does not mean that your conversation will not be heard by others. Radios that
set with the same CTCSS/CDCSS, or no CTCSS/CDCSS, can receive from you.
Note: See Glossary for definitions of CTCSS and CDCSS.
Battery Save
The Battery Save feature is automatically activated once no activity on the channel and no
operation performed (no key press and no knob selection), for extended operation time.
Once the radio detects no activity on the channel and no operation performed (no key
press and no knob selection) during radio standby time, it shall automatically enter sleep
mode ten seconds later. Pressing any key or receiving a signal will restore the radio to
normal operation and exit from Battery Save.
Note: See Glossary for the definitions of Battery Save and Standby.
Page 26

24
Power Adjust
A press of the programmed Power Adjust key switches the transmit power level between
high and low power.
Time-out Timer (TOT)
Limits the amount of time the radio user can continuously transmit on a channel. This can
also protect your radio from damage due to excessive transmission. If the user holds
down the PTT longer than the preprogrammed limit, the radio automatically stops
transmitting, and generates a warning tone until the PTT is released.
Your dealer may program the alert tone that sounds before the TOT timer nearly expires.
Note: See Glossary for the definition of Time-out Timer.
Battery Strength Indicator
The TC-300 allows you to simply press one button to illuminate the LED batter gauge,
which emits different indications representing battery strength levels until the key is
released.
The LED glows different colors to represent battery strength levels:
Battery Strength LED Indication
70%-100% Green LED solidly glows
50%-70% Orange LED solidly glows
30%-50% Red LED solidly glows
10%-30% No indication is shown when programmable key is
pressed; LED flashes red while radio is operating.
Less than 10% No indication is shown when programmable key is
pressed. While the radio is standby, LED flashes red
and a low-pitched tone sounds at intervals of ten
seconds. Pressing the PTT then shall cause the radio
to emit transmission prohibit tone.
Page 27

25
Monitor
Holds down the programmed Monitor key to enter Monitor mode, and release it to exit.
Scan
The Scan feature enables a two-way radio to continuously scan each channel for activity.
Press the programmed Scan key to initiate scanning channels in the order as they appear
in scan list. Green LED flashes during the scan process, and solidly glows when activity is
detected and signaling condition is satisfied on a channel. Press the key again to exit
scanning.
When scanning is active, the radio continuously scans for activity on scan list members.
Once activity is detected on a channel, scanning pauses on the active channel for you to
receive activity. Your dealer can choose channels that you wish to scan and list them in a
scan list.
No Priority Channel
Assuming a scan list with 6 channels, if all the channels are non-prioritized, the normal
scan operation would proceed in the following sequence, as shown in figure 1.
Figure 1 Normal Scan Sequence
Priority Channel Scan
If you prioritize Channel 2 as Priority 1, the scan operation would proceed in the following
sequence, as shown in figure 2.
Page 28

26
Figure 2 Priority Scan Sequence
Scan On/Off
You can enter scan mode through any of the following two methods:
(1) Key operation
Press the programmed Scan key to enter scan mode, provided that there’re no less than
2 members in the scan list.
(2) Auto
When Auto Scan is enabled for a channel, the radio shall automatically enter scan mode
when it is switched to this channel.
You can exit scan mode through any of the following three methods:
(1) Key operation
Press the programmed Scan key to exit scan mode.
(2) Auto
The radio automatically exits from scan mode when it is switched to another channel.
(3) Turn the radio off.
Talk Back
Defines whether the user is able to PTT the radio and talk back on the channel on which
the radio currently stops.
When checked, if the radio stops on a channel, the radio user is able to PTT the radio and
talk back on that channel. If the radio does not stop on any channel, the user is able to
PTT the radio and talk back on the predefined channel.
Priority Channel Scan
Page 29

27
Enable you to constantly monitor & keep an update on the activities on the most
commonly used channel so that messages will not be missed. Your dealer may program
priority channel via the programming software. Check with your dealer for details.
When scanning remains on a non-priority channel, the radio continues to monitor activities
on the priority channel, and jumps to the priority channel if activity is detected.
Busy Channel Lockout (BCL)
Avoid interference with the users using the same channel by preventing transmission if
another talk group is already on the air. The radio will generate a continuous tone upon
PTT press if a transmission is not allowed. Release the PTT to cancel the tone.
Note: See Glossary for the definition of BCL
Low Battery Alert
Should the battery level run low, LED flashes red and a low-pitched tone sounds at every
ten seconds to alert users to recharge the battery.
VOX (Voice-Operated Transmit)
You can transmit hands free with the use of optional accessories. The radio will
automatically begin transmitting when you speak, and terminate transmitting when you
stop talking.
Before you can transmit hands free,
1. Select the PTT/VOX switch on the earpiece to VOX.
2. Plug the earpiece into the accessory jack of the radio.
3. Press the programmed VOX key to activate the VOX feature.
4. Two seconds later (green LED goes out and no audio is output from the speaker),
speaker into the earpiece microphone and your voice will be transmitted.
Operation Instruction:
1. Press the programmed VOX key to activate/disable the VOX feature, with
corresponding alert tone.
2. The VOX feature is disabled automatically after the radio is turned off or
Page 30

28
programmed.
3. VOX earpiece is necessary.
4. You dealer may set VOX sensitivity or disable the VOX feature through the
programming software. The VOX key is null when the VOX feature is disabled.
Note:
1. If you select the PTT/VOX switch on the earpiece to PTT, you are able to transmit by
press of the external PTT, no matter whether the VOX feature is enabled.
2. If you select the PTT/VOX switch on the earpiece to PTT, you are disallowed to push
the switch from PTT to VOX, this action shall cause the radio to continuously
transmit.
3. You can select VOX sensitivity according to the surrounding noise level. Activating
the VOX feature in high noise environment shall cause the radio to continuously
transmit.
4. When continuous transmission occurs, push the PTT/VOX switch from VOX to PTT,
or turn on the radio again to restore the radio to operational use.
Note: to order accessories, please contact your dealer.
Troubleshooting
Symptom Solution
Cannot power on the radio.
The battery has run out. Please recharge
the battery or replace it with a new one.
The battery is not properly installed.
Please remove the battery and attach it
again.
The operating time is noticeably
shorter than normal, even though
the battery is properly charged.
The battery has worn out, and it is time to
buy a new battery.
The battery is not fully charged. Make
sure that you remove the battery from
Page 31

29
charger after the charger LED glows
green.
Cannot talk to or hear group
members.
Make sure radios have the same channel,
and CTCSS/CDCSS settings.
Make sure you are within their
communication range.
Hear non-group members
Send the radio to your dealer to change
your CTCSS/CDCSS settings, and so as
your group members.
No voice or low voice while
transmitting
Make sure the volume control knob is
positioned at the maximum volume.
Send the radio to your dealer for
microphone detection.
Noise always on
Group members are too far away to
receive their call. Please go within the
communication range and re-power on
the radio to try.
Care and Cleaning
Do not handle the radio by its antenna or external earpiece directly.
Do not place the radio in a dusty or dirty environment.
Clean the radio with a lint-free cloth to remove dirt or grease, to avoid poor contact
due to excessive dust.
Clean the radio using a lint-free cloth moistened with clean water and a mild
dishwashing liquid.
Avoid subjecting the radio to corrosives, solvents or spirits.
Optional Accessories
Page 32

30
Earbud with in-Line PTT &
VOX ESS09
Earset with in-Line MIC &
PTT & VOX EHS09
Earset with Boom MIC &
in-Line PTT & VOX EHS10
Li-Ion Battery (1700mAh)
BL1715
Rapid-Rate Charger (for
Li-Ion Battery) CH05L01
Vehicle Power Adapter
PV1001
Remote Ring PTT Switch
(Mini USB port) POA18
Belt Clip BC15
PU Carrying Case
(non-swivel) (blue) PCN002
Waterproof Bag (yellow
grinding PVC) LCYY02
Note: Pictures are for reference only. Image may vary from actual product. And
description shall remain the same.
Glossary
Name Description
Short Press Key press shorter than 1 second.
Long Press Key press longer than 1 second.
Standby In normal mode, no key operation is made on the
Page 33

31
radio and the radio is in receiving status.
CTCSS/CDCSS
CTCSS/CDCSS is transmitted along with the
carrier and at a sub-audible frequency. The Tx
CTCSS/CDCSS of the transmitting party must
match the Rx CTCSS/CDCSS of the receiving
party, for the receiver to unmute speaker and output
audio.
Battery Save
This function can save battery power and prolong
radio operation time. Once no activity on the
channel and no operation performed, the radio shall
be on and off alternately.
Time-out Timer (TOT)
Limits the amount of time the radio user can
continuously transmit on a channel. This can also
protect your radio from damage due to excessive
transmission.
Squelch
Eliminates noise from the radio’s speaker. If the
incoming signal is not strong enough to produce a
clear transmission, then it should not be heard. This
helps to filter out unwanted noise. If the incoming
signal strength satisfies the squelch threshold, the
radio shall open squelch and unmute its speaker.
Squelch Off
Always unmute speaker to receive audio as well as
background noise.
Monitor
Carrier condition must be satisfied for the radio to
unmute to an incoming call, regardless of
CTCSS/CDCSS condition.
Momentary
Holds down a function key to activate the status,
and release it to exit. Non-momentary: Press a
function key to activate the status, and press it
Page 34

32
again to exit.
Scan
The Scan feature enables a two-way radio to
continuously scan each channel for activity.
Busy Channel Lockout (BCL)
Avoid interference with the users using the same
channel by preventing transmission if another talk
group is already on the air.
VOX (Voice-Operated Transmit)
The radio will automatically begin transmitting when
you speak.
HYT endeavors to achieve the accuracy and completeness of this manual, but no
warranty of accuracy or reliability is given. All the above specifications and design are
subject to change without notice due to continuous development.
No part of this manual may be copied, reproduced, translated, stored in a retrieval system,
distributed, or transmitted in any form or by any means, electronic or mechanical, for any
purpose without the express written permission of HYT.
 Loading...