

HYSEN HY03WE-4, HY03WW-4 User Manual
Web:www.cn-hysen.com // Email:hysen@cn-hysen.com Web:www.cn-hysen.com // Email:hysen@cn-hysen.com
1 2
HY03WE-4/HY03WW-4 Touch Screen Heating
Thermostat Manual
Product Summary
This new design heating thermostat aims at market demand,it has large LCD display.Easy operation, complete functions.It can
be control motorized ball valve,motorized valve,thermal valve,solenoid valve, heater,electric heating film,electric heating
carbon crystal.It is used for floor heating.
Technical Data
❖ Power Supply: AC200-240V, 50/60HZ
❖ Load Current: 3A(Water Heating); 12A/16A(Electric Heating)
❖ Accuracy: ±0.5ºC
❖ Set-point Temperature Range: 5ºC - 35ºC
❖ Limit Temperature Range: 5-99℃
❖ Consumption: <0.3W
❖ Temperature Sensor: NTC
❖ Size: 86*86*17mm (H*W*D)
Features
❖ Large LCD touch screen with blue backlight display and double temperature display mode
❖ Time display (minutes,hours,weeks)
❖ 6 period programmable controlling temperature setting
❖ Internal and external temperature sensor for choice
❖ Room temperature display precision is 0.5,inner precision is 0.1
❖ Setting temperature meet user’s demand of room temperature
❖ Memory function when power failure,protect your setting from power failure
❖ Room temperature automatically calibration function
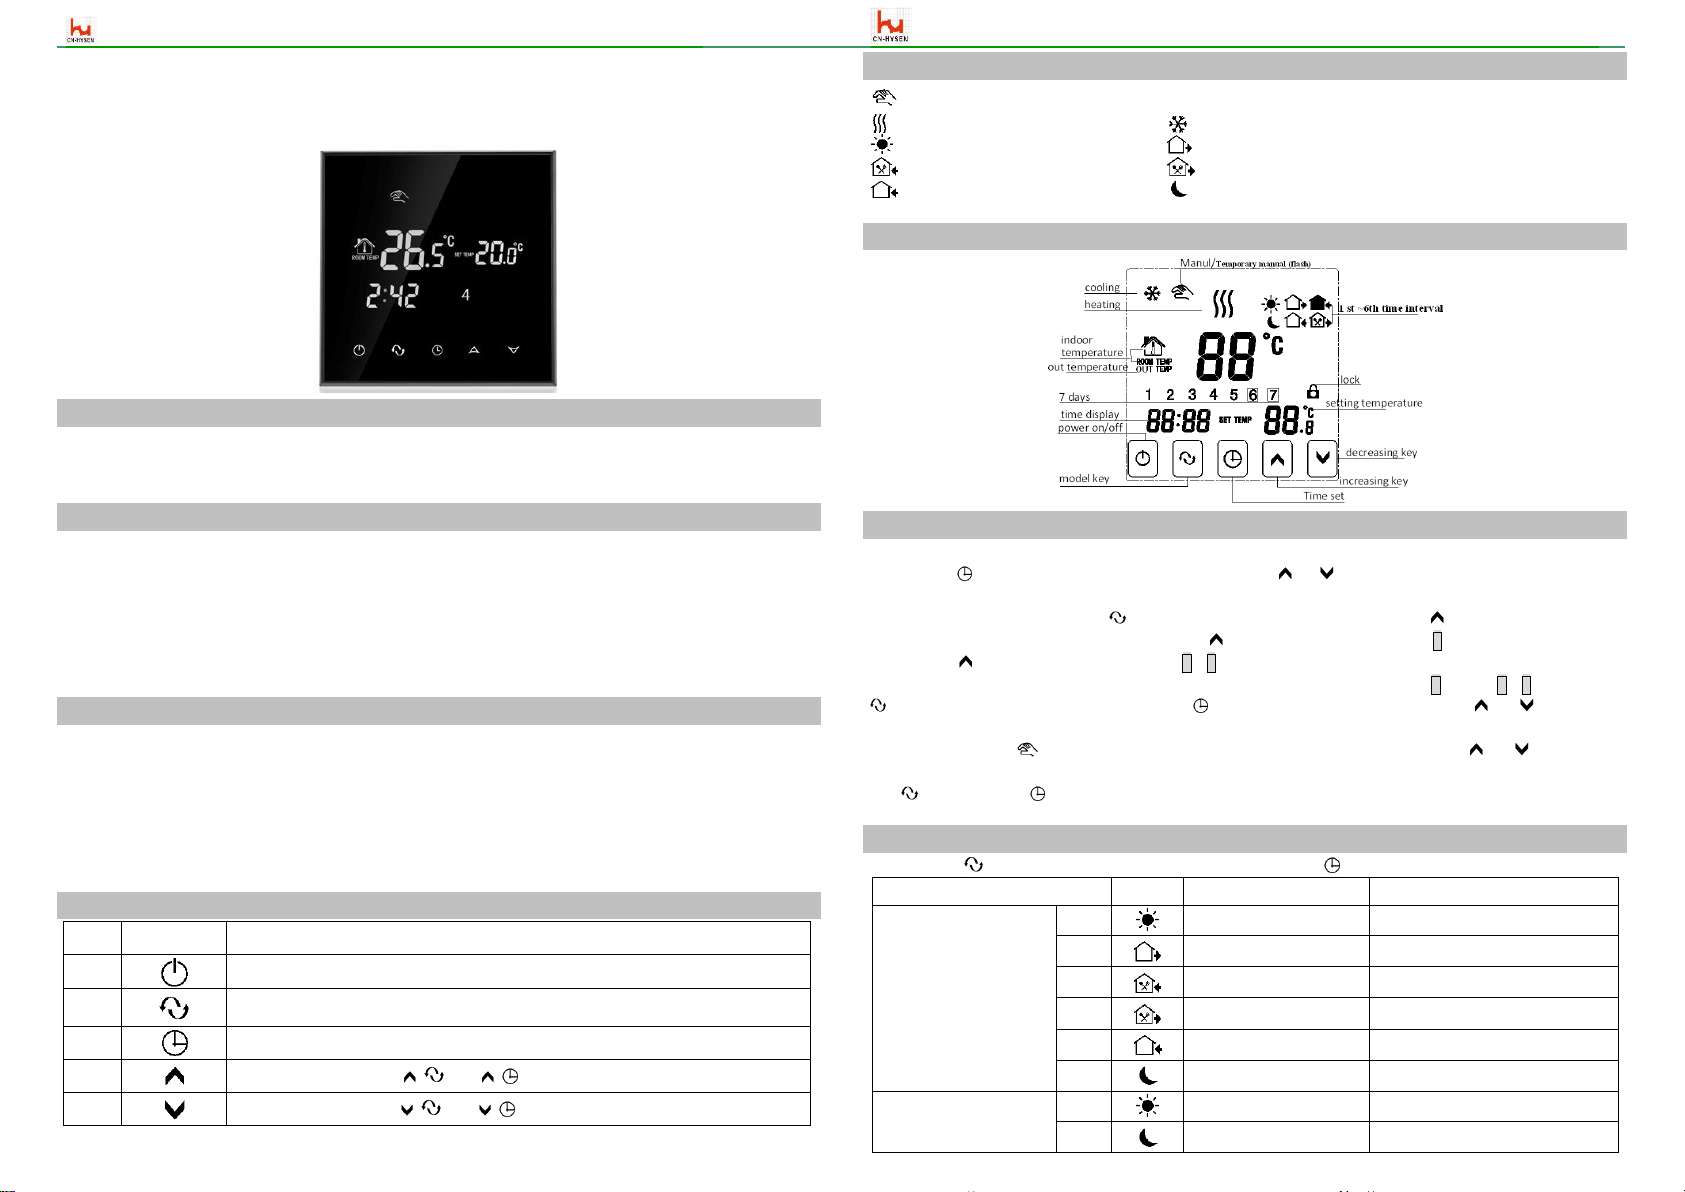
Button description
NO.
signal
Description
1 on / off
2
Mode key:switch over auto/manual time interval control and temporary manual,long press
enter into time interval setting function
3
Time setting:hours,minutes,weeks setting.
4
Higher temperature setting, + and + to increase programmable parameter
5
Lower temperature setting, + and + to decrease programmable parameter
Function and display
“ ”manual control(temporary manual control when flashing,auto control when no this sign display);
“ ” it is heating; “ ” open anti-freezing function;
“ ” get up in morning,the first time interval; “ ” go out in morning,the second time interval;
“ ” back home at noon,the third time interval;“ ” go out at noon,the fourth time interval;
“ ” back home at night,the fifth time interval; “ ” sleep at night,the sixth time interval;
Operation diagram
Time and time interval setting
1)Time setting
Press time key“ ”,time zone display minute,hour,week,press key“ ”or“ ”to adjust time.
2)Time interval temperature auto control setting
First step,select time interval first,press “ ” screen display“LooP”(cycle control),then press “ ”,screen
display“12345”(Monday to Friday control mode); press “ ” for 2 times,screen display“123456”(Monday to Saturday control
mode);press “ ” for 3 times,screen display“123456、7”(Monday to Sunday control mode);
Second step,time interval time and temperature setting, when screen display “12345”or“123456”or123456、7”,press
“ ”enter into time interval temperature setting,press “ ” enter into time interval time setting,press“ ”or “ ” to adjust and
save automatically.
Note:when auto control “ ”will disappear,if need re-set temperature when auto control,can press “ ”or “ ” to adjust.
3)Modify interval time control setting
Press“ ” first, then press “ ”switch to the time option to modify time of time interval.
Time interval programming
Press menu key“ ”,can enter into time interval setting,then press time key“ ”can enter into interval time setting.
Period
Icon
Default Period Time
Default Period Temperature
Working Day
1
06:00
20℃
2
08:00
15℃
3
11:30
15℃
4
12:30
15℃
5
17:30
22℃
6
22:00
15℃
Weekend
1
08:00
22℃
2
23:00
15℃

Web:www.cn-hysen.com // Email:hysen@cn-hysen.com Web:www.cn-hysen.com // Email:hysen@cn-hysen.com
3 4
1,The factory default temperature value of time interval 3 and 4 are the same as period 2,please modify
default temperature when it’s necessary.
2,Setting temperature is“00”, this time interval is shutdown.
3,View out temperature value (floor temperature)
(1)Touch screen version(HY03WE,HY03WW series):when internal control temperature and external limit temperature(high
temperature protection),under power on state,press time key not move first,then press on/off key together to switch and view
external temperature (this time measure temperature display zone displays OUT TEMP temperature value),press time key to
display room temperature;
(2)Button version(HY-2B03H,HY-02B07H,HY-02B09H series):when internal control temperature and external limit
temperature (high temperature protection),under power on state,press mode key not move first,then press on/off key together
to switch and view external temperature (this time measure temperature display zone displays OUT TEMP temperature
value),press mode key to display room temperature;
Advanced Setting(suggestion:operated by technician)
(1)Touch screen version(HY03WE,HY03WW series):under power off state,first press not move,then press together
enter into advanced setting,it will save after backlight is out,press to set next data
(2)Button version(HY-2B03H,HY-02B07H,HY-02B09H series):under power off state,first press not move,then press
together enter into advanced setting. ,it will save after backlight is out,press to set next data
No.
Symbols
Setting Item
Parameter Setting Function
Factory Default
1
SEN
Sensor control option
0:internal sensor
1:external sensor
2:internal control temperature,
external limit temperature
0:internal sensor
2
OSV
Limit temperature value
of external sensor
5-99℃
42℃
3
dIF
Return difference of limit
temperature value of
external sensor
1-9℃
2℃
4
SVH
Set upper limit
temperature value
5-99℃
35℃
5
SVL
Set lower limit
temperature value
5-99℃
5℃
6
AdJ
Measure temperature
Measure temperature,check and
calibration
0.1℃ precision
Calibration (actual
temperature)
7
FrE
Anti-freezing function
00:anti-freezing function shut
down
01:anti-freezing function open
00:anti-freezing function
shut down
8
POn
Power on memory
00:Power on no need memory
01:Power on need memory
00:Power on no need memory
9 FAC
Factory default
08:just display,no other meaning
00:Restore factory default
08
Note:hysteresis (return temperature) description:the factory default of external sensor limit temperature(OSV) set as 42℃,
external sensor limit temperature hysteresis(dIF) set as 2,when temperature up to 44℃,relay stop output,when temperature
drops to 40℃,relay output again and heating.(operation when room temperature lower than setting temperature)
Sensor fault hint
Please select internal,external sensor working mode correctly.If it is choose wrong or sensor is fault (breakdown),LCD
interface will display“Err”,temperature controller stops heating until fault is eliminated. Special Hint:installation cable
Please select:water heating selects 1.5-2.5mm2 rigid line;electric heating select above 2.5mm2 rigid line.
Power wiring diagram
Electric heating wiring diagram Water heating wiring diagram
(disconnection when electric valve close)
Water heating no external sensor wiring diagram Water heating no contact wiring diagram
(disconnection when electric valve close) (disconnection when electric valve close)
Installation
Warning:please wiring right strictly according to the wiring diagram,do not make water,mud and other debris into the
thermostat,otherwise it will cause thermostat damage!
1,open main control panel,
with 3.5mm slotted point
screwdriver along the
inclined plane until to card
depths of 4mm, pry up
slightly to open the card
hook
2,connect back panel and
power,wire as per wiring
diagram,fasten back panel
on cassette with M4 screw
3,connect winding
displacement of back
panel and upper panel
4,Hang up with 30° to 2
hooks,press on the 2
bottom corners,stuck on the
upper shell, installation
finished.
 Loading...