

Page 1
UL 325 Standard For Safety
1
3
2
Public side
3
Public side
Public side
2
4
Protection Against Entrapment
HySecurity Gate Operators
UL 325 – 2016
Quick Start - Supplement
Revision J
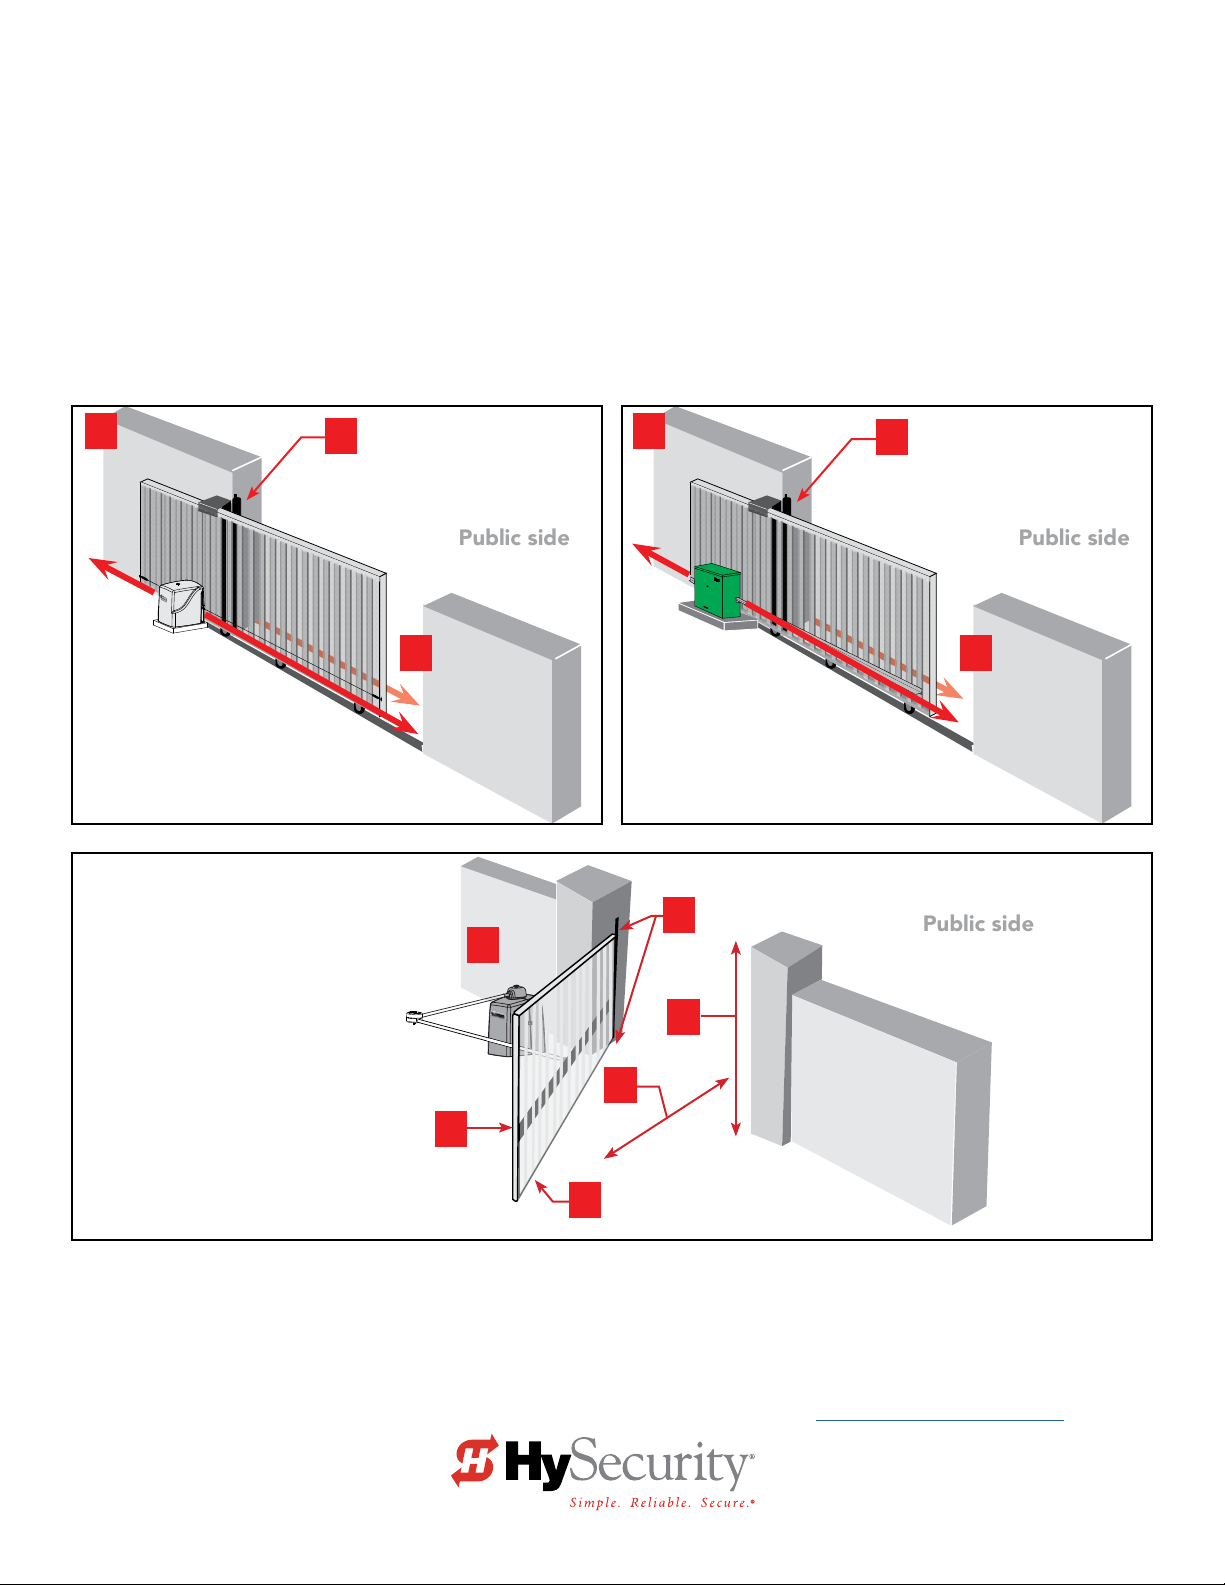
Trailing End
Slide Gates:
Potential Zones for
Entrapment Protection
1. Draw-in zones
2. Leading end
3. Trailing end
Swing Gates:
Potential Zones requiring
Entrapment Protection
1. Leading Edge
2. Bottom Edge
3. Entry / Exit
4. Posts
5. Post Pivot / Pinch Points
6. Arm Movement
Draw-in Zones
Wired edge sensors can protect
areas of entrapment along
posts or walls
Leading End
Secure side
6
1
1
Trailing End
Slide Gates:
Potential Zones for
Entrapment Protection
1. Draw-in zones
2. Leading end
3. Trailing end
5
5
4
3
3
2
Secure side
Draw-in Zones
1
Wired edge sensors can protect
areas of entrapment along
posts or walls
Leading End
2
Secure side
Drawings NOT TO SCALE
This document supplies site planning scenarios and reference tables that help explain the UL 325-2016 requirements for
monitoring of external entrapment protection sensors. HySecurity is monitoring Normally Closed (NC) sensors to conform to
UL 325 monitored entrapment protection requirements.
Approved sensors recommended for use with HySecurity gate operators are specied in this document.
For more information regarding UL 325-2016, refer to the HySecurity website section: www.hysecurity.com/gatesafety
Page 2

Important Safety Information
WARNING
A moving gate or barrier arm, bollard, or wedge can cause serious injury or death. It is therefore incumbent on the site designer, installer, and
property owner to ensure that these hazards are mitigated and the public is warned of the existence of a potential hazard. Read all the product
safety information prior to installation. Verify the gate operator is installed to comply with all safety standards and local and federal regulations
and is designated for its proper usage class. For more information, refer to your gate operator's product manual.
To reduce the risk of injury or death:
1. READ AND FOLLOW ALL INSTRUCTIONS. Read the gate operator’s product manual and review all the product labels and literature prior to
installing, operating, or maintaining the automatic gate operator.
2. Never let children operate or play with gate controls. Keep all remote controls, especially radio transmitters, away from children. Do not allow
children to play on or around the gate or gate operators.
3. Always keep people and objects away from the gate. NO ONE SHOULD CROSS THE PATH OF THE MOVING GATE. Start the gate operator
only when a gate’s travel path is clear.
4. Test the gate operator monthly. The gate MUST reverse on contact with a rigid object or stop when an object activates the non-contact
sensors. After adjusting the force or the limit of travel, retest the gate operator. Perform routine tests of the entrapment protection sensors,
such as photo eyes and edge sensors. Failure to adjust and retest the gate operator properly can increase the risk of injury or death.
5. Use the emergency release only when the gate is not moving.
6. KEEP GATES PROPERLY MAINTAINED. Read the product manuals. Have a qualied service person make repairs to gate hardware and replace
batteries in accessory or entrapment protection sensory devices on a regular basis.
7. The automated gate entry is for vehicle use only. Pedestrians must use a separate entrance. Make sure a separate walk-through entrance is
nearby. Make certain a clear pedestrian path is designated and signs direct pedestrians to the walk-through gate.
8. Install the supplied WARNING signs on the inside and outside of the gate or barrier gate/operator so they are clearly visible from both the
secure and public sides. Installing the signs is a requirement for UL 325 compliance.
9. Use monitored sensors for protection against entrapment as specied in the current UL 325 Standard for Safety. Refer to General Entrapment
Protection Provisions per UL 325, Table 31.1 on page 18.
NOTICE: Extensive safety information exists in the gate operator product manuals. Be aware and read all safety information, labels and signage
that is shipped with your gate operator
document is a supplement, and as such, focuses on the differences in monitoring external entrapment protection sensors and the application of
external sensors.
Be sure to read all the information provided with your product manuals.
to ensure quality site design, proper set up for functional gate operation and pedestrian safety
. This
Safety InformatIon SpecIfIc to monItored entrapment
The following is found in HySecurity Programming and Operations Manuals, but re-iterated here. Before
installing the gate operator:
Mount access control devices beyond reach of the gate. The control devices that operate the gate must:
• Be located in a clear line of sight to the gate. Locate controls (Open, Close, Stop/Reset) where a user will have a clear view of the gate.
NOTE: An exception for Emergency Access Control devices exists. An EAC device accessible by authorized
personnel only (e.g. re, police, EMS), may be placed at any location within the line-of-sight.
• Be mounted beyond 6 feet (183 cm) of the gate to prevent users from touching or accessing the gate while operating the controls. People
attempting to access the controls by reaching through or around the gate can be seriously injured or killed by the moving gate.
• Connect radio and other remote access (non-resetting controls) to the RADIO OPTIONS terminal.
Install an automatic operator only on gates that comply with ASTM F2200 Gate and Fence Standards and the usage class of the gate. Screen or
enclose openings in the gate per UL 325 Standards for Safety which include:
• All horizontal slide gates must guard or screen openings from the gate’s base support to a minimum height of 6 feet (183 cm) above the
ground. This must prevent a sphere of 2¼-inches (57 mm) in diameter from passing through an opening in the gate or the adjacent fence that
is covered in the gate’s open position.
• All exposed pinch points are eliminated or guarded.
• Physical stops must exist in the gate construction to prevent over-travel in both directions and, for slide gates, guide posts must be installed
to prevent the gate from falling in the event of a roller failure. Guarding must be supplied for exposed rollers.
• External entrapment protection sensors must be used wherever the risk of entrapment exists. Refer to 6
SAVE THESE INSTRUCTIONS
2 D0726 Rev. J UL 325 - 2016 HySecurity Monitored Sensors © 2016 www.hysecurity.com
.
Page 3

Contents
Important Safety InformatIon ..................................................................................2
Safety Information Specic to Monitored Entrapment ....................................................................................................2
HySecurity Gate Operators ..............................................................................................................................................5
Table 1: HySecurity Gate Operators requiring External Monitored Entrapment Protection Sensors ...........................5
Table 2: HySecurity Gate Operators maintaining Object Detection .............................................................................5
Table 3: External Entrapment Protection Sensors Approved for Use with HySecurity Gate Operators .......................6
Label Changes to Controller Inputs .................................................................................................................................7
How Software Handles Monitored Entrapment ...............................................................................................................8
Table 4: Changes to Sensor Inputs on the Controller ...................................................................................................8
What the Installer Needs to Do .......................................................................................................................................9
Table 5: Installer Menu Settings for SENSOR Inputs ..................................................................................................10
Table 6: Setting the Sensor Logic ...............................................................................................................................11
Temporarily Power the Sensors ......................................................................................................................................12
Photo Eye Alignment ....................................................................................................................................................12
Troubleshooting .............................................................................................................................................................13
Table 7: Troubleshooting Codes ................................................................................................................................14
Site Assessment & Gate Design for Monitored Entrapment ..........................................................................................16
Site Assessment & Gate Design for Monitored Entrapment ..........................................................................................17
Usage Class 4 Designated Gate Operator Provisions ................................................................................................18
General Entrapment Protection Provisions per UL 325, Table 31.1 ............................................................................18
Diagram 1: Typical Slide Gate Site Assessment .............................................................................................................19
Diagram 2: Typical Swing Gate Site Assessment ...........................................................................................................20
Diagram 3: Typical Barrier Arm Site Assessment ...........................................................................................................21
Diagram 4: Typical Vertical Lift Site Overview ................................................................................................................22
Diagram 5: Typical SlideSmart DC Site Assessment ......................................................................................................23
Diagram 6: SwingSmart DC Site Overview (Dual Gate) .................................................................................................24
WIrIng HySecurIty SenSorS: Smart toucH ...............................................................25
Smart Touch: Wired Edge Sensor with GEM (-104)........................................................................................................26
Smart Touch: Photo Eye Thru Beam (EMX IRB MON) ....................................................................................................27
Smart Touch: Photo Eye / Reective (E3K R10K4) .........................................................................................................28
Smart Touch: The Solution, MIM-62 (Multi-input Module) .............................................................................................29
Smart Touch: Photo Eye / Reecti-Guard (RG-R) ............................................................................................................30
Smart Touch: Wireless Edge, Wireless Gate Link ...........................................................................................................31
Smart Touch: Wired Edge with GEM-104 & Photo Eye .................................................................................................32
Smart Touch: WireLess Edge Gate Link & Photo Eye ....................................................................................................33
Smart Touch: 2 CH Wired Edge with GEM-204 .............................................................................................................34
www.hysecurity.com © 2016 Quick Start D0726 Rev. J 3
Page 4

WIrIng HySecurIty SenSorS: Smart Dc ..................................................................35
Wiring Tips for SENSOR COM Terminal: Smart DC .......................................................................................................36
Menu Mode Navigational Tips .......................................................................................................................................36
Smart DC: Wired Edge Sensor with GEM-104 ...............................................................................................................37
Smart DC: Photo Eye Thru Beam (EMX IRB MON) ........................................................................................................38
Smart DC: Photo Eye / Reective (E3K R10K4) ..............................................................................................................39
Smart DC: Multi-input Module (The Solution, MIM-62) .................................................................................................40
Smart DC: Photo Eye / Reecti-Guard (RG-R) ................................................................................................................41
Smart DC: MGL-RX20 Wireless Gate Link .....................................................................................................................42
Smart DC: Wired Edge with GEM-104 and Photo Eye ..................................................................................................43
Smart DC: WireLess Edge Gate Link and Photo Eye .....................................................................................................44
Smart DC: 2 CH Wired Edge with GEM-204 .................................................................................................................45
Smart DC Bi-Parting Gates: Dual Gate Wiring ............................................................................................................46
Smart DC Bi-Parting Gates: Photo Eye (EMX IRB MON) ...............................................................................................46
HySecurity Contact Information .................................................................................................................................48
4 D0726 Rev. J UL 325 - 2016 HySecurity Monitored Sensors © 2016 www.hysecurity.com
Page 5

HySecurIty Gate operatorS
The following bullet points highlight how your automated gate system sites can monitor external entrapment protection
using HySecurity gate operators:
• Normally Closed (NC) sensors - Before gate movement occurs, the gate operator veries that the external entrapment protection
sensor is connected and fully functional.
• Build Year (BY) - An added menu item distinguishes between pre-2016 manufacturing dates and post-2016 manufacturing dates.
Build Year (BY) is a factory-setting. Build Year 2 (BY 2) is the default for all HySecurity gate operators indicating a manufacturing date
of 2016 in the serial number. Replacement controller boards for existing sites allow for a Build Year setting of 1 (BY 1) (pre-2016).
• Independent Sensor Inputs - The edge, photo eye and photo eye COM inputs on the Smart Touch and Smart DC Controllers (STC
and SDC) have been re-labeled. The same wiring connections become three independent methods for easy entrapment sensor
conguration and normally closed outputs. Refer to page 7.
Table 1: HySecurity Gate Operators requiring External Monitored Entrapment Protection Sensors
UL 325 Entrapment Protection Device Monitoring Required
HySecurity Gate Operators
(includes Modular, Correctional, and UPS
models)
Build Year
post-2016
(set at the factory)
Normally Closed (NC) sensors tested & approved.*
Three SENSOR Inputs on Controller.
Installer Menu congurable.*
Build Year (BY) factory-set to post-2016.
SlideDriver 15, 40, 30F, 50VF 2/3, 80, 200 2
SlideDriver 50VF series 2
SlideSmart DC 15 & DCS 15 2
SlideSmart DC 10F & DCS 10F 2
SwingRiser 14, 14-Twin, 19,
19-Twin, 30, 30-Twin
SwingSmart DC 20 & DCS 20 2
HydraSwing 40, 40F, 40-Twin, 40F-Twin,
80F, 150
HydraLift 10, 10F, 20, 20F 2
*NOTE: Refer to tables on 6 and 10.
2
2
●
●
●
●
●
●
●
●
Table 2: HySecurity Gate Operators maintaining Object Detection
Table 2 indicates those HySecurity gate operators that may be within the exception parameters of UL 325 or comply with
standards other than UL 325, but continue to maintain object detection capabilities. HySecurity strongly recommends that
you assess every site for entrapment zones and provide the necessary protection to guard against entrapment.
HySecurity Gate Operators
with
Obstruction Protection (Object Detection)
StrongArm (HTG) 14, 20, 28, 36 2
Build Year
post-2016
Sensor Inputs automatically set to "NOT USED"
Installer has option to change settings as site design dictates.
●
StrongArmCRASH (M30/M50) 2
StrongArmPark DC 10 & DCS 10
StrongArmPark DC 14 & DCS 14
WedgeSmart DC 10 & 10 DCS 2
WedgeSmart DC 14 & 14 DCS 2
HydraWedge SM50 with HydraSupply XL 2
www.hysecurity.com © 2016 Quick Start D0726 Rev. J 5
2
●
●
●
●
●
Page 6
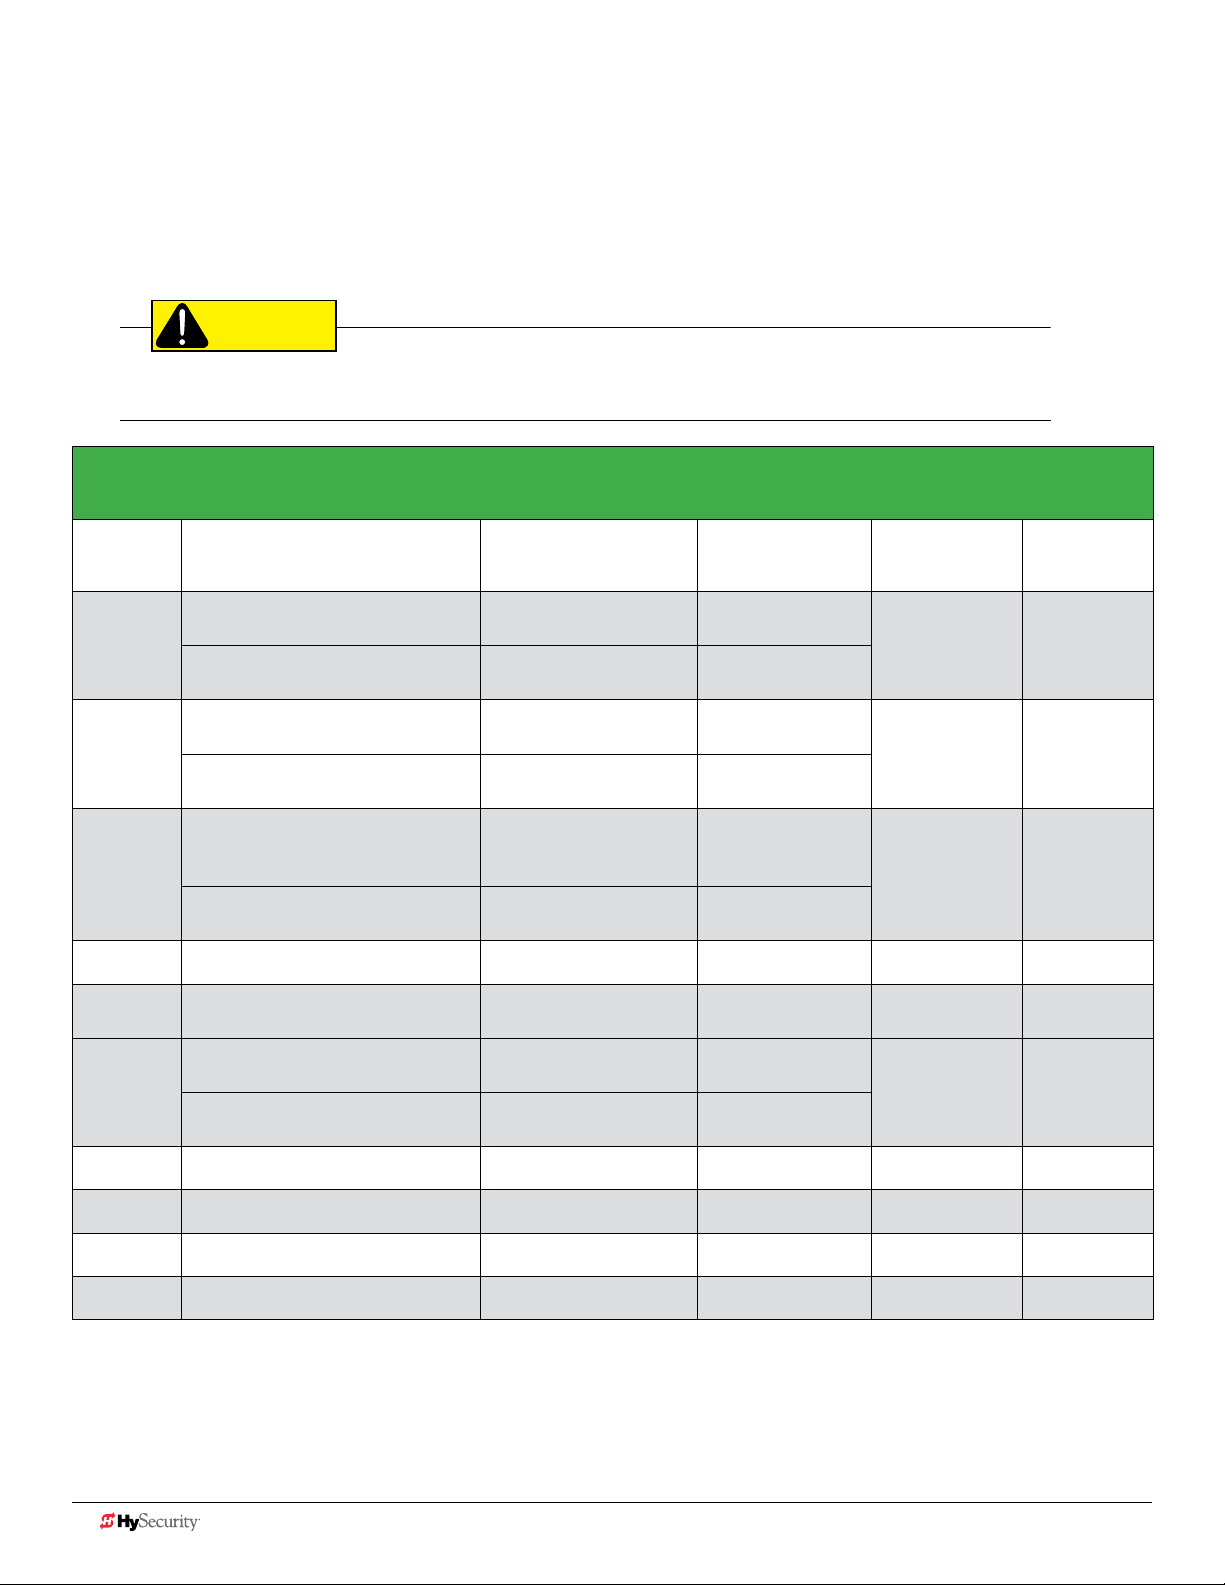
Table 3: External Entrapment Protection Sensors Approved for Use with HySecurity Gate Operators
The site designer or installer must determine which external entrapment protection sensors will be installed
with the gate operator to create a UL 325 compliant installation site.
NOTE: Table 3 provides the list of sensors that are approved for use with HySecurity gate operators using the monitoring
capabilities found in software versions h4.50 or h5.50 (or higher).
CAUTION
Temperatures and environmental conditions affect proper operation of external entrapment protection sensors.
Always check the manufacturer's specications shipped with the sensors.
External Entrapment Protection Sensors: Normally Closed Contact, Compatible with
HySecurity Gate Operators
P/N 2016 Monitored Sensors Sensor Type Output Manufacturer
MX3981
MX4161
MX3982
MX4161
MX4037
MX4161
MX3985
MX4015
MX3986
MX4013
Wired Gate Edge Sensor
MGR20-2U-05-T2, Round
2 CH Gate Edge Module
(GEM-204)
Wired Gate Edge Sensor
MGS20-2U-05-T2, Square
2 CH Gate Edge Module
(GEM-204)
KIT: Wired Gate Edge Sensor
MGO20-2E-05-T2, Square
and Channel mount
2 CH Gate Edge Module
(GEM-204)
Reecti-Guard (RG-R) Photo eye, reective Normally Closed
KIT: MGL-K20
(includes MX3986 and MX4013)
Wireless Gate Link
MGL-TX20
Wireless Gate Link
MGL-RX20
Wraparound edge
(5 ft for 2" round post)
Edge Interface Module Normally Closed
Wraparound edge
(5 ft for 2" square post)
Edge Interface Module Normally Closed
Edge (3-sided activation
Slide In Style)
(5 ft, 1½" width)
Edge Interface Module Normally Closed
Wireless Gate Link Normally Closed
Transmitter (battery-
operated, radio control)
Receiver (24VDC, radio
control)
10K Resistor
10K Resistor
10K Resistor
N/A
Normally Closed
Miller Edge Type B2
Miller Edge Type B2
Miller Edge Type B2
Miller Edge Type B1
Miller Edge Yes
Miller Edge Yes
UL 325
Recognized
MX3987
MX3990
MX000846
MX000999
NOTE: Bold type indicate sensors or accessories that must be installed together for external entrapment protection to be properly
monitored.
6 D0726 Rev. J UL 325 - 2016 HySecurity Monitored Sensors © 2016 www.hysecurity.com
The Solution, MIM-62 Multi-Input Module Normally Closed
IRB-MON (Dist.~ 65 ft) Thru-beam photo eye Normally Closed
KIT: IRB-325 (Dist.~ 50 ft) Thru-beam photo eye Normally Closed
KIT: E3K-R10K4-NR (Dist. ~ 40 ft) Photo eye, reective Normally Closed
Miller Edge Yes
EMX Industries Type B1
EMX Industries Type B1
Omron Type B1
Page 7
24VDC
24VDC
24VAC
24VAC
12VDC
12VDC
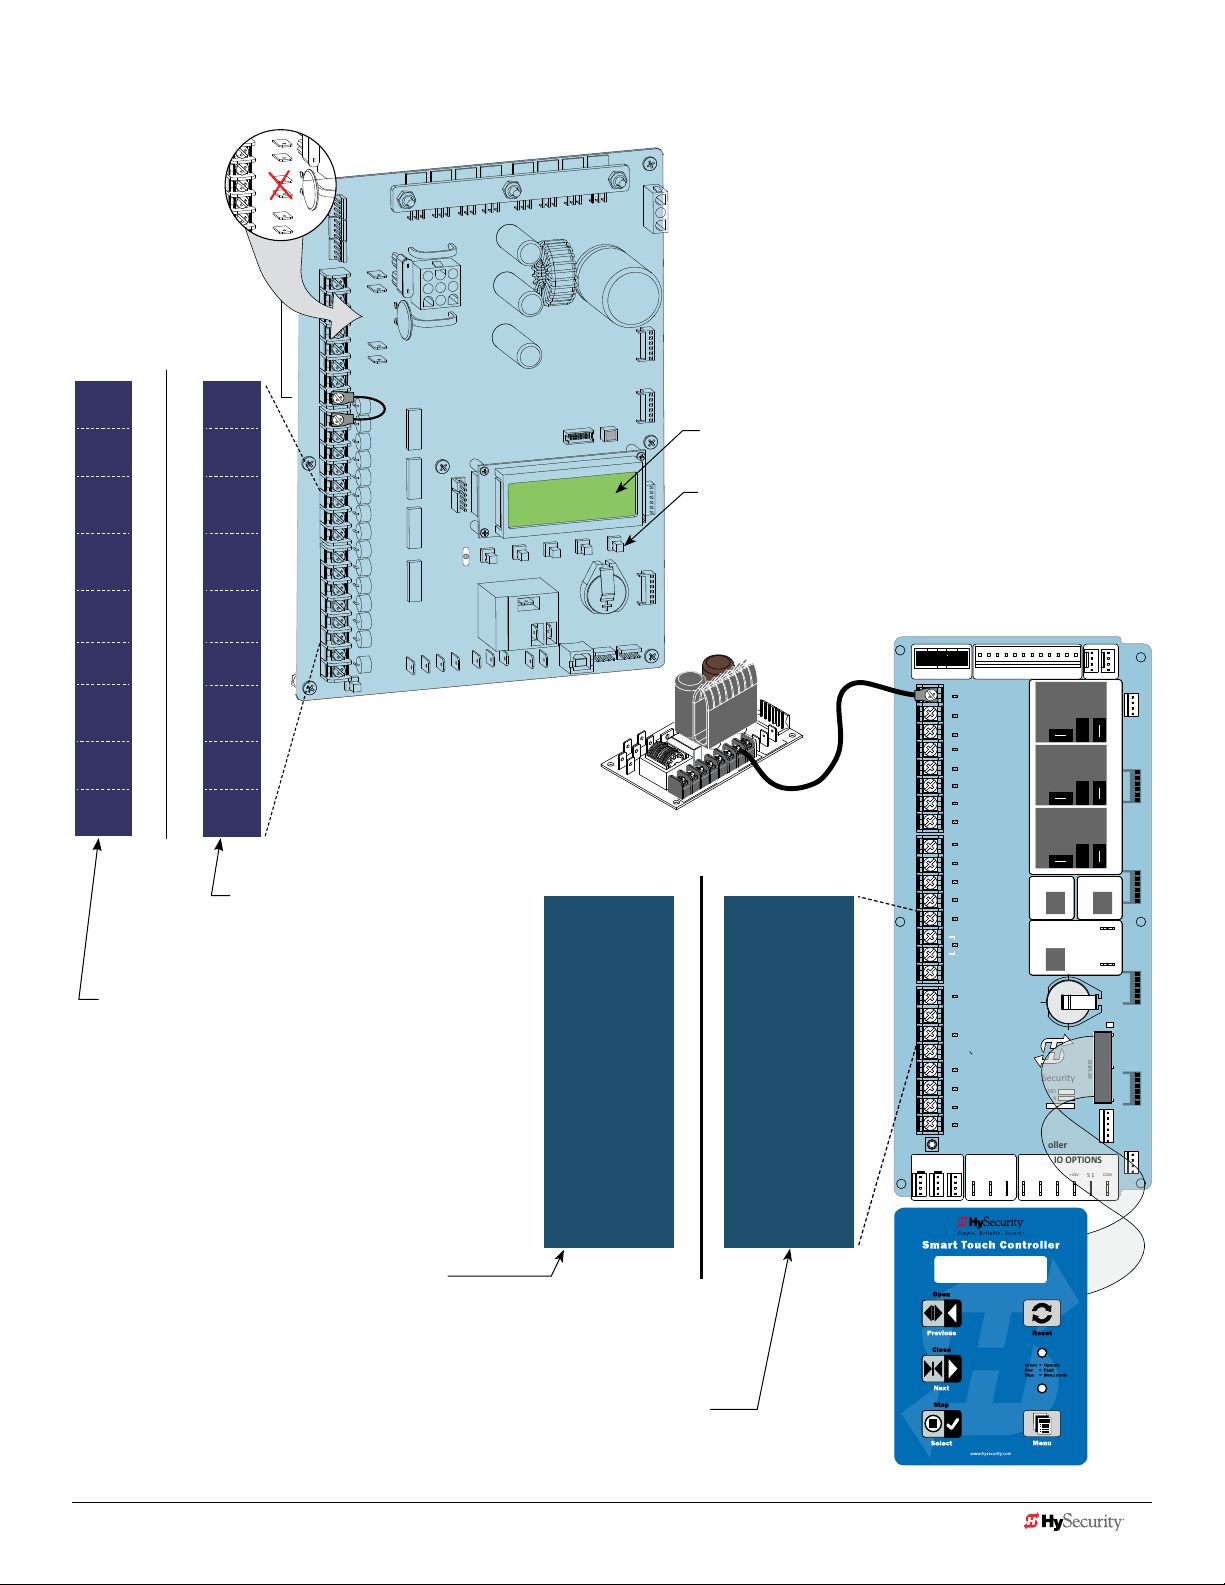
LabeL cHanGeS to controLLer InputS
Labels are available and may be overlaid to cover
the silk screened text on the controller inputs.
24VDC
COM
24VDC
COM
COM
COM
COMMON
COM
TERMINALS
EYE
OPEN
EYE
CLOSE
EXIT
LOOP
BLOCK
EXIT
IN OBS
LOOP
OUT OBS
LOOP
CENTER
LOOP
EDGE
EYE
COM
SENSOR 2
SENSOR 3
EXIT
LOOP
BLOCK
EXIT
IN OBS
LOOP
OUT OBS
LOOP
CENTER
LOOP
SENSOR 1
SENSOR
COM
Post 2016 Label
Build Year (BY 2)
MX3978-01
Temporary use on existing inventory.
Pre-2016
Build Year (BY 1)
MX3978-02
Used on replacement boards for gate
operators manufactured prior to 2016.
12VDC
12VDC
COM
COM
COM
STOP
OPEN
CLOSE
RADIO
OPEN
OPEN
PARTIAL
SENSOR 2
SENSOR 3
EXIT
LOOP
BLOCK
EXIT
IN OBS
LOOP
OUT OBS
LOOP
CENTER
LOOP
SENSOR 1
SENSOR
COM
+ 24 V
EMERG
OPEN
SHOW
LEDs
B
M
O
C
AL
U
D
USER RELAY 1
Electro-mechanical
1
S
24V
+
EN
OP
M
O
C
A
E
T
A
G
N
IO
OPT
O
I
D
A
R
Smart DC Controller
Pre-2016
Build Year (BY 1)
MX3979-02
Used on replacement boards for gate
operators manufactured prior to 2016.
R
B
S
U
C
D
R2
E
S
U
O
N
M
O
C
S
EDGE SENSOR
EDGE SENSOR
PHOTO EYE POWER
PHOTO EYE POWER
24 VOLTS COMMO
24 VOLTS COMMON
PHOTO EYE POWER
PHOTO EYE POWER
DO NOT USE
PHOTO EYE
PHOTO EYE
OPEN DIRECTION
OPEN DIRECTION
DO NOT USE
PHOTO EYE
PHOTO EYE
CLOSE DIRECTION
CLOSE DIRECTION
Smart DC Display
Keypad (buttons)
5
8
4
-
S
2
4
V
A
C
A
c
ce
ss
o
ry
p
ower
ON
COMM
Power Supply Board
SENSOR 1
SENSOR 1
SENSOR
SENSOR
COM
COM
DO NOT USE
SENSOR 2
SENSOR 2
DO NOT USE
SENSOR 3
SENSOR 3
Smart Touch Controller
USER 3
HySecurity
MX000585
VERSION
S/N
RADIO OPTIONS
+24V +24V
DISPLAY
S 1
RS485
STATUS
RS232
COM
NO
COMOPEN
MOTOR USER 1
EXIT
USER 2
OBSTR
OBSTR
RESET
STOP/BUZZER
FREE
INSIDE
OUTSIDE
VEHICLE DETECTORVEHICLE DETECTORVEHICLE DETECTOR
SHADOW
VEHICLE DETECTOR
WIEGAND
DRIVE
1
2
C
D
V
4
2
+
3
4
5
6
7
8
9
10
11
12
14
15
16
17
18
19
20
21
22
23
24
LED
LIMIT DUAL GATE
RPM
S2 7 (EYE BOTH)
SENSOR #2 TYPE
POWER
STOP BUTTON
OPEN BUTTON
CLOSE BUTTON
REMOTE OPEN AND
RADIO CONTROL
OPEN/CLOSE
OPEN PARTIAL
INTERLOCK OPEN
TIME CLOCK OPEN
FREE EXIT DETECTOR
DISABLE EXIT DETECTOR
DISABLE CLOSE TIMER
INSIDE OBSTRUCTION
VEHICLE DETECTOR
OUTSIDE OBSTRUCTION
VEHICLE DETECTOR
SHADOW/RESET
VEHICLE DETECTOR
EDGE SENSOR
PHOTO EYE POWER
24 VOLTS COMMON
PHOTO EYE POWER
DO NOT USE
PHOTO EYE
OPEN DIRECTION
DO NOT USE
PHOTO EYE
CLOSE DIRECTION
DO NOT USE
CHARGER
AC LOSS
LOCK INTERLOCK
EMERG CLOSE
FIRE DEPT OPEN
Smart Touch Controller
COM COMA B
Post 2016 Label
Build Year (BY 2)
MX3978-01
www.hysecurity.com © 2016 Quick Start D0726 Rev. J 7
Temporary use on existing inventory.
Keypad and Display
Page 8

How Software HandLeS monItored entrapment
Since HySecurity gate operators use software to control gate movement, contacts, and accessories, the changeover to
monitored sensors is simple. In fact, the ability to monitor sensors has always been an available Installer Menu item. (Refer
to Table 6: Setting the Sensor Logic on page 11) Instead of an option, it now becomes the default standard.
• Build Year is a new Installer Menu item in Smart DC and Smart Touch Controllers versions h5.50 and h4.50 (and
higher).
• New labels show where Edge, Photo Eye Open and Photo Eye Closed have changed to "SENSOR" inputs. You
can program the type of sensor wired to one of those inputs. Refer to illustrations on page 7 and Table 4
below.
• Installer Menu items, PC and GC (Photo eye output and edge sensor output) which used to default to Normally
Open (NO) have been converted to Normally Closed (NC) contacts so the software can detect the presence and
proper operation of entrapment protection sensors.
Table 4: Changes to Sensor Inputs on the Controller
Location of Sensor Inputs on Controller Installer Menu Item Codes
Smart Touch Controller (STC): Hydraulic gate operators Smart Touch Display:
Input # Current Silk Screen Label 2016 Silk Screen
Label
13 EDGE SENSOR SENSOR 1 S1 SENSOR 1
17 PHOTO EYE OPEN DIRECTION SENSOR 2 S2 SENSOR 2
19 PHOTO EYE CLOSE DIRECTION SENSOR 3 S3 SENSOR 3
Smart DC Controller (SDC):
Electromechanical gate operators
No numerical input
number appears on
Smart DC
EYE OPEN SENSOR 2 S2 SENSOR 2
EYE CLOSE SENSOR 3 S3 SENSOR 3
EDGE SENSOR 1 S1 SENSOR 1
OLED - two line,
32 character
Smart DC Display:
32 character LCD
LCD - 7
segment text
S1
S2
S3
NOTE: Three inputs for external entrapment protection sensors are available on the HySecurity gate operator controller. New silk
screen controller boards are on order, but until they are ready for shipment, labels will be overlaid on the board to indicate
terminology adaptations.
Table 4 indicates how the edge and photo eye inputs have been renamed to generic "sensor" inputs. They are
interchangeable and congurable. The software must know what type of sensor is wired to SENSOR 1, 2, and 3 BEFORE it
will allow gate travel. Refer to page 10.
8 D0726 Rev. J UL 325 - 2016 HySecurity Monitored Sensors © 2016 www.hysecurity.com
Page 9
wHat tHe InStaLLer needS to do
1
2
All HySecurity gate operators indicating a manufacturing date of 2016 (or later) in the serial number, will have the Build Year set to 2.
A Build Year of 2 (BY 2) indicates that your gate operator is prepared to monitor for external entrapment protection sensors. The Build
Year setting appears in the system scroll on the gate operator display. The gate operator will not automatically cycle the gate unless
an indication that the appropriate number of external entrapment protection sensors are connected and operational.
The normally closed (NC) entrapment protection sensors wired to the Controller's SENSOR inputs are monitored using
HySecurity software. Prompts appear in the display requesting specic congurations based on the gate operator type.
Table 5 illustrates what options are available for the HySecurity Controller's congurable inputs.
SENSOR 1 SENSOR 2 SENSOR 3 SENSOR COM
CAUTION
All external entrapment protection sensors must be NC sensor outputs and wired to
the SENSOR COM terminal for monitoring and powering purposes. The sensor becomes
actively powered when the gate operator receives a run command.
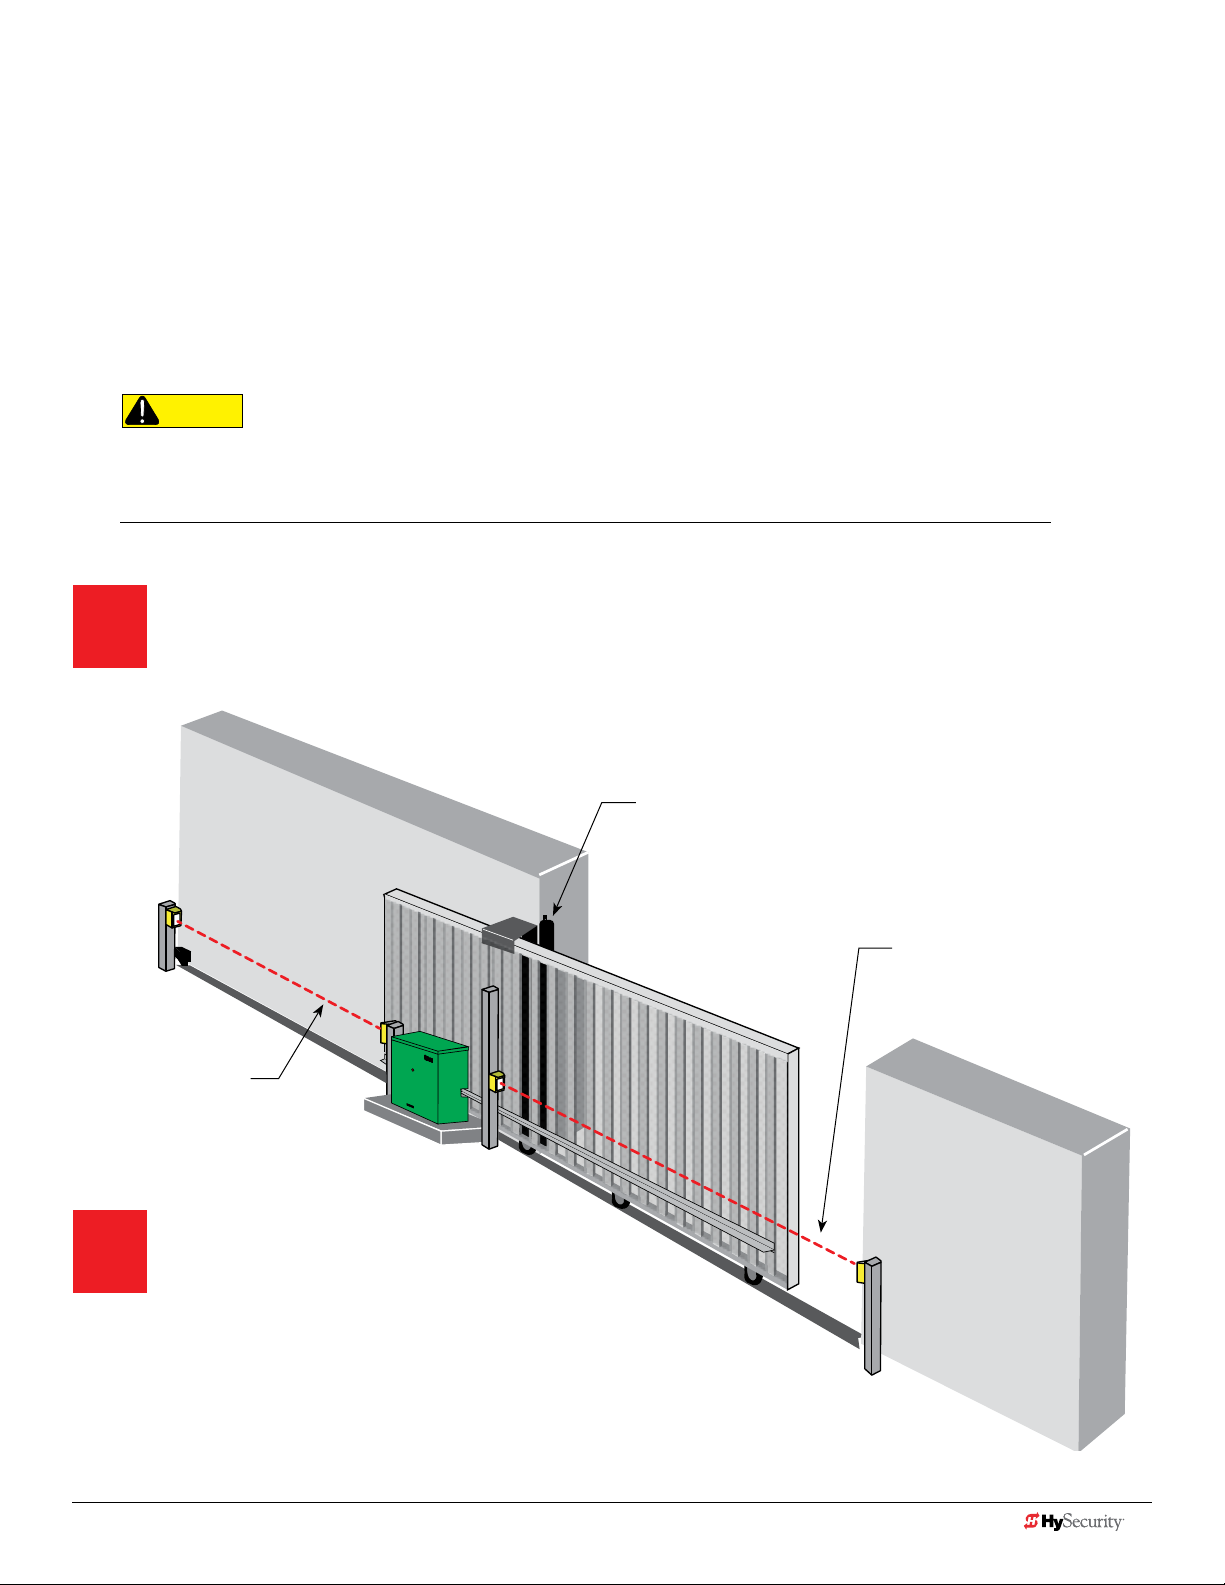
Assess Your Gate Site.
Design your gate installation so entrapment zones are kept to
a minimum, and then install your HySecurity gate operator.
Draw-in zone
Edge sensor (protecting open direction)
(EDGE OPEN)
Photo eye thru beam protecting
Leading End
(EYE CLOSE)
Photo eye thru-beam
protecting Trailing End (EYE
OPEN)
Install NC sensors.
Install NC contact and non-contact
eyes) for all potential entrapment zones. HySecurity gates monitor normally
closed (NC) sensors. Wire your NC sensors to SENSOR input terminals (SENSOR 1,
SENSOR 2, or SENSOR 3) on the Smart Touch or Smart DC Controllers. The SENSOR
inputs are interchangeable and congurable. For example, it doesn't matter whether you
wire a normally closed photo eye sensor or edge sensor to the SENSOR 1, 2, or 3 input.
NOTE: When installing wired edge sensors, the WIRED EDGE edge must be connected to an interface module
that produces an NC output. Refer to Table on page 6. Wireless edge sensors require no interface module.
www.hysecurity.com © 2016 Quick Start D0726 Rev. J 9
sensors (edge sensors and photo
Page 10

3
Turn Power ON.
4
Electromechanical
Hydraulic
I/0 Switch
DC Power
I/0 Switch
2
4
V
A
C
A
c
ce
ss
o
ry
p
ower
I/0 Switch
AC Power
S1 2 (EYE CLOSE)
SENSOR #1 TYPE
SlideSmart DC
Control Box
SlideDriver Control Box
NOTE: Use PE, Photo Eye Alignment mode to temporarily
power the sensors. Refer to Photo Eye Alignment on page 12.
Answer Initial Setup Prompts.
For slide gates you will be prompted for USAGE CLASS,
GATE HANDING, and SENSOR 1, SENSOR 2, and
SENSOR 3. Each SENSOR input, whether or not it has a contact or non-contact sensor
wired to it, must be programmed to a non-zero setting before the gate will move.
NOTE: The gate operator will not automatically cycle unless an indication is received that the
appropriate number of external entrapment protection sensors are connected and
operational.
STOP BUTTON
OPEN BUTTON
CLOSE BUTTON
REMOTE OPEN AND
RADIO CONTROL
OPEN/CLOSE
OPEN PARTIAL
INTERLOCK OPEN
TIME CLOCK OPEN
FREE EXIT DETECTOR
DISABLE EXIT DETECTOR
DISABLE CLOSE TIMER
INSIDE OBSTRUCTION
VEHICLE DETECTOR
OUTSIDE OBSTRUCTION
VEHICLE DETECTOR
SHADOW/RESET
VEHICLE DETECTOR
SENSOR 1
SENSOR COM
DO NOT USE
SENSOR 2
DO NOT USE
SENSOR 3
DO NOT USE
CHARGER
AC LOSS
LOCK INTERLOCK
EMERG CLOSE
FIRE DEPT OPEN
LED
Smart Touch Controller
RPM
COM COMA B
POWER
USER 3
HySecurity
MX000585
VERSION
S/N
RADIO OPTIONS
+24V +24V
STOP/BUZZER
MOTOR USER 1
FREE
EXIT
USER 2
INSIDE
OBSTR
OUTSIDE
OBSTR
COM
NO
VEHICLE DETECTORVEHICLE DETECTORVEHICLE DETECTOR
STATUS
SHADOW
RESET
DISPLAY
VEHICLE DETECTOR
RS232
WIEGAND
COMOPEN
S 1
DRIVE
1
2
3
4
5
6
7
8
C
D
V
4
2
+
ON
COMM
9
10
11
12
14
15
16
17
18
19
20
21
22
23
24
LIMIT DUAL GATE
RS485
S1 2 (EYE CLOSE)
SENSOR #1 TYPE
OPEN
PREV
CLOSE
NEXT
STOP
SELECT
MENU
RESET
Smart Touch and Smart DC Controller: Menu Mode Navigation Buttons
To change data
appearing in the display
Press Select.
Two left characters blink.
To navigate through
the Selections
Press Next or Previous.
Continue pressing Next to view
all selections.
To choose what appears
on the display
Press Select.
Blinking characters
become static.
Table 5: Installer Menu Settings for SENSOR Inputs
UL 325
HySecurity Gate
Operator
Build
Year
2016
(BY set)
SlideDriver
(xed speed)
SlideDriver VFD 2
SlideSmart DC 15 2
SlideSmart DC 10 2
SwingRiser * 2
SwingSmart DC * 2
HydraSwing * 2
HydraLift 2
DISABLED
2
Installer Menu Settings for STC & SDC Sensors 1, 2, or 3 (solo operators)
#0
#1
NOT USED
#2
EYE CLOSE
#3
EDGE
CLOSE
● ● ● ● ● ● ●
● ● ● ● ● ● ●
● ● ● ● ● ● ●
● ● ● ● ● ● ●
● ● ● ● ● ● ●
● ● ● ● ● ● ●
● ● ● ● ● ● ●
● ● ● ●
#4
EYE OPEN
To navigate between
menu items
Press Next or Previous.
Advance - press Next
Previous - press Previous
#5
EDGE
OPEN
#6
EDGE BOTH
DIRECTIONS
#7
EYE BOTH
DIRECTIONS
NOTE: HySecurity does not update software for SlideWinder models. Refer to Table 2: HySecurity Gate Operators maintaining
Object Detection on page 5 for an overview of HySecurity gate operators not requiring monitoring of external entrapment
protection sensors to meet the 2016 UL 325 Standard of Safety regulations. * For notes on swing gates, refer to page 20.
10 D0726 Rev. J UL 325 - 2016 HySecurity Monitored Sensors © 2016 www.hysecurity.com
Page 11

Table 6: Setting the Sensor Logic
External entrapment protection sensors can be wired to any one of the three sensor inputs on the HySecurity Controller.
The sensor logic, such as Eye Close Logic (EC), Eye Open Logic (EO) and Gate Edge Logic (GR) remain accessible in
the Installer Menu, if the corresponding sensor type is installed, and determine how the gate operator will react when a
monitored sensor is activated.
NOTE: Default settings shown in Bold.
Installer Menu Setting Options Menu Tasks & Explanations
EC 0 STOP ONLY
EYE CLOSE LOGIC
EO 0 STOP ONLY
EYE OPEN LOGIC
GR 0 FULL OPEN
GATE EDGE LOGIC
SR 1 REVERSE 25
REVERSAL LOGIC
0 = Close eye stops only
1 = Two second reversal to open
on swing, slide, or vertical gates.
Reverse to full open with barrier
gates, StrongArm M30 and
StrongArm M50.
2 = Reverse to full open.
0 = Open eye stops only
1 = Two second reverse to close
0 = Edge reverses fully open
1 = Two second reversal only
0 = IES reverses fully open
1 = Two second reversal only
If the close photo eye is triggered, the default
setting is non-reversal while the gate is traveling
in the close direction. When triggered, with the
optional setting of EC 1, the gate pauses and
reverses it's direction for a 2-second interval,
and then resumes moving in the close direction
if the photo eye clears within 5 seconds. (See
exception for barrier arms.) A setting of EC 2
causes the gate to reverse and travel full open
when triggered.
If the open photo eye is triggered, the default
setting is non-reversal while the gate is traveling
in the open direction. When triggered, with the
optional setting of EO 1, the gate pauses and
reverses it's direction for a 2-second interval, and
then resumes moving in the open direction if the
photo eye clears within 5 seconds.
The default setting is to reopen fully if the edge
sensor is triggered while closing. The optional
setting of GR 1 sets the gate to a 2-second
reversal if triggered while closing.
If the inherent sensor is triggered, the default
setting reverses the gate travel for a 2-second
duration. The optional setting of SR 0 will cause
the gate to reopen fully if triggered while closing.
STC Wire
Connections
Sensor 1, 2, or 3
Sensor COM
COM
+24V
Sensor 1, 2, or 3
Sensor COM
COM
+24V
Sensor 1, 2, or 3
Sensor COM
+24V
10K resistor
(Edge)
N/A
PC 0 NO INPUT
PHOTO EYE OUTPUT
GC 0 NO INPUT
GATE EDGE OUTPUT
NOTE: The shaded Installer Menu items do not appear when Build Year is set to 2 (BY 2), post-2016. Exceptions exist for barrier
arms, CRASH products, operators set to pre-2016 and Usage Class 4 provisions.
www.hysecurity.com © 2016 Quick Start D0726 Rev. J 11
0 = Normally Open NO input
1 = Normally Closed NC input
(monitored)
0 = Normally Open NO input
1 = Normally Closed NC input
(monitored)
Changes occurring in 2016.
The default setting is for photo eyes with
Normally Close outputs. When set for NC, the
connection is monitored and any short circuit
fault will generate a FAULT 2 (FAL2) alert. Press
the Stop or Reset button to clear.
See NOTE.
Changes occurring in 2016.
The default setting is edge sensor with Normally
Closed (NC) output. The optional setting of 0
requires an (NO) output.
See NOTE.
EYE Close
EYE COM
4 wires total:
COM
+24V
COM
PHOTO EYE
CLOSE
EDGE SENSOR
COM
4 wires total:
COM
+24V
COM
EDGE
Page 12

temporarILy power tHe SenSorS
The sensors are not receiving power until the gate operator receives a command to run (open or close command). To
temporarily power sensors and check that the gate operator is monitoring the sensors properly, turn on Photo Eye Align
by taking the following steps:
1. Access the User Menu and select PE.
To access the User Menu, press the Menu button twice. For a refresher on
using the Menu Mode navigational buttons, refer to the chart below.
2. Press NEXT and continue to press NEXT until PE 0 (OFF) appears.
3. Press SELECT.
PE characters begin blinking.
4. To turn ON photo eye alignment and temporarily power the sensors, press
NEXT so PE 1 (ON) appears.
5. Press SELECT.
PE stops blinking.
6. Press MENU to exit Menu Mode and return to Run Mode.
NOTE: NOTE: The Photo Eye Align mode turns OFF with the next limit contact.
Controller Temporarily apply Power to Sensors LED Status
Smart DC PE 1 (ON)
PHOTO EYE ALIGN
Smart Touch PE 1 (ON)
PHOTO EYE ALIGN
When PE is ON, the LEDs associated with the sensor devices will be lit
if the sensors are properly connected and sensors are grounded. The
LEDs turn off when the ground circuit is removed.
LEDs next to the sensor connections will be lit when no power is being
applied. When PE is turned ON, the LEDs turn off. If they do not turn
off, check for wiring issues such as a short or misapplied relay COM
connections. See CAUTION. If error messages appear on the display,
refer to Table 7: Troubleshooting Codes on page 14.
PE 0 (OFF)
PHOTO EYE ALIGN
OPEN
PREV
CLOSE
NEXT
SELECT
STOP
MENU
Smart DC display and keypad
RESET
pHoto eye aLIGnment
PE 1 (ON)
Most photo eyes require careful optical alignment in order to aim the emitter
beam to the center of the receiver or reector. In order to avoid false triggering, it is
important to carefully align the system.
Align the photo eyes using this feature by taking the following steps:
1. Follow steps 1 through 6 in Temporarily Power the Sensors.
2. Move the photo eyes (up/down, side to side) to align the emitter beam.
Audible Chirp Beam Aligned ??
One No
Two Yes
3. When the buzzer chirps twice, indicating the photo eyes are aligned, set the next
photo eye (if the site has one) and continue the process until all photo eyes are
aligned.
4. Run the gate with an open or close command. When any limit is triggered, the
User Menu item PE resets to zero (OFF).
NOTE: To cover the potential entrapment areas, mount photo eyes preferably within 5 inches
(13 cm) of the gate face. For more information, refer to ASTM F2200 Gate and Fence Standards.
12 D0726 Rev. J UL 325 - 2016 HySecurity Monitored Sensors © 2016 www.hysecurity.com
PHOTO EYE ALIGN
CLOSE
OPEN
NEXT
PREV
PE 1 (ON)
PHOTO EYE ALIGN
STOP
SELECT
MENU
RESET
Page 13

troubLeSHootInG
The Smart Touch Controller reports system malfunctions using three simultaneously occurring methods:
• Codes presented on its display (alert, fault or error)
• Activation of a buzzer which emits a series of chirps at dened intervals
• Stop gate travel (and/or reverse direction of travel)
Overriding a tripped sensor or fault condition on a HySecurity gate operator
with monitored entrapment sensors requires a 2-step process:
• Press Open or Close momentarily. Audible beeps in quick succession
indicate tripped sensors or fault conditions.
• Within 5 seconds of hearing the beeps, apply constant hold pressure
to override the tripped sensor or fault. The gate operator runs while
pressure is maintained to actuating device (examples include, Push
button Open, Push button Close, Open Partial or Keypad Open/
Close), or a limit is reached, or another sensor trips.
A short list of codes appears in Table 7: Troubleshooting Codes and provides
additional troubleshooting solutions. For a complete list of troubleshooting
codes, refer your gate operator’s Programming and Operations manual.
NOTE: A qualied technician may troubleshoot the operator with the aid of the
information and procedures that follow. If it is necessary to call a distributor for
assistance, be sure to have the model and serial numbers available. Other helpful
information is the job name, approximate installation date, and service records of any
recently-performed maintenance work.
FAULT 2
SENSOR #1
HYSECURITY
GATE STOPPED
www.hysecurity.com © 2016 Quick Start D0726 Rev. J 13
Page 14

Table 7: Troubleshooting Codes
Type Display Buzzer Chirp Sequence Possible Cause & Suggested Corrective Action
ALERT HYSECURITY
ENTRAPMENT MODE
ENTR
ALERT HYSECURITY
SAFE MODE
SAFE
ALERT !ACTION BLOCKED
PHOTO EYE CLOSE
PEC
ALERT !ACTION BLOCKED
PHOTO EYE OPEN
PEO
ALERT !ACTION BLOCKED
GATE EDGE
(Open or Close)
GEO
FAULT FAULT 2
FAL2
2 chirps per second every
2s while control input is
active
2 chirps once when in Safe
Mode
5 chirps indicating that
the command cannot be
initiated
5 chirps indicating that
the command cannot be
initiated
5 chirps indicating that
the command cannot be
initiated
2 chirps per second once
per minute
An IES has been tripped twice within a specic period of time.
Check the gate site for obstructions and clear the gate area. To
return to run mode operation, press the Reset button.
A gate “edge” or IES has been tripped or the operator has exited
entrapment mode. Refer to the description above.
NOTE: Gate will operate, if it receives a RUN command.
Operator received command to run, but movement is prevented.
Photo eye is not recognized as active.
• Clear photo eye path
• Realign photo eye. Refer to Photo Eye Alignment on page 12.
• Replace photo eye battery
• Check N.C. wiring (verify wires are not disconnected or shorted)
• Review wiring diagrams. Especially path to SENSOR COM
• Make sure SENSOR settings S1, S2, and S3 are correctly
assigned. Refer to What the Installer Needs to Do on page 9.
Operator received command to run open, but movement is
prevented. Photo eye is not recognized as active.
• Clear photo eye path
• Realign photo eye. Refer to Photo Eye Alignment on page 12.
• Replace photo eye battery
• Check N.C. wiring (verify wires are not disconnected or shorted)
• Review wiring diagrams. Especially path to SENSOR COM
• Make sure SENSOR settings S1, S2, and S3 are correctly
assigned. Refer to What the Installer Needs to Do on page 9.
Operator received command to run open, but movement is
prevented. Gate edge blocked or disconnected and causes
operator to enter SAFE mode.
Gate edge is not recognized as active.
• Replace sensor batteries
• If using Miller Monitored Edge Link, be aware. Issues with radio
interference cause false trips. Placing the antenna high and
reducing environmental “noise” is critical to proper wireless
transmission. Avoid placing the receiver sets within 100 feet of
each other as crosstalk may occur. Use receivers & transmitters
Version 1.02 or higher.
• Verify wired edges are using a gate edge converter-type module.
Miller Edges must have a wire with blue tape. The blue tape
indicates that a resistor is built in.
• Check N.C. wiring (verify wires are not disconnected or shorted)
• Review wiring diagrams. Especially path to SENSOR COM
• Make sure SENSOR settings S1, S2, and S3 are correctly
assigned. Refer to What the Installer Needs to Do on page 9.
“Monitored” means the Controller must see the photo eye N.C.
contact change from open to close after receiving the command to
run, but before starting the motor. FAULT 2 indicates the controller
did not see this sequence when the gate received a run command.
• Check the wiring. Refer to the wiring diagram associated with the
attached sensor.
• Be sure the eye “common” wire is wired properly to the SENSOR
COM terminal.
14 D0726 Rev. J UL 325 - 2016 HySecurity Monitored Sensors © 2016 www.hysecurity.com
Page 15

Type Display Buzzer Chirp Sequence Possible Cause & Suggested Corrective Action
ERROR
ERROR ERROR 2
ERROR ERROR 7
FAIL FAIL
ERROR 4
DUAL GATE
IES DISCONNECT
MENU CHECKSUM
ERR7
PROGRAM DATA ERR
FAIL
3 chirps per second once
per minute
3 chirps per second once
per minute
3 chirps per second once
per minute
3 chirps per second once
per minute
Indicates a problem with the communication between the two gate
operators in a bi-parting gate system.
• Check the version of software by pressing Reset. The version
number ashes on the display (examples, h4.54 or h5.56).
• The software versions on the Primary and Secondary gate should
be the same. If not, upload current software version using
S.T.A.R.T. and a PC laptop computer.
• Verify the Installer Menu item DG (DUAL GATE) is set to DG2 in
Primary and set to DG1 in Secondary gate operator.
• Make sure the wires are twisted and shielded. See illustration on
page 46.
• Be sure the low voltage wire runs, which include the bi-parting
gate communication wires, are separate from any high voltage
wires runs. Interference occurs if wire runs are mixed or too close
to each other.
The error automatically clears when the communication fault is
resolved.
• The IES sensor could be bad, check to see that the NC contact is
intact.
• Check that you have the most current sensor; visit our website
and view the technical bulletins in the Tech Support area. The
sensor wire could be loose; you may want to tighten the female
connectors with some pliers.
• Verify the version of the software by pressing the Reset button.
The software version appears on the display. Make a note of it.
The software version should be h4.50 or h5.50 (or higher).
• If necessary, update the software using a PC laptop and
S.T.A.R.T. Register and login in at www.hysecurity.com
Contact HySecurity.
1. Try turning off the power to the operator and having the
customer re-seat all of the various connectors and cables.
2. Upload the latest software release. If the fail does not go away,
contact Technical Support.
NOTE: For a more extensive list of error codes, refer to your gate operator’s product manual.
www.hysecurity.com © 2016 Quick Start D0726 Rev. J 15
Page 16

SIte aSSeSSment & Gate deSIGn for monItored entrapment
Edge Open
Eye Close
Eye Open
Check gap & protect
potential draw-in zones
SECURE
NOTE: Any gap larger than 2¼" (57 mm) between gate and xed objects must be
protected. Install edge sensors where gap between post and gate creates a draw-in zone.
Slide Gate: Monitored Entrapment Site Scenario (Viewing from SECURE side)
PUBLIC
Eye Close
SECURE
PUBLIC
Slide Gate: Monitored Entrapment Site Scenario (Viewing from PUBLIC side)
NOTICE: UL 325 Standard of Safety provides the MINIMUM safety standards. Site, gate hardware usage,
and other conditions may dictate the use of additional safety designs/components. It is up to the gate system
designer and installer to assess appropriate safety design and components above and beyond minimum
UL 325 and ASTM F2200 standards. Always check your local area codes and comply with all regulations.
16 D0726 Rev. J UL 325 - 2016 HySecurity Monitored Sensors © 2016 www.hysecurity.com
Page 17

SIte aSSeSSment & Gate deSIGn for monItored entrapment
continued...
Edge Open
Check gap & protect
potential draw-in zones
Eye Close
Eye Open
SECURE
NOTE: Any gap larger than 2¼" (57 mm) between gate and
xed objects must be protected. Install edge sensors where
gap between post and gate creates a draw-in zone.
PUBLIC
Eye Open
Retro-reective
photo eye shown
Edge Both
SECURE
Slide Gate: Monitored Entrapment Site Scenario (Viewing from SECURE side)
Eye Close
PUBLIC
Edge Both
Wrap around edge
sensor example
Swing Gate: Monitored Entrapment Site Scenario (Viewing from SECURE side)
NOTICE: UL 325 Standard of Safety provides the MINIMUM safety standards. Site, gate hardware usage, and
other conditions may dictate the use of additional safety designs/components. It is up to the gate system
designer and installer to assess appropriate safety design and components above and beyond minimum UL 325
and ASTM F2200 standards. Always check your local area codes and comply with all regulations.
www.hysecurity.com © 2016 Quick Start D0726 Rev. J 17
Page 18

General Entrapment Protection Provisions per UL 325, Table 31.1
Effective January 12, 2016, Table 31.1 General Entrapment Protection Provisions for gate operator categories.
The following chart is a copy of UL 325 Standard of Safety, Table 31.1
Gate Operator Category
Horizontal Slide, Vertical Lift and Vertical Pivot Swing and Vertical barrier (arm)
Entrapment protection types: A, B1, B2, D Entrapment protection types: A, B1, B2, C or D
NOTE: The same type of device shall not be utilized for both entrapment protection means. Use of a single device to cover both
the opening and closing directions is in accordance with the requirement; however, a single device is not required to cover both
directions. A combination of one Type B1 for one direction and one Type B2 for the other direction is the equivalent of one
device for the purpose of complying with the requirements of either entrapment protection means.
Type A – Inherent entrapment protection system.
Type B1 – Non-contact sensor (photoelectric sensor or the equivalent).
Type B2 – Contact sensor (edge device or the equivalent).
Type C – Inherent force limiting, inherent adjustable clutch or inherent pressure relief device.
Type D – Actuating device requiring continuous pressure to maintain opening or closing motion of the gate.
The changes that occurred to HySecurity software and discussed on the previous pages are based on compliance with the
UL 325 -2016 Standard of Safety.
An exception for vehicular barrier arms exists. As stated in UL 325 Standard of Safety:
An operator for a vehicular barrier (arm) that is not intended to move toward a rigid object closer than 16 inches
(406 mm), and does not have a pinch point between moving parts by virtue of the operator’s design or as a result of
installation in accordance with instructions supplied with the operator as specied in UL 325 Standard of Safety is not
required to be provided with means to protect against entrapment.
A provision also exists for Usage Class 4 and is described below.
Usage Class 4 Designated Gate Operator Provisions
Usage Class 4 sites must have a guard house or CCTV gate monitoring to verify credentials of vehicles entering or exiting
the facility and to ensure safe gate operation in the rare occurrence where pedestrians may be present. HySecurity
handles the UL 325 - 2016 gate operator provisions for Usage Class 4 in the following manner:
• SENSOR inputs default to 0 and must be set to a non-zero number before automatic gate operation is allowed.
Normally Closed (NC) sensors become the default for monitoring if external entrapment protection sensors are
connected. However, the gate operator can be congured through the Installer Menu to accept either Normally
Closed (NC) or Normally Open (NO) outputs from sensors.
• When SENSOR 1, 2, and 3 are set to 1 (NOT USED) or when the software detects a programmed monitored
sensor fault, a Warn-Before-Operate buzzer automatically sounds 3 seconds before movement and throughout
gate travel.
• If a sensor input is held tripped, the gate operator can move the gate in the same manner as other usage classes
with a simple constant hold input (Push button Open, Push button Close, Open Partial or Keypad Open/Close
activation). Refer to Troubleshooting on page 13.
• Note that Alerts, Faults, and Errors used for troubleshooting are handled in the same manner as other HySecurity
gate operator usage classes.
18 D0726 Rev. J UL 325 - 2016 HySecurity Monitored Sensors © 2016 www.hysecurity.com
Page 19

dIaGram 1: typIcaL SLIde Gate SIte aSSeSSment
NOTE: This scenario shows a possible conguration with the minimum recommended external entrapment protection sensors.
Other sensor congurations are valid. Each gate site is different. It is the installer's responsibility to assess and protect all
entrapment zones.
Edge sensor
(protecting open
direction) Draw-in
zones
Photo eye thru-beam
protecting Trailing End of
gate (Open direction of
travel)
Photo eye thru beam
protecting Leading End of
gate (Close direction of travel)
Drawing is not to scale
NOTICE: HySecurity slide gates are equipped with a Type A inherent entrapment sensor (IES) that complies with
UL 325. Any impediment to gate travel causes the gate to stop and reverse.
Monitored external entrapment protection sensors, which can be used in this site scenario and are compatible with
HySecurity slide gates, appear in the following chart. For a full list, refer to page 6.
EXAMPLE: External Entrapment Protection Sensors: Normally Close Contact, Compatible with HySecurity Gate Operators
P/N 2016 Monitored Sensors Sensor Type Output Manufacturer
MX3981
MX3983
MX3990 IRB-MON (Dist.~ 65 ft)t Thru-beam photo eye
MX3990 IRB-MON (Dist.~ 65 ft) Thru-beam photo eye
Wired Gate Edge Sensor
MGR20-2U-05-T2, Round
Gate Edge Module (GEM -104) Edge Interface Module
Wraparound edge
(5 ft for 2" round post)
10K
Resistor
Normally
Closed
Normally
Closed
Normally
Closed
Miller Edge Type B2
EMX Industries Type B1
EMX Industries Type B1
UL 325
Recognized
A minimum of one monitored external entrapment protection sensor, in addition to the slide gate operator’s inherent
sensor, is required before enabling momentary control activation. However, if there is a risk of entrapment in both
directions of gate travel, then both directions of travel must be protected by an external sensor.
NOTE: At minimum, external entrapment protection sensors must be installed wherever potential for entrapment exists during gate
movement. Note that every site is different. All potential entrapment zones should be protected with contact or non-contact
sensors. HySecurity gate operators detect NC output sensors and monitor them to comply with UL 325 Standard of Safety.
www.hysecurity.com © 2016 Quick Start D0726 Rev. J 19
Page 20

dIaGram 2: typIcaL SwInG Gate SIte aSSeSSment
Pedestrian
gate
WARNING
Moving Gate Can Cause
Serious Injury or Death
KEEP CLEAR! Gate may move at any me without
prior warning.
Do not let children operate the gate or play in
the gate area.
This entrance is for vehicles only. All pedestrians
must use a separate entrance.
Read the owner’s manual and safety instrucons.
Wraparound edge sensor
for potential Entrapment
Zone along base of gate.
Wraparound *
edge sensor on the
Leading End.
* If gate does not accommodate 2" wraparound edge
sensor, two standard channel mount edge sensors may
need to be used.
NOTE: If the bottom edge of a swing gate is greater than 6 inches (152 mm) above the ground at
any point in its arc of travel, one or more contact sensors shall be located on the bottom edge.
Reective Photo Eye to
protect potential
Entrapment Zone
which exists if gate
comes within 16 inches
of a rigid object.
Drawing is not to scale.
NOTICE: HySecurity swing gates are equipped with a Type A inherent entrapment sensor (IES) that complies with
UL 325. Any impediment to gate travel causes the gate to stop and reverse.
Monitored external entrapment protection sensors, which can be used in this site scenario and are compatible with
HySecurity swing gates, appear in the following chart. *For a full list, refer to page 6.
Example: External Entrapment Protection Sensors: Normally Close Contact, Compatible with HySecurity Gate Operators*
P/N 2016 Monitored Sensors Sensor Type Output Manufacturer
MX3981
Wired Gate Edge Sensor
MGR20-2U-05-T2, Round
MX3983
Gate Edge Module (GEM -104) Edge Interface Module
MX3985 Reecti-Guard (RG-R) Photo eye, reective
Wraparound edge
(5 ft for 2" round post)
10K
Resistor
Normally
Closed
Normally
Closed
Miller Edge Type B2
Miller Edge Type B1
UL 325
Recognized
A minimum of one monitored external entrapment protection sensor, in addition to the swing gate operator’s inherent
sensor, is required before enabling momentary control activation. Installers may decide both the type and location of the
one required entrapment protection sensor to protect either the open direction, the close direction or both directions of
swing gate travel. However, if there is a risk of entrapment in both directions of gate travel, then both directions of travel
must be protected by an external sensor.
NOTE: If a photo eye open is the only external entrapment protection sensor connected to a swing gate, it's application will require
a constant push button hold close for the swing gate to operate. HySecurity gate operators detect NC output sensors and monitor
them to comply with UL 325 Standard of Safety. Understand that UL 325 conveys the minimum standard of safety. Installers must
assess each specic gate design and site and install external entrapment protection sensors to guard all potential entrapment zones.
20 D0726 Rev. J UL 325 - 2016 HySecurity Monitored Sensors © 2016 www.hysecurity.com
Page 21

dIaGram 3: typIcaL barrIer arm SIte aSSeSSment
M
X
31
86-
0
1,
-02,
-
0
3
Access control device
WARNING Signs
Photo eye
Photo eye receiver (not
shown in illustration)
emitter
NOTICE: Site design considerations: Any rigid object such as, bollards, photo eye mounting
posts, fencing and walls cannot be within 16 inches of barrier arm travel. If a potential exists for a
barrier arm to travel within 16 inches of a solid, rigid object, the potential entrapment zone must
be protected with a monitored external entrapment protection sensor.
UL 325 Exception: An operator for a vehicular barrier (arm) that is not intended to move toward a rigid object closer
than 16 inches (406 mm), and does not have a pinch point between moving parts by virtue of the operator’s design or
as a result of installation in accordance with instructions supplied with the operator as specied in UL 325 Standard of
Safety is not required to be provided with means to protect against entrapment.
HySecurity barrier arms provide features for object detection. For more information, refer to the gate operator’s product
manual. Since the StrongArm falls in the exception classication for monitored entrapment, your options for accessory
connections and programming vary depending on your site requirements.
If your StrongArm uses version h4.50 software or higher:
• Build Year (BY) is set to 2
• SENSOR inputs default to normally closed contacts
• SENSOR input conguration defaults to “NOT USED”
• Gate will run with all SENSOR inputs set to “NOT USED”
All three sensor inputs can be re-congured.
NOTE: Even though no wires are attached to a SENSOR input, it must be “set” to 1 (NOT USED). The software requires
conrmation of all 3 monitored input designations before allowing the gate to move.
www.hysecurity.com © 2016 Quick Start D0726 Rev. J 21
Page 22

dIaGram 4: typIcaL VertIcaL LIft SIte oVerVIew
WARNING
Minimum
8 ft (2.4 m)
Clearance
KEEP CLEAR!
Moving Gate Can Cause Serious
Injury, Death, or Vehicle Damage
KEEP CLEAR! Gate may move at any time
without prior warning.
Do not let children operate the gate or play
in the gate area.
This entrance is for vehicles only.
Pedestrians must use a separate entrance.
Thru-beam Photo Eye
NOTICE: HySecurity vertical lift gates are equipped with a Type A inherent entrapment sensor (IES) that complies
with UL 325. Any impediment to gate travel causes the gate to stop and reverse.
Monitored external entrapment protection sensors, which can be used in this site scenario and are compatible with
HySecurity vertical lift gates, appear in the following chart. For a full list, refer to page 6.
EXAMPLE: External Entrapment Protection Sensors: Normally Close Contact, Compatible with HySecurity Gate Operators
P/N 2016 Monitored Sensors Sensor Type Output Manufacturer
MX3990 IRB-MON (Dist.~ 65 ft) Thru-beam photo eye Normally Closed EMX Industries Type B1
NOTE: A Thru-beam Photo Eye is recommended in this site scenario. A monitored wireless edge sensor is a viable option, though it
is not called out in the site scenario, chart above, or wiring diagram. Every site is different. On vertical lift gates, one monitored
sensor must be installed to protect the close direction of travel. However, all potential entrapment zones should be protected with
contact or non-contact sensors. HySecurity gate operators detect NC output sensors and monitor them to comply with UL 325
Standard of Safety.
UL 325
Recognized
22 D0726 Rev. J UL 325 - 2016 HySecurity Monitored Sensors © 2016 www.hysecurity.com
Page 23

dIaGram 5: typIcaL SLIdeSmart dc SIte aSSeSSment
Left Hand Gate
opening
ENTRAPMENT
6 ft (1.8 m) minimum
ZONE
Public Side
WARNING
sides of the gate in clear view.
For your records, take a photograph of
the completed installation site.
Gap between vertical bars
must be less than 2¼” (57 mm)
If gap is larger, a screened wire
mesh must extend to top of gate
or, to a minimum height
of 6 ft (1.8 m).
Be sure to place the
WARNING signs on both
Photo eye (Emitter or Reector in the Open direction)
Physical stop - at both ends of gate rail.
Interior posts,
Non-pinch
rollers (2x)
Mount access control
devices at least 6 ft
(1.8 m) beyond the gate.
Earth ground
Photo eye (Receiver)
Pedestrian gate located
near the slide gate.
Make sure a separate walk-
through entrance is available
and its pedestrian path is
clearly designated.
Physical
V track
stop
(gate rail)
Edge sensors (Public and Secure sides)
(Draw-in zone)
Photo eye (Receiver)
Secure Side
NOTE: Any gap larger than 2¼” (57 mm)
between gate and xed objects must be
protected. Install wrap around edge sensors
where gap between post and gate creates a
draw-in zone.
Photo eye
Emitter or Reector
(Close direction)
NOTE: To use monitored entrapment protection sensors for all four areas called out in this site scenario, The Solution multi-
input device would be required. Refer to page 6. Note that every site is different. All potential entrapment zones should be
protected with contact or non-contact sensors.
After wiring your external entrapment protection sensors to the Controller’s sensor inputs, access the Installer Menu. Set
sensors S1, S2, and S3 for this example of a site scenario, as follows:
GATE OPERATOR: SlideSmart DC and SlideSmart DCS using multi-input device.
S1 0
SENSOR #1 TYPE
CLOSE
OPEN
NEXT
PREV
OPEN
PREV
OPEN
PREV
S1 5 (EDGE OPEN)
STOP
MENU
RESET
SENSOR #1 TYPE
SELECT
CLOSE
STOP
MENU
S2 5 (EDGE OPEN)
SENSOR #2 TYPE
SELECT
NEXT
CLOSE
S3 7 (EYE BOTH)
STOP
MENU
SENSOR #3 TYPE
SELECT
NEXT
CLOSE
OPEN
STOP
SELECT
NEXT
PREV
Initial SENSOR setting = 0
Set SENSOR 1 = #5
EDGE OPEN (public side)
RESET
Set SENSOR 2 = #5
EDGE OPEN (secure side)
RESET
MENU
RESET
Set SENSOR 3 = #7
EYE BOTH **
**Since in the site scenario there are two monitored photo eye sensors protecting open and close
directions of travel and only one input remaining, you could use a Multi-input device (The Solution).
Connect sensors to two separate inputs on The Solution, set to NC contact (not Pulse) and wire The
Solution output to SENSOR 3 on the Controller. In the Installer Menu, set SENSOR #3 TYPE to EYE
BOTH. Another option? Use a long range photo eye and wire as a singular SENSOR input 1.
www.hysecurity.com © 2016 Quick Start D0726 Rev. J 23
Page 24

dIaGram 6: SwInGSmart dc SIte oVerVIew (duaL Gate)
Public Side
WARNING
sides of the access point in clear view of vehicles.
For your records, take a photograph of the
completed installation site.
Be sure to place the
WARNING signs on both
Mount access control
devices at least 6 ft
(1.8 m) beyond the gate.
Photo eye
(transmitter)
Gate Operator 1
Set SENSOR 1 input to #2
Photo eye Close
(Receiver)
Gate Operator 2
Photo
Set SENSOR 3 input to
eye
#4 (EYE OPEN)
Gate
Operator 2
ZONE
Reector
for Photo
Eye
Gate
Operator 1
Earth ground
Curb
ENTRAPMENT
Wrap around
Edge sensor (2x)
Wrap around
Edge sensor (2x)
ENTRAPMENT
Curb
A
ENTRAPMENT
ZONE
Pedestrian gate located
near the swing gate.
Make sure a separate walk- through entrance is
available and its pedestrian path is clearly designated.
View A
Cross Section
NOTE: If the bottom edge of a swing gate is greater than 6 inches (152 mm) above the ground at any point in its arc of travel,
one or more contact sensors shall be located on the bottom edge. In this gate site scenario, two wraparound edge sensors are
used on both gates which requires 2 inputs and 2 Installer Menu settings. See displays below for Gate operator 1 and 2.
Secure Side
After wiring your external entrapment protection sensors to the Controller’s sensor inputs, access the Installer Menu, Set
sensors S1, S2, and S3. (Refer to Table 5: Installer Menu Settings for SENSOR Inputs on page 10.)
GATE OPERATOR 1: SwingSmart DC or DCS GATE OPERATOR 2: SwingSmart DC or DCS
S1 0
SENSOR #1 TYPE
S1 0
SENSOR #1 TYPE
Set Sensor 1 = #2
Initial Sensor setting = 0
OPEN
PREV
S1 2 (EYE CLOSE)
CLOSE
STOP
SENSOR #1 TYPE
SELECT
NEXT
CLOSE
OPEN
S2 6 (EDGE BOTH)
SENSOR #2 TYPE
NEXT
PREV
STOP
SELECT
MENU
MENU
RESET
RESET
Photo EYE CLOSE
Set Sensor 2 = #6
EDGE BOTH
OPEN
PREV
S1 6 (EDGE BOTH)
CLOSE
STOP
SENSOR #1 TYPE
SELECT
NEXT
CLOSE
OPEN
S2 6 (EDGE BOTH)
SENSOR #2 TYPE
SELECT
NEXT
PREV
STOP
MENU
RESET
MENU
Set Sensor 3 = #6
OPEN
PREV
CLOSE
S3 6 (EDGE BOTH)
SENSOR #3 TYPE
NEXT
CLOSE
OPEN
NEXT
PREV
STOP
SELECT
STOP
SELECT
MENU
MENU
RESET
RESET
EDGE BOTH
OPEN
PREV
CLOSE
STOP
S3 4 (EYE OPEN)
SENSOR #3 TYPE
SELECT
NEXT
CLOSE
OPEN
NEXT
PREV
MENU
STOP
SELECT
24 D0726 Rev. J UL 325 - 2016 HySecurity Monitored Sensors © 2016 www.hysecurity.com
Initial Sensor setting = 0
Set Sensor 1 = #6
EDGE BOTH
RESET
Set Sensor 2 = #6
EDGE BOTH
RESET
MENU
RESET
Set Sensor 3 = #4
EYE OPEN
Page 25

Wiring HySecurity Sensors: Smart Touch
Wiring diagrams are provided on the following pages. The diagrams illustrate how to connect sensors and program the
gate operator. HySecurity Smart Touch gate operators can monitor entrapment protection sensors per UL 325 - 2015
Standard of Safety using software version h4.50 (or higher).
The site designer or installer must determine which external entrapment protection sensors will be installed with the
gate operator to create a UL 325 compliant installation site. For additional information, review For additional information,
review Gate Safety on the HySecurity website.
Power Supply Board
2
4
V
A
C
A
c
ce
ss
Label: pre-2016
EDGE SENSOR
EDGE SENSOR
PHOTO EYE POWER
PHOTO EYE POWER
24 VOLTS COMMO
24 VOLTS COMMON
PHOTO EYE POWER
PHOTO EYE POWER
DO NOT USE
PHOTO EYE
PHOTO EYE
OPEN DIRECTION
OPEN DIRECTION
DO NOT USE
+24V +24V
RS485
STATU S
DISPLAY
S 1
RS232
COM
NO
COMOPEN
MOTOR USER 1
EXIT
USER 2
OBSTR
OBSTR
RESET
STOP/BUZZER
FREE
INSIDE
OUTSIDE
VEHICLE DETECTORVEHICLE DETECTORVEHICLE DETECTOR
SHADOW
VEHICLE DETECTOR
WIEGAND
DRIVE
1
2
C
D
V
4
2
+
ON
o
ry
p
ower
COMM
Label: 2016
SENSOR 1
SENSOR 1
SENSOR
SENSOR
COM
COM
DO NOT USE
SENSOR 2
SENSOR 2
3
4
5
6
7
8
9
10
11
12
14
15
16
17
18
19
20
21
22
23
24
STOP BUTTON
OPEN BUTTON
CLOSE BUTTON
REMOTE OPEN AND
RADIO CONTROL
OPEN/CLOSE
OPEN PARTIAL
INTERLOCK OPEN
TIME CLOCK OPEN
FREE EXIT DETECTOR
DISABLE EXIT DETECTOR
DISABLE CLOSE TIMER
INSIDE OBSTRUCTION
VEHICLE DETECTOR
OUTSIDE OBSTRUCTION
VEHICLE DETECTOR
SHADOW/RESET
VEHICLE DETECTOR
EDGE SENSOR
PHOTO EYE POWER
24 VOLTS COMMON
PHOTO EYE POWER
DO NOT USE
PHOTO EYE
OPEN DIRECTION
DO NOT USE
PHOTO EYE
CLOSE DIRECTION
DO NOT USE
CHARGER
AC LOSS
LOCK INTERLOCK
EMERG CLOSE
FIRE DEPT OPEN
LED
Smart Touch Controller
LIMIT DUAL GATE
RPM
COM COMA B
POWER
USER 3
HySecurity
MX000585
VERSION
S/N
RADIO OPTIONS
DO NOT USE
PHOTO EYE
PHOTO EYE
SENSOR 3
Label:
Pre-2016
Build Year (BY 1)
CLOSE DIRECTION
CLOSE DIRECTION
SENSOR 3
S2 6 (EDGE BOTH)
SENSOR #2 TYPE
MX3979-02
Used on replacement boards for gate
operators manufactured prior to 2016.
Label:
Post 2016 Label
Build Year (BY 2)
MX3978-01
Change effective January 12th 2016
per UL 325 - 2016 Standard of Safety
www.hysecurity.com © 2016 Quick Start D0726 Rev. J 25
Page 26

Smart toucH: wIred edGe SenSor wItH Gem (-104)
1. Turn OFF power.
2. Connect the Green NC relay wire from GEM to Sensor 1, 2, or 3.
3. Connect Red & Green wires from GEM to SENSOR COM on Controller (or Power Supply Board, STC).
4. Connect Red wire from GEM to +24V on Controller (or Power Supply Board, STC).
5. Connect Black & White wire from GEM to 10K resistor in edge
sensor.
6. Turn ON power and access the Installer Menu.
Congure SENSOR setting accordingly (i.e. Edge Open, Edge
S2 0
SENSOR #2 TYPE
Installer Menu
showing Sensor 2
set to Edge Open
(Option #5)*
Close, or Edge Both). See Table 5: Installer Menu Settings for
SENSOR Inputs on page 10.
S2 5 (EDGE OPEN)
SENSOR #2 TYPE
CAUTION
All external entrapment protection sensors
must be NC sensor outputs and wired to the
SENSOR COM terminal for monitoring and
powering purposes. The sensor becomes
actively powered when the gate operator's
motor runs.
*NOTE: For 2 channel
capabilities, refer to Smart
Touch: 2 CH Wired Edge with
GEM-204 on page 34
Power Supply
Board
24V
A
C A
cce
s
s
or
y powe
r
ON
MM
O
C
C
D
V
24
+
GEM: Red Wire
CONNECT TO GATE EDGE
WITH 10K OHM RESISTOR
Black & White
GEM:
Red Wire
Wires
GEM:
Green Wire
B W
MILLER EDGE
GEM
GEM:
Green Wire
Green output wire can attach
to any SENSOR input.
*NOTE: Make sure whichever wired input used (SENSOR 1, 2, or 3) is the
same Sensor # congured through the Installer Menu.
DRIVE
1
2
3
4
5
6
7
8
9
10
11
12
14
15
16
17
18
19
20
21
22
23
24
LIMIT DUAL GATE
STOP BUTTON
OPEN BUTTON
CLOSE BUTTON
REMOTE OPEN AND
RADIO CONTROL
OPEN/CLOSE
OPEN PARTIAL
INTERLOCK OPEN
TIME CLOCK OPEN
FREE EXIT DETECTOR
DISABLE EXIT DETECTOR
DISABLE CLOSE TIMER
INSIDE OBSTRUCTION
VEHICLE DETECTOR
OUTSIDE OBSTRUCTION
VEHICLE DETECTOR
SHADOW/RESET
VEHICLE DETECTOR
SENSOR 1
SENSOR
COM
DO NOT USE
SENSOR 2
DO NOT USE
SENSOR 3
DO NOT USE
CHARGER
AC LOSS
LOCK INTERLOCK
EMERG CLOSE
FIRE DEPT OPEN
LED
Smart Touch Controller
RPM
COM COMA B
POWER
USER 3
HySecurity
MX000585
VERSION
S/N
RADIO OPTIONS
+24V +24V
RS485
STATU S
DISPLAY
RS232
S 1
MOTOR USER 1
USER 2
COM
NO
COMOPEN
EXIT
OBSTR
OBSTR
RESET
STOP/BUZZER
FREE
INSIDE
OUTSIDE
VEHICLE DETECTORVEHICLE DETECTORVEHICLE DETECTOR
SHADOW
VEHICLE DETECTOR
WIEGAND
26 D0726 Rev. J UL 325 - 2016 HySecurity Monitored Sensors © 2016 www.hysecurity.com
Page 27

Smart toucH: pHoto eye tHru beam (emX Irb mon)
1. Connect photo eye wiring.
NOTE: Run a jumper between photo eye -24V (POWER
INPUT) and COM terminals on the Receiver.
2. Turn ON power.
3. Access the Installer Menu and congure SENSOR setting
according to the entrapment area that the photo eye is
monitoring. Refer to table on page 10.
*NOTE: Make sure whichever wired input used (SENSOR 1, 2, or 3) is the
same Sensor # congured through the Installer Menu.
EMX IRB MON Photo Eye
Transmitter
C
D
V
24
+
24V
A
C A
cce
s
s
or
y powe
r
Power Supply Board
+24V
COMMON / NEG. to SENSOR COM
S1 0
SENSOR #1 TYPE
DRIVE
1
2
3
4
5
6
7
8
9
10
11
12
14
15
16
S1 4 (EYE OPEN)
SENSOR #1 TYPE
POWER
STOP BUTTON
OPEN BUTTON
CLOSE BUTTON
REMOTE OPEN AND
RADIO CONTROL
OPEN/CLOSE
OPEN PARTIAL
INTERLOCK OPEN
TIME CLOCK OPEN
FREE EXIT DETECTOR
DISABLE EXIT DETECTOR
DISABLE CLOSE TIMER
INSIDE OBSTRUCTION
VEHICLE DETECTOR
OUTSIDE OBSTRUCTION
VEHICLE DETECTOR
SHADOW/RESET
VEHICLE DETECTOR
SENSOR 1
SENSOR
COM
DO NOT USE
Installer Menu showing
Sensor 1 set to Eye Open
(Option #4)*
RS485
MOTOR USER 1
USER 2
USER 3
COM
NO
EXIT
OBSTR
OBSTR
STOP/BUZZER
FREE
INSIDE
OUTSIDE
VEHICLE DETECTORVEHICLE DETECTORVEHICLE DETECTOR
SENSOR 2
DO NOT USE
SENSOR 3
DO NOT USE
CHARGER
AC LOSS
LOCK INTERLOCK
EMERG CLOSE
FIRE DEPT OPEN
LED
Smart Touch Controller
RPM
COM COMA B
HySecurity
MX000585
VERSION
S/N
RADIO OPTIONS
+24V +24V
STATU S
DISPLAY
RS232
S 1
SHADOW
RESET
VEHICLE DETECTOR
WIEGAND
COMOPEN
EMX IRB MON Photo Eye
Jumper POWER
Receiver
CAUTION
Set DIP Switches
1 = OFF
2 = OFF
3 = OFF
4 = ON
+24V
17
18
19
20
21
22
23
24
LIMIT DUAL GATE
NC Relay
COMMON / NEG. to SENSOR COM
INPUT - 24V to COM
CAUTION
DIP switches must be set as shown otherwise the photo eye will not operate correctly. If you receive an Alert, "!ACTION BLOCKED"
"Photo Eye Open" PEO or "Photo Eye Close" PEC, take steps to align the photo eye. Refer to Photo Eye Alignment on page 12.
www.hysecurity.com © 2016 Quick Start D0726 Rev. J 27
Page 28

Smart toucH: pHoto eye / refLectIVe (e3K r10K4)
1. Set Photo Eye switch to LIGHT ON. See NOTE.
1. Connect photo eye wiring.
NOTE: Run a jumper between photo eye -24V and
Relay COM (C2) terminals. See photo.
2. Turn ON power.
3. Access the Installer Menu and congure SENSOR setting
according to the entrapment area that the photo eye is
monitoring. Refer to table on page 10.
CAUTION
All external entrapment protection sensors
must be NC sensor outputs and wired to the
SENSOR COM terminal for monitoring and
powering purposes. The sensor becomes
actively powered when the gate operator's
motor runs.
NOTE: Light/Dark switch
must be set to LIGHT ON.
Power Supply Board
24V
A
C A
cce
s
s
or
y powe
r
Omron (E3K R10K4)
Reflective Photo Eye
+24V
S3 0
SENSOR #3 TYPE
S3 2 (EYE CLOSE)
SENSOR #3 TYPE
DRIVE
1
2
3
4
C
D
V
24
+
5
6
7
8
9
10
11
12
14
15
16
17
18
19
20
21
22
23
24
COMMON / NEG. to SENSOR COM
LIMIT DUAL GATE
STOP BUTTON
OPEN BUTTON
CLOSE BUTTON
REMOTE OPEN AND
RADIO CONTROL
OPEN/CLOSE
OPEN PARTIAL
INTERLOCK OPEN
TIME CLOCK OPEN
FREE EXIT DETECTOR
DISABLE EXIT DETECTOR
DISABLE CLOSE TIMER
INSIDE OBSTRUCTION
VEHICLE DETECTOR
OUTSIDE OBSTRUCTION
VEHICLE DETECTOR
SHADOW/RESET
VEHICLE DETECTOR
SENSOR 1
SENSOR
COM
DO NOT USE
SENSOR 2
DO NOT USE
SENSOR 3
DO NOT USE
CHARGER
AC LOSS
LOCK INTERLOCK
EMERG CLOSE
FIRE DEPT OPEN
LED
RPM
COM COMA B
POWER
USER 3
HySecurity
MX000585
VERSION
S/N
Smart Touch Controller
RADIO OPTIONS
+24V +24V
Installer Menu
showing Sensor 3 set
to Eye Close (Option
#2)
RS485
MOTOR USER 1
EXIT
STOP/BUZZER
FREE
USER 2
INSIDE
OBSTR
OUTSIDE
OBSTR
COM
NO
VEHICLE DETECTORVEHICLE DETECTORVEHICLE DETECTOR
STATU S
SHADOW
RESET
DISPLAY
RS232
S 1
VEHICLE DETECTOR
WIEGAND
COMOPEN
Jumper -24V to Relay COM
(Terminal 6, C2)
NOTE: If you receive an Alert, "!ACTION
BLOCKED" "Photo Eye Open" PEO or "Photo
Relay NO (Terminal 5, NO2)
Eye Close" PEC, take steps to align the photo
eye. Refer to Photo Eye Alignment on page 12.
28 D0726 Rev. J UL 325 - 2016 HySecurity Monitored Sensors © 2016 www.hysecurity.com
Page 29

Smart toucH: tHe SoLutIon, mIm-62 (muLtI-Input moduLe)
1. Turn OFF AC power.
2. Input channels 1 and 2 must be used and are always assigned to OUTPUT A.
3. All other input channels may be congured to either A or B.
NOTE: If different sensor types are connected to the same output, then program the Controller SENSOR type
for EDGE options.
4. Turn ON power.
5. Access the Installer Menu. Congure SENSOR
setting according to the types of sensors wired to the Smart Touch Controller..
2
4V AC
Acces
s
ory p
o
w
e
r
Power Supply Board
C
D
V
4
2
+
OMMON
C
Connect either output
(P/NC wire) to SENSOR 1,
2, or 3.
DRIVE
1
2
3
4
5
6
7
8
9
10
11
12
14
15
16
17
18
19
20
21
22
23
24
LIMIT DUAL GATE
STOP BUTTON
OPEN BUTTON
CLOSE BUTTON
REMOTE OPEN AND
RADIO CONTROL
OPEN/CLOSE
OPEN PARTIAL
INTERLOCK OPEN
TIME CLOCK OPEN
FREE EXIT DETECTOR
DISABLE EXIT DETECTOR
DISABLE CLOSE TIMER
INSIDE OBSTRUCTION
VEHICLE DETECTOR
OUTSIDE OBSTRUCTION
VEHICLE DETECTOR
SHADOW/RESET
VEHICLE DETECTOR
SENSOR 1
SENSOR
COM
DO NOT USE
SENSOR 2
DO NOT USE
SENSOR 3
DO NOT USE
CHARGER
AC LOSS
LOCK INTERLOCK
EMERG CLOSE
FIRE DEPT OPEN
LED
Smart Touch Controller
RPM
COM COMA B
POWER
USER 3
HySecurity
MX000585
VERSION
S/N
RADIO OPTIONS
+24V +24V
RS485
STATU S
DISPLAY
RS232
S 1
MOTOR USER 1
USER 2
COM
NO
COMOPEN
EXIT
OBSTR
OBSTR
RESET
STOP/BUZZER
FREE
INSIDE
OUTSIDE
VEHICLE DETECTORVEHICLE DETECTORVEHICLE DETECTOR
SHADOW
VEHICLE DETECTOR
WIEGAND
An example site scenario where The Solution
might be useful is found on page 23.
CAUTION
All external entrapment protection sensors must be NC sensor
outputs and wired to the SENSOR COM terminal for monitoring
and powering purposes. The sensor becomes actively powered
when the gate operator's motor runs.
www.hysecurity.com © 2016 Quick Start D0726 Rev. J 29
Page 30

Smart toucH: pHoto eye / refLectI-Guard (rG-r)
1. Connect photo eye wiring.
NOTE: Run a jumper between photo eye -24V and CM terminals.
2. Turn ON power.
3. Access the Installer Menu and congure SENSOR setting
according to the entrapment area that the photo eye is
monitoring. Refer to table on page 10.
CAUTION
All external entrapment protection sensors must be
NC sensor outputs and wired to the SENSOR COM
terminal for monitoring and powering purposes. The
sensor becomes actively powered when the gate
operator's motor runs.
S1 0
SENSOR #1 TYPE
S1 4 (EYE OPEN)
SENSOR #1 TYPE
Installer Menu
showing Sensor 1
set to Eye Open
(Option #4)
Power Supply Board
C
D
V
24
+
24V
A
C A
cce
s
s
or
y powe
r
ON
MM
O
C
+24V
Reflecti-GUARD Photo Eye
Connect NC relay
wire to SENSOR 1,
2, or 3.
To pull 3 wires instead of
4, jumper, PWR Relay to
CM terminal
NOTE: If you receive an Alert, "!ACTION BLOCKED" "Photo
Eye Open" PEO or "Photo Eye Close" PEC, take steps to align
the photo eye. Refer to Photo Eye Alignment on page 12.
DRIVE
1
2
3
4
5
6
7
8
9
10
11
12
14
15
16
17
18
19
20
21
22
23
COMMON / NEG. to SENSOR COM
24
LIMIT DUAL GATE
STOP BUTTON
OPEN BUTTON
CLOSE BUTTON
REMOTE OPEN AND
RADIO CONTROL
OPEN/CLOSE
OPEN PARTIAL
INTERLOCK OPEN
TIME CLOCK OPEN
FREE EXIT DETECTOR
DISABLE EXIT DETECTOR
DISABLE CLOSE TIMER
INSIDE OBSTRUCTION
VEHICLE DETECTOR
OUTSIDE OBSTRUCTION
VEHICLE DETECTOR
SHADOW/RESET
VEHICLE DETECTOR
SENSOR 1
SENSOR
COM
DO NOT USE
SENSOR 2
DO NOT USE
SENSOR 3
DO NOT USE
CHARGER
AC LOSS
LOCK INTERLOCK
EMERG CLOSE
FIRE DEPT OPEN
LED
Smart Touch Controller
RPM
COM COMA B
POWER
USER 3
HySecurity
MX000585
VERSION
S/N
RADIO OPTIONS
+24V +24V
RS485
STATU S
DISPLAY
RS232
S 1
MOTOR USER 1
USER 2
COM
NO
COMOPEN
EXIT
OBSTR
OBSTR
RESET
STOP/BUZZER
FREE
INSIDE
OUTSIDE
VEHICLE DETECTORVEHICLE DETECTORVEHICLE DETECTOR
SHADOW
VEHICLE DETECTOR
WIEGAND
30 D0726 Rev. J UL 325 - 2016 HySecurity Monitored Sensors © 2016 www.hysecurity.com
Page 31

Smart toucH: wIreLeSS edGe, wIreLeSS Gate LInK
A transmitter (MGL-TX20) and receiver (MGL-RX20) are
required. Refer to table on page 6.
1. Turn OFF power.
2. Connect the wiring per the diagram shown.
3. Turn ON power and access the Installer Menu.
4. Congure SENSOR setting accordingly (i.e.
Edge Open, Edge Close, or Edge Both). Refer
to table on page 10.
Refer to site scenarios on pages 20 and 24. Follow
instructions that accompany the device.
CAUTION
All external entrapment protection
sensors must be NC sensor outputs
and wired to the SENSOR COM
terminal for monitoring and powering
purposes. The sensor becomes actively
powered when the gate operator's
motor runs.
24V
A
C A
cce
s
s
or
NOTE: In bi-parting swing gates,
CH1 and CH2 may be programmed
to the same SENSOR # TYPE on
one controller, but each CH must
be connected to separate SENSOR
inputs. Always make sure that a gate
edge is installed on each bi-parting
swing gate.
Be aware. Issues with radio interference
cause false trips. Placing the antenna
high and reducing environmental
“noise” is critical to proper wireless
transmission. Avoid placing the
receiver sets within 100 feet of each
other as crosstalk may occur.
NOTE: Use Miller Gate Edges
that have a wire marked with Blue
Tape. The Blue Tape indicates a
resistor is built in. Use receivers
and transmitters, labeled Version
1.02 or higher.
Miller Edge LEARN mode. Press
the LEARN button on the Receiver
for 2 seconds until the amber light
blinks continuously. Press the Edge
or Test button on the Transmitter
Wireless Edge Link (Receiver)
to complete the LEARN mode
process and sync the receiver and
transmitter.
Signal received from battery-
powered Transmitter (MGL - TX20)
Power Supply Board
y powe
r
Yellow
Green
MGL - RX20
ON
MM
O
C
Connect either channels
output (P/NC wire) to
SENSOR 1, 2, or 3.
Red (Channel 1 &
Channel 2)
Installer Menu showing SENSOR 2 set to EDGE OPEN (Option #5) and
SENSOR 3 set to EDGE CLOSE (Option #3)
S2 0
SENSOR #2 TYPE
S2 5 (EDGE OPEN)
SENSOR #2 TYPE
C
D
V
24
+
DRIVE
1
2
3
4
5
6
7
8
9
10
11
12
14
15
16
17
18
19
20
21
22
23
24
LIMIT DUAL GATE
STOP BUTTON
OPEN BUTTON
CLOSE BUTTON
REMOTE OPEN AND
RADIO CONTROL
OPEN/CLOSE
OPEN PARTIAL
INTERLOCK OPEN
TIME CLOCK OPEN
FREE EXIT DETECTOR
DISABLE EXIT DETECTOR
DISABLE CLOSE TIMER
INSIDE OBSTRUCTION
VEHICLE DETECTOR
OUTSIDE OBSTRUCTION
VEHICLE DETECTOR
SHADOW/RESET
VEHICLE DETECTOR
SENSOR 1
SENSOR
COM
DO NOT USE
SENSOR 2
DO NOT USE
SENSOR 3
DO NOT USE
CHARGER
AC LOSS
LOCK INTERLOCK
EMERG CLOSE
FIRE DEPT OPEN
LED
Smart Touch Controller
RPM
COM COMA B
S3 0
SENSOR #3 TYPE
S3 3 (EDGE CLOSE)
SENSOR #3 TYPE
POWER
USER 3
HySecurity
MX000585
VERSION
S/N
RADIO OPTIONS
+24V +24V
RS485
STATU S
DISPLAY
RS232
S 1
MOTOR USER 1
USER 2
COM
NO
COMOPEN
EXIT
OBSTR
OBSTR
RESET
STOP/BUZZER
FREE
INSIDE
OUTSIDE
VEHICLE DETECTORVEHICLE DETECTORVEHICLE DETECTOR
SHADOW
VEHICLE DETECTOR
WIEGAND
www.hysecurity.com © 2016 Quick Start D0726 Rev. J 31
Page 32

Smart toucH: wIred edGe wItH Gem-104 & pHoto eye
The wiring diagram illustrates a wired edge sensor with GEM-104 interface module and a photo eye connection. An
example of the connections for an Edge sensor and a Photo Eye and the Installer Menu settings for the Smart Touch
Controller (STC) are shown in Diagram 1 and Diagram 2 on 19 and 20.
For photo eye alignment, refer to
page 12.
EMX IRB MON Photo Eye
Transmitter
COMMON / NEG. to SENSOR COM
CAUTION
Set DIP Switches
1 = OFF
2 = OFF
3 = OFF
4 = ON
NOTE: DIP switches must
be set as shown otherwise
the photo eye will not
operate correctly. For easy
photo eye alignment, refer
to page 12.
Jumper POWER INPUT - 24V
to COM
GEM Black &
White Wires
B W
*NOTE: For 2
channel capabilities,
See Smart Touch:
2 CH Wired Edge
with GEM-204 on
page 34..
24V
A
C A
cce
s
s
or
y powe
r
Power Supply Board
+24V
*Green output wire can attach to
any SENSOR input.
C
D
V
24
+
GEM +24V
EMX IRB MON Photo Eye
Receiver
+24V
COMMON / NEG. to SENSOR COM
GEM: Red Wires
GEM:
Green Wires*
RS485
STATU S
DISPLAY
RS232
S 1
10
11
12
14
15
16
17
18
19
20
21
22
23
24
NC Relay
DRIVE
1
2
3
4
5
6
7
8
9
LIMIT DUAL GATE
STOP BUTTON
OPEN BUTTON
CLOSE BUTTON
REMOTE OPEN AND
RADIO CONTROL
OPEN/CLOSE
OPEN PARTIAL
INTERLOCK OPEN
TIME CLOCK OPEN
FREE EXIT DETECTOR
DISABLE EXIT DETECTOR
DISABLE CLOSE TIMER
INSIDE OBSTRUCTION
VEHICLE DETECTOR
OUTSIDE OBSTRUCTION
VEHICLE DETECTOR
SHADOW/RESET
VEHICLE DETECTOR
SENSOR 1
SENSOR
COM
DO NOT USE
SENSOR 2
DO NOT USE
SENSOR 3
DO NOT USE
CHARGER
AC LOSS
LOCK INTERLOCK
EMERG CLOSE
FIRE DEPT OPEN
LED
Smart Touch Controller
RPM
COM COMA B
POWER
USER 3
HySecurity
MX000585
VERSION
S/N
RADIO OPTIONS
+24V +24V
NOTE: Drawing is not to scale.
Combination of D0711 and D0712, Rev. A
CAUTION
All external entrapment protection sensors must be
NC sensor outputs and wired to the SENSOR COM
terminal for monitoring and powering purposes.
The sensor becomes actively powered when the
gate operator's motor runs.
MOTOR USER 1
USER 2
COM
NO
COMOPEN
EXIT
OBSTR
OBSTR
RESET
STOP/BUZZER
FREE
INSIDE
OUTSIDE
VEHICLE DETECTORVEHICLE DETECTORVEHICLE DETECTOR
SHADOW
VEHICLE DETECTOR
WIEGAND
32 D0726 Rev. J UL 325 - 2016 HySecurity Monitored Sensors © 2016 www.hysecurity.com
Page 33

Smart toucH: wIreLeSS edGe Gate LInK & pHoto eye
The wiring diagram illustrates a wireless edge receiver and a photo eye connection. For photo eye alignment, refer
to page 12.
CAUTION
Connect all contact and non-contact sensors
to same power source. Example, Do NOT
connect photo eyes to +24VDC and gate
edges to +12VDC. Incompatible electricity
ow. A FAULT 2 will appear.
EMX IRB MON Photo Eye
Transmitter
COMMON / NEG. to SENSOR COM
CAUTION
Set DIP Switches
1 = OFF
2 = OFF
3 = OFF
4 = ON
NOTE: DIP switches must
be set as shown otherwise
the photo eye will not
operate correctly. For easy
photo eye alignment, refer
to page 12.
Jumper POWER INPUT - 24V to
COM in Receiver
Miller Edge 2 Channel Wireless
Receiver (MGL - RX20)
Green
Yellow
MGL - RX20
OUTPUT
SELECT
LEARN
POWER
STATUS
CH 1
CH 2
* P / NC
* P / NC
POWER
Antenna
24V
A
C A
cce
Power Supply Board
Photo Eye
Transmitter
COM
COM
10K
10K
CH 1 CH 2
*Sensor wire (P/ NC) can
attach to any SENSOR
input.
s
s
or
y powe
r
+24V
COM attaches to
SENSOR COM
CH 1 and CH 2 “LEARN” buttons. To identify and sync to one active transmitter, follow
manufacturer’s installation instructions. Use receivers & transmitters Version 1.02 or higher.
DIP switches for CH1 and CH2. Verify dip switch is set to “R” for each channel used. HySecurity uses NC
"Relay" sensors. Do NOT select "P" as the output. P = "Pulse" device.
C
D
V
24
+
MGL - RX20
+24V
EMX IRB MON Photo Eye
Receiver
+24V
COMMON / NEG. to SENSOR COM
+24V
DRIVE
1
2
3
4
5
6
7
8
9
10
11
12
14
15
16
17
18
19
20
21
22
23
24
LIMIT DUAL GATE
NC Relay to SENSOR
STOP BUTTON
OPEN BUTTON
CLOSE BUTTON
REMOTE OPEN AND
RADIO CONTROL
OPEN/CLOSE
OPEN PARTIAL
INTERLOCK OPEN
TIME CLOCK OPEN
FREE EXIT DETECTOR
DISABLE EXIT DETECTOR
DISABLE CLOSE TIMER
INSIDE OBSTRUCTION
VEHICLE DETECTOR
OUTSIDE OBSTRUCTION
VEHICLE DETECTOR
SHADOW/RESET
VEHICLE DETECTOR
SENSOR 1
SENSOR
COM
DO NOT USE
SENSOR 2
DO NOT USE
SENSOR 3
DO NOT USE
CHARGER
AC LOSS
LOCK INTERLOCK
EMERG CLOSE
FIRE DEPT OPEN
LED
RPM
CAUTION
All external entrapment protection sensors must be
NC sensor outputs and wired to the SENSOR COM
terminal for monitoring and powering purposes.
The sensor becomes actively powered when the
gate operator's motor runs.
To SENSOR COM
Congure Installer Menu items:
SENSOR 1, 2, & 3
S1 0
SENSOR #1 TYPE
POWER
S1 2 (EYE CLOSE)
SENSOR #1 TYPE
S2 0
SENSOR #2 TYPE
S2 1 (NOT USED)
SENSOR #2 TYPE
USER 3
S3 0
SENSOR #3 TYPE
S3 5 (EDGE OPEN)
SENSOR #3 TYPE
HySecurity
MX000585
VERSION
S/N
Smart Touch Controller
RADIO OPTIONS
COM COMA B
+24V +24V
RS485
STATU S
DISPLAY
RS232
S 1
MOTOR USER 1
USER 2
COM
NO
COMOPEN
EXIT
OBSTR
OBSTR
RESET
STOP/BUZZER
FREE
INSIDE
OUTSIDE
VEHICLE DETECTORVEHICLE DETECTORVEHICLE DETECTOR
SHADOW
VEHICLE DETECTOR
WIEGAND
www.hysecurity.com © 2016 Quick Start D0726 Rev. J 33
Page 34

Smart toucH: 2 cH wIred edGe wItH Gem-204
The wiring diagram illustrates a WIRED edge receiver connected to the STC controller via GEM-204.
CAUTION
Connect all contact and non-contact sensors to same power source.
Example, Do NOT connect photo eyes to +24VDC and gate edges to
+12VDC. Incompatible electricity ow. A FAULT 2 will appear.
Male spade
connector
Installer Menu Displays
Power Supply Board
24V
A
C A
cce
s
s
or
y powe
Red wire
Power +24V
Yellow wire
SENSOR connection for
CH 2
r
NOTE:
Red wires are not
polarity sensitive.
Blue wire
SENSOR Connection
for CH 1
Red wire SENSOR COM
The sensor does not become active
until a command is received by the
Controller and the motor runs.
Female quick
disconnects provided
DRIVE
1
2
C
D
V
24
+
3
4
5
6
7
8
9
10
11
12
14
15
16
17
18
19
20
21
22
23
24
LIMIT DUAL GATE
STOP BUTTON
OPEN BUTTON
CLOSE BUTTON
REMOTE OPEN AND
RADIO CONTROL
OPEN/CLOSE
OPEN PARTIAL
INTERLOCK OPEN
TIME CLOCK OPEN
FREE EXIT DETECTOR
DISABLE EXIT DETECTOR
DISABLE CLOSE TIMER
INSIDE OBSTRUCTION
VEHICLE DETECTOR
OUTSIDE OBSTRUCTION
VEHICLE DETECTOR
SHADOW/RESET
VEHICLE DETECTOR
SENSOR 1
SENSOR
COM
DO NOT USE
SENSOR 2
DO NOT USE
SENSOR 3
DO NOT USE
CHARGER
AC LOSS
LOCK INTERLOCK
EMERG CLOSE
FIRE DEPT OPEN
LED
Smart Touch Controller
RPM
COM COMA B
POWER
USER 3
HySecurity
MX000585
VERSION
S/N
RADIO OPTIONS
+24V +24V
RS485
S1 0
SENSOR #1 TYPE
MOTOR USER 1
S1 6 (EDGE BOTH)
SENSOR #1 TYPE
S2 0
SENSOR #2 TYPE
USER 2
S2 3 (EDGE CLOS)
SENSOR #2 TYPE
COM
NO
STATU S
DISPLAY
RS232
COMOPEN
S 1
EXIT
OBSTR
OBSTR
RESET
STOP/BUZZER
FREE
INSIDE
OUTSIDE
VEHICLE DETECTORVEHICLE DETECTORVEHICLE DETECTOR
SHADOW
VEHICLE DETECTOR
WIEGAND
CAUTION
All external entrapment protection sensors must be NC
sensor outputs and wired to the SENSOR COM terminal for
CH 2 Wires to
10k Edge
CH 1 Wires to
10k Edge
monitoring and powering purposes. The sensor becomes
actively powered when the gate operator's motor runs.
34 D0726 Rev. J UL 325 - 2016 HySecurity Monitored Sensors © 2016 www.hysecurity.com
Page 35

Wiring HySecurity Sensors: Smart DC
24VDC
24VDC
24VAC
24VAC
12VDC
12VDC
Wiring diagrams are provided on the following pages. The diagrams illustrate how to connect sensors and program
the gate operator. HySecurity Smart DC gate operators can monitor entrapment protection sensors per UL 325 - 2015
Standard of Safety using software version h5.50 (or higher).
The site designer or installer must determine which external entrapment protection sensors will be installed with the gate
operator to create a UL 325 compliant installation site. For additional information, review Gate Safety on the HySecurity
website.
Power: +24VDC
connections
24VDC
24VDC
12VDC
12VDC
SENSOR 2
SENSOR 3
COM
COM
COM
COM
COM
COM
COM
COM
EXIT
LOOP
BLOCK
EXIT
IN OBS
LOOP
OUT OBS
LOOP
CENTER
LOOP
Power: +24VDC
connections
SENSOR 1
SENSOR
COM
STOP
OPEN
CLOSE
RADIO
OPEN
PARTIAL
EYE
OPEN
EYE
CLOSE
EXIT
LOOP
BLOCK
EXIT
IN OBS
LOOP
OUT OBS
LOOP
CENTER
LOOP
EDGE
EYE
COM
+ 24 V
EMERG
OPEN
OPEN
SHOW
LEDs
NOTE: In 2012, location
of pins changed. Older
boards show pins
swapped.
O
C
B
A
M
O
C
E
T
A
G
AL
U
D
OP
M
A
R
USER RELAY 1
Electro-mechanical
S
24V
+
EN
OPT
O
I
D
5
8
4
-
S
R
B
S
U
C
D
R2
E
S
U
1
O
N
M
O
C
S
N
IO
Power: +24VDC connections
www.hysecurity.com © 2016 Quick Start D0726 Rev. J 35
Page 36

RADIO
OPEN
OPEN
wIrInG tIpS for SenSor com termInaL: Smart dc
OPEN
If using multiple sensor devices, use a wire nut as a junction and pigtail to SENSOR COM. Or, stack locking spade
connectors. Or, install a separate terminal block and jumper outputs to one lead for SENSOR COM.
CAUTION
All external entrapment protection sensors must be NC sensor outputs and wired to the SENSOR COM terminal for
monitoring and powering purposes. The sensor becomes actively powered when the gate operator receives a run command.
Reference numbers indicate terminal
location from base of controller.
Wires coming
from sensor
device
PARTIAL
SENSOR 2
OPEN
EYE
SENSOR 3
EXIT
EXIT
LOOP
LOOP
BLOCK
EXIT
EXIT
IN OBS
LOOP
LOOP
OUT OBS
LOOP
LOOP
CENTER
LOOP
LOOP
EDGE
SENSOR 1
EYE
SENSOR
COM
COM
+ 24 V
EMERG
OPEN
11
10
9
8
7
6
5
4
3
2
1
SHOW
LEDs
Wires coming
from sensor
device
Wire to
SENSOR
COM
Wires coming
from sensor
device
RADIO
PARTIAL
SENSOR 2
OPEN
EYE
SENSOR 3
EXIT
EXIT
LOOP
LOOP
BLOCK
EXIT
EXIT
IN OBS
LOOP
LOOP
OUT OBS
LOOP
LOOP
CENTER
LOOP
LOOP
EDGE
SENSOR 1
EYE
SENSOR
COM
COM
+ 24 V
EMERG
OPEN
OPEN
SHOW
LEDs
Wire nut and pigtail to SENSOR COM Crimp spade on wire and stackAdd terminal block
11
10
9
8
7
6
5
4
3
2
1
menu mode naVIGatIonaL tIpS
The buttons on the display keypad perform certain functions while in Menu Mode. Refer to the chart.
To change data
appearing in the display
Press Select.
Two left characters blink.
To navigate through
the Selections
Press Next or Previous.
Continue pressing Next to view
all selections.
36 D0726 Rev. J UL 325 - 2016 HySecurity Monitored Sensors © 2016 www.hysecurity.com
To choose what appears
on the display
Press Select.
Blinking characters
become static.
To navigate between
menu items
Press Next or Previous.
Advance - press Next
Previous - press Previous
Page 37

COM
COM
COM
COM
COM
COM
COM
COM
STOP
OPEN
RADIO
CLOSE
OPEN
OPEN
PARTIAL
OPEN
EYE
EXIT
LOOP
EXIT
LOOP
LOOP
LOOP
EDGE
EYE
COM
+ 24 V
EMERG
OPEN
SHOW
LEDs
S
1
+
24V
OP
EN
C
O
M
D
U
AL
G
A
T
E
C
O
M
A
B
U
S
E
R2
C
O
M
N
O
D
C
USER RELAY 1
Electro-mechanical
24VDC
24VDC
12VDC
12VDC
SENSOR 2
SENSOR 3
SENSOR 1
SENSOR
COM
EXIT
LOOP
BLOCK
EXIT
CENTER
LOOP
IN OBS
LOOP
OUT OBS
LOOP
Smart dc: wIred edGe SenSor wItH Gem-104
1. Turn OFF AC power.
2. Connect the Green NC relay wire from Miller Edge GEM to Sensor 1, 2, or 3.
3. Connect one Red and one Green wire from GEM to SENSOR COM on Controller.
4. Connect Red wire from GEM to +24V on Controller. (Red wires are not polarity sensitive.)
5. Connect Black & White wire from GEM to edge sensor. Blue tape on Miller Edge wire indicates a 10k edge. Only
Miller edges with blue taped wire can be used with the GEM module.
6. Turn ON power.
NOTE: Make sure both AC & DC switches are ON and the red battery wire is plugged in.
7. Access the Installer Menu. Congure SENSOR setting accordingly. For example, Edge Open, Edge Close, or
Edge Both.
Installer Menu Settings
CAUTION
All external entrapment protection sensors must be NC
sensor outputs and wired to the SENSOR COM terminal
for monitoring and powering purposes. The sensor
becomes actively powered when the gate operator
receives a run command.
*NOTE: Make sure whichever wired input used
(SENSOR 1, 2, or 3) matches the SENSOR # congured
through the Installer Menu.
S1 0
SENSOR #1 TYPE
OPEN
PREV
PREV
OPEN
CLOSE
NEXT
S1 5 (EDGE OPEN)
SENSOR #1 TYPE
CLOSE
STOP
SELECT
STOP
MENU
RESET
MENU
RESET
CONNECT TO GATE EDGE
WITH 10K OHM RESISTOR
Black & White
Wires
NOTE: Green output wire can
attach to any SENSOR input.
S1 SENSOR #1 TYPE shown in
illustration.
11
10
9
8
B W
MILLER EDGE
GEM
GEM:
Green Wires
7
6
5
4
GEM: Red Wire
*NOTE: For 2 channel
GEM:
Red Wire
capabilities, refer to Smart
DC: 2 CH Wired Edge with
GEM-204 on page 45.
www.hysecurity.com © 2016 Quick Start D0726 Rev. J 37
3
2
1
PREV
NEXT
SELECT
Page 38

Smart dc: pHoto eye tHru beam (emX Irb mon)
COM
COM
COM
COM
COM
COM
COM
COM
STOP
OPEN
RADIO
CLOSE
OPEN
OPEN
PARTIAL
OPEN
EYE
EXIT
LOOP
EXIT
LOOP
LOOP
LOOP
EDGE
EYE
COM
+ 24 V
EMERG
OPEN
SHOW
LEDs
S
1
+
24V
OP
EN
C
O
M
D
U
AL
G
A
T
E
C
O
M
A
B
U
S
E
R2
C
O
M
N
O
D
C
USER RELAY 1
Electro-mechanical
24VDC
24VDC
12VDC
12VDC
SENSOR 2
SENSOR 3
SENSOR 1
SENSOR
COM
EXIT
LOOP
BLOCK
EXIT
CENTER
LOOP
IN OBS
LOOP
OUT OBS
LOOP
1. Turn OFF AC power.
2. Connect photo eye wiring.
NOTE: On the Receiver, run a jumper between photo eye -24V (POWER INPUT) and COM terminals to reduce
the number of wires connect to Smart DC terminals.
3. Turn ON power.
NOTE: Make sure both AC & DC switches are ON and the red battery wire is plugged in.
4. Access the Installer Menu. Congure SENSOR setting accordingly.
For example, Eye Close, Eye Open, or Eye Both.
Installer Menu Settings
CAUTION
All external entrapment protection sensors must be NC sensor
S1 0
SENSOR #1 TYPE
outputs and wired to the SENSOR COM terminal for monitoring
and powering purposes. The sensor becomes actively powered
CLOSE
when the gate operator receives a run command.
EMX IRB MON Photo Eye
Transmitter
+24V
COMMON / NEG. to SENSOR COM
CAUTION
Set DIP Switches
1 = OFF
2 = OFF
3 = OFF
4 = ON
EMX IRB MON Photo Eye
Receiver
COMMON / NEG.
to SENSOR COM
TIP: Jumper
POWER COM to
RELAY COM
CAUTION
+24V
NC Relay
DIP switches must be set as shown otherwise the photo eye will not operate correctly. If you receive an Alert,
"!ACTION BLOCKED" "Photo Eye Open" PEO or "Photo Eye Close" PEC, take steps to align the photo eye.
Refer to Photo Eye Alignment on page 12.
38 D0726 Rev. J UL 325 - 2016 HySecurity Monitored Sensors © 2016 www.hysecurity.com
OPEN
PREV
OPEN
PREV
11
10
9
8
7
6
5
4
3
2
1
STOP
S1 2 (EYE CLOSE)
SELECT
NEXT
SENSOR #1 TYPE
CLOSE
NEXT
STOP
SELECT
MENU
MENU
RESET
RESET
Page 39

COM
COM
COM
COM
COM
COM
COM
COM
STOP
OPEN
RADIO
CLOSE
OPEN
OPEN
PARTIAL
OPEN
EYE
EXIT
LOOP
EXIT
LOOP
LOOP
LOOP
EDGE
EYE
COM
+ 24 V
EMERG
OPEN
SHOW
LEDs
S
1
+
24V
OP
EN
C
O
M
D
U
AL
G
A
T
E
C
O
M
A
B
U
S
E
R2
C
O
M
N
O
D
C
USER RELAY 1
Electro-mechanical
24VDC
24VDC
12VDC
12VDC
SENSOR 2
SENSOR 3
SENSOR 1
SENSOR
COM
EXIT
LOOP
BLOCK
EXIT
CENTER
LOOP
IN OBS
LOOP
OUT OBS
LOOP
11
10
9
8
7
6
5
4
3
2
1
Smart dc: pHoto eye / refLectIVe (e3K r10K4)
1. Set Photo Eye switch to LIGHT ON.
2. Turn OFF AC power.
3. Connect photo eye wiring.
NOTE: Run a jumper between photo eye -24V and
Relay COM (C2) terminals. See photo.
4. Turn ON power.
NOTE: Make sure both AC & DC switches are ON and the red battery
wire is plugged in.
5. Access the Installer Menu. Congure SENSOR
setting accordingly. For example, Eye Close,
Eye Open, or Eye Both.
CAUTION
All external entrapment protection sensors must be
NC sensor outputs and wired to the SENSOR COM
terminal for monitoring and powering purposes. The
sensor becomes actively powered when the gate
operator receives a run command.
Installer Menu Settings
S1 0
SENSOR #1 TYPE
CLOSE
OPEN
STOP
S1 4 (EYE OPEN)
SELECT
PREV
NEXT
SENSOR #1 TYPE
CLOSE
OPEN
PREV
NEXT
STOP
SELECT
MENU
MENU
RESET
RESET
NOTE: Light/Dark switch
must be set to LIGHT ON.
Omron (E3K R10K4)
Reflective Photo Eye
+24V
Jumper -24V to Relay COM
(Terminal 6, C2)
COMMON / NEG. to SENSOR COM
Relay NO (Terminal 5, NO2) to SENSOR on Smart DC
NOTE: If you receive an Alert, "!ACTION BLOCKED"
"Photo Eye Open" PEO or "Photo Eye Close" PEC, take
steps to align the photo eye. Refer to Photo Eye
Alignment on page 12.
www.hysecurity.com © 2016 Quick Start D0726 Rev. J 39
Page 40

Smart dc: muLtI-Input moduLe (tHe SoLutIon, mIm-62)
COM
COM
COM
COM
COM
COM
COM
COM
STOP
OPEN
RADIO
CLOSE
OPEN
OPEN
PARTIAL
OPEN
EYE
EXIT
LOOP
EXIT
LOOP
LOOP
LOOP
EDGE
EYE
COM
+ 24 V
EMERG
OPEN
SHOW
LEDs
S
1
+
24V
OP
EN
C
O
M
D
U
AL
G
A
T
E
C
O
M
A
B
U
S
E
R2
C
O
M
N
O
D
C
USER RELAY 1
Electro-mechanical
24VDC
24VDC
12VDC
12VDC
SENSOR 2
SENSOR 3
SENSOR 1
SENSOR
COM
EXIT
LOOP
BLOCK
EXIT
CENTER
LOOP
IN OBS
LOOP
OUT OBS
LOOP
11
10
9
8
7
6
5
4
3
2
1
1. Turn OFF AC power.
2. Input channels 1 and 2 must be used and are always assigned to OUTPUT A.
3. All other input channels may be congured to either A or B.
NOTE: If different sensor types are connected to the same output, then
program the Controller SENSOR type for EDGE options.
4. Turn ON power.
NOTE: Make sure both AC & DC switches are ON and the red battery
wire is plugged in.
5. Access the Installer Menu. Congure SENSOR
setting according to the types of sensors wired to
the Smart DC.
CAUTION
All external entrapment protection sensors must be NC
sensor outputs and wired to the SENSOR COM terminal
for monitoring and powering purposes. The sensor
becomes actively powered when the gate operator
receives a run command.
Connect either output
(P/NC wire) to
SENSOR 1, 2, or 3.
Installer Menu Settings
Examples in displays show
bi-parting swing gate site scenario.
S2 0
SENSOR #2 TYPE
OPEN
CLOSE
STOP
MENU
RESET
S2 6 (EDGE BOTH)
SELECT
PREV
NEXT
SENSOR #2 TYPE
CLOSE
OPEN
PREV
NEXT
STOP
SELECT
MENU
RESET
S3 0
SENSOR #3 TYPE
OPEN
CLOSE
STOP
MENU
RESET
S3 6 (EDGE BOTH)
SELECT
PREV
NEXT
SENSOR #3 TYPE
OPEN
PREV
CLOSE
NEXT
STOP
SELECT
MENU
RESET
40 D0726 Rev. J UL 325 - 2016 HySecurity Monitored Sensors © 2016 www.hysecurity.com
Page 41

Smart dc: pHoto eye / refLectI-Guard (rG-r)
COM
COM
COM
COM
COM
COM
COM
COM
STOP
OPEN
RADIO
CLOSE
OPEN
OPEN
PARTIAL
OPEN
EYE
EXIT
LOOP
EXIT
LOOP
LOOP
LOOP
EDGE
EYE
COM
+ 24 V
EMERG
OPEN
SHOW
LEDs
S
1
+
24V
OP
EN
C
O
M
D
U
AL
G
A
T
E
C
O
M
A
B
U
S
E
R2
C
O
M
N
O
D
C
USER RELAY 1
Electro-mechanical
24VDC
24VDC
12VDC
12VDC
SENSOR 2
SENSOR 3
SENSOR 1
SENSOR
COM
EXIT
LOOP
BLOCK
EXIT
CENTER
LOOP
IN OBS
LOOP
OUT OBS
LOOP
1. Turn OFF AC power.
2. Connect photo eye wiring.
NOTE: Run a jumper between photo eye -24V and CM terminals.
3. Turn ON power.
NOTE: Make sure both AC & DC switches are ON and the red battery
wire is plugged in.
4. Access the Installer Menu. Congure SENSOR
setting accordingly. For example, Eye Close,
Eye Open, or Eye Both.
CAUTION
All external entrapment protection sensors must be NC sensor
outputs and wired to the SENSOR COM terminal for monitoring
and powering purposes. The sensor becomes actively powered
when the gate operator receives a run command.
Installer Menu Settings
S2 0
SENSOR #2 TYPE
OPEN
CLOSE
STOP
S2 2 (EYE CLOSE)
SELECT
PREV
NEXT
SENSOR #2 TYPE
OPEN
PREV
CLOSE
NEXT
SELECT
STOP
MENU
MENU
RESET
RESET
Reflecti-GUARD Photo Eye
Connect NC relay
wire to SENSOR 1,
2, or 3.
11
10
9
8
7
Jumper, PWR -24V to
relay CM
6
5
4
3
2
1
www.hysecurity.com © 2016 Quick Start D0726 Rev. J 41
+24V
COMMON / NEG. to SENSOR COM
NOTE: If you receive an Alert, "!ACTION BLOCKED"
"Photo Eye Open" PEO or "Photo Eye Close" PEC, take
steps to align the photo eye. Refer to Photo Eye
Alignment on page 12.
Page 42

COM
COM
COM
COM
COM
COM
COM
COM
STOP
OPEN
RADIO
CLOSE
OPEN
OPEN
PARTIAL
OPEN
EYE
EXIT
LOOP
EXIT
LOOP
LOOP
LOOP
EDGE
EYE
COM
+ 24 V
EMERG
OPEN
SHOW
LEDs
S
1
+
24V
OP
EN
C
O
M
D
U
AL
G
A
T
E
C
O
M
A
B
U
S
E
R2
C
O
M
N
O
D
C
USER RELAY 1
Electro-mechanical
24VDC
24VDC
12VDC
12VDC
SENSOR 2
SENSOR 3
SENSOR 1
SENSOR
COM
EXIT
LOOP
BLOCK
EXIT
CENTER
LOOP
IN OBS
LOOP
OUT OBS
LOOP
Smart dc: mGL-rX20 wIreLeSS Gate LInK
A transmitter (MGL-TX20) and receiver (MGL-RX20) are required (Version 1.02 or higher).
1. Turn OFF AC power.
2. Connect the wiring per the diagram shown.
3. Turn ON power.
Conguring SENSOR 2 Conguring SENSOR 3
Installer Menu Settings
Examples in displays show
bi-parting swing gate site scenario.
4. Access the Installer Menu. Congure
SENSOR setting accordingly For
example, Edge Open, Edge Close, or
S2 0
SENSOR #2 TYPE
S3 0
SENSOR #3 TYPE
Edge Both.
5. Follow instructions that accompany the
device.
CAUTION
All external entrapment protection sensors must be
NC sensor outputs and wired to the SENSOR COM
terminal for monitoring and powering purposes. The
sensor becomes actively powered when the gate
operator receives a run command.
NOTE: Miller Edge LEARN mode. Press the LEARN button on the
Receiver for 2 seconds until the amber light blinks continuously.
Press the Edge or Test button on the Transmitter to complete the
LEARN mode process and sync the receiver and transmitter.
Connect either
channels output
(P/NC wire) to
SENSOR 1, 2, or 3.
OPEN
PREV
CLOSE
STOP
S2 6 (EDGE BOTH)
SELECT
NEXT
SENSOR #2 TYPE
CLOSE
OPEN
PREV
NEXT
STOP
SELECT
MENU
MENU
RESET
RESET
11
10
CLOSE
OPEN
PREV
OPEN
PREV
STOP
S3 6 (EDGE BOTH)
SELECT
NEXT
SENSOR #3 TYPE
CLOSE
STOP
SELECT
NEXT
NOTE: One wireless edge receiver
has the NC connections for up to
two wireless edge transmitters. Use
Miller Gate Edges that have a wire
marked with Blue Tape. The Blue Tape
indicates a resistor is built in. To avoid
crosstalk, use receivers & transmitters
Version 1.02 or higher.
9
Wireless Edge Link (Receiver) MGL - RX20
Signal received from battery-powered
42 D0726 Rev. J UL 325 - 2016 HySecurity Monitored Sensors © 2016 www.hysecurity.com
Yellow
Green
Transmitter (MGL - TX20)
Red (Channel 1
& Channel 2)
NOTE: In bi-parting swing gates, CH1 and CH2 may be
programmed to the same SENSOR # TYPE on one controller,
but each CH must be connected to separate SENSOR inputs.
Always make sure that a gate edge is installed on each bi-
parting swing gate.
8
7
6
5
4
3
2
1
MENU
MENU
RESET
RESET
Page 43

COM
COM
COM
COM
COM
COM
COM
COM
STOP
OPEN
RADIO
CLOSE
OPEN
OPEN
PARTIAL
OPEN
EYE
EXIT
LOOP
EXIT
LOOP
LOOP
LOOP
EDGE
EYE
COM
+ 24 V
EMERG
OPEN
SHOW
LEDs
S
1
+
24V
OP
EN
C
O
M
D
U
AL
G
A
T
E
C
O
M
A
B
U
S
E
R2
C
O
M
N
O
D
C
USER RELAY 1
Electro-mechanical
24VDC
24VDC
12VDC
12VDC
SENSOR 2
SENSOR 3
SENSOR 1
SENSOR
COM
EXIT
LOOP
BLOCK
EXIT
CENTER
LOOP
IN OBS
LOOP
OUT OBS
LOOP
Smart dc: wIred edGe wItH Gem-104 and pHoto eye
RADIO
OPEN
OPEN
The wiring diagram illustrates a wired edge sensor with GEM-104 interface module
and a photo eye connection. Refer to Photo Eye Alignment on page 12.
NOTE: Turn OFF AC power before connecting sensor wires to Smart DC.
CAUTION
All external entrapment protection sensors must be NC sensor outputs and wired
to the SENSOR COM terminal for monitoring and powering purposes. The sensor
becomes actively powered when the gate operator receives a run command.
EMX IRB MON Photo Eye
Transmitter
Installer Menu Settings
S2 0
SENSOR #2 TYPE
CLOSE
OPEN
S2 2 (EYE CLOSE)
NEXT
PREV
SENSOR #2 TYPE
CLOSE
OPEN
S3 0
NEXT
PREV
SENSOR #3 TYPE
STOP
SELECT
STOP
SELECT
MENU
RESET
MENU
RESET
CLOSE
OPEN
S3 6 (EDGE BOTH)
NEXT
PREV
SENSOR #3 TYPE
CLOSE
OPEN
NEXT
PREV
STOP
SELECT
STOP
SELECT
MENU
MENU
+24V
COMMON / NEG. to SENSOR COM
CAUTION
11
Set DIP Switches
1 = OFF
2 = OFF
3 = OFF
4 = ON
10
9
8
7
6
NOTE: DIP switches must
be set as shown otherwise
the photo eye will not
operate correctly. Refer to
Photo Eye Alignment on
page
12.
TIP:
Jumper
POWER COM to
RELAY COM
GEM Black &
White Wires
*NOTE: For 2
channel capabilities,
refer to Smart DC: 2
CH Wired Edge with
B W
GEM-204 on page
45.
www.hysecurity.com © 2016 Quick Start D0726 Rev. J 43
EMX IRB MON Photo Eye
Receiver
+24V
COMMON / NEG.
to SENSOR COM
NC Relay
GEM: Red Wires
GEM:
Green Wires*
*Green output wire can attach to
any SENSOR input.
TIP: Use a
wire nut as
a junction
for SENSOR
COM.
5
4
3
2
1
GEM +24V
PARTIAL
OPEN
EYE
EXIT
LOOP
EXIT
LOOP
LOOP
LOOP
EDGE
EYE
COM
+ 24 V
EMERG
OPEN
SENSOR 2
SENSOR 3
EXIT
LOOP
BLOCK
EXIT
IN OBS
LOOP
OUT OBS
LOOP
CENTER
LOOP
SENSOR 1
SENSOR
COM
RESET
RESET
SHOW
LEDs
11
10
9
8
7
6
5
4
3
2
1
Page 44

Smart dc: wIreLeSS edGe Gate LInK and pHoto eye
COM
COM
COM
COM
COM
COM
COM
COM
STOP
OPEN
RADIO
CLOSE
OPEN
OPEN
PARTIAL
OPEN
EYE
EXIT
LOOP
EXIT
LOOP
LOOP
LOOP
EDGE
EYE
COM
+ 24 V
EMERG
OPEN
SHOW
LEDs
S
1
+
24V
OP
EN
C
O
M
D
U
AL
G
A
T
E
C
O
M
A
B
U
S
E
R2
C
O
M
N
O
D
C
USER RELAY 1
Electro-mechanical
24VDC
24VDC
12VDC
12VDC
SENSOR 2
SENSOR 3
SENSOR 1
SENSOR
COM
EXIT
LOOP
BLOCK
EXIT
CENTER
LOOP
IN OBS
LOOP
OUT OBS
LOOP
PREV
NEXT
SELECT
The wiring diagram illustrates a wireless edge receiver and a
photo eye connection. Refer to Photo Eye Alignment on page 12.
NOTE: Turn OFF AC power before connecting sensor wires to Smart DC.
Installer Menu Settings
Conguring SENSOR 1
EMX IRB MON Photo Eye
Transmitter
CAUTION
Connect all contact and non-
contact sensors to same power
S1 0
SENSOR #1 TYPE
CLOSE
OPEN
S1 1 (NOT USED)
NEXT
PREV
SENSOR #1 TYPE
STOP
SELECT
source. Example, Do NOT
connect photo eyes to +24VDC
OPEN
STOP
CLOSE
and gate edges to +12VDC.
Incompatible electrical ow.
A FAULT 2 appears.
Photo Eye
Transmitter
+24V
PREV
Conguring SENSOR 2
OPEN
PREV
OPEN
SELECT
NEXT
S2 0
SENSOR #2 TYPE
CLOSE
STOP
S2 2 (EYE CLOSE)
SELECT
NEXT
SENSOR #2 TYPE
CLOSE
STOP
COMMON / NEG. to SENSOR COM
CAUTION
Set DIP Switches
1 = OFF
2 = OFF
4 = ON
NOTE: DIP switches must
be set as shown otherwise
the photo eye will not
operate correctly. For easy
photo eye alignment,
3 = OFF
TIP:
Jumper
POWER COM to
RELAY COM
EMX IRB MON Photo Eye
Receiver
+24V
COMMON / NEG.
to SENSOR COM
NC Relay
11
10
9
8
7
6
5
4
3
2
1
* P / NC
* P / NC
COM
10K
COM
10K
+24V
To SENSOR COM
COM attaches to
SENSOR COM
CH 1 CH 2
*Sensor wire (P/ NC) can
attach to any SENSOR input.
CAUTION
All external entrapment protection sensors must be
NC sensor outputs and wired to the SENSOR COM
terminal for monitoring and powering purposes.
The sensor becomes actively powered when the
gate operator receives a run command.
CH 1 and CH 2 “LEARN” buttons.
Press the LEARN button on the Receiver for 2 seconds until the
amber light blinks continuously. Press the Edge or Test button on the Transmitter to complete
the LEARN mode process and sync the receiver and transmitter.
DIP switches for CH1 and CH2. Verify dip switch is set to “R” for each channel used. HySecurity uses NC
"Relay" sensors. Do NOT select "P" as the output. P = "Pulse" device.
Miller Edge 2 Channel Wireless
Receiver (MGL - RX20)
Green
Yellow
MGL - RX20
OUTPUT
SELECT
LEARN
POWER
STATUS
CH 1
CH 2
POWER
Antenna
44 D0726 Rev. J UL 325 - 2016 HySecurity Monitored Sensors © 2016 www.hysecurity.com
Conguring SENSOR 3
S3 0
SENSOR #3 TYPE
CLOSE
OPEN
PREV
OPEN
PREV
STOP
S3 6 (EDGE BOTH)
SELECT
NEXT
SENSOR #3 TYPE
CLOSE
STOP
SELECT
NEXT
MGL - RX20
+24V
MENU
MENU
MENU
MENU
MENU
MENU
RESET
RESET
RESET
RESET
RESET
RESET
Page 45

COM
COM
COM
COM
COM
COM
COM
COM
STOP
OPEN
RADIO
CLOSE
OPEN
OPEN
PARTIAL
OPEN
EYE
EXIT
LOOP
EXIT
LOOP
LOOP
LOOP
EDGE
EYE
COM
+ 24 V
EMERG
OPEN
SHOW
LEDs
S
1
+
24V
OP
EN
C
O
M
D
U
AL
G
A
T
E
C
O
M
A
B
U
S
E
R2
C
O
M
N
O
D
C
USER RELAY 1
Electro-mechanical
24VDC
24VDC
12VDC
12VDC
SENSOR 2
SENSOR 3
SENSOR 1
SENSOR
COM
EXIT
LOOP
BLOCK
EXIT
CENTER
LOOP
IN OBS
LOOP
OUT OBS
LOOP
Smart dc: 2 cH wIred edGe wItH Gem-204
PREV
NEXT
SELECT
The wiring diagram illustrates a WIRED edge receiver connected to the
SDC controller via the 2 channel GEM-204.
NOTE: Turn OFF AC power before connecting sensor wires to Smart DC.
Installer Menu Settings
Conguring SENSOR 1
CAUTION
Connect all contact and non-contact sensors to same power
source. Example, Do NOT connect photo eyes to +24VDC
and gate edges to +12VDC. Incompatible electricity ow. A
S1 0
SENSOR #1 TYPE
CLOSE
OPEN
NEXT
PREV
S1 5 (EDGE OPEN)
PREV
SENSOR #1 TYPE
STOP
MENU
SELECT
FAULT 2 will appear.
CLOSE
CAUTION
OPEN
PREV
Conguring SENSOR 2
NEXT
STOP
SELECT
All external entrapment protection sensors must be NC
sensor outputs and wired to the SENSOR COM terminal for
monitoring and powering purposes. The sensor becomes
actively powered when the gate operator receives a run
command.
www.hysecurity.com © 2016 Quick Start D0726 Rev. J 45
Yellow wire
SENSOR connection for CH 2
Blue wire
SENSOR Connection for CH 1
Channel wires to 10k Edge
Red wire SENSOR COM
The sensors do not become active
until the motor runs.
11
10
9
8
7
6
5
4
3
NOTE: In 2012, location of
pins changed. Older boards
show pins swapped.
2
1
Red wire
Power +24V
NOTE: Red wires are not polarity
sensitive.
S2 0
SENSOR #2 TYPE
CLOSE
OPEN
S2 3 (EDGE CLOS)
NEXT
PREV
SENSOR #2 TYPE
CLOSE
OPEN
STOP
SELECT
STOP
MENU
MENU
Conguring SENSOR 3
S3 0
SENSOR #3 TYPE
CLOSE
OPEN
S3 1 (NOT USED)
NEXT
PREV
SENSOR #3 TYPE
CLOSE
OPEN
NEXT
PREV
STOP
SELECT
STOP
SELECT
MENU
MENU
MENU
RESET
RESET
RESET
RESET
RESET
RESET
Page 46

COM
COM
COM
COM
COM
COM
COM
COM
STOP
OPEN
RADIO
CLOSE
OPEN
OPEN
PARTIAL
OPEN
EYE
EXIT
LOOP
EXIT
LOOP
LOOP
LOOP
EDGE
EYE
COM
+ 24 V
EMERG
OPEN
SHOW
LEDs
S
1
+
24V
OP
EN
C
O
M
D
U
AL
G
A
T
E
C
O
M
A
B
U
S
E
R2
C
O
M
N
O
D
C
USER RELAY 1
Electro-mechanical
24VDC
24VDC
12VDC
12VDC
SENSOR 2
SENSOR 3
SENSOR 1
SENSOR
COM
EXIT
LOOP
BLOCK
EXIT
CENTER
LOOP
IN OBS
LOOP
OUT OBS
LOOP
COM
COM
COM
COM
COM
COM
COM
COM
STOP
OPEN
RADIO
CLOSE
OPEN
OPEN
PARTIAL
OPEN
EYE
EXIT
LOOP
EXIT
LOOP
LOOP
USER RELAY 1
24VDC
24VDC
12VDC
12VDC
SENSOR 2
SENSOR 3
EXIT
LOOP
BLOCK
EXIT
IN OBS
LOOP
OUT OBS
LOOP
Smart dc bI-partInG GateS: pHoto eye (emX Irb mon)
USER RELAY 1
Electro-mechanical
USER RELAY 1
Electro-mechanical
N
C
N
O
CAUTION
The following illustrates a photo eye connection for bi-parting Smart DC gate operators and the Installer Menu
congurations for each (Primary and Secondary).
NOTE: Turn OFF AC power before connecting sensor wires to Smart DC.
CAUTION
Connect all contact and non-contact sensors to same power source.
Example, Do NOT connect photo eyes to +24VDC and gate edges
to +12VDC. Incompatible electrical ow and FAULT 2 occurs.
PRIMARY
Gate Operator
DG 2
Installer Menu Settings
DG 2 (PRIMARY)
DUAL GATE
NOTE: To align the
OPEN
PREV
CLOSE
NEXT
STOP
SELECT
MENU
RESET
Photo Eye, access
PE (photo eye
alignment) via the
User Menu.
EMX IRB MON Photo Eye
Transmitter
COMMON and +24V
can be wired to
matching terminals
in Receiver
+24V
11
10
9
8
7
6
Set DIP
Switches
1 = OFF
2 = OFF
5
4
3
2
1
3 = OFF
4 = ON
+24V
NC Relay
TIP:
Jumper
COMMON / NEG. to SENSOR COM
POWER COM to
RELAY COM inside
receiver
+24V
Smart DC Bi-Parting Gates: Dual Gate Wiring
C
O
C
D
M
U
AL
A
T
A
G
B
E
EN
OP
M
O
C
D
RA
24V
+
PT
O
O
I
PRIMARY
Gate Operator
DG 2
46 D0726 Rev. J UL 325 - 2016 HySecurity Monitored Sensors © 2016 www.hysecurity.com
N
O
N
C
D
R2
E
S
U
1
S
O
N
M
O
C
NS
O
I
Shielded cable (3
wire)
Conduit
Supports low voltage cable
A
M
O
C
E
T
A
G
AL
U
D
B
S1 2 (EYE CLOSE)
SENSOR #1 TYPE
OPEN
CLOSE
STOP
MENU
RESET
S2 1 (NOT USED)
SENSOR #2 TYPE
SELECT
NEXT
PREV
OPEN
CLOSE
STOP
MENU
RESET
S3 1 (NOT USED)
SENSOR #3 TYPE
SELECT
NEXT
PREV
OPEN
PREV
CLOSE
NEXT
STOP
SELECT
MENU
SECONDARY
Gate Operator
DG 1
DG 1 (SECONDARY)
DUAL GATE
CLOSE
OPEN
PREV
11
10
9
8
7
C
D
R2
E
S
U
1
S
O
24V
+
EN
OP
M
O
C
O
O
I
D
RA
N
M
O
C
NS
O
I
PT
SELECT
NEXT
S1 1 (NOT USED)
SENSOR #1 TYPE
CLOSE
OPEN
S2 1 (NOT USED)
SENSOR #2 TYPE
NEXT
PREV
CLOSE
OPEN
S3 1 (NOT USED)
SENSOR #3 TYPE
NEXT
PREV
CLOSE
OPEN
PREV
STOP
NEXT
SECONDARY
Gate Operator
DG 1
NOTE: Connect ground shield
wire to one Controller, not both.
RESET
STOP
SELECT
STOP
SELECT
SELECT
MENU
STOP
MENU
MENU
RESET
MENU
RESET
RESET
RESET
Page 47

WARRANTY
1. Warranty.
Hy-Security Gate, Inc. (“HySecurity”) warrants that at the time of sale each of its prod-
ucts will, in all material respects, conform to its then applicable specication and will be
free from defects in material and manufacture.
The following additional durational warranties apply to HySecurity products, depending
on whether (1) the product is purchased through an authorized HySecurity distributor
and (2) whether a timely and complete product registration is submitted to HySecurity.
It is therefore important that you register your product with HySecurity, (online
www.hysecurity.com), within the 60-day period described below.
1(a) HySecurity Products Purchased Through Authorized Distributors and
Properly Registered
For any gate operator product that is purchased from an authorized HySecurity
distributor (this excludes product purchased through internet resellers or any distributor not authorized by HySecurity), if the product registration is completed by
the Dealer/Installer/End User within 60 days of the date of purchase, the following
warranty terms will apply. HySecurity warrants that the product will remain serviceable for the following periods:
a. Hydraulic Industrial Gate Operators: Five Years or 500,000 gate cycles
(whichever occurs rst) after the date of installation,
b. Electromechanical Slide and Swing operators: Five Years after the date of
installation—unless installed in a single family residential application, in which
case the warranty term shall be Seven Years after the date the product is
shipped from HySecurity,
c. Electromechanical Barrier Arm Operators: Two Years or 1,000,000 gate cycles
(whichever occurs rst) after the date of installation,
d. Hydraulic Wedge Operators and Electromechanical Surface Mount Wedge
Operator: Two Years or 500,000 gate cycles (whichever occurs rst) after the
date of installation;
provided that the preceding 5-year warranty period in (a) and (b) will not extend
beyond seven years from the date that the product was shipped from HySecurity,
and the 2-year warranty period in (c) and (d) will not extend beyond four years from
the date that the product was shipped from HySecurity.
The preceding warranty durations do not apply to the products or components
described below (e-h), which have a shorter warranty period.
e. Hydraulic Gate Operator Drive Wheels including XtremeDrive™ wheels and
rack: Two Years from date of installation.
f. AC and DC power supplies, chargers and inverters and HyNet module: Two
years from date of installation, except batteries.
g. Batteries: One Year from date of shipment from HySecurity.
h. Components subject to normal wear including, but not limited to, chains, belts,
idler wheels, sprockets and fuses: One Year from date of installation.
1(b) HySecurity Products Not Purchased Through an Authorized Distributor or
Not Properly Registered within 60 Days
For any product that is not purchased from an authorized HySecurity distributor
or for which the product registration was not completed by the Dealer/Installer/
End User within 60 days of the date of purchase, the following One-Year Limited
Warranty will apply: HySecurity warrants that the product will remain serviceable
for the following periods, which begin on the date that the product was shipped
from HySecurity:
a. All Gate Operators: One Year or 100,000 gate cycles whichever comes rst.
b. AC and DC power supplies, chargers or inverters: One Year.
c. HyNet module: One Year.
d. Hydraulic Gate Operator Drive Wheels: One Year.
1(c) Replacement Parts
HySecurity warrants that replacement parts (whether new or reconditioned) will
remain serviceable for One Year from the date that the product was shipped from
HySecurity or the remaining period of the Gate Operator warranty, whichever is
longer.
1(d) Limitations and Exclusions Applicable to Each of the Preceding Warranties.
The preceding warranties shall not apply to equipment that has been (1) installed,
maintained, or used improperly or contrary to instructions; (2) subjected to negligence, accident, vandalism, or damaged by severe weather, wind, ood, re, terrorism or war; or (3) damaged through improper operation, maintenance, storage
or abnormal or extraordinary use or abuse. Any modication made to products will
Warranty D0317 revised June 5, 2015
void the warranty unless the modications are approved in writing by HySecurity
in advance of the change (this exclusion does not apply to normal installation of
approved accessories and/or protective devices or sensors). It is the responsibility
of the distributor, installer, or End User to ensure that the software version in the
product is maintained to the latest revision level.
The preceding warranties do not extend to accessories when those items carry
another manufacturer’s name plate and they are not a part of the base model.
HySecurity disclaims all warranties for such accessory components, which carry
only the original warranty, if any, of their original manufacturer. HySecurity hereby
assigns its rights under such manufacturer warranties—to the extent that such
rights are assignable—to Buyer.
These warranties extend to HySecurity’s Distributors, to the Dealer/Installer, and
to the rst End User of the product following installation. They do not extend to
subsequent purchasers.
2. Exclusion of Other Warranties.
The warranties contained in Section 1 are the exclusive warranties given by HySecurity and
supersede any prior, contrary or additional representations, whether oral or written. Any
prior or extrinsic representations or agreements are discharged or nullied.
HEREBY DISCLAIMS AND EXCLUDES ALL OTHER WARRANTIES—WHETHER EXPRESS,
IMPLIED, OR STATUTORY—INCLUDING ANY WARRANTY OF MERCHANTABILITY,
ANY WARRANTY OF FITNESS FOR A PARTICULAR PURPOSE, ANY LIABILITY,
FOR INFRINGEMENT, AND ANY IMPLIED WARRANTIES OTHERWISE ARISING FROM
COURSE OF DEALING, COURSE OF PERFORMANCE, OR USAGE OF TRADE.
3. Buyer’s Exclusive Remedies for Any Nonconformity.
If a HySecurity product fails to conform to the warranties in Section 1, Buyer must
notify and order replacement parts from the Distributor through which the product was
purchased within a reasonable time and in no event more than thirty (30) days after
the discovery of the nonconformity. HySecurity will investigate and, in the event of a
breach, will provide, within a reasonable period of time, one of the following: (1) repair
or replacement of any nonconforming products or components or (2) refund of the
price upon return of the nonconforming items. HySecurity reserves the right to supply
used or reconditioned material for all warranty claims. HySecurity will not be considered to be in breach of or default under this Warranty because of any failure to perform
due to conditions beyond its reasonable control, including any force majeure. This war-
ranty does not cover any incidental expenses, including nes or penalties, temporary
security, labor, shipping, travel time or standby time that are incurred for inspection or
replacement of any nonconforming items. As a condition of warranty coverage, warranty claims must be submitted in accordance with the procedures described on the
HySecurity form, “RMA Procedures.”
THE REMEDY SELECTED BY HYSECURITY IN ACCORDANCE WITH THIS PARAGRAPH
SHALL BE THE EXCLUSIVE AND SOLE REMEDY OF BUYER FOR ANY BREACH
OF WARRANTY.
4. Exclusion of Consequential and Incidental Damages.
HYSECURITY SHALL NOT BE LIABLE FOR ANY INCIDENTAL, SPECIAL, OR CONSEQUENTIAL DAMAGES, WHETHER RESULTING FROM NONDELIVERY OR FROM THE
USE, MISUSE, OR INABILITY TO USE THE PRODUCT OR FROM DEFECTS IN THE
PRODUCT OR FROM HYSECURITY’S OWN NEGLIGENCE.
This exclusion applies regardless of whether such damages are sought for breach of
warranty, breach of contract, negligence, or strict liability. This exclusion does not apply
to claims for bodily injury or death.
5. Severability.
If any provision of this warranty is found to be invalid or unenforceable, then the
remainder shall have full force and effect.
6. Proprietary Rights.
HySecurity retains and reserves all right, title, and interest in the intellectual property
rights of its products, including any accompanying proprietary software. No ownership
of any intellectual property rights in the products or accompanying software is transferred to Distributor, Dealer/Installer or End User.
7. Applicable Law.
This warranty will be interpreted, construed, and enforced in all respects in accordance
with the laws of the State of Washington, without reference to its choice of law principles. The U.N. Convention on Contracts for the International Sale of Goods will not
apply to this warranty.
HYSECURITY
www.hysecurity.com Wiring HySecurity Sensors: Smart DC D0726 Rev. J 47
Page 48

HySecurIty contact InformatIon
Before contacting your distributor or HySecurity Technical Support, obtain
the serial number of your operator.
• Qualied HySecurity distributors are experienced and trained
to assist in resolving any problems. For the name of a qualied
distributor near you, contact us at www.hysecurity.com.
• HySecurity Technical Support 800-321-9947.
For information about HySecurity training for installers, maintenance personnel, and end users, refer to the company
website at www.hysecurity.com.
Copyright Notice
© Copyright 2016 by HySecurity Gate, Inc.
All rights reserved. No part of this manual may be reproduced by any means (photocopier, electronic, or mechanical),
without the express written permission of HySecurity Gate, Inc. Federal copyright law prohibits the reproduction,
distribution, or public display of copyrighted materials without the express written permission of the copyright
owner, unless fair use or other exemption under copyright law applies. Additionally, HySecurity Gate, Inc. makes no
representations or warranty with respect to this manual. We also reserve the right to make changes in the products
described without notice and without any obligation to notify any persons of any such revision or change.
Trademarks
SlideDriver, StrongArm, SwingRiser, StrongArm CRASH, StongArm M30, StrongArm M50, HydraLift, HydraSwing,
HydraWedge SM50, HydraSupply XL, HydraSupply, HyNet, Hy8Rely, HyInverter AC, HyCharger DC, SlideWinder, Smart
Touch, S.T.A.R.T., SwingSmart DC, SlideSmart DC, StrongArmPark DC, WedgeSmart DC, Smart DC and the HySecurity
logo are trademarks or registered trademarks of HySecurity Gate, Inc.
GEM, GEM-104 and GEM-204 are registered trademarks of Miller Edge, Inc.
UL and UL logo are trademarks of UL LLC and ETL is a trademark of Intertek. Intertek provides the ETL Listed Mark
D0726 Rev. J
 Loading...