

Page 1

MX3037, MX3037R, MX001457
EXAMPLE
Smart DC Controller Installation Instructions
The following instructions are intended to assist the user in replacing the Smart DC Controller (SDC) in HySecurity
electromechanical gate operators. Please read all assembly instructions before installing the kit.
REQUIRED TOOLS
Phillips head screwdriver
Needle nose pliers
Always ensure operator rmware is updated to
latest available version. The latest available version
is at www.hysecurity.com/contact-us/technical-
support/operator-software/ or by naviagting the
HySecurity website by clicking:
TechSupport Resources Operator Software
Current Operator Software Versions
UL 325 - 2018 requires that gate operators monitor
external entrapment protection sensors. Affects
all HySecurity gate operators manufactured
beginning in 2016.
CAUTION
Remember the operator may have unique user
& installer menu settings on the existing board.
Prior to replacing the SDC board, compare
the programmed settings that appear in the
existing board’s display to the default settings
shown in the "Smart DC Controller Worksheet"
on page 2 and note any changes. If you have
a bi-parting gate system, be sure the software
version in both operators is identical.
COPY USER & INSTALLER MENU SETTINGS
Examples of the settings that need to be
reprogrammed when you replace an SDC board
include: Build Year, Operator Type, Usage Class,
Gate Handing and Learn Limits. Other settings
may include Gate Weight, Close Timer, and
accessory congurations. The operator can be
reprogrammed on site by entering the User or
Installer Menu via the Menu buttons or using
S.T.A.R.T. software and a laptop PC to save/load
existing settings. If you need more information,
see "Technical Support" on page 1.
Create a backup copy of the gate operator
congurations, using one of two methods:
z Use a PC laptop and S.T.A.R.T. with a USB cable
(Type A to Type B).
z Use the "Smart DC Controller Worksheet" on
page 2. Go through each menu item and
write the number that appears in the display
into the chart’s column titled, “Display Setting.”
TWO METHODS TO RECORD USER &
INSTALLER MENU SETTINGS
TECHNICAL SUPPORT
For technical support, call your installer or
authorized HySecurity distributor. Obtain the serial
number of your operator before calling. For the
name of a distributor near you, contact HySecurity
at 800-321-9947.
For more information regarding how HySecurity
is handling monitoring of external entrapment
protection sensors, go online to:
www.hysecurity.com/gatesafety
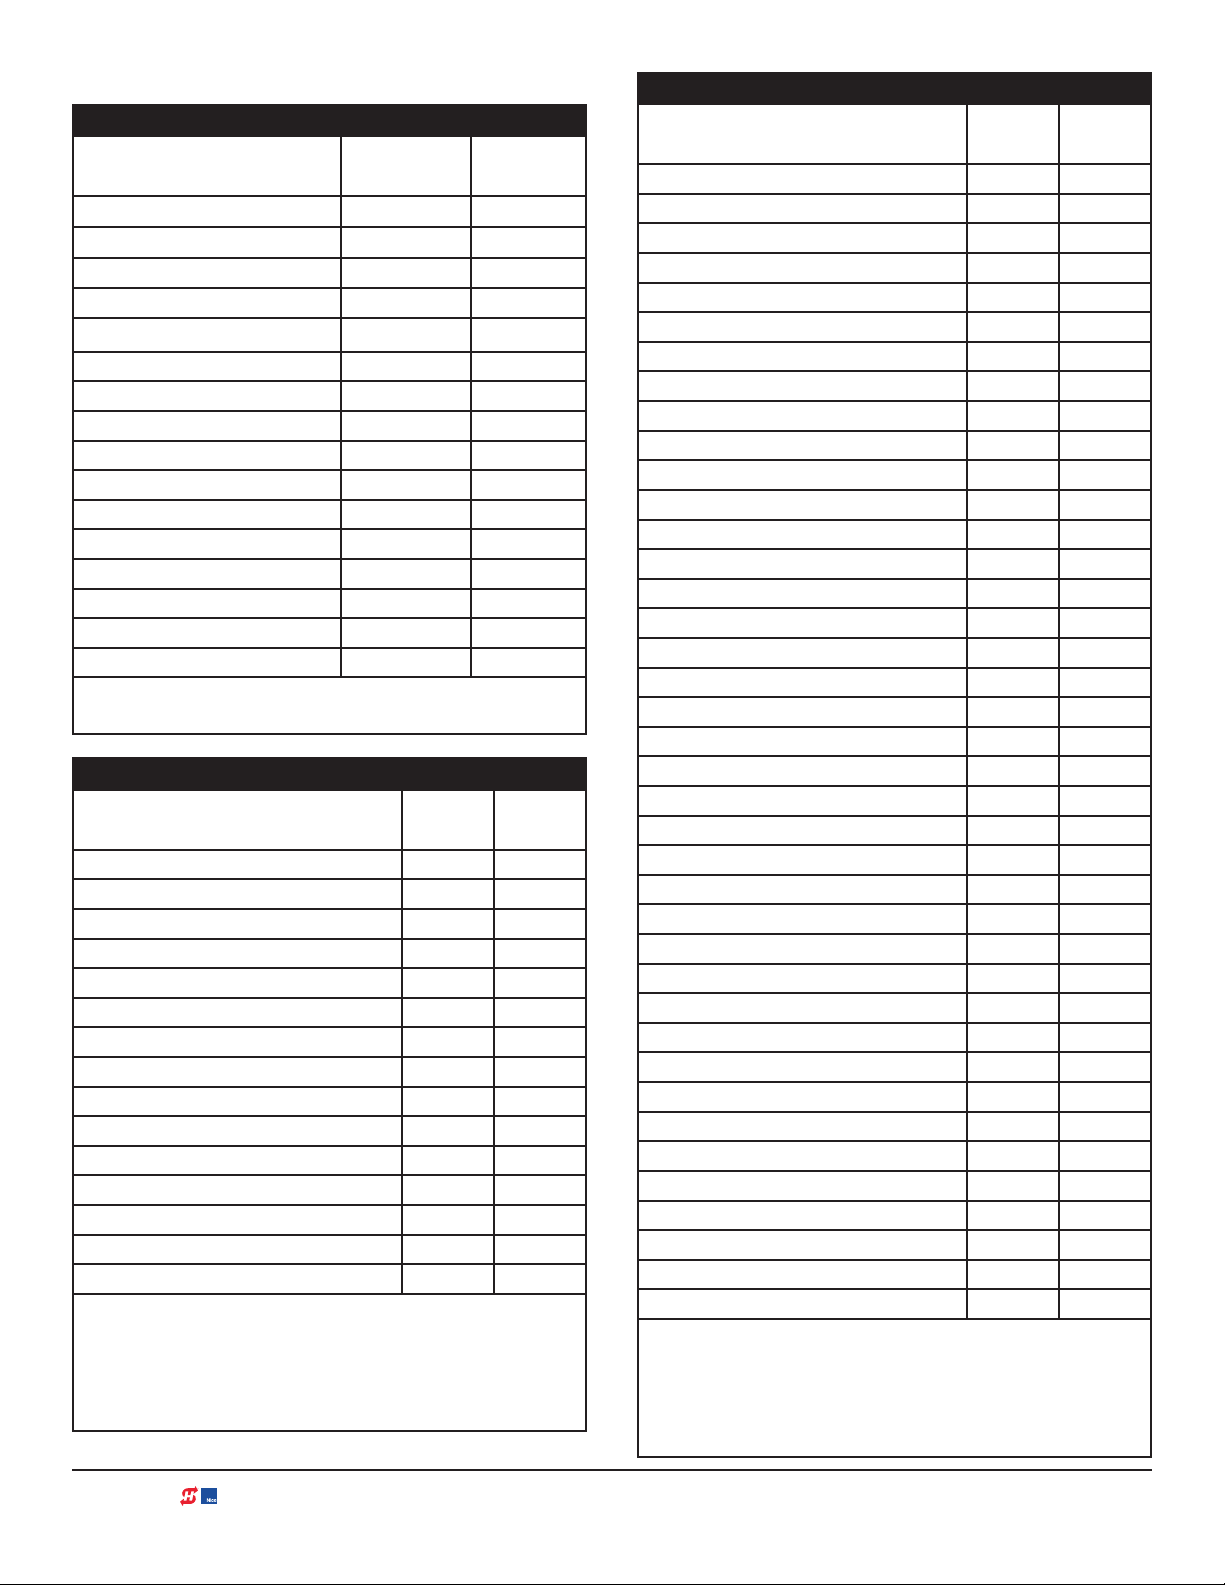
Figure 2. SDC Programmable Menu Items Settings
D0360 REV. I ©2018 SMART DC INSTALLATION INSTRUCTIONS www.hysecurity.com | 1
Figure 1. S.T.A.R.T. Display
User Menu Item* Default Setting Display Setting
CT _ Close Timer 0
HC _ Hold to Close 0
HO _ Hold to Open 0
AP _ AC Loss function 0
RO_ Radio Open/Close 0
BF _ Warn Before Operate 2
FA _ Forced Open Alert 0
DA _ Drift Close Alert 0
PE _ Photo Eye Alignment 0
CL_ Set Clock (24 hour) 0
LD_ LCD Contrast setting 5
CA_ Close Limit Adjustment 0
AL_ Flash on Close Limit 1
DS_ Diagnostic Log 0
*NOTE: The items shown in the user & installer menu charts may or may not appear on
your operator’s display. The menu items that appear are dependent on the operator type
Installer Menu Item* Default Setting Display Setting
OT _ Select Operator Type 0
MN _ Model Number 0
LL _ Learn Limits 0
UC _ Usage Class 0
SH _ Gate Handing 0
WT _ Gate Weight (lbs) 0
LN _ Gate Length (Feet) 0
OS _ Open Speed 5
CS _ Close Speed 5
FD _ Load Factory Defaults 0
DG _ Dual Gate 0
SG _ Sequenced Gate 0
CH _ Charger Type 0
FO _ Fire Dept. Open 0
Smart DC Controller Worksheet
(write it down here)
(write it down here)
Notes:
SE _ IES Sensitivity 2
SS _ Inherent sensor Stop 0
LC _ Leaf Delay Close 0.0 Secs
LO_ Leaf Delay Open 0.0 Secs
RT _ Maximum Run Timer 30 Secs
PO _ Partial Open distance 0
EC _ Eye Close Logic 0
EO _ Eye Open Logic 0
GR _ Gate Edge Logic 0
SR _ IES Sensor Logic 1
PC _ Photo Eye Contact NC 0
GC _ Gate Edge Output NC 0
DT _ Disable Free Exit 0
OR _ Outside Obstr Loop 1
IR _ Inside Obstr Loop 1
HD _ Center Loop Hold 1
DL _ Detector Logic 1
CR _ RLD Reverse Open 0
CB _ RLD Disables ELD 0
CP _ Counts PBO 0
EB _ ELD Back off - Detector 0
R1 _ Relay 1 Logic - disabled 0
R2 _ Relay 2 Logic - Close Limit 1
TL _ Gate Open alert 2
LT _ Loitering alert 3
SA _ STC Address 0
ELD _ Exit Loop Set 0
ILD _ Inside Obstr. Loop Set 0
OLD _ Outside Obstr. Loop Set 0
CLD _ Center Loop Set 0
Installer Menu Item* Default Setting Display Setting
(write it down here)
Notes:
Page 2
SMART DC CONTROLLER WORKSHEET
Table 1. User Menu
User Menu Item*
Default
Setting
CT _ Close Timer 0
HC _ Hold to Close 0
HO _ Hold to Open 0
AP _ AC Loss function 0
RO_ Radio Open/Close 0
BF _ Warn Before Operate 2
FA _ Forced Open Alert 0
DA _ Drift Close Alert 0
PE _ Photo Eye Alignment 0
CL_ Set Clock (24 hour) 0
LD_ LCD Contrast setting 5
US_ Clear count 0
CA_ Close Limit Adjustment 0
AL_ Flash on Close Limit 1
DS_ Diagnostic Log 0
PD_ Set password 0
NOTE: Available menu items are dependent on operator type
and programming congurations or options.
Table 2. Installer Menu
Installer Menu Item*
BY _ Build Year
OT _ Select Operator Type 0
MN _ Model Number 0
S1_ Sensor 1 Type
S2_ Sensor 2 Type
S3_ Sensor 3 Type
LL _ Learn Limits 0
UC _ Usage Class 0
SH _ Gate Handing 0
WT _ Gate Weight (lbs) 0
LN _ Gate Length (Feet) 0
OS _ Open Speed 5
CS _ Close Speed 5
FD _ Load Factory Defaults 0
DG _ Dual Gate 0
1
See "Setting the Build Year" and Table 3 on page 5
2
Setting dependent on BY. S1, S2, S3 appear if BY is set to 2 or
higher.
NOTE: Available menu items are dependent on operator type
and programming congurations or options.
1
1
1
1
Default
Setting
Display
Setting
Display
Setting
0
0
0
0
Table 2. Installer Menu
Installer Menu Item*
Default
Setting
SG _ Sequenced Gate 0
CH _ Charger Type 0
OC_Emergency Close 0
BT_ Battery type 0
FO _ Fire Dept. Open 0
DR_ Reversing Sensor 0
SE _ IES Sensitivity 2
SS _ Inherent sensor Stop 0
LC _ Leaf Delay Close 0.0 Secs
LO_ Leaf Delay Open 0.0 Secs
RT _ Maximum Run Timer 30 Secs
PO _ Partial Open distance 0
EC _ Eye Close Logic 0
EO _ Eye Open Logic 0
GR _ Gate Edge Logic 0
SR _ IES Sensor Logic 1
PC _ Photo Eye Contact NC
GC _ Gate Edge Output NC
2
2
0
0
DT _ Disable Free Exit 0
OR _ Outside Obstr Loop 1
IR _ Inside Obstr Loop 1
HD _ Center Loop Hold 1
DL _ Detector Logic 1
CR _ RLD Reverse Open 0
CB _ RLD Disables ELD 0
CP _ Counts PBO 0
EB _ ELD Back off - Detector 0
R1 _ Relay 1 Logic - disabled 0
R2 _ Relay 2 Logic - Close Limit 1
R3 -R10 Multiple Relay Logic 0
TL _ Gate Open alert 2
LT _ Loitering alert 3
BA_ Break Away (Arm only) 0
SA _ SDC Address 0
NE_ Network Address 0
ELD _ Exit Loop Set 0
ILD _ Inside Obstr. Loop Set 0
OLD _ Outside Obstr. Loop Set 0
CLD _ Center Loop Set 0
1
See "Setting the Build Year" and Table 3 on page 5
2
Setting dependent on BY. S1, S2, S3 appear if BY is set to 2 or
higher.
NOTE: Available menu items are dependent on operator type
and programming congurations or options.
Display
Setting
2 | www.hysecurity.com SMART DC BOARD INSTALLATION INSTRUCTIONS D0360 REV. I ©2018
Page 3

TO
SCREWS
ANDOFF
REPLACING THE SMART DC CONTROLLER
To replace a SDC board, take the following steps:
1. Back up (make a copy) of the existing board’s menu
settings. See "www.hysecurity.com/gatesafety" on
page 1 and "Smart DC Controller Worksheet"
on page 2.
2. Turn OFF power to the Control Box (both AC & DC
switches).See Figure 3.
3. Use tape to identify the various accessory
connections and then disconnect all accessory
cables attached to the board. See Figure 4.
4. Disconnect all harness connectors and any
HY-5A or HY-5B vehicle loop detectors. Use
needle nose pliers to crimp the HY-5A or HY-5B
standoffs and then push the standoff through
the mounting hole. See Figure 4.
5. Use a Phillips-head screwdriver to remove the
seven screws from the board and three screws
at the top of the control box. Set the Smart
DC Controller board and the ten screws aside.
See Figure 4.
6. Note the orientation of the replacement
board and align the holes with the mounting
standoffs. Secure the board using the screws
removed in Step 5.
NOTICE
Tighten the three screws on top of the control
box rst, then tighten the remaining screws
that secure the board.
7. Reattach all accessories, harness connectors,
and HY-5A or HY-5B vehicle detectors to their
proper locations on the replacement Smart
DC Controller board. Make sure all jumpers
are wired correctly. See Figure 4.
DC POWER
I/O
AC POWER
I/O
Figure 3. Turn AC and DC Power On
P THREE
CONTROL BOX
Phillips Head
Screws (7x)
CUT-AWAY
VIEW
MOUNTING STANDOFF
SDC BOARD
HY-5A or HY-5B
HY-5A or HY-5B
MOUNTING ST
HY-5A or HY-5B
HY-5A or HY-5B
MOUNTING
STANDOFF
8. Turn ON the Control Box AC & DC power switches
(Figure 3), and then set the operator type and other
parameters by following "Setting the Operator
Type" on page 4.
Figure 4. Control Box - Cut-away view of the SDC
Board in a SwingSmart DC Operator
DANGER
Failure to select the correct operator type
(OT) can result in gate operator malfunction
which has the potential to cause serious injury
or death due to the improper operation of
the gate.
D0360 REV. I ©2018 SMART DC INSTALLATION INSTRUCTIONS www.hysecurity.com | 3
Page 4

SETTING THE OPERATOR TYPE
After replacing an SDC board and supplying
power, the display prompts you to address the
operator type. Depending on what operator
type you have, several other prompts need to
be addressed before the operator will enter Run
Mode.
1. Press SELECT. Display characters blink which
indicates that the menu item can be addressed.
2. Use the NEXT and PREV buttons to scroll
through the options and display the appropriate
data for entry before pressing Select again to
lock-in the selection.
NOTICE
Make sure you designate the correct operator
type! Refer to Table 3.
3. The display prompts you to complete the
standard setup. A sequence of menus, such
as build year, usage class, gate handing, or
model number need to be addressed before
the operator will work properly. Pressing
NEXT allows you to ow through the set up.
If necessary, review the operator’s product
manual.
4. When the last menu item in the series is
addressed, the operator enters Run Mode and
a gate status appears on the display.
NOTICE
If you make a mistake and need to redene the
operator type, use a PC and S.T.A.R.T. software
version 3.00 or higher to reset the operator
type. If necessary, contact HySecurity Technical
Support at 800-321-9947.
Load operator’s custom settings that you saved
in the S.T.A.R.T. backup copy or wrote on the
worksheet on "Smart DC Controller Worksheet"
on page 2. This reprograms the replacement
SDC board with the same settings and operator
functionality as the old board.
4 | www.hysecurity.com SMART DC BOARD INSTALLATION INSTRUCTIONS D0360 REV. I ©2018
Page 5

ASSESS YOUR GATE SITE. UL 325-
Left Hand Gate
24VDC
24VDC
24VAC
24VAC
12VDC
12VDC
(BUTTONS)
1
Three inputs are available on the Controller
for monitoring external entrapment protection
sensors. Set Build Year according to your gate
manufacturing date. See "Setting the Build Year"
on page 6.
opening
2016 COMPLIANCE
Review your gate installation. Entrapment
zones should be kept to a minimum.
6 ft (1.8 m) minimum
WARNING
ENTRAPMENT
Photo eye thru-beam
protecting Trailing End
(EYE OPEN)
Figure 5. Site Overview
ZONE
Photo eye
thru-beam
protecting
Leading End
(EYE CLOSE)
WHEN BY ≥ 2, INSTALL NC
2
for all entrapment zones. HySecurity gates monitor
normally closed (NC) sensors. Wire your NC
sensors to SENSOR input terminals (SENSOR 1,
SENSOR 2, or SENSOR 3) on Smart DC Controllers.
SENSORS.
Install contact and/or non-contact
sensors (edge sensors and photo eyes)
CAUTION
Table 3. Menu Mode Navigation
Change
Displayed
Data
Press
Select.
Two left
characters
blink.
Labels are
available and
may be overlaid
to cover the silk
screened text
on the controller
inputs.
EYE
OPEN
EYE
CLOSE
EXIT
LOOP
BLOCK
EXIT
IN OBS
LOOP
OUT OBS
LOOP
CENTER
LOOP
EDGE
EYE
COM
Pre-2016
Build Year (BY 1)
MX3978-02
Figure 6. SDC Board BY-Lable Changes
3
Navigate
Selections
Press Next
or Previous.
Continue
pressing
Next to
view all
selections.
COMMON
TERMINALS
SENSOR 2
SENSOR 3
EXIT
LOOP
BLOCK
EXIT
IN OBS
LOOP
OUT OBS
LOOP
CENTER
LOOP
SENSOR 1
SENSOR
COM
Post 2016 Label
Build Year (BY 2)
MX3978-01
COM
COM
COM
COM
COM
COM
COM
COM
STOP
OPEN
CLOSE
OPEN
PARTIAL
SENSOR 2
SENSOR 3
EXIT
LOOP
BLOCK
EXIT
IN OBS
LOOP
OUT OBS
LOOP
CENTER
LOOP
SENSOR 1
SENSOR
COM
+ 24 V
EMERG
OPEN
24VDC
24VDC
12VDC
12VDC
RADIO
OPEN
SHOW
LEDs
Choose
Displayed
Data
Press
Select.
Blinking
characters
become
static.
USER RELAY 1
Electro-mechanical
2
+
N
E
P
O
M
O
C
A
B
M
OP
O
C
O
I
AD
R
E
T
A
G
L
A
U
D
TURN POWER ON.
See Figure 3.
Navigate
Menu Items
Press Next
to Advance
Press
Previous to
Previous.
SMART DC
DISPLAY
KEYPAD
5
-48
S
R
B
S
U
C
2
D
R
E
S
U
1
O
S
N
V
4
M
O
C
S
ON
I
T
All external entrapment protection sensors
must be wired to the SENSOR COM terminal
for power and monitoring purposes. The
three SENSOR inputs are interchangeable and
congurable. For example, it doesn’t matter
whether you wire a normally closed photo
eye sensor or edge sensor to the SENSOR
1, 2, or 3 input. However, due to monitoring
requirements, each SENSOR input (1, 2, and
3) can only accept one NC sensor output
4
based on the date the gate was manufactured.
Each SENSOR input whether or not it has
a sensor wired to it, must be programmed
before the gate will move.
ANSWER INITIAL SETUP PROMPTS.
Answer the prompts. When you enter
Operator Type, access the next prompt
by pressing Next. Enter the Build Year
connection.
D0360 REV. I ©2018 SMART DC INSTALLATION INSTRUCTIONS www.hysecurity.com | 5
Page 6

SETTING THE BUILD YEAR
Set the Build Year to 1 for HySecurity gate operator’s manufactured prior to 2016. Set the Build Year to
2 for gate operators manufacutured between 1/1/2016 and 7/31/2018. Set the Build Year to for gate
operators manufactured after 7/31/2018.
`
CAUTION
When Build Year is set to 2 or 3, the gate operator will not automatically cycle unless an indication
is received that the appropriate number of external entrapment protection sensors are connected
and operational. See Table 4 for SENSOR settings. At minimum, external entrapment protection
sensors must be used to protect both open and close directions of gate travel. If you choose not
to use the monitoring capabilities of the gate operator, your site may not be in compliance with
UL 325-2016 Standard of Safety.
Table 4. Installer Menu Settings for SENSOR Inputs
Build
UL 325 HySecurity
Gate Operator
SlideDriver
(xed speed)
SlideDriver VFD 2 or 3
SlideSmart DC 15 2 or 3
SlideSmart DC 10 2 or 3
SlideSmartDC HD
25
SlideSmartDC HD
30
SwingRiser 2 or 3
SwingSmart DC 2 or 3
HydraSwing 2 or 3
HydraLift 2 or 3
NOTE: HySecurity does not update software for SlideWinder models.
Year
2018
(BY set)
2 or 3
2 or 3
2 or 3
#0
DISABLED
USED
• • • • • • •
• • • • • • •
• • • • • • •
• • • • • • •
• • • • • • •
• • • • • • •
• • • • • • •
• • • • • • •
• • • • • • •
• • • •
Installer Menu Options for Sensors 1, 2, or 3
#1
NOT
#2
EYE
CLOSE
#3
EDGE
CLOSE
#4
EYE
OPEN
#5
EDGE
OPEN
#6
EDGE BOTH
DIRECTIONS
#7
EYE BOTH
DIRECTIONS
6 | www.hysecurity.com SMART DC BOARD INSTALLATION INSTRUCTIONS D0360 REV. I ©2018
Page 7

Table 5. HySecurity Gate Operators requiring External Monitored Entrapment Protection Sensors
UL 325 Entrapment Protection Device Monitoring Required
Normally Closed (NC) sensors tested & approved.*
Three SENSOR Inputs On Controller.
Installer Menu congurable.*
Build Year (BY) factory-set to post-2018.
•
•
•
•
•
•
•
•
•
HySecurity Gate Operator
(includes Modular, Correctional, and UPS
models)
SlideDriver 15, 40, 30F, 80, 200 2 or 3
SlideDriver 50VF series 2 or 3
SlideSmart DC 15 & DCS 15 2 or 3
SlideSmart DC 10F & DCS 10F 2 or 3
SlideSmartDC HD 25 & HD 30 2 or 3
SwingRiser 14, 14-Twin, 19, 19-Twin, 30,
30-Twin
SwingSmart DC 20 & DCS 20 2 or 3
HydraSwing 2 or 3
HydraLift 10, 10F, 20, 20F 2 or 3
Build Year
post-2016
(set at the
factory)
2 or 3
Table 6 indicates those HySecurity gate operators that may be within the exception parameters of UL
325 or comply with standards other than UL 325, but continue to maintain object detection capabilities.
HySecurity strongly recommends that you assess every site for entrapment zones and provide the
necessary protection to guard against entrapment.
Table 6. HySecurity Gate Operators maintaining Object Detection
HySecurity Gate Operator with
Obstruction Protection (Object
Detection)
StrongArm (HTG) 2 or 3
StrongArmCRASH (M30/M50) 2 or 3
StrongArmPark DC 10 & DCS 10
StrongArmPark DC 14 & DCS 14
WedgeSmart DC 10 & 10 DCS
WedgeSmart DC 14 & 14 DCS
HydraWedge SM50 2 or 3
NOTE: For more information, refer to the Quick Start Supplement describing changes to HySecurity software due to UL
325 - 2016 Standard of Safety updates. Review the information regarding monitoring of external entrapment protection
sensors online at www.hysecurity.com/gatesafety
Build Year
2018
2 or 3
2 or 3
Sensor Inputs automatically set to "NOT USED"
Installer has option to change settings as site design dictates.
•
•
•
•
•
D0360 REV. I ©2018 SMART DC INSTALLATION INSTRUCTIONS www.hysecurity.com | 7
Page 8

Table 7. Reprogramming the SDC Replacement Board (OT_12 - OT_17)
Operator
Model
Operator Type
(OT)
Build Year (BY)**
SwingSmart
DC20 & DCS
20 Solar
WedgeSmart
DC
OT_12 OT_13 OT_13 OT_14 OT_15 OT_16 OT_17
BY_3 (post-2018
monitored)
BY_3 BY_3 BY_3 BY_3 BY_3 BY_3
1 = family
dwelling
User Class
(UC)
2 = multi-family
3 = industrial*
4 = guarded
location
Model Number
(MN)
1
1 =
Arm
2 =
Wedge
SH_R = Face
Gate Handing
(SH)
SH_R = Face
Smart DC
Controller display.
Gate swings right
to open
SH_L = Face
Smart DC
Controller display.
Gate swings left
to open
Smart DC
Controller
display. Arm
raises right to
open.
SH_L = Face
Smart DC
Controller
display. Arm
raises left to
open.
Gate Weight
(WT)
(Enter weight in
pounds (lbs.))
Gate Length
(LN)
Enter length in
feet (ft.))
SENSOR Type
1
Not servicing general public.
2
Only appears when BY is set to 2 or higher.
0 = Gate Disabled
1 = 0 to 300
2 = 301 to 600
3 = 601 to 800
4 = 800 to 1300
0 = Gate Disabled
1 = 0 to 8
2 = 8 to 12
3 = 12 to 16
4 = 16 to 20
2
S1, S2, S3 S1, S2, S3 S1, S2, S3 S1, S2, S3 S1, S2, S3 S1, S2, S3
NOTE: Build Year is an Installer Menu item added in 2016 and denes HySecurity gate operators as having monitoring capabilities
for external entrapment protection sensors per UL 325 Standard of Safety. See page 6
StrongArmPark
DC10 & DC14
DCS 10 Solar &
DSC 14 Solar
0 = Gate Disabled
1 = DC10 model
or DCS 10 solar
2 = DC 14 model
or DCS 14 solar
SH_R = Face
Smart DC
Controller display.
Arm raises right to
open
SH_L = Face
Smart DC
Controller display.
Arm raises left to
open.
SlideSmart
DC 15 & DCS
15 Solar
1 = family
dwelling
2 = multi-family
3 = industrial*
4 = guarded
location
SH_R = Face
Smart DC
Controller
display. Gate
slides right to
open.
SH_L = Face
Smart DC
Controller
display. Gate
slides left to
open.
0 = Gate
Disabled
1 = 0 to 400
2 = 401 to 800
3 = 801 to 1100
4 = 1101 to 1500
1
SlideSmart DC
10F & DCS 10F
Solar
1 = family
dwelling
2 = multi-family
3 = industrial*
4 = guarded
location
SH_R = Face
Smart DC
Controller display.
Gate slides right
to open.
SH_L = Face
Smart DC
Controller display.
Gate slides left to
open.
0 = Gate Disabled
1 = 0 to 250
2 = 251 to 500
3 = 501 to 750
4 = 751 to 1000
1
SlideSmart
DC HD 25 &
30
1 = family
dwelling
2 = multi-family
3 = industrial*
4 = guarded
location
SH_R = Face
Smart DC
Controller
display. Gate
slides right to
open.
SH_L = Face
Smart DC
Controller
display. Gate
slides left to
open.
0 = Gate
Disabled
1 = 0 to 700
2 = 701 to 1400
3 = 1401 to
2100
4 = >2100
1
8 | www.hysecurity.com SMART DC BOARD INSTALLATION INSTRUCTIONS D0360 REV. I ©2018
 Loading...