

HYRIS bCUBE 2.0 Quick Start Manual

Hyris Ltd
_________________________________________
Hyris Headquarters
Lower Ground Floor, One George Yard,
EC3V 9DF, London UK
Phone: +44.2036082968
Mail: office.uk@hyris.net
_________________________________________
Hyris Research Center
Corso Garibaldi, 60
20121 Milano, Italy
Phone: +39.02.82951302
Mail: office@hyris.net
_________________________________________
Hyris Asia Pac
38 Ang Mo Kio Industrial Park 2 #02-07A
569511 Singapore
Phone: +65.8160.7207
Mail: office.uk@hyris.net
_________________________________________
www.hyris.net
London, September 2019
bCUBE® 2.0 Quick Start Guide
Hyris Platform guide
Version 1.2.5

September 2019
bCUBE® 2.0 Quick Start Guide - Hyris Platform guide - Version 1.2.5
2
Copyright ©2019 Hyris Ltd. All rights reserved.
Reproduction of this document, either in printed or electronics form, is prohibited without the
permission of Hyris Ltd.
Information in this document is subject to change without notice. Hyris Ltd assumes no responsibility
for any incorrect information that may appear in this document.
Notice:
bCUBE® 2.0 is only for research purpose and for all other fields except for in vitro diagnostics.
HYRIS LTD DISCLAIMS ALL WARRANTIES WITH RESPECT TO THIS DOCUMENT, EXPRESSED OR IMPLIED, INCLUDING BUT NOT
LIMITED TO THOSE OF MERCHANTABILITY OR FITNESS FOR A PARTICULAR PURPOSE. IN NO EVENT SHALL HYRIS LTD BE LIABLE,
WHETHER IN CONTRACT, TORT, WARRANTY, OR UNDER ANY STATUTE OR ON ANY OTHER BASIS FOR SPECIAL, INCIDENTAL,
INDIRECT, PUNITIVE, MULTIPLE OR CONSEQUENTIAL DAMAGES IN CONNECTION WITH OR ARISING FROM THIS DOCUMENT,
INCLUDING BUT NOT LIMITED TO THE USE THEREOF.
Trademarks:
bCUBE® and bDATA® are registered trademarks of Hyris Ltd.
Microsoft® and Windows® are registered trademarks of Microsoft Corporation. FAM™, HEX™ and
ROX™ are a trademark of Thermo Fisher Scientific or its subsidiaries in the U.S. and certain other
countries.
Technical Support Contacts:
Hyris Ltd – Italian Branch
Corso Garibaldi 60, 20121 Milano (MI) – ITALY
Phone: +39 02 82951302
Mail: support@hyris.net
Website: https://www.hyris.net/

September 2019
bCUBE® 2.0 Quick Start Guide - Hyris Platform guide - Version 1.2.5
3
Index
Hyris bCUBE® 2.0 .................................................................................................................................... 4
Box Opening ......................................................................................................................................... 4
Device Overview .................................................................................................................................. 5
Status LEDs ........................................................................................................................................... 6
First set up .............................................................................................................................................. 8
PC settings ............................................................................................................................................ 8
bCUBE® 2.0 Connection ....................................................................................................................... 8
Interacting bCUBE® 2.0: bAPP and bPANEL ......................................................................................... 10
bAPP interface.................................................................................................................................... 10
Access the bAPP ............................................................................................................................... 10
Create a New Analysis: general information ................................................................................... 11
Create a new analysis: the cartridge ............................................................................................... 13
Analysis details ................................................................................................................................ 15
bPANEL 2.0 interface ......................................................................................................................... 18
Installation ....................................................................................................................................... 18
Main view ........................................................................................................................................ 18
Settings: Log in/Sync and bCUBE® 2.0 connection .......................................................................... 19
New analysis creation ...................................................................................................................... 20
Run the analysis ............................................................................................................................... 21
Old analyses view ............................................................................................................................ 21
Flow Chart ............................................................................................................................................ 23
Appendix-1: Set bCUBE® 2.0 Wi-Fi from bCUBEs® menu .................................................................... 24
Appendix-2: Custom Recipe ................................................................................................................. 25
Appendix-3: Cartridge Preparation ...................................................................................................... 26
Load samples ...................................................................................................................................... 26
Load/Unload the cartridge to/from bCUBE® 2.0 ............................................................................... 26
September 2019
bCUBE® 2.0 Quick Start Guide - Hyris Platform guide - Version 1.2.5
4
Hyris bCUBE® 2.0
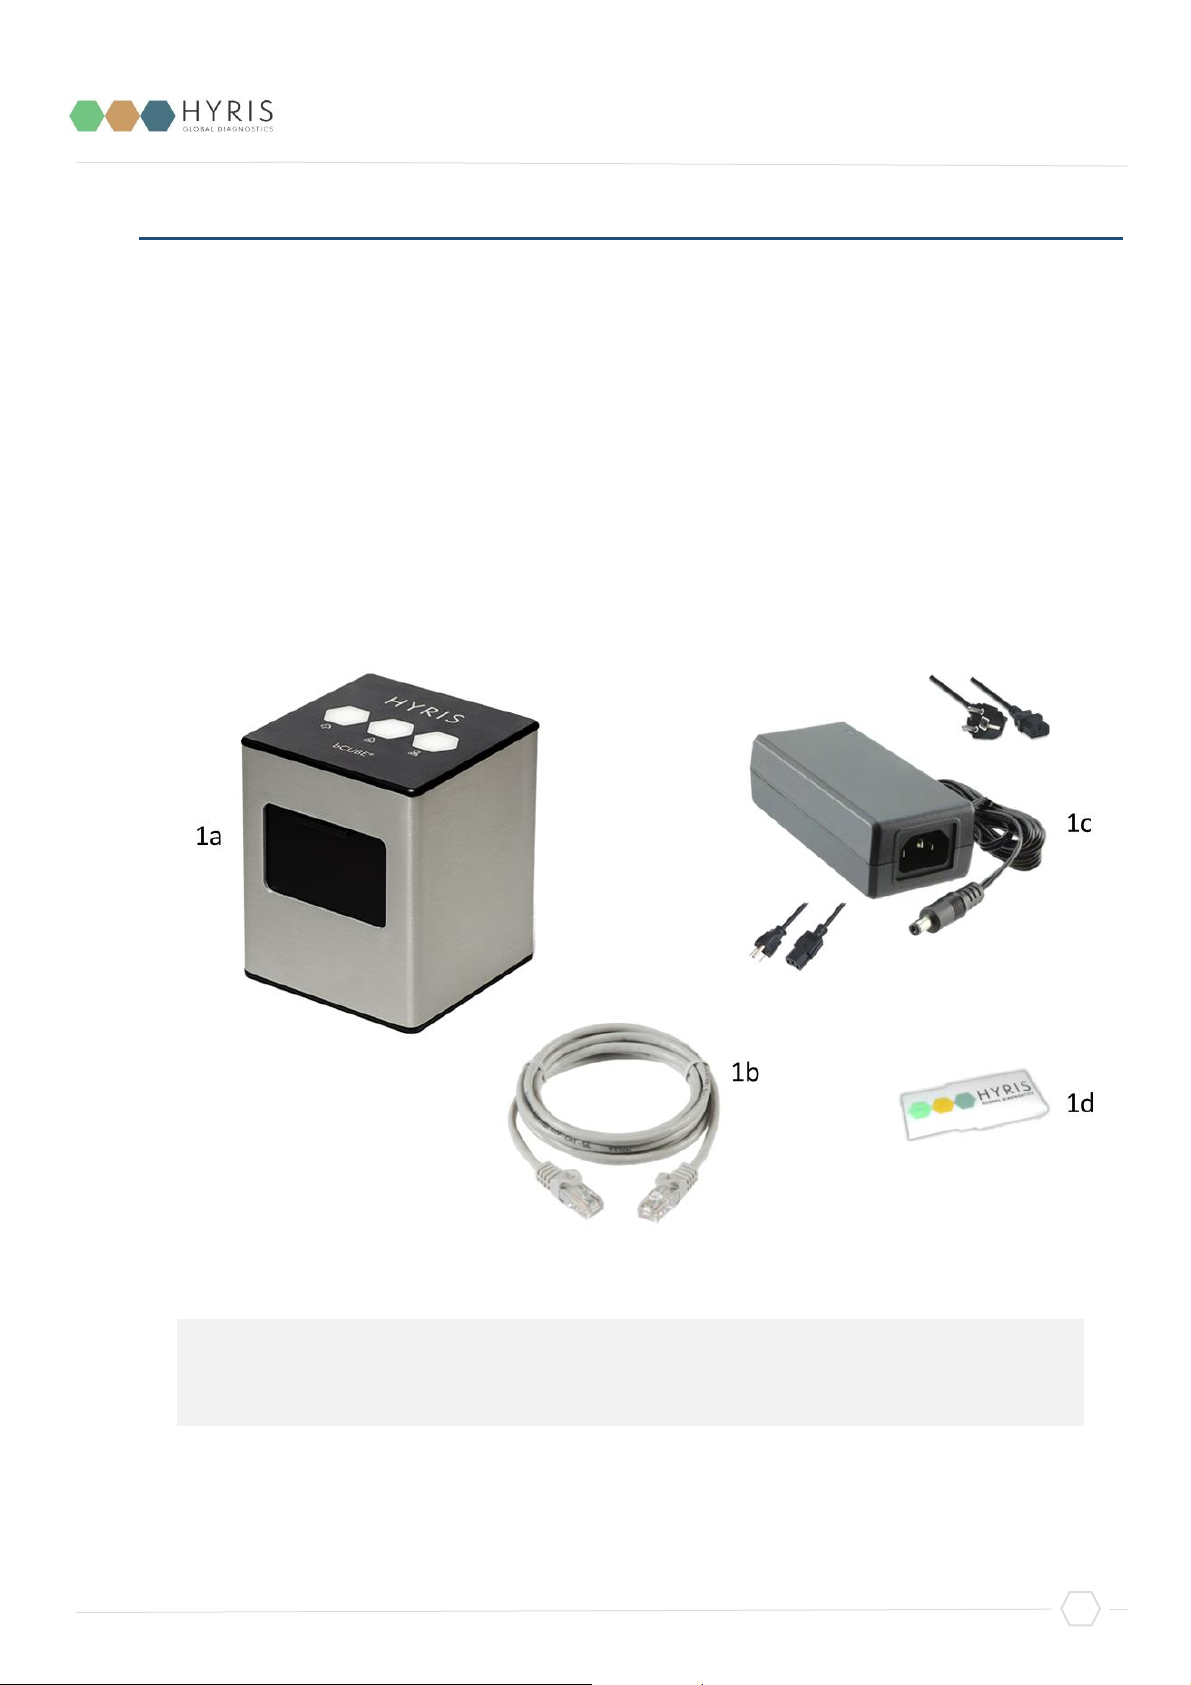
Box Opening
The following items will be found in the provided box:
o bCUBE® 2.0 (Figure 1a)
o Ethernet cable (Figure 1b)
o Power Supply including European and North American power cords (Figure 1c).
Characteristics:
- Input: 100 ~ 240 V c.a. 1.4A 50/60Hz
- Output: 12V DC 5A
- Power: 60W
o USB stick with Hyris bPANEL software installer and User Manuals (Figure 1d)
Note: Please check the presence of all these items. Remove the items carefully from the
shipping box and inspect them for any external damage. If any of the parts is missing or
damaged, contact the manufacturer prior to installation.
September 2019
bCUBE® 2.0 Quick Start Guide - Hyris Platform guide - Version 1.2.5
5
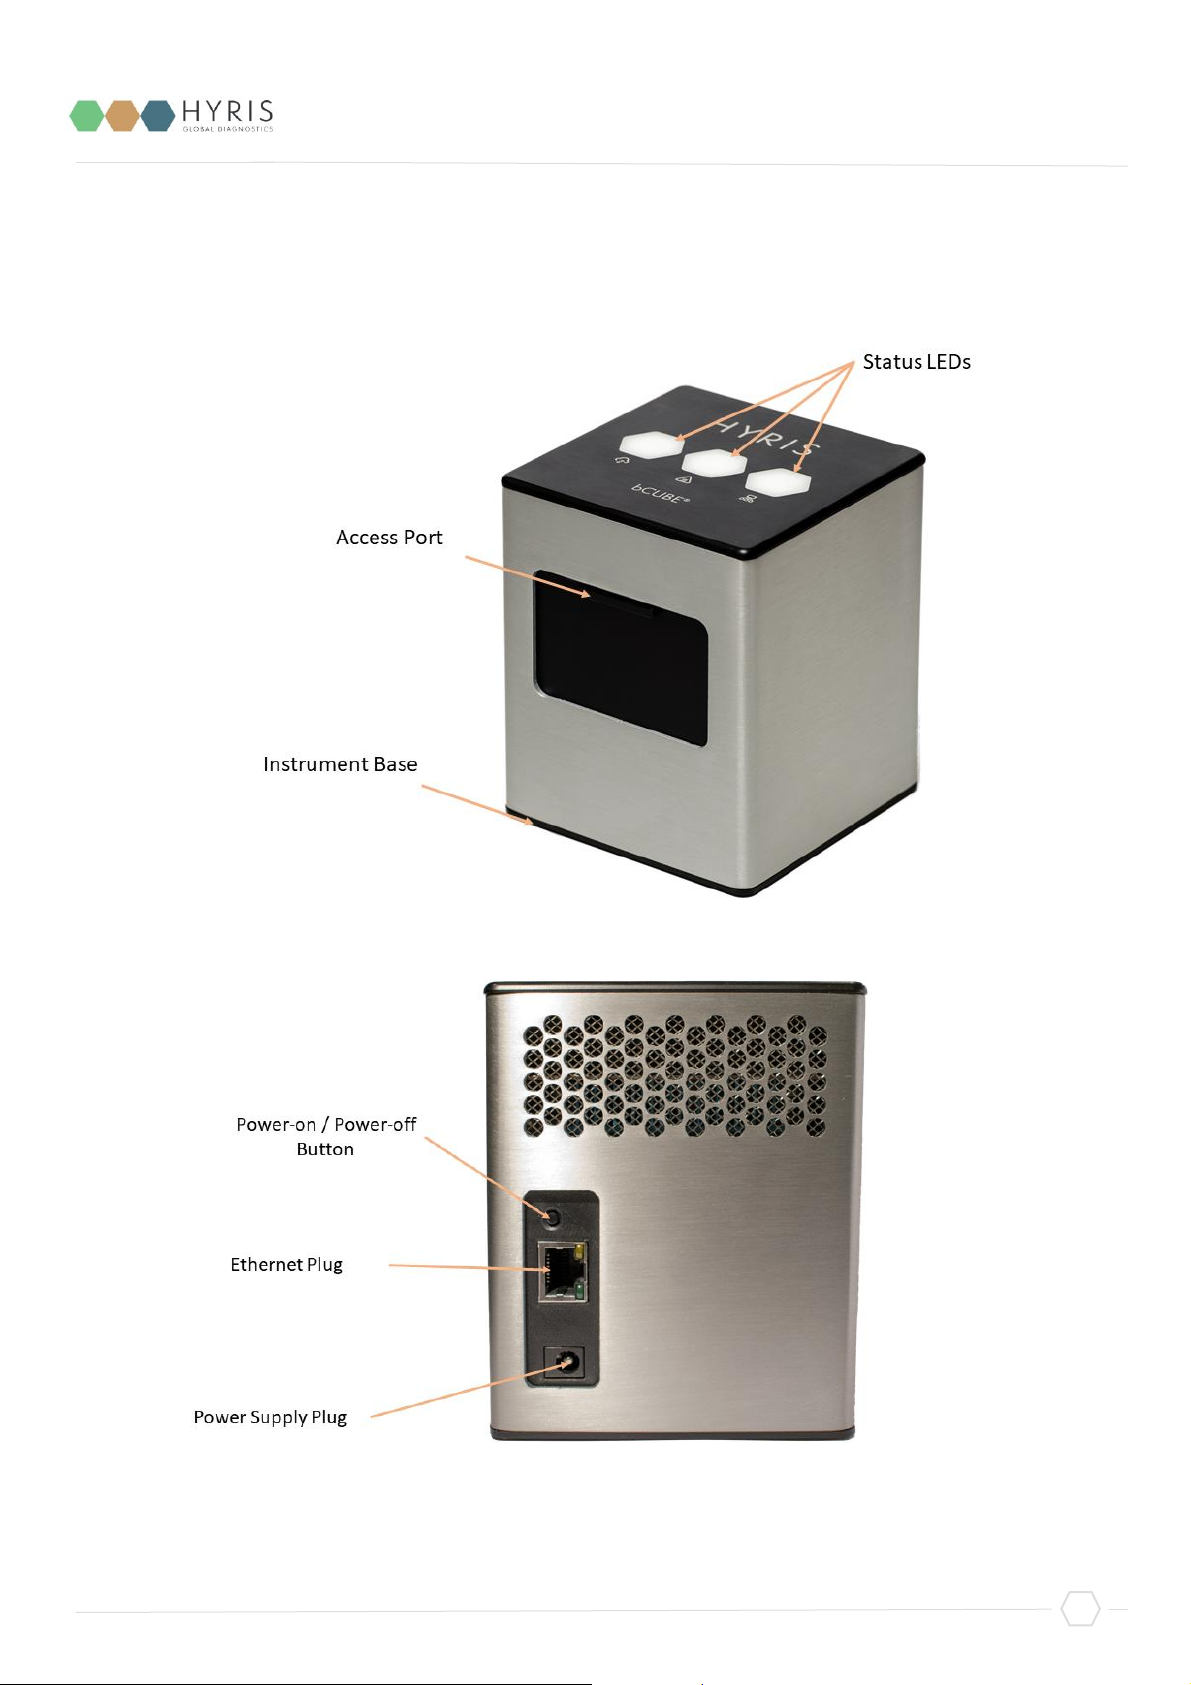
Device Overview
September 2019
bCUBE® 2.0 Quick Start Guide - Hyris Platform guide - Version 1.2.5
6
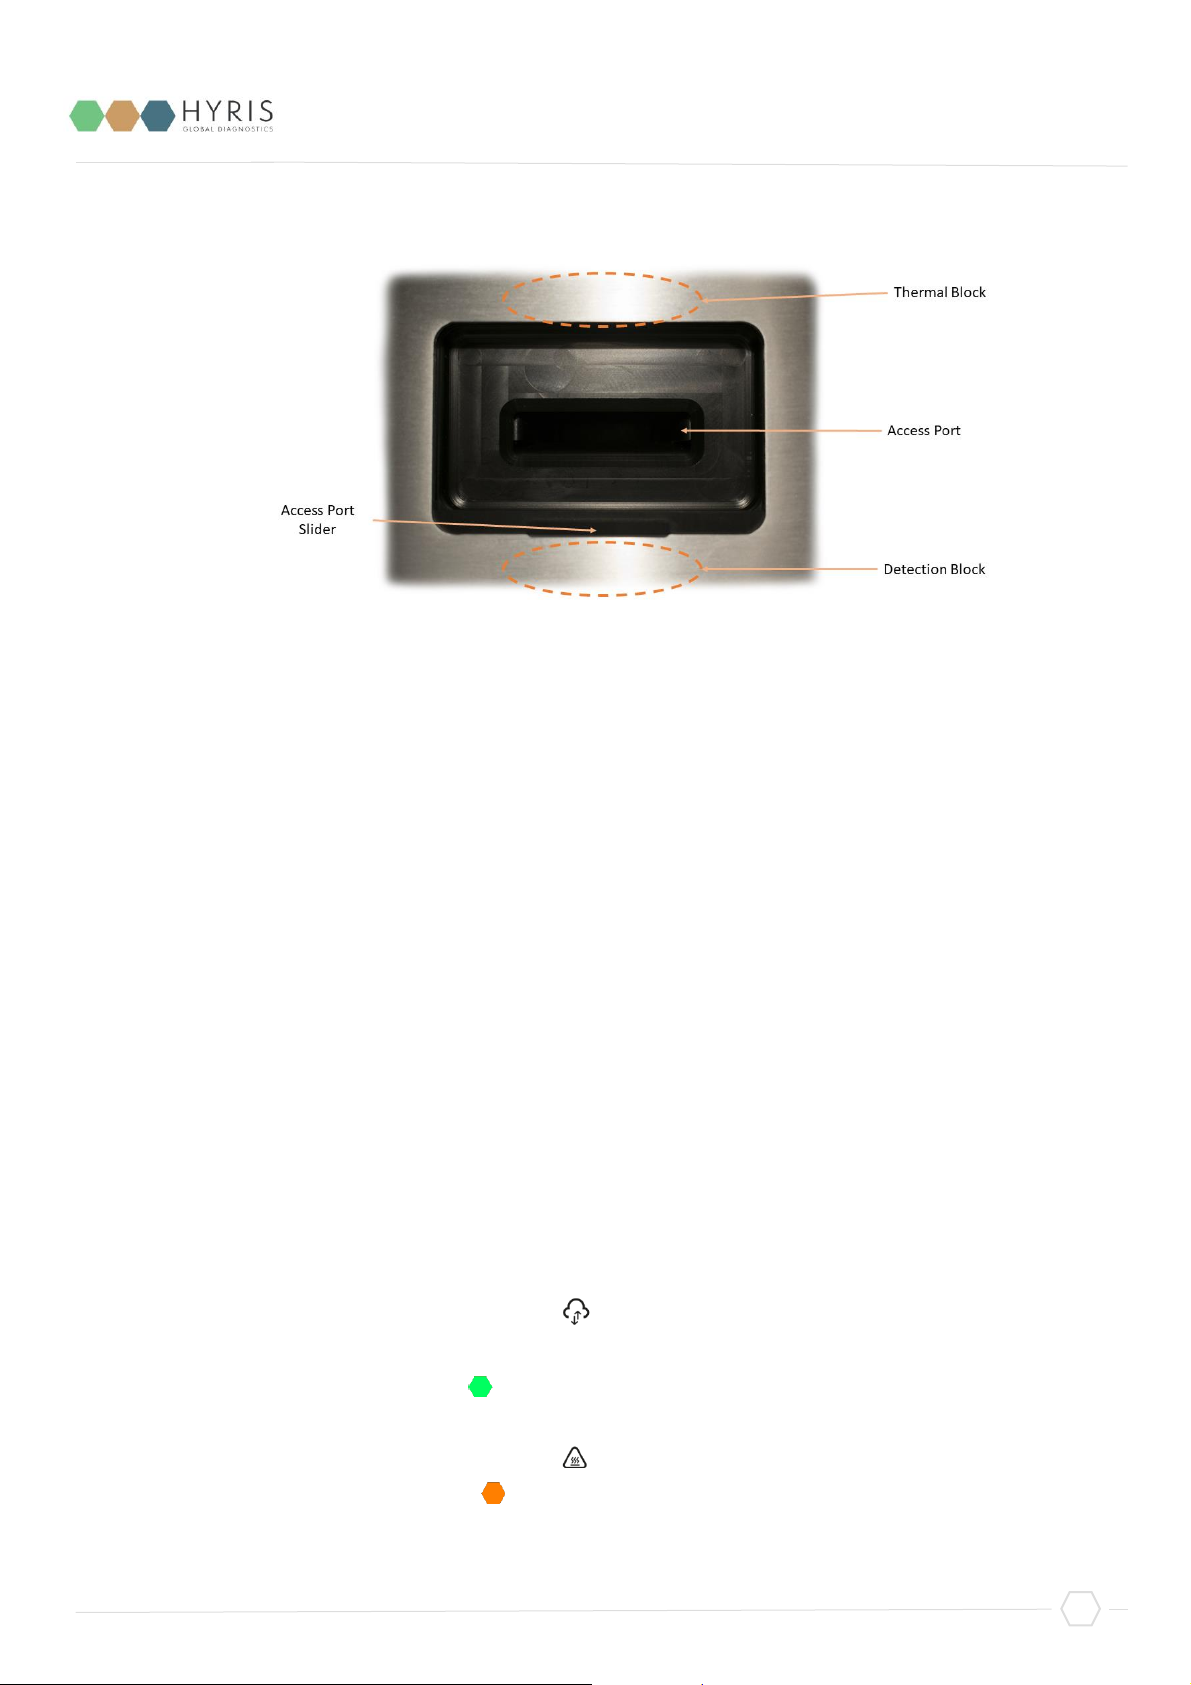
Description of the features highlighted in the pictures above:
o Access Port Slider: opened to insert/remove the cartridge inside bCUBE® 2.0. To be kept
closed during operations.
o Access port: insert the cartridge here. Always push the cartridge up to the end of the port.
o Thermal Block: precisely controls the temperature of the cartridge and contained samples.
Heating/Cooling is obtained with a Peltier element.
o Detection block: features high brightness LEDs with dichroic filters for fluorophores
excitation. Detection is obtained thanks to a CMOS sensor with dichroic filters matched to
fluorophores emission wavelengths.
o Top venting holes: allows air exchange between the inside of the Instrument and the
ambient
o Power supply Plug: insert here the 12 VDC adapter jack
o Power-on/Power-off button: press shortly to wake up the instrument from Stand-By. When
the machine is running, long press (about 5 seconds) to safely power down the bCUBE®
o Ethernet Plug: insert here the Ethernet cable for Windows PC / Network communication
o Status LEDs: Give information about the status of the instrument
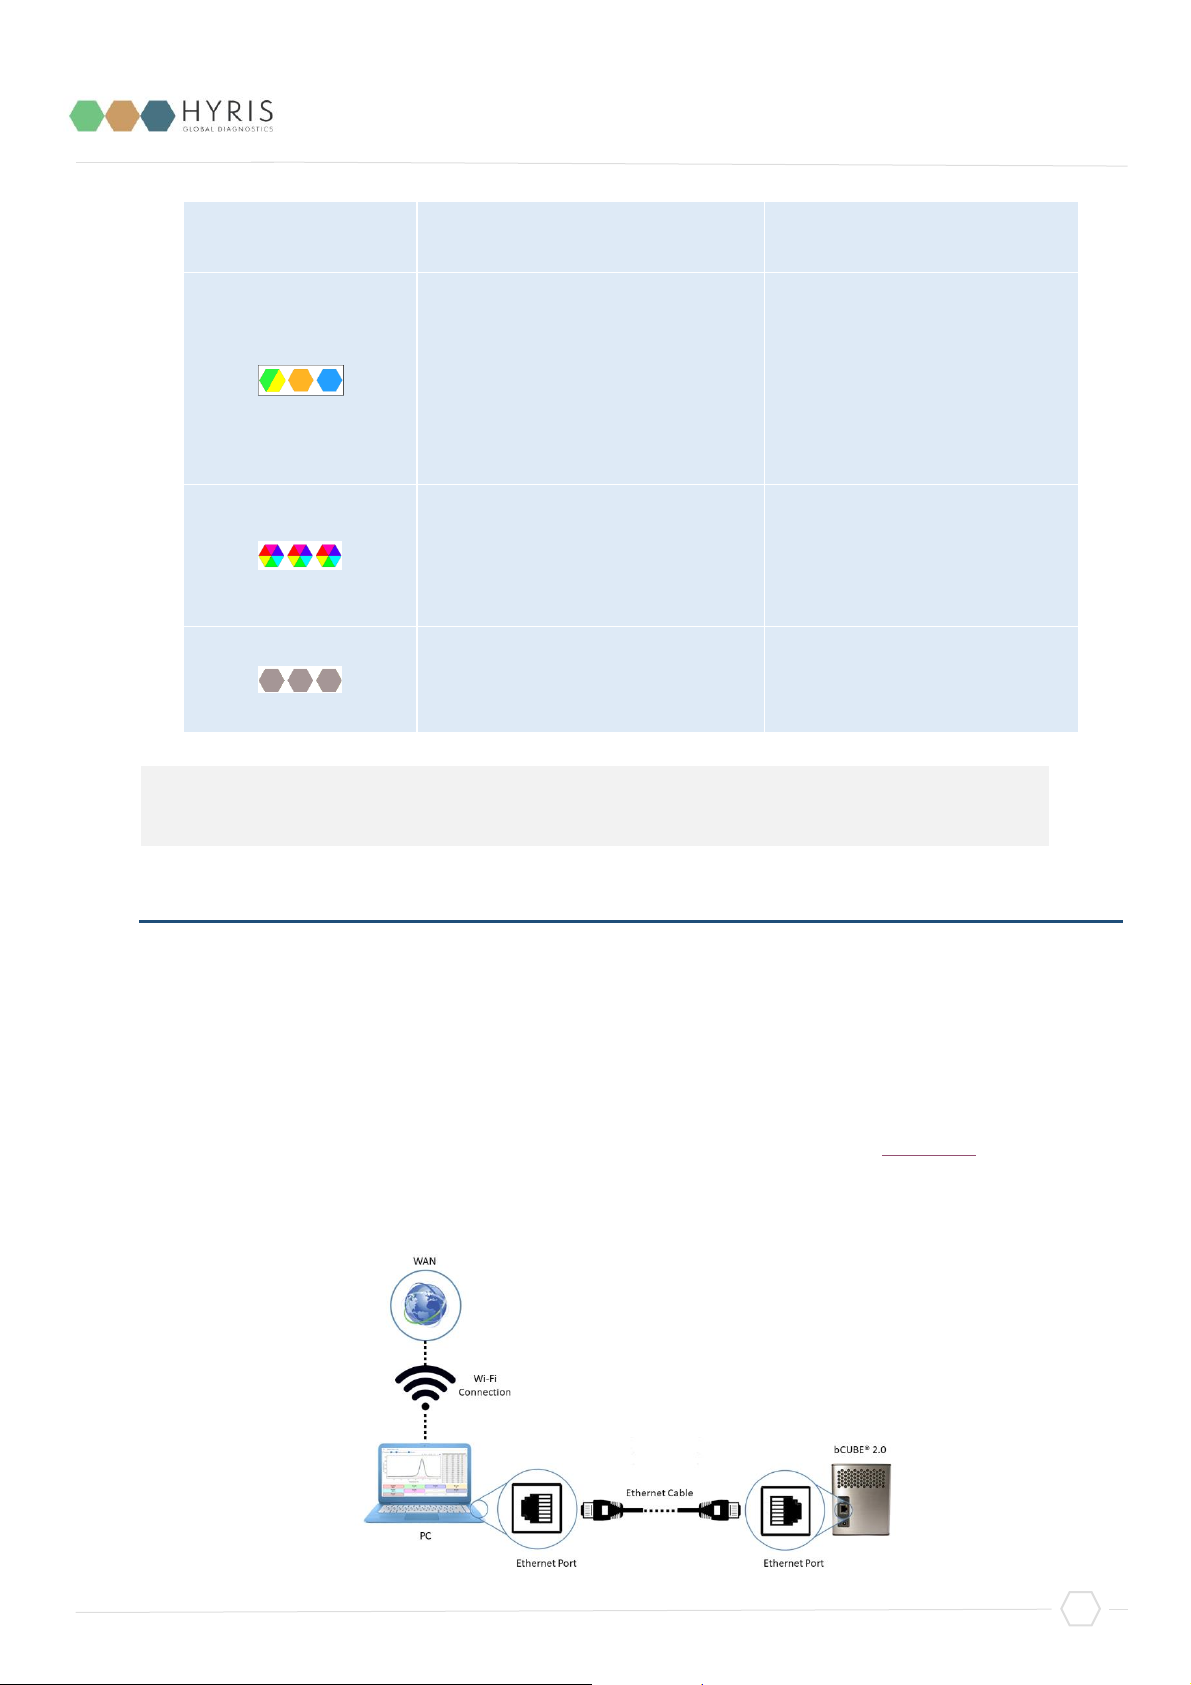
Status LEDs
The status of the bCUBE® and its functioning are communicated to the user by the different colour
combinations of the status LEDs on the top of the device.
o bDATA® LED: corresponding to the symbol, it indicates the connection status to Hyris
server.
Ready colour: green
When Ready colour is on, bCUBE® 2.0 is connected to bDATA®
o Thermal LED: corresponding to the symbol, it indicates if the cartridge is hot or not.
Ready colour: orange
When Ready colour is on, the internal temperature of the bCUBE® 2.0 is not hot. If

September 2019
bCUBE® 2.0 Quick Start Guide - Hyris Platform guide - Version 1.2.5
7
cartridge is inserted, it can be safely handled
o Connection LED: corresponding to the symbol, it indicates the internet connection state
of the bCUBE® 2.0
Ready colour: blue
When ready colour is on, bCUBE® 2.0 is connected to a network
For a graphical representation, the symbol (from left to right: bDATA®, Thermal and
Connection LEDs) will be displayed in this document when colour code explanation is required.
Some examples are reported in the following table:
LEDs Colours
DESCRIPTION
INTERPRETATION
- bDATA® LED steady green
- Thermal LED steady
orange:
- Connection LED steady
blue:
- bDATA® connection
OK
- Cartridge not hot
- Network connection
OK
- bDATA® LED steady green
- Thermal LED blinking
orange and red
- Connection LED steady
blue
- bDATA® connection
OK
- WARNING: Cartridge
hot
- Network connection
OK
- bDATA® LED blinking
green and yellow
- Thermal LED steady
orange
- Missing bDATA®
connection
- Cartridge not hot
September 2019
bCUBE® 2.0 Quick Start Guide - Hyris Platform guide - Version 1.2.5
8
- Connection LED blinking
red and yellow
- Missing network
connection
- bDATA® LED blinking
green and yellow
- Thermal LED steady
orange
- Connection LED steady
blue
- Missing bDATA®
connection
- Cartridge not hot
- Network connection
OK. bCUBE® 2.0 can
be used locally
- bDATA® LED multicolour
- Thermal LED multicolour
- Connection LED
multicolour
- Experiment is running
on bCUBE® 2.0
- bDATA® LED off
- Thermal LED off
- Connection LED off
- bCUBE® 2.0 off
First set up
PC settings
PC has to be connected to a stable internet connection.
bCUBE® 2.0 Connection
In order to properly work, the following steps have to be respected:
1. Make sure the bCUBE® 2.0 is set on a flat and stable surface
2. Make sure to have correctly provided the condition explained in the PC Set-up section
3. Connect one end of the Ethernet cable to the bCUBE® 2.0 and the other to the PC according
the following configuration
Note: not all the Status LEDs colour combinations are shown. For further information,
please read the Owner’s Manual.
 Loading...