

Hypex Electronics FusionAmp FA251, FusionAmp FA252, FusionAmp FA122, FusionAmp FA502, FusionAmp FA501 User Manual
...Page 1

User's Guide
FusionAmp
Page 2

FusionAmp, an introduction
Thank you for purchasing the new Hypex Plate
Amplifier, powered by our NCORE technology.
This FusionAmp will be the basis of a powerful active
subwoofer, a two-way or a three-way monitor.
The FusionAmp family consists of the following
models:
FusionAmp One-Way models:
FA251, 1x250W
FA501, 1x500W
FusionAmp Two-Way models:
FA122, 2x125W
FA252, 2x250W
FA502, 2x500W
FusionAmp Three-Way models:
FA123, 2x125W + 100W Tweeter
FA253, 2x250W + 100W Tweeter
FA503, 2x500W + 100W Tweeter
RTFM (Read This Fine Manual)
Please read the safety instructions on the next page
before installing and/or operating the module.
Please note the different models. This guide describes
the one-way and multi-way models. In addition to the
analogue inputs, the one-way models have a high
level analogue input, whereas the multi-way models
have a digital input instead.
This user’s guide covers the general user instructions
for these models. For detailed 3D CAD models, please
refer to our website. In addition to the 3D CAD, files we
have 2D drawings and an FAQ section, with a lot of
additional support material.
Included in the box
The FusionAmp
This user guide
Speaker connection cable(s)
One-Way models:
4 way, pluggable terminal block, 5.08 mm
Default filter
To protect your valuable drivers, the DSP does not
contain a filter out of the box. One must first configure
a filter before the FusionAmp gives an output signal.
See chapter HFD.
Chapter
Page
Introduction, Table of contents
3
Safety precautions
4
Getting started
5
Fusion Accessories
5
Features
6-7
Using the remote (optional)
8
Example applications
8-9
Connections one-way models
10
Connections multi-way models
11
Installation
12-13
Connecting the speakers
14
System information
16
Advanced system information
17
Troubleshooting
18
Frequently asked questions
18
Support
18
Warranty
19
Disclaimer
19
Revisions
19
Notes
19
Hi there!
This user guide is preliminary, so things might
change, disappear, be added or whatever.
No rights can be derived from this information.
If you have questions, remarks or feedback,
please direct them to: [email protected]
Page 3

3
FusionAmp, an introduction
Thank you for purchasing the new Hypex Plate
Amplifier, powered by our NCORE technology.
This FusionAmp will be the basis of a powerful active
subwoofer, a two-way or a three-way monitor.
The FusionAmp family consists of the following
models:
FusionAmp One-Way models:
FA251, 1x250W
FA501, 1x500W
FusionAmp Two-Way models:
FA122, 2x125W
FA252, 2x250W
FA502, 2x500W
FusionAmp Three-Way models:
FA123, 2x125W + 100W Tweeter
FA253, 2x250W + 100W Tweeter
FA503, 2x500W + 100W Tweeter
RTFM (Read This Fine Manual)
Please read the safety instructions on the next page
before installing and/or operating the module.
Please note the different models. This guide describes
the one-way and multi-way models. In addition to the
analogue inputs, the one-way models have a high
level analogue input, whereas the multi-way models
have a digital input instead.
This user’s guide covers the general user instructions
for these models. For detailed 3D CAD models, please
refer to our website. In addition to the 3D CAD, files we
have 2D drawings and an FAQ section, with a lot of
additional support material.
Included in the box
The FusionAmp
This user guide
Speaker connection cable(s)
One-Way models:
4 way, pluggable terminal block, 5.08 mm
Default filter
To protect your valuable drivers, the DSP does not
contain a filter out of the box. One must first configure
a filter before the FusionAmp gives an output signal.
See chapter HFD.
Table of Contents
Chapter
Page
Introduction, Table of contents
3
Safety precautions
4
Getting started
5
Fusion Accessories
5
Features
6-7
Using the remote (optional)
8
Example applications
8-9
Connections one-way models
10
Connections multi-way models
11
Installation
12-13
Connecting the speakers
14
System information
16
Advanced system information
17
Troubleshooting
18
Frequently asked questions
18
Support
18
Warranty
19
Disclaimer
19
Revisions
19
Notes
19
Page 4
Getting Started
We understand you want to experience the sound of
your new FusionAmp powered speaker as quickly as
possible. Therefore, we have made you this ‘roadmap
to success’.
Selecting your Fusion Amps:
Before you order your FusionAmps, you have to select
the correct version that fits your design. Take a look at
the example applications in this manual and write
down your requirements.
Ordering your Fusion Amps:
Once you know which FusionAmps you need, you can
order them on our webshop. Cables to connect to your
woofers and tweeters are included. Other cables are
not included. If you do not have mains cables or a mini
USB cable, you can also add those to your order.
Additionally we offer a range of high quality audio
cables to make sure your have all the cables you need.
Designing and loading a filter:
Since the FusionAmp’s DSP does not contain a filter by
default, you need to get started with HFD. This free
software can be downloaded from our website. You
can start getting acquainted with the software, even
without a Hypex product connected. An elaborate
guide how to design the filters, can be found on our
website.
Installing the FusionAmp in your cabinet:
For best performance, the FusionAmp should be
installed in a sealed compartment of your speaker
cabinet. This guide includes basic dimensions for
installation. Refer to the chapter ‘Installation’ for
instructions. Detailed 3D models and 2D drawings can
be found on our website, to assist in design of the
speaker cabinet.
Start listening!
Once the filters are uploaded to the DSP and the
speaker cabinet is fully assembled, you can start
listening and tweaking your sound experience.
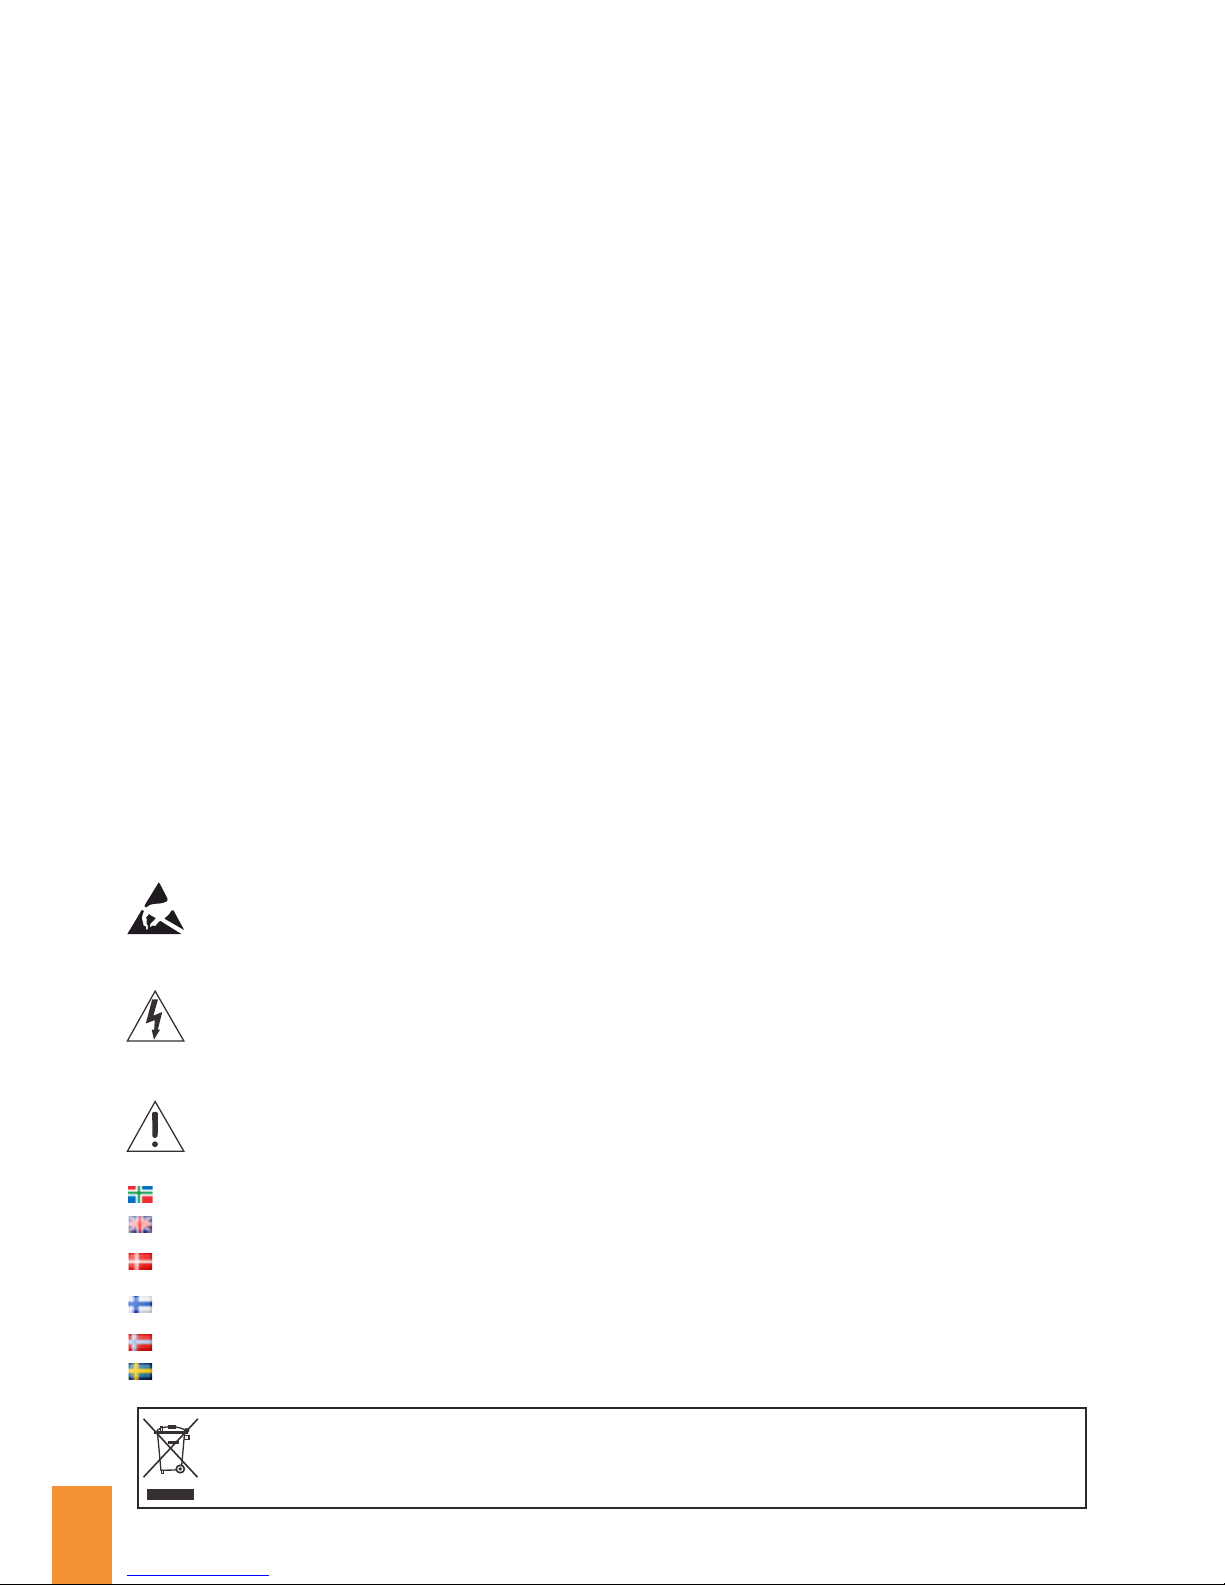
Attention: Obse r v e p r e c a u t i o n s fo r h a n d l i n g
electrostatic sensitive devices. This module uses
semiconductors that can be damaged by electrostatic
discharge (ESD).
The exclamation point within an equilateral triangle is
intended to alert the user of the prescence of important
operating and maintaining (servicing) instructions in
the literature accompanying the appliance.
The lightning flash with arrowhead symbol within an
equilateral triangle is intended to alert the user to the
prescence of uninsulated “dangerous voltage” within
the product’s enclosure, that may be of significant
magnitude to constitute a risk of electric shock to
persons.
1.
Read these instructions.
2.
Keep these instructions.
3.
Heed all warnings.
4.
Follow all instructions.
5.
Do not use this apparatus near water.
6.
Clean only with a dry cloth.
7.
Natural convection should not be impeded by covering the
module (apart from the end applications housing). Do not
block any ventilation openings. Install in accordance with
the manufacturer’s instructions.
8.
Do not install near any heat sources such as radiators,
heat registers, stoves, or other apparatus (including
amplifiers) that produce heat.
9.
Do not defeat the safety purpose of the protective earth
/ grounding mains inlet. Protective earth is provided for
your safety.
10.
Protect the power cord from being walked on or pinched
particularly at plugs, convenience receptacles, and the
point where they exit from the apparatus.
11.
Only use attachments/accessories specified by the
manufacturer.
12.
Unplug this apparatus during lightning storms or when
unused for long periods of time.
13.
Refer all servicing to qualified service personnel.
Servicing is required when the apparatus has been
damaged in any way, such as power-supply cord or plug
is damaged, liquid has been spilled or objects have
fallen into the apparatus, the apparatus has been
exposed to rain or moisture, does not operate normally,
or has been dropped.
14.
This apparatus shall not be exposed to dripping or
splashing, and no object filled with liquids, such as
vases or beer glasses, shall be placed on the apparatus.
15.
Do not overload wall outlets and extension cords as this
can result in a risk of fire or electric shock.
16.
This apparatus has been designed with Class-I
construction and must be connected to a mains socket
outlet with a protective earthing connection.
17.
This apparatus has been equipped with a rocker-style
AC mains power switch. This switch is located on the
rear panel and should remain readily accessible to the
user.
18.
The MAINS plug or an appliance coupler is used as the
disconnect device, so the disconnect device shall remain
readily operable.
19.
Do not run any cables across the top or the bottom of the
module. Apply fixtures to cables to ensure that this is not
compromised.
20.
Before using this product, ensure all cables are correctly
connected and the power cables are not damaged. If you
detect any damage, do not use the product.
21.
Changes or modifications not expressly approved by
Hypex Electronics will void compliance and therefore the
user's authority to operate the equipment.
22.
Service or modifications by any person or persons other
than by Hypex Electronics authorized personnel voids the
warranty.
This module operates at mains voltage and carries
hazardous voltages at accessible parts. These parts may
never be exposed to inadvertent touch. Observe extreme
care during installation and never touch module of the
unit while it is connected to the mains. Disconnect the
unit from the mains and allow all capacitors to discharge
for 10 minutes before handling it.
Damage due to inappropriate handling is not covered by
warranty. This product has no user-serviceable parts.
Warning: To reduce the risk of fire or electric shock, do not
expose this device to rain or moisture.
Safety precautions
Précautions de sécurité
Ce module est sous tension secteur et certaines de ses
pièces accessibles sont sous une tension dangereuse.
Ces pièces doivent dans tous les cas être protégées
contre contacts accidentels. Lors de l'installation, une
prudence extrême s'impose. Ne jamais toucher les pièces
du module quand celui-ci est relié au secteur. Isoler
l'appareil du secteur et attendre 10 minutes pour laisser
à tous les condensateurs le temps de se décharger avant
de le manipuler.
Les dommages causés par un usage non approprié sont
exclus de la garantie.
Ce produ it n e contien t aucune piè ce d evant êtr e
entretenue par l'utilisateur.
Avertissement: Pour réduire les risques de choc électrique, ne
pas exposer cet appareil à la pluie ou l'humidité.
Correct disposal of this product: This symbol indicates that this product should not be disposed of with your household waste, according to the
WEEE directive (2012/19/EU) and your national law. This product should be handed over to an authorized collection site for recycling waste
electrical and electronic equipment (EEE). Improper handling of this type of waste could have a possible negative impact on the environment
and human health due to potentially hazardous substances that are generally associated with EEE. At the same time, your cooperation in the
correct disposal of this product will contribute to the effective usage of natural resources. For more information about where you can drop off
your waste equipment for recycling, please contact your local city office, waste authority, or your household waste disposal service.
This product must be earthed.
Laite on liitettävä suojakoskettimilla varustettuun
pistorasiaan.
Apparatets stikprop skal tilsluttes en stikkontakt med
jord, som giver forbindelse til stikproppens jord.
Apparatet må tilkoples jordet stikkontakt.
Apparaten skall anslutas till jordat uttag.
Dit fertuut mout aansloten worden op raandeerde.
4
Page 5
Getting Started
We understand you want to experience the sound of
your new FusionAmp powered speaker as quickly as
possible. Therefore, we have made you this ‘roadmap
to success’.
Selecting your Fusion Amps:
Before you order your FusionAmps, you have to select
the correct version that fits your design. Take a look at
the example applications in this manual and write
down your requirements.
Ordering your Fusion Amps:
Once you know which FusionAmps you need, you can
order them on our webshop. Cables to connect to your
woofers and tweeters are included. Other cables are
not included. If you do not have mains cables or a mini
USB cable, you can also add those to your order.
Additionally we offer a range of high quality audio
cables to make sure your have all the cables you need.
Designing and loading a filter:
Since the FusionAmp’s DSP does not contain a filter by
default, you need to get started with HFD. This free
software can be downloaded from our website. You
can start getting acquainted with the software, even
without a Hypex product connected. An elaborate
guide how to design the filters, can be found on our
website.
Installing the FusionAmp in your cabinet:
For best performance, the FusionAmp should be
installed in a sealed compartment of your speaker
cabinet. This guide includes basic dimensions for
installation. Refer to the chapter ‘Installation’ for
instructions. Detailed 3D models and 2D drawings can
be found on our website, to assist in design of the
speaker cabinet.
Start listening!
Once the filters are uploaded to the DSP and the
speaker cabinet is fully assembled, you can start
listening and tweaking your sound experience.
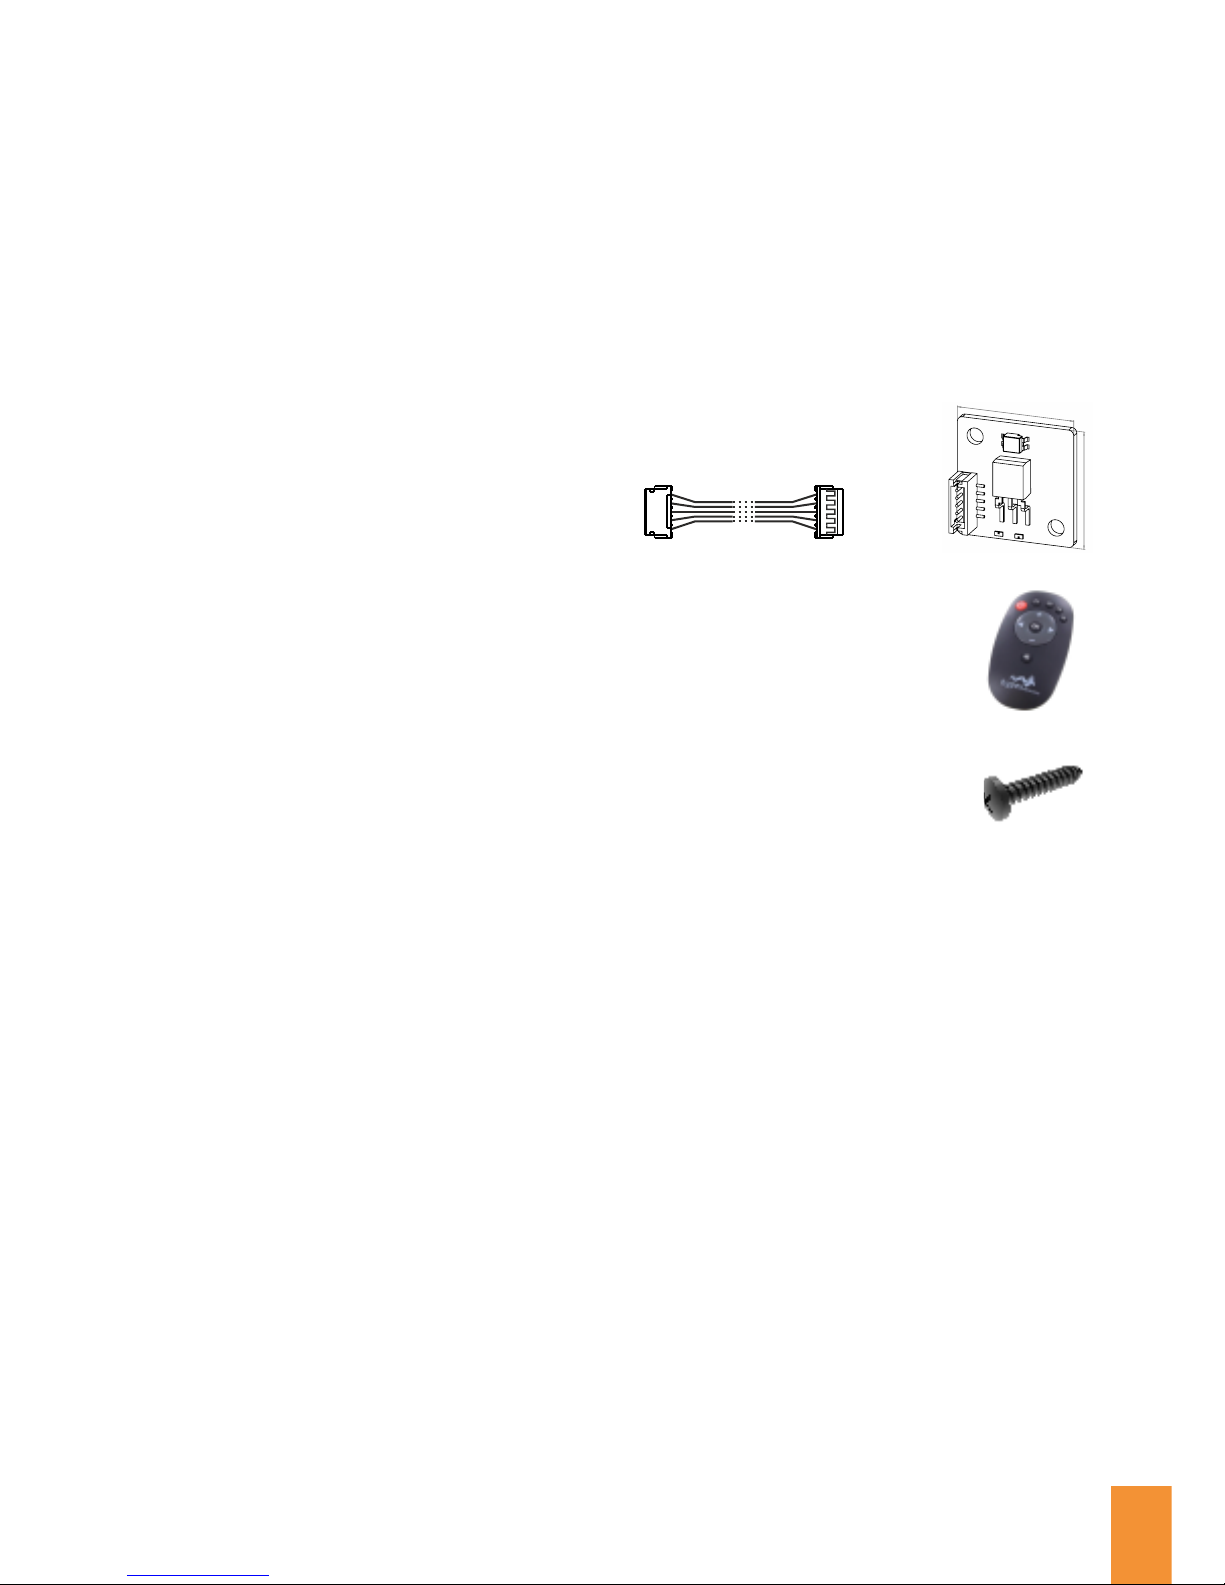
With your FusionAmp you may need some additional
accessories, these can be optionally ordered:
Fusion IR Receiver Kit
All modules can be extended with the Fusion IR
Receiver Kit. This set contains a PCBA with IR receiver
and bi-colour LED, and the necessary cable (125cm).
This set must be used in master devices if the Hypex
remote is to be used. Furthermore, this set can also be
added in slave devices, but the IR functionality will be
disabled. The green LED acts as on-off indicator, the
re d L E D m ir r or s t he pr o te c t
indicator. This set is available for
separate purchase.
Hypex Remote
The Hypex Remote can be used in
combi n a tion w ith t h e Fu s i on I R
Receiver Kit to control volume, source,
pr esets a nd put the sy stem into
standby.
Fusion Mounting Screws
The Fusion Amp must be mounted into
the speaker cabinet with 8 or 10
screws. This set contains 10 selftapp i n g, b l ack, Pozi d r iv s c r ews,
3.9x20mm.
USB 2.0 Cable
USB Type A Plug - Mini USB Type B Plug,
Powercord EU
IEC 60320 C13 - IEC Type F
Used in: Germany, Austria, the Netherlands and Spain
among others.
Powercord UK
IEC 60320 C13 - IEC Type G
Used in: UK, Ireland, Cyprus, Malta, Malaysia,
Singapore, Hong Kong.
Powercord AU/NZ
IEC 60320 C13 - IEC Type I
Used in: Australia, New Zealand, Papua New Guinea,
Argentina, China.
Powercord USA
IEC 60320 C13 - IEC Type B / NEMA 5-15P
Used in: North and Central America, Japan.
Hypex Filter Design
If you need a physical copy of Hypex Filter Design, you
can order a CD containing HFD from our webshop. HFD
is also available for free download.
6
1
6
1
Fusion Accessories
23
23
5
Page 6
Thermal protection
All amplifiers produce heat, even highly efficient Class
D amplifiers. Therefore, the FusionAmp has an
internal thermal protection.
# Thermal limiting
If the amplifier is reaching its maximum temperature,
the output is lowered by 6dB. Additionally the protect
indication starts blinking once every second.
# Thermal shutdown
If the maximum temperature is reached, the amplifier
is switched off to protect it from damage. Additionally
the protect indication starts blinking twice every
second.
When the amplifier has cooled down to a safe
operating temperature, the thermal protection resets
and the FusionAmp resumes to normal operation.
Te prevent overheating, install the FusionAmp
according to the installation instruction. Never cover
the ventilation holes or place the FusionAmp near a
heat source.
Gain and volume
The FusionAmp has an advanced gain structure. First
of all, we distinguish a master gain (referred to as
‘volume’). This volume can be adjusted with HFD, via
the remote link, or with the Hypex remote.
Secondly, each FusionAmp as a whole, can have an
offset to the master volume.
Thirdly, each filter can have an offset to this volume.
This can be used to match less sensitive woofers with
more sensitive woofers.
Finally, the one-way models have a manual gain
offset, since these models are meant for use as a
subwoofer, one might want to ad a little extra punch at
a certain moment.
To prevent the FusionAmp to power up at maximum
volume, an optional startup volume (master) can be
configured in HFD.
Input sensitivity
Since different FusionAmp models have different
output power, the gain is adjusted in the DSP to make
sure dBFS equals full power output. This also applies
to the analogue inputs.
Filter protection
The presets loaded in the FusionAmp can be password
protected, so that unauthorized persons can not
overwrite the configuration. This feature can be
configured in HFD. Use this function with caution. If
you configure this function, you will be asked to enter
an email address. This address is stored in the
FusionAmp’s memory. If you lost your password, a
reset code can be requested and will be send to this
email address.
Features
Fan control
The FA502 and FA503 feature an advanced cooling
system. The software monitors the signal input and
mod u l e t e m perature. A proportiona l – integral
algorithm controls the fan speed. This ensures
sufficient cooling when needed and quiet operation
when desired.
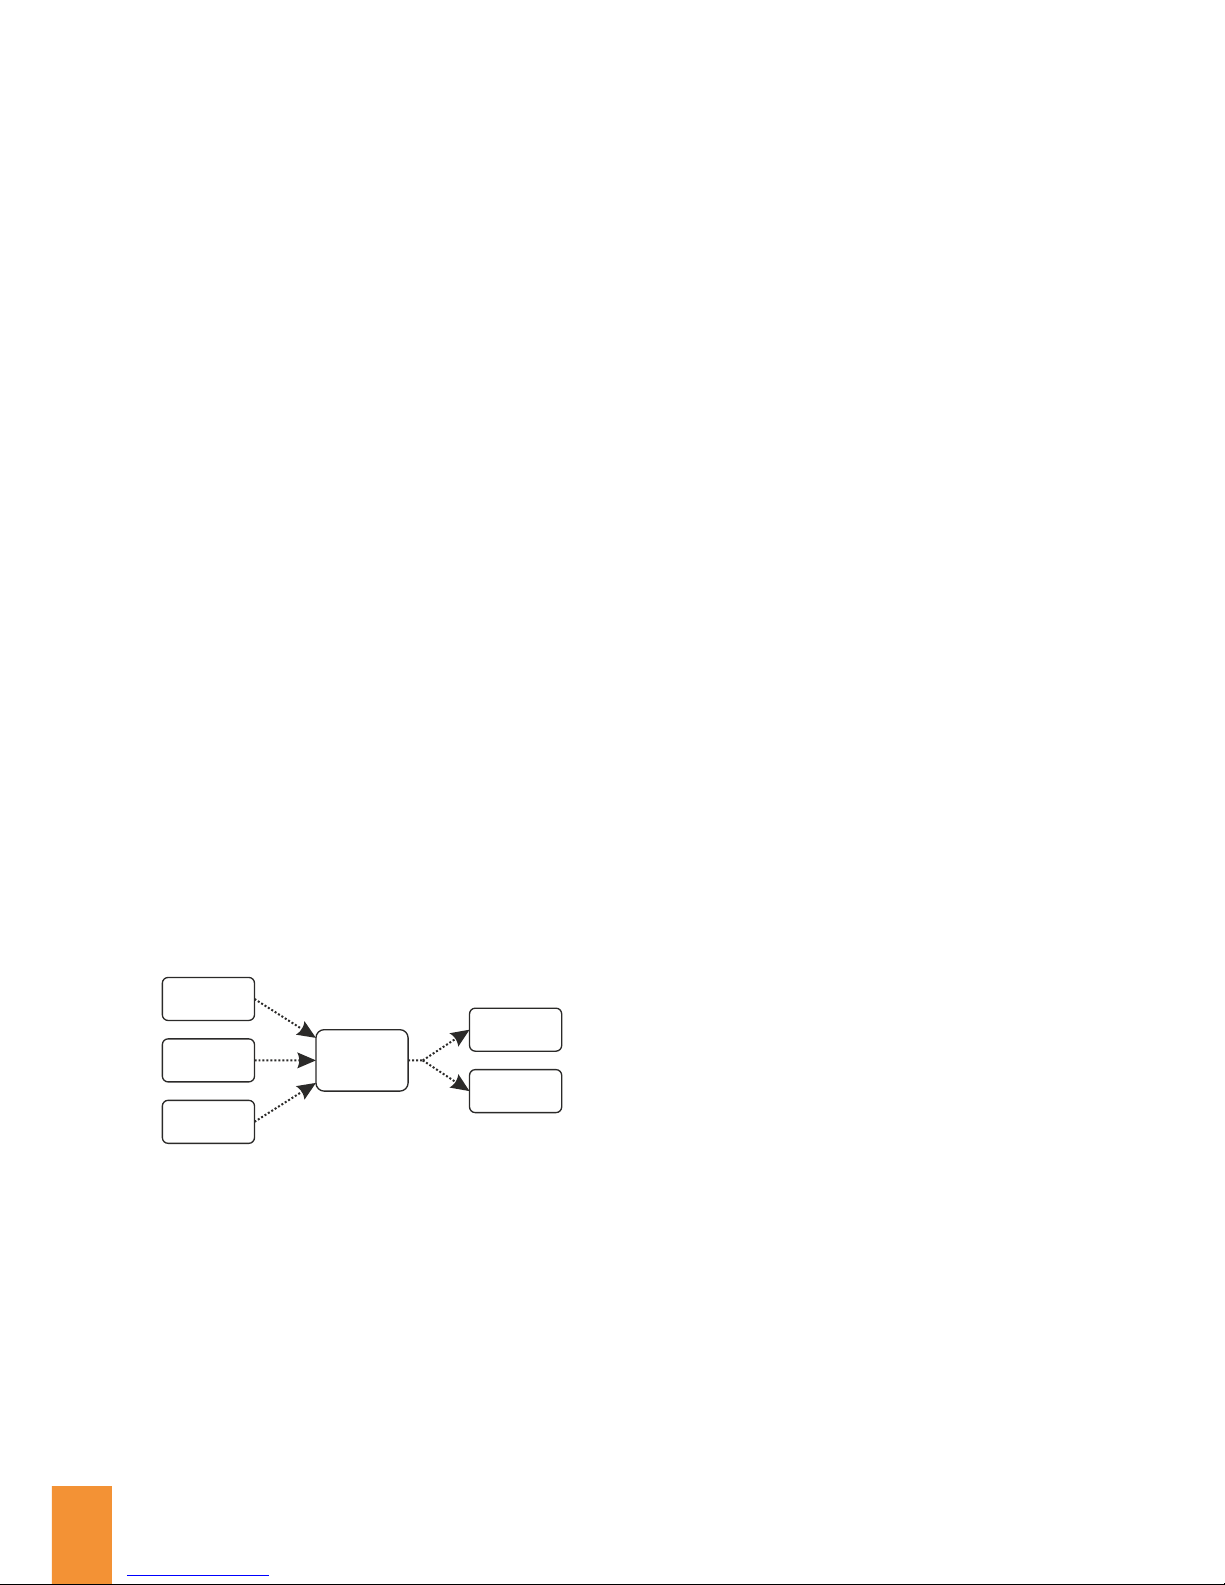
Source select
Automatic source select automatically locks to the
first available source. The input scanner scans in the
following order and loops:
# One-way models:
XLR | RCA | High Level Input
# Multi-way models:
AES | S/PDIF | Optical | XLR | RCA.
The source can also be selected manually. Configure
manual or automatic source selection in HFD.
Daisy-chaining
The balanced analogue input can be daisy chained
using the XLR through connector. This output XLR is
directly connected to the input XLR. The maximum
number of chained modules is limited by the source’s
capabilities.
Multi way versions:
The FusionAmp can also be daisy chained in the
digital domain. The signal on the AES and S/PDIF
output is the signal of the current selected digital
input.
Note: there is no link between analogue and digital
domains. Analogue input signal can not be routed to
digital output and vise versa.
Signal detect
Instead of a trigger input, the FusionAmp features a
signal detect function. Depending on the selected
power mode (explained next), the FusionAmp scans
for input signal and enables if it detects or locks on to a
signal. Signal detect can be configured in HFD.
Auto-shutdown
In addition to signal detect, the FusionAmp can
automatically switch off if there is no input detected
on any of the inputs configured with signal detect.
This feature can be configured in HFD.
AES
S/PDIF
Optical
AES
S/PDIF
source
select
Power modes
# Ultra-low power
Meets 2013 ERP Lot 6 0.5W. In this mode the
FusionAmp scans for analogue input only. If an
analogue input signal is detected, the FusionAmp
automatically turns on.
Power usage: 410mW (preliminary)
# Low power
In addition to ultra-low power mode, which only scans
for analogue input, this mode also scans the digital
inputs for signal. Multi-way only.
Power usage: 750mW (preliminary)
# Wake up on line
In this mode, the FusionAmp is always on, when
connected to mains.
In ultra-low or low power mode, the FusionAmp can
also be enabled by pressing the select button or via the
optional Hypex Remote. P ower modes can be
configured in HFD.
Bridge-tied load
The multi-way Fusion Amp can be configured for BTL.
BTL allows two amplifiers to be combined to double
the output power. This features can be configured in
HFD. Speaker connection must be done according to
the description in chapter: installation.
Soft-clip
Soft-clip minimizes audible distortion if the amplifier
is over-driven. By default, the FusionAmp DSP has
soft-clip enabled, to protect the amplifier from
clipping.
Every limiter has its effect on audio quality. For
optimal sound quality, one may want to disable this
feature. If soft-clip is disabled, the hardware clipping
takes over.
If the FusionAmp is driven into clipping (soft or hard)
the protect indicator lights up. Hardware clipping
only indicates when the amplifiers are over driven. It
does not protect the amplifier, nor your speakers.
Soft-clip can be configured using HFD. To correctly
configure soft-clip, the speaker impedance and
maximum output power parameters need to be set. By
default, soft-clip is configured to deliver maximum
power into 4Ω load impedance.
Critical failure
If a critical failure is detected, i.e. a DC error, the amp
shuts down immediately and the protect indication
will be enabled. A critical error is latching, meaning
only a power cycle might solve the issue. If a power
cycle does not work, contact Hypex support.
6
Page 7
Preset selection
The FusionAmp can store up to three presets, each
containing:
Source
Filter
Gain offset
Clip mode
These presets can be configured in HFD. The presets
filter, gain and clip mode are static and can only be
configured in HFD. The filter of the specific presets can
be specifically designed for e.g. audiophile listening,
party or any other purpose. Source selection is
dynamic and stores the last selected source in
memory of the selected preset. If another preset is
selected, the source is switched to the particular input
of that preset. Master volume stays equal while
switching presets, gain-offset is added, if this is
configured in the preset.
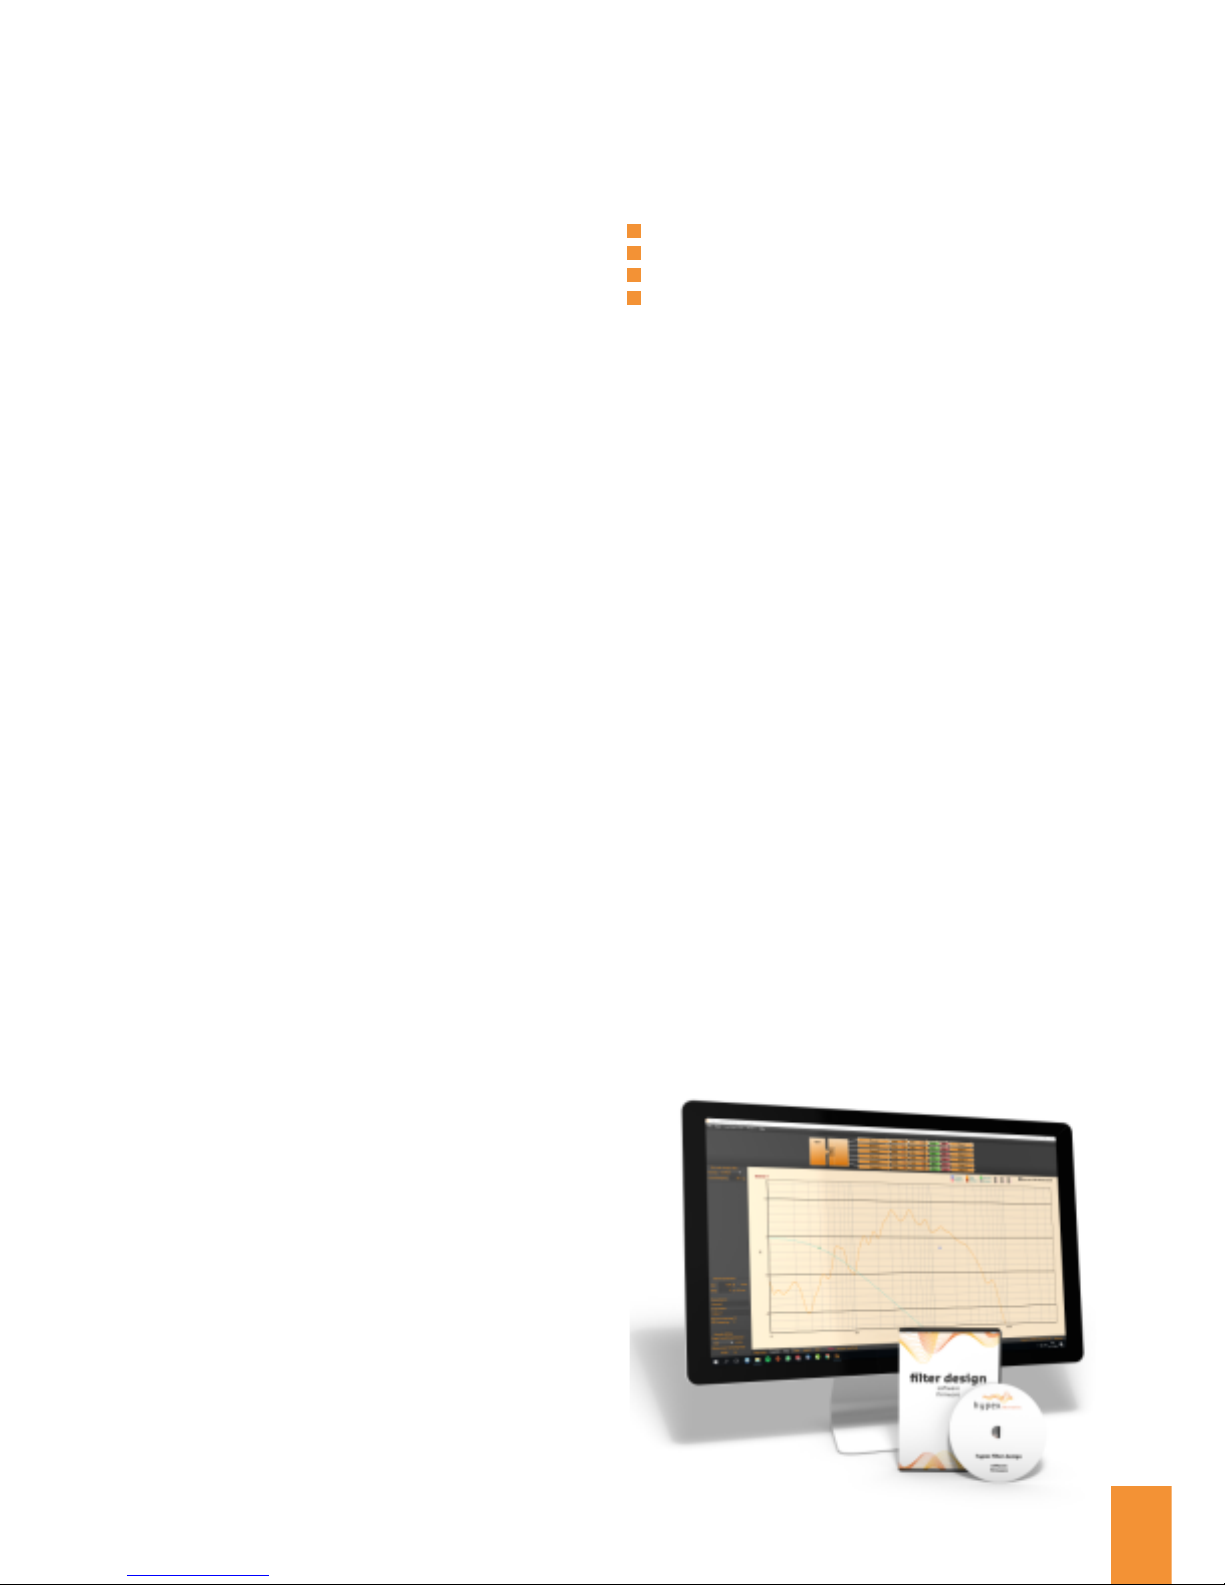
Hypex Filter Design (HFD)
HFD is a free software tool needed to configure the
FusionAmp. To protect your valuable drivers, the DSP
does not contain a filter out of the box. One must first
configure a filter before the FusionAmp generates an
output signal.
HFD can be used to measure the frequency response
of the speaker and this information can be used to
design your filter. 15 biquad filters are available per
amplifier channel.
A more elaborate guide is available on our website, to
guide you to a fully configured FusionAmp.
The most recent version of HFD is available for
download on our website or, if you would like a
physical copy, add a CD to your order.
Thermal protection
All amplifiers produce heat, even highly efficient Class
D amplifiers. Therefore, the FusionAmp has an
internal thermal protection.
# Thermal limiting
If the amplifier is reaching its maximum temperature,
the output is lowered by 6dB. Additionally the protect
indication starts blinking once every second.
# Thermal shutdown
If the maximum temperature is reached, the amplifier
is switched off to protect it from damage. Additionally
the protect indication starts blinking twice every
second.
When the amplifier has cooled down to a safe
operating temperature, the thermal protection resets
and the FusionAmp resumes to normal operation.
Te prevent overheating, install the FusionAmp
according to the installation instruction. Never cover
the ventilation holes or place the FusionAmp near a
heat source.
Gain and volume
The FusionAmp has an advanced gain structure. First
of all, we distinguish a master gain (referred to as
‘volume’). This volume can be adjusted with HFD, via
the remote link, or with the Hypex remote.
Secondly, each FusionAmp as a whole, can have an
offset to the master volume.
Thirdly, each filter can have an offset to this volume.
This can be used to match less sensitive woofers with
more sensitive woofers.
Finally, the one-way models have a manual gain
offset, since these models are meant for use as a
subwoofer, one might want to ad a little extra punch at
a certain moment.
To prevent the FusionAmp to power up at maximum
volume, an optional startup volume (master) can be
configured in HFD.
Input sensitivity
Since different FusionAmp models have different
output power, the gain is adjusted in the DSP to make
sure dBFS equals full power output. This also applies
to the analogue inputs.
Filter protection
The presets loaded in the FusionAmp can be password
protected, so that unauthorized persons can not
overwrite the configuration. This feature can be
configured in HFD. Use this function with caution. If
you configure this function, you will be asked to enter
an email address. This address is stored in the
FusionAmp’s memory. If you lost your password, a
reset code can be requested and will be send to this
email address.
7
Page 8
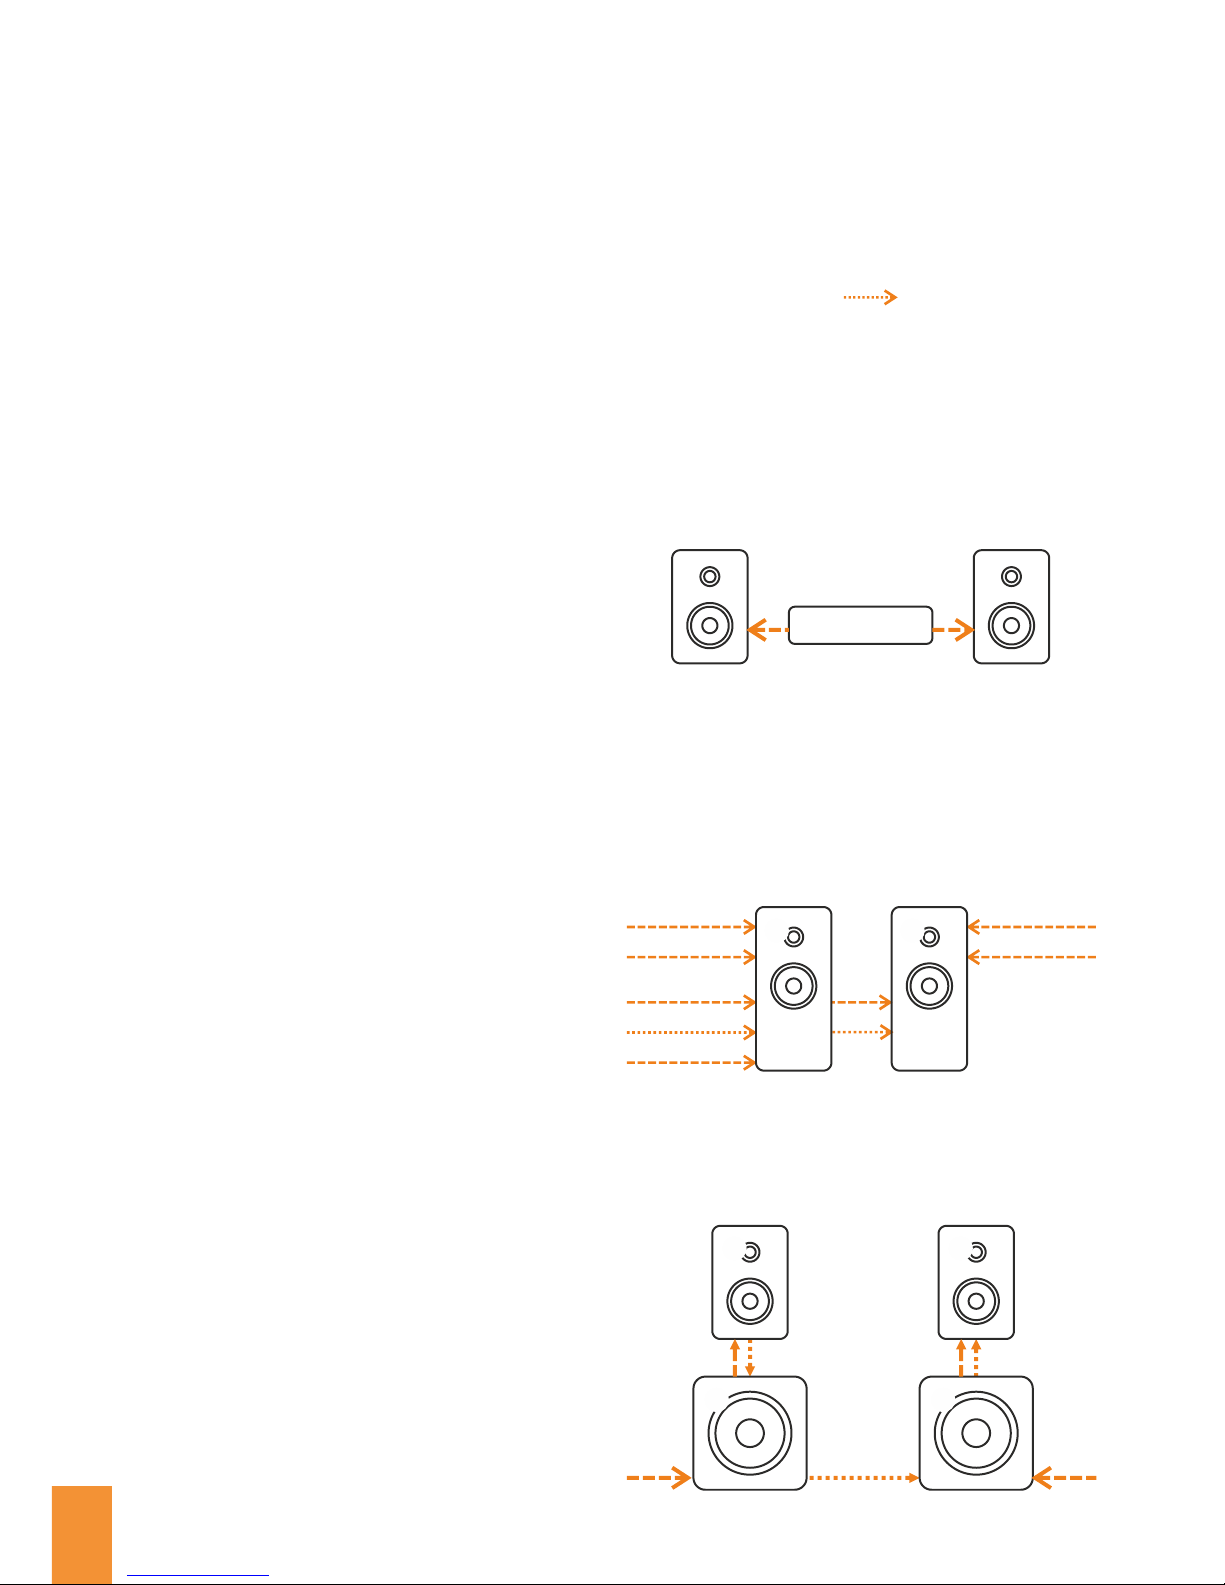
Application examples
❶ ❹
❷
❸
left
right
Multi-way top speakers, one-way subwoofers
This example is connected using analogue XLR. The
left and right channels are daisy chained per channel.
This setup can be used with, or without remote kit.
xlr right
rca right
s/pdif
aes
toslink
xlr left
rca left
❶ ❷
Without a preamp, with multiple sources
This example features two multi-way models that are
equipped with the remote kit. The two FusionAmps are
linked via the S/PDIF I/O for remote communication
and this also functions as a daisychain for the digital
domain. If toslink is selected in the master(1), the
slave(2) can be configured to listen to the S/PDIF
daisychain.
A couple of examples are given. These examples are
meant as reference. Other configurations are also
possible. Read all examples, since valuable principles
are explained in different examples. These examples
assume your have read the other chapters in this
guide. In the schematic drawing, the remote link is
depicted as a dotted line:
Other connections are depicted as dashed line and
may be digital, analogue, balanced ore unbalanced.
Setup with preamp or directly from source
This is the most simple setup. Use your (existing)
preamp for source selection, volume etc. The
FusionAmps can be connected analogue or digitally,
depending on your preamp. This setup can be easily
expanded with additional FusionAmp speakers. This
setup can be used with, or without a optional remote.
preamp
Multi-way top speakers with dual mono sub.
You can choose for a full-digital setup here. The
master (1) can be used as input and can be daisy
chained to the other modules. A digital signal carries
both left and right channel. Using HFD the channel can
be select ed and filt ers need t o be config ured
accordingly. Module 2,3 and 4 must be set as slave.
You can also choose for a BTL setup in the subwoofers,
using only one driver and the multi-way FusionAmp
configured as BTL.
High level input
In this setup we add one (or two) FA one-way models
to act as active subwoofer. If only one subwoofer is
added, both le ft and right ch anne l should be
connected to the respective high-level input of that
one subwoofer. If two subwoofers are added, connect
them in respect to the corresponding channel.
In this setup a remote kit does not add much value,
since volume is controlled by the existing amplifier,
just as source selection. The gain of the subwoofer(s)
can be adjusted using the gain control knob.
Using the remote (optional)
All modules can be extended with the Fusion IR
Receiver set. This set contains a PCBA with IR receiver
and bi-colour LED, and the ne cessary cables.
Additionally you need a Hypex Remote. Installation
instructions for this kit are supplied with the product.
Principle of master and slave.
To work with the remote feature, you need to
understand the principle of master and slave modules.
In principle, the module to which the Fusion IR
Receiver Kit is connect, should be configured as
master. Additionally, the other FusionAmps in your
setup should be configured as slave.
The IR receiver PCBA can be used in both master and
slave devices, only in slave devices the IR functionality
is disabled. The bi-colour LED can then be used to
indicate the status of the particular slave device. Note
to correctly configure master and slaves to prevent
unexpected behaviour.
How to link the slave modules to the master?
The S/PDIF I/O is utilized to communicate between
the modules. The master module modulates a
communication link on to the S/PDIF I/O. Use a decent
quality 75 ohm coaxial cable to link the modules. The
maximum total cable length should be kept under 25
meter. A maximum of three slave modules can be
connected to one master. Refer to the application
examples for more information.
What to do with a mixed model setup?
If a mixed setup is created (one-way models mixed
with multi-way models) the master should be a multiway mod e l . S i nce a mi x e d c o nfiguration has
conflicting inputs (digital vs high-level), the one-way
models are muted if a digital source is selected at the
master. If this is undesirable, consider a two-way
model in BTL or dual-mono as subwoofer amplifier.
Analogue or digital and remote?
The remote feature can be used with all types of
inputs. Thus, analogue balanced and unbalanced can
be used, providing that the remote link (S/PDIF) is
connected. In case of analogue inputs, the S/PDIF link
only carries the remote signal.
left
Page 9
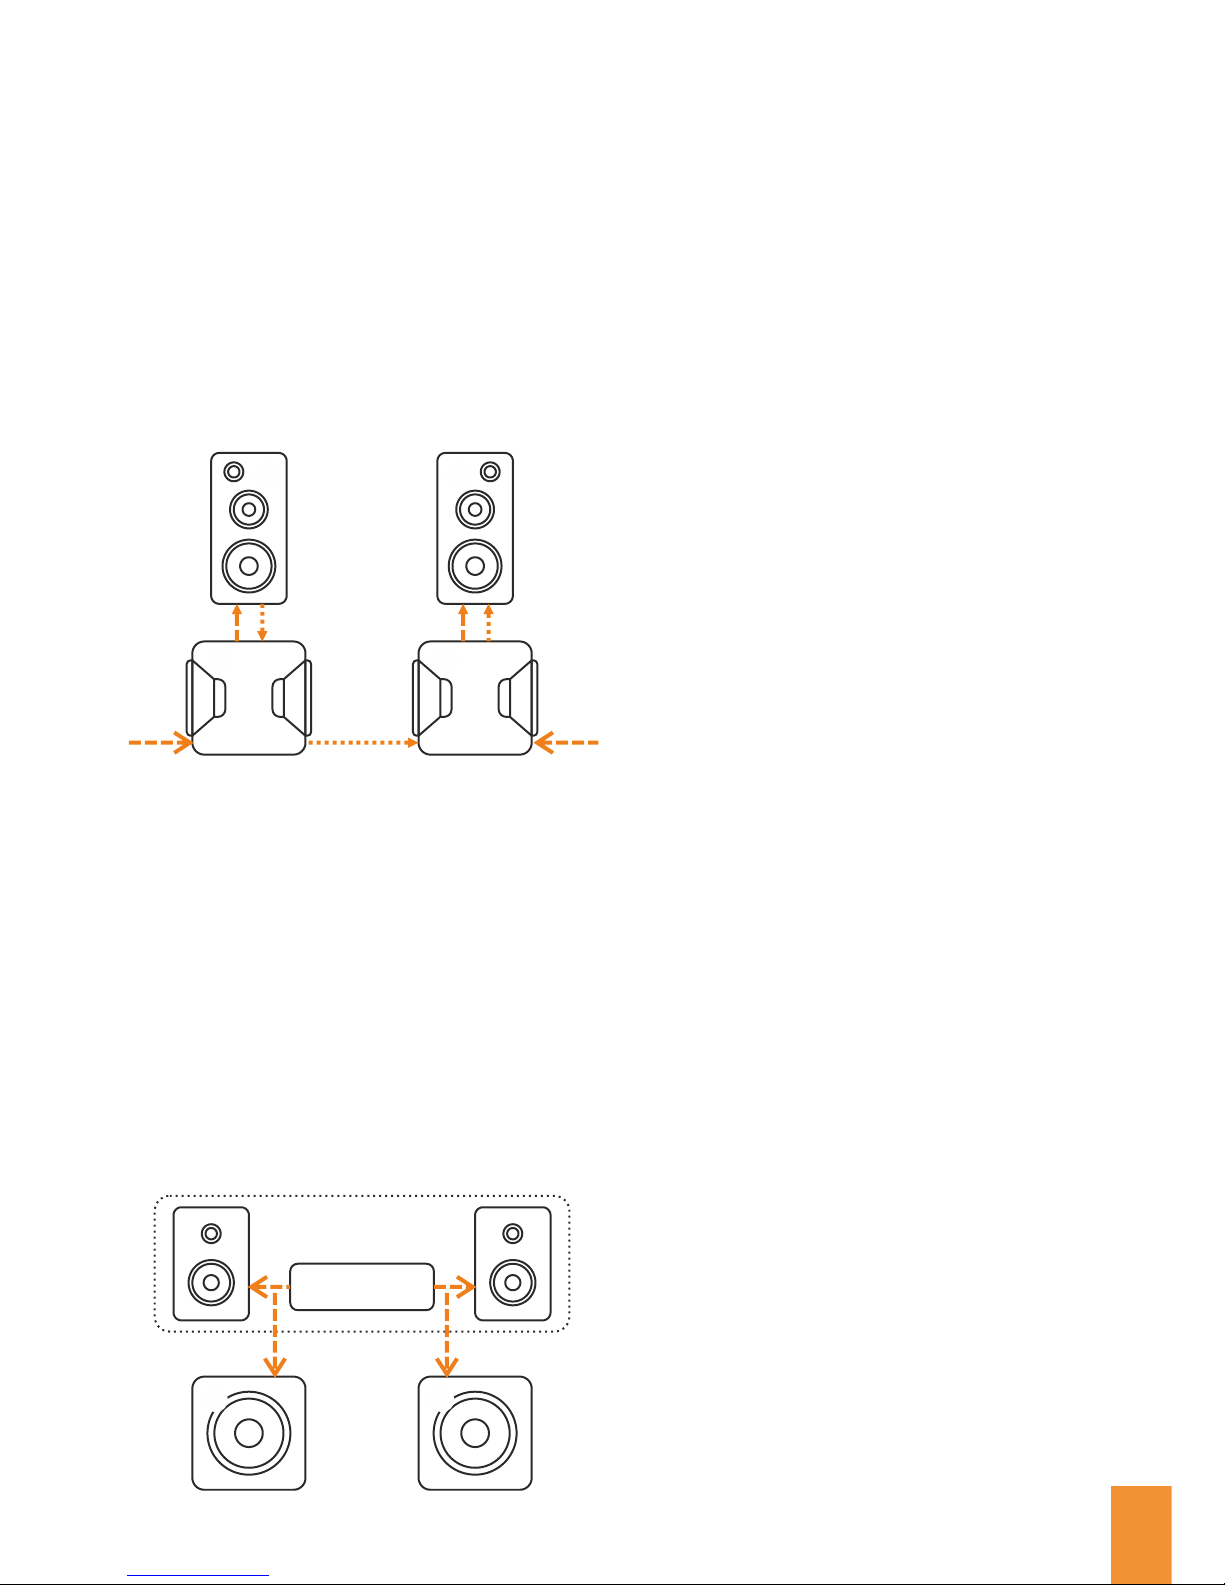
Multi-way top speakers with dual mono sub.
You can choose for a full-digital setup here. The
master (1) can be used as input and can be daisy
chained to the other modules. A digital signal carries
both left and right channel. Using HFD the channel can
be select ed and filt ers need t o be config ured
accordingly. Module 2,3 and 4 must be set as slave.
You can also choose for a BTL setup in the subwoofers,
using only one driver and the multi-way FusionAmp
configured as BTL.
❶ ❹
❷
❸
❶ ❹
High level input
In this setup we add one (or two) FA one-way models
to act as active subwoofer. If only one subwoofer is
added, both le ft and right ch anne l should be
connected to the respective high-level input of that
one subwoofer. If two subwoofers are added, connect
them in respect to the corresponding channel.
In this setup a remote kit does not add much value,
since volume is controlled by the existing amplifier,
just as source selection. The gain of the subwoofer(s)
can be adjusted using the gain control knob.
❶
❷
amplifier
existing setup
left
right
98
Page 10
10
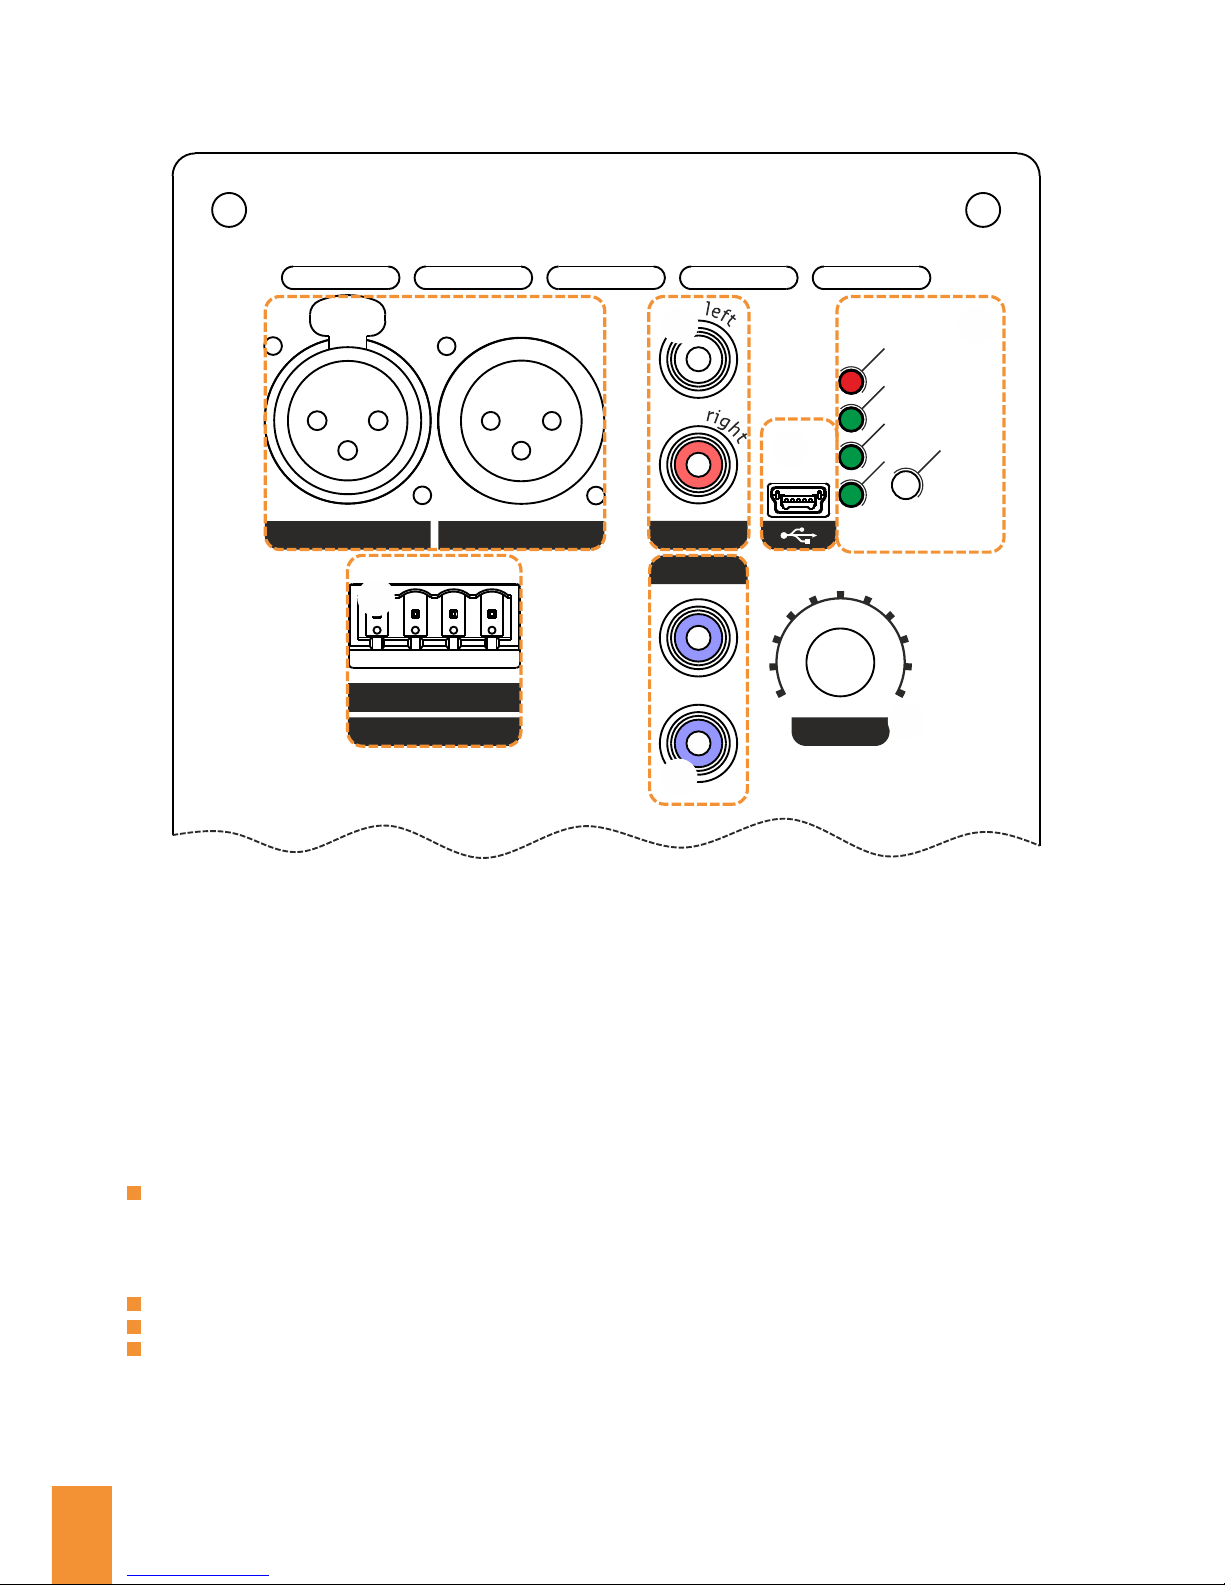
Connections one-way models
❶ Balanced analogue I/O:
Differential (also known as balanced) analogue input.
Refer to chapter Technical Specifications for more
information.
❷ Unbalanced analogue input:
A stereo input signal is internally mixed to mono. For
mono use, simply connect only the relevant channel.
❸ USB:
Can be used to configure the DSP. This connection
does not support USB audio.
❹ LED Indicators and button:
Clip or Limit indication
Prot: Random blinking: Amplifier limits
Steady on: Fatal / DC Error
Once per second: High temperature
Twice per second: Over temperature
Preset:
P1: Preset 1 selected
P2: Preset 2 selected
P3: Preset 3 selected
Preset selection:
The selected preset is lid by default, to change the
selected preset, short press the select button.
❺ High level input:
The high level input can be used to connect to your
existing amplifier if no pre-out is available.
❻ Remote I/O:
Connects to the remote of other FusionAmps.
❼ Gain adjust:
A manual offset can be set using the gain knob. This is
especially useful in subwoofer applications: for
instance to add that little bit of extra punch during
your favourite action movie.
By default, the gain offset can be adjusted by 6dB in
both directions. The volume of the one-way model can
be set using HFD or via the optional remote.
Connections multi-way models
❶ Balanced analogue I/O:
Differential (also known as balanced) analogue input.
Refer to chapter Technical Specifications for more
information.
❷ Unbalanced analogue input:
A stereo input signal is internally mixed to mono. For
mono use, simply connect only the relevant channel.
❸ USB:
Can be used to configure the DSP. This connection
does not support USB audio.
❹ LED Indicators:
Clip or Limit indication
Prot: Random blinking: Amplifier limits
Steady on: Fatal / DC Error
Once per second: High temperature
Twice per second: Over temperature
Preset:
P1: Preset 1 selected
P2: Preset 2 selected
P3: Preset 3 selected
Preset selection:
The selected preset is lit by default. To change the
selected preset, short press the select button.
- R + - L +
P1
Select
P2
P3
Prot
high level input
gain
unbal
analogue in
through
remote
t
u
p
n
i
t
u
p
t
u
o
❶
❷
❸
❺
❻
❹
❼
Page 11
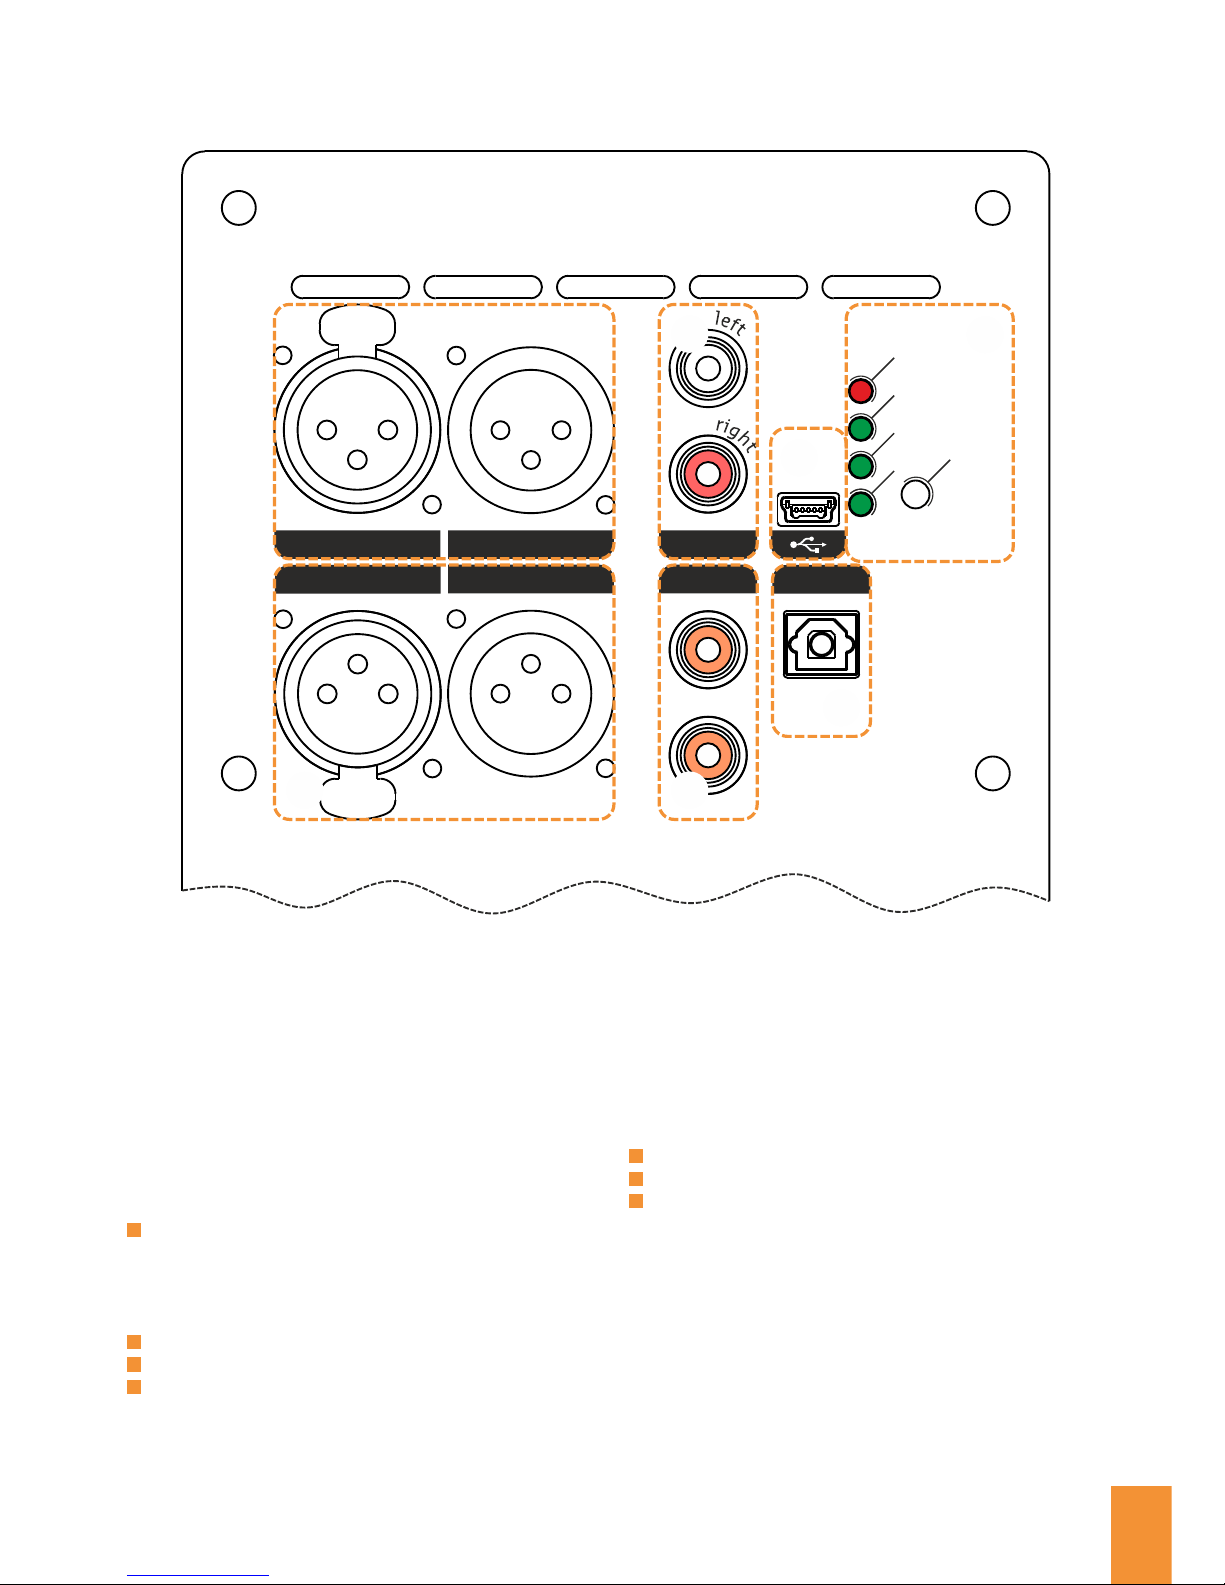
Connections multi-way models
❶ Balanced analogue I/O:
Differential (also known as balanced) analogue input.
Refer to chapter Technical Specifications for more
information.
❷ Unbalanced analogue input:
A stereo input signal is internally mixed to mono. For
mono use, simply connect only the relevant channel.
❸ USB:
Can be used to configure the DSP. This connection
does not support USB audio.
❹ LED Indicators:
Clip or Limit indication
Prot: Random blinking: Amplifier limits
Steady on: Fatal / DC Error
Once per second: High temperature
Twice per second: Over temperature
Preset:
P1: Preset 1 selected
P2: Preset 2 selected
P3: Preset 3 selected
Preset selection:
The selected preset is lit by default. To change the
selected preset, short press the select button.
Digital channel selection:
Digital signal carries both left and right signal.
Therefore, the desired channel can be configured
using HFD.
To display the selected channel setting, hold the select
button for 3 seconds, the selected channel mode
starts blinking.
Left: Left digital channel selected
Right: Right digital channel selected
L/R: Both digital channels mixed into mono
To change the selected channel mode, hold the select
button after the long press. Every 1.5 seconds, the
channel mode is switched.
❺ AES digital I/O:
AES3 (2-channel digital audio)
❻ S/PDIF digital I/O:
S/PDIF
❼ EIAJ optical:
EIAJ optical / Toslink
11
AES in
through
in
out
unbal
analogue in
through
AES in
through
P1 / Left
in
S/PDIF
Select
P2 / Right
P3 / L+R
Prot
optical
out
t
u
p
n
i
t
u
p
t
u
o
❶
❷
❸
❺
❹
❻
❼
Page 12
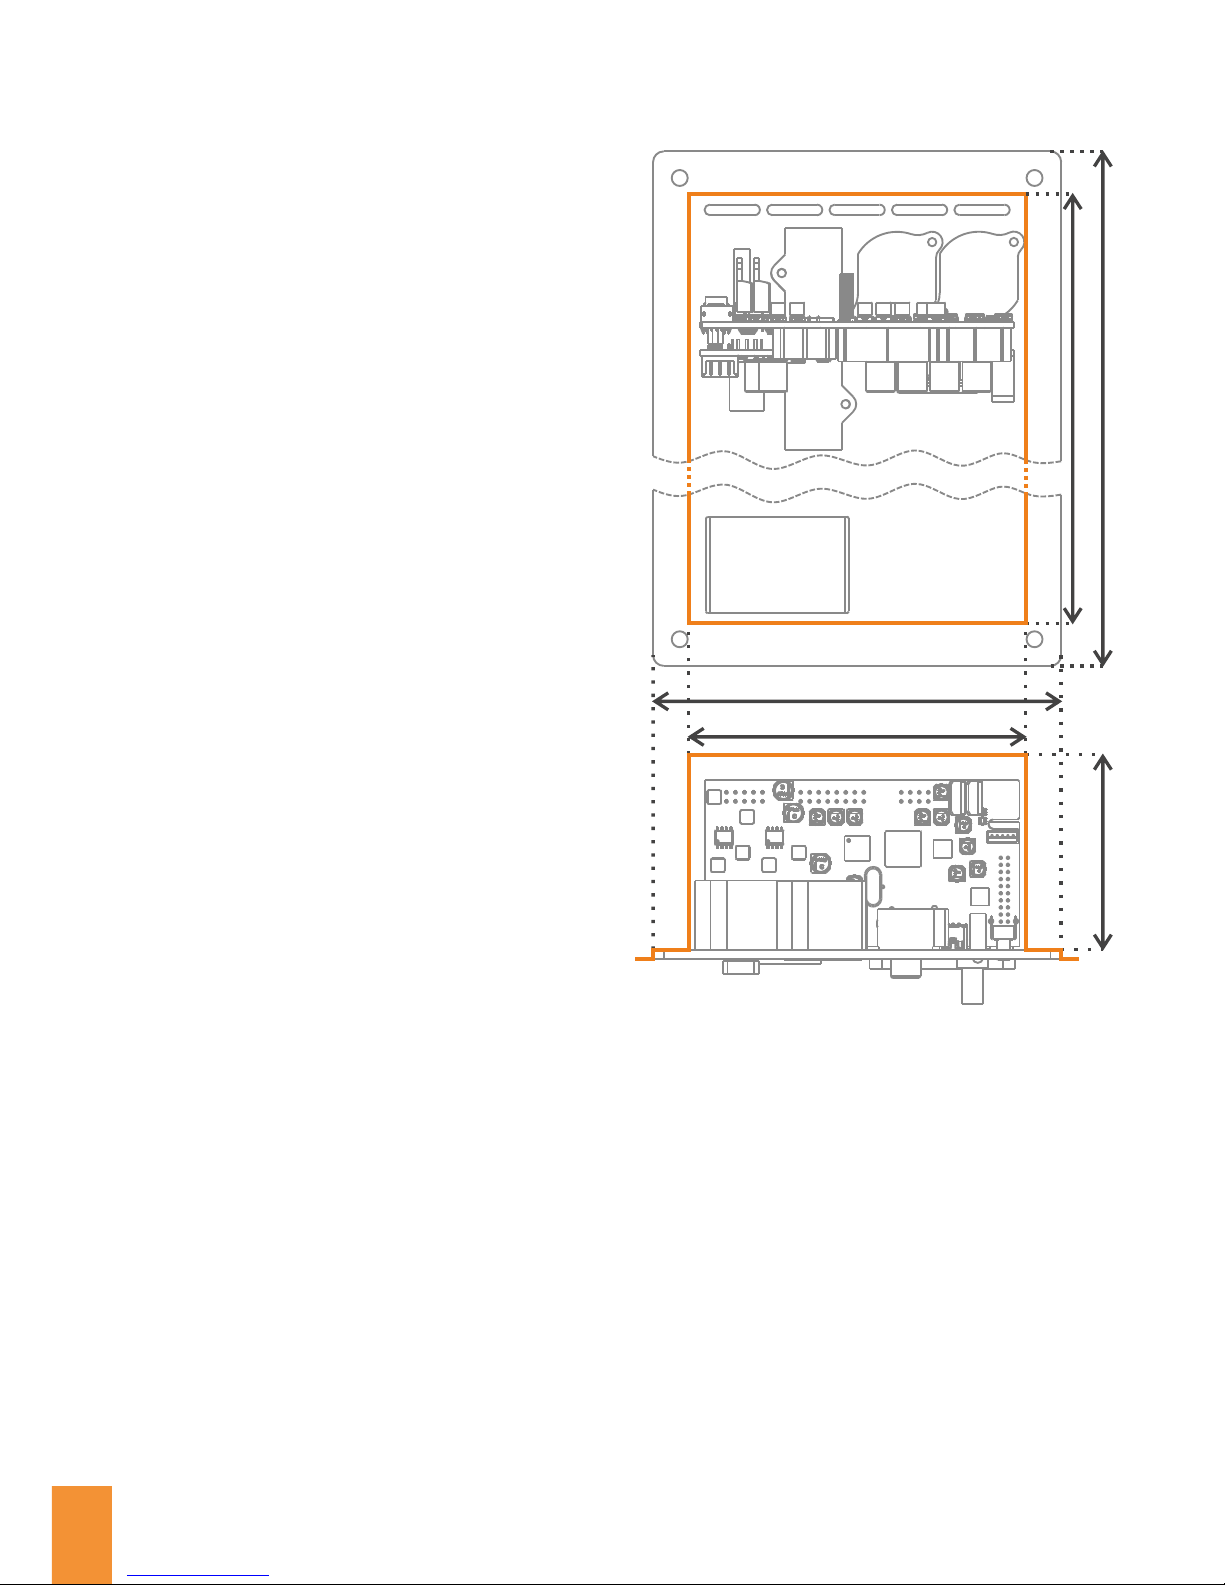
Installation instruction:
For your own safety: never remove the protective
earth connections. Always connect the FusionAmp to
a pow er outle t w ith protective ea rth. Alw ays
disconnect the FusionAmp if serviced.
The F u sionAm p is n o t ai r t i ght. F or op t i mal
performance the module should be installed in a
separate compartment in the speaker cabinet.
All possible conductive parts of the enclosure should
be connected to protective earth. Keep a minimum
clearance of 3 mm to all these possible conductive
parts.
Compartment requirements
The compartment in which the FusionAmp is fitted
sh ould be cons tructed of V- 1 c lass mate rial.
Additionally, a layer of V-0 class
material should be fitted, on the
inner side of the cabinet, at both
sides of the amplifier module.
A l t e r n a t i v e l y , t h e w h o l e
compartment can be made of V-0 class
m a te r i a l or b e t te r . N o t e: th i s
information is given as guideline only.
For exact measurers, please consult
EN-IEC 62368-1:2014, chapter 6.
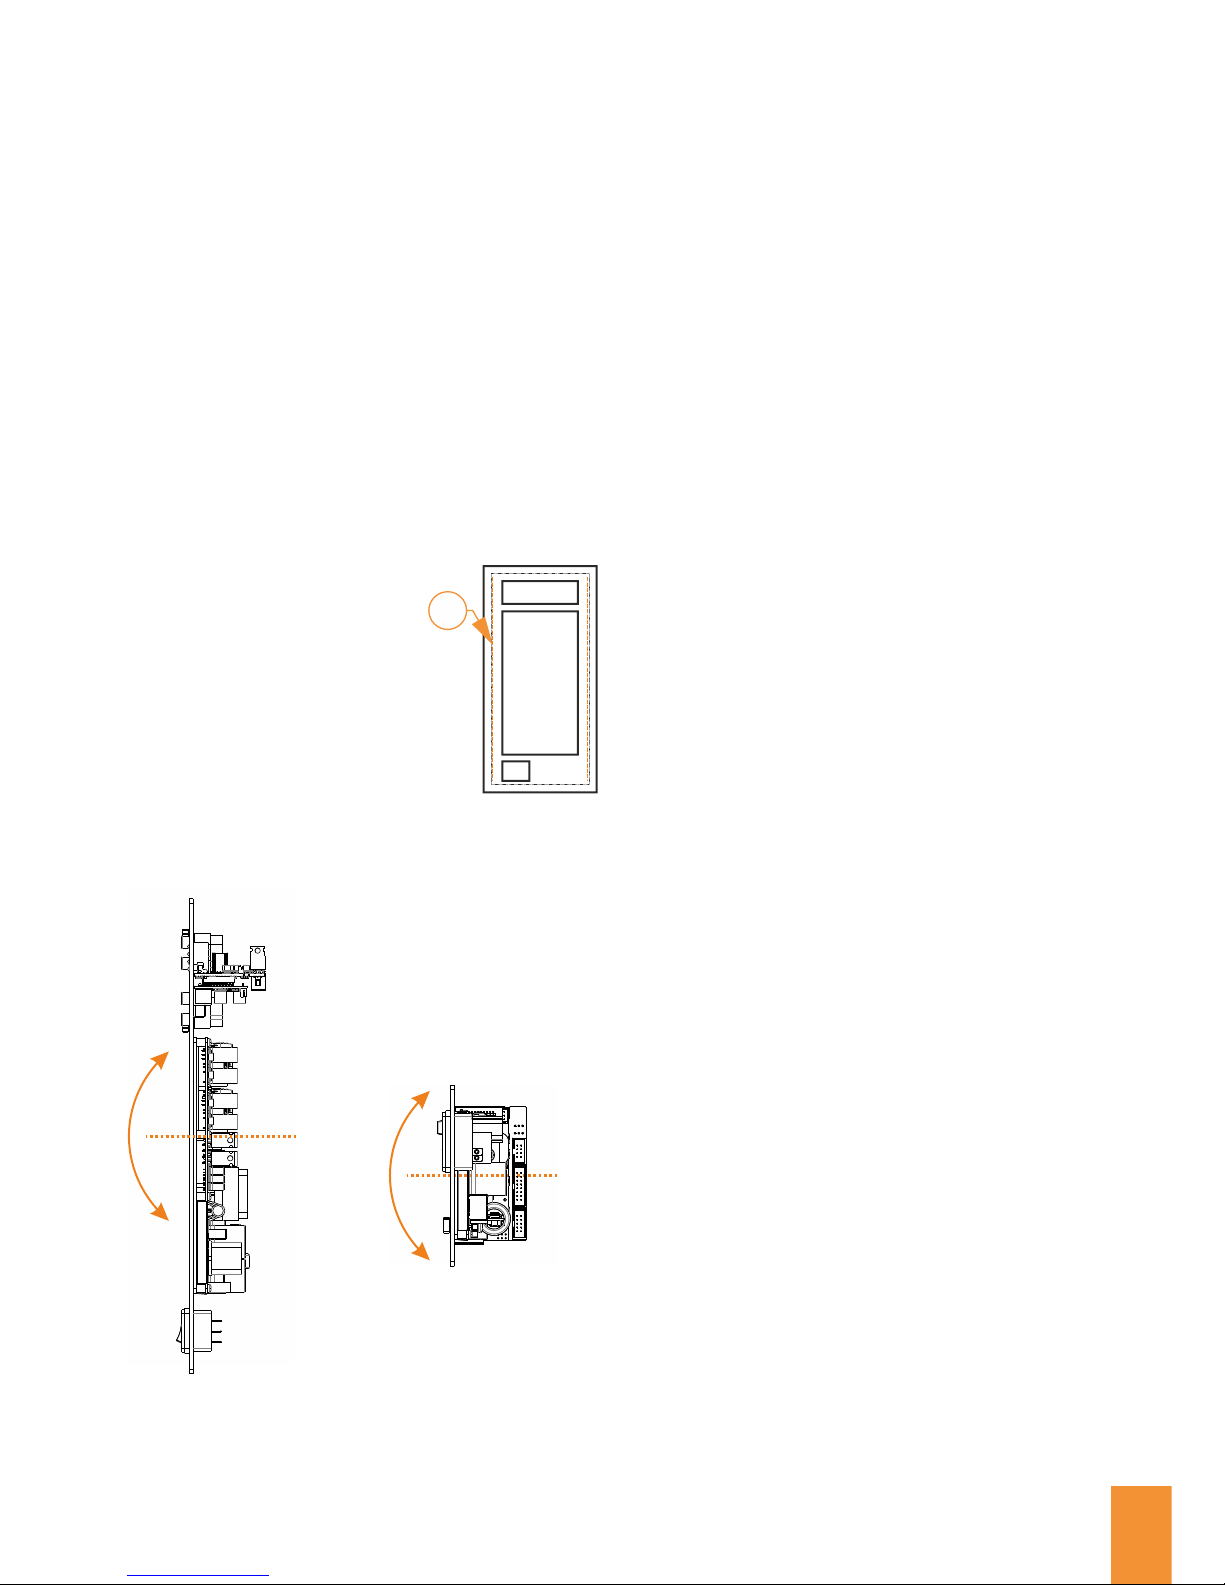
Mounting angles
The FusionAmp is designed to be mounted in vertical
or horizontal position. The FusionAmp may be tilted
45°
E
B
C
D A
ABCDE
FA122
315
12055291
96
mm
FA123
360
12055336
96
mm
FA251
280
12055256
96
mm
FA252
315
13555291
111
mm
FA253
360
13555336
111
mm
FA501
280
13555256
111
mm
FA502
380
15090356
126
mm
FA503
420
15090396
126
mm
Installation
Dimensions:
Size D and E is the recommended milling dimension
for mounting the FusionAmp inside your speaker
cabinet. This leaves 12mm on each side for the
mounting screws.
Weight:
FA122: 815 gr
FA123: 955 gr
FA251: 725 gr
FA252: 1000 gr
FA253: 1145 gr
FA501: 925 gr
FA502: 2150 gr
FA503: 2275 gr
Detailed dimensions are available on our website. We
supply 3D models in .STEP, .ESAM and 3D PDF.
Furthermore, 2D milling and drilling patterns are
available. Please verify all drawings with your model
before you start milling!
12
Page 13
DSP
AMP
V-0
45°
Installation instruction:
For your own safety: never remove the protective
earth connections. Always connect the FusionAmp to
a pow er outle t w ith protective ea rth. Alw ays
disconnect the FusionAmp if serviced.
The F u sionAm p is n o t ai r t i ght. F or op t i mal
performance the module should be installed in a
separate compartment in the speaker cabinet.
All possible conductive parts of the enclosure should
be connected to protective earth. Keep a minimum
clearance of 3 mm to all these possible conductive
parts.
Compartment requirements
The compartment in which the FusionAmp is fitted
sh ould be cons tructed of V- 1 c lass mate rial.
Additionally, a layer of V-0 class
material should be fitted, on the
inner side of the cabinet, at both
sides of the amplifier module.
A l t e r n a t i v e l y , t h e w h o l e
compartment can be made of V-0 class
m a te r i a l or b e t te r . N o t e: th i s
information is given as guideline only.
For exact measurers, please consult
EN-IEC 62368-1:2014, chapter 6.
Mounting angles
The FusionAmp is designed to be mounted in vertical
or horizontal position. The FusionAmp may be tilted
45° in both direction as depicted.
Vent holes should not be covered
and free convection should not
be blocked.
45°
13
Page 14
General recommendations
For best performance, Hypex recommends to twist
the speaker wires per channel. Route the speaker
cables in such a way that the cables and connectors
are not stressed. Preferably route the speaker cable
away from the module, especially the power supply
part.
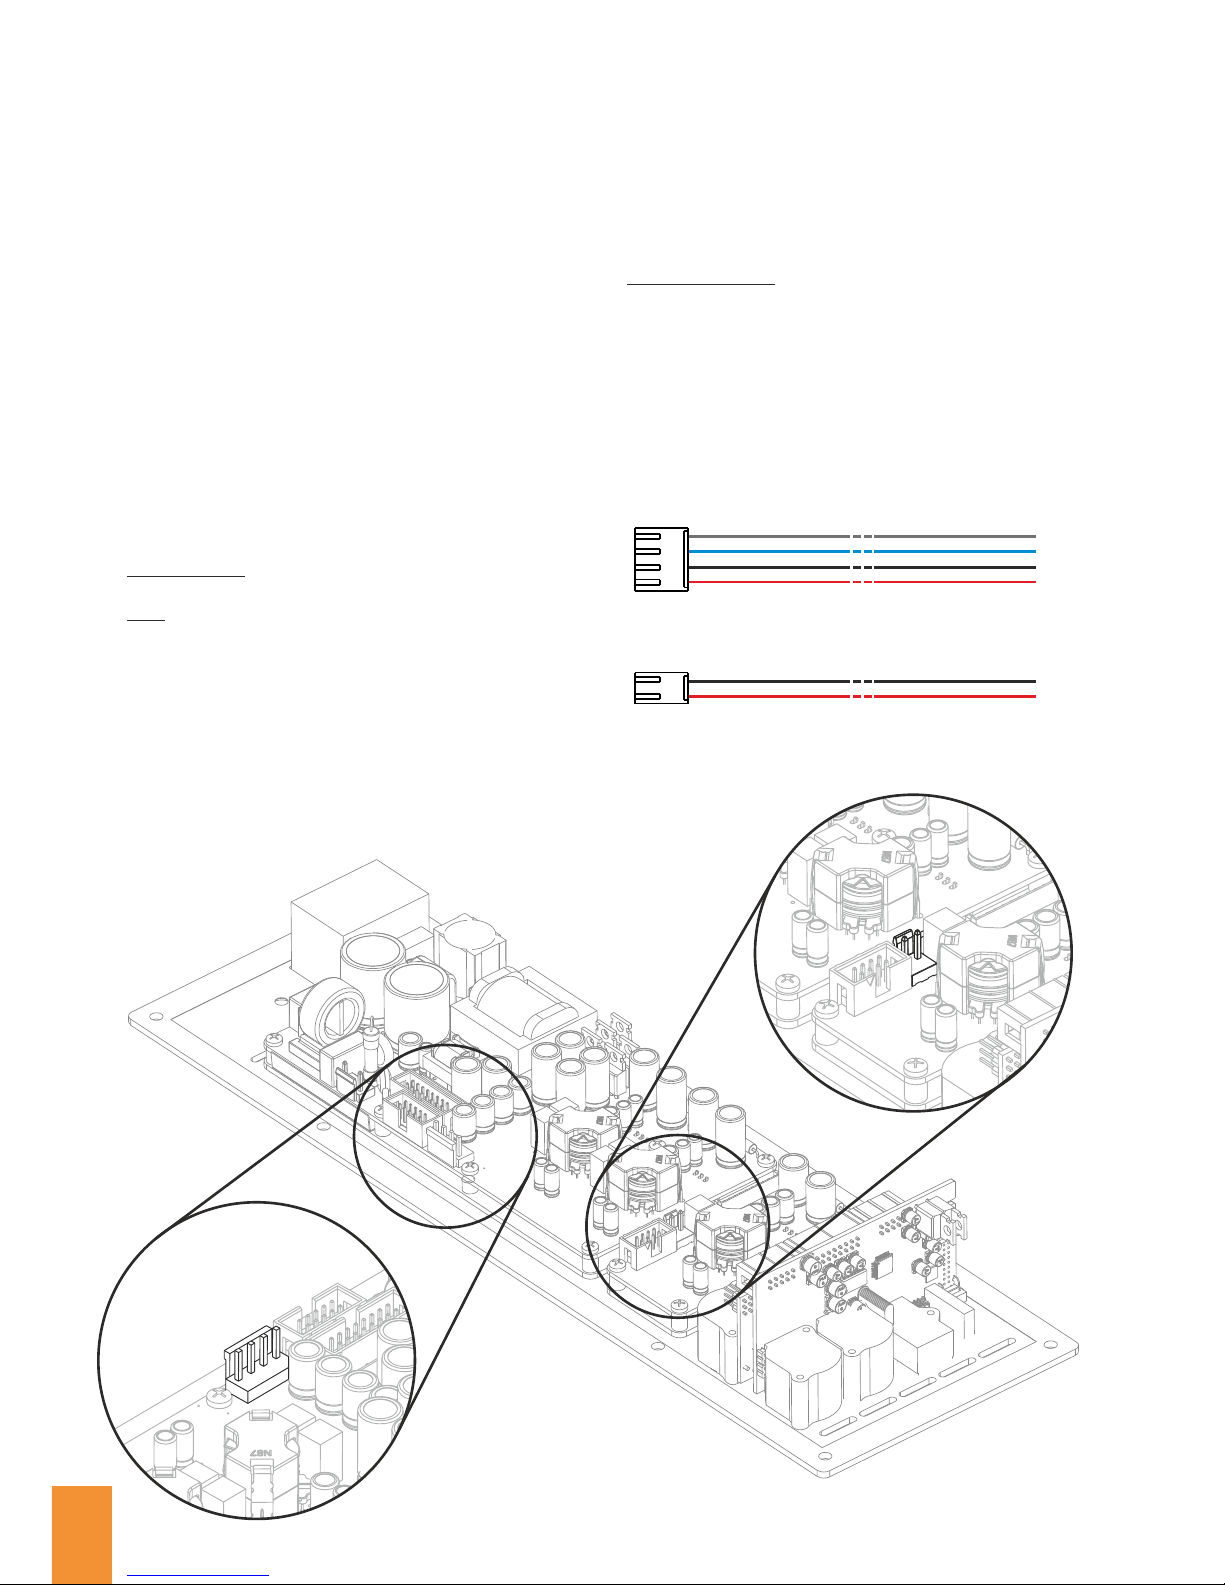
One-way model
The speakers must be connected using the included
cable assembly. Connect to J5 on the main module.
If one woofer is connected, one can remove wire 1
and 2, or bi-wire the speaker by combining wire 1-3
and 2-4.
Two-way model
The speakers must be connected using the included
cable assembly. Connect to J5 on the main module.
Single ended:
Ch1: Red(+) / Black(-), Ch2: Blue(+) / Gray(-).
BTL:
For BTL, the second channel needs to be inverted
using HFD. Connect the woofer between red / blue
(inv).
Connecting speakers
Three-way model
Connect the main amplifiers in the same way as the
two-way model. Additionally connect the third
channel using the included cable assembly. This main
module can also be configured as BTL.
Tweeter channel:
By design, Ncore and thus the NC100HF, has a full
range frequency response and power bandwidth.
However the NC100HF module is designed to be used
for mid- and high frequencies, i.e. starting at
approximately 500Hz. One must make sure that the
applied filter suppresses frequencies below 500Hz.
Cable part#: Z4A125L1
2
125cm, 2.5mm speaker connection cable, included in
all models:
Cable part#: Z2A125L1
2
125cm,1.5mm included in three-way model:
Main module J5: one- and two-way models
Extension J5: three-way models
1
4
red
black
blue
gray
1
red
black
2
14
Page 15

15
Page 16
Advanced system information
This information is given for reference and to guide
you to connect your FusionAmp in the correct way. Do
not modify the internal wiring of the FusionAmp.
Balanced XLR connection:
Neutrik NC3FXX-B or -BAG
Neutrik NC3FXX-B or -BAG
Pinout:
Pin 1: Shield
Pin 2: Positive (+ or hot)
Pin 3: Negative (- or cold)
Input impedance:
XLR Analogue: 44K DM
2M2 CM
AES: 110
Unbalanced RCA connections:
Hypex RCA set Gold or Hypex RCA set Rhodium
Pinout:
Sleeve: Shield (Ground)
Tip: Positive (+ or hot)
Input impedance:
RCA Analogue: 54K
S/PDIF: 75
High level input:
Phoenix contact MSTB 2,5/ 4-ST-5,08
Maximum input level: 50Vrms, 70Vpeak
Speaker connectors:
With your FusionAmp, a standard cable set is included
to connect your speakers to the amplifiers. If you wish
to make your own cables, please use the following
connectors to connect to the amplifiers. Never directly
solder to the connectors of the modules, this will void
your warranty.
Cablepart main amplifier: VHR-4N
Cablepart tweeter amplifier: VHR-2N
Required contact pins: SVH-41T-P1-1
Pin 1: Ls2- Cold Output
Pin 2: Ls2+ Hot Output
Pin 3: Ls1- Cold Output
Pin 4: Ls1+ Hot Output
System requirements:
To configure your FusionAmp, you need a PC with at
least the following requirements:
Windows 7, 8.1 or 10
A free USB 2.0 port
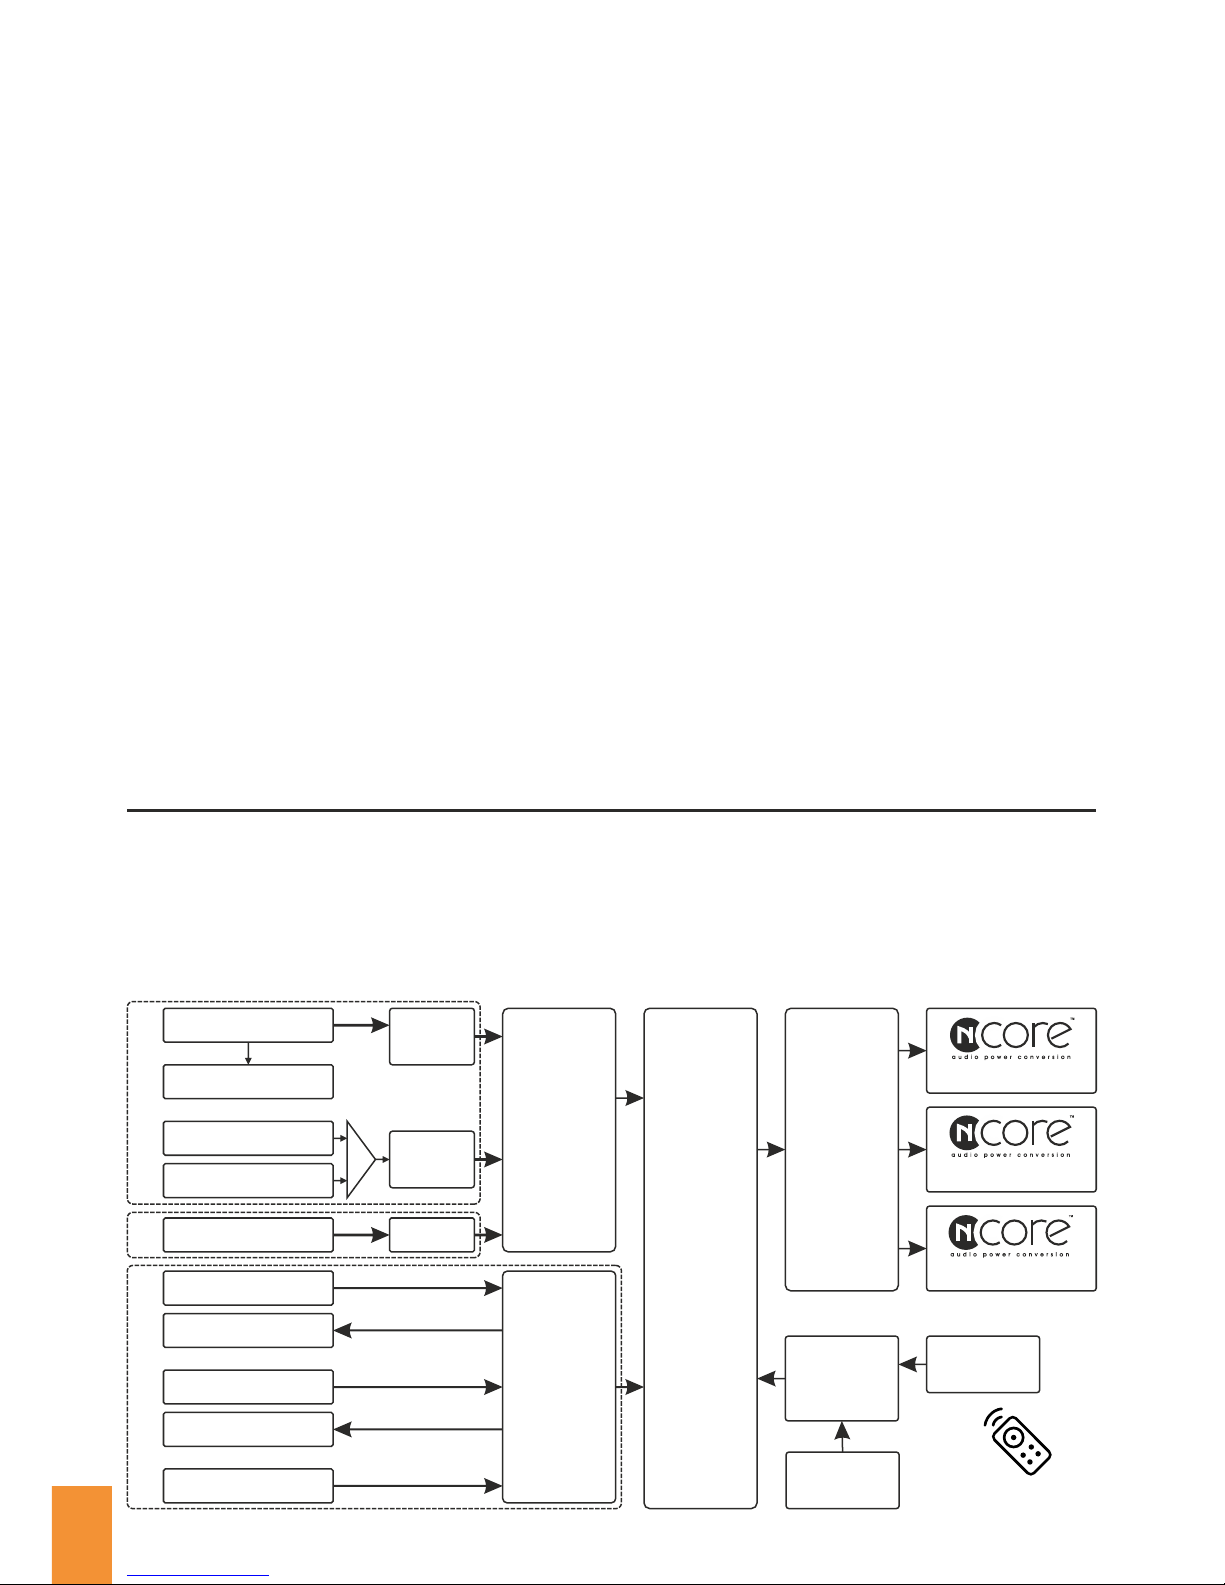
Block diagram
The is block diagram gives a overview of the technical architecture of the FusionAmp. Depending on the model,
the available inputs vary. All models have analogue balanced and unbalanced input. The one-way models have a
additional high level input. The multi-way models feature digital IO. The IR receiver and remote are optional.
The unused DSP/DAC channels of the one- and two-way models are disabled and can not be used for other
purposes.
DSP
DAC
analogue in
through
RCA left
RCA right
ADC
buffer
buffer
USB
uC
AES in
AES out
S/PDIF in
S/PDIF out
optical in
digital
receiver
multichannel
high level in
buffer
1-way all models
Two-Way
Three-Way
One-Way
IR receiver
(optional)
Auto switching Line input power
Low Line input voltage: 100-120Vac ±10%
High Line input voltage: 200-240Vac ±10%
Line input frequency: 47 - 63 Hz
Connector: 3-pin IEC 250Vac, 10A male.
Input power:
FA122, FA123, FA251: 350W max
FA252, FA253, FA501: 650W max
FA502, FA503: 1200W max
Output power in 4 Ohm at < 0,1% THD+N:
FA122: 2x 125Wrms
FA123: 2x 125Wrms + 1x 100Wrms
FA251: 1x 250Wrms
FA252: 2x 250Wrms
FA253: 2x 250Wrms + 1x 100Wrms
FA501: 1x 500Wrms
FA502: 2x 500Wrms
FA503: 2x 500Wrms + 1x 100Wrms
Dimensions and weight
Refer to the installation instruction page.
Chip specification:
DSP: ADAU1450 using external ADC and DAC
ADC: 192kHz 24-Bit Enhanced Dual Bit ADC
SRC: AES/EBU - S/PDIF 192kHz 24-bit
DAC: AK4454 768kHz 32-bit
System information
DSP Filters:
15 biquads per amplifier. A one-way Fusion Amp has
15 biquads, a two-way has 2x15 biquads and a threeway has 3x15 biquads. Amplifiers configured in BTL
still have 15 biquads available.
Maximum delay:
19,2ms per amplifier.
Sample frequency:
Supported digital sampling rates
Fs 32, 44.1, 48, 88.2, 96,192 kHz
All input rates are converted to 93.75kHz
Input latency:
Analogue input approximately 350uS.
Digital input 1,8mS @ 96kHz input sample rate.
Performance:
MBW=20kHz (20Hz-20Khz), unweighted, all filters set
to unity, gain adjust 0dB, unless otherwise specified.
SNR AD/DA -109dB
SNR DA -111dB
THD(D+N) (at -1dBFS) AD/DA -100dB
THD(D+N) (at -1dBFS) DA -102.5dB
16
Page 17
Advanced system information
This information is given for reference and to guide
you to connect your FusionAmp in the correct way. Do
not modify the internal wiring of the FusionAmp.
Balanced XLR connection:
Neutrik NC3FXX-B or -BAG
Neutrik NC3FXX-B or -BAG
Pinout:
Pin 1: Shield
Pin 2: Positive (+ or hot)
Pin 3: Negative (- or cold)
Input impedance:
XLR Analogue: 44K DM
2M2 CM
AES: 110
Unbalanced RCA connections:
Hypex RCA set Gold or Hypex RCA set Rhodium
Pinout:
Sleeve: Shield (Ground)
Tip: Positive (+ or hot)
Input impedance:
RCA Analogue: 54K
S/PDIF: 75
High level input:
Phoenix contact MSTB 2,5/ 4-ST-5,08
Maximum input level: 50Vrms, 70Vpeak
Speaker connectors:
With your FusionAmp, a standard cable set is included
to connect your speakers to the amplifiers. If you wish
to make your own cables, please use the following
connectors to connect to the amplifiers. Never directly
solder to the connectors of the modules, this will void
your warranty.
Cablepart main amplifier: VHR-4N
Cablepart tweeter amplifier: VHR-2N
Required contact pins: SVH-41T-P1-1
Pin 1: Ls2- Cold Output
Pin 2: Ls2+ Hot Output
Pin 3: Ls1- Cold Output
Pin 4: Ls1+ Hot Output
System requirements:
To configure your FusionAmp, you need a PC with at
least the following requirements:
Windows 7, 8.1 or 10
A free USB 2.0 port
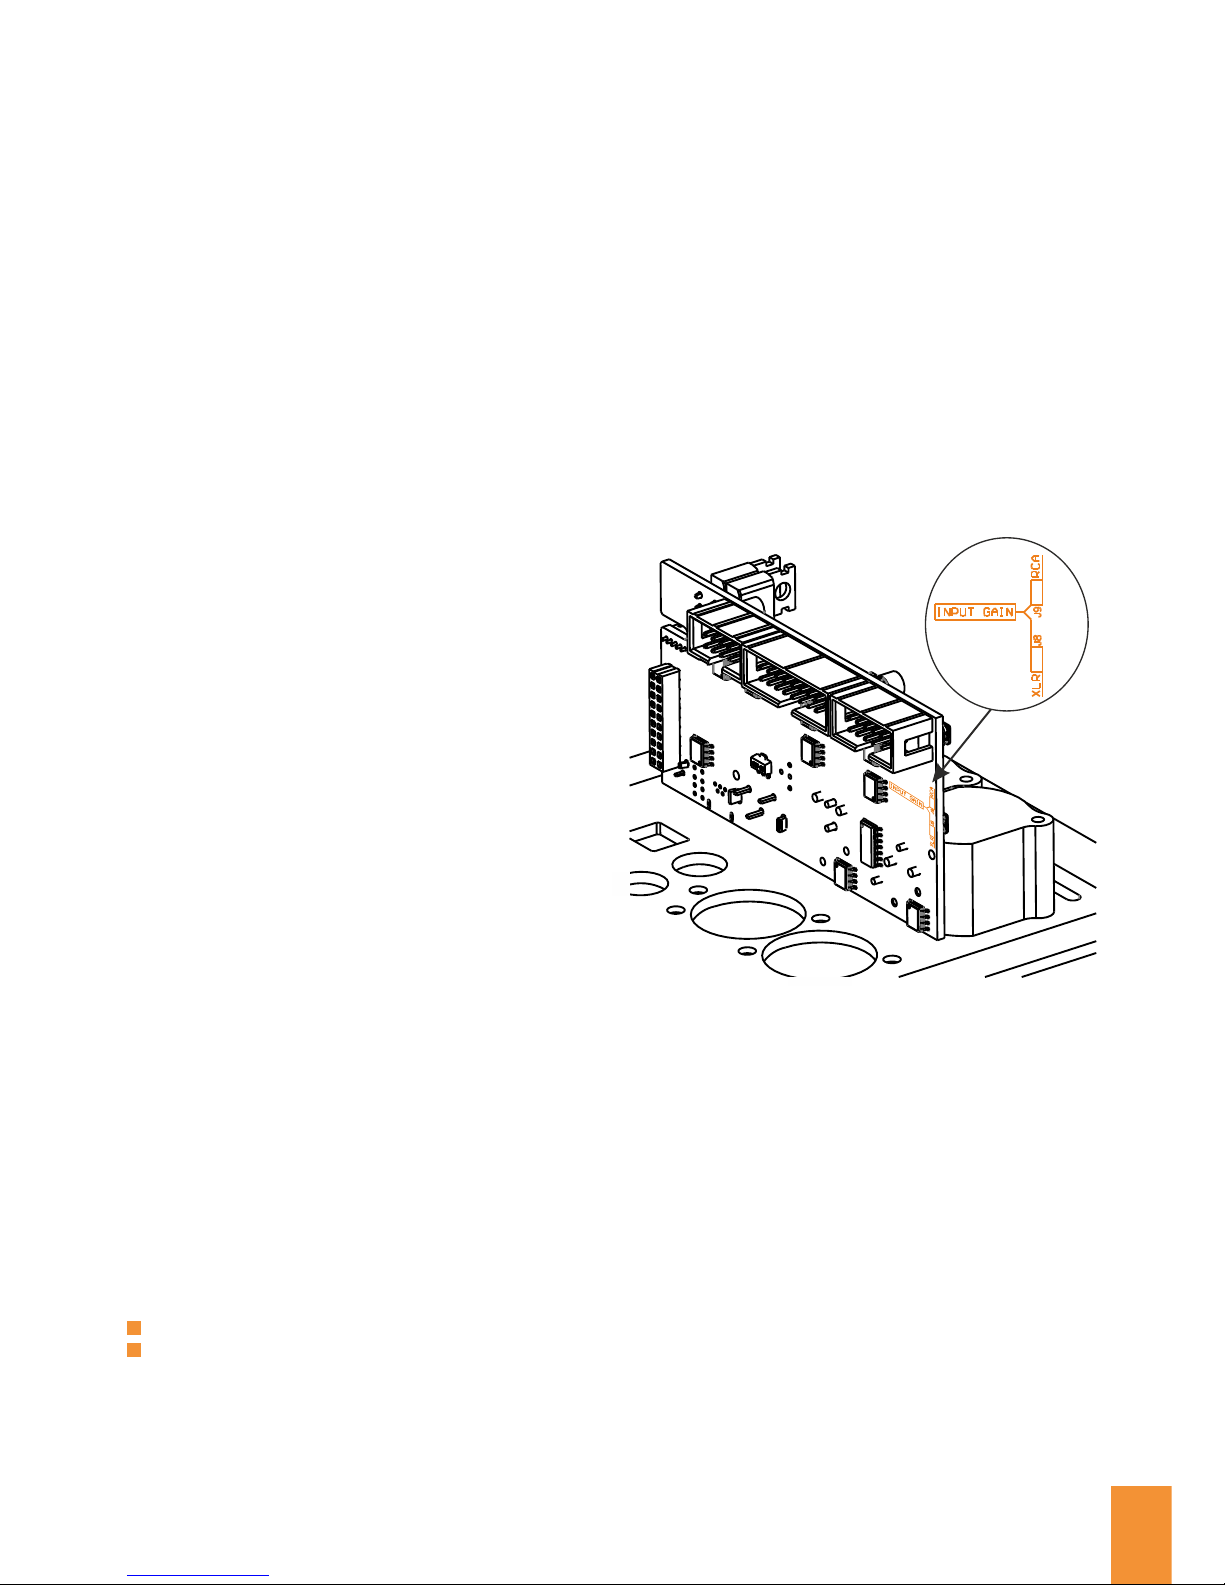
Gain jumper (advanced)
This is an advanced modification. If you are not
familiar with delicate soldering or you do not feel
confident doing this, please ask an expert for
assistance.
Two very small solder jumpers are located on the
bottom side of the upper PCBA. These can be soldered
to decrease the input sensitivity per analogue input.
Out of the box, the jumpers are not soldered.
XLR:
Ÿ un-set: 18 dBu 6.15 Vrms
Ÿ set: 9 dBu 2.18 Vrms
RCA:
Ÿ un-set: 9 dBu 2.18 Vrms
Ÿ set: 2 dBu 0.98 Vrms
17
Onboard amplifiers:
The FusionAmp serie is powered by our range of mains
powered Ncore modules. For more information on
their performance, you can download the relevant
datasheet from our website.
FA122: NC122MP
FA123: NC122MP + NC100HF
FA251: NC250MP
FA252: NC252MP
FA253: NC252MP + NC100HF
FA501: NC500MP
FA502: NC502MP
FA503: NC502MP + NC100HF
Page 18

Hypex Electronics warrants this device for a period of
two years after the original date of purchase against
defects due to faulty workmanship or materials
arising from Normal Use of the device. The warranty
covers working parts that affect the function of the
device. It does NOT cover cosmetic deterioration
caused by fair wear and tear, or damage caused by
accident, misuse or neglect. Any attempt to modify or
take apart the device (or its accessories) will void the
warranty.
If you discover a defect, notify Hypex Electronics
during the warranty period. Claims under warranty
must be supported by reasonable evidence that the
date of the claim is within the warranty period. To
validate your warranty, please keep your original
purchase receipt together with these warranty
conditions for the duration of the warranty period.
Replacement products claimed under warranty are
not entitled to renewed 2-year warranty coverage.
Date of purchase:
Limited Warranty Revisions
Hypex Electronics BV, its affiliates, agents, and
employees, and all persons acting on its or their behalf
(collectively,“Hypex Electronics”), disclaim any and
all li a bil i ty f or a ny err o rs, in a ccu r aci e s o r
incompleteness contained in any datasheet or in any
other disclosure relating to any product.
This subassembly is designed for use in music
reproduction equipment only. No representations are
made as to fitness for other uses. Except where noted
otherwise any specifications given pertain to this
subassembly only. Responsibility for verifying the
performance, safety, reliability and compliance with
leg a l st a ndar d s o f en d pro d uct s usi n g t h i s
subassembly falls to the manufacturer of said end
product.
LIFE SUPPORT POLICY: Use of Hypex products in life
support equipment or equipment whose failure can
reasonably be expected to result in injury or death is
not permitted except by explicit written consent from
Hypex Electronics BV.
Disclaimer
Revision
Comment
Date
Doc.
HW.
00
00xx
Pre-release
01-02-2017
01
00xx
Pre-release update
08-03-2018
No power:
Ÿ Check the power outlet
Ÿ The internal fuse may be blown. This fuse is not
user replaceable. Please contact Hypex
Electronics for more information about service
and repair.
No Sound
Ÿ A protection might be triggered. Is the module
overheated?
Ÿ Verify the gain settings.
Ÿ Is the DSP muted?
Ÿ Check the source signal.
Ÿ Check the cables.
Ÿ Is there a filter installed in the DSP?
Poor sound or noise
Ÿ Check your filters
Ÿ Check if the signal is not inverted. Inverted
signals might cause one of your woofers to be
out-of-phase.
Ÿ Clip?
Ÿ Check all connections.
Hum
Use balanced connections for best system
performance.
Troubleshooting
We continuously work to improve your experience
with the FusionAmp. If you have suggestions, remarks
or found a bug, please contact us.
If you have problems with your FusionAmp, please
first make sure your have the latest version of HFD
and you have updated t h e firm w a r e of your
FusionAmp. If you need to update your firmware,
please follow the instruction carefully.
Do you need additional assistance with assembling or
configuring your FusionAmp?
Visit our website!
The latest datasheets, manuals, 3D models can be
found there. Look into our FAQ and if you can not find
the answer there, you can also contact us and we will
be happy to assist you!
Support
Frequently asked questions
Why is there not a FusionAmp with one
Q
NC250MP or NC500MP, with an additional
NC100HF?
Since the FA123 and FA253 can be configured in
A BTL, one can achieve the same result with better
audio performance with these models. In
addition, e.g. a NC250MP with NC100HF would
result in a larger plate compared to a FA252,
whilst having a lower specification.
Q
The DSP used in the FusionAmp is capable of
processing FIR filters, why is this not supported
in the FusionAmp?
The DSP used in the FusionAmp does indeed
A support FIR filtering, however due to several
design choices and internal software functions, a
percentage of the processing capabilities of the
DSP is reserved. Because of this, the remaining
amount of resources are too limited for a FIR
filter of proper use.
18
Page 19

Hypex Electronics warrants this device for a period of
two years after the original date of purchase against
defects due to faulty workmanship or materials
arising from Normal Use of the device. The warranty
covers working parts that affect the function of the
device. It does NOT cover cosmetic deterioration
caused by fair wear and tear, or damage caused by
accident, misuse or neglect. Any attempt to modify or
take apart the device (or its accessories) will void the
warranty.
If you discover a defect, notify Hypex Electronics
during the warranty period. Claims under warranty
must be supported by reasonable evidence that the
date of the claim is within the warranty period. To
validate your warranty, please keep your original
purchase receipt together with these warranty
conditions for the duration of the warranty period.
Replacement products claimed under warranty are
not entitled to renewed 2-year warranty coverage.
Date of purchase:
Limited Warranty Revisions
Notes
Hypex Electronics BV, its affiliates, agents, and
employees, and all persons acting on its or their behalf
(collectively,“Hypex Electronics”), disclaim any and
all li a bil i ty f or a ny err o rs, in a ccu r aci e s o r
incompleteness contained in any datasheet or in any
other disclosure relating to any product.
This subassembly is designed for use in music
reproduction equipment only. No representations are
made as to fitness for other uses. Except where noted
otherwise any specifications given pertain to this
subassembly only. Responsibility for verifying the
performance, safety, reliability and compliance with
leg a l st a ndar d s o f en d pro d uct s usi n g t h i s
subassembly falls to the manufacturer of said end
product.
LIFE SUPPORT POLICY: Use of Hypex products in life
support equipment or equipment whose failure can
reasonably be expected to result in injury or death is
not permitted except by explicit written consent from
Hypex Electronics BV.
Disclaimer
Revision
Comment
Date
Doc.
HW.
00
00xx
Pre-release
01-02-2017
01
00xx
Pre-release update
08-03-2018
19
Page 20
Hypex Electronics BV
Kattegat 8
9723 JP Groningen, The Netherlands
+31 50 526 4993
[email protected]
www.hypex.nl
 Loading...