

Page 1
HyperX Cloud Stinger Core
Wireless Gaming Headset + 7.1
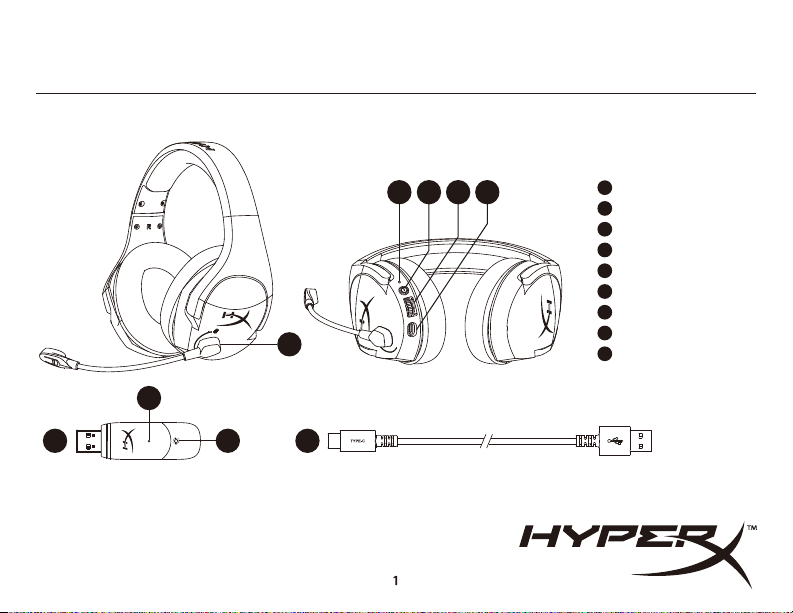
Overview
B C D E
A
G
Quick Start Guide
A
Swivel to mute microphone
Status LEDB
C
Power button
D
Volume wheel
E
USB charge port
F
USB adapter
G
Wireless pairing pin hole
H
Wireless status LED
I
USB charge cable
F
4402168B
H
I
Page 2
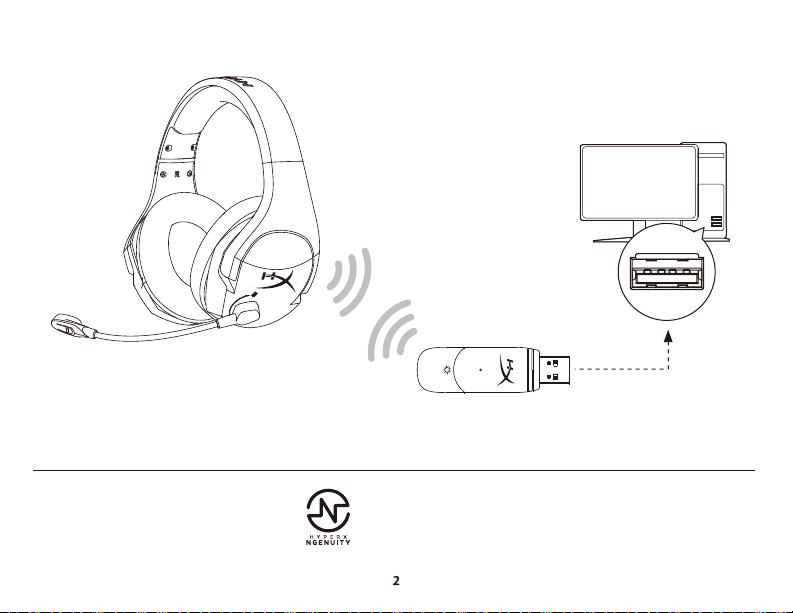
Using the Headset
HyperX NGENUITY Software
Download software and latest rmware updates at
hyperxgaming.com/ngenuity
1. Connect the wireless USB adapter to your device.
2. Power on the headset.
Page 3
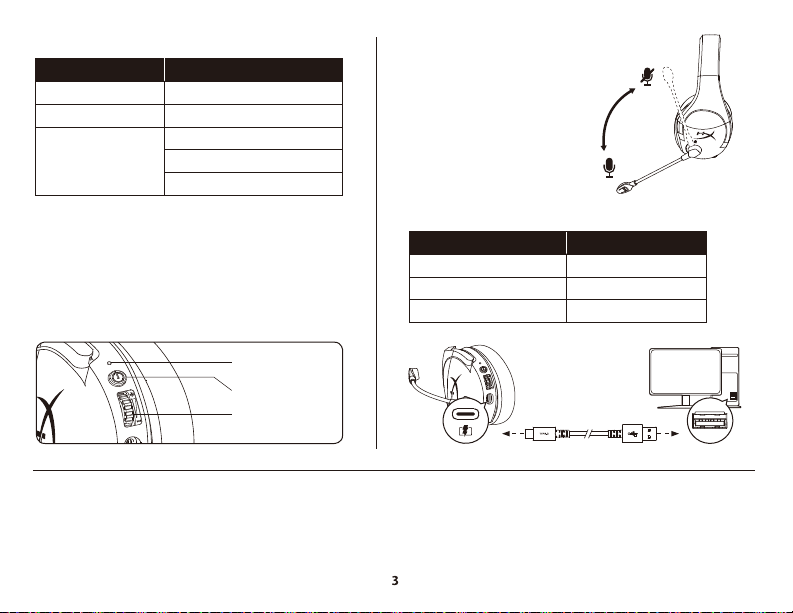
Status LED
HEADSET STATUS
Pairing
Searching
Connected
Flashing green and red every 0.2s
90% — 100% battery: Solid green
15% — 90% battery: Blinking green
LED
Slow breathing green
< 15% battery: Blinking red
Power Button
Power on/o – Hold power button for 3 seconds
Volume Wheel
Scroll up or down to adjust volume level.
WARNING: Permanent hearing damage can occur if a headset is used at
high volumes for extended periods of time.
Status LED
Power button
Volume wheel
Questions or Setup Issues?
Contact the HyperX support team at hyperxgaming.com/support/headsets
Swivel to Mute Microphone
Charging
It is recommended to fully charge your headset before rst use.
CHARGE STATUS
Fully charged
15% — 99% battery
< 15% battery
LED
Solid green
Breathing green
Breathing red
Page 4
English
Overview
A - Swivel to mute microphone
B - Status LED
C - Power button
D - Volume wheel
E - USB charge port
F - USB adapter
G - Wireless pairing pin hole
H - Wireless status LED
I - USB charge cable
Using the Headset
1. Connect the wireless USB adapter to your device.
2. Power on the headset.
HyperX NGENUITY Software
Download software and latest rmware updates at
hyperxgaming.com/ngenuity
Status LED
HEADSET STATUS LED
Searching
Connected
Power Button
Power on/o – Hold power button for 3 seconds
Volume Wheel
Scroll up or down to adjust volume level.
WARNING: Permanent hearing damage can occur if a headset is used at
high volumes for extended periods of time.
Flashing green and red every 0.2sPairing
Slow breathing green
90% – 100% battery: Solid green
15% – 90% battery: Blinking green
< 15% battery: Blinking red
Swivel to Mute Microphone
Charging
It is recommended to fully charge your headset before rst use.
CHARGE STATUS LED
Questions or Setup Issues?
Contact the HyperX support team at
hyperxgaming.com/support/headsets
Solid greenFully charged
Breathing green15% – 99% battery
Breathing red< 15% battery
Page 5

FRANÇAIS
Présentation
A - Microphone avec coupure audio par pivot
B - État LED
C - Bouton Marche/Arrêt
D - Molette de réglage du volume
E - Port de chargement USB
F - Adaptateur USB
G - Accès par jumelage sans l
H - État Sans l LED
I - Câble de chargement USB
Utilisation du casque-micro
1. Connectez l'adaptateur USB sans l à votre dispositif.
2. Allumez le casque-micro.
Logiciel HyperX NGenuity
Téléchargez le logiciel et la dernière mise à jour du rmware depuis la
page hyperxgaming.com/ngenuity
État LED
ÉTAT CASQUEMICRO LED
Recherche en cours
Connecté
Bouton Marche/Arrêt
Marche/Arrêt : maintenez le bouton Marche/Arrêt enfoncé pendant
environ 3 secondes.
Molette de réglage du volume
Glissez vers le haut ou le bas pour régler le volume sonore.
AVERTISSEMENT : L'exposition prolongée à des niveaux sonores élevés
peut provoquer une détérioration irréversible de la capacité auditive.
Clignotement vert et rouge avec un intervalle de 0,2 sJumelage
Respiration lente Vert
Batterie 90% – 100% : Vert xe
Batterie 15% – 90% : Clignotement vert
Batterie < 15% : Clignotement rouge
Microphone avec coupure audio par pivot
Chargement en cours
Il est recommandé de charger complètement votre casque-micro avant
sa première utilisation.
ÉTAT CHARGEMENT LED
Questions ou problèmes de conguration ?
Contactez l'équipe de support HyperX à l'adresse
hyperxgaming.com/support/headsets
Vert xeCharge pleine
Respiration vertBatterie 15% – 99% :
Respiration rougeBatterie < 15% :
ITALIANO
Descrizione generale del prodotto
A - Microfono con sistema di silenziamento voce a rotazione "Swivel-to-mute"
B - LED di stato
C - Pulsante di accensione
D - Manopola di regolazione volume
E - Porta USB con funzione di ricarica
F - Adattatore USB
G - Ingresso spinotto di accoppiamento wireless
H - LED dello stato wireless
I - Cavo di ricarica USB
Uso delle cue
1. Connettere l'adattatore wireless USB al dispositivo.
2. Accendere le cue.
Software HyperX NGENUITY
Scaricare aggiornamenti del software e rmware all'indirizzo
hyperxgaming.com/ngenuity
Page 6

LED di stato
STATO DELLE CUFFIE LED
Ricerca in corso
Connessione stabilita
Pulsante di accensione
Accensione/spegnimento - Tenere premuto il pulsante di
accensione per 3 secondi
Manopola di regolazione volume
Scorrere verso l'alto/basso per regolare il livello del volume.
ATTENZIONE: l'uso delle cue ad alto volume per periodi di tempo
prolungati può causare danni permanenti all'udito.
Rossa e verde lampeggianti ogni 0,2sCollegamento
Verde lampeggiante lenta
Autonomia residua tra 90% e 100%: Verde sso
Autonomia residua tra 15% e 90%: Verde lampeggiante
Autonomia residua inferiore a 15%:Rosso (lampeggiante)
Microfono con sistema di silenziamento voce a rotazione
In ricarica
In occasione del primo utilizzo, si consiglia di eettuare un ciclo di
ricarica completo.
STATO DI RICARICA LED
Avete altre domande o dubbi sulla congurazione?
Contattare il Team di supporto HyperX all'indirizzo web
hyperxgaming.com/support/headsets
Verde ssoCarica completa
Verde lampeggianteAutonomia residua tra 15% e 99%
Rosso lampeggianteAutonomia residua inferiore al 15%
DEUTSCH
Übersicht
A - Mikrofon mit Stummschaltung durch Hochklappen
B - Status LED
C - An-/Ausschalter
D - Lautstärkeregler
E - USB-Ladeanschluss
F - USB-Adapter
G - Stiftloch für drahtlose Kopplung
H - Kabellos-Status LED
I - USB-Ladekabel
Verwendung des Headsets
1. Verbinde den kabellosen USB-Adapter mit deinem Gerät.
2. Schalte das Headset ein.
HyperX NGENUITY Software
Lade die Software und die neuesten Firmware-Updates herunter
unter hyperxgaming.com/ngenuity
Status-LED
HEADSETSTATUS LED
Suche läuft
Verbunden
An-/Ausschalter
Ein-/Ausschalten – Halte den An-/Ausschalter 3 Sekunden lang gedrückt.
Lautstärkeregler
Scrolle nach oben und unten, um die Lautstärke zu ändern.
ACHTUNG: Durch Hören mit Kopfhörern in hoher Lautstärke über einen
längeren Zeitraum kann das Gehör dauerhaft geschädigt werden.
Blinkt alle 0,2 Sek. grün und rotKopplung läuft
Langsam pulsierendes Grün
90% – 100% Batterie: Konstant grün
15% – 90% Batterie: Blinkt grün
< 15% Batterie: Blinkt rot
Mikrofon mit Stummschaltung durch Hochklappen
Page 7

Wird geladen
Es wird empfohlen, dein Headset vollständig zu laden, bevor du es zum
ersten Mal verwendest.
LADESTATUS LED
Fragen oder Probleme bei der Einrichtung?
Wende dich an das HyperX Supportteam unter
hyperxgaming.com/support/headsets
Durchgehend GrünVoll geladen
Pulsierend Grün15% – 99% Batterie
Pulsierend Rot< 15% Batterie
POLSKI
Prezentacja
A - Mikrofon wyciszany przez podniesienie ramienia
B - Wskaźnik stanu LED
C - Przycisk zasilania
D - Pokrętło głośności
E - Port USB do ładowania
F - Adapter USB
G - Otwór na szpilkę do kojarzenia urządzeń bezprzewodowych
H - Wskaźnik stanu łączności bezprzewodowej LED
I - Przewód USB do ładowania
Korzystanie ze słuchawek
1. Podłącz adapter USB (moduł łączności bezprzewodowej) do urządzenia.
2. Włącz zestaw słuchawkowy.
Oprogramowanie HyperX NGENUITY
Pobierz aplikację i najnowsze oprogramowanie sprzętowe na stronie
hyperxgaming.com/ngenuity
Wskaźnik LED stanu
STAN ZESTAWU SŁUCHAWKOWEGO LED
Wyszukiwanie
Połączenie
Przycisk zasilania
Aby włączyć lub wyłączyć zestaw słuchawkowy: naciśnij i przytrzymaj
przycisk zasilania przez 3 sekundy
Pokrętło głośności
Pokręć w górę lub w dół, aby dostosować głośność dźwięku.
OSTRZEŻENIE: Używanie słuchawek przez dłuższy czas przy wysokiej
głośności może spowodować trwałe uszkodzenie słuchu.
Błyska naprzemiennie kolorem zielonym i czerwonym co 0,2 sKojarzenie
Pulsuje powoli kolorem zielonym
Bateria naładowana w 90%–100%: świeci ciągłym zielonym światłem
Bateria naładowana w 15%–90%: miga zielonym światłem
Bateria naładowana <15%: miga czerwonym światłem
Mikrofon wyciszany przez podniesienie ramienia
Ładowanie
Przed rozpoczęciem użytkowania zestawu słuchawkowego zalecamy
jego pełne naładowanie.
STAN ŁADOWANIA LED
Pytania? Problemy z konguracją?
Skontaktuj się z działem pomocy technicznej HyperX na stronie
hyperxgaming.com/support/headsets
Świeci ciągłym zielonym światłemPełne naładowanie
Pulsuje kolorem zielonymBateria naładowana w 15%–90%
Pulsuje kolorem czerwonymBateria naładowana w <15%
Page 8

ESPAÑOL
Resumen
A - Micrófono que al girar se pone en modo mudo
B - LED de estado
C - Botón de encendido
D - Perilla de volumen
E - Puerto de carga USB
F - Adaptador USB
G - Oricio para la clavija de emparejamiento inalámbrico
H - LED de estado inalámbrico
I - Cable de carga USB
Cómo usar los audífonos
1. Conecta el adaptador USB inalámbrico a tu dispositivo
2. Enciende los audífonos.
Software HyperX NGENUITY
Descarga el software y las últimas actualizaciones del rmware en
hyperxgaming.com/ngenuity
LED de estado
ESTADO DE LOS AUDÍFONOS LED
Buscando
Conectado
Botón de encendido
Apagado/Encendido - Mantener presionado el botón de encendido
durante 3 segundos
Perilla de volumen
Deslízate hacia arriba y abajo para ajustar el nivel del micrófono.
ADVERTENCIA: Si los audífonos se utilizan a volúmenes altos durante
periodos de tiempo prolongados, existe la posibilidad de sufrir daño
auditivo permanente.
Titila de color verde y rojo de manera cada 0,2sEmparejando
Respiración verde suave
90% –100% de batería: Verde sólido
15% –90% de batería: Verde parpadeante
< 15% batería: Rojo parpadeante
Micrófono que al girar se pone en modo mudo
Cargando
Se recomienda cargar totalmente tus audífonos antes del primer uso.
ESTADO DE CARGA LED
¿Tienes alguna pregunta o consulta sobre la instalación?
Pónte en contacto con el equipo de ayuda de HyperX en
hyperxgaming.com/support/headsets
Verde sólidoTotalmente cargado
Respiración Verde15% –99% de batería
Respiración Roja< 15% batería
PORTUGUÊS
Visão geral
A - Gire para colocar o microfone em mudo
B - Status LED
C - Botão liga/desliga
D - Botão de volume
E - Porta de carregamento USB
F - Adaptador USB
G - Furo do pino para pareamento wireless
H - Status da conexão sem o LED
I - Cabo de carregamento USB
Usando o Headset
1. Conecte o adaptador USB sem o ao seu dispositivo.
2. Ligue o headset.
Software HyperX NGENUITY
Faça o download do software e das últimas atualizações do rmware em
hyperxgaming.com/ngenuity
Page 9

LED de status
STATUS DO HEADSET LED
Pesquisando
Conectado
Botão de Energia
Ligar/Desligar - Mantenha pressionado o botão liga/desliga por 3 segundos
Botão de volume
Role para cima e para baixo para ajustar o nível do volume.
AVISO: Em caso de uso prolongado em alto volume, o headset pode
causar danos permanentes ao aparelho auditivo.
Piscando em verde e vermelho a cada 0,2 segundosPareamento
Respiração lenta em verde
90% – 100% da bateria: verde sólido
15% – 90% da bateria: verde piscando
< 15% bateria: vermelho piscando
Gire para colocar o microfone em mudo
Carregando
Recomenda-se carregar totalmente o headset antes do primeiro uso.
STATUS DA CARGA LED
Dúvidas ou Problemas na Instalação?
Contate a equipe de suporte HyperX em
hyperxgaming.com/support/headsets
Verde sólidoTotalmente carregado
Respiração em verde15% – 99% bateria
Respiração em vermelho < 15% bateria
ČEŠTINA
Přehled
A - Otočit pro ztlumení mikrofonu
B - Stav LED
C - Vypínač
D - Kolečko pro ovládání hlasitosti
E - Dobíjecí port USB
F - USB adaptér
G - Otvor bezdrátového párování
H - Bezdrátový režim LED
I - Dobíjecí kabel USB
Použití sluchátek
1. Připojte bezdrátový USB adaptér k zařízení.
2. Zapni náhlavní soupravu.
Software HyperX NGENUITY
Stáhnout software a nejnovější aktualizace rmwaru na
hyperxgaming.com/ngenuity
Kontrolka stavu
STAV SLUCHÁTEK LED
Hledání
Připojeno
Vypínač
Vypnutí/zapnutí – přidrž stlačeně vypínač po dobu 3 sekund
Kolečko pro ovládání hlasitosti
Otáčejte nahoru nebo dolů pro nastavení hlasitosti.
VAROVÁNÍ: Pokud náhlavní soupravu používáte dlouhodobě s
nastavením vysoké hlasitosti, může dojít k trvalému poškození sluchu.
Blikající zelená a červená každé 0,2 sek.Párování
Pomalu pulzující zelená
Baterie 90 % – 100 %: Nepřetržitě svítící zelená
Baterie 15 % – 90 %: Blikající zelená
Baterie <15 %: Blikající červená
Otočit pro ztlumení mikrofonu
Page 10

Nabíjení
Před prvním použitím doporučujeme náhlavní soupravu plně dobít.
STAV DOBÍJENÍ LED
Otázky nebo problémy s nastavením?
Kontaktujte tým podpory HyperX na adrese
hyperxgaming.com/support/headsets
Nepřetržitě svítící zelenáPlně nabito
Pulzující zelenáBaterie 15 % – 99 %
Pulzující červenáBaterie <15 %
УКРАЇНСЬКА
Огляд
A - Механізм із поворотним вимкненням мікрофона
B - Стан LED
C - Кнопка живлення
D - Коліщатко регулювання гучності
E - Зарядний USB-роз’єм
F - USB-адаптер
G - Маленький отвір під голку для бездротового з’єднання
H - Стан бездротового зв’язку LED
I - Зарядний USB-кабель
Використання гарнітури
1. Під’єднайте бездротовий USB-адаптер до свого пристрою.
2. Увімкніть гарнітуру.
Програмне забезпечення HyperX NGENUITY
Завантажте програмне забезпечення та останню версію прошивки
з сайту hyperxgaming.com/ngenuity
Світлодіод індикації стану
LED
Пошук
Підключено
Кнопка живлення
Увімкнення/вимкнення живлення – утримуйте кнопку натиснутою
протягом 3 секунд
Коліщатко регулювання гучності
Прокрутіть вгору або вниз, щоб відрегулювати рівень гучності.
ПОПЕРЕДЖЕННЯ! Використання навушників за великого рівня гучності
протягом довгого періоду часу може призвести до тривалого
погіршення слуху.
Блимає зелений та червоний індикатор кожні 0,2 сЗ’єднання
Миготить повільно зелений індикатор
90 % – 100 % заряду акумулятора: Постійно горить зелений індикатор
15 % – 90 % заряду акумулятора: Блимає зелений індикатор
< 15 % заряду акумулятора: Блимає червоний індикатор
Механізм із поворотним вимкненням мікрофона
Заряджання
Рекомендується повністю зарядити гарнітуру перед першим
використанням.
LED
Виникли питання або проблеми під час установки?
Зверніться до служби підтримки HyperX на сайті
hyperxgaming.com/support/headsets
Постійно горить зелений індикаторПовністю заряджено
Миготить зелений індикатор15 % – 99 % заряду акумулятора
Миготить червоний індикатор< 15 % заряду акумулятора
Page 11

РУССКИЙ
Обзор
A - Микрофон с поворотным отключением
B - Светодиодный индикатор состояния
C - Кнопка питания
D - Колесико регулятора громкости
E - USB-порт зарядки
F - USB-адаптер
G - Отверстие для сопряжения беспроводного устройства
H - Беспроводной светодиодный индикатор состояния
I - USB-кабель для зарядки
Использование гарнитуры
1. Подключите беспроводной USB-адаптер к своему устройству.
2. Включите питание гарнитуры.
Программное обеспечение HyperX NGENUITY
Загрузить программное обеспечение и последние обновления
встроенного ПО можно по адресу hyperxgaming.com/ngenuity
Светодиодный индикатор состояния
LED
Поиск
Подключена
Кнопка питания
Включение/выключение питания — нажмите и удерживайте
кнопку питания в течение 3 секунд
Колесико регулятора громкости
Для регулировки уровня громкости используйте прокрутку вверх и вниз.
ПРЕДУПРЕЖДЕНИЕ: В случае использования гарнитуры при
высокой громкости в течение продолжительного времени
возможно необратимое нарушение слуха.
Мигает зеленым и красным цветом каждые 0,2 сСопряжение
Медленно пульсирует зеленым цветом
Батарея заряжена на 90 % – 100 %: Непрерывно горит зеленым цветом
Батарея заряжена на 15 % – 90 %: мигает зеленым цветом
Заряд батареи <15 %: мигает красным цветом
Микрофон с поворотным отключением
Выполняется зарядка
Перед первым использованием рекомендуется зарядить
гарнитуру полностью.
LED
Вопросы или проблемы с настройкой?
Свяжитесь с командой технической поддержки HyperX по
адресу: hyperxgaming.com/support/headsets
Непрерывно горит зеленым цветомПолностью заряжено
Пульсирует зеленым цветомБатарея заряжена на 15 % – 99 %
Пульсирует красным цветомЗаряд батареи <15 %
繁體中文
概觀
A - 旋轉式靜音麥克風
狀態燈 LED
B -
電源鍵
C D - 音量滾輪
E - USB 充電埠
F - USB 接收器
G - 無線配對小孔
H - 無線狀態燈 LED
充電線
I - USB
使用耳機
1. 將 USB 無線接收器插入您的裝置。
2. 開啟耳機電源。
Page 12

HyperX NGENUITY 軟體
請於以下連結下載軟體和最新韌體更新:
hyperxgaming.com/ngenuity
LED
狀態燈
耳機狀態 LED
搜尋中
已連線
電源鍵
開啟/關閉電源-長按電源鍵 3 秒鐘
每 0.2 秒閃爍綠燈和紅燈配對中
慢速綠色呼吸燈
剩餘電量 90% – 100%:綠燈恆亮
剩餘電量 15% – 90%:綠燈閃爍
剩餘電量 < 15%:紅燈閃爍
音量滾輪
向上或向下滾動以調整音量。
警告:長時間以高音量使用耳機將可能導致永久性聽力受損。
旋轉式靜音麥克風
充電中
建議您在初次使用耳機前,先進行完整充電。
充電狀態 LED
綠燈恆亮充電完成
綠色呼吸燈15 % – 99 % 電量
紅色呼吸燈<15 % 電量
有任何安裝或使用問題?
請聯絡 HyperX 支援團隊,網址為:
hyperxgaming.com/support/headsets
简体中文
概述
A - 旋转可使麦克风静音
B - 状态 LED
C - 电源按钮
D - 音量滚轮
E - USB 充电端口
F - USB 适配器
G - 无线配对插孔
H - 无线状态 LED
USB 充电线
I -
使用耳机
1. 将无线 USB 适配器连接至您的设备。
2. 打开耳机电源。
HyperX NGENUITY 软件
访问以下网站,下载软件和最新固件更新:
hyperxgaming.com/ngenuity
状态 LED
耳机状态 LED
正在搜索
已连接
每 0.2 秒闪烁绿灯和红灯配对
绿灯缓慢闪烁
90% – 100% 电量:绿灯常亮
15% – 90% 电量:绿灯闪烁
< 15% 电量:红灯闪烁
电源按钮
开机/关机 - 按住电源按钮 3 秒钟
音量滚轮
向上或向下滚动以调整音量。
警告:长时间开大音量使用耳机可能导致听力永久受损。
Page 13

旋转可使麦克风静音
正在充电
第一次使用之前,建议给耳机充满电再使用。
充电状态 LED
绿灯常亮电量已满
绿灯闪烁15 % – 99 % 电量
红灯闪烁<15 % 电量
存有疑问或遇到设置问题?
请访问以下网站联系 HyperX 支持团队:
hyperxgaming.com/support/headsets
日本語
概要
A - マイクブームの上げ下げでミュートが可能なマイク
B -ステータス LED
電源ボタン
C D -音量調整ホイール
E -USB 充電ポート
F -USB アダプター
G -ワイヤレスペアリングピンホール
H -ワイヤレスステータス LED
I -USB 取り外し可能なマイク
ヘッドセットの使用方法
1. ワイヤレスUSB アダプターを使用するデバイスに接続します。
2. ヘッドセットの電源をオンにします。
ステータス LED
ヘッドセットのステータス LED
ペアリング
検索中
接続済み
0.2 秒おきに点滅(グリーンとレッド)
ゆっくりと点滅(グリーン)
バッテリー残量
バッテリー残量
バッテリー残量
90% – 100%:点灯(グリーン)
15% – 90%:点滅(グリーン)
< 15% 未満:点滅(レッド)
電源ボタン
電源のオン/オフ-電源ボタンを3秒間長押しします。
音量調整ホイール
音量レベルを調節するために、上または下に回します。
注意:ヘッドセットを大音量で長期間使用した場合、聴覚に恒久的な障害を
与える可能性があります。
マイクブームの上げ下げでミュートが可能なマイク
充電中
ヘッドセットは初回使用前に完全に充電してください。
充電ステータス LED
バッテリー残量
15 % – 99 %
15 % 未満
バッテリー残量
点灯(グリーン)充電完了
点滅(グリーン)
点滅(レッド)
ご質問、またはセットアップに問題がありますか?
HyperX サポートチームにお問い合わせいただくか、
hyperxgaming.com/support/headsets にあるユーザーマニュアルを参
照してください
Page 14

한국어
개요
회전식 마이크 음소거
A B - 상태표시 LED
C - 전원 버튼
D - 볼륨 휠
E - USB 충전 포트
F - USB 어댑터
G - 무선 페어링 핀 구멍
H - 무선 상태 LED
I - USB 충전 케이블
헤드셋 사용하기
무선 어댑터를 장치에 연결합니다.
1. USB
2. 헤드셋 전원을 켭니다.
HyperX NGENUITY 소프트웨어
소프트웨어 및 최신 펌웨어 다운로드
hyperxgaming.com/ngenuity
상태표시 LED
헤드셋 상태 LED
페어링
검색
연결됨
0.2 초마다 녹색 및 적색 점멸
느린 호흡 녹색
90% – 100% 배터리: 녹색 지속
15% – 90% 배터리: 녹색 점멸
< 15% 배터리: 적색 점멸
전원 버튼
전원 켬/끔–전원 버튼을 3 초간 누르십시오
볼륨 휠
스크롤을 위아래로 움직여서 볼륨 레벨을 조정하십시오.
경고: 장시간 동안 높은 볼륨으로 헤드셋을 사용할 경우 영구적인 청각
손상을 입을 수 있습니다.
회전식 마이크 음소거
충전 중
첫 사용 전 헤드셋을 완전히 충전하는 것을 권장합니다.
충전 상태 LED
녹색 지속완전 충전됨
호흡 녹색15 % – 99 % 배터리
호흡 적색<15 % 배터리
질문 또는 설치 문제가 있으십니까?
hyperxgaming.com/support/headsets
HyperX 지원 팀에 문의하십시오.
에서
Page 15

MN: CS002
MN: CS002-WA
产品中有毒有害物质或元素的名称及含量标识表
部件名称
(Parts Name)
电路板 (PCBA)
本表格依据 SJ/T 11364 的规定编制。
铅 (Pb) 汞 (Hg) 镉 (Cd) 六价铬 (Cr(VI)) 多溴联苯 (PBB) 多溴二苯醚 (PBDE)
有毒有害物质或元素 Cloud Stinger Core + 7.1
X O O O O O
O: 表示该有害物质在该部件所有均质材料中的含量均在 GB/T 26572 规定的限量要求以下。
X: 表示该有害物质至少在该部件的某一均质材料中的含量超出 GB/T 26572 规定的限量要求。
此标志为产品的环保使用期限标志, 且此标保使用期限只适用于产品正常工作的温度和湿度等条件。
Battery/TX Power Info
Battery Information
Contains 3.7V, 1000mAh Li-ion Battery, 3.7Wh
Cannot be replaced by user
Frequency & TX Power Information
Frequency Bands: 2.4GHz (TX Power: <2dBm)
FCC Compliance and Advisory Statement
This device complies with Part 15 of the FCC rules. Operation is subject to the following two conditions:(1) this device
may not cause harmful interference, and (2) this device must accept any interference received, including
interference that may cause undesired operation.
This equipment has been tested and found to comply with the limits for a Class B digital device, according to Part 15 of
the FCC rules. These limits are designed to provide reasonable protection against harmful interference in a residential
installation. This equipment generates, uses and can radiate radio frequency energy and if not installed and used in
accordance with the instructions, may cause harmful interference to radio communications. However, there is no
guarantee that interference will not occur in a particular installation. If
this equipment does cause harmful interference to radio or television
reception, which can be determined by turning the equipment o
and on, the user is encouraged to try correct the interference by one
or more of the following measures:
1. Reorient the receiving antenna.
2. Increase the separation between the equipment and receiver.
3. Connect the equipment into and outlet on a circuit dierent
from that to which the receiver is connected.
4. Consult the dealer or an experienced radio/TV technician for
help.
Any special accessories needed for compliance must be specied in
the instruction manual.
Warning: A shielded-type power cord is required in order to meet
FCC emission limits and also to prevent interference to the nearby
radio and television reception. It is essential that only the supplied
power cord be used. Use only shielded cables to connect I/O
devices to this equipment.
CAUTION: Any changes or modications not expressly approved by
the party responsible for compliance could void your authority to
operate the equipment.
Canada statement
Canada Notices
This Class B digital apparatus complies with Canadian ICES-003.
This device complies with Industry Canada license-exempt RSS
standard(s). Operation is subject to the following two conditions: (1)
this device may not cause interference, and (2) this device must
accept any interference, including interference that may cause
undesired operation of the device.
Avis Canadian
Cet appareil numérique de la classe B est conforme à la norme
NMB-003 du Canada.
Cet appareil est conforme à la ou aux normes RSS non soumises
aux licences d’Industry Canada. Son utilisation est soumise aux
deux conditions suivantes: (1) cet appareil ne doit pas causer
d’interférence et (2) cet appareil doit accepter toutes les
interférences, y compris celles susceptibles de provoquer le
fonctionnement accidentel de l’appareil.
Page 16

Japan VCCI JRF Statement:
Class B ITE
この装置は、情報処理装置等電波障害自主規制協議会(VCCI)クラス
B情報技術装置です。この装置は、家庭環境で使用することを目的として
いますが、この装置がラジオやテレビジョン受信機に近接して使用される
と、受信障害を引き起こすことがあります。
取扱説明書に従って正しい取り扱いをして下さい。
IFETEL
La operación de este equipo está sujeta a las siguientes dos condiciones: (1) es posible
que este equipo o dispositivo no cause interferencia perjudicial y (2) este equipo o
dispositivo debe aceptar cualquier interferencia, incluyendo la que pueda causar su
operación no deseada.
IFETEL ID: RCPKICS20-0714
IFETEL ID: RCPKICS20-0715
Taiwan NCC Statement:
NCC / DGT 警語
第十二條:經型式認證合格之低功率射頻電機,非經許可,公司、商號
或使用者均不得得擅自變更頻率、加大功率或變更通原計之特性及功能。
第十四條:低功率射頻電機之使用不得影響飛航安全及干擾合法通信;
經發現有干擾現象時,應立即停用,並改善至無干擾時方得繼續使用。
前項合法通信,指依電信法規定作業之無線電通信。低功率射頻電機須忍受
合法通信或工業、科學及醫療用電波輻射性電機設備之干擾。
KCC statement
B급 기기
(가정용 방송통신기자재)
이 기기는 가정용(B급) 전자파적합기기로서 주 로 가정에서 사용하는
것을 목적으로 하며, 모 든지역에서 사용할 수 있습니다.
CNC ID: C-24818
CNC ID: C-24800
Brazil ANATEL statement (Resolution 680)
Este equipamento não tem direito à proteção contra interferência prejudicial e não pode
causar interferência em sistemas devidamente autorizados.
ANATEL ID: 02366-20-07196
ANATEL ID: 02363-20-07196
HyperX is a division of Kingston.
THIS DOCUMENT SUBJECT TO CHANGE WITHOUT NOTICE
©2020 Kingston Technology Corporation, 17600 Newhope Street, Fountain Valley, CA 92708 USA.
All rights reserved. All registered trademarks and trademarks are the property of their respective owners.
No. ESD-2021447C
NTC
Type Accepted
TRA
REGISTERED No:
ER77286/19
DEALER No:
DA81684/19
66396/SDPPI/2020
9100
NTC
Type Accepted
No. ESD-2021474C
TRA
REGISTERED No:
ER77285/19
DEALER No:
DA81684/19
66397/SDPPI/2020
9100
 Loading...