

Page 1
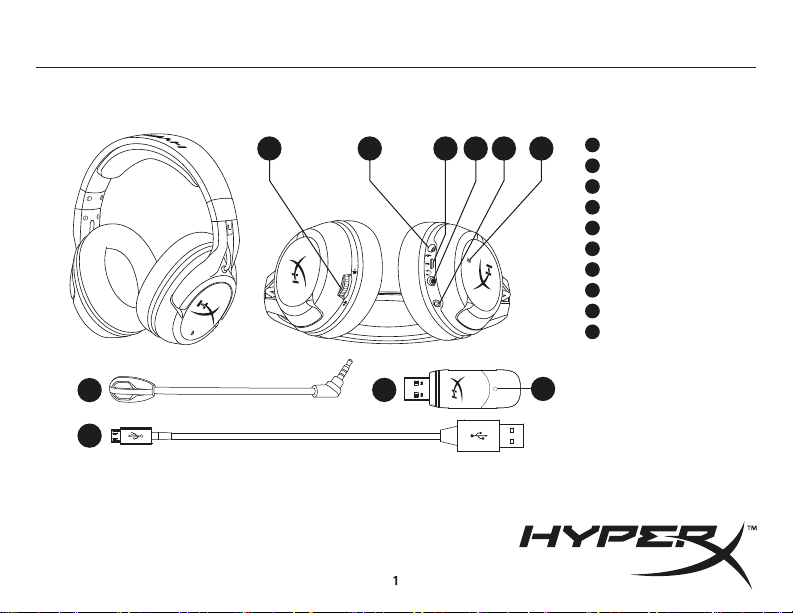
HyperX Cloud Flight
Overview
A B C E FD
Quick Start Guide
A
Volume wheel
Microphone portB
C
USB charge port
D
Analog headphone port
E
Power button
F
Mic mute button
G
Detachable microphone
H
Wireless adapter
I
Wireless status light
J
USB charge cable
4460272B
G
H
I
J
K
Page 2
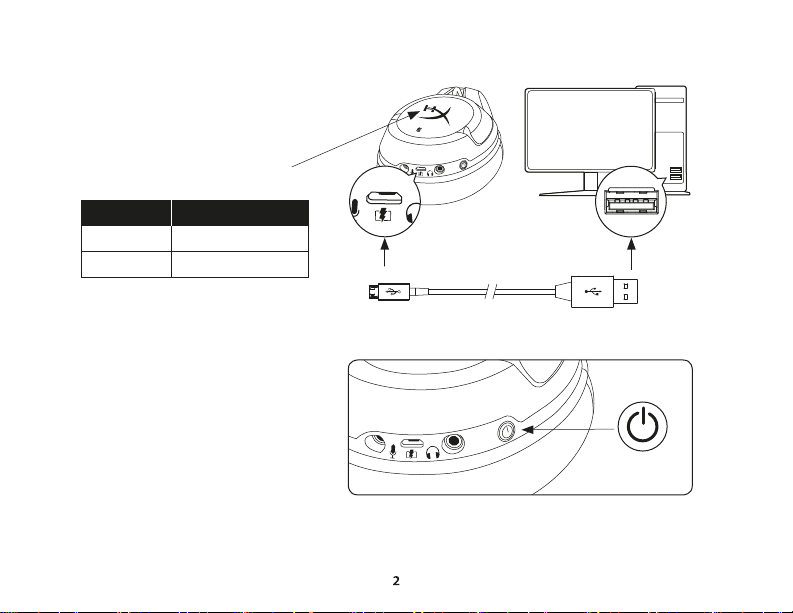
Usage
Charging
It is recommended to fully charge your
headset before rst use.
When the charge cable is connected the
ear cup LED will indicate the status.
EAR CUP LED CHARGE STATUS
Charging completeO
Power Button
Power on - Hold down power button for 3 secs
until you hear a beep.
Power o - Hold down power button for 3 secs
until you hear a beep.
LED eect - Press power button to cycle
LED eect.
ChargingBreathing
Page 3
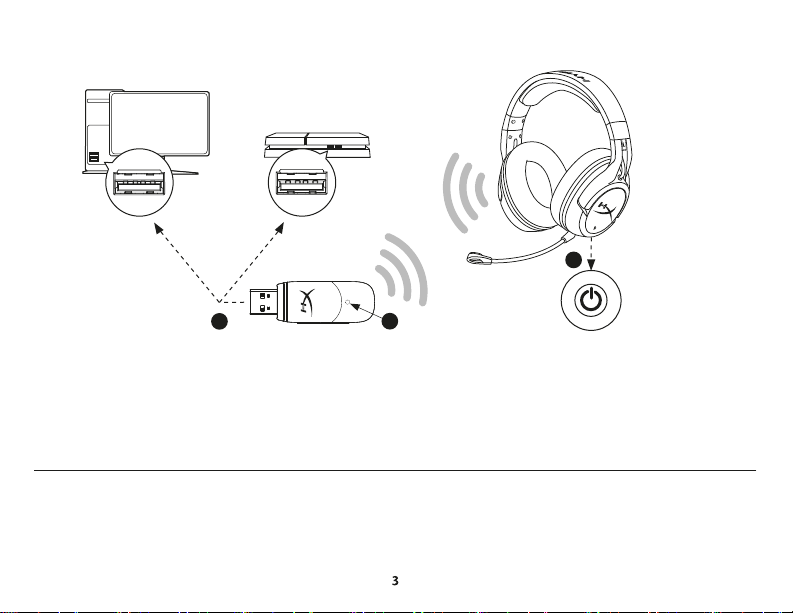
Using with PC, PS4™ or Mac®
2
1
1. Connect the wireless adapter to a USB port on your PC, PS4 or Mac. (The wireless adapter status light will blink.)
2. Power on the headset.
3. When the wireless adapter status light is solid the headset is connected.
Note: If it is your rst time using the headset you may need to set the headset as the default input and output device.
3
Questions or setup issues?
Contact the HyperX support team or see the user manual at: hyperxgaming.com/support/headsets
Page 4
ENGLISH
Overview
A - Volume wheel
B - Microphone port
C - USB charge port
D - Analog headphone port
E - Power button
F - Mic mute button
G - Detachable microphone
H - Wireless adapter
I - Wireless status light
J - USB charge cable
Usage
Charging
It is recommended to fully charge your headset before rst use.
When the charge cable is connected the ear cup LED will indicate
the status.
EAR CUP LED CHARGE STATUS
Power Button
Power on – Hold down power button for 3 secs until you hear a beep.
Power o – Hold down power button for 3 secs until you hear a beep.
LED eect – Press power button to cycle LED eect.
Using with PC, PS4™ or Mac®
1. Connect the wireless adapter to a USB port on your PC, PS4 or Mac.
(The wireless status light will blink.)
2. Power on the headset.
3. When the wireless adapter status light is solid the headset
is connected.
ChargingBreathing
CompleteO
Note: If it Is your rst time using the headset you may need to set the
headset as the default input and output device.
Questions or setup issues?
Contact the HyperX support team or see the user manual at:
hyperxgaming.com/support/headsets
FRANÇAIS
Présentation
A - Molette de réglage du volume
B - Port microphone
C - Port de chargement USB
D - Port de casque analogique
E - Bouton Marche/ Arrêt
F - Bouton de désactivation du micro
G - Microphone amovible
H - Adaptateur sans l
I - Voyant Statut sans l
J - Câble de chargement USB
Utilisation
Chargement de la batterie
Il est recommandé de charger complètement votre casque-micro avant
sa première utilisation.
Lorsque le câble de chargement est connecté, le voyant LED de l’écouteur
indique le statut.
ÉCOUTEUR LED STATUT DE CHARGEMENT
Chargement de la batterieRespiration
Chargement completDésactiver
Page 5
Bouton Marche/ Arrêt
Marche - maintenez le bouton Marche/Arrêt pendant 3 secondes
jusqu’à ce qu’un bip retentisse.
Arrêt - maintenez le bouton Marche/Arrêt pendant 3 secondes
jusqu’à ce qu’un bip retentisse.
Eet LED - Appuyez sur le bouton Marche/ Arrêt pour changer l’eet
LED.
TM
Utilisation avec un PC, une PS4
1. Branchez l’adaptateur sans l sur le port USB d’un PC/ PS4 ou Mac.
(Le voyant Statut sans l de l’adaptateur va clignoter)
2. Allumez le casque-micro.
3. Lorsque le voyant Statut sans l de l’adaptateur est allumé (xe), le
casque-micro est connecté.
Remarque: Si vous utilisez votre casque-micro pour la première fois, il
peut être nécessaire de le congurer comme Périphérique d’entrée/
sortie par défaut.
Questions ou problèmes de conguration?
Contactez l’équipe d’assistance HyperX ou consultez le manuel
d’utilisation: hyperxgaming.com/support/headsets
ou un Mac®
ITALIANO
Panoramica
A - Regolazione volume
B - Ingresso microfono
C - Porta USB con funzione di ricarica
D - Ingresso analogico per cuat
E - Pulsante di accensione
F - Pulsante di esclusione microfono
G - Microfono scollegabile
H - Adattatore wireless
I - Spia dello stato wirelesst
J - Cavo di ricarica USB
Istruzioni d’uso
Ricarica
In occasione del primo utilizzo, si consiglia di eettuare un ciclo completo di
ricarica.
Una volta connesso il cavo di ricarica, il LED presente sul padiglione
indicherà che le cue sono in stato di caricamento.
LED SUL PADIGLIONE STATO DI RICARICA
Pulsante di accensione
Accensione - Tenere premuto il pulsante di accensione per 3 secondi
no ad avvertire un beep.
Spegnimento - Tenere premuto il pulsante di accensione per 3 secondi
no ad avvertire un beep.
Eetti LED - Premere il pulsante di accensione per passare al successivo
eetto LED.
TM
Uso con PC, PS4
1. Collegare l’adattatore wireless a una porta USB presente su pc, PS4 o
Mac. (il LED di stato dell’adattatore wireless inizierà a lampeggiare)
2. Accendere le cue
3. La connessione con le cue sarà stabilità una volta che il LED di stato
dell’adattatore wireless resterà acceso senza lampeggiare
Nota: la prima volta che si utilizzano le cue potrebbe essere
necessario impostarle come dispositivo di ingresso e uscita audio
predenito.
Domande o dubbi sulla congurazione?
Contattare il team di supporto HyperX oppure consultare il manuale
utente: hyperxgaming.com/support/headsets
o Mac®
RicaricaAcceso
Ricarica completataSpento
Page 6

DEUTSCH
Übersicht
A - Lautstärkeregler
B - Mikrofonbuchse
C - USB-Ladeanschluss
D - Analaoger Kopfhöreranschluss
E - Ein/Ausschalter
F - Mikrofon-Stummschalten
G - Abnehmbares Mikrofon
H - Drahtloser Adapter
I - Drahtlose Statusanzeige
J - USB-Ladekabel
Nutzung
Laden
Es wird empfohlen, dein Headset vollständig zu laden, bevor Du es zum
ersten Mal verwendest.
Wenn das Ladekabel angeschlossen ist, zeigt die LED das in der
Ohrmuscheln an.
OHRMUSCHELNLED LADESTATUS
An-/Ausschalter
Spannung ein - Halte den Ein/Ausschaltknopf 3 Sekunden gedrückt,
bis du ein Piepen hörst.
Spannung aus - Halte den Ein/Ausschaltknopf 3 Sekunden gedrückt,
bis du ein Piepen hörst.
Spannung aus - Betätigen Sie den An-/Ausschalter, um durch die
verschiedenen LED-Eekte zu schalten.
Nutzung mit einem PC, einer PS4
1. Verbinde den drahtlosen Adapter mit einem USB-Port an deinem PC, PS4
oder deinem Mac. (Das Statuslicht deines drahtlosen Adapters blinkt auf.)
LadenAtmung
Vollständig geladenAus
TM
oder einem Mac®
2. Das Headset einschalten
3. Wenn das Statuslicht am drahtlosen Adapter nicht mehr blinkt, ist das
Headset verbunden.
Hinweis: Wenn Du das Headset zum ersten Mal verwendest, musst Du es
möglicherweise erst als Standard-Eingabe- und Ausgabegerät festlegen.
Hast du Fragen oder Probleme bei der Installation?
Wenden Sie sich an das HyperX-Support-Team oder beziehen Sie sich
auf die Bedienungsanleitung unter:
hyperxgaming.com/support/headsets
POLSKI
Prezentacja
A - Pokrętło głośności
B - Port mikrofonu
C - Port USB ładowania
D - Analogowy port słuchawek
E - Przycisk zasilania
F - Przycisk wyciszenia mikrofonu
G - Odłączany mikrofon
H - Moduł łączności bezprzewodowej
I - Wskaźnik stanu łączności bezprzewodowej
J - Przewód USB do ładowania
Użytkowanie
Ładowanie
Przed rozpoczęciem użytkowania zestawu słuchawkowego zalecamy jego
pełne naładowanie.
Po podłączeniu przewodu do ładowania wskaźnik LED na nauszniku
pozwala określić stan baterii.
Page 7

WSKAŹNIK LED NA NAUSZNIKU STAN ŁADOWANIA
Przycisk zasilania
Włączanie zestawu - naciśnij i przytrzymaj przycisk zasilania przez 3
sekund do chwili wyemitowania sygnału dźwiękowego.
Wyłączanie zestawu - naciśnij i przytrzymaj przycisk zasilania przez 3
sekundy do chwili wyemitowania sygnału dźwiękowego.
Efekt świetlny - do przełączania sposobu świecenia wskaźnika LED
służy przełącznik zasilania.
Użytkowanie zestawu z komputerem PC lub Mac® oraz konsolą
TM
PS4
1. Podłącz moduł łączności bezprzewodowej do portu USB w
komputerze lub konsoli PS4. (Zaświeci wskaźnik stanu łączności
bezprzewodowej.)
2. Włącz zestaw słuchawkowy.
3. Gdy wskaźnik stanu łączności bezprzewodowej na module świeci
nieprzerwanie, połączenie z zestawem słuchawkowym zostało
nawiązane.
Uwaga: Jeśli zestaw słuchawkowy jest używany po raz pierwszy,
może być konieczne skongurowanie go jako domyślnego
urządzenia wejściowego i wyjściowego.
Pytania? Problemy z konguracją?
Skontaktuj się z działem pomocy technicznej HyperX lub przeczytaj
instrukcję obsługi na stronie:
hyperxgaming.com/support/headsets
Ładowanie w tokuPulsowanie
Ładowanie zakończoneNie świeci
ESPAÑOL
Visión general
A - Rueda de volumen
B - Puerto de micrófono
C - Puerto de carga USB
D - Puerto de auriculares analógicos
E - Botón de encendido
F - Botón de silencio de micrófono
G - Micrófono desmontable
H - Adaptador inalámbrico
I - Luz de estado inalámbrica
J - Cable de de carga USB
Uso
Carga
Se recomienda cargar al completo los auriculares antes de usarlos por
primera vez.
Cuando el cable de carga esté conectado a los auriculares, el LED indicará
el estado.
LED DE AURICULARES ESTADO DE LA CARGA
Botón de encendido
Encendido - presiona el botón de encendido durante 3 s hasta que oigas
un pitido
Apagado - presiona el botón de encendido durante 3 s hasta que oigas
un pitido.
Efecto LED - pulsa el botón de encendido para ciclar el efecto LED.
TM
Uso con PC, PS4
1.Conecta el adaptador inalámbrico a un puerto USB del PC,
de la PS4 o del Mac. (La luz de estado del adaptador inalámbrico
parpadeará)
2.Encender los auriculares
3.Cuando la luz de estado del adaptador inalámbrico esté ja, los
auriculares estarán conectados
Nota: Si es la primera vez que usas los auriculares, es posible que necesites
establecerlos como dispositivo de entrada o salida predeterminado.
o Mac®
CargaRespiración
Carga completaApagado
Page 8

¿Preguntas o problemas de conguración?
Ponte en contacto con el equipo de soporte técnico de HyperX o
consulta el manual de usuario en:
hyperxgaming.com/support/headsets
PORTUGUÊS
Descrição geral
A - Roda de volume
B - Porta do microfone
C - Porta de carregamento USB
D - Porta de auscultadores analógicos
E - Botão ligar/desligar
F - Botão para silenciar o microfone
G - Microfone amovível
H - Adaptador do modo sem os
I - Luz de estado do modo sem os
J - Cabo de carregamento USB
Utilização
A carregar
Recomenda-se carregar por completo os auscultadores antes da
primeira utilização.
Quando o cabo de carregamento estiver ligado, o LED no
auscultador esquerdo indica o estado.
LED DO AUSCULTADOR ESQUERDO ESTADO DO CARREGAMENTO
Botão ligar/desligar
Ligar - Mantenha o botão de ligar/desligar premido durante 3 seg.
até ouvir um sinal sonoro.
A carregarRespirar
Carregamento concluídoDesligado
Desligar - Mantenha o botão de ligar/desligar premido durante 3 seg.
até ouvir um sinal sonoro.
Efeito LED - Prime o botão ligar/desligar para percorreres os efeitos LED.
TM
Utilizar com PC, PS4
1. Ligue o adaptador sem os a uma porta USB no seu PC, PS4 ou Mac.
(A luz de estado do adaptador sem os ca intermitente).
2. Ligar os auscultadores.
3. Quando a luz de estado do adaptador sem os se apresentar xa, os
auscultadores estão ligados.
Nota: Se é a primeira vez que utiliza os auscultadores, poderá ter de
deni-los como o dispositivo de entrada e saída predenido.
Dúvidas ou Problemas na Instalação?
Contacte a equipa de assistência HyperX ou consulte o manual do
utilizador em: hyperxgaming.com/support/headsets
ou Mac®
ČEŠTINA
Přehled
A - Kolečko pro ovládání hlasitosti
B - Port pro mikrofon
C - Dobíjecí port USB
D - Analogový port sluchátek
E - Vypínač
F - Tlačítko pro vypnutí mikrofonu
G - Odpojitelný mikrofon
H - Bezdrátový adaptér
I - Kontrolka bezdrátového režimu
J - Dobíjecí kabel USB
Použití
Dobíjení
Page 9

Před prvním použitím doporučujeme náhlavní soupravu plně dobít.
Když je dobíjecí kabel připojen, kontrolka LED na náušníku indikuje stav
připojení.
KONTROLKA LED NA NÁUŠNÍKU STAV DOBÍJENÍ
Vypínač
Zapnutí - Přidrž vypínač po dobu 3 sekund, ozve se pípnutí.
Vypnutí - Přidrž vypínač po dobu 3 sekund, ozve se pípnutí.
LED efekt - stisknutí tlačítka spustí LED efekt.
Použití se systémy PC, PS4
1. Připoj bezdrátový adaptér k USB portu systému PC, PS4 nebo Mac.
(Stavová kontrolka bezdrátového adaptéru se rozbliká.)
2. Zapni náhlavní soupravu.
3. Když stavová kontrolka bezdrátového adaptéru přestane blikat a
svítí, je náhlavní souprava připojena.
Poznámka: Pokud používáš tuto náhlavní soupravu poprvé, může být
nutné nastavit ji jako výchozí zařízení pro zvukový vstup/výstup.
Dotazy? Problémy s instalací?
Kontaktuj tým podpory HyperX nebo hledej odpověď v manuálu:
hyperxgaming.com/support/headsets
TM
nebo Mac®
DobíjeníVětrání
Dobíjení je hotovoVypnuto
UKRAINIAN
Огляд
A - Коліщатко регулювання гучності
B - Мікрофонний роз’єм
C - Зарядний USB-роз’єм
D - Аналоговий роз’єм для навушників
E - Кнопка живлення
F - Кнопка вимкнення мікрофона
G - Знімний мікрофон
H - Безпровідний адаптер
I - Індикатор стану безпровідного зв’язку
J - Зарядний USB-кабель
Використання
Заряджання
Рекомендується повністю зарядити гарнітуру перед першим
використанням.
При підключенні зарядного кабелю світлодіодні індикатори
на навушниках відображатимуть стан заряджання.
СВІТЛОДІОДНІ ІНДИКАТОРИ НА ЧАШКАХ НАВУШНИКІВ СТАН ЗАРЯДЖАННЯ
Кнопка живлення
Живлення увімкн. – утримуйте кнопку живлення 3 секунди,
доки не почуєте звуковий сигнал.
Живлення вимкн. – утримуйте кнопку живлення 3 секунди,
доки не почуєте звуковий сигнал.
Світлодіодний ефект – натисніть кнопку живлення, щоб
обрати світлодіодний ефект.
TM
Використання з ПК, PS4
1. Під’єднайте безпровідний адаптер до USB-роз’єму вашого
ПК, PS4 або Mac. (Індикатор стану безпровідного адаптера
почне миготіти).
2. Увімкніть гарнітуру.
3. Коли індикатор стану безпровідного адаптера
світитиметься постійно, під’єднання гарнітури завершено.
Примітка. Якщо ви використовуєте гарнітуру вперше, можна
обрати її як вхідний і вихідний пристрій за замовчуванням.
Виникли питання або проблеми під час установки?
Зверніться до служби підтримки HyperX або ознайомтеся з
або Mac®
ЗаряджанняМигання
Заряджання завершеноВимкнення
Page 10

посібником користувача на сайті
hyperxgaming.com/support/headsets
РУССКИЙ
Обзор
A - Регулятор громкости
B - Порт микрофона
C - USB-порт зарядки
D - Порт аналоговых наушников
E - Кнопка питания
F - Кнопка выключения микрофона
G - Съемный микрофон
H - Беспроводной адаптер
I - Индикатор состояния беспроводного адаптера
J - USB-кабель зарядки
Использование
Зарядка
Перед первым использованием рекомендуется зарядить
гарнитуру полностью.
При подключении кабеля зарядки на светодиоде чашки будет
отображаться индикация его состояния.
СВЕТОДИОД ЧАШКИ СОСТОЯНИЕ ЗАРЯДА
Кнопка питания
Питание вкл - Удерживайте кнопку питания 5 с, пока не
раздастся звуковой сигнал.
Питание выкл - Удерживайте кнопку питания 3 с, пока не
раздастся звуковой сигнал.
Светодиодный эффект - для выполнения цикла работы
светодиодного эффекта нажмите кнопку питания.
Идет зарядкаИндикация
Зарядка выполненаВыкл
Использование с ПК, PS4TM или Mac®
1. Подключите беспроводной адаптер к порту USB на своем ПК,
ps4 или Mac. (Индикатор состояния беспроводного адаптера
начнет мигать)
2. Питание гарнитуры
3. Когда индикатор состояния беспроводного адаптера светится
постоянно, гарнитура подключена
Примечание: Если вы пользуетесь гарнитурой первый раз, может
потребоваться настройка гарнитуры в качестве входного и
выходного устройства по умолчанию.
Возникли вопросы или проблемы с установкой?
Свяжитесь с командой технической поддержки HyperX или
обратитесь к руководству пользователя по адресу: hyperxgam-
ing.com/support/headsets
繁體中文
概覽
A - 音量轉盤
B - 麥克風連接埠
C - USB 充電埠
D - 類比耳機連接埠
E - 電源按鈕
F - 麥克風靜音按鈕
G - 可拆式麥克風
H - 無線轉接器
I - 無線狀態燈
J - USB 充電線
使用方法
充電
我們建議您在初次使用您的耳機前,先進行完整的充電。
Page 11

當充電線連接時,耳罩上的 LED 燈號將會顯示充電狀態。
耳罩 燈 充電狀態
充電呼吸
充電完成熄滅
電源鍵
電源開啟 - 長按電源按鈕 3 秒鐘直到您聽見「嗶」一聲
電源關閉 - 長按電源按鈕 3 秒鐘直到您聽見「嗶」一聲
LED 效果 - 按下電源鍵以循環 LED 效果。
使用於 PC、PS4TM 或 Mac®
將無線轉接器連接至您 PC、PS4 或 Mac 的 USB 連接埠。(無線轉接器
1.
的狀態燈將會閃爍)
將耳機開機
2.
3. 當無線轉接器的狀態燈恆亮時,表示已成功連接耳機。
注意事項:如果這是您初次使用此耳機,您需要將耳機設定為預設輸入和
輸出裝置。
您是否有問題或設定上的疑難雜症?
請聯絡 HyperX 支援部門或查看使用者手冊,網址為:
hyperxgaming.com/support/headsets
简体中文
概述
A - 音量滚轮
B - 麦克风端口
C - USB 充电端口
D - 模拟耳机端口
E - 电源按钮
F - 麦克风静音按钮
G - 可拆卸麦克风
H - 无线适配器
I - 无线状态指示灯
J - USB 充电线
使用
充电
第一次使用之前,建议给耳机充满电再使用。
连接充电线之后,耳罩 LED 灯会显示状态。
耳罩 LED 灯 充电状态
充电呼吸
充电完成关闭
电源按钮
打开 - 按住电源按钮保持 3 秒钟,直到发出哔哔声
关闭 - 按住电源按钮保持 3 秒钟,直到发出哔哔声
LED 效果 - 按下电源按钮即可循环使用 LED 效果。
可与 PC、PS4TM 或 Mac® 一起使用
1. 将无线适配器连接到 PC、PS4 或 Mac 上的 USB 端口。(无线适配器状态
指示灯会闪烁)
打开耳机电源
2.
3. 无线适配器状态指示灯稳定之后,表示耳机已连接
注意:如果这是您第一次使用耳机,则需要将耳机设置为默认输入和输出
设置。
有疑问或者遇到设置问题?
请联系 HyperX 支持团队,或者访问以下网站查阅用户手册:
hyperxgaming.com/support/headsets
Page 12

日本語
概要
A - 音量調整ホイール
B -マイクポート
C -USB 充電ポート
D -アナログヘッドホンポート
E -電源ボタン
F -マイクのミュートボタン
G -取り外し可能なマイク
H -ワイヤレスアダプター
I -ワイヤレスステータスライト
J -USB 充電ケーブル
使い方
充電
ヘッドセットは初回使用前に完全に充電してください。
充電ケーブル接続時に、イヤーカップの LED が点灯します。
イヤーカップLED 充電状況
充電中点滅
充電完了オフ
電源ボタン
電源オン -ビープ音が鳴るまで3秒間ボタンを押し続けます
電源オフ -ビープ音が鳴るまで3秒間ボタンを押し続けます
LED エフェクト -電源ボタンを押すと、 LED エフェクトを周期的に繰り
返します。
PC、PS4TM または Mac® での使用
1. ワイヤレスアダプターを PC、PS4、または Mac の USB ポートに接続し
ます。(ワイヤレスアダプターのステータスライトが点滅します)
2. ヘッドセットの電源をオンにします
3. ワイヤレスアダプターのステータスライトが点滅をやめ点灯状態になる
と、ヘッドセットの接続が完了したことを示します。
注意:初めてヘッドセットを使用する際には、そのヘッドセットを既定の
入力および出力のデバイスとして設定する必要がある場合があります。
ご質問、またはセットアップに問題がありますか?
HyperX サポートチームにお問い合わせいただくか、
hyperxgaming.com/support/headsets にあるユーザーマニュアルを
参照してください
한국어
개요
볼륨 휠
A B - 마이크 포트
C - USB 충전 포트
D - 아날로그 헤드폰 포트
E - 전원 버튼
F - 마이크 음소거 버튼
G - 탈착식 마이크
H - 무선 어댑터
I - 무선 상태등
J - USB 충전 케이블
사용
충전
첫 사용 전 헤드셋을 완전히 충전하는 것을 권장합니다.
충전 케이블이 연결되면 이어 컵에
이어 컵 LED 충전 상태
LED 상태가 표시됩니다.
충전브레싱
충전 완료끔
Page 13

전원 버튼
전원 켬 - 삐 소리가 들릴 때까지 전원 버튼을 3초간 누르고
있습니다.
- 삐 소리가 들릴 때까지 전원 버튼을 3초간 누르고
전원 끔
있습니다.
LED 효과 - 전원 버튼을 누르면 회전 LED 효과가 나타납니다.
PC, PS4TM 맥과 사용
무선 어댑터를 PC, PS4 맥의 USB 포트에 연결합니다. (무선
1.
어댑터의 상태등이 깜빡입니다)
2. 헤드셋 전원 켜기
3. 무선 어댑터의 상태 등이 계속해서 켜져있으면 헤드셋이
연결됩니다
: 헤드셋의 첫 사용일 경우, 헤드셋을 기본 입력 및 출력
참고
장치로 설정해야 합니다.
기타문의사항이 있거나 설정 관련 사항이 더 궁금하다면
지원 팀에 연락하거나
HyperX
hyperxgaming.com/support/headsets 의 사용자 매뉴얼을
참조합니다.
ﺮﻋ
ﺔﻣﺎﻋ ةﺮﻈﻧ
- A
USB - C
- D
- H
.
.
LED
.
نذﻷا ةدﺎﺳﻮﺑ ﺔﺻﺎﺨﻟا ﺢﻴﺑﺎﺼﻣﻦﺤﺸﻟا ﺔﻟﺎﺣ
3 –
.
3 –
.
:
.
–
®Mac وأ PS4 وأ ﴢﺨﺸﻟا ﺮﺗﻮﻴﺒﻤﻜﻟا ﻊﻣ ماﺪﺨﺘﺳﻻا
USBPS4.Mac
:
HyperX
hyperxgaming.com/support/headsets
- B
- E
- F
- G
- I
USB - J
ماﺪﺨﺘﺳﻻا
ﻦﺤﺸﻟا ٍرﺎﺟ
LED
ﺔﻗﺎﻄﻟا" رز
"
LED.LED
(. )
.
؟داﺪﻋﻹا ﰲ تﻼﻜﺸﻣ وأ ﺔﻠﺌﺳأ يأ
.1
.2
.3
Page 14

Battery/TX Power Info
Battery Information
Contains 3.7 V, 1500 mAh
Li-ion Battery, 5.55Wh
Cannot be replaced
by user
Frequency & TX Power
Information
Frequen cy Bands: 2.4GHz
(TX Power: <2dBM )
Regulatory Notices
FCC Notice
This device complies with Part 15
of the FCC rules. Operation is
subject to the following two
conditions:(1) this device may not
cause harmful interference, and
(2) this device must accept
any interference received,
including interference that may
cause undesired operation.
This equipment has been tested
and found to comply with the
limits for a Class B digital device,
according to Part 15 of the FCC
rules. These limits are designed to
provide reasonable protection
against harmful interference in a
residential installation. This
equipment generates, uses and can
radiate radio frequency energy and
if not installed and used in
accordance with the instructions,
may cause harmful interference to
radio communications. However,
there is no guarantee that
interference will not occur in a
particular installation. If this
equipment does cause harmful
interference to radio or television
reception, which can be determined
by turning
the equipment o and on, the user
is encouraged to try correct the
interference by one or more
of the following measures:
1. Reorient the receiving
antenna.
2. Increase the separation between
the equipment and receiver.
3. Connect the equipment into and
outlet on a circuit dierent from that
to which the receiver is connected.
4. Consult the dealer or an
experienced radio/TV technician
for help.
Any special accessories needed for
compliance must be specied in the
instruction manual.
Warning: A shielded-type power
cord is required in order to meet
FCC emission limits and
also to prevent interference to the
nearby radio and television
reception. It is essential that
only the supplied power cord be
used. Use only shielded cables to
connect I/O devices to this
equipment.
CAUTION: Any changes or
modications not expressly
approved by the party responsible
for compliance could void your
authority to operate the equipment.
Canada Notices
This Class B digital apparatus
complies with Canadian ICES-003.
This device complies with Industry
Canada license-exempt RSS
standard(s). Operation is subject to
the following two conditions: (1) this
device may not cause interference,
and (2) this device must accept any
interference, including interference
that may cause undesired operation of
the device.
Cet appareil numérique de la classe B
est conforme à la norme NMB-003 du
Canada.
Avis Canadian
Cet appareil numérique de classe B est
conforme à la norme canadienne
ICES-003.
Cet appareil est conforme à la ou aux
normes RSS non soumises aux
licences d’Industry Canada. Son
utilisation est soumise aux deux
conditions suivantes : (1) cet appareil
ne doit pas causer d’interférence et (2)
cet appareil doit accepter toutes les
interférences, y compris celles
susceptibles de provoquer le
fonctionnement accidentel de
l’appareil.
Cet appareil numérique de la classe B
est conforme à la norme NMB-003 du
Cantada.
Page 15

ANATEL ID: 00803-19-07196
ANATEL ID: 00835-19-07196
Brazil ANATEL statement (Resolution 680)
Este equipamento não tem direito à proteção contra interferência prejudicial e não
pode causar interferência em sistemas devidamente autorizados.
IFETEL
La operación de este equipo está sujeta a las siguientes dos condiciones: (1) es posible
que este equipo o dispositivo no cause interferencia perjudicial y (2) este equipo o
dispositivo debe aceptar cualquier interferencia, incluyendo la que pueda causar su
operación no deseada.
KCC statement
B급 기기
(가정용 방송통신기자재)
이 기기는 가정용(B급) 전자파적합기기로서 주 로 가정에서 사용하는
것을 목적으로 하며, 모 든지역에서 사용할 수 있습니다.
Taiwan NCC Statement:
NCC / DGT 警語
第十二條:經型式認證合格之低功率射頻電機,非經許可,公司、商號或
使用者均不得得擅自變更頻率、加大功率或變更通原計之特性及功能。
第十四條:低功率射頻電機之使用不得影響飛航安全及干擾合法通信;經
發現有干擾現象時,應立即停用,並改善至無干擾時方得繼續使用。
前項合法通信,指依電信法規定作業之無線電通信。低功率射頻電機須忍
受合法通信或工業、科學及醫療用電波輻射性電機設備之干擾。
VCCI JRF Statement:
Class B ITE
この装置は、情報処理装置等電波障害自主規制協議会(VCCI)クラス
B情報技術装置です。この装置は、家庭環境で使用することを目的として
いますが、この装置がラジオやテレビジョン受信機に近接して使用される
と、受信障害を引き起ことがあります。
取扱説明書に従って正しい取り扱いをして下さい。
CNC ID: H-22811
CNC ID: H-22810
Page 16

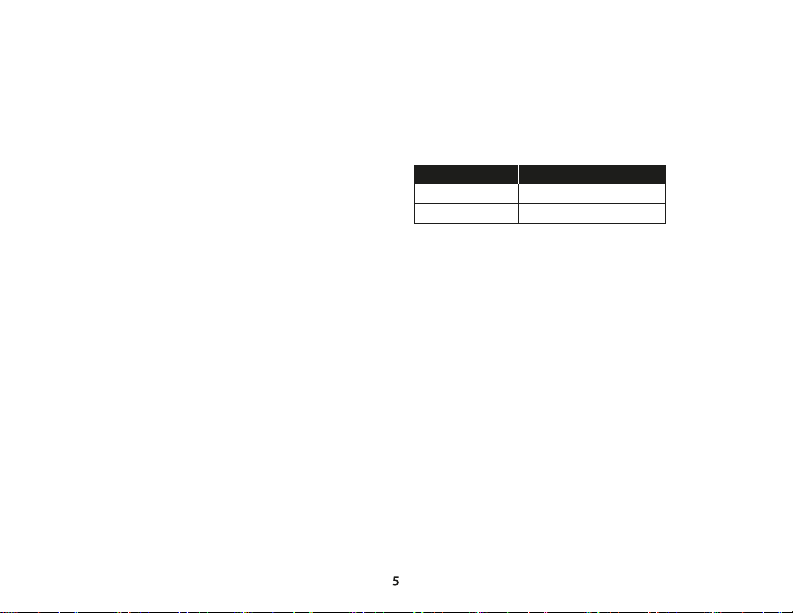
产品中有毒有害物质或元素的名称及含量标识表
部件名称
(Parts Name)
麦克风 (MIC)
电池 (Battery) X O O O O O
本表格依据 SJ/T 11364 的规定编制。
铅 (Pb) 汞 (Hg) 镉 (Cd) 六价铬 (Cr(VI)) 多溴联苯 (PBB) 多溴二苯醚 (PBDE)
X O O O O O
有毒有害物质或元素 Cloud Flight
O: 表示该有害物质在该部件所有均质材料中的含量均在 GB/T 26572 规定的限量要求以下。
X: 表示该有害物质至少在该部件的某一均质材料中的含量超出 GB/T 26572 规定的限量要求。
此标志为产品的环保使用期限标志, 且此标保使用期限只适用于产品正常工作的温度和湿度等条件。
HyperX is a division of Kingston.
THIS DOCUMENT SUBJECT TO CHANGE WITHOUT NOTICE
©2020 Kingston Technology Corporation, 17600 Newhope Street, Fountain Valley, CA 92708 USA.
All rights reserved. All registered trademarks and trademarks are the property of their respective owners.
 Loading...