

Page 1

Hypertherm Automation
5 Technology Drive, Suite 300
W. Lebanon, NH 03784 USA
Phone: 603-298-7970
Fax: 603-298-7977
Automation
HYPERTHERM SENSOR™ PHC
LASMA HEIGHT CONTROL
P
PERATION & SET UP GUIDE
O
Making people and machines more productive through process Automation
Page 2

D
ISCLAIMER The information in this document is subject to change without notice and should not be
construed as a commitment by Hypertherm Automation
®
. Hypertherm Automation®
assumes no responsibility for any errors that appear.
T
RADEMARKS Hypertherm Automation is a wholly owned subsidiary of Hypertherm
Sensor™ is a trademark of Hypertherm Automation.
HyDefinition
®
Plasma is a reg. trademark of Hypertherm®, Inc.
®
, Inc.
HyPerformance™ Plasma is a trademark of Hypertherm Automation.
Other trademarks are properties of their respective owners.
C
OPYRIGHT 2008 by Hypertherm Automation. All rights Reserved
Printed in USA
Page 3

iii
Table of Contents
Making people and machines more productive through process Automation .............................................. I
SAFETY ............................................................................................................................................................... 1
SECTION 1: OVERVIEW ................................................................................................................................. 9
PHC Control Module ......................................................................................................................................... 9
Plasma Interface Assembly .............................................................................................................................. 9
Lifter Assembly ................................................................................................................................................. 9
Sensor PHC Models .......................................................................................................................................... 9
Features ........................................................................................................................................................... 10
Features ....................................................................................................................................................... 10
Options ......................................................................................................................................................... 10
System Specifications* ................................................................................................................................... 11
Connections ..................................................................................................................................................... 12
PHC to CNC Signals ................................................................................................................................... 13
PHC to Plasma Signals ............................................................................................................................... 13
PHC to Lifter Signals .................................................................................................................................. 13
Sensor™ PHC Front Panel Indicators ....................................................................................................... 14
Sensor™ PHC Front Panel Controls .......................................................................................................... 14
Control Module ................................................................................................................................................ 15
Plasma Interface Assembly ............................................................................................................................ 16
Standard Lifter Assembly .............................................................................................................................. 17
SECTION 2: INSTALLATION AND SETUP .............................................................................................. 19
Standard components ..................................................................................................................................... 19
PHC Control Module ................................................................................................................................... 19
Optional components ...................................................................................................................................... 19
Claims .............................................................................................................................................................. 19
Claims for damage during shipment .......................................................................................................... 19
Claims for defective or missing merchandise ............................................................................................ 19
Power Requirements ....................................................................................................................................... 20
Control Unit Mounting ................................................................................................................................... 21
Control Unit Mounting from Rear ............................................................................................................. 21
Control Unit Mounting from Front ............................................................................................................ 22
Plasma Interface Assembly Mounting ........................................................................................................... 23
Lifter Assembly Mounting .............................................................................................................................. 24
Torch Breakaway Assembly ........................................................................................................................... 25
Torch Mounting Block Kit .............................................................................................................................. 26
System Cables ................................................................................................................................................. 27
Grounding Requirements ............................................................................................................................... 28
Grounding Requirements ............................................................................................................................... 28
PHC Interface Signals .................................................................................................................................... 29
CNC Interface Signals .................................................................................................................................... 30
CNC Signal Descriptions ................................................................................................................................ 30
Cycle Start ................................................................................................................................................... 30
Auto Disable / Corner Hold ......................................................................................................................... 30
IHS Sync ...................................................................................................................................................... 31
IHS Complete .............................................................................................................................................. 31
Motion .......................................................................................................................................................... 31
Retract Complete ......................................................................................................................................... 31
Error ............................................................................................................................................................. 31
Interlock ....................................................................................................................................................... 31
Plasma Interface Signals ................................................................................................................................ 33
Page 4

iv
Plasma Start ................................................................................................................................................ 37
Hold Ignition ................................................................................................................................................ 37
Transfer ........................................................................................................................................................ 37
Lifter Interface Signals ................................................................................................................................... 38
Lower Limit Switch ..................................................................................................................................... 38
Upper Limit Switch ..................................................................................................................................... 38
Breakaway Switch ....................................................................................................................................... 38
Lifter Power Connections ............................................................................................................................... 39
Motor Power ................................................................................................................................................. 39
Lifter Brake ................................................................................................................................................. 39
DIP Switch Setup ............................................................................................................................................ 40
Switch Settings ............................................................................................................................................ 40
Calibration Pot Setup ..................................................................................................................................... 44
ARC - Arc Voltage Calibration ................................................................................................................... 44
KERF - Auto Kerf Detection Level ............................................................................................................. 44
STALL - IHS Stall Sensing Level ............................................................................................................... 44
SECTION 3: OPERATION ............................................................................................................................ 45
Automatic Operation ...................................................................................................................................... 46
Manual Operation ........................................................................................................................................... 47
SECTION 4: TROUBLESHOOTING ........................................................................................................... 49
Error Codes ..................................................................................................................................................... 49
E.01 CYCLE_START at power up Error ................................................................................................... 49
E.02 Plate Contact at Home Error ............................................................................................................. 49
E.03 Lifter Timeout Error ........................................................................................................................... 50
E.04 Limit Reached during Auto Operation .............................................................................................. 50
E.05 IHS SYNC Timeout ............................................................................................................................ 50
E.06 Transfer Timeout Error ...................................................................................................................... 50
E.07 Lost Plasma Arc Error ........................................................................................................................ 50
E.08 Torch Breakaway Error ...................................................................................................................... 50
E.09 Low Input Power Error ...................................................................................................................... 51
E.10 High Input Voltage Error ................................................................................................................... 51
E.11 Over-Temperature Error .................................................................................................................... 51
E.12 Interlock Tripped Error ...................................................................................................................... 51
E.13 Excess Plate Contact Error ................................................................................................................ 51
E.99 Internal Software Error ..................................................................................................................... 51
Troubleshooting Guide ................................................................................................................................... 52
Parts and Kits ................................................................................................................................................. 55
Recommended THC Slide Maintenance ........................................................................................................ 55
Interval......................................................................................................................................................... 55
Lubricant...................................................................................................................................................... 56
APPENDIX A: INTERFACING TO A CUSTOM LIFTER ....................................................................... 57
Requirements .................................................................................................................................................. 57
Page 5

v
Table of Figures
Figure 1: Connections ......................................................................................................................................... 12
Figure 2: Control Module ................................................................................................................................... 15
Figure 3: Plasma Interface (Cover Removed) ................................................................................................... 16
Figure 4: Lifter Assembly .................................................................................................................................. 17
Figure 5: Power Connection and Fuse .............................................................................................................. 20
Figure 6: Control Unit Rear Mounting ............................................................................................................. 21
Figure 7: Control Unit Front Mounting ............................................................................................................ 22
Figure 8: Plasma Interface Mounting ............................................................................................................... 23
Figure 9: Lifter Mounting .................................................................................................................................. 24
Figure 10: Torch Breakaway ............................................................................................................................. 25
Figure 11: Torch Mounting Clamp .................................................................................................................... 26
Figure 12: System Cables................................................................................................................................... 27
Figure 13: System Grounding ............................................................................................................................ 28
Figure 14: General Interfacing Examples ......................................................................................................... 29
Figure 15: Basic CNC Interface ......................................................................................................................... 32
Figure 16: Powermax Connections using Plasma Interface Unit ................................................................... 34
Figure 17: Plasma Interface............................................................................................................................... 35
Figure 18: Plasma Interface Connections ......................................................................................................... 36
Figure 19: Interfacing to Older Plasma Systems (MAX100 or MAX200) ....................................................... 37
Figure 20: Setup DIP Switches .......................................................................................................................... 40
Figure 21: Error Indications .............................................................................................................................. 49
Page 6

vi
Page 7

Safety 1
Safety
Read this Manual
Readandunderstandthismanual,thecuttingmachinemanuals,andyouremployer’ssafetypractices.
Note:Thisproductisnotdesignedtobefieldserviceable.Returnthisproducttoanauthorizedrepaircenter
forservice.
Sensor PHC Safety Listing
Note: This product has been designed and manufactured in a c cordance with CE and UL Safety Standards.
UL has successfully tested and listed this product in accordance with the applicable U.S. and Canadian Safety
Standards. File number E307226.
Additional markings:
1) Useminimum75
0
Ccopperwireonly.
2) Usecopperconductorsonly.
3) Suitableforuseonacircuitcapableofdeliveringnotmorethan5000rmssymmetricalamperes,
230voltsmaximum.
4) Integralsolidstateshortcircuitprotectiondoesnotprovidebranchcircuitprotection.Branch
circuitprotectionprovidedbyintegralLISTEDbranchcircuitprotection
fuse.
5) “Solidstatemotoroverloadprotectionisprovidedat145%offullloadcurrent”,ortheequivalent.
Page 8

8 Sensor™ PHC Operation and Setup Guide
Page 9

Section 1: Overview 9
Section 1: Overview
Hypertherm’s Sensor™ PHC (228214) is a plasma torch height control/initial height sensing (THC/IHS) system
designed for conventional plasma cutting applications on an X-Y cutting table. The system uses the plasma
arc voltage to control the physical stand-off (distance) between the torch and work piece during plasma arc
cutting. Initial Height Sense (IHS) is accomplished by ohmic contact sensing or by a limited force stall
detection method. The Sensor™ PHC has been optimized for conventional plasma at or below 200 amps.
Note: Sensor™ PHC is not recommended for HyDefinition
applications. The system is not recommended for use on a water table.
A complete Sensor™ PHC system includes the following components:
PHC Control Module
The PHC control module (228116) houses a microcontroller, an operator control panel, and a Lifter motor drive.
This unit provides initial height sensing, arc voltage control. The PHC control module interfaces with the torch
lifter, the CNC machine, and the plasma power supply through standard discrete I/O interfaces. The operator
interface includes an LED display for set and actual arc voltage as well as error codes. The control unit ma in
functions are: arc voltage control/manual position mode, end of cut retract, IHS test, pierce height, voltage
controlled cut height, pierce delay; and access to setup and calibration adjustments. See Figure 2 on page 15.
Plasma Interface Assembly
®
or HyPerformance™ cutting or for higher power
The plasma interface (228256) provides a clean, standardized connection between the PHC control module
and the plasma power supply. The assembly can be mounted either to the back of or inside the plasma power
supply. The voltage divider provides a filtered low voltage signal which is derived from the cutting arc voltage.
The interface also provides an enclosed terminal block for easy connection to the interface signals. See Figure
3 on page 16.
Lifter Assembly
The torch lifter station (228117) positions a torch head vertically above the work piece and is controlled by the
PHC control module. Its maximum standard stroke is 6 inches (152 mm) between home and the lower limit. It
is driven by a DC motor attached to a lead screw. The control module interfaces with an optional lower limit
switch to detect maximum travel downward. The control also interfaces with an optional home switch to detect
when the lifter is in the highest position. The standard lifter does not use limit switches but has been designed
to allow for hard stop limit detection. A power-off brake disables power off motion of the torch. A torch
breakaway is an integral part of the lifter and provides a level of protection for the torch, lifter and X-Y table.
Upon impact, the breakaway releases from the locked position and allows the torch to float. A breakaway
switch detects when this protection has tripped and signals both the PHC control and the CNC machine. See
Figure 4 on page 17.
Sensor PHC Models
Kit Number Description
228214 Sensor PHC with control module, lifter, and 50-foot cables
228123 Sensor PHC (with 123896) for Powermax bundle
228242 Sensor PHC without lifter station
228243 Sensor PHC without lifter or 123895
228244 Sensor PHC without control module
228245 Sensor HPC without plasma interface
Page 10

10 Sensor™ PHC Operation and Setup Guide
Features
Sensor™ PHC Plasma Height Control is an automated height control system for plasma shape cutting
applications. This product uses microprocessor technology to automatically detect the plate and adjust torch
position to an arc voltage set point during plasma cutting operations. This reduces operator input, improves
accuracy and increases productivity. The design of the Sensor™ PHC has been optimized for lower power
conventional plasma operation.
Features
¾ Sensor™ PHC can be used with any CNC
¾ Easy setup & operation
¾ Both manual & automatic operation modes
¾ Microprocessor control for increased sensitivity and control
¾ High positioning speeds possible with up to 6 amps continuous current and linear adjustment over
full range
¾ Built-in torch breakaway protection
¾ Built-in diagnostic and fault detection features
¾ Auto retract on plate contact
¾ 7 Segment LED display for set/actual arc voltage & error displays
¾ Power on indicator
¾ Upper and lower limit indicators
¾ In Position Indicator
¾ Attention / error indicator
¾ Torch position hold indicator
¾ Plate contact indicator
Options
¾ Interface cables
¾ Torch mounting clamps -1 3/8”, 1 3/4” and 2” diameters available.
Page 11

Section 1: Overview 11
System Specifications*
Compatible motors:
DC PM 24Vdc, 2 Amps to 6 Amps
Max power output:
Standard lifter range:
Motor output:
Accuracy:
Voltage control range:
IHS range:
Operator controls:
Operator switches:
Operator display:
Calibration adjustments:
Setup DIP switches:
Measuring technology:
Interface inputs/ outputs:
150W
Linear 6” (152mm)
Full “H” bridge PWM with current & voltage sensing
0.01” (.25mm ) or 0.5 Volt **
50 Vdc to 210 Vdc
0.05 inches (1.2 mm) to 0.5 inches (12 mm) **
Arc voltage, IHS height, & pierce delay control knobs
IHS test, auto / manual, & manual up / down
3 digit 7 segment display for set volts, actual volts, & error
Arc voltage, stall force, auto kerf detect level
Max motor current, arc voltage response, IHS speed, auto delay,
int/ext pierce delay, end of cut retract height, auto kerf detect,
preflow during IHS, limit switches, breakaway switch, arc voltage
calibration
Arc voltage feedback & ohmic contact sensing
8 outputs and 6 inputs optically isolated on “D” connectors
Control dimensions:
Control weight:
Control power:
Standard lifter dimensions:
Standard lifter weight:
Operating environment:
*Information subject to change without notice.
** With Standard supplied lifter mechanics
6.2”(157mm)W x 4.3”(1.9mm)D x 10.4”(264mm)H
9 lbs
115VAC 0r 230VAC +/- 10% 50/60 Hz –selectable
6”(152mm)W x 3.15”(80mm)D x 21.5”(546mm) **
19 lbs **
0 to 50C; 95% relative humidity (non-condensing)
Page 12

12 Sensor™ PHC Operation and Setup Guide
Connections
All connections to the Sensor™ PHC are made through four connectors on the bottom of the control unit. See
Figure 1.
Lifter signal
connections
Computer
controller I/O
Input power
115/230 Vac
Figure 1: Connections
table.
Fuse and voltage
selector w/ switch
WARNING! For safety and proper operation this unit must be connected to the star ground o n the work
Lifter motor &
brake power
Plasma
system I/O
Ground
Page 13

Section 1: Overview 13
PHC to CNC Signals
All signals to the CNC are connected through the 25-pin D subconnector on the control unit. For detailed
interfacing information, see PHC Interface Signals on page 29 and CNC Interface Signals on page 30.
Outputs to CNC:
Digital IHS complete output
Digital motion output
Digital retract complete output
Digital error output/torch collision
Inputs from CNC:
Digital cycle start input
Digital corner hold input
Digital IHS sync input
Interlock
PHC to Plasma Signals
All signals to the plasma interface are connected through the 15-pin D subconnector on the control unit. These
signals are easily connected through the plasma interface unit or d irectly to a Powermax
®
G3 supply using a
G3 interface cable. For more detailed information, see Plasma Interface Assembly on page 16.
Outputs to plasma:
Digital plasma start output
Digital hold ignition output
Inputs from plasma:
Digital transfer input
Analog attenuated arc voltage
PHC to Lifter Signals
All signals to the lifter are connected through the 9-pin D subconnector on the control unit. For more detailed
information, see Standard Lifter Assembly on page 17.
Inputs from lifter:
Digital upper limit switch
Digital lower limit switch
Digital breakaway switch
Analog tip touch sense
PHC to Lifter Power Connections
All power connections to the lifter are coupled through the 7-pin circular connector on the control unit. For
more detailed information, see Standard Lifter Assembly on page 17.
Outputs to Lifter:
Motor drive 24V PWM
Power off brake 24Vdc
Page 14

14 Sensor™ PHC Operation and Setup Guide
Sensor™ PHC Front Panel Indicators
Green Power
Yellow Upper Limit
Green In Position
Yellow Lower Limit
Red Attention / Error Code
Yellow Corner / Kerf Hold
Red Plate Contact
Red 3 digit Set / Actual Arc Voltage – Error Number – Set Pierce Height & Delay
Sensor™ PHC Front Panel Controls
Multiturn Rotary Pot Set Arc Voltage
Rotary Pot Pierce Height Retract
Rotary Pot Pierce Delay Time
Momentary Toggle Switch IHS Test
Toggle Switch Auto / Manual
Momentary 3 pos Toggle Manual Up / Down
Page 15
Section 1: Overview 15
Control Module
Electrical
Input power (switch selected dual range)................................ 115 VAC or 230 VAC, 1 Phase, 50/60 Hz
Parallel digital I/O ................................................................... + 12 Vdc
Motor drive output voltage ……………………….....................24 Vdc
Motor drive output current ……………………….....................2,3,4,6 Amps max DIP switch selectable
Motor brake output ………………………………......................+24 Vdc ½ Amp
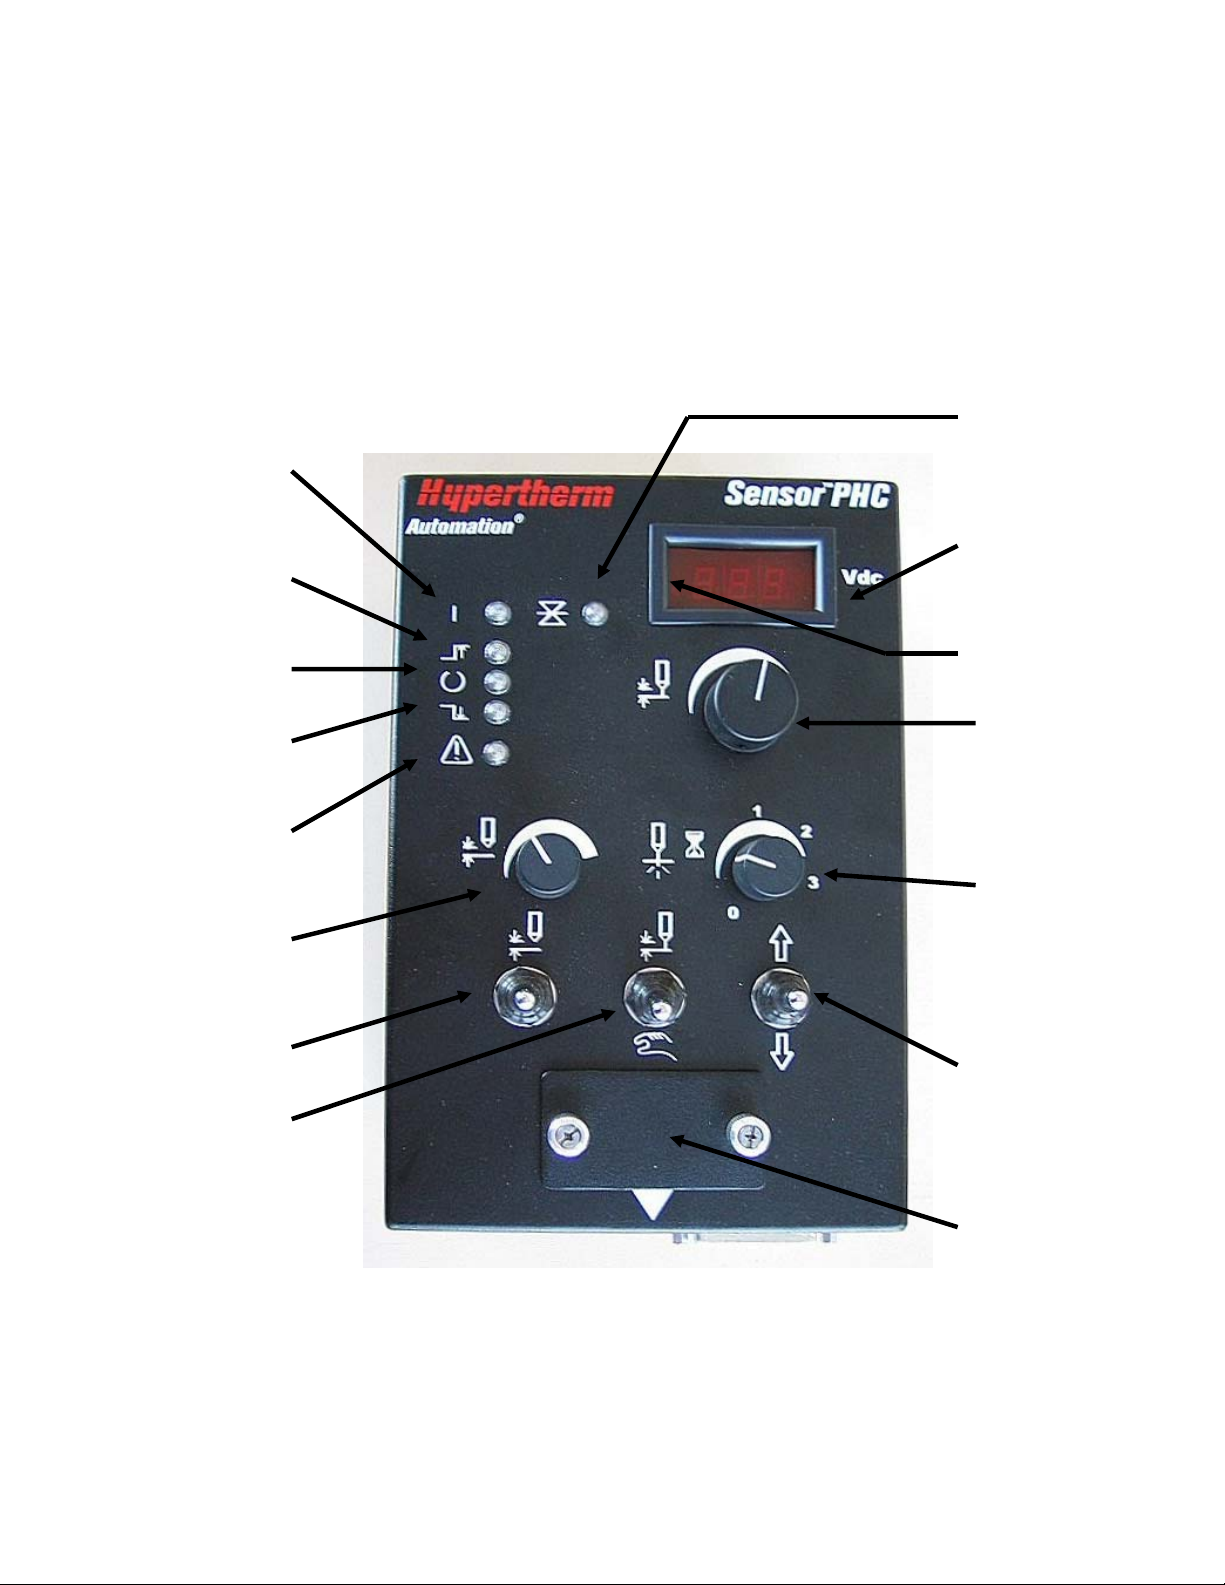
The features of the control module are highlighted in Figure 2.
Power
Upper limit
Torch position hold
Display actual /
set arc voltage &
errors
Voltage in
control
Lower limit
Error
Set IHS
height
IHS test
Manual / auto
Plate contact LED
Set arc voltage
Set pierce
delay time
Manual up / down
for torch
Figure 2: Control Module
Calibration
and setup
Page 16
16 Sensor™ PHC Operation and Setup Guide
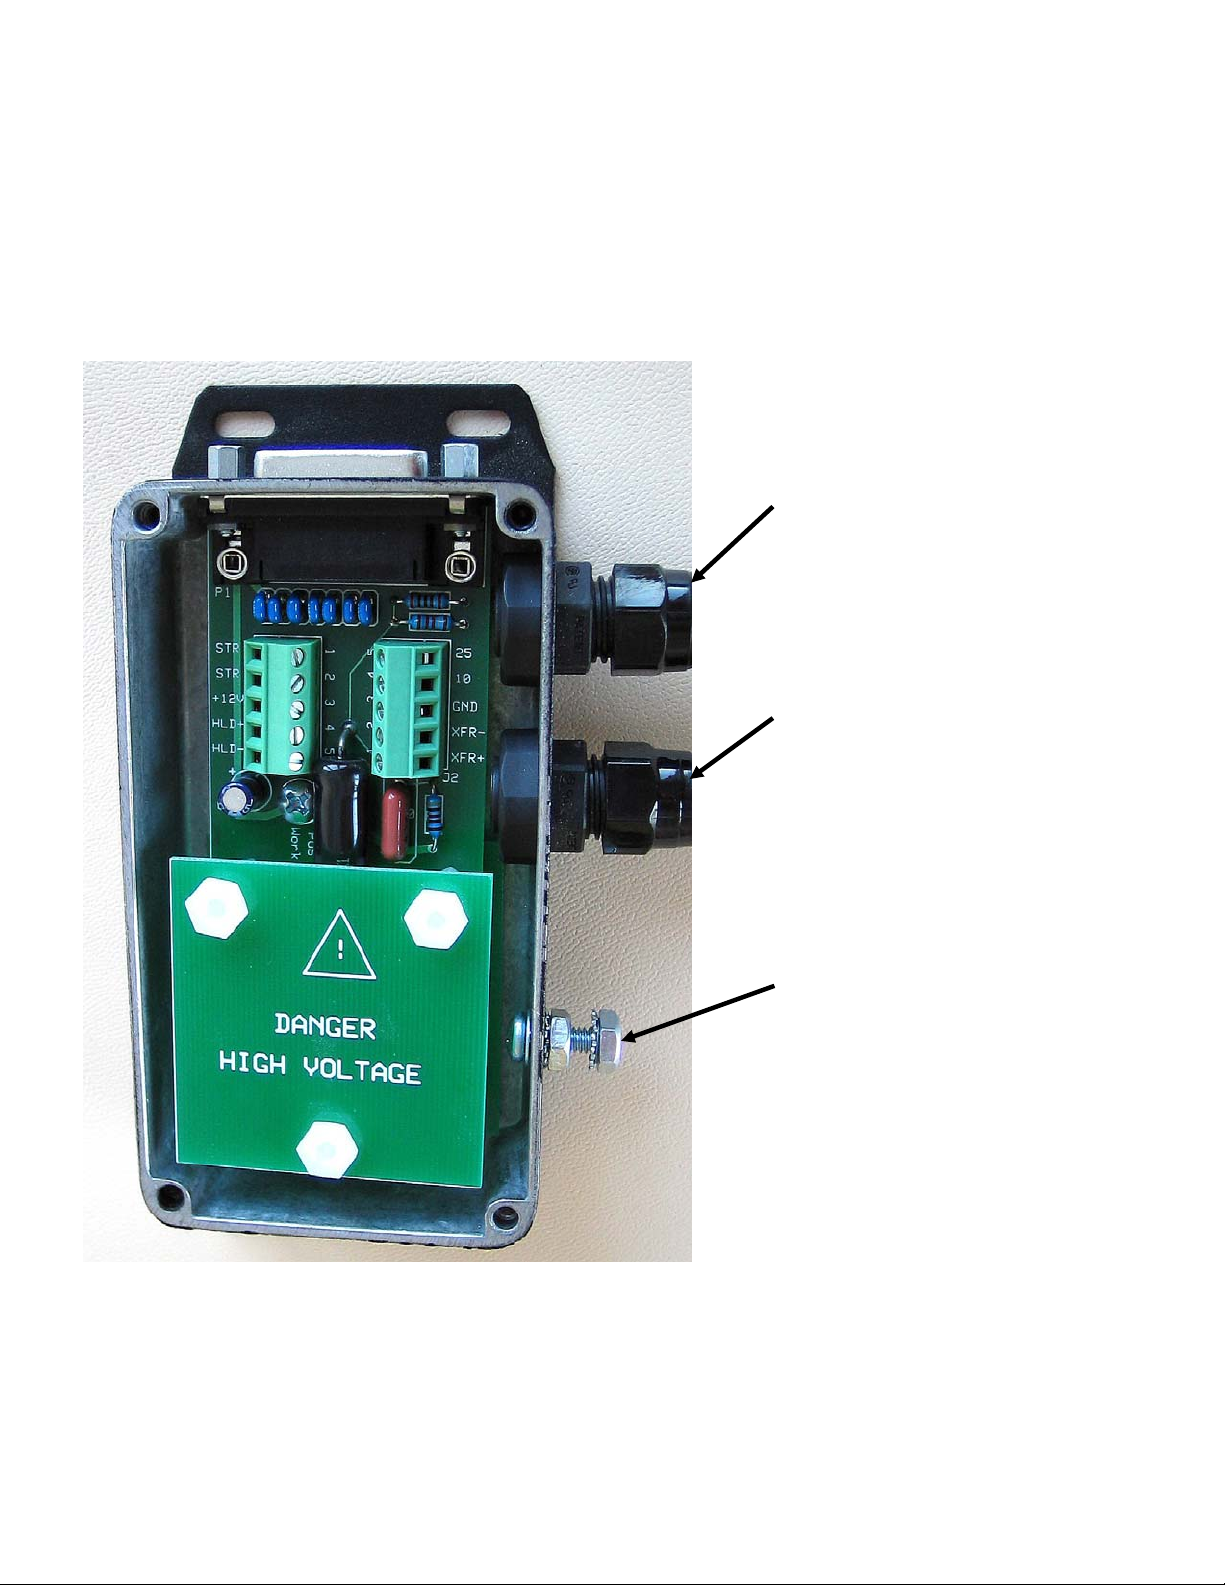
Plasma Interface Assembly
The plasma interface module is shown in Figure 3.
Electrical
Parallel digital I/O.....................................................................+12 Vdc to +24 Vdc
Interface signals……………………………………................... Plasma start, hold ignition, transfer
Voltage divider function............................................................Arc voltage (attenuated and filtered)
Plasma interface
signals
Electrode voltage
(negative)
Connection for ground
to the star ground on
the work table
Figure 3: Plasma Interface (Cover Removed)
If you are using a Sensor PHC 228245 with an HSD 130, select plasma interface assembly 22824 7 (25-foot
cable) or 228248 (50-foot cable). Refer to Field Service Bulletin 805740 for installation information.
Page 17
Section 1: Overview 17
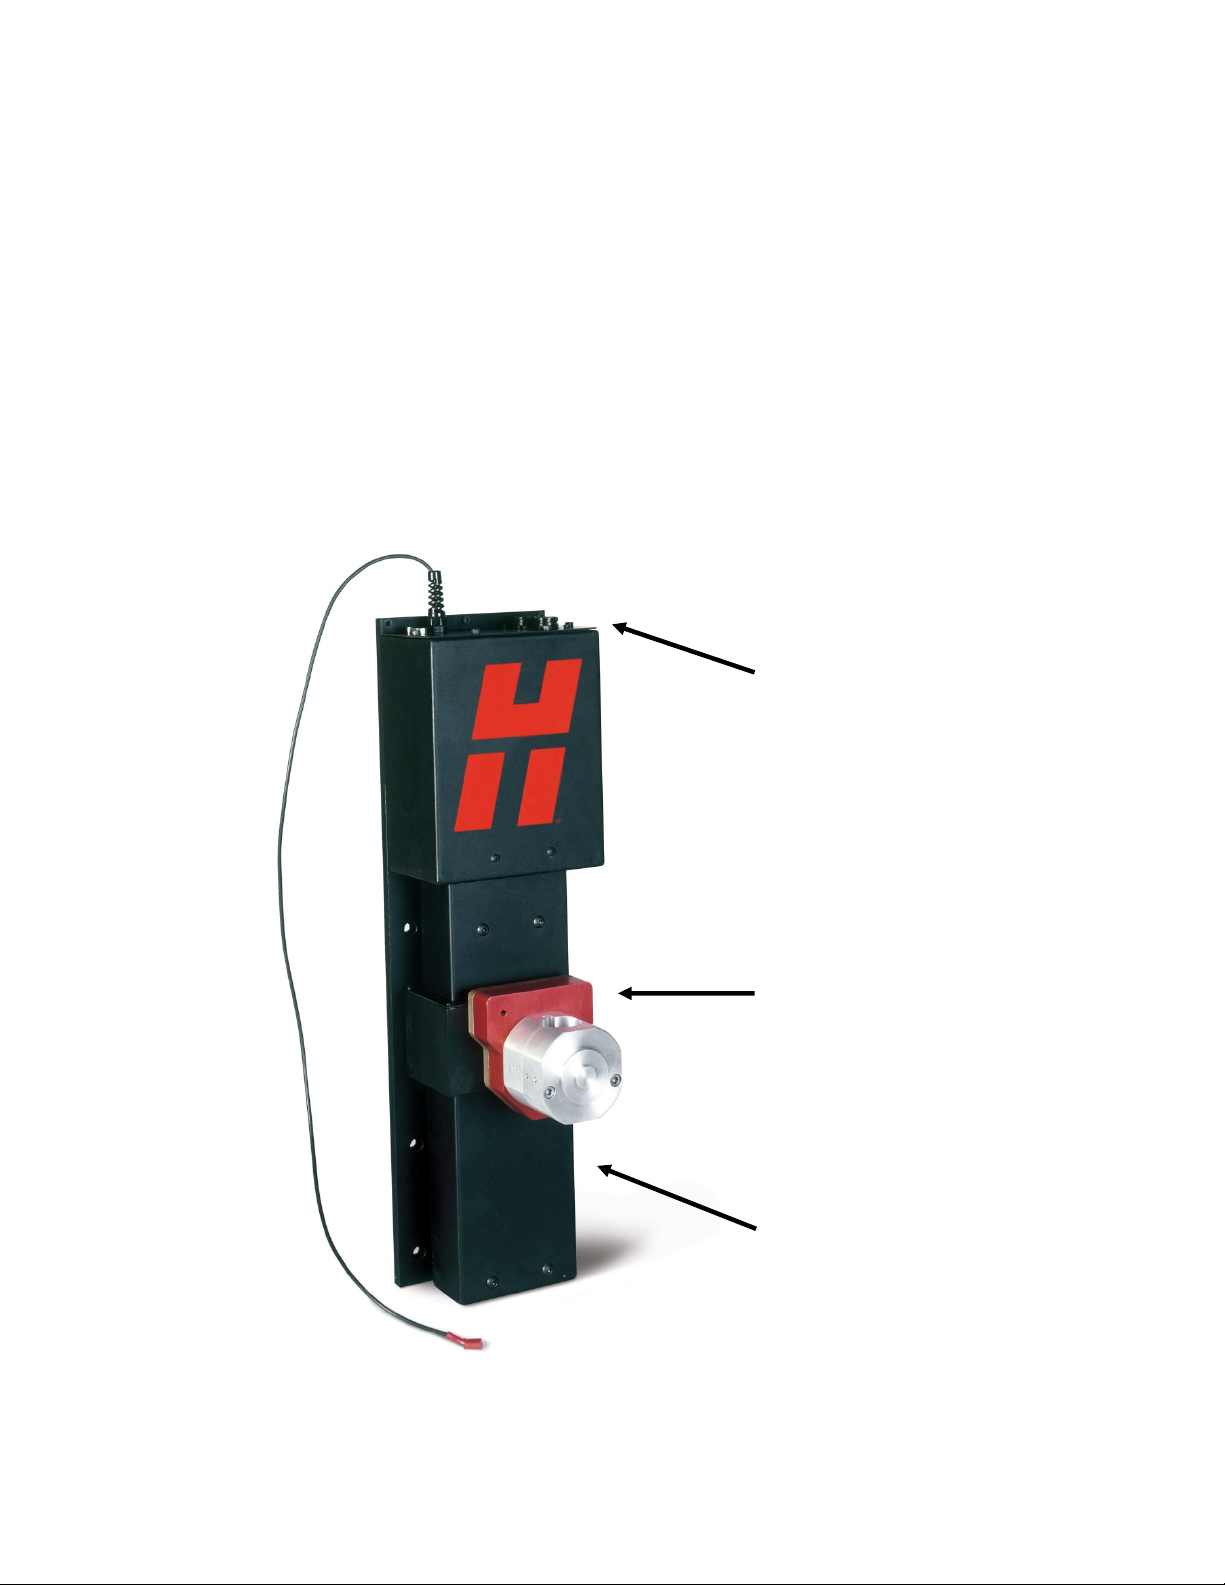
Standard Lifter Assembly
Electrical
Motor .......................................................................................+ 24 Vdc, 3 Amps
Motor brake …………………………………………...................+ 24 Vdc ½ Amp
Limit switches...........................................................................not used – hard stop limit detection
Breakaway switch ……..……………………………..................+ 12 Vdc proximity
Lifter Control Function
Motordrive...............................................................................DC full bridge, PWM chopped current source
Lifter speed feedback.............................................................Motor voltage
Maximum lifter speed..............................................................200 inches (508 cm) per minute
Maximum lifter stroke..............................................................6- inches (152 mm)
Maximum lifter load 10 pounds
All cable connections
exit top cover
Torch magnetic
breakaway
All lifter components, including
motor and brake, are fully
enclosed
Figure 4: Lifter Assembly
Page 18

18 Sensor™ PHC Operation and Setup Guide
Page 19

Section 2: Installation and Setup 19
Section 2: Installation and Setup
The standard PHC system includes the following components:
Standard components
PHC Control Module
Power cord - 6.5 ft. (2 m)
Lifter assembly with torch breakaway
Plasma interface assembly
Interface cables
• Lifter motor drive cable
• Lifter interface cable
• Plasma interface cable
• Ohmic contact wire
• CNC interface cable
Sensor™ PHC system instruction manual
In addition, the following optional components can be ordered:
Optional components
Interface cables
Torch mounting clamps -1 3/8 ”, 1 3/4” and 2” diameters available.
Claims
Claims for damage during shipment
If your unit is damaged during shipment, you must file a claim with the carrier. Hypertherm will furnish you with
a copy of the bill of lading upon request. If you need additional assistance, please contact your Hypertherm
Customer Service agent.
Claims for defective or missing merchandise
If any of the merchandise is defective or missing, call your authorized Hypertherm distributor. If you need
additional assistance, please contact your Hypertherm Customer Service agent.
Page 20

20 Sensor™ PHC Operation and Setup Guide
Power Requirements
The PHC can be connected to either 115 Vac or 230 Vac 50/60 Hz. Depending on the input voltage, Slow
Blow fuses of the correct size should be installed. For 115 Vac, install a 2 Amp fuse and for 230 Vac, a 1 Amp
fuse should be used. The power input voltage is selected by installing the fuse block into the power input
module so that the correct voltage is displayed through the power input module window. See Figure 5 for input
voltage selection.
If the line cord plug is removed and the unit is directly wired then the connections should be made as follo ws.
• Blue wire AC neutral
• Brown wire AC hot
• Green wire ground-chassis
WARNING!
Configure for the correct
input voltage. 115V or
230V should be displayed
in the window.
Figure 5: Power Connection and Fuse
Page 21

Section 2: Installation and Setup 21
Control Unit Mounting
Before interconnecting the PHC system, mount the units as required, using customer-supplied hard wa re. Do
not allow the units to lie unsecured on top of cabinets or on the floor. The control units can be mounted from
either the rear or the front as shown in Figure 6 and Figure 7.
Control Unit Mounting from Rear
Mount the PHC control unit close to the machine operator console for easy access to the operator panel. The
unit should be mounted to provide easy access and visibility to the PHC controls and display. There are four
mounting holes for #10-32 inch or M4 mm fasteners.
NOTE: For reliable operation the ground must be connected.
Figure 6: Control Unit Rear Mounting
Page 22

22 Sensor™ PHC Operation and Setup Guide
Control Unit Mounting from Front
Mount the PHC control unit close to the machine operator console for easy access to the operator panel. The
unit should be mounted to provide easy access and visibility to the PHC controls and display. There are six
mounting holes available. See Figure 7
NOTE: For reliable operation the ground must be connected.
WARNING!
Connect ground here
Figure 7: Control Unit Front Mounting
Page 23

Section 2: Installation and Setup 23
Plasma Interface Assembly Mounting
Mount the plasma interface assembly close to the plasma power supply for easy connection of arc voltage and
signal wires between the units. The unit can be mounted in any position and can be mounted directly to the
back or inside of the power supply. The mounting holes are sized for #6 or M3 fasteners. See Figure 8.
NOTE: The plasma interface ground terminals must be connected to the plasma power supply
positive ground to provide measurement feedback for arc voltage. This feedback is essential for
optimal cutting performance.
WARNING!
Connect to the star
ground on the work
table.
Figure 8: Plasma Interface Mounting
Page 24

24 Sensor™ PHC Operation and Setup Guide
Lifter Assembly Mounting
Mount the lifter assembly on the cutting table to take maximum advantage of the vertical travel range. Typically
the bottom of the lifter should be between 6 and 8 inches above the cutting table.
NOTE: The lifter ground terminal must be connected to the cutting table ground to provide
measurement feedback for tip touch sensing. This feedback is essential for optimal cutting
performance. See Figure 9.
Figure 9: Lifter Mounting
WARNING!
Connect to the star
ground on the work
table.
Page 25

Section 2: Installation and Setup 25
Torch Breakaway Assembly
The torch breakaway (229164) should be mounted to the lifter as shown in Figure 10.
CAUTION: The breakaway uses extremely strong magnets to clamp the two halves of the
breakaway unit together. Use extra care when you mate the two halves of the breakaway.
Hold the breakaway at a 45 degree angle to the mounting plate and carefully place the lower alignment pin into
the mating depression on the breakaway back plate. Slowly angle the breakaway toward the back plate. Use
care to avoid pinching your fingers between the two halves. After installation, it is almost impossible to
separate the two halves without the leverage of the mounting block and torch.
Figure 10: Torch Breakaway
WARNING!
Pinch Point: Use
Caution when mating
two halves of torch
breakaway assembly.
Page 26

26 Sensor™ PHC Operation and Setup Guide
Torch Mounting Block Kit
Mount the torch mounting block kit to the lifter torch breakaway assembly. See Figure 11.
The mounting blocks are available in three sizes as listed.
• 128277 Torch mounting block 1 3/8” diameter
• 128278 Torch mounting block 1 3/4” diameter
• 128279 Torch mounting block 2” diameter
Breakaway
mounting plate
Gap adjustment
set screw
Torch breakaway
Torch mounting clamp
Figure 11: Torch Mounting Clamp
Page 27

Section 2: Installation and Setup 27
System Cables
Install system cables as shown in Figure 12. All cables should be properly shielded with shield connections at
both ends of the cables. If possible, route all PHC cables away from high power plasma cables. If both the
plasma high power and PHC cables must share a cable track, it is recommended that they are se parated as
much as possible in the cable track. For reliable operation, all grounds must be connected to machine grounds
as directly as possible.
Tip touch sense
high voltage cable
Lifter signal cable
PN = 123897
CNC interface cable
PN = 123895
See Figure 15
Plasma signal wiring,
user supplied
Lifter power cable
PN = 123898
Plasma interface
cable
PN = 228249
High voltage wiring,
user supplied
See Figure 16
Figure 12: System Cables
Note: If you are using a Powermax with a built-in voltage divider, use the Powermax interface cable 123896.
Page 28

28 Sensor™ PHC Operation and Setup Guide
Grounding Requirements
WARNING!
To ensure personal safety and reduce electromagnetic interference (EMI), the PHC system must be
properly grounded.
NOTE: For reliable operation, the lifter ground terminals must be connected to the ground on the
cutting table ground to provide measurement feedback for tip touch sensing. The plasma interface
ground terminals must be connected to the plasma power supply positive ground to provide
measurement feedback for arc voltage. Both types of feedback are essential for optimal cutting
performance.
Power cord grounding
The PHC control module must be properly grounded through the power cord according to national or local
electrical codes.
Protective earth ground
Install protective earth (PE) grounding cables to the three PHC components (control unit, lifter, and plasma
interface,) as shown in Figure 13. Grounding must comply with national or local electrical requirements.
Note: The PE (Ground) cables must be supplied by the customer.
Connect lifter
assembly to star
ground on work
table.
Connect control
unit to star ground
on work table.
Connect plasma
interface to star
ground on work
table.
Figure 13: System Grounding
Page 29

Section 2: Installation and Setup 29
PHC Interface Signals
Most of the PHC interface signals are through optoisolators. Figure 14 shows the details of connecting the IO
to external switches, relays, transistors, and other circuitry. The figure shows examples using both the
internally available isolated +12V source and using an external voltage source. Do not use an external voltage
higher than +24V with inputs without adding some additional series resistance.
Note: The “Plasma Start” output to the plasma power supply is a relay dry contact closure.
WARNING!
Do not exceed 24V or 30mA in or out of any optoisolator. Observe correct signal polarity to prevent damage.
Example Inputs
External Circuitry
Use Internal PHC +12V Supply
SWITCH RESISTOR LED
Use External +24V Supply
OPTO ISOLATOR
Use External +24V Supply
+
24V
GND_External
+
24V
RELAY
GND_External
Sensor PHC Internal Circuitry
Inputs
+12V Field
+IN
-IN
+IN
-IN
+IN
-IN
3300
3300
3300
Outputs External Circuitry
+12V Field
+OUT
-OUT
+OUT
-OUT
+OUT
-OUT
Example Outputs
Use Internal PHC +12V Supply
Use External +24V Supply
Use External +24V Supply
RELAY
Figure 14: General Interfacing Examples
RESISTOR
OPTO ISOLATOR
DIODE
GND_External
+
24V
GND_External
+
24V
Page 30

30 Sensor™ PHC Operation and Setup Guide
CNC Interface Signals
See Figure 14 on page 29 for an illustration.
CNC Interface Signals 25-pin D Subconnector
Name Pair ~ Pin #s (wire color) Signal Type
Cycle Start
Auto Disable / Corner Hold In + 10 (red) ~ In - 22 (green) Isolator input
IHS Sync In + 9 (red) ~ In - 21 (white) Isolator input
IHS Complete Out + 18 (black) ~ Out - 5 (yellow) Isolator output
Motion
Retract Complete Out + 16 (black) ~ Out - 3 (green) Isolator output
Error or Breakaway
(DIP switch selectable)
Interlock
Field +12V
Field Common
Note: All required signals are shown in bold. All other signals are optional for multiple torch operation,
improved performance, or reduction in cycle times.
In + 11 (red) ~ In - 23 (blue) Isolator input
Out + 17 (black) ~ Out - 4 (blue) Isolator o utput
Out + 15 (black) ~ Out - 2 (white) Isolator output
14 (black) ~ 1 (red)
contact closure required
12 (red), 24 (yellow), 13 (yellow),
25(brown)
6 (brown), 19 (black), 8 (black), 20
(orange)
Isolator & relay coil
Field power output
Field power
common
WARNING:
Observe optoisolator signal polarities to prevent damage to the control unit.
CNC Signal Descriptions
Use a customer supplied mating 25-pin D subconnector or cut off the unused connector and wire directly to the
appropriate signals.
Cycle Start
This signal is an output from the CNC and an input to the PHC. The CNC activates this signal to begin the
Initial Height Sensing and start a plasma cut.
Auto Disable / Corner Hold
This output from the CNC is activated to turn off the automatic voltage control and freeze the position of the
torch. This signal is optional but improves performance and is usually used to prevent diving in corners. This
signal is required if PHC pierce delay has been disabled and the CNC is controlling the pierce delay time. In
this case, the “Auto Disable” is activated during the “Pierce Delay Time” as well as the subsequent “Accel
Delay” to allow machine motion to reach a steady cutting speed.
Page 31

Section 2: Installation and Setup 31
IHS Sync
This optional CNC output is used to synchronize torches in a multiple torch installation. The CNC issues this
signal to delay plasma torch ignition until all torches in a multiple torch configuration have completed their IHS
sequence and are in position and ready to fire. When the CNC releases (de-activates) this signal, the torch
ignites and the plasma torch begins piercing.
For single torch installations, this signal is not required and can be left unconnected.
IHS Complete
This optional signal is an output from the PHC and an input to the CNC. This signal is used to indicate that
initial height sensing is complete and that a torch is in position and ready to fire. For multiple torch installations,
the CNC waits for all active torches to indicate IHS COMPLETE before simultaneously releasing all IHS SYNC
signals to allow the torches to ignite.
For single torch installations, this signal is not required.
Motion
This signal is an output from the PHC and an input to the CNC. The signal is issued after plasma ignition and
the PHC set pierce delay time. It indicates to the CNC that the pierce delay is complete and the cut motion
should begin. If the CNC performs all pierce delay timing, the EXT_PIERCE_DELAY - DIP switch on the PHC
should be turned ON which forces the PHC pierce delay to be zero and disables the front panel pierce delay
control. If the CNC is controlling the pierce delay, the CNC uses the AUTO_DISABLE / HOLD signal to delay
the arc voltage control until the pierce and accel times have elapsed.
Retract Complete
This signal is an output from the PHC that is active when a cut has been completed and the torch has been
retracted to the selected retract height. The CNC can use this signal to delay rapid transit to the next cut until
the torch has been raised and cleared any tip-ups. The use of this signal is optional.
Error
This signal is output by the PHC for errors. The actual error number displays on the PHC front panel LED
display.
Interlock
This is a normally closed contact closure provided by the CNC to allow PHC motion. If this contact is opened,
the PHC motor drive does not receive power.
NOTE: This signal is required for operation of the PHC. If this signal is not used as an external interlock,
use a jumper to satisfy the input.
Page 32

32 Sensor™ PHC Operation and Setup Guide
t
t
CNC I/O
Start Output
Motion Input
OPTO
Interlock Output
RELAY
+
jumper if
not used
RELAY
+24V
Sensor PHC I/O
11
23
17
4
14
1
+Out
+
- Out
+Ou
+
-Ou
+
3300
Common
OPTO
+12V
OPTO
Motion Output
Interlock
RELAY
Start Input
25 Pin D Sub
Figure 15: Basic CNC Interface
Page 33

Section 2: Installation and Setup 33
Plasma Interface Signals
WARNING: HAZARDOUS VOLTAGE & ENERGY The plasma interface signals from
plasma cutting equipment without an internal voltage divider are directly connected to
the plasma cutting circuit output. To prevent electrical shock and energy hazards,
wiring from the plasma cutting circuit of the power supply to the plasma interface
(228256) must be enclosed or protected.
Hypertherm Powermax systems are equipped with a factory-installed intern al voltage divider which is designed
to be safely connected without tools to the Sensor™ PHC plasma interface using the standard PHC to
Powermax cable provided by Hypertherm.
The plasma interface (228256) includes the arc voltage divider for connection to Hypertherm Powermax
plasma supplies not equipped with a factory installed internal voltage divider and other plasma sup plies.
However, the wiring from the plasma cutting circuit to the 228256 must be enclosed or protected for safe
operation and use. The plasma cutting circuit output ratings are printed on the data plate and vary by
manufacturer and model up to 500 VDC and 400 ADC, such that contact with metal live parts of this connection
under normal operating and fault conditions can result in death or burns.
To make connections between the plasma cutting circuit and 228256:
- Use qualified service personnel only.
- Turn OFF and disconnect all power.
- Mount the 228256 as close as is practical to the entry point to the power supply. Permanent
connection is recommended.
- If cord connected, use jacketed cables suitable for the environment.
o Verify that the outer jacket of each interconnecting cable is protected from damage at the entry
point to the power supply. A strain relief is recommended.
o Verify that the outer diameter of the interconnecting cable fits the strain relief with provided
228256:
Plasma start, transfer grip: .114" - .250" diameter
Plasma interface grip: .064" -.210" diameter
o Strip back the outer jacket and individual conductor insulation as needed.
o Insert the outer jacket cable through the strain relief and make co nnections as shown in Figure
16 on page 34.
o Verify the outer jacket is a min. of 1 inch (2.54 cm) inside the 228256 and tighten the strain
relief(s).
- Before operating the equipment, verify that the connections are correct and that all live parts are
enclosed and that all jacket/conductor insulation is protected against damage.
Page 34

34 Sensor™ PHC Operation and Setup Guide
Plasma Interface Signals
Name
Plasma start 2, 10
15-pin D Subconnector
Pin #s
Plasma Interface Signal Type
J1-1, J1-2 (dry
contact)
Relay contact output
Hold iIgnition Pos 3 Neg 11 J1-4 (+), J1-5 (-) Isolator output
Transfer Out + 4 Out - 12 J3-1 (+), J3-2 (-) Isolator input
Arc voltage Out + 8 Out - 15
Ground stud (+),
Term (-)
Attenuated filtered analog
Field +12V 1, 9 J1-3 Field power output
Field common 5, 6, 7, 13, 14 J3-3 Field power common
Start-
Start +
15 D-Sub
J19J3J1
1
2
3
4
5
5
4
3
2
1
Xfer-
Xfer+
1
2
3
4
5
6
PowerMax
WHT
G3 Series
RED
PowerMax
YEL
G3 Series
BLK
+24Vdc
Com
Positive Ground
Work (pos GND)
J15
Arc Volts (neg)
Electrode (neg)
J16
Sensor PHC
Plasma Interface
Figure 16: Powermax Connections using Plasma Interface Unit
For a diagram of circuits on the plasma interface, see Figure 18 on page 36.
Page 35

Section 2: Installation and Setup 35
Start output
(contact closure)
+12V output
50mA max
Hold output +
Hold output -
Common for
12V output
Signals
enter here
High voltage
enter here
Figure 17: Plasma Interface
-Transfer input
+Transfer input
Connection to star
ground on work
table
Connect negative
electrode voltage
here.
Page 36

36 Sensor™ PHC Operation and Setup Guide
WARNING! For safety and proper operation this unit must be connected to positive ground.
RELAY
OPTO
OPTO
Sensor PHC Plasma
Interface I/O
J1
1
2
3
4
5
J3
1
2
3
4
5
Electrode (N eg)
Figure 18: Plasma Interface Connections
3300
+12V Field
1
2
STR
STR
HLD+
HLD-
XFR+
XFR-
External Plasma Supply
(using External +24V)
+24V Exte rnal
GND_External
PLASMA START (+24V)
DIODE
GND_External
Electrode (Neg)
Work
Positive Ground
HOLD
IGNITION
RELAY 24V c oil
TRANSFER
RELAY
WARNING:
Observe signal polarities when connecting to optocouplers. Do not exceed 24Vdc on any signal lines. Do not
exceed 30mA current from any input or output. Do not exceed 50mA total current drawn from Sensor™
internal +12V field supply. Failure to observe these warnings could damage the unit.
Page 37

Section 2: Installation and Setup 37
Plasma Start
This signal is a relay contact output from the PHC and an input the plasma power supply. The PHC activates
this signal by closing the contact to start the plasma power supply.
WARNING: An interface to older plasma systems, such as the MAX100 or MAX200 must be
implemented with a customer-supplied relay (see Figure 19). Older plasma systems draw large current
levels through the PLASMA START input that are far in excess of the capability of the Sensor PHC
START output.
Figure 19: Interfacing to Older Plasma Systems (MAX100 or MAX200)
Hold Ignition
This output from the PHC and input to the plasma power supply should be activated to delay the high
frequency ignition of mechanized torches. This signal is usually issued to synchronize the ignition of multiple
plasma torches. This signal can also be used to save cycle time by performing preflow during IHS. The use of
this signal is optional but improves performance on plasma systems that can use it. This signal is not used for
contact start torches installed on Powermax
Transfer
This signal is an output from the plasma power supply and an input the PHC. The plasma power supply
activates this output to signal that arc transfer has occurred.
®
plasma units.
Page 38

38 Sensor™ PHC Operation and Setup Guide
Lifter Interface Signals
These signals can be directly connected to a Sensor™ PHC standard lifter using the supplie d cable.
Lifter Interface Signals 9-Pin D Subconnector
Name Pin #s Signal Type
Lower limit switch *
Upper limit switch *
Torch breakaway switch 7 - Switch to common Isolator input
Torch tip touch sense 4, 5, 9 Attenuated filtered analog
Field +12V 1 Field power output
Field common 3, 8 Field power common
6 - Switch to common Isolator input
2 - Switch to common Isolator input
* The PHC standard lifter does not include limit switches and the PHC detects the hard stop limits by
monitoring motor speed.
Lower Limit Switch
This signal is an output from the lifter and an input to the PHC. The lifter can activate this signal to indicate that
the lifter has reached the lower range of motion. The normally open/closed sense of this signal can be
changed through setup DIP switch #14. The use of a limit switch is optional.
Upper Limit Switch
This signal is an output from the lifter and an input to the PHC. The lifter can activate this signal to indicate that
the lifter has reached the upper range of motion. The normally open/closed sense of this signal can be
changed through setup DIP switch #14. The use of a limit switch is optional.
Breakaway Switch
This signal is an output from the lifter and an input to the PHC. The lifter can activate this signal to indicate that
the mechanical torch breakaway has tripped. The normally open/closed sense of this signal can be changed
through setup DIP switch #15. The use of a torch breakaway switch is optional.
Page 39

Section 2: Installation and Setup 39
Lifter Power Connections
These connections can be made directly to a Sensor™ PHC standard lifter using the supplied cabl e.
Lifter Power Connections 7-Pin Circular Connector
Name Pin #s Signal Type
Motor power – up direction Positive 1 Negative 2 PWM H bridge output
Lifter brake Positive 4 Negative 5 +24Vdc output
Chassis ground 6
Motor Power
This signal is an output from the PHC. It is output from a PWM controlled “H” bridge motor drive. The
maximum current level can be set using DIP switches #1 and #2. This output is intended to drive a 24Vdc
permanent magnet motor.
Lifter Brake
This output from the PHC is a 24Vdc signal to an electromagnetic brake. When this signal is energized, the
brake is released to allow lifter motion.
Page 40

40 Sensor™ PHC Operation and Setup Guide
DIP Switch Setup
Arc voltage
calibrate
SW1 SW8
Auto kerf
detect level
Stall force
level
Switch on
Switch off
Figure 20: Setup DIP Switches
Switch Settings
Switch settings for control module operation and setup outlined below. Note*: Default switch settings (as
shipped) are indicated in BOLD text.
As shown in the figure above, the setup DIP switches are divided into two groups of eight switches. The top
set of switches is numbered SW1 through SW8 and the bottom set of switches is numbered SW9 through
SW16.
SW1
SW2 Maximum Motor Current / Power
on on Max Current = 2 Amps, 50 Watts
on off Max Current = 3 Amps, 75 Watts *
off on Max Current = 4 Amps, 100 Watts
off off Max Current = 6 Amps, 150 Watts
Set DIP switches SW1 and SW2 to the rating for the current of the lifter motor. This is the maximum current
that is applied and is directly related to the motor power rating. This setting is also used to determine the
minimum applied current for stall sensing and to calculate the motor speed based on the measured motor
voltage.
SW9
SW16
NOTE: For optimum performance it is important that these switches are set correctly. For the standard
lifter, these switches should be set for 3 Amps
Page 41

Section 2: Installation and Setup 41
SW3
SW4 Voltage Control Response / Gain
on on Gain = Low = +/- 4V In Position Range
on off Gain = Med Low = +/- 2V In Position Range *
off on Gain = Med High = +/- 1V In Position Range
off off Gain = High = +/- 0.5V In Position Range
Set DIP switches SW3 and SW4 to select the closed loop voltage control response. The DIP switches should
be set for the highest gain possible that yields an acceptable control response. An acceptable response should
be stable and should have a minimum overshoot. These settings are a function of the lifter and motor
combination. For faster lifters use a lower gain setting. Faster settings can require the use of the “Corner Hold”
signal from the CNC to prevent diving in the corners. This setting affects control.
SW5
IHS Slow Approach / Retract Speed
on Speed = Low = 15% of Max Speed *
off Speed = High = 30% of Max Speed
The setting of SW5 affects the speed of the torch when it approaches the plate during an IHS cycle. This
speed is also used when the torch retracts from plate contact to the pierce height and during the first seconds
of low speed manual motion. This setting is a compromise between positioning accuracy and cycle time. Set a
speed that is as fast as possible and still provides the required IHS range and fine manual motion accuracy.
SW6
CNC Error Select
on Normal – Error output on all errors *
off Error output on Torch Breakaway only
The SW6 allows the user to select logic for error conditions. Select On to provide an output for all errors.
Select Off to provide an output only when the torch breakaway input is active.
SW7
Auto Voltage Control Acceleration Delay
on Low – Enable Voltage Control 0.5 Second after Pierce delay *
off High – Enable Voltage Control 2.5 Second after Pierce delay
The SW7 delay setting is used to allow the cutting machine to accelerate to steady state speed before starting
the closed loop voltage control of torch height. The shorter delay should be used for most machines. For very
large cutting machines, use the longer delay to avoid diving into the plate during machine acceleration.
SW8
External Pierce Delay
on CNC controls pierce delay – Front panel Pierce delay is disabled
off Normal – Internal Pierce Delay *
SW8 should be turned ON if the CNC controls the time for the pierce delay. When this switch is ON, the front
panel control for pierce time is disabled and the PHC uses a pierce time of zero. The CNC issues the AUTO /
CORNER HOLD command, waits for the MOTION signal, and begins timing the pierce delay. After the Pierce
Time has elapsed, the CNC can begin the actual cutting machine motion and start to time the acceleration
delay. After the acceleration delay time has elapsed, the CNC can remove the AUTO / CORNER HOLD and
allow the PHC to control the torch height.
Page 42

42 Sensor™ PHC Operation and Setup Guide
SW9 SW10 End of Cut Retract Time
on on Retract = Low = 0.25 Sec @ Max Speed (0.8” std lifter)
on off Retract = Med Low = 0.5 Sec @ Max Speed (1.6” std lifter)*
off on Retract = Med High = 1.0 Sec @ Max Speed (3.3” std lifter)
off off Retract = High = 1.5 Sec @ Max Speed (5.0” std lifter)
SW9 and SW10 control the end of cut retract. This setting should be set as low as possible to achieve
optimum cycle times and still clear worst case tip-ups. The end of cut retract moves at the maximum lifter
speed.
SW11
Automatic Kerf Detect
on Normal – PHC the detects Kerf crossings and auto HOLD
off Automatic Kerf Detection is disabled*
For the automatic kerf detection to operate properly, the kerf threshold pot must be adjusted to the correct
level. The correct level is low enough to trip the kerf detection when crossing a kerf, but high enough that
nuisance trips are avoided during normal cutting. This pot should be adjusted by viewing the yellow “corner /
kerf hold LED” during a test cut.
SW12
Preflow During IHS
on Plasma Start and Preflow during IHS with capable plasma systems
off Normal – Plasma Start and Preflow after IHS – Contact Start Torch *
Note: This function must be disabled for Powermax
®
contact start torches.
This function is only used with high frequency start mechanized torches. With mechanized torches, this
function can save cycle time by performing IHS and torch preflow during the same period of time. When
“Preflow During IHS” is active, the “Start” and “Ignition Hold” output signals are applied to the plasma system
during the IHS process. This allows the plasma system to begin the gas preflow requirement during the same
period of time when the PHC lifter is positioning the torch at the correct pierce height. After the PHC lifter has
been positioned at the correct pierce height, the Ignition Hold output is removed to allow the torch to start and
the cutting process to begin.
SW13
Reserved
on Normal
off Special operation
SW14
Lifter Limit Switches
on (Sw NC) Open on Limit – Use normally closed lifter inputs
off (Sw NO) Close on Limit – or switches not used, lifter hard stops *
For the standard lifter, limit switches are not used. The PHC senses the lifter upper and lower limits by sensing
when the lifter hard stops at the travel limits.
Page 43

Section 2: Installation and Setup 43
SW15
Torch Breakaway Switch
on (Sw NO) Open on Breakaway – Use normally open s witch input *
off (Sw NC) Close on Breakaway – or switch not used
For the standard lifter, the torch breakaway uses a normally open proximity switch. When the breakaway is
installed, the switch closes. When the breakaway is tripped, the switch opens again.
SW16
Arc Voltage Calibration Mode
on Display actual arc voltage during idle state for calibration
off Normal – Display set arc voltage during Idle state *
For normal operation, this switch should be set to OFF.
This switch is used to display the actual arc voltage on the PHC display. This allows the arc voltage to be
calibrated by adjusting the Arc Voltage adjustment pot. When the calibration mode is active, the PHC displays
“X.X.X.” with the X’s indicating the measured arc voltage and all the decimal points on to indicate calibration
mode.
When calibration mode is active the display can be temporarily overridden by adjusting either the kerf detect
level or the stall force. If you adjust either the kerf detect or stall force, a 0 to 10 reference level displays
temporarily. After one second of inactivity the display reverts to the measured arc voltage.
NOTE: The arc voltage calibration procedure should be performed on all new installations
because the actual measured arc voltage accuracy is a combination of the indiv idual plasma interface
and control units.
Page 44

44 Sensor™ PHC Operation and Setup Guide
Calibration Pot Setup
ARC - Arc Voltage Calibration
This trim pot is used to calibrate the actual arc voltage used for arc voltage control feedback. To calibrate the
arc voltage, place the PHC into the arc voltage calibration mode by turning ON DIP switch #16. This causes
the actual arc voltage to display on the 3 digit LED display. The user can either perform a test cut with a meter
connected to the plasma supply output or connect a known voltage (250 Vdc max.) to the plasma interface arc
voltage terminals (negative electrode and positive ground). Adjust the arc voltage pot until the display is equal
to the applied voltage on the meter.
NOTE: For accurate operation, this procedure should be done for all new installations since the
measured arc voltage accuracy is combination of the specific plasma interface and control units.
KERF - Auto Kerf Detection Level
This adjustment pot sets the auto kerf detection level. The auto kerf function must be enabled by turning ON
the automatic kerf detect DIP switch #11. When this pot is adjusted with the PHC in calibration mode, the
display temporarily shows a 0 to 10 reference level display. The auto kerf detection works by looking for a
rapid change in the arc voltage. When the pot is adjusted toward the lower settings, the PHC looks for smaller
voltage changes and the kerf detection is more sensitive. At higher settings, the kerf detection is less sensitive.
The pot should be set sensitive enough to reliably detect kerf crossings but not so sensitive that false nuisance
trips occur and degrade the height control performance. The operation of auto kerf detect can be checked by
monitoring the yellow Hold LED on the PHC front panel during a plasma cut. If the threshold is properly se t,
the yellow Hold LED lights whenever a Kerf is crossed. Note that this LED also lights when an active
Auto/Corner input is present on the CNC Interface or when the unit is set for Manual operation.
STALL - IHS Stall Sensing Level
This adjustment is used to set the Stall force sensing level during Initial Height Sense (IHS). When this pot is
adjusted with the PHC in calibration mode, the display temporarily shows a 0 to 10 reference level display.
The stall force is always used as a backup to the ohmic contact sensing in automatic mode. When it is set to
the lower settings (turn counter-clockwise), the maximum applied force i s lower d uring IHS. Higher settings
(turn clockwise) increase the maximum applied force. If this setting is too high, the torch or consumables can
be damaged or can deflect the work piece or trip the torch breakaway. Set this adjustment as low as possible
but high enough so that false stalled plate detects do not occur in mid air. The adjustment can be checked by
executing an IHS Test with the nozzle ohmic wire disconnected.
Page 45

Section 3: Operation 45
Section 3: Operation
Automated torch height control (THC) systems used in mechanized plasma cutting are used to provide the
optimum height for the desired metal cutting process. The appropriate cut height is crucial to the pla sma
process to provide the ability to transfer the Arc to the work piece for piercing / cutting and for optimum cut
quality (bevel angle, etc).
With the plasma process there is a direct relationship between the cut voltage and the torch height (g ap
between the metal work surface and the torch electrode). By using the automated control to monitor the
working arc (cut) voltage, it can then control the THC to maintain a specific voltage set point.
Page 46

46 Sensor™ PHC Operation and Setup Guide
Automatic Operation
Automatic voltage control operation is selected by placing the lower center toggle switch in the upper auto
position. In this mode, the unit automatically performs IHS to the set pierce height, ignite the plasma torch, wait
for the torch to pierce the plate, and begin the cutting machine motion.
The basic Sensor™ PHC auto operation setup consists of three steps:
1. Set arc voltage
Use the larger multi-turn adjustment, to set the arc voltage on the display. The starting point for this
voltage should be included in the cut charts supplied with your plasma system. It is important to remember
that this voltage is just a starting point since the actual arc voltage depends on consumable wear, torch
lead lengths, gas flow rates, and machine motion. For optimal cut quality you must make small
adjustments to the nominal arc voltage that is specified in the cut charts. The important item to control is
the torch-tip to work height during a cut. The arc voltage is just an indirect method to control this height.
2. Set IHS retract or pierce height
Use the lower left rotary control to set the IHS retract height. As this control is adjusted, the display is
temporarily overridden with a 0 to 10 reference level. This represents the desired pierce height. The actual
height should be available in the cut charts supplied with the plasma system. This setting is approximate
because it depends on whether the unit can sense the plate using ohmic contac t or must rely on the
backup limited force stall sensing.
Check this setting by performing an IHS test and check for the correct pierce height. Each time the lower
left IHS test switch is pressed, the torch alternates between the set IHS height and the end of cut retract
height. Continue testing and fine tuning this adjustment until the desired IHS height is achieved.
If the IHS speed (DIP SW #5) has been set to the normal low speed setting, then the IHS retract
adjustment range should be between about 50 thousandths and 1/2 inch. If the IHS speed was set to the
high speed setting, then the IHS retract adjustment range should be between about 1/10
3. Set pierce delay time
Use the lower right rotary control to set the pierce time delay. As this control is adjusted, the display is
temporarily overridden with a 0 to 4.0 second delay time. This is the time delay between igniting the torch
and beginning the cut motion. The pierce delay is the time required for the plasma torch to initially cut
through the plate. This time delay should be included in the cut charts provided with your plasma system.
To provide more accuracy for the short delay settings, this rotary control is divided into two ranges. The
first range covers the first ½ rotation of the control and provides a linear delay between 0 and 1 second.
The second ½ rotation provides a linear delay of between 1 and 4 seconds.
th
inch and 1 inch.
Page 47

Section 3: Operation 47
Manual Operation
Manual lifter operation is selected by placing the lower center toggle switch in the lower manual position. In
this mode, the unit manually jogs or slews slow or fast in the desired direction. If a cut is started while in the
manual mode, the torch moves only in response to the front panel manual move commands. The IHS, voltage
control, and end-of-cut retract functions are all disabled during manual mode.
Use your cut chart and the following steps to set up operations in manual mode:
1. Select manual mode with the toggle switch.
2. Set cut height with the up/down toggle switch.
The three types of manual motion are jog, slow and fast. Note that slow and fast types of manual motion are
time-based.
Manual Jog
Manual jog motion is useful for fine-tuning the torch height in manual mode. When the lower right manual
motion switch is momentarily switched into either the up or down position, the torch jogs approximately 20
thousandths in the desired direction. Repeat the momentary depression of the switch up or down to create a
series of discrete jog motions in the desired direction. This is useful for fine-tuning the torch height in manual
mode.
Slow Manual Motion
Continue to hold the manual motion switch for about ½ second after the jog has completed to create slow
manual motion in the desired direction. This motion should be at the IHS speed as determined by DIP SW #5.
Fast Manual Motion
Hold the manual motion switch for about one second after the start of slow manual motion to create fast
manual motion. The fast manual motion continues for as long as the manual motion switch is depressed.
Page 48

48 Sensor™ PHC Operation and Setup Guide
Page 49

Section 4: Troubleshooting 49
Section 4: Troubleshooting
Error Codes
Error code
Displays here
Red error
LED
Figure 21: Error Indications
The red ERROR LED indicates abnormal conditions. The error code is displayed in the PHC 3 digit LED
display as E.XX where XX represents the error number. The meanings are listed below. Most errors are
cleared by either removing the abnormal condition or with the application of the next “Cycle Start” from the
CNC.
E.01 CYCLE_START at power up Error
Reason: The CNC CYCLE_START input was active when the PHC was powered up.
Solution: Deactivate the CYCLE_START input on the CNC interface to clear the error.
E.02 Plate Contact at Home Error
Reason: Ohmic contact sensed the work piece when the torch was at the maximum retract position.
Possible causes:
• A short circuit in either the nozzle connection wire or the torch consumables.
Page 50

50 Sensor™ PHC Operation and Setup Guide
• A coolant leak on a liquid cooled torch.
Solution: This error is reset on the next CYCLE_START.
E.03 Lifter Timeout Error
Reason: Lifter motion was commanded but the lifter destination was not sensed within the timeout period.
Possible causes:
• A mechanical problem in the lifter such as the motor coupling to the lifter mechanics has loosened.
• The torch lead set is binding and limiting the lifter motion.
• A problem with the motor wiring, motor drive, or with the motor itself.
Solution: The error is reset on the next CYCLE_START.
E.04 Limit Reached during Auto Operation
Reason: The lifter reaches a travel limit during arc voltage controlled operation.
Possible causes:
• The lifter does not have the range of travel to accommodate the thickness of the material being cut.
• Improper operation of either the limit switches or the limit switch wiring.
Solution: Adjust the lifter or torch mounting to make more effective use of the lifter travel range.
This error is reset on the next CYCLE_START.
E.05 IHS SYNC Timeout
Reason: The torch reaches the IHS pierce position and is waiting for the IHS_SYNC input from the CNC to be
released.
Solution: Check the wiring of the IHS_SYNC input and the CNC programming for this signal. This error is
reset on the next CYCLE_START.
The HIS_SYNC signal is usually only used for multiple torch installations.
E.06 Transfer Timeout Error
Reason: The Plasma torch was fired but that the TRANSFER signal was not received within 5 seconds
Possible causes:
• A faulty IHS sequence that resulted in an improperly high pierce height.
• Failure to transfer due to bad consumables.
• Improper plasma gas settings.
• Bad work piece grounding.
• The TRANSFER signal on the power supply interface is missing or improperly connected to the PHC
Plasma Interface
Solution: The next CYCLE_START resets this error.
E.07 Lost Plasma Arc Error
Reason: The plasma torch lost transfer during operation before CYCLE_START was removed
Possible causes:
• Cutting off the edge of the plate.
• Bad consumables.
• Improper height control settings.
Solution: The next CYCLE_START resets this error.
E.08 Torch Breakaway Error
Reason: The torch breakaway has tripped.
Possible causes:
• The torch crashed into the work piece because of tip-ups or improper height control setup.
Solution: If a torch breakaway is not installed, turn the setup DIP switch #15 on the PHC to OFF (down) to
ignore this input.
If a torch breakaway is installed, see Torch breakaway error on page 53 for a troubleshooting procedure.
Page 51

Section 4: Troubleshooting 51
E.09 Low Input Power Error
Reason: The PHC input power is 20% below the nominal voltage.
Solution: increase the input voltage to within the nominal operating range.
E.10 High Input Voltage Error
Reason: The PHC input power is 15% above the nominal voltage.
Solution: Decrease the input voltage to within the nominal operating range.
E.11 Over-Temperature Error
Reason: The motor drive circuitry has experienced an over-temperature shutdown.
Solution: Allow the unit to cool down.
E.12 Interlock Tripped Error
Reason: The External Interlock has been tripped.
Solution: Verify that there is a contact closure across the External Interlock input on the CNC Interface
connector.
E.13 Excess Plate Contact Error
Reason: The torch tip made excess contact with the plate during a short period of time.
• The voltage set point is too low.
• The consumables are worn and the voltage set point needs to be increased.
Solution: The next CYCLE_START resets this error.
E.99 Internal Software Error
Reason: An abnormal, unexpected condition occurred in the software.
Solution: Perform a power up reset of the PHC.
Page 52

52 Sensor™ PHC Operation and Setup Guide
Troubleshooting Guide
Problem Solution
The Error LED and Error code
are displayed.
¾ Note the error code number and refer to the detailed list of
error indications on page 49.
No response to
CYCLE START Input
Torch Ignites before IHS is
complete
No IHS motion
Inaccurate IHS using ohmic
contact
¾ Check the power switch on the PHC.
¾ Check power connections.
¾ Check the fuse in the power entry module.
¾ Check the cycle start connection.
¾ Check that preflow during IHS is disabled – DIP SW #12 Off.
¾ Check plasma Corner Hold Input if it is used.
¾ Check that the PHC is in auto mode.
¾ Check that the torch lead set is not binding.
¾ Check that the stall force is not set too low – increase stall
force setup adjustment.
¾ Check that the PHC is in auto mode.
¾ Check that the ohmic contact wire is connected.
¾ Check that the torch retaining cap is tight.
¾ Check for water on the plate. If there is water present,
disconnect the ohmic wire and use stall force only.
¾ Check for oil or paint coating on the plate. If they are
present, use stall force only.
¾ Check the nozzle, shield, or both and clean or replace them.
¾ Check the work plate connection.
Inaccurate IHS using stall
force
Torch fails to ignite
Torch fails to Transfer
¾ To disable ohmic sensing, disconnect the wire from the
torch tip.
¾ Check that the stall force is set correctly.
¾ Check for excessive plate deflection.
¾ Check plate support.
¾ Increase the IHS setting to compensate for plate deflection.
¾ Check that plasma is powered and operational.
¾ Check for proper IHS height.
¾ Check that the IHS SYNC input from the CNC is not active.
¾ Check the torch consumables.
¾ Check that the pierce height is not too high.
¾ Check the work plate connection.
¾ Check the torch consumables.
¾ Check the preflow gas flow rate.
Page 53

Section 4: Troubleshooting 53
Problem Solution
Arc extinguishes after
Transfer with large pierce
hole
¾ Check that the pierce delay is not too long.
¾ Check that the machine motion output is active and
connected to the CNC.
¾ Check that the CNC is active and the set machine speed is
appropriate.
Torch begins cutting before
the pierce is complete
Torch dives toward plate
immediately after voltage
control begins
Torch retracts from plate
immediately after voltage
control begins
Erratic voltage control
Failure to retract at end of cut
Torch breakaway error
¾ Check that the pierce delay is not set too short.
¾ Increase the Set Arc Voltage value.
¾ Increase Machine Accel Delay – DIP SW#7 Off.
¾ Check the arc voltage calibration.
¾ Decrease the Set Arc Voltage value.
¾ Increase the Set Pierce Height value.
¾ Check the arc voltage calibration.
¾ Check all system ground connections.
¾ Check the torch for cooling water leaks.
¾ Check End of Cut Retract settings – DIP SW #9 & #10.
¾ Check for torch and lead set binding or obstruction.
If the torch breakaway has not tripped, check the connections from the lifter to
the PHC:
1. To test the switch, touch a piece of metal to the target on the magnetic
sensor at the top of the breakaway. The LED in the middle of the sensor
lights up if the switch is working.
Target
LED
2. Verify that the ground is seamless from the lifter interface board to the
start ground on the work table. See Figure 13 on page 12.
3. Verify that the magnetic sensor cable is connected to the lifter interface
board. This connector is third from the top of the board.
Page 54

54 Sensor™ PHC Operation and Setup Guide
4. Test the connection by attaching a jumper between pins 7 and 8 on the 9pin D subconnector.
Pins 7 and 8
Ground connection
If the E08 error disappears, repair the connection between the magnetic
sensor and the lifter interface board.
5. If the error message remains, test the cable and the lifter interface
connector on the PHC:
a. To test the cable, verify the continuity of each wire that connects
the lifter to the PHC.
b. To test the connector on the PHC, place a jumper b etween pins 7
and 8 of the 9-pin D subconnector.
Pins 7 and 8
If the E08 error disappears from the console, the fault is in the cable. If the
error persists, the fault is in the PHC. Contact Technical Support.
Page 55

Section 4: Troubleshooting 55
Parts and Kits
Kit Number Description
Configured PHC Kits
228214 Sensor PHC with control module, lifter, and 50-foot cable
228242 Sensor PHC without lifter station
228243 Sensor PHC without lifter or 123895
228244 Sensor PHC without control module
228245 Sensor PHC without plasma interface
PHC Replacement Parts
228199 PHC control module assembly, complete
228200 PCB assembly, PHC processor
228201 PCB assembly, PHC motor drive
228202 Cable kit, Sensor PHC enclosure (line filter, CPC harness, wired pot)
228203 Bezel with Red Lens, for PHC control module
228204 Fuse, 1.6A Slo Blo, 1/4 x 1 1/4" (2 required)
PHC Lifter Replacement Parts
228205 Torch lifter station, 6" stroke, breakaway, PHC, complete
228206 Motor, PHC lifter (24v, w/brake, terminated)
228207 Coupling, PHC lifter
228191 Wire, ohmic contact, Ti or PHC lifter
228192 PCB assembly, Ti or PHC lifter interface
228193 Magnetic breakaway assembly, PHC/Edge Ti
228194 Breakaway Sensor/cable with fastener, terminated
228195 Ti or PHC upper sheet metal cover with fasteners
228196 Ti or PHC lower sheet metal cover with fasteners
228197 Ti or PHC lifter silicone end stop and fastener
228208 Ball screw, 2mm pitch, with nut and bearing
Recommended THC Slide Maintenance
Servicing a ball screw generally means cleaning and re-lubricatio n. The ball screw should be cleaned carefully
by wiping away all used grease, dust and dirt with a clean, dry cloth. If possible, move the nut several times
over the full travel to ensure that as much old grease as possible comes out of the nut. Do not use any
detergents or other cleaning fluids, such as trichloroethylene, alcohol or acetone.
NOTE: Do not remove or disassemble the ball screw or ball screw nut. After cleaning, apply a thin layer of
fresh grease over the entire surface of the screw. After re-lubrication, the assembly should be operated through
its stroke several times at low speeds and low loads to ensure that all contact surfaces of nut, balls and screw
are covered with a grease film.
Interval
Every six months
Page 56
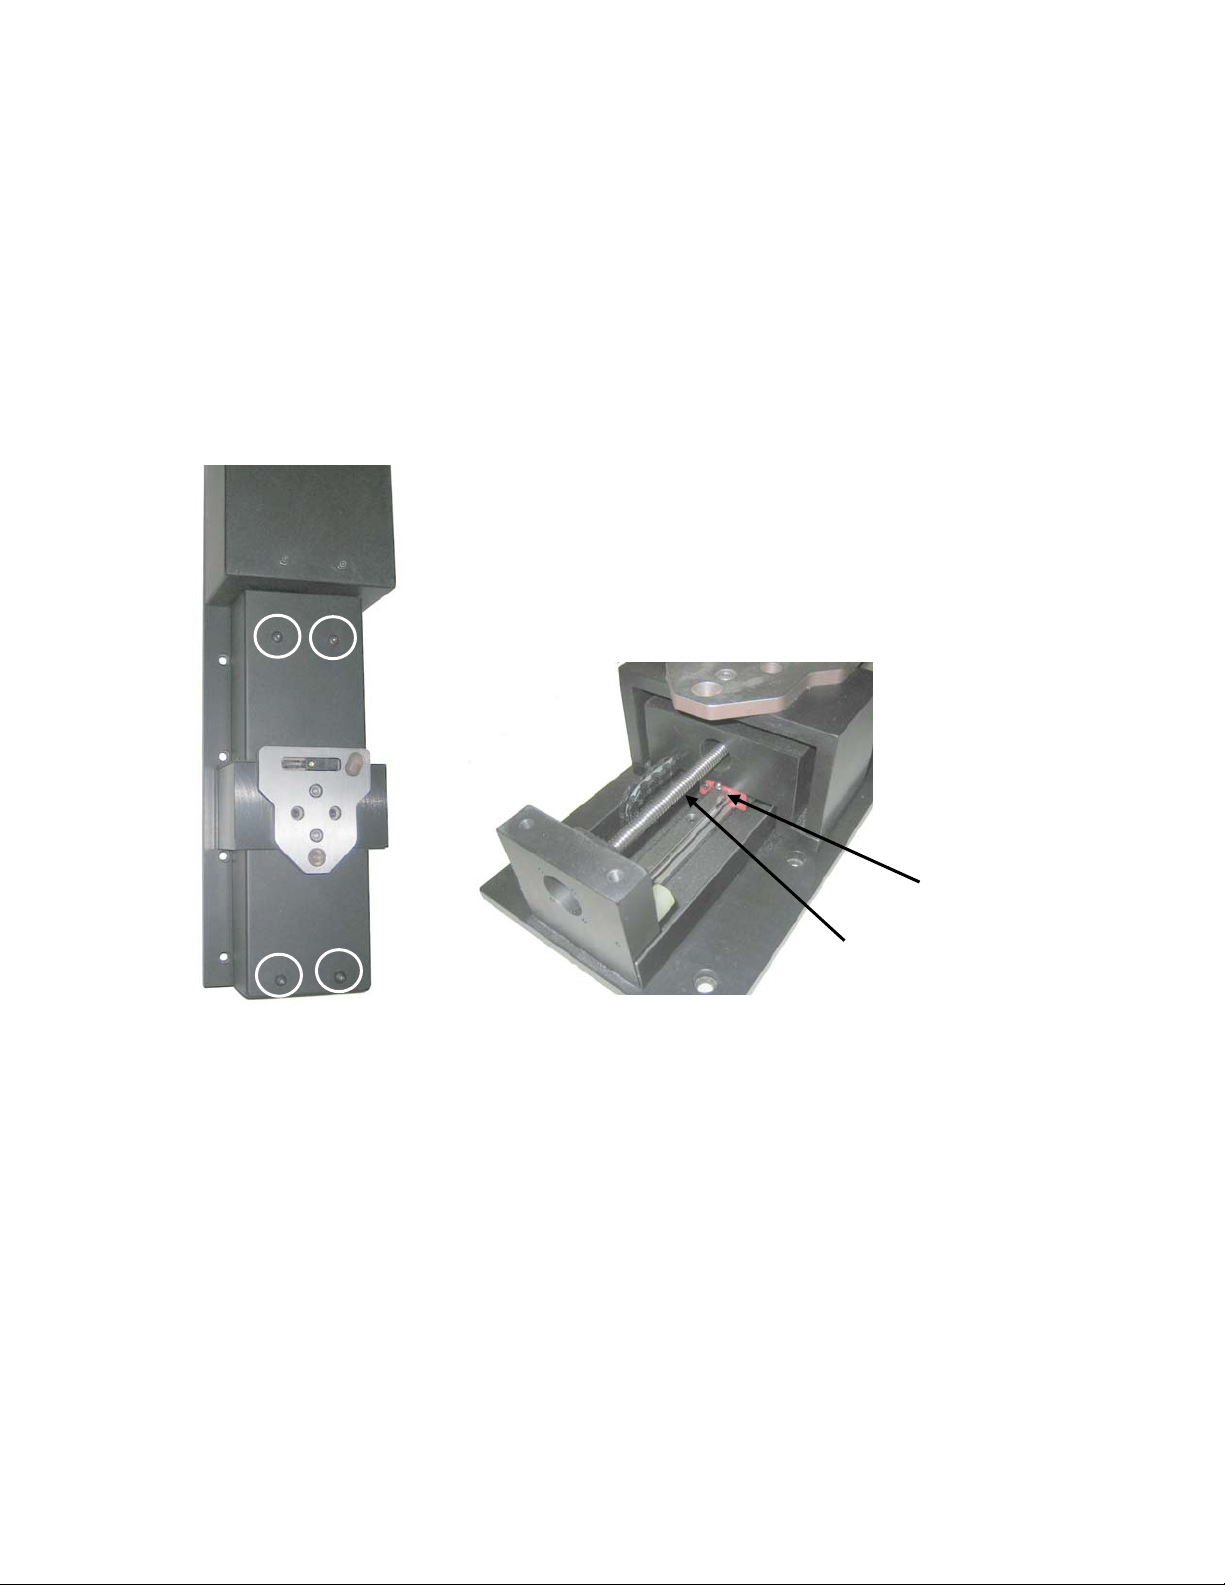
56 Sensor™ PHC Operation and Setup Guide
y
g
t
Lubricant
For the linear bearing carriage and ball screw, the bearing manufacturer suggests grease with the following
characteristics:
1. Lithium soap-based grease
2. NLGI Grade 2
3. No metallic particles in the grease.
Examples of compatible lubricants:
• Mobil-1 Synthetic grease and is available at most Auto Parts Stores.
• Mobilith SHC220 is another example that should be available at an industrial supply such as McMaster-
Carr.
The linear bearing carriage uses a grease fitting and the ball screw lubricant is applied to the screw itself:
To lubricate the THC slide:
1. Position the lifter approximately at the top of stroke.
2. Press the E-stop on the Ti (or power off the PHC).
3. Remove the lifter lower cover.
4. Clean the visible portion of the ball screw and bearing rails with a clean dry cloth.
5. Enable the Ti (or PHC).
6. Slew to the bottom of the stroke.
7. Press the E-stop on the Ti (or power off the PHC).
8. Clean the visible portion of the ball screw and bearing rails with a clean dry cloth.
9. Repeat several times (slewing back and forth to distribute and remove grease/debris).
10. Grease the bearing grease port with a needle-type grease gun.
11. Apply a thin coat of grease to the ball screw threads.
12. Slew back and forth do distribute grease, while checking for binding or erratic movement.
13. Replace cover.
Remove Screws
Linear bearing
rease por
Ball screw,
apply grease
directl
Cover Removed
Page 57

Appendix A: Interfacing to a Custom Lifter 57
Appendix A: Interfacing to a Custom Lifter
The performance of the Sensor™ PHC is tightly coupled to the lifter and motor characteristics. The Sensor™
PHC was designed as a conventional plasma height control and the lifter does not include any position
feedback. All lifter moves are timed moves at regulated speeds. The Sensor™ PHC microprocessor uses both
the DC motor’s back generated voltage and the DC motor’s ohmic component to calculate the motor feedback
speed. The lifter screw pitch affects the lifter linear speed and the control loop gain when operating with ar c
voltage. The screw pitch also affects the limited stall force sensing. The lifter friction and maximum torch
weight affect the point at which the lifter requires a brake to maintain position. For these reasons, the motor
and lifter characteristics are critical and must be tightly controlled.
Requirements
The following is a partial list of lifter and motor characteristics that are compatible with this controller.
• Lifter Ball screw pitch = 2mm/rev
• Lifter with limit switches or lifter with soft mechanical end stops
• Lifter capable of 200 in/min.
• Lifter should have low backlash and little mechanical play
• If the functions are required the lifter should provide for the electrical interface to limit switches, breakaway
switches, and torch tip sensing. Contact Hypertherm Automation Engineering for information concerning
the lifter signal interface.
• Motor should be a 24Vdc permanent magnet type
• Motor should turn 2500 RPM at 24Vdc. Alternatively, the motor RPM at 24Vdc should be matched with the
lifter ball screw pitch/ gear reduction/ pulley reduction so that the combination results in 200 in / min of lifter
linear speed.
• Motor should have 2A, 3A, 4A, or 6A max current rating.
• Motor resistance should be about 20% of full-scale rating. For example, a 3A rated motor should have an
ohmic resistance of approximately = 24 / 3 * 20% = 1.6 Ohms
• Depending on the torch weight load and lifter friction, you may need a brake to hold position.
WARNING:
The performance of the Sensor™ PHC is tightly coupled to the lifter and motor characteristics. To ensure
proper operation, a non-standard customer designed lifter should be fully tested with this controller under all
anticipated operating conditions.
Page 58

Printed in the USA
806150 -- Revision 1
 Loading...