

Page 1
ENGLISH / FRENCH / SPANISH
INSTRUCTION MANUAL
TWO-IN-ONE GAMING SYSTEM
www.hyperkin.com
®
©2015 Hyperkin®. Hyperkin® and RetroN® and their logos are trademarks and/or registered trademarks of Hyperkin, and/or
its afliated companies. All other product names and images, trademarks or registered trademarks are properties of their
respective owners. This product is NOT 100% ofcial and is NOT manufactured, guaranteed, sponsored, endorsed or approved
by Nintendo. All rights reserved.
Page 2

Hyperkin’s Warranty: 1 Year Limited Warranty
Please visit www.Hyperkin.com/warranty to register your ofcial Hyperkin product for Hyperkin’s
Warranty, as well as promo updates. You will have two weeks from your date of purchase to register
with the required proof of purchase, otherwise you will not be qualied for Hyperkin’s Warranty.
ENGLISH / TABLE OF CONTENTS ..... 01
Package Contents ..... 02
RetroN® 2 Layout ..... 03
RetroN® 2 Setup ..... 04
Playing Games ..... 05
Using NES or SNES Controllers ..... 05
Page 3
Thank you for purchasing the RetroN® 2 Gaming System. For your safety and the safety of others,
please carefully read the instruction manual before using this product.
For troubleshooting, contact us at [email protected].
2
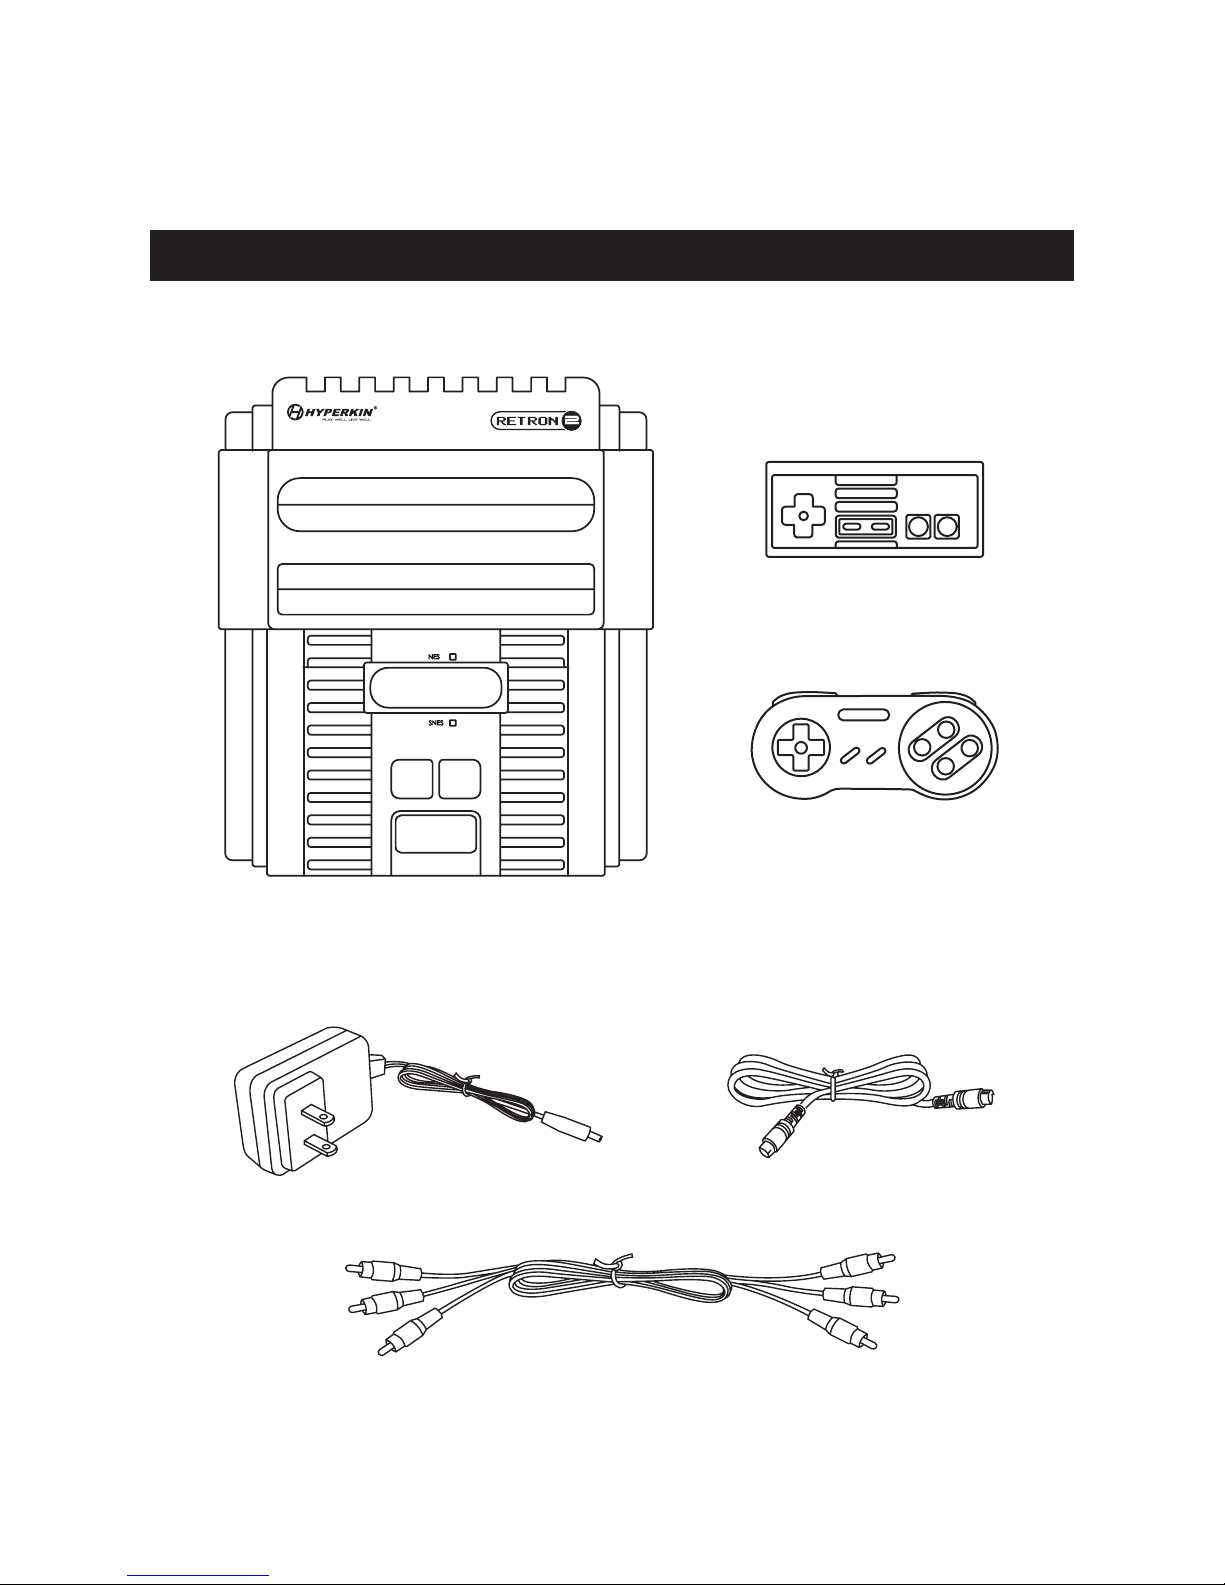
PACKAGE CONTENTS
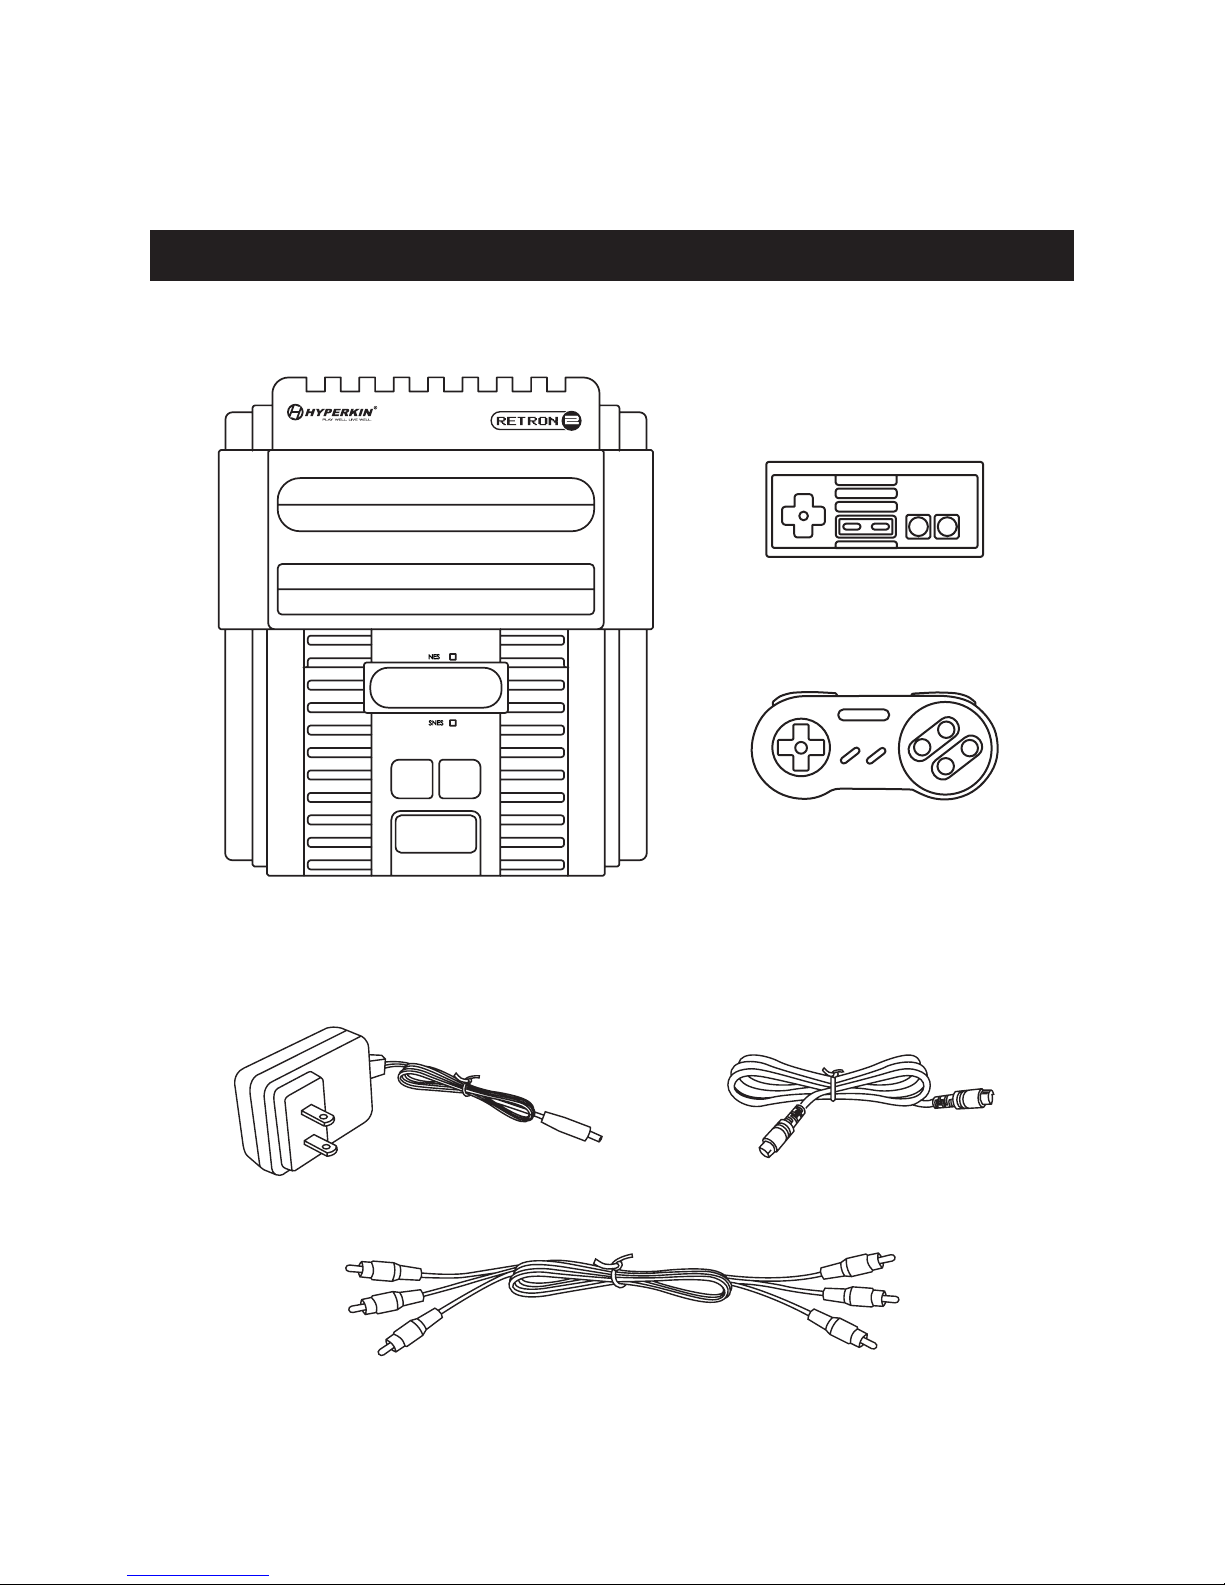
1-RetroN® 2
Controller for SNES
1-RetroN® 2
Controller for NES
RetroN® 2 Console
AC Adapter
S-Video Cable
AV-Cable
®
Page 4
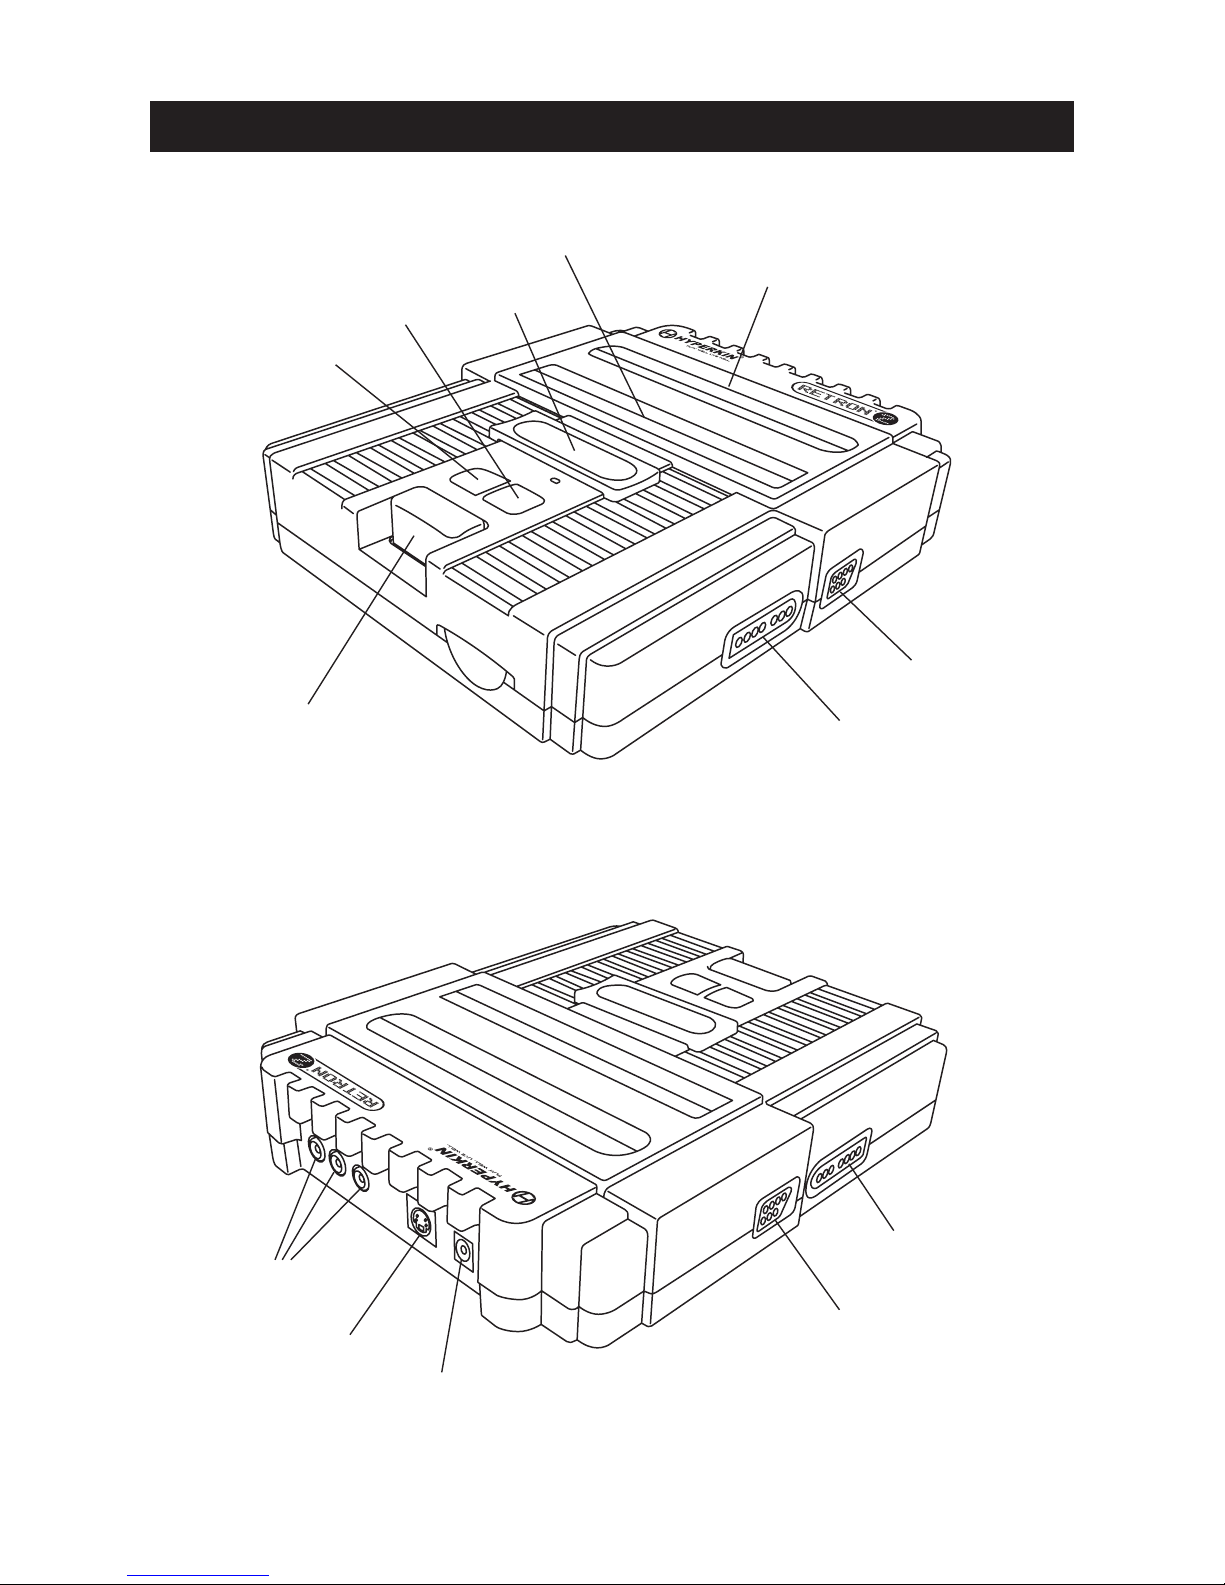
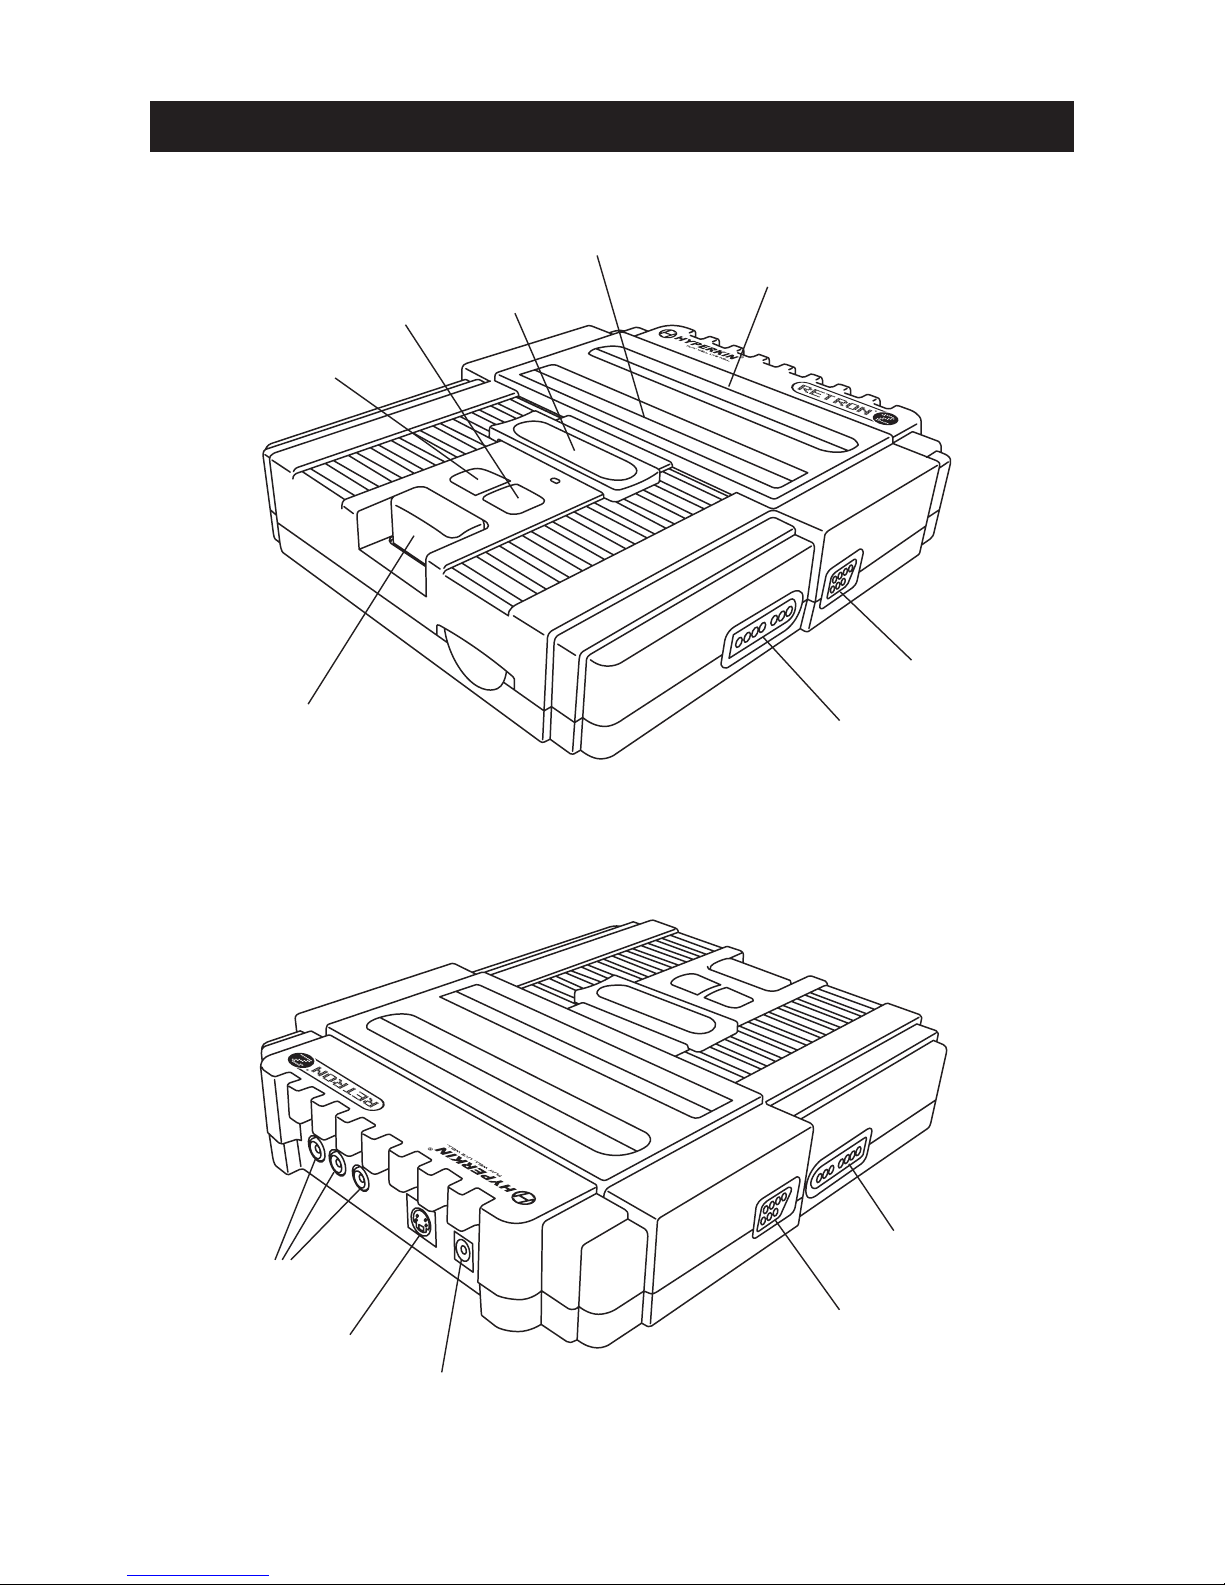
NES Cartridge Slot
S-Video Out
DC In
Eject Button for
SNES Cartridge
SNES Controller Port 2
NES Controller Port 1
NES Controller Port 2
SNES Controller Port 1
SNES Cartridge Slot
Game Selector
Power Button
Reset Button
FRONT
BACK
RetroN® 2 LAYOUT
3
AV-Out
SNES
Page 5
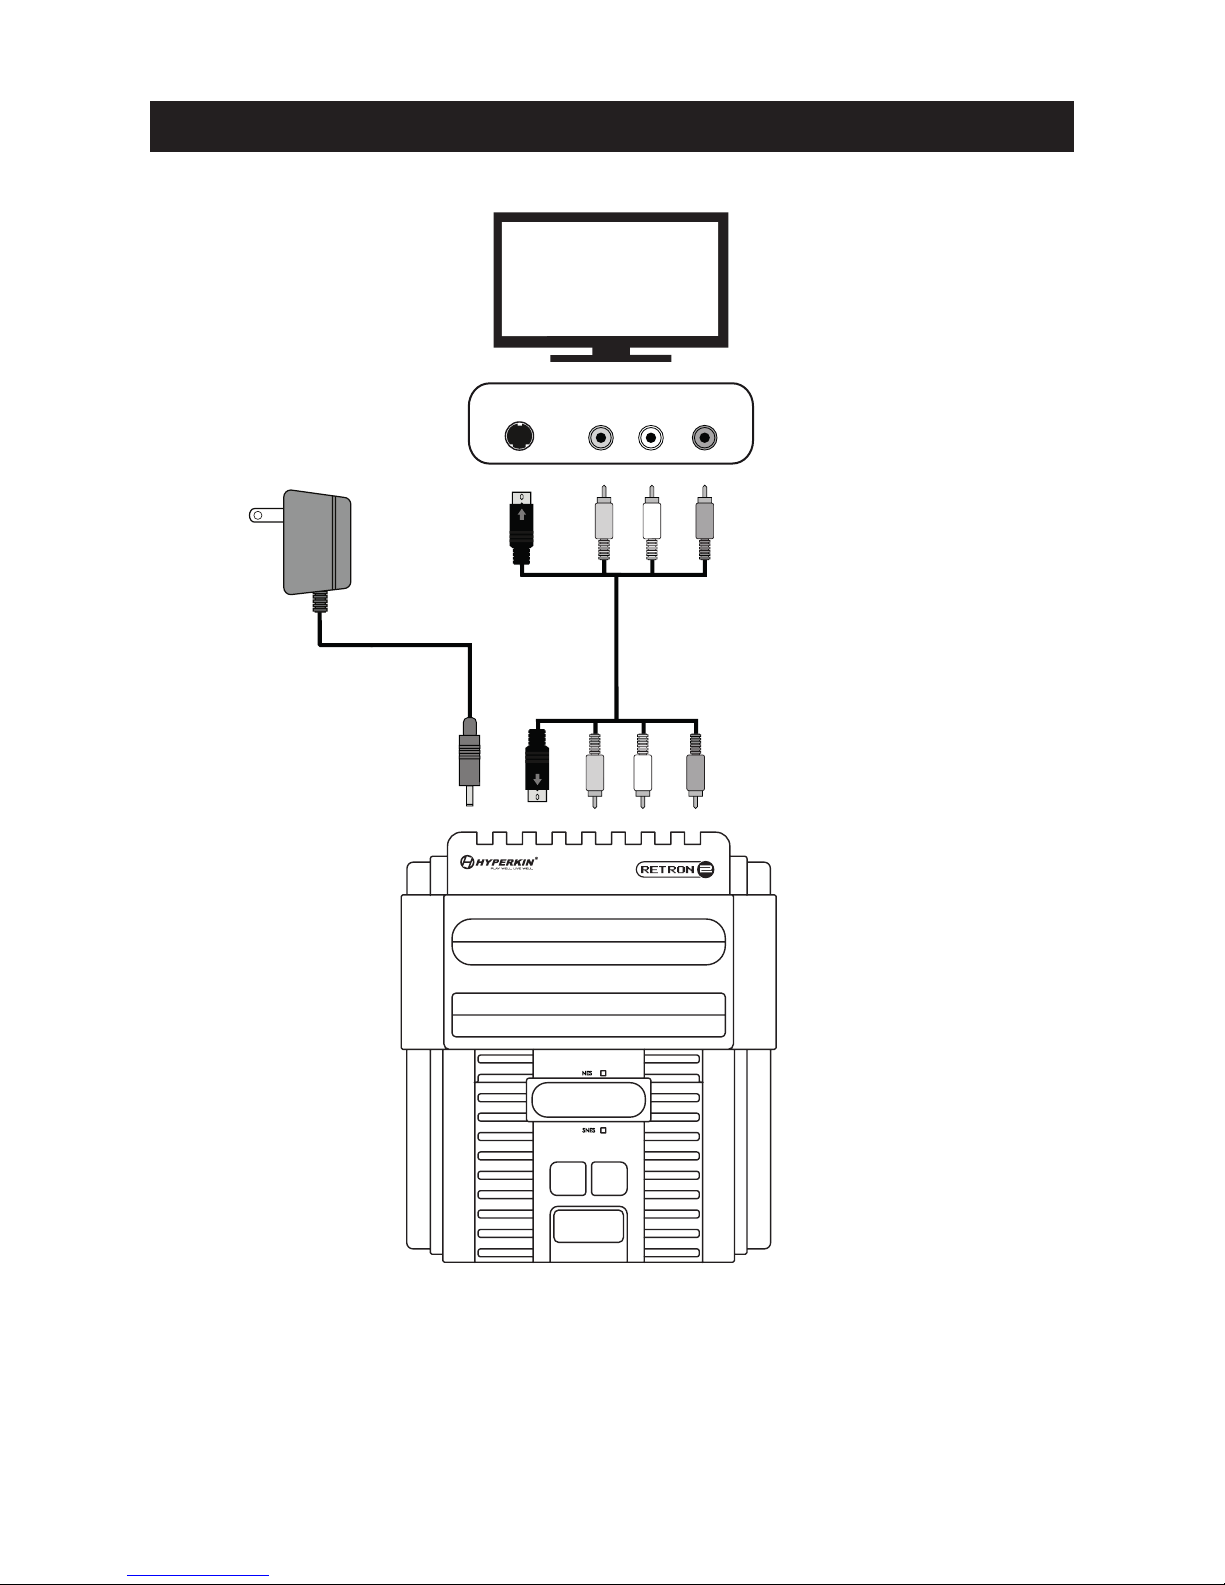
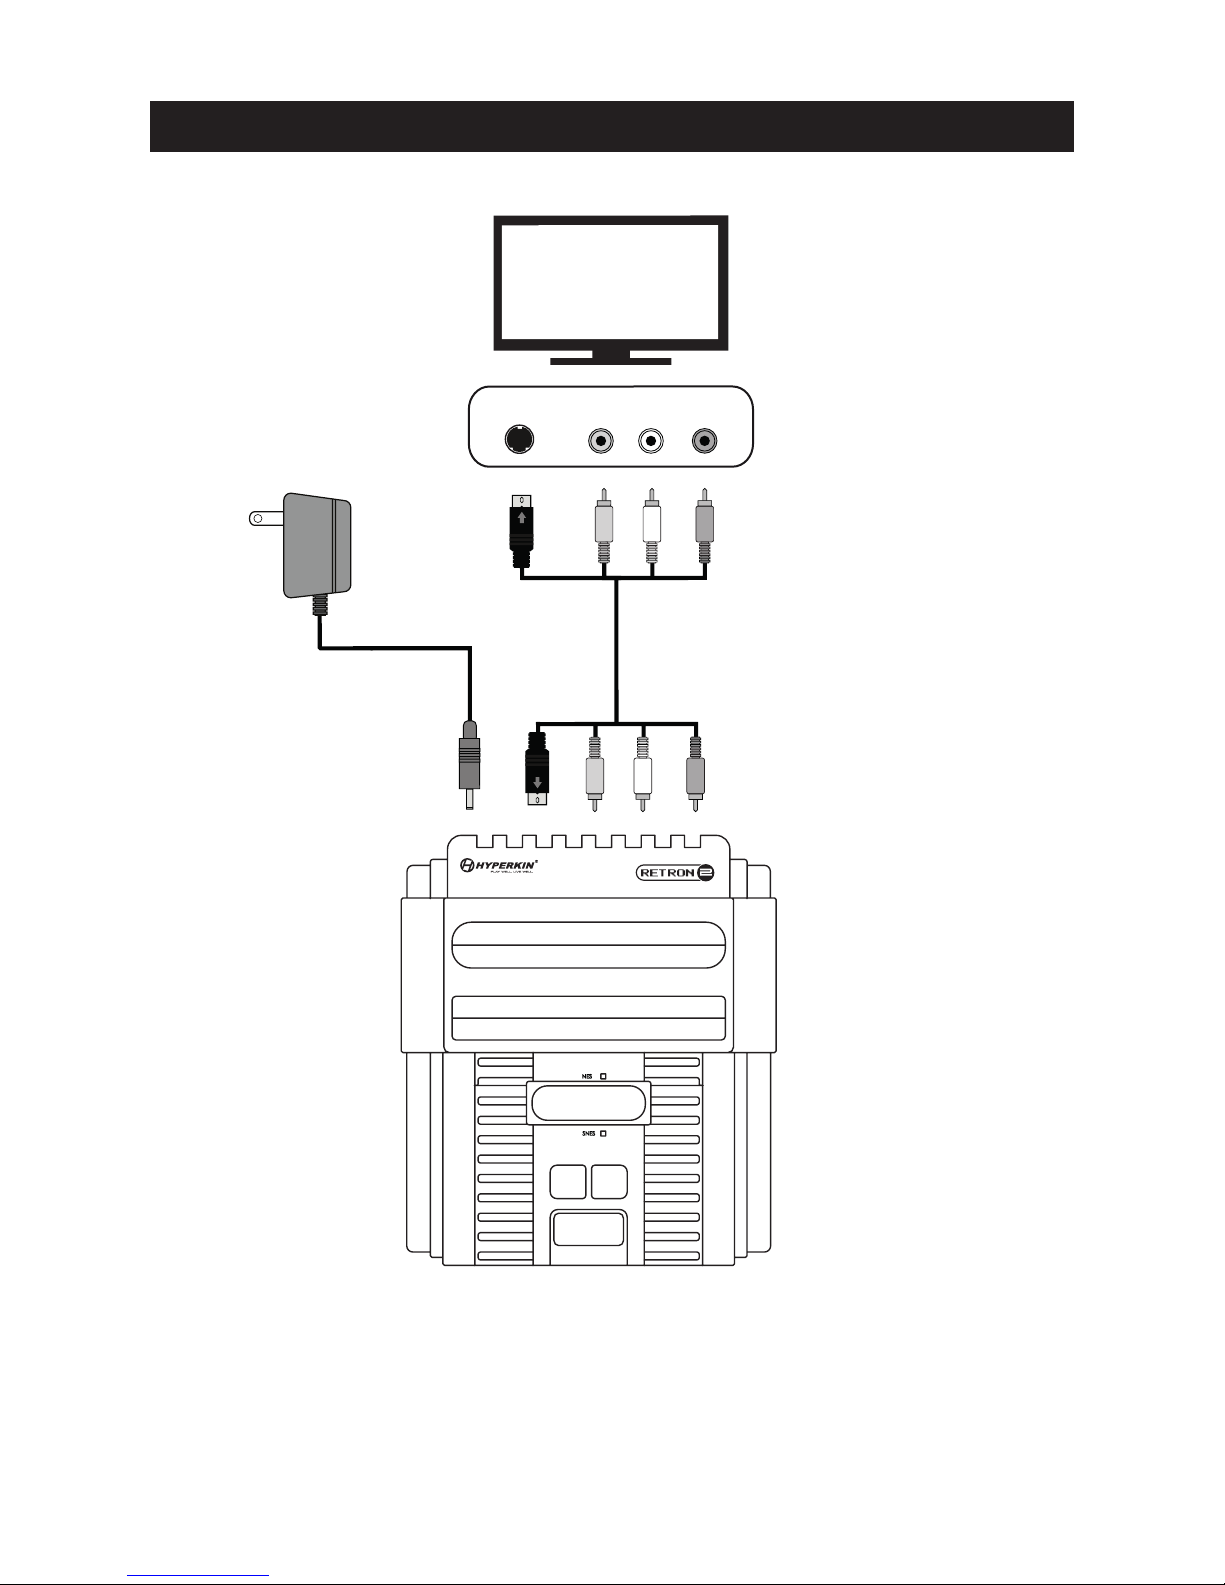
1. Insert the AV/S Cable into the AV or S-Video Out (video output only) on the RetroN® 2. The S-Video
function only works on SNES and Genesis games.
2. Insert the other end of the AV/S Cable into the AV or S-Video ports on the TV.
3. Insert the AC Adapter into the DC port on the RetroN® 2.
4. Plug the AC Adapter into a power outlet.
AC Adapter
S-AV Cable
RetroN® 2 SETUP
4
TV
S-VIDEO
AUDIO IN
VIDEO
L R
®
Page 6
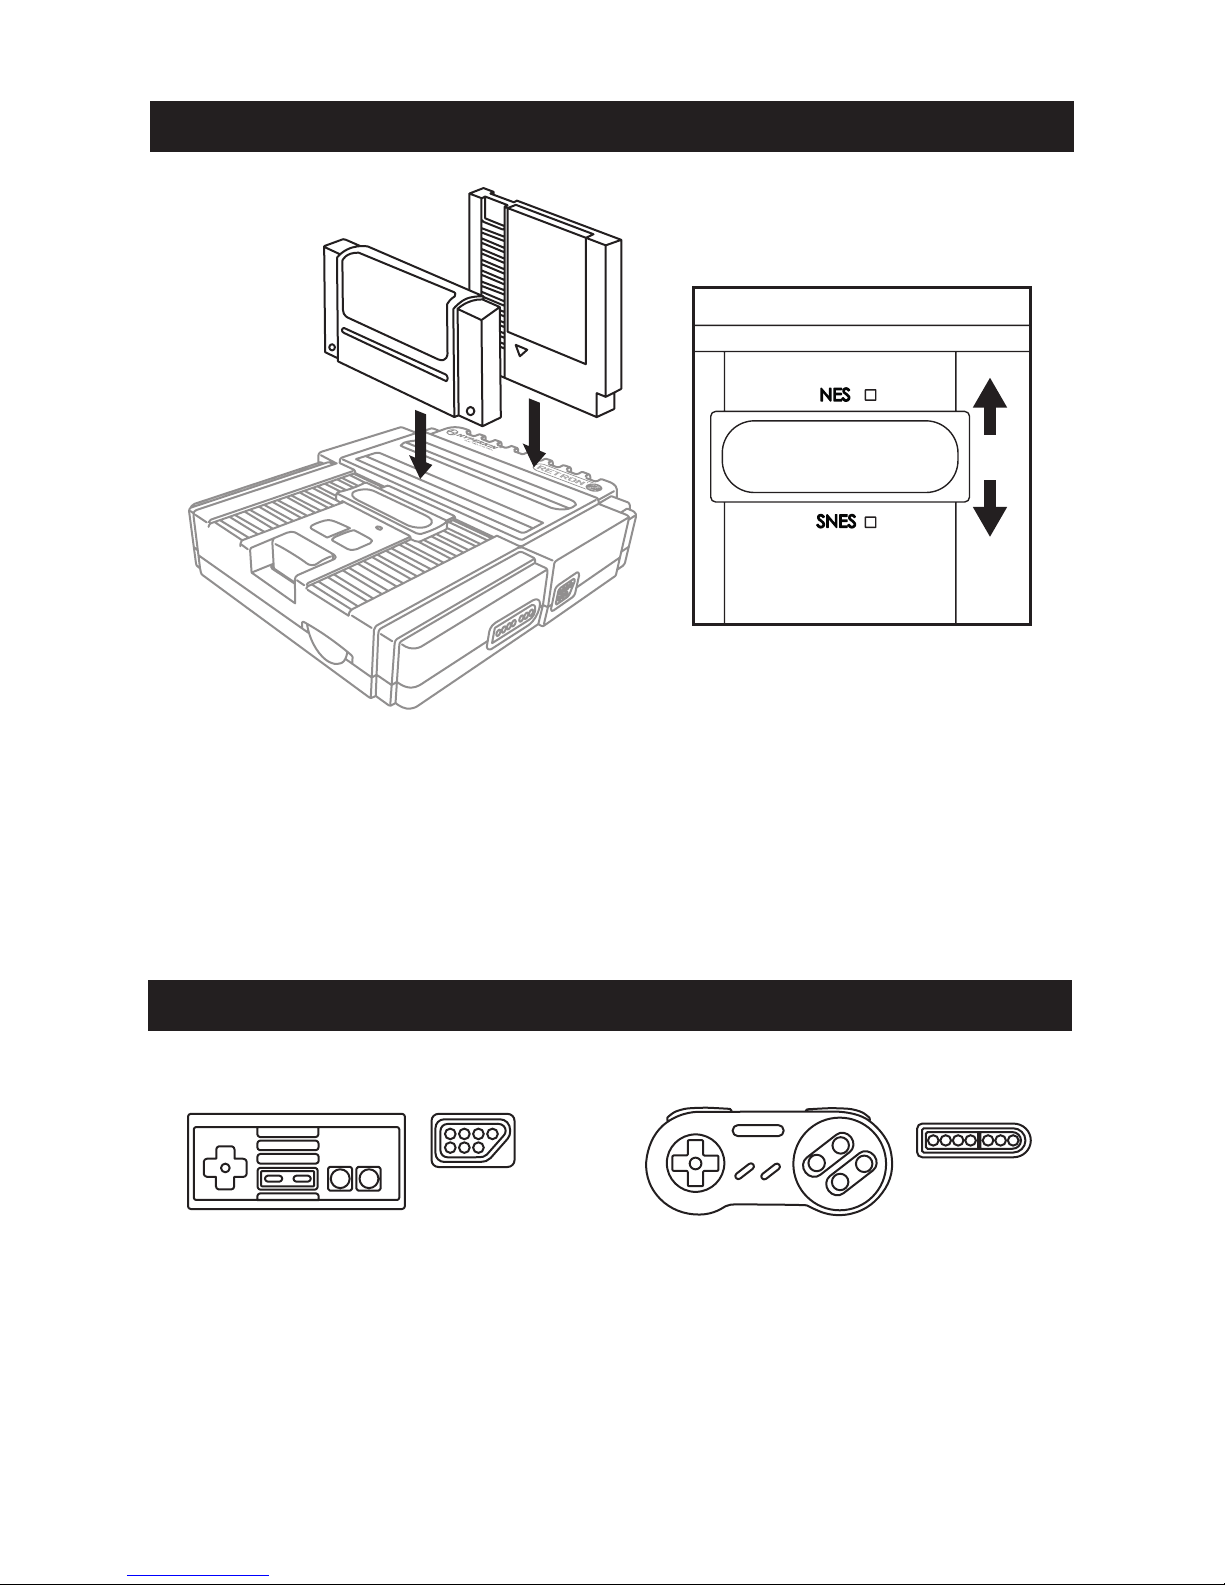
PLAYING GAMES
Using NES or SNES Controllers
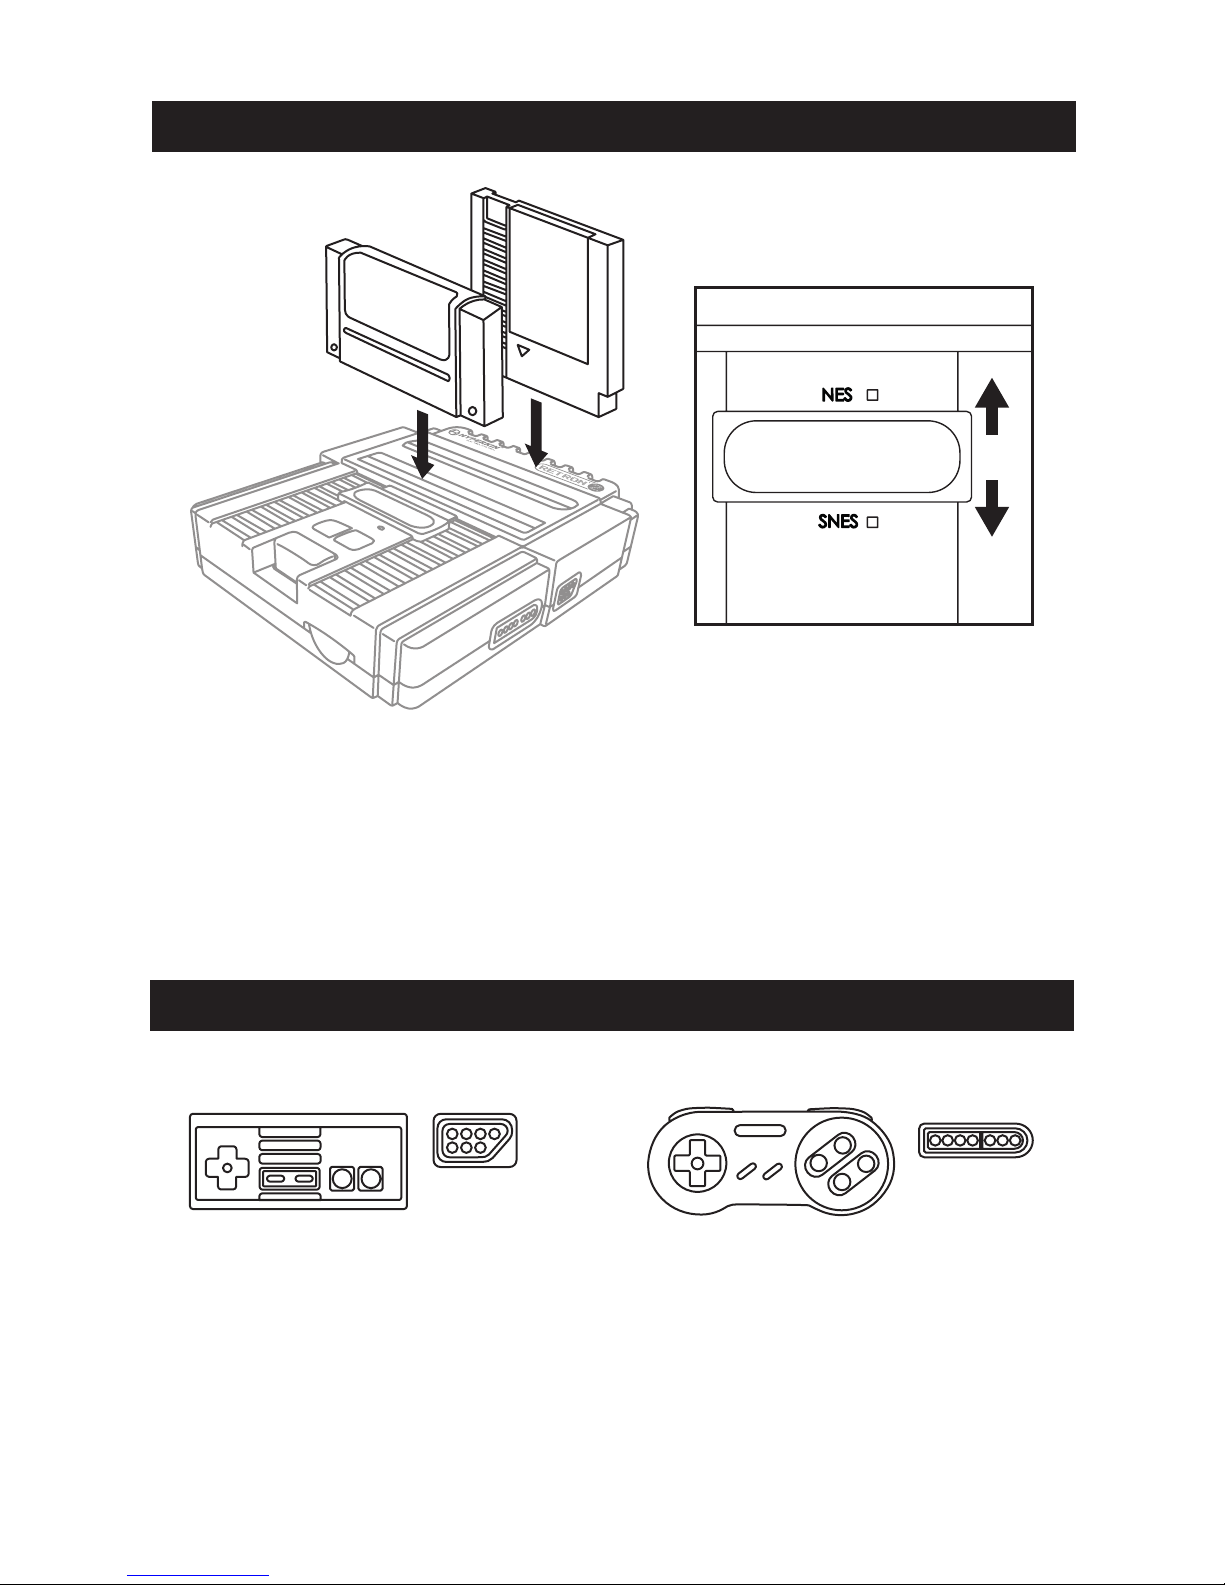
1. Insert the cartridge into its appropriate slot (NES or SNES).
2. Use the System Selector switch to choose which system you will be playing. A red light will indicate
NES is selected. A green light indicates SNES is selected.
3. Turn ON the RetroN® 2 by pressing the Power button.
4. When you’re done playing an SNES game, after you have turned OFF the console, you can push the
EJECT button to remove the cartridge from the RetroN® 2.
With the RetroN® 2 turned OFF, insert the controller(s) into their corresponding slot (NES or SNES).
The RetroN® 2 comes with an NES-compatible controller and an SNES-compatible controller. The
RetroN® 2 also supports original NES and SNES controllers.
Note: NES and SNES controllers are only playable with their corresponding systems.
5
NES Controller SNES Controller
Page 7

6
FRANÇAIS / TABLE DES MATIÈRES
Table des matières ..... 06
Contenu de l’emballage ..... 07
Plan du RetroN
®
2 ..... 08
Installation du RetroN® 2 ..... 09
Jouer au jeu ..... 10
Utiliser NES, SNES, ou les manettes Genesis ..... 10
SIS
Page 8
7
Merci d’avoir acheté le RetroN® 2 Système de jeu. Pour votre sécurité et celle des autres, veuillez lire
attentivement le manuel d’instructions avant d’utiliser ce produit.
Pour le dépannage, contactez-nous au [email protected].
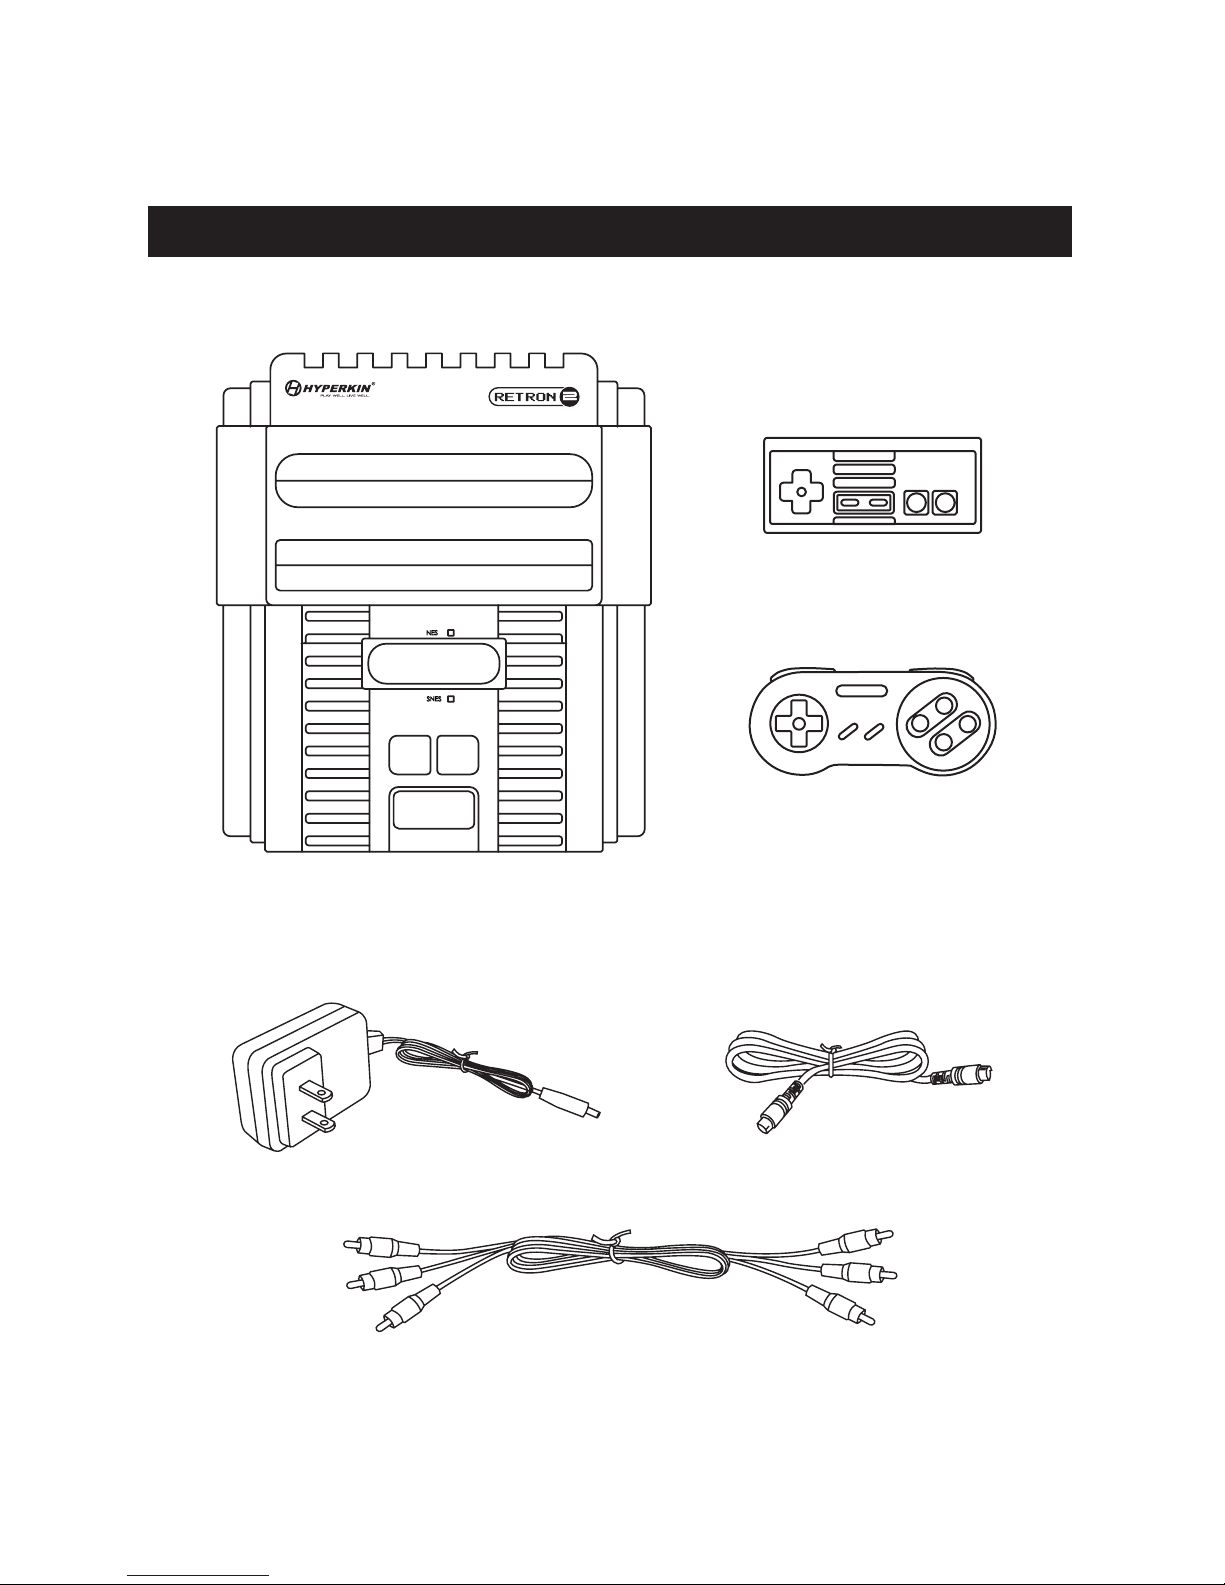
CONTENU dE L’EMbALLAGE
1-RetroN® 2
Controller for SNES
1-RetroN® 2
Controller for NES
1-Console RetroN® 2
Adaptateur secteur
Câble S-vidéo
Câble AV
®
Page 9
8
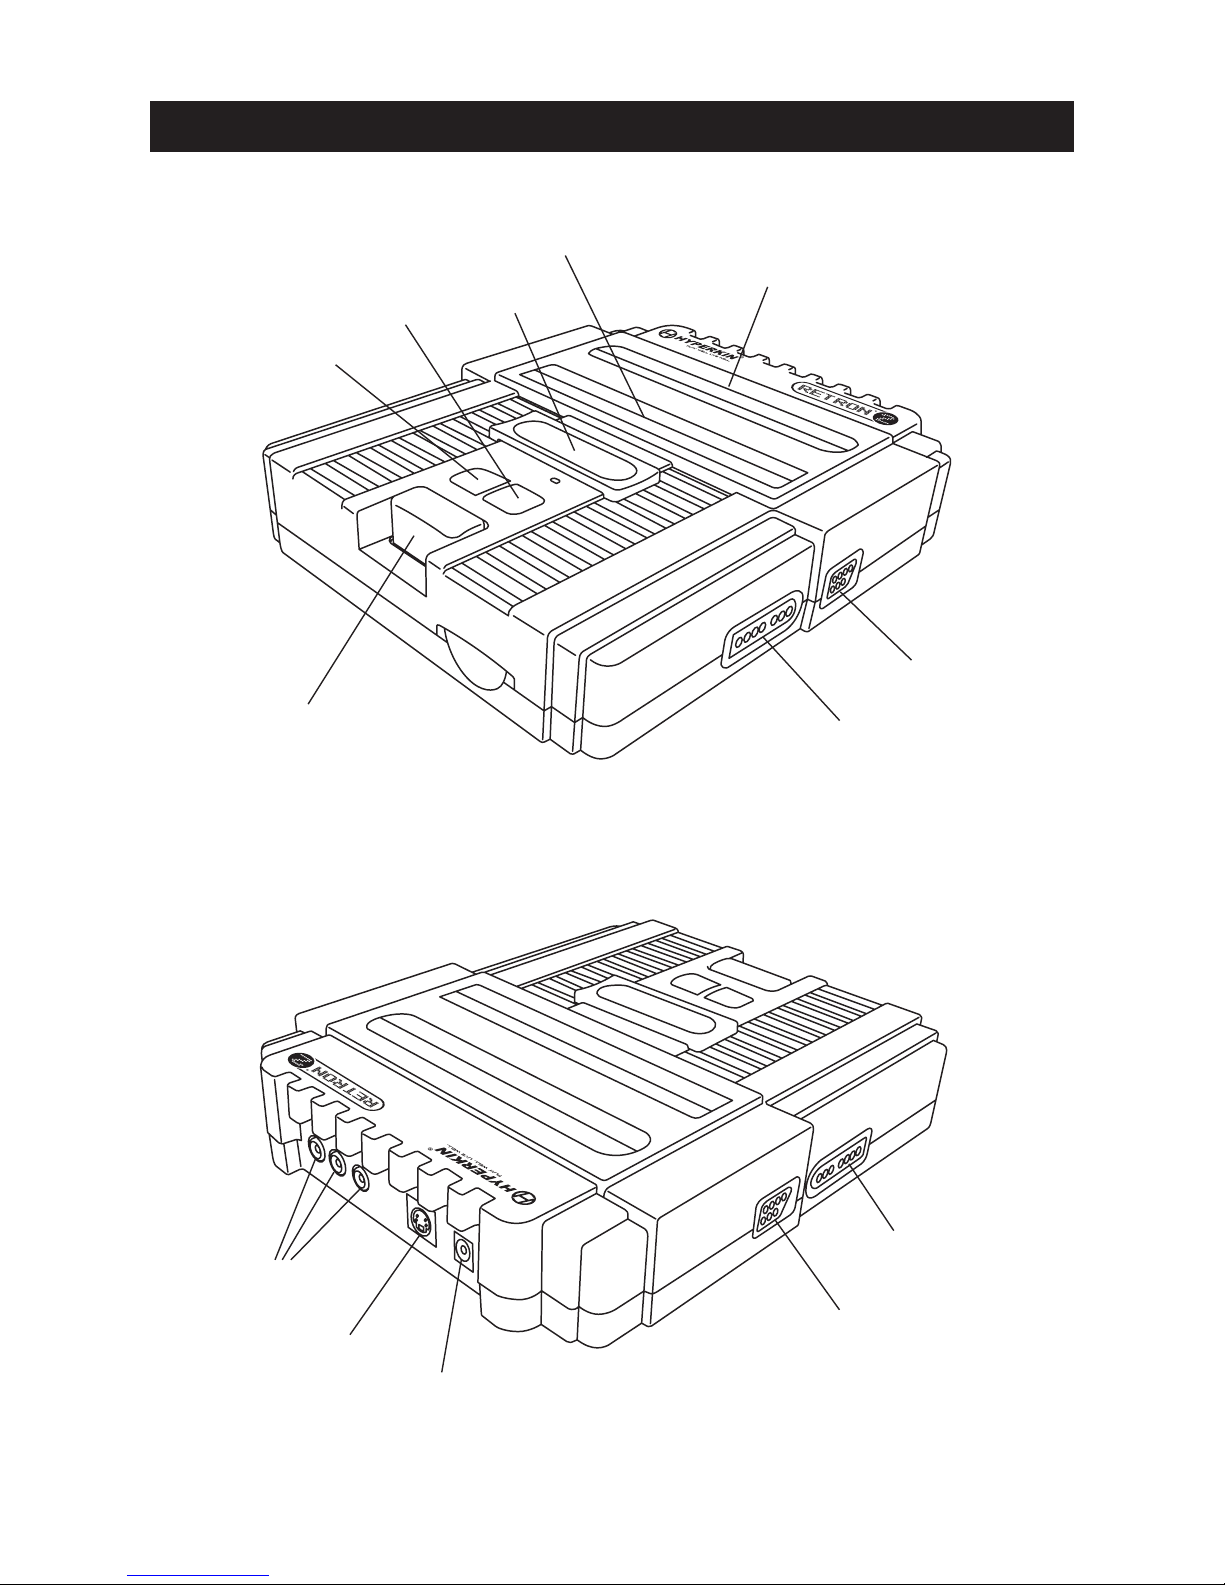
Port Cartouche NES
S-Video Out
Alimentation sélecteur
Bouton Eject pour
Cartouche SNES
SNES Port manette 2
NES Port manette 1
NES Port manette 2
SNES Port manette 1
Port Cartouche SNES
Game Selector
Bouton Power
Bouton Reset
AVANT
ARRIÈRE
PLAN dU RetroN® 2
AV-Out
SNES
Page 10
9
5
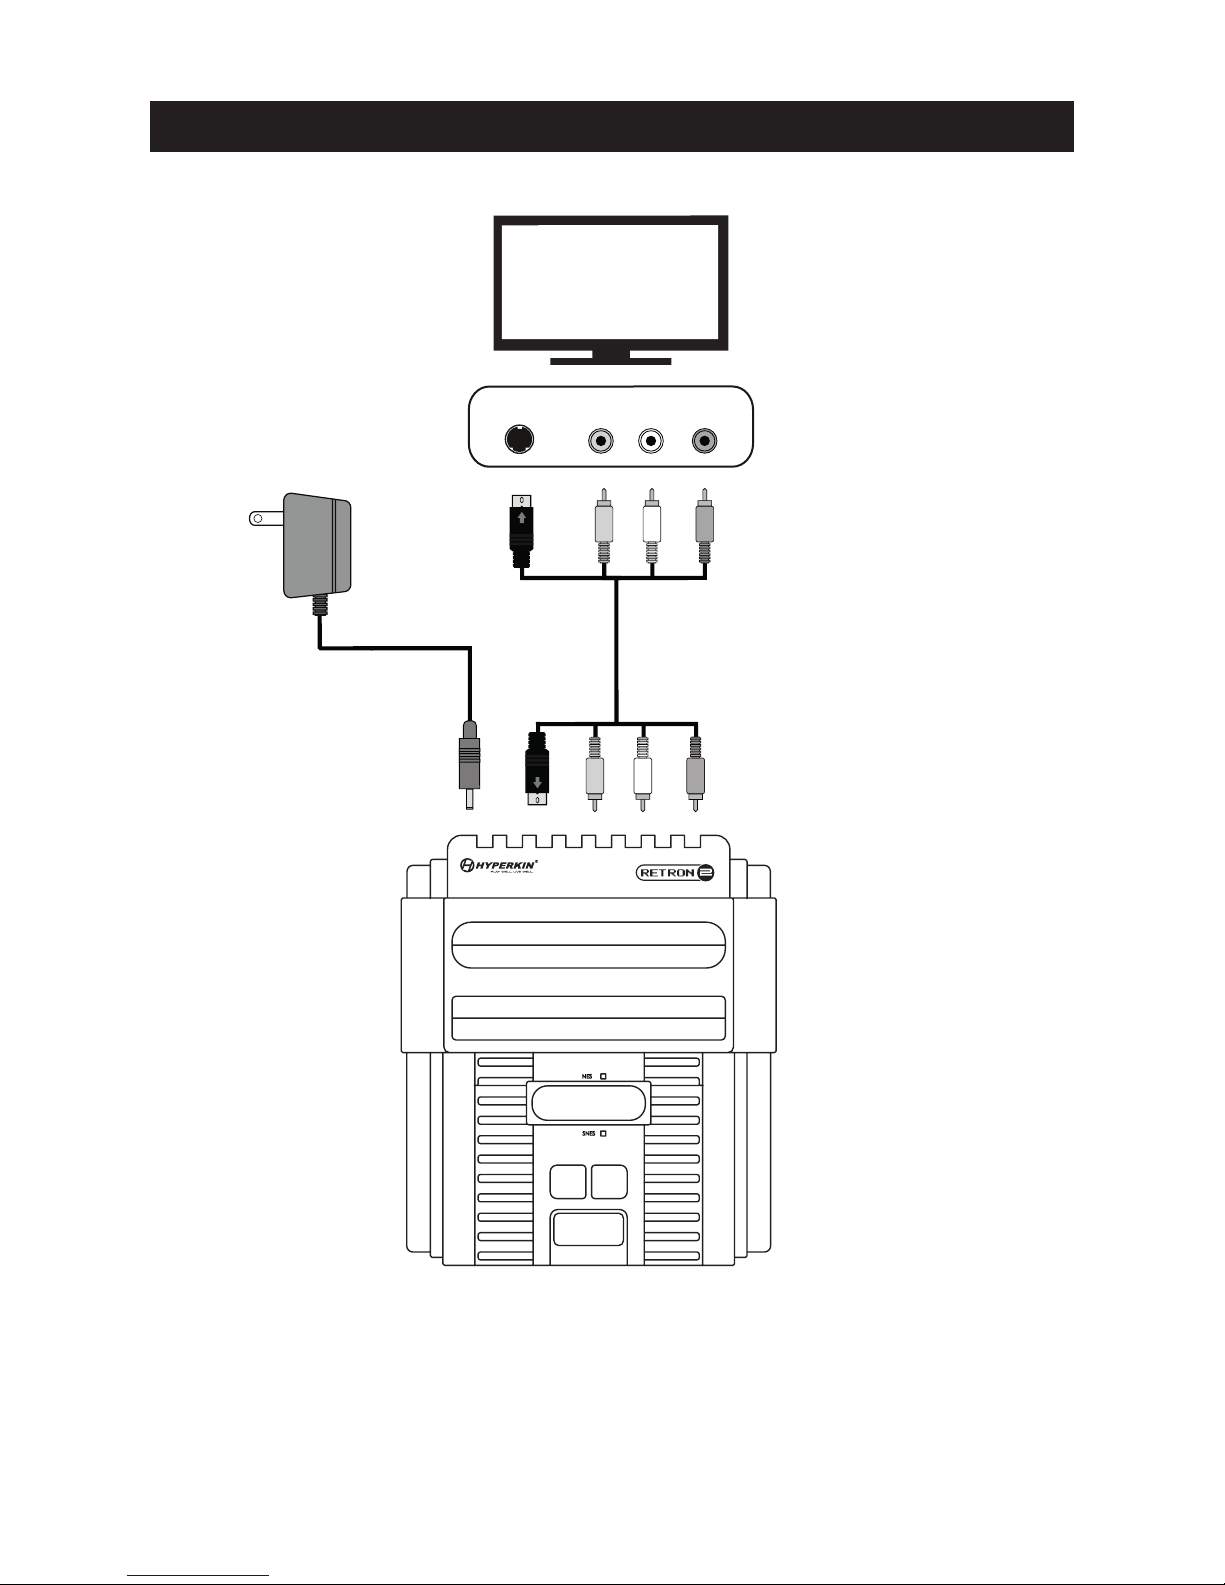
1. Insérer l’AV/S Câble dans l’AV ou S-Video Out (sortie vidéo uniquement) sur le RetroN® 2. La fonction
S-Vidéo ne fonctionne uniquement que sur la SNES et les jeux Genesis.
2. Insérez l’autre extrémité du câble AV/S dans l’AV ou dans le port S-Vidéo du téléviseur.
3. Insérez l’adaptateur secteur sur le port CC sur le RetroN® 2.
4. Branchez l’adaptateur secteur CA dans une prise de courant.
Adaptateur secteur
S-AV Cable
INSTALLATION dU RetroN® 2
TV
S-VIDEO
AUDIO IN
VIDEO
L R
®
Page 11
10
JOUER AU JEU
UTILISER NES OU LES MANETTES SNES
1. Insérez la cartouche dans le logement approprié (NES ou SNES).
2. Utilisez le Sélecteur de Système pour choisir le système auquel vous jouerez. Une lumière rouge vous
indiquera que la NES est sélectionné. Une lumière verte vous indiquera que la SNES est sélectionné.
3. Allumez le RetroN® 2 en appuyant sur le bouton d’alimentation.
4. Quand vous avez terminé de jouer à un jeu SNES, quand vous aurez éteint la console, vous pouvez
appuyer sur le bouton EJECT pour enlever la cartouche de la RetroN® 2.
Avec le RetroN® 2 éteint, insérez le(s) contrôleur(s) dans leur fente correspondante (NES ou SNES).
Il y a une manette compatible avec la NES et la SNES inclut dans la RetroN® 2. La RetroN® 2 est
aussi compatible avec les manettes originales de la NES et la SNES.
Note: NES et SNES contrôleurs (non inclus) sont uniquement jouable avec leurs systèmes correspondants.
NES contrôleur SNES contrôleur
Page 12

11
ESPAÑOL / TABLA DE CONTENIDO ..... 11
Contenido del paquete ..... 12
Diseño del RetroN
®
2 ..... 13
Configuración del RetroN® 2 ..... 14
Juegos ..... 15
Usando mandos de NES o SNES ..... 15
Page 13
12
Gracias por comprar la consola de Juegos RetroN® 2. Por su seguridad y la de los demás, por favor
lea cuidadosamente las instrucciones del manual antes de usar este producto.
Para solucionar cualquier problema, contáctenos a [email protected].
CONTENIdO dEL PAqUETE
1-RetroN® 2
Control para SNES
1-RetroN® 2
Control para NES
1 Consola RetroN® 2
Adaptador de corriente
Cable de S-Video
Cable de AV
®
Page 14
13
Ranura de cartuchos NES
Adaptador de video - S
Entrada de corriente DC
Botón de extraer para
cartuchos de SNES
Puerto 2 del mando SNES
Puerto 1 del mando NES
Puerto 2 del mando NES
Puerto 1 del mando SNES
Ranura de cartuchos SNES
Selector de juegos
Botón de encendido
Botón de servicio
ADELANTE
ATRÁS
dISEÑO dEL RetroN® 2
Cable de salida AV
SNES
Page 15
14
1. Inserte el cable AV/S en la salida AV o S (salida de video solamente) en el RetroN® 2. El adaptador de
video solo sirve en juegos de SNES y Genesis.
2. Inserte el otro extreme del cable AV/S en los puertos AV de video en el televisor.
3. Inserte el adaptador de corriente alterna en el puerto de corriente directa en el RetroN® 2.
4. Conecte el adaptador de corriente alterna en la fuente de poder.
Adaptador de corriente
Cable S-AV
CONFIGURACION dEL RetroN® 2
TV
S-VIDEO
AUDIO IN
VIDEO
L R
®
Page 16
JUEGOS
USANdO CONTROLES dE NES O SNES
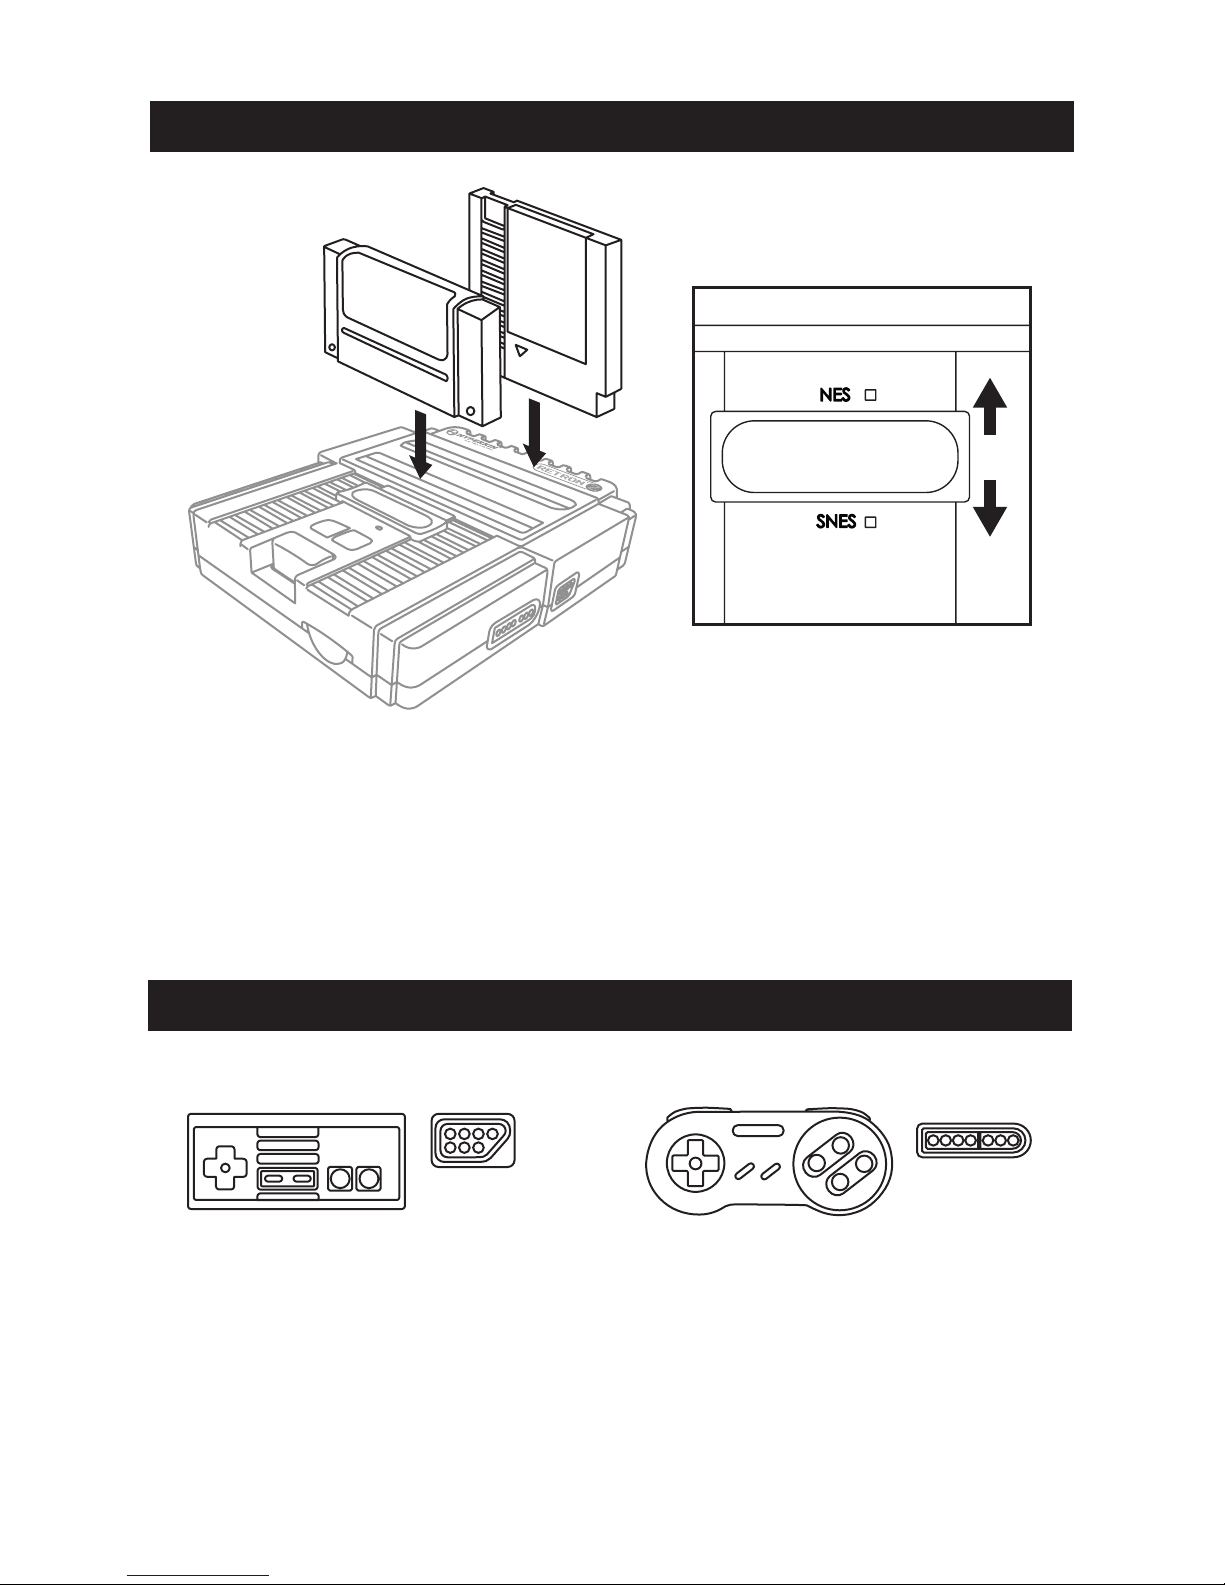
1. Introduzca el cartucho en su ranura apropiada (NES o SNES).
2. Use el interruptor del selector de sistema para elegir qué sistema va a estar reproduciendo. Una luz roja
indicará que NES está seleccionado. Una luz verde indicará que SNES está seleccionado.
3. Encienda el RetroN® 2 presionando el botón de encendido.
4. Cuando haya terminado de jugar un juego SNES, después de haber apagado la consola, puede pulsar
el botón de Extraer para eliminar el cartucho del RetroN® 2.
Con el RetroN® 2 apagado, introduce el/los controles en su ranura correspondiente (NES, SNES).
El RetroN® 2 viene con un control compatible con NES y un control compatible con SNES. El RetroN® 2
también soporta los controles originales NES y SNES.
Nota: Los controles de NES y SNES (No incluidos) solo funcionan con su sistema correspondiente.
Control de NES Control de SNES
 Loading...