

Page 1
B M X S C O O T E R O W N E R ’ S M A N U A L
Page 2

The following manual is only a guide to assist you and is not a complete or comprehensive manual of all
aspects of maintaining and repairing your BMX Scooter. The BMX Scooter you have purchased is a complex object.
Ballard Pacific Resources Inc. recommends that you consult a BMX Scooter specialist if you have doubts or
concerns as to your experience or ability to properly assemble, repair, or maintain your BMX Scooter. You will
save time and the inconvenience of having to go back to the store if you choose to write or call us concerning
missing parts, service questions, operating advice, and/or assembly questions.
Bottom View
SERIAL NUMBER LOCATION
serial number
WRITE YOUR SERIAL NUMBER HERE
IMPORTANT NOTICE
Keep your serial number handy in case of damage, loss or theft.
410 S. Adele Avenue
Joplin, Mo 64801
Call Toll Free 1.866.424.0500
Local 417-206-0563
Fax: 775-248-5155
Monday-Friday 8:00AM to 5:00PM (CST)
For product related questions email us at: [email protected]
For customer service questions email us at: [email protected]
Page 3
B M X S c o o t e r O W N E R ’ S M A N U A L
Safety Equipment 2
Mechanical Safety Check 3
Riding Safety 5
IMPORTANT NOTE TO PARENTS 5
Rules of the Road 7
Rules of the Trail 9
Wet Weather Riding 10
Night Riding 10
Bicycling in Traffic 11
Tools/Tech Support 13
Saddle 14
Handlebar and Stem 16
Front Wheel 19
Brakes 23
Tire Valves 29
Tires 30
Repair and Service 31
Warranty 36
Purchase Record 37
SAFETY
Contents
ASSEMBLY, MAINTENANCE
AND ADJUSTMENT
NEW OWNER
M A X W E I G H T : 2 2 0 l b s
This manual contains important safety, performance
and maintenance information. Please read this manual
before taking your first ride on your new BMX Scooter,
and keep this manual handy for future reference.
If you have a problem, do not return to the store,
call 1-866-424-0500. Adult Supervision Required
when in use. For parts or repair service, call
Ballard Pacific Resources Inc. at 1-866-424-0500.
VISIT US ONLINE
@
May not be
exactly as
illustrated
Page 4
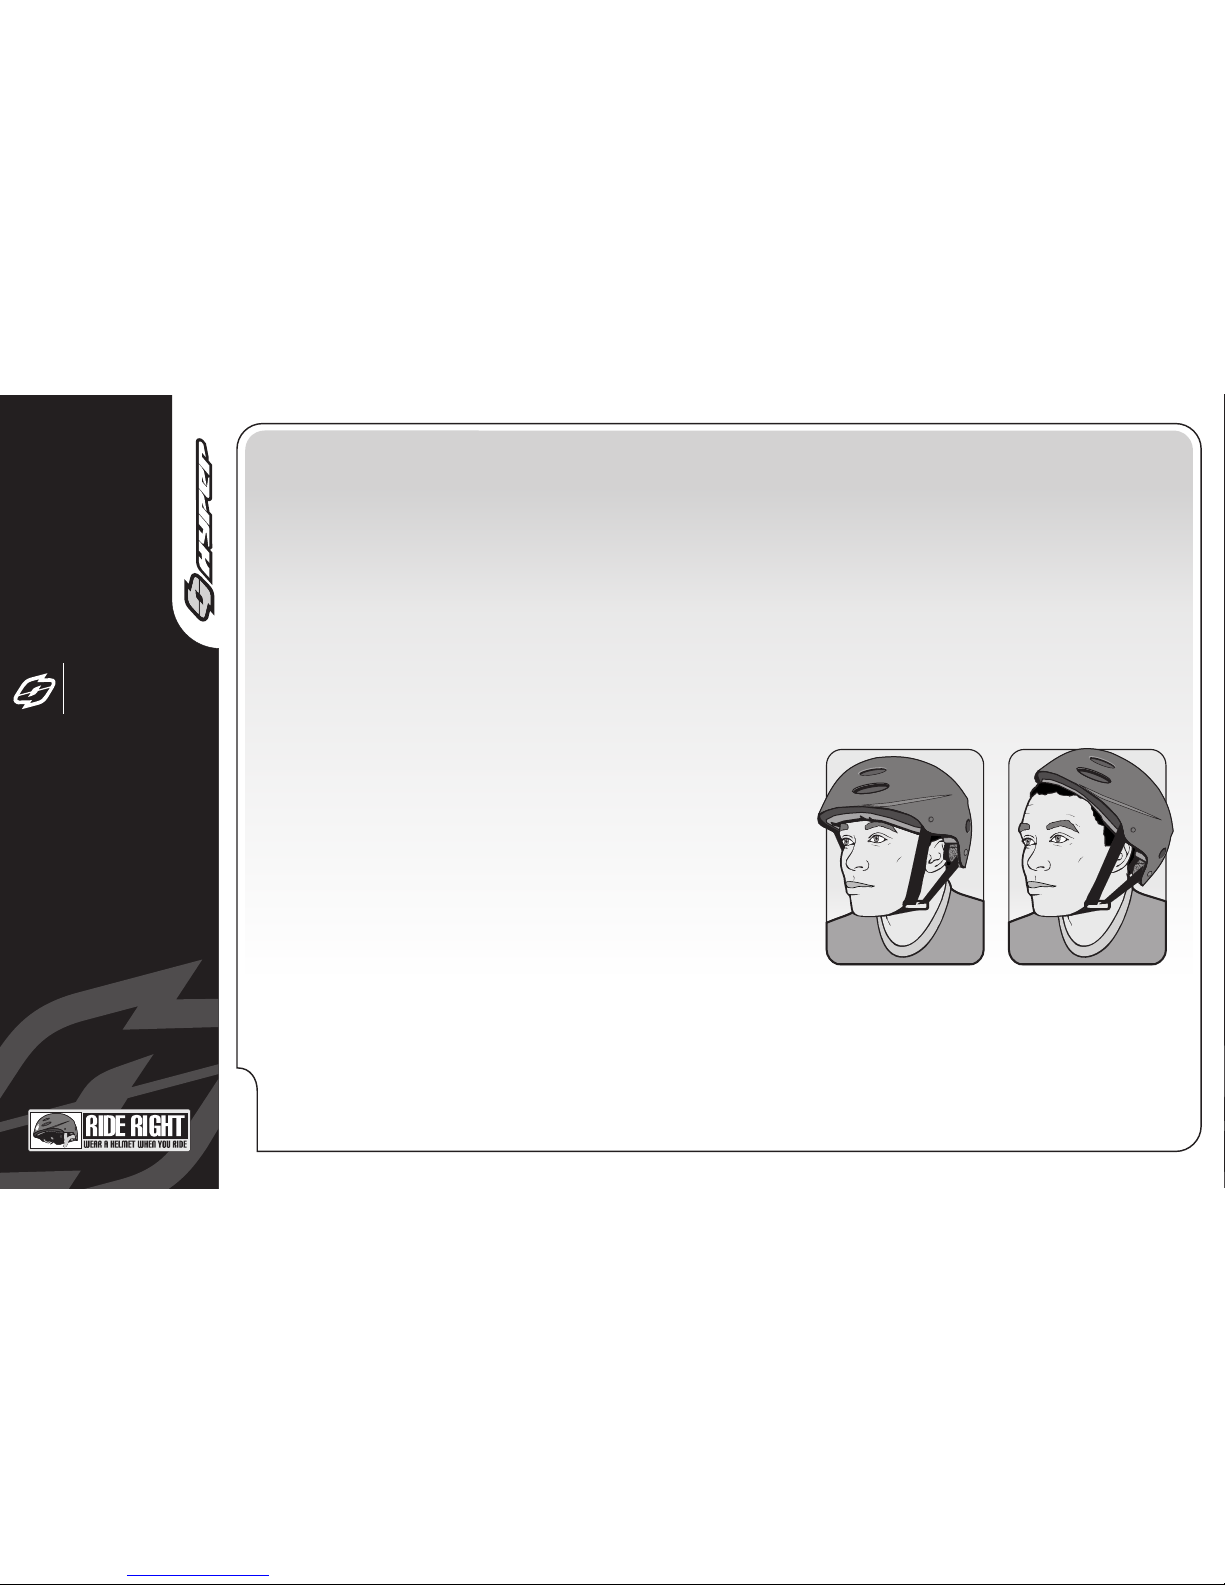
1. HELMET
While not all states require bicyclists to wear approved protective headgear, common sense dictates that you should wear an
ANSI or Snell approved helmet whether the law requires it or not. Most serious BMX Scooter injuries involve head injuries which
might have been avoided if the rider had worn a helmet. Your dealer has a variety of attractive helmets, and can recommend
one to suit your needs. Your helmet must fit correctly, be worn correctly and be properly secured to do its real job. Ask your
dealer to help you with the fit and adjustment of your helmet.
WARNING: Always wear a helmet when riding your bike. Always keep the chin strap securely buckled. Failure to wear an
approved helmet may result in serious injury or death.
P A G E
2
Right Way Wrong Way
GENERAL WARNINGS
1. Rider must be age 6 years or older. Maximum weight limit 220 lbs
2. Adults must assist children in the initial adjustment procedures to adjust handlebar and steering to height.
3. Always wear safety equipment such as helmet, knee pads and elbow pads. Always wear a helmet when riding your scooter
and keep the chin strap securely buckled. Always wear shoes.
4. Avoid sharp bumps, drainage grates, and sudden surface changes. Scooter may suddenly stop.
5. Ride on smooth, paved surfaces away from motor vehicles.
6. Avoid streets and surfaces with water, sand, gravel, dirt, leaves, and other debris. Wet weather impairs traction, braking,
and visibility.
7. Do not ride at night.
8. Brake will get hot from continuous use. Do not touch after braking.
9. Avoid excessive speed associated with downhill rides.
10. Obey all local traffic and scooter riding laws and regulations.
11. Watch out for pedestrians.
12. Check and secure all fasteners before every ride.
13. Replace worn or broken parts immediately
SAFETY EQUIPMENT
WARNING: Many states require specific safety devices. It is your
responsibility to familiarize yourself with the laws of the state where you
ride and to comply with all applicable laws, including properly equipping
yourself and your bike as the law requires.
SAFETY
BMX Scooter
SAFETY
Page 5
MECHANICAL SAFETY CHECK
Here is a simple, sixty-second mechanical safety
check which you should get in the habit of making
every time you’re about to get on a bike.
1. NUTS, BOLTS
Lift the front wheel off the ground by two or three
inches, then let it bounce on the ground. Anything
sound, feel or look loose? Do a quick visual and tactile
inspection of the whole bike. Any loose parts or
accessories? If so, secure them. If you’re not sure, ask
someone with experience to check.
2. TIRES & WHEELS
Tires correctly inflated? Check by putting one hand on
the saddle, one on the intersection of the handlebars
and stem, then bouncing your weight on the BMX Scooter while
looking at tire deflection. Compare what you see with
how it looks when you know the tires are correctly
inflated; and adjust if necessary. See Section 5.C.1 for
details and recommended tire pressures.
2. LIGHTS
We strongly recommend that children not ride after
dusk or before daylight. If you must ride your BMX Scooter
after dusk or before full daylight, your BMX Scooter must be
equipped with lights so that you can see the road and
avoid road hazards; and so that others can see you.
Vehicle laws treat BMX Scooters like any other vehicle. That
means you must have a white front and a red rear light
operating if you are riding after dusk or before full
daylight. Your bike dealer can recommend a battery or
generator powered lighting system appropriate to
your needs.
WARNING: Reflectors are not a substitute for
proper lights. It is your responsibility to equip
your BMX Scooter with all state and locally mandated
lights. Riding at dawn, at dusk, at night or at other
times of poor visibility without a BMX Scooter lighting system
which meets local and state laws and without reflectors
Is dangerous and may result in serious injury or death.
P A G E
3
SAFETY
BMX Scooter
SAFETY
Page 6
4. WHEEL NUTS
Are the front and rear wheels straight and secure in
the dropouts? Are the wheel nuts properly tightened?
WARNING: Riding with an improperly installed or
insufficiently tightened wheel can cause the wheel to
wobble or disengage from the BMX Scooter, which can cause
damage to the BMX Scooter and serious injury or death.
5. HANDLEBAR AND SADDLE ALIGNMENT
Are the saddle and handlebar stem correctly parallel
to the bike’s top tube and tight enough so that you
can’t twist them out of alignment?
6. HANDLEBAR ENDS
Are the handlebar grips secure and in good condition?
If not, replace them. Are the handlebar ends plugged?
If not, plug them before you ride.
WARNING: Loose or damaged handlebar grips can
cause you to lose control and fall. Unplugged
handlebars can act like a cookie cutter on your body,
and cause serious injury in an otherwise minor accident.
Tires in good shape? Spin each wheel slowly and look
for cuts in the tread and sidewall. Replace damaged
tires before riding the bike.
Wheels true? Spin each wheel and check for brake
clearance and side-to-side wobble. If a wheel wobbles
side to side or hits the brake pads, take the bike to a
qualified bike shop to have the wheel trued.
CAUTION: Wheels must be true for hand brakes
to work effectively. Wheel truing is a skill which
requires special tools and experience. Do not attempt to
true a wheel unless you have the knowledge and tools
needed to do the job correctly.
3. BRAKES
If your BMX Scooter has hand-operated brakes, squeeze the
brake levers. Are the brake shoes contacting the wheel
rim within an inch of brake lever movement? Can you
apply full braking force at the levers without having
them touch the handlebar? If not, your brakes need
adjustment. Do not ride the bike until the brakes are
properly adjusted.
WARNING: Riding with improperly adjusted and
secured brakes or worn brake shoes is dangerous
and can result in serious injury or death.
P A G E
4
SAFETY
BMX Scooter
SAFETY
Page 7
2. LESSONS
The lessons that follow relate to some of the most
common real situations that children encounter when
riding their bikes. Go over these situations with your
child and make sure the lesson objective is
accomplished.
Driveway Ride Out: When a youngster rides out
of the driveway and is struck by a car, that is called a
ride out accident.
What can you do?
First, realize the danger of your own driveway.
If there are obstructions to the view of passing
motorists (like bushes or trees), trim them back.
You might park your car in front of the driveway, if
local ordinance permits. This way, your child can’t
use the driveway as a launching pad.
But the most important thing you can do is teach
your child about driveway safety. Take your child
outside to the driveway and have him / her practice
riding down the drive way and stopping prior to
reaching the street.
Running the Stop Sign: Car/bike crashes can
happen when a cyclist runs a stop sign. Most cyclists
who get hit riding through stop signs know that they
were supposed to stop.
P A G E
5
RIDING SAFELY AND RESPONSIBLY
The RIP RAIL BMX Scooter is not designed or
intended for use on public streets. DO NOT
OPERATE YOUR RIP RAIL ON THE STREET OR
IN CLOSE PROXIMITY OF MOTOR VEHICLES!
NOTE: Like any sport, BMX Scooter riding involves risk of injury
and damage. By choosing to ride a BMX Scooter, you assume
the responsibility for that risk. Not the people who sold you the
bike. Not the people who made it. Not the people who
distribute it. Not the people who manage or maintain the roads
or trails you ride on. So you need to know and practice the
rules of safe and responsible riding.
AN IMPORTANT NOTE TO PARENTS
I addition to The Basics (page 7), the Rules of the
Road (page 7), the Rules of the Trail (page 9), Wet
Weather Riding (page 10), Night Riding (page 10)
kids need to be taught the following rules and lessons which
adults are already expected to know and have them frequently
reinforced. We urge you to take the time to familiarize yourself
with these rules and to teach them to your child before you let
your child ride unsupervised.
1. Rules
• No playing in the road or in the street
• No riding on busy streets
• No riding at night
• Stop for all STOP signs
SAFETY
BMX Scooter
SAFETY
Page 8

What can you do?
Of course, you ought to teach your child not to ride
across busy streets - at least until the child has had
some advanced training and is old enough to
understand traffic. But in the meantime, for
residential street riding, you can teach your child to
always look and signal before turning left. A big
part of this lesson is teaching the child how to look
to the rear without swerving.
Take your child to a playground to practice riding
along a straight line while looking behind. Stand
alongside and hold up a different number of fingers
on your hand after the child rides by. Call his/her
name. After 15 minutes of practice, a ten year old
should be able to look behind his/herself and
identify how many fingers you are holding up without swerving.
Night Time Riding (See also page 10).
Most car/BMX Scooter accidents happen at night
where an overtaking car hits a bike. (An overtaking
car is one that comes up from behind and passes the
cyclist on the left.) These overtaking accidents can
be very serious.
What can you do?
First, you should keep your youngster from riding
at night. It requires special skills and equipment.
Few children have either. Secondly, make sure your
child understands that if he/she gets caught out
after dark on a bike, the thing to do is to call you
for a ride home. One suggestions is to tape “phone
They just thought it would be OK this time; or they may have
been distracted. The thing to impress upon your child is that
while he/she may not get hit every time, running stop signs will
eventually result in an accident.
What can you do?
Take your child to a stop sign near home. Explain
what it means by emphasizing the following points:
1). Stop at all stop signs, regardless of what is
happening.
2). Look in all directions for traffic.
3). Watch for oncoming cars making left turns.
4). Watch for cars behind you making right turns.
5). Wait for any cross traffic to clear.
6). Proceed when safe.
In order to make this lesson stick, you may have to
change your own driving habits. If you creep
through intersections controlled by stop signs, you
are showing your child that you don’t really believe
what you preach. For your child’s sake, stop at stop
signs.
Turning Without Warning: Another major
accident type involves cyclists who make unexpected
left turns. They neither look behind for traffic, nor do
they signal. The key factor here is neglecting to look
to the rear: If the cyclist had looked, he/she would
have seen the danger coming up from behind.
P A G E
6
SAFETY
BMX Scooter
SAFETY
The RIP RAIL BMX Scooter is not designed or intended for use on public streets. DO NOT
OPERATE YOUR RIP RAIL ON THE STREET OR IN CLOSE PROXIMITY OF MOTOR VEHICLES!
Page 9
2. Be thoroughly familiar with the controls of your
BMX Scooter.
3. Be careful to keep body parts and other objects
away
from the spinning wheels of your BMX Scooter.
4. Always wear a cycling helmet which meets the
latest Snell or ANSI standard.
5. Always wear shoes that will stay on your feet and
will grip the pedals. Never ride barefoot or wearing
sandals.
6. Wear bright, visible clothing that is not
so loose that is can catch on moving
parts of the BMX Scooter or be snagged by
objects at the side of the road or trail.
7. Don’t jump with your bmx scooter. Jumping a
bmx scooter can be fun but it puts incredible stress
on everything from your spokes to your frame. The
most dangerous risk to jumping a bmx scooter is the
risk of serious injury to the rider or serious damage
to the bmx scooter.
C. RULES OF THE ROAD
1. Learn the local BMX Scooter laws and regulations.
Communities may have regulations about where you
can ride your Scooter and safety equipment that
may be required. It’s your responsibility to know and
obey the laws.
money” to the bike so that, in an emergency, the
child will be able to call home.
Following the Leader: There is increased risk of
car/bike collision if children are following each other,
because if the first one does something dangerous,
those following may do it too.
What can you do?
Teach your child to always assess the traffic
situation for him/herself. When a group is riding
around, each cyclist should stop for stop signs;
each cyclist should look to the rear before making
left turns; and so on. One way to get the message
across is to play a game with the chld similar to
‘Simon Says’. In this game, however, the emphasis
should not be on doing what ‘Simon Says’, but
rather have the child make a decision based on the
situation. The child should learn to ignore what
‘Simon Says’. Children need to learn to think for
themselves to ride safely.
SUMMARY: Teach your child early - the earlier the
better. Learning skills such as looking and avoiding
hazards takes time. Be prepared to repeat lessons
until your child understands what you’re trying to
get across. Be patient. Your efforts will be rewarded,
knowing that your child is aware of safe riding skills.
B. THE BASICS
1. Always do the Mechanical Safety Check Before
you get on a bike.
P A G E
7
SAFETY
BMX Scooter
SAFETY
Page 10
5. Ride in designated bike lanes, on designated bike
paths or on the right side of the road, in the same
direction as car traffic and as close to the edge of the
road as possible.
6. Stop at stop signs and traffic lights; slow down and
look both ways at street intersections. Remember
that a BMX Scooter always loses in a collision with a
motor vehicle, so be prepared to yield even if you
have the right of way.
7. Use hand signals for turning and stopping. Learn
the local vehicle code for the correct signals.
8. Never ride with headphones. They mask traffic
sounds and emergency vehicle sirens, distract you
from concentrating on what’s going on around you,
and their wires can tangle in the moving parts of the
BMX Scooter, causing you to lose control.
9. Never carry a passenger.
10. Never carry anything which obstructs your vision or
your complete control of the BMX Scooter, or which could
become entangled in the moving parts of the BMX Scooter.
11. Never hitch a ride by holding on to another vehicle.
12. Don’t do stunts, wheelies or jumps. They can cause
you injury and damage your bike.
13. Don’t weave through traffic or make any moves that
may surprise people with whom you are sharing the road.
14. Observe and yield the right of way.
2. You are sharing the road or the path with others motorists, pedestrians and other cyclists. Respect
their rights, and be tolerant if they infringe on yours.
3. Ride defensively. Assume that the people with whom
you are sharing the road are so absorbed with what
they are doing and where they are going that they
are oblivious to you.
4. Look ahead of where you’re going, and be ready to
avoid:
!Vehicles slowing or turning in front of you,
entering the road or your lane ahead of you,
or coming up behind.
!Parked car doors opening in front of you.
!Pedestrians stepping out in front of you.
!Children playing near the road.
!Pot holes, sewer grating, railroad tracks,
expansions joints, road or sidewalk construction,
debris and other obstructions that could cause
you to swerve into traffic, catch your wheel or
otherwise cause you to lose control and have an
accident.
!The many other hazards and distractions which
can occur on a BMX Scooter ride.
P A G E
8
SAFETY
BMX Scooter
SAFETY
Page 11
SAFETY
5. Yield right of way to pedestrians and animals. Ride in
a way that does not frighten or endanger them, and
stay far enough away so that their unexpected moves
don’t endanger you.
6. You may be riding in sensitive habitat, so stay on the
designated trail. Don’t contribute to erosion by riding in
mud or with unnecessary sliding. Don’t disturb wildlife
or livestock; and don’t disturb the ecosystem by cutting
your own trail through vegetation or streams.
7. It is your responsibility to minimize your impact on the
environment. Ride accordingly. Leave things as you
found them; and always take out everything you
brought in.
8. If you crash: First, check yourself for injuries, and
take care of them as best you can.
Next, check your bmx scooter for damage, and fix what you can.
Then, when you get home, carefully perform the maintenance
proceedure described this manual and check for any other
damaged parts. All bent, scored or discolored parts are
suspect and should be replaced.
WARNING: A crash can put extraordinary stress
on BMX Scooter components, causing them to fatigue
prematurely. Components suffering from stress fatigue
can fail suddenly and catastrophically, causing loss of
control, serious injury or death.
CAUTION: If you have any doubt about the
condition of the BMX Scooter or any of its parts, take it
to your dealer for a thorough check.
15. Never ride your BMX Scooter while under the
influence of alcohol or drugs.
16. If possible, avoid riding in bad weather, when
visibility is obscured, at dusk or in the dark, or
when extremely tired. Each of these conditions
increases the risk of accident.
RULES OF THE TRAIL
1. We recommend that children not ride off-road
without the accompaniment of an adult. In any
event, never ride alone in remote areas. Even
when riding with others, make sure that someone
knows where you’re going and when you expect to
be back. Always take along some kind of
identification, so that people know who you are in
case of an accident; and take a couple of dollars in
cash for a candy bar, a cool drink or an emergency
phone call.
2. Surface hazards make off-road riding much more
difficult and therefore more dangerous than riding
on paved roads. Start slowly and build up your skills
on easier terrain before tackling the more difficult.
3. Learn and obey the local laws regulating where and
how you can ride off-road, and respect private
property. Don’t ride where you are not welcome or
where you are not allowed.
4. You are sharing the trail with others - hikers,
equestrians, other cyclists. Respect their rights, and
be tolerant if they inconvenience you.
P A G E
9
BMX Scooter
SAFETY
Page 12
Even if you have excellent night vision, many of the people
with whom you’re sharing the road don’t. A
bicyclist is very difficult for motorists and pedestrians
to see at dawn, at dusk, at night or at other times of
poor visibility. If you must ride under these conditions,
check and be sure you comply with all local laws about
night riding: follow the Rules of the Road and of the
Trail even more carefully; and make sure to take the
following additional precautions:
Before riding at dawn, at dusk, at night or at other
times of poor visibility, take the following steps to
make yourself more visible:
! Purchase and install an adequate battery or
generator powered head and tail light.
! Wear light colored, reflective clothing and
accessories, such as a reflective vest, reflective
arm and leg bands, reflective stripes on your
helmet, flashing lights...any reflective device or
light source that moves will help you get the
attention of approaching motorists, pedestrians
and other traffic.
! Make sure your clothing or anything you may be
carrying on the BMX Scooter does not obstruct a
reflector or light.
WET WEATHER RIDING
Under wet conditions, the stopping power of your
brakes (as well as the brakes of other vehicles sharing
the road) is dramatically reduced and your tires don’t
grip nearly as well. This makes it harder to control
speed and easier to lose control. To make sure that you
can slow down and stop safely in wet conditions, ride
more slowly and apply your brakes earlier and more
gradually than you would under normal, dry
conditions.
NIGHT RIDING
Riding a BMX Scooter at night is many times more
dangerous than riding during the day. Therefore,
children should never ride at dawn, at dusk or in the
dark. Adults should not ride at dawn, at dusk or at
night unless it is absolutely necessary.
WARNING: Riding at dawn, at dusk, at night or
at other times of poor visibility without a BMX Scooter
lighting system which meets local and State laws and
without reflectors is dangerous and can result in serous
injury or death.
P A G E
10
SAFETY
BMX Scooter
SAFETY
Page 13
P A G E
11
SAFETY
BMX Scooter
SAFETY
The Owner's Responsibility
WARNING: This BMX Scooter is made to be ridden by one rider at a time for general
transportation and recreational use. It is not made to withstand the abuse of
stunting and jumping.
If the BMX Scooter was purchased unassembled, it is the owner's responsibility to follow
All assembly and adjustment instructions exactly as written in this manual and any
"Special Instructions" supplied with the BMX Scooter. The owner must make sure all
components are securely attached.
If the BMX Scooter was purchased assembled, it the owner's responsibility, before riding the
BMX Scooter for the first time, to make sure the BMX Scooter is assembled and adjusted exactly
As written in this manual and any "Special Instructions" supplied with the BMX Scooter.
The owner must make sure all components are securely attached.
Riding Safety and Responsibility
Page 14
P A G E
12
TOOLS/TECHNICAL SUPPORT
Your new BMX Scooter was assembled and tuned in the factory and then partially disassembled for
shipping. You may have purchased the BMX Scooter already full re-assembled and ready to ride OR in
the shipping carton in the partially disassembled form. The following instructions will enable you
to prepare your BMX Scooter for years of enjoyable cycling. Please check that all parts referred to in the
instructions and shown in the diagram have been included, and that all tools needed are at your
disposal. For more details on inspections, lubrication, maintenance and adjustment of any area
please refer to the relevant sections in this manual. If you need replacement parts or have questions
pertaining to assembly of your BMX Scooter, call HYPER direct at:
To avoid injury, this product must be properly assembled before use. If your BMX Scooter was obtained
after assembled, we strongly recommended that you review the complete assembly instructions
and maintenance checks specified in this manual before riding.
HYPER BICYCLES SERVICE AND TECHNICAL SUPPORT:
1.866.424.0500
Monday - Friday (8:00AM - 5:00PM - CST)
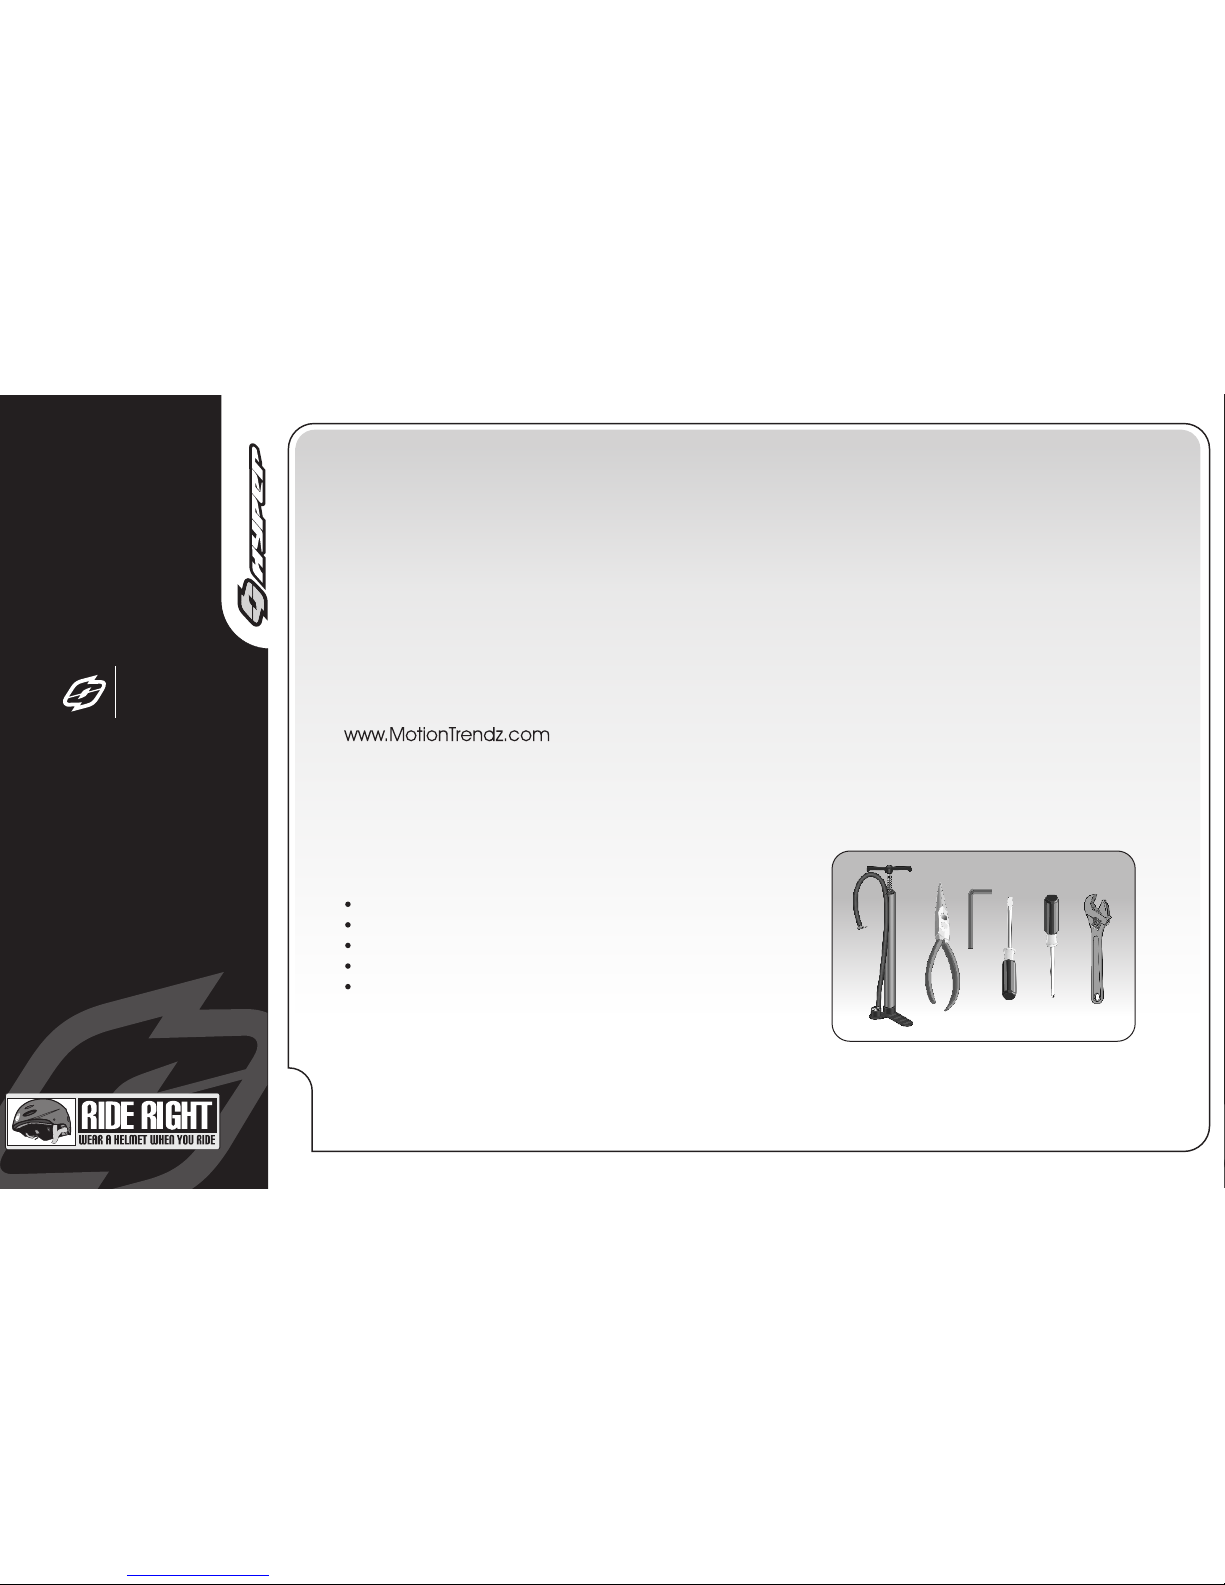
Tools Required:
Phillips head screw driver; 4mm, 5mm
6mm & 8mm Allen keys; adjustable
Adjustable wrench or a 9mm, 10mm, 14mm & 15mm
Open and box end wrenches; and a
Pliers with cable cutting ability.
VISIT US ONLINE
@
For product related questions email us at: [email protected]
For customer service questions email us at: [email protected]
TOOLS
TOOLS
REQUIRED
Page 15
P A G E
13
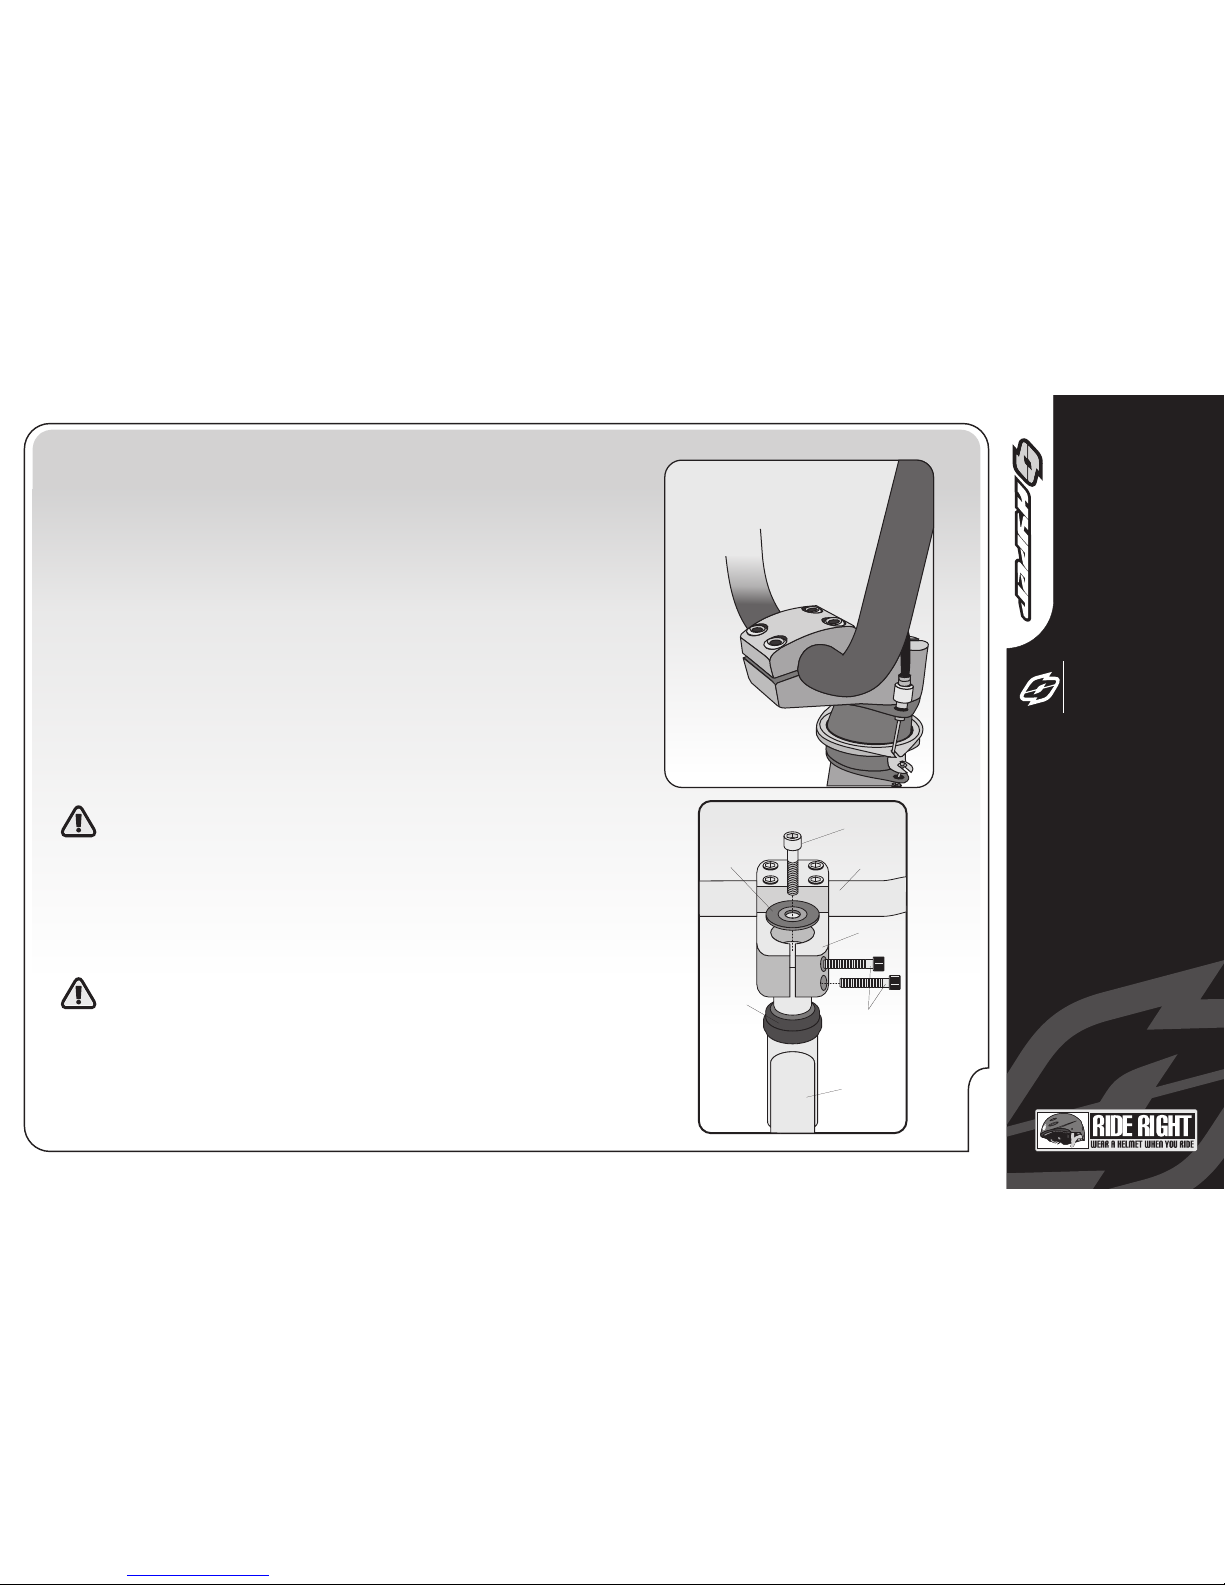
Stem Diagram
Adjuster Bolt
Headset
Top Cap
Stem
Binder
Bolts
Headset
Frame
Handlebar
NOTE: the handlebar stem and headset are an integrated system.
Both must be adjusted at the same time.
1. To adjust the headset or stem, first loosen the two stem binder
bolts, then the adjuster bolt in the top cap.
2. Align the handlebar stem with the front wheel.
3. To remove play from the headset, begin by tightening the
adjuster bolt in the top cap. This will tighten the headset and
remove side to side movement of the fork. If the fork fails to
rotate freely, the adjuster bolt is too tight and needs to be
loosened.
WARNING: Do not over tighten the adjuster bolt. Its function
is to adjust the headset. The stem binder bolts' function is to
hold the fork and stem in place.
4. Once the headset is adjusted, tighten the two stem binder bolts
to the recommended torque of 140 pounds per inch. Do not over
tighten these bolts.
WARNING: Do not over tighten the stem binder bolts
and handlebar binder bolts. Failure to properly tighten
these bolts may damage the handlebar and/or stem to
fork assembly. This may compromise the steering action,
causing you to possibly lose control, and possibly injure
yourself.
Adjusting the Handlebar Stem
and Headset (Four Bolt)
Four Bolt
Diagram
Stem
BMX Scooter
ASSEMBLY
Page 16
ADJUSTMENT
P A G E
14
BMX Scooter
ASSEMBLY
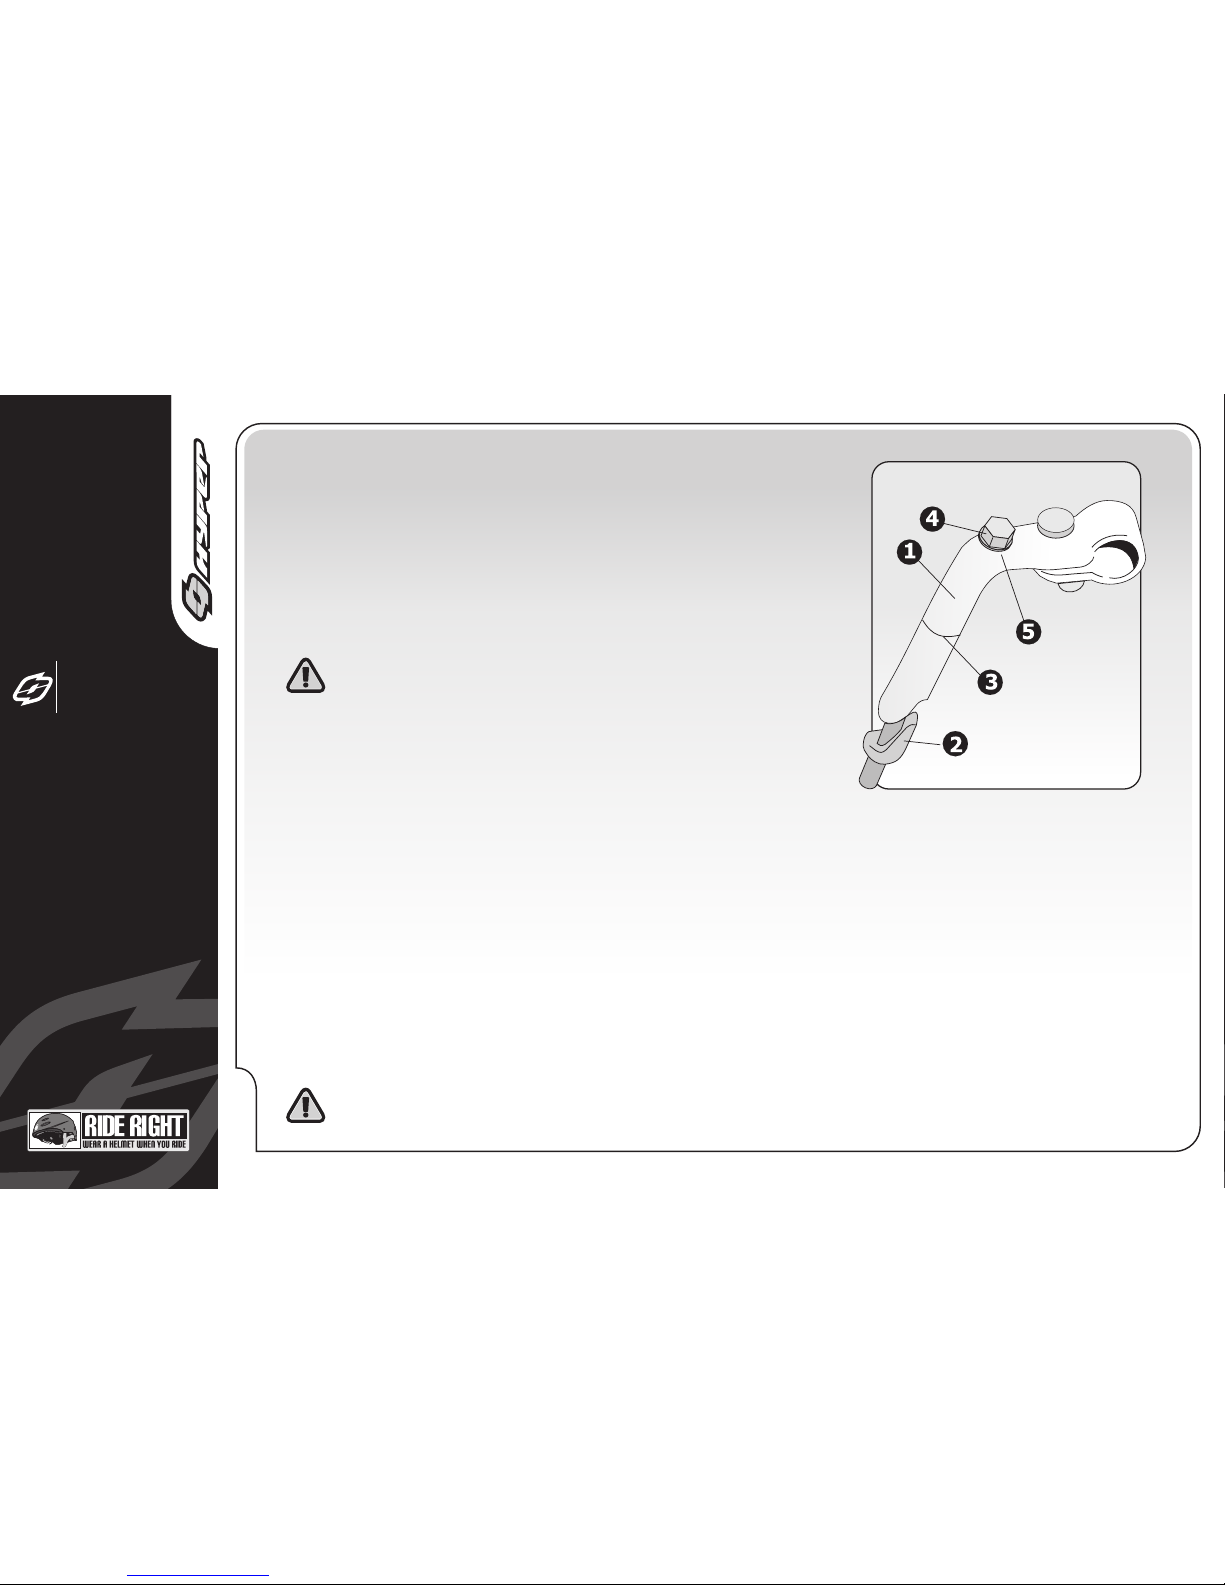
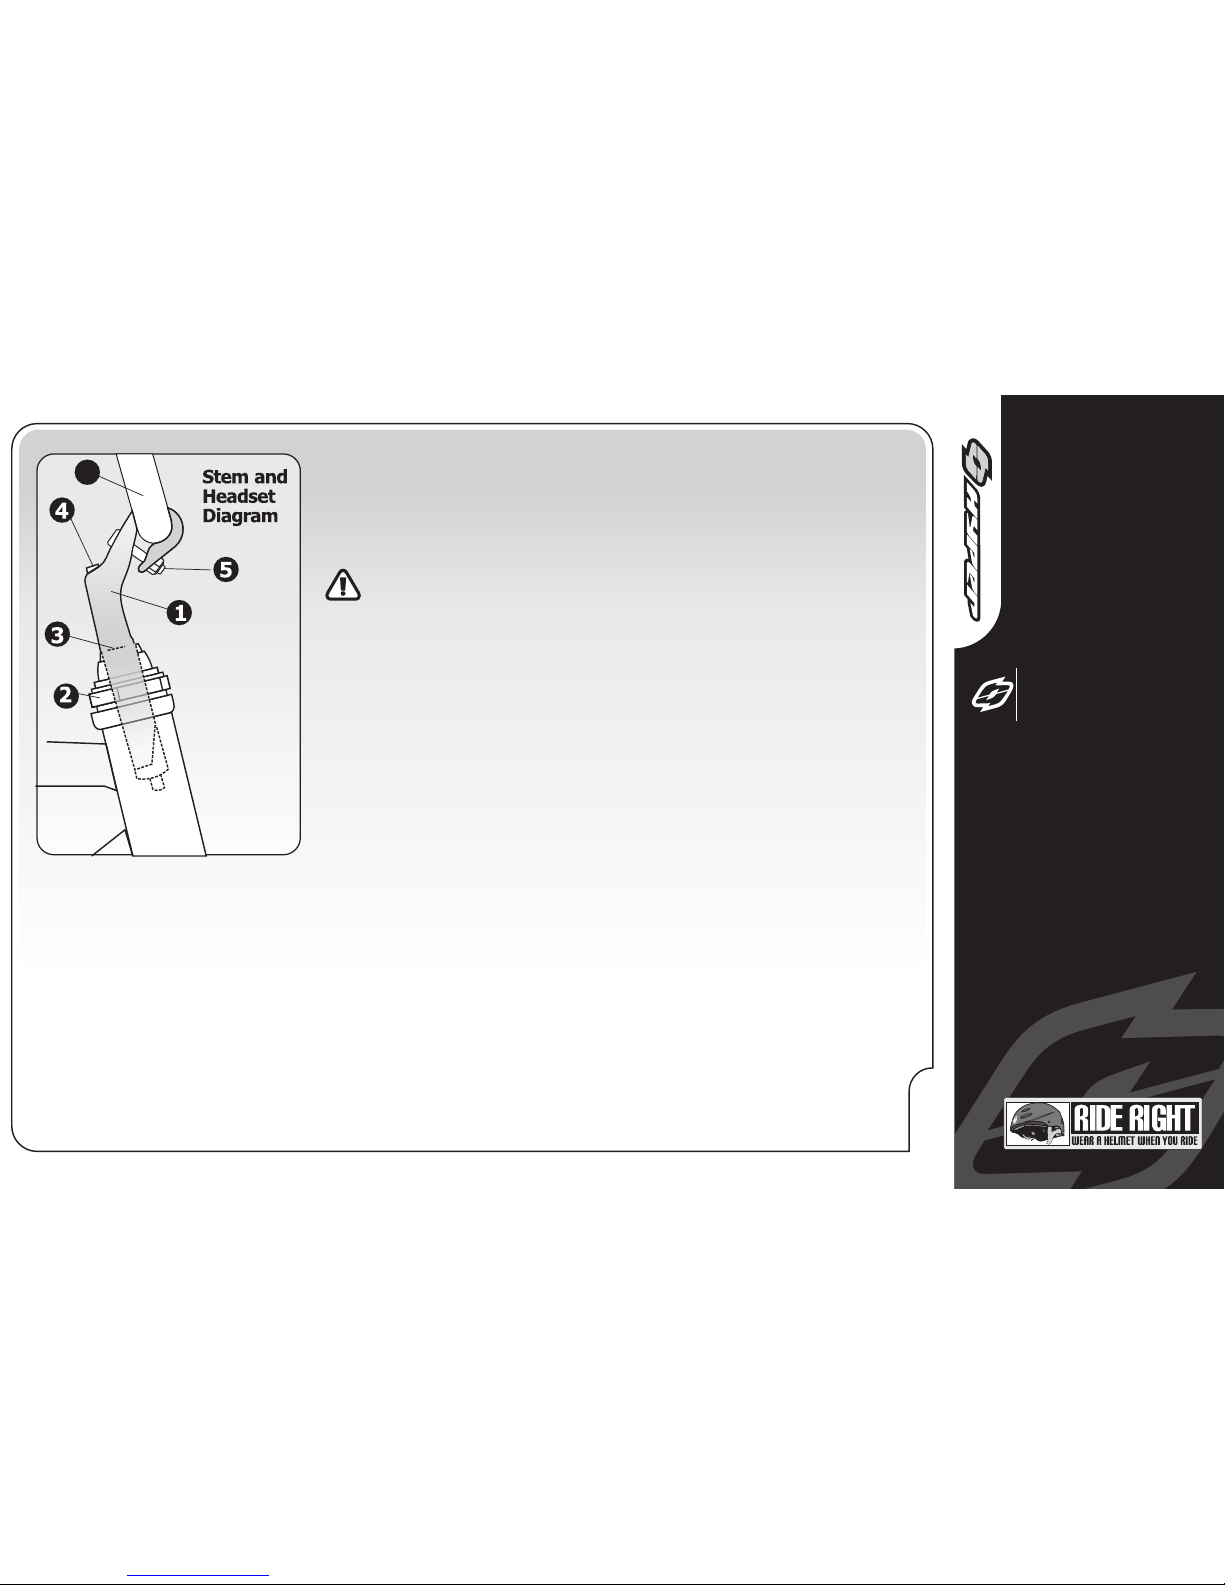
Handlebar and Stem (Single Bolt)
1. Assemble the stem to the fork: If necessary, assemble the stem to
bolt (4),washer (5), and wedge nut (2) to the stem (1).
Turn the stem bolt only four revolutions into the wedge nut.
Turn the stem bolt only four revolutions into the wedge nut (2).
Point the stem toward the front of the BMX Scooter and put it into the locknut (7).
Put the stem at a comfortable height for the rider.
WARNING: To prevent steering system damage and possible loss of
control, the “MIN-IN” (minimum insertion) mark on the stem must
be inside the locknut.
Make sure you can not see the “MIN-IN” (minimum insertion) mark (3) on
the stem above the locknut.
Tighten the stem bolt just enough that the stem will not
fall into the locknut.
2. Assemble the handlebar to the stem:
Put the handlebar (8) into the stem, but do not tighten the handlebar clamp (6)
at this time.
Align the stem with the front wheel and tighten the stem bolt
3. Assemble the brake lever to the handlebar. Loosen the clamp screw of each
brake lever.
If necessary, move the handlebar to each side to install the brake levers put the brake levers on the
handlebar with the brake lever for the rear brake on the right side of handlebar.
Do not tighten the clamp screw of the brake levers at this time.
4. Tighten stem bolt and the handlebar clamp:
WARNING: do not overtighten the stem bolt. Over tightening the stem bolt can damage the steering
and cause loss of control. Make sure the stem is aligned with the front wheel and tighten stem bolt
MINIMUM
INSERTION
LINE
Single Bolt Stem Diagram
Page 17
P A G E
15
BMX Scooter
ASSEMBLY
Put the handlebar in a comfortable position for the rider
WARNING: if the handlebar clamp is not tight enough, the handlebar can
slip in the stem. This can cause loss of control
Tighten the bolts of the handlebar clamp. If the handlebar clamp has more than
one bolt, than tighten the bolts equally.
5. Test the tightness of the stem: straddle the front wheel and hold it between
your legs.
Try to turn the front wheel by turning the handlebar. If the handlebar and stem
turn with out turning the front wheel, realign the stem with the front wheel.
Tighten the bolt tighter than you did before
(about half a revolution only at a time).
Do this test again, until the handlebar and stem do not turn without turning
the wheel
6. Test the tightness of the handlebar: Hold the BMX Scooter stationary and
try to move the ends of the handlebar forward or backward. If the handlebar
moves , loosen bolts of handlebar clamps. Put the handlebar in
the correct position
Tighten the bolts of the handlebar clamp tighter than before If the handlebar
clamp has more than one bolt, tighten the bolts equally
Do this test again, until the handlebar does not move in
the handlebar clamp.
Handlebar and Stem (continued)
6
Page 18
P A G E
16
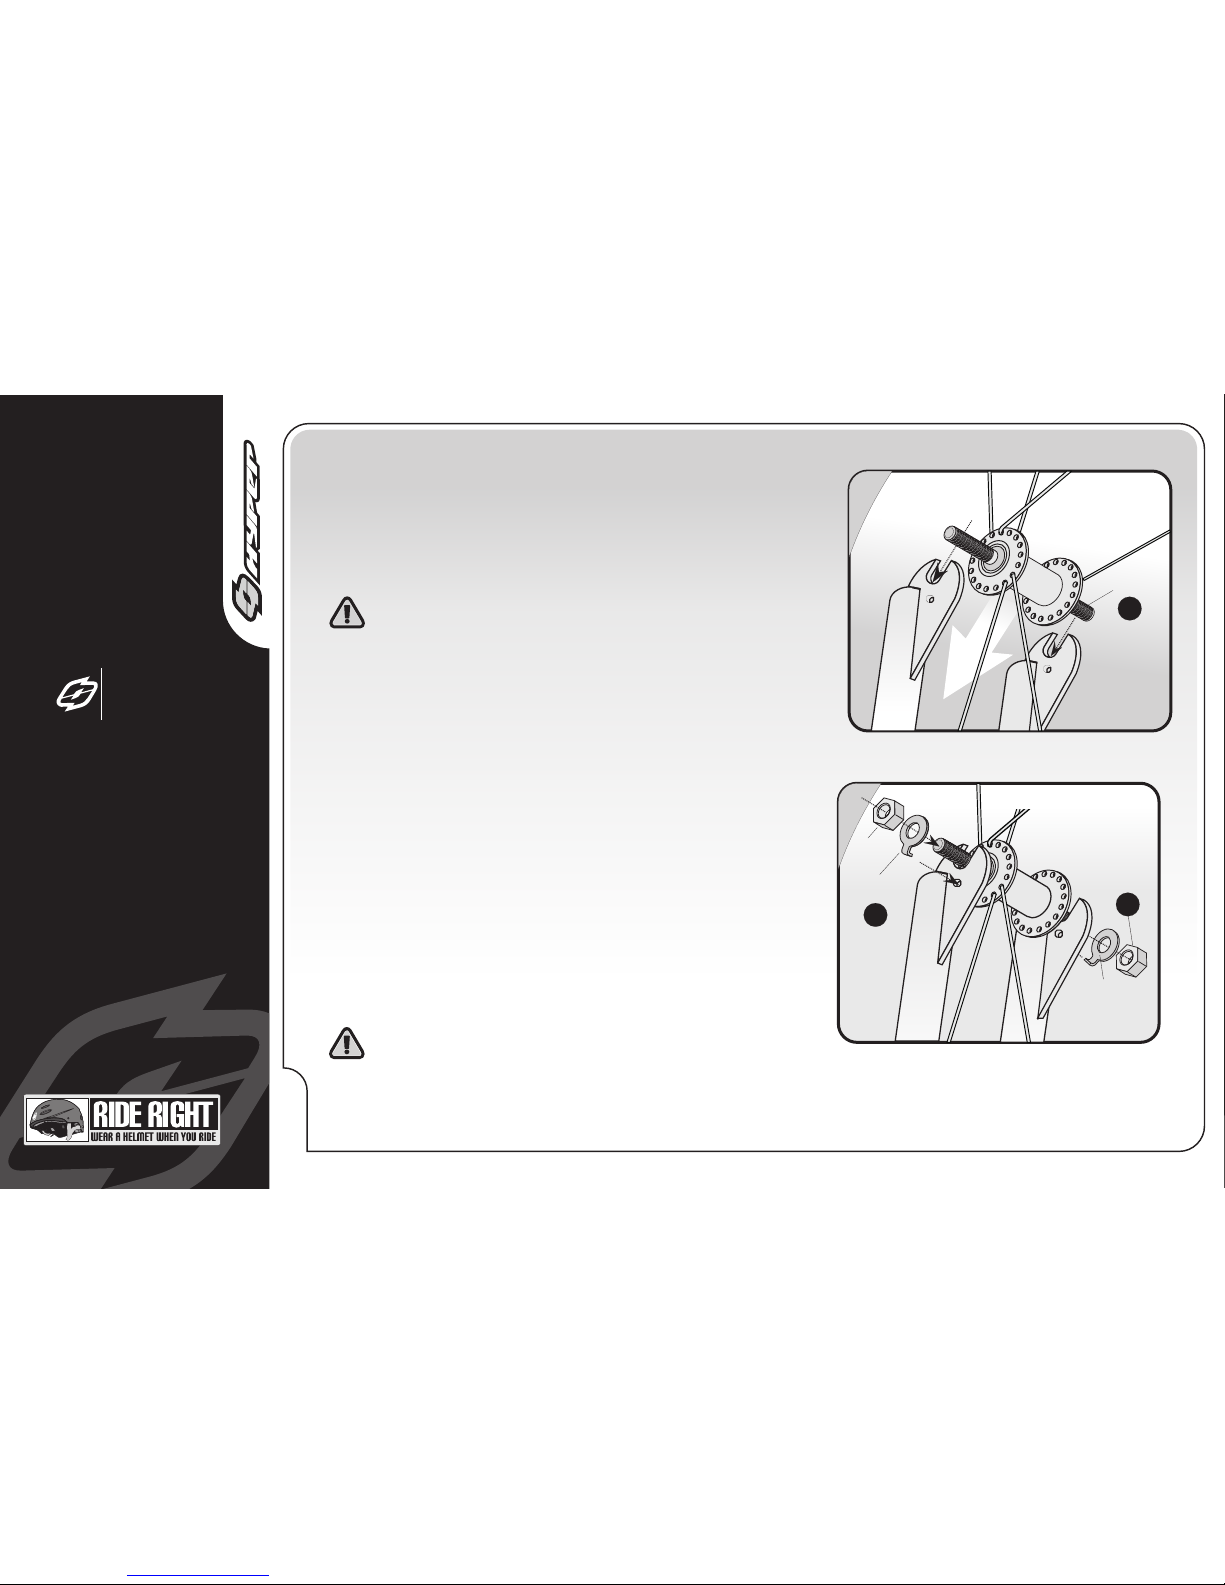
AXLE
NUT
SECURITY
WASHER
AXLE
NUT
SECURITY
WASHER
Security Washer
Diagram
2
3
- Make sure the tab of each security washer (2) is in the
hole of the fork
NOTE: Some models have a front fork with a built in
wheel retention feature. The security washers are
not required and will not fit on a fork with this feature.
- Using the two axle nuts (3) with serrations, attach the
front wheel.
WARNING: Do not use the nuts without
serrations to attach the front wheel.
- Put the wheel in the center of the fork and tighten both
nuts to the recommended torque of 21 ft-lbs.
Assemble the front wheel to the
fork as shown:
ADJUSTMENT
BMX Scooter
ASSEMBLY
- If the BMX Scooter has a front caliper brake and the tire will
not go down between the brake shoes (1), remove
one brake shoe.
WARNING: If you remove a brake shoe to
install the front wheel, return it to the correct
position as written in the "Brake and Cable
Adjustment" section.
Assemble the front wheel to the
fork as shown:
(Shown with Bike Sitting Upside-Down)
Hub
Insertion
Diagram
AXLE
4
Page 19
P A G E
17
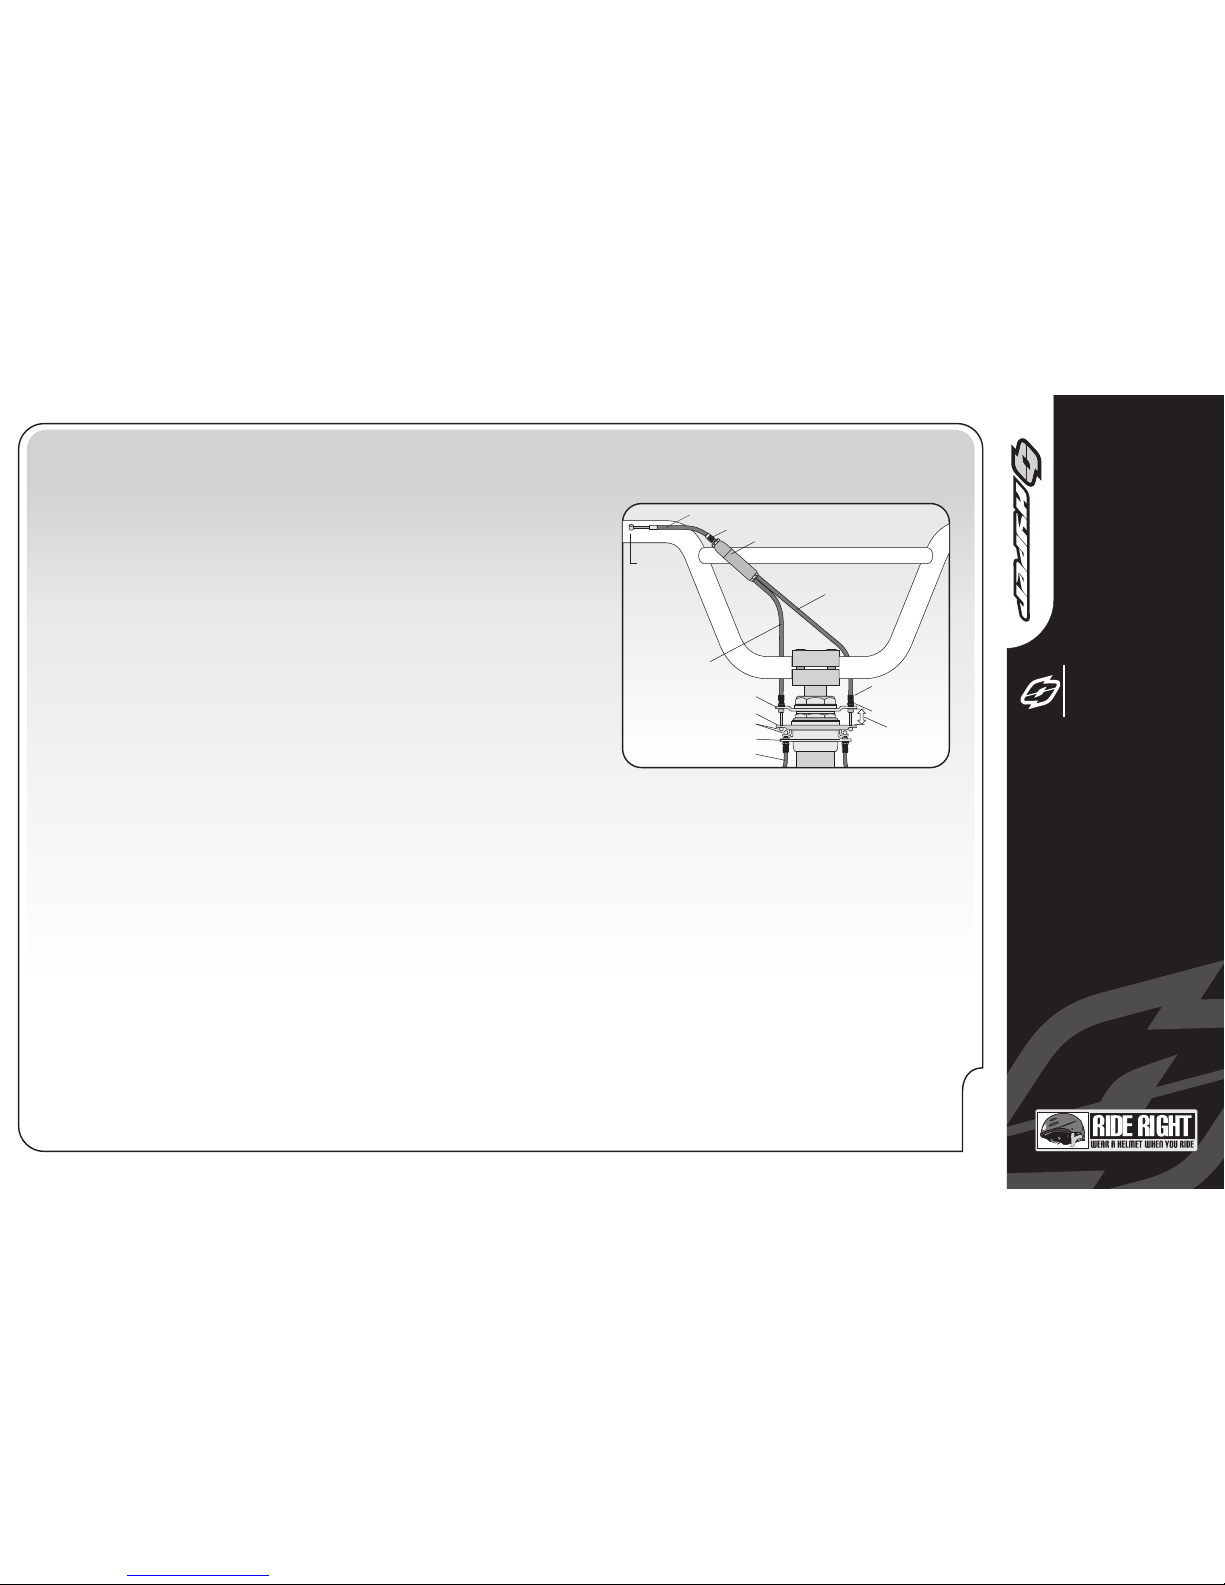
Adjusting the rotor
1)
Ensure that the threaded portion of the upper adjusting barrel
is flush with or slightly protrudes through the bottom of the
upper cable stop.
2)
3)
5)
6)
4)
Ensure that the threaded portion of the lower adjusting barrel
is flush with or slightly protrudes through the top of the lower
cable stop.
Attach the upper cable to the brake lever. Ensure that the
adjusting barrel is fully tightened in the brake lever.
Pull the link wire on the rear brake assembly until the brake
shoes are touching the rim wall and tighten the brake bolt.
The lower cable tension should be tight.
Ensure that the brake shoes are positioned as per the
diagram.
Adjust the tension on the upper cable at the Y junction to
ensure that there is sufficient tension on the cable stops to
keep the cable ends in place in the rotor unit.
CABLE
END
UPPER CABLE
(SHORT CASING)
UPPER PLATE
BEARING
FOOTBALL ENDS
LOWER PLATE
LOWER CABLE
ADJUSTING
BARREL
LOCKNUT
UPPER CABLE
(LONG CASING)
SET FOR
MAX TRAVEL
CABLE SPLITTER
CABLE ADJUSTER
SINGLE CABLE CASING
Rotor
BMX Scooter
ASSEMBLY
Page 20
P A G E
18
ADJUSTMENT
BMX Scooter
ASSEMBLY
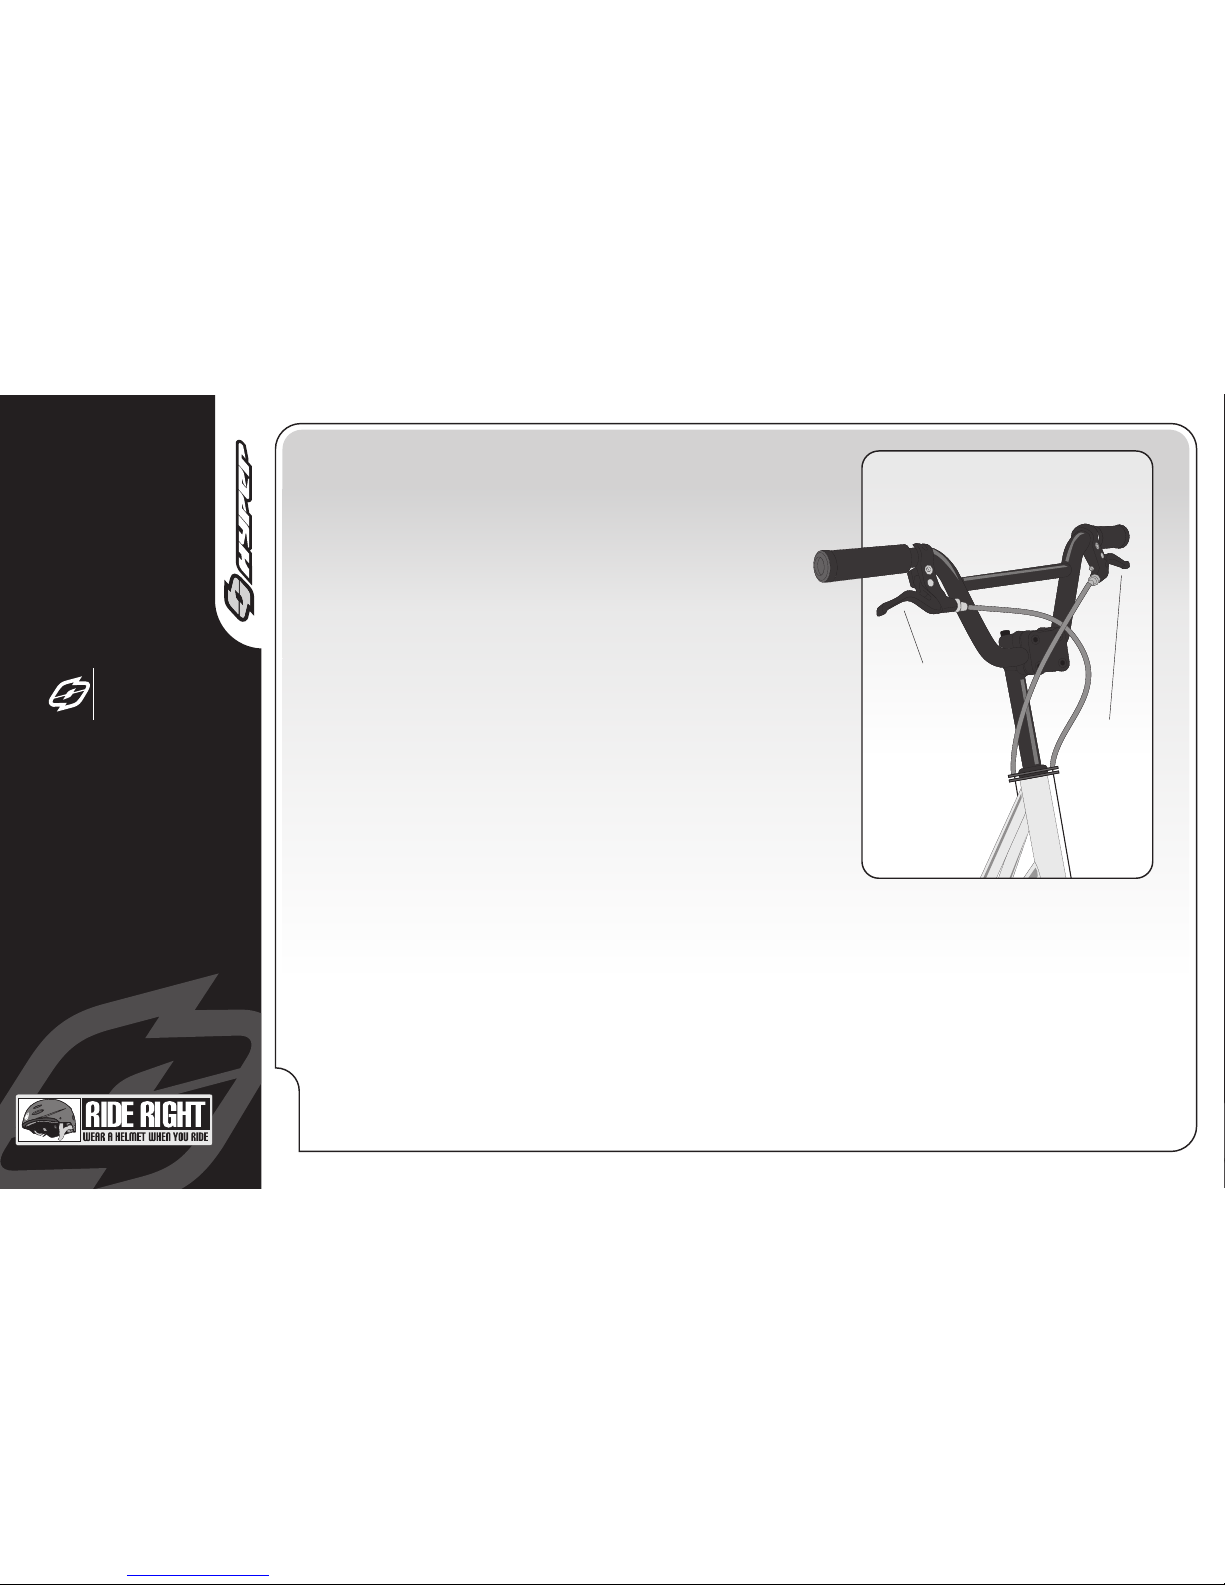
A BMX Scooter with hand brakes may have one hand lever
which operates a rear brake, or two brake levers, one
of which operates on the front wheel and the other on
the rear wheel. It's important to your safety that you
instinctively know which brake lever controls which
brake on your bike. In the U.S., bikes are required to
be set up with the right brake lever controlling the rear
brake, and the left lever controlling the front brake.
The braking action of BMX Scooter hand brakes is a function
of the friction between the brake shoes and wheel rim.
To make sure that you have maximum friction available,
keep your wheel rims and brake shoes clean and free of
lubricants, waxes or polishes.
Make sure that your hands can reach and squeeze the
brake levers comfortably. If your hands are too small
to operate the levers comfortably, consult you dealer
before riding the bike. The lever reach may be adjustable;
or you may need a different brake lever design.
Hand Brake
Front and Rear
Handbrake
Diagram
Front (Left)
Rear (Right)
Page 21
P A G E
19
BMX Scooter
ASSEMBLY
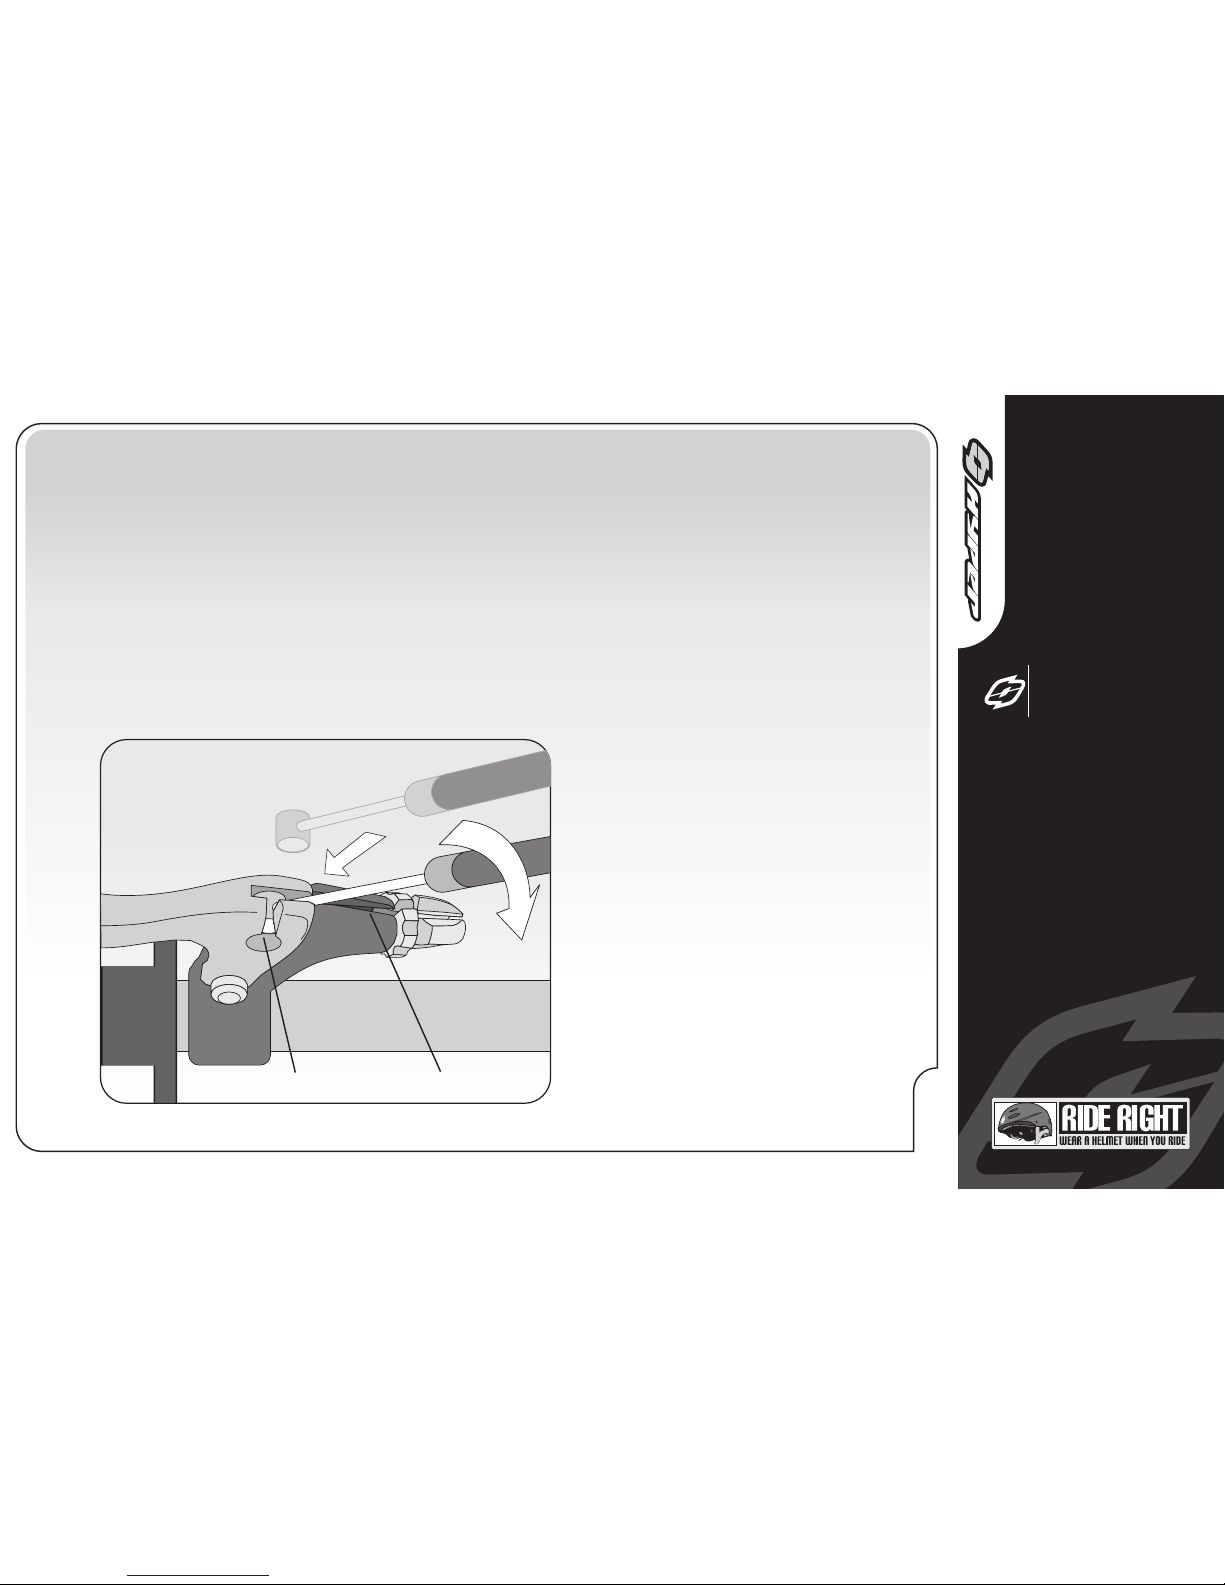
Brake Lever Cable Installation
1)
Tighten adjuster all the way into lever. Slide the cable end up into the
cable end slot. Run the cable into the cable slot through the adjuster slot
until cable is seated in adjuster.
Turn adjuster slightly counter clockwise so adjuster slot is not aligned
with the cable slot. This keeps the brake cable attached to the lever.
Squeeze and releasing the lever to test if the brake cable is securely in
installed on the brake lever.
2)
3)
Brake Cable
Installation
ADJUSTER
CABLE END
CABLE
LEVER
CABLE END SLOT CABLE SLOT
Page 22
P A G E
20
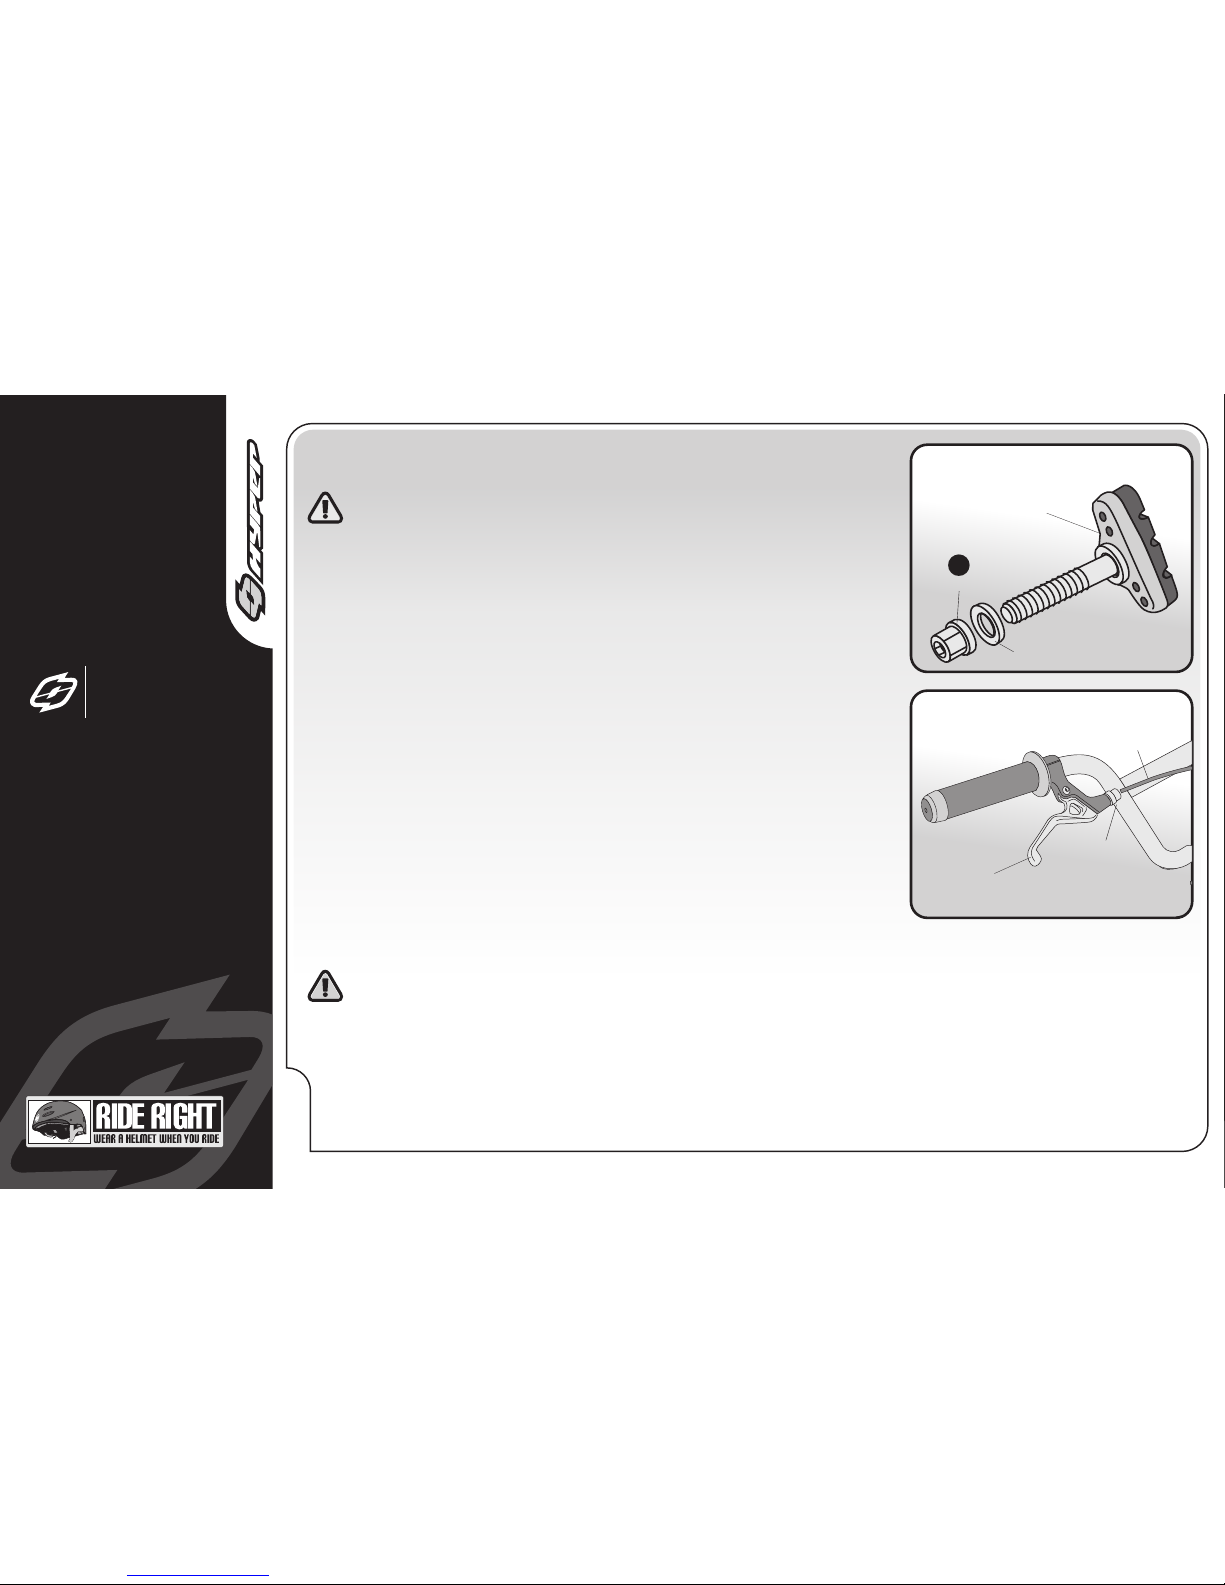
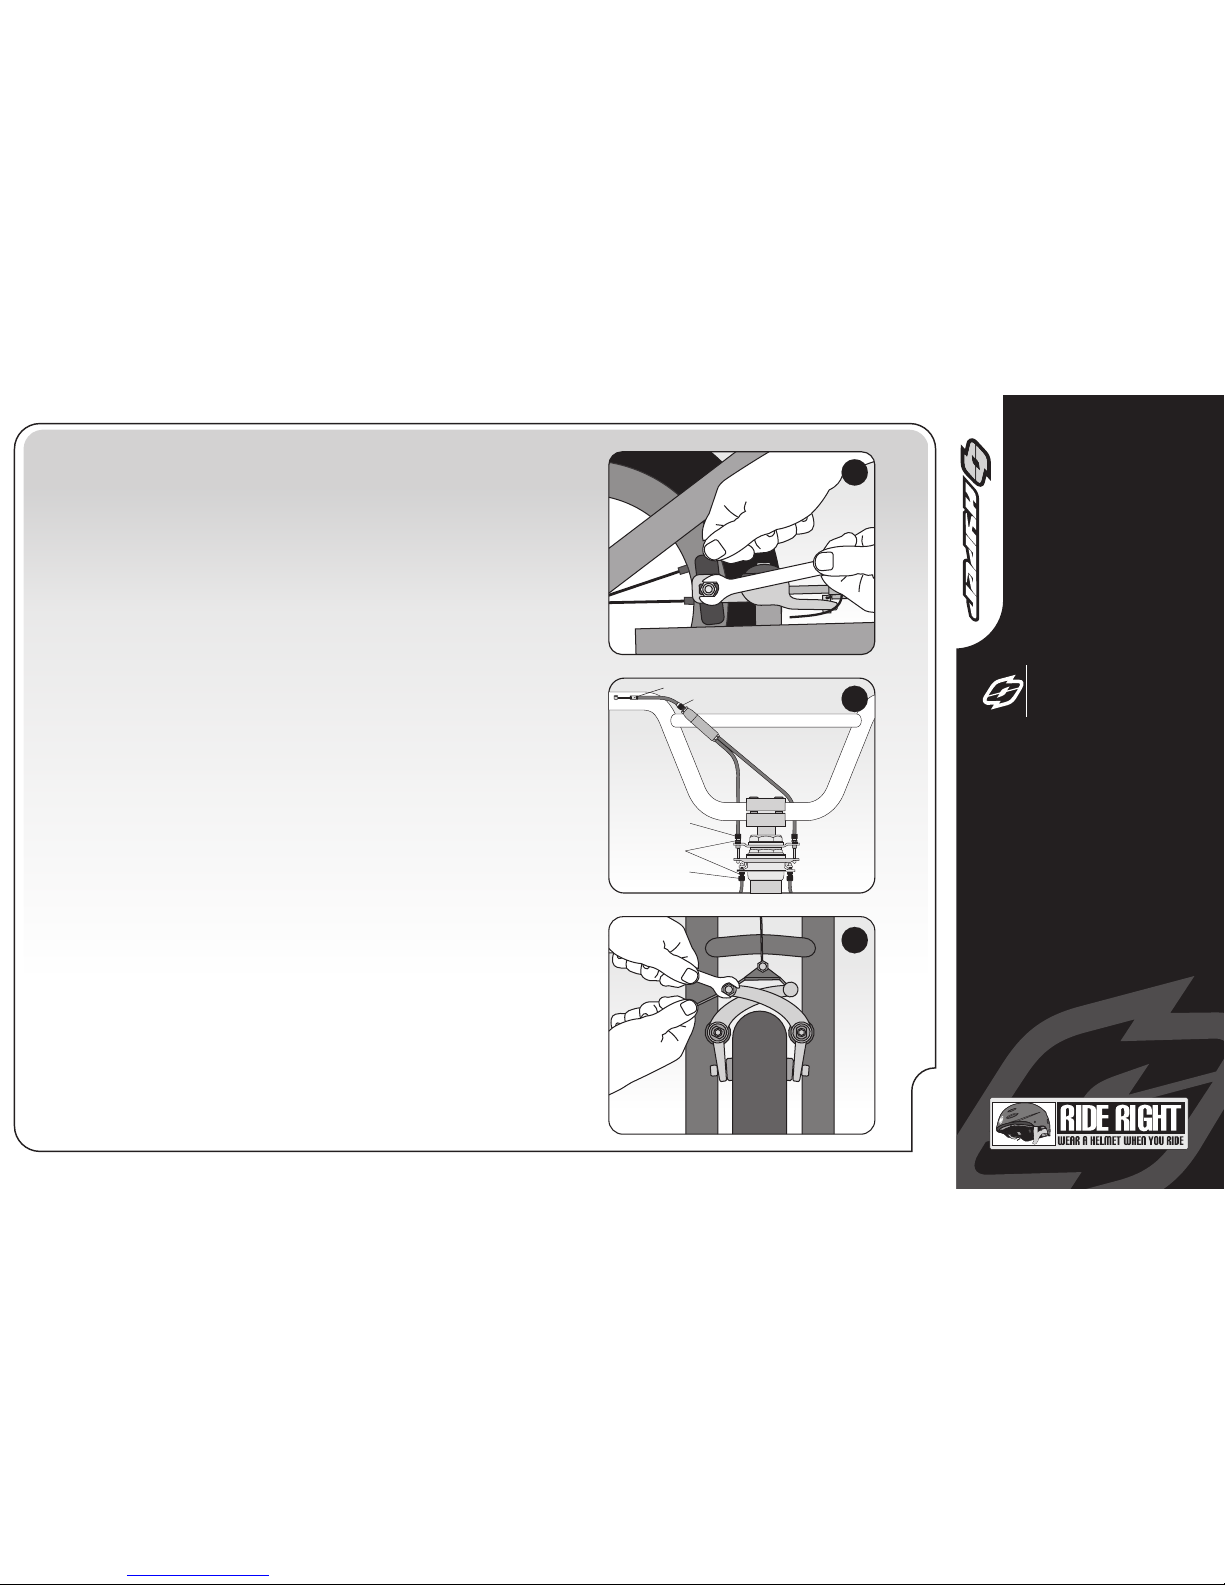
Brake System Adjustments
WARNING: You must adjust the rear brakes as
written before you ride the BMX Scooter.
1. Put the brake shoes in the correct position:
Loosen the nut (1) of each brake shoe. Adjust each brake shoe so it is
flat against the rim and aligned with the curve of the rim. Make sure
each brake shoe does not rub the tire. If the surface of the brake shoes
has arrows, make sure the arrows point torward the rear of the
BMX Scooter. Hold each brake shoe in position and tighten the nut.
2. Test the tightness of each brake shoe:
Try to move each brake shoe out of position.
If a brake shoe moves, do Step 1 again, but tighten the nut tighter than
before. Do this test again, until each brake shoe does not move.
3. Stretch the cable:
Hold both brake shoes against the rim. Loosen the cable clamp.
Pull the cable tight and tighten the cable clamp
WARNING: Do not overtighten the cable clamp.
Overtightening the cable clamp may cut the cable and cause
injury to the rider or to others.
Squeeze each brake lever firmly 20 times. Hold both brake shoes against
the rim and loosen the cable clamp. Pull the cable tight and tighten the
cable clamp.
Brake Shoe
Brake Lever
1
BRAKE SHOE
WASHER
NUT
BRAKE LEVER
CABLE ADJUST
CABLE
ADJUSTMENT
BMX Scooter
ASSEMBLY
Page 23
P A G E
21
BMX Scooter
ASSEMBLY
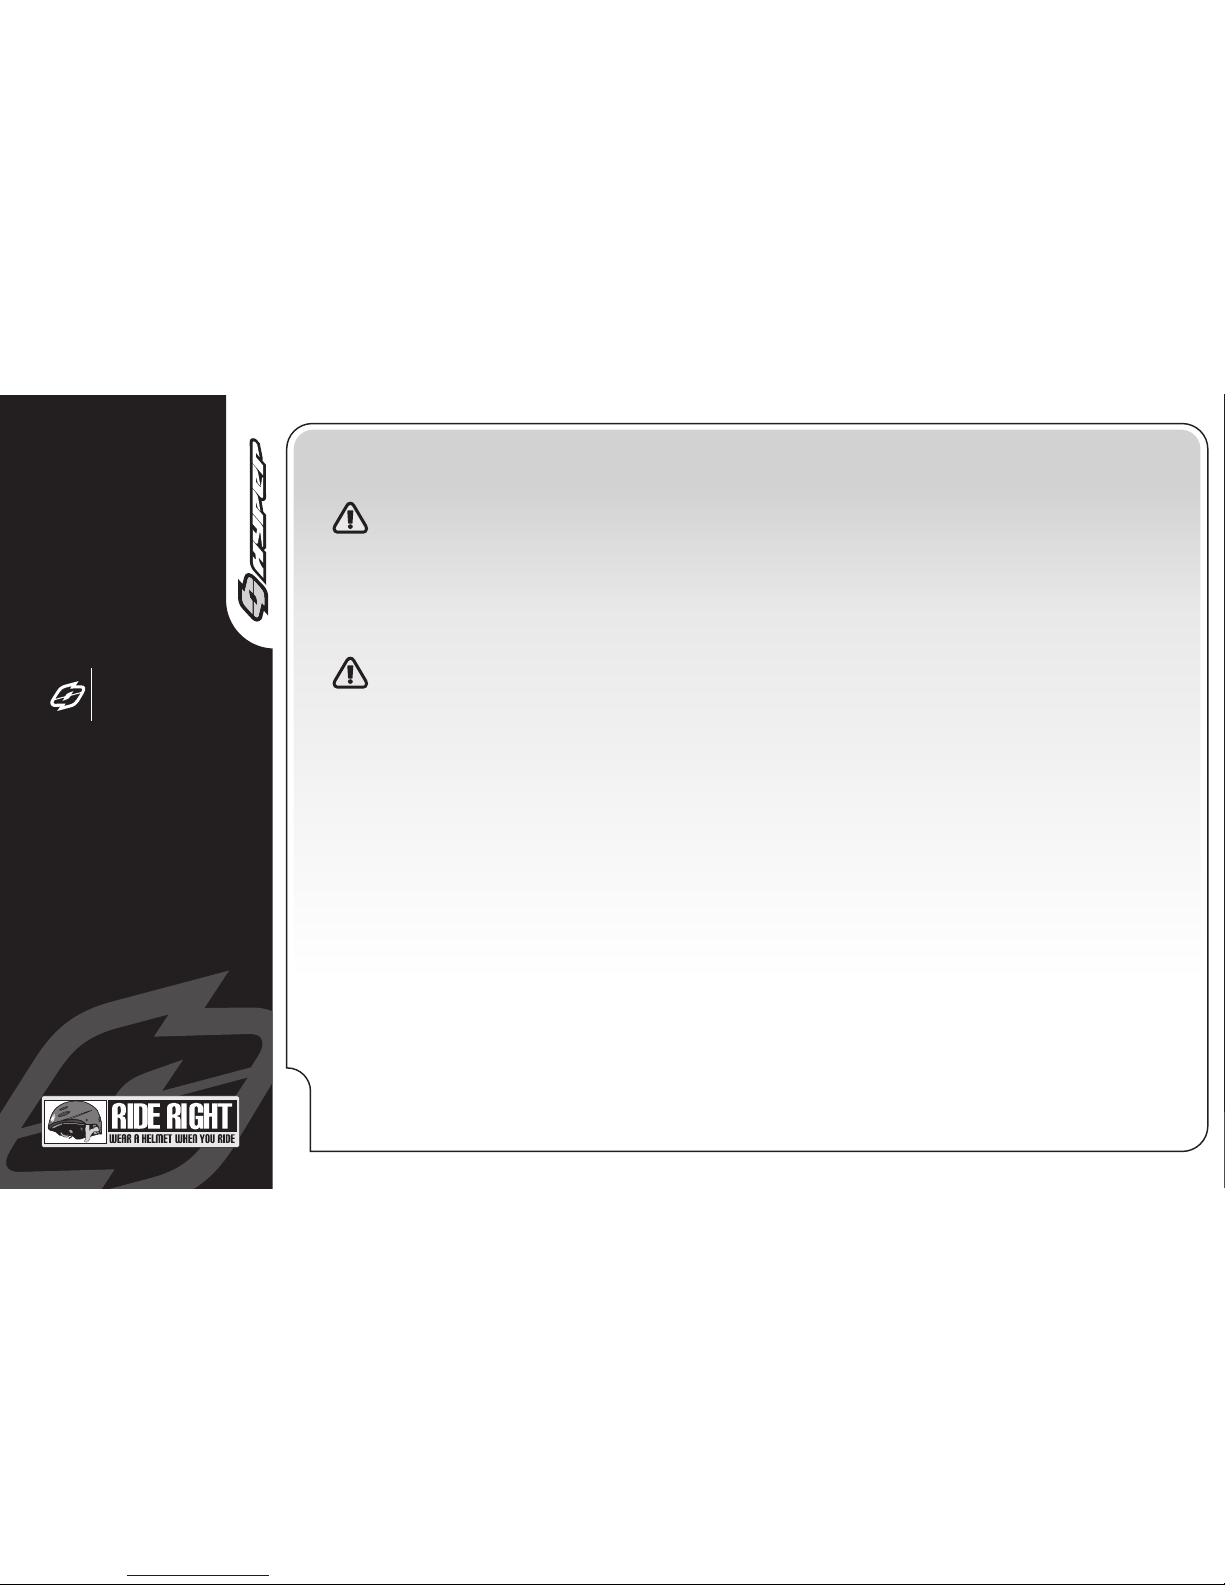
The following sections describe final brake system adjustments
required before riding.
1. Align and tighten brake shoes:
If the top and bottom edges are not evenly aligned to rim then
first loosen the brake shoe nuts until brake shoes move freely.
Align the brake shoes top and bottom edges evenly to the rim as
shown. Then tighten bolts, but never over tighten.
2. Put the brake shoes the correct distance from the rim:
Correct position of each brake shoe is 1/16 inch away from the
rim. If brake shoe distance is off first try turning the rotor
adjusting barrels in or out to make the adjustment. NOTE: You
may need to loosen or tighten locknut’s before and after turning
adjusting barrels.
3. Adjust Cable:
If the brake shoes cannot be positioned to correct distance from
the rim hold both brake shoes against the rim and loosen the
cable anchor bolt. Position each brake shoe 1/16 inch away from
the rim. Pull brake cable tight getting rid of any excess slack. Be
careful not to pull brake arm out of center. Tighten anchor bolt
securely. Squeeze the brake lever to check brake action.
3
ADJUSTING
BARREL
LOCKNUT
CABLE ADJUSTER
LEVER ADJUSTING BARREL
ADJUSTING
BARREL
2
1
Page 24
P A G E
22
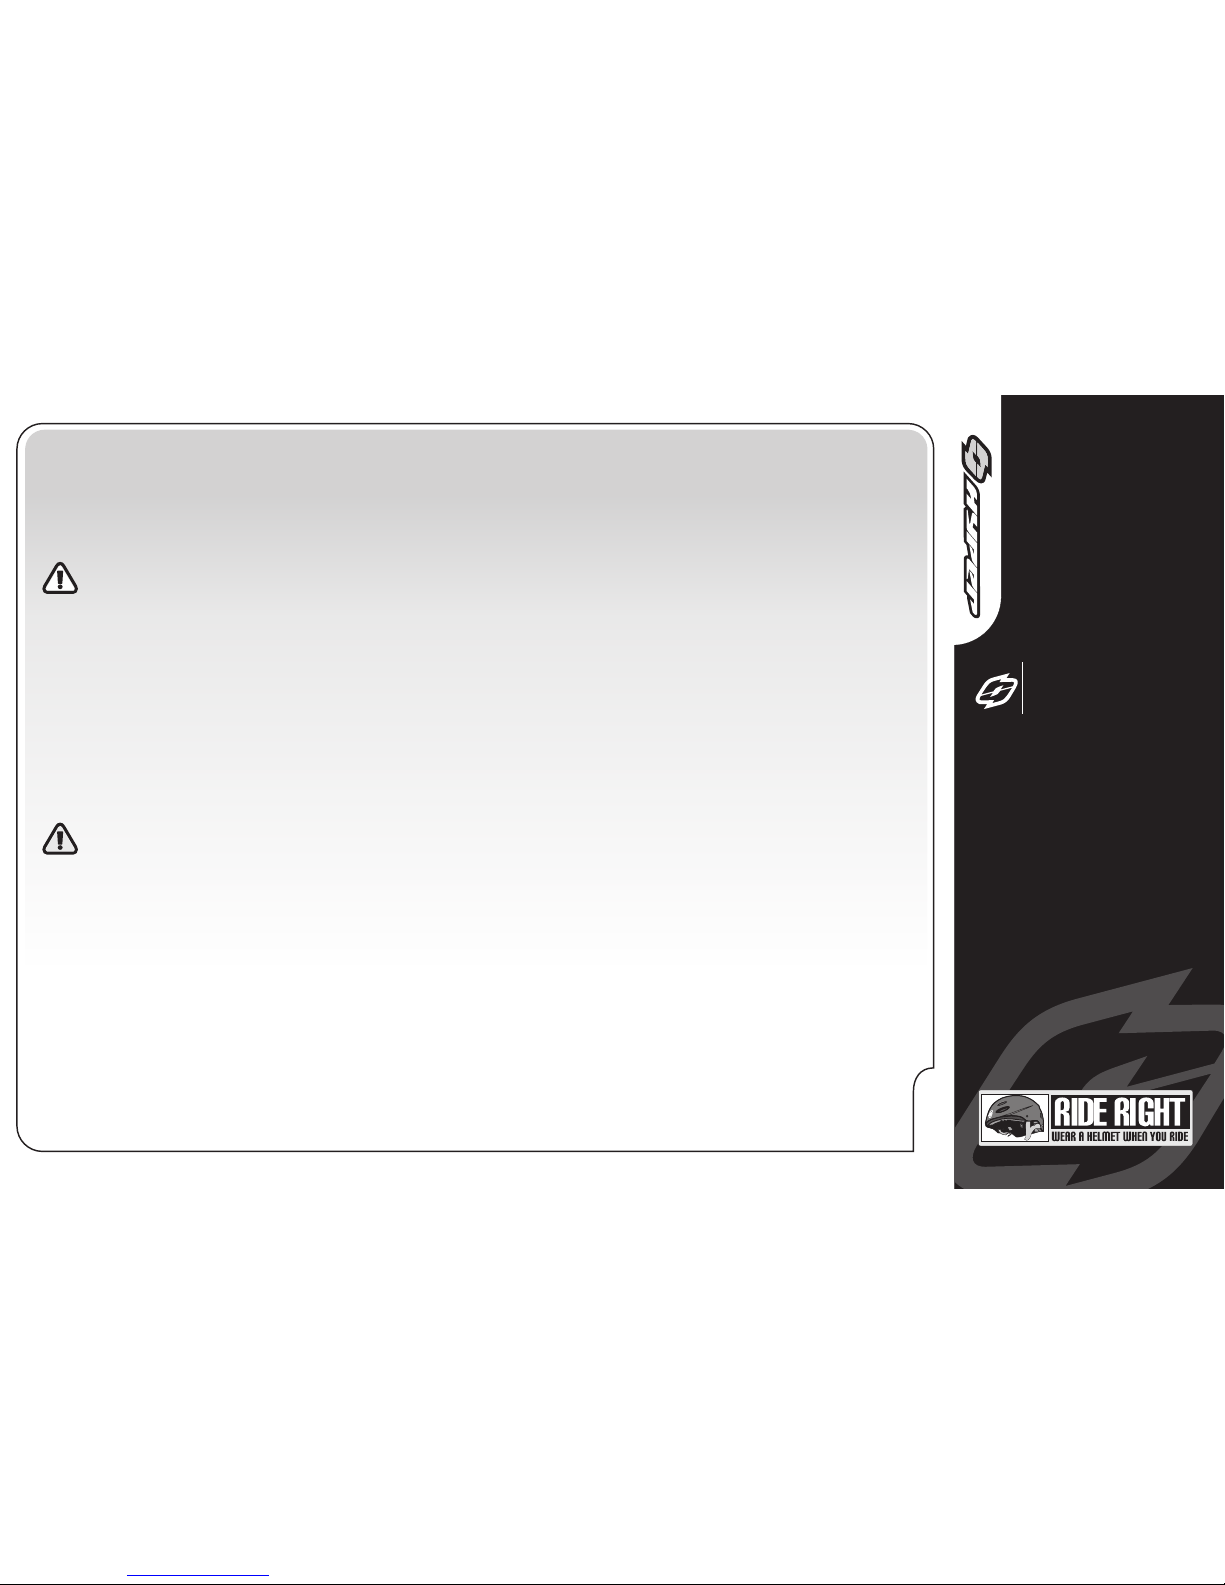
Pull or loosen the cable wire slightly. Tighten the cable clamp
WARNING: Do not overtighten the cable clamp.
Overtightening the cable clamp may cut the cable and cause injury to the rider or to
others.
Do Step 3 until the brake shoes are the correct distance from the rim.
Turn the locknut(s) against the brake lever and the caliper brake.
WARNING: Do not move the brake shoes away from a wheel
rim that is not true (straight). This can cause the caliper brake to be less effective and
unsafe. To allow safe adjustment of the caliper brake, have a BMX Scooter service shop
true the wheel.
4. Check sheath position:
Make sure both ends of the sheath are fully recessed in the brake lever, sheath stops (if equipped) and
brakes. If not, install sheath in correct position and do Step 3 again. Do this test again, until the sheath
is in the correct position.
5. Test the tightness of the cable clamp:
Squeeze each brake lever with firm pressure. Make sure the cable does not move in the cable clamp. If
the cable moves in the cable clamp, do Steps 3 and 4 again but tighten the cable clamp tighter than
before. Do this test again, until the cable does not move in the cable clamp.
6. Adjust the brake lever reach so the distance from the grip is comfortable to the rider.
Turn the adjustment screw (if equipped) to change the distance of the brake lever from the grip. Make
sure the back of each grip is no more than 3 ½ inches from the front of each brake lever.
ADJUSTMENT
BMX Scooter
ASSEMBLY
Page 25
P A G E
23
7. Test the travel of each brake lever:
Squeeze each brake lever with strong pressure. If the brake lever touches the grip, do Steps 1 through
7 again.
WARNING: After you do Steps 1 though 7 again, if either brake lever touches the grip or
does not work well, have a BMX Scooter service shop repair or adjust the caliper or
cantilever brakes.
Reducing Caliper Brake Noise (Caliper Brake Only)
It is common for caliper brakes to make noise or "squeak" when in use. This noise does not
Normally indicate a brake problem. Following the instructions below may reduce the noise:
Make sure the caliper brakes are adjusted correctly. Using a small adjustable wrench, bend each caliper
arm so the front edge of each brake shoe is the first part to touch the rim.
WARNING: Bend each caliper only a small amount. If you bend the caliper arm too far,
the caliper brake can be damaged and performance of the caliper brake reduced.
Operate the brakes as follows:
Squeeze the brake lever on the handlebar. The brake lever pulls on a cable that is attached to the brake.
The brake squeezes the rim between two brake shoes.
Operate the brakes by slowly and continuously squeezing both brake levers until you feel the braking
action. Make a habit of always using both brakes to stop the BMX Scooter. You will stop in the shortest
distance by using both brakes.
Brake System Operation
ADJUSTMENT
BMX Scooter
ASSEMBLY
Page 26
ADJUSTMENT
P A G E
24
BMX Scooter
ASSEMBLY
WARNING: If you do not obey the following instructions, injury to the rider or to others
can occur:
Before you ride the BMX Scooter for the first time, check and adjust the brakes as written in the
"Adjustments” section. Then test the brakes and practice using them at low speed in a large and level
area that is free of obstruction.
When correctly used, the brake system is very effective.
Always try to brake while going in a straight line. Apply brakes earlier in the following conditions: wet
pavement, sand, gravel, leaves, or if you need to brake while turning. To reduce the chance of skidding
apply brakes intermittently.
If the rims are wet, start to brake earlier than normal because a longer distance to stop the BMX
Scooter will be necessary.
Be careful when riding downhill or at a high speed because as your speed increases, a longer distance
to stop the BMX Scooter will be necessary. Slow for curves because too much speed can force you to
make a turn too wide.
Keep wax, oil, grease, etc. off the rims and the brake shoes. These lubricants will reduce brake
performance and a longer distance to stop the BMX Scooter will be necessary.
Check and adjust the brakes the first time they do not stop the BMX Scooter quickly and smoothly, do
not stop the BMX Scooter as well as they have in the past, or if either brake lever can touch the grip.
Page 27
25
P A G E
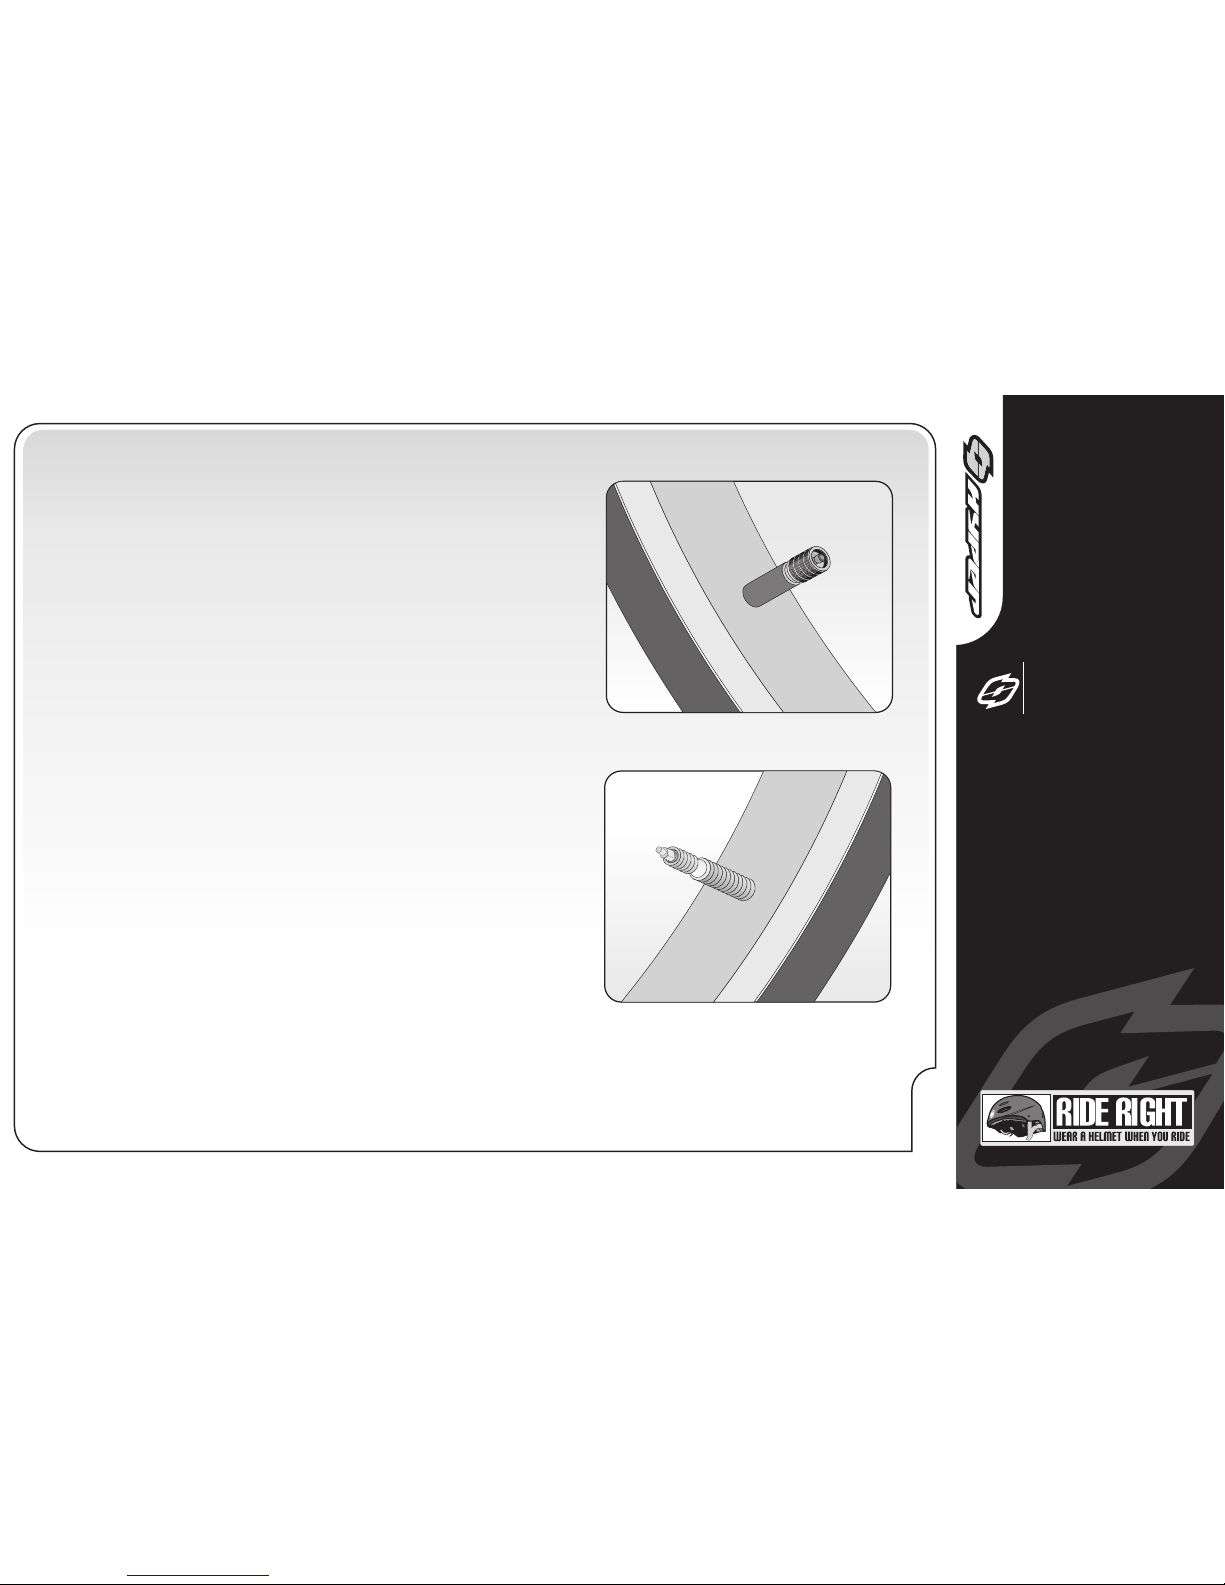
The tire valve allows air to enter the tire’s inner tube under
pressure, but doesn’t let it back out unless you want it to.
There are primarily two kinds of BMX Scooter tube valves
(actually, there are other designs, but they are seldom seen
in the US anymore): The Schraeder Valve and the Presta
Valve. The BMX Scooter pump you use must have the fitting
appropriate to the valve stems on your BMX Scooter.
The Schraeder (Shown) is like the valve on a car tire. To
inflate a Schraeder valve tube, just remove the valve cap
and push the air hose or pump fitting onto the end of the
valve stem. To let air out of a Schraeder valve, depress the
pin in the end of the valve stem with the end of a key or
other appropriate object.
The Presta (Shown) has a narrower diameter and is
only found on BMX Scooter tires. To inflate a Presta valve tube
using a Presta headed BMX Scooter pump, remove the
valve cap; unscrew (counterclockwise) the valve stem lock nut;
and push down on the valve stem to free it up. Then push the
pump head on to the valve head, and inflate. To inflate a
Presta valve with a gas station air hose, you’ll need a Presta
adapter (available at your bike shop) which screws on to the
valve stem once you’ve freed up the valve. The adapter fits
the end of the air hose fitting. To let air out of a Presta
valve, open up the valve stem lock nut and depress the
valve stem. Always close the valve stem lock after inflation.
Shraeder Valve
Presta Valve
ADJUSTMENT
BMX Scooter
ASSEMBLY
Page 28
P A G EP A G E
26
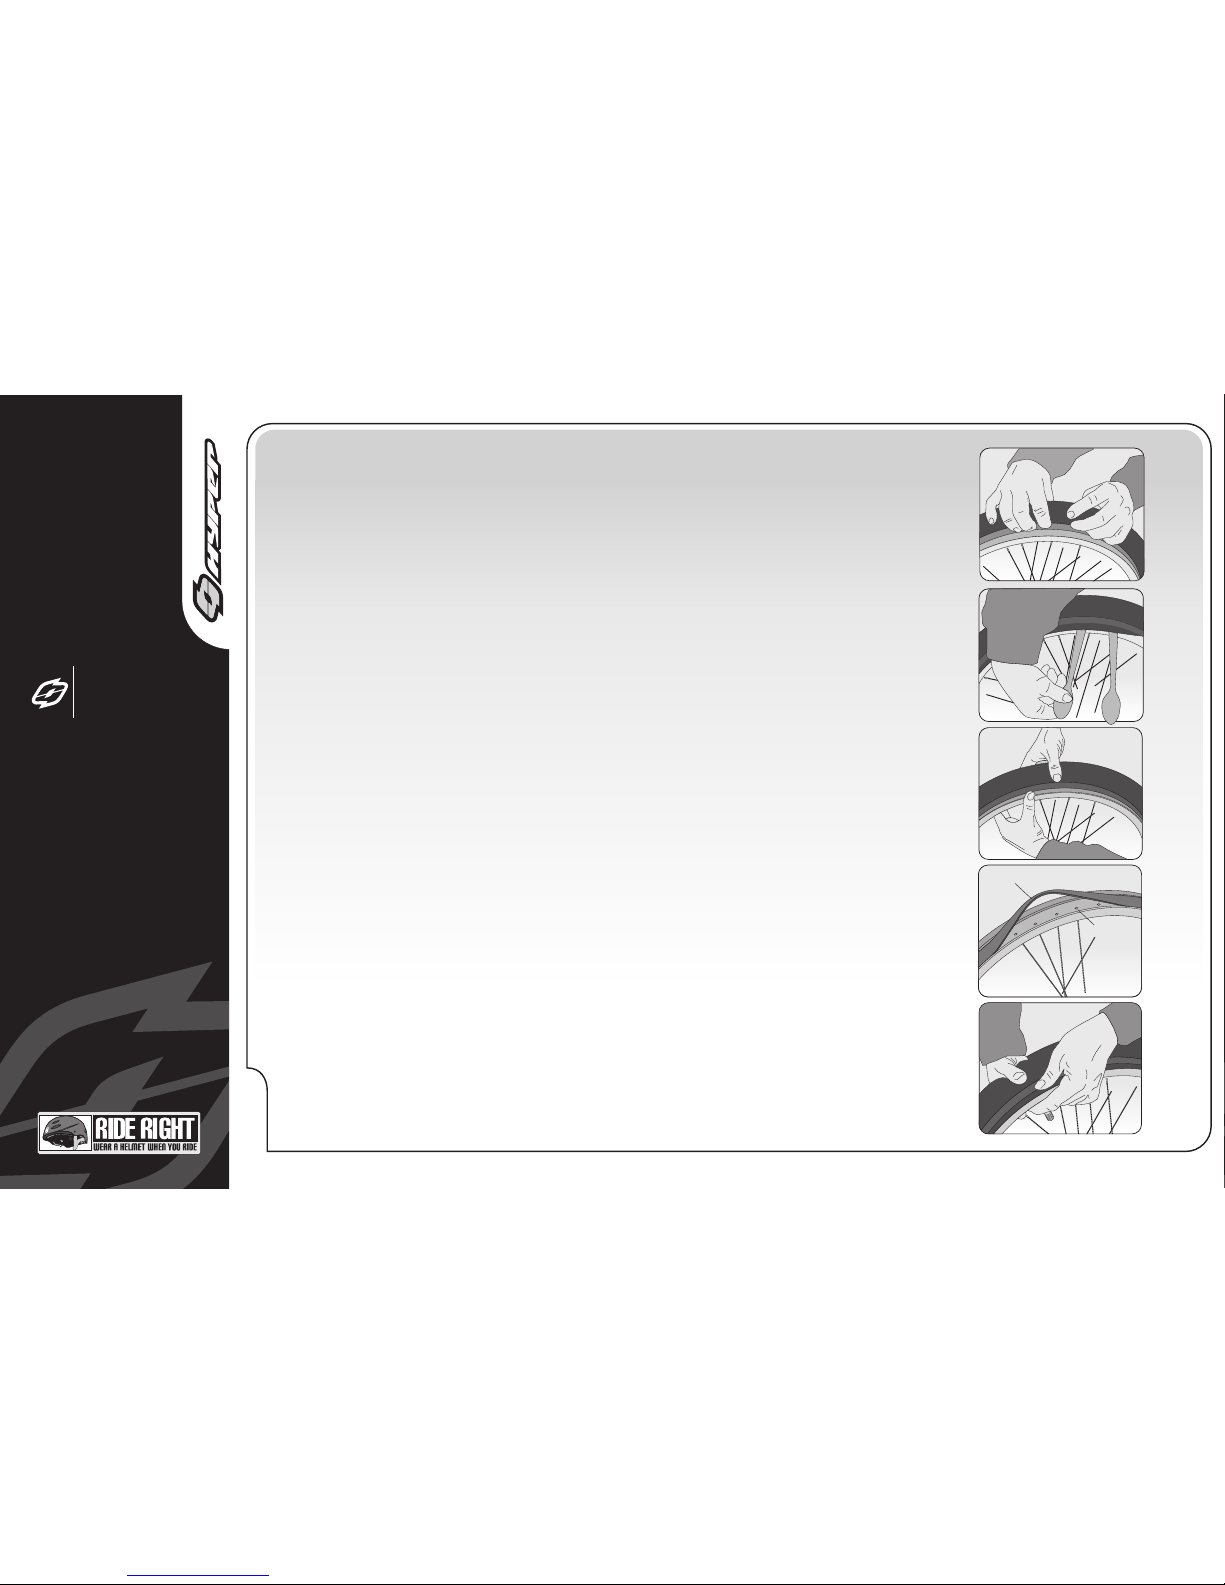
TIRE REMOVAL
1
Let the air out of the tire by depressing the valve core (the little
pin in the centre of the valve stem opening).
2
3
5
6
4
Separate the tire bead from the sides of the rim by pressing
with your thumbs. Work your way around the tire on both
sides to be sure that the beads of the tire are not sticking to
the rim. (Figure A)
Stand the wheel up on a firm surface with the valve stem on
the bottom and grasp the upper part of the tire with both
hands. Try to roll the tire off the far side of the rim.
With the wheel standing as in Figure 3, use BMX Scooter tire
tools or spoon handles with rounded ends (at least two preferably three) to lift the bead on one side of the tire off the
rim. Be careful not to pinch the inner tube between the tire
tools and the tire bead or rim. Once you have got the bead off
for about one fourth of the circumference of the tire using the
tools, the rest can usually be pulled off by hand.
With the bead on one side of the tire completely off the rim,
you can now pull the inner tube out from between the tire and
rim everywhere except in the area of the valve stem.
It should now be easy to pull the tire the rest of the way off the
rim. Start at the side of the wheel opposite the valve stem
and simply lift the bead of the tire up over the side of the rim
and pull it off.
FIGURE A
Press with thumbs
to separate tire bead.
Continue around entire
rim until the bead is
completely separated.
FIGURE B
Lift bead with
spoons or tire
tools.
FIGURE C
Replace tire
onto rim.
FIGURE D
Rim strip protects
inner tube from
spoke ends.
FIGURE F
Use thumb to press
valve stem through
hole in rim. Make
certain valve stem
is straight.
Rim Strip
Spoke Ends
ADJUSTMENT
BMX Scooter
ASSEMBLY
Page 29
WARNING: Inspect the BMX Scooter frequently. Failure to inspect the BMX Scooter and to make
repairs or adjustments, as necessary can result in injury to the rider or to others. Make sure all
parts are correctly assembled and adjusted as written in this manual and any "Special Instructions".
Immediately replace any damaged, missing, or badly worn parts.
Make sure all fasteners are correctly tightened as written in this manual and any "Special Instructions".
Parts that are not tight enough can be lost or operate poorly. Overtightened parts can be damaged.
Make sure any replacement fasteners are the correct size and type.
If your frame is aluminum, inspect the BMX Scooter frame carefully and frequently. Aluminum frames
can develop very small cracks due to stress, severe shocks, etc. If you see any small cracks, stop riding
the BMX Scooter. Have the frame inspected by a qualified professional at a bicycle service shop before
riding the BMX Scooter again.
NOTE: Have a bicycle service shop make any repairs or adjustments for which you do not have the
correct tools or if the instructions in this manual or any "Special Instructions" are not sufficient for you.
Repair and Service
P A G E
27
BMX Scooter
ASSEMBLY
Page 30
Maintenance Frequently check the tire inflation pressure because all tires lose air slowly over
time. For extended storage, keep the weight of the BMX Scooter off the tires.
WARNING: Do not ride or sit on the BMX Scooter if either inner tube is under
inflated. This can damage the tire and inner tube. Do not use unregulated air hoses to
inflate the inner tubes. An unregulated hose can suddenly over inflate BMX Scooter
tires and cause them to burst.
Use a hand or a foot pump to inflate the inner tubes. Service station meter-regulated air hoses
are also acceptable. The correct inflation pressure is shown on the tire sidewall.
Before adding air to any tire, make sure the edge of the tire (the bead) is the same distance from
the rim, all around the rim, on both sides of the tire. If the tire does not appear to be seated
correctly, release air from the inner tube until you can push the bead of the tire into the rim where
necessary. Add air slowly and stop frequently to check the tire sealing and the pressure, until you
reach the correct inflation pressure as indicated on the tire sidewall. Replace worn or defective
tires and inner tubes.
Tires
P A G E
28
TOOLS
TOOLS
REQUIRED
Page 31
Maintenance: Frequently check the bearings of the BMX Scooter. Have a bicycle service shop lubricate
the bearings once a year or any time they do not pass the following tests.
Head Tube Bearings: The fork should turn freely and smoothly at all times. With the front wheel off
the ground, you should not be able to move the fork up, down, or side-to-side in the head tube.
Wheel Bearings: Lift each end of the BMX Scooter off the ground and slowly spin the raised wheel by
hand. The bearings are correctly adjusted if:
The wheel spins freely and easily. The weight of the spoke reflector, when you put it toward the front or
rear of the BMX Scooter, causes the wheel to spin back and forth several times. There is no side-to-side
movement at the wheel rim when you push it to the side with light force.
WARNING: Do not over lubricate. If oil gets on the wheel rims or the brake shoes, it will
reduce brake performance and a longer distance to stop the BMX Scooter will be
necessary. Injury to the rider or to others can occur.
Keep all oil off the surfaces of the foot deck where your feet rest.
Using soap and hot water, wash all oil off the wheel rims, the brake shoes, and the tires. Rinse with clean
water and dry completely before you ride the BMX Scooter.
Inspection of Bearings
Lubrication / Maintenance
P A G E
29
BMX Scooter
ASSEMBLY
Page 32
Using a light machine oil (20W) and the following guidelines, lubricate the BMX Scooter:
What When How
Brake Levers every six months Put one drop of oil on the pivot point of each brake lever
Caliper Brakes every six months Put one drop of oil on the pivot point of each caliper brake
Brake Cables every six months Put four drops of oil into both ends of each cable. Allow the
oil to soak back along the cable wire.
P A G E
30
ADJUSTMENT
BMX Scooter
ASSEMBLY
Page 33
Repair and Service
WHEELS
Wheel Inspection
It is most important that wheels are kept in top condition. Properly maintaining your BMX Scooter's wheels
will help braking performance and stability when riding. Be aware of the following potential problems:
Dirty or greasy rims:
Caution: These can render your brakes ineffective. Do not clean them with oily or greasy materials.
When cleaning, use a clean rage or wash with soapy water, rinse and air dry. Don't ride while they're wet.
When lubricating your BMX Scooter, don't get oil on the rim braking surfaces.
Wheels not straight:
Lift each wheel off the ground and spin them to see if they are crooked or out of round. If wheels are not
straight, they will need to be adjusted. This is quite difficult and is best left to a BMX Scooter specialist.
Broken or loose spokes:
Check that all spokes are tight and that none are missing or damaged.
Caution: Such damage can result in severe instability and possibly an accident if not corrected.
Again, BMX Scooter specialist best handles spoke repairs.
Loose hub bearings:
Lift each wheel off the ground and try to move the wheel from side to side.
Caution: If there is movement between the axle and the hub, do not ride the
BMX Scooter. Adjustment is required.
Axle nuts:
Check that these are tight before each ride.
P A G E
31
BMX Scooter
ASSEMBLY
Page 34
Your purchase includes the following warranty which is in lieu of all other express warranties. This warranty is extended only to the initial consumer
purchaser. No warranty registration is required. This warranty gives you specific legal rights and you may have other rights which vary from state
to state.
The entire frame is guaranteed against faulty materials and workmanship for as long as the initial consumer purchaser has the BMX Scooter,
subject to the condition of the warranty listed below. If frame failure should occur due to faulty materials or workmanship during the guarantee
period, the frame will be replaced. For frame replacement under this Ballard Pacific Resources Inc. Warranty, contact us, stating the nature of the
failure, model number, date received and the name of the store from which the bike was received, at the address given on this page. Frame must
be returned for inspection at customer’s expense.
All other parts of the unit except Normal Wear Parts are warranted against defective materials and workmanship for a period of 1 years from the
date of purchase by the initial consumer purchaser, subject to the Terms and Conditions of the warranty listed below. If failure of any part should
occur during the warranty period. The part will be replaced for you if the failure was due to faulty materials or workmanship. There will be no cost to
you except possibly for shipping and labor. Normal Wear Parts are defined as grips, tires, tubes, cables and saddle covering. These parts are
warranted to be free from defects in material and workmanship as delivered with the product. Any claim for repair or replacement of Normal Wear
Products must be made within thirty (30) days of the date of purchase. The warranty does not cover normal wear and tear, improper assembly or
maintenance, or installation of parts or accessories not originally intended or compatible with the BMX Scooter as sold. The warranty does not
apply to damage or failure due to accident, abuse, misuse, neglect, or theft. Claims involving these issues will not be honored.
1. Your BMX Scooter has been designed for general transportation and recreational use, but has not been designed to withstand abuse
associated with stunting and jumping. This warranty ceases when you rent, sell, or give away the BMX Scooter, ride with more than one person, or
use the BMX Scooter for stunting or jumping.
2. This warranty does not cover ordinary wear and tear or anything you break accidentally or deliberately.
3. It is the responsibility of the individual consumer purchaser to assure that all parts included in the factory-sealed carton are properly installed, all
functional parts are initially adjusted properly, and subsequent normal maintenance services and adjustments necessary to keep the BMX Scooter
in good operating condition are properly made. This warranty does not apply to damage due to improper installation of parts or failure to properly
maintain or adjust the BMX Scooter. NOTICE: BMX Scooter specifications subject to change without notice.
4. This BMX Scooter was designed to be assembled and operated solely in accordance with the assembly instructions. If the purchaser and/or
user alters, changes or modifies any of the components, the design or any original manufacturing specifications of the BMX Scooter, all
manufacturing warranties are null and void and Ballard Pacific Resources Inc. and any of it’s affiliated companies or manufacturing sources will not
be liable for any damages, injuries or problems of any kind whatsoever. If you have any questions regarding this policy, please contact our
warranty department.
Frame
Parts
Conditions of Warranty
BALLARD PACIFIC RESOURCES INC. WARRANTY
and Policy on Replacement Procedures and Responsibilities
410 Adele Joplin, Mo 64801
Call Toll Free 1.866.424.0500
Local 417-206-0563
Fax: 775-248-5155
Monday-Friday 8:00AM to 5:00PM (CST)
VISIT US ONLINE
@
For product related questions email us at:
[email protected]
For customer service questions email us at:
[email protected]
WARRANTY
NEW
OWNER
Page 35
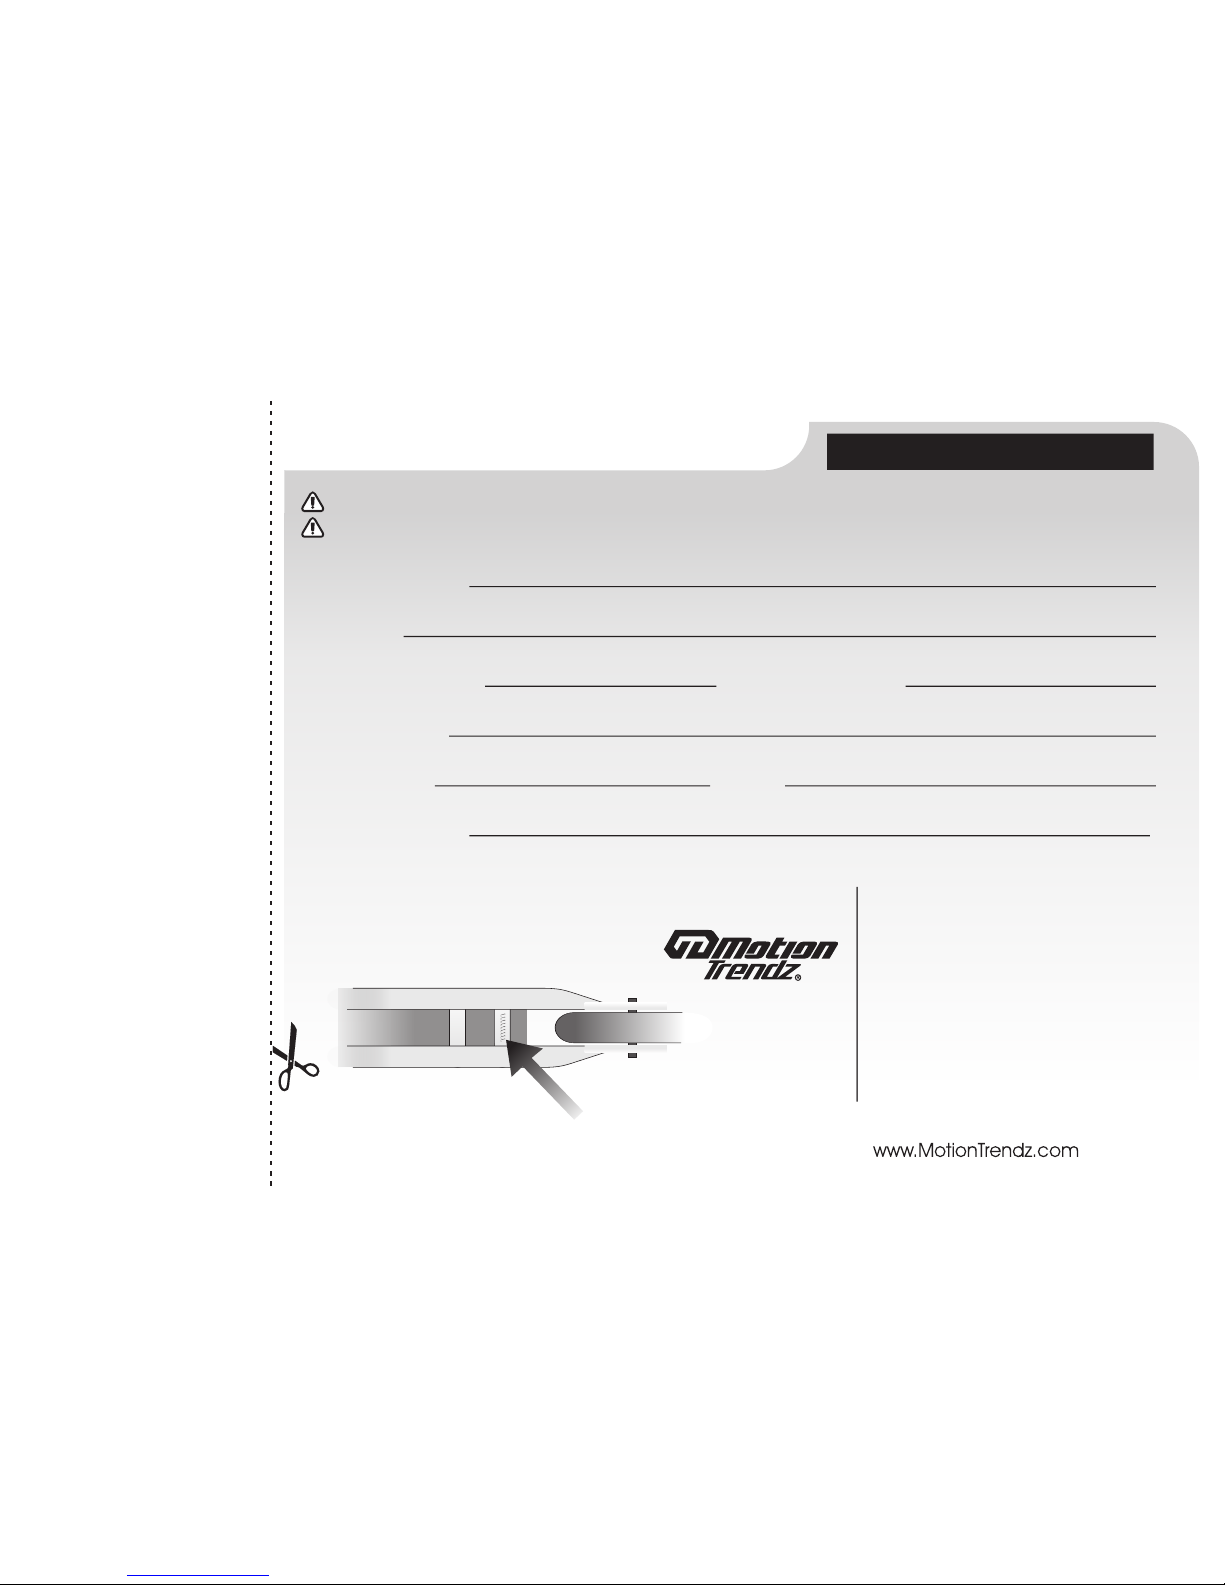
Bottom View
SERIAL NUMBER LOCATION
serial number
PURCHASE RECORD CARD
Fill in immediately and send in as a record of your purchase.
Record Serial Number and retain in designated spot in front of this Manual.
Owner’s Name:
Address:
Date Purchased:
Model Name:
Wheel Size:
Serial Number:
Place of Purchase:
Color:
(ALSO RECORD AND RETAIN SERIAL NUMBER IN DESIGNATED SPOT IN FRONT OF THIS MANUAL)
IMPORTANT NOTICE
410 S. Adele Avenue
Joplin, Mo 64801
Call Toll Free 1.866.424.0500
Local 417-206-0563
Fax: 775-248-5155
Monday-Friday 8:00AM to 5:00PM (CST)
VISIT US ONLINE
@
For product related questions email us at:
[email protected]
For customer service questions email us at:
[email protected]
Page 36
D
U
O
C
R
P
R
E
M
U
S
N
O
C
.
S
.
U
S
T
E
E
M
ITEM NO: 551400557
410 Adele Joplin, Mo 64801
Call Toll Free 1.866.424.0500
Local 417-206-0563
Fax: 775-248-5155
Monday-Friday 8:00AM to 5:00PM (CST)
For product related questions email us at: [email protected]
For customer service questions email us at: [email protected]
 Loading...