

Page 1
DIGITAL SPY GLASSES
Operation Manual HY-SGLS
Page 2
Thank you for purchasing the Digital Spy Glasses.
Please read all instructions carefully before using and
retain this manual for future use and reference.
PACKAGE CONTENTS
• Digital Spy Glasses
• Zip Case
• USB Charging Cable
• Operation Manual
KEY FEATURES
• Built-in camera
• Captures videos, audio and photos
SAFETY INSTRUCTIONS
Keep the unit away from heat sources, direct sunlight,
humidity, water and any other liquids.
Do not operate the unit of it has been exposed to water,
moisture or any other liquids to prevent against electric
shock, explosion and/or injury to yourself and damage to
the unit.
Do not use the unit if it has been dropped or damaged in
any way.
Repairs to electrical equipment should only be
performed by a qualified electrician. Improper repairs
may place the user at serious risk.
Do not puncture or harm the exterior surface of the
product in any way.
Keep the unit free from dust, lint, etc.
Do not use this unit for anything other than its intended
use or purpose. Doing so may damage the device.
This product is not a toy. Keep out of reach of children.
1
Do not use with wall chargers
that exceed 0.5A output.
Do not charge over 4 hours.
WARNING:
Page 3
2
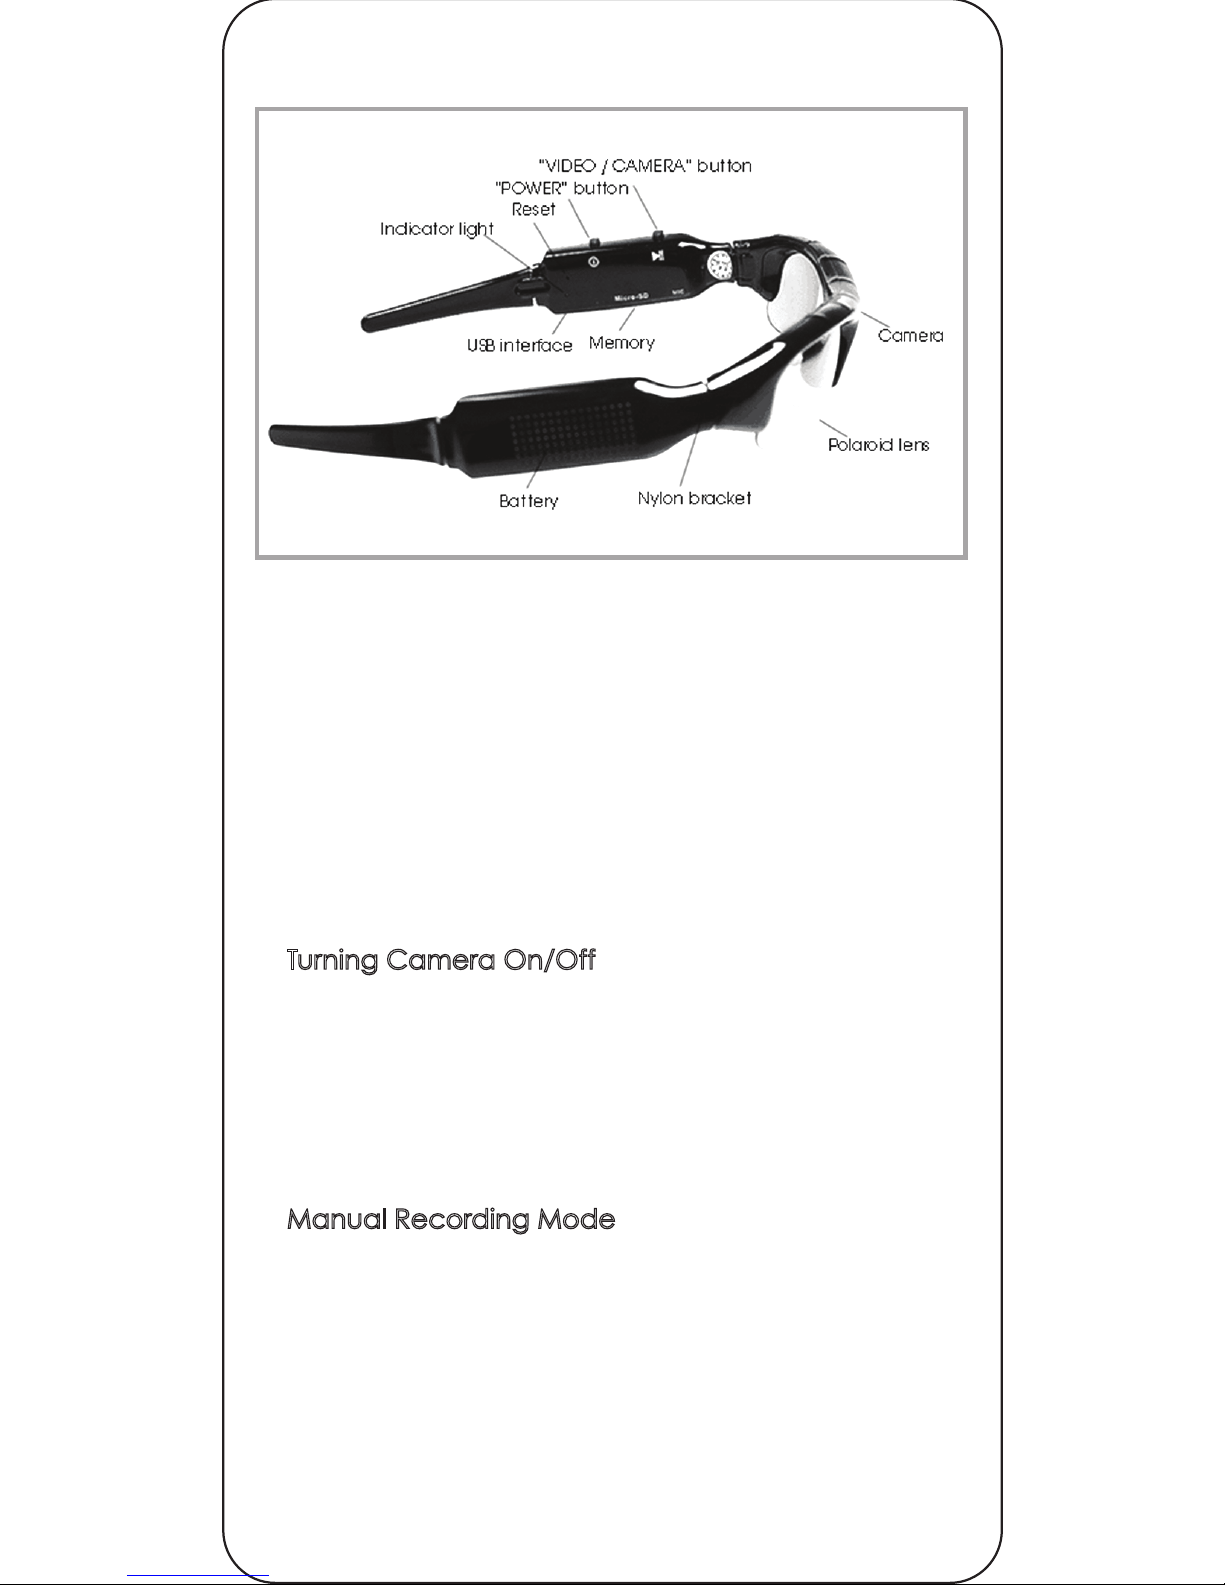
DIAGRAM
SPECIFICATIONS
Video format: AVI
Video resolution: 720 x 480
Input: DC-5V 200mAh
Storage support: Micro SD card
Battery type: Rechargeable lithium
Supported Memory: 16G micro SD card (Max)
Charging Interface: USB
Operating Instructions
1. Turning Camera On/Off
• Insert the micro SD card.
• Press the POWER button.
• The blue light will turn on and the device will enter
standby mode.
• Press the POWER button until the red light turns off to
turn the device off.
2. Manual Recording Mode
• In standby mode, press and hold the VIDEO button
for 2 seconds.
• The blue light will begin flashing and the device will
begin recording video.
• Press the VIDEO button quickly and the device will
stop recording video.
• Connect device to a computer to retrieve your .avi
format video.
3. Taking a Photo
• In standby mode, press the VIDEO/ CAMERA
button quickly.
• The blue light flashes once and turns off.
• The device will save a .jpeg file and return to
standby mode.
4. Connecting to Computer
• Ensure the device is turned on.
• Using the enclosed USB cable, connect the
device to a computer
• The computer will recognize the device as a
“Removable Disk”
• During the first connection, please wait 30
seconds while the device installs necessary drivers
onto your computer. Do not disconnect it during this
time.
• After you have reviewed, saved, or deleted any
video, right click on the “Removable Disk” and
select “Eject.”
• Do not disconnect the device from your
computer until your device says it is safe to remove
5. Charging your Device
Connect your device to a computer or a certified
wall charger using the enclosed mini USB cable.
During charging, the red LED will remain lit. When
the battery is fully recharged, the red LED light will
turn off automatically. Charging may take up to 4
hours.
6. Setting Time
• Install micro SD card into device.
• Turn off the camera and connect to a computer.
• Open the Removable Disk.
• Select “tag.txt” and open.
Type in the date/time in the following format
YEAR.MO.DAY - HR:MIN:SEC
Please note, you will need to follow a 24-hour
military time format. Below is an example:
“2012.05.01 23:59:59
The above time string shows the time you want to
set. Pay attention to the space between
Year/Month/Day and Hours Minutes and Seconds.
Page 4

3
3. Taking a Photo
• In standby mode, press the VIDEO/ CAMERA
button quickly.
• The blue light flashes once and turns off.
• The device will save a .jpeg file and return to
standby mode.
4. Connecting to Computer
• Ensure the device is turned on.
• Using the enclosed USB cable, connect the
device to a computer
• The computer will recognize the device as a
“Removable Disk”
• During the first connection, please wait 30
seconds while the device installs necessary drivers
onto your computer. Do not disconnect it during this
time.
• After you have reviewed, saved, or deleted any
video, right click on the “Removable Disk” and
select “Eject.”
• Do not disconnect the device from your
computer until your device says it is safe to remove
5. Charging your Device
Connect your device to a computer or a certified
wall charger using the enclosed mini USB cable.
During charging, the red LED will remain lit. When
the battery is fully recharged, the red LED light will
turn off automatically. Charging may take up to 4
hours.
6. Setting Time
• Install micro SD card into device.
• Turn off the camera and connect to a computer.
• Open the Removable Disk.
• Select “tag.txt” and open.
Type in the date/time in the following format
YEAR.MO.DAY - HR:MIN:SEC
Please note, you will need to follow a 24-hour
military time format. Below is an example:
“2012.05.01 23:59:59
The above time string shows the time you want to
set. Pay attention to the space between
Year/Month/Day and Hours Minutes and Seconds.
7. Webcam Usage
• Connect to computer USB interface using the
enclosed cable
• After the device is recognized by your computer
as a “Removable Disk,” press POWER the button quickly.
• If your computer supports webcam functionality,
the device will begin recording as a webcam.
• If your computer does not support this device as a
webcam, you may need to download additional
software. Please visit “amcap.en.softonic.com” to
download a free software called AMCap that may
assist in compatibility. Please note, DGL Group is not
responsible for any software or hardware problems
resulting from the download and use of AMCap.
8. Automatic Shutdown
• When the device is recording, if power is low, the
green LED light will flash 4 times, and the device will
automatically shut down to save battery life.
• When the micro SD card’s memory is full, the
green LED light will flash 4 times, and the device will
automatically shut down to save the current file
9. Restore Factory Settings
• If you want to restore your device to factory
settings, you can do so by inserting a paper clip into
the slot where the RESET button is located and
pressing once.
FCC STATEMENT
This equipment has been tested and found to comply
with the requirements for a Class B digital device under
Part 15 of the Federal Communications Commission
(FCC) rules. These requirements are intended to provide
reasonable protection against harmful interference in a
residential installation. This equipment generates, uses
and can radiate radio frequency energy and, if not
installed and used in accordance with the instructions,
may cause harmful interference to radio communica-
tions. However, there is no guarantee that interference
will not occur in a particular installation. If this equipment
does case harmful interference radio or television
reception, which can be determined by turning the
equipment off and on, the user is encouraged to try to
correct the interference by one or more of the following
measures.
Page 5

4
HY-6200
7. Webcam Usage
• Connect to computer USB interface using the
enclosed cable
• After the device is recognized by your computer
as a “Removable Disk,” press POWER the button quickly.
• If your computer supports webcam functionality,
the device will begin recording as a webcam.
• If your computer does not support this device as a
webcam, you may need to download additional
software. Please visit “amcap.en.softonic.com” to
download a free software called AMCap that may
assist in compatibility. Please note, DGL Group is not
responsible for any software or hardware problems
resulting from the download and use of AMCap.
8. Automatic Shutdown
• When the device is recording, if power is low, the
green LED light will flash 4 times, and the device will
automatically shut down to save battery life.
• When the micro SD card’s memory is full, the
green LED light will flash 4 times, and the device will
automatically shut down to save the current file
9. Restore Factory Settings
• If you want to restore your device to factory
settings, you can do so by inserting a paper clip into
the slot where the RESET button is located and
pressing once.
FCC STATEMENT
This equipment has been tested and found to comply
with the requirements for a Class B digital device under
Part 15 of the Federal Communications Commission
(FCC) rules. These requirements are intended to provide
reasonable protection against harmful interference in a
residential installation. This equipment generates, uses
and can radiate radio frequency energy and, if not
installed and used in accordance with the instructions,
may cause harmful interference to radio communications. However, there is no guarantee that interference
will not occur in a particular installation. If this equipment
does case harmful interference radio or television
reception, which can be determined by turning the
equipment off and on, the user is encouraged to try to
correct the interference by one or more of the following
measures.
Re-orient or relocate the receiving antenna.
Increase the separation between the equipment and
receiver.
Connect the equipment into an outlet on a circuit
different from that to which the receiver is connected.
Consult the dealer or an experienced radio/TV
technician for help.
Do not attempt to repair or modify this equipment.
WARNING: Changes or modifications to this equipment
not expressly approved by the party responsible for
compliance could void the user’s authority to operate
the equipment and invalidate the warranty claim.
WARRANTY INFORMATION
The condition of this warranty and our responsibilities
under this warranty are as follows:
Supplier’s warranty is non-transferable. And this warranty
is limited to the original purchaser only.
* You must be able to prove the date of original purchase
of the unit with a dated receipt.
* The warranty is not applicable if the product has been
subject to physical abuse, improper installation,
modification or repair by unauthorized third party.
* The responsibility of supplier’s products shall be limited to
the repair of replacement of the product as its sole
discretion.
* Specifically exempt from any warranty are limited-life
consumable components subject to normal wear and
tear such as batteries, decorates and other accessories.
* A supplier will not take any responsibility if the failure of
the unit has resulted from accident, abuse, misuse, or any
unauthorized repair, modification or disassemble.
* Modification and repair of the unit should be done by
authorized and qualified service personnel, Center or
returned to the manufacturer.
* This warranty gives you specific legal rights, and you
may also have other rights which vary under local laws.
Page 6

5
Re-orient or relocate the receiving antenna.
Increase the separation between the equipment and
receiver.
Connect the equipment into an outlet on a circuit
different from that to which the receiver is connected.
Consult the dealer or an experienced radio/TV
technician for help.
Do not attempt to repair or modify this equipment.
WARNING: Changes or modifications to this equipment
not expressly approved by the party responsible for
compliance could void the user’s authority to operate
the equipment and invalidate the warranty claim.
WARRANTY INFORMATION
The condition of this warranty and our responsibilities
under this warranty are as follows:
Supplier’s warranty is non-transferable. And this warranty
is limited to the original purchaser only.
* You must be able to prove the date of original purchase
of the unit with a dated receipt.
* The warranty is not applicable if the product has been
subject to physical abuse, improper installation,
modification or repair by unauthorized third party.
* The responsibility of supplier’s products shall be limited to
the repair of replacement of the product as its sole
discretion.
* Specifically exempt from any warranty are limited-life
consumable components subject to normal wear and
tear such as batteries, decorates and other accessories.
* A supplier will not take any responsibility if the failure of
the unit has resulted from accident, abuse, misuse, or any
unauthorized repair, modification or disassemble.
* Modification and repair of the unit should be done by
authorized and qualified service personnel, Center or
returned to the manufacturer.
* This warranty gives you specific legal rights, and you
may also have other rights which vary under local laws.
The following conditions comprise the requirements
and scope of our warranty conditions and do not
affect our legal and contractual warranty obligations.
We offer a warranty on our products in accordance
with the following conditions:
1) Hype® products are covered by a 12 month
warranty. We will resolve damages or defects on
Hype
®
products free of charge within 12 months of the
purchase date under the following warranty
conditions. For any damage or defect determined
later than 12 months after the purchase date, proof of
a manufacturing fault must be submitted for repair
under warranty.
2) The warranty does not cover batteries and other
parts, which are considered consumables, parts that
break easily such as glass or plastic or defects based
on normal wear and tear. There is no warranty
obligation in the event of marginal differences
compared to the target appearance and workman-
ship provided these have a negligible effect on the
product’s fitness for use, in the event of damage
caused by chemical or electrochemical effects, by
water or generally from abnormal conditions.
3) The warranty will be performed in such a way that
we shall decide whether to repair the defective parts
or to replace them with working parts free of charge.
Hype
®
reserves the right to exchange the product for a
replacement product of equal value if the product
sent in cannot be repaired within a reasonable time or
at a reasonable cost. Requests cannot be made for
repairs to be carried out on site. Parts that have been
replaced or exchanged become our property.
4) The warranty claim does not apply if repairs or other
work is carried out by unauthorized persons or if our
products are equipped with additional parts or
accessories that are not approved for our product.
5) Warranties that have been activated do not cause
the warranty period to be extended, nor do they
trigger a new warranty period. The warranty period for
any replacement parts installed ends with the warranty
period for the entire product.
6) Any other further claims are excluded, especially
those for replacement due to damage caused to the
outside of the product, provided there is no obligatory
Page 7

6
The following conditions comprise the requirements
and scope of our warranty conditions and do not
affect our legal and contractual warranty obligations.
We offer a warranty on our products in accordance
with the following conditions:
1) Hype® products are covered by a 12 month
warranty. We will resolve damages or defects on
Hype
®
products free of charge within 12 months of the
purchase date under the following warranty
conditions. For any damage or defect determined
later than 12 months after the purchase date, proof of
a manufacturing fault must be submitted for repair
under warranty.
2) The warranty does not cover batteries and other
parts, which are considered consumables, parts that
break easily such as glass or plastic or defects based
on normal wear and tear. There is no warranty
obligation in the event of marginal differences
compared to the target appearance and workmanship provided these have a negligible effect on the
product’s fitness for use, in the event of damage
caused by chemical or electrochemical effects, by
water or generally from abnormal conditions.
3) The warranty will be performed in such a way that
we shall decide whether to repair the defective parts
or to replace them with working parts free of charge.
Hype
®
reserves the right to exchange the product for a
replacement product of equal value if the product
sent in cannot be repaired within a reasonable time or
at a reasonable cost. Requests cannot be made for
repairs to be carried out on site. Parts that have been
replaced or exchanged become our property.
4) The warranty claim does not apply if repairs or other
work is carried out by unauthorized persons or if our
products are equipped with additional parts or
accessories that are not approved for our product.
5) Warranties that have been activated do not cause
the warranty period to be extended, nor do they
trigger a new warranty period. The warranty period for
any replacement parts installed ends with the warranty
period for the entire product.
6) Any other further claims are excluded, especially
those for replacement due to damage caused to the
outside of the product, provided there is no obligatory
legal liability. We therefore accept no liability for
accidental, indirect or other consequential damage
of any kind, which leads to usage restrictions, data loss,
and loss of earnings or interruption to business
Asserting a warranty claim:
1) To make use of the warranty service for hardware
issues, you must contact the Hype
email at support@dglusa.com
2) Hype
®
will try to diagnose and solve your problem. If
it is determined that a warranty claim exists, you will be
given an RMA number (Return Material Authorization)
and will be asked to send the product to Hype
IMPORTANT: Hype
®
will only accept parcels that have
an RMA number.
Please observe the following when sending the
product:
1) Send the product suitably packaged with carriage
and insurance paid. Do not enclose any accessories
with the product (cables, chargers, manuals, etc.)
unless the Hype
®
Service Center specifies otherwise.
2) Mark the RMA number on the outside of the
package in such a way that it is visible and clearly
legible.
3) You must enclose a copy of the sales slip as proof of
purchase.
4) Once Hype
®
has received the product, it will meet its
warranty obligations in accordance with the warranty
conditions and will return the product to the sender
with carriage and insurance paid.
Service outside of warranty
Hype
®
can refuse any service claim made that is not
covered by the warranty.
If Hype
®
agrees to provide a service outside the
warranty, the customer will be invoiced for all repair
and transport costs. Hype
packages that have not first been approved by
Hype
®
by means of an (Return Material Authoriza-
tion).
Page 8

7
legal liability. We therefore accept no liability for
accidental, indirect or other consequential damage
of any kind, which leads to usage restrictions, data loss,
and loss of earnings or interruption to business
Asserting a warranty claim:
1) To make use of the warranty service for hardware
issues, you must contact the Hype
®
Service Center by
email at support@dglusa.com
2) Hype
®
will try to diagnose and solve your problem. If
it is determined that a warranty claim exists, you will be
given an RMA number (Return Material Authorization)
and will be asked to send the product to Hype
®
.
IMPORTANT: Hype
®
will only accept parcels that have
an RMA number.
Please observe the following when sending the
product:
1) Send the product suitably packaged with carriage
and insurance paid. Do not enclose any accessories
with the product (cables, chargers, manuals, etc.)
unless the Hype
®
Service Center specifies otherwise.
2) Mark the RMA number on the outside of the
package in such a way that it is visible and clearly
legible.
3) You must enclose a copy of the sales slip as proof of
purchase.
4) Once Hype
®
has received the product, it will meet its
warranty obligations in accordance with the warranty
conditions and will return the product to the sender
with carriage and insurance paid.
Service outside of warranty
Hype
®
can refuse any service claim made that is not
covered by the warranty.
If Hype
®
agrees to provide a service outside the
warranty, the customer will be invoiced for all repair
and transport costs. Hype
®
will not accept any
packages that have not first been approved by
Hype
®
by means of an (Return Material Authoriza-
tion).
WARING: Changes or modifications to this unit not
expressly approved by the party responsible for
compliance could void the user’s authority to
operate the equipment.
NOTE: This equipment has been tested and found to
comply with the limits for a Class B digital device,
pursuant to Part 15 of the FCC Rules. These limits are
designed to provide reasonable protection against
harmful interference in a residential installation. This
equipment generates, uses and can radiate radio
frequency energy and, if not installed and used in
accordance with the instructions, may cause harmful
interference to radio communications.
However, there is no guarantee that interference will
not occur in a particular installation. if this equipment
does cause harmful interference to radio or television
reception, which can be determined by turning the
equipment off and on, the user is encouraged to try
to correct the interference by one or more of the
following measures:
� Reorient or relocate the receiving antenna.
� Increase the separation between the equipment
and receiver.
� Connect the equipment into an outlet on a circuit
different from that to which the receiver is connect-
ed.
� Consult the dealer or an experienced radio/TV
technician for help.
Page 9

8
WARING: Changes or modifications to this unit not
expressly approved by the party responsible for
compliance could void the user’s authority to
operate the equipment.
NOTE: This equipment has been tested and found to
comply with the limits for a Class B digital device,
pursuant to Part 15 of the FCC Rules. These limits are
designed to provide reasonable protection against
harmful interference in a residential installation. This
equipment generates, uses and can radiate radio
frequency energy and, if not installed and used in
accordance with the instructions, may cause harmful
interference to radio communications.
However, there is no guarantee that interference will
not occur in a particular installation. if this equipment
does cause harmful interference to radio or television
reception, which can be determined by turning the
equipment off and on, the user is encouraged to try
to correct the interference by one or more of the
following measures:
� Reorient or relocate the receiving antenna.
� Increase the separation between the equipment
and receiver.
� Connect the equipment into an outlet on a circuit
different from that to which the receiver is connected.
� Consult the dealer or an experienced radio/TV
technician for help.
 Loading...