

Best.-Nr. 022-1300 (ARF)
Ein Qualitätsprodukt aus dem Hause
für Modellsportler ab 14 Jahren.
Spielzeug, geeignet
Modell ist kein
Dieses
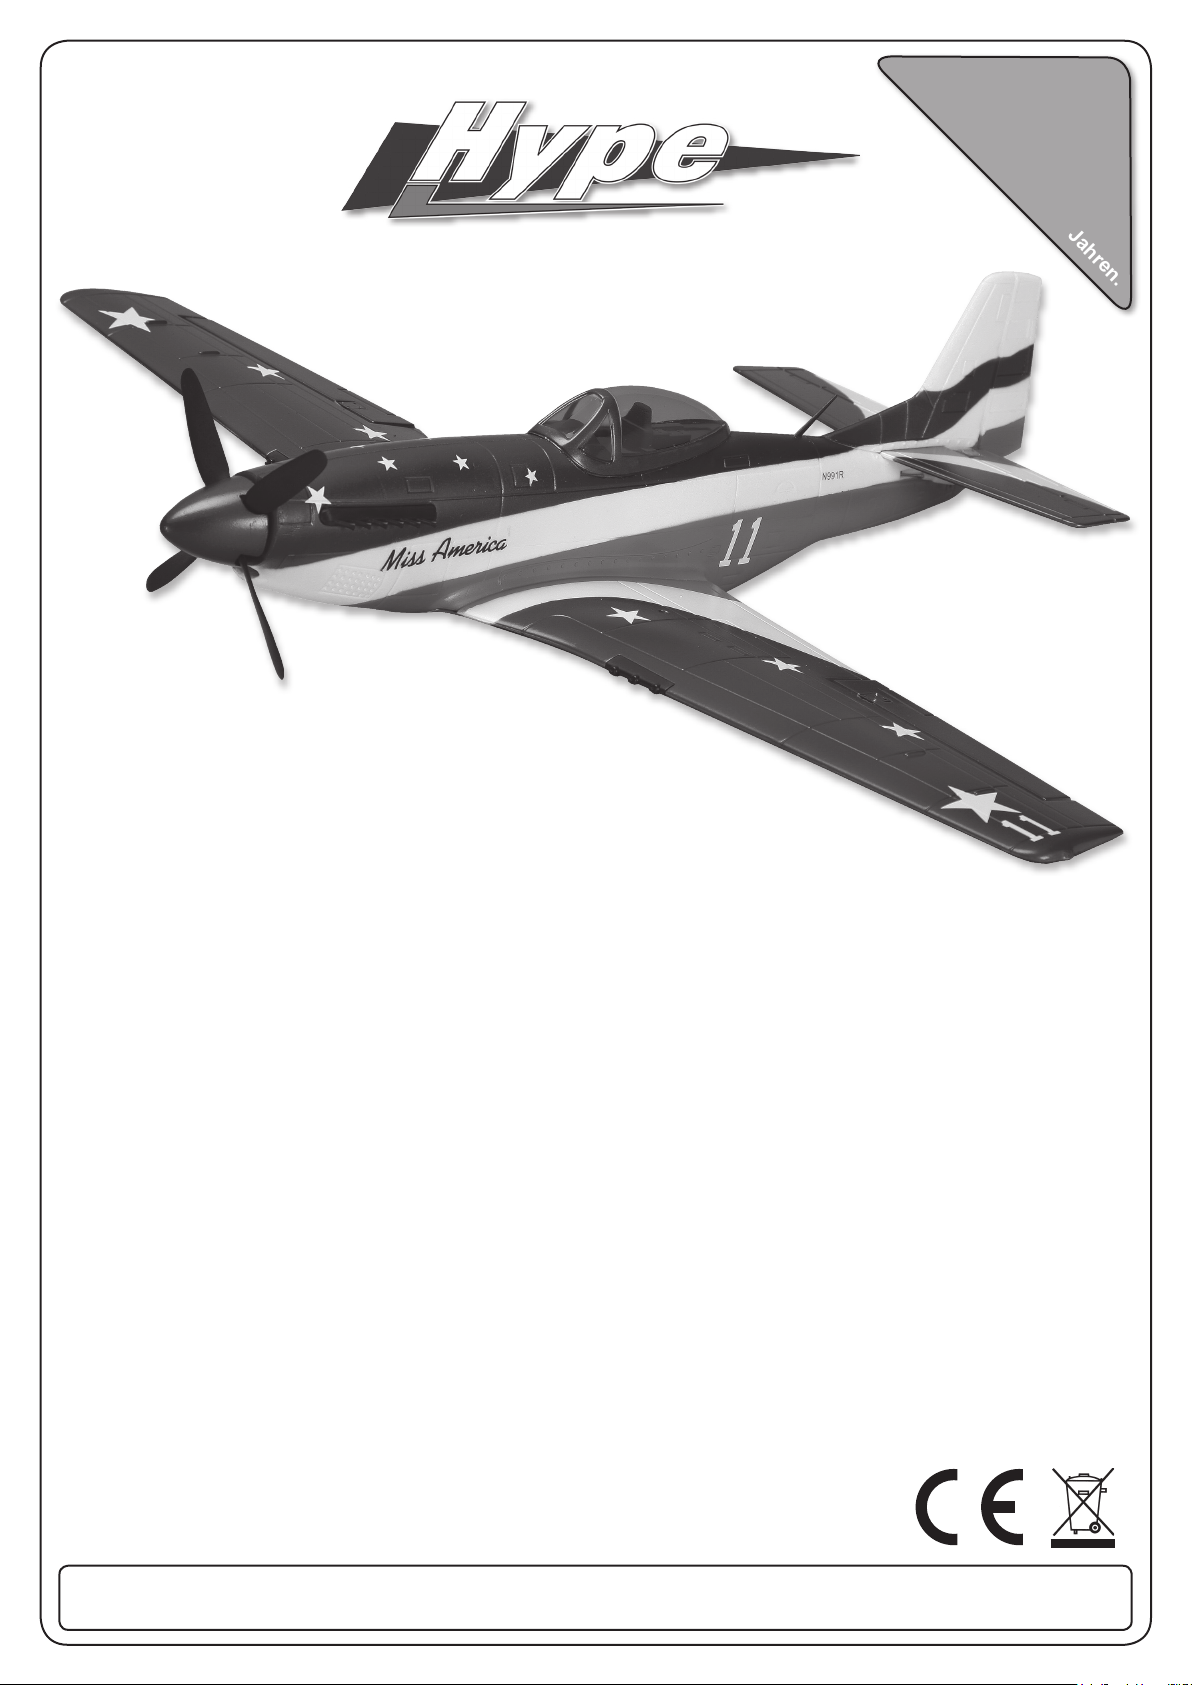
Miss America
Der maßstabsgetreue Nachbau der P-51 Mustang im Miss America Design steht dem Original in nichts nach.
Das Modell ist aus EPP in geschäumter Bauweise gefertigt. Überragende Flugeigenschaften und eine bisher
unerreichte Detailtreue kennzeichnen die Miss America von Hype. Das Modell ist für den Outdoor-Einsatz konzipiert worden, normale Windbedingungen sind kein Problem für die P-51. Die Steuerung des Modells erfolgt über
Höhen-, Seiten- und Querruder sowie die Motorsteuerung. Höhen- und Querruder sind als spaltfreie Elastoaps
ausgelegt, um eine maximale Ruderwirkung zu erzielen. Das Modell geht sauber durch alle Flugguren und liegt
stets sicher am Ruder. Die Miss America ist zu 95% vorgefertigt, das Dekor ist bereits fertig am Modell aufgebracht.
Alle Komponenten wie Servos, Regler und Brushless-Motor sind bereits ugfertig im Modell montiert. Ebenso sind
die Servogestänge bereits fertig im Modell eingebaut. Die Tragäche wird mit einer Schraube am Rumpf montiert.
Our scale replica of the P-51 Mustang with the Miss America design reproduces the same spirit of the original. The
model is made by the lightweight material EPP. The outstanding ight behaviour and the highly detailed skin are
the unique features of the Miss America made by Hype. The model is designed for outdoor ying at normal wind
conditions. The steering of the P-51 is done by elevator, rudder, aileron and motor control. The elevator and the
ailerons are designed as gapless elastoaps for maximum aerodynamic efciency. You can y all kinds of aerobatic
gures with our Hype P-51 Miss America. So you can feel that the model is under control in each ight situation.The
model is 95% preassembled, the colouring and the decals are attached to the model completely. All components like
servos, brushless motor, brushless speed controller are installed in the P-51 already. Also the rudder control linkages
are connected to the servos and trimmed to neutral. The wing is xed to the fuselage by one single screw.
La riproduzione in scala HYPE del P-51 Mustang con livrea Miss America riproduce pari pari lo spirito dell’originale.
Il modello è realizzato in EPP, un materiale leggerissimo e colpisce per delle doti di volo eccezionali, nonché per la
cura nella riproduzione della livrea. Il modello è adatto per il volo all’aperto con vento normale. P-51 Hype si pilota
con il piano di quota, il direzionale, gli alettoni e il motore. Il piano di quota e gli alettoni sono realizzati come elastoaps prive di fessure per massima efcienza aerodinamica. Con Hype P-51 Miss America potrete effettuare tutte le
gure acrobatiche, sentirete il modello perfettamente sotto controllo in ogni situazione. Il modello viene consegnato
preassemblato al 95 %, ed è già colorato con le decalcomanie applicate. Tutti i componenti come servi, motore
brushless, regolatore brushless sono già installati. Anche le aste di comando dei piani mobili sono già collegati con
rispettivi servi. L’ala viene ssata sulla fusoliera con un’unica vite.
Technische Daten
Spannweite: 680 mm; Länge: 570 mm; Gewicht
ca.: 260 g; Motor: 2.000 kV Brushless; Akku: LiPo
7,4 V / 450 mAh; RC-Anlage: 4-Kanäle; Maßstab
ca.: 1:15
RC-Funktionen
Höhenruder, Seitenruder, Querruder, Motor
Technical Data
Wingspan: 680 mm; Length: 570 mm; Weight
approx.: 260 g; Motor: 2.000 kV Brushless;
Battery: LiPo 7,4 V; RC-System: 4 channels;
Scale approx.: 1:15
RC-Functions
Elevator, Rudder, Aileron, Motor
Caratteristiche tecniche
apertura alare: 680 mm; lunghezza: 570 mm; peso
circa.: 260 g; motore: 2.000 kV Brushless; batteria:
LiPo 7,4 V / 450 mAh; radiocomando: 4 canali;
scala circa.: 1:15
funzioni radio
piano di quota, direzionale, alettoni, motore
Bauanleitung / Instruction Manual /
manuale d'istruzione
Wichtiger Hinweis:
Bitte bewahren Sie diese Dokumentation für Ersatzteilbestellungen auf.
1. Inhaltsverzeichnis / Content / Indice
1. Inhaltsverzeichnis / Content / indice
2. Lieferumfang / Kit Content / contenuto del kit
3. Die Montage des Modells / The Assembly / L'assemblaggio
4. Hinweise zur Bedienung / How To Use / l'utilizzo
5. Sicherheitshinweise / Safety Instructions / per la vostra sicurezza
6. Ersatzteile / Spare Parts / ricambi
7. Garantiebedingungen / Warranty / garanzia
• Entsorgung / Disposal / smaltimento
Bitte entsorgen Sie Elektronik ausschließlich in den dafür vorgesehenen Behältnissen.
Please dispose defective electronic parts in special marked containers.
I riuti elettronici vanno smaltiti negli appositi contenitori e seguendo le leggi del rispettivo paese.
Seite 2
Best.-Nr. / Item-No. / art. 022-1300
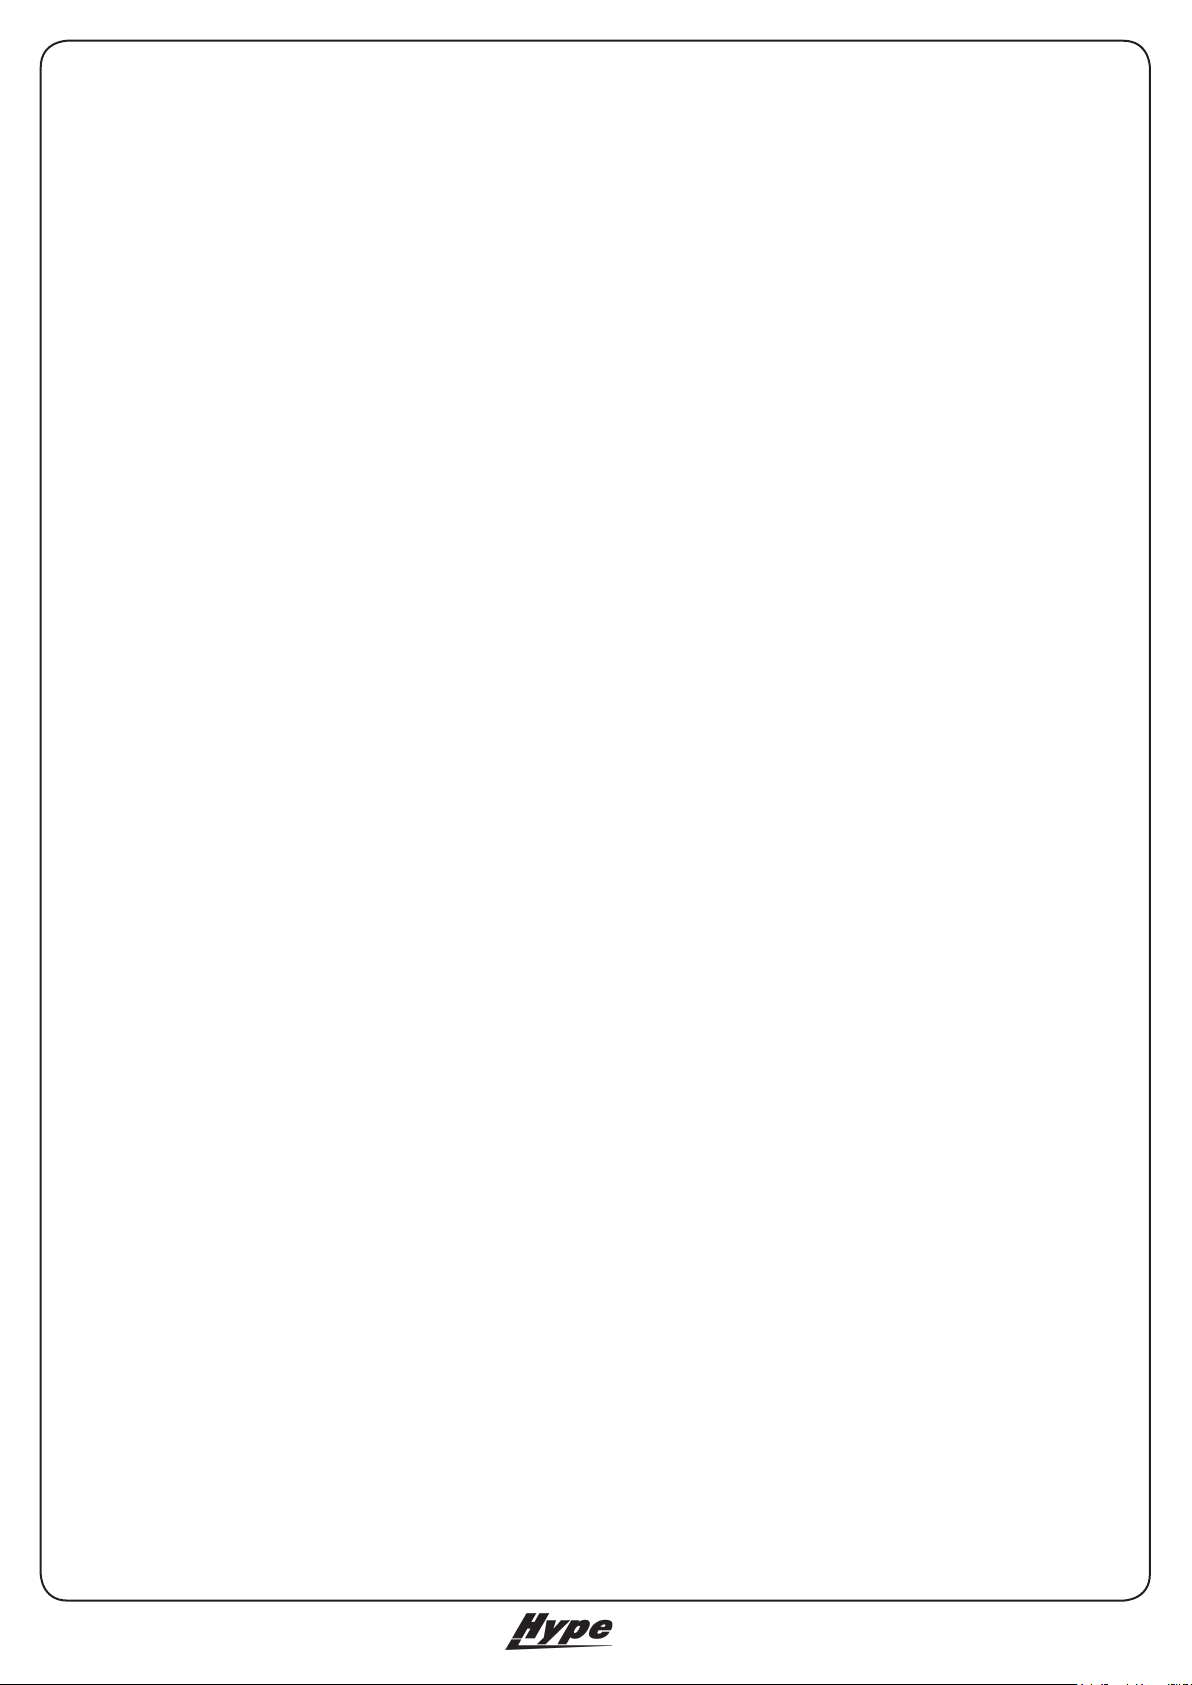
2. Lieferumfang / Kit Content / Contenuto del kit
1
2
3
Best.-Nr. / Item-No. / art. 022-1300
1 - Tragäche / Main Wing / ala
2 - Rumpf / Fuselage / fusoliera
3 - Modellständer / Model Stand / supporto modello
Seite 3
3. Die Montage des Modells / The Assembly /
L'assemblaggio
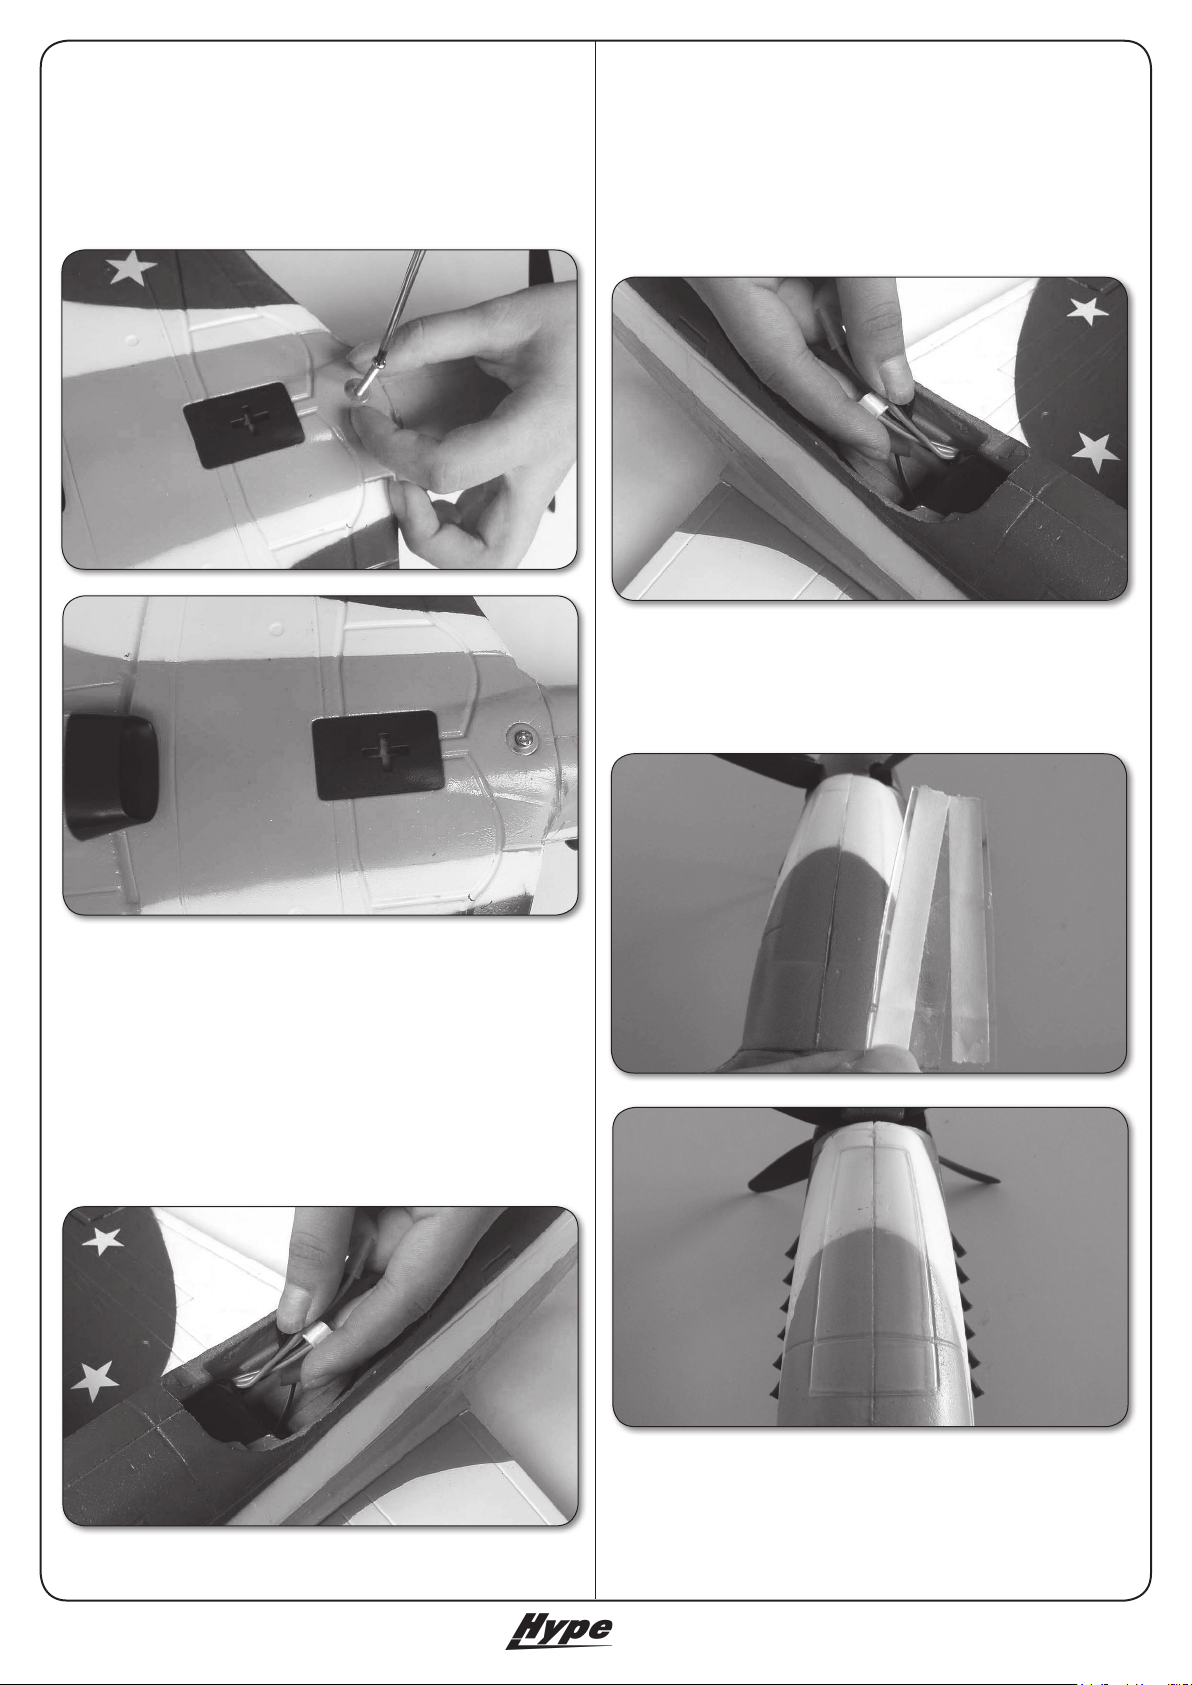
Setzen Sie die Tragäche von unten an den Rumpf und
sichern Sie sie mit der beiliegenden Tragächenschraube.
/ Put the wing to the fuselage as shown and secure it with
the wing bolt. / Appoggiare l'ala da di sotto alla fusoliera e
ssarla con l'apposita vite fornita nel kit.
Setzen Sie nun den Antriebsakku (2s LiPo 7,4V / 450mAh)
in den vorderen Teil des Rumpfes ein. Akku jetzt noch
nicht am Regler anschließen! / Install the battery (2s LiPo
7,4V / 450mAh) in the front area of the fuselage. Do not
connect the battery with the speed controller now! / Ora
inserire la batteria (2s LiPo 7,4V / 450mAh) nella parte
anteriore della fusoliera, ma non collegarla ancora con il
regolatore!
Nehmen Sie das doppelseitige Klebeband und montieren
Sie die Auspuffattrappen an beiden Seiten des Rumpfes.
/ Attach the exhaust pipes on both sides of the fuselage
with doublesided tape. / Fissare le imitazioni dello scarico
con il nastro biadesivo su entrambi i lati della fusoliera.
Nehmen Sie die Kabinenhaube vom Rumpf ab und
schließen Sie die Servos am Empfänger an. Verlegen
Sie anschließend die Empfängerantenne(n). Beachten
Sie hierzu die Herstelleranweisungen der RC-Anlage! /
Remove the canopy from the fuselage and connect the
servos to the receiver. Afterthat install the antenna(s) in
the model. Please note the manual from the radio manufacturer accordingly. / Rimuovere la cabina dalla fusoliera
e collegare i servi alla ricevente. Ora posizionare l'antenna
ricevente, rispettando le indicazioni fornite dal produttore
dell'impianto radio.
Seite 4
Best.-Nr. / Item-No. / art. 022-1300
HÖHENRUDER
PIANO DI QUOTA
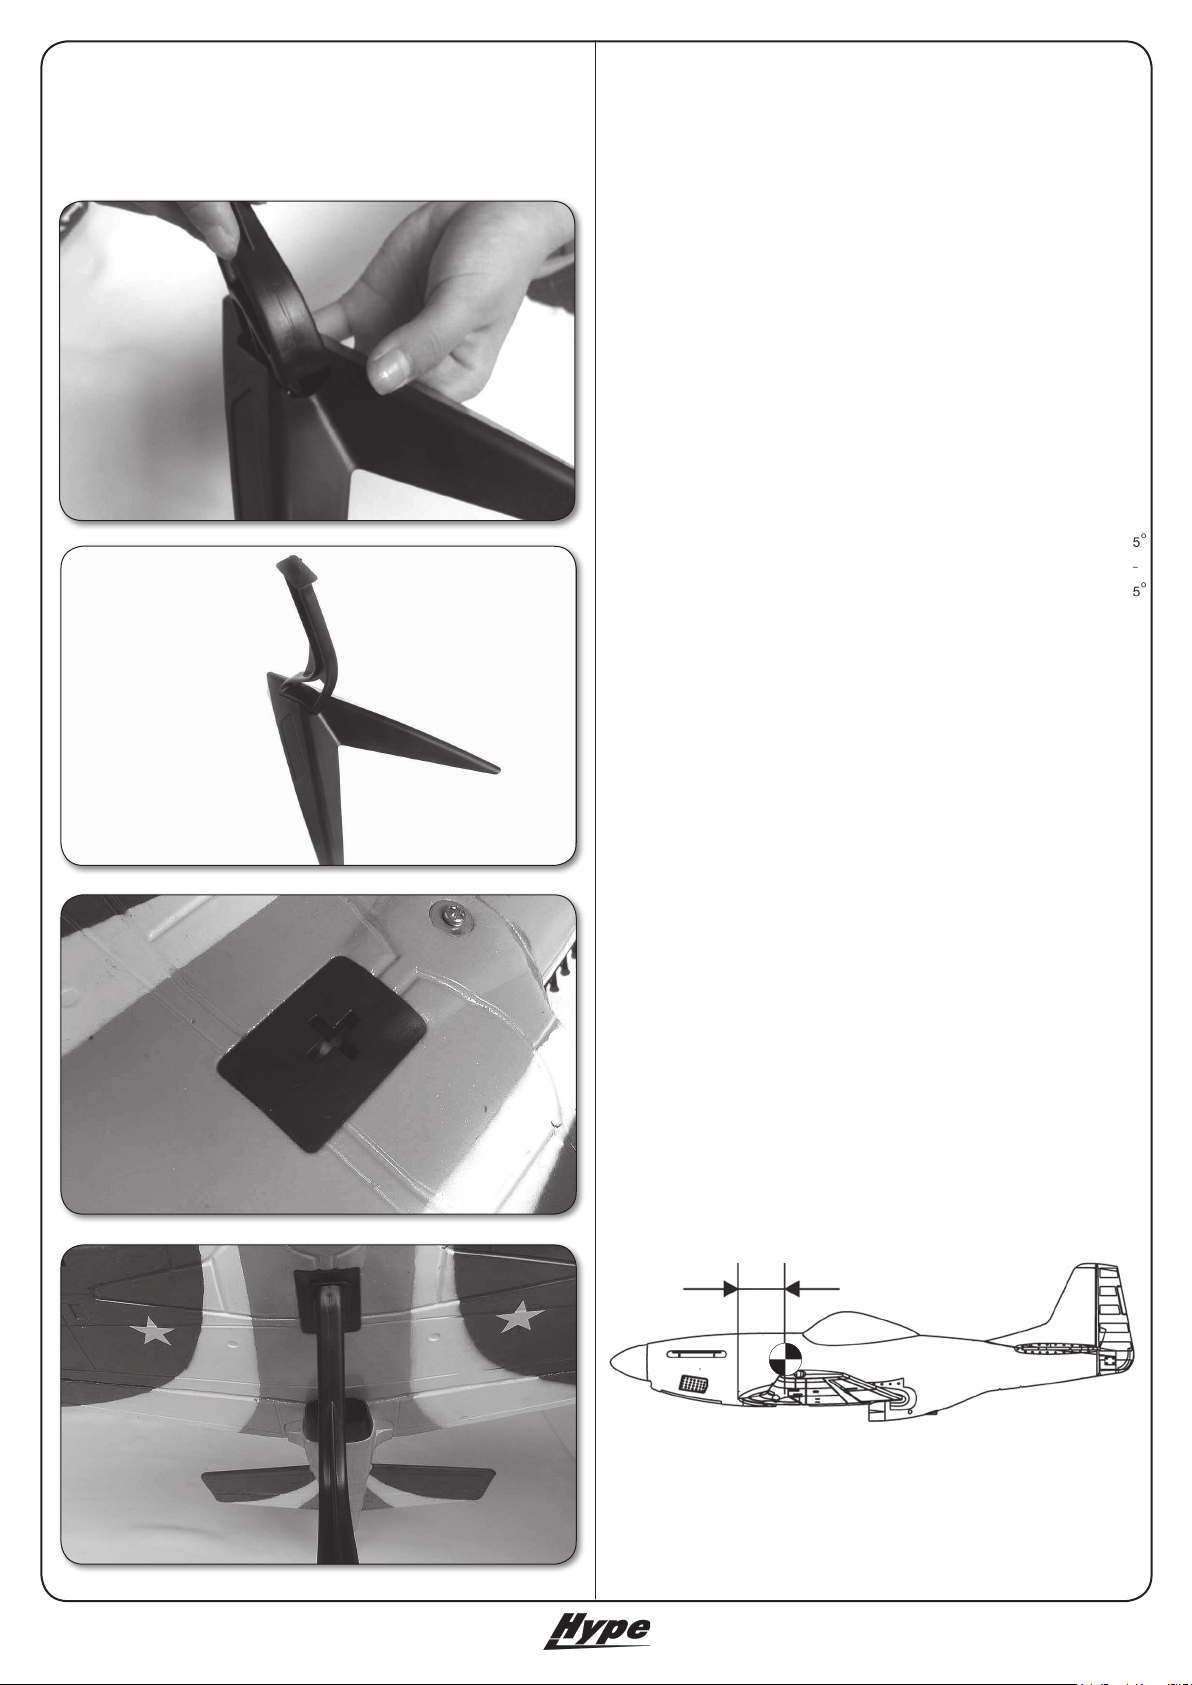
Stecken Sie den Modellständer zusammen und setzen
Sie das Modell darauf, wie dargestellt. / Assemble the
model stand and put the model on it as shown. / Montare il
supporto modello e appoggiarci il modello come mostrato
in foto.
Prüfen Sie nun, ob sich alle Ruder korrekt bewegen.
Sender einschalten und den geladenen Antriebsakku im
Modell anschließen. Betätigen Sie der Reihe nach alle
Funktionen am Sender. Vorsicht im Umganmg mit der drehenden Luftschraube! / Check the function of all rudders.
Switch on the transmitter and connect the LiPo-Battery to
the controller in the model. Move all rudders one by one.
Attention! Be careful with the rotating propeller! / Vericate ora che tutte le parti mobili si muovano correttamente:
accendere la trasmittente e collegare al batteria caricata
nel modello. Ora provare tutte le funzioni radio. Attenzione
a non ferirvi con l'elica in rotazione!
Stellen Sie die maximalen Ruderausschläge gemäß der
nachfolgenden Werte ein. / Adjust the maximum travel of
the control aps according to the sketch below. / regolare
le escursioni massime dei piani mobili come segue:
QUERRUDER
AILERON
ALETTONI
SEITENRUDER
RUDDER
TIMONE
ELEVATOR
Abschließend muss der Schwerpunkt am Modell überprüft
werden. Dazu werden alle Komponenten (auch der Akku!)
im Modell montiert. Der Schwerpunkt liegt 70 mm hinter
der Nasenleiste. Die exakten Punkte zum Unterstützen
des Modells sind durch Aufkleber an der Tragächenunterseite markiert! Unterstützen Sie das Modell mit zwei
Fingern exakt an diesen Punkten und beobachten Sie,
wie das Modell auspendelt. Die Nase des Modells sollte
sich leicht nach unten neigen. Dann ist der Schwerpunkt
optimal justiert. / Before the rst ight you have to check
the center of gravity. For doing so you have to mount all
components (also the battery!) in to the model. The CG
is placed 70 mm behind the nose cone of the main wing.
Support the model exactly at the marked spots on the
bottom side of the wing. Put the model on two ngers and
watch the fuselage. The nose should point slightly to the
ground. Then the CG is placed correctly! / Vericare il
centro di gravità. Dovrete usare il modello completo della
batteria! Il CG è a 70 mm dietro il bordo d'entrata dell'ala.
Tenere il modello tra due dita come mostrato e guardate
la fusoliera. Il muso dovrebbe puntare leggermento verso
il basso.
Best.-Nr. / Item-No. / art. 022-1300
70 mm
Seite 5
 Loading...