

HYOSUNG GD250 Owner's Manual
1
This owner’s manual contains important safety information.
Please read it carefully.
WARNING
1
This manual should be considered a permanent part of the motorcycle and
should remain with the motorcycle when resold or otherwise transferred to
a new owner or operator. The manual contains important safety
information and instructions which should be read carefully before
operating the motorcycle.
2
BATTERY INITIAL CHARGING
The 『 』 uses a battery ignition system.
Do not permit to start or operate the motorcycle without the battery otherwise the
electrical system will be damage.
Always start or ride the motorcycle with the correct battery installed and connected.
WARNING
1. BATTERY INITIAL CHARGING
Initial charging of the battery is required after filling electrolyte to improve the battery
durability.
2. BATTERY INSTALLATION
① Fill the electrolyte to the battery.
② Leave the battery for 30 minutes.
③ C harge the battery by standard charging. This is necessary for reliability of the
battery.
④ Install the battery to the motorcycle.
※ STANDARD CHARGING TIME : 1.0 A for 10 hours
CAUTION
Do not use the battery without the battery initial charging.
Otherwise the battery service life may be shortened.
CAUTION
Use only the genuine Hyosung battery on the 『 』.
If use a non genuine battery, as poor performance for low temperature of the battery,
the engine could not start because the ECU is not running by lower battery moment
voltage than 7V when pushing the starter switch.
3
All information, illustrations photographs
and specifications contained in this manual
are based on the latest product information
available at the time of publication. Due to
improvements or other changes, there may
be some discrepancies between
information
in this manual and your
motorcycle.
Hyosung reserves the right to make
changes at any time, without notice and
without incurring any obligation to make the
same or similar changes to motorcycles
previously built or sold.
Please note that this manual applies to all
specifications for all respective destinations
and explains all equipments. Therefore,
your model may have different standard
features than shown in this manual.
Ⓒ COPYRIGHT S&T Motors Co., Ltd.
FOREWORD
THANK YOU for choosing a Hyosung
motorcycle. We at Hyosung have
designed, tested and produced this
motorcycle using the most modern
technology available to provide you with
much happy, enjoyable, safe riding.
Motorcycling is one of the most exhilarating
sports and to ensure your riding enjoyment,
you should become thoroughly familiar with
the information presented in this Owner's
Manual before riding the motorcycle.
The proper care and maintenance that
your motorcycle requires is outlined in this
manual.
By following these instructions explicitly you
will ensure a long trouble-free operating life
for your motorcycle. Your Hyosung dealer
has experienced technicians that are
trained to provide your machine with the
best possible service with the right tools
and equipment.

4
IMPORTANT
BREAK-IN INFORMATION
FOR YOUR MOTORCYCLE
The first 1,600 km (1,000 miles) are the
most important in the life of your
motorcycle.
Proper break-in operation during this time
will help ensure maximum life and
performance from your new motorcycle.
Hyosung parts are manufactured of high
quality materials, and manufactured parts
are finished to close tolerances. Proper
break-in operation allows the machined
surfaces to polish each other and mate
smoothly.
Motorcycle reliability and performance
depend on special care and restraint
exercise during the break-in period. It is
especially important that you avoid
operating the engine in a manner which
could expose the engine parts to excessive
heat.
Please refer to the BREAK-IN section for
specific break-in recommendations.
WARNING / CAUTION /
NOTE
Please read this manual and follow its
instructions carefully.
To emphasize special information the
words 『WARNING』, 『CAUTION』 and
『NOTE』 have special meanings.
Information following these signal words
should be carefully reviewed.
The personal safety of the rider may be
involved. Disregarding this information
could result in injury to the rider.
N O T E
This provides special information to
make maintenance easier or important
instructions clearer.
WARNING
CAUTION
These instructions point out special
service procedures or precautions that
must be followed to avoid damaging
the machine.

5
WARNING
Noise Control System (muffler assembly)
TAMPERING WITH NOISE CONTROL SYSTEM PROHIBITED
Owners are warned that the law may prohibit :
(a) Th e removal or rendering inoperative by any person other than for the
purpose of maintenance, repair or replacement, of any device or
element of design incorporated into any new vehicle for the purpose of
noise control prior to its any sale or delivery to the ultimate purchaser
or while it is in use ; and
(b) Th e use of the vehicle after such device or element of design has been
removed or rendered inoperative by any person.
MAINTENANCE :
The exhaust system of this motorcycle requires no periodic maintenance.
Th e engine should be adjusted to the manufacture’ s specifications and
the spark plug should be kept in good condition. Running the engine with
incorrectly operating spark plug or misadjusted fuel injection system may
cause permanent damage to the catalyst and to the noise control system.
6
WARNING
WARNING
● Before first use of the
『 』, read this owner’s
manual carefully to become familiar
with the motorcycle features, and
safety and maintenance
requirements. Review all instructions,
requirements and warnings.
Keep the owner’s manual in the
owner’s manual storage
compartment located under the rear
seat.
● Before the rider’s first use of the
『
』, make sure that he / she
is familiar with the location and
operation of all controls, and has
been instructed in the proper
operation of the motorcycle.
● F o r f i r s t u s e o f t h e
『
』, find a level, open area
for the rider to use to become familiar
with the operation of controls and the
operating and handling
characteristics of the motorcycle.
Motorcycle riding is great fun and an
exciting sport. Motorcycle riding also
requires he/she to take some extra
precautions to ensure the safety of the rider
and passenger.
These precautions are :
CONSUMER
INFORMATION
SAFE RIDING
RECOMMENDATION
FOR MOTORCYCLE RIDERS
● Before each use, perform daily
inspections with the rider. Specific
items to check are listed in the
INSPECTION BEFORE RIDING
section on page 55 of this owner’s
manual.
● Make sure the rider wears a helmet,
eye protection, and protective
clothing (gloves, leather or heavy
cloth pants, long sleeved shirt or
jacket, boots).
● Permit use only by two persons.
The motorcycle is designed for use
only by one rider and one passenger.
● Do not permit anyone to operate the
『
』 under the influence of
alcohol or other drugs. It may cause
damage to the motorcycle and alter
handling characteristics.
● Observe periodic maintenance
requirements. Your authorized
HYOSUNG dealer is trained and
equipped to perform this service.
● Drain gasoline from the fuel tank
prior to transporting the
『
』.
● Caution the rider and others near the
『
』 not to get close to or
touch any moving parts or any
heated areas such as the engine and
exhaust system.
● Do not make any modifications to
the 『
』.
Modifications may make the
motorcycle unsafe or illegal in your
state.
7
WARNING
WARNING
WARNING
WARNING
The 『 』 is equipped with the
side stand ignition interlock system.
If the transmission is in neutral or the
side stand up, you can only start the
engine by squeezing the clutch lever.
This side stand ignition interlock
system prevents the motorcycle from
being started with side stand down.
Make sure that the side stand ignition
interlock system is working properly
before riding.
While operating the 『
』, the
rider should keep both feet on the
footrests at all times to avoid injuries
resulting from accidents. Moving the
rider’s feet from the footrests reduces
the rider’s ability to control the
motorcycle and could lead to an
accident.
Always open the throttle gradually to
prevent front wheel lifting. Failure to
observe this precaution may result in
loss of control and an accident.
Keep both hands on the handgrips at all
times when riding. Removing your
hands from the handgrips reduces your
ability to control the motorcycle and
could result in an accident.
● Do not run the engine indoors or
where there is little or no ventilation.
Exhaust gases contain carbon
monoxide, a potentially lethal gas
that is colorless and odorless.
● Never leave the motorcycle running
while unattended, even for a short
time.
WARNING
CAUTION
The position lamp, meter lamp, tail lamp
and license plate lamp on this motorcycle
always comes on when the ignition
switch is turned to the “ON” position.
The head lamp is always lit when starting
the engine.
CAUTION
WHEN STORING FOR LONG PERIOD :
1. Drain the fuel in the fuel tank.
2. Remove the battery from the
motorcycle.
CAUTION
● The trunk could be heated.
Don’t keep anything that doesn’t
endure heat.
● Don’t keep the fragile.
● Check if it is locked.
● The unlocking of rear seat could
cause serious accident.
● Don’t allow water to get inside the
trunk or it could damage.
● Don’t keep the valuables in the trunk
when leaving unattended.
● Loading limit of trunk : 2 kg (4.4 lbs)

8
WARNING
WARNING
WARNING
WARNING
⊙ WEAR A HELMET
⊙ RIDING APPAREL
⊙ INSPECTION BEFORE RIDING
Motorcycle safety equipment starts with
a quality safety helmet. One of the most
serious injuries that can happen is a
head injury. ALWAYS wear a properly
approved helmet. You should also wear
a suitable eye protection.
Do not turn the ignition switch to its
“OFF” or “LOCK” position or the
engine stop switch to its “ ” position
while riding the motorcycle.
Loose clothing can be uncomfortable
and unsafe when riding a motorcycle.
Use good quality motorcycle riding
apparel when riding your motorcycle.
Review thoroughly the instructions in
the “INSPECTION BEFORE RIDING”
section of this manual. Do not forget to
perform an entire safety inspection to
ensure the safety of the rider and its
passenger.
9
⊙ FAMILIARIZE YOURSELF WITH
THE MOTORCYCLE
⊙ KNOW YOUR LIMITS
⊙ BE EXTRA SAFETY CONSCIOUS
ON BAD WEATHER DAYS
WARNING
WARNING
WARNING
Your riding skill and mechanical
knowledge from the foundation for safe
riding practices.
We suggest that you practice riding
your motorcycle in a non-traffic
situation until you are thoroughly
familiar with your machine and its
controls.
Remember practice makes perfect.
Ride within the boundaries of your own
skill at all times. Knowing these limits
and staying within them will help you to
avoid accidents.
Riding on bad weather days, especially
wet ones, requires extra caution.
Braking distances double on a rainy
day. Stay off of the painted surface
marks, manhole covers and greasy
appearing areas as they can be
especially slippery.
Use extreme caution at railway
crossings and on metal gratings and
bridges.
Whenever you have a doubt about road
condition, slow down!
10
WARNING
There are a great variety of accessories
available to Hyosung owners. Hyosung
can not have direct control over the quality
or suitability of accessories you may wish
to purchase except genuine parts.
The addition of unsuitable accessories
can lead to unsafe operating conditions. It
is not possible for Hyosung to test each
accessory on the market or combinations
of all the available accessories, however,
your dealer can assist you in selecting
quality accessories and installing them
correctly.
Use extreme caution when selecting and
installing the accessories for your
Hyosung. We have developed some
general guidelines which will aid you when
deciding whether, and how to equip your
motorcycle.
1. In case that additional weight or
aerodynamic affecting accessories are
installed, they should be mounted as
low as possible, as close to the
motorcycle and as near the center of
gravity as is feasible. The mounting
brackets and other attachment
hardware should be carefully checked
to ensure that it provides for a rigid,
nonmovable mount. Weak mounts can
allow the shifting of the weight and
create a dangerous, unstable
condition.
2. In spect for proper ground clearance
and bank angle. An improperly
mounted load could critically reduce
these two safety factors. Also
determine that the “load” does not
interfere with the operation of the
suspension, steering or other control
operations.
3. A ccessories fitted to the handlebars or
the front fork area can create serious
stability problems. This extra weight will
cause the motorcycle to be less
responsive to your steering control.
The weight may also cause oscillations
in the front end and lead to instability
problems. Accessories added to the
machine should be as light as possible
and kept to a minimum.
4. T he motorcycle may be affected by a
lifting condition or by an instability in
cross winds or when being passed or
passing large vehicles. Improperly
mounted or poorly designed
accessories can result in an unsafe
riding condition, therefore caution
should be used when selecting and
installing all accessories.
ACCESSORY
INSTALLATION AND
PRECAUTION SAFETY TIPS
Improper accessories or modifications
can make your motorcycle unsafe and
can lead to an accident.
Never modify the motorcycle with
improper or poorly installed
accessories. Follow all instructions in
this owner’s manual regarding
accessories and modifications.
Use genuine Hyosung accessories or
equivalent designed and tested for your
motorcycle. Consult your Hyosung
dealer if you have any questions.

11
Modification of the motorcycle, or removal of
original equipment may render the vehicle
unsafe or illegal.
Obey all applicable equipment regulations in
your area.
MODIFICATION
5. Certain accessories displace the rider
from his or her normal riding position.
This limits the freedom of movement of
the rider and may limit his or her control
ability.
6. Additional electrical accessories may
damage the existing electrical system.
Severe overloads may damage the
wiring harness or create a dangerous
situation due to the loss of electrical
power during the operation of the
motorcycle.
When carrying a load on the motorcycle,
mount it as low as possible and as close as
possible to the machine. An improperly
mounted load can create a high center of
gravity which is very dangerous and makes
the motorcycle difficult to handle. The size
of the “load” can also affect the
aerodynamics and handling of the
motorcycle.
Balance the load between the left and
right side of the motorcycle and fasten it
securely.

12
1. SERIAL NUMBER LOCATION 14
2.
FUEL, ENGINE OIL AND ENGINE COOLANT RECOMMENDATION
15
FUEL
ENGINE OIL
ENGINE COOLANT SOLUTION
3. NAMES OF EACH PARTS 18
4. CONTROLS
21
IGNITION SWITCH
IGNITION KEY
INSTRUMENT PANEL
LEFT HANDLE SWITCHES
RIGHT HANDLE SWITCHES
FRONT BRAKE LEVER ADJUSTMENT
REAR BRAKE PEDAL
GEARSHIFT LEVER
FOOTRESTS
SIDE STAND
SEAT LOCK
TRUNK
REAR SHOCK ABSORBER
5.
SUPPLY OF GASOLINE, ENGINE OIL AND ENGINE COOLANT
40
GASOLINE
ENGINE OIL
ENGINE COOLANT
6. RIDING TIPS47
STARTING THE ENGINE
STARTING OFF
USING THE TRANSMISSION
RIDING ON HILLS
STOPPING AND PARKING
7. BREAK-IN 52
TABLE OF CONTENTS

13
8. INSPECTION BEFORE RIDING55
9. PERIODIC MAINTENANCE
57
10. INSPECTION AND MAINTENANCE
61
TOOL
ENGINE OIL
FUEL HOSE
GASOLINE
ENGINE COOLANT
RADIATOR
RADIATOR HOSE
RUBBER CAP OF CABLES
EXHAUST PIPE AND MUFFLER
FRONT AND REAR SUSPENSIONS
REAR-VIEW MIRROR
REFLECTOR
BATTERY
AIR CLEANER
SPARK PLUG
IDLING ADJUSTMENT
THROTTLE CABLE PLAY ADJUSTMENT
CLUTCH CABLE ADJUSTMENT
DRIVE CHAIN
BRAKES
TIRE
BULBS
11. TROUBLESHOOTING85
12. TRANSPORT
87
13. CLEANING PROCEDURE
88
14. STORAGE PROCEDURE
90
15. LABEL
91
16. SPECIFICATIONS94
14
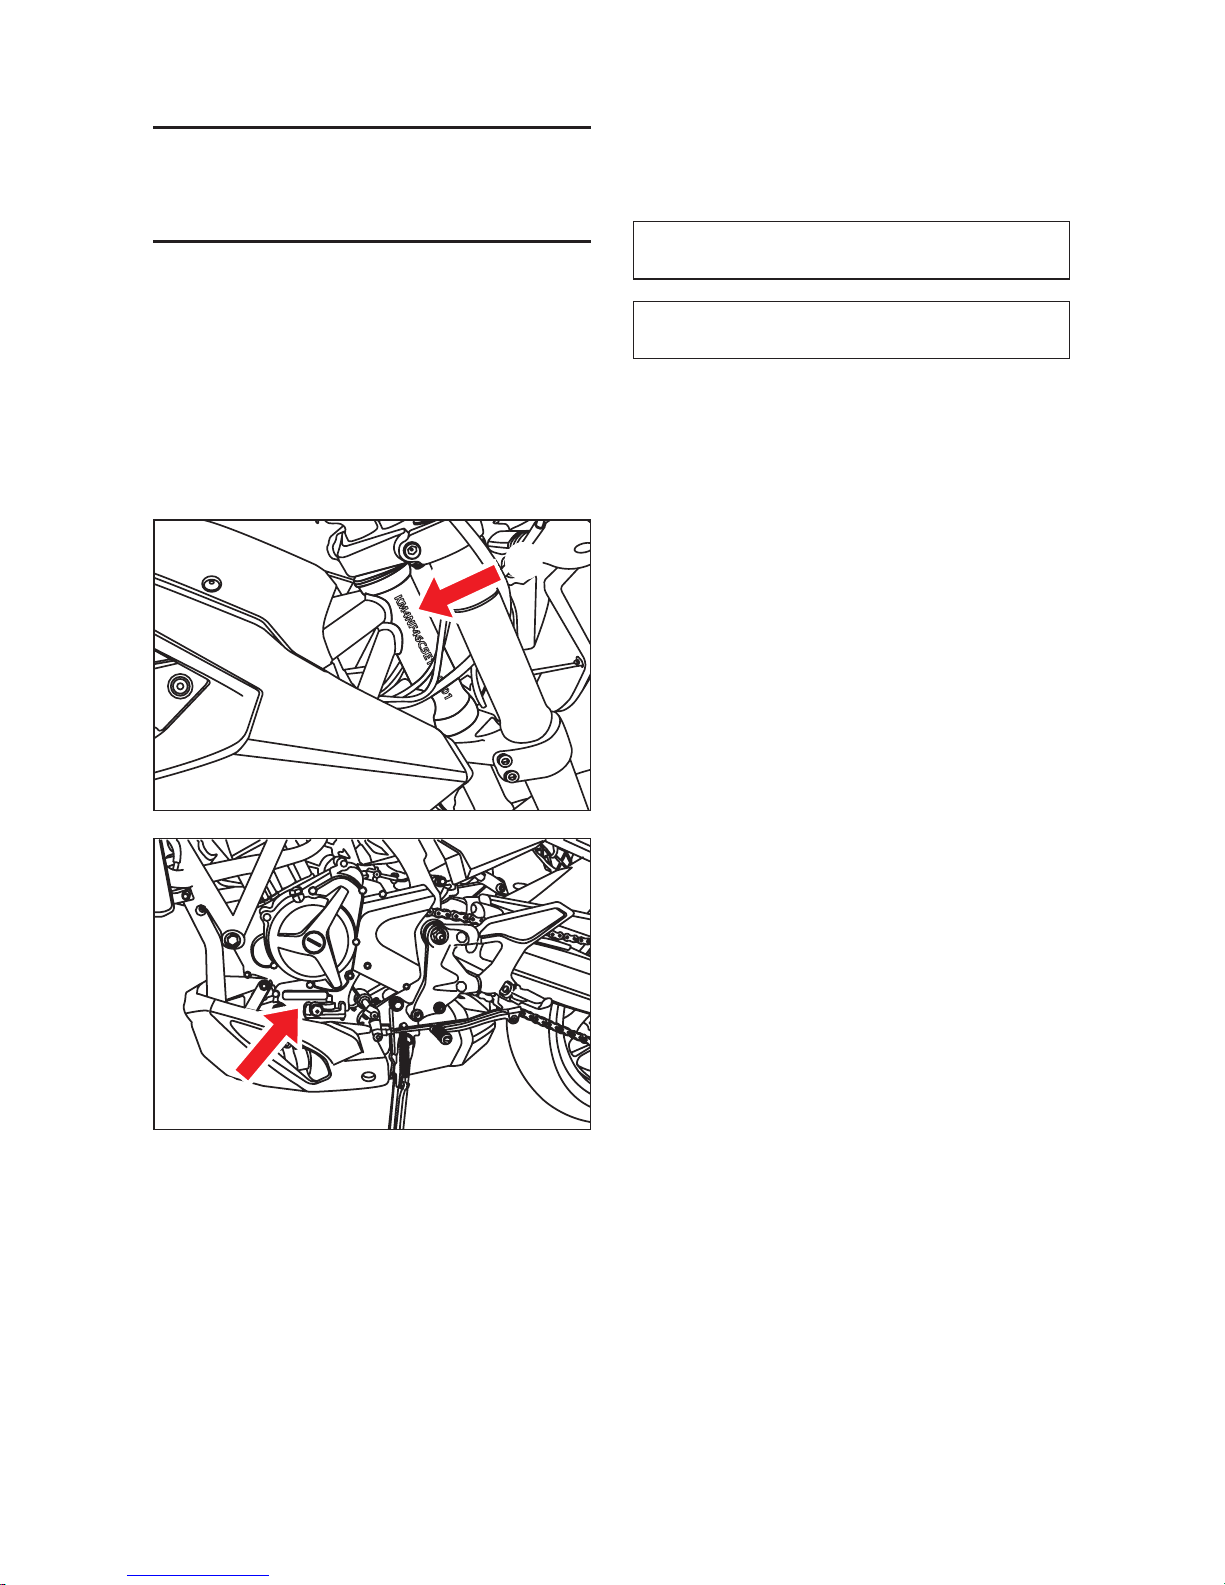
Frame number :
Engine number :
The frame serial number ① is stamped
on the right side of the steering head tube.
The engine serial number ② is stamped
on the left downside of the crankcase
assembly.
Please write down the numbers in the box
provided below for your future reference.
The frame and/or engine serial numbers
are used to register the motorcycle. They
are also to assist your dealer in terms of
ordering parts or referring to special
service information.
The frame number is also known as the
VIN or Vehicle Identification Number.
SERIAL NUMBER
LOCATION
❶
GD250-000010
❷
15
N O T E
WARNING
F U E L
ENGINE OIL
Classification
system
API
SAE
Grade
Over SL
10W/40
Remarks
⊙ ENGINE OIL SPECIFICATION
Use unleaded gasoline with an octane
rating of 91 or higher.
Unleaded gasoline can extend spark plug
life and exhaust components life.
Oil quality is a major contributor to your
engine’s performance and life.
Always select good quality engine oil.
Using a premium quality four stroke
motor oil will increase the service life of
your motorcycle.
※ If a SAE 10W/40 motor oil is not
available, select alternative according to
the following chart.
FUEL, ENGINE OIL AND
ENGINE COOLANT
RECOMMENDATION
● When refueling, always shut the
engine off and turn the ignition key
to the “OFF” position.
Never refuel near the flames, sparks
and heat sources.
● Do not overfill the fuel tank.
Do not fill gasoline above the fuel
tank entrance lower end.
Use the chart to select a viscosity rating
based on temperature range in your area.
In very cold weather [below
-
15 C (5
F)], use SAE 5W/30 for good starting
and smooth operation.
ENGINE OIL
Temperature
℃
℉
-30
-22
-20-4-101403210502068308640
104
20W50
15W40 15W50
10W40 10W50
10W30
5W30
CAUTION
Spilling gasoline can damage the
painted surfaces.
Be careful not to spill any fuel when
filling the fuel tank.
Wipe spilled gasoline up immediately.
16
WARNING
● Don’t mix the unrecommended oil.
It could damage the engine.
● When refilling the oil, don’t allow the
dust to get inside.
● Wipe the spilled oil up immediately.
ENGINE COOLANT
SOLUTION
Use an engine coolant that is compatible
with aluminum radiator, mixed with distilled
water only at a 50 : 50 mixture ratio for
engine coolant solution.
An engine coolant mixture other than
50 : 50 can affect cooling efficiency or rust
inhibiting peformance.
Engine coolant is harmful or fatal if
swallowed or inhaled.
Do not drink anti-freeze or coolant
solution. If swallowed, do induce
vomiting. Immediately contact a
poison control center or a physician.
Avoid inhaling mist or hot vapors ; if
inhaled, remove to fresh air. If coolant
gets in eyes, flush eyes with water
and seek medical attention. Wash
thoroughly after handling. Solution
can be poisonous to animals.
Keep out of the reach of children and
animals.
WARNING
⊙ WATER FOR MIXING
Use distilled water only.
Water other than distilled water can
corrode and clog the aluminum radiator.
CAUTION
Spilled engine coolant can damage
painted surfaces.
Do not spill any fluid when filling the
radiator. Wipe spilled engine coolant
up immediately.
17
⊙ ENGINE COOLANT
The engine coolant performs as rust
inhibitor and water pump lubricant as well
as anti-freeze.
Therefore the engine coolant should be
used at all times even though the
atmospheric temperature in your area does
not go down to freezing point.
50%
Water
Engine coolant
0.615
ℓ
0.615
ℓ
Required amount of water / coolant
Solution capacity (total) 1.23
ℓ
⊙ COOLANT RESERVOIR TANK
☞ Refer to 45 page.
N O T E
This 50 mixture will protect the
cooling system from freezing at
temperatures above
-
31℃.
If the motorcycle is to be exposed to
temperature below
-
31℃this mixing
ratio should be increased up to 55
(
-
40℃) or 60 (-55℃).
The mixing ratio should not exceed 60
.
18
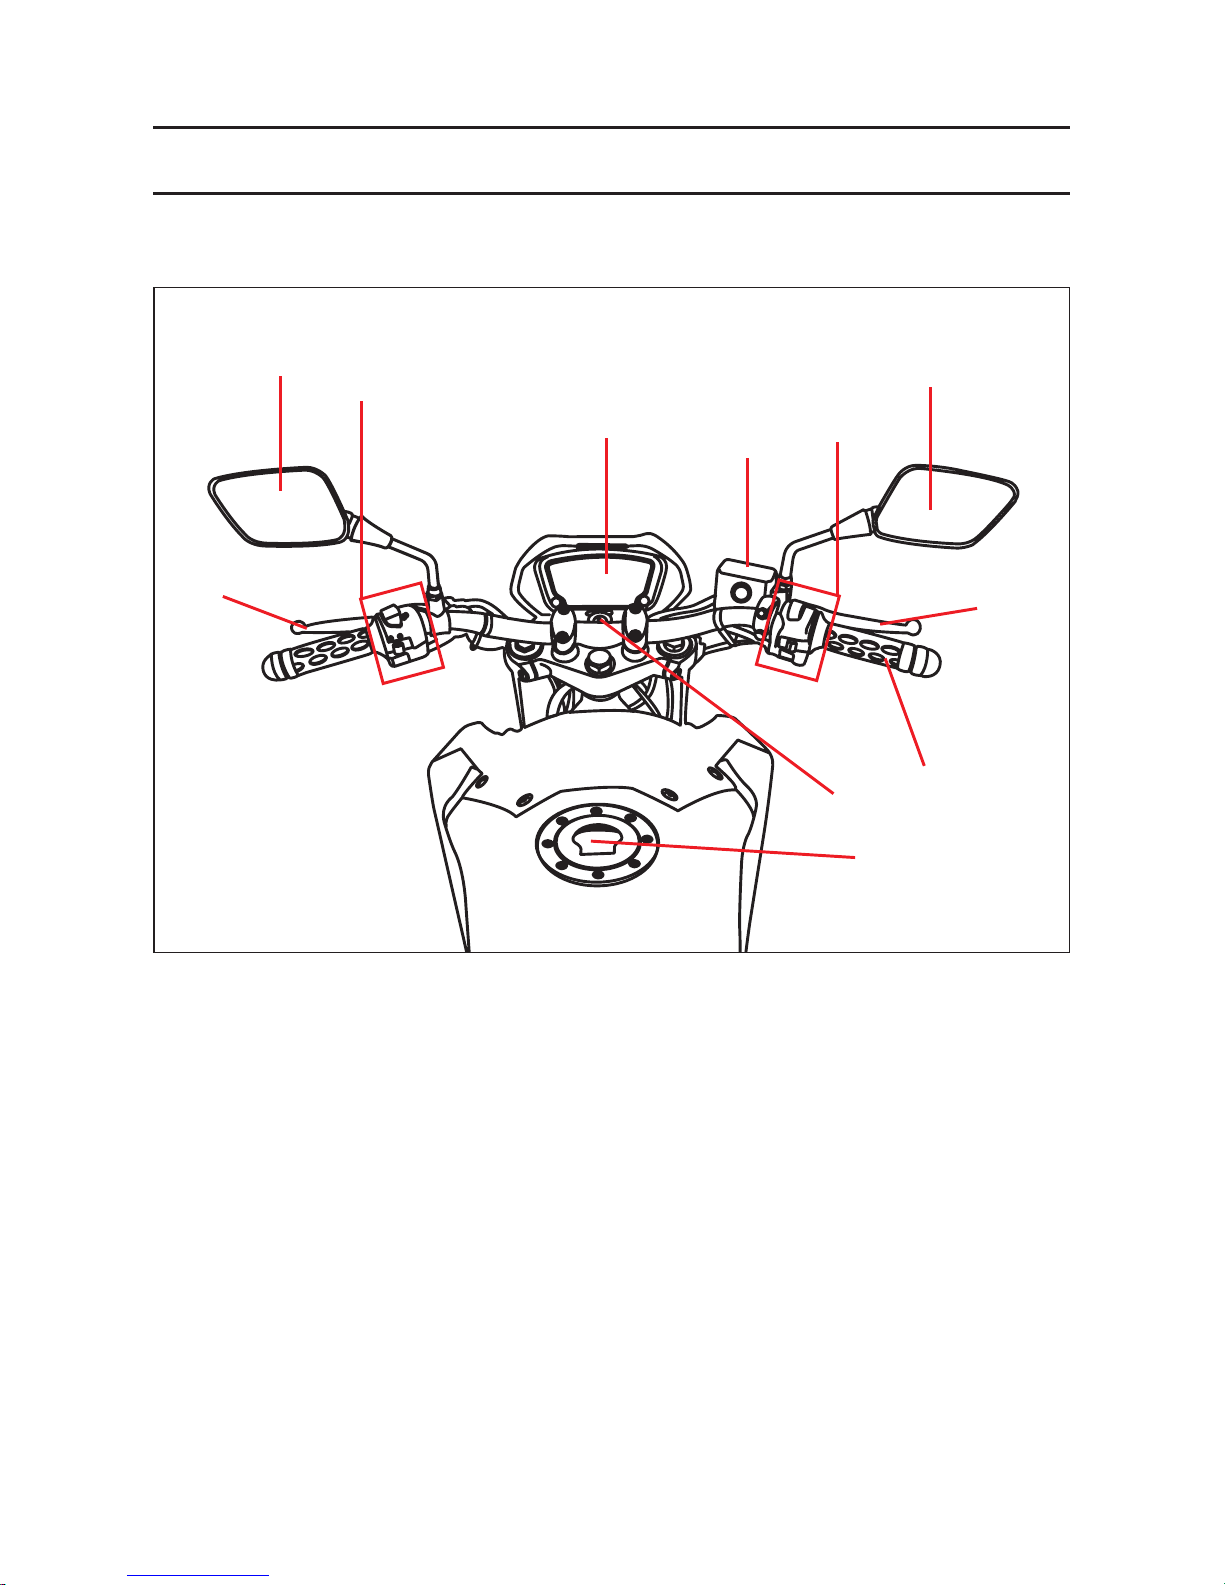
NAMES OF EACH PARTS
① Clutch lever
②Rear-view mirror
③ Left handle switches
④ Instrument panel
⑤ Front brake fluid reservoir
⑥ Right handle switches
⑦ Front brake lever
⑧ Throttle grip
⑨ Ignition switch
⑩
Fuel tank cap
②
①
③
④
⑤
⑥
②
⑦
⑧
⑨
⑩
19
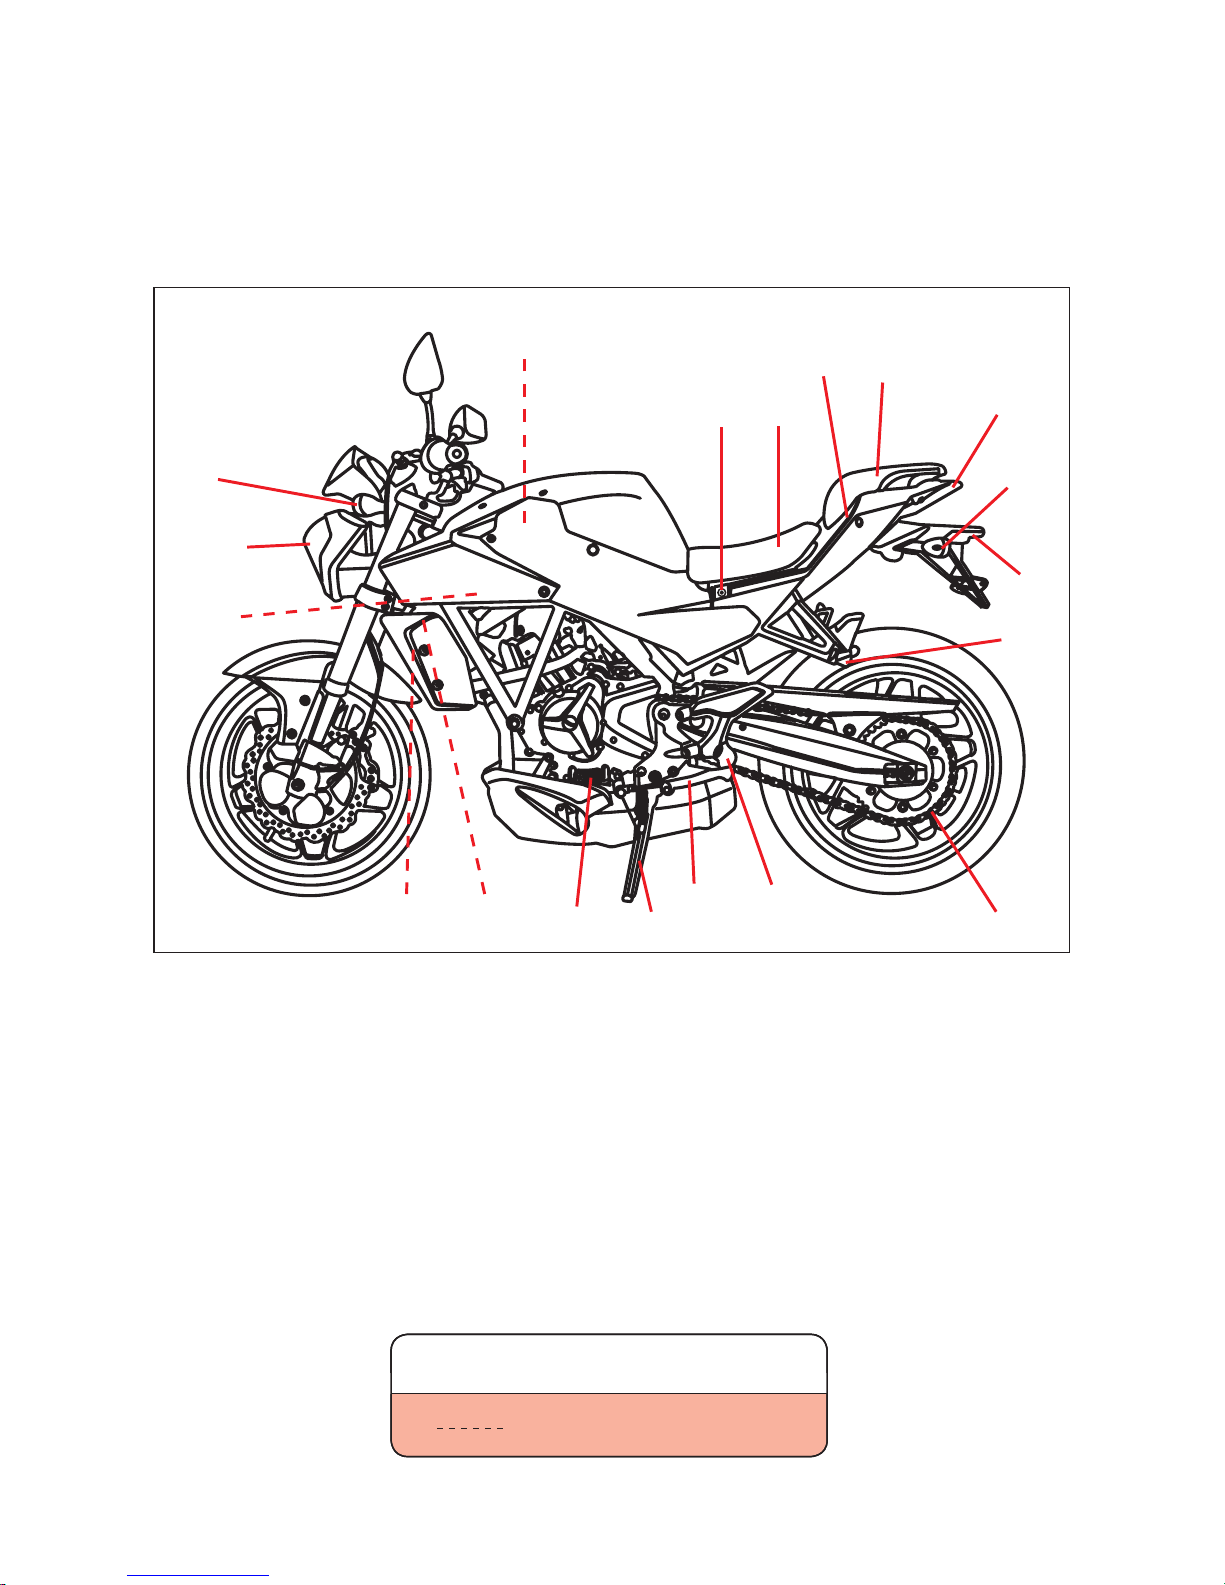
⑪ Spark plug
⑫ Head lamp & Position lamp
⑬ Front turn signal lamp
⑭ Air cleaner
⑮ Front seat mounting bolt
⑯ Front seat
⑰ Rear seat lock
⑱ Rear seat
⑲Brake / Tail lamp
⑳Rear turn signal lamp
License plate lamp
Passenger footrests
Drive chain
Footrests
Gearshift lever
Side stand
Engine oil drain plug
ECU (Engine Control Unit)
Ignition coil
N O T E
“ ” means the invisable parts.
⑬
⑫
⑭
⑮
⑯
⑰
⑱
⑲
⑳
⑪
20
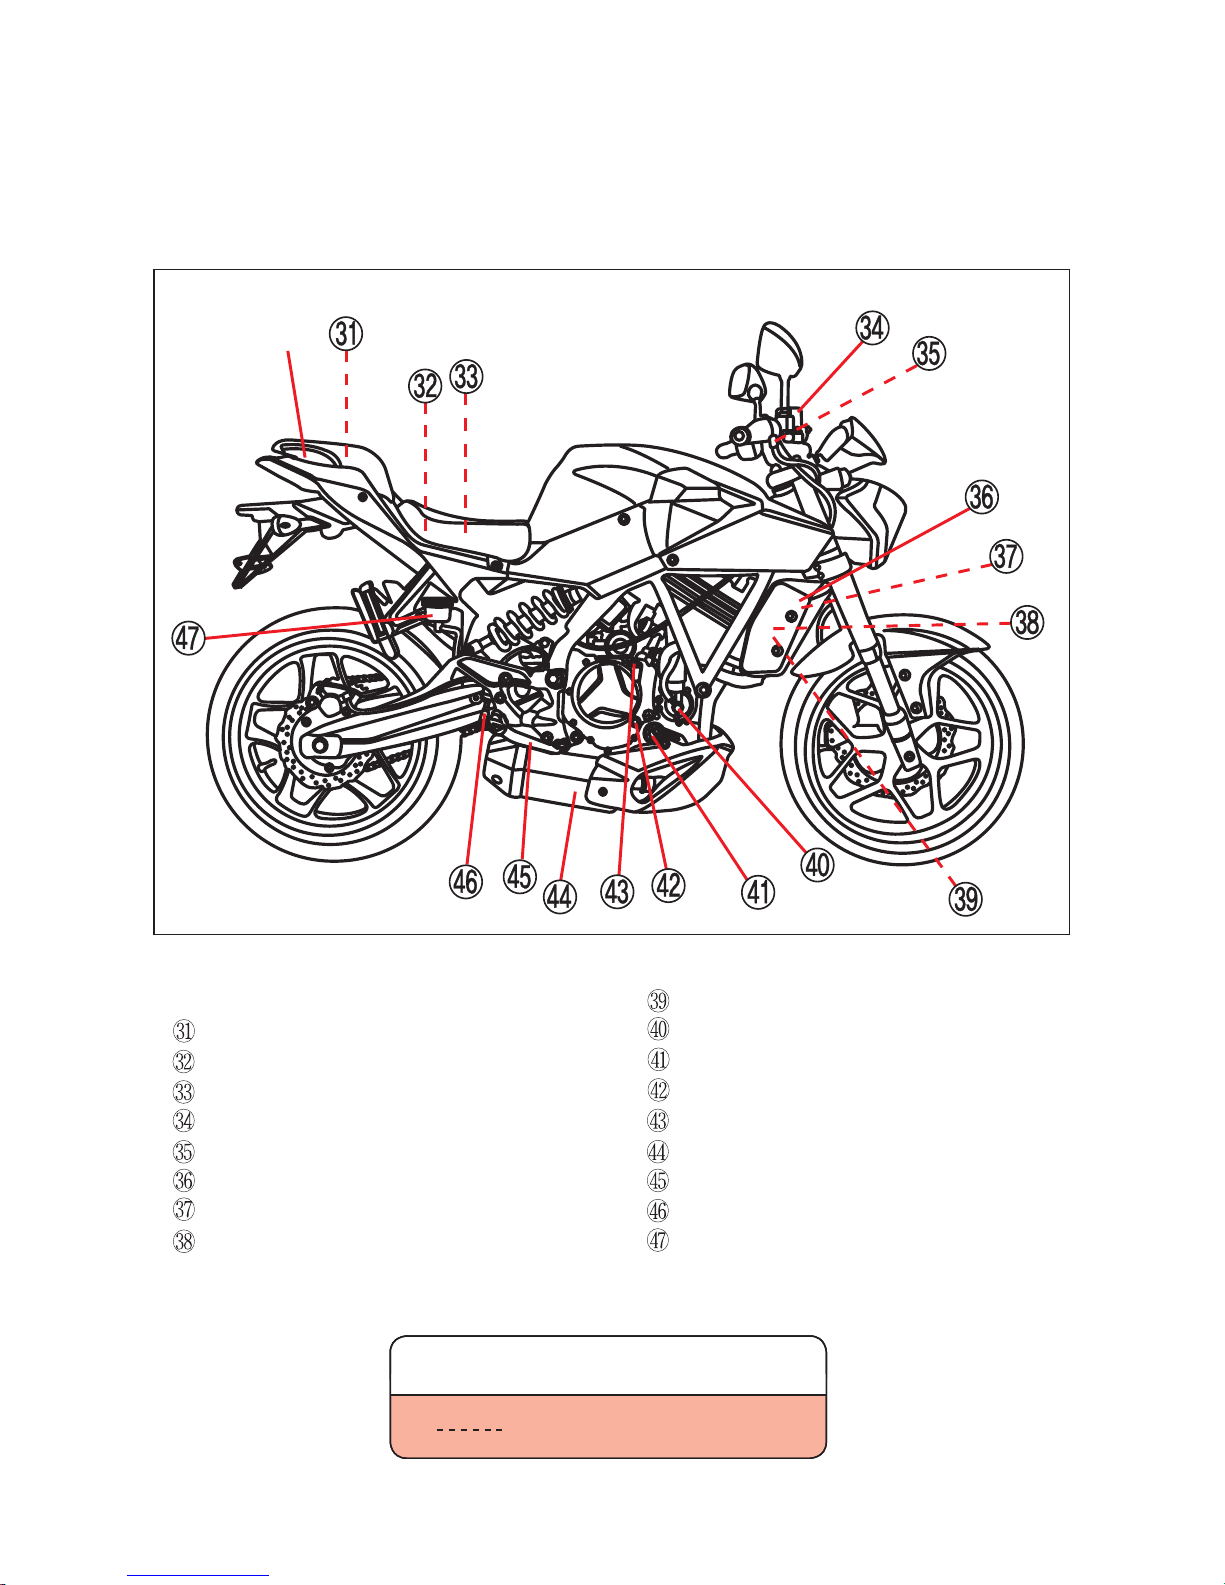
Lift bar
Trunk
Fuse box
Battery
Front brake fluid reservoir
Front brake lamp switch
Radiator cover
Radiator
Coolant reserve tank
Cooling fan and motor
Water pump
Engine oil filter
Engine oil level lens
Engine oil filler plug
Muffler
Rear brake pedal
Rear brake lamp switch
Rear brake fluid reservoir
N O T E
“ ” means the invisable parts.
21
KEY
CONTROLS
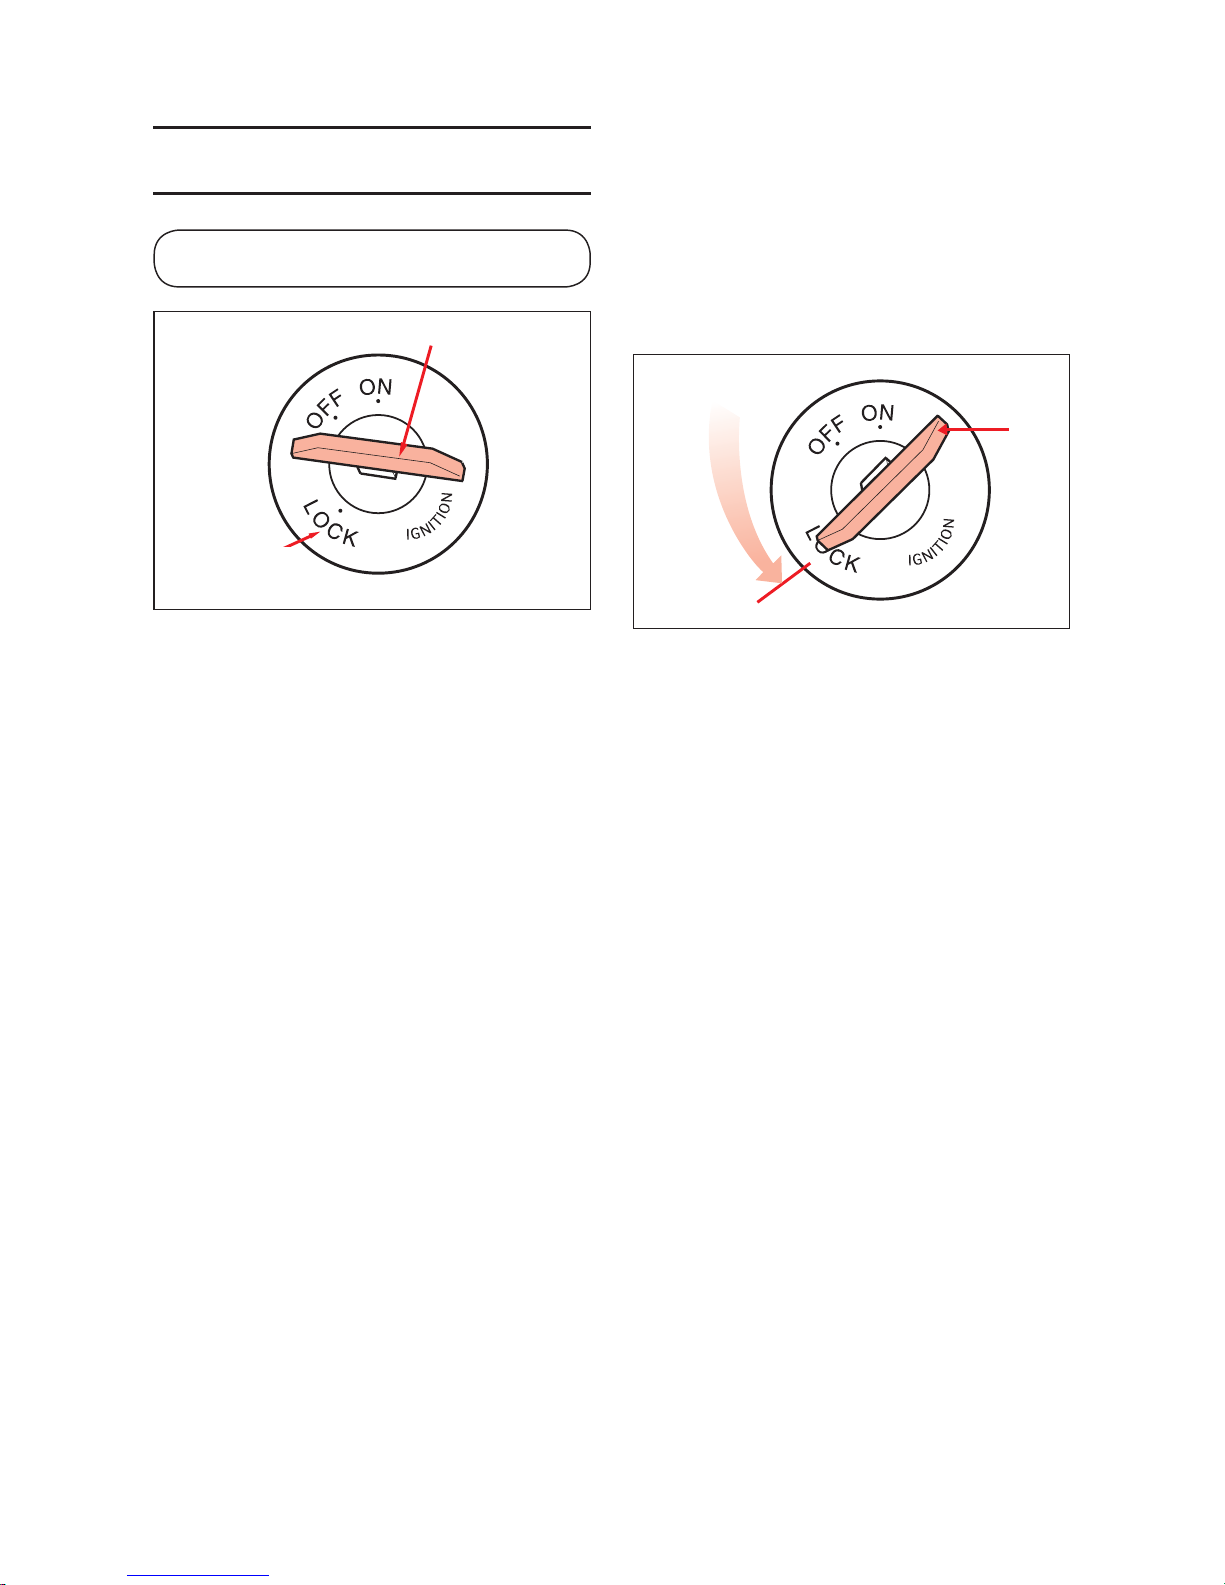
IGNITION SWITCH
The ignition switch has three positions :
⊙ “ON” POSITION
In this position, the ignition circuit is
closed and the engine can be started.
The key cannot be removed from the
ignition switch in this position.
⊙ “OFF” POSITION
In this position the ignition circuit is
interrupted, a running engine stops, and a
non-running engine will not start.
The key can be removed.
STEERING
LOCK
KEY
STEERING
LOCK
In this position, the ignition circuit is
interrupted and the steering locked.
The key can be removed.
⊙ “LOCK” POSITION
22
WARNING
To lock the steering :
ⓐTurn the handlebars all the way to the
left.
ⓑTurn the ignition key to the “OFF”
position.
ⓒPush down the ignition key from the
“OFF” position, come up again and turn
it to the “LOCK” position.
ⓓRemove the ignition key.
Turning the ignition switch to the
“OFF”or “LOCK” position while the
motorcycle is moving can be
hazardous. Moving the motorcycle while
the steering is locked can be hazardous.
You could lose your balance and fall, or
you could drop the motorcycle.
Stop the motorcycle and place it on the
side stand if equipped before locking
the steering. Never attempt to move the
motorcycle when the steering is locked.
This motorcycle come equipped with two
ignition keys.
Keep the spare key in a safe place.
IGNITION KEY
N O T E
Start the engine after turning the key to
the “ON” position, or the battery will
lose power due to consumption by the
lamp.
23
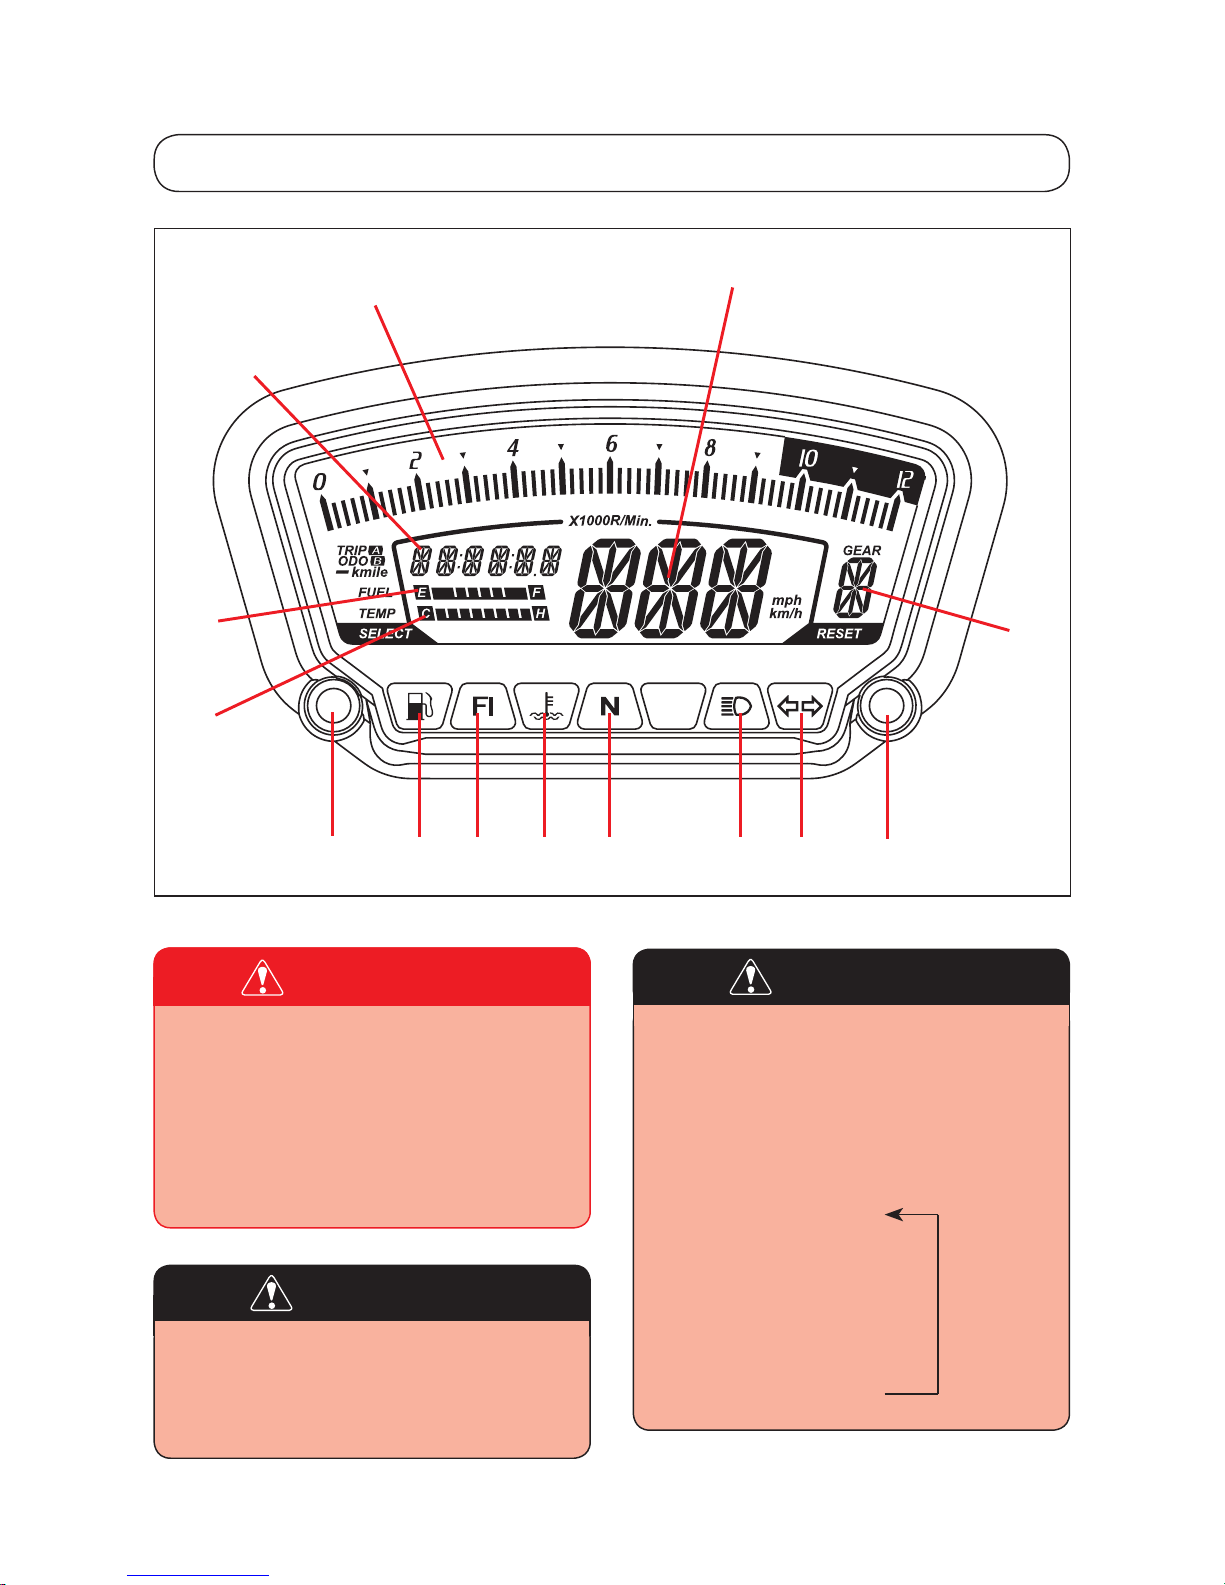
INSTRUMENT PANEL
WARNING
Operating the display while riding can
be hazardous. Removing a hand from
the handlebars can reduce your ability
to control the motorcycle.
Always keep both hands on the
handlebars while riding.
CAUTION
When the ignition switch is turned to
the “ON” position, the meter lamp and
display of the instrument panel will
come on.
CAUTION
To adjust brightness of the instrument
panel display, push the switch ⑭ (in
the Normal mode) for 0.6 ~ 1 seconds
while you want to change.
[Brightness of instrument panel display]
100%
↓
75%
↓
50%
↓
25%
❶
❿
❾
❽
❼
❻❺❹❸
❷

24
②
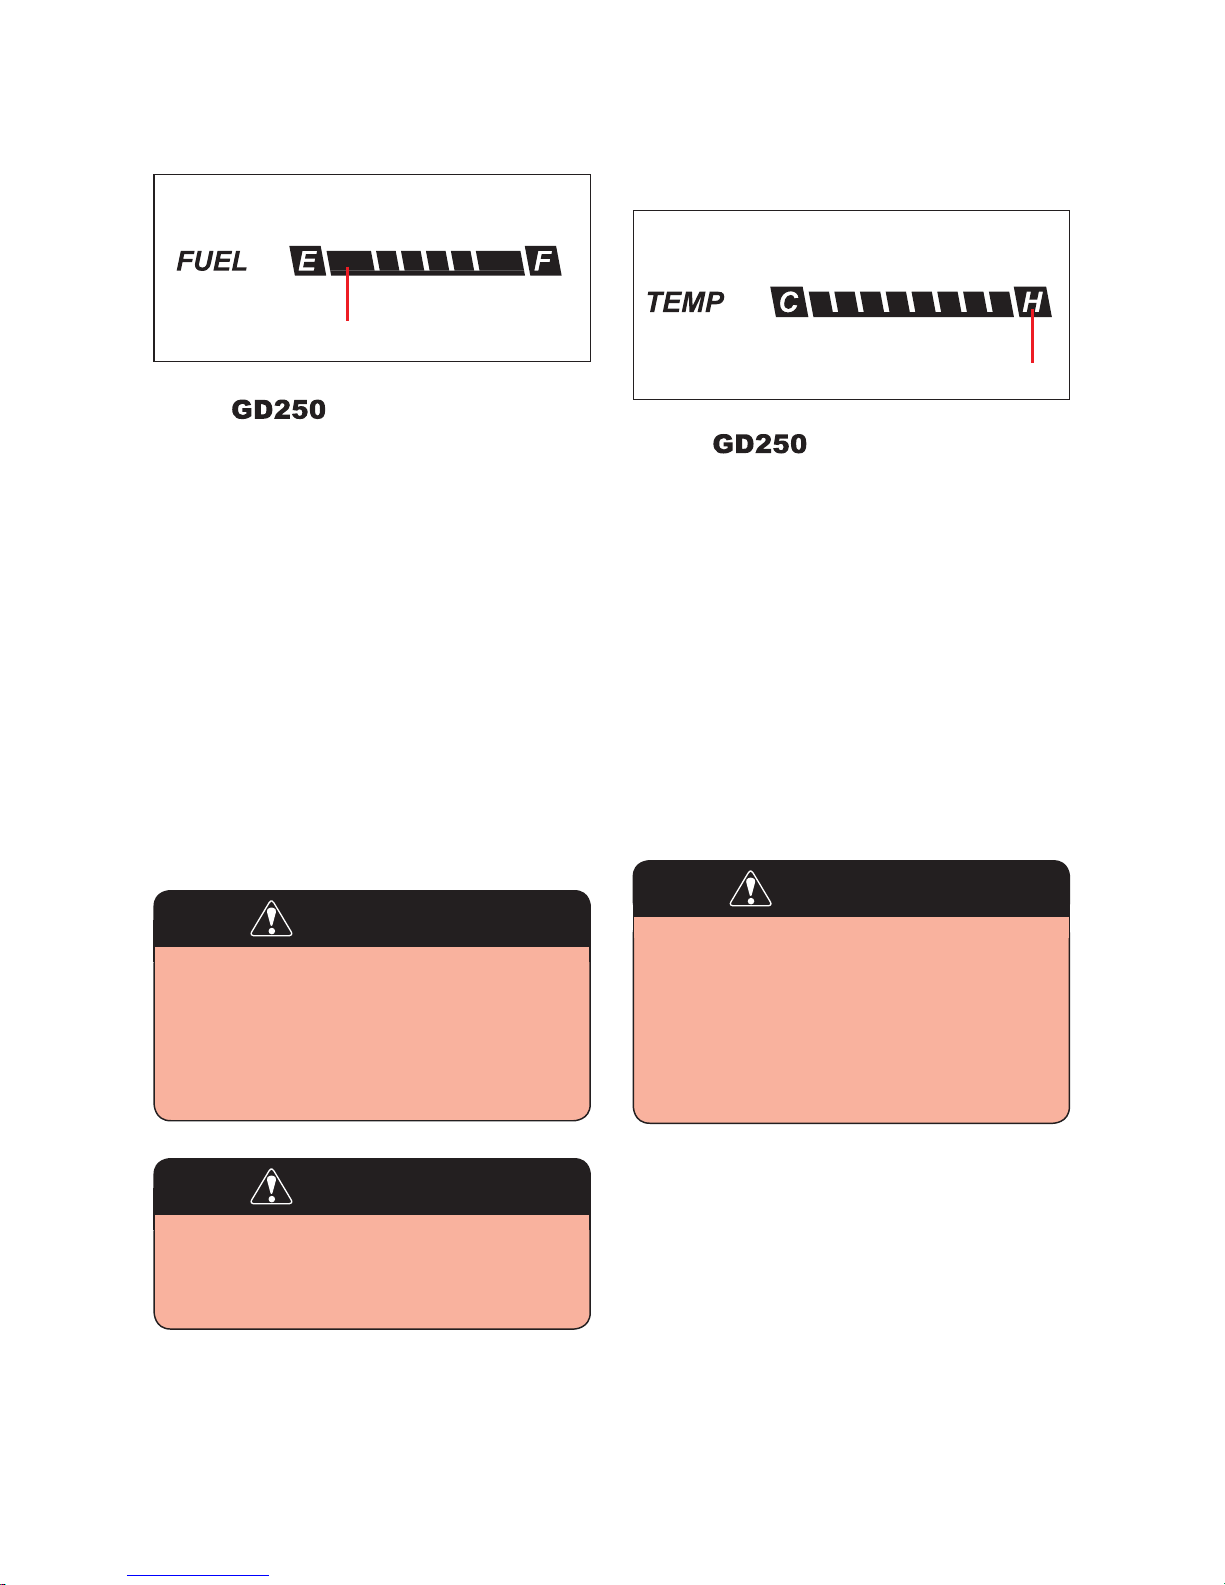
FUEL WARNING LAMP
The red fuel warning lamp will come on
when the fuel level in the fuel tank
becomes too low requiring fuel refilling.
The fuel tank capacity is 11.0 ℓ.
The fuel warning lamp comes on when
the remaining fuel is approximately 4.0 ℓ.
When it comes on, you should add fuel
as soon as possible.
Driving with the fuel warning lamp on or
with the fuel level below “E” can cause the
engine to misfire and damage the catalytic
converter.
CAUTION
Revving the engine into the black zone
of the tachometer can cause severe
engine damage.
Never allow the engine to rev into the
black zone of the tachometer in any
gear.
①
TACHOMETER
The tachometer indicates the engine
speed in revolutions per minutes (rpm).
CAUTION
Riding the motorcycle with the “FI”
check lamp lit after starting the engine
can damage the engine and
transmission.
Whenever the “FI” check lamp is lit
while riding, have your authorized
Hyosung dealer or a qualified
mechanic inspect the electric fuel
injection system as soon as possible.
③ “F I” (Fuel Injection) CHECK
LAMP
The “FI” check lamp ③ comes on and
remains lit when the ignition switch is set to
“ON” position with the engine stopped as a
test of injection system operation.
As soon as the engine starts, the “FI”
check lamp
③should go out.
If the fuel injection system fails, the “FI”
check lamp
③ comes on and remains lit.
CAUTION
If the “FI” check lamp does not come
on when the ignition switch is set to
“ON” position with the engine stopped
or fail to go out after the engine start,
contact an authorized Hyosung dealer.

25
N O T E
④
C OOLANT TEMPERATURE
WARNING LAMP
The red coolant temperature warning
lamp will come on when the coolant gets
too hot while operating.
When coolant temperature is higher than
113℃ (235.4℉), the coolant temperature
warning lamp comes on.
Operating the motorcycle while the
coolant temperature warning lamp is lit
can damage your motorcycle.
Continued operation of the motorcycle
with high engine coolant temperature
may result in engine damage or
premature wear.
If the coolant temperature warning lamp
comes on, stop the engine and allow it
to cool before restarting.
Refer to the note below.
● High engine speed, low vehicle
speeds, or heavy load can
increase engine coolant
temperature.
Decrease engine speed, reduce
load and select an appropriate
transmission gear to lower the
temperature.
● Debris or mud in front of the
engine or packed between the
radiator fins can reduce cooling
ability.
Remove any debris or mud
preventing air flow to the engine.
⑤ NEUTRAL INDICATOR LAMP
The green neutral indicator lamp will
come on when the transmission is in
neutral.
The lamp will go out when you shift into
any gear other than neutral.
⑥
H IGH BEAM INDICATOR
LAMP
The blue high beam indicator lamp will
come on when the head lamp high beam is
turned on.
⑦ T URN SIGNAL INDICATOR
LAMP
When the turn signals are being operated
either to the right or to the left, the green
indicator will flash at the same time.
CAUTION
26
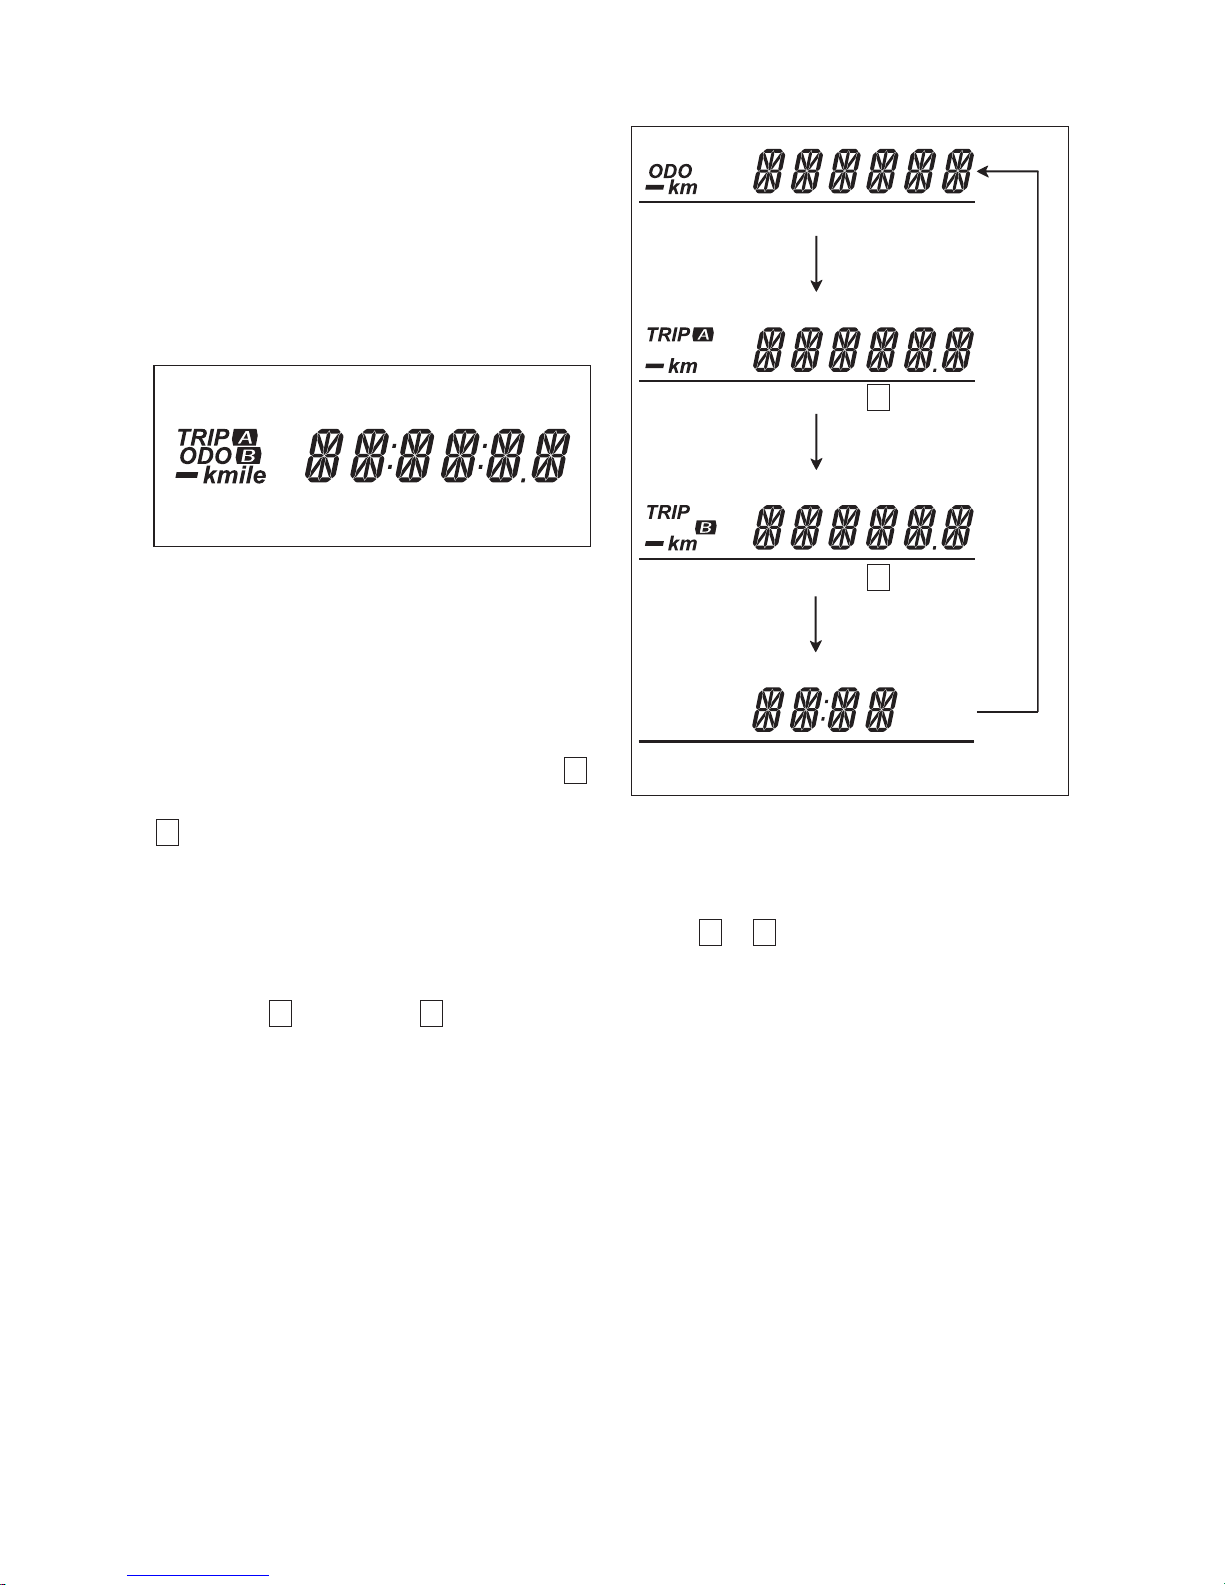
⑧ O DOMETER / TRIP METER
/ CLOCK
The display in it has four functions, the
odometer, two trip meters and clock.
The display changes the odometer, trip
meter or clock, as indicated before turning
the ignition switch off.
The odometer registers the total distance
that the motorcycle has been ridden.
The two trip meters are resettable
odometer.
They can register two kinds of distance at
the same time. For instance, trip meter
A
can register the trip distance and trip meter
B
can register the distance between fuel
stops.
To change the display, push the switch ⑬
(in the Normal mode) for 0.6 ~ 1 seconds
while the display indicates the odometer,
trip meter
A
,
trip meter
B
or clock you
want to change.
To reset the trip meter to zero, push the
switch ⑭(in the Normal mode) for 2
seconds while the display indicates trip
meter
A
or B you want to reset.
Odometer
Trip meter
A
Trip meter
B
Clock
27
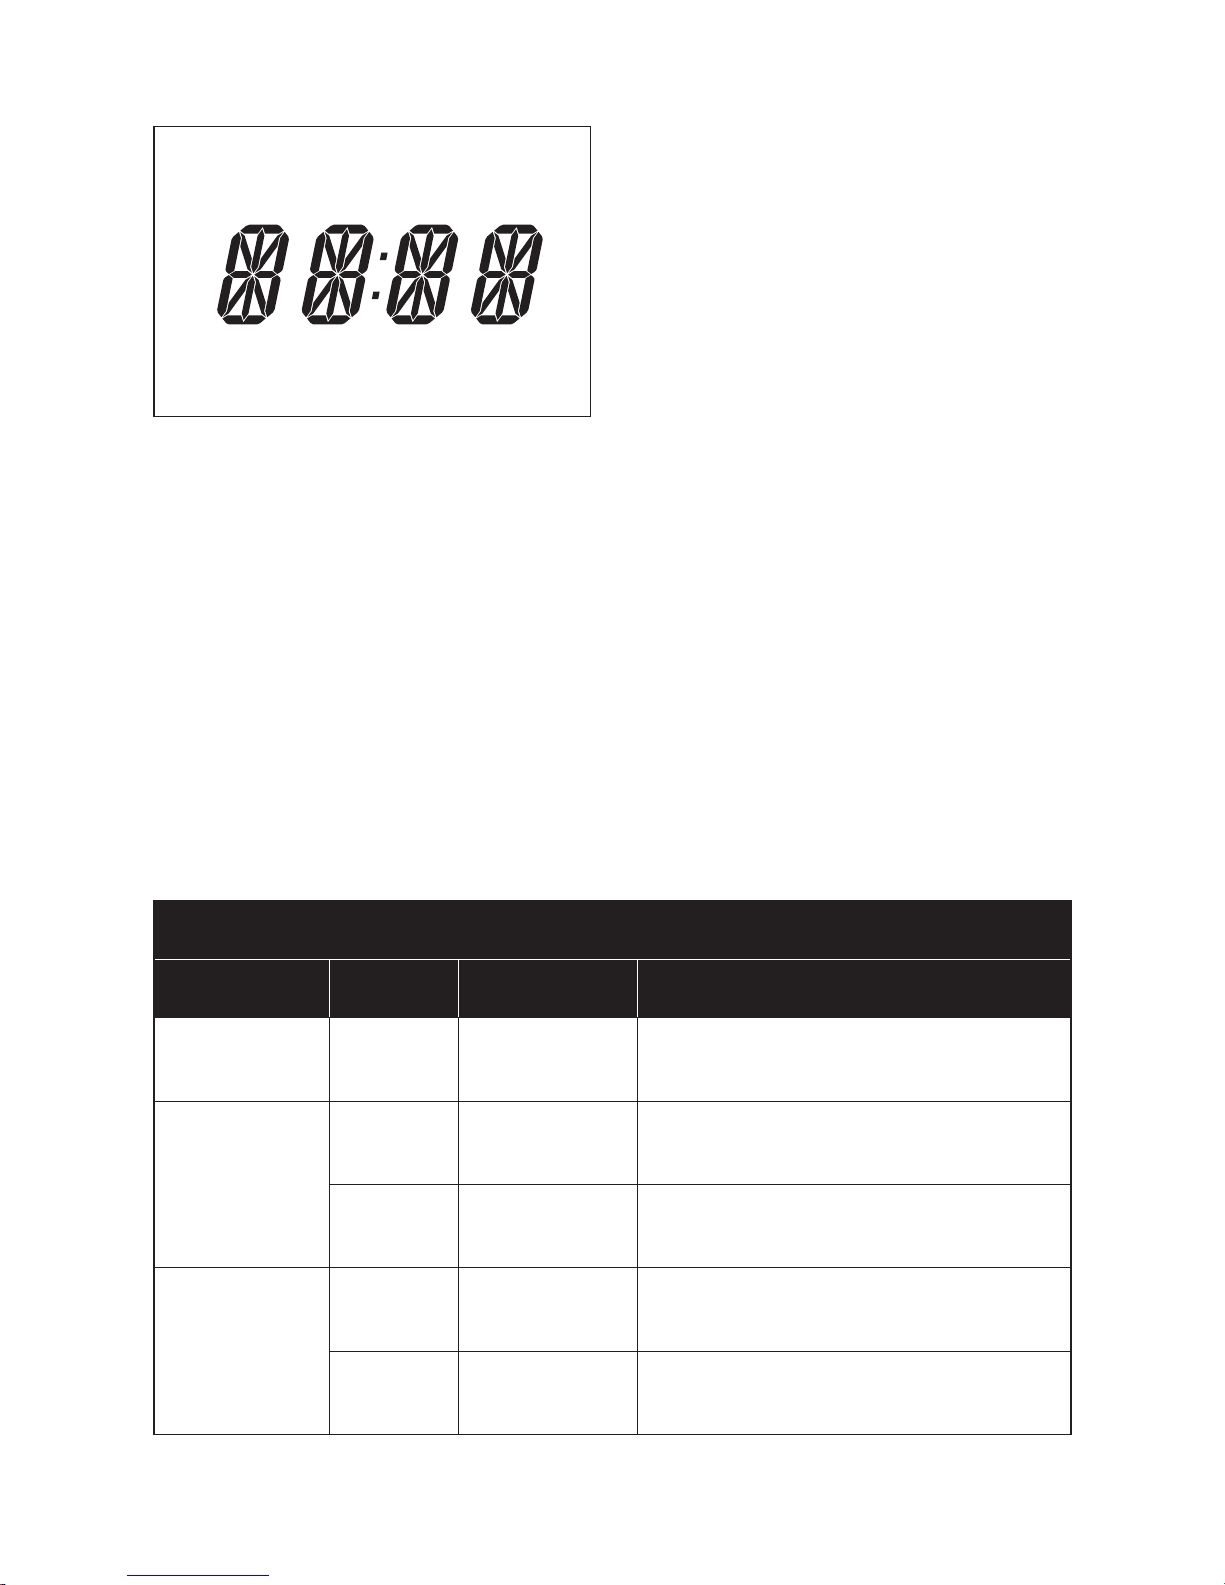
The clock indicates 12-hour mode.
Follow the procedure below to adjust the
clock.
1. Push the switch ⑬(in the Clock display
of the Normal mode) for 2 seconds until
the hour display blinks.
1. It is the Hour reset mode.
2. Adjust the hour display by pushing the
switch ⑭ (in the Hour reset mode) for
0.6 ~ 1 seconds.
3. To move to the 「Minutes reset mode」,
push the switch ⑬ (in the Hour reset
mode) for 0.6 ~ 1 seconds.
CLOCK ADJUSTMENT
Mode Switch Push it for Adjustment
Normal Select (⑬) 2 seconds
Normal mode(in Clock display) →
Hour reset mode
Hour
reset mode
Reset (⑭
)
0.6 ~ 1 seconds Increase the Hour of clock
Select (⑬) 0.6 ~ 1 seconds Hour reset mode → Minutes reset mode
Minutes
reset mode
Reset (⑭) 0.6 ~ 1 seconds Increase the Minutes of clock
Select (⑬) 2 seconds
Minutes reset mode →
Normal mode(Clock display)
4. Adjust the minutes display by pushing the
switch ⑭(in the Minutes reset mode) for
0.6 ~ 1 seconds.
5. Push the switch ⑬ (in the Minutes reset
mode) for 2 seconds to resume as the
Clock display of the Normal mode.
28
⑨
FUEL METER
The 『 』’s fuel meter is LCD
(Liquid Crystal Display) type, it indicates
the remaining fuel amount in the fuel tank.
The fuel meter displays all 6 segments
when the fuel tank is full.
[ The “F”(Full) mark indicates the fuel tank
is full.]
The “E”(Empty) mark indicates the fuel
tank is empty or nearly so.
When the remaining fuel is approximately
4.0
ℓ,
the indicator Ⓐ of the last column
blinks only.
Fill the fuel tank before the indicator Ⓐ of
the last column blinks only.
The fuel tank capacity is 11.0 ℓ.
The『
』’s coolant temperature
meter is LCD (Liquid Crystal Display) type,
it indicates the coolant temperature.
The coolant temperature meter displays
all 9 segments when the coolant
temperature is hot.
[ The “H”(Hot) mark indicates the coolant
temperature is hot.]
When the coolant temperature is higher
than 113℃(235.4℉), the “H” (Hot) mark Ⓑ
blinks.
The “C”(Cool) mark indicates the coolant
temperature is cool.
CAUTION
Running the engine with high engine
coolant temperature can cause serious
engine damage.
If the “H” mark Ⓑ on the engine
coolant temperature meter blinks, stop
the engine to let it cool.
CAUTION
Before the indicator Ⓐ of the last
column blinks only, you should add
fuel to the fuel tank at the first
opportunity to avoid running out of
fuel.
CAUTION
For checking the fuel meter, hold the
motorcycle vertically and the ignition
switch “ON”.
⑩ C OOLANT TEMPERATURE
METER
Ⓐ
Ⓑ
29
WARNING
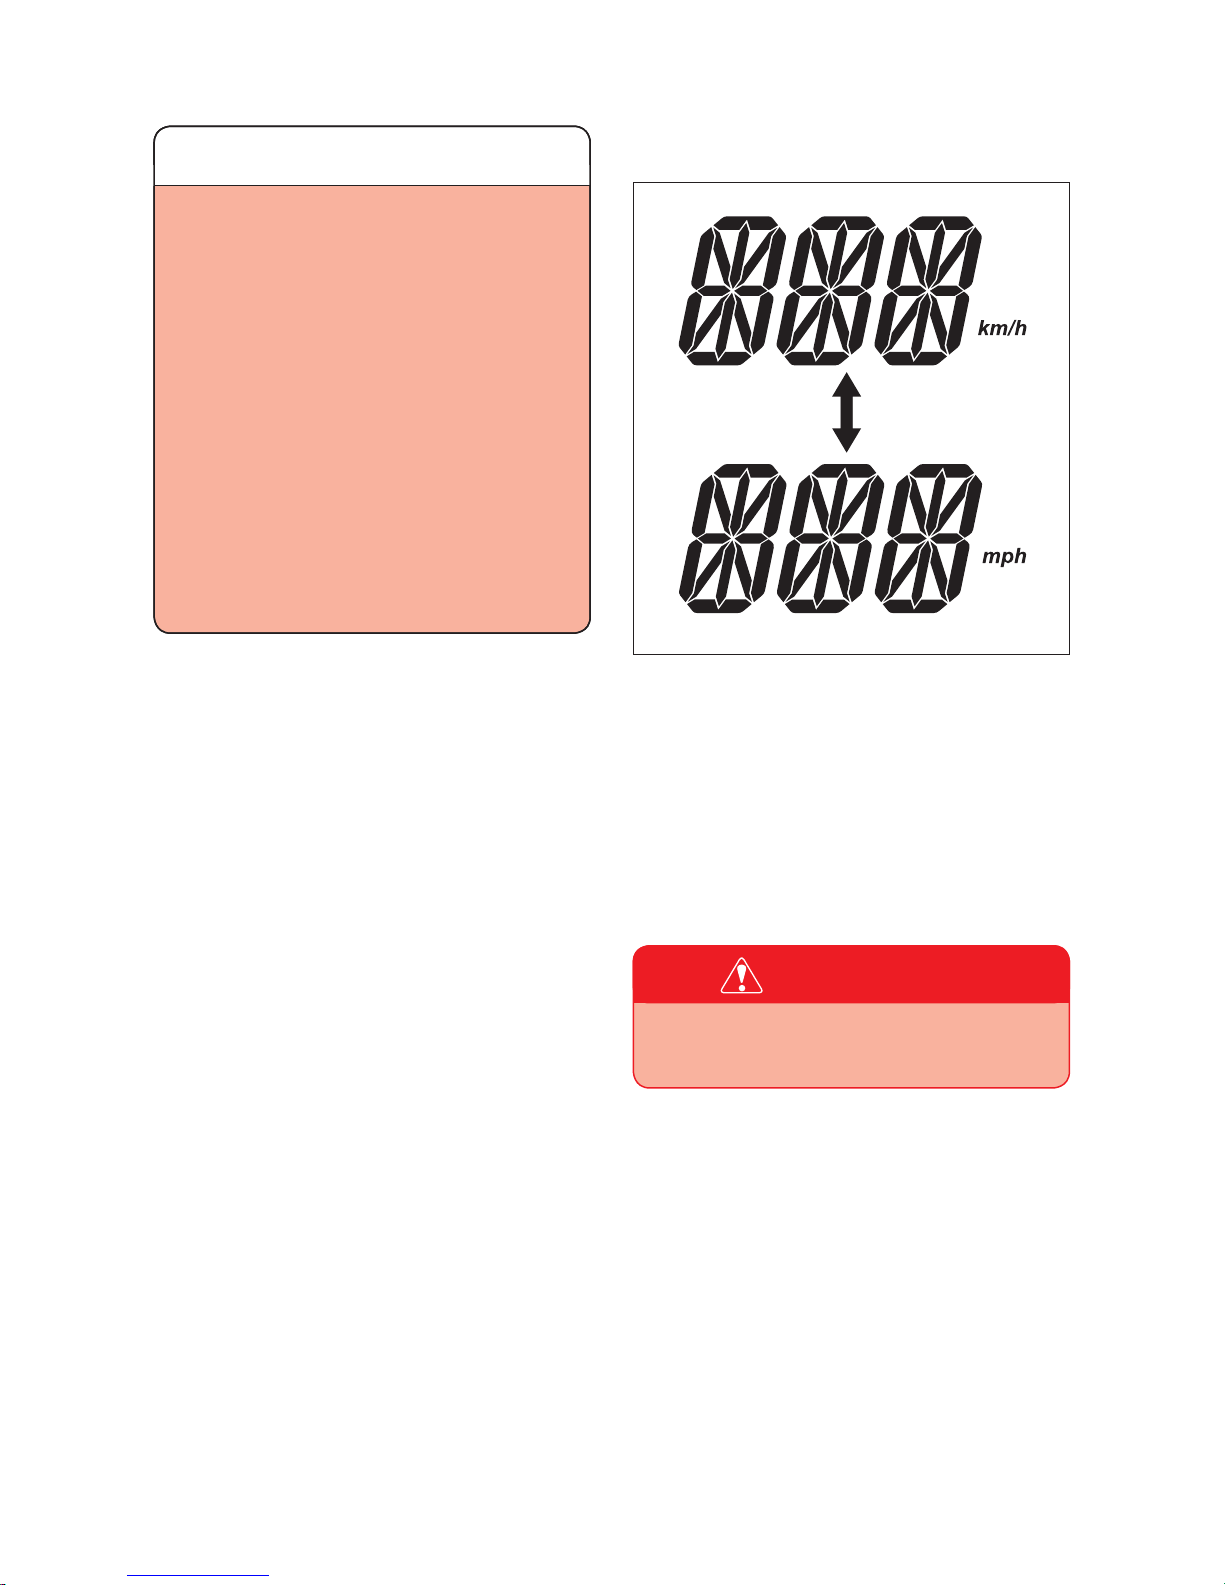
⑪ SPEEDOMETER
The speedometer indicates the road
speed in kilometers or miles per hour.
To change the speedometer display :
Pushing the switch ⑬ (in the Normal
mode), turn the igniton switch to the “ON”
position from the “OFF” position and keep
for 5 second.
Obey the speed limit and traffic
regulation at all times.
N O T E
● High engine speed, low vehicle
speeds, or heavy load can
increase engine coolant
temperature.
Decrease engine speed, reduce
load and select an appropriate
transmission gear to lower the
temperature.
● Debris or mud in front of the
engine or packed between the
radiator fins can reduce cooling
ability.
Remove any debris or mud
preventing air flow to the engine.
 Loading...