


1 / 14
www.hyndsightvision.com
Made in China for Hyndsight Vision Systems, Inc.
2017-1-7
WARRANTY
This Limited Product Warranty shall apply to Hyndsight Vision Systems, Inc. products including all accessories as
contained within the original package. Hyndsight Vision Systems, Inc. warrants that products from its authorized
distributors and retailers will meet the applicable product specifications and be free from all defects in material and
workmanship during the Limited Product Warranty Period, one year starting from the date of original purchase,
assuming the products are used in accordance with the user manual and other documentation provided at the time of
purchase. This Limited Product Warranty is subject to the following terms and conditions:
1. To obtain warranty service, a proof of purchase in the form of an original or copy of the sales receipt from the original
retailer is required.
2. This Limited Product Warranty is only valid and enforceable in the country/region where the product is sold.

2 / 14
www.hyndsightvision.com
Made in China for Hyndsight Vision Systems, Inc.
2017-1-7
3. This Limited Product Warranty is at sole option of Hyndsight Vision Systems, Inc. to either repair or replace the
defective product during the Limited Product Warranty Period. Hyndsight Vision Systems, Inc. will not replace missing
components from any package purchased through online auctions.
4. To obtain warranty service, contact your local Hyndsight Vision Systems, Inc. authorized retailer or
Hyndsight Vision Systems, Inc. for shipping instructions and an RMA number.
5. This Limited Product Warranty covers expenses for inspecting and repairing the product during the
Limited Product Warranty Period. The defective product shall be delivered by the purchaser at his/her own
expense to the designated premises together with the proof of purchase and RMA number.
6. Hyndsight Vision Systems, Inc. will return the repaired or replaced product to the drop-zone for collection
by the customer in good working condition. All replaced faulty products or components will become
property of Hyndsight Vision Systems, Inc..
7. If Hyndsight Vision Systems, Inc. repairs or replaces the product, the repaired or replaced product shall
continue to be warrantied for the remaining time of the original warranty period or for three (3) months
from date of repair or replacement, whichever is longer.
8. Hyndsight Vision Systems, Inc. reserves the right to add, delete, or amend the terms and conditions at any
time without prior notice on its website, www.hyndsightvision.com.
9. A two (2) year warranty is extended to the Flush Mount, as well as to all purchases made in the United
Kindgom.
10. This limited warranty shall not apply if the damage was caused by any of the following:
a. The product serial number has been removed, erased, defaces, altered, or is illegible.
b. The damage resulting from the use of the product in a manner other than its normal and customary
manner.
c. Deterioration of the product due to normal wear and tear.
d. The damage arising from improper installation, unauthorized repair, alteration, or modification to this
product by third parties other than Hyndsight Vision Systems, Inc. or its designee.
e. The damage arising from operation with components or accessories not officially authorized or provided
by Hyndsight Vision Systems, Inc. or used in ways other than its intended use.
f. The damage arising from exposure to abnormally corrosive conditions or operation with extreme
heat/cold or humidity.

3 / 14
www.hyndsightvision.com
Made in China for Hyndsight Vision Systems, Inc.
2017-1-7
TABLE OF CONTENTS
Warranty ................................................................................................1-2
Product Specifications ...........................................................................3
Intended Use .........................................................................................3
Important Safety Notice ........................................................................3-4
Caution ..................................................................................................4
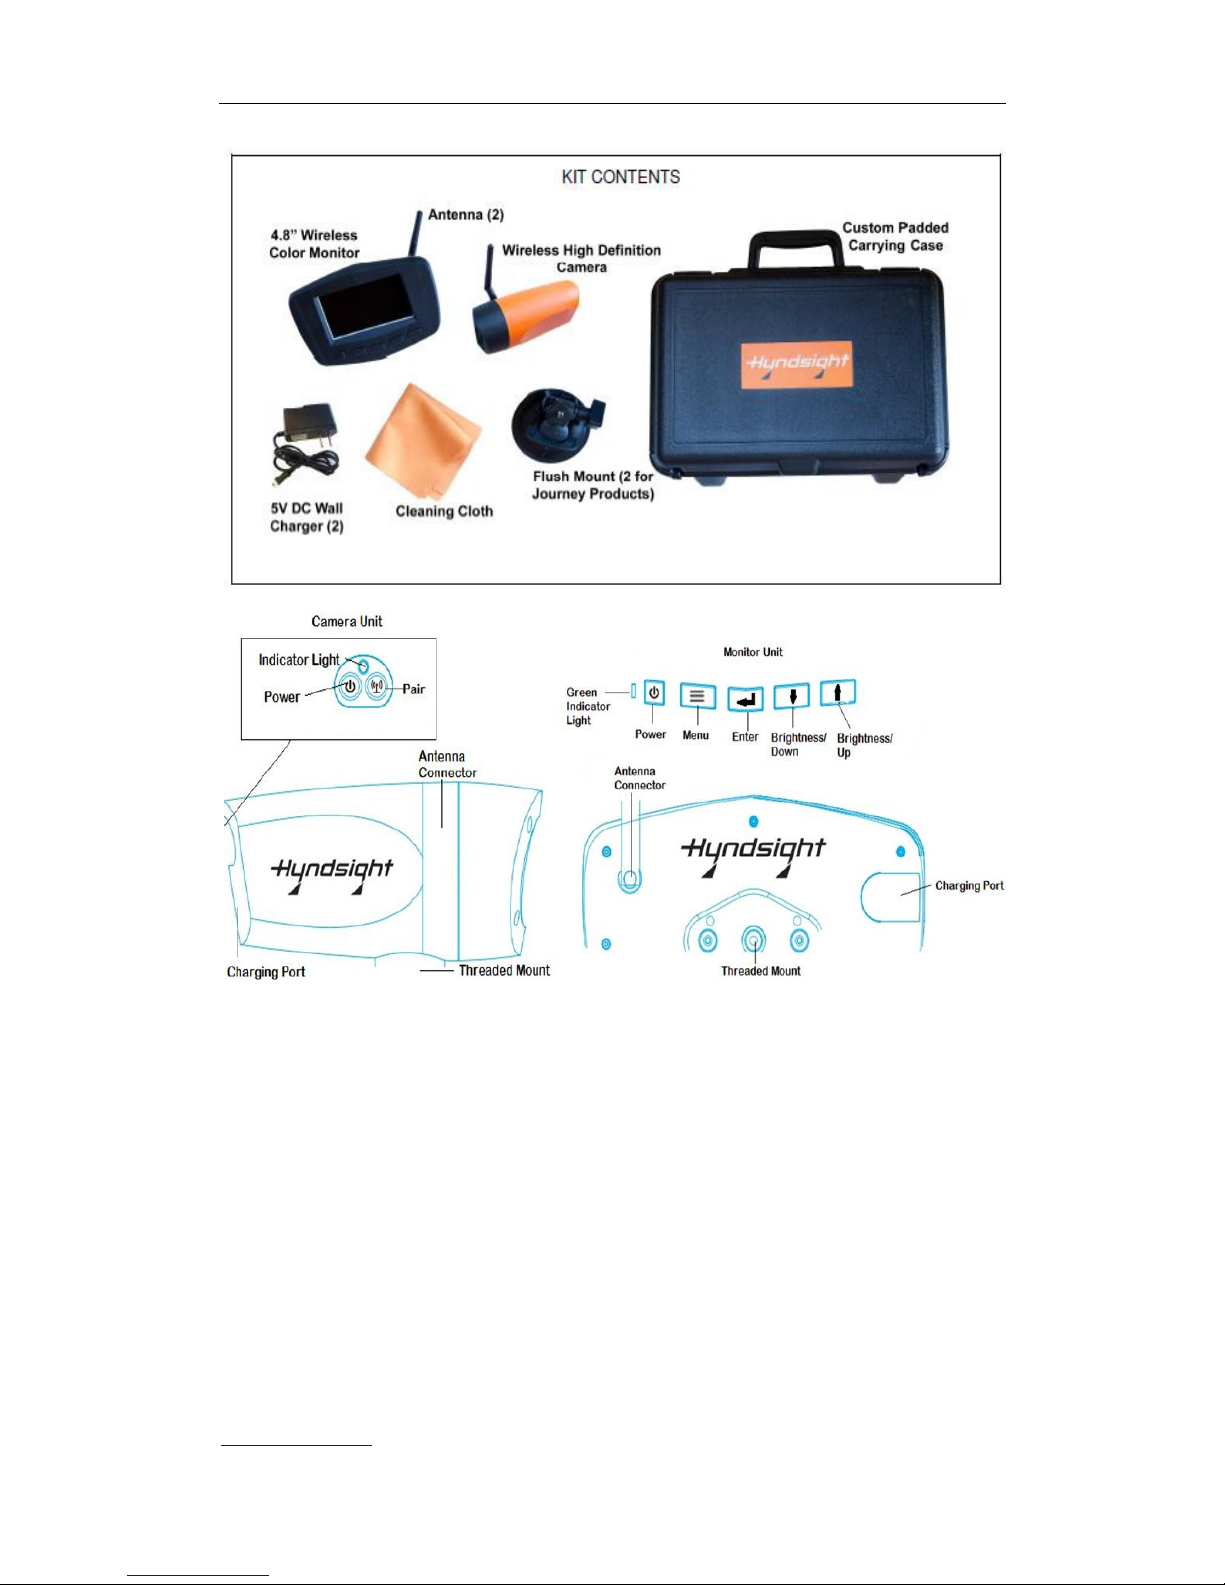
Kit Contents ...........................................................................................5
Troubleshooting .....................................................................................6
Charging .................................................................................................6-7
Single Camera Set-Up ............................................................................7
Monitor Set-Up……………………………………………………………………………7-13.
Compliance Information……………………………………………………………………………….13-14
PRODUCT SPECIFICATIONS
Transmission Frequency: 2.4 GHz
Unobstructed Effective Range: up to 300 ft.
Power Supply Input, per adapter: 100-240 V AC 50/60 Hz 0.4A
Power Supply Output, per adapter: 5V DC 2.0A
Monitor (CRUZ & Journey 1) - 5.0" sunlight-readable display (4.8" viewable)
Monitor (Journey 2) - 4.8" TFT LCD
Camera (CRUZ) - Tight Angle Lens
Camera (Journey 1 & 2) - Wide Angle Lens
Screen Resolution: 800x480
Real time video stream for recording function
Style and color may vary
INTENDED USE
Hyndsight Vision Systems wireless cameras and monitors are to be used as an aid for
visualizing blind spot conditions or for monitoring locations not always in clear sight. Use of
your own common sense and judgment is always indicated before and during use of this
product. Hyndsight is not responsible for accidents of actions that result under use of this
product
IMPORTANT SAFETY NOTICE
Program you settings before you operate any vehicle.
Do not program product while driving or while in motion. When adjusting settings, stop in a safe and legal
manner before doing such operations.
Hyndsight Vision Systems, Inc. products are designed for use in outdoor activities. While using your
Hyndsight product, safety rules must be followed to prevent accidents that can result in injury or death to
yourself and/or others.
Distractions can be dangerous and result in an accident in which you or others could be injured. Please do
not solely rely on screen image alone. No technology is a replacement for your attentiveness.

4 / 14
www.hyndsightvision.com
Made in China for Hyndsight Vision Systems, Inc.
2017-1-7
Do not disassemble the Camera or Monitor.
Do not attempt to remove the internal, non-replaceable battery in the Camera or the Monitor. Do not expose
the product to abnormal conditions such as extreme heat or humidity or prolonged sun exposure.
When disposing of the unit, have the batteries removed and recycled by a professional waste electronics
treatment provider.
Do not use paint thinner or rubbing alcohol to clean unit.
Do not subject unit to strong impact. Do prevent the Camera and Monitor from falling.
Do not submerge the Camera or Monitor in water. Do not subject unit to prolonged exposure to rain, snow,
and other outside environments.
Do charge the units indoors in dry conditions. Do not charge the units around water or during rain when
unit is installed outdoors. Doing so may cause electrical shock and/or injury to you or the device.
Sunglasses with polarized lenses may impair the visibility of the display.
This monitor is not intended to be used as a medical monitor and its use should not replace proper adult
supervision. You should check your child’s activity at regular intervals as this monitor will not alert parents
to the silent activities of a child.
Strangulation Hazard - Children have STRANGLED in cords. Keep cords out of reach of children.
CAUTION
In order to prevent improper operation of the AC Adaptor, please read the user manual carefully. For your
safety, please use only the AC Adaptor provided. The manufacturer will not be responsible for any losses
caused by converters and chargers not provided by the manufacturer. IMPORTANT Please use only the
socket match with the AC Adaptor. Use of improper socket may cause electrical and fire damage. Only
charge the Camera and Monitor in dry environments. Charging the Camera and/or Monitor in the rain or in
a wet environment may cause electrical shock, fire, personal injury and/or product destruction. Improper
use of the Camera and/or Monitor and accessories will void the warranty.
5 / 14
www.hyndsightvision.com
Made in China for Hyndsight Vision Systems, Inc.
2017-1-7
FLUSH BRACKET MOUNTING
To attach the Camera or Monitor to the desired smooth, clean, flat, non-porous surface, follow the instructions below.
Note: The mounting surface and the Suction Cup should be clean and dry. Wipe with a clean, damp cloth and let dry
completely. The Flush Mount should be installed at room temperature (avoid extreme heat or cold). Do not moisten the
Suction Cup.
_ Thoroughly clean the smooth, flat, non-porous surface, making sure the surface is dry and free of scratches.
_ Twist the Camera or Monitor onto the flush mount's threaded mounting stud. Do not remove the Rubber Washer.
_ Hold the Camera in place and firmly tighten the Lock Ring.
_ Position the Suction Cup Lever in the "down" position.
_ Position the Suction Cup on your mounting area. In order to remove the Flush mount easily, HVS recommends that the
Suction cup Release Tab be at the bottom of the installation area.
_ Push the Suction Cup firmly against the mounting surface (the Suction Cup Lever should be in the "down" position).
Press the Suction Cup Button and pull the Suction Cup Lever up and over the Button. You will feel the Button move out
during this procedure; this action locks the Suction Cup into place.

6 / 14
www.hyndsightvision.com
Made in China for Hyndsight Vision Systems, Inc.
2017-1-7
_ Loosen the Flush Mount Adjusting Knob, position the Camera or Monitor, and then retighten the Adjusting Knob.
_ Check the Camera's position as necessary by loosening the Adjusting Knob. Tighten securely when in position.
_ To release the Suction Cup, move the Suction Cup Lever back into its "down" position. Lift the Suction Cup Release Tab
to help break the hold.
TROUBLESHOOTING
For screen shots and instruction videos, please visit our website at www.hyndsightvision.com or check out our YouTube
page.
A digital copy of the instruction manual can be found at www.hyndsightvision.com
CHARGING
Fully charge both devices before using.
To Charge Your Hyndsight System
Connect the USB cable to the Wall Charger.
Insert the straight jack into the Camera/Monitor.
Plug in the Wall Charger.
Red light appears when charging. Red light turns off when charge is complete (3-4 hours).
Hyndsight Systems are equipped with multiple functions depending upon if Multi-Camera mode is
Disabled (only one camera can be used) or Enabled (more than one camera can be used).
SINGLE CAMERA SET-UP
Remove the protective screen cover from the Monitor before using. HVS recommends pairing Cameras before mounting
them to desired surfaces. Using your best judgment, attach Camera and Monitor Antennas either before or after mounting
Devices to desired surfaces. Note: Unpair, Select, and Scan settings are disabled in Single Camera mode.

7 / 14
www.hyndsightvision.com
Made in China for Hyndsight Vision Systems, Inc.
2017-1-7
To Power on* Your Hyndsight System
Hold Monitor Power button for 3-4 seconds until the orange Hyndsight screen appears.
Green Indicator Light will light up to show Monitor is on.
Hold Camera Power button for 3-4 seconds. An image will appear on the Monitor after you release the Power button.
Indicator Light will illuminate to show Camera is on.
*Always power up Monitor before Camera to help sync automatically. If Camera and Monitor do not sync automatically,
follow the steps below:
Press the Menu button.
Scroll to Pair using or.
Select Pair by hitting the Enter button.
Monitor screen will go white and the Green Indicator Light will flash.
While Monitor's Green Indicator Light is flashing, press the Pair button on Camera and an image will appear on Monitor.
Monitor Set-Up
1.ICON/ Button
1. 2. 3. 4. 5. 6. 7. 8.
10 11. 12. 13. 14. 9. 15.
1. Signal intensity 2. Current use lens number 3. Memory card 4. Image
5. Monitor recording 6. Camera recording 7. Monitor battery energy display
8. Camera battery energy display 9. Current date time
10. Power indicator light 11. Power switch button 12. Menu button
13. Confirm / enlarge butto 1 4. record /down button 15. Preview / up button
2.Special note
1. Arrow button Choose the left main menu options after the confirmation button to
confirm. The sub menu settings, use the arrow button to choose the left ( ), after the
confirmation button to confirm option settings accordingly
2. Menu button, after entering the option, this key is used to exit and return to the previous
layer

8 / 14
www.hyndsightvision.com
Made in China for Hyndsight Vision Systems, Inc.
2017-1-7
Main menu:
1. Sub menu:
1.1. Pair
Matching options
Choice pair pair cam1-cam4 ;
Remark:
Camera number display color description
Paired numbers show red Unpaired number display white;
Show red, can not be selected to match. Can only be selected in the submenu UNPIR delete,
can be selected to match.
1.2. UNPIR
Delete selected camera
Choice pair UNPIR cam1-cam4 ;

9 / 14
www.hyndsightvision.com
Made in China for Hyndsight Vision Systems, Inc.
2017-1-7
Remarks
Camera number display color description
Number display red representation is also shown to be matched, non book except;
Number display white, can be deleted;
1.3 WAKE CAM
Select camera power saving mode
Choice pair WAKE CAM cam1-cam4 ON/OFF;
Remarks
Working mode ON; Sleep mode OFF;
Camera number display color description
Number display red, that can not be selected to set;
Number display white, that can be selected to set;

10 / 14
www.hyndsightvision.com
Made in China for Hyndsight Vision Systems, Inc.
2017-1-7
1.4 SETECT CAM
Select camera view
Choice pair SETECT CAM cam1-cam4
Remarks
Camera number display color description
The number shows red, indicating no choice;
Number display white, indicating that you can choose;
2. SCAN
Start scan
Choice SCAN ON/OFF
3.MIRROR
Start mirror
Choice mirror ON/OFF
4.PLAY

11 / 14
www.hyndsightvision.com
Made in China for Hyndsight Vision Systems, Inc.
2017-1-7
Start play
Choice play
Press key to pause 1 times, and then press this key to continue playing;
When playing, press the arrow button to rewind the tape (-X1, -X2….; Press the
arrow button to fast forward X,X….;
Press the menu button to play, stop, press the power button , return to the
top or exit
5.RECORD
Start record
Choice record
5.1 rec setup Monitor
Start Monitor
Choice record Monitor
Choice rec setup off/on
Set to open or close the recording;
5.2 rx over write

12 / 14
www.hyndsightvision.com
Made in China for Hyndsight Vision Systems, Inc.
2017-1-7
Start rx over write
Choice rx over write off/on
When the memory card space is insufficient to cover the original record;
5.3 rx fomrat
Start rx format
Choice rx fomrat off/on
Data formatting or delete record;s
6. rec setup camera
Start camera
Choice record camera
'
6.1 rec setup camera
Start rec setup
Choice rec setup on/off
Set to open or close the recording;
6.2 tx over write
Start tx over write
Choice rx over write on/off
When the memory card space is insufficient to cover the original record;
6.3 tx format
Start rx format
Choice rx fomrat on/off
Data formatting or delete records;
7. BRIGHT
Start bright
Choice bright
Brightness adjustment, through the arrow keys to adjust the brightness level

13 / 14
www.hyndsightvision.com
Made in China for Hyndsight Vision Systems, Inc.
2017-1-7
8.TIME
Start time
Choice time
Time and date adjustment, set by arrow;
9.ZOOM
Start zoom
Choice zoom
Mage magnification, through the arrow keys select amplifier series, (X1, X1.5, X2);
Compliance Information
USA
This device complies with Part 15 of the FCC Rules. Operation is subject to the
following two conditions: (1) this device may not cause harmful interference, and
(2) this device must accept any interference received, including interference that
may cause undesired operation. Note: This equipment has been tested and found
to comply with the limits for a Class B digital device, pursuant to part 15 of the FCC
Rules. These limits are designed to provide reasonable protection against harmful
interference in a residential installation. This equipment generates uses and can
radiate radio frequency energy and, if not installed and used in accordance with
the instructions, may cause harmful interference to radio communications.
However, there is no guarantee that interference will not occur in a particular
installation. If this equipment does cause harmful interference to radio or

14 / 14
www.hyndsightvision.com
Made in China for Hyndsight Vision Systems, Inc.
2017-1-7
television reception, which can be determined by turning the equipment off and
on, the user is encouraged to try to correct the interference by one or more of the
following measures:
• Reorient or relocate the receiving antenna.
• )ncrease the separation between the equipment and receiver.
• Connect the equipment into an outlet on a circuit different from that to
which the receiver is connected.
• Consult the dealer or an experienced radio/TV technician for help.
Any Changes or modifications not expressly approved by the party
responsible for compliance could void the user’s authority to operate the
equipment.
This equipment complies with FCC radiation exposure limits set forth for an
uncontrolled environment. This equipment should be installed and operated with
minimum distance 20cm between the radiator& your body. This transmitter must
not be co-located or operating in conjunction with any other antenna or
transmitter.
Canada
Operation is subject to the following two conditions:
(1) This device may not cause interference, and (2) this device must accept
any interference, including interference that may cause undesired operation of the
device.
L’exploitation est
autorisée aux deux
conditions suivantes: l’appareil ne doit pas produire de brouillage, et
l’utilisateur de l’appareil doit accepter tout brouillage radioélectrique subi, même
si le brouillage est susceptible d’en compromettre le fonctionnement.
Under ISEDC regulations, this radio transmitter may only operate using an antenna of a type
and maximum (or lesser) gain
approved for the transmitter by ISEDC. To
reduce potential radio interference to other users
, the antenna type and its gain
should be so chosen that the equivalent isotropically radiated power (e.i.r.p.) is not more than that
necessary for successful
communication.
Conformément á la réglementation ISEDC, le présent émetteur radio peut fonctionner avec u
ne antenne d’un type d’un
gain maximal (ou inférieur) approuvé pour l’émetteu
r par lSEDC. Dans le but de réduire les risques de brouillage
radioélectrique á l’intention des autres utilisateurs, il faut choisir le type d’antenne et son gain d
e sorte que la puissance isotrope
rayonnée équivalente (p.i.r.e) ne dépasse pas l’int
ensité nécessaire á l’établissement d’une communica
tion satisfaisante.
CAN ICES-3 (B) / NMB-3 (B)
 Loading...