


USER MANUAL
Vision Systems
CAPTURE
TM

CAPTURE EVERY MOMENT

3
TABLE OF CONTENTS
INTENDED USE
SAFETY
CAUTION
CARE INSTRUCTIONS
KIT CONTENTS
OVERVIEW
CHARGING
SINGLE CAMERA SET-UP
POWER ON
DATE & TIME
IRROR IMAGE VIEW
BRIGHTNESS & NIGHT MODE
ZOOM
RECORD (MONITOR, CAMERA)
WAKE CAMERA
VIEW (MONITOR, CAMERA)
DELETE FROM MONITOR
MULTI-CAMERA SET-UP
PAIR ADDITIONAL CAMERAS
UNPAIR
SELECT CAMERA
SCAN
RECORD
POWER OFF
FLUSH BRACKET MOUNTING
TROUBLESHOOTING
PRODUCT SPECIFICATIONS & WARRANTY
4
5
6
7
8
9
10
11
11
12
12
13
13
14
16
17
18
19
19
19
20
20
21
21
22
23
24

4
INTENDED USE
Hyndsight Vision Systems, Inc. wireless cameras and monitors are to be used as an aid for visualizing blind spot conditions
or for monitoring locations not always in clear sight. CAPTURE cameras have a memory card slot, and the monitor has builtin memory allowing the user to record events. Use of your own common sense and best judgment is always necessary both
before and during use of this product. Hyndsight Vision Systems, Inc. is not responsible for accidents of actions that result
under use of this product.

5
IMPORTANT SAFETY NOTICE
Program your settings before you operate any vehicle. Do not program product while driving or while in motion. When
adjusting settings, stop in a safe and legal manner before doing such operations. Hyndsight Vision Systems, Inc. products
are designed for use in outdoor activities. While using your Hyndsight product, safety rules must be followed to prevent
accidents that can result in injury or death to yourself and/or others. Distractions can be dangerous and result in an accident
in which you or others could be injured. Please do not solely rely on screen image alone. No technology is a replacement
for your attentiveness. Do not disassemble the Camera or Monitor; doing so will void warranty. Do not attempt to remove
the internal, non-replaceable battery in the Camera or the Monitor; doing so will void warranty. Do not expose the product
to abnormal conditions such as extreme heat or humidity or prolonged sun exposure. When disposing of the unit, have
the batteries removed and recycled by a professional waste electronics treatment provider. Do not subject unit to strong
impact. Do prevent the Camera and Monitor from falling. Do not submerge the Camera or Monitor in water. Though Camera
and Monitor are buoyant, they are not life saving devices and are not guaranteed to float when mounting brackets are attached. Hyndsight Vision Systems, Inc. is not responsible for loss or damage due to mounting bracket failure. Do not subject
unit to prolonged exposure to rain, snow, and other outside environments. Do charge the units indoors in dry conditions. Do
not charge the units around water or during rain when unit is installed outdoors. Doing so may cause electrical shock and/or
injury to you and/or the device. Sunglasses with polarized lenses may impair the visibility of the display. This monitor is not
intended to be used as a medical monitor and its use should not replace proper adult supervision. You should check your
child’s activity at regular intervals as this monitor will not alert parents to the silent activities of a child. Strangulation Hazard
- Children have strangled in cords. Keep cords out of reach of children.

6
CAUTION
In order to prevent improper operation of the AC Adaptor, please read the user manual carefully. For your safety, please use
only the AC Adaptor provided. The manufacturer will not be responsible for any losses caused by converters and chargers
not provided by the manufacturer. IMPORTANT Please use only the socket match with the AC Adaptor. Use of improper
socket may cause electrical and fire damage. Only charge the Camera and Monitor in dry environments.
Charging the Camera and/or Monitor in the rain or in a wet environment may cause electrical shock, fire, personal injury and/
or product destruction. Improper use of the Camera and/or Monitor and accessories will void the warranty.

7
CARE INSTRUCTIONS
• If wet, dry unit completely before putting away.
• If unit is exposed to salt water, rinse with clean water and allow to dry completely before putting away.
• Make certain charging ports are securely sealed before exposing camera or monitor to water, snow,
and other precipitation.
• Do not use paint thinner or rubbing alcohol to clean unit.
• Store at room temperature in a dry environment out of direct sunlight to maximize the life of the product.
8
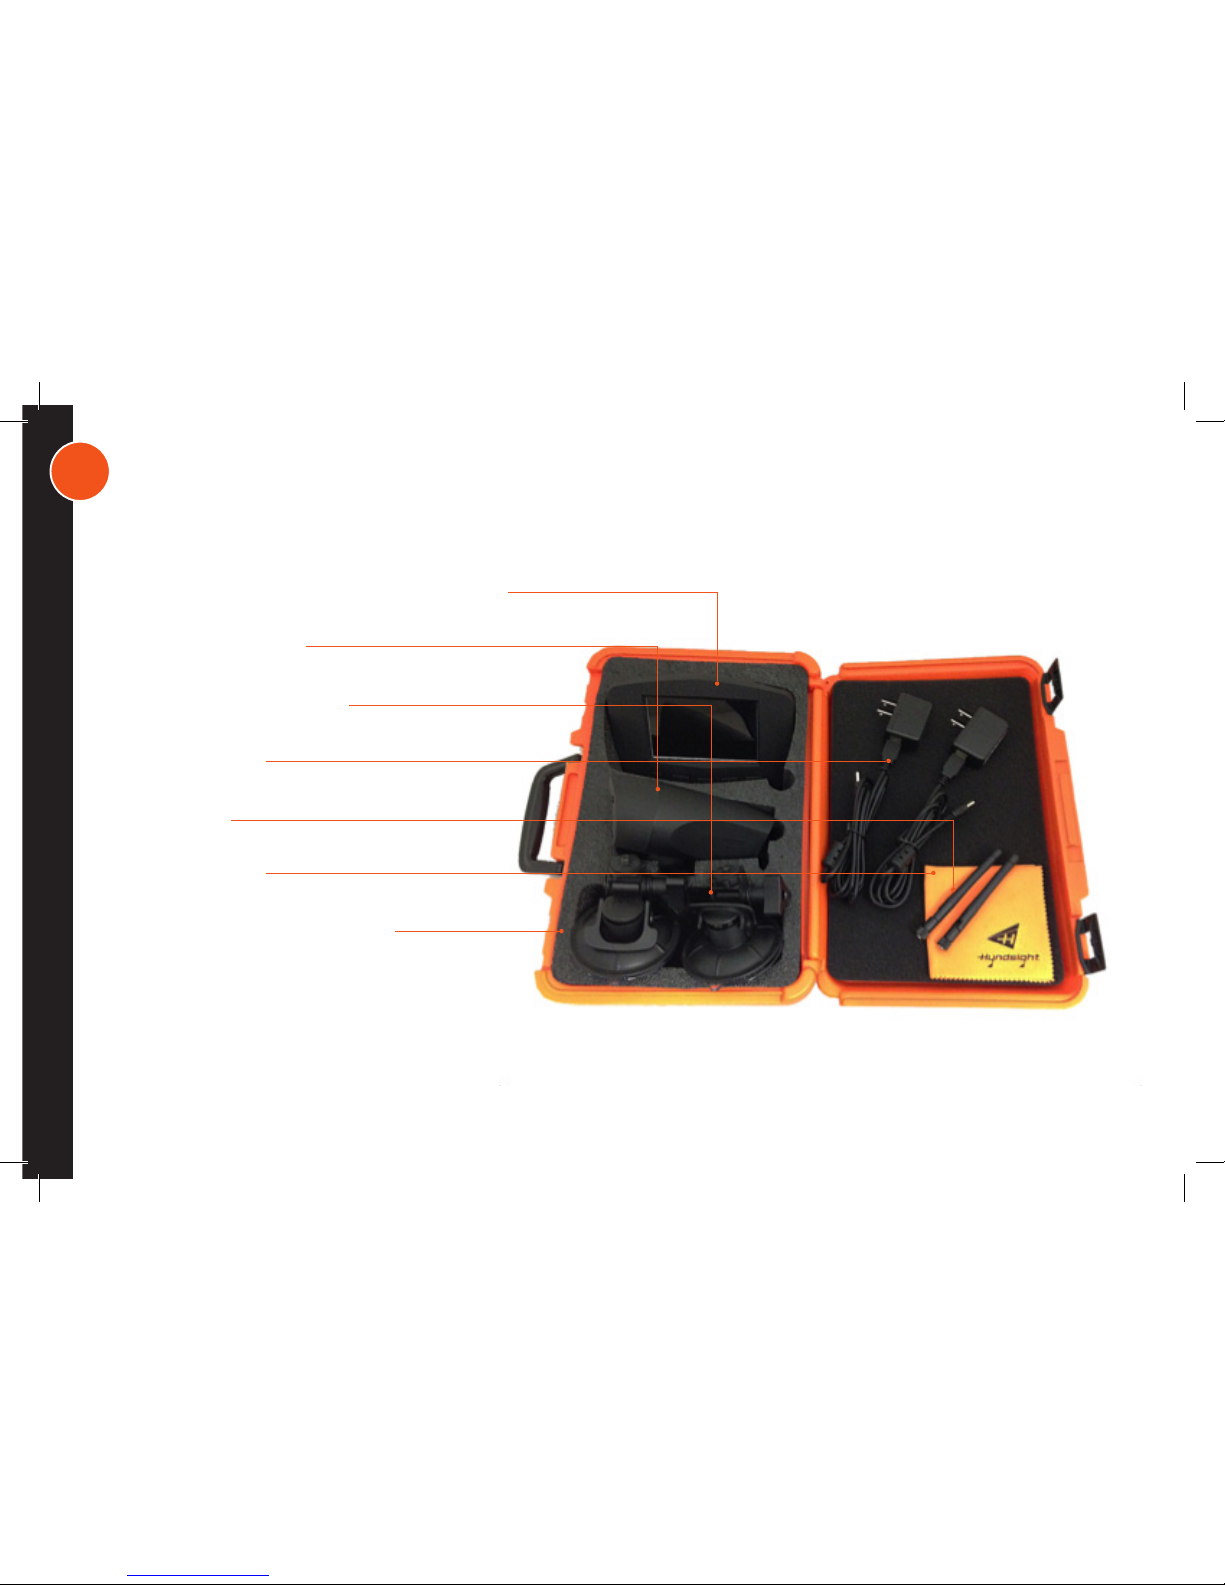
KIT CONTENTS
1 Recording Monitor with 4GB Internal Memory
1 Recording Camera
2 Flush Mounting Brackets
2 USB Chargers
2 Antennas
1 Cleaning Cloth
1 Custom Padded Carrying Case
1 Instructions for use
MicroSD card not included for camera*
*MicroSD card not included for camera. For best results, use up to a 32GB card, generic brands not recommended.

9
OVERVIEW
Top Row (left to right): Signal strength, Camera being viewed, Scan
ON, MicroSD card inserted, Mirror mode (F when forward mode),
Monitor recording, Monitor overwrite enabled, Camera recording,
Camera overwrite enabled, Monitor battery life, Camera battery life
Bottom Row: Date/Time stamp
Buttons: Power Light (green when on, red when charging), Power
button, Back or Menu button, Select or Zoom shortcut, Left/Down
and Record shortcut, Right/Up and Monitor Playback shortcut
Power Button
Power Light
Pair Button
Antenna
Charging Port
Threaded Mount
MicroSD Slot
On the back of the camera, in the same location as the charging port, is
a small slot for the MicroSD card. The card should be inserted with the
bump upward and slotted end going in first. Push the SD card into the
slot until it cannot go any further. It will lie flush with the charging port. The
SD card will remain firmly inserted into the camera unless you choose to
remove. To remove, push on the card, and it will eject from the slot so
you can download the video content.

10
CHARGING
Fully charge both devices before using. Either charger can be used with the camera or the monitor.
To Charge CAPTURE
• Connect the USB cable to the Wall Charger.
• Firmly insert the straight jack into the Camera. Repeat for Monitor.
• Plug the Wall Chargers into a wall outlet.
• Red light appears when charging. Red light turns off when charge is complete (4-5 hours).
*Optional hardwiring is available for use where USB or AC connections are unavailable.

11
SINGLE CAMERA SETUP
Hyndsight recommends pairing Camera before mounting it. Using your best judgment, attach Antennas either before or
after mounting Devices to desired surfaces.
Power On*
• Hold Monitor Power button for 3 - 5 seconds until the orange Hyndsight screen appears and Green Indicator
Light turns on.
• Hold Camera Power button for 3 - 5 seconds. until Blue Indicator Light turns on. An image will appear on the
Monitor after you release the Power button.
*Always power on Monitor first to help camera sync automatically. If Camera and Monitor do not sync automatically, follow
the steps listed in Troubleshooting.
To access Capture’s functions, press Menu/Back once or twice. Press Left/Down or Right/Up to navigate menu. Press
Select to open desired function. Press Back to exit function or menu screen.

12
DATE AND TIME
MIRROR IMAGE VIEW
Menu/Back (Twice) Select to choose field, Up/Down to change number Back to exit
Menu/Back (Twice) ON for mirror view OFF for forward view
Note: M on the monitor represents Mirror mode (ideal for backing up); F represents Forward Mode. Mirror mode can not be used
when multiple cameras are paired or when in scan mode.
TIME
20**/**/** **:**:**
REC
PAIR
RECORD
SCAN
BRIGHT TIME ZOOM
MIRROR PLAY
MIRROR MIRROR
REC
PAIR
RECORD
SCAN
BRIGHT TIME ZOOM
MIRROR PLAY
ON
ON
OFF
OFF

13
ZOOM
BRIGHTNESS AND NIGHT MODE
Menu/Back (Twice) Down arrow to decrease brightness Back to exit
Up arrow to increase brightness
Menu/Back (Twice) Zoom 1X, 2X, or 3X Back to exit
Follow the instructions above to access Night Mode, press select, then turn night mode ON or OFF. Press back to exit.
Shortcut: From the home screen, press the Select button once, twice, or three times to zoom.
REC
REC
PAIR
PAIR
RECOR
RECORDD
SCAN
SCAN
BRIGHT
BRIGHT
TIME
TIME
ZOOM
ZOOM
MIRROR
MIRROR
PLAY
PLAY
ZOOM
BRIGHT
- +
X1
X2 X3

14
RECORD
Menu/Back (Twice) Select monitor icon (left) RX format OFF
RX Overwrite ON to record over existing footage Rec cont ON to begin recording Back 3 times to exit
RX Overwrite OFF to record from previous stopping point Rec cont OFF to end recording Back 3 times to exit
Recordings can be made using up to a 32GB MicroSD card in the camera or can be stored directly on the monitor if no SD card
is available. Note that images stored directly on the monitor cannot be removed or transferred, only previewed. Battery life
averages 3-4 hours during recording.
Monitor: RX Format completely erases internal memory card.
Red dot beside V or V-OW on home screen indicates recording in progress.
REC
PAIR
RECORD
SCAN
BRIGHT TIME ZOOM
MIRROR PLAY
REC
REC
SETUP
REC
CONT
REC
CONT
REC
CONT
SETUP
RX OVER
WRITE
RX OVER
WRITE
RX OVER
WRITE
RX
FORMAT
RX
FORMAT
RX
FORMAT
ON
ON ON
ON
ON ON
ON
ON ON
OFF
OFF OFF
OFF OFF
OFF
OFF
OFF OFF

15
RECORD CONT.
Menu/Back (Twice) Select camera icon (right) TX format OFF
TX Overwrite ON to record over existing footage Rec cont ON to begin recording Back 3 times to exit
TX Overwrite OFF to record from previous stopping point Rec cont OFF to end recording Back 3 times to exit
Camera: Be certain to insert MicroSD card into camera before recording. Instructions for MicroSD card insertion
can be found on page 9. SD Card icon will appear on home screen once card is fully inserted into the camera. TX
Format completely erases camera MicroSD card.
Red dot beside V or V-OW on home screen indicates recording in progress.
Shortcut: From the home screen, press the Down Arrow to begin recording to both the monitor and camera. Press the Up Arrow to stop recording.
REC
PAIR
RECORD
SCAN
BRIGHT TIME ZOOM
MIRROR PLAY
REC
REC
SETUP
REC
CONT
REC
CONT
REC
CONT
SETUP
RX OVER
WRITE
RX OVER
WRITE
RX OVER
WRITE
RX
FORMAT
RX
FORMAT
RX
FORMAT
ON
ON ON
ON
ON ON
ON
ON ON
OFF
OFF OFF
OFF OFF
OFF
OFF
OFF OFF
16
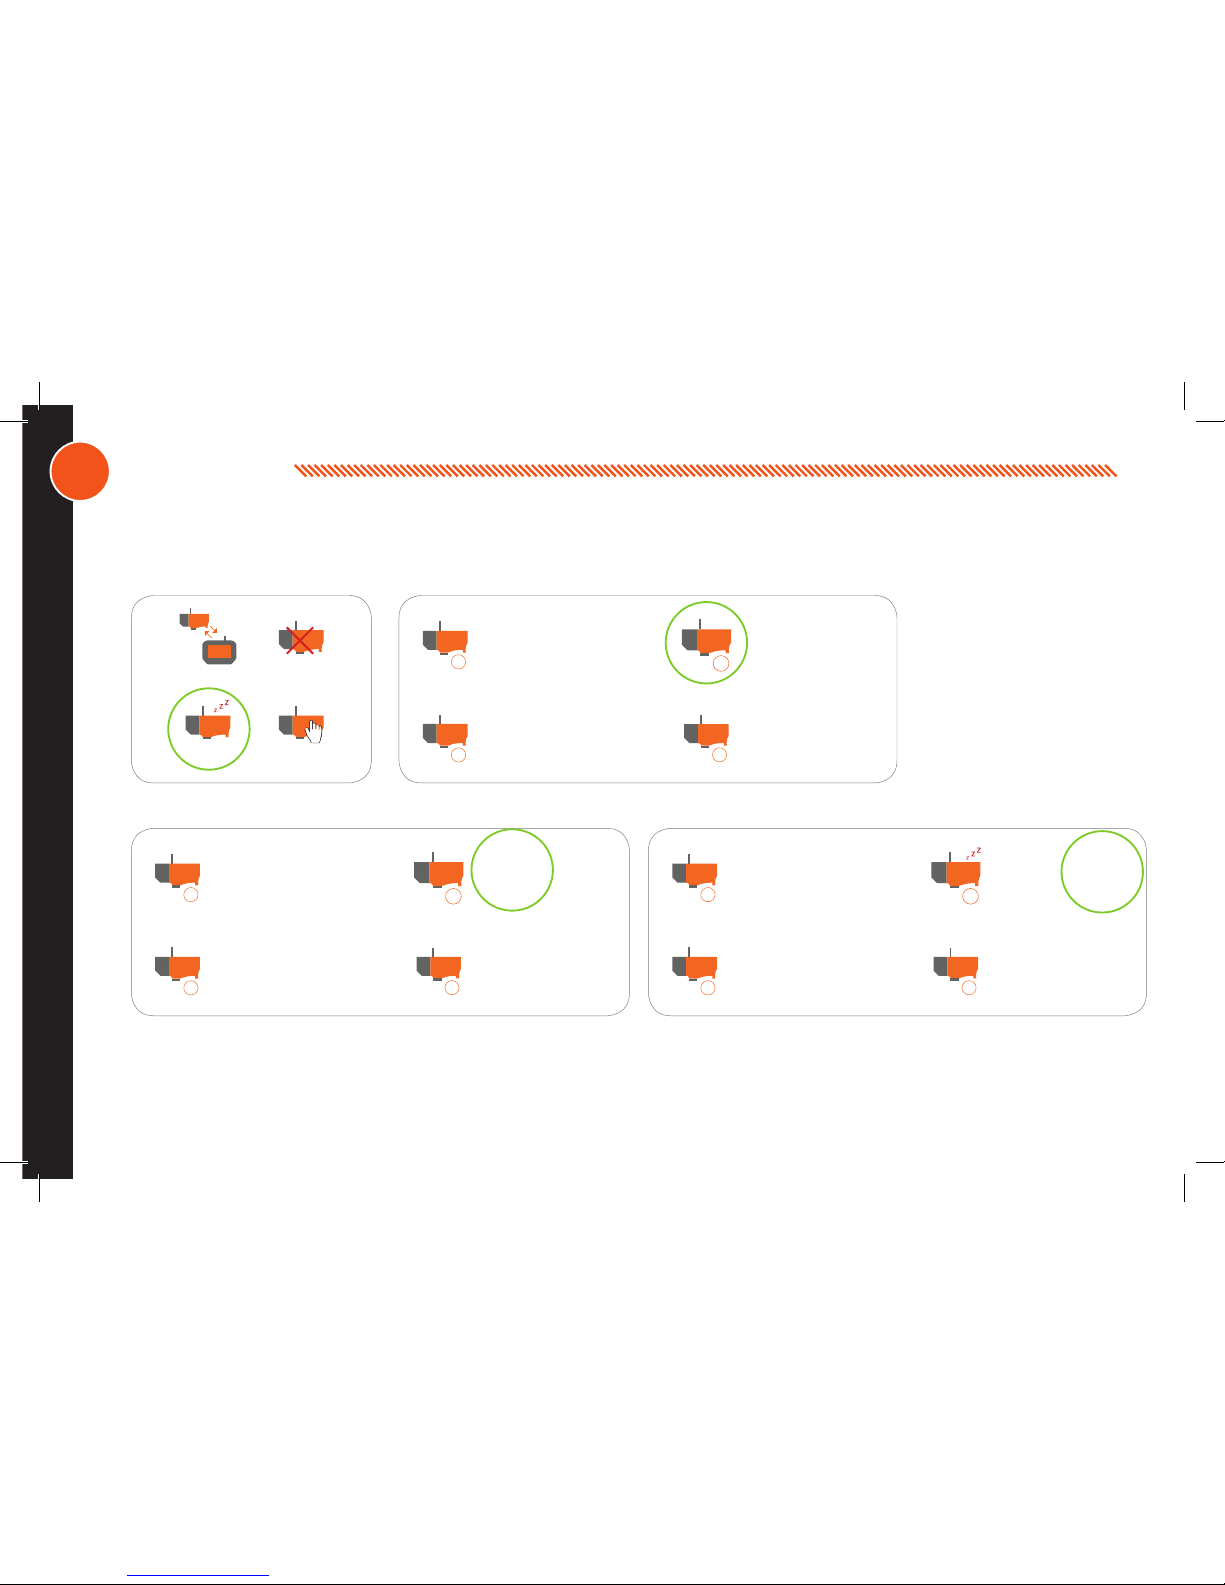
WAKE CAM
Menu/Back (Once) Select paired camera (i.e. Camera 2) ON wakes camera OFF sleeps camera Back to exit
Put camera(s) in sleep mode when not in use to save battery life. Turn back on when ready to use.
PAIR
UNPAIR
WAKE CAM
SELECT CAM
1
1 1
3
3 3
2
2 2
4
4 4
ON
ON ON
ON
ON ON
ON
ON ON
ON
ON ON
OFF
OFF OFF
OFF
OFF OFF
OFF
OFF OFF
OFF
OFF OFF
X
X X
X
X X

17
VIEW
Menu/Back (Twice) Play DCIM Select dated folder AVI
Playback Menu Options
Back to Main Menu Pause/Play Recording Retreat or Rewind by 2x Speed Up Viewing by 2x, 4x, 8x, or 16x
Monitor: RX Format completely erases internal memory card.
Camera: View the images recorded by the camera on the MicroSD card. Recording time depends upon the storage size
of the memory card in use. Note that the “standard” view gets recorded even when in zoom mode.
• Open the charging port cover on the camera.
• Quickly push the Micro SD Card, causing it to eject for easy removal.
• Insert the microSD card into an SD Card adaptor, then directly into a computer/TV SD slot to enjoy the video
REC
PAIR
RECORD
SCAN
BRIGHT TIME ZOOM
MIRROR
PLAY

18
DELETE
Menu/Back (Twice) Play DCIM Select dated folder Menu Yes to Delete
No to exit
Monitor: RX Format completely erases internal memory card.
REC
PAIR
RECORD
SCAN
BRIGHT TIME ZOOM
MIRROR
PLAY

19
MULTICAMERA SETUP: PAIR ADDITIONAL CAMERAS
UNPAIR
Menu/Back Select available camera Press and release pair button on camera Back to exit
(i.e. 3 and 4 are available)
Menu/Back Select camera to pair Power o unpaired camera Back to exit
Note: Do not unpair camera when in single camera mode. Do unpair cameras 2-4 in multi-camera mode so that Camera 1 pairs
automatically upon start-up.
PAIR
PAIR
UNPAIR
UNPAIR
WAKE CAM
WAKE CAM
SELECT CAM
SELECT CAM
1
1
2
2
3
3
4
4

20
SELECT CAMERA
SCAN
Menu/Back (Once) Select to view a specific camera while multiple cameras are paired Camera selected displays
Menu/Back (Twice) SCAN appears on monitor during use
(i.e. choose between watching camera 3 or 4) on home screen (i.e. CAM 4)
Scan ON to watch loop from all cameras
Scan OFF to watch one camera
Watch images from each paired camera. The camera image will rotate every 10 seconds.
PAIR
UNPAIR
WAKE CAM
SELECT CAM
1 2
3 4
REC
PAIR
RECORD
SCAN
SCAN
BRIGHT TIME ZOOM
MIRROR
PLAY
ON
OFF

21
RECORD
VIEW
POWER OFF
Please see instructions on Page 14 to record from Camera and/or Monitor. Recordings can be made using up to a 32GB
MicroSD card in the camera or can be stored directly on the monitor’s 4GB internal memory. Note that images stored directly
on the monitor cannot be removed or transferred, only previewed.
When multiple cameras are paired, or when in Scan Mode, the camera that is currently being viewed is the one that
will automatically record to its internal memory card when using the shortcut “Record” feature (i.e. pressing the down
arrow). Similarly, when using the “Stop Record” shortcut button (up arrow), only the camera currently being viewed will stop
recording. All other cameras must be started or stopped manually by selecting the camera and using the “Record” icon on
the monitor.
When recording to the monitor in Multi-Camera mode, the monitor will record either the view from one camera if one
camera has been selected or alternating images if in scan mode. Each camera that is recording will capture its own image,
regardless of what the monitor is recording.
Please see instructions on Page 17 to view recordings from Camera and/or Monitor.
Hold Camera Power button for 3 - 5 seconds until Blue Indicator Light turns off. Monitor image will disappear.
Hold Monitor Power button for 3 - 5 seconds. The screen will show “Monitor is Shutting Down.”

22
FLUSH BRACKET MOUNTING
To attach the Camera or Monitor to the desired smooth, clean, flat, non-porous surface, follow the instructions below. Note: The mounting surface and
the Suction Cup should be clean and dry. Wipe with a clean, damp cloth and
let dry completely. The Flush Mount should be installed at room temperature
(avoid extreme heat or cold). Do not moisten the Suction Cup.
• Thoroughly clean the smooth, flat, non-porous surface, making sure the surface is dry and free of scratches.
• Twist the Camera or Monitor onto the flush mount’s threaded mounting stud. Do not remove the Rubber Washer.
• Hold the Camera in place and firmly tighten the Lock Ring.
• Position the Suction Cup Lever in the “down” position.
• Position the Suction Cup on your mounting area. In order to remove the Flush mount easily, HVS recommends that
the Suction cup Release Tab be at the bottom of the installation area.
• Push the Suction Cup firmly against the mounting surface (the Suction Cup Lever should be in the “down” position).
Press the Suction Cup Button that reads “PRESS,” and pull the Suction Cup Lever up and over the Button. You will
feel the Button move out during this procedure; this action locks the Suction Cup into place.
• Loosen the Flush Mount Adjusting Knob, position the Camera or Monitor, and then retighten the Adjusting Knob.
• Check the Camera’s position as necessary by loosening the Adjusting Knob. Tighten securely when in position.
• To release the Suction Cup, move the Suction Cup Lever back into its “down” position. Lift the Suction Cup
Release Tab to help break the hold.

23
TROUBLESHOOTING
PROBLEM
Camera won’t pair automotically Press the Menu button. Select Pair.
Press the Menu button. Select Pair. Toggle to an unpaired Camera (no X across camera number)
Press Enter. The Monitor will prompt you to press the Pair button on the Camera. Remember to
Unpair Cameras 2-4 before Powering off
Make sure antennas are attached and devices are within effective range. Weather, interference,
and other such factors may reduce the unit’s ability to convey video.
Adjust angle of Monitor or change the Brightness. Also, polarized sunglasses may affect viewing
Unpair unused Camera icons using Monitor; turning off the Camera alone does not unpair it from
the Monitor. Press the Menu button. Toggle to a camera icon that is shown to be paired (number
without an X over it). Unpair by pressing Select. Repeat the above steps to Unpair any occupied
camera icons that actually do not have a paired Camera
Reset the Monitor by pressing the Power button + Up button at the same time. It is recommended
to turn off the devices between use.
Camera 1 icon is displayed as in use, but
no image is showing and I can’t pair it
No Signal
Difficulty Seeing Screen
All four Camera icons are in use, but I
don’t have all cameras paired
Monitor is going black or orange
SOLUTION

24
PRODUCT SPECIFICATIONS
WARRANTY
Transmission Frequency: 2.4 GHz
Unobstructed Effective Range: up to 1/3 mile
Power Supply Input, per adapter: 100-240 V AC 50/60 Hz Max 0.4A
Power Supply Output, per adapter: 5V DC 2.0A
Monitor (CAPTURE) - 5.0” sunlight-readable display (4.8” viewable)
Camera (CAPTURE) - Wide Angle Lens
Screen Resolution: 1080 p, 30 fps
Live video stream with recording capabilities
This Limited Product Warranty shall apply to Hyndsight Vision Systems, Inc. products including all accessories as contained within the original package. Hyndsight Vision Systems, Inc. warrants that products
from its authorized dis-tributors and retailers will meet the applicable product specifications and be free from all defects in material and workmanship during the Limited Product Warranty Period, one year
starting from the date of original purchase, assum-ing the products are used in accordance with the user manual and other documentation provided at the time of purchase.
This Limited Product Warranty is subject to the following terms and conditions:
1. To obtain warranty service, a proof of purchase in the form of an original or copy of the sales receipt from the original retailer is required.
2. This Limited Product Warranty is only valid and enforceable in the country/region where the product is sold.
3. This Limited Product Warranty is at sole option of Hyndsight Vision Systems, Inc. to either repair or replace the defective product during the Limited Product Warranty Period. Hyndsight Vision Systems, Inc.
will not replace missing components from any package, including those purchased through online auctions.
4. To obtain warranty service, contact either your local Hyndsight Vision Systems, Inc. authorized retailer or, for online and trade show purchases, Hyndsight Vision Systems, Inc. at 1-844-733-7233 for shipping
instructions and an RMA number.
5. This Limited Product Warranty covers expenses for inspecting and repairing the product during the Limited Product Warranty Period if the defect is found to be the fault of Hyndsight Vision Systems, Inc .
The defective product shall be delivered by the purchaser at his/her own expense to the designated premises together with the proof of purchase and RMA number.
6. Hyndsight Vision Systems, Inc. will return the repaired or replaced product to the drop-zone for collection by the customer in good working condition. All replaced faulty products or components will become
property of Hynd-sight Vision Systems, Inc.
7. If Hyndsight Vision Systems, Inc. repairs or replaces the product, the repaired or replaced product shall continue to be warrantied for the remaining time of the riginal warranty period or for three (3) months
from date of repair or replacement, whichever is longer.
8. Hyndsight Vision Systems, Inc. reserves the right to add, delete, or amend the terms and conditions at any time without prior notice on its website, www.hyndsightvision.com.
9. A two (2) year warranty is extended to all purchases made in the United Kindgom. A two (2) year warranty is also extended to the Flush Mount; however, Hyndsight Vision Systems, Inc. is not responsible
for loss of or damage to the product as a result of improper use of the mounting bracket.
10. This limited warranty shall not apply if the damage was caused by any of the following:

a. The product serial number has been removed, erased, defaces, altered, or is illegible.
b. The damage resulting from the use of the product in a manner other than its normal and customary manner.
c. Deterioration of the product due to normal wear and tear.
d. The damage arising from improper installation, unauthorized repair, alteration, or modification to this product by third parties other than Hyndsight Vision
Systems, Inc. or its designee.
e. The damage arising from operation with components or accessories not officially authorized or provided by Hyndsight Vision Systems, Inc. or
used in ways other than its intended use.
f. The damage arising from exposure to abnormally corrosive conditions or operation with extreme heat/cold or humidity
HYNDSIGHT VISION SYSTEMS, INC. MODELS HVS-001CR AND HVS-001MR
FCC ID:2ACT7-CJTXR
FCC ID:2ACT7-CJRXR
IC: 12341A-HVS001CR
IC:12341A-HVS001MR
This device complies with Part 15 of the FCC Rules. Operation is subject to the following two conditions: (1) this device may not cause harmful interference, and (2) this device must accept any interference received,
including inter-ference that may cause undesired operation. Note: This equipment has been tested and found to comply with the limits for a Class B digital device, pursuant to part 15 of the FCC Rules. These limits
are designed to provide reason-able protection against harmful interference in a residential installation. This equipment generates, uses and can radiate radio frequency energy and, if not installed and used in accordance with the instructions, may cause harmful interference to radio communications. However, there is no guarantee that interference will not occur in a particular installation. If this equipment does cause harmful interference to radio or television reception, which can be deter-mined by turning the equipment off and on, the user is encouraged to try to correct the interference by one or more of the following measures:
• Reorient or relocate the receiving antenna.
• Increase the separation between the equipment and receiver.
• Connect the equipment into an outlet on a circuit different from that to which the receiver is connected.
• Consult the dealer or an experienced radio/TV technician for help.
This equipment complies with FCC radiation exposure limits set forth for an uncontrolled environment. This equipment should be installed and operated with minimum distance 20cm between the radiator& your
body. This transmit-ter must not be co-located or operating in conjunction with any other antenna or transmitter.
This equipment complies with IC RF radiation exposure limits set forth for an uncontrolled environment. This transmitter must not be co-located or operating in conjunction with any other antenna or transmitter.
This equipment should be installed and operated with minimum distance 20cm between the radiator& your body.
This device complies with Industry Canada license-exempt RSS-210 standard(s). Operatiaon is subject to the following two conditions: (1) this device may not cause interference, and (2) this device must accept any
interference, includ-ing interference that may cause undesired operation of the device.
Under Industry Canada regulations, this radio transmitter may only operate using an antenna of a type and maximum (or lesser) gain approved for the transmitter by Industry Canada. To reduce potential radio
interference to other users, the antenna type and its gain should be so chosen that the equivalent isotropically radiated power (e.i.r.p.) is not more than that necessary for successful communication.
Ce dispositif est conforme à la norme CNR-210 d’Industrie Canada applicable aux appareils radio exempts de licence. Son fonctionnement est sujet aux deux conditions suivantes: (1) Le dispositif ne doit pas
produire de brouillage préjudiciable, et (2) Ce dispositif doit accepter tout brouillage reçu,y compris un brouillage susceptible de provoquer un fonctionnement indésirable. NOTE IMPORTANTE: Déclaration d’exposition aux radiations: Cet équipement est conforme aux limites d’exposition aux rayonnements IC établies pour un environnement non contrôlé. Cet équipement doit être installé et utilisé avec un minimum de
20 cm de distance entre la source de rayonnement et votre corps

2017 Manufactured in China for Hyndsight Vision Systems
 Loading...