

Hymn Technology HT-300 Hymnal Plus User Manual

Welcome 1
Welcome
Congratulations on the purchase of your new Hymn Technology HT-300
Hymnal Plus
. You now have immediate
access to thousands of hymns, worship songs and incidental tunes without the need for any musical knowledge.
Repertoire
Choose from the onboard
Library
of thousands of tunes (expandable)
Play user-supplied standard
MIDI
files+
Play user-supplied
MP3
compressed audio files+
Index
Select tunes directly from the entire onboard
Library
or choose a favorite hymn book from the
Book Index
list (expandable) and enter familiar hymn numbers.
Search
Look up tunes in the
Library
by first line or tune name using the onboard search function.
Customize to suit your congregation
Change the tempo (speed)
Change the key (pitch)
Change the number of verses
Orchestrate
Choose from hundreds of high-quality onboard sounds, or just select one of the many professionally
orchestrated preset musical Styles.
Organise
Select a tune, customize it, orchestrate it and then add it to a Play List ahead of time, ready for the service.
Play Lists can hold any number of
Library
tunes, MIDI files and MP3 files.
+
*
Store as many different Playlists as you like
+
* – you can even name them for later identification.
+
Using the compact flash memory card *Limited only by available memory
In some instances the arrangement of a particular tune may not exactly match the version contained in your hymn book. The HT-300 uses a
core of nearly 2000 recordings to cover many others. Consequently, tunes whose arrangements differ only slightly may still be referenced to
one recording.
Copying or broadcast transmission of copyright music contained in the HT-300 is strictly prohibited.
The illustrations and LCD screenshots shown in this manual are intended as a guide only, and may differ from those in your unit.

2 Table of Contents
Table of Contents
Welcome ............................................... 1
Table of Contents ................................... 2
1. How to use this guide .......................... 4
2. Let's play a tune .................................. 5
3. Setting Up .......................................... 6
LCD TOUCH SCREEN PRECAUTIONS .................................... 6
OPENING THE STAND........................................................... 6
CONNECTING THE AC POWER ADAPTOR ............................ 6
INSERTING THE COMPACT FLASH MEMORY CARD ............... 7
REMOVING THE COMPACT FLASH MEMORY CARD .............. 7
INSTALLING THE OPTIONAL BATTERY PACK .......................... 7
CHARGING THE OPTIONAL BATTERY PACK .......................... 8
ATTACHING THE OPTIONAL QWERTY TYPING KEYBOARD .... 8
CONNECTING HEADPHONES .............................................. 9
CONNECTING A MICROPHONE........................................... 9
CONNECTING EXTERNAL AMPLIFICATION ............................ 9
DISCONNECTING EXTERNAL AMPLIFICATION .....................10
CONNECTING A PROJECTOR OR TV MONITOR .................10
CONNECTING THE OPTIONAL PSALM PLAYER TRIGGER .....10
4. Getting Started ................................. 11
USE OF THE TOUCH SCREEN .............................................11
TURN THE UNIT ON ............................................................11
SELECT A HYMN FROM THE LIBRARY ...................................12
Select a hymn book ............................................................12
Select a hymn ....................................................................12
PLAY A HYMN .....................................................................13
Introduction .......................................................................13
Ritardando ........................................................................13
Amen ................................................................................13
Start playback ....................................................................13
Alter the volume .................................................................13
Pause playback ..................................................................14
Fade out playback .............................................................14
PLAY THE DEMO .................................................................14
THROUGH-RECORDED TUNES............................................14
5. The Remote Control Handset .............. 15
WHAT’S IT FOR? .................................................................15
WHAT CAN I DO WITH IT? ..................................................15
Add an Introduction ...........................................................15
Start/Pause playback ..........................................................15
Adjust the Volume ..............................................................15
Select a hymn number ........................................................15
Select a Style .....................................................................15
Select a Play List .................................................................15
Select an item in the currently selected Play List ....................15
Cancel ..............................................................................16
Alter the Number of Verses .................................................16
Add a Ritardando to the End of a Tune ................................16
Fade Music In or Out .........................................................16
Raise or Lower the Pitch ......................................................16
Alter the Tempo .................................................................16
Turn Video Output On/Off .................................................16
Add a Metronome Click ..................................................... 16
Add an Amen .................................................................... 16
Modify the Soprano, Alto, Tenor and Bass parts ................... 16
THE ORCHESTRATOR ......................................................... 17
6. The Tune Library ............................... 18
Traditional Hymns ............................................................. 18
Modern Worship Music ...................................................... 18
Incidental Music ................................................................ 19
Different versions of the same tune ..................................... 19
7. Book Indexes .................................... 20
WHAT IS A BOOK INDEX? .................................................. 20
SELECTING A BOOK INDEX ................................................ 20
Do I have to use a Book Index? .......................................... 20
SEARCHING FOR HYMNS ................................................... 21
How do I find a hymn if I don’t know its number? ................ 21
Search Results ................................................................... 21
8. Styles .............................................. 22
WHAT IS A STYLE? .............................................................. 22
SELECTING A STYLE ............................................................ 22
Applying a Style ................................................................. 22
Preset Organ Styles ........................................................... 23
Preset Orchestral Styles ...................................................... 23
Preset Combination Styles .................................................. 23
USER STYLES ....................................................................... 24
Selecting Sounds ............................................................... 25
Changing the Volume, Chorus and Pan of a Sound ............. 25
Selecting parts ................................................................... 26
Adding a Drum Rhythm ...................................................... 26
Saving User Styles.............................................................. 27
Renaming User Styles ......................................................... 27
Deleting User Styles ........................................................... 28
THE CUSTOM STYLE ........................................................... 29
SETTING THE DEFAULT STYLE ............................................. 29
9. Play Lists .......................................... 30
WHAT IS A PLAY LIST? ......................................................... 30
WHY USE THE PLAY LIST FEATURE? ..................................... 30
CREATE A NEW PLAY LIST.................................................... 30
ADD ITEMS TO A NEW PLAY LIST ........................................ 31
PERFORM A PLAY LIST ......................................................... 31
EDIT A PLAY LIST ................................................................. 32
Add items to the end of a Play List ............................. 32
Insert additional items anywhere in a Play List ............ 32
Delete items from a Play List ..................................... 32
Change the play order of items in a Play List .............. 32
Edit items in a Play List ............................................. 33
DELETE A PLAY LIST ............................................................. 33
EXIT FROM A PLAY LIST ....................................................... 33
CONTINUOUS PLAY ........................................................... 33
NAME OR RENAME A PLAY LIST .......................................... 33
10. Playing Standard Midi Files ............... 34
WHAT ARE MIDI FILES? ....................................................... 34
ARE MIDI FILES ANY GOOD?.............................................. 34

Table of Contents 3
MIDI FILES AND THE HT-300 ............................................... 34
SELECTING A MIDI FILE ....................................................... 35
CONTROLLING PLAYBACK OF A MIDI FILE .......................... 35
Start playback .................................................................... 35
Pause playback .................................................................. 36
Stop playback .................................................................... 36
Fade out playback ............................................................. 36
11. Playing MP3 files............................. 37
WHAT ARE MP3 FILES? ........................................................ 37
ARE MP3 FILES ANY GOOD? .............................................. 37
MP3 FILES AND THE HT-300 ............................................... 37
SELECTING AN MP3 FILE ..................................................... 37
CONTROLLING PLAYBACK OF AN MP3 FILE ....................... 38
Start playback .................................................................... 38
Pause playback .................................................................. 38
Stop playback .................................................................... 38
Fade out playback ............................................................. 38
12. The Options Screen ......................... 39
CHANGING PARAMETER VALUES ........................................ 39
Master Volume .................................................................. 39
Equalizer ........................................................................... 39
Internal Speakers On/Off ................................................... 39
Microphone On/Off .......................................................... 40
Microphone Level .............................................................. 40
Video Type ........................................................................ 40
Video OSD’s (On Screen Displays) ...................................... 40
Reverb Type ....................................................................... 40
Reverb Volume .................................................................. 40
Reverb Time ...................................................................... 40
Chorus Volume.................................................................. 40
Metronome On/Off ........................................................... 40
13. Entering Text .................................. 41
14. Lyrics and Slides (optional feature) ..... 42
TEXT FILES AND THE HT-300 ............................................... 42
CREATING LYRICS AND SLIDES ............................................ 42
FOLDERS ............................................................................ 43
Create a new folder ........................................................... 43
Delete a folder................................................................... 44
FORMATTING LYRICS .......................................................... 44
ENTERING TEXT DIRECTLY ON-SCREEN............................... 45
SAVING LYRICS AND SLIDES ................................................ 45
CREATE A TEXT FILE USING A PC ......................................... 46
EDIT AN EXISTING TEXT FILE ON-SCREEN ............................ 47
PLAY A HYMN WITH DISPLAYED LYRICS ............................... 48
DISPLAY A SLIDE .................................................................. 48
15. The Psalm Player (optional feature) .... 50
PSALM STRUCTURE ............................................................. 50
PSALMS ARE DIFFERENT TO HYMNS .................................... 50
SELECTING A CHANT .......................................................... 50
Select a chant (tune) for your chosen psalm ......................... 51
Start playback .................................................................... 51
Appendix ............................................. 53
i. Using the compact flash memory card .. 53
INSERTING AND REMOVING THE COMPACT FLASH CARD . 53
WHAT IS IT FOR? ............................................................... 53
CONNECTING THE COMPACT FLASH CARD TO A PC ....... 54
FOLDERS ............................................................................ 54
ii. Creating MP3 files ............................. 55
WHAT DO I NEED? ............................................................ 55
WHAT CAN I CONVERT TO MP3? ...................................... 55
TRANSFER AN MP3 FILE TO THE COMPACT FLASH CARD ... 55
iii. Metrical indexes - and why you might
want to know about them ....................... 56
iv. Troubleshooting ............................... 57
v. Glossary .......................................... 58
vi. Specifications ................................... 59
Index ................................................... 60
4 How to use this guide
1. How to use this guide
Safety Precautions (inside front cover)
Take a moment to read through the safety precautions before you start.
Let’s play a tune (page 5)
Play a tune immediately – after all, that is what the HT-300 is designed to do!
Glossary (page 58)
Familiarity with a few basic terms will help as you explore the HT-300.
Setting Up (page 6)
Follow the instructions to set up your HT-300 and connect external equipment.
Basics (page 11)
This section covers the essentials of using the HT-300, from selecting
Library
tunes to changing the sound.
Reference Section (page 18)
Here’s where you can find out how to really get the best out of the HT-300. Divided into individual topics, the
Reference Section covers all aspects of use. Find out what each function of the HT-300 does and how to use it
effectively.
Troubleshooting (page 57)
Answers to commonly asked questions. Please consult this section before calling for technical support.
Icons
Throughout this guide, icons are used to highlight various points of information:
Tips and hints
This feature is easier with, or requires,
the optional qwerty typing keyboard
Important information
This feature requires the Video Display
Option to be installed
This feature is also available
from the remote control handset
This feature uses the compact flash
memory card

Let’s play a tune 5
2. Let's play a tune
Now that you’ve got your HT-300, you are probably eager to play some music. Here’s how to do it in just 5
steps:
1. Plug the AC power adaptor into the HT-300 (and a wall socket!) and turn the unit on. The on/off switch
is on the back.
2. Wait until the main menu appears on the LCD screen, and then press the PLAY key.
3. We are going to use the popular tune
Great is Thy Faithfulness
for our example. In the HT-300’s
Master Index of tunes this is number 54, so enter 54 on the number pad and press the NEXT key.
4. The PLAY screen will appear. You are now ready to play the tune
Great is Thy Faithfulness
. If you want
it to start with a musical introduction, press the INTRO key so that it changes to a check mark ().
5. Press the START key to play the music.
Press these on-screen keys to:
VERSES +/-
Alter the number of verses
PITCH +/-
Change the pitch (key)
TEMPO +/-
Change the tempo (speed)
BREAK +/-
Adjust the break (the pause between verses)
RIT
Add a
ritardando
(a gradual slowing of the speed) at the end of the last verse
AMEN
Add an Amen after the end of the last verse
To change the sound coming out, press the STYLE key and choose another of the HT-300’s many preset musical
Styles.
If you would like to play some more tunes immediately, skip straight to Section 4: Getting Started on
page 11
6 Setting Up
3. Setting Up
LCD touch screen precautions
NEVER place the unit face down, unless on a soft cloth, to prevent scratching of the LCD touch screen.
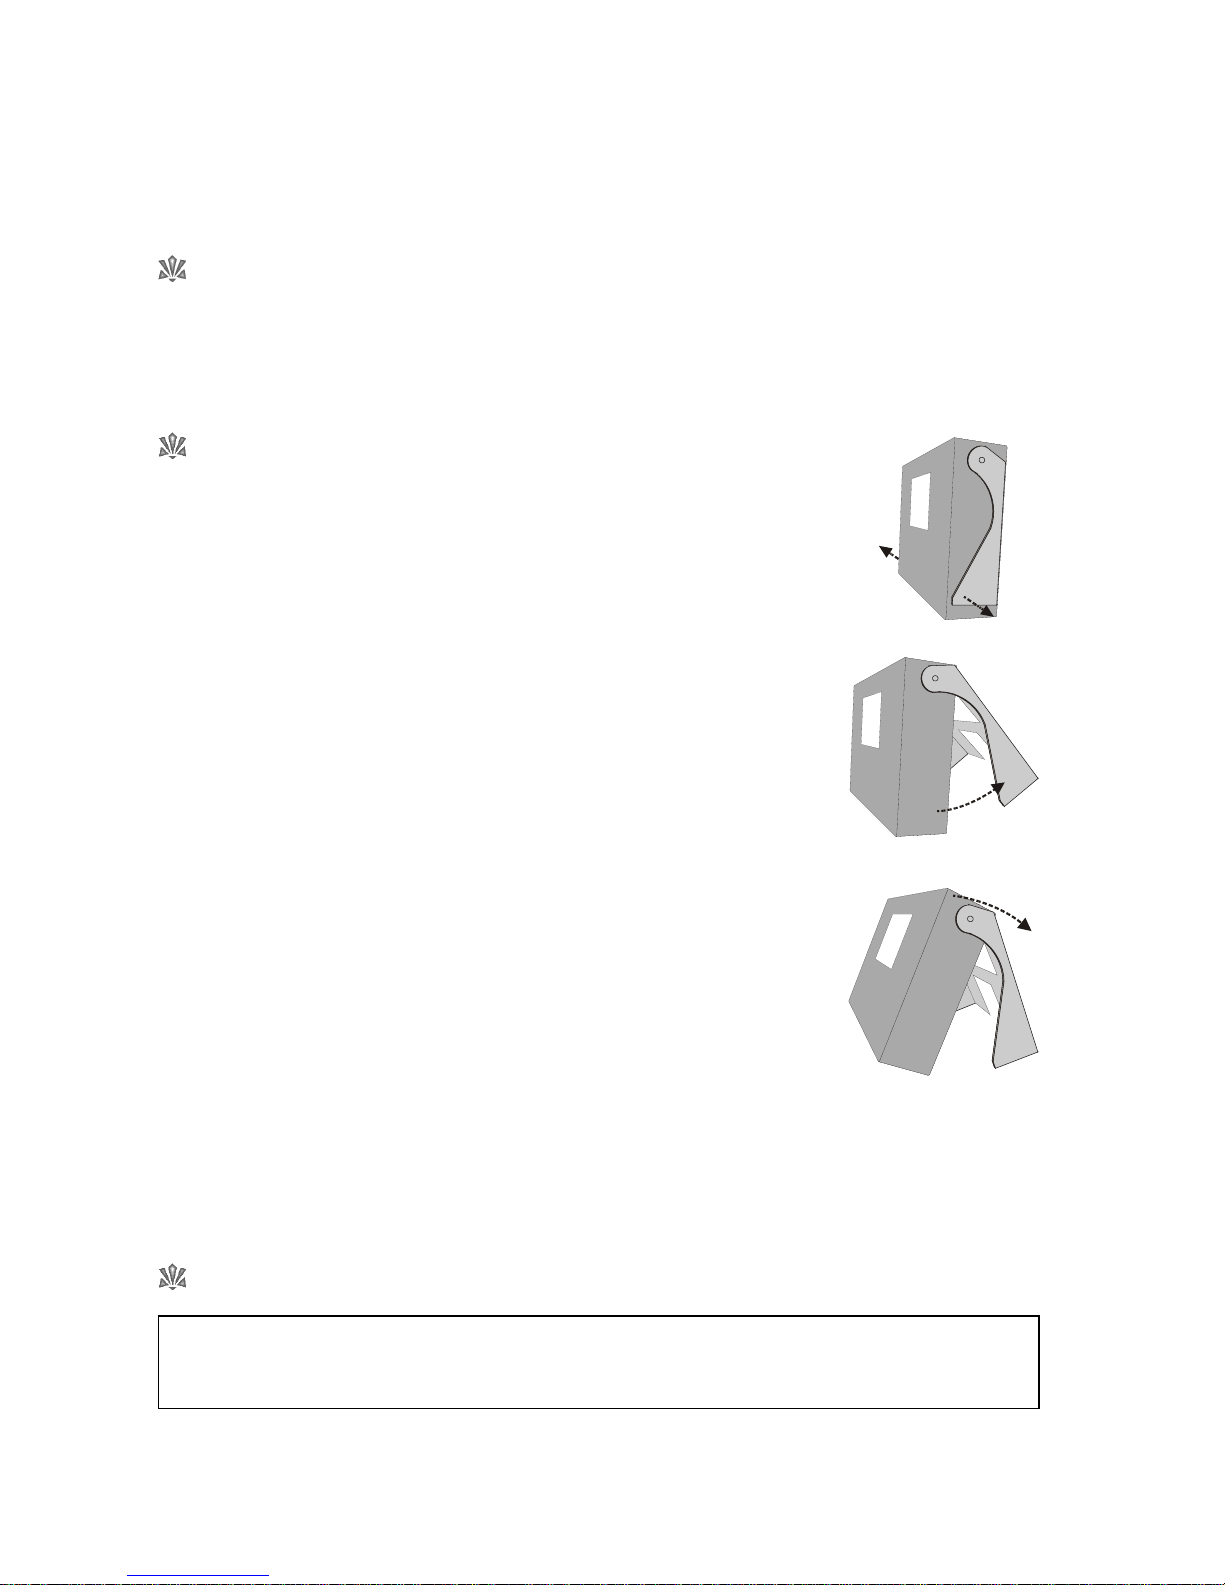
Opening the stand
Gently flex the ears of the stand slightly outwards, away from the case, to release the
retaining lugs. Only very slight flexing is required.
Open the stand out to the full extent of its travel.
Lie the unit back until it is resting on the stand legs.
To close the stand, support the unit and swing the stand back in against the case. When fully closed the
retaining lugs will snap back into place.
Connecting the AC power adaptor
Connect the AC power adaptor to the DC IN connector on the HT-300.
It is best to use the AC power adaptor whenever mains power is available. Use only the supplied AC
power adaptor.
Setting Up 7
Connect the mains lead to the AC power adaptor.
Plug the mains lead into a wall socket.
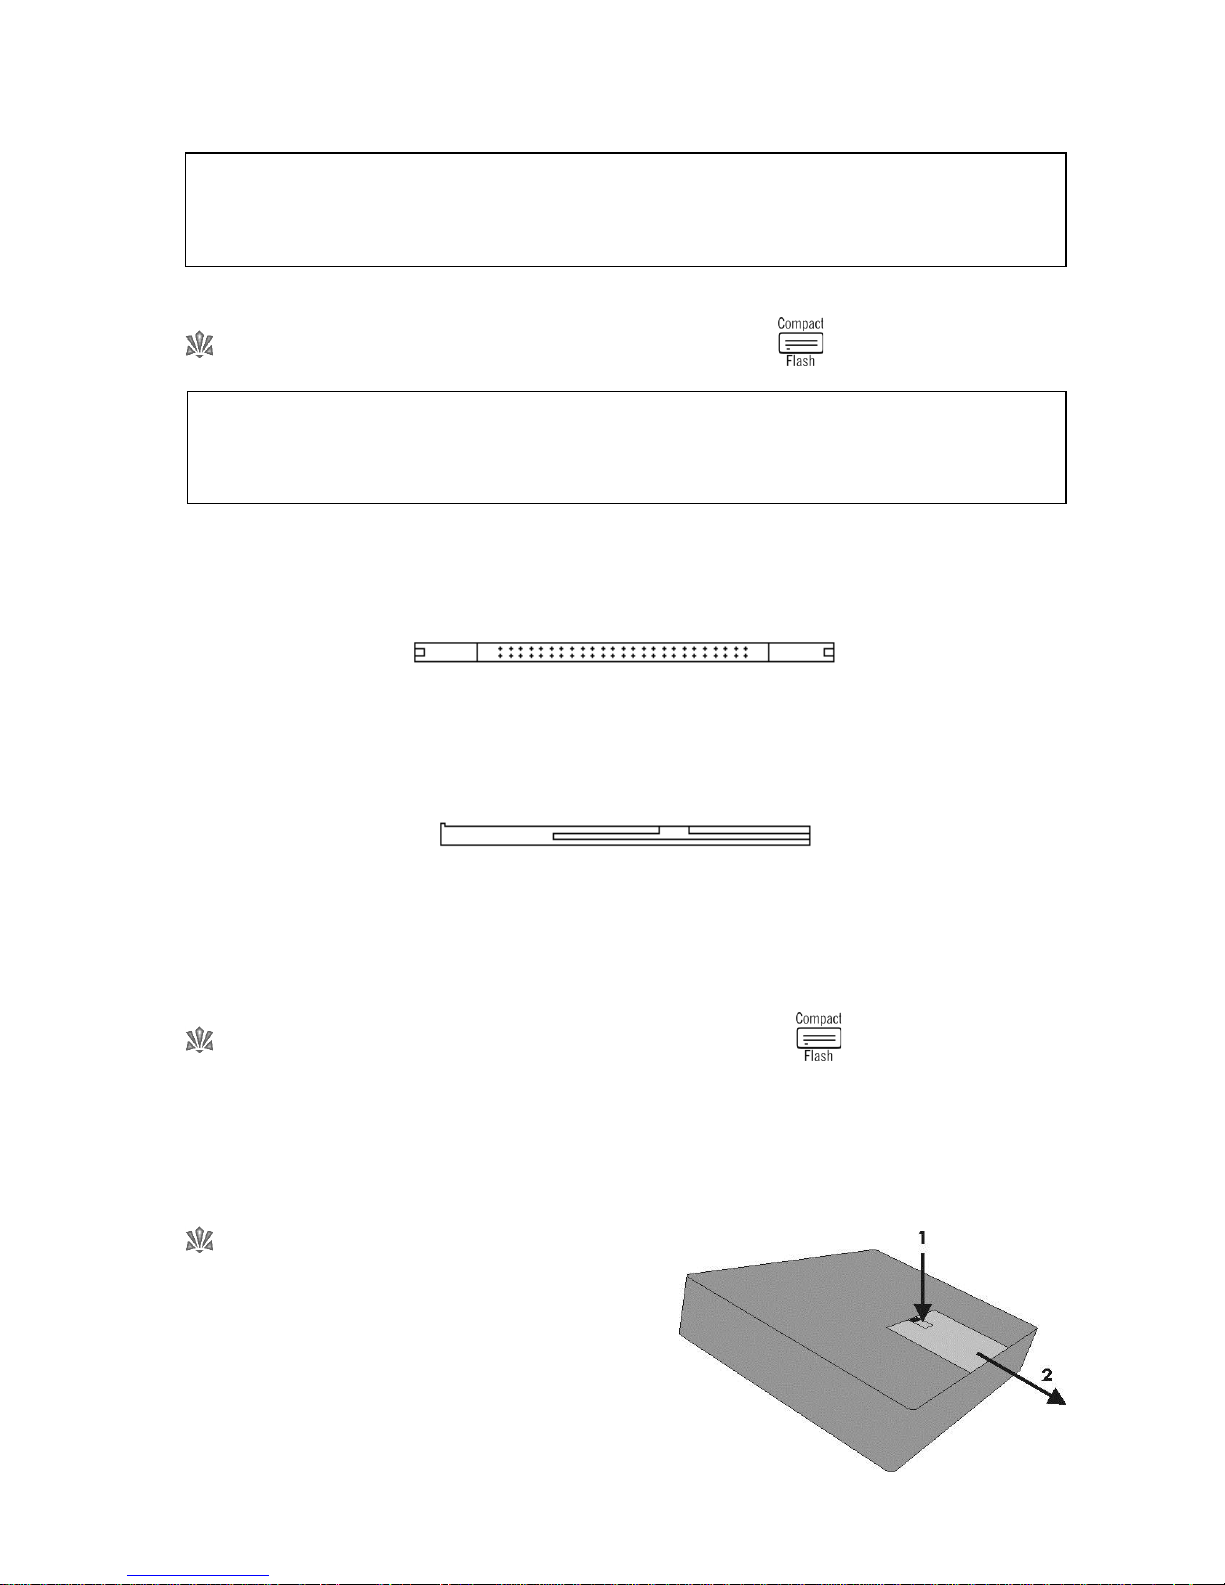
Inserting the compact flash memory card
Place the HT-300 on a flat surface, with the LCD screen facing up. The compact flash card slot is on the left
hand side of the unit.
Examine the edges of the compact flash card. One edge has two rows of small holes along it, like this:
This edge MUST be inserted into the slot first.
The compact flash card MUST be inserted upside down (it won’t go in up the other way, so never try to force it).
Examine the side edges of the card. When positioned the correct way up for insertion into the slot, they will look
like this:
Ensure that the HT-300 is switched off. Once the correct orientation of the card has been established, gently
push the card fully into the slot (at which point its outer edge will be flush with the edge of the slot). The card
eject button will appear next to the card, and will be level with it, when the card is fully inserted.
Removing the compact flash memory card
Ensure that the HT-300 is switched off. Using a suitably sized, blunt tool (e.g. the tip of a ball point pen) gently
push the card eject button. The card will slide out of the slot.
Withdraw the card.
Installing the optional battery pack
An optional rechargeable NiMH (nickel metal hydride)
battery pack is available for the HT-300, for use when it is
not practical to plug in the AC power adaptor. To install or
replace the battery pack, follow this procedure:
Remove the battery cover (located on the bottom of the unit):
1. Push lightly down on the battery cover latch.
2. Slide the cover out to the side.
The supplied compact flash memory card MUST be plugged into the HT-300 for the unit to function.
The HT-300 is supplied with the compact flash memory card already inserted. For normal basic
operation you will not need to remove it.
When connected, the AC power adaptor provides power for the HT-300 even if a battery pack is
installed. The HT-300 is only ever powered by an installed battery pack when the AC power adaptor
is disconnected.

8 Setting Up
Connect the battery pack:
Push the battery connector plug onto the connector in the battery compartment. The connectors are designed so
that they will only click together when correctly aligned. If they won’t click together easily reverse one connector
and try again. Excessive force is not required.
Insert the battery pack:
Lower the battery pack into the battery compartment.
Ensure the battery cables will not obstruct the battery cover.
Replace the battery cover:
Align the battery cover to the slots in the case and gently slide the cover back on until the latch clicks.
Charging the optional battery pack
Unlike older NiCad designs, the HT-300’s optional NiMH battery pack suffers no memory effect and may be
repeatedly re-charged from a partly discharged state without loss of performance. The HT-300 has built-in
safety features to prevent over-charging and/or over-heating.
To charge an installed battery pack, simply connect the AC power adaptor as above (Connecting the AC power
adaptor). Then whenever mains power is being supplied to the AC power adaptor the battery is being charged.
There is no need to turn on the HT-300 itself. However, whenever the HT-300 is in use (powered by the AC
power adaptor) background charging of an installed battery pack takes place.
The red CHARGE LED (labeled CHG) on the front panel will light in normal use while the battery pack is being
charged. The CHARGE LED will go out when the battery pack is fully charged.
A new battery pack may initially take up to 4 hours to reach full charge and will require cycling (i.e.
charging/depleting) several times before it reaches its optimum performance. A fully charged battery pack will
provide several hours of music use at a moderate volume level. This will be reduced if higher volumes are used,
or increased if the internal speakers are turned off (see Section 12: The Options Screen).
Unless battery charging is required, always un-plug the AC power adaptor from both the HT-300 and the wall
socket when not in use.
Attaching the optional QWERTY typing keyboard
Ensure that the HT-300 is switched off. Locate the keyboard socket on the rear of the HT-300 (labeled KYBD).
Examine the end of the plug on the HTKB-1 QWERTY typing keyboard’s cable. When the plug is the correct way
up to go into the KYBD socket on the back of the HT-300, it will look like this:
The plug will only go in when the correct way up. Never try to force the plug
into the socket.
Battery low warning
When running the HT-300 off the battery pack, inevitably the power in the pack will eventually
become depleted. When this situation is approaching, the HT-300 will show a warning message.
Turn off the HT-300 as soon as possible and charge the battery pack.

Setting Up 9
Connecting headphones
Ensure that the HT-300 is switched off.
Locate the headphone socket on the rear of the HT-300 (labeled PHONES).
Gently insert the headphone jack plug fully into the headphone socket.
Turn on the HT-300. Turn the volume down to zero.
Put on the headphones and then adjust the volume to a comfortable level.
Connecting a microphone
Ensure that the HT-300 is switched off. Locate the microphone socket on the rear of the HT-300 (labeled MIC
IN).
Gently insert the microphone jack plug fully into the microphone socket.
Turn on the HT-300.
Open the OPTIONS screen and adjust the microphone volume to zero (see Section 12: The Options Screen).
Turn on the microphone input (see Section 12: The Options Screen).
Adjust the microphone volume to a comfortable level.
Connecting external amplification
The HT-300 has small built-in speakers, designed for use when auditioning tunes and for portable use (carol
singing etc). However, you will probably want to play the HT-300 through external amplification.
Ensure that both the HT-300 and the external amplifier are switched off.
Connect suitable audio cables from the left and right audio outputs on the back of the HT-300 to the amplifier.
Make a note of where the volume control on the external amplifier is usually set, and then turn it down to zero.
Do not turn the external amplifier on yet.
Turn on the HT-300. Turn its volume down to zero.
Turn on the external amplifier and gradually increase its volume control until it is back to where it is normally set
(in this manner any other items already connected to the external amplifier, e.g. microphones, will still appear at
their normal volume).
Adjust the volume of the HT-300 until a comfortable level is reached.
The audio outputs on the back of the HT300 are
pre-amp
, so to use these you will need an external
amplifier
and
speaker(s). Sometimes these are built into one box, known as a
powered speaker
.
Always connect both audio outputs on the back of the HT-300 to the external amplifier. If your
amplifier/speaker equipment is mono, you will need a need a Y-connector cable to merge the two
outputs together.
Inserting the headphone jack plug does not automatically turn off the internal speakers. These are
turned on and off in the OPTIONS screen (see Section12: The Options Screen).

10 Setting Up
Disconnecting external amplification
Always disconnect external amplification in this order:
Turn the volume of the external amplification down to zero.
Turn off the external amplification.
Turn off the HT-300.
Disconnect the audio cables.
Connecting a projector or TV monitor
Only applicable if the Video Display Option is installed.
Ensure that the HT-300 is switched off. Locate the video socket on the rear of the HT-300 (labeled VIDEO).
Using a suitable video cable, gently insert the video RCA phono plug fully into the video socket.
Turn on the HT-300.
Open the OPTIONS screen and check that:
o VIDEO ENABLE is set to YES
o VIDEO TYPE is set appropriately for your country (PAL is used in the UK and throughout most
of the world. NTSC is used predominantly in the USA, Canada, Japan and Mexico)
o VIDEO OSD’s is set to your preference (see Section 12: The Options Screen)
Connecting the optional Psalm Player trigger
Only applicable if the Psalm Player Option is installed.
Ensure that the HT-300 is switched off. Locate the psalm trigger socket on the rear of the HT-300 (labeled
PSALM).
Gently insert the psalm trigger plug fully into the psalm socket.
Turn on the HT-300.
If you are unable to obtain any undistorted sound from the HT-300 through your external
amplification, even at very low volumes, then you may have plugged the HT-300 into an unsuitable
input on the external amplifier. The HT-300 is equipped with
line level
audio outputs which, in turn,
need
line level
inputs on any external amplification (such as those used to connect a CD player or
cassette player). Microphone inputs are generally not suitable for connection of the HT-300, although
often a DI (Direct Injection) box can be used to overcome this. Consult your sound equipment installer
for further information.
Basics – Getting Started 11
4. Getting Started
Use of the touch screen
Most features of the HT-300 are controlled from the touch screen, so you will be using it often. Observing the
following precautions will help to prolong its life:
Only ever touch the screen lightly, with a single finger (do not use a finger nail or any other hard object that
may scratch the surface of the screen).
Try to press the on-screen keys in the middle of the key. If the touch screen does not respond when a key is
pressed, you probably pressed the key too far off-center.
If you need to hold a key down (e.g. to adjust the tempo), only hold it lightly. It is human nature to press
harder when holding a key – resist the temptation!
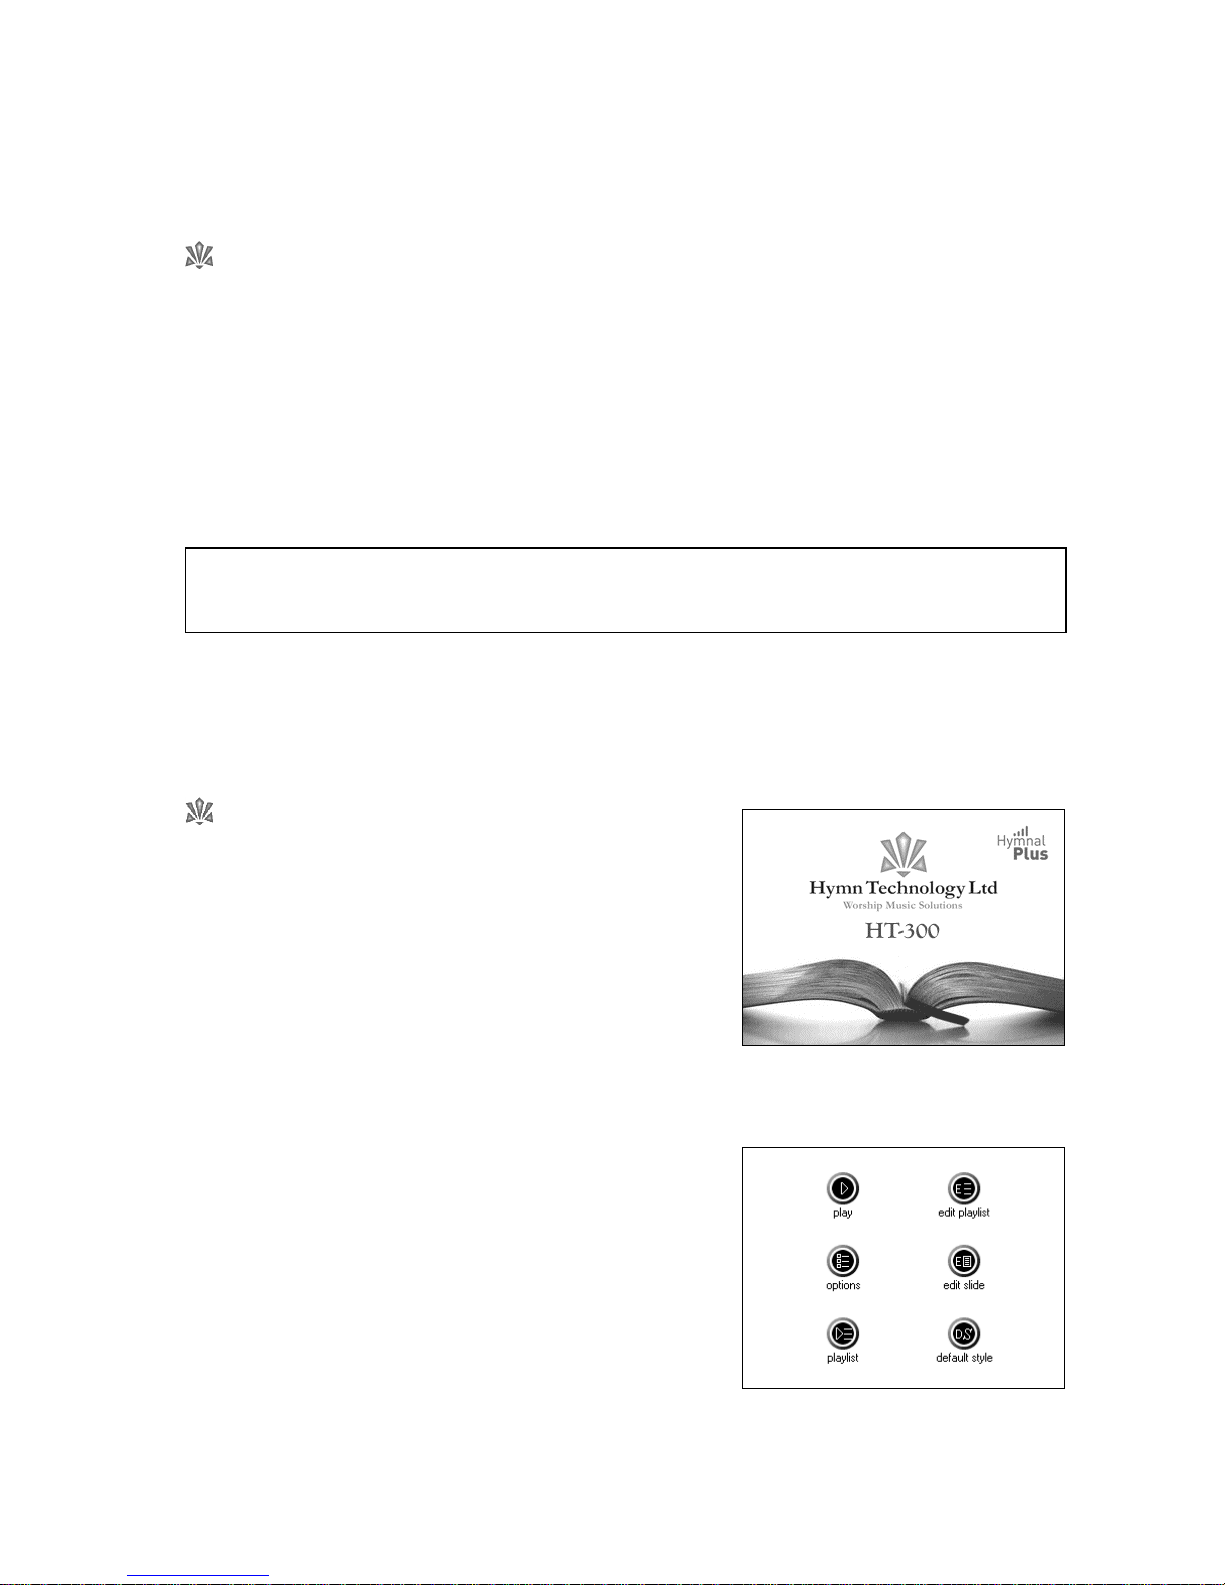
Turn the unit on
The power switch is located on the back of the unit.
The red POWER LED (labeled PWR) on the front panel will light
and the Hymn Technology logo screen will appear.
This will remain for a short time while the unit prepares itself
for use. Then the MAIN MENU screen will appear.
The unit is now ready for use.
The on-screen keys normally appear in black and white. If a key appears in light grey (known as
greyed out
) then that feature is not currently available and the key will be inactive.
main menu screen
logo screen
12 Basics – Getting Started
Select a hymn from the Library
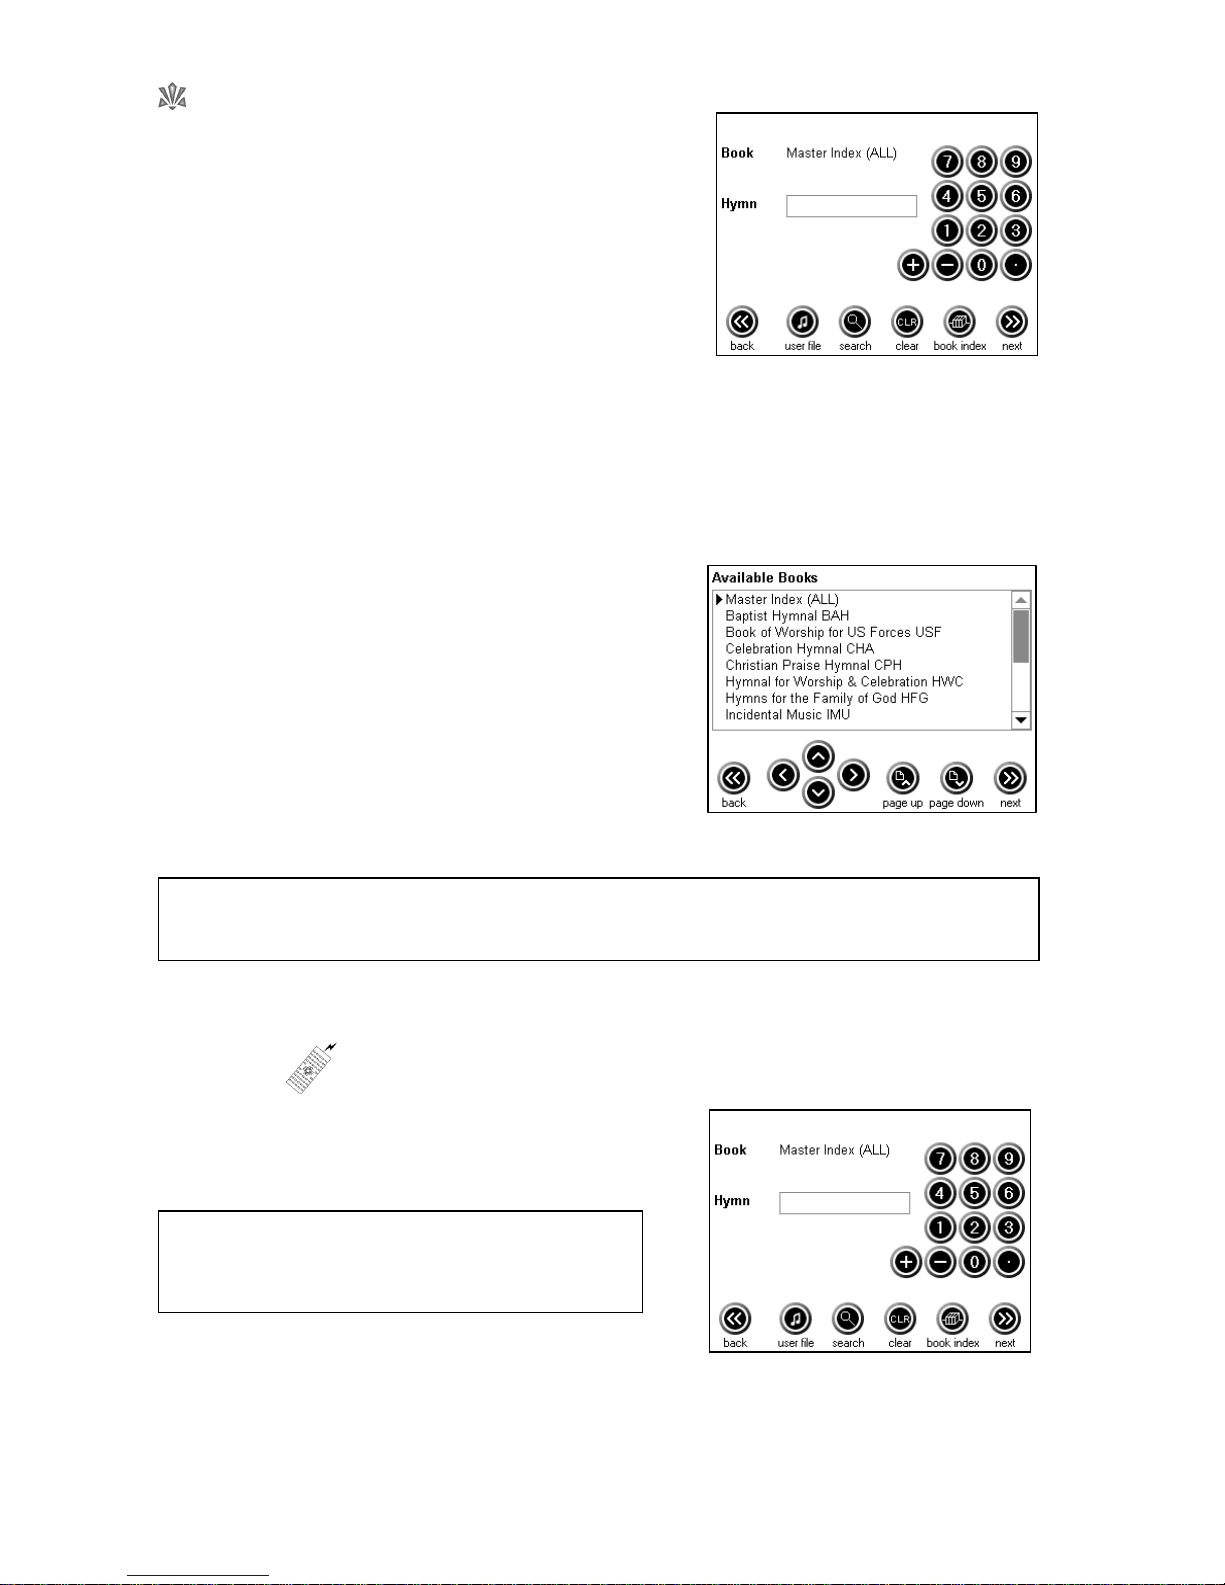
Press the PLAY key on the MAIN MENU screen. The HYMN
SELECT screen will appear.
Select a hymn book
Tunes may be selected either from the Master Index (a list of all available tunes in the unit) or from one of the
indexed hymn books. The currently selected index is shown at the top of the HYMN SELECT screen.
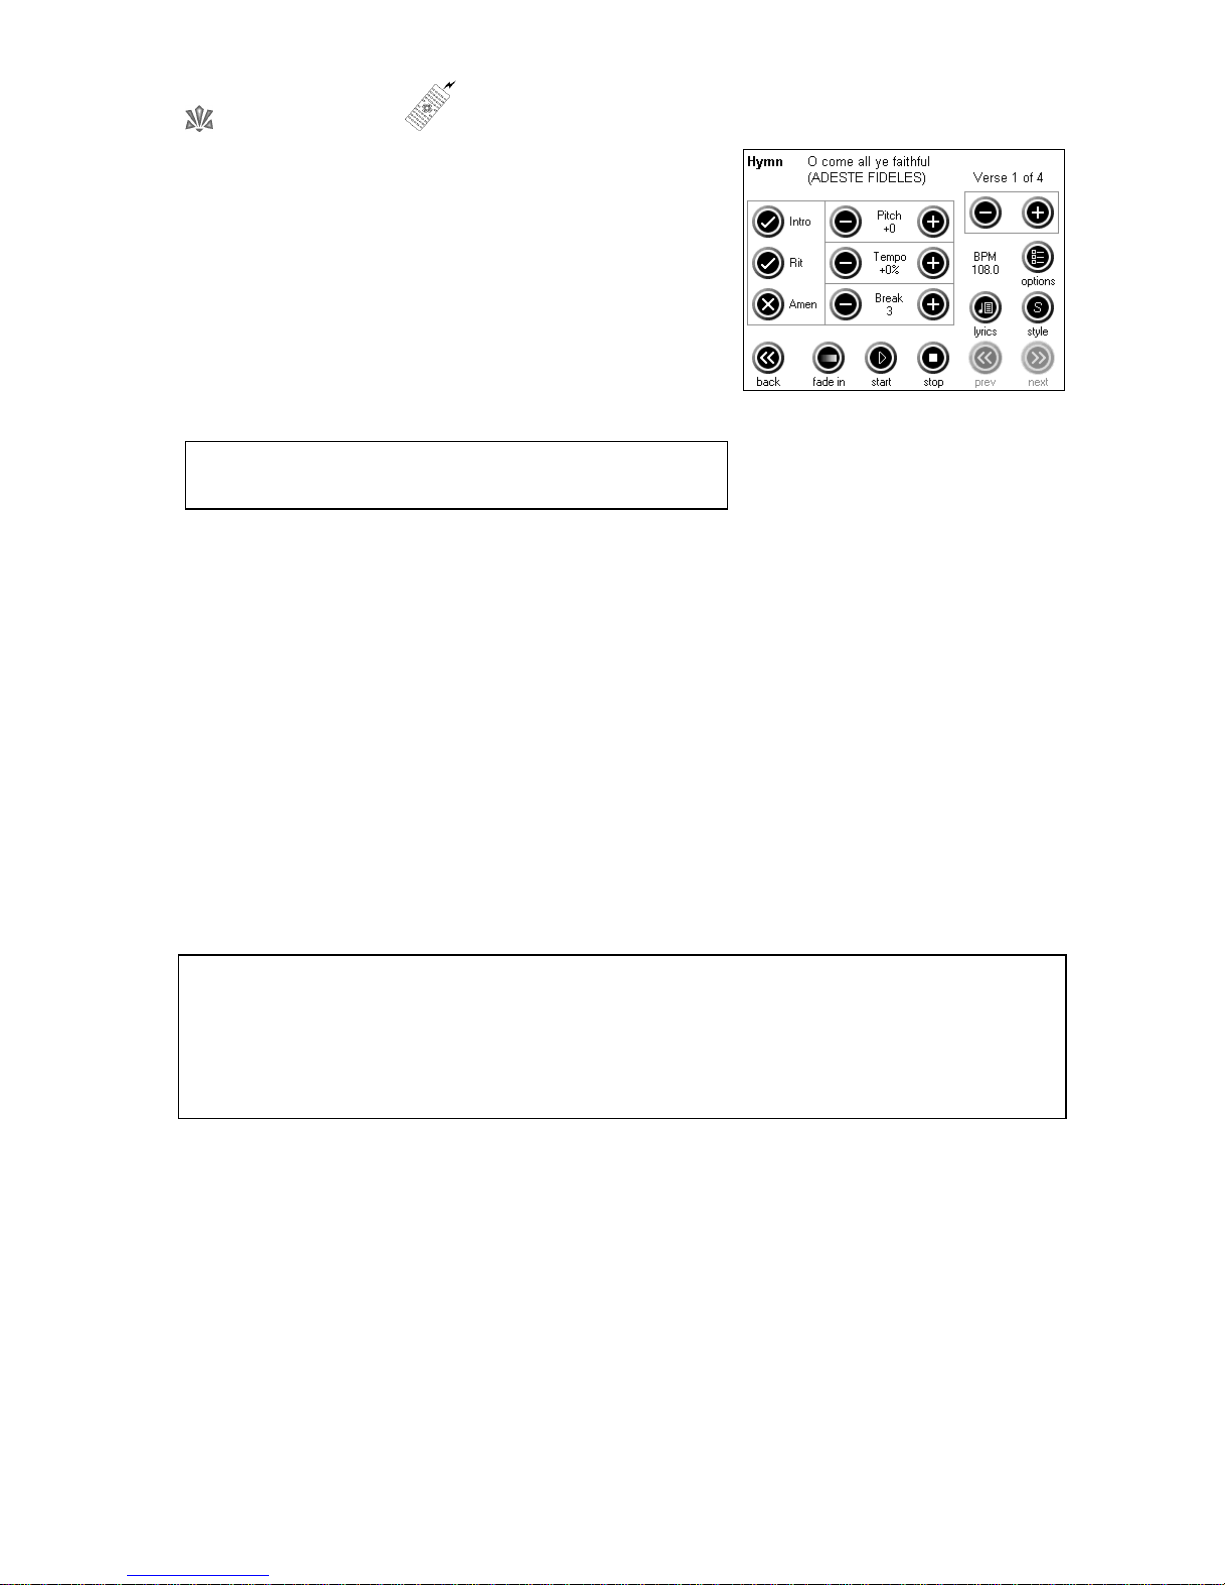
To select a book press the BOOK INDEX key. The BOOK INDEX screen will appear.
The currently selected book is shown by the cursor () to its left.
Move through the list by pressing the UP () or DOWN () keys,
or hold to scroll through the list. You can skip to the next/previous
page of the list by pressing the PAGE UP/PAGE DOWN keys.
When the desired book has been selected, press the NEXT key*.
This will return the display to the HYMN SELECT screen. Note that
the book shown at the top of the screen is now the one just
selected.
Select a hymn
To select a hymn from the current book press the relevant
number keys. The selected numbers will appear in the hymn
box to the left of the number pad. If you make a mistake
simply press the CLEAR key and re-enter the number.
When the desired hymn number has been entered, press the
NEXT key. The PLAY screen will appear.
hymn select screen
hymn select screen
*If you change your mind and do not want to select a different hymn book, press the BACK key
instead of NEXT.
You can scroll through the hymns in the currently
selected book by pressing the +/– keys.
example book index screen
Basics – Getting Started 13
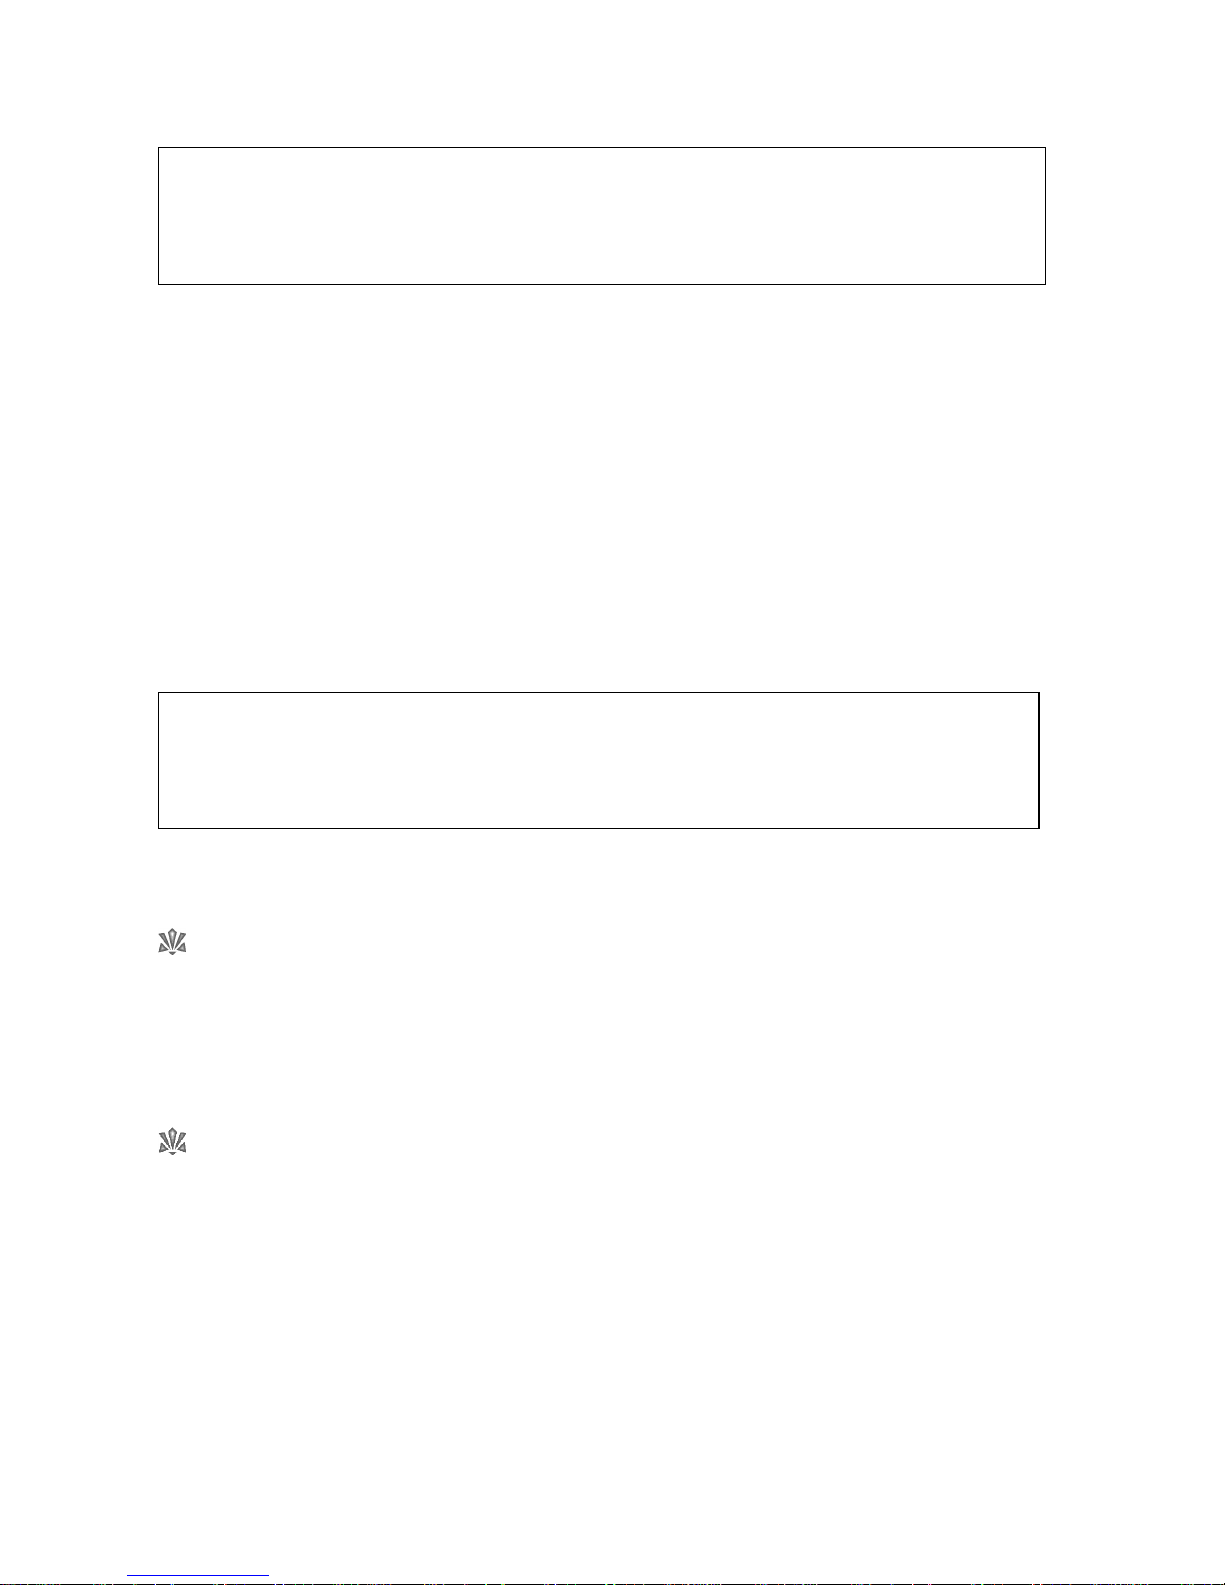
Play a hymn
You are now ready to play the hymn. The unit has automatically
recalled standard settings for the chosen hymn:
Pitch
Tempo (speed)
Break (the pause between verses)
Number of verses
Any of these may be altered by simply pressing the relevant +/–
keys before commencing playback.
Introduction
To add the normal introduction for the hymn, press the INTRO key. Its cross (X) will change to a check mark ()
when selected. The Introduction can be turned off by pressing the INTRO key again.
Ritardando
Ritardando
is the musical term for slowing down at the end of the hymn. To add this effect, press the RIT key. Its
cross (X) will change to a check mark () when selected. The Ritardando can be turned off by pressing the RIT
key again.
Amen
To add a normal Amen at the end of the hymn, press the AMEN key. Its cross (X) will change to a check mark
() when selected. The Amen can be turned off by pressing the AMEN key again.
Start playback
You can start playback in two ways:
1.
The START key
Starts playback normally.
2.
The FADE IN key
Starts playback silently and the volume fades up gently.
Alter the volume
The master volume is controlled by the VOLUME UP and DOWN buttons on the front panel of the HT-300, just
below the touch screen. Holding one of these keys will cause the volume to change progressively (like turning a
knob). The volume level (0 -100) will be displayed across the bottom of the touch screen while it is being
Alterations may also be made during playback if desired.
play screen
The HT-300 is programmed to play a simple Amen when selected. Some plainsong hymns have a
specific musical arrangement of their Amen, and that Amen is an integral part of the hymn. Where this
can be identified as the case, the HT-300 will play the correct Amen as part of the hymn and there is
no need to add the HT-300’s normal Amen.
If using plainsong hymns, always check that the music plays as expected prior to using in a service.
14 Basics – Getting Started
altered. When the desired volume level has been set, release the key. The volume display will disappear after a
couple of seconds (or will disappear immediately if you press that area of the screen).
Pause playback
The START key becomes the PAUSE key when playback is started. To pause playback, press the PAUSE key.
Press the same key again (START) to resume playback.
Stop playback
Playback will automatically stop when all the selected verses (and Amen if selected) have been played.
Press the STOP key to halt playback at any other time.
Fade out playback
The FADE IN key becomes the FADE OUT key when playback is started. To stop playback by fading the sound
out, press the FADE OUT key. The sound will gradually fade away, after which playback is automatically
stopped.
Play the Demo
The HT-300 has a built-in demonstration, to showcase the huge range of tunes and Styles available and give
examples of how you may care to use them. To start the demonstration press the OPTIONS key from the MAIN
MENU screen. The OPTIONS screen will appear. Press the DEMO key to start the demonstration.
Through-Recorded Tunes
Around 95% of the tunes in the HT-300’s
Library
repeat the same music for each verse, and so the required
number of verses can simply be entered using the relevant +/– keys. However, a small number of tunes have
differences or irregularities from verse to verse. Rather than omit these tunes, in these instances the recording
stored in the
Library
is of the whole performance (i.e. all the verses recorded as one item) and the default
number of verses will be shown as 1. With this setting all verses of the tune will be played.
For these tunes (known as
through-recorded
) it is not possible to modify the number of verses to be played.
Increasing the number of verses setting will result in the whole recording (i.e. all the verses) being played more
than once. Similarly, the break between verses cannot be altered.
Tunes of this nature are usually easy to recognize. If you know that a tune has more than one verse, but the HT300 shows its default number of verses as 1, then the chances are that the tune falls into this category.
The default master volume level is set in the Options screen (see Section12: The Options Screen). The
default master volume is recalled each time the HT-300 is powered up. Hence any volume alterations
made using the VOLUME UP and DOWN buttons only remain for the current session (and will also be
over-ridden by the volume settings stored for items in a Play List).
The BACK and NEXT keys are how you move from one screen to another. To select a different hymn
simply press the BACK key from the PLAY screen. Note that the BACK key is not available (it is greyed
out) while a hymn is playing – you must halt playback by pressing the STOP key before you can move
back to the HYMN SELECT screen.
Basics – The Remote Control Handset 15
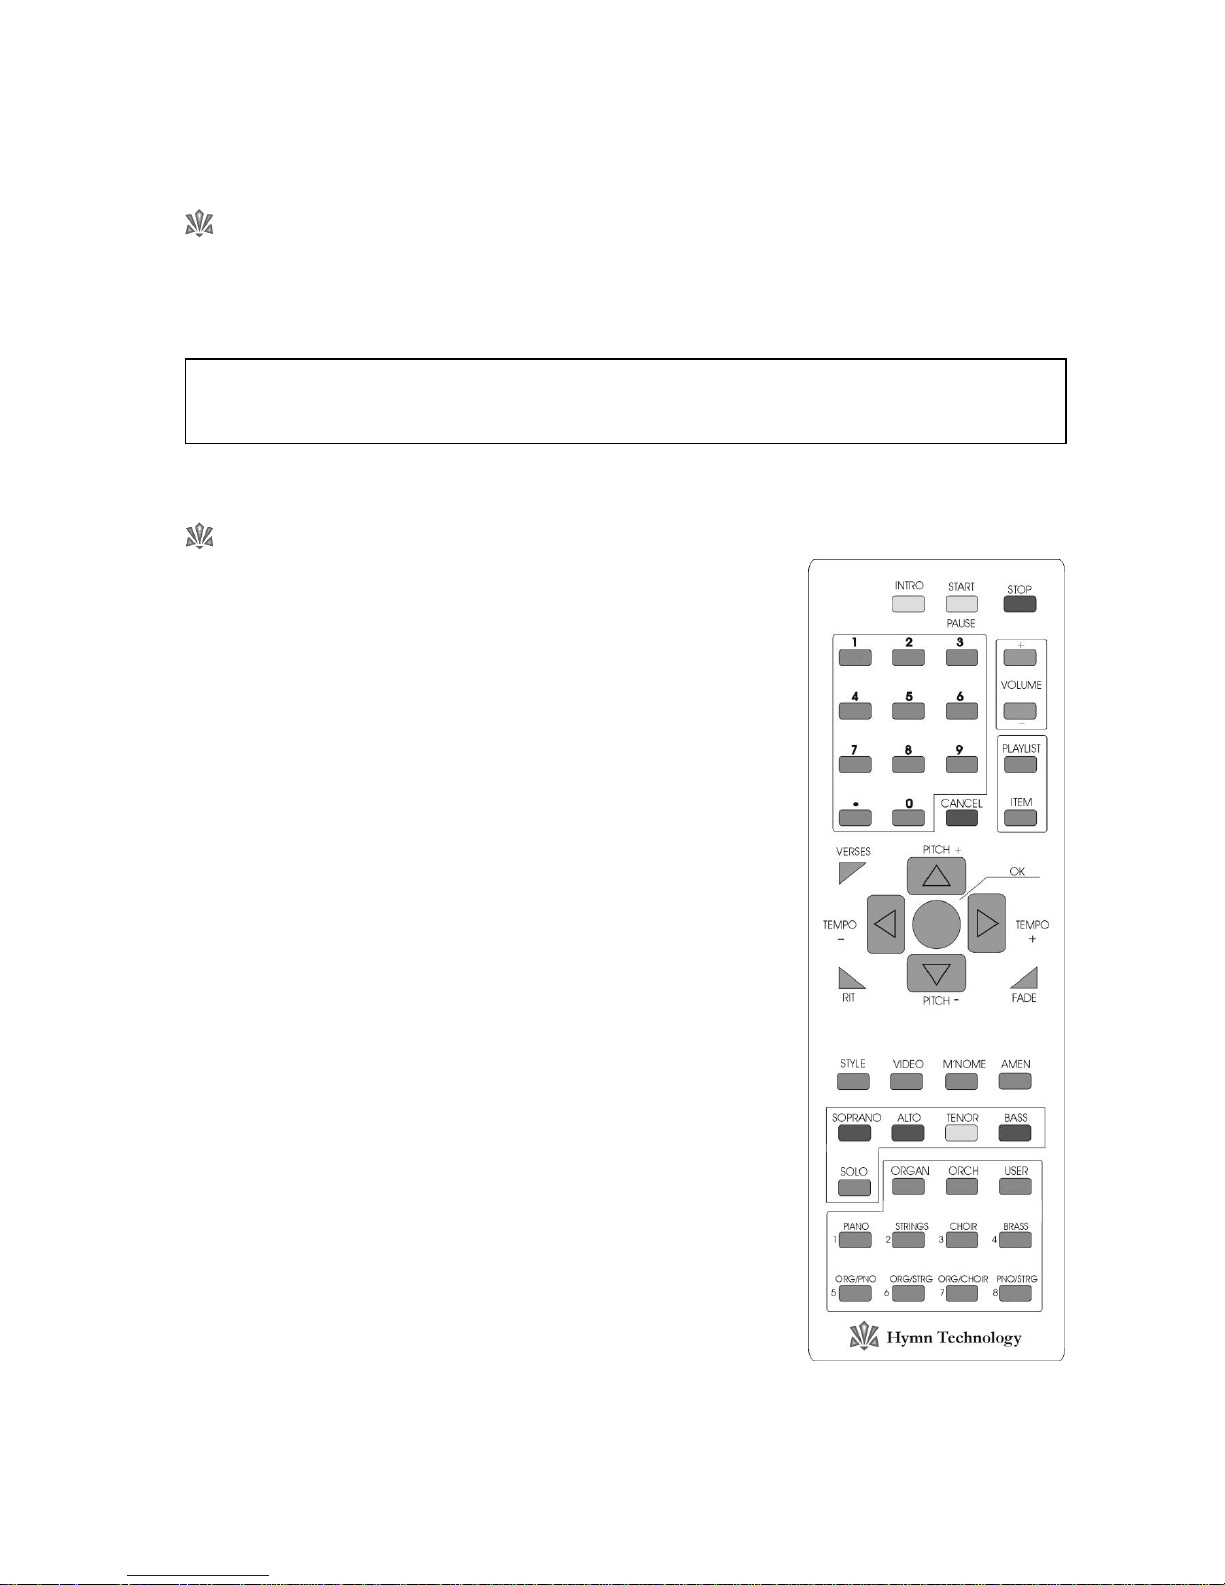
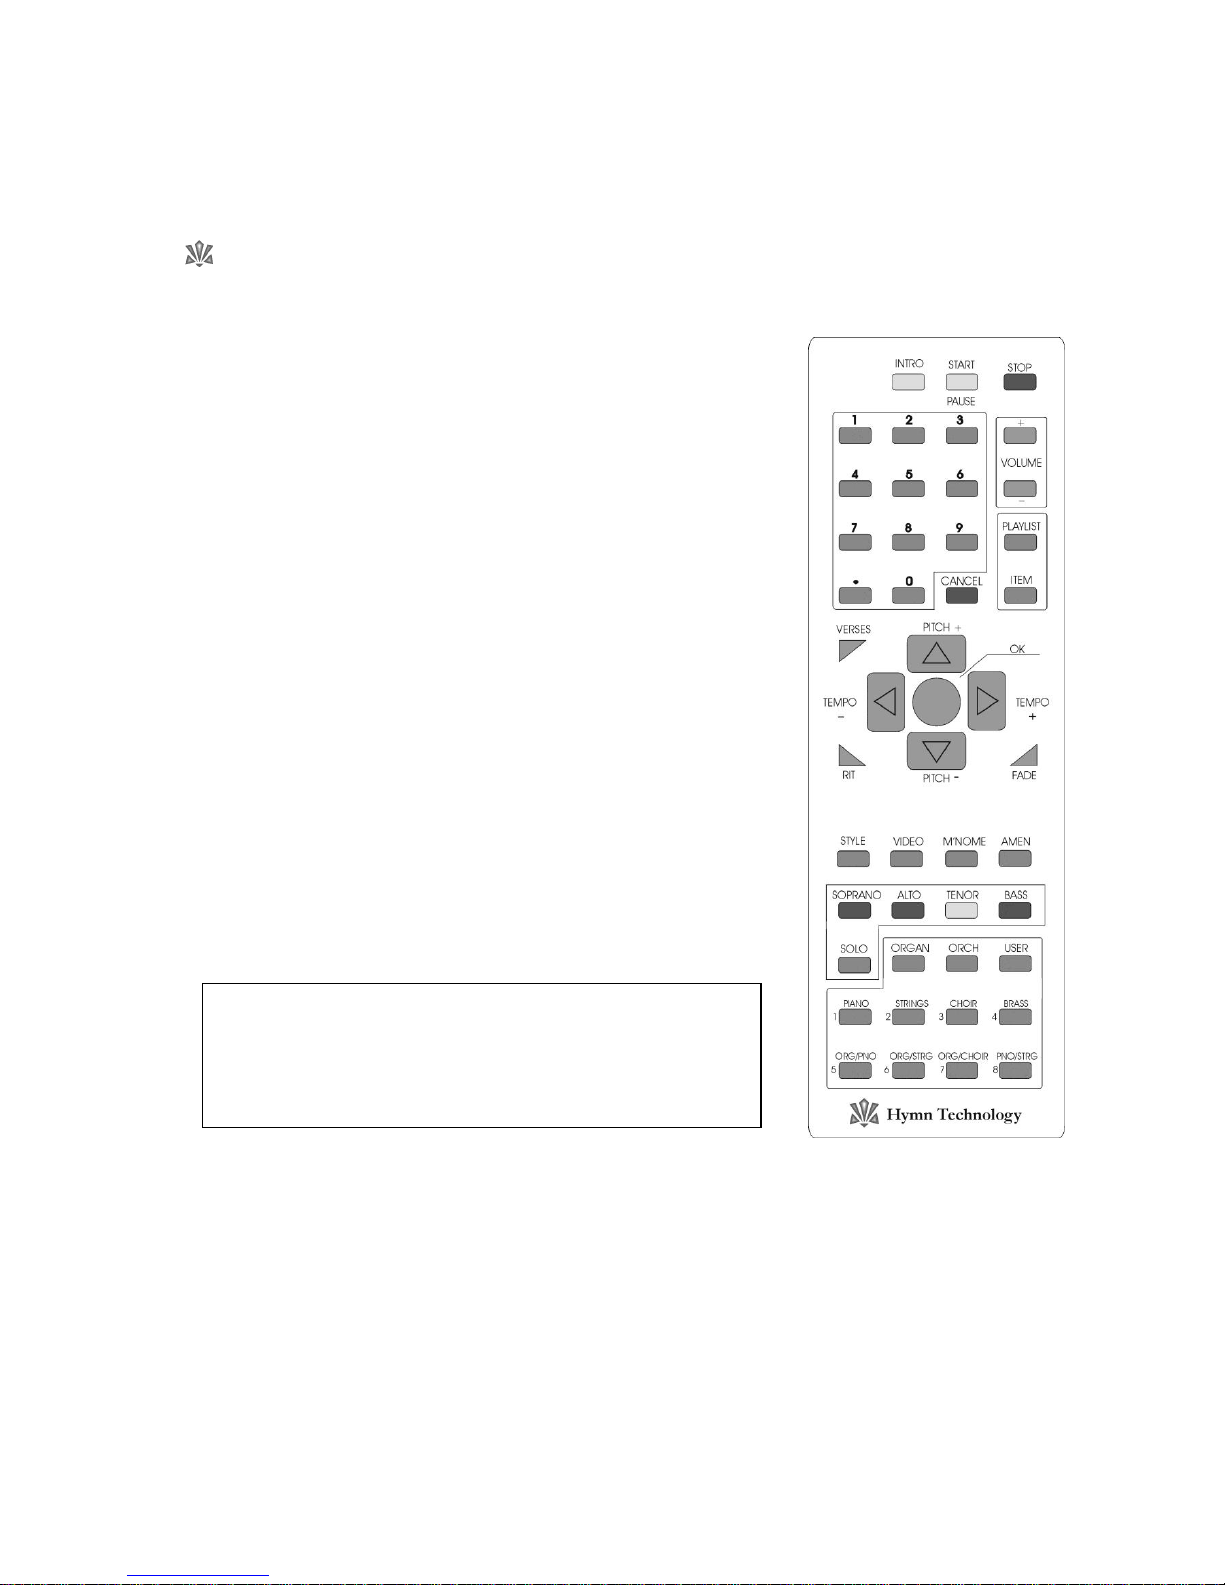
5. The Remote Control Handset
What’s it for?
The Infra-red remote control handset enables the HT-300 user to access many of the unit’s features and
functions from a distance of anything up to about 10 metres (30 feet). This can be very handy when the worship
leader is also the HT-300 operator.
What can I do with it?
The following functions are available from the remote control handset:
Add an Introduction
Press the [INTRO] button to add the normal introduction when playback
is started.
Start/Pause Playback
Press the [START] button to start, pause or resume playback.
Adjust the Volume
Repeatedly press or hold the [VOLUME+] or [VOLUME] button to
increase or decrease the volume.
Select a Hymn Number
Enter the desired number on the number pad and then press the [OK]
button in the middle of the handset.
Select a Style
Press the [STYLE] button, enter the desired style number on the number
pad and then press the [OK] button.
Select a Play List
Press the [PLAYLIST] button, enter the desired Play List number on the
number pad and then press the [OK] button.
Select an Item in the Currently Selected Play List
Press the [ITEM] button, enter the desired item number on the number
pad and then press the [OK] button.
Infra-red devices can be adversely affected by bright fluorescent light or bright daylight. If this is a
problem, shield the HT-300 from the source of the bright light.

16 Basics – The Remote Control Handset
Cancel
Cancels the selection just made, if pressed within a couple of seconds of making that selection (but before
pressing the [OK] button).
Alter the Number of Verses
Press the [VERSES] button, enter the desired number of verses on the number pad and then press the [OK]
button.
Add a Ritardando to the End of a Tune
Press the [RIT] button to turn on the RIT feature (automatically slows down the final few bars of the last verse of a
tune). Press again to turn the RIT feature off.
Fade Music In or Out
Press the [FADE] button to start playback of the music with a gentle fade in.
Press the [FADE] button
during
playback to stop the music with a gentle fade out.
Raise or Lower the Pitch
Press the [PITCH+] or [PITCH] button once to raise or lower playback pitch by one step (semitone). Press
repeatedly to move the pitch by more steps (range: 5 to +6).
Alter the Tempo
Press the [TEMPO+] or [TEMPO] button to increase/decrease playback speed.
Turn Video Output On/Off
If the Video Display option is installed in your HT-300, press the [VIDEO] button to enable output to an external
projector. Press again to disable.
Add a Metronome Click
Press the [MNOME] button to turn on a metronome click. Press again to turn it off.
Add an Amen
Press the [AMEN] button to turn the Amen feature on (adds a simple Amen at the end of the last verse of a tune).
Press again to turn it off.
Modify the Soprano, Alto, Tenor and Bass parts
Solo a Part
Press the relevant part button ([SOPRANO] [ALTO] [TENOR] [BASS]) followed by the [SOLO] button, in
order to play that part on its own (solo). Any of the other parts may be re-introduced by pressing the
relevant buttons. To revert to normal playback of all four parts, press the [SOLO] button on its own to turn
off the Solo feature.
Alter the Volume of a Part
Press the relevant part button ([SOPRANO] [ALTO] [TENOR] [BASS]) and then quickly press the
[VOLUME+] or [VOLUME] button to increase or decrease the volume of the selected part.
Basics – The Remote Control Handset 17
Alter the Style (Sound) of a Part
Press the relevant part button ([SOPRANO] [ALTO] [TENOR] [BASS]) and then quickly press the [STYLE]
button. Enter the desired style number on the number pad and then press the [OK] button.
The Orchestrator
For convenience, 24 Styles can be selected very quickly from the remote
control. These are divided into three groups of eight presets – Organ,
Orchestral and User. Using these, the Style may be easily changed from
verse to verse during playback of a tune.
Organ
To select one of the eight pipe organ presets, press the [ORGAN]
button followed by one of the eight numbered buttons below it
(
not
the number pad buttons). To change to another organ preset
you don’t need to press the [ORGAN] button again, just press
another of the eight numbered buttons.
Orchestral
To select one of the eight orchestral presets, press the [ORCH]
button followed by one of the eight numbered buttons below it
(
not
the number pad buttons). To change to another orchestral
preset you don’t need to press the [ORCH] button again, just
press another of the eight numbered buttons.
User
To select one of the eight user presets, press the [USER] button
followed by one of the eight numbered buttons below it (
not
the
number pad buttons). To change to another user preset you don’t
need to press the [USER] button again, just press another of the
eight numbered buttons.
See Section 8: Styles for information on how to store user Styles
for selection from the remote control.
The HT-300 has hundreds of Styles that you can use. The
Orchestrator
is purely a shortcut to 24 of them. To access
the full range of Styles from the remote control handset, see
Select a Style above.
18 Reference – The Tune Library
6. The Tune Library
The HT-300 has thousands of tunes built-in, providing immediate access to a wealth of music. Known as the
Library
, this repertoire comprises three main types of tune:
Traditional hymns
Modern worship music
Incidental music
Traditional Hymns
Most hymn books (music edition) have at least two indexes at the back of the book – a
first line
index and a
tune
index. Why? All songs are made up of two components, the music and the lyrics. There is a convention with
traditional hymns to give the music its own name in order that it may be used with many sets of lyrics, not just
the ones for which it was originally written. For example, the hymn
Love divine all loves excelling
is commonly
sung to no less than four different tunes – BLAENWERN, HYFRYDOL, LOVE DIVINE and WESTMINSTER. So, you
can see that the well-known title of
Love divine all loves excelling
only accurately identifies the lyrics, not the tune
to which it is sung.
Wherever possible the traditional hymns in the
Library
of tunes are cross-referenced by both first line and tune
name. Consequently, searching the Master Index for the words
Love divine
will produce several results:
Love divine all loves excelling (BLAENWERN)
Love divine all loves excelling (HYFRYDOL)
Love divine all loves excelling (LOVE DIVINE)
Love divine all loves excelling (WESTMINSTER)
Modern Worship Music
The conventions of traditional hymn writing outlined above largely do not apply to modern worship music – the
combination of music and lyrics is collectively known by one title. However, many modern worship songs consist
of verses and a chorus section. In these instances it is common for the song to be known by both its first line and
a common title (usually the first few words of the chorus). For example
Lord the light of your love
is commonly
known as
SHINE JESUS SHINE
, the first few words of the chorus section. For speedy identification, the HT-300
stores both the first line and the common title wherever possible. The common title is shown as though it were a
proper tune name:
Lord the light of your love (SHINE JESUS SHINE)
For ease of recognition, the HT-300 always shows first lines in normal upper/lower case letters, while
tune names always appear in UPPER CASE (capital) letters. All punctuation has been removed to assist
in simplifying searches.
A fourth category - Psalms and Canticles - is available if the
PSALM PLAYER
option is installed. See
Section 15: The Psalm Player.
The HT-300 will display all commonly used tunes for any recognized first line. If you want to know
which other tunes would fit to a set of lyrics, you will need to refer to the metrical index at the back of
your hymn book (music edition) – if it has one. For an explanation of how metrical indexes work, see
Appendix iii: Metrical Indexes.
 Loading...