

hygena AHY8122 Installation Manual
DISHWASHER
INSTALLATION AND USE
AHY8122
0120501055
NOTES
DECLARATION OF CONFORMITY
The manufacturer of the product/s described herein, to which this description refers, declares on its sole responsibility that the
product/s meet the relevant fundamental safety, health and protection requirements of the relevant EU guidelines and that corresponding test reports are available for examination by the relevant authorities and can be requested from the seller of the appliance ,
especially with regard to CE Declaration of Conformity issued by the manufacturer or with the manufacturer's approval.
Moreover, the manufacturer declares that the parts of the appliance described in this user manual, which come into contact with fresh
food, do not contain any toxic substances.
Please keep this handbook for future reference or for anyone else who may use this appliance.
○○○○○○○○○○○○○○○○○○○○○○○○○○○○○○
1
Safety Is a Good Habit to Get Into
Close-up View (control panel)
○○○○○○○○○○○○○○○○○○○○○○○○○○○○○○○○
1
Close-up View (Interior)
Salt
○○○○○○○○○○○○○○○○○○○○○○○○○○○○○○○○○○○○
2
○○○○○○○○○○○○○○○○○○○○○○○○○○○○○○○○○○○○○○○○○○○○
3
Detergent and Rinse Aid
Loading the Dishwasher
○○○○○○○○○○○○○○○○○○○○○○○○○○○○○○○○○
○○○○○○○○○○○○○○○○○○○○○○○○○○○○○○○○○○○
4
5
Turning on the Appliance
Wash Cycle adjustment Buttons
○○○○○○○○○○○○○○○○○○○○○○○○○○○○○○○○○○○
6
○○○○○○○○○○○○○○○○○○○○○○○○○○○○○○○
6
Wash Cycle Table
How to Keep Your Dishwasher in Shape
○○○○○○○○○○○○○○○○○○○○○○○○○○○○○○○○○○○○○○
○○○○○○○○○○○○○○○○○○○○○○○○○○○
7
8
Cleaning and Special Maintenance
Troubleshooting
○○○○○○○○○○○○○○○○○○○○○○○○○○○○○○
8
○○○○○○○○○○○○○○○○○○○○○○○○○○○○○○○○○○○○○○○
9
Installation
○○○○○○○○○○○○○○○○○○○○○○○○○○○○○○○○○○○○○○○○○○○
9
CONTENTS
Energy Saving Tips
10
○○○○○○○○○○○○○○○○○○○○○○○○○○○○○○○○○○○○○○○
S
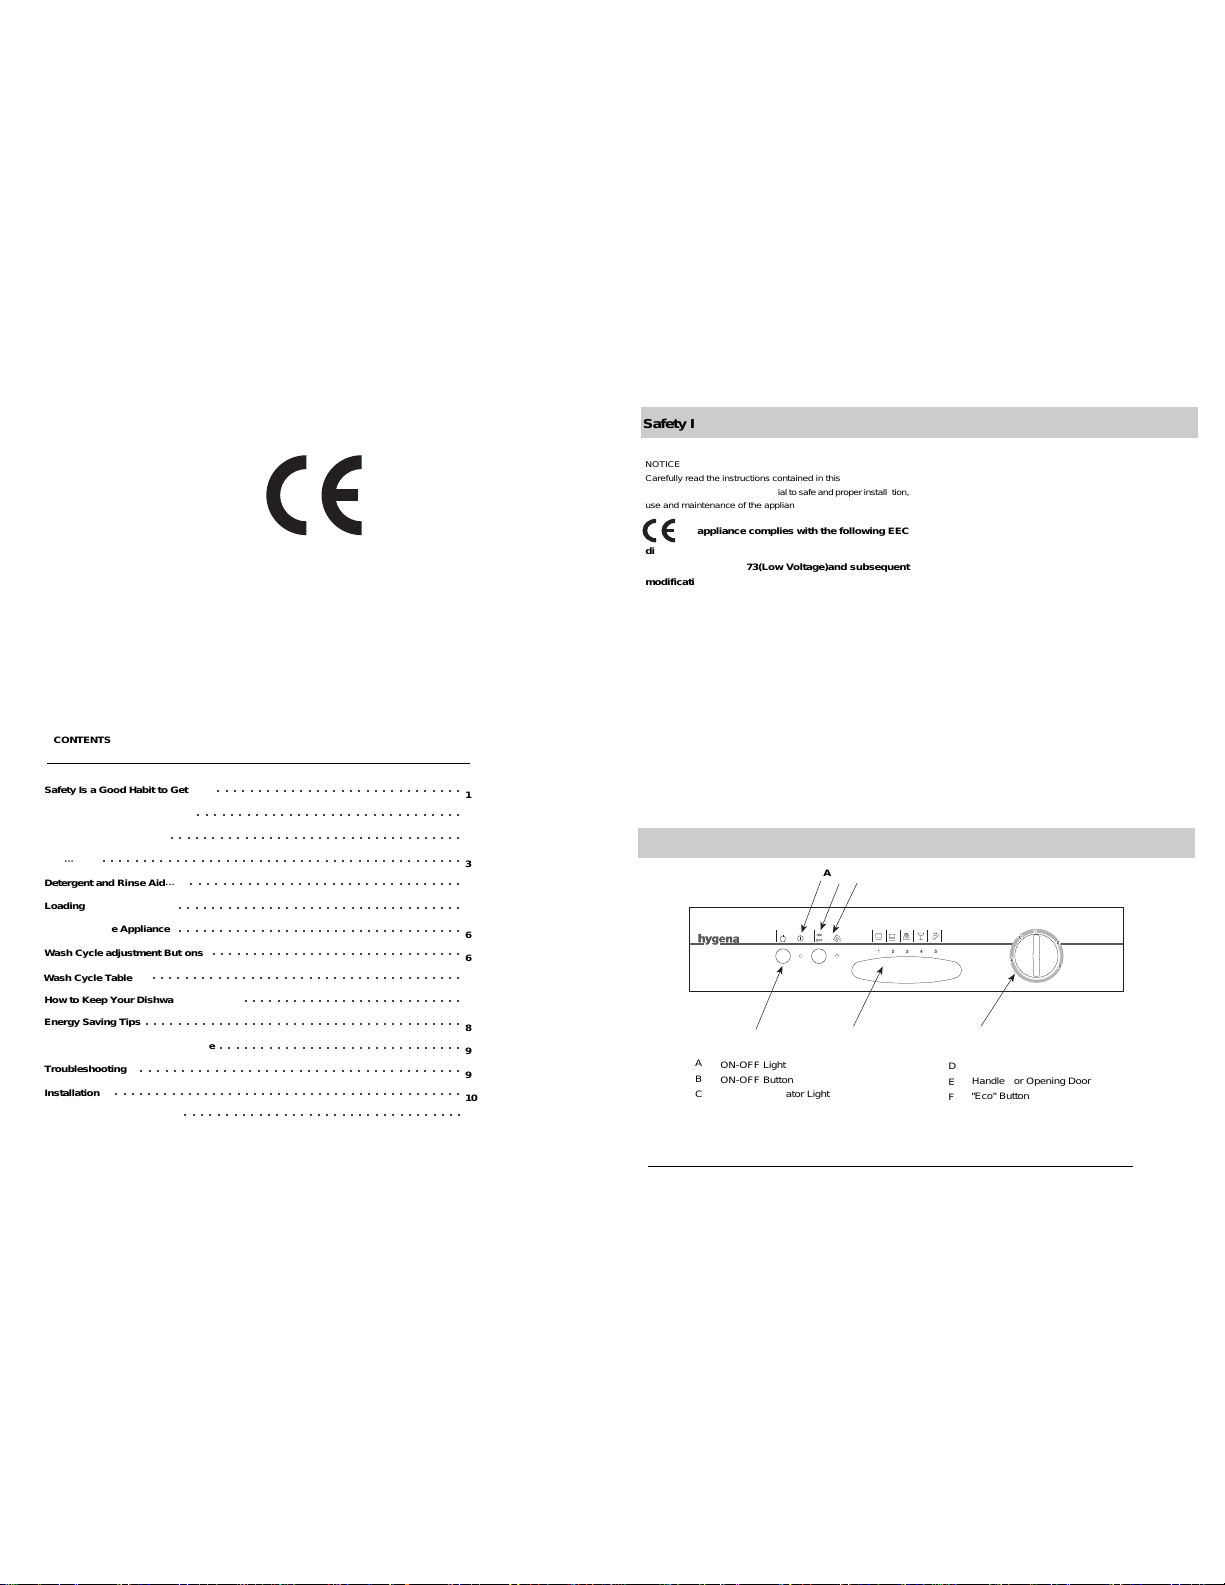
Safety Is a Good Habit to Get Into
Close-up View (Control Panel)
A
B
C
ON-OFF Light
ON-OFF Button
Handle For Opening Door
D
E
F
"Eco" Button
A B C
F
E
D
Knob For Selecting Program
Low Salt Indicator Light
NOTICE
Carefully read the instructions contained in this manual, as they
provide importion which is essential to safe and proper installation,
use and maintenance of the appliance.
This appliance complies with the following EEC
directives:
-73/23/EEC of 19/02/73(Low Voltage)and subsequent
modifications;
- 89/336/EEC of 03/05/89 (Electromagnetic
Compatibility) and subsequent modifications.
- Carefully dispose of the packing material.
- After removing the packing, check to make sure that the appli ance is not damaged. If in doubt, contact a qualified professional.
- The dishwasher must only be used by adults for the washing of
household dishes and cooking utensils.
- Fundamental rules to follow when using the appliance:
* Do not use the extension cords or multiple sockets;
* During installation, the power supply cord must not be exces sively or dangerously bent or flattened;
* If the appliance is not operating properly or maintenance must
be performed, disconnect the appliance from the power supply.
- Keep detergents out of the reach of children, who must also be
kept away from the dishwasher when it is open.
- This appliance cannot be installed outdoors, not even if the
area in which it is installed is covered by a roof; it is also very
dangerous to leave it exposed to the rain and elements.
- Do not touch the heating element during or after a wash cycle.
- Do not lean or sit on the door when it is open ,as this could
overturn the dishwasher.
- Do not use solvents of any kind inside your dishwasher. They
could cause an explosion.
- If the appliance malfunctions, turn off water supply to the appli
ance and disconnect the plug from the wall socket. Then, con
sult the section entitled, "Troubleshooting. "If you cannot
solve the problem, contact a service centre.
- Only specialized personnel are authorized to make repairs.
- Appliances which are no longer being used must be made
inoperable by cutting the power supply cord and removing the
plugs from the socket.
- The appliance must be positioned so that the plug is accessible.
- If the supply cord is damaged , it must be replaced by a
special cord or assembly available from the manufacturer or
its service agent.
.1.
Electrical Safety Instruction
○○○○○○○○○○○○○○○○○○○○○○○○○○○○○○○○○○
12
Close-up View (Interior)
A
B
C
D
Upper Rack
Rack Height Adjustor
Top Sprayer Arm
Lower Rack
E
F
G
H
Washing Filter
Bottom Sprayer Arm
Detergent and Rinse Aid Dispenser
Salt Container Cap
Technical characteristics
Width
60 cm
Depth
60 cm
Height
85 cm
Capacity
12 standard place settings
Mains water pressure
Voltage
220-240V~ 50Hz
2100W
Total power
.2.
Minimun30KPa / Maxmun600KPa
Salt
Salt
The hardness of the water varies from place to place. If hard
water is used in the dishwasher, deposits will form on the dishes
utensils.
The appliance is equipped with a special softener that uses a salt
specifically designed to eliminate lime and minerals from the water.
Loading the Salt into the Softener
Always use salt intended for use with dishwashers.
The salt container is located beneath the lower rack and should
be filled as follows:
- Remove the lower rack, unscrew and remove the cap
from the salt container;
- If you are filling the container for the first time, fill it with water;
- Place the end of the funnel (supplied) into the hole and intro duce about 2 kg of salt. It is normal for a small amount of water
to come out of the container.
- Carefully screw the cap back on.
The salt container should be filled when the "low salt" indicator
light (located on the control panel) counts on.
To prevent the formation of rust, load the salt just before beginning a wash cycle.
Adjusting Salt Consumption
The dishwasher is equipped with a system to adjust the level of
salt consumption in function of the hardness of the water being
used in order to optimize and customize the level of salt consumption while keeping it to a minimum.
To adjust salt consumption level , follow these instructions:
- Unscrew the cap on the salt container;
- There is a ring on the container with an arrow on it. (See figure
above). If necessary, turn the arrow in the anti-clockwise direc tion from the "-" setting to the "+" setting based on the hard ness of the water being used.
- It is highly recommended that the table be consulted when
making adjustments .
.3.
Water Hardness
Clark
detergent
dH
mmol/l
Selector
position
Salt
consumption
(Grams/cycle)
Autonomy
(cycles/2kg)
0 14
 Loading...