

Page 1
Attenborough 4',4'6"and 5' Ottoman Beds
Assembly Instructions Please keep for future reference
hygena
417/9810
417/9810
404/8972
413/6822
418/1279
417/8536
381/4561
418/6463
418/6614
418/7981
Dimensions (4')
Length - 203cm
Width - 130cm
Height - 85cm
Dimensions (4'6)
Length - 203cm
Width - 145cm
Height - 85cm
Dimensions (5')
Length - 213cm
Width - 160cm
Height - 85cm
Important Please read these instructions fully before starting assembly
If you need help or have damaged or missing parts, call the Customer Helpline: 0345 6400 800
Issue 1-24/06/15
Page 2
Safety and Care Advice
Check you have all the
components and tools listed on
pages 2, 3 and 4.
Remove all fittings from the
plastic bags and separate them
into their groups.
Keep children and animals
away from the work area, small
parts could choke if swallowed.
Make sure you have enough
space to layout the parts before
starting.
Only clean using a damp cloth
and mild detergent, do no use
bleach or abrasive cleaners.
Assemble the item as close
to its final position (in the same
room) as possible.
Assemble on a soft level
surface to avoid damaging the
unit or your floor.
Assembly requires 2 people.
Do not fully tighten bolts until the
whole bed is assembled. Do not
overtihgten the nuts to avoid
causing damage to the threads.
From time to time check that
there are no loose screws on
this unit.
We do not
recommend the
use of power
drill/drivers for
inserting screws,
as this could damage the unit.
Only use hand screwdrivers and
Allen keys.
Dispose of all packaging
carefully and responsibly.
This product should not be
discarded with household
waste. Take to your local
authority waste disposal centre.
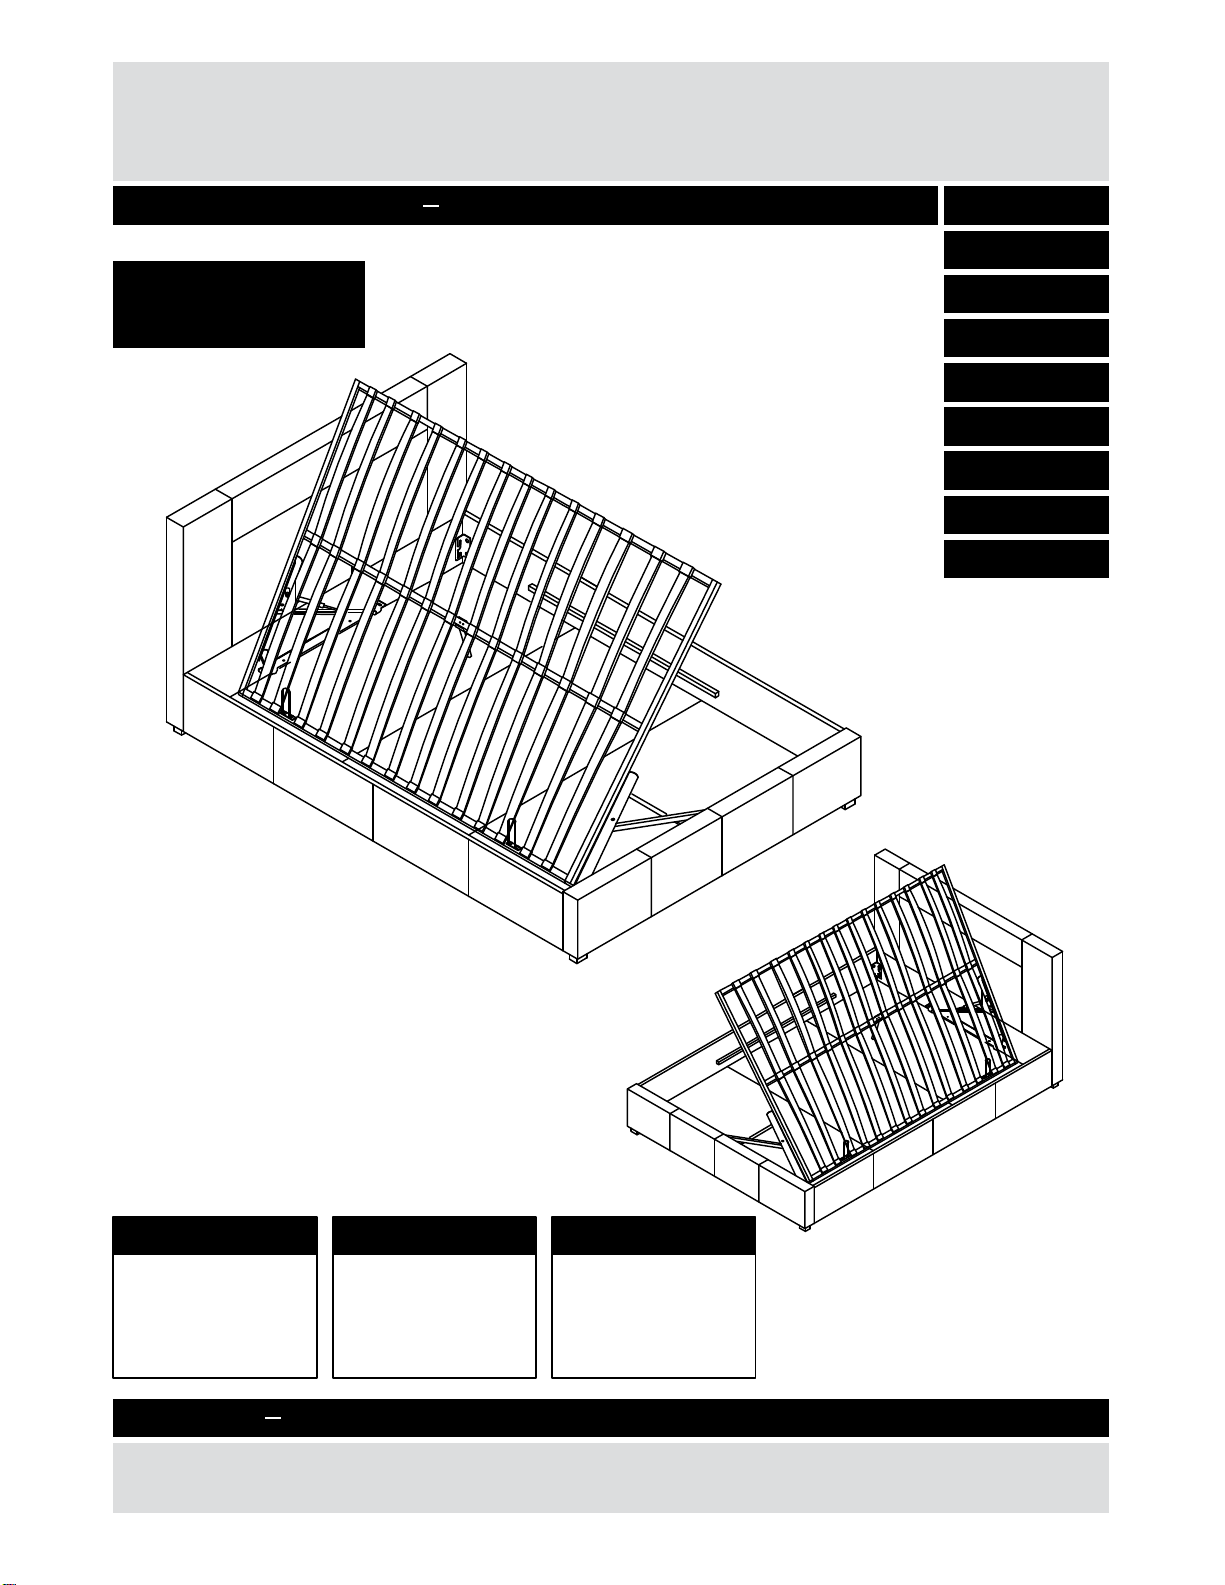
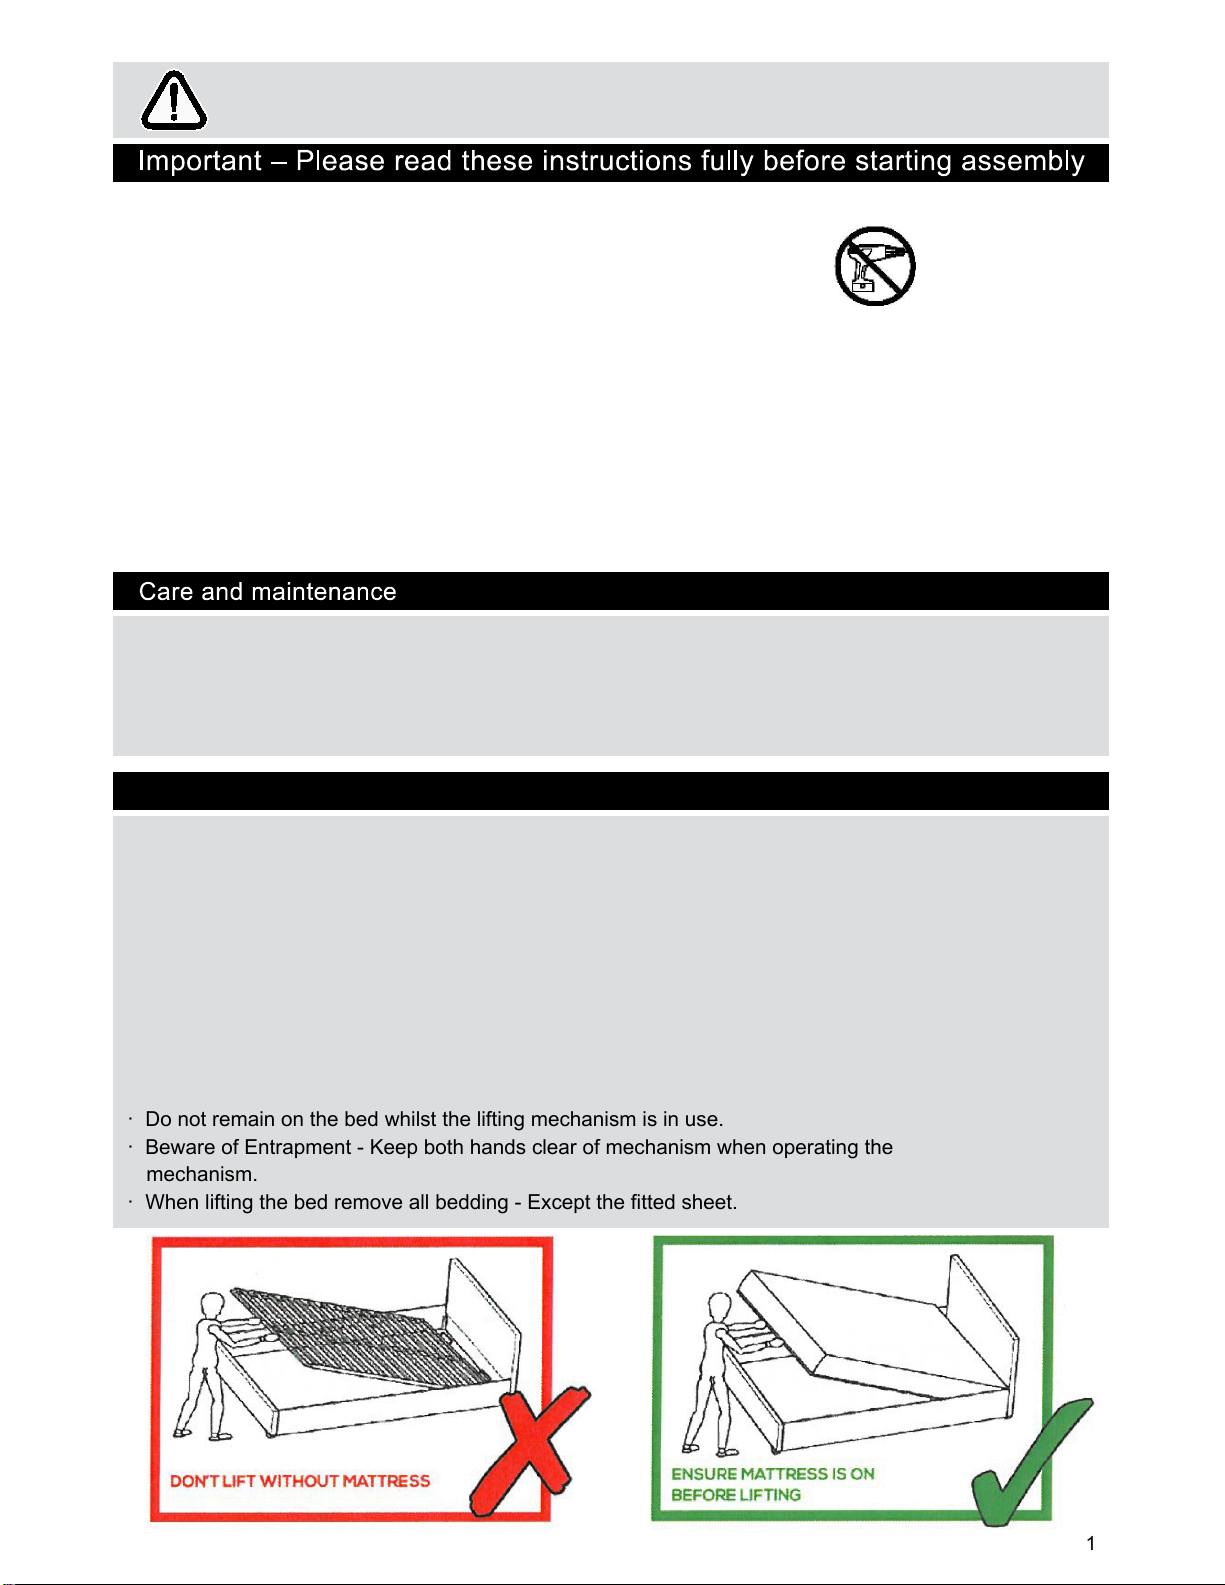
Important Ottoman Safety Warnings
· Caution.This bed uses a pressurised mechanism.
· Use caution when operating - Always use two hands at arm’s length, and only where
illustrated on the product.
· You must ensure the mattress is on the bed frame before lifting the mechanism - Failure
to do so may result in injury.
· Please ensure Children and pets are kept away from the bed when operating the bed
mechanism.
· If removing the mattress, make sure that the frame is secured as it could flip open.
· Only use the storage compartment when the frame is fully raised in the ‘up’ position.
· No children or animals are left unattended when the frame is in the ‘up’ position.
· Do not remain on the bed whilst the lifting mechanism is in use.
· Beware of Entrapment - Keep both hands clear of mechanism when operating the
mechanism.
· When lifting the bed remove all bedding - Except the fitted sheet.
v.jpg
X.jpg
1
Page 3
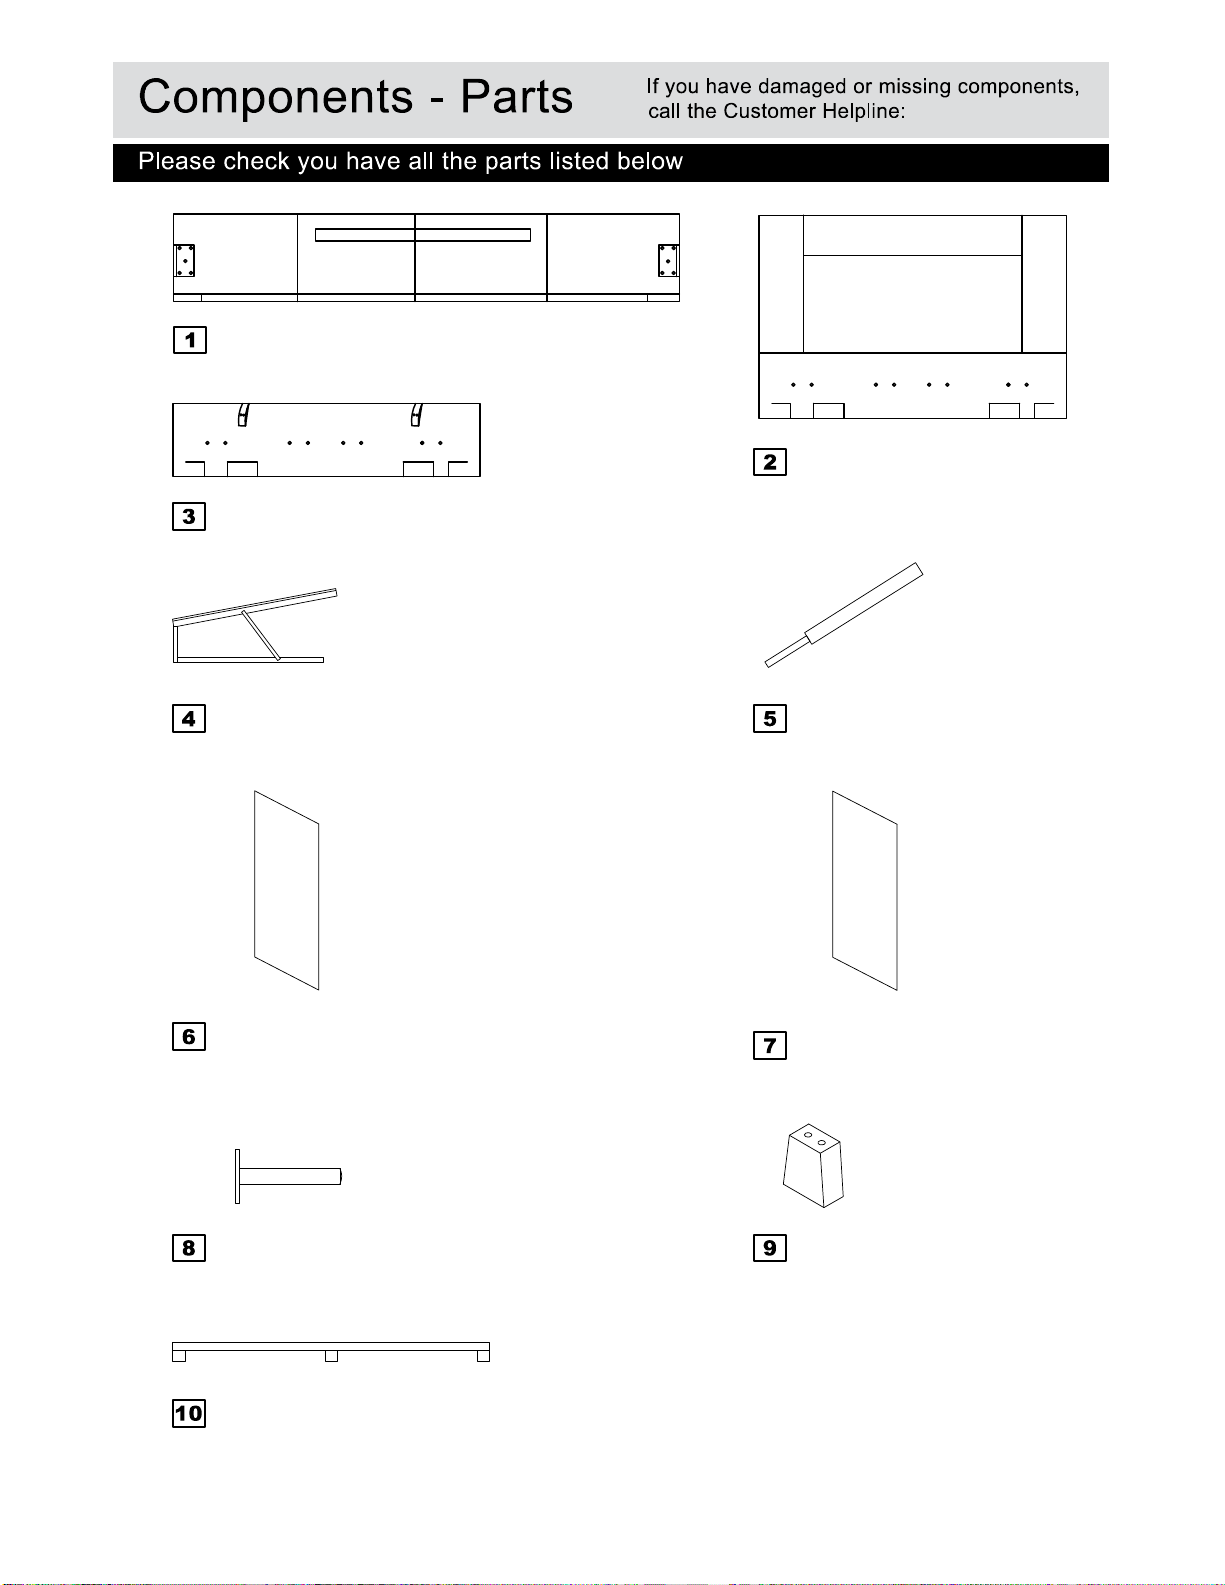
Side rail x 2 (4'-1930 × 310mm)(4'6-1930 × 310mm)
(5'-2030 × 310mm)
0345 6400 800
INSIDE
Footboard
(4'-1300 × 310mm)(4'6-1445 × 310mm)
(5'-1600 × 310mm)
Hinges (x 1 pair)
(750 x 115mm)
FRONT
Headboard
(4'-1300 × 810mm)(4'6'-1445 × 810mm)
(5'-1600 × 810mm)
Piston x 2
(420mm)
Base panel x 2
(4'-600× 1228mm)(4'6-600 × 1379mm)
(5'-600 × 1528mm)
Long support leg x 1 (Ø25 × 190mm)
Ottoman end frame x 2
(4'-1210 × 118mm)(4'6-1360 × 118mm)
(5'-1510 × 118mm)
Base panel x 1
(4'-724× 1228mm)(4'6-724 × 1379mm)
(5'-824 × 1528mm)
Feet x 4
(62 x 33 x 41.6mm)
2
Page 4
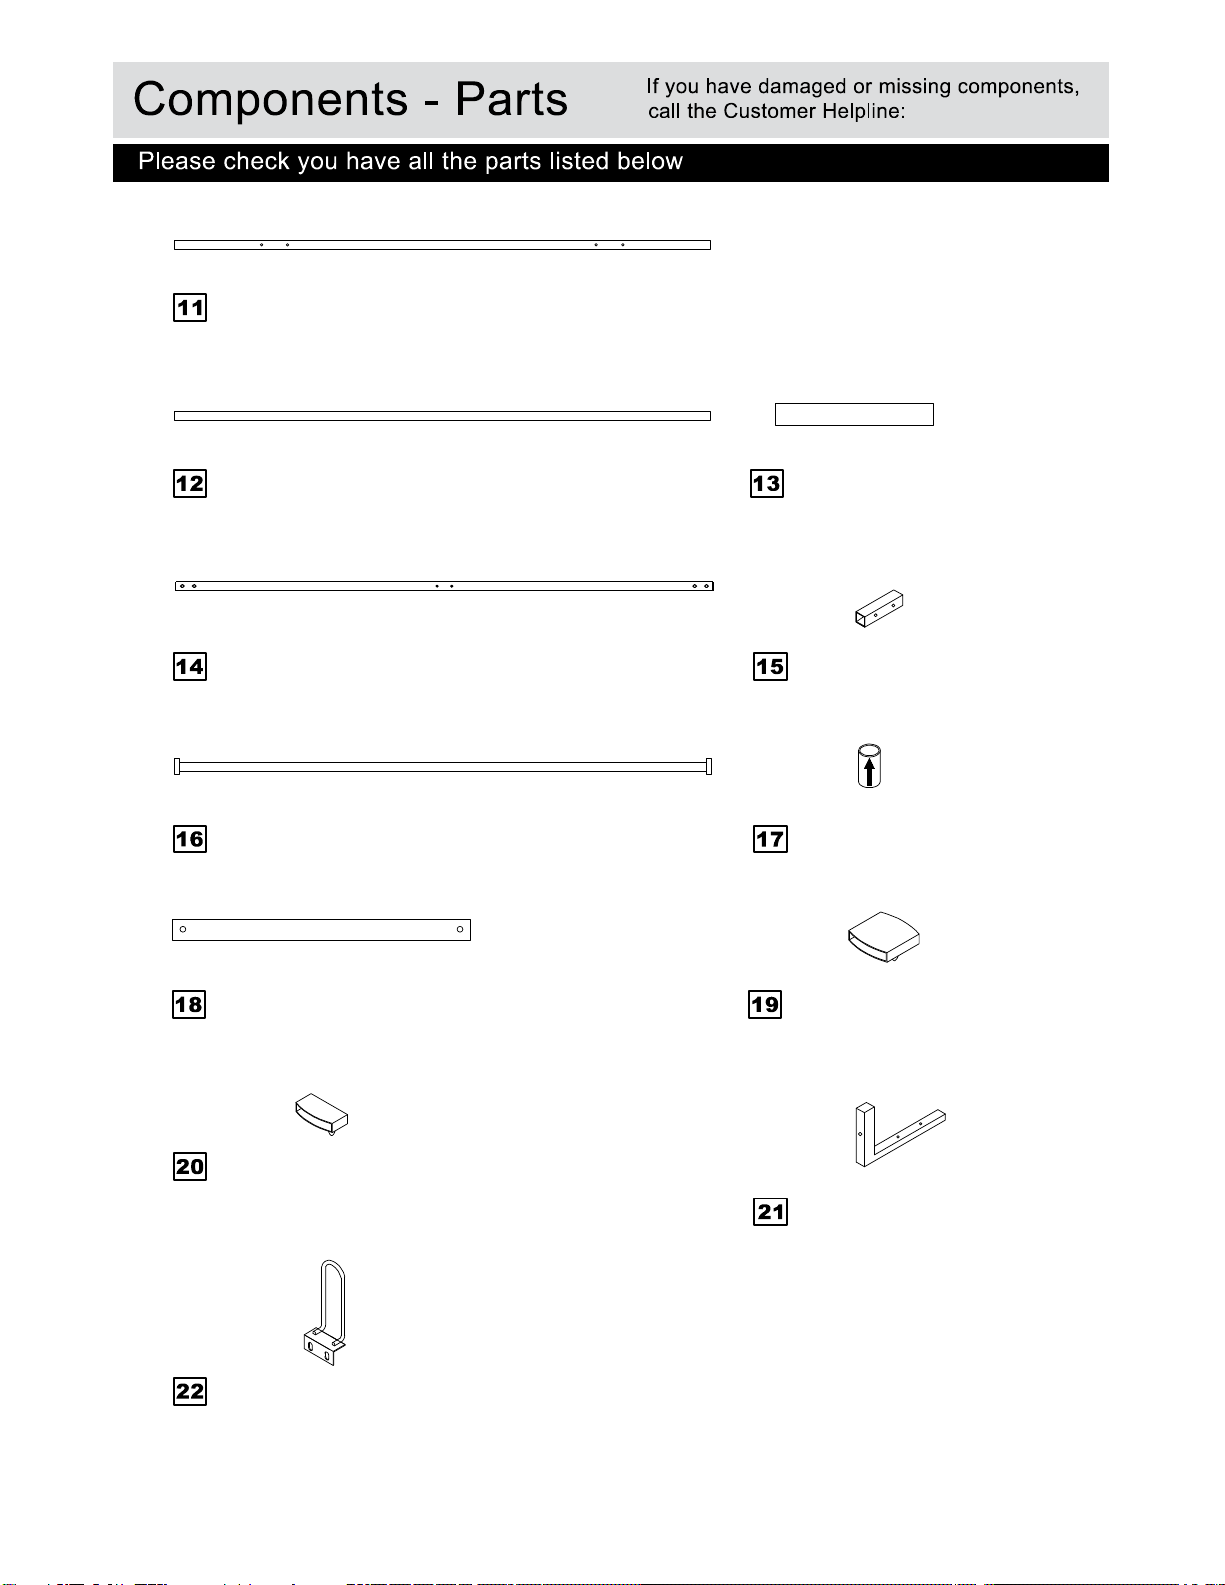
Ottoman side frame (4'-1822*30mm)(4'6-1822*30mm)
(5'-1925 × 30mm)
Note: Extra holes
0345 6400 800
Ottoman side frame
(4'-1822*30mm)(4'6-1822*30mm)(5'-1925 × 30mm)
Ottoman centre rail x 1
(4'-1822*30mm)(4'6-1822*30mm)(5'-1925 × 30mm)
Central support x 1
(4'-1930*80mm) (4'6-1930*80mm) (5'-2030*80mm)
Wooden support rail x 2
(4'-1230*60mm)(4'6-1381*60mm)(5'-1530*60mm)
Bentwood slats x28 (4'-598*9*53mm)
Bentwood slats x28 (4'6-673*9*53mm)
Bentwood slats x30 (5'-748*9*53mm)
Base support x 4
(120 x 20mm)
Short support leg x 2
(Ø25*36mm)
Double slat caps x 14 (4'-5.5mm)
Double slat caps x 14 (4.6-5.5mm)
Double slat caps x 15 (5'-5.5mm)
Single slat caps x 28 (4'-5.5mm)
Single slat caps x 28 (4'6-5.5mm)
Single slat caps x 30 (5'-5.5mm)
Mattress support
bracket x 2
(Ø6*78mm)
Corner bracket x 4 (120 × 80mm)
3
Page 5
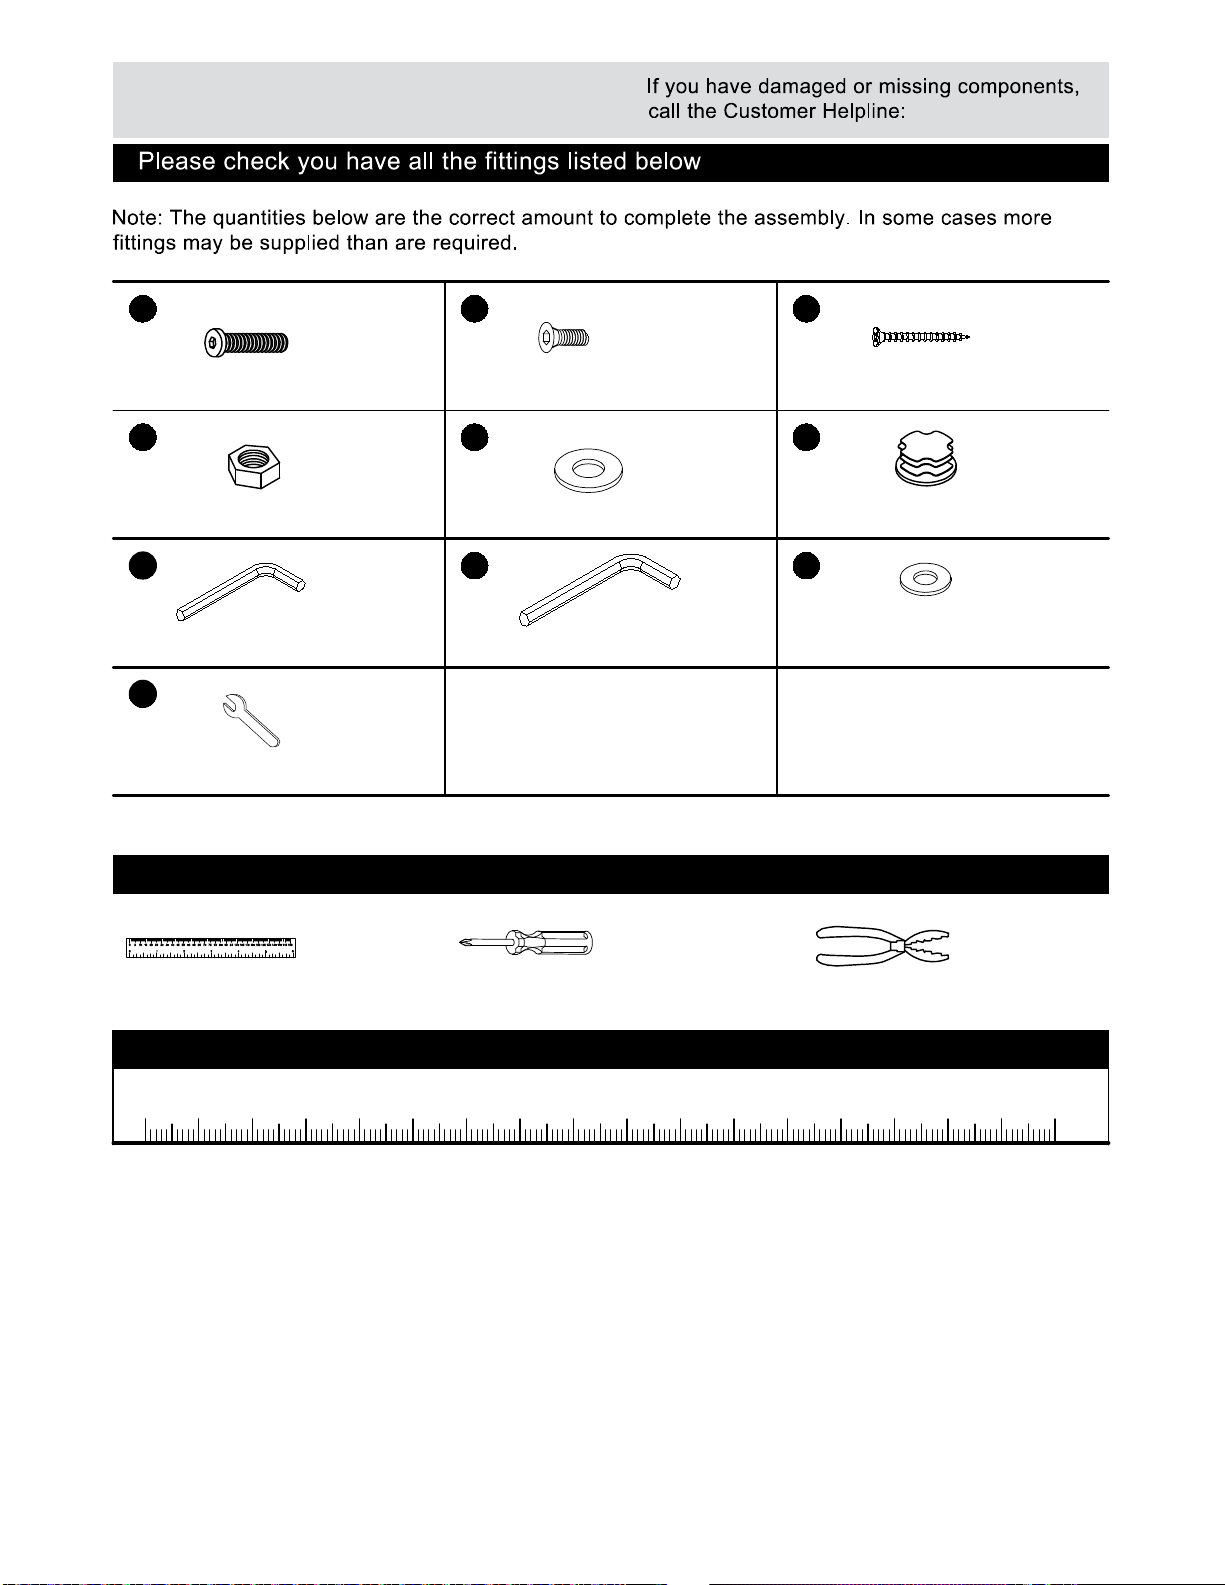
Components - Fittings
0345 6400 800
A
25mm M8 Bolt x 20 15mm M6 Bolt x 30
B C
D E
Nut x 4
G
4mm Allen key x 1
19mm Flat washer x 12
H
5mm Allen key x 1
K
Spanner x 1
Tools required
35mm M4 Wood screw x 28
F
Plastic cap x 2
J
14mm Flat washer x 4
Ruler/tape
measure
Phillips screwdriver
(Not supplied)
PLIERS (Not
supplied)
Ruler - Use this ruler to help correctly identify the screws
0 5 10 15 20 25 30 35 40 45 50 55 60 65 70 75 80 85 90 95 100 105 110 115 120 125 130 135 140 145 150 155 160 165 170
4
Page 6

Assembly Instructions
Attaching feet
a: Attach 2 x feet to
the underside of the
headboard using
screws as shown.
Repeat on the underside
of the footboard .
Note: The position is
outlined.
C
9
2
3C3
C
9
2
9
3
5
Page 7

Assembly Instructions
a:
Carefully place headboard
2
and footboard flat
3
on the floor with the fixing
holes facing up.
a: Attach base supports
to the headboard
15
and footboard using
screws as shown.
C
3
2
Note: The positions
should be outlined.
C
C
15
2
15
3
b: Loosely fit bolts into
headboard and
footboard as shown.
2
3
A
b:
A
2
A
3
6
Page 8

Assembly Instructions
With help, raise the
headboard into the
standing position.
2
Hang the metal brackets
on the end of the side
1
rails , over the bolts in
the headboard .
2
Note: Do not fully tighten
A
bolts at this stage.
Finger tighten only.
Repeat to assemble
footboard .
3
1
1
3
2
A
2
1
7
Page 9

Assembly Instructions
Preparing base
a: Attach the short
support legs to the
underside of the central
support using bolts
.
B
Fit plastic caps into
support legs .
17
16
F
17
b: Assemble central
support in between
headboard and
footboard using
fixings and at both
ends.
16
2
3
B
J
1
b:
C:
2
C
2
1
21
16
2
J
B
1
21
21
a:
3
F
B
17
16
c: Assemble corner
brackets into each
corner using screws .
Note: Ensure these are
at the same height as all
other metal support bars.
The positions should be
outlined.
21
C
d: Assemble wooden
support rails in
between side rails
using screws .
Finally, fully tighten all
other fixing points from
previous step 3 .
18
1
B
16
1
18
1
d:
18
18
B
1
8
Page 10

Assembly Instructions
Completing base
With help, carefully slide
base panels and
inside the bed frame as
shown.
6
7
9
Page 11

Assembly Instructions
At this stage you can
choose to have the
ottoman frame lifting from
either side as shown.
Attaching folding hinges
Right opening
To lift from the right side ,
assemble hinges in
4
the location shown .
Secure the hinges to
the headboard and
footboard using bolts
as shown.
B
3
4
2
Note: Ensure the hinges
are fitted the correct way
around as shown.
Note: The correct hole
positions should be
identified ‘R’ for right side
opening and ‘L’ for left
side opening, on both the
headboard and
footboard . The metal
folding hinges should
2
3
4
also be labelled with
corresponding ‘R’ and ‘L’
labels. Align the ‘R’ or ‘L’
markings to ensure the
correct assembly.
Opening from right side
2
4
R
Headboard fixing holes position for right side opening
4' and 4'6
B
B
Important
5'
3
Headboard
2
R
B
Footboard fixing holes position for right side opening
4' and 4'6 5'
Footboard
3
R
B
R
Footboard
Headboard
B
2
3
R
B
10
Page 12

Assembly Instructions
Attaching hinges
Left opening
To lift from the left side,
assemble hinges in the
4
location shown .
Attaching folding hinges
Secure the hinges to
the headboard and
footboard using bolts
as shown.
B
3
4
2
Note: Ensure the hinges
are fitted the correct way
around as shown.
Note: The correct hole
positions should be
identified ‘R’ for right side
opening and ‘L’ for left
side opening, on both the
headboard and
footboard . The metal
folding hinges should
2
3
4
also be labelled with
corresponding ‘R’ and ‘L’
labels. Align the ‘R’ or ‘L’
markings to ensure the
correct assembly.
Opening from left side
2
4
L
B
B
3
Important
Headboard fixing holes position for left side opening
4' and 4'6 5'
Headboard
Footboard fixing holes position for left side opening
4' and 4'6 5'
Footboard
L
B
2
L
B
3
Headboard
L
B
B
Footboard
2
L
3
11
Page 13

Assembly Instructions
Assembling pistons
Locate pistons onto
hinges as shown.
4
5
up
4
D
Note: Ensure the "smaller"
diameter end is facing
down as shown.
Secure the pistons using
D
nuts at both ends.
Note: Use spanner to
tighten nut .
D
K
5
D
down
2
D
4
R
3
12
Page 14

Assembly Instructions
Assembling ottoman
frame
a: Assemble long support
leg to the underside of
8
centre rail using
screws .
14
B
b: Assemble ottoman
frame components ,
12
and together
11
as shown.
Note: Ensure the extra
holes in side frame
are correctly located on
the inside of the frame
after assembly.
14
10
11
a:
b:
B
8
12
14
A
E
14
10
10
Note: Secure the
assembly using fixings
and as shown.
A E
Important
Do not fully tighten
screws at this stage.
Finger tighten only.
A
c: With help, carefully
turn the frame over.
Note: The frame is heavy,
lift with care.
Assemble mattress
support brackets to
one ottoman frame side
11
using screws .
22
B
C:
11
10
22
B
11
22
13
Page 15

Assembly Instructions
Locating ottoman frame
Carefully open both
hinges to the raised
position.
your hands inside the
hinges during this
operation.
With help, lift the ottoman
frame into position onto
hinges .
Note: The frame is heavy,
lift with care.
Secure at both ends
using screws .
4
Warning: Do not put
4
B
B
4
Once assembly is
complete, fully tighten
all screws around the
ottoman frame.
1
B
B
4
14
Page 16

Assembly Instructions
Attaching single slat
caps
Assemble single slat
caps onto one end of
20
bentwood slats .
13
Attaching slats
a: Fit bentwood slats
13
into the ottoman side
frames and , by
11
12
locating single slat caps
into the holes.
20
b: Fit bentwood slats
13
into both sides of double
slat caps , before
pushing caps into the
19
19
holes in central support
.
14
a:
11
20
14
13
20
13
13
12
19
20
13
20
13
19
b:
14
If you need help or have damaged or missing parts, call the Customer Helpline: 0345 6400 800
Home Retail Group. 489-499 Avebury Boulevard. Saxon Gate West. Central Milton Keynes. MK9 2NW
15
 Loading...